

Aerowerks PRC Service Manual

TABLE OF CONTENTS
INSTALLATION & OPERATING INSTRUCTION MANUAL FOR MODEL PRC-POWER ROLLER CONVEYOR
1. INSTALLATION ___________________________________________________2
1.1. GENERAL INSTALLATION ________________________________________2
1.1.1. Building Connections ___________________________________________3
2. OPERATION ______________________________________________________3
2.1. GENERAL DESCRIPTION__________________________________________3
2.2. OPERATION _____________________________________________________4
2.2.1. General Instructions ____________________________________________4
3. MAINTENANCE ___________________________________________________4
3.1. REPAIR INSTRUCTIONS __________________________________________4
3.2. CHAIN TAKE-UP _________________________________________________4
3.2.1. Gearmotor Take-up_____________________________________________5
3.2.2. Chain Link Take-up ____________________________________________5
3.3. ELECTRICAL SYSTEM ____________________________________________5
3.4. LUBRICATION ___________________________________________________6
3.4.1. Bushings _____________________________________________________6
3.4.2. Gearmotor ____________________________________________________6
3.5. MAINTENANCE SCHEDULE _______________________________________6
3.5.1. Daily ________________________________________________________6
3.5.2. Monthly______________________________________________________7
3.5.3. Semi-Annually ________________________________________________7
3.6. REPLACING FRAME BUSHINGS ___________________________________7
3.7. REPLACING GEARMOTOR ________________________________________7
3.8. REPLACING ROLLER SHAFTS _____________________________________8
3.9. REPLACING SPROCKETS _________________________________________9
3.10. TROUBLE SHOOTING POWERED ROLLER CONVEYOR _____________10
3.11. REPLACEMENT PARTS LIST – POWERED ROLLER CONVEYOR______11
4. WARRANTY FOR MODEL PRC - POWERED ROLLER CONVEYOR ___13
4.1. WARRANTY PERIOD ____________________________________________13
4.2. WARRANTY COVERAGE_________________________________________13
4.3. GENERAL ______________________________________________________13
1

INSTALLATION & OPERATING INSTRUCTION MANUAL
FOR MODEL PRC - POWER ROLLER CONVEYOR
SYSTEM
The following instructions for installation and maintenance of Model PRC Conveyor
System should be carefully read and followed. Any deviation will affect the warranty of
this machine. The conveyor unit shall be installed by or under the supervision of
Aerowerks personnel or its representatives to validate the warranty.
NOTE: A “Layout Drawing” representing the overall conveyor system, specific to
this project is included in this manual. The owners and maintenance personnel
should become familiar with this document.
1. INSTALLATION
1.1. GENERAL INSTALLATION
Please read the instructions carefully and follow the steps given below for the installation
of Model PRC conveyor system.
1. Set and level the machine in place. Seal the joints using silicon-sealing compound.
2. Remove the cover of drive housing.
3. Adjust the length of the chain and make sure that the ends are properly connected
4. Make sure that the key between the gear motor shaft and drive sprocket is removed.
5. Start the motor, check and set the correct direction of rotation. The direction of the
rotation is marked on the drive housing.
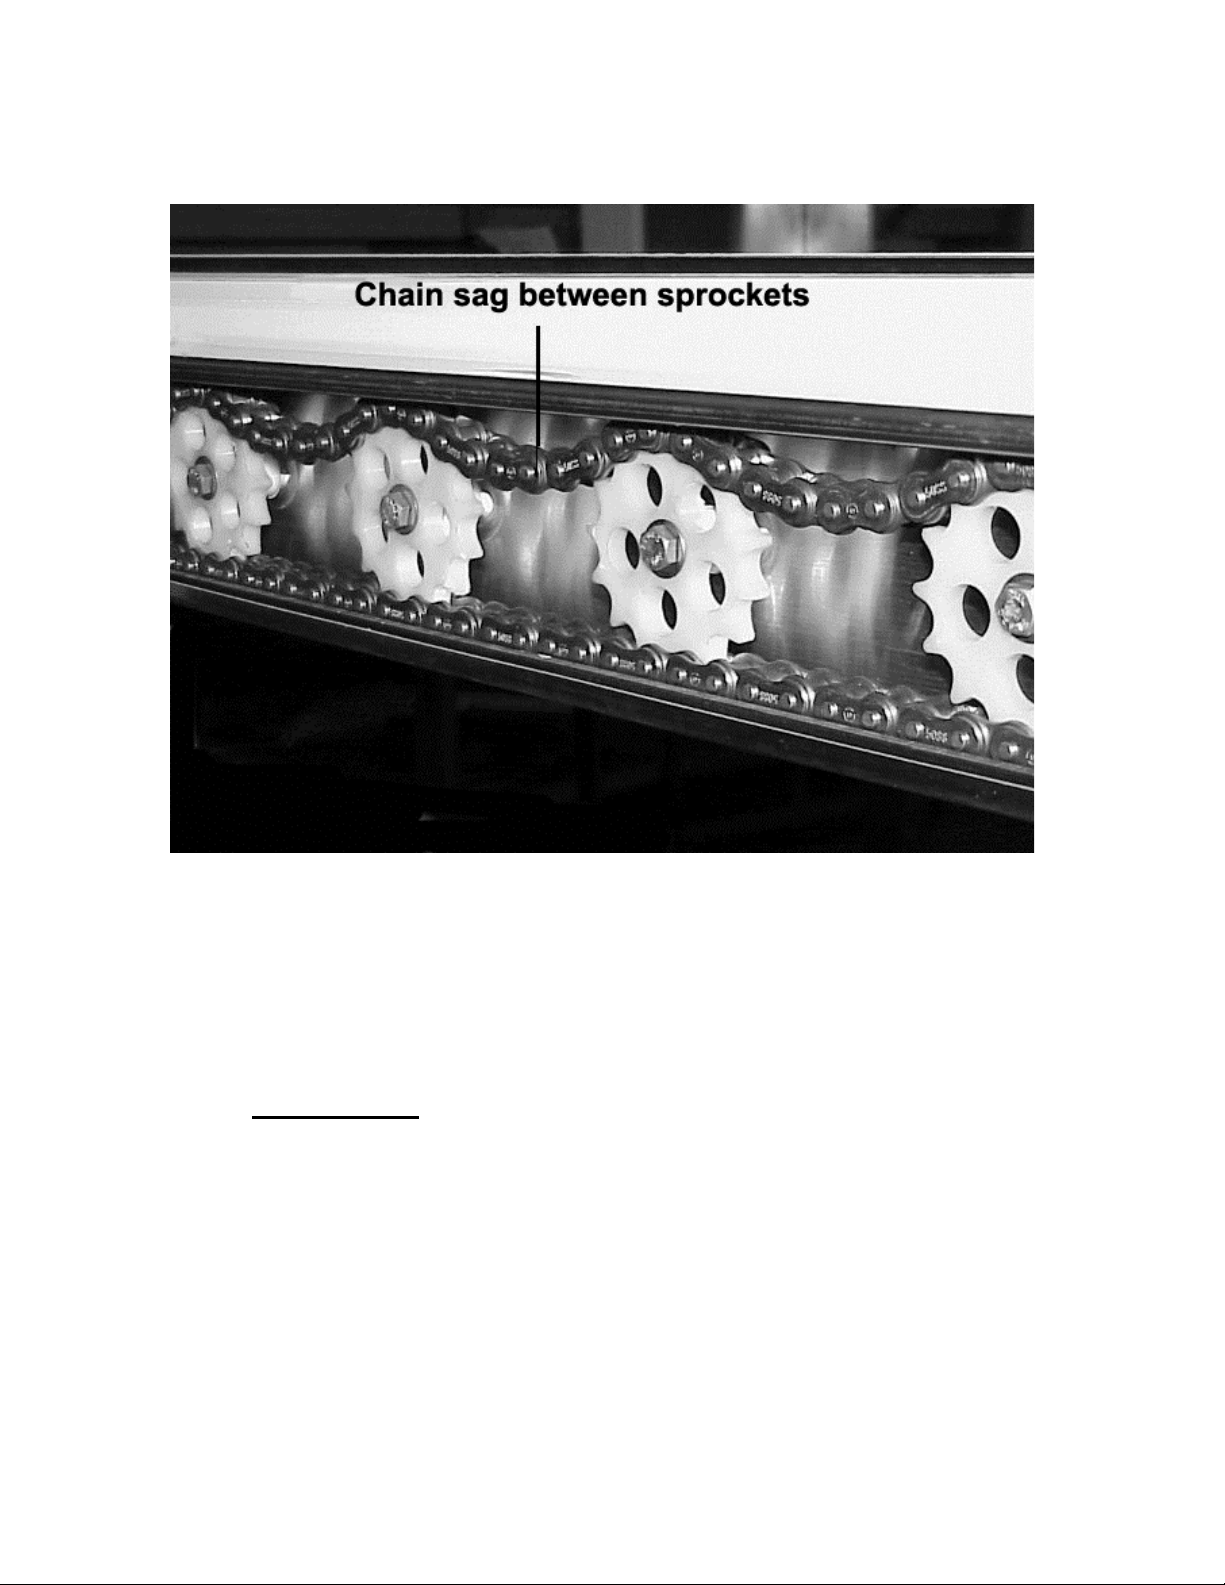
6. Assemble the drive chain and make sure that it engages the drive, idler and all other
plastic sprockets driving the power rollers. Connect the ends of the chain using the link
provided. Make sure that the chain engages all the sprockets with sufficient slackness
as shown in the Figure-1. This will ensure effective meshing between the chain and the
sprocket during the operation. The drive chain around the motor drive and idler
sprockets should be tight.
7. Insert the key between the gear motor shaft and the drive sprocket. Secure the key in
position with the sets screw.
8. Adjust the chain take up.
2
9. Replace the cover plates on side channels and mount any other auxiliary hardware
items.
Figure 1.0 Normal Chain Sag Between Plastic Sprockets
1.1.1. B
UILDING CONNECTIONS
An electrical connection is required at the Main Control Panel. Check the "Layout
Drawings" for the specific details of this project.
2. OPERATION
2.1. GENERAL DESCRIPTION
The Power Roller Conveyor usually forms an integral part of the scrapping table. Its
function is to convey 20” x 20” dish racks to the gravity roller conveyor or directly to the
dishwasher. This conveyor has been custom designed to suit your application. Do not
use this conveyor to convey items other than 20” x 20” dish racks.
3

The low-pressure accumulation principle treats each roller as an individual unit. Hence
when the racks get accumulated, the rollers underneath them stop turning where as the
remaining rollers will continue to function.
2.2. OPERATION
2.2.1. G
ENERAL INSTRUCTIONS
1. Turn the ‘MAIN DISCONNECT’ switch on the main control panel to “ON”
position.
2. Push the green ‘START’ button marked ‘Rack Conveyor’. Some systems may have
auxiliary push button stations located in other required areas.
3. To shut down the conveyor, push the red ‘STOP’ button marked ‘Rack Conveyor’.
Then turn the ‘MAIN DISCONNECT’ switch to ‘OFF’.
Note:
Power rollers run at constant speed at low pressure driving force, allowing
accumulation to take place without having to stop the conveyor.
3. MAINTENANCE
3.1. REPAIR INSTRUCTIONS
.
Our Conveyor Systems are built with the highest quality materials to provide a reliable
service and trouble free operation. The life of the equipment can be extended by regular
maintenance. It is strongly recommended to get the equipment serviced by Aerowerks or
its authorized service agent.
3.2. CHAIN TAKE-UP
Generally the drive chain does not need any replacement. However, it requires time-totime adjustment to remove the slack developed in the chain due to the tension. This can be
accomplished either by moving the gear motor away from its initial position or by
removing a few links from the chain. The first method is recommended for the small
adjustments where as the second method is ideal choice for the large adjustments.
4
 Loading...