


INSTRUCTION MANUAL FOR MODEL SBC
SLAT BELT CONVEYOR SYSTEM
Toll Free : 888-774-1616 Fax : (905)-363-6998 URL: www.aero-werks.com - 1 -

TABLE OF CONTENTS
1. |
OPERATION |
|
3 |
||||||||||||||||||||||
|
|
|
|
|
|
|
|
|
|
|
|
|
|
|
|
|
|
|
|
|
|
|
|
|
|
|
1.1. START UP PROCEDURE |
3 |
|||||||||||||||||||||||
|
|
|
|
|
|
|
|
|
|
|
|
|
|
|
|
|
|
|
|
|
|
|
|
||
|
1.2. SHUT DOWN PROCEDURE |
|
3 |
||||||||||||||||||||||
|
|
|
|
|
|
|
|
|
|
|
|
|
|
|
|
|
|
|
|
|
|
|
|
|
|
|
1.3 |
DETERGENT |
|
|
4 |
||||||||||||||||||||
|
|
|
|
|
|
|
|
|
|
|
|
|
|
|
|
|
|
|
|
|
|
|
|||
2. |
PREVENTIVE MAINTENANCE |
|
|
5 |
|||||||||||||||||||||
|
2.1. |
DAILY |
|
6 |
|||||||||||||||||||||
|
|
|
|
|
|
|
|
|
|
|
|
|
|
|
|
|
|
|
|
|
|
|
|
||
|
2.2. |
WEEKLY |
|
6 |
|||||||||||||||||||||
|
|
|
|
|
|
|
|
|
|
|
|
|
|
|
|
|
|
|
|
|
|
|
|||
|
2.3. |
MONTHLY |
|
6 |
|||||||||||||||||||||
|
|
|
|
|
|
|
|
|
|
|
|
|
|
|
|
|
|
|
|
|
|
||||
|
2.4. |
SEMI ANNUALLY |
7 |
||||||||||||||||||||||
|
|
|
|
|
|
|
|
|
|
|
|
|
|
|
|
|
|
|
|
|
|
||||
|
2.5. |
RETURN TRACK CORNER GUIDES |
|
7 |
|||||||||||||||||||||
|
|
|
|
|
|
|
|
|
|
|
|
|
|
|
|
|
|
|
|
|
|
||||
|
2.6. |
SPRAY ARM |
|
|
8 |
||||||||||||||||||||
|
|
|
|
|
|
|
|
|
|
|
|
|
|
|
|
|
|
|
|
|
|||||
|
2.7. WASH CHAMBER WATER SUPPLY |
|
8 |
||||||||||||||||||||||
|
|
|
|
|
|
|
|
|
|
|
|
|
|
|
|
|
|
|
|
||||||
3. |
MAINTENANCE |
|
|
8 |
|||||||||||||||||||||
|
|
|
|
|
|
|
|
|
|
|
|
|
|
|
|
|
|
|
|||||||
|
3.1.REMOVAL & INSTALLATION OF SLATS |
8 |
|||||||||||||||||||||||
|
|
|
|
|
|
|
|
|
|
|
|
|
|
|
|
|
|
|
|||||||
|
|
3.1.1. REMOVAL |
|
|
|
8 |
|||||||||||||||||||
|
|
3.1.2. INSTALLATION OF SLATS |
|
9 |
|||||||||||||||||||||
|
|
|
|
|
|
|
|
|
|
|
|
|
|
|
|
|
|
||||||||
|
3.2. |
BEARINGS |
|
|
|
9 |
|||||||||||||||||||
|
3.3. |
CHAIN TAKEUP |
|
10 |
|||||||||||||||||||||
|
|
3.3.1. SLAT BELT CHAIN |
|
10 |
|||||||||||||||||||||
|
|
3.3.2. DRIVECHAIN |
|
11 |
|||||||||||||||||||||
|
|
|
|
|
|
|
|
|
|
|
|
||||||||||||||
|
3.4. DETERGENT FEED PUMP |
11 |
|||||||||||||||||||||||
|
|
|
|
|
|
|
|
|
|
|
|
||||||||||||||
|
|
3.4.1. REPLACING DETERGENT PUMP |
12 |
||||||||||||||||||||||
|
|
|
|
|
|
|
|
|
|
|
|
||||||||||||||
|
|
3.4.2. DETERGENT _________________________________________________13 |
|||||||||||||||||||||||
|
3.5. |
GEAR BOX |
|
13 |
|||||||||||||||||||||
|
3.6. REPLACING GEAR BOX |
|
13 |
||||||||||||||||||||||
|
|
|
|
|
|
|
|
|
|
|
|||||||||||||||
4. |
SLAT BELT CONVEYOR PARTS |
|
14 |
||||||||||||||||||||||
|
4.1. SBC-SLAT BELT CONVEYOR PARTS |
|
14 |
||||||||||||||||||||||
|
4.2. SBC-SLAT BELT CONVEYOR DRIVE UNIT PARTS LIST |
|
14 |
||||||||||||||||||||||
|
|
|
|
|
|
|
|
|
|||||||||||||||||
|
4.3. |
SBC-SLAT BELTCONVEYOR SINGLE TAIL UNIT PARTS LIST |
|
15 |
|||||||||||||||||||||
|
4.4. SBC-SLAT BELT CONVEYOR PART LIST |
16 |
|||||||||||||||||||||||
|
4.5. ACCUMULATION SWITCH |
|
17 |
||||||||||||||||||||||
5. |
Electrical Manual |
|
18 |
||||||||||||||||||||||
|
|
DROP AREA |
LED LIGHTING___________________________________________ |
31 |
|||||||||||||||||||||
6. Warranty_______________________________________________________________31-33
Toll Free : 888-774-1616 Fax : (905)-363-6998 URL: www.aero-werks.com - 2 -
INSTRUCTION MANUAL FOR MODEL (SBC)
SLAT BELT CONVEYOR SYSTEMS
1. OPERATION
1.1. START UP PROCEDURE
1.Make sure belt is correctly in place.
2. Turn the main disconnect switch to the ON position.
3. Run on detergent & spray for only 5-10 minutes every hour.
1.2. SHUT DOWN PROCEDURE
1.Turn the belt wash switch to spray only. Allow the system to  run until the belt line is thoroughly clear of detergent suds.
2.Once the belt line has been rinsed, turn the belt wash switch to
the off position, press the red stop button and turn the main  disconnect off. Once the system is completely shut down,
perform equipment wash down procedure.
3.Turn main disconnect off.
4.Use a heavy duty wash down hose to spray down the entire conveyor system.
5.Lift the slat belt out of the track to spray out the debris underneath, follow the arrow direction on the slat for the direction of spray.
6.Do not spray directly at the electrical control panel. Use a warm, damp cloth to wipe it down. Use detergent on cloth if heavily soiled, then wipe clean.
Toll Free : 888-774-1616 Fax : (905)-363-6998 URL: www.aero-werks.com - 3 -

7.Make sure to lift the belt out at the corners to spray underneath.
8.Make sure it snaps completely back into place.
9.Open the drive unit wash chamber to spray the inside of the wash tank.
10.Inspect the spray arms to make sure no debris is blocking the spray holes. Make sure spray arms are correctly positioned to hit the belt.
11.Remove and clear the basket scrap pans located in the drive wash tank and the tail tank. Please note for each slat belt conveyor these two areas need to be serviced frequently.
12.Be sure to replace the strainers once they are clean and free of debris. Replace access doors and ensure belt properly in its track before restarting the conveyor.
13.Leave the belt wash switch in the OFF position. This will allow the belt to selfclean by draining out the water that
has accumulated in the channels on top and bottom. This is the only time belt should be operated without the spray on.
14.Shut down entire system by turning the main disconnect switch to the off position.
15.Once the conveyor system is completely shut down remove the belt from its upper track and place on the side to further aid in the drying process overnight or between shifts.
1.3 DETERGENT
To prevent mold growth on the slat belt, use ECOLAB (or equivalent) Sani Glide detergent. It must be diluted to 1 part detergent to 5 parts water. Water temperature must be at least 105° F.
Toll Free : 888-774-1616 Fax : (905)-363-6998 URL: www.aero-werks.com - 4 -
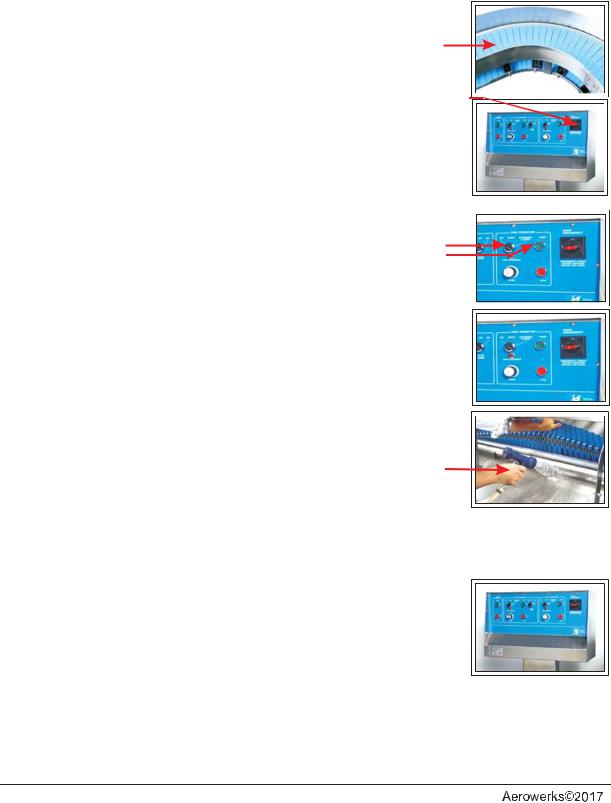
Note:
Never operate conveyor if the belt wash system is not operating correctly. Ensure there is sufficient detergent to complete the conveyor wash cycle. The conveyor will stop automatically if the accumulation switch or photo sensor is activated by dishes or racks. The conveyor will run as soon as dishes are cleared and the flap is not pressing against the switch. The auto accumulation switch is optional. The conveyor comes with Anti-Jam switch which prevents cutlery from entering the drive unit and hence protect its operating mechanism.
FLAP
AUTOACCUMULATION SWITCH
AUTO ACCUMULATION SWITCH |
ACCUMULATION PHOTO SENSOR |
2.PREVENTIVE MAINTENANCE
Every month the belt should be inspected and any damaged or missing slats should be replaced immediately. To perform an inspection, run the belt slowly for one complete revolution and observe it for any damage or misalignment. An ideal way is putting a tape mark on the slat belt to recognize the starting position. Remove the slats which are damaged or not sitting properly. The second part of the inspection is to examine the bottom of the belt, staring from the tape mark. Remove the slats having any of the following damage.
•Slats missing a roller wheel.
•Cracks beside the holes in the slat lugs.
•Slats that sit loose on the chain.
•Any broken slat.
Toll Free : 888-774-1616 Fax : (905)-363-6998 URL: www.aero-werks.com - 5 -

2.1.DAILY
1.Remove the basket strainers from the drive and tail units, clean and replace them.
2.If your unit is equipped with a 'hose wash down station', use this hose to wash the scrapping table and slat belt conveyor to remove all debris. When hosing down the system, make sure that no water gets into the sensor. (Optional equipment).
3.Check the top and bottom of the entire belt line and remove if there are any foreign objects (knives, forks, plastic, etc.).These objects will hinder the performance of the conveyor unit and may cause jams.
4.If your unit is equipped with accumulation switches make sure that they are free from obstructions. System will not start unless the obstructions are cleared.
Clean out any foreign matter from the conveyor belt, underneath the belt and in the return track where exposed.
2.2.WEEKLY
Replace any missing slats. See section 3.1 for more information.
1.Clean the areas, which are not accessible to the hose, using a wet soapy cloth. Use hard water cleaners to clean areas where hard water build-up may occur.
2.Check the detergent pump to make sure it is operating effectively.
3.Clean out any foreign body from the conveyor belt, underneath the belt and in the return track.
2.3. MONTHLY
1.Ensure that there is sufficient detergent available in stock. It is recommended to have an inventory of detergent, which typically lasts for up to a month.
2.Inspect entire belt line and replace any slats that are missing. The slats with broken edges, cracks and missing rollers should also be replaced. See section 3.1 for more information.
3.Check sag of slat belt in drive unit. If belt is sagging too much & close to bottom spray arm, remove a chain link. See section 3.3.
4.Make sure that all the switches are functioning correctly.
5.Remove and flush out spray arms located in the drive unit.
Aqualified mechanic should perform this work.
Toll Free : 888-774-1616 Fax : (905)-363-6998 URL: www.aero-werks.com - 6 -

2.4. SEMI-ANNUALLY
Inspect the slat belt chain for excessive slack caused by stretching. The excessive slack can be removed by adjusting the length of the chain. Please refer the section 3.3 of this manual for details.
1.Inspect plastic wear strips. Worn or damaged strips should be replaced immediately.
2.Apply food-grade grease to flange bearings and drive chain located in the drive unit. ContactAerowerks for grease available in solid andAerosol form. Use only food - grade lithium grease.
3.Ensure the slat belt is at the center of the openings on both drive and tail ends. If the belt has shifted from off-center adjust the position of the corresponding sprockets.
4.Check the oil quality and level in the gearbox. For the gearbox oil change, please refer the section 3.5 for more Information.
2.5. RETURN TRACK CORNER GUIDES
The Aerowerks conveyor belt is unique in its use of small guide wheels on the bottom to reduce the cornering friction. As the belt is upside down on the return track, special cornering guides are employed to engage these wheels and guide the belt around corners. The proper operation of the system is dependent upon these guides being correctly set up.
When properly set up the belt should go around the corners without the tips of the slats touching either the inside or outside edges of the return track. The system is designed to allow a 1/8” gap between the tips of the slats and the edges of the return track. Also adjust the guide rails to have 1/8” vertical gap between the bottom surface of the slat and the guide rail. (Please refer to figure above). Once adjusted, the guide rail should be locked in place by tightening the nuts. Apply sealant such as Loctite 262 to the nuts to prevent them from loosening due to vibration during operation. The most common indication of return track misalignment is wearing of the slats on one side.
Toll Free : 888-774-1616 Fax : (905)-363-6998 URL: www.aero-werks.com - 7 -
2.6. SPRAY ARM
The belt is washed within the drive unit by two fixed stainless steel spray arms. The spray arms can be taken out by removing the large plastic union nut located on the rear side of tank. Inspect the spray arms for any damage or clogged spray holes. Once spray arms are replaced, make sure that they are properly oriented to have the water jet holes pointing directly towards the belt. Start the unit and adjust the water pressure. Inspect the spray arm for any leaks at the connection points.
2.7. WASH CHAMBER WATER SUPPLY
The incoming water for the slat belt wash should be set at 105 degree
Fahrenheit (40 degree Celsius) with 60psi water pressure. This is required to ensure effective cleaning of the slat belt. All plumbing connections must be done by a qualified plumber in accordance with local codes.
3. MAINTENANCE
Before performing any maintenance operation on equipment, shut down the conveyor and disconnect the power at your main circuit breaker.
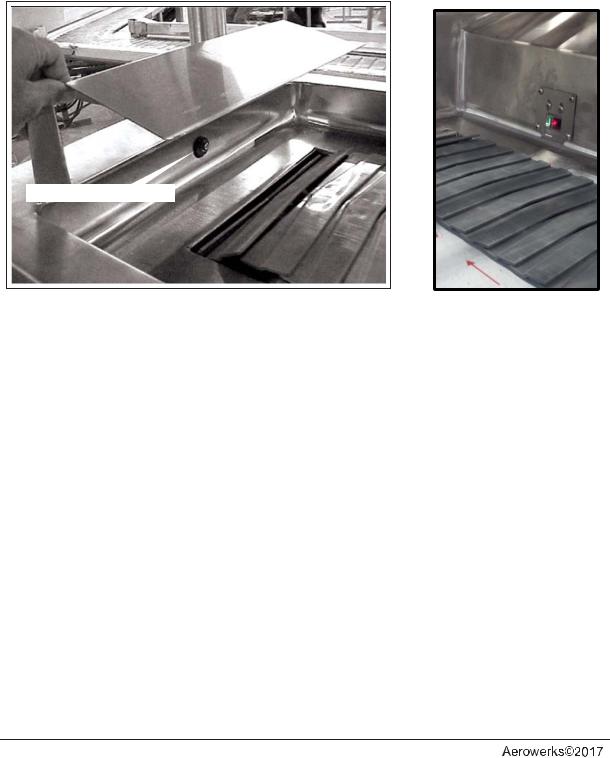
3.1. REMOVAL & INSTALLATION OF SLATS
The Aerowerks slat is specially designed for easy installation and removal from the stainless steel side-bow chain. Once the slats are assembled, the extended pins of the chain must be completely engaged in the holes provided in the slat. This is usually ensured by a “clicking” sound heard during the assembly. The slat should lay flat and straight when properly installed as shown below.
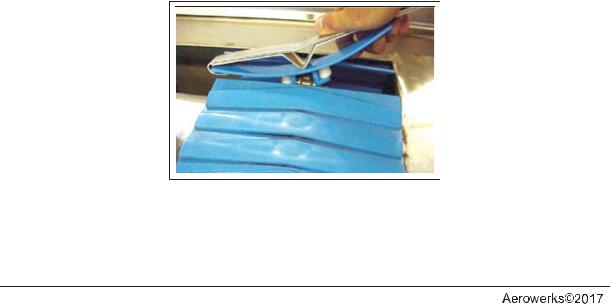
3.1.1. REMOVAL
Engage one end of the slat in slat tool and arch the slat by grasping the other end. Pull away the slat once the pins on the chain disengage the holes in the slat lugs.
Note: The slat tool aides in removal & installation of slat and is available for purchase from Aerowerks.
Toll Free : 888-774-1616 Fax : (905)-363-6998 URL: www.aero-werks.com - 8 -
Slat tool part number:
For 10” Slat: 0214003
For 12” Slat: 0218301
Under no circumstances should slats shall be hammered to mount on the chain. This will cause the extended pin to damage the nesting holes causing the slat to be out of level with the rest of the belt.
Do not run the system when more than three adjacent slats are missing.
Jog the belt where slats are to be replaced to top of bed or on the drive sprocket just before entering the belt slot.
If you are replacing the slat on the bed top (not at drive sprocket) always put something under the chain (e.g. a screw driver or block of wood, etc.) so that the chain is raised to exposure to the pins on the chain.
3.1.2. INSTALLATION OF SLATS
Aerowerks offers a custom slat tool that can be ordered as a spare part. This tool has been specially designed to ease the installation of new slats as shown below.
Slat part no:
1)Slat Green AD – 8403024
2)Slat Grey AD – 8403027
3)Slat Blue AD – 8403021
This figure shows proper orientation of the slat. (The apex of the “wing” should point towards the moving direction of the conveyor belt)
Engage and arch the slat using the slat tool.
Push the arched slat to the chain.
The pins on the chain snap into the holes of the slat. A slight click may be heard when the slat is engaged.
Toll Free : 888-774-1616 Fax : (905)-363-6998 URL: www.aero-werks.com - 9 -
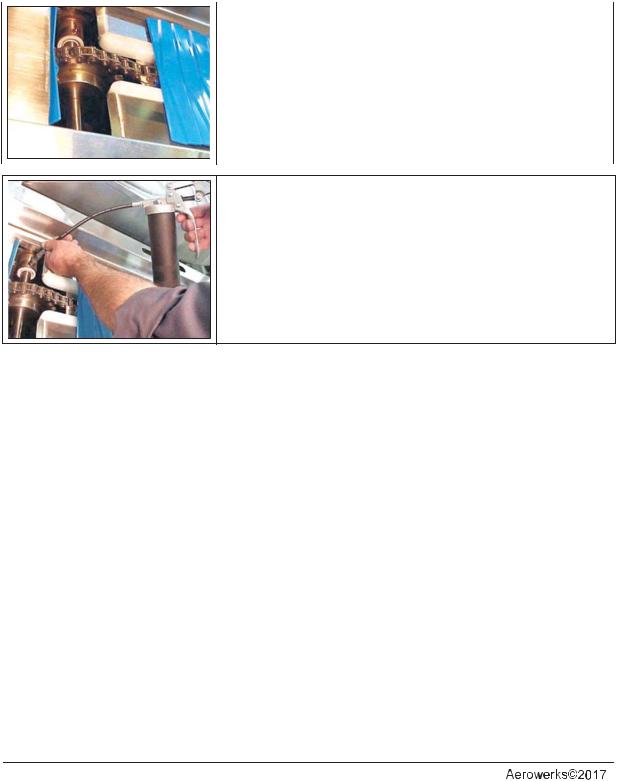
3.2. BEARINGS
Two bearings, 1” dia. are located in the drive unit. These bearings shall be lubricated once a year from the date of start up with food-grade grease only. Contact Aerowerks to purchase proper grease.
Remove a few slats to access the grease nipples.
Lubricate the bearing using a grease pump.
Toll Free : 888-774-1616 Fax : (905)-363-6998 URL: www.aero-werks.com - 10 -
3.3.CHAIN TAKE UP
3.3.1.SLAT BELT CHAIN
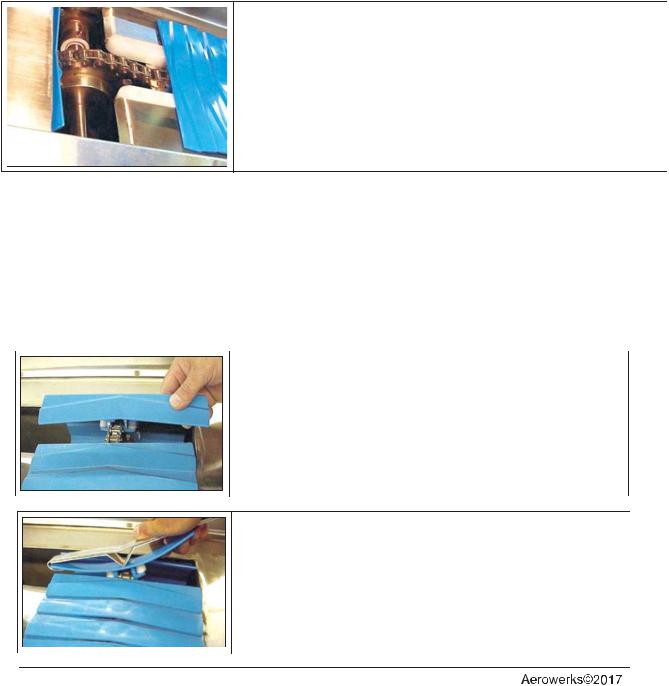
The slats are attached t o a stainless steel slat belt chain. Under normal operating conditions this chain should not require any replacement. However over a period of time, the chain stretches; this is normal. Regular adjustment to reduce the length is required. Follow these steps to reduce the length of the slat belt chain.
Note: There is no master link, chain can be separated at any point.
Overlap the chain to determine where the next slat link should be disassembled & re-connected.
Remove required number of links.
Removal of each link reduces the overall chain length by 1 ½”.
Re-connect the chain by press-fitting the side link onto the pin link. (Channel-Lock or Vice-Grip pliers work well).
Install the slats, run the conveyor and inspect the slat belt for smooth operation.
Chain breaker & custom made Aerowerks chain press fitting vice grip available for purchase.
Toll Free : 888-774-1616 Fax : (905)-363-6998 URL: www.aero-werks.com - 10 -
 Loading...