

Page 1

Add-on for Microsoft
Add-on for Microsoft
Flight Simulator
Flight Simulator
and FS2004!
and Prepar3D v3
Approaching
Quito
historic procedures!
DOWNLOAD
Page 2
Approaching Quito – Historic Procedures
Developers: A-Flight
Copyright: © 2016 / Aerosoft GmbH
Flughafen Paderborn/Lippstadt
D-33142 Bueren, Germany
Tel: +49 (0) 29 55 / 76 03-10
Fax: +49 (0) 29 55 / 76 03-33
E-Mail: info@aerosoft.de
Internet: www.aerosoft.de
www.aerosoft.com
All trademarks and brand names are trademarks or registered of their
respective owners. All rights reserved. /
namen sind Warenzeichen oder eingetragene Warenzeichen ihrer jeweiligen
Eigentümer. Alle Urheber- und Leistungsschutzrechte vorbehalten
Alle Warenzeichen und Marken-
Approaching
Quito
Historic Procedures
Anhang
Appendix
.
Aerosoft GmbH 2016
2 3
Page 3
Approaching Quito – Historic Procedures
Anhang: Hohe Dichtehöhe
(„High Density Altitude)
Wenn es eine Sache gibt, die dieses Produkt besonders macht, dann
ist es die hohe Lage des Flughafens. Die Erfahrung zeigt, dass einige
Simulationspiloten die Auswirkungen des daraus folgenden geringen
Luftdrucks nicht vollständig verstehen; daher haben wir ein Kapitel
über das Fliegen unter solchen Bedingungen geschrieben.
Hohe Dichtehöhe
In diesem Kapitel nehmen wir die Cessna 182RG als Grundmodell. Für
alle anderen Flugzeuge gelten dieselben Prinzipien, nur die Zahlen sind
anders. Einen Faktor, der für Dichtehöhe von Bedeutung ist, lassen wir
vollständig weg: Luftfeuchtigkeit. Er ist nicht ganz so wichtig und wird
im Flugsimulator nicht beachtet. Wen es interessiert: hohe Luftfeuchtigkeit ERHÖHT die Dichtehöhe.
WICHTIG: Die WIRKLICHE Höhe des Flugplatzes ist (fast) ohne Bedeutung. Das einzige was zählt, ist die DICHTEHÖHE des Flugplatzes. Alles
was zählt ist die MENGE an Luftmolekülen!
Wir brauchen Luft (wir verwenden diesen Begriff, um die für uns wichtige Gasmischung zu beschreiben) für verschiedene Dinge:
• um Auftrieb zu erzeugen
• für den Vortrieb („Schieben” bei Düsenflugzeugen, „Ziehen”
bei Propellermaschinen)
• als Verbrennungsluft für den Treibstoff
• für die Kühlung des Antriebsaggregats
• und natürlich muss der Pilot auch atmen
Wenn weniger Luft da ist, sind alle genannten Faktoren nicht so effizient wie unter optimalen Bedingungen. Also, welche Auswirkung hat
das auf die Leistungsfähigkeit des Flugzeugs? Insbesondere auf Start
und Landung? Wie klingt eine Startstrecke von 1800 ft.?
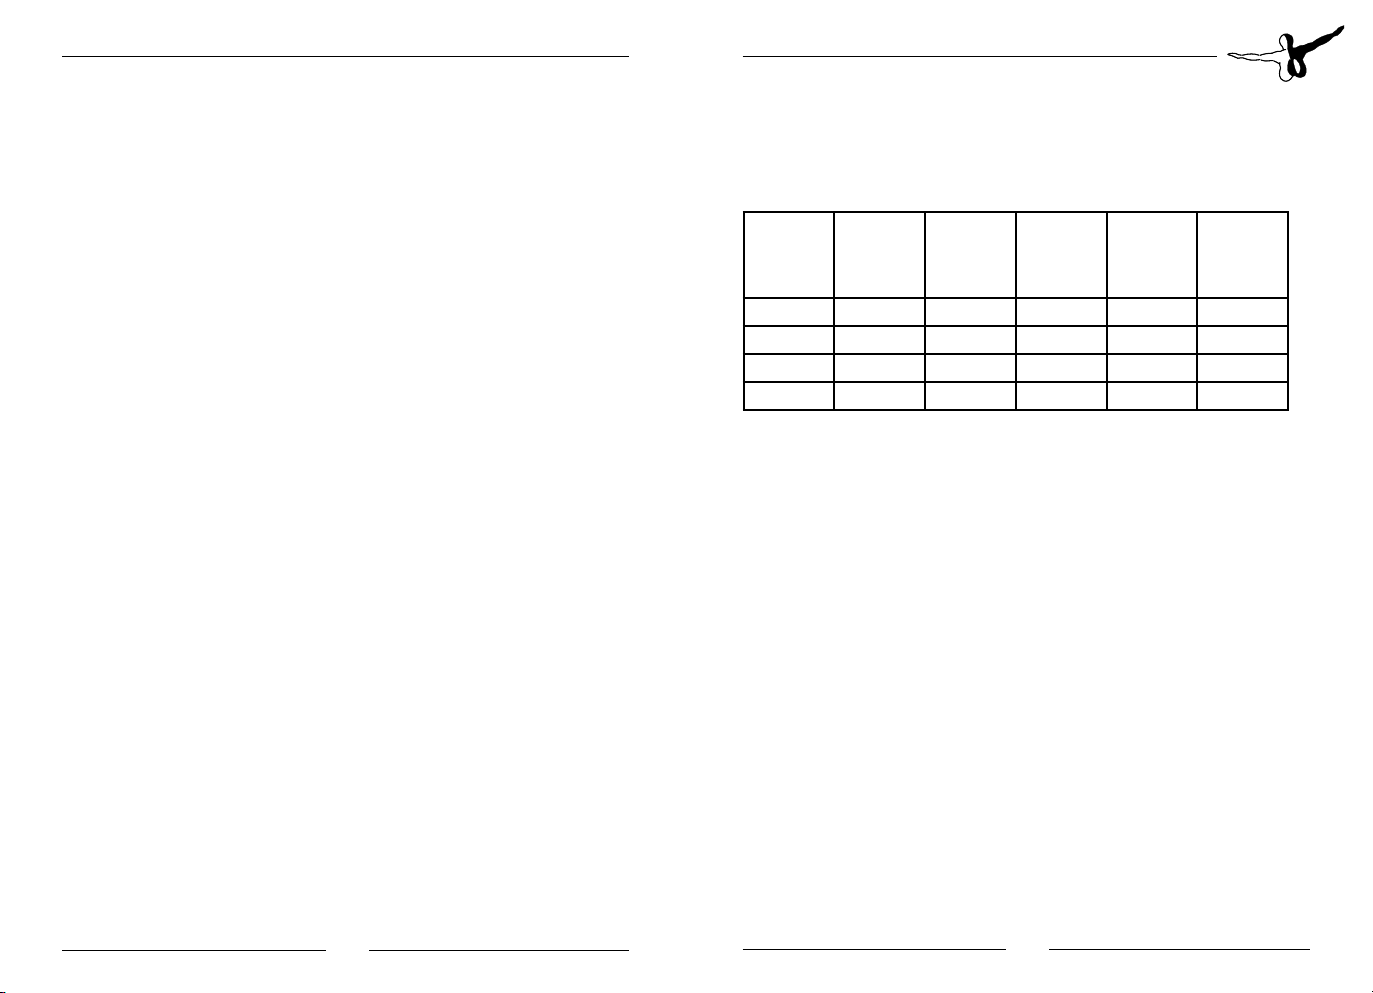
Für eine nicht besonders schwer beladene Cessna? Macht das Eindruck oder nicht? Ein Blick auf die folgende Tabelle zeigt das Verhältnis
zwischen Höhe, Temperatur und Luftdruck. Die Daten für Start und
Landung beziehen sich alle auf eine mäßig beladene Cessna 182 RG.
Höhe in
feet
0 59 29.291 0 ft 640 ft 600 ft
4000 59 29.291 4924 ft 950 ft 720 ft
8000 59 29.291 9816 ft 1350 ft 900 ft
8000 100 29.00 13255 ft 1850 ft ? 1200 ft ?
Temperatur (in °F)
Höhenmesser in
Inch Hg
Resultierende
Dichtehöhe
Runwaylänge
Start
Runwaylänge
Landung
Die Fragezeichen stehen deshalb, weil das Cessna-Handbuch diese
Zahlen nicht liefert und sie deshalb aus den anderen Zahlenwerten
hochgerechnet wurden.
Man sollte nicht vergessen, dass ein Flugzeug mit Turbolader wie die
182 dafür gebaut ist, in größeren Höhen zu fliegen und dass es viel
bessere Leistung bringen wird als ein Flugzeug ohne. Wenn Sie versuchen, mit einer Piper Cub bei einer Dichtehöhe von 13.000 ft. abzuheben, werden Sie niemals die notwendige Takeoff-Geschwindigkeit
erreichen. Vorher ist die Startbahn zu Ende und Sie müssten auch bei
Geschwindigkeiten OBERHALB der Reisegeschwindigkeit landen. In der
letzten Zeile des Beispiels ist das Flugzeug auf 8000 ft., aber technisch
gesehen ist es 5000 ft. höher.
Dichtehöhe ist die Höhe, auf der das Flugzeug zu sein GLAUBT
Weiterhin leidet nicht nur die Leistung; ihr Motor wird VIEL schneller
überhitzen, weil es weniger Luft gibt, ihn zu kühlen. Und wenn Winter
ist und die Dichtehöhe ein geringeres Problem darstellt, steht man
einem anderen Problem gegenüber. Man trifft bereits wenige Minuten
nach dem Start sehr leicht auf sehr kalte Luftschichten und Vereisung
stellt ein echtes Problem dar. Eins sollte man immer bedenken: Ihre
Airspeed-Anzeige, die immer auf die Dichtehöhe hin korrigiert ist,
zeigt das an, was sie fühlt.
Aerosoft GmbH 2016
4 5
Page 4

Approaching Quito – Historic Procedures
Verhalten bei (hoher) Dichtehöhe
Von einem hochgelegenen Flugplatz aus zu fliegen ist von Haus aus
schon gefährlicher als von Flugplätzen auf Meereshöhe. Aber das
Hauptproblem ist, dass Probleme viel schneller zu echten Gefahren
eskalieren.
Vorbereitungen
Vermindern Sie ihre Zuladung: Schmeißen Sie die Kiste Bier und die
Schwiegermutter raus! Es ist besser, sie zurückzulassen, als sie später
auf den letzten Metern des Runway zu verteilen. Fliegen Sie nicht mit
mehr Sprit als unbedingt notwendig. Als Daumenregel gilt, dass sich
die Leistung für jede 10% unter dem maximalen Abfluggewicht um
20% steigert. Denken Sie daran, dass ein Flugzeug wie die Cessna 175
bei 8000 ft. nur 50% ihrer Leistung bringt.
Stellen Sie vor allem sicher, dass Ihr Flugzeug unter den vorgegebenen
Bedingungen fliegen KANN. Eine Piper Cub mit einer Dienstgipfelhöhe
von 11.500 ft. wird einfach nicht fliegen, wenn die Dichtehöhe bei
12.000 ft. liegt. Sie könnte einfach nicht abheben, selbst wenn die
Startbahn 20 Kilometer lang wäre. Wenn die Dienstgipfelhöhe Ihres
Flugzeugs und die Dichtehöhe nahe beieinander liegen, verringert sich
Ihr Sicherheitsspielraum. Es wäre vielleicht besser, erst loszufliegen,
wenn es kälter geworden ist!
Anlassen des Motors
Abhängig vom jeweiligen Flugzeug werden die Vorgänge beim Anlassen anders sein. Bei der Cessna 182 muss man das Motorgemisch
weniger fett einstellen (= „pre-lean“) und ein bisschen Gas geben,
um ihn zum Laufen zu bringen. Lassen Sie ihn nicht länger auf hoher
Leistungsstufe laufen, weil er sich überhitzen könnte. Es ist aber eine
gute Idee, kurz vor der Startbahn einen kurzen Test bei hoher Leistung
zu machen, um sicherzugehen, dass das Triebwerk ohne Probleme zügig hochläuft. Unter den vorgegebenen grenzwertigen Bedingungen
wollen Sie sicher keinen Motor haben, der das nicht tut. Aber werfen
Sie immer auch ein Auge auf die Temperatur!
In dieser Höhe können Sie bei einigen Flugzeugen den Motor NICHT
mit der FSX „Auto Start“-Funktion anlassen! Sie müssen ihn manuell
starten, indem Sie die Mischung ein wenig abmagern (= leanen) und
etwas Gas geben.
Abflug
Als erstes sollte man daran denken, seinen Instrumenten und vor allem
der Airspeed-Anzeige zu trauen. Sich auf sein Augenmaß zu verlassen,
könnte täuschen und der Punkt, wo man normalerweise abhebt, könnte
nicht der Punkt sein, wo man aufgrund der hohen Dichtehöhe genug
Geschwindigkeit dafür hat! Setzen Sie die Klappen nicht auf die Einstellung für kurze Startbahnen, da dies sehr wahrscheinlich dazu führt,
dass Sie mehr Startbahn brauchen. Stellen Sie das Gemisch immer auf
maximale Leistung ein, ehe Sie mit dem Startvorgang beginnen.
Sie sollten sich dessen bewusst sein, dass Sie nicht nur mehr Startbahn
benötigen je höher die Dichtehöhe steigt, sondern auch die Steigfähigkeit beeinträchtigt wird.
Landung
Verlassen Sie sich wieder mal NICHT auf Ihre Augen, sondern auf die
Airspeed-Anzeige. Die ANGEZEIGTE Airspeed ist das einzige, was Sie
in der Luft hält. Aber letztendlich ist es nur die Geschwindigkeit über
Grund, die anders ist. Die Landung selbst ist überraschend normal – so
lange man sein Triebwerk dazu verwendet, die korrekte Geschwindigkeit zu halten. Die einzig wahre Überraschung könnte das völlige
Fehlen des Bodeneffekts sein, da dieser offensichtlich bei über 5000 ft.
abnimmt. Seien Sie darauf vorbereitet, dass alles VIEL schneller abzulaufen scheint und Sie wohl mehr Landestrecke als normal benötigen
werden. Das ist meist kein großes Thema, da Landebahnen in den
Bergen oft recht lang sind.
Die echten Probleme fangen dann an, wenn etwas schief geht. Bei einer normalen Landung haben Sie fast Ihre gesamte Triebwerksleistung,
um dem Problem zu begegnen, aber bei hoher Dichtehöhe liegen
Maximalgeschwindigkeit und Stall Speed sehr nahe beieinander.
Wenn Sie noch nie auf einem Flugplatz in hoher Dichtehöhe geflogen
sind, sind Sie sehr gefährdet, wenn Sie es zum ersten Mal probieren,
da auf Ihrer Standard-Checkliste der Punkt [Full Rich Mixture = Gemisch fett] steht.
Deutsch
Aerosoft GmbH 2016
6 7
Page 5

Approaching Quito – Historic Procedures
Wenn Sie das bei 8000 ft. Höhe machen, laufen Sie große Gefahr,
dass Ihnen das Triebwerk ausfällt. Wenn Sie Glück haben, passiert das
nicht, ehe das Triebwerk beim Ausrollen langsamer läuft, aber wenn
nicht, dann wird es Sie verlassen, ehe Sie zum nächsten Punkt auf der
Checkliste kommen. Stellen Sie sicher, dass Sie den Propeller mit hoher
Umdrehungszahl (rpm) laufen lassen. Es passiert aber schnell, dass
die Propellerwelle überdreht; also halten Sie am besten die Nadel kurz
unter der roten Linie.
Wie errechnet man die Dichtehöhe?
Die tatsächliche Berechnung ist sehr komplex und man braucht dazu
Tabellen und viele Variablen, aber wie immer bei der Luftfahrt gibt
es auch hier eine Daumenregel, die für fast alle unsere Erfordernisse
ausreicht.
Setzen Sie den Höhenmesser auf 29.92 (1013)
Lesen Sie die angezeigte Höhe ab. Dies ist ihre Druckhöhe (Pressure
Altitude).
Suchen Sie in der ersten Spalte die Zahl, die dieser am nächsten
kommt.
In der entsprechenden Temperaturspalte können Sie jetzt in etwa
die momentane Dichtehöhe (Density Altitude) ablesen.
41°/ 5C50°/
10C
4000 3750 4350 4900 5450 6000 6550 7100 7650
4500 4400 5000 5500 6050 6600 7150 7700 8250
5000 4990 5550 6100 6650 7200 7750 8300 8850
5500 5600 6200 6700 7250 7800 8350 8900 9450
6000 6200 6800 7300 7850 8400 8950 9500 10050
6500 6850 7400 7950 8500 9050 9600 10150 10700
7000 7500 8000 8550 9100 9650 10200 10750 11300
7500 8100 8650 9150 9700 10250 10800 11350 11900
8000 8700 9250 9750 10300 10850 11400 11950 12500
8500 9300 9900 10350 10900 11450 12000 12550 13000
59°/
15C
68°/
20C
77°/
25C
85°/
30C
94°/
35C
104°/
40C
Wenn die Temperatur unter 50°F liegt, können Sie davon ausgehen,
dass die Dichtehöhe kein Problem darstellt, fast genau wie bei einem
Flugplatz auf Meereshöhe.
Deutsch
Aerosoft GmbH 2016
8 9
Page 6

Approaching Quito – Historic Procedures
Appendix: High Density Altitude
If there is one thing that makes this product special it is the high altitude
of the airports. It is our experience that many sim pilots do not fully understand the effects of the resulting lower air pressure, so a full chapter
on flying in these conditions is in order.
High Density Altitude
In this chapter we are going to use the Cessna 182RG as our base
model, for all other aircraft the principle is the same, only the numbers
change. There is one complete factor that should be used when talking
about Density Altitude that we will not mention, Humidity. It is not a
major factor and in FS it is not used. If you want to know, high humidity
will RAISE the Density Altitude.
IMPORTANT: The ACTUAL altitude of an airport is of little or no consequence, the only thing that matters is the DENSITY ALTITUDE of the
airport. The only thing that matters is the AMOUNT of air molecules!
Air is needed for many things (we will use the word ‘air’ to describe the
mixture of gasses we experience):
• to create lift
• to create a forwards force by pushing onto (jets) or ‘screwing’ into
(props)
• to assist the combustion of the fuel
• to cool the propulsion system
• and of course, the pilot also needs something to breath.
If there is less air all of these things will not be as efficient as in optimal
conditions. So what effect has that one to the performance of the aircraft? And in particular for the take-off and landing? Well how does a
takeoff run of 1800 feet sound to you? For a Cessna that is not loaded
very heavy? Is that impressive or not? Look at the following table that
shows the relation between altitude, temperature and pressure. The
data for takeoff and landing are for a moderately loaded Cessna 182 RG.
Altitude
in feet
0 59 29.291 0 ft 640 ft 600 ft
4000 59 29.291 4924 ft 950 ft 720 ft
8000 59 29.291 9816 ft 1350 ft 900 ft
8000 100 29.00 13255 ft 1850 ft ? 1200 ft
Where there are question marks they are there because the Cessna manual does not supply these numbers and they have been extrapolated
from the other numbers. Keep in mind that a turbo charged aircraft like
the 182 is built to operate at higher altitudes and that it will perform
much better than a non turbo charged aircraft.
If you try to take off with a Piper Cub with a density altitude of 1300’
you’ll probably never reach takeoff speed before running out of runway
and landings will have to be done at speeds ABOVE cruise speed. In the
last row of the example the aircraft is located at 8000’ feet but for all
logical and practical purposes it is 5000’ higher.
Density Altitude is the altitude where the aircraft THINKS it is.
Also it is not only performance that suffers; your engine will also overheat MUCH faster because there is less air to cool the engine. And
when the winter comes and density altitude becomes less of an issue
you run into another problem. It’s very easy to run into very cold layers
of air only minutes after takeoff and icing is a real danger. One thing
to keep in mind… your air speed indicator is always corrected for the
density altitude, it shows what it feels.
Temperature in
degrees F
Altimeter
Setting in
Inch Hg
Resulting
Density
Altitude
Required
Runway
Takeoff
Required
Runway
Lading
High (Density) Altitude Operations
Flying from high altitude airports is something that is inherently more
dangerous than flying from airports located nearer to sea level. But the
major issue is that it is different and that the problems escalate much
faster into real dangers.
Deutsch
Aerosoft GmbH 2016
10 11
Page 7

Approaching Quito – Historic Procedures
Preparation
Reduce your load; kick out those six-packs and your mother-in-law. Better to leave them behind than to scatter them all over the last few feet
of the runway. Don’t fly with more fuel than is needed. Rule of thumb,
for every 10% under max gross weight, performance increase 20%.
Keep in mind that an aircraft like a Cessna 175 at 8000 feet only delivers 50% of its rated power. Above all, make sure your aircraft CAN
fly in the current conditions. A Piper Cub with a ceiling of 11500 feet
simply will not fly if the density altitude is 12000 feet. It simply will not
be able to lift off even if the runway is 20 miles. If the ceiling of your
aircraft and the density altitude come close together your margins of
safety decrease. You might need to wait for cooler conditions to fly!
Starting
Depending on the aircraft starting procedures will be different. In the
Cessna 182 you will need to pre-lean the engine and give a bit of
throttle to get the engine to start. Do not run at high power settings
for a long time because the engine might overheat. It is however a very
good idea to do a quick high power setting just before entering the
runway to make sure the engine will rev up without problems. Under
these marginal conditions you do not want to have an engine that does
not spool up fast and smooth. But keep an eye on the temperature!
On some aircraft the FSX “Auto Start” function ([CONTROL]-[E]) will
NOT start the engine at this altitude! You will have to manually start the
engine with the mixture leaned and a bit of throttle set.
Takeoff
The first thing to remember is to trust your instruments and above all
your airspeed indicator. Visual impressions might be misleading and the
point where you normally lift off might not be the point where you have
enough airspeed in a high density altitude situation! Do not use Short
Field flap settings as this most likely increase your takeoff run. Always
lean your engine for max performance before starting your take-off.
Make sure you understand that not only your takeoff run will be longer
as density altitude increases but also that your climb performance will
be affected.
Landing
Again, do NOT rely on your eyes but on your airspeed indicator. The INDICATED airspeed is the only thing that keeps you aloft. But in the end
it is only the groundspeed that is different, the landing itself is actually
surprisingly normal as long as you use your engine to keep the correct
speed. The only real surprise might be the lack of any ground effect as
that seems to drop off over 5000’.
Be prepared to see everything go a LOT faster than you might be used
to and be prepared to use a lot more ground than normal. That is not
a major issue most of the time as mountain runways are often rather
long.
The real problems start when things go wrong. On a normal landing you
have almost all of your power to get you out of a problem, but at high
Density Altitudes you might not have much to use, and in the thin air
the difference between max speed and stall speed is very small.
If you’ve never flown at a high altitude airport before, the first time you
do you run a major risk because on your standard checklist there will be
the item [Full Rich Mixture]. Now if you do that at 8000’ you run a high
risk of the engine stalling on you. If you are lucky this will not happen
before the engines slows down on the rollout, but if you are unlucky it
will die on you before you hit the next item on your checklist. Make sure
you keep high rpm on the prop but it is easy to over rev the prop shaft
so keep the needle just under the red line.
How do I estimate the Density Altitude?
Actually the correct calculation is very complex and involves tables and
many variables, but as always in aviation there is a rule of thumb that is
close enough for almost any purpose:
Set your altimeter to 29.92 (1013).
Read the altitude indicated. This is your Pressure Altitude (pa)
Now find the closest figure in the first column.
In the correct temperature column you can read a good approximation of the current Density Altitude.
English
Aerosoft GmbH 2016
12 13
Page 8

Approaching Quito – Historic Procedures
41°/ 5C50°/
10C
4000 3750 4350 4900 5450 6000 6550 7100 7650
4500 4400 5000 5500 6050 6600 7150 7700 8250
5000 4990 5550 6100 6650 7200 7750 8300 8850
5500 5600 6200 6700 7250 7800 8350 8900 9450
6000 6200 6800 7300 7850 8400 8950 9500 10050
6500 6850 7400 7950 8500 9050 9600 10150 10700
7000 7500 8000 8550 9100 9650 10200 10750 11300
7500 8100 8650 9150 9700 10250 10800 11350 11900
8000 8700 9250 9750 10300 10850 11400 11950 12500
8500 9300 9900 10350 10900 11450 12000 12550 13000
59°/
15C
68°/
20C
77°/
25C
85°/
30C
94°/
35C
104°/
40C
If the temperature is below 50° you can almost always assume Density
Altitude will not be an issue, just as it will almost never be on an
airport near sea level.
Aerosoft GmbH 2016
14 MF
 Loading...