


ENGLISH
■
GROUND TESTER
6422
6424
User Manual

Statement of Compliance
Chauvin Arnoux®, Inc. d.b.a. AEMC® Instruments
certifies that this instrument has been calibrated using
standards and instruments traceable to international
standards.
We guarantee that at the time of shipping your
instrument has met its published specifications.
An N.I.S.T. traceable certificate may be requested at
the time of purchase, or obtained by returning the
instrument to our repair and calibration facility, for a
nominal charge.
The recommended calibration interval for this
instrument is 12 months and begins on the date of
receipt by the customer. For recalibration, please use
our calibration services. Refer to our repair and
calibration section at www.aemc.com
.
Serial #:
Catalog #:
Model #: 6422 / 6424
Please fill in the appropriate date as indicated:
Date Received:
Date Calibration Due:
Chauvin Arnoux®, Inc.
d.b.a AEMC
®
Instruments
www.aemc.com
2 Ground Tester Models 6422/6424

CONTENTS
1. INTRODUCTION .................................................................................. 8
1.1. Battery Installation ......................................................................... 8
1.2. Battery Charging (Model 6424) .................................................... 10
1.3. Desktop Stand ............................................................................. 11
1.4. Instrument Interface ..................................................................... 11
1.5. Instrument Functions ................................................................... 13
1.6. Buttons and Keys ......................................................................... 13
1.7. LCD Display ................................................................................. 15
2. OPERATION ............................................................................... 16
2.1. Voltage Measurement .................................................................. 16
2.2. Resistance Measurement (2P) .................................................... 17
2.3. Grounding Resistance Measurement (3P) ................................... 20
2.4. AC Current Measurement (Model 6424) ...................................... 30
3. SPECIFICATIONS ...................................................................... 32
3.1. General Reference Conditions ..................................................... 32
3.2. Electrical Specifications ............................................................... 32
3.3. Influences ..................................................................................... 24
3.4. Uncertainty ................................................................................... 36
3.5. Environmental Conditions ............................................................ 37
3.6. Power Supply ............................................................................... 37
3.7. Mechanical Specifications ............................................................ 38
3.8. International Standards ................................................................ 38
3.9. Electromagnetic Compatibility (CEM) .......................................... 38
4. MAINTENANCE ......................................................................... 39
4.1. Cleaning ....................................................................................... 39
4.2. Replacing the batteries ................................................................ 39
REPAIR AND CALIBRATION .............................................................. 40
TECHNICAL AND SALES ASSISTANCE ............................................. 40
LIMITED WARRANTY ........................................................................ 41
Ground Tester Models 6422/6424 3

Thank you for purchasing the AEMC Ground Tester Model 6422 or 6424. For
best results from your instrument and for your safety, read the enclosed
operating instructions carefully and comply with the precautions for use. These
products must be only used by qualified and trained users.
WARNING, risk of DANGER! The operator must refer to these
instructions whenever this danger symbol appears.
CAUTION! Risk of electric shock. The voltage at the parts marked
with this symbol may be dangerous.
Useful information or tip.
Earth/ground.
Current clamp.
The product is declared recyclable following a life cycle analysis in
accordance with standard ISO 14040.
Battery.
Guarantees conformity with European directives and with
regulations covering EMC.
In the European Union, the product must undergo selective disposal
for the recycling of electric and electronic material, in compliance with
Directive WEEE 2002/96/EC.
4 Ground Tester Models 6422/6424

Precautions
This instrument is compliant with safety standard IEC 61010-2-030 for voltages
up to 600V in category IV. Do not use the instrument for measurements on
circuits that are not in measurement categories II, III, or IV or that might be
connected inadvertently to circuits that are not in measurement categories II, III,
or IV.
The operator and/or the responsible authority must carefully read and
clearly understand the various precautions to be taken in use. Sound
knowledge and a keen awareness of electrical hazards are essential
when using this instrument.
If you use this instrument other than as specified, the protection it
provides may be compromised, thereby endangering you.
Do not use the instrument on networks of which the voltage or category
exceeds those mentioned.
Do not use the instrument if it seems to be damaged, incomplete, or
poorly closed.
Before each use, check the condition of the insulation on the leads,
housing, and accessories. Any item of which the insulation is
deteriorated (even partially) must be set aside for repair or scrapping.
Before using your instrument, check that it is perfectly dry. If it is wet, it
must be thoroughly dried before it can be connected or used.
The use of leads (or accessories) of a lower voltage or category limits the
voltage or category of the combined instrument and leads (or
accessories) to that of the leads (or accessories).
Use personal protection equipment systematically.
When handling the leads, test probes, and alligator clips, keep your
fingers behind the physical guard.
All troubleshooting and metrological checks must be performed by
competent and accredited personnel.
Definition of Measurement Categories (CAT)
CAT IV Measurement category IV corresponds to measurements taken at the
source of low-voltage installations.
Example: power feeders, counters and protection devices.
CAT III Measurement category III corresponds to measurements on building
installations.
Example: distribution panel, circuit-breakers, machines or fixed
industrial devices.
CAT II Measurement category II corresponds to measurements taken
on circuits directly connected to low-voltage installations.
Example: power supply to domestic electrical appliances and
portable tools.
Ground Tester Models 6422/6424 5

Receiving Your Shipment
Upon receiving your shipment, make sure that the contents are consistent with
the packing list. Notify your distributor of any missing items. If the equipment
appears to be damaged, file a claim immediately with the carrier and notify your
distributor at once, giving a detailed description of any damage. Save the
damaged packing container to substantiate your claim.
Ordering Information
Ground Tester Model 6422…………………..…….……............... Cat. #2135.55
Includes 6 AA alkaline batteries, carrying bag and user manual
Ground Tester Model 6422 Kit-150 ft …………………..….......... Cat. #2135.56
Includes ground tester, two 150 ft color-coded leads on spools (red/blue),
one 30 ft lead (green), two T-shaped auxiliary ground electrodes, set of two
5 ft color-coded (red/blue) leads, one 100 ft AEMC® tape measure, 6 AA
batteries, carrying bag and user manual
Ground Tester Model 6424…………………..…….……............... Cat. #2135.57
Includes 6 AA rechargeable NiMH batteries, USB to wall charger, 5V, 2A,
USB charger cable, carrying bag and user manual
Ground Tester Model 6424 Kit-150 ft …………………..….......... Cat. #2135.58
Includes ground tester, two 150 ft color-coded leads on spools (red/blue), one
30 ft lead (green), two T-shaped auxiliary ground electrodes, set of two 5 ft
color-coded (red/blue) leads, one 100 ft AEMC
rechargeable NiMH batteries, USB to wall charger, 5V, 2A, USB charger
cable, carrying bag and user manual
®
tape measure, 6 AA
Ground Tester Model 6424 Kit-300 ft …………………..….......... Cat. #2135.59
Includes ground tester, two 300 ft color-coded leads on spools (red/blue), two
100 ft color-coded leads (hand-tied, green/black), four T-shaped auxiliary
ground electrodes, set of two 5 ft color-coded (red/blue) leads, one 100 ft
®
AEMC
charger, 5V, 2A, USB charger cable, carrying bag and user manual
tape measure, 6 AA rechargeable NiMH batteries, USB to wall
Accessories
Ground Rod – Set of 2, 17” stainless steel T-shaped
auxiliary rods ………………..……………………………….......... Cat. #2135.44
AC Current Probe Model MN72 for use with Model 6424 only... Cat. #2153.06
Calibration checker for ground tester
models 6422/6424…….… Cat. #5000.92
6 Ground Tester Models 6422/6424

Replacement Parts
Bag – Multi-purpose large canvas bag
(replacement for ground kits) …………..………..…….….......... Cat. #2119.82
Case – Replacement carrying case for Models 3620, 3640,
4600, 4610, AN1, 6422, 6424, 6501 & 6503…………….……... Cat. #2126.71
Tape measure – AEMC
Test Kit for 3-Point Testing ………………………………….…..… Cat. #2135.35
Includes two 150 ft color-coded leads on spools (red/blue), one 30 ft lead
(green), two T-shaped auxiliary ground electrodes, set of two 5 ft colorcoded (red/blue) leads, one 100 ft AEMC
Ground Rod – Set of 2, 14.5” T-shaped auxiliary rods …..…..… Cat. #2135.39
Cable – Replacement USB charger cable w/wall plug
for Model 6424 ……………………………………………….…..… Cat. #2135.93
®
100 ft ………………………….……..… Cat. #2130.60
®
tape measure, and carrying bag
Ground Tester Models 6422/6424 7

1. INTRODUCTION
1.1 Battery Installation
1. Open the battery compartment cover.
2. With your fingers on either side of the cover, insert a tool (for example a
screwdriver) in the latching system, and lift up.
3. Remove the battery compartment cover.
8 Ground Tester Models 6422/6424

4. Pull open the rubber seal covering the battery compartment.
5. Insert the batteries, ensuring correct polarities. We recommend
disposable batteries for the Model 6422 (for example alkaline) and
rechargeable batteries for the Model 6424. The Model 6422 comes with
alkaline batteries installed, and the Model 6424 with rechargeable
batteries installed.
6. Press the rubber seal back in place, ensuring it correctly covers the
compartment.
7. Replace the battery compartment cover.
If you insert disposable batteries in the Model 6424, the batteries will
last longer but the battery level indicator will be inaccurate.
If you insert rechargeable batteries in the Model 6422, the battery level
indicator will always display low battery level and the batteries
will not last as long.
Ground Tester Models 6422/6424 9

1.2 Battery Charging (Model 6424)
Before using the Model 6424 for the first time, you should fully charge the
battery. Charging must be done in a location with the temperature between 32
and 104°F (0 and 40°C).
Do not perform the charging procedure if disposable batteries are
installed in the instrument.
1. Connect one end of the provided USB cable to the Model 6424 terminal
block and the other end to a wall outlet using the provided externalpower-to-USB adapter.
2. The instrument displays CHrG. While the battery charges, the battery
level indicator displays progress. Full charging requires approximately 6
hours.
3. When the battery level indicator shows full charge disconnect the
USB cable from the instrument.
10 Ground Tester Models 6422/6424

1.3 Desktop Stand
Terminal block:
Hazardous
Backlit LCD display
TEST button
ON/OFF button
The instrument is equipped with two back supports that enable desktop operation
from an angled position. Pull the supports out to lock them in place, then place
the instrument on a flat surface.
1.4 Instrument Interface
1.4.1 Model 6422
3 measurement
terminals
voltage indicator
Ground Tester Models 6422/6424 11

1.4.2 Model 6424
Terminal block
Battery charger
input
MN72 AC Current Probe
Measurement terminals
Backlit LCD display
ON/OFF button
Function keys
TEST button
Connector for optional
Hazardous voltage indicator
Measurement data storage location
12 Ground Tester Models 6422/6424

1.5 Instrument Functions
terminals to C, P, X (§2.3.2).
The Models 6422 and 6424 are battery-powered portable measuring instruments
with LCD displays.
These instruments check the safety of electrical installations. They can be used
to test a new installation before it is powered up. They can also check an existing
installation (after it has been disconnected) or diagnose a malfunction in an
installation.
Function 6422 6424
Ground resistance measurement (with three rods)
Voltage measurement
Resistance measurement
Average of ground measurements at 52, 62, and 72%
RH over limit detection
RE over limit detection
Stray or foreign voltage on USE detection
AC current measurement with current clamp
(optional)
1.6 Buttons and Keys
Both models:
Buttons Function
Long press (>2 seconds) turns instrument ON.
Second long press turns instrument OFF.
Short press starts ground measurements in automatic mode
(§2.3.3).
Long press starts ground measurements in permanent mode.
TEST
+ TEST
Pressing TEST during a measurement stops the
measurement (§2.3.5).
At the end of the measurement, pressing TEST exits the frozen
measurement display.
Pressing and TEST simultaneously for >5 seconds while
turning ON the instrument changes the names of the H, S, E
Ground Tester Models 6422/6424 13

Model 6424 only:
Ke ys Function
V/A takes voltage measurements (§2.1), or current
V/A
Ω
measurements if a current probe is connected (§2.4).
In the latter case, a second press forces voltage
measurements.
Ω takes resistance measurements (§2.2).
Ω and TEST pressed simultaneously takes ground resistance
measurements (§2.3).
stores the displayed measurement with the S rod at 52%
of the distance (§2.3.4).
52%
0
62%
Pressing and then activates/deactivates lead
compensation.
Pressing and then for >2 seconds compensates the
resistance of the leads for the resistance measurement
(§2.2.2).
stores the displayed measurement with the S rod at 62%
of the distance (§2.3).
Pressing and then turns on backlighting for one
minute, or turns backlighting off.
stores the displayed measurement with the S rod at 72%
72%
CLR
of the distance (§2.3.4).
Pressing and then deactivates the Auto Off feature.
activates the “second” functions of the 52%, 62%, and
72% keys (§2.3).
Pressing for >2 seconds erases the values stored in
memory.
14 Ground Tester Models 6422/6424

1.7 LCD Display
1. Battery level indicator
Auto Off enabled/disabled
lead compensation
2. Input terminals
3. In a 3P ground measurement:
HOLD indicates measurement is frozen
AVG indicates the displayed measurement is the average of 3
measurements
% indicates the range of variation in the averaged measurements
4. Main display
5. Errors in the displayed measurement and (Model 6424) in the ground
measurement stored in memory
6. (Model 6424) additional information about the ground measurement
Ground Tester Models 6422/6424 15

2. OPERATION
2.1 Voltage Measurement (Model 6424)
The Model 6424 measures the RMS (Root Mean Square) voltage up to 600VAC.
1. Turn ON the instrument by pressing for >2 seconds.
2. Press to access the voltage measurement mode. The
symbol V appears on the right side of the LCD.
3. Connect one end of the leads to the V and COM terminals and the other
end to the sample under test.
The measurement appears on the LCD.
If the measurement falls outside the instrument’s measurement range,
the LCD displays >700.0V.
16 Ground Tester Models 6422/6424

2.2 Resistance Measurement (2P)
2.2.1 Model 6422
The sample under test should not be live.
1. Turn ON the instrument by pressing for >2 seconds. The
symbol 2P appears on the right side of the LCD.
2. Connect one end of the leads to the Ω and COM terminals and the other
end to the sample under test.
The measurement appears on the LCD.
Ground Tester Models 6422/6424 17

2.2.2 Model 6424
If the message Err appears, the compensation procedure failed, either
The sample under test should be de-energized.
1. Turn ON the instrument by pressing for >2 seconds. The
symbol 2P appears on the right side of the LCD.
2. If the Model 6424 is already ON but in voltage or current
measurement mode, press to access the resistance
measurement mode.
3. Before making measurements, perform lead compensation. This
subtracts the test lead resistance from the measurement. Connect one
end of the leads to the Ω and COM terminals and touch the other ends
together, creating a short-circuit.
4. Press the button.
5. Press for >2 seconds. The symbol blinks during the
compensation procedure. When finished, the LCD displays
00.00Ω.
because the value to be compensated exceeds 5Ω or because the
leads were disconnected during compensation.
Press to deactivate/reactivate lead compensation.
18 Ground Tester Models 6422/6424

6. Connect one end of the leads to the Ω and COM terminals and the other
end to the sample under test.
The measurement appears on the LCD.
The instrument displays the measured value minus the compensation.
The value displayed may be negative if the leads used for the
measurement are not the ones that were compensated. In this case,
repeat the compensation. Lead compensation is preserved after Auto
Off but not after the instrument is manually turned OFF.
Error messages:
>99.99kΩ: The measured value falls outside the instrument’s
measurement range.
NOISE: A stray or foreign voltage UHE > 3V is detected between the Ω
and COM terminals.
: A stray or foreign voltage U
and COM terminals; in this case measurement is not possible.
Note that 2P mode is useful for ensuring the H electrode connection is intact.
HE > 50V is detected between the Ω
Ground Tester Models 6422/6424 19

2.3 Grounding Resistance (3P)
This function performs a 3-pole (3P) test to measure grounding resistance when
the electrical installation to be tested is de-energized (for example a new
installation). It uses two auxiliary rods, with the third rod being the grounding
electrode to be tested (hence the name 3P or 3-pole). To perform a 3P test, the
instrument:
1. Generates a 128Hz square wave between the H and E terminals, with
an amplitude of 10V peak. If the measurement is unstable, the test
frequency will automatically switch from 128Hz to 256Hz to improve the
measurement.
2. Measures the resulting current IHE along with the voltage between the S
and E terminals USE.
3. Calculates the value of RE = U
The 3P test can also be performed on an existing electrical installation, but the
power must be OFF. Whether testing a new or existing installation, the grounding
electrode system under test must be isolated from other grounding connections
during the measurement.
2.3.1 3-Point Test Theory of Operation
3-Point measurement is used to measure resistance to ground of auxiliary
ground electrodes and grids. The potential difference between rods E and S is
measured by a voltmeter, and the current flow between rods E and H is
measured by an ammeter.
By Ohm’s Law E = RI or R = E/I, we may obtain the ground electrode resistance
R.
SE
/ IHE.
If E = 20V and I = 1A, then:
20
E
=
I
= 20 ohms
1
R=
It is not necessary to calculate all the measurements when using a ground tester.
The ground tester will measure directly by generating its own current and
displaying the resistance of the ground electrode.
20 Ground Tester Models 6422/6424
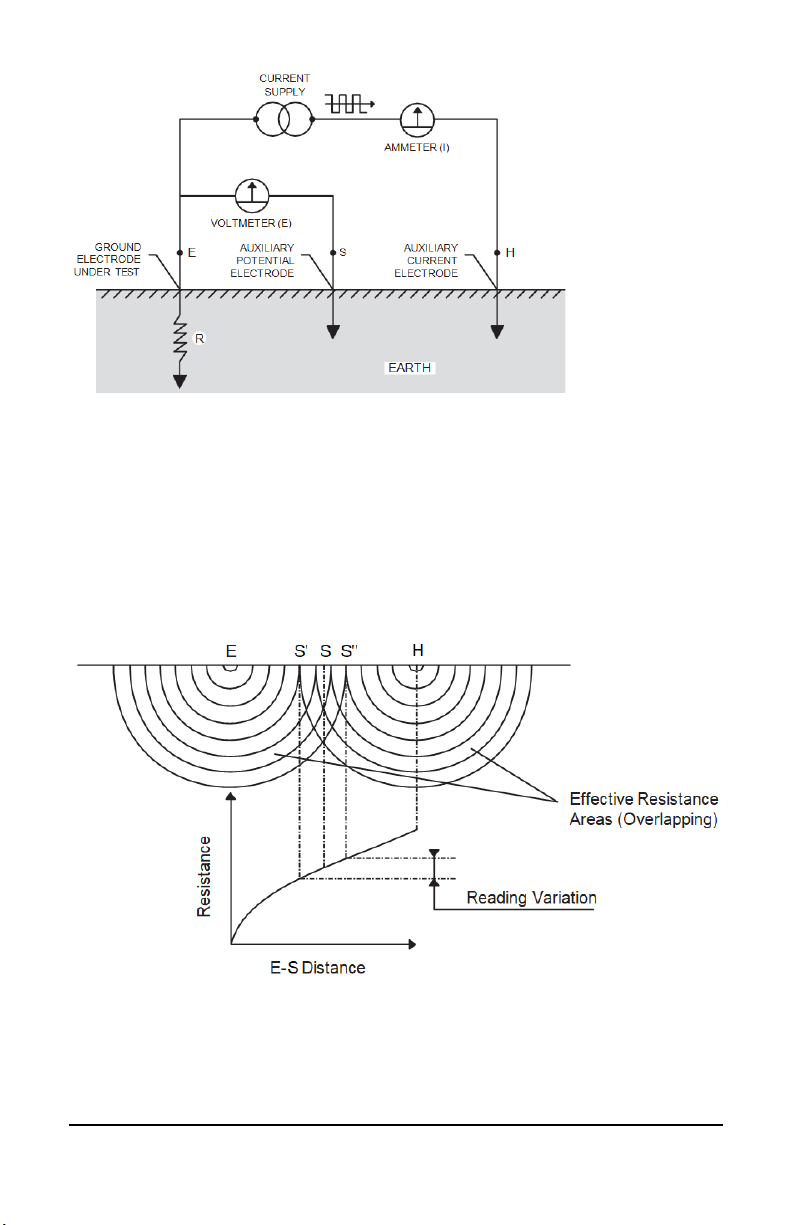
2.3.1.1 Position of the Auxiliary Electrodes in Measurements
The goal in precisely measuring the resistance to ground is to place the auxiliary
current electrode H far enough from the ground electrode under test so that the
auxiliary potential electrode S will be outside of the effective resistance areas of
both the ground electrode and the auxiliary current electrode. The best way to
find out if the auxiliary potential rod S is outside the effective resistance areas is
to move it between E and H and to take a reading at each location. If the auxiliary
potential rod S is in an effective resistance area (or in both if they overlap), by
displacing it, the readings taken will vary noticeably in value. Under these
conditions, no exact value for the resistance to ground may be determined.
On the other hand, if the auxiliary potential rod S is located outside the effective
resistance areas, as S is moved back and forth the reading variation is minimal.
The readings taken should be relatively close to each other, and are the best
values for the resistance to ground of the ground E. The readings should be
plotted to ensure that they lie in a “plateau” region as shown below.
Ground Tester Models 6422/6424 21

2.3.1.2 Measuring Resistance of Ground Electrodes (62% Method)
The 62% method the most accurate method but is limited by the fact that the
ground tested is a single unit. This method applies only when all three electrodes
are in a straight line and the ground is a single electrode, pipe, or plate, etc., as
shown below.
Consider the illustration below, which shows the effective resistance areas
(concentric shells) of the ground electrode E and of the auxiliary current
electrode H. The resistance areas overlap.
22 Ground Tester Models 6422/6424

If readings were taken by moving the auxiliary potential electrode S towards
either E or H, the reading differentials would be great and we could not obtain a
reading within a reasonable band of tolerance. The sensitive areas overlap and
act constantly to increase resistance as S is moved away from E.
Now consider the illustration below, where the E and H electrodes are sufficiently
spaced so that the areas of effective resistance do not overlap. If we plot the
resistance, measured we find that the measurements level off when S is placed
at 62% of the distance from E to H, and that the readings on either side of the
initial Y setting are most likely to be within the established tolerance band. This
tolerance band is defined by the user and expressed as a percent of the initial
reading: ±2%, ±5%, ±10%, etc.
Ground Tester Models 6422/6424 23

2.3.1.3 Auxiliary Electrode Spacing
No definite distance between X and Z can be given, since this distance is relative
to the diameter of the electrode tested, its length, the homogeneity of the soil
tested, and particularly, the effective resistance areas. However, an approximate
distance may be determined from the following chart which is given for a
homogeneous soil and an electrode of 1" in diameter. (For a diameter of 1/2",
reduce the distance by 10%; for a diameter of 2" increase the distance by 10%.)
24 Ground Tester Models 6422/6424

Approximate Distance to Auxiliary Electrodes Using the 62% Method
6 ft
45 ft
72 ft
8 ft
50 ft
80 ft
12 ft
60 ft
96 ft
18 ft
71 ft
115 ft
20 ft
74 ft
120 ft
30 ft
86 ft
140 ft
Depth Driven Distance to Y Distance to Z
10 ft 55 ft 88 ft
2.3.1.4 Multiple Electrode System
A single driven ground electrode is an economical and simple means of making a
good ground system, but sometimes a single rod will not provide sufficient low
resistance, and several ground electrodes will be driven and connected in
parallel by a cable.
Very often when two, three or four ground electrodes are used, they are driven in
a straight line. When four or more are used, a hollow square configuration is
used and the ground electrodes are still connected in parallel and equally spaced
(see below).
Ground Tester Models 6422/6424 25

In multiple electrode systems, the 62% method electrode spacing may no longer
Max Grid Distance
Distance to Y
Distance to Z
6 ft
78 ft
125 ft
8 ft
87 ft
140 ft
10 ft
100 ft
160 ft
12 ft
105 ft
170 ft
14 ft
118 ft
190 ft
16 ft
124 ft
200 ft
18 ft
130 ft
210 ft
20 ft
136 ft
220 ft
30 ft
161 ft
260 ft
40 ft
186 ft
300 ft
50 ft
211 ft
340 ft
60 ft
230 ft
370 ft
80 ft
273 ft
440 ft
100 ft
310 ft
500 ft
120 ft
341 ft
550 ft
140 ft
372 ft
600 ft
160 ft
390 ft
630 ft
180 ft
434 ft
700 ft
200 ft
453 ft
730 ft
be applied directly. The distance of the auxiliary electrodes is now based on the
maximum grid distance (e.g. in a square, the diagonal; in a line, the total length).
A square having a side of 20 ft will have a diagonal of approximately 28 ft.
Multiple Electrode System
2.3.2 Terminals Definitions
By default, the instrument’s terminals are defined as H, S, and E. To change
these to C, P, and X:
While turning ON the instrument, simultaneously press and
hold down the and TEST buttons for >5 seconds. The
terminal assignments will be changed to C, P, and X. These
assignments will be retained even when the instrument is
turned OFF.
26 Ground Tester Models 6422/6424

2.3.3 Grounding Resistance Measurement
For the first grounding resistance test, we recommend starting with the 62%
distance.
1. Place the H and S rods in a line with the grounding electrode under test.
The distance between the S rod and the grounding electrode must be
approximately 62% of the distance (d) between the H rod and the
grounding electrode. (To avoid electromagnetic interference, we
recommend using the full length of the cables, placing them several
inches apart and avoiding loops.)
2. Connect the cables to the H and S terminals.
3. Power down the installation and isolate the ground under test from other
ground systems and connections.
4. Connect the E terminal to the grounding electrode to be tested.
5. Press TEST to take a measurement in automatic mode.
The TEST button blinks red, then the measurement is displayed. It
remains frozen (HOLD) until you press TEST again.
(Model 6424) R
and USE values are displayed.
H
Ground Tester Models 6422/6424 27

2.3.4 Measurement Average (Model 6424)
After completing the measurement made with the S rod at 62% of the distance
between the H rod and the grounding electrode, press to store the value in
memory.
1. Place the S rod at 72% of the distance d and take another measurement.
2. Press to store the measurement.
3. Place the S rod at 52% of d, and take another measurement.
4. Press to store the measurement.
The instrument immediately calculates and displays the average of the
three measurements and the percent difference between the lowest and
highest values. For the measurement to be valid, the difference must not
exceed 5%. If it is, place the H electrode out further and repeat the tests
at the 52%, 62%, and 72% distances.
Press for >2 seconds to erase the stored measurements.
28 Ground Tester Models 6422/6424

2.3.5 Measurement Mode (Model 6424)
1. Place the H and S rods and connect the instrument as explained in
§2.3.2.
2. Press TEST for >2 seconds to start the measurement.
The TEST button blinks red, then the measurement is displayed.
(Model 6424) RH and USE values are displayed.
3. Press TEST to stop the measurement.
2.3.6 Validating the Measurement
1. Place S rod at 72% of d and take a measurement.
2. Move the S rod to 52% of d and take a measurement.
All three measurements must be within 5% of each other for the measurement to
be valid. If not, the S rod is within the zone of influence of the grounding
electrode. If this is the case, place the H electrode further away and repeat the
measurement.
Ground Tester Models 6422/6424 29

2.3.6.1 Auxiliary Rod Positioning
To ensure measurements are not distorted by interference, we recommend
repeating the measurement with the auxiliary rods placed at a different distance
and in another direction (for example rotated 90° from the first alignment).
If the measurements match, they are valid. If they differ significantly, they could
be influenced by factors such as ground currents or a groundwater artery. In this
case, we recommend driving the auxiliary rods deeper into the ground.
If in-line rod configuration is not possible, you can place the rods in an equilateral
triangle. To validate the measurement, move the S rod on either side of the line
HE.
2.3.6.2 Ground Measurement Tips
To avoid “cross-talk” with the measurement current, do not route the
connecting cables of the rods near or parallel to other cables
(transmission or power supply), metal pipes, rails, or fences.
To reduce auxiliary rod resistance, add one or more rods, two meters
apart, in the H (S) circuit of the circuit.
Another way to reduce rod resistance is to drive the rods deeper and
firmly pack the earth around them, or sprinkle water on them.
After completing the measurement, reconnect the grounding strip
before restoring power to the installation.
30 Ground Tester Models 6422/6424
2.3.7 Error Messages
>3.000kΩ
RH ! (blinking)
(Model 6422) Measurement outside range
>60.00kΩ
S (blinking)
P (blinking)
NOISE
(Model 6424) Measurement outside range
S rod resistance >50kΩ
H rod resistance >15kΩ
or UHE voltage amplitude is between 3 and 50V
U
SE
(blinking)
USE or UHE > 50V (no measurement is possible)
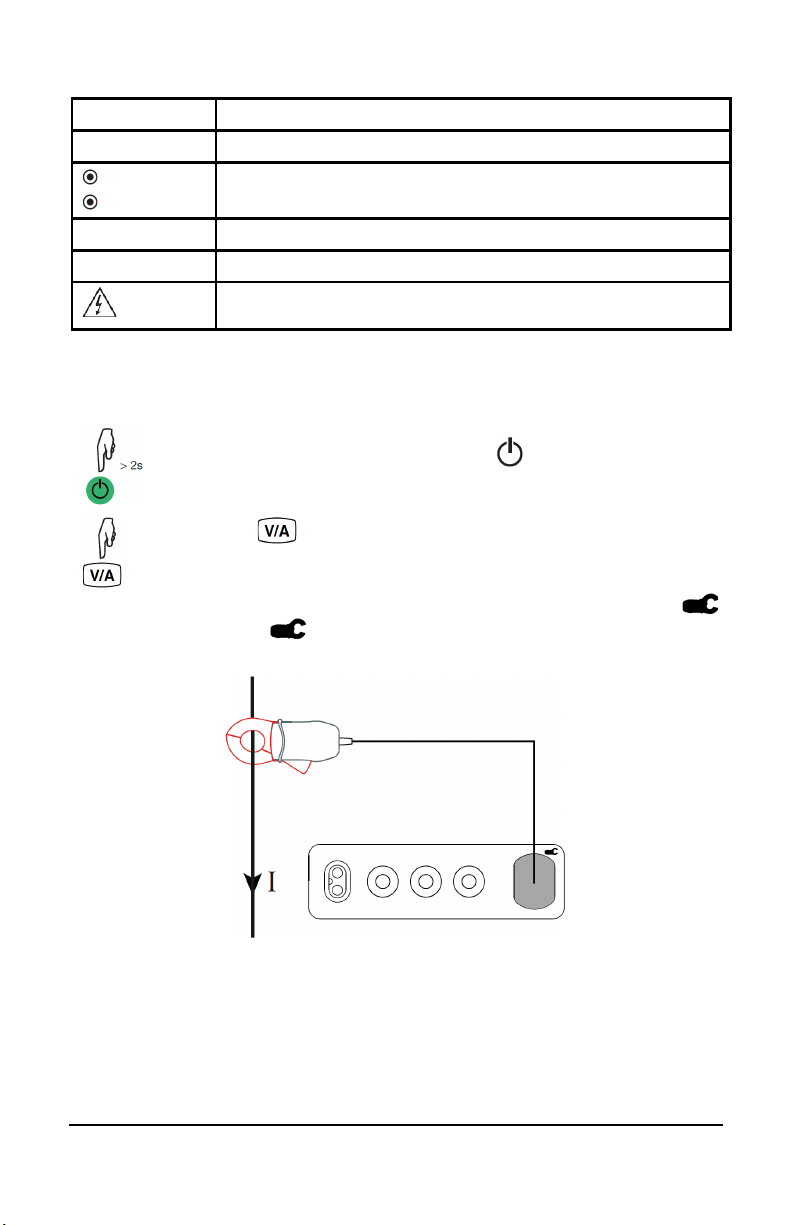
2.4 AC Current Measurement (Model 6424)
AC current measurement requires an optional MN72 current probe.
1. Turn ON the instrument by pressing for >2 seconds.
2. Press .
3. Connect the clamp to the instrument’s current terminal (identified by the
symbol). The A and symbols appear on the LCD.
4. Open the clamp and place it on the conductor under test.
Ground Tester Models 6422/6424 31

The measurement appears on the LCD.
Error messages:
>70.00A: The measured value falls outside the instrument’s
measurement range.
Err: The probe is not completely inserted (the symbol also
blinks).
32 Ground Tester Models 6422/6424

3. SPECIFICATIONS
Quantity of influence
Reference values
Model 6424: 6 ± 0.2 V
Frequency
45 to 65Hz
Electric field
< 0.1V/m
Magnetic field
< 40A/m
Resolution
0.1V
Intrinsic uncertainty
± (1% R + 1 ct)
3.1 General Reference Conditions
Temperature 73 ± 3.6 °F (23 ± 2 °C)
Relative humidity 45 to 75% RH
Supply voltage
Intrinsic uncertainty is the error defined under the reference conditions.
Operating uncertainty includes the intrinsic uncertainty plus the effects of
variation of the quantities of influence (supply voltage, temperature, interference,
etc.) as defined in standard IEC 61557-5.
The uncertainties are expressed in % of the reading (R) and in number of display
counts (ct): ± (a% R + b ct)
The Model 6424 cannot make measurements when the battery
charger is connected.
Model 6422: 8 ± 0.2 V
3.2 Electrical Specifications
3.2.1 Voltage Measurement
Additional reference condition:
Peak factor = √2
UHE Voltage Measurement
Measurement range 0.1 – 600.0V
Ground Tester Models 6422/6424 33

3.2.2 Resistance Measurement (2P)
range
uncertainty
voltage
range
Intrinsic
uncertainty
frequency
±10V
PEAK
Measurement
range
Resolution
0.01Ω
0.1Ω
1Ω
10Ω
uncertainty
Measurement
frequency
voltage
Additional reference conditions:
External voltage between H and E terminals = zero.
Resistance of the leads ≤ 0.1Ω.
Measurement
Resolution
Intrinsic
UHE no-load
0.05 - 99.99Ω 80.0 - 999.9Ω 0.800 - 9.999kΩ 8.00 - 50.00kΩ
0.01Ω 0.1Ω 1Ω 10Ω
± (2% R + 10 ct) ± (2% R + 2 ct) ± (2% R + 1 ct) ± (2% R + 1 ct)
±10V
PEAK
The compensation of the leads of the Model 6424 may result in a negative
reading of up to 5Ω.
3.2.3 Ground Resistance Measurement (3P)
Additional reference conditions:
Resistance of the E lead: ≤ 0.1Ω
R
(rod + lead) ≤ 100Ω
H
(rod + lead) ≤ 1kΩ
R
S
Spurious voltages on U
Model 6422 Ground Measurement
Measurement
Resolution
Measurement
and USE ≤ 0.01V
HE
0.50 - 99.99Ω 80.0 - 999.9Ω 0.800 – 2.000kΩ
0.01Ω 0.1Ω 1Ω
± (1% R + 10 ct) ± (1% R + 2 ct) ± (1% R + 1 ct)
128Hz or 256Hz
No-load voltage
Model 6424 Ground Measurement
Intrinsic
No-load
The measurement current is a square signal of not more than 20mA.
34 Ground Tester Models 6422/6424
0.50 - 99.99Ω 80.0 - 999.9Ω 0.800 - 9.999kΩ 8.00 - 50.00kΩ
± (1% R + 10 ct) ± (1% R + 2 ct) ± (1% R + 1 ct) ± (1% R + 1 ct)
128Hz, or 256Hz if the spurious voltage is at 128Hz
±10V
PEAK

RH Ground Electrode Resistance Measurement (Model 6424)
8.00 – 49.99kΩ
1Ω
10Ω
0.01V
0.1V
range
uncertainty
of use
Variation of the measurement
Typical
Maximum
Frequency
DC to 440Hz
-
-3dB
Peak factor
1.4 to 3 (up to 300V)
-
± 1% R
Measurement range
Resolution
Intrinsic uncertainty
Voltage Measurement (Model 6424)
U
SE
Measurement range
Resolution
Intrinsic uncertainty
The instrument is protected up to 600V between any two of the three input
terminals.
0.050 – 9.999kΩ
± (10% R + 1 ct) ± (10% R + 1 ct)
0.10 - 99.99V
± (2% R + 2 ct) ± (2% R + 2 ct)
80.0 - 600.0V
AC/DC
AC/DC
3.2.4 Current Measurement (Model 6424)
Additional reference condition:
Peak factor = √2
Measurement
0.5 - 999.9mA 0.800 - 9.999A 8.00 - 60.00A
Resolution
Intrinsic
0.1mA 1mA 10mA
± (1% R + 4 ct) ± (1% R + 2 ct) ± (1% R + 2 ct)
3.3 Influences
3.3.1 Voltage Measurement (Model 6424)
Quantities of influence
Temperature
Relative humidity 10 to 90% RH - ± 2% R
DC and 50/60Hz
common mode rejection
Limits of the range
14 to + 122 °F
(-10 to + 50 °C)
0 to 600VAC 65dB 50dB
± 0.2% R ± (0.5% R + 1 ct)
Ground Tester Models 6422/6424 35

3.3.2 Resistance Measurement (2P)
influence
of use
Variation of the measurement
Typical
Maximum
Relative humidity
10 to 90% RH
± 1% R
± 2% R
posed on
influence
of use
Variation of the measurement
Typical
Maximum
Relative humidity
10 to 90% RH
-
± 2% R
Rod resistance
RS
Quantities of
Temperature
Supply voltage
50/60Hz voltage
superim
the test voltage
Limits of the range
14 to + 122 °F
(-10 to + 50 °C)
Model 6422: 6.0 to 9.6V
Model 6424: 6.0 to 7.6V
0 to 3V
3 to 25V
3.3.3 Ground Measurement (3P)
Quantities of
Temperature
Supply voltage
Voltage in series
between S and
E, 50/60Hz
Limits of the range
14 to + 122 °F
(-10 to + 50 °C)
Model 6422: 6.0 to 9.6V
Model 6424: 6.0 to 7.6V
0 to 3V ± (0.5% R + 0.2Ω) ± (1% R + 1Ω)
3 to 25V ± (2% R + 8Ω) ± (4% R + 20Ω)
± (25 ppm R +
10mΩ/°C)
- ± (2% R + 1Ω)
± (0.5% R + 0.5Ω)
± (2% R + 5Ω)
± 1% R ± 2% R
- ± (2% R + 1Ω)
± (200 ppm R +
2 mΩ/°C)
± (2% R + 1Ω)
± (4% R + 10Ω)
Voltage in series
between H and
E, 50/60Hz
Rod resistance
R
H
36 Ground Tester Models 6422/6424
0 to 3V ± (0.5% R + 0.2Ω) ± (1% R + 1Ω)
3 to 25V ± (20% R + 10Ω) ± (30% R + 20Ω)
0 to 50 kΩ - ± (2% R + 1Ω)
< 100 x R
R
H
and RH < 50kΩ
E
± (2% R + 2 ct) ± (10% R + 5 ct)

3.3.4 Current Measurement (Model 6424)
influence
of use
Variation of the measurement
Typical
Maximum
Relative humidity
10 to 90% RH
± 0% R
± 1% R
Quantities of
Temperature
Limits of the range
14 to + 122 °F
(-10 to + 50 °C)
± 250 ppm R ± 500 ppm R
Frequency DC to 440Hz - -3dB
Peak factor 1.4 to 3 (up to 30A) ± 0% R ± 1%
3.4 Uncertainty
The instruments comply with standard IEC-61557 part 5, which requires that the
operating uncertainty (B) be less than 30%.
In ground measurement:
= ±||+ .
+
+
+
+
with
A = intrinsic uncertainty
E1 = influence of the reference position ± 90°
E
= influence of the supply voltage within the limits indicated by the
2
manufacturer
E3 = influence of the temperature between 32 and 95°F (0 and 35°C)
E
= influence of the interference voltage in series mode (3V at 16.6; 50; 60
4
and 400Hz)
E5 = influence of the resistance of the rods from 0 to 100 x RA but ≤ 50kΩ
E
= influence of the network frequency from 99 to 101% of the nominal
7
frequency
E
= influence of the network voltage from 85 to 110% of the nominal voltage
8
The uncertainty of operation of the instrument is ≤ 15% + 1Ω
+
+
Ground Tester Models 6422/6424 37

3.5 Environmental Conditions
Voltage /
Current
> 2500 measurements from 5s to
100Ω
> 2000 measurements from 5s to
100Ω
Ground test
(3P)
> 2000 measurements from
100Ω
Instrument off
> 1 year
> 1 year
1 = Reference range, 70 to 77°F (21 to 25°C)
2 = Operating range, 14 to 122°F (-10 to +50°C)
3 = Storage range (without batteries), -40 to +158°F (-40 to +70°C)
Range for recharging of the rechargeable batteries; 32 to 104°F (0 to 40°C)
Indoor and outdoor use
Altitude < 6500’ (2,000m)
Pollution degree 2
3.6 Power Supply
Model 6422: 6 LR6 or AA disposable batteries.
Model 6424: 6 NiMH type AA rechargeable batteries. The charging time is
approximately 6 hours.
During charging, the instrument cannot make measurements. All front
panel buttons are disabled.
Typical time between battery charges
Function
Resistance
Model 6422
(disposable batteries
> 80h > 50h
> 1500 measurements from 100Ω
Model 6424
(rechargeable batteries)
38 Ground Tester Models 6422/6424

3.7 Mechanical Specifications
Dimensions (L x D x H): 8.78 x 4.96 x 2.75” (223 x 126 x 70mm)
Weight:
Protection class:
Free fall test:
approximately 2.2 lb (1kg)
IP 65 per IEC 60 529 IK 04
per IEC 50102
1 meter per IEC 61010-1
3.8 International Standards
The instrument:
Conforms with IEC 61010-2-030, 600V CAT IV, pollution degree 2.
Assigned characteristics: measurement CAT IV, 600 V with respect to
earth.
Complies with IEC 61557 parts 1 and 5.
Is protected by reinforced insulation.
3.9 Electromagnetic Compatibility (CEM)
The instrument conforms with standard IEC 61326-1.
Ground Tester Models 6422/6424 39

4. MAINTENANCE
Except for the batteries, the instrument contains no parts that can
be replaced by personnel who have not been specially trained and
accredited. Any unauthorized repair or replacement of a part by
an “equivalent” may severely impair safety.
4.1 Cleaning
Disconnect the instrument from all leads, probes, etc. and turn it OFF.
Use a soft cloth, dampened with soapy water. Rinse with a damp cloth and dry
rapidly with a dry cloth or forced air. Do not use alcohol, solvents, or
hydrocarbons.
4.2 Battery Replacement
1. Disconnect the instrument from all leads, probes, etc. and turn it OFF.
2. Open the battery compartment as instructed in §1.1.
3. Remove the old batteries.
4. Insert new batteries as instructed in §1.1.
Spent batteries must not be treated as ordinary household waste.
Take them to the appropriate recycling collection facility.
40 Ground Tester Models 6422/6424

REPAIR AND CALIBRATION
To ensure that your instrument meets factory specifications, we recommend that
it be sent back to our factory Service Center at one-year intervals for
recalibration, or as required by other standards or internal procedures.
For instrument repair and calibration:
You must contact our Service Center for a Customer Service Authorization
Number (CSA#). This will ensure that when your instrument arrives, it will be
tracked and processed promptly. Please write the CSA# on the outside of the
shipping container. If the instrument is returned for calibration, we need to know if
you want a standard calibration; or a calibration traceable to N.I.S.T. (includes
calibration certificate plus recorded calibration data).
Ship To: Chauvin Arnoux
15 Faraday Drive
Dover, NH 03820 USA
Phone: (800) 945-2362 (Ext. 360)
(603) 749-6434 (Ext. 360)
Fax: (603) 742-2346 or (603) 749-6309
E-mail: repair@aemc.com
(Or contact your authorized distributor)
Cost for repair, standard calibration, and calibration traceable to N.I.S.T. are
available.
NOTE: You must obtain a CSA# before returning any instrument.
®
, Inc. d.b.a. AEMC® Instruments
TECHNICAL AND SALES ASSISTANCE
If you are experiencing any technical problems, or require any assistance with
the proper operation or application of your instrument, please call, mail, fax or email our technical support team:
Chauvin Arnoux
Phone: (800) 343-1391
(508) 698-2115
Fax: (508) 698-2118
E-mail: techsupport@aemc.com
www.aemc.com
NOTE: Do not ship instruments to our Foxborough, MA address.
®
, Inc. d.b.a. AEMC® Instruments
Ground Tester Models 6422/6424 41

LIMITED WARRANTY
The instrument is warranted to the owner for a period of two years from the date
of original purchase against defects in manufacture. This limited warranty is
given by AEMC
purchased. This warranty is void if the instrument has been tampered with or
abused, or if the defect is related to service not performed by AEMC
Instruments. The warranty does not apply in the following cases:
Inappropriate use of the equipment or use with incompatible equipment.
Modifications made to the equipment without the explicit permission of the
manufacturer’s technical staff.
Work done on the device by a person not approved by the manufacturer.
Adaptation to a particular application not anticipated in the definition of the
equipment or not indicated in this user’s manual.
Damage caused by shocks, falls, or floods.
Full warranty coverage and product registration is available on our website at
www.aemc.com/warranty.html
Information for your records.
What AEMC® Instruments will do: If a malfunction occurs within the warranty
period, you may return the instrument to us for repair, provided we have your
warranty registration information on file or a proof of purchase. AEMC
Instruments will, at its option, repair or replace the faulty material.
®
Instruments, not by the distributor from whom it was
. Please print the online Warranty Coverage
REGISTER ONLINE AT:
www.aemc.com
®
®
Warranty Repairs
What you must do to return an Instrument for Warranty Repair:
First, request a Customer Service Authorization Number (CSA#) by phone or by
fax from our Service Department (see address below), then return the
instrument along with the signed CSA Form. Please write the CSA# on the
outside of the shipping container. Return the instrument, postage or shipment
pre-paid to:
Chauvin Arnoux
15 Faraday Drive • Dover, NH 03820 USA
Phone: (800) 945-2362 (Ext. 360)
(603) 749-6434 (Ext. 360)
Fax: (603) 742-2346 or (603) 749-6309
E-mail: repair@aemc.com
Caution: To protect yourself against in-transit loss, we recommend you insure
your returned material.
NOTE: You must obtain a CSA# before returning any instrument.
®
, Inc. d.b.a. AEMC® Instruments
42 Ground Tester Models 6422/6424

Ground Tester Models 6422/6424 43

03/20
99-MAN 100517 v1
Chauvin Arnoux®, Inc. d.b.a. AEMC® Instruments
15 Faraday Drive • Dover, NH 03820 USA
Phone: (603) 749-6434 • Fax: (603) 742-2346
www.aemc.com
 Loading...