

Page 1
SCOgb.book Seite 1 Freitag, 28. Mai 1999 2:04 14
SCO 10.
Instruction book . . . . . . . . . . . . .4
g
Mode demploi . . . . . . . . . . . . . .9
f
Brugsanvisning. . . . . . . . . . . . .14
k
PAGE
Bruksanvisning . . . . . . . . . . . . 19
s
Bruksanvisning . . . . . . . . . . . . 24
n
Käyttöohje . . . . . . . . . . . . . . . . 29
q
Page 2

L
K
H
1
A
C
J
G
B
D
M
F
E
SCOgb.book Seite 2 Freitag, 28. Mai 1999 2:04 14
A
D
B
C
E
F
2
2
Page 3

SCOgb.book Seite 3 Freitag, 28. Mai 1999 2:04 14
10
4
5
1
2
3
4
87
11
3
6
9
12
3
Page 4

SCOgb.book Seite 4 Freitag, 28. Mai 1999 2:04 14
g
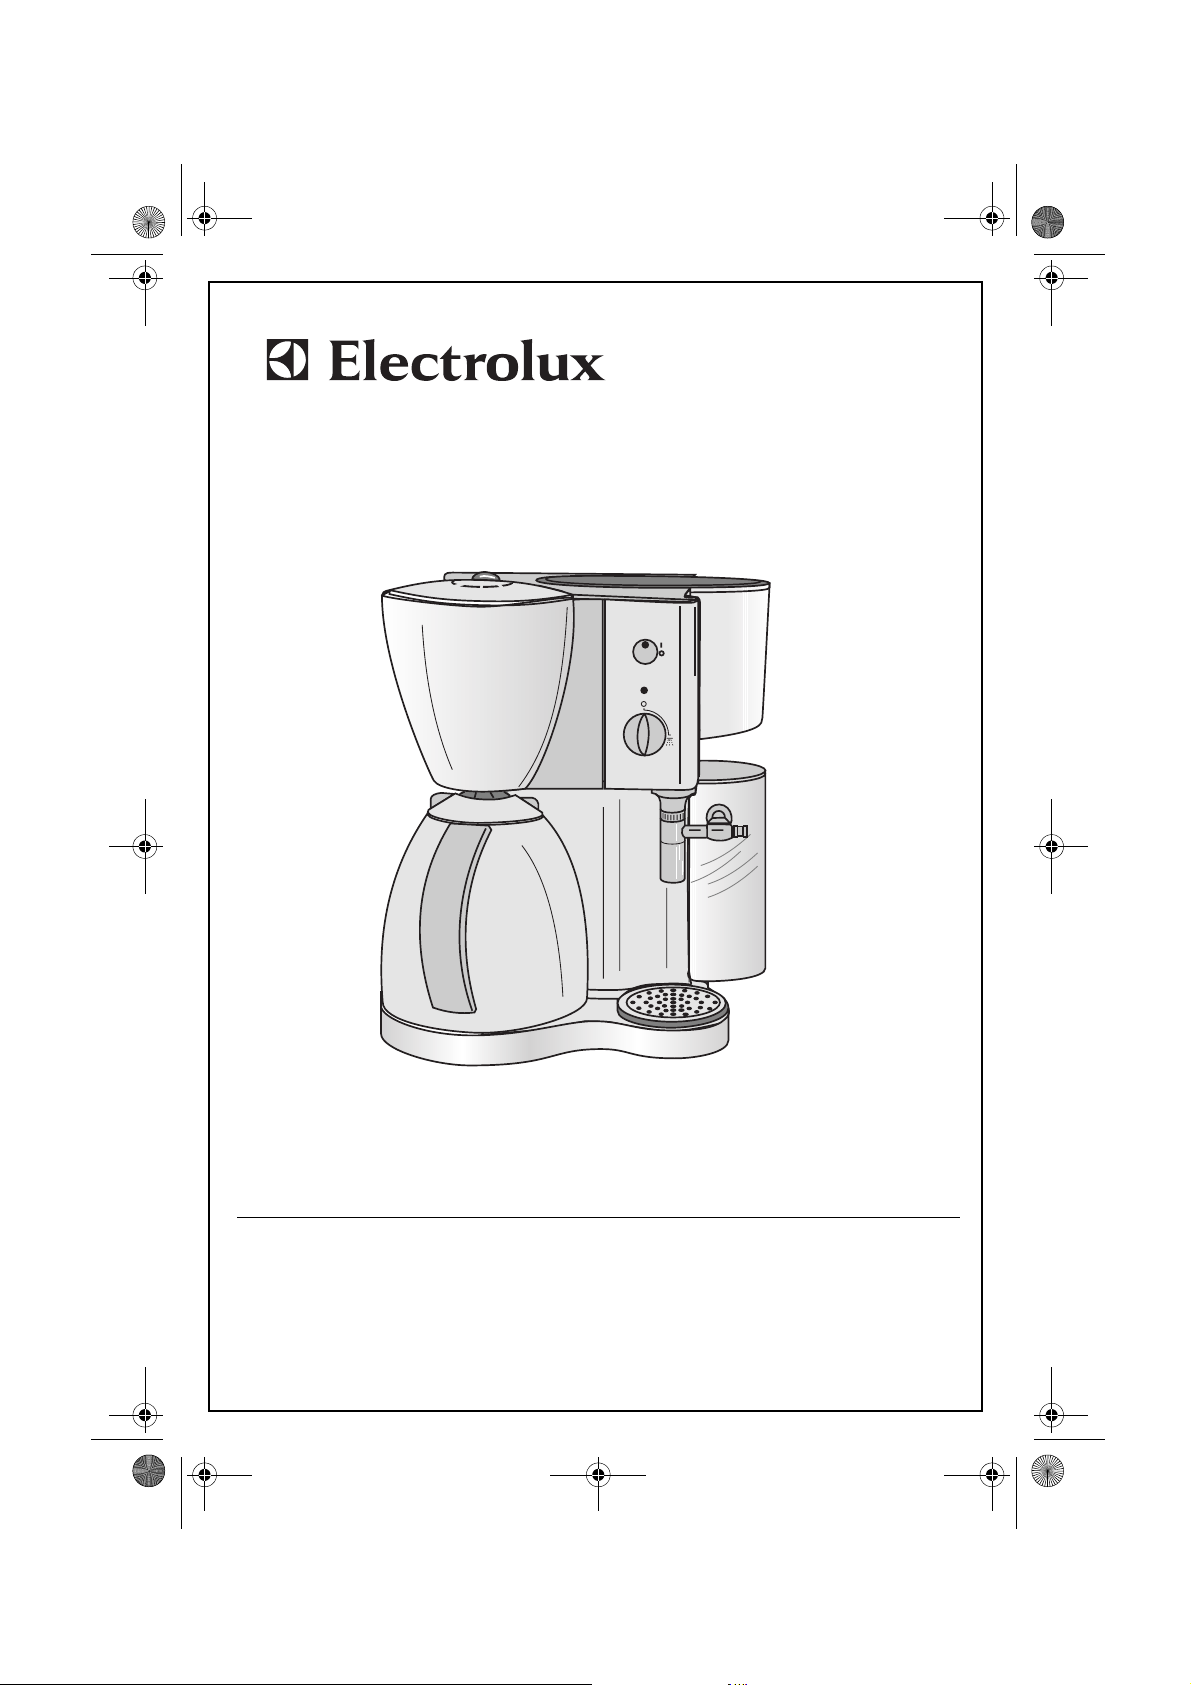
Congratulations ...
g
... on the purchase of your new coffee
machine. You have bought a modern
and reliable appliance which you will
certainly often enjoy using to make
fresh and aromatic coffee. As with
every technical appliance, there are
some fundamental aspects of this coffee machine which must be noted and
observed. Please read the operating
instructions very carefully and keep
them in a safe place. Above all, please
pay attention to the safety instructions.
Features
Figure 1
Water tank lid
A
On/off switch with operating lamp
B
Water tank with cup markings
C
Steam selector
D
Steam nozzle
E
Receptacle with lid and feed pipe
F
Drip grid with drip tray
G
Nameplate (on base of appliance)
H
Plate
J
Thermos jug with lid
K
Swing filter
L
Button for opening the swing filter
M
Frothed milk spout
Figure 2
Knob for regulating the froth
A
Suction piece
B
Milk discharge outlet
C
Connector
D
Flexible hose
E
Descaling hose
F
1
Safety instructions
Operating voltage and mains voltage
must be the same! (See nameplate on
the base of the coffee machine).
Never bring the mains cord into con-
tact with hot parts!
Never remove the plug from the socket
by pulling on the mains cord!
Do not use the appliance if:
the mains cord is damaged
the casing shows clear signs of dam-
age.
The milk discharge outlet gets hot
when being used. Keep children away!
Do not pour in water when the appli-
ance is hot! Switch off the coffee
machine and let it cool down for about
5 minutes!
Observe the descaling instructions!
Before servicing or cleaning the appli-
ance, ensure that it is switched off and
that the mains cord has been
unplugged!
Do not immerse the appliance in water!
If it is necessary to repair the coffee
machine or to replace the mains cord,
send the appliance either to the spe-
cialist dealer you bought it from (spe-
cial tools must be used for repairs), or
to one of the Electrolux customer serv-
ice centres. Electrical appliances may
only be repaired by trained technicians.
Improper repairs can put the appliance
user in considerable danger. No liability
can be assumed for possible damage if
the appliance is used for the wrong
purpose or if it is operated incorrectly.
4
Page 5

SCOgb.book Seite 5 Freitag, 28. Mai 1999 2:04 14
g
This appliance complies with the fol-
;
lowing EU guidelines:
73/23/EWG from 19.02.1973 "Low
voltage guideline", including the
amendment guideline 93/68/EWG
89/336/EWG from 03.05.1989 "EMC
Guideline", including the amendment
guideline 92/31/EWG
Cord compartment (Figure 3)
Your coffee machine has a cord compartment. If the mains cord to the plug
socket is too long, surplus cable can be
stored in the base of the housing.
Before first-time use
Before you make coffee for the first
3
time, you should carry out the brewing
procedure once or twice using just the
maximum quantity of water in order to
clean the coffee machine.
Fill the fresh water tank with cold
water up to the upper level marking.
Without using ground coffee or filter
paper, switch the appliance on and let
the water run through into the thermos jug. Pour away the water after it
has run through.
Making coffee
1. Fill with water (Figure 4)
Lift up the lid above the water tank.
Remove the water tank and fill it with
clear, cold tap water.
Never use hot water. Please never fill
1
the water tank with milk, ready-made
coffee, tea, etc.
The cup markings are on the water
tank (Figure 1/C). The markings refer to
the quantity of fresh water. The resulting amount of coffee will be less,
because the ground coffee soaks up
water.
Replace the water tank and close the
lid.
Tip: To pre-warm the thermos jug,
3
rinse it out with hot water before
making coffee.
2. Insert filter paper (Figure 5)
Press the button to open the swing fil-
ter (Figure 1/M). The filter automati-
cally swings out to the right (Figure 5).
Insert a Size 4 paper filter into the fil-
ter holder. Please fold the perforated
sides first.
3. Fill with ground coffee
(Figure 6)
Please use "medium grade" ground
coffee. The amount of ground coffee
to be used is a matter of taste. One
measuring spoonful (approx. 6-7g) is
sufficient for medium-strong coffee.
Swing back the filter
Ensure that the filter insert is sitting
properly (Figure 9).
until it clicks in
4. Place the thermos jug with lid
on the plate
Place the thermos jug
screwed-on (clockwise) on the plate.
The lid
the thermos jug because it activates
the anti-drip valve (Figure 7). Although
the lid is closed, coffee enters the ther-
mos jug through the so-called chicane
lock. It remains hot enough to drink for
a lengthy period of time.
always be screwed onto
must
with
5. Switch on the appliance
(Figure 8)
Now switch on the appliance using the
on/off switch (Figure 8/2). The operat-
ing lamp (Figure 8/1) lights up.
To ensure that the coffee is uniformly
3
strong, you should stir it in the jug
after it has been made.
6. Remove the thermos jug
When the thermos jug has been
removed, the anti-drip valve (Figure 7)
prevents surplus water from dripping
onto the plate. Therefore make sure
that the filter insert (Figure 9) is sitting
properly.
.
the lid
5
Page 6

SCOgb.book Seite 6 Freitag, 28. Mai 1999 2:04 14
g
To pour out the coffee, open the lid of
the thermos jug by unscrewing it in an
anti-clockwise direction until it audibly
clicks (or until the marker is over the
spout). After pouring, close the lid by
turning it in a clockwise direction until
it is tight in order to keep the rest of
the coffee warm.
When the water has completely run
through and you want to add water for
more coffee, you should switch off the
appliance and let it cool down for
about 5 minutes.
To froth or heat up milk
You can make cappuccino, café au lait
and cocoa, or even just heat up milk
(for example, as a drink with honey
against colds) using the frothed milk
spout (Figure 2/A, B, C, D).
Close the frothed milk spout as follows
(Figure 10):
Insert the knob for regulating the froth
0
(Figure 2/A) into the suction piece (Figure 2/B) and press it on
Push the suction piece into the con-
0
nector (Figure 2/D), place the milk discharge outlet (Figure 2/C) onto the
connector.
Firmly
0
0
0
3
0
0
0
attach the complete frothed
milk spout to the steam nozzle
(Figure 1/E) until the red seal of the
steam nozzle is no longer visible.
Leave the appliance switched on after
the coffee has been made.
Wait until the temperature indicator
(Figure 8/3) lights up, showing that the
steam temperature has been reached.
Caution:
perature indicator (Figure 8/3) sometimes goes off. The required steam
temperature is reached within a short
time by turning the steam selector to
the right.
Fill the receptacle (Figure 1/F), for
instance with cold milk.
Close the lid of the receptacle.
Connect the receptacle to the frothing
nozzle (Figure 11).
During operation the tem-
6
firmly
You can also suck up the milk directly
3
out of the packaging using the flexible
hose (Figure 2/E).
Important:
allowed to exceed the height of the
frothing nozzle. The flexible hose must
be inserted down into the packaging.
Connect the hose to the frothing nozzle and insert the other end into the
packaging (Figure 12).
Place an empty cup underneath the
0
frothing nozzle (Figure 12).
Turn the steam selector to the right
(Figure 8/4). This sucks the milk out of
the container. It is then mixed with
steam in the frothed milk spout, and at
the same time heated and frothed up.
The frothed-up milk flows through the
milk discharge outlet into the cup.
Important:
(more or less froth) according to taste
using the knob for regulating the froth
(Figure 2/A). To do this, turn the knob
slowly to the left or the right until you
.
achieve the desired result.
After making the frothed milk turn the
0
steam selector to the 0 position.
You can froth up as much milk as often
0
as you like provided that there is
enough excess water in the water tank.
If necessary, simply add more water.
Caution
0
water tank above the upwards pointing
valve, because otherwise the water
flows into the coffee brewing system.
Test what tastes better or what you
3
prefer: first coffee, then adding
frothed milk, or first frothed milk and
then filling up with coffee.
The packaging must not be
You can set the air mixture
: For frothing, do not fill the
Making cocoa
You can make cocoa by adding cocoa
powder to some milk in the receptacle
and lightly stirring it. Proceed as if
frothing milk. The cocoa is heated up
by the hot steam in the frothing
nozzle. The cocoa can also be frothed
up if desired (see section "Froth or heat
up milk").
Page 7

SCOgb.book Seite 7 Freitag, 28. Mai 1999 2:04 14
g
To heat water
Fill the receptacle with water.
0
Connect the receptacle to the frothing
0
nozzle.
Proceed as if frothing milk.
0
Switch off the appliance using the on/
0
off switch.
Descaling - so you can use your
coffee machine for longer
The service life of your coffee machine
can be lengthened with regular descaling. We recommend descaling the
appliance every three months.
If you use a permanent filter, remove it
1
from the swing filter before descaling.
For descaling use a liquid, environmen-
tally-friendly descaling agent available everywhere at retail outlets. Only
use it in accordance with the manufacturer's instructions. Do not use a formic acid-based descaler.
Descaling the coffee machine
Fill the water tank with water and then
add the descaling agent - and
other way round! Swing the swing filter back into the appliance, place the
thermos jug with lid onto the plate
(Figure 1/J). (Please note that the lid
serves to open the anti-drip valve, and
is required to ensure that the water
flows through correctly). Allow the
descaling solution to take effect for
about 15 minutes, then switch on the
appliance and allow the descaling
solution to run through. If necessary
repeat the descaling procedure.
Then repeat the run-through process at
least twice using clear water. Rinse the
thermos jug, lid and swing filter thoroughly under running water. Repeatedly press the anti-drip valve while
rinsing.
not
the
Descaling the steam system
Remove the steam nozzle by turning it
an anti-clockwise direction. Screw on
the descaling hose (Figure 2/F) and
place a cup underneath. Switch on the
steam selector several times for one
minute. Switch off the appliance. If
necessary repeat the descaling procedure. Rinse out the water tank with
clear water to remove any possible
traces of descaling solution.
By switching on the steam switch,
allow clear water to flow through the
steam system again to clean it. Remove
the descaling hose and replace the
steam nozzle.
Cleaning
Caution:
into contact with milk (frothing nozzle,
receptacle including lid and feed pipe,
steam nozzle, flexible hose, drip tray
and drip grid) in normal washing-up
water immediately after use! Dry the
parts. Do
washer as this could damage the seals.
The inner filter can be removed for
cleaning. Swing it out to the right as
far as it will go. The inner filter can
then be removed (Figure 9). You should
repeatedly press the anti-drip valve
during cleaning, especially to remove
all particles of coffee. Wipe the appliance with a damp cloth, but
immerse it under water
thermos jug and lid with hot water,
using a brush if necessary, and dry it
with a cloth. Do not clean it in a dishwasher.
Clean all parts which come
not
clean them in a dish-
never
! Wash out the
7
Page 8

SCOgb.book Seite 8 Freitag, 28. Mai 1999 2:04 14
g
What to do if...
only steam but no frothed milk is pro-
duced?
Attach the receptacle or flexible
hose correctly.
Put the milk froth spout together
correctly and firmly.
Press the knob firmly onto the suc-
tion piece and check the position of
the knob (lengthways: maximum
amount of froth).
Too little or no milk in the recepta-
cle.
The flexible hose in the packaging
does not reach far enough into the
milk.
Clean the steam nozzle.
the volume of milk froth is too low or
frothing takes too long?
Clean the milk froth spout.
Clean the steam nozzle.
Descale the appliance
no steam is produced?
Refill the water tank.
Insert the water tank correctly.
Please ask your local authorities about
the location of the responsible recycling centre in your vicinity.
After making coffee the paper filter
and ground coffee are perfectly suitable for composting.
Customer Service
Our products are subject to the highest
quality demands.
However, should you have any questions regarding the use of this appliance, please write to us. Only with your
support are we able to develop appliances which satisfy your requirements.
Spare parts / accessories
Thermos jug
If the glass flask in the thermos jug
breaks, you can purchase a new thermos jug without lid from the Electrolux
Customer Service by quoting the PNC
no. 663 910 490.
2
For the environment's sake
Do not simply throw away the packaging.
The packaging carton can be given
to the waste paper collection or the
appropriate waste disposal centre.
Take plastic bags made of polyethyl-
ene (PE) to PE collection centres for
recycling.
Padding made of foam polystyrene is
CFC-free.
8
Page 9

SCOgb.book Seite 1 Freitag, 28. Mai 1999 2:04 14
822 949 063 - 0599
 Loading...