

Page 1

Fridge-Freezer
Kullanma Kýlavuzu
User manual
Buzdolabý
SANTO C 7 18 40-6i
Page 2
2
Dear Customer
Thank you for choosing one of our high-quality products.
With this appliance you will experience the perfect combination of func-
tional design and cutting edge technology.
Convince yourself that our appliances are engineered to deliver the best
performance and control - indeed we are setting the highest standards of
excellence.
In addition to this you find environmental and energy saving aspects as an
integral part of our products.
To ensure optimal and regular performance of your appliance please read
this instruction manual carefully. It will enable you to navigate all processes
perfectly and most efficiently.
To refer to this manual any time you need to, we recommend you to keep
it in a safe place. And please pass it to any future owner of the appliance.
We wish you much joy with your new appliance.
The following symbols are used in this manual
Important information concerning your personal safety and information on
how to avoid damaging the appliance
General information and tips
Environmental information
Page 3
3
Contents
Safety . . . . . . . . . . . . . . . . . . . . . . . . . . . . . . . . . . . . . . . . . . . . . . . . . .4
Disposal . . . . . . . . . . . . . . . . . . . . . . . . . . . . . . . . . . . . . . . . . . . . . . . .6
Appliance Packaging Information . . . . . . . . . . . . . . . . . . . . . . . . . . . . . . .6
Disposal of old Appliances . . . . . . . . . . . . . . . . . . . . . . . . . . . . . . . . . . . . .6
Remove transport safeguard . . . . . . . . . . . . . . . . . . . . . . . . . . . . . . . .7
Installation . . . . . . . . . . . . . . . . . . . . . . . . . . . . . . . . . . . . . . . . . . . . . .7
Installation Location . . . . . . . . . . . . . . . . . . . . . . . . . . . . . . . . . . . . . . . . . .7
Your appliance needs air . . . . . . . . . . . . . . . . . . . . . . . . . . . . . . . . . . . . . .8
Rehingeing the door . . . . . . . . . . . . . . . . . . . . . . . . . . . . . . . . . . . . . . . . . .8
Housing dimension . . . . . . . . . . . . . . . . . . . . . . . . . . . . . . . . . . . . . . . . . . .9
Instructions for total built-in . . . . . . . . . . . . . . . . . . . . . . . . . . . . . . . . . .9
Electrical Connection . . . . . . . . . . . . . . . . . . . . . . . . . . . . . . . . . . . . .14
Prior to Initial Start–Up . . . . . . . . . . . . . . . . . . . . . . . . . . . . . . . . . .14
Starting up and temperature regulation . . . . . . . . . . . . . . . . . . . . .14
Interior Accessories . . . . . . . . . . . . . . . . . . . . . . . . . . . . . . . . . . . . . .15
Storage shelves . . . . . . . . . . . . . . . . . . . . . . . . . . . . . . . . . . . . . . . . . . . . .15
Variable Inner Door . . . . . . . . . . . . . . . . . . . . . . . . . . . . . . . . . . . . . . . . . .15
Variable Storage Box . . . . . . . . . . . . . . . . . . . . . . . . . . . . . . . . . . . . . . . . .16
Fresh food refrigeration . . . . . . . . . . . . . . . . . . . . . . . . . . . . . . . . . .16
Freezing and storing frozen food . . . . . . . . . . . . . . . . . . . . . . . . . . .17
Preparation of Ice Cubes . . . . . . . . . . . . . . . . . . . . . . . . . . . . . . . . .18
Ice packs . . . . . . . . . . . . . . . . . . . . . . . . . . . . . . . . . . . . . . . . . . . . . . .18
Freezing Calendar . . . . . . . . . . . . . . . . . . . . . . . . . . . . . . . . . . . . . . .18
Defrosting . . . . . . . . . . . . . . . . . . . . . . . . . . . . . . . . . . . . . . . . . . . . .18
Switching off the appliance . . . . . . . . . . . . . . . . . . . . . . . . . . . . . . .19
Cleaning and Care . . . . . . . . . . . . . . . . . . . . . . . . . . . . . . . . . . . . . . .19
Energy Saving Tips . . . . . . . . . . . . . . . . . . . . . . . . . . . . . . . . . . . . . . .21
What to do if . . . . . . . . . . . . . . . . . . . . . . . . . . . . . . . . . . . . . . . . . . .21
Correcting Malfunctions . . . . . . . . . . . . . . . . . . . . . . . . . . . . . . . . . . . . .21
Changing the light bulb . . . . . . . . . . . . . . . . . . . . . . . . . . . . . . . . . .23
Regulations, Standards, Guidelines . . . . . . . . . . . . . . . . . . . . . . . . .23
Page 4

4
Safety
The safety aspects of our refrigerators/freezers comply with accepted technical standards and the German Appliance Safety Law. Nevertheless, we
consider it our obligation to make you aware of the following safety information:
Intended use
• The refrigerator is intended for use in the home. It is suitable for the cooling, freezing and storing of frozen food, as well as for making ice. If the
appliance is used for purposes other than those intended or used incorrectly, no liability can be accepted by the manufacturer for any damage
that may be caused.
• Alterations or changes to the freezer are not permitted for reasons of
safety.
• If you use the refrigerator in a commercial application or forpurposes
other than the cooling, freezing or frozen storage of foods,please observe all valid legal regulations for your application.
Prior to initial start–up
• Check the refrigerator for transport damage. Under no circumstance
should a damaged appliance be plugged in! In the event of damage, please
contact the vendor.
Refrigerant
The refrigerant isobutane (R600a) is contained within the refrigerant circuit
of the appliance, a natural gas with a high level of environmental compatibility, which is nevertheless flammable.
• During transportation and installation of the appliance, be certain that
none of the components of the refrigerant circuit become damaged.
• If the refrigerant circuit should become damaged:
– avoid open flames and sources of ignition;
– thoroughly ventilate the room in which the appliance is situated.
Safety of children
• Packaging (e.g. wraps, polystyrene) can be dangerous for children. There is
a risk of suffocation! Keep packaging material away from children!
• Please make old appliances unusable prior to disposal. Pull out the mains
plug, cut off the mains cable, break or remove spring or boltcatches, if fitted. By doing this you ensure that children cannot lock themselves in the
Page 5

5
fridge when playing (there is risk of suffocation!)or get themselves into
other dangerous situations.
• This appliance is not intended for use by persons (including children) with
reduced physical, sensory or mental capabilities, or lack of experience and
knowledge, unless they have been given supervision or instruction concerning use of the appliance by a person responsible for their safety. Children should be supervised to ensure that they do not play with the
appliance.!
Daily Operation
• Containers with flammable gases or liquids can leak at low temperatures.
There is a risk of an explosion! Do not store any containers with flammable materials such as, for example, spray cans, fire extinguisher refill cartridges etc in the refrigerator/freezer.
• Bottles and cans must not be placed in the freezer compartment. They can
burst when the contents freeze, high carbonate content drinks can even
explode! Never store lemonade, juices, beer, wine, sparkling wine etc. in
the freezer compartment. Exception: high alcohol content spirits can be
stored in the freezer compartment.
• Do not put ice creams or ice cubes in the mouth immediately after removal from the freezer compartment. Very cold ice can freeze to the lips or
tongue and cause injury.
• Do not touch frozen food with wet hands. Your hands could freeze to the
food.
• Do not operate any electrical appliances in the refrigerator/freezer (e.g.
electric ice cream makers, mixers etc.).
• Before cleaning the appliance, always switch off the appliance and unplug
it, or pull the house fuse or switch off the circuit breaker.
• When unplugging always pull the plug from the mains socket, do not pull
on the cable.
In case of malfunction
• If the a malfunction occurs on the appliance, please look first in the "What
to do if ..." section of these instructions. If the information given there
does not help, please do not perform any further repairs yourself.
• Refrigerators/freezers may only be repaired by qualified service engineers.
Improper repairs can give rise to significant hazards. If your appliance
needs repairing, please contact your specialist dealer or our Customer Service.
Page 6
6
Disposal
Appliance Packaging Information
All materials are environmentally sound! They can be dumped or burned at
an incinerating plant without danger!
About the materials: The plastics can be recycled and are identified as follows:
>PE< for polyethylene, e.g. the outer covering and the bags in the interior.
>PS< for polystyrene foam, e.g. the pads, which are all free of chlorofluorocarbon.
The carton parts are made from recycled paper and should be disposed of
at a waste-paper recycling collection location.
Disposal of old Appliances
For environmental reasons, refrigeration appliances must be disposed of
properly. This applies to your old appliance, and - at the end of its service
life - for your new appliance as well.
Warning! Before disposing of old appliances make them inoperable. Remove plug from mains, sever the power cable, remove or destroy any snap or
latch closures. This eliminates the danger that playing children lock themselves into the appliance (danger of suffocation!) or place themselves into
other life-endangering situations.
Disposal:
• The appliance may not be disposed of with domestic waste or bulky refuse.
• The refrigerant circuit, especially the heat exchanger at the back of the
appliance, may not be damaged.
• The symbol on the product or on its packaging indicates that this
product may not be treated as household waste. Instead it shall be handed over to the applicable collection point for the recycling of electrical
and electronic equipment. By ensuring this product is disposed of correctly, you will help prevent potential negative consequences for the
environment and human health, which could otherwise be caused by
inappropriate waste handling of this product. For more detailed information about recycling of this product, please contact your local city
office, your household waste disposal service or the shop where you purchased the product.
Page 7
7
Installation
Installation Location
The appliance should be set up in a well ventilated, dry room.
Energy use is affected by the ambient temperature. The appliance should
therefore
– not be exposed to direct sunlight;
– not be installed next to radiators, cookers or other sources of heat;
– only be installed at a location whose ambient temperature corresponds to
the climate classification, for which the appliance is designed.
The climate classification can be found on the serial plate, which is located
at the left on the inside of the appliance.
The following table shows which ambient temperature is correct for each
climate classification: each climate classification:
Climate classification
for an ambient temperature of
SN +10 bis +32 °C
N +16 bis +32 °C
ST +18 bis +38 °C
T +18 bis +43 °C
If installation next to a source of heat is unavoidable, the following minimum clearances must be maintained at the sides of the appliance:
– for electric cookers 3 cm;
– for oil and coal fired ranges 30 cm.
If these clearances cannot be maintained a heat insulating pad is required
between the cooker and the refrigeration appliance.
If the refrigeration appliance is installed next to another refrigerator or freezer a clearance of 5 cm at the sides is required, in order to prevent the formation of condensation on the outside of the appliance.
Remove transport safeguard
The appliance and the interior fittings are protected for transport.
• Pull off the adhesive tape on the left and right side of the door.
• Remove all adhesive tape and packing pieces from the interior of the
appliance.
Page 8
8
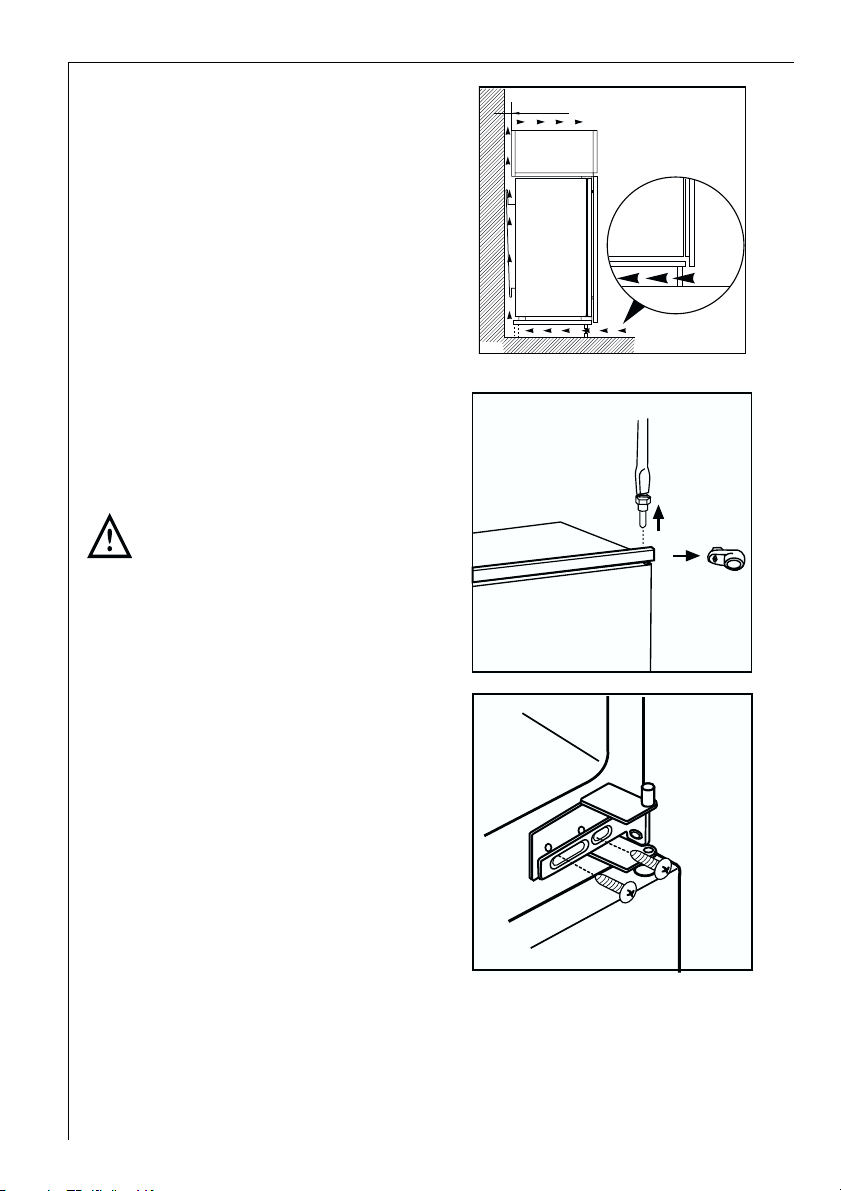
Your appliance needs air
For safety reasons, minimum
ventilationmust be as shown Fig.
Attention: keep ventilation openings clear of obstruction;
Rehingeing the door
The side at which the door opens
can be changed from the right
side (factory adjustment) to the
left side, if the installation site
requires.
Warning! When changing the
side at which the door opens, the
appliance may not be connected
to the mains. Remove plug from
the mains beforehand.
1. Unscrew the upper pin and remove
the spacer.
2. Remove the upper pin and the upper
door.
3. Unscrew the middle hinge und the
covers on the opposite side.
4. Remove the lower door.
5. Unscrew the lower pin and refit it on
the opposite side
6. Refit the lower door.
7. Rescrew the middle hinge und the
covers on the opposite side.
D567
50 mm
min.
200 cm
2
min.
2
200 cm
Page 9
9
Housing dimensions
Height 1780 mm
Depth 550 mm
Width 560 mm
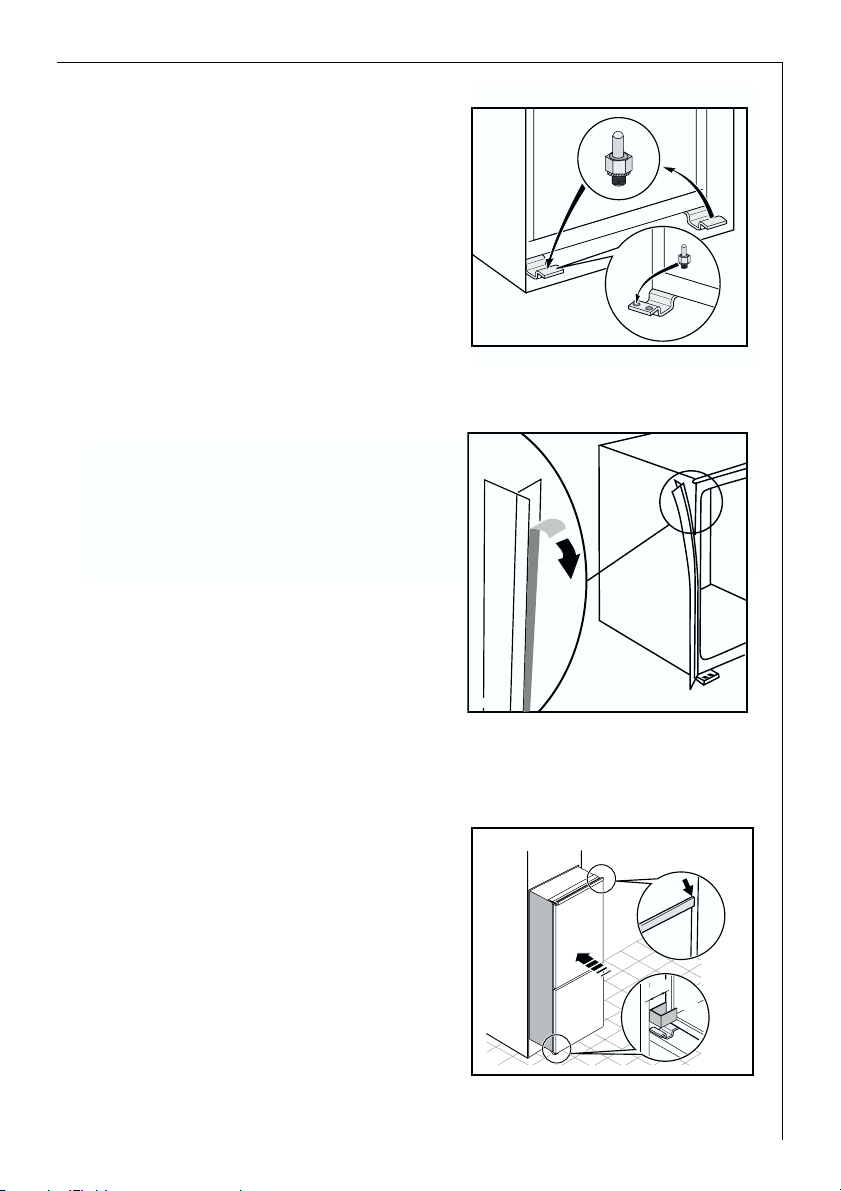
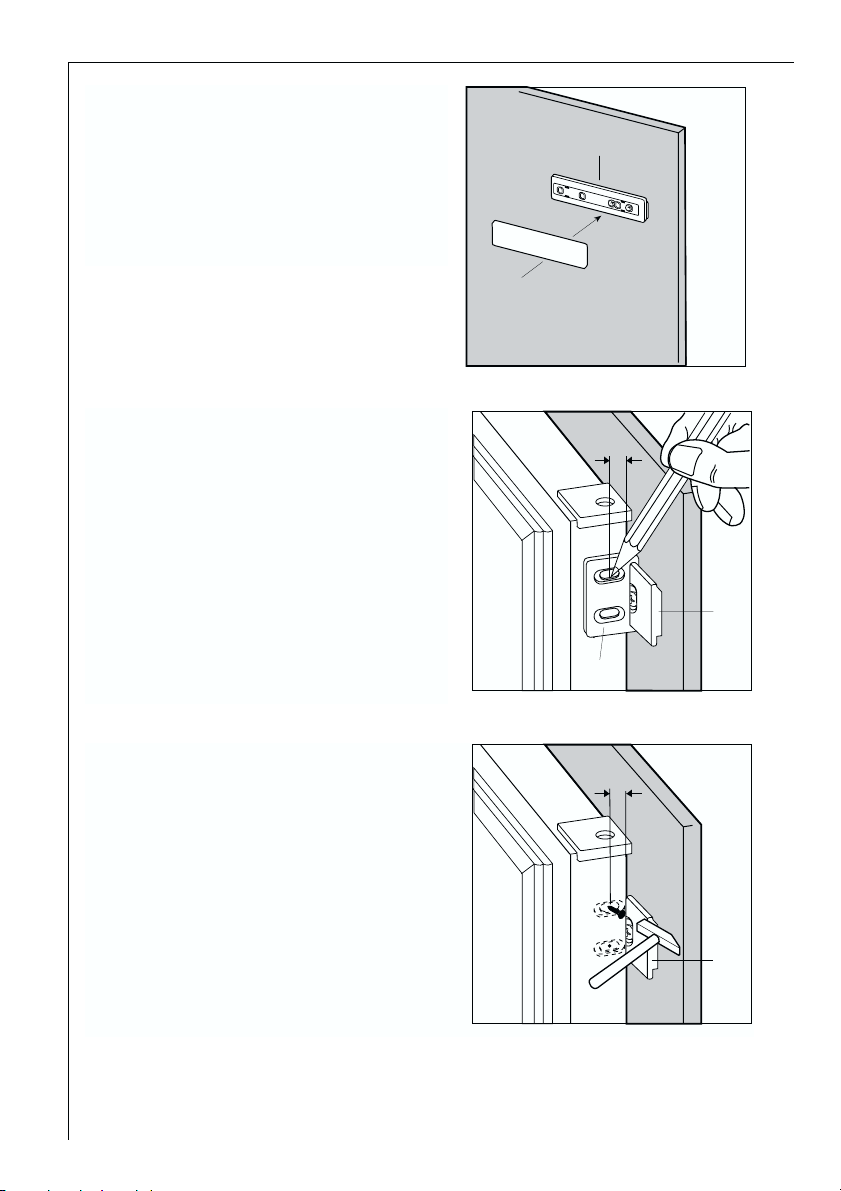
Instructions for total built-in
Apply joint the sealing strip as
shown in figure.
8. Refit the upper door and rescrew the
hinge pin and the spacer on the
opposite side
Make sure that a distance of 44 mm
is maintained in the lower part between the kitchen furniture and the
border of the appliance.
The lower hinge cover inserted in the
accessories bag, is useful to guarantee the exact position of the kitchen
furniture and the appliance.
Also make sure that the appliance
does not clamp the mains cable.
D765
44m
1
m
2
Page 10
10
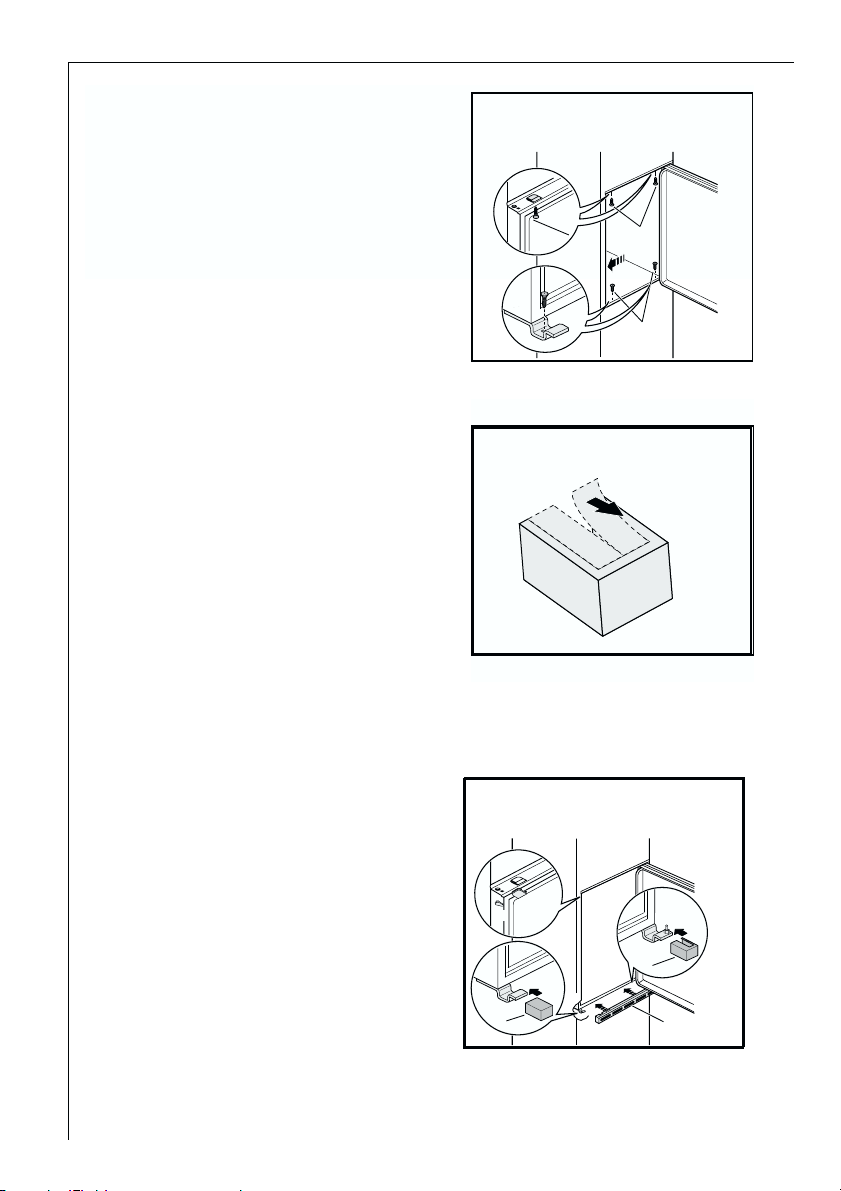
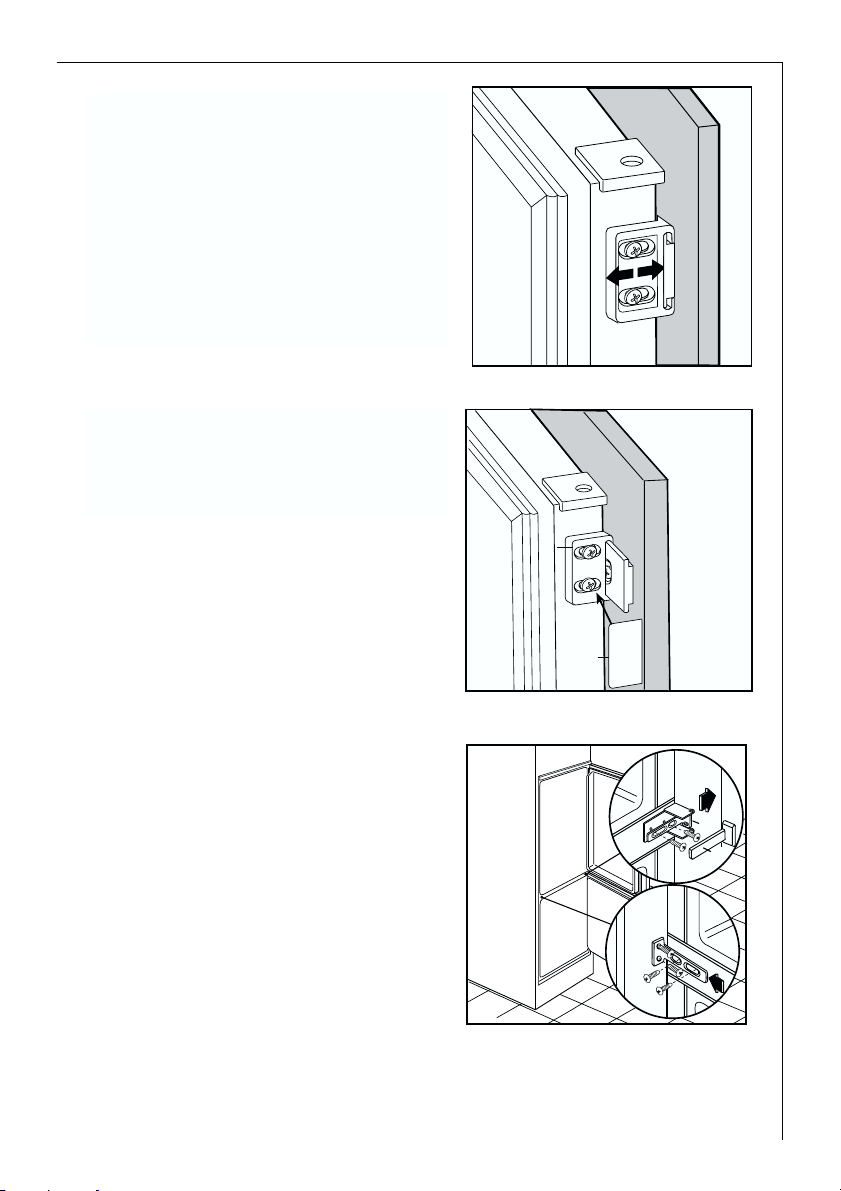
Apply covers (C-D) on joint cover
lugs and into hinge holes.
Snap vent grille (B) and hinge covers
(E) into position.
Fasten the appliance with 4
screws provided in the kit
included with the appliance.
From the plastic cover (E), which is
used to cover the hinge with the
pivot pin, you must take away the
part as indicated in the drawing.
This operation is made easer since
there is, in the internal part of the
cover hinge lid a groove that facilates the removal of this coomponent.
“Remove the part marked with DX, if
the pivot pin is inserted in the right
hinge, SX in opposite case.”
I
I
C
D
E
E
B
Page 11
11
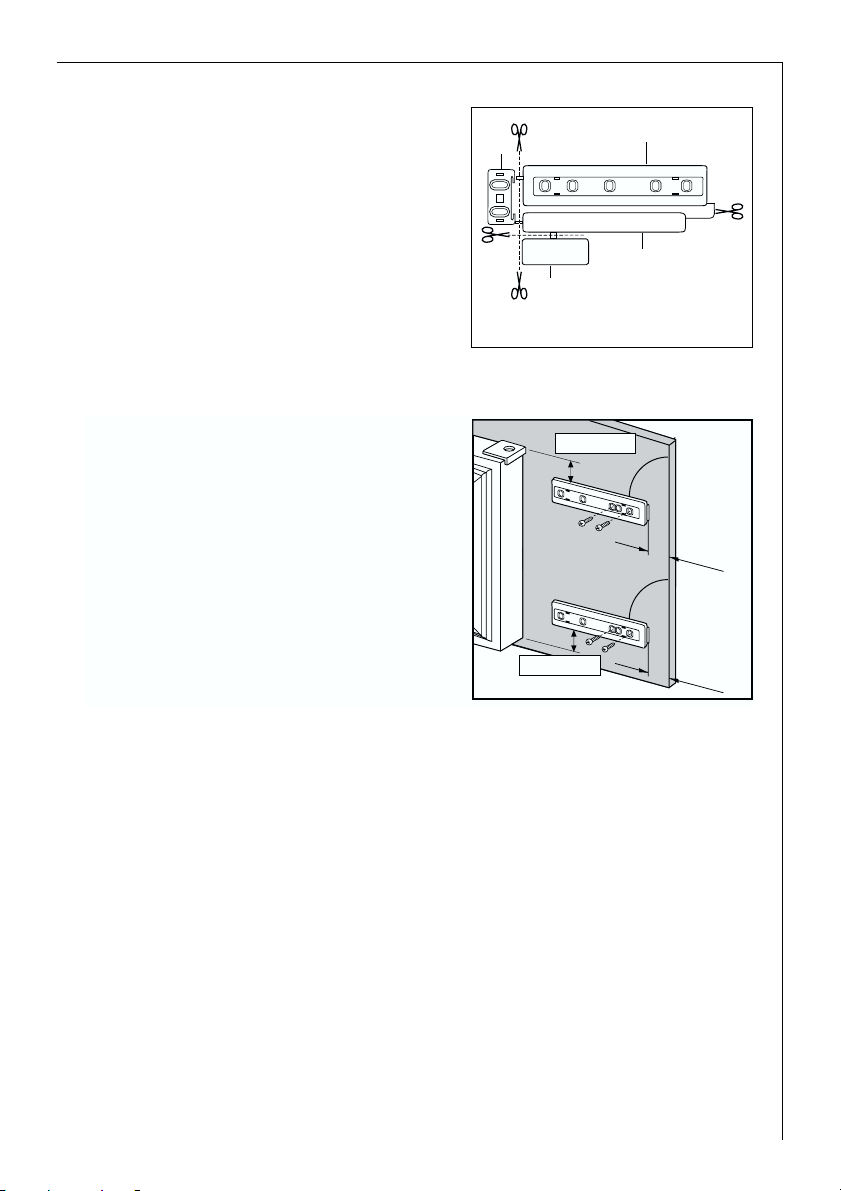
Place guide (Ha) on the inside
part of the furniture door, up
and down as shown in the figure
and mark the position of external holes. After having drilled
holes, fix the guide with the
screws supplied.
Separate parts Ha Hb, Hc, Hd as
shown in the figure.
Hb
PR266
Ha
Hc
Hd
ca. 50 mm
ca. 50 mm
90°
90°
2
1
m
m
2
1
m
m
Page 12
12
Fix cover (Hc) on guide (Ha) until it
clips into place.
Open the appliance door and the furniture door at 90°. Insert the small
square (Hb) into guide (Ha). Put
together the appliance door and the
furniture door and mark the holes as
indicated in the figure.
Remove the brackets and mark a
distance of 8 mm from the outer
edge of the door where the nail
must be fitted (K).
Ha
Hc
PR33
8mm
Ha
PR167
Hb
8mm
K
Ha
Page 13
13
Place the small square on the guide
again and fix it with the screws supplied.
Should the lining up of the furniture
door be necessary, use the clearance
of slots.
At the end of operations, it is necessary to check if the door of the furniture closes properly.
Fix cover (Hd) on guide (Hb) until it
clips into place.
If the appliance is fixed to the side of
the kitchen unit, simply slacken the
screws in the fixing brackets (D),
move the brackets as shown in figure and re-tighten the screws. Fit
cover (E).
PR168
Hb
Hb
Hd
PR167/1
D
E
D734
Page 14
14
Prior to Initial Start–Up
• Please clean the appliance interior and all accessories prior to initial start-
up (see section: “Cleaning and Care”).
Electrical connection
Before initial start-up, refer to the appliance rating plate to ascertain if supply voltage and current values correspond with those of the mains at the
installation location.
e.g.: AC 230 ... 240 V 50 Hz or
230 ... 240 V~ 50 Hz
(i.e. 230 to 240 volts alternating current, 50 Hertz)
The rating plate is inside the appliance on the left.
A correctly installed, earthed socket is required for the electrical supply. The
supply must have a fuse rating of at least 10 Amps.
If the socket is not accessible once the appliance is built in, the electrical
installation must include suitable means of isolating the appliance from the
mains (e.g. fuse, cut-out, current trip or similar with a minimum contact
separation of 3 mm).
Attention: The mains connection cable may only be replaced by a skilled
electrician. Please contact your dealer or our customer service department
for repairs.
Starting up and temperature regulation
• Insert the plug into the plug socket. With the refrigerator compartment
door open, the internal lighting is switched on. The temperature selector
knob is located on the RH side of the refrigerator compartment.
Setting „0“ means: Off.
Setting „1“ means: Hightest temperature, (warmest setting).
Setting „6“ (end-stop) means: Lowest temperature, (coldest setting).
However, the exact setting should be chosen keeping in the mind that the
temperature inside the refrigerator depends on:
-the quantity of food stored
-how often the door is opened
Page 15
15
Interior Accessories
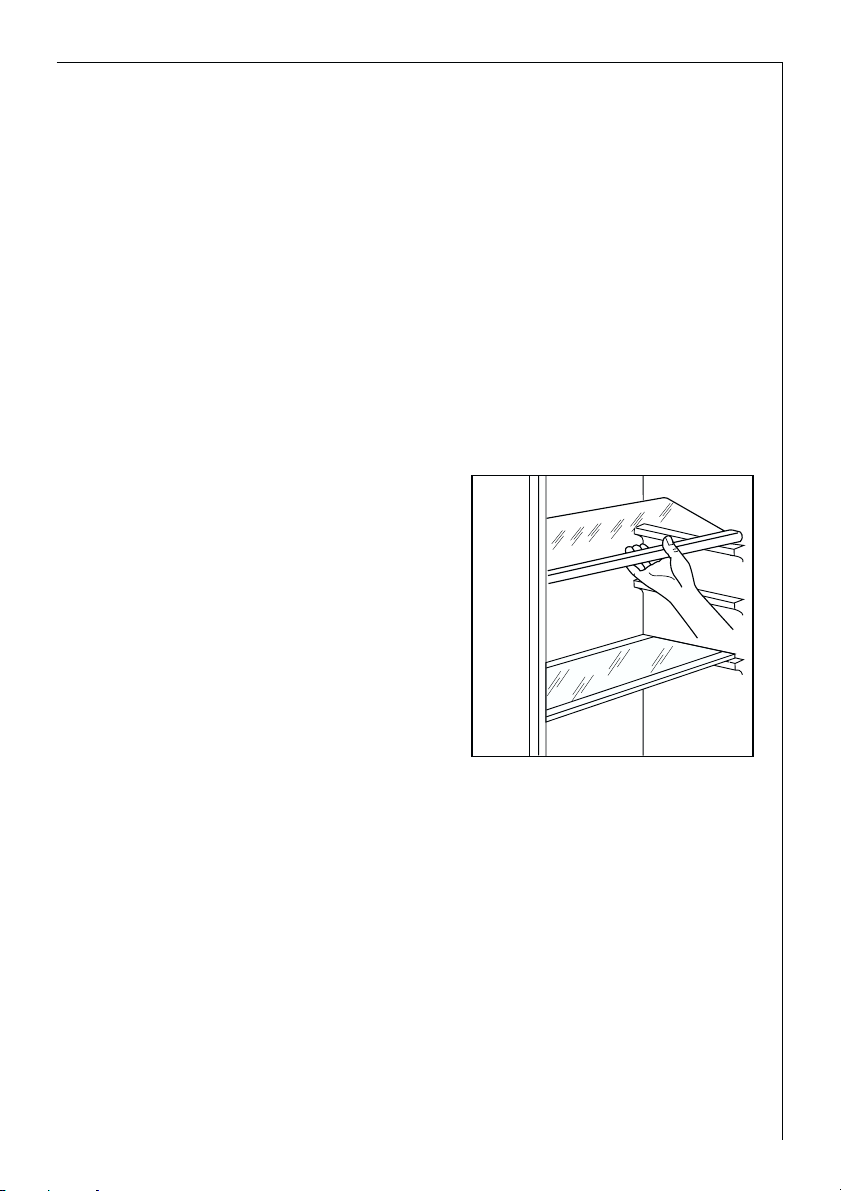
Storage Shelves
The glass shelf above the fruit and
vegetable compartment should
always remain in position, to ensure
fruit and vegetables stay fresh longer.
The remaining storage shelves can be
adjusted to various heights:
Pull the storage shelf forward until it
can be tipped up or down and removed.
To insert at a different height use the same procedure in reverse.
Adjustment for tall goods:
Remove the front half of the two-part vario glass storage shelf and insert it
at a different level. Space is thus gained for storage of tall goods on the
underlying storage shelf.
Variable Inner Door
The door compartments can be pulled up and removed, and inserted at
other positions as needed.
The temperatures in the refrigerator compartment and freezer co partment
cannot be independently regulated.
If you want the freeze fresh food rapidly, select setting „6“, ensuring that
the temperature in the refrigerator compartment does not drop blow 0°C.
You should also promptly reset the temperature regulator to setting „3“ or
„4“.
Important!
High ambient temperatures (e.g. on hot summer days) and a cold setting on
the temperature regulator (position"5" to "6") can cause the compressor to
run continuously.
If this happens, turn the temperature regulator back to a warmer setting
(position "3" to "4"). At this setting the compressor will be switched on and
off as usual and automatic defrosting recommenced.
D338
Page 16

16
Fresh food refrigeration
To obtain the best performance:
• do not store warm food or evaporating liquide in the refrigeator
• do cover or wrap the food, particularly if it has a strong flavour.
• Position food so that air can circuiate freely round it.
Useful hints:
Meat (all types): wrap in polythene bags and place on the glass shelf above
the vegetable drawer(s)For safety, store in this way only one or two days
at the most.
Cooked foods, cold dishes, etc: these should be covered and may be placed
on any shelf.
Fruit and vegetables: these should be thoroughly cleaned and placed in the
special drawer(s) provided.
Butter and cheese: these should be placed in special airtight containers or
wapped in aluminium foil or polythene bags to exclude as much air as possible.
Milk bootles: these should have a cap and should be stored in the bottle
rack on the door.
Bananas, potatoes, onions and garlic, if not packed, must not be kept in
the refrigerator.
Variable Storage Box
Some models are equipped with a
variable storage box which is fitted
under a door shelf compartment and
can be slid sideways.
The box can be inserted under any
door shelf compartment.
1. To change the position of the storage box; lift the shelf compartment
with the box upwards and out of the
holders in the door and remove the
retaining bracket out of the guide
under the shelf compartment.
2. Reverse the above operation to insert
the shelf at a different height.
Page 17

17
Freezing and storing frozen food
You can use your freezer for freezing fresh food yourself.
Important!
• The temperature in the freezer compartment must be –18 °C or colder
before freezing food.
• Please observe the freezing capacity given on the rating plate. The free-
zing capacity is the maximum quantity of fresh food that can be frozen
within a period of 24 hours. If you wish to freeze food several days in a
row, please observe a maximum capacity of only 2/3 to 3/4 of that on the
rating plate. The quality of the food is best preserved when it is frozen
right through to the core as quickly as possible.
• Allow warm food to cool down before freezing. The warmth will cause
increased ice formation and increase the power consumption.
• Please note the maximum storage times specified by the manufacturer.
• Thawed foods which have not been processed further (cooked into meals)
may not under any circumstances be frozen a second time.
• Containers with flammable gases or liquids can leak at low temperatures.
There is a risk of an explosion! Do not store any containers with flammable materials such as, for example, spray cans, fire extinguisher refill cartridges etc in the refrigerator/freezer.
• Bottles and cans must not be placed in the freezer. They can burst when
the contents freeze, high carbonate content drinks can even explode!
Never store lemonade, juices, beer, wine, sparkling wine etc. in the freezer. Exception: high alcohol content spirits can be stored in the freezer.
• All foods must be packed air tight prior to freezing, so that they do not
dry out or lose their flavour, and so that no flavour contamination of
other frozen goods occurs.
Caution! Do not touch frozen food with wet hands. Your hands could freeze to the food.
1. Unfrozen food must not touch items already frozen, otherwise the frozen
food could begin to defrost.
2. To achieve faster freezing of food or to freeze the maximum allowed quantity, turn the thermostat setting to the highest position.
Page 18

18
Preparation of Ice Cubes
1. Fill the ice cube tray 3/4 full with cold water, place it in the freezer compartment and leave to freeze.
2. To loosen the frozen cubes, either bend the ice cube tray or hold it under
running water for a few seconds.
Important! Never try to free an ice tray that is frozen to the freezer compartment using pointed or sharp edged objects.
Freezing Calendar
• The symbols show different types of frozen goods.
• The numbers indicate storage times in months for the appropriate types
of frozen goods. Whether the upper or lower value of the indicated storage time is valid depends on the quality of the foods and pre-treating before freezing. The lower value applies to foods with high fat content.
Defrosting
Refrigerator
Frost is automatically removed from the evaporator of the refrigerator compartment every time the motor compressor stops, during normal use. The
defrost water drains out through a trough into a special container at the back
of the appliance, located over the motor compressor, where it evaporates.
Freezer
The freezer compartment, however, will become progressively covered with
frost. This should be removed with the special plastic scraper provided,
whenever the thickness of the frost exceeds 4 mm. During this operation it
is not necessary to switch off the power supply or to remove the foodstuffs.
However when the ice becomes very thick on the inner liner, complete
defrosting should be carried out as follows:
1. Remove the frozen food from the freezer, wrap it in several layers of newspaper and put it in a very cool place.
Ice packs
There are two ice packs in one drawer of the freezer.
In the event of a power failure or malfunction, the ice pack will lengthen
the amount of time it takes for the frozen food to become too warm by
several hours. The ice pack can only fulfil this task optimally if it is placed in
the uppermost drawer, at the front, above the frozen food. You can use the
ice pack for cooling cold bags.
Page 19

19
Cleaning and Care
For hygienic reasons the appliance interior, including interior accessories,
should be cleaned regularly.
Warning!
• The appliance may not be connected to the mains during cleaning. Dan-
Switching off the appliance
To switch off the appliance, turn the temperature regulator to position "0".
If the appliance is not going to be used for an extended period:
1. Remove all refrigerated and deep-frozen packages as well as ice trays.
2. Switch off the appliance by turning the temperature regulator to position "0".
3. Remove the mains plug or switch off or turn out the circuit breaker or fuse.
4. Defrost freezer compartment and clean thoroughly (see section: “Cleaning
and Care”).
5. Leave the door open to avoid the build up of odours.
2. Switch off the appliance and pull out the plug, or turn the temperature
control knob to “0”.
3. Leave the freezer compartment door open.
4. Insert the plastic scraper into the
recess provided under the defrost
water channel and place a collecting
basin under it.
5. Once defrosting is completed keep
the scraper handy for future use;
6. Turn the thermostat knob to the
required setting or replace the plug
in the power socket.
Warning!
Never use metal tools to scrape off
the frost
Do not use a mechanical device or any artificial means to speed up the
thawing process other than those recommended by the manufacturer.
A temperature rise of the frozen food packs, during defrosting, may shorten their safe storage life.
D068
Page 20

20
ger of electrical shock! Before cleaning switch the appliance offand rem
ve the plug from the mains, or switch off or turn out the circuit breaker
or fuse.
• Never clean the appliance with a steam cleaner. Moisture could accumu-
late in electrical components, danger of electrical shock! Hot vapours can
lead to the damage of plastic parts.
• The appliance must be dry before it is placed back into service.
Attention!
• Ethereal oils and organic solvents can attack plastic parts, e.g.
– lemon juice or the juice from orange peals;
– butyric acid;
– cleansers which contain acetic acid.
Do not allow such substances to come into contact with appliance parts.
• Do not use any abrasive cleansers.
1. Remove frozen food and the food from the refrigerator. Wrap frozen food
in several layers of newspaper. Store it in a cool place, well covered.
2. Defrost the freezer compartment prior to cleaning (see "Defrosting" section).
3. Switch the appliance off and remove the plug from the mains, or switch off
or turn out the circuit breaker or fuse.
4. Clean the appliance and the interior accessories with a cloth and lukewarm
water. Commercially available dish washing detergents may also be used.
5. After cleaning wipe with fresh water and rub dry.
Accumulation of dust at the conden-
ser increases energy consumption.
For this reason carefully clean the
condenser at the back of the
appliance once a year with a soft
brush or a vacuum cleaner.
6. Check the water drain hole on the
rear wall of the fridge. Clear a
blocked drain hole with the aid of
the green peg in the pack of accessories included with the appliance.
7. After everything is dry place appliance back into service.
D037
Page 21

21
Energy Saving Tips
• Do not install the appliance near cookers, radiators or other sources of
warmth. High ambient temperatures cause longer, more frequent operation of the compressor.
• Ensure sufficient air circulation and exhaust at the appliance base and at
the back wall of the appliance. Never cover air vent openings.
• Do not place warm foods into the appliance. Allow warm foods to cool
first.
• Only leave door open as long as necessary.
• Do not set temperature any colder than necessary.
• Keep the heat emitting condenser, the metall grille on the rear wall of
your appliance, always clean.
What to do if ...
Correcting Malfunctions
A malfunction may be caused by only a minor fault that you can rectify
yourself using the following instructions. Do not perform any other work on
the appliance if the following information does not provide assistance in
your specific case.
Warning! Repairs to refrigerators/freezers may only be performed by
qualified service engineers. Improper repairs can give rise to significant
hazards for the user. If your appliance needs repairing, please contact your
specialist dealer or our Customer Service.
Page 22

22
The food is too warm.
Interior lighting does not
work.
The appliance is near a heat
source.
Temperature is not properly
adjusted.
Please look in the "Initial Start
Up" section.
Light bulb is defective.
Please look in the "Changing
the Light Bulb" section.
Turn the temperature regulator to a colder setting temporarily.
Door was open for an extended period.
Please look in the "Installation
location" section.
A large quantity of warm
food was placed in the
appliance within the last 24
hours.
Open the door only as long as
necessary.
Heavy build up of frost, possibly also on the door seal.
Door seal is not air tight (possibly after changing over the
hinges).
Carefully warm the leaking
sections of the door seal with
a hair dryer (not hotter than
approx. 50 °C). At the same
time shape the warmed door
seal by hand such that it sits
correctly.
Malfunction Possible Cause Remedy
Appliance does not work.
Appliance is not switched on Switch on the appliance.
Mains plug is not plugged in
or is loose.
Insert mains plug.
Fuse has blown or is defective.
Check fuse, replace if necessary.
Socket is defective.
Mains malfunctions are to be
corrected by an electrician.
Appliance cools too much. Temperature is set too cold.
Turn the temperature regulator to a warmer setting temporarily..
Unusual noises.
The appliance is touching the
wall or other objects.
Appliance is not level.
A component, e.g. a pipe, on
the rear of the appliance is
touching another part of the
appliance or the wall.
If necessary, carefully bend
the component out of the
way.
Move the appliance slightly.
Readjust the feet.
Page 23

23
The compressor starts after a
period of time.
See the "Cleaning and Care"
section.
This is normal, no error has
occurred.
The compressor does not start
immediately after changing
the temperature setting.
Water on the floor or on storage shelves.
Water drain hole is blocked.
Changing the light bulb
Warning! There is a risk of electric shocks! Before changing the light bulb,
switch off the appliance and unplug it, or pull the fuse or the circuit breaker.
Light bulb data: 220-240 V, max. 15 W
1. To switch off the appliance, turn the
temperature regulator to position "0".
2. Unplug the mains plug.
3. To change the light bulb, undo the
screw.
4. Press the light bulb cover as shown
and slide it backwards.
5. Change the defective light bulb.
6. Refit the light bulb cover and the
screw.
7. Put the refrigerator back into operation.
Malfunction Possible Cause Remedy
Regulations, Standards, Guidelines
This appliance was designed for household use and was manufactured in
accordance with the appropriate standards. The necessary measures in
accordance with appliance safety legislation regulations (GSG), accident
prevention regulations for refrigeration appliances (VBG 20) and the regulations of the German Society of Electrical Engineers (VDE) were observed in
the manufacture of this appliance.
The refrigerant circuit has been checked for leaks.
This appliance is in accordance with the following EU guidelines:
– 73/23/EWG dated 19 February 1973 - low voltage guidelines.
– 89/336/EWG dated 3 May 1989
(including guideline change notice 92/31/EWG) - EMV guideline
AEG65
Page 24

24
Değerli Müşterimiz,
Yüksek kaliteli ürünlerimizden birini seçtiğiniz için teşekkür
ederiz.
Bu cihazla, fonksiyonel tasarım ile ileri teknolojinin mükemmel
kombinasyonunu deneyimleyeceksiniz.
Cihazlarımızın en iyi performansı ve kontrolü sağlamak üzere
tasarlanmış olduğuna ve geliştirildiğine ikna olacaksınız. Buna
ilave olarak, ürünlerimizin çevre dostu ve enerji tasarruflu
olarak geliştirildiklerini göreceksiniz.
Cihazınızın performansını sürekli aynı seviyede korumak için
bu kullanma kılavuzunu dikkatlice okumanızı tavsiye ederiz.
Böylelikle, bütün süreçleri kusursuz ve etkili olarak takip
edebilirsiniz.
İhtiyacınız olan herhangi bir zamanda kılavuza başvurabilmek
için, onu güvenilir bir yerde saklamanızı tavsiye ederiz.
Ürününüzü güle güle kullanmanızı dileriz.
Aşağıdaki semboller bu kılavuzda kullanılmaktadır:
Kişisel güvenliğinizle ve cihazın zarar görmesinin nasıl önleneceği
ile ilgili önemli bilgiler
Genel bilgiler ve tavsiyeler
Çevre ile ilgili bilgiler
Page 25

25
İçindekiler
Güvenlik . . . . . . . . . . . . . . . . . . . . . . . . . . . . . . . . . . . . . . . . . .26
Elden çıkarma . . . . . . . . . . . . . . . . . . . . . . . . . . . . . . . . . . . .28
Cihazın ambalaj bilgileri . . . . . . . . . . . . . . . . . . . . . . . . . . . . . .28
Eski cihazların elden çıkarılması . . . . . . . . . . . . . . . . . . . . . . .28
Nakliye koruma aparatlarının çıkartılması . . . . . . . . . . . . . .29
Montaj . . . . . . . . . . . . . . . . . . . . . . . . . . . . . . . . . . . . . . . . . . .29
Montaj yeri . . . . . . . . . . . . . . . . . . . . . . . . . . . . . . . . . . . . . . . .29
Cihazınız havaya ihtiyaç duyar . . . . . . . . . . . . . . . . . . . . . . . .30
Kapı menteşesinin yeniden takılması . . . . . . . . . . . . . . . . . . .30
Dış boyutlar . . . . . . . . . . . . . . . . . . . . . . . . . . . . . . . . . . . . . . .31
Komple ankastre montaj talimatları . . . . . . . . . . . . . . . . . . . . .31
Elektrik bağlantısı . . . . . . . . . . . . . . . . . . . . . . . . . . . . . . . . .36
İlk çalıştırma öncesi . . . . . . . . . . . . . . . . . . . . . . . . . . . . . . .36
Çalıştırma ve sıcaklık ayarlaması . . . . . . . . . . . . . . . . . . . .36
Dahili aksesuarlar . . . . . . . . . . . . . . . . . . . . . . . . . . . . . . . . .37
Muhafaza rafları . . . . . . . . . . . . . . . . . . . . . . . . . . . . . . . . . . . .37
Portatif iç kapak . . . . . . . . . . . . . . . . . . . . . . . . . . . . . . . . . . . .37
Çok amaçlı muhafaza kutusu . . . . . . . . . . . . . . . . . . . . . . . . .38
Taze yiyeceklerin soğutulması . . . . . . . . . . . . . . . . . . . . . . .38
Yiyeceklerin dondurulması ve dondurulmuş yiyeceklerin
muhafazası . . . . . . . . . . . . . . . . . . . . . . . . . . . . . . . . . . . . . . .39
Buz küplerinin hazırlanması . . . . . . . . . . . . . . . . . . . . . . . .40
Buz paketleri . . . . . . . . . . . . . . . . . . . . . . . . . . . . . . . . . . . . .40
Dondurma takvimi . . . . . . . . . . . . . . . . . . . . . . . . . . . . . . . .40
Buz çözme . . . . . . . . . . . . . . . . . . . . . . . . . . . . . . . . . . . . . . .40
Cihazın kapatılması . . . . . . . . . . . . . . . . . . . . . . . . . . . . . . . .41
Temizlik ve bakım . . . . . . . . . . . . . . . . . . . . . . . . . . . . . . . . .41
Enerji tasarrufu ipuçları . . . . . . . . . . . . . . . . . . . . . . . . . . . .43
Servis çağırmadan önce . . . . . . . . . . . . . . . . . . . . . . . . . . . .43
Arızaların giderilmesi . . . . . . . . . . . . . . . . . . . . . . . . . . . . . . .43
Lamba ampulünün değiştirilmesi . . . . . . . . . . . . . . . . . . . .45
Kurallar, standartlar, talimatlar . . . . . . . . . . . . . . . . . . . . . . .45
Page 26

26
Güvenlik
Buzdolaplarımızın / dondurucularımızın güvenlik özellikleri, kabul
gören teknik standartlara ve Alman Cihaz Güvenliği Kanunu’na
uygundur. Bununla birlikte, aşağıdaki güvenlik bilgilerini size
vermeyi sorumluluğumuz olarak kabul etmekteyiz:
Kullanım amacı
• Buzdolabı, evde kullanım için tasarlanmıştır. Dondurulmuş
yiyeceklerin soğutulması, dondurulması ve muhafaza edilmesi ve
ayrıca buz yapımı için uygundur. Eğer cihaz tasarlanan amaçlar
dışında kullanılırsa ya da yanlış bir şekilde kullanılırsa,
oluşabilecek zararlardan üretici hiçbir şekilde sorumlu tutulamaz.
• Güvenlik sebeplerinden ötürü, dondurucuda değişiklikler
yapılmasına izin verilmez.
• Buzdolabınızı ticari amaçlı veya yiyeceklerin soğutulması,
dondurulması ya da donmuş halde muhafazası dışında başka bir
amaçla kullanırsanız, lütfen kullanım şeklinize uyan ilgili tüm yasal
düzenlemelere riayet ediniz.
İlk çalıştırma öncesi
• Buzdolabınızı olası nakliye hasarlarına karşı kontrol ediniz. Hasar
görmüş bir cihaz hiçbir şekilde çalıştırılmamalıdır! Bir hasar tespit
etmeniz halinde, lütfen cihazı satın aldığınız satıcıyla temasa
geçiniz.
Soğutucu gaz
Cihazın soğutucu devresinde, çevreyle oldukça dost doğal bir gaz
olan ve bununla birlikte yanıcı özelliği olan soğutucu izobütan
(R600a) bulunmaktadır.
• Cihazın nakliyesi ve montajı süresince, soğutucu devre
bileşenlerinin hiçbirinin hasar görmediğinden emin olunuz.
• Eğer soğutucu devresi hasar görmüşse:
– çıplak ateş ve ateşleme kaynaklarını uzak tutunuz;
– cihazın yerleştirildiği odayı iyice havalandırınız.
Çocuk güvenliği
• Ambalaj (örneğin paket kağıtları, polistiren) çocuklar için tehlikeli
olabilir. Boğulma riski söz konusudur! Ambalaj malzemelerini
çocuklardan uzak tutunuz!
• Eski cihazlarınızı elden çıkarmadan önce kullanılamaz hale
getiriniz. Elektrik fişini çekiniz, elektrik kablosunu kesiniz, koparınız
Page 27

27
veya eğer varsa yay veya cıvata tutucularını çıkartınız. Bu şekilde,
çocukların oyun oynarken kendilerini buzdolabına kilitlemelerini
(boğulma riski söz konusudur!) veya kendilerini daha başka
tehlikeli durumlara sokmalarını önlemiş olursunuz.
• Bu cihaz, fiziksel, duyumsal veya zihinsel kapasitesi düşük kişiler
(çocuklar da dahil) veya yeterli bilgi ve deneyime sahip olmayan
kişiler tarafından, yanlarında güvenliklerinden sorumlu ve cihazın
kullanımıyla ilgili bilgi veren ve gözetleyen bir kişi olmadıkça
kullanılmamalıdır. Çocukların, cihazla oynamadıklarından emin
olacak şekilde gözetim altında tutulması gerekir!
Günlük kullanım
• İçinde yanıcı gaz veya sıvı bulunan kaplar düşük ısılarda sızıntı
yapabilir. Patlama riski söz konusudur! İçinde yanıcı maddelerin
bulunduğu kapları, örneğin sprey kutularını, yangın söndürücü
doldurma kartuşlarını vs. buzdolabınıza / dondurucunuza
koymayınız.
• Şişe ve konserveler dondurucu bölmesine konulmamalıdır.
İçindekiler donduğunda bunlar çatlayabilir, hatta yüksek karbonat
içerikli içecekler patlayabilir! Limonata, meyve suları, bira, şarap,
köpüklü şarap vs. gibi içecekleri asla dondurucu bölmesinde
muhafaza etmeyiniz. İstisnai durumlar: Yüksek alkol içerikli sıvılar
dondurucu bölmesinde saklanabilir.
• Dondurma veya buz küplerini dondurucu bölmesinden çıkarır
çıkarmaz ağzınıza almayınız. Çok soğuk olan buz, dudakları veya
dili dondurabilir ve yaralanmanıza neden olabilir.
• Donmuş yiyeceğe ıslak ellerle dokunmayınız. Elleriniz yiyeceğe
yapışıp donabilir.
• Buzdolabında / dondurucuda hiçbir elektrikli cihazı (örneğin
elektrikli dondurma makineleri, mikserler vs.) çalıştırmayınız.
• Cihazı temizlemeden önce, her zaman cihazınızı kapatınız ve
fişini çekiniz veya evin sigortasını ya da şalterini attırınız.
• Fişi prizden çekerken kablosundan tutarak değil her zaman fişin
kendisini tutarak çekiniz.
Arıza durumunda
• Cihazda arıza meydana gelirse lütfen öncelikle bu talimatların
“Servis çağırmadan önce” kısmına bakınız. Bu kısımda verilen
bilgiler yardımcı olmazsa, lütfen kendi kendinize tamir etmeye
çalışmayınız.
• Buzdolapları / dondurucular sadece kalifiye servis teknisyenleri
tarafından tamir edilebilir. Yanlış onarımlar ciddi tehlikelere yol
açabilir. Cihazınız tamire ihtiyaç duyduğunda, lütfen uzman
satıcınızla veya Müşteri Hizmetleri bölümümüzle temasa geçiniz.
Page 28

28
Elden çıkarma
Cihazın ambalaj bilgileri
Tüm malzemeler çevreyle dosttur! Bir yakma / imha tesisinde
tehlike arz etmeksizin imha edilebilir veya yakılabilir!
Malzemeler hakkında bilgiler: Plastik aksamlar geri
dönüştürülebilirler ve aşağıdaki şekilde tanımlanmışlardır:
>PE< polietilen, örneğin dış kabı ve iç kısımdaki torbalar.
>PS< polistiren köpük, örneğin hiçbirisi kloroflorokarbon
içermeyen pedler.
Karton parçalar geri dönüşümlü kağıttan yapılmıştır ve bunlar
atık-kağıt geri dönüşüm toplama yerlerinde imha edilmelidir.
Eski cihazların elden çıkarılması
Çevresel sebeplerden dolayı, soğutma cihazları doğru bir
şekilde imha edilmelidir. Bu durum, sizin eski cihazınız için
olduğu kadar kullanım ömrünün sonunda yeni cihazınız için de
geçerlidir.
Uyarı! Eski cihazlarınızı elden çıkarmadan önce onları
çalıştırılamaz hale getiriniz. Fişini prizden çekiniz, güç kablosunu
kesiniz, mevcut kilit ve kilit dillerini çıkartınız veya imha ediniz.
Böylece, çocukların oyun oynarken kendilerini cihazın içine
kilitlemeleri (boğulma riski!) veya kendilerini hayati tehlike arz
eden başka bir duruma sokmaları önlenmiş olur.
Elden çıkarma:
• Bu cihaz normal ev çöpleriyle veya büyük atıklarla birlikte
atılamaz.
• Soğutucu devresine, özellikle de cihazın arkasındaki ısı
eşanjörüne hasar verilmemelidir.
• Ürünün veya ambalajının üzerindeki sembolü, bu ürünün
normal ev atığı gibi işlem göremeyeceğini belirtir. Bunun
yerine, elektrikli ve elektronik ekipmanların geri-dönüşümü için
uygun bir toplama noktasına götürülmesi gerekir. Ürünün
hatalı bir şekilde atılması veya imha edilmesi çevre ve insan
sağlığı açısından olumsuz sonuçlara yol açabilir. Bu nedenle,
bu ürünün doğru bir şekilde elden çıkarılmasını sağlayarak
potansiyel olumsuz sonuçları önlemeye yardımcı olmuş
olursunuz. Bu ürünün geri dönüşümü hakkında daha detaylı
bilgi için lütfen mahalli idareyle, ev çöpü toplama servisiyle ya
da ürünü satın aldığınız mağaza ile temasa geçiniz.
Page 29

29
Montaj
Montaj yeri
Cihaz, iyi havalandırılan kuru bir odaya yerleştirilmelidir.
Enerji kullanımı ortam sıcaklığından etkilenir. Dolayısıyla cihaz
– direk güneş ışığına maruz bırakılmamalıdır;
– kaloriferlere, fırınlara veya diğer ısı kaynaklarına yakın monte
edilmemelidir;
– sadece cihazın tasarımına uygun ve ortam sıcaklığının iklim
sınıfına denk geldiği bir yere monte edilmelidir.
İklim sınıfı, cihazın iç kısmında sol tarafta bulunan bilgi etiketinde
yazılıdır.
Aşağıdaki tabloda, her bir iklim sınıfı için hangi ortam sıcaklığının
doğru olduğu gösterilmektedir. İklim sınıfı:
İklim sınıfı
Karşılık geldiği ortam sıcaklığı
SN +10 ile +32 °C arası
N +16 ile +32 °C arası
ST +18 ile +38 °C arası
T +18 ile +43 °C arası
Eğer cihazın bir ısı kaynağının yakınına monte edilmesi
kaçınılmazsa, aşağıda belirtilen minimum mesafeler cihazın
yanlarında bırakılmalıdır:
– elektrikli fırınlar için 3 cm.;
– petrol ve kömür yakıtlı cihazlar için 30 cm.
Eğer bu mesafeler sağlanamazsa, fırın (ısı kaynağı) ile
soğutma cihazı arasında bir ısı yalıtım pedi yerleştirilmelidir.
Eğer soğutma cihazı başka bir buzdolabının veya
dondurucunun yanına monte edilecekse, cihazın dış kısmında
yoğunlaşma olmasını önlemek amacıyla yanlarda 5 cm. boşluk
bırakılmalıdır.
Nakliye koruma aparatlarının çıkartılması
Cihaz ve içindeki donanımlar nakliye amaçlı olarak korumaya
alınmıştır.
• Kapının sol ve sağ tarafındaki yapışkan bandı çekip çıkartınız.
• Cihazın içindeki tüm yapıştırıcı bantları ve ambalaj parçalarını
çıkartınız.
Page 30

30
Cihazınız havaya ihtiyaç
duyar
Güvenlik nedenlerinden
ötürü, şekilde gösterildiği
gibi minimum havalandırma
sağlanmalıdır.
Dikkat: Havalandırma
menfezlerini, tıkanmasını
önleyerek temiz halde
tutunuz;
Kapı menteşesinin yeniden
takılması
Montaj yerinden ötürü mecbur
kalınması halinde, kapının
açılma yönü sağ yerine (fabrika
ayarı) sola açılacak şekilde
değiştirilebilir.
Uyarı! Kapının açılma yönünü
değiştirirken, cihazın fişi prize
takılı olmamalıdır. İşleme
başlamadan önce fişi prizden
çekiniz.
1. Üstteki pimi sökünüz ve
aralayıcıyı (pulu) çıkartınız.
2. Üst pimi ve üst kapıyı çıkartınız.
3. Orta menteşeyi ve kapakları
sökerek karşı tarafa takınız.
4. Alt kapıyı sökünüz.
5. Alt pimi sökünüz ve karşı tarafa
takınız.
6. Alt kapıyı geri takınız.
7. Orta menteşeyi ve kapakları
karşı tarafa tekrar vidalayınız.
D567
50 mm
min.
200 cm
2
min.
2
200 cm
Page 31

31
Dış boyutlar
Yükseklik 1780 mm.
Derinlik 550 mm.
Genişlik 560 mm.
Komple ankastre montaj talimatları
Eklem kısmına conta bandını
şekilde gösterildiği gibi
takınız.
8. Üst kapıyı geri takınız ve
menteşe pimini ve aralayıcıyı
karşı tarafa tekrar vidalayınız.
Alt kısımda, mutfak mobilyası
ile cihazın kenarı arasında 44
mm.’lik bir mesafe bırakınız.
Aksesuar torbasında bulunan
alt menteşe kapağı mutfak
mobilyasının ve cihazın doğru
konumlandırılmasını sağlamak
için faydalıdır.
Ayrıca, cihazın ana elektrik
kablosunu sıkıştırmadığından
emin olunuz.
D765
44mm
1
2
Page 32

32
Eklem kapağı tırnaklarına ve
menteşe deliklerine kapakları
(C-D) takınız.
Havalandırma ızgarasını (B)
ve menteşe kapaklarını (E)
yerlerine oturtunuz.
Cihazın içindeki kitte
bulunan 4 vidayı kullanarak
cihazı sabitleyiniz.
Menteşeyi pivot pimle
kapatmak için kullanılan
plastik kapaktan (E) çizimde
gösterildiği gibi ilgili parçayı
çıkartmanız gerekir.
Bu işlem, menteşe kapağının
iç kısmında bu parçanın
çıkartılmasını kolaylaştıran bir
oyuk olması sayesinde
oldukça basittir.
“Eğer pivot pim sağ
menteşeye takılacaksa DX
harfleri ile işaretli parçayı, tersi
durumda SX ile işaretli parçayı
çıkartınız.”
I
I
C
D
E
E
B
Page 33

33
Mobilya kapağının iç
tarafına, şekilde gösterildiği
gibi üst ve alta gelecek
şekilde kılavuzu (Ha)
takınız ve harici deliklerin
yerini işaretleyiniz. Delikleri
deldikten sonra,
beraberinde verilmiş
vidalarla kılavuzu
sabitleyiniz.
Ha Hb, Hc, Hd parçalarını
şekilde gösterildiği gibi
ayırınız.
Hb
PR266
Ha
Hc
Hd
ca. 50 mm
ca. 50 mm
90°
90°
2
1
m
m
2
1
m
m
Page 34

34
Kapağı (Hc) kılavuz (Ha)
üzerine geçirip yerine oturacak
şekilde sabitleyiniz.
Cihazın kapısını ve mobilya
kapağını 90° açınız. Küçük
kare parçayı (Hb) kılavuza
(Ha) takınız. Cihazın kapısı ile
mobilya kapağını bir arada
tutunuz ve şekilde gösterildiği
gibi delikleri işaretleyiniz.
Braketleri çıkartınız ve
kapının dış kenarından 8
mm. mesafedeki bir
noktayı (tırnağın (K)
takılması gereken yer)
işaretleyiniz.
Ha
Hc
PR33
8mm
Ha
PR167
Hb
8mm
K
Ha
Page 35

35
Küçük kare parçayı tekrar
kılavuzun üzerine yerleştiriniz
ve beraberindeki vidalarla
sabitleyiniz.
Mobilya kapağının hiza
ayarının yapılması gerekirse,
yarıklardaki boşluklardan
faydalanınız.
Bu işlemler tamamlandığında,
mobilya kapağının düzgün
kapanıp kapanmadığı kontrol
edilmelidir.
Kapağı (Hd) kılavuz (Hb)
üzerine geçirip yerine oturacak
şekilde sabitleyiniz.
Eğer cihaz mutfak
mobilyasının yan tarafına
sabitlenecekse, sabitleme
braketlerindeki (D) vidaları
basit bir şekilde gevşetiniz,
braketleri şekilde gösterildiği
gibi kaydırınız ve vidaları geri
sıkınız. Kapağı (E) takınız.
PR168
Hb
Hb
Hd
PR167/1
D
E
D734
Page 36

36
İlk çalıştırma öncesi
• Cihazı ilk kez çalıştırmadan önce iç kısmını ve tüm
aksesuarlarını temizleyiniz (bkz. “Temizlik ve bakım”).
Elektrik bağlantısı
İlk kez çalıştırmadan önce, besleme gerilimi ve akım
değerlerinin cihazı monte ettiğiniz yerdeki şebeke değerleriyle
aynı olduğundan emin olmak için cihazın bilgi etiketine
bakınız.
Örneğin: AC 230 ... 240 V 50 Hz veya
230 ... 240 V~ 50 Hz
(yani 230 ile 240 volt arası, alternatif akımlı, 50 Hertz)
Bilgi etiketi cihazın iç kısmında sol taraftadır.
Elektrik beslemesi için, doğru takılmış ve topraklı bir priz
gereklidir. Besleme hattına bağlı en az 10 Amperlik bir sigorta
olmalıdır.
Cihaz monte edildikten sonra priz ulaşılamaz konumda kalırsa,
elektrik bağlantısı cihazı ana elektrik tesisatından yalıtan bir
aygıt içermelidir (örneğin bir sigorta, şalter, akım rölesi veya
kontakları arasındaki açıklık en az 3 mm. olan benzer bir devre
kesici).
Dikkat: Elektrik kablosu sadece tecrübeli bir elektrikçi
tarafından değiştirilmelidir. Tamir işlemleri için lütfen satıcınızla
veya müşteri hizmetleri departmanımızla iletişime geçiniz.
Çalıştırma ve sıcaklık ayarlaması
• Fişi prize takınız. Soğutucu bölmesinin kapağı açık olduğunda,
dahili aydınlatma lambası yanar. Sıcaklık seçme düğmesi,
soğutucu bölmesinin sağ tarafında bulunmaktadır.
“0” ayarı; kapalı anlamına gelir.
“1” ayarı; en yüksek sıcaklık (en sıcak ayar) anlamına gelir.
“6” ayarı (son durma) ayarı ise; en düşük sıcaklık (en soğuk
ayar) anlamına gelir.
Ancak tam ayar, buzdolabının içindeki sıcaklığın aşağıdaki
hususlara bağlı olduğu dikkate alınarak seçilmelidir:
- Cihaza konan yiyecek miktarı,
- Cihaz kapısını açma sıklığı.
Page 37

37
Dahili aksesuarlar
Muhafaza rafları
Meyve ve sebze bölmesinin
üstündeki cam raf, meyve ve
sebzelerin daha uzun süre taze
kalmalarını sağlamak
bakımından daima yerinde
kalmalıdır.
Diğer muhafaza rafları farklı
yüksekliklere ayarlanabilir:
Muhafaza rafını, aşağı ve yukarı
doğru hareket edip yerinden
çıkana kadar ileriye doğru
çekiniz.
Farklı bir yüksekliğe yerleştirmek için, işlemin tersini uygulayınız.
Uzun nesnelerin düzenlenmesi:
İki parçalı ve sürgülü camlı muhafaza rafının ön yarısını çıkarınız ve
farklı bir seviyeye takınız. Böylece, daha uzun nesneler için alttaki
rafta gereken büyüklükte boşluk sağlanmış olur.
Portatif iç kapak
Kapı bölmeleri yukarıya kaldırılabilir ve çıkarılabilir ve istenilen diğer
konumlara yerleştirilebilir.
Soğutucu ve dondurucu bölmelerindeki sıcaklıklar, birbirinden
bağımsız şekilde ayarlanamaz.
Eğer taze yiyecekleri hızlı bir şekilde dondurmak istiyorsanız,
soğutucu bölmesindeki sıcaklığın 0°C’nin altına düşmemesine
dikkat ederek “6” ayarını seçiniz. Ayrıca, sıcaklık ayar düğmesini
hemen ardından “3” veya “4” ayarına getiriniz.
Önemli!
Yüksek ortam sıcaklıkları (örneğin sıcak yaz günleri) ve sıcaklık
ayar düğmesinden soğuk bir ayarın seçilmesi (konum “5” ile “6”),
kompresörün devamlı surette çalışmasına neden olabilir.
Eğer böyle bir durumla karşılaşırsanız, sıcaklık ayar düğmesini
daha sıcak bir ayara getiriniz (konum “3” ile “4”). Bu ayarda,
kompresör normal bir şekilde çalışır ve durur ve buz çözme
işlemi uygulanması önerilir.
D338
Page 38

38
Taze yiyeceklerin soğutulması
En iyi performansı elde etmek için:
• Sıcak yiyecekleri veya buharlaşan sıvıları buzdolabına koymayınız.
• Yiyecekleri kapatınız veya sarınız (özellikle de keskin bir kokusu
varsa).
• Yiyecekleri, etrafında hava rahatça devridaim yapabilecek şekilde
yerleştiriniz.
Faydalı tavsiyeler:
Et (her türlü): Naylon torbalara sarınız ve sebze çekmecesinin /
çekmecelerinin üstündeki bardak rafına yerleştiriniz. Güvenlik
açısından, bu şekilde en fazla bir veya iki gün muhafaza ediniz.
Pişmiş yiyecekler, soğuk yemekler, vs.: Bunlar, ağzı kapalı olmak
suretiyle herhangi bir rafa yerleştirilebilir.
Meyve ve sebzeler: Bunlar iyice temizlenmeli ve temin edilmiş özel
çekmecelere yerleştirilmelidir.
Tereyağı ve peynir: Bunlar, içine havanın mümkün olduğunca
girmemesi için özel hava geçirmeyen kaplara konulmalı veya
alüminyum folyoya sarılmalı ya da polietilen torbalara konulmalıdır.
Süt şişeleri: Bunlar, ağızları kapaklı şekilde kapıdaki şişe raflarına
yerleştirilmelidir.
Muzlar, patatesler, soğanlar ve sarımsaklar (paketli değilse),
buzdolabına konulmamalıdır.
Çok amaçlı muhafaza kutusu
Bazı modeller, bir kapı rafı bölmesi
altına takılmış ve yanlara doğru
kayabilen çok amaçlı bir muhafaza
kutusu ile donatılmıştır.
Bu muhafaza kutusu her kapı rafı
bölmesinin altına yerleştirilebilir.
1. Muhafaza kutusunun yerini
değiştirmek için; raf bölmesini
muhafaza kutusu ile birlikte
yukarıya ve kapıdaki tutucuların
dışına doğru kaldırınız ve tutucu
desteği raf bölmesinin altındaki
kılavuz raydan çıkarınız.
2. Rafı farklı bir yükseklikte tekrar
takmak için yukarıdaki işlemi
tersten yapınız.
Page 39

39
Yiyeceklerin dondurulması ve
dondurulmuş yiyeceklerin muhafazası
Dondurucunuzu, taze yiyecekleri kendiniz dondurmak için
kullanabilirsiniz.
Önemli!
• Dondurucu bölümündeki ısı, yiyecekleri dondurmadan önce –18
°C veya daha soğuk olmalıdır.
• Lütfen bilgi etiketinde yazılı olan dondurma kapasitelerini dikkate
alınız. Dondurma kapasitesi, 24 saatlik süre içerisinde
dondurulabilecek maksimum yiyecek miktarıdır. Eğer yiyecekleri
bir rafta bir iki günden fazla donmuş halde muhafaza etmek
istiyorsanız, bilgi etiketinde yazılı kapasitenin maksimum 2/3 ile
3/4 oranında yiyecek koymaya dikkat ediniz. Yiyeceğin kalitesi, en
iç kısmına kadar mümkün olduğunca kısa süre içinde
dondurulduğu zaman en iyi şekilde korunur.
• Sıcak yiyecekleri dondurmadan önce soğumalarını bekleyiniz.
Sıcaklık yüksek buz oluşumuna neden olur ve enerji tüketimini
artırır.
• Üretici tarafından belirtilen maksimum muhafaza sürelerine lütfen
uyunuz.
• Artık başka işlemden geçirilemeyecek olan çözülmüş yiyecekler
(pişmiş) asla ikinci bir kez dondurulmamalıdır.
• İçinde yanıcı gaz veya sıvı bulunan kaplar düşük ısılarda sızıntı
yapabilir. Patlama riski söz konusudur! İçinde yanıcı maddelerin
bulunduğu kapları, örneğin sprey kutularını, yangın söndürücü
doldurma kartuşlarını vs. buzdolabınıza / dondurucunuza
koymayınız.
• Şişe ve konserveler dondurucuya konulmamalıdır. İçindekiler
donduğunda bunlar çatlayabilir, hatta yüksek karbonat içerikli
içecekler patlayabilir! Limonata, meyve suları, bira, şarap, köpüklü
şarap vs. gibi içecekleri asla dondurucuda muhafaza etmeyiniz.
İstisnai durumlar: Yüksek alkol içerikli sıvılar dondurucu
bölmesinde saklanabilir.
• Dondurulmadan önce tüm yiyecekler hava geçirmez bir şekilde
paketlenmelidir, böylece kurumaz veya tatlarını kaybetmezler ve
ayrıca diğer donmuş yiyeceklere tatları ve aromaları karışmaz.
Dikkat! Donmuş yiyeceğe ıslak ellerle dokunmayınız. Elleriniz
yiyeceğe yapışıp donabilir.
1. Donmamış yiyecekler donmuş yiyeceklere temas etmemelidir, aksi
takdirde donmuş yiyecekler çözünmeye başlayabilir.
2. Yiyeceği daha hızlı dondurabilmek veya izin verilen maksimum
miktarda yiyeceği dondurmak için, termostat ayarını en yüksek
konuma getiriniz.
Page 40

40
Buz küplerinin hazırlanması
1. Buz küpü kabına 3/4 doluluk oranında soğuk su doldurunuz,
dondurucu bölmesine koyunuz ve donmaya bırakınız.
2. Donmuş küpleri gevşetmek için, buz küpü kabını kıvırınız veya
birkaç saniyeliğine akan suyun altına tutunuz.
Önemli! Dondurucu bölmesine yapışmış olan bir buz küpü kabını
asla sivri uçlu veya keskin kenarlı bir nesneyle çıkarmaya
çalışmayınız.
Dondurma takvimi
• Semboller, farklı tipte donmuş yiyecekleri göstermektedir.
• Sayılar, uygun tipte donmuş yiyecekler için ay cinsinden
muhafaza sürelerini belirtmektedir. Belirtilen muhafaza süresinin
hem üst hem de alt sınır değerinin geçerliliği, yiyeceğin miktarına
ve dondurma işleminden önceki ön işlemin yapılıp yapılmadığına
bağlıdır. Düşük değer, yağ içeriği yüksek olan yiyecekler için
geçerlidir.
Buz çözme
Soğutucu
Soğutucu bölmesinin buharlaştırıcı devresindeki buzlar, normal
çalışma esnasında motor kompresörü her durduğunda otomatik
olarak giderilir. Buz çözme suyu bir kanal vasıtasıyla motor
kompresörü üzerinden geçerek buharlaştırıldığı yer olan cihazın
arka tarafındaki özel bir kaba boşaltılır.
Dondurucu
Bununla birlikte dondurucu bölmesi, devamlı şekilde karla
(buzla) kaplanacaktır. Bu karlanma, kalınlığı 4 mm.’yi geçtiğinde
özel plastik raspa (kazıyıcı) ile temizlenmelidir. Bu işlemi
yaparken, cihazın fişini prizden çekmek veya yiyecekleri
çıkartmak gerekmez.
Ancak, iç kaplama üzerindeki buz kalınlığı çok aşırıysa aşağıda
anlatıldığı gibi bir buz çözme işlemi uygulayınız:
1. Dondurucunun içindeki yiyecekleri çıkarınız, birkaç kat gazete
kağıdına sarınız ve çok serin bir yere koyunuz.
Buz paketleri
Dondurucunun bir çekmecesinde iki tane buz paketi
bulunmaktadır.
Bir elektrik kesintisi veya arızası durumunda buz paketi, donmuş
yiyeceklerin ılıma süresini saatlerce geciktirir. Buz paketi sadece,
ön kısımda ve donmuş yiyeceklerin üstünde bulunan en üstteki
çekmeceye yerleştirildiğinde bu görevi yerine getirebilir. Buz
paketini soğuk torbaları soğuk tutmak için kullanabilirsiniz.
Page 41

41
Temizlik ve bakım
Hijyenik nedenlerden ötürü, dahili aksesuarlar da dahil olmak
üzere cihazın iç kısmı düzenli olarak temizlenmelidir.
Uyarı!
• Temizlik işlemi esnasında cihazın fişi prize takılmamalıdır.
Elektrik çarpma tehlikesi! Temizlik işleminden önce, cihazı
Cihazın kapatılması
Cihazı kapatmak için, sıcaklık ayarını “0” konumuna getiriniz.
Eğer cihaz uzunca bir süre kullanılmayacaksa:
1. Soğutulmuş ve dondurulmuş paketlerin tümünü ve buz
çekmecelerini buzdolabından çıkarınız.
2. Cihazı kapatmak için, sıcaklık ayarını “0” konumuna getiriniz.
3. Fişini prizden çekiniz veya şalteri ya da sigortayı attırınız veya
çıkartınız.
4. Dondurucu bölmesini eritiniz ve iyice temizleyiniz (bkz. “Temizlik
ve bakım”).
5. Kötü kokuların oluşmasını önlemek için kapıyı açık bırakınız.
2. Cihazı kapatınız ve fişini çekiniz veya sıcaklık kontrol düğmesini
“0” konumuna getiriniz.
3. Dondurucu bölümünün kapısını açık bırakınız.
4. Plastik raspayı buz çözme
suyu kanalının altındaki
bölmeye sokunuz ve altına bir
toplama kabı yerleştiriniz.
5. Buz çözme işlemi
tamamlandığında, ileride
kullanmak üzere raspayı
saklayınız.
6. Termostat düğmesini tekrar
istediğiniz ayara getiriniz veya
cihazın fişini prize takınız.
Uyarı!
Buz / kar oluşumlarını asla
metal nesnelerle kazımayınız.
Eritme sürecini hızlandırmak için üretici tarafından önerilenin
dışında mekanik bir alet veya başka suni bir yöntem
kullanmayınız.
Buz çözme esnasında donmuş yiyecek paketlerinin sıcaklığının
artması, bunların güvenli muhafaza ömrünü kısaltabilir.
D068
Page 42

42
kapatınız ve fişini prizden çekiniz veya şalteri ya da sigortayı
attırınız veya çıkartınız.
• Cihazı asla bir buharlı temizleyici ile temizlemeyiniz. Elektrikli
aksamlarda nem birikebilir ve elektrik çarpmasına yol açabilir!
Sıcak buharlar plastik parçaların hasar görmesine neden
olabilir.
• Cihaz tekrar çalıştırılmadan önce kurulanmalıdır.
Dikkat!
• Uçucu petrol ürünleri ve organik çözücüler plastik parçalara
zarar verebilir, örneğin:
– Limon suyu veya portakal kabuğu suları;
– Butirik asit;
– Asetik asit içeren temizlik ürünleri.
Bu tür maddelerin cihazın parçalarına temas etmesine izin
vermeyiniz.
• Herhangi bir aşındırıcı temizlik ürünü kullanmayınız.
1. Donmuş yiyecekleri ve soğutucudaki yiyecekleri çıkartınız.
Donmuş yiyecekleri birkaç kat gazete kağıdına sarınız. Kapalı
bir halde soğuk bir yerde muhafaza ediniz.
2. Temizlik işleminden önce dondurucu bölümünün buzunu
çözünüz (bkz. “Buz çözme” bölümü).
3. Cihazı kapatınız ve fişini prizden çekiniz veya şalteri ya da
sigortayı attırınız veya çıkartınız.
4. Cihazı ve dahili aksesuarlarını bir bez ve ılık suyla temizleyiniz.
Piyasada bulabileceğiniz bulaşık deterjanlarını da
kullanabilirsiniz.
5. Temizlik işlemini tamamladıktan sonra, su ile siliniz ve iyice
kurulayınız.
Kondansatörde biriken tozlar
enerji tüketimini artırır. Bu
sebeple, cihazın arkasındaki
kondansatör ünitesini yılda bir
defa yumuşak bir fırça veya bir
elektrik süpürgesi ile dikkatlice
temizleyiniz.
6. Soğutucunun arka panelindeki
su tahliye deliğini kontrol ediniz.
Tahliye deliği tıkanmışsa, cihazla
birlikte verilen aksesuar
paketinde yer alan yeşil
mandalla temizleyiniz.
7. Her şeyi kuruladıktan sonra,
cihazı tekrar çalıştırınız.
D037
Page 43

43
Enerji tasarrufu ipuçları
• Cihazı, fırınların, kalorifer peteklerinin veya diğer ısı
kaynaklarının yakınına monte etmeyiniz. Yüksek ortam
ısıları, kompresörün daha uzun süre ve daha sık çalışmasına
neden olur.
• Cihazın tabanı ile arka panelinde yeterli hava devridaimi ve
hava çıkışının gerçekleşebilmesini sağlayınız. Havalandırma
menfezlerini asla kapatmayınız.
• Sıcak yiyecekleri cihaza koymayınız. Sıcak yiyeceklerin
soğumasını bekleyiniz.
• Kapıyı sadece gerekli olduğunda açınız.
• Isıyı gerektiğinden daha soğuk bir değere ayarlamayınız.
• Isı yayıcı kondansatörü, cihazın arka panelindeki metal
ızgarayı daima temiz tutunuz.
Servis çağırmadan önce
Arızaların giderilmesi
Bir arıza, aşağıdaki talimatları uygulayarak çözebileceğiniz
ufak bir hatadan kaynaklanıyor olabilir. Eğer aşağıdaki bilgiler
durumu düzeltmeniz için faydalı olmadıysa, cihaz üzerinde
herhangi başka bir işlem yapmayınız.
Uyarı! Soğutucunun / dondurucunun tamir işlemleri sadece
kalifiye servis teknisyenlerince yapılmalıdır. Yanlış
onarımlardan dolayı kullanıcı için ciddi tehlikeler oluşabilir.
Cihazınız tamire ihtiyaç duyduğunda, lütfen uzman satıcınızla
veya müşteri hizmetleri bölümümüzle temasa geçiniz.
Page 44

44
Yiyecekler çok ılık.
Dahili aydınlatma
çalışmıyor.
Cihaz bir ısı kaynağına
yakındır.
Isı doğru olarak
ayarlanmamıştır.
Lütfen “İlk kez çalıştırma”
bölümüne bakınız.
Lamba ampulü bozuktur.
Lütfen “Lamba ampulünün
değiştirilmesi” bölümüne
bakınız.
Isı ayarını geçici olarak
daha soğuk bir ayara
getirin.
Kapı uzunca bir süre açık
kalmıştır.
Lütfen “Montaj yeri”
bölümüne bakınız.
Cihaza, son 24 saat içinde
çok fazla miktarda sıcak
yiyecek yerleştirilmiştir.
Kapıyı sadece gerektiği
kadar açınız.
Aşırı miktarda buz oluşumu
var (muhtemelen kapı
contasında da).
Kapı contası hava
sızdırmaz özelliğini
kaybetmiştir (muhtemelen
menteşelerin yerini
değiştirdikten sonra).
Kapı contasının kaçak
yapan yerlerini bir saç
kurutma makinesi ile
dikkatlice temizleyiniz
(yaklaşık 50°C’yi
geçmemeye dikkat ediniz).
Aynı zamanda, kapı
contasının doğru bir şekilde
yerine oturması için ısınan
kısımlarını elinizle düzeltiniz.
Sorun Olası sebep Çözüm
Cihaz çalışmıyor.
Cihaz açılmamıştır. Cihazı açınız.
Elektrik fişi prize
takılmamıştır veya gevşektir.
Fişi prize takınız.
Sigorta yanmıştır / atmıştır
veya arızalıdır.
Sigortayı kontrol ediniz,
gerekirse değiştiriniz.
Priz arızalıdır.
Elektrik tesisatıyla ilgili
arızalar bir elektrikçi
tarafından düzeltilmelidir.
Cihaz çok fazla soğutuyor.
Isı çok yüksek
ayarlanmıştır.
Isı ayarını geçici olarak
daha sıcak bir ayara
getirin..
Olağandışı sesler.
Cihaz duvara veya başka
bir nesneye temas
ediyordur.
Cihaz düzlemsel değildir.
Cihazın arkasındaki bir
bileşeni (örneğin bir boru)
cihazın başka bir kısmına
veya duvara değiyordur.
Gerekirse, bileşeni biraz
eğerek normal
doğrultusundan saptırınız.
Cihazı yavaşça çekiniz.
Ayakları tekrar ayarlayınız.
Page 45

45
Kompresör belirli bir süre
sonra çalışmaya başlar.
“Temizlik ve bakım”
bölümüne bakınız.
Bu normaldir, bir sorun
anlamına gelmez.
Isı ayarını değiştirdikten
hemen sonra kompresör
çalışmıyor.
Zeminde veya muhafaza
raflarında su var.
Su tahliye deliği tıkalıdır.
Lamba ampulünün değiştirilmesi
Uyarı! Elektrik çarpma riski söz konusudur! Lamba ampulünü
değiştirmeden önce, cihazı kapatınız ve fişini çekiniz ya da
sigortasını veya şalterini attırınız.
Lamba ampulü verileri: 220-240 V, maks. 15 W
1. Cihazı kapatmak için, sıcaklık
ayarını “0” konumuna getiriniz.
2. Fişini prizden çekiniz.
3. Lamba ampulünü değiştirmek
için, vidayı sökünüz.
4. Lamba ampulünün kapağına
şekilde gösterildiği gibi bastırıp
geriye doğru kaydırınız.
5. Arızalı ampulü değiştiriniz.
6. Lamba ampulünün kapağını
geri takınız ve vidalayınız.
7. Buzdolabını tekrar çalıştırınız.
Sorun Olası sebep Çözüm
Kurallar, standartlar, talimatlar
Bu cihaz, sadece evde kullanım için tasarlanmıştır ve ilgili
standartlara uygun olarak üretilmiştir. Cihaz güvenliği yasal tüzükleri
(GSG), soğutucu cihazlar için kaza önleme tüzükleri (VBG 20) ve
Alman Elektrik Mühendisleri Birliği tüzükleri (VDE) uyarınca
alınması gereken önlemler bu cihazın üretimi esnasında
uygulanmıştır.
Soğutucu devresi kaçaklara karşı kontrolden geçirilmiştir.
Bu cihaz, aşağıdaki AB direktiflerine uygundur:
– 19 Şubat 1973 tarihli 73/23/EWG alçak gerilim direktifi.
– 3 Mayıs 1989 tarihli 89/336/EWG
(direktif değişiklik bildirimi 92/31/EWG de dahil) - EMV direktifi
AEG65
Page 46

Page 47

Page 48

www.electrolux.com
www.aeg.electrolux.com.tr
2223 488-11-00-03032008 Subject to change without notice
Önceden uyarıda bulunmaksızın değiştirilebilir.
 Loading...