

Page 1

Integrierbare EinbauKühl-Gefrierkombination
Integrating Fridge-Freezer
Gebrauchs- und Montageanweisung
Operating and Installation Instructions
AUS
ERFAHRUNG
GUT
Page 2
_______________________
D
Inhalt
Bildseiten (bitte ausklappen) 3-6
Allgemeine Hinweise 7/8
Wechsel des Türanschlags 8
Einbauen, Ausrichten und Befestigen 8/9
Türankoppelung 9
Inbetriebnahme und Temperaturregelung 9
Richtig lagern 10
Einfrieren und Tiefkühllagern 10
Eiswürfel bereiten 10/11
Abtauen 11
Reinigung und Pflege 12
Störungen und Kundendienst 12
Tips 13
_______________________
GB
Contents
lllustration pages (please unfold) 3-6
General instructions 14
Rehingeing the door 15/16
Installing, aligning, and fixing 16
Connecting the door 16
Starting up and temperature regulation 16
Correct storage 17
Freezing fresh food and storing frozen food 17/18
Making ice-cubes 18
Defrosting 18/19
Cleaning and care 19
Faults and servicing 19/20
Hints 20
Seite
Page
2
Page 3
3
AEG29
1
A
1443-1446
50min.
550min.
50min.
560min.
B
90°
1441
C
540
11
E
15
90°
831
552
D
540
AEG30
32
4
AEG7
2
AEG8
3
2222 178-54
AEG10
5
A
B
AEG11
6
3
Page 4

4
C
G
AEG12
7
AEG13
8
AEG15
10
2,7
D
H
D
E
AEG16
11
H
AEG14
9
F
90°
AEG17
12
Page 5
90°
5
5 6
26-30
H
4
4
1
2
AEG18
13
AEG31
14
5
K
6
7
3
3
9
8
8
O
AEG32
16
B
AEG20
15
A
AEG22
17a
Page 6

AEG23
17b
AEG006
18
AEG26
20
AEG27
21
AEG25
19
AEG110
22
Page 7

GB
IMPORTANT!
If the fridge-freezer you have purchased is replacing
an older refrigerator or freezer still fitted with a snap
catch or lock, you should render this lock unserviceable before throwing the appliance away or putting it
out for environment-friendly refuse collection. In this
way you can prevent children locking themselves in
when playing and thus endangering their lives.
Please make sure that the pipelines of your fridgefreezer are not damaged before collection for environment-friendly disposal.
Appliance packaging
information
All used materials are environmentally compatible!
They can be safely disposed of or burnt in a refuse
incinerator!
Regarding the materials: the plastics can also be
recycled and are marked as follows:
>PE< for polyethylene e.g. as used in the outer
wrapping and bags inside
>PS< for polystyrene foam e.g. as used in the
packing; this material is basically CFC-free
The cardboard parts are made of waste paper and
should be put back into the waste paper collection
system.
General instructions
You have just purchased a home fridge-freezer
which has been produced according to the standards applicable to these appliances.
During manufacture, the necessary measures have
been taken as required by the Appliance Safety Act
(GSG), the Accident Prevention Regulations for
Refrigerating Installations (VBG 20), and the Specifications of the Institute of German Electrical Engineers (VDE).
The refrigeration circuit has been checked for
leakage.
This appliance complies with the following EC
Directives:
- 73/23/EEC of 19.02.1973 - Low-Voltage Directive
- 89/336/EEC of 03.05.1989 (including Amendment
Directive 92/31/EEC) - EMC (Electromagnetic
Compatibily) Directive.
Before starting up, we recommend you to read
the following Operating Instructions, since only
by doing so can you benefit from all the advantages
offered by your fridge-freezer. Please unfold the
illustration pages on the cover to enable you to
compare the text and pictures alongside.
Removing the adhesive tapes
The doors are secured to the housing with adhesive
tapes. Remove any adhesive tape residues with a
suitable petroleum-based cleansing agent.
Commercial use
Should you use your home fridge-freezer commercially or for purposes other than refrigeration,
freezing, and deep frozen storage of food and
drinks, you must observe the legal requirements
applicable to your area.
Location
The most suitable location is a dry room which can
be ventilated.
The refrigerating unit needs a good supply of air and
proper ventilation in order to function properly.
Please make sure that the air-vents in the plinth
underneath the kitchen cabinet and the air-shafts
behind it are not covered over or blocked.
Ambient temperature has an effect on the power
consumption of the unit. The appliance should
therefore:
- not stand in the direct sunshine, or close to a
radiator or cooker
- stand in a position where the ambient temperature corresponds with the climate category for
which the appliance is designed.
Y ou will find data on this on the rating plate, which is
in the interior of the appliance on the left hand side.
It will consist of one of the following:
Climate category Ambient temperature
from ... to ...
SN +10 to +32°C
N +16 to +32°C
ST +18 to +38°C
T +18 to +43°C.
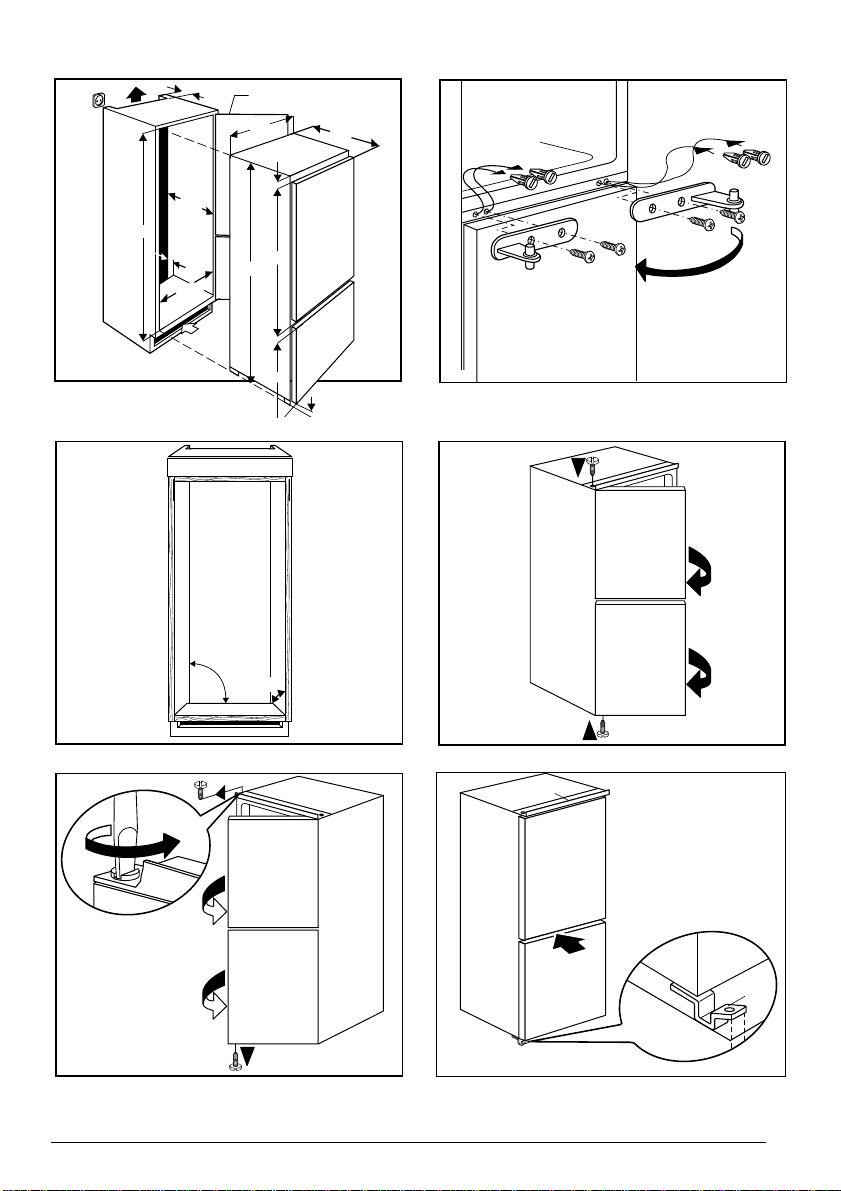
Appliance and installation
dimensions
Fig. 1
A = 200 cm2 air outlet
B = 200 cm2 air inlet
C = Split kitchen unit door
D = Depth overall
E = Height overall
14
Page 8

Your fridge-freezer needs air
The refrigerating unit does not require any maintenance.
All it needs is proper ventilation. Air intake takes place
through the base of the upright kitchen unit.
Provision for air outlet must be made at the top
behind the upright kitchen unit. In such a unit, a
clear air inlet and outlet cross-section of at least
200 cm2 must be provided in the base and towards
the room ceiling.
Ensure that these openings are not obstructed by
base panels, etc.!
Before using for the first time
In common with all new appliances, your fridgefreezer will smell "new". For this reason, the interior
of the fridge-freezer and all accessories should be
cleaned before use (see also "Cleaning and care").
Electrical connection
WARNING - THIS APPLIANCE MUST BE
EARTHED
Please ensure that the voltage and current indicated
on the rating plate agree with the voltage of your
electricity supply.
220/240 volts (i. e. 220/240 V AC).
If your appliance has been equipped with a mains
lead with a moulded-on type plug, you must comply
with the following regulations: The plug moulded on
to the cord incorporates a fuse. For replacement,
use a 13 amp BS 1362 fuse. Only ASTA approved
or certified fuses should be used. The fuse cover/
carrier must be replaced in the event of changing
the fuse. The plug must not be used if the fuse
cover/ carrier is lost. A replacement cover/carrier
must be obtained from an electrical goods retailer. If
the socket outlets in your home are not suitable for
the plug fitted to the appliance, then the plug must
be cut off and an appropriate one fitted. When
fitting the plug please note the following points:
Important
The wires in the mains lead are coloured in accordance with the following code:
Green and Yellow Earth
Blue Neutral
Brown Live
As the colours of the wires in the mains lead of this
appliance may not correspond with the coloured
markings identifying the terminals in your plug,
proceed as follows:
GB
1. The wire which is coloured green and yellow
must be connected to the earth terminal in your
plug, which is marked with the letter E or by the
earth symbol or coloured green, or green
and yellow.
2. The wire which is coloured brown must be connected to the live terminal which is marked with
the letter L or coloured red.
3. The wire which is coloured blue must be connected to the neutral terminal which is marked
with the letter N or coloured black.
When wiring the plug, ensure that all strands of wire
are securely retained in each terminal. Do not forget
to tighten the mains lead clamp on the plug.
Warning! A cut-off plug inserted into a 13 amp
socket is a serious safety (shock) hazard. Ensure
that the cut-off plug is disposed of safely.
Voltage 220/240 V AC
Fuse rating 13 amps
See rating plate for further information.
The rating plate is inside, on the left.
Preparing the upright kitchen
unit
Fig. 2
Before installing the upright furniture unit, the back
panel must be removed where fitted as a transport
safety device.
To ensure satisfactory operation and sealing of the
appliance, the upright kitchen unit with its intermediate panels must be exactly at right-angles in all
directions and must be aligned vertically.
The doors of the upright kitchen unit should be
aligned before the appliance is installed, and the
hinge screws should be tightened.
The distance between the kitchen unit door and unit
sides should be 1 mm.
Rehingeing the door
Figs. 3, 4, and 5
During transport, the doors are secured with bolts.
Unscrew the LH upper and lower bolts with a
screw-driver (Fig. 3). Both doors can now be
opened to the right.
If the doors are to be opened to the left to ensure
better operation, you should also unscrew the bolts
on the RH side and unhinge the upper door
upwards.
15
Page 9

GB
Unscrew the central door pivot and fit it on the left
(Fig. 4).
Remount the upper door and screw in the upper
bolt on the LH side (Fig. 5). Unscrew the lower bolt
on the RH side and screw it in on the LH side. Both
doors can now be opened to the left.
Installing, aligning, and fixing
Figs. 6, 7, 8, 9, and 10
Insert the fridge-freezer in the recess of the upright
kitchen unit until the upper limit strip (A) bears
against the unit ceiling or intermediate panel and
the lower door pivot (B) (Fig. 6) closes flush with the
unit floor at the front.
If a gap remains owing to a greater recess height
between the limit strip above and unit ceiling, this
can be closed by insertion of the supplied profile
sealing strip (C) (Fig. 7).
Slide and align a fridge-freezer with doors hinged on
the right until it bears against the LH side (Fig. 8)
and a fridge-freezer with doors hinged on the left
until it bears against the RH side.
Screw in mounting screws (D) above and below.
Insert ventilation grille (E).
Cut supplied the sealing strip (F) (Fig. 9) to length
and press in between the appliance and kitchen
unit side wall.
Seal mounting and hinge holes with supplied plugs
(G) (Fig. 10).
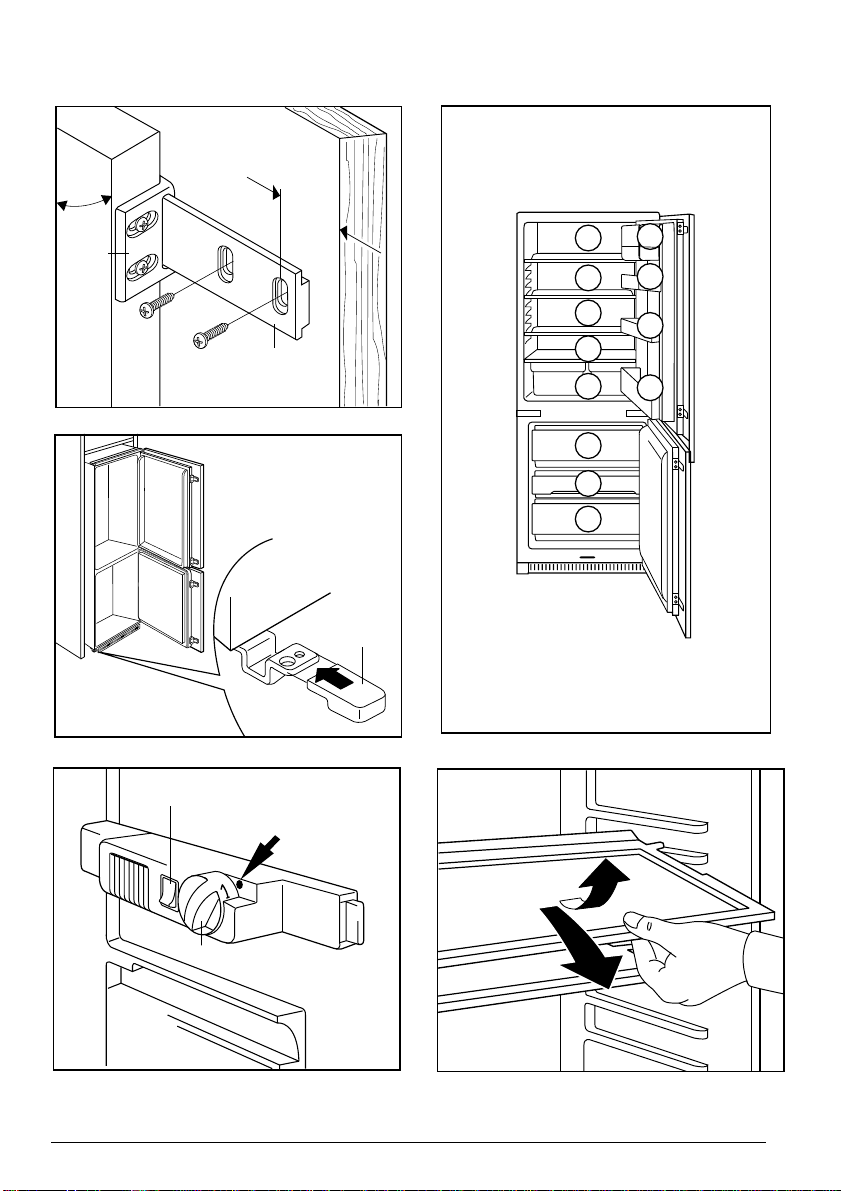
Connecting the door
Figs. 11,12, 13 and 14
Mounting positions for slide pieces (H) (Fig. 11)
should be marked on the appliance doors.
Drillholes of 2.7 mm dia. should be drilled and the
slide pieces screwed on, 2 per door. Open kitchen
unit and appliance doors 90° (Fig. 12). Place guide
pieces (K) on slide pieces (H), prepunch mounting
drillholes 26-30 mm away from the kitchen unit
door edge depending on the furniture sidewall
thickness, and screw on guide pieces (Fig. 13).
Check closing function of doors, and re-adjust slide
pieces (H) and guide pieces (K) as necessary.
Insert cover (O) on lower door pivot (Fig. 14).
Starting up and temperature
regulation
Fig. 15
Insert the plug of your fridge-freezer in a plug socket
with protective earth contact wired as prescribed.
The knob for temperature selection is located in the
upper RH part of the refrigerator compartment (A)
(Fig. 15).
The mark to which the knob must be set is located
on top of the thermostat housing (Fig. 15/arrow).
Setting "O" means: Off.
Rotation in direction "1": Lighting on, refriger-
ating unit on, the latter then operating automatically.
Setting "1" means: Highest temperature, warmest
setting.
Setting "6" means: Lowest temperature, coldest
setting.
The internal temperature is strongly affected by the
ambient temperature, loading, and frequent dooropening. If the setting is changed, the refrigerating
unit of your fridge-freezer does not start immediately if automatic defrosting is in progress.
When starting your fridge-freezer for the first time,
we recommend selection of setting "6" = lowest
temperature, coldest setting for 3-4 hours.
The necessary refrigerator and freezer compartment temperatures are then rapidly attained. After
3-4 hours, you can set back the knob to a medium
setting between 2 and 4.
Setting when the room
temperature is below 16 °C *)
Fig. 15
In the cold season in unheated rooms, the switch
(B) (Fig. 15) should be switched on. The red pilot
lamp in the switch comes on.
Through engagement of a low heating capacity of
8 W in the refrigerator compartment, it is ensured
that, at a low room temperature, the running time of
the refrigerating unit is prolonged and the storage
temperature of -18°C is attained in the freezer
compartment.
*) Not on all models
16
Page 10

Important!
At a room temperature above 16 °C, the switch (B)
should be switched off again (red light goes out),
since this causes higher power consumption.
Important note!
High room/ambient temperatures, coldest temperature selector setting, and high refrigerator compartment loading may cause continuous operation of
the refrigerating unit and frosting of the refrigerator
compartment rear wall.
Set the temperature selector to the warmest setting
(setting 4 or 5) to start the automatic defrosting
sequence in the refrigerator compartment.
Correct storage
Fig. 16
1 =Butter, cheese
2 =Eggs
3 =Drinks, preserves
4 = Preserves
5 =Pastries, convenience foods, dairy produce
6 =Meat, salami, and fish
7 =Fruit and vegetables
8 =Storage compartments for frozen food and
ice-cubes
9 = Compartment for freezing fresh food and
storage compartment for frozen food
For safety reasons (such as the risk of an explosion!)
containers containing inflammable gases, e.g.
aerosol cans or cigarette lighter refills, must never be
placed in the freezer or the refrigerator compartment.
Adjusting the storage racks
Fig. 17a
Storage shelves made either of glass or of plastic,
are included, depending on which version of which
model you have bought. You must push one of
these shelves into the lowest set of guides, just
above the containers for fruit and vegetables, and it
must stay in this position. If you wish to change the
distance between the other storage shelves, please
raise the shelf at the back and pull it slightly
forwards until it can be swivelled upwards or downwards and taken out. To insert it in a different position, please follow the same procedure in reverse.
VARIO glass shelf
Fig. 17b
If, for instance, you wish to store bottles, cans, or
GB
jars in the upright position, please move the front
half of the VARIO glass shelf (if fitted) to a different
level. You will thus gain the necessary space to
store tall items on the shelf below.
Adjusting the door rack
Fig. 18
Depending on the food stored, some door racks
can be changed to other holders or removed. Take
out the refrigerated food, press the door racks
upwards, reposition them, and press them back
into place.
Freezing fresh food
and storing frozen food
You can use the freezer compartment of your
fridge-freezer combination for freezing of fresh food
yourself.
Before filling the fridge-freezer for the first time with
frozen food (deep-frozen food), an inside temperature of -18 °C must have been attained. Were
commend you to place a commercially available
thermometer with a measurement range of +40°C/40°C in the central storage compartment or on the
frozen food. If you want to freeze fresh food yourself, please observe the following instructions to be
sure of obtaining the best results.
Freeze only sound fresh food. Do not freeze too
large a quantity at any one time. The quality of the
food is best preserved when it is frozen right
through to the core as quickly as possible. The
freezing capacity in 24 hours indicated on the rating
plate should not be exceeded.
If you want to freeze fresh food on several consecutive days, this should be limited to 2/3 to 3/4 of the
indicated quantity. If you want to utilize the
maximum freezing capacity, set the knob (Fig. 15)
to setting "6". For smaller quantities of up to 2 kg,
the knob need not be changed.
Place the packaged food to be frozen in the
upper storage compartment (9) (Fig. 16).
Take special care not to mix already frozen
foods with those not yet frozen.
After around 24 hours (earlier for smaller quantities),
set back the knob of the temperature selector to
the normal setting (between 2 and 4). After freezing,
you can place the frozen food at the appropriate
freezing level.
If further food is to be frozen, you must restack the
frozen food in the storage compartments (8)
17
Page 11

GB
(Fig. 16) to obtain free freezing space.
Note for test centres:
Stacking diagrams for determination of freezing
capacity and warm-up time can be requested direct
from the manufacturer.
Icemaking
Fill the ice-tray 3/4 full with cold water, place it in
storage compartments (8) or (9), and allow it to
freeze. The ice-cubes can be easily loosened by
twisting the ice-tray or by holding it for a short time
under running water. To ensure that you always
have stocks available, the ice-cubes can be stored
in the ice-box in the freezer compartment.
Storing frozen food in the
freezer compartment and the
do's and don'ts of
storing frozen food
Once the freezing process is completed, deepfrozen storage takes place in the temperature range
below -18 °C.
For storage of already frozen food, it is imperative to
note the storage time specified by the manufacturer
on the packaging. Make sure that only packaged
food is stored in the freezer, since unpackaged food
will soon dry out when exposed to the extreme cold.
With the exception of spirits and drinks containing a
higher percentage of alcohol, beverages in glass
bottles, particularly soft drinks containing carbon
dioxide, juices, beer, wine, etc., should not be stored
in the freezer. When the contents freeze, the glass
bottles will crack or even burst.
Never handle deep-frozen food with wet hands.
Your hands could easily become frozen to the food.
Never use the freezer as a means of cooling hot
meals, since this causes heavy frost formation
inside and an increase in electricity consumption.
Cold-pack accumulator
(Some models only)
In the event of a power cut, the cold pack accumulators (the cold pack accumulator) will prolong the
storage of frozen food by a few hours.
For safety reasons (in some models), during transport,
the cold-pack accumulators are placed (the cold pack
accumulator is placed) in the bottom drawer of the
freezer compartment.
To use them efficiently, place the frozen cold-pack
accumulators on top of frozen foods in the top drawer .
Frozen food symbols
Fig. 19
Wharever possible, separate the frozen food in the
compartments and place the supplied rider opposite the food type symbol concerned. This will give
you a better overall view of the food stored, will
enable you to avoid excessive door opening, and
will save you power. The figures beside the symbols
indicate the maximum storage time in months altogether for several types of frozen food.
Taking out the drawers
The storage baskets have an antitilt feature and are
retained in their end position. This assures safe and
convenient insertion and removal of frozen food.
To remove the storage baskets, withdraw them as
far as their catch, tilt them upwards, and pull them
out forwards.
Opening the freezer
compartment door hint on magnetic door seal
After opening and closing the door of the freezer
compartment whilst the latter is in operation, you
will not immediately be able to open the door again,
since a vacuum will have developed inside, keeping
the door closed until the pressures inside and
outside the door have equalized. After a few
minutes, you can easily re-open the door.
Defrosting
Figs. 20 and 21
The evaporator on the rear wall of the refrigerator
compartment is defrosted fully automatically. The
water evaporates automatically. This automatic
feature thus saves you laborious work.
Make sure that the drain opening of the drip gutter
(Fig. 20) is always clear and the thaw water can
flow out unimpeded.
Once to twice a year or whenever heavy frost builds
up the freezer compartment must be defrosted
and cleaned.
For this purpose the appliance should be
unplugged or otherwise disconnected from the
mains supply (by removing the fuse) and the door
left ajar.
In order to avoid excessive warming of the frozen
food, you should operate your the appliance on
18
Page 12

regulator setting "6" for about 6 to 12 hours beforehand, thus creating a "reserve" of coldness in the
frozen food.
The food still located in the freezer compartment is
then packed together as tightly as possible,
wrapped in several layers of newspaper, and stored
in a cool place.
You can collect the thaw water from the freezer
compartment by inserting the plastic scraper delivered with the fridge-freezer into the slit provided the
middle of the appliance underneath the drip gutter
and placing a bowl or similar underneath it (Fig. 21).
You can accelerate the defrosting process by
placing a bowl of hot water in the freeezer compartment and by removing detaching pieces of ice
before complete defrosting. Never attempt to accelerate the defrosting process by using other heat
sources, such as electric heating and warming
appliances, candles, or the like! After defrosting,
clean the interior of your fridge-freezer and its
accessories with lukewarm water to which a mild,
non abrasive detergent can be added. Finally, wash
with clean water and wipe dry.
Restart your fridge-feezer. The frozen food can be
loaded after around 30 minutes.
Cleaning and care
Your fridge-freezer should be cleaned at regular
intervals. This should preferably occur when the
appliance is empty or partly loaded. All food packages remaining in the freezer compartment,
hermetically packed if possible, should then be
wrapped in several layers of newspaper and stored
in a cool place (e. g. cellar).
To clean, take all storage baskets out of the freezer
compartment.
During cleaning, the appliance must basically not be
connected to the mains supply (pull out mains plug
or remove fuse).
For safety reasons, this appliance must never be
cleaned with steam-cleaning equipment. Moisture
could find its way into the electronic components,
and steam could cause damage to the plastic
parts.
Make sure that the drain opening of the drip gutter
in the rear wall of the refrigerator compartment
(Fig. 20) is always free. If the water drain opening
becomes choked, it is to be cleaned with the aid of
a wire. Some organic solvents as well as essential
oils (e. g. juice from lemon and orange peel, butyric
acid) attack the plastic parts.
GB
Do not forget that, even in the refrigerator, food
stored too long may spoil. To prevent any odours
from forming, the contents should therefore be
checked from time to time (including accessories)
and thoroughly cleaned with lukewarm water to
which a mild, non-abrasive cleaning agent
containing no acetic acid can be added. Finally,
wash with clean water and wipe dry. After cleaning
of the refrigerator compartment, promptly reconnect the appliance to the power supply (see section
on Starting up).
At least once a year, you should thoroughly clean
the heat-emitting condenser (heat exchanger), the
metal grille on the rear wall of your appliance.
When not in use
If your fridge-freezer is to remain unused for any
length of time, it must be disconnected (unplugged)
from the electricity supply.
The appliance should then be cleaned thoroughly
and the appliance doors left ajar to prevent any
odours from forming.
Internal lighting
Fig. 22
Light bulb data: 220 V, 15 W
E 14 socket (never insert a bulb of more than 15 W).
To change the light bulb (A):
Pull out mains plug or remove fuse from
holder. Unscrew the light cover securing screws,
unhook the moving part. Untwist light bulb and
replace from below.
Faults and servicing
In order to keep your appliance in perfectly
safe condition, you should arrange for repairs,
particularly to the "live" parts, to be carried
out only by qualified electricians.
In the event of a break-down you should therefore
contact your electrical dealer or our Customer
Service Centre.
Before calling the Service Centre, please check
whether there is power in the mains socket (e. g. by
plugging a lamp in). Your local electrician will repair
any defects in the mains supply.
If the defect lies in the appliance, please inform the
nearest Service Centre. In order to avoid unnecessary travel or expense, please state:
- Model description
- E-number
19
Page 13

GB
- F-number of your appliance.
Y ou will find these data on the rating plate on the left
inside your appliance. We recommend that you
enter them here:
- Model description. . . . . . . . . . . . . . . . . . . . . . .
- E-number. . . . . . . . . . . . . . . . . . . . . . . . . . . . .
- F-number.. . . . . . . . . . . . . . . . . . . . . . . . . . . . .
Please note: We have to make a charge if our
Customer Service technician is called in for no
adequate reason, even if the guarantee has
not yet expired.
Minor repairs that you
can carry out yourself
- Spare parts:
Spare parts can be ordered from the service
centre. You can fit these yourself without any
special skill or training, e. g.
- internal equipment parts, such as closed containers,
egg holders,
door racks,
fruit and vegetable drawers,
storage racks,
ice-box and ice-tray.
Hints on proper use
Store your food, depending on type and sensitivity,
in the appropriate temperature zones. This will
enable you to achieve an optimum storage duration
(see "Correct storage", Fig. 16). Ensure good packaging and coverage of food intended for storage in
the refrigerator to retain flavour, colour, moisture,
and freshness.
Clean the refrigerator compartment regularly to
ensure hygienic storage of food and to prevent
undesirable odours from forming.
Note the storage duration of deep-frozen food in
the freezer compartment to avoid quality impairment.
Never place hot food in the refrigerator compartment or freezer compartment for cooling.
- Do not install your fridge-freezer next to a radiator, oven, or in direct sunlight, since, through
high ambient temperature, the temperature regulator switches on the refrigerating unit more frequently and for longer.
- Do not place any hot food in the refrigerator
compartment or freezer compartment - first
allow the food to cool to room temperature.
- Do not open the doors unnecessarily and close
them again as quickly as possible.
- Check the storage temperature in the freezer
compartment with a thermometer.
- Set the most energy-saving frozen food storage
temperature (see "Starting up and temperature
regulation").
- Ensure good ventilation.
- Keep the heat-emitting condenser (heat
exchanger), the metal grille on the rear wall of
your appliance, clean. Thoroughly clean it at
least once per year.
If you ever move house
If your freezer compartment is not fully loaded, pack
all the frozen food in concentrated fashion at a few
storage levels.
Switch the temperature selector knob to setting "6"
24 hours before the removal van leaves to build up
a low-temperature reserve in the frozen food.
Secure the doors against opening during transport.
Place your fridge-freezer on the removal van last so
that you can unload it first and replug it into the
mains supply.
Hints on energy-saving
One or two additional hints on energy-saving are
given below:
20
Page 14

ET
AUS
ERFAHRUNG
GUT
AEG Hausgeräte GmbH
Postfach 1036
D-90327 Nürnberg
Copyright by AEG
H 271 280 000 - 0497/00 - 151
2222 178-54
123456789101112/97
 Loading...