

Page 1

SANTO
Electronic Refrigerator/Freezer
Combinaciones de refrigeradores y
congeladores electrónicos
Operating Instructions
Instrucciones para el uso
818 41 56-00/1
Page 2

Dear customer,
Pri
Before placing your new refrigerator/freezer into operation please read
these operating instructions carefully. They contain important
information for safe use, for installation and for care of the appliance.
Please keep these operating instructions for future reference. Pass them
on to possible new owners of the appliance.
Notes which are important for your safety or for the proper function-
1
ing of the appliance are stressed with a warning triangle and/or with
signal words (Warning!, Caution!, Important!). Please observe the following carefully.
0 1. This symbol and numbered instructions guide you step by step in the
operation of the appliance.
2. .....
Supplementary information regarding operation and practical uses of
3
the appliance appear after this symbol.
Tips and notes concerning economical and environmentally sound use
2
of the appliance are marked with the cloverleaf.
Explanations of the technical terminology used in the operating
instructions can be found at the end in the section "Technical
Terminology".
The operating instructions contain instructions for the correction of
possible malfunctions by the user in the section "What to do if ...". If
these instructions should not be sufficient, please contact your local
AEG Service Force Centre.
nted on paper manufactured with environmentally sound processes.
he who thinks ecologically acts accordingly ...
2 818 41 56-00/1
Page 3

Contents
Important Safety Instructions . . . . . . . . . . . . . . . . . . . . . . . . . . . . . . . . . . . . 5
Environmental Information . . . . . . . . . . . . . . . . . . . . . . . . . . . . . . . . . . . . . . 7
Appliance Transport . . . . . . . . . . . . . . . . . . . . . . . . . . . . . . . . . . . . . . . . . . . . 8
Before Use . . . . . . . . . . . . . . . . . . . . . . . . . . . . . . . . . . . . . . . . . . . . . . . . . . . . . 9
Packaging . . . . . . . . . . . . . . . . . . . . . . . . . . . . . . . . . . . . . . . . . . . . . . . . . . . . . . 9
Installation . . . . . . . . . . . . . . . . . . . . . . . . . . . . . . . . . . . . . . . . . . . . . . . . . . . . 11
Installation Location . . . . . . . . . . . . . . . . . . . . . . . . . . . . . . . . . . . . . . . . . . . . . 11
The refrigerator/freezer needs ventilation . . . . . . . . . . . . . . . . . . . . . . . . . . . 12
Appliance Alignment . . . . . . . . . . . . . . . . . . . . . . . . . . . . . . . . . . . . . . . . . . . . . 12
Electrical Connection . . . . . . . . . . . . . . . . . . . . . . . . . . . . . . . . . . . . . . . . . . . . 12
Carbon filter . . . . . . . . . . . . . . . . . . . . . . . . . . . . . . . . . . . . . . . . . . . . . . . . . . . . 13
Reversing The Door . . . . . . . . . . . . . . . . . . . . . . . . . . . . . . . . . . . . . . . . . . . . . 14
Appliance Description . . . . . . . . . . . . . . . . . . . . . . . . . . . . . . . . . . . . . . . . . . . 18
View of Appliance . . . . . . . . . . . . . . . . . . . . . . . . . . . . . . . . . . . . . . . . . . . . . . . 18
Freezer tray . . . . . . . . . . . . . . . . . . . . . . . . . . . . . . . . . . . . . . . . . . . . . . . . . . . . . 19
Cold Accumulation Block . . . . . . . . . . . . . . . . . . . . . . . . . . . . . . . . . . . . . . . . . 19
Control Panel . . . . . . . . . . . . . . . . . . . . . . . . . . . . . . . . . . . . . . . . . . . . . . . . . . . 20
Temperature setting buttons . . . . . . . . . . . . . . . . . . . . . . . . . . . . . . . . . . . . . . 20
Temperature Displays . . . . . . . . . . . . . . . . . . . . . . . . . . . . . . . . . . . . . . . . . . . . 21
ALARM OFF button . . . . . . . . . . . . . . . . . . . . . . . . . . . . . . . . . . . . . . . . . . . . . . 21
Prior to Initial Start-Up . . . . . . . . . . . . . . . . . . . . . . . . . . . . . . . . . . . . . . . . . 22
Initial Start-Up . . . . . . . . . . . . . . . . . . . . . . . . . . . . . . . . . . . . . . . . . . . . . . . . . 22
Temperature Adjustment . . . . . . . . . . . . . . . . . . . . . . . . . . . . . . . . . . . . . . . . 23
COOLMATIC/FROSTMATIC . . . . . . . . . . . . . . . . . . . . . . . . . . . . . . . . . . . . . . . 24
COOLMATIC . . . . . . . . . . . . . . . . . . . . . . . . . . . . . . . . . . . . . . . . . . . . . . . . . . . . 24
Quick chill . . . . . . . . . . . . . . . . . . . . . . . . . . . . . . . . . . . . . . . . . . . . . . . . . . . . . . 24
FROSTMATIC . . . . . . . . . . . . . . . . . . . . . . . . . . . . . . . . . . . . . . . . . . . . . . . . . . . . 25
Holiday Mode . . . . . . . . . . . . . . . . . . . . . . . . . . . . . . . . . . . . . . . . . . . . . . . . . . 25
Switching the Appliance Off . . . . . . . . . . . . . . . . . . . . . . . . . . . . . . . . . . . . . 26
818 41 56-00/1 3
Page 4

Contents4
Control and Information Systems . . . . . . . . . . . . . . . . . . . . . . . . . . . . . . . . . 27
"Open Door"-Warning . . . . . . . . . . . . . . . . . . . . . . . . . . . . . . . . . . . . . . . . . . . . 27
Temperature Warning . . . . . . . . . . . . . . . . . . . . . . . . . . . . . . . . . . . . . . . . . . . . 27
Function Errors . . . . . . . . . . . . . . . . . . . . . . . . . . . . . . . . . . . . . . . . . . . . . . . . . . 28
Opening the Freezer Compartment Door . . . . . . . . . . . . . . . . . . . . . . . . . . 28
Interior Accessories . . . . . . . . . . . . . . . . . . . . . . . . . . . . . . . . . . . . . . . . . . . . . 29
Storage Shelves . . . . . . . . . . . . . . . . . . . . . . . . . . . . . . . . . . . . . . . . . . . . . . . . . 29
Variable Inner Door . . . . . . . . . . . . . . . . . . . . . . . . . . . . . . . . . . . . . . . . . . . . . . 29
LONGFRESH 0 °C cold section . . . . . . . . . . . . . . . . . . . . . . . . . . . . . . . . . . . . . 29
Quick Chill Shelf . . . . . . . . . . . . . . . . . . . . . . . . . . . . . . . . . . . . . . . . . . . . . . . . 30
Bottle- and Can Holder . . . . . . . . . . . . . . . . . . . . . . . . . . . . . . . . . . . . . . . . . . . 30
Dismantling of the Bottle- and Can Holder . . . . . . . . . . . . . . . . . . . . . . . . . . 31
Bottle Holder . . . . . . . . . . . . . . . . . . . . . . . . . . . . . . . . . . . . . . . . . . . . . . . . . . . 31
Correct storage . . . . . . . . . . . . . . . . . . . . . . . . . . . . . . . . . . . . . . . . . . . . . . . . . 32
Freezing . . . . . . . . . . . . . . . . . . . . . . . . . . . . . . . . . . . . . . . . . . . . . . . . . . . . . . . 35
Frozen Storage . . . . . . . . . . . . . . . . . . . . . . . . . . . . . . . . . . . . . . . . . . . . . . . . . 36
Storage Goods Symbols/Freezing Calendar . . . . . . . . . . . . . . . . . . . . . . . . . 36
Preparation of Ice Cubes . . . . . . . . . . . . . . . . . . . . . . . . . . . . . . . . . . . . . . . . 37
Energy Saving Advice . . . . . . . . . . . . . . . . . . . . . . . . . . . . . . . . . . . . . . . . . . . 37
Defrosting . . . . . . . . . . . . . . . . . . . . . . . . . . . . . . . . . . . . . . . . . . . . . . . . . . . . . 38
Fridge zone and LONGFRESH 0 °C cold zone . . . . . . . . . . . . . . . . . . . . . . . . . 38
Freezer Compartment Defrosting . . . . . . . . . . . . . . . . . . . . . . . . . . . . . . . . . . . 38
Maintenance and Cleaning . . . . . . . . . . . . . . . . . . . . . . . . . . . . . . . . . . . . . . 39
Internal Cleaning . . . . . . . . . . . . . . . . . . . . . . . . . . . . . . . . . . . . . . . . . . . . . . . . 40
External Cleaning . . . . . . . . . . . . . . . . . . . . . . . . . . . . . . . . . . . . . . . . . . . . . . . . 41
What to do if ... . . . . . . . . . . . . . . . . . . . . . . . . . . . . . . . . . . . . . . . . . . . . . . . . 42
Correcting Malfunctions . . . . . . . . . . . . . . . . . . . . . . . . . . . . . . . . . . . . . . . . . . 42
Replacing the Light Bulb . . . . . . . . . . . . . . . . . . . . . . . . . . . . . . . . . . . . . . . . . . 44
Normal Operating Sounds . . . . . . . . . . . . . . . . . . . . . . . . . . . . . . . . . . . . . . . 45
Regulations, Standards, Guidelines . . . . . . . . . . . . . . . . . . . . . . . . . . . . . . . 45
Technical Terminology . . . . . . . . . . . . . . . . . . . . . . . . . . . . . . . . . . . . . . . . . . 46
Customer Service . . . . . . . . . . . . . . . . . . . . . . . . . . . . . . . . . . . . . . . . . . . . . . . 47
4 818 41 56-00/1
Page 5

1 Important Safety Instructions
The safety of our appliances is in accordance with recognised technological standards and appliance safety legislation. We nevertheless feel
that it is important to acquaint you with the following safety guidelines:
Use for Intended Purpose
• The appliance is intended for use at home. Depending on the preset
operation mode, this appliance becomes suitable for cooling,
freezing, for frozen storage of foods or for ice preparation. The
manufacturer assumes no liability for damages occurring through
improper operation or use of the appliance for unintended purposes.
• Alterations or changes to the appliance are not permitted for reasons
of safety.
• If you should use this appliance in a commercial application or for
purposes other than cooling, freezing, or frozen storage of foods,
please observe all valid legal regulations for your application.
Prior to initial start-up
• Check the appliance for transport damage. Do not under any
circumstances connect a damaged appliance! Please contact your
supplier in the event of damage.
• Make sure that the power plug is not squashed or damaged by the
back of the appliance. A damaged power plug may overheat and
cause a fire.
• If the power plug socket is loose, do not insert the power plug. There
is a risk of electric shock or fire.
Refrigerant
The refrigerant isobutane (R600a) is contained within the refrigerant
circuit of the appliance, a natural gas with a high level of
environmental compatibility, which is nevertheless flammable.
• Warning - During transportation and installation of the appliance,
be certain that none of the components of the refrigerant circuit
become damaged.
• If the refrigerant circuit should become damaged:
– avoid open flames and sources of ignition;
– thoroughly ventilate the room in which the appliance is situated.
818 41 56-00/1 5
Page 6

Important Safety Instructions
Safety for Children
• Packaging materials (e.g. films, styrofoam) can be dangerous for
children. Danger of suffocation! Keep packaging materials away from
children!
• Before disposing of old appliances make them inoperable. Remove
plug from mains, sever the power cable, remove or destroy any snap
or latch closures. This eliminates the danger that playing children lock
themselves into the appliance (danger of suffocation!) or place
themselves into other life-endangering situations.
• Children often do not recognise the dangers involved with household
appliances. Please provide for the necessary supervision and do not
allow children to play with the appliance! Inform children of the possible dangers and instruct them in the correct use of the appliance.
Daily Operation
• Containers with flammable gases or fluids can develop leaks through
contact with the cold. Danger of explosion! Do not store containers
with flammable substances, such as aerosol cans, refill cartridges for
cigarette lighters etc. in the appliance.
• Bottles and cans may not be placed in the freezer compartment. They
can burst when the contents freeze - or even explode if the contents
contain carbonic acid! Never place sodas, juices, beer, wine,
champagne etc. into the freezer compartment. Exception: Spirits with
high alcohol content may be stored in the freezer compartment.
• Do not place ice cream or ice cubes directly from the freezer
compartment into the mouth. Very cold ice can freeze to the lips or
tongue and cause injury. Inform children of this danger.
• Never touch frozen goods with wet hands. Hands can freeze to the
goods.
• Warning - Do not operate any electrical appliances in the appliance
(e.g. electric ice cream makers, mixers etc.).
• Warning - Do not cover or obstruct the ventilation openings as this
will impair the operation of the appliance.
• Warning - Do not use any mechanical devices or other artificial
means to speed up defrosting unless they are recommended by the
manufacturer.
• Before cleaning the appliance switch off and remove the plug from
the mains, or switch off or turn out the circuit breaker or fuse.
• Placing frozen goods on the top of the appliance can lead to the
accumulation of condensation on the top panel through contact with
6 818 41 56-00/1
Page 7

the cold. Electronic components are housed within this top panel. If
water should drip onto these components, the appliance could be
damaged by a short circuit. For this reason do not place frozen goods
on top of the appliance.
• Do not remove the power cord by pulling on its lead, particularly
when the appliance is being pulled out of its niche. Damage to the
cord may cause a short circuit, fire and/or electric shock.
• Do not place heavy articles or the appliance itself on the power cord.
There is a risk of a short circuit and fire.
• If the power cord is damaged, it must be replaced by a certified
service agent or qualified personnel.
In case of malfunction
• If a malfunction should occur at the appliance, refer first to the
section "What to do if ..." in these operating instruction. If the
instructions in this section are not sufficient, do not undertake any
further work on your own.
• Refrigerators or feezers may only be repaired by trained personnel.
Repairs carried out by untrained personnel can lead to substantial
danger. Please contact your dealer or our customer service
department for repairs.
Environmental Information
2
Packaging material
The packaging materials are environmentally friendly and can be recycled. The plastic components are identified by markings, e.g. >PE<,
>PS<, etc. Please dispose of the packaging materials in the appropriate
container at the community waste disposal facilities.
2 Old appliance
The symbol
product may not be treated as household waste. Instead it shall be
handed over to the applicable collection point for the recycling of electrical and electronic equipment. By ensuring this product is disposed of
correctly, you will help prevent potential negative consequences for the
environment and human health, which could otherwise be caused by
inappropriate waste handling of this product. For more detailed information about recycling of this product, please contact your local city
office, your household waste disposal service or the shop where you
purchased the product.
818 41 56-00/1 7
W on the product or on its packaging indicates that this
Page 8
When disposing of your old appliance:
• Make the appliance unusable by cutting off the cable and remove
any door catches to ensure small children cannot be trapped inside.
• The appliance may not be disposed of with domestic waste or bulky
refuse.
• The refrigerant circuit, especially the heat exchanger at the back of
the appliance, may not be damaged.
Help to keep your country tidy - use an authorised disposal site.
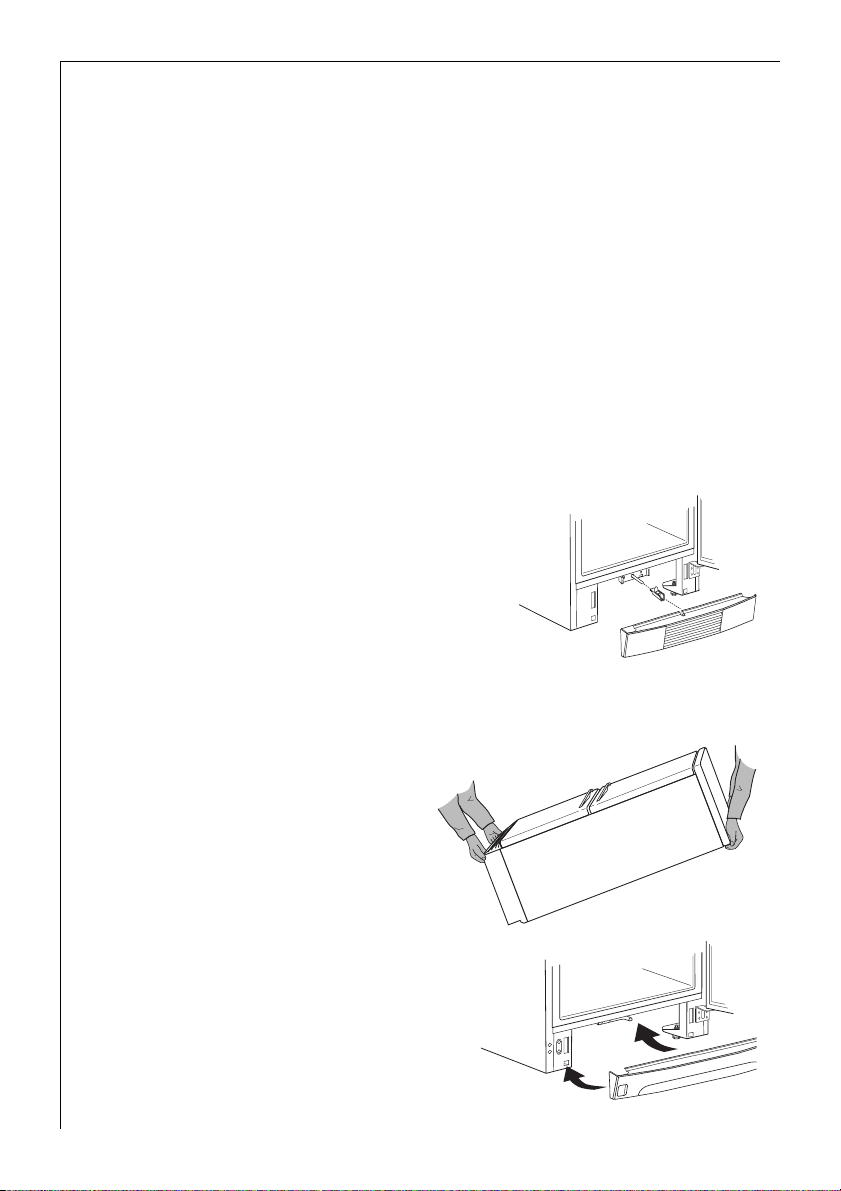
Appliance Transport
Two persons are required to transport the appliance. Two handles are
provided on the back of the appliance at the top to enable a better
hold. Before transporting, the plinth cover must be removed to prevent
damage.
0 1. To remove the plinth cover from the
stops, tilt downwards and then pull
forwards.
Important: Do not damage door
contact (if present)
2. When the appliance is standing in
the desired place, attach the plinth
cover. Make sure that the door
contact (if present) is not damaged and that it engages in the
corresponding aperture in the plinth cover.
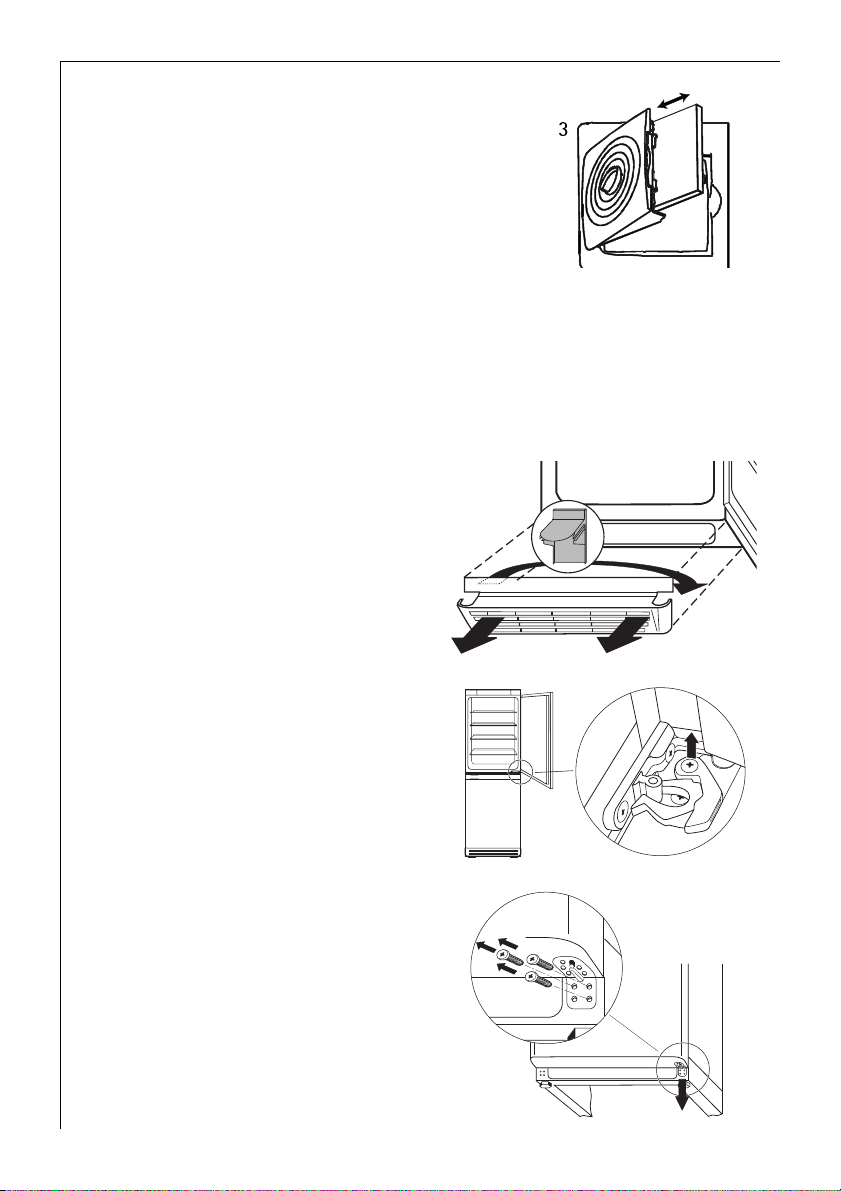
3. Grip the appliance with the
recessed handles positioned as
in the drawing, and transport
the appliance.
4. When the appliance is standing in
the desired place, attach the plinth
cover. First hook at the hitches on
the lower edge, then press the grid
2
in position. Make sure that the door
contact (if present) is not damaged
and that it engages in the corre-
1
sponding aperture in the plinth cover.
8 818 41 56-00/1
Page 9
Before Use
Packaging
0 1. Remove all adhesive tape and packaging from the interior of the appli-
ance.
Any remnants of adhesive can be removed with white spirit.
3
2. Remove the transport protection pieces and pull off the adhesive tape.
3. Wash the inside of the appliance with lukewarm water with a little
bicarbonate of soda added (5 ml to 0.5 litre of water). Do not use soap
or detergent as the smell may linger. Dry the appliance thoroughly.
818 41 56-00/1 9
Page 10

Remove the transport fittings from
the storage shelves:
4. Slide the fittings securing the shelf
forward to the thicker section on
the edge of the storage shelf.
5. Take hold of the shelf at the back
and together with the fittings slide
the storage shelf far enough forward so that it can be hinged
downwards and the fittings can be
removed from the guides.
10 818 41 56-00/1
Page 11

Installation
Installation Location
The appliance should be installed in a well ventilated, dry room.
Energy use and efficient performance of the appliance is affected by
the ambient temperature.
The appliance should therefore
– not be exposed to direct sunlight;
– not be installed next to radiators, cookers or other sources of heat;
– only be installed at a location whose ambient temperature
corresponds to the climate classification, for which the appliance is
designed.
The climate classification can be found on the rating plate, which is
located at the left on the inside of the appliance.
The following table shows which ambient temperature is correct for
each climate classification:
Climate classification for an ambient temperature of
SN +10 to +32 °C
N +16 to +32 °C
ST +18 to +38 °C
T +18 to +43 °C
If installation next to a source of heat is unavoidable, the following
minimum clearances must be maintained at the sides of the appliance:
– for electric cookers 3 cm;
– for oil and coal fired ranges 30 cm.
If these clearances cannot be maintained a heat insulating pad is required between the cooker and the refrigeration appliance.
818 41 56-00/1 11
Page 12
Installation
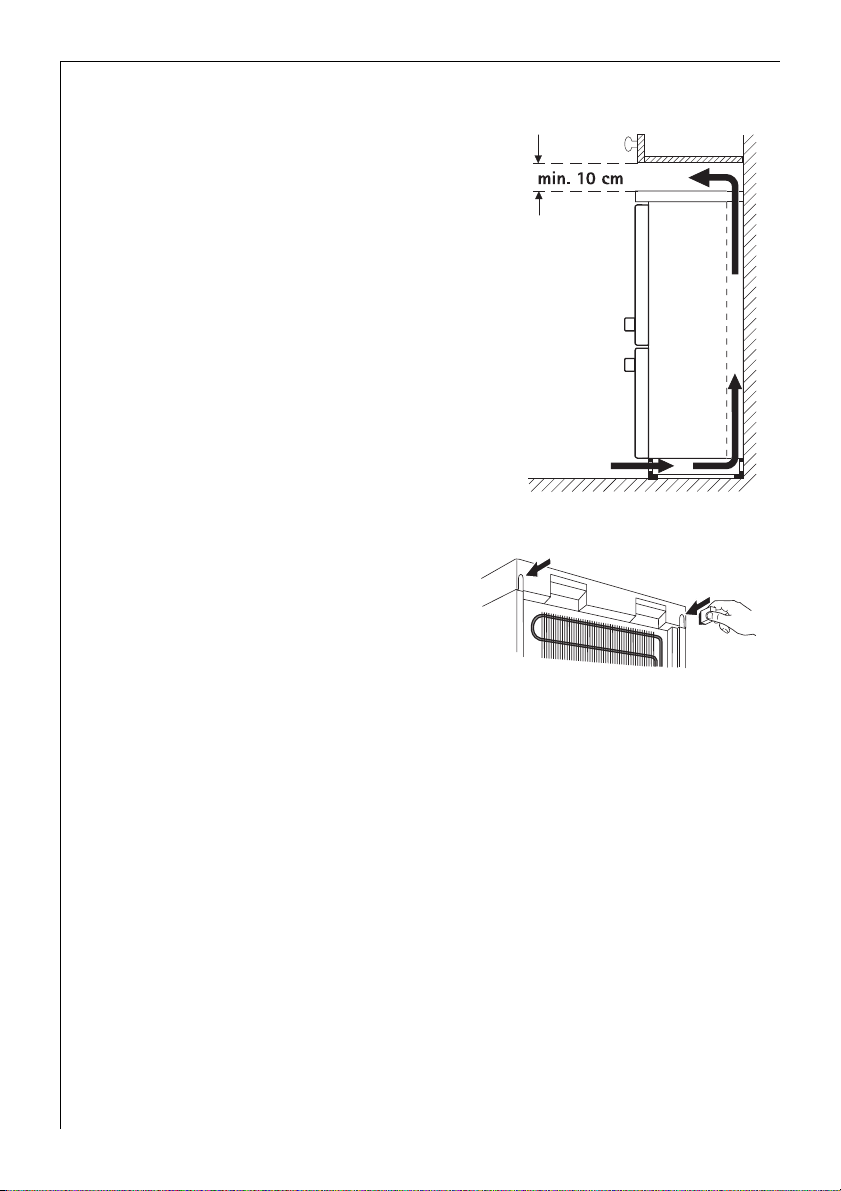
The refrigerator/freezer needs ventilation
Air is fed under the door through the
vent slots in the base and is exhausted
upwards along the back wall. To ensure
proper air circulation never cover or
alter the vent openings.
Important! If the appliance is installed
under a hanging cabinet, a clearance of
at least 10 cm between the top of the
appliance and the cabinet above it must
be maintained.
Please check whether, after installing
your appliance and especially after
reversing the door, the door seal seals
tightly. A badly fitting door seal may
lead to heavy frosting and a higher
power consumption (see also "What to
do if ...“).
Remove the two wall spacers from
the appliance accessories pack and,
in accordance with the illustrations,
fix them at the top of the rear of the
appliance so that the distance from
the wall required for the necessary
ventilation is ensured.
Appliance Alignment
0 1. The appliance must be level. Please compensate for unevenness in the
floor by turning the two adjustable feet at the front.
Electrical Connection
A properly installed socket outlet with earthing contact is required for
electrical connection. Electrical fuse protection must be of at least 10
ampere.
If the outlet socket is no longer accessible after installation of the
appliance, appropriate measures must be taken during electrical installation to assure that the appliance can be disconnected from the mains
(e.g. fuse, circuit breaker, non-operate current safety-switch or the like,
with a contact opening of at least 3 mm).
12 818 41 56-00/1
Page 13
Installation
0 1. Before initial start-up, refer to the appliance rating plate to ascertain if
supply voltage and current values correspond with those of the mains
at the installation location.
e.g.: AC 220 ... 240 V 50 Hz or
220 ... 240 V~50 Hz
(i.e. 220 to 240 volts alternating current, 50 Hertz)
The rating plate is inside the appliance at the left.
Warning: To avoid potential danger, if the mains connection lead of
this appliance is damaged, it must be replaced by our customer service
representative or a person with similar qualifications.
Warning: Under no circumstances should the appliance be connected
to electronic “power saving plugs” or to a.c.-d.c. converters which convert direct current to 230 V alternating current (e.g., solar installations,
ship networks)
Carbon filter
There is a active carbon filter in the rear wall of the fridge section. The
carbon filter cleans the air in the fridge section and in the LONGFRESH
0°C cold section by binding unpleasant smells.
Tip: The active carbon filter is a part subject to wear and is not covered
by the warranty.
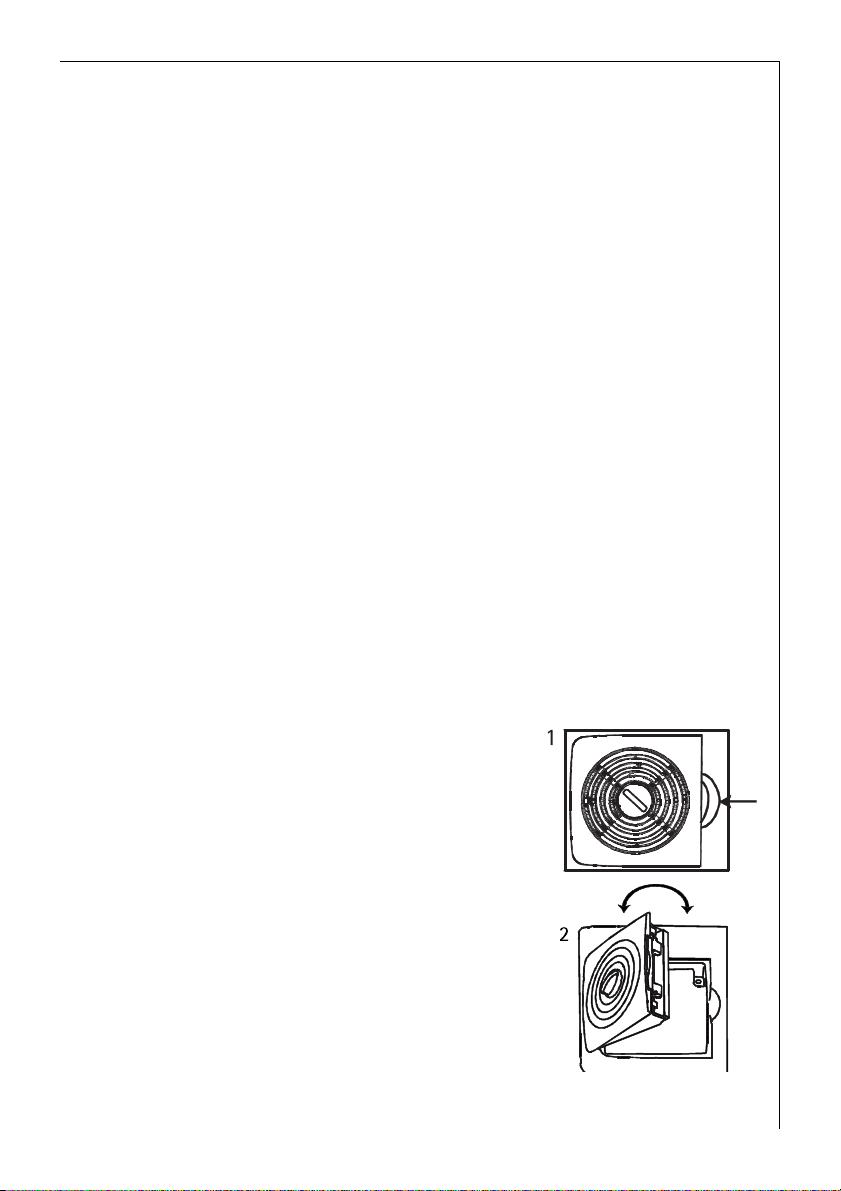
Inserting and changing the active carbon filter:
When the fridge is delivered, the carbon filter is packed in a plastic bag
to ensure a long life. Before using the appliance for the first time, the
carbon filter must be inserted behind the air discharge grill.
With the fridge operating normally, the
carbon filter should be changed once a year
to ensure optimum function.
New carbon filters can be obtained from
specialist dealers or from the customer care
department.
0
1. To open the grill, press the lever on the right
of the grill (1) and open the grill forwards (2).
2. To change the old carbon filter, pull it from
the runners (3).
818 41 56-00/1 13
Page 14
3. Insert the new carbon filter into the runners
of the grill (3) and press the grill closed until
it snaps into place.
Take care when handling the filter to prevent
1
dislodging carbon particles.
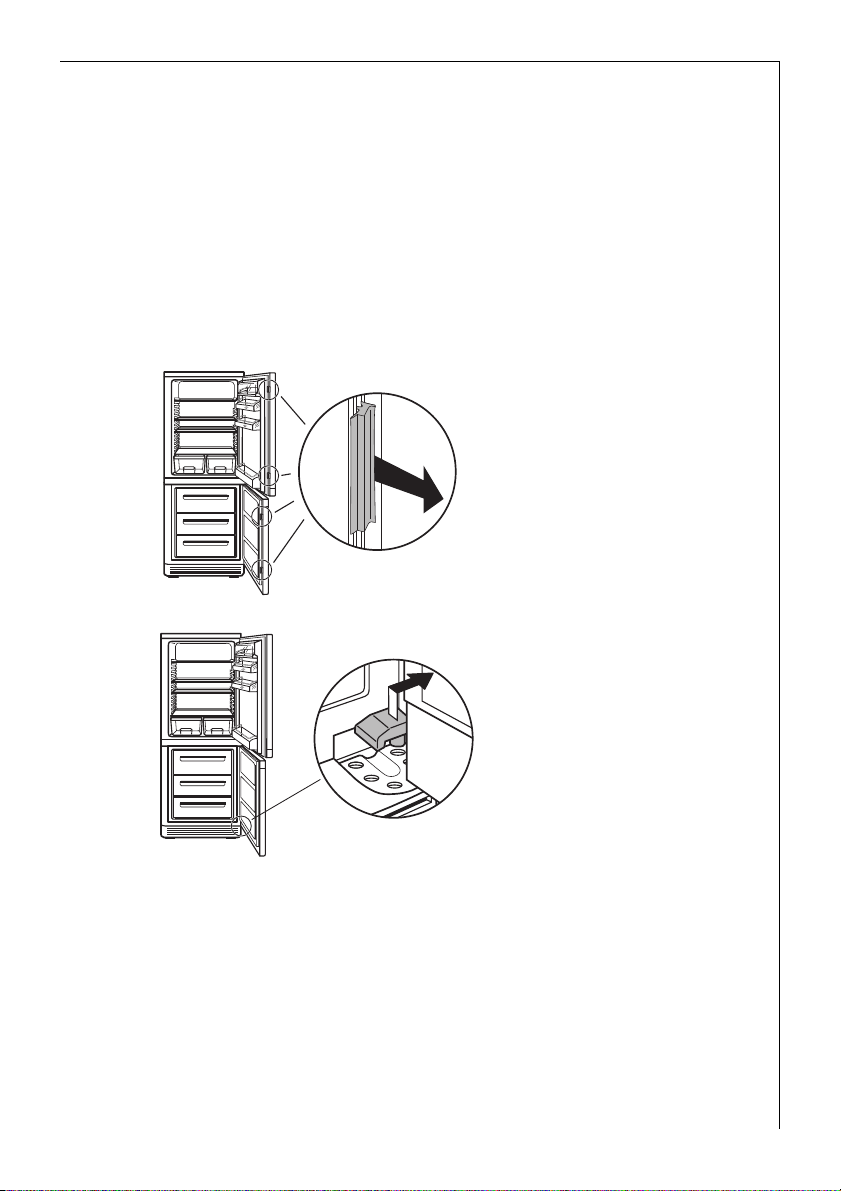
Reversing The Door
The door hinges can be changed from right (as supplied) to left if
required to suit the location where the appliance is installed.
Warning! Unplug from the mains, before reversing the door.
1
0 1. Open the freezer compartment
door and remove the plinth to
the front. Move the door bearing
cover on the plinth from the left
to the right.
2. Close the freezer compartment
door. Open the fridge compartment door and unscrew the
retaining screw for the self-closing mechanism on the top of the
freezer compartment door.
3. With the freezer compartment
door closed, remove the crosshead screws from the lower door
bearing and remove the door
bearing downwards.
14 818 41 56-00/1
Page 15
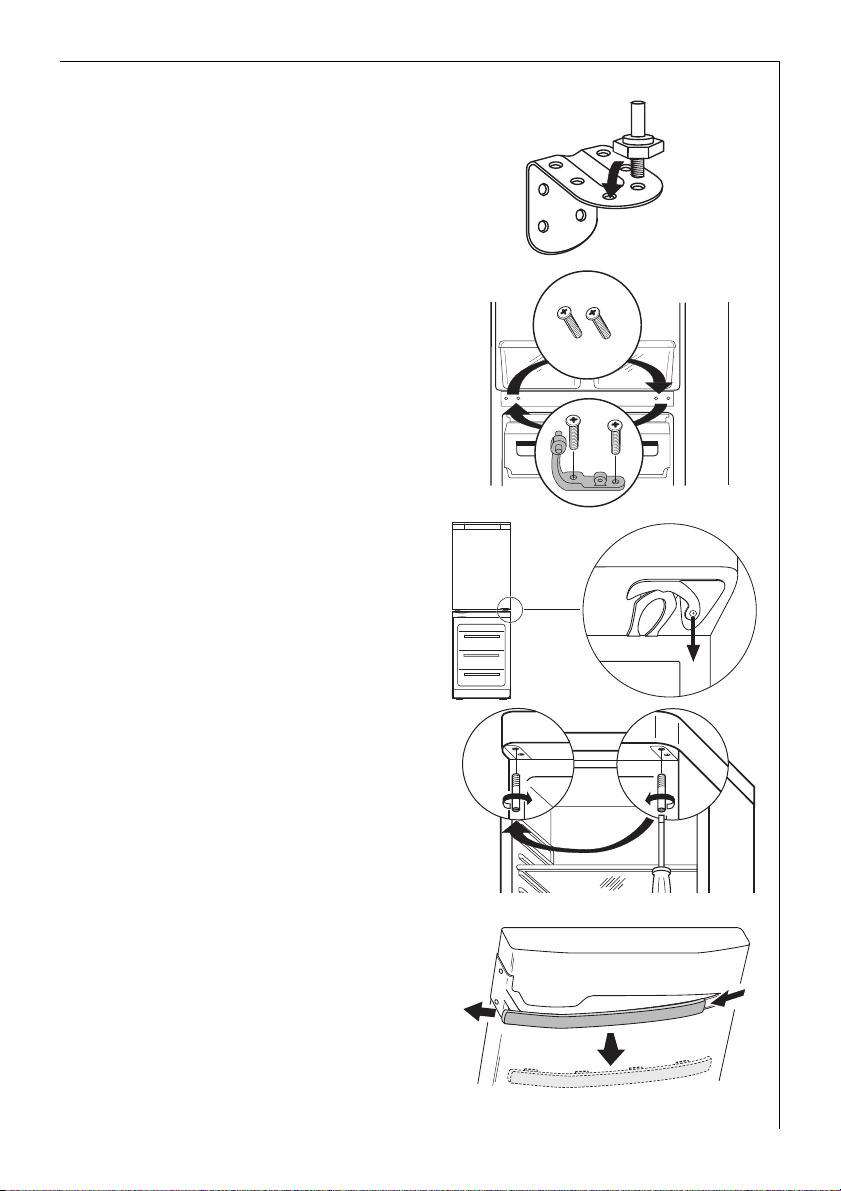
4. Move the bearing pivot from the
right to the left hand hole.
Remove the freezer compartment
door carefully to the front and
place on one side.
5. Unscrew the centre door bearing.
6. Remove the fridge compartment
door carefully to the front and
place on one side.
7. Unscrew the retaining screw for
the self-closing mechanism on the
bottom of the fridge compartment door.
Reversing The Door
8. Move the upper bearing pivot to
the left.
9. Push the cover on the door handle
to the left and remove it by bringing it towards you.
818 41 56-00/1 15
Page 16
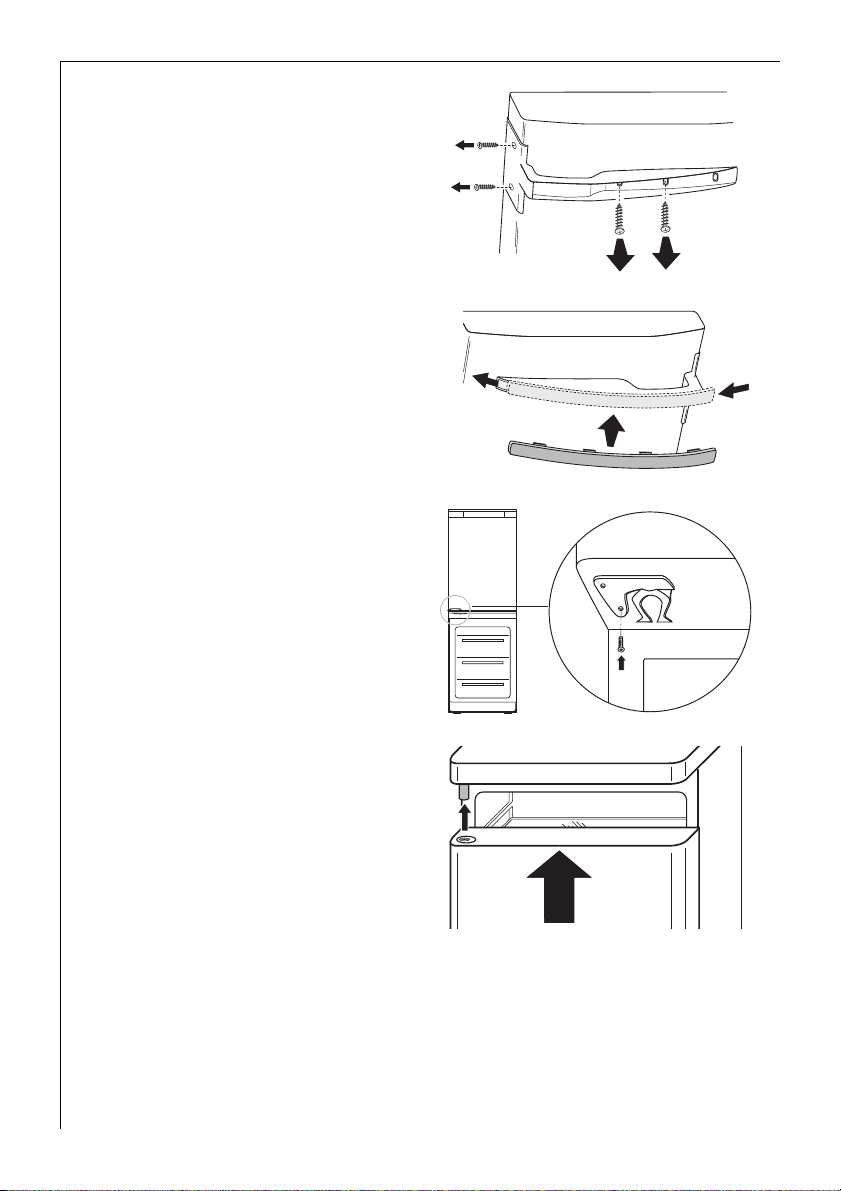
Reversing The Door1
10. Unscrew the door handle, turn it
180° and screw it back on to the
right-hand side of the door.
11. Replace the cover for the door
handle and push it towards the
left as far as it will go.
12. Fasten the self-closing mechanism
to the bottom left of the fridge
compartment door.
13. Carefully slide the fridge compartment door onto the top bearing pivot and close.
16 818 41 56-00/1
Page 17
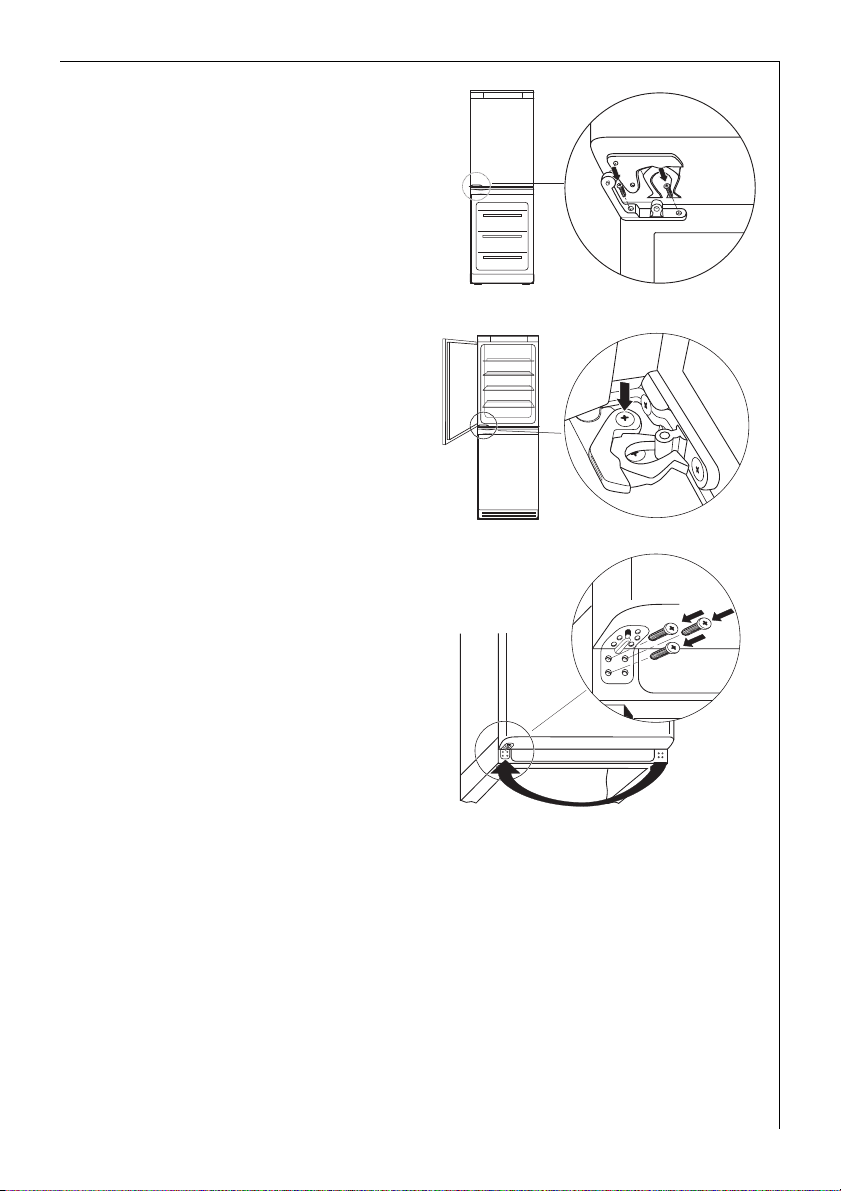
14. Slide the centre door bearing into
the bottom left of the fridge compartment door and fasten to the
housing.
15. Fasten the self-closing mechanism
on the top left of the freezer
compartment door,
16. Carefully slide the freezer compartment door onto the centre
bearing pivot and close.
17. Place the lower door bearing with
the bearing pivot in the lower left
of the freezer compartment door
and fasten.
Reversing The Door
18. Open the freezer compartment
door and fit the plinth.
Important: Do not damage door
contact (if present).
818 41 56-00/1 17
Page 18
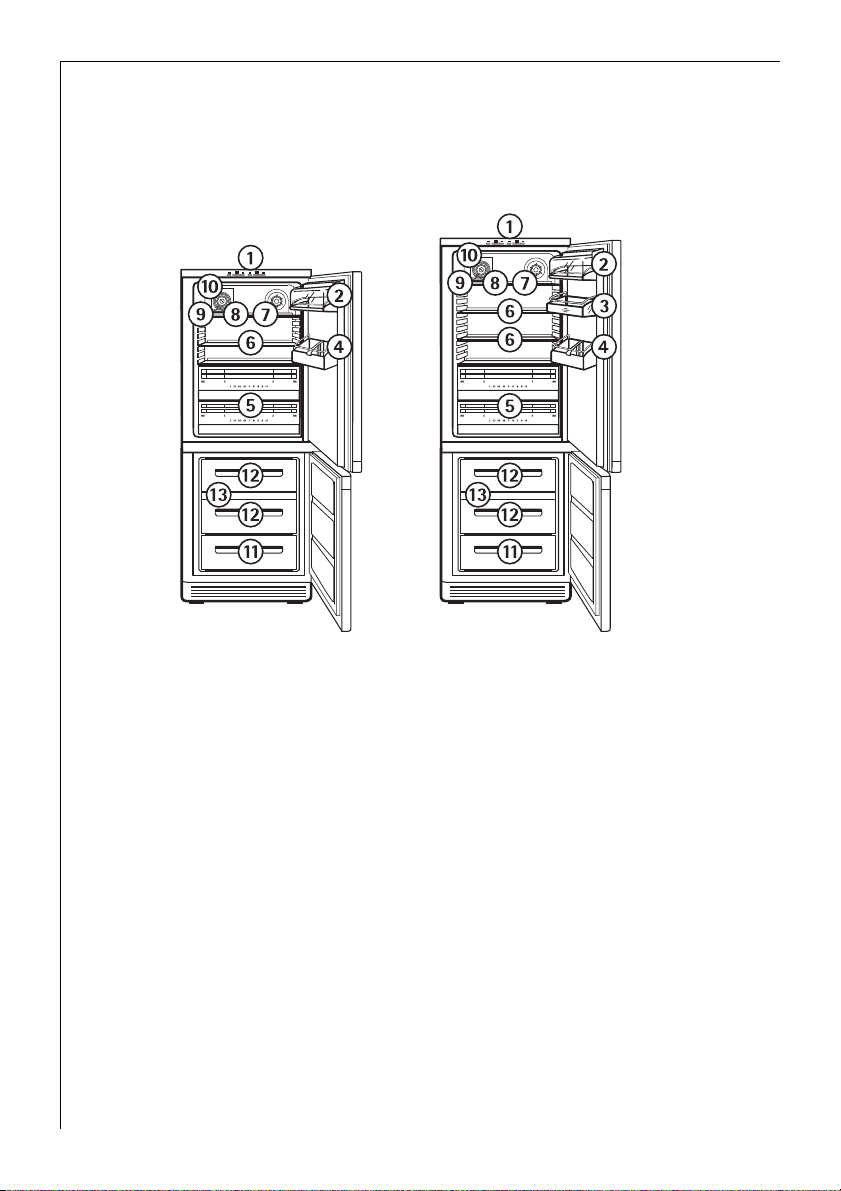
Appliance Description
View of Appliance
(various models)
á Control panel
à Butter and cheese compartment with lid
â Door storage compartments
ä Bottle compartment
ã LONGFRESH 0 °C cold zone
å Shelves
ç Quick chill shelf
é Bottle and can holder
è Rating plate
ê Air discharge grill with regulator
ë Freezer drawer (only for storage). When defrosting the bottom
drawer also serves as a water collecting vessel
í Freezer drawer (for storage and freezing)
ì Freezer tray
18 818 41 56-00/1
Page 19
Appliance Description
Freezer tray
A freezer tray is included below the
upper drawer in the freezer
compartment.
Berries and vegetables, for example,
can be pre-frozen on the freezer tray.
Advantage: The berries are not squeezed and maintain their natural
form. The frozen berries can then be stored in compartments or drawers
packaged in individual portions.
Cold Accumulation Block
A cold accumulation block is enclosed with the appliance.
In the event of power failure or a malfunction of the appliance, the
3
cold accumulation block will increase the hold over period by several
hours. The cold accumulation block cools best if it is placed in the top
drawer at the front on the frozen food. If the freezer section is only
partially filled, pack the frozen food together as tightly as possible, so
that in the event of a power cut the cold remains in the frozen food for
longer.
When freezing food, place the cold accumulation block on the already
frozen food to prevent defrosting due to the warmth of the food that is
being frozen.
When defrosting the appliance place the cold accumulation block on
top of the frozen food to keep it cold.
The block may also be used in a cool bag to keep the temperature of
food down during transportation.
Refer to the section "Prior to Initial Start-Up" regarding the freezing of
the cold accumulation block.
818 41 56-00/1 19
Page 20
Appliance Description
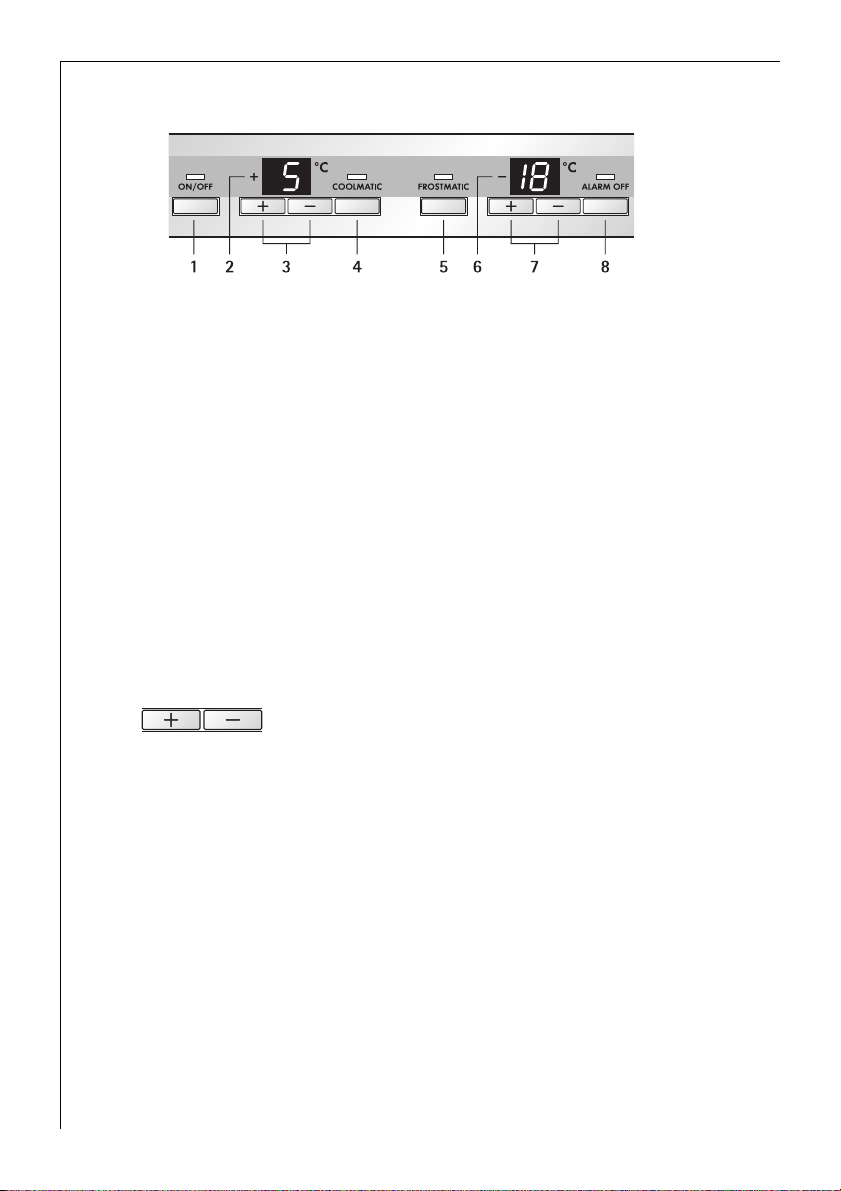
Control Panel
1 ON/OFF button and ON/OFF indicator light (green)
2 Temperature display for refrigerator (not for LONGFRESH 0 °C
cold zone)
3 Temperature setting buttons for refrigerator
4 COOLMATIC button and COOLMATIC indicator light (yellow)
• COOLMATIC for intensive cooling in the refrigerator
5 FROSTMATIC button and FROSTMATIC indicator light (yellow)
• FROSTMATIC for fast freezing in the freezer compartment
6 Temperature display for freezer compartment
7 Temperature setting buttons for freezer compartment
8 ALARM OFF button and warning indicator light (red)
(see section: "Control and Information Systems")
Temperature setting buttons
The temperature is adjusted using the
„+“ (WARMER) and „-“ (COLDER) buttons.
These buttons are connected to the temperature display.
• The temperature display is switched over from the display of the
ACTUAL temperature (Temperature display is illuminated) to the display of the DESIRED temperature (Temperature display flashes) by
pressing one of the two buttons, „+“ (WARMER) or „-“ (COLDER).
• Each time one of the two buttons is pressed again the DESIRED tem-
perature is adjusted by 1 °C.
• If neither button is pressed, the temperature display automatically
switches back after a short period (approx. 5 sec.) to the display of
the ACTUAL temperature.
DESIRED temperature means:
The temperature that has been selected for inside the fridge or the
freezer compartment. The DESIRED temperature is indicated by flashing
numbers.
20 818 41 56-00/1
Page 21
Appliance Description
ACTUAL temperature means:
The temperature display indicates the current temperature inside the
fridge or the freezer compartment. The ACTUAL temperature is indicated with illuminated numbers.
Once the COOLMATIC- or the FROSTMATIC function has been switched
3
on the DESIRED temperature that was set originally for the fridge or
the freezer cannot be changed.
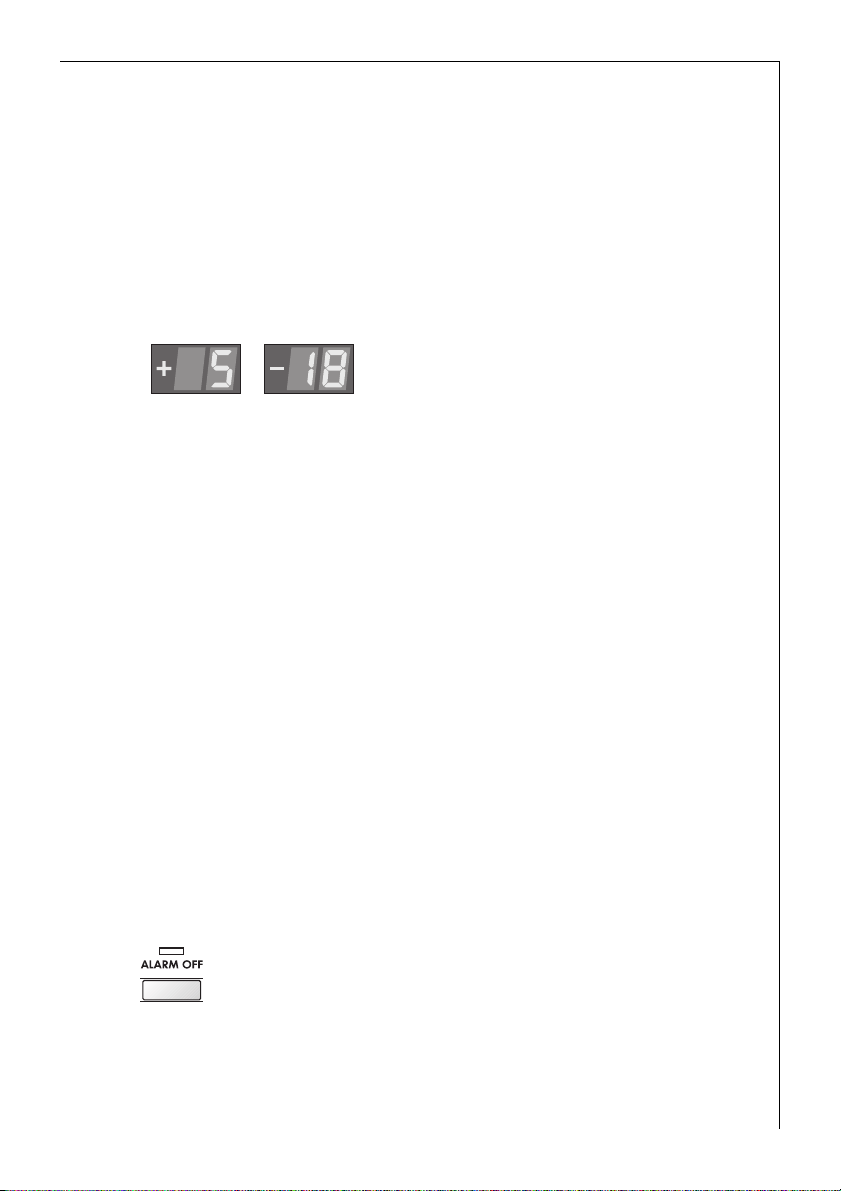
Temperature Displays
The temperature displays shows several
types of information.
• In normal operation the average temperature in the fridge section is
displayed (ACTUAL temperature). The variations in temperature in the
whole fridge section are small.
• In the freezer section the warmest temperature is displayed (ACTUAL
temperature). When fully filled, the warmest zone is normally located
at the top in the front area of the freezer section. Depending upon
how the section is filled, the temperatures are lower in other areas of
the freezer section.
• When the temperature is being adjusted a flashing display indicates
the fridge or the freezer compartment temperature currently set
(DESIRED temperature).
• Tip: When changing the temperature setting wait about 24 hours
until the temperature display has stabilised.
• If there is a fault in the appliance the temperature display shows:
– a square or a letter in the temperature display of the fridge for a
fault in the fridge,
– a square or a letter in the temperature display of the freezer for a
fault in the freezer.
ALARM OFF button
With the ALARM OFF button, the acoustic warning signal
can be switched off, e.g. the "Open Door" warning when
sorting in or out, the food to be chilled or frozen.
When there is a temperature warning for the freezer compartment, if
the ALARM OFF button is activated, the temperature display will show
the warmest temperature the frozen food has reached.
818 41 56-00/1 21
Page 22

Prior to Initial Start-Up
Before connecting the appliance to the mains and putting it into ope-
1
ration for the first time, leave the appliance to stand for 30 minutes if
was transported upright. After transport on its side, the appliance must
be left to stand for 2 hours before putting it into operation. This is
necessary to allow the oil to flow back into the compressor. Otherwise
the compressor may be damaged.
0 1. Please clean the appliance interior and all accessories prior to initial
start-up (see section: "Maintenance and Cleaning").
2. The appliance must be correctly installed in accordance with the chapter "Installation" before it is put into operation for the first time. Care
should be especially taken that the mains voltage and frequency available correspond with the appliance’s rating plate.
3. Remove the cold accumulation block from the appliance.
4. Place the cold accumulation block into a drawer only after the optimal
storage temperature of -18 °C has been reached, and allow to freeze.
5. After 24 hours place the cold accumulation block at the front of the
upper drawer.
6. Re-freeze the thawed cold accumulation block in the same fashion, e.g.
after cleaning the appliance.
Initial Start-Up
0 1. Insert plug into mains socket.
2. Press the ON/OFF button.
The green power indicator lights up. A warning tone sounds and the
flashing red warning light indicates that the required storage temperature has not yet been reached. The temperature displays shows the current, actual refrigerator and freezer temperature. The compressor will
start and then run automatically.
3. Press the ALARM OFF button to switch off the warning tone.
4. Set the refrigerator to the desired temperature (see section: "Tempera-
ture Adjustment").
Goods to be refrigerated can be loaded immediately after switching on,
3
because the storage temperature in the refrigerator is quickly reached.
5. Set the freezer temperature to -18 °C or colder (see section: "Temperature Adjustment").
Do not load freezer with goods until a temperature of -18 °C has been
3
reached, or until the red warning indicator light has gone out.
22 818 41 56-00/1
Page 23

Temperature Adjustment
With the individual temperature setting buttons the desired
temperatures in the refrigerator and in the freezer compartment can be
adjusted independently of one another.
In the LONGFRESH 0 °C cold zone the temperature is automatically
3
controlled. It remains constant at about 0 °C, no setting is required.
Note: Your appliance is equipped with a dynamic circulating air cooling
function. To adapt the refrigerating capacity required in the fridge zone
and the LONGFRESH 0 °C cold zone in a optimum manner, the fan is
operated at different powers. Because of this, different fan noises are
discernable due to the length of time it is switched on and the speed.
This is normal - there is no malfunction or defect.
0 1. Press either the „+“ (WARMER) or „-“ (COLDER) button for the refriger-
ator or freezer compartment .
The temperature display switches over and the DESIRED temperature
currently set flashes on the temperature display.
2. To adjust to a warmer temperature, press the „+“ (WARMER) button. To
adjust to a colder temperature, press the „-“ (COLDER) button. The
changed setting is immediately displayed on the temperature display.
Each time the button is pressed the temperature is adjusted by 1 °C.
Adjustable temperature range for the freezer compartment:
-15 °C to -24 °C.
Adjustable temperature range for the refrigerator compartment:
+3 °C to +8 °C, +15 °C (Holiday mode)
Note: From a food science point of view, +5 °C for the refrigerator
3
compartment and -18 °C for the freezer compartment should be considered cold enough as a storage temperature.
3. When the buttons are not further pressed after an adjustment has been
made, after a short period (approx. 5 sec.) the temperature display
switches over and again displays the ACTUAL temperature in the refrigerator compartment. The display changes from flashing to illuminated
numbers.
When the setting is changed, the compressor does not start immedi-
3
ately if automatic defrosting is currently taking place.
Important! Please check red warning indicator light and temperature
display regularly to assure maintenance of the storage temperature.
818 41 56-00/1 23
Page 24
COOLMATIC/FROSTMATIC
COOLMATIC
The COOLMATIC function is suited for quick cooling of
large quantities of goods in the refrigerator, e.g. drinks
and salads for a party or wedding.
0 1. The COOLMATIC function is switched on by pressing the COOLMATIC
button. The yellow light illuminates.
The COOLMATIC function now provides for intensive cooling. A DESIRED temperature of +3 °C is automatically selected. The COOLMATIC
function is ended automatically after a period of 6 hours. The originally
selected DESIRED temperature is again valid. The temperature display
shows the ACTUAL refrigerator temperature.
2. The COOLMATIC function can be ended manually at any time by pressing the COOLMATIC button again. The yellow light goes out.
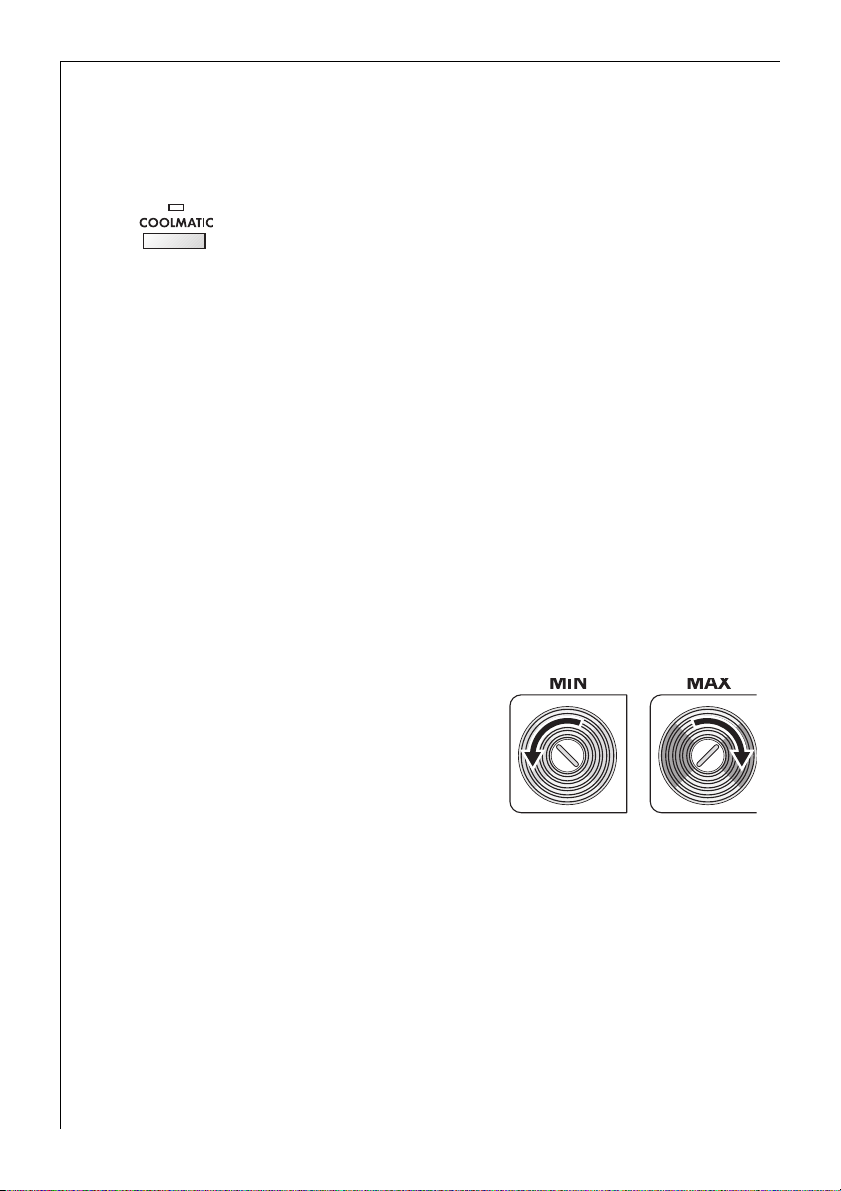
Quick chill
The quick chill function can be used for the fast cooling of drinks in
cans or bottles in the fast cool storage tray or of larger amounts of
room-temperature food. The built-in charcoal filter reduces the
development of any smell.
Chilling of cans or bottles
Place cans or bottles in the holder on the
fast cool storage tray in front of the air
discharge grill. Turn the regulator to
maximum and press the COOLMATIC button.
The yellow indicator light comes on.
Chilling of food
Place the food in the fridge.
Open the regulator to maximum and press the COOLMATIC button. The
yellow indicator light comes on.
When the drinks or the food is sufficiently cooled, press the COOLMATIC
button again. The yellow indicator light goes out. Set the regulator to the
minimum position.
When this function has been activated, forced air will chill the groce-
3
ries, and the temperature in the cabinet reset to +3 °C. After 6 hours
the COOLMATIC function is ended automatically. The yellow light goes
out. Turn the regulator to its minimum position.
24 818 41 56-00/1
Page 25
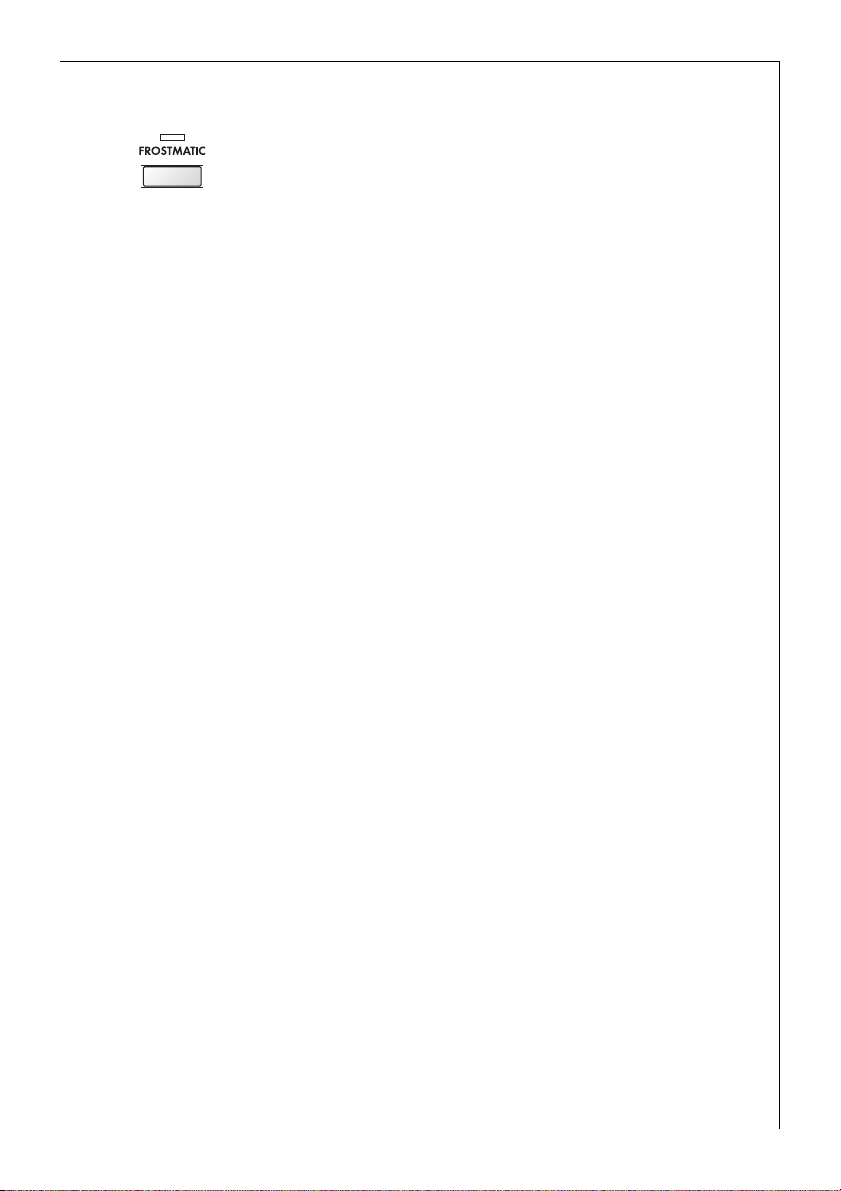
FROSTMATIC
The FROSTMATIC function provides for quick freezing of
fresh food products, and at the same time protects
previously stored goods against undesired warming in the
freezer compartment.
0 1. The FROSTMATIC function is switched on by pressing the FROSTMATIC
button. The yellow light illuminates.
2. The FROSTMATIC function can be ended manually at any time by pressing the FROSTMATIC button again. The yellow light goes out.
If the FROSTMATIC function is not ended manually, the appliance electronics switch off the FROSTMATIC function after approx. 50 hours. The
yellow light goes out.
Holiday Mode
In the holiday mode the temperature for the refrigerator is approximately +15 °C. In the holiday mode it is therefore possible to leave the
door of the empty refrigerator closed during periods of extended
absence. Advantage: Unintentional closing of the door, or accidental
closing of the door by persons who have access to your home during
your absence, is no longer possible. Without the holiday mode leaving
the door closed would lead to the accumulation of odours and mould.
After emptying and cleaning the appliance, proceed as follows:
0 1. T
o set the holiday mode, press the „+“ (WARMER) or „-“ (COLDER) button.
The temperature display will change and indicate in flashing numbers
the DESIRED temperature that is currently set.
2. Press the „+“ (WARMER) button until the temperature display indicates
H (for holiday). The temperature shown in the temperature display will
change in steps of 1 °C until it reaches +8 °C. After +8 °C the letter H
will appear in the display. The fridge is now operating in energy-saving
holiday mode.
To switch the fridge back to normal operation, press the „-“ (COLDER)
3
button.
Important! Do not store any goods in the refrigerator when the holiday
mode is in operation. The temperature is regulated at about +15 °C
when the holiday mode is in operation. This is too warm for food products.
If, while you are away, the room temperature could fall below 15 °C for
a long period, the fridge should not be operated in the HOLIDAY mode,
but switched off and the door opened.
818 4156-00/1 25
Page 26

Switching the Appliance Off
Refrigerator and freezer compartments can be switched off
3
independently of one another.
0 1. To switch off the appliance, hold down the ON/OFF button. This will
result in a countdown from "3" to "1" taking place in the temperature
displays. On reaching "1" the fridge and freezer compartment will
switch off. The temperature displays will go off.
Switching off the refrigerator:
0 1. To switch off the refrigerator, hold down the "+" button for the refrig-
erator until „OF“ is shown in the temperature display. Then again press
and hold down the "+" button. After a short time a countdown from
"3" to "1" is taking place in the temperature display for the refrigerator.
On reaching "1" the refrigerator will switch off. The temperature display will go off.
Switching off the freezer:
0 1. To switch off the freezer, hold down the "+" button for the freezer until
„OF“ is shown in the temperature display. Then again press and hold
down the "+" button. After a short time a countdown from "3" to "1" is
taking place in the temperature display for the freezer. On reaching "1"
the freezer will switch off. The temperature display will go off.
The appliance is only completely disconnected from the electricity
3
supply when the power plug has been removed from the power outlet.
Note:
The appliance cannot be switched on or off if unplugged, or if there is
no power being supplied to it.
Following connection to the mains power supply, the appliance returns
to the same operating state as before the interruption of main power.
If the appliance is not to be used for an extended period:
0 1. Switch appliance off by pressing and holding the ON/OFF button (see
above).
2. Remove the mains plug or switch off.
3. Defrost freezer compartment and clean thoroughly (see section: "Main-
tenance and Cleaning").
4. Leave the doors open after defrosting to avoid accumulation of odours.
26 818 41 56-00/1
Page 27

Control and Information Systems
The control and information systems consist of a temperature display,
an optical warning indicator light and an acoustic warning.
The system warns if:
– when first switching on the appliance (when the storage temperature
has not yet been attained);
– when the appliance doors are open
– the temperature in the refrigerator or freezer compartment is too
high;
– functional disturbances at the appliance.
"Open Door"-Warning
If the fridge or freezer door is left open the red warning indicator light
will flash and an acoustic warning tone will sound
– after approx. 80 seconds if the freezer door is left open
– after approx. 5 minutes if the fridge door is left open
If you need more time to load or rearrange refrigerated or frozen foods,
you can switch off the warning tone by pressing the ALARM OFF button.
If the doors are still left open the warning tone will sound again at the
end of the appropriate period of time.
The red warning indicator light will go off when the doors are closed.
Temperature Warning
For the fridge:
The red warning indicator light flashes and a warning tone sounds as
soon as the temperature in the fridge rises to more than +11 °C.
0 1. You can switch off the warning tone using the ALARM OFF button.
The warning indicator light and warning tone switch themselves off
3
automatically when the temperature in the fridge drops to below
+12 °C.
818 41 56-00/1 27
Page 28

For the freezer:
The red warning indicator light flashes and a warning tone sounds as
soon as the temperature in the freezer rises to more than -11 °C. In
addition the freezer temperature display flashes.
0 1. You can switch off the warning tone using the ALARM OFF button.
The freezer temperature display stops flashing and displays the warmest temperature that has been reached in the freezer during the temperature alarm. After approx. 5 seconds the temperature display reverts
to the current freezer temperature.
The warning tone switches itself off automatically if the temperature in
3
the freezer falls to lower than -11 °C. The red warning indicator light
and the temperature display continue to flash.
If the possibility of partial or complete thawing exists, you should
check the quality of the foods.
A rise in temperature may be caused by:
– frequent door opening for long periods of time;
– loading with large quantities of warm foods;
– high ambient temperature;
– an error with the appliance.
Function Errors
If the electronics in the appliance detects a technical defect that has to
be rectified by the customer, the temperature display indicates:
– a square or a letter in the temperature display of the fridge for a fault
in the fridge,
– a square or a letter in the temperature display of the freezer for a
fault in the freezer.
Opening the Freezer Compartment Door
If the freezer compartment door is closed when the appliance is in
operation, it is possible that it cannot be immediately opened again. A
vacuum occurs in the freezer compartment which holds the door closed
until pressure has been equalised. The door can be opened again after
several minutes.
28 818 41 56-00/1
Page 29
Interior Accessories
Storage Shelves
The storage shelves can be adjusted
to various heights:
0 1. Pull the storage shelf forward until
it can be tipped up or down and
removed.
2. To insert at a different height use
the same procedure in reverse.
Variable Inner Door
The door compartments can be pulled up and removed, and inserted at
other positions as needed.
LONGFRESH 0 °C cold section
The LONGFRESH 0 °C cold section consists of two drawers, which are
fitted with sliding regulators to adjust the air humidity.
In the LONGFRESH 0 °C cold section the temperature is automatically
controlled. It remains constant at about 0 °C, no setting is required.
The low storage temperature of around 0 °C and the air moisture that
can be regulated result in optimum storage conditions for various
foodstuffs.
Compared to the normal fridge zone, fresh food can be stored in the
LONGFRESH 0 °C cold section for longer while keeping the same
quality.
High levels of taste and freshness, vitamins and minerals are retained.
Weight loss in fruit and vegetables is reduced. Nutrition levels in your
food are higher as a result.
The LONGFRESH 0 °C cold section is also suitable for slowly defrosting
3
frozen food. If you do this, the defrosted food can be kept in the
LONGFRESH 0 °C cold section for up to two days.
818 41 56-00/1 29
Page 30

Interior Accessories
Setting the air moisture
The two drawers can be used independently of one another with higher
or lower air moisture according to the storage conditions required.
The air moisture can be set with the aid of the slide control on the front
of each drawer.
• Dry: a low relative air moisture is obtained when both controls are
slid to position
• Moist: a high relative air moisture is obtained when both controls are
slid to position
The air moisture in the drawers depends upon the moisture content of
the food stored and upon how often the door is opened.
c, i.e. the air holes are fully opened.
a, i.e. the air holes are fully closed.
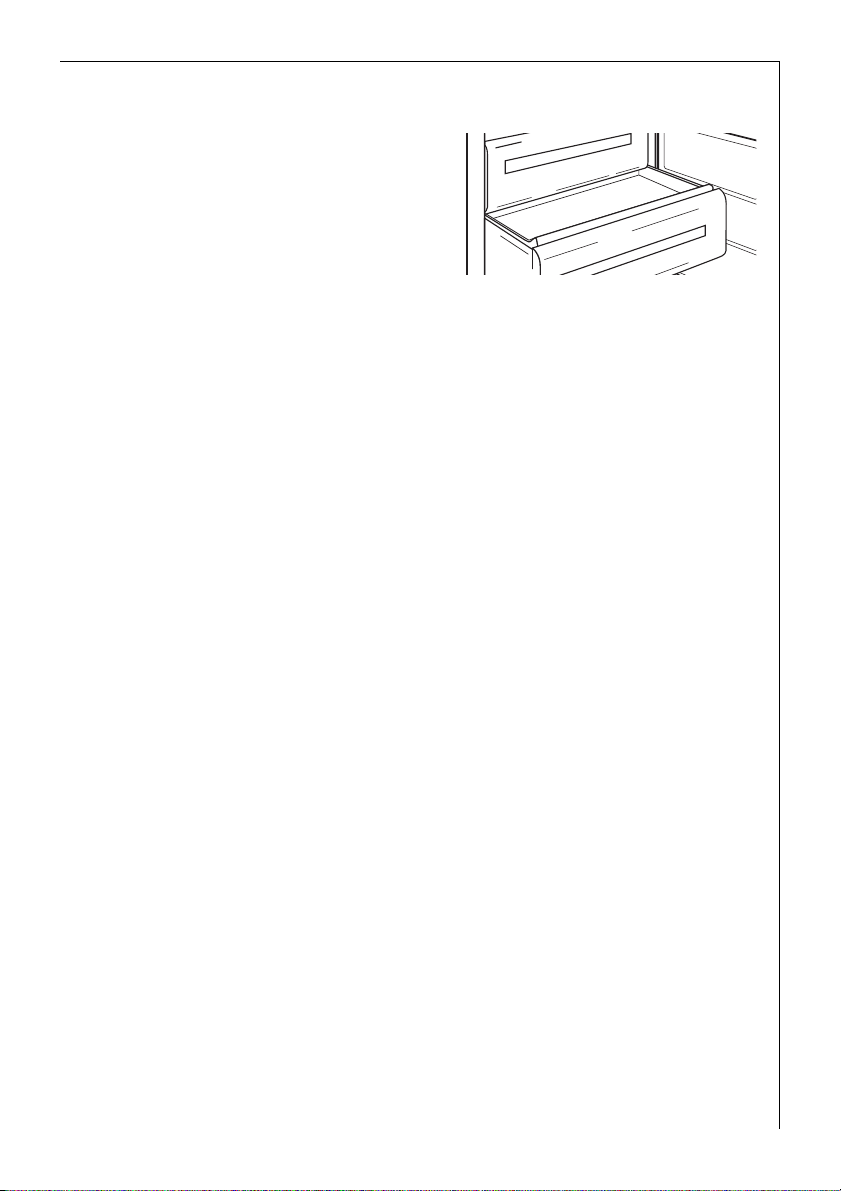
Quick Chill Shelf
The quick chill shelf can be placed
in one of the upper grooves. To
maintain the best performance the
shelf should be placed in the
second groove from the top.
Bottle- and Can Holder
The side of the bottle- and can
holder is moveable to enable a
more flexible placement of cans
and bottles in front of the air discharge grill. To allow the holder to
be moved easier when moving
sideways, press the shelf backwards.
The bottle support can be pulled
out when chilling larger bottles.
30 818 41 56-00/1
Page 31

Dismantling of the Bottle- and Can Holder
0 1. Take out the quick chill shelf with
holder from the cabinet.
2. To loosen the holder from the
shelf, bend the hooks/brackets
that surround the backside of the
shelf.
Bottle Holder
Some models are equipped with a
bottle holder in the bottle compartment. This is used to prevent
individual bottles from falling over
and can be slid sideways.
Interior Accessories
818 41 56-00/1 31
Page 32

Correct storage
Food stored in the refrigerator compartment should always be covered
or packed so that they do not dry out, lose their flavour, or transfer
their flavour to any other refrigerated food. The following are suitable
for packing:
– polyethylene bags;
– plastic containers with lids;
– special plastic covers with rubber retainers;
– aluminium foil.
Food that is sensitive to cold temperatures should not be stored in the
LONGFRESH 0 °C cold section:
• citrus and tropical fruits, such as pineapples, bananas, grapefruits,
melons, mangoes, papayas, oranges, lemons, kiwi fruit.
• hard cheese, potatoes, vegetables that are sensitive to cold
temperatures such as cucumbers, peppers, aubergines, avocados, half
ripe tomatoes, beans, courgettes.
Important: Do not store any dripping wet fruit or vegetables in the
1
LONGFRESH 0°C cold section
32 818 41 56-00/1
Page 33

Guidelines for storage times
Some foods in the LONGFRESH 0 °C cold zone:
Dry storage:
Food Storage period
Butter up to 30 days
Cheese, soft up to 30 days
Milk, fresh up to 7 days
Sausage, sliced up to 7 days
Fish up to 4 days
Shellfish up to 3 days
Poultry up to 5 days
Pork
larger joints
cut into smaller pieces
Beef, game up to 7 days
Moist storage:
Correct storage
up to 7 days
up to 5 days
Vegetables, salad stuffs Storage period
Artichokes up to 21 days
Cauliflower up to 21 days
Broccoli up to 14 days
Iceberg lettuce, lamb’s lettuce up to 21 days
Peas up to 10 days
Green cabbage up to 14 days
Carrots up to 150 days
Cabbage up to 14 days
Leeks up to 60 days
Mushrooms up to 7 days
Radishes up to 14 days
Asparagus up to 7 days
Spinach up to 7 days
818 41 56-00/1 31
Page 34

Correct storage
Fruit Storage period
Apricots up to 14 days
Pears up to 120 days
Blackberries up to 8 days
Dates (fresh) up to 60 days
Strawberries up to 5 days
Blueberries up to 14 days
Raspberries up to 5 days
Cherries up to 14 days
Peaches up to 30 days
Plums up to 21 days
Rhubarb up to 21 days
Gooseberries up to 21 days
Grapes up to 21 days
Tips:
• When shopping always look for the freshest foods. Quality and
freshness are crucial to how long food can be kept.
• Always store meat and fish wrapped and dry.
• Foodstuffs rich in protein spoil more quickly: Shellfish and
crustaceans go off more quickly than fish and fish in turn goes off
more quickly than meat. By storing them in the 0°C section, the
storage period even for these foodstuffs can be increased by up to 3
times without loss of quality.
• All food that is stored in the LONGFRESH 0 °C cold section should be
removed from the drawers approx. 15 - 30 minutes before
consumption. Aroma and taste develop at room temperature and the
enjoyment of the food is increased.
To obtain the best performance from your refrigerator/freezer:
• Do not store warm food or evaporating liquids.
• Do not store food uncovered.
• Keep the time between buying chilled food and placing it in your
freezer as short as possible.
• Do not push food together too much, try to allow air to circulate
around each item.
34 818 41 56-00/1
Page 35

Freezing
Except for the bottom drawer, which serves only for storage purposes,
all compartments and drawers in the freezer compartment are suitable
for freezing fresh food.
Warning!
• Before foods are frozen, the actual temperature in the freezer
compartment must be -18 °C or colder.
• Please observe indicated freezing capacity on the rating plate. The
freezing capacity represents the maximum amount of fresh goods
that can be frozen within 24 hours. If you freeze goods on several
days, one after the other, freeze amounts equal to 2/3 to 3/4 of the
capacity indicated on the rating plate.
• When freezing large quantities of food, place the frozen freezing
accumulator at the front into the top compartment in the freezing
chamber.
• Thawed foods which have not been processed further (cooked into
meals) may not under any circumstances be frozen a second time.
0 1. For freezing the maximum capacity press the FROSTMATIC button 24
hours prior to freezing, or 4 to 6 hours for smaller quantities. Yellow
indicator lights up.
The FROSTMATIC button need not be pressed for freezing of small
3
quantities of up to 3 kg.
2. All foods must be packed air tight prior to freezing, so that they do not
dry out or lose their flavour, and so that no flavour contamination of
other frozen goods occurs.
Caution! Do not touch frozen goods with wet hands. Hands can freeze
to the goods.
3. Place packaged goods in the drawers. Unfrozen goods may not come
into contact with already frozen goods, otherwise the frozen goods
may start to thaw.
The appliance electronics automatically switch the FROSTMATIC func-
3
tion off after a period of approx. 50 hours. Yellow indicator light goes
out. You can also stop the FROSTMATIC function manually by pressing
the FROSTMATIC button again.
818 41 56-00/1 35
Page 36

Tips:
• The following are suited for the packaging of frozen goods:
– freezer bags and polyethylene wraps;
– plastic containers for frozen foods;
– extra-thick aluminium foil
• The following are suited for sealing bags and wraps:
plastic clips, rubber bands or adhesive tape.
• Press air out of bags and wraps before sealing, because air
encourages drying of frozen goods.
• Make flat packages, because these freeze more quickly.
• Do not fill plastic containers for frozen foods to the brim with liquid
or paste-like goods, because liquids expand during freezing.
Frozen Storage
Warning! Before initial loading of the freezer compartment with
previously frozen goods, the required storage temperature of -18 °C
must be reached.
• Load freezer only with packaged frozen goods, so that they do not
dry out or lose their flavour, and so that no flavour contamination of
other frozen goods can occur.
• Please observe maximum storage times and expiry dates of frozen
goods.
• If the freezer section is only half filled, pack the frozen food together
as tightly as possible. This ensures that the cold is retained in the
frozen food for longer in the event of a power cut.
When possible store frozen goods separately according to type in
2
drawers.
Storage Goods Symbols/Freezing Calendar
• The symbols on the drawers
show different types of frozen
goods.
• The numbers indicate storage
times in months for the appropriate types of frozen goods. Whether
the upper or lower value of the indicated storage time is valid
depends on the quality of the foods and pre-treating before freezing.
The lower value applies to foods with high fat content.
36 818 41 56-00/1
Page 37

Preparation of Ice Cubes
0 1. Fill ice cube tray 3/4 full with cold water and place in the freezer tray
or a drawer and allow to freeze.
2. To remove the finished ice cubes twist the ice cube tray or hold under
running water for a short time.
Warning! Do not, under any circumstances, free an ice tray which is
frozen to the appliance with pointed or sharp edged objects. Use a
spoon-handle or similar object.
2 Energy Saving Advice
• Do not install the appliance close to sources of heat, such as a cooker,
dishwasher or radiator.
• Locate the appliance in a cool well ventilated room and make sure
that the air openings of the appliance are not obstructed.
• Always leave warm food to cool down to room temperature before
placing in the freezer.
• Try to avoid keeping the door open for long periods or opening the
door too frequently as warm air will enter the cabinet and cause the
compressor to switch on unnecessarily often.
• Ensure there are no obstructions preventing the door from closing
properly.
• Place frozen goods into the refrigerator for thawing. Cold from fro-
zen goods is thus used for cooling in the refrigerator.
• Always keep the condenser at the back of the appliance clean.
818 41 56-00/1 37
Page 38

Defrosting
Fridge zone and LONGFRESH 0 °C cold zone
Fridge section and LONGFRESH 0 °C cold section defrost automatically.
The defrosted water is fed into the drip tray on the compressor and
evaporated there.
Freezer Compartment Defrosting
Moisture is precipitated in the form of white frost in the freezer
compartment during operation and when the door is opened, especially
in the middle at the top. Remove this white frost from time to time
with a soft plastic scraper, e.g. a dough scraper. Do not under any
circumstances use hard or pointed objects for this purpose.
The appliance should be defrosted when the thickness of the white
frost has reached about 4 mm; but at least once a year in any case. A
convenient time for defrosting is any time when the appliance is empty,
or only minimally loaded.
Warning!
1
• Do not use electrical heating appliances or any other mechanical or
artificial devices to speed up the defrosting process, with the
exception of those recommended in these operating instructions.
• Do not use defrosting sprays, because they may be health
endangering and/or contain substances damaging to plastics.
0 1. About 12 hours prior to defrosting push the FROSTMATIC button, in
order to build up sufficient chill reserve for the interruption in operation.
Caution! Do not touch frozen goods with wet hands. Hands can freeze
to the goods.
2. Remove frozen goods, pack them in several layers of newspaper, cover
them and store them in a cool place.
3. Switch off refrigerator and freezer and remove plug from the mains, or
disconnect from the electricity supply.
38 818 41 56-00/1
Page 39

4. Remove all the drawers. Place the
bottom drawer directly in front of
the appliance to collect the water
from defrosting. Take out the
water drain spout from its resting
position at the bottom of the
freezer compartment and place it
as shown.
Tip: In order to speed up the
defrosting process, place a pot of warm water in the freezer
compartment. In addition, remove pieces of ice that break away before
defrosting is complete.
5. After defrosting thoroughly clean the freezer interior, as well as interior
accessories (see section: "Maintenance and Cleaning").
Maintenance and Cleaning
Before any maintenance or cleaning work is carried out DISCONNECT
the appliance from the ELECTRICITY supply.
Warning!
1
• Do not use detergents, abrasive powders, highly perfumed cleaning
products, wax polishes or cleaning products containing bleach or
alcohol.
• Never clean the appliance with a steam cleaner. Moisture could accu-
mulate in electrical components, danger of electrical shock! Hot
vapours can lead to the damage of plastic parts.
• The appliance must be dry before it is placed back into service.
Attention!
• Ethereal oils and organic solvents can attack plastic parts, e. g.
– lemon juice or the juice from orange peals;
– butyric acid;
– cleansers which contain acetic acid.
Do not allow such substances to come into contact with appliance
parts.
• Do not use any abrasive products.
818 41 56-00/1 39
Page 40

Maintenance and Cleaning
Internal Cleaning
If the refrigerator only is to be cleaned, press the FROSTMATIC button
3
several hours in advance, in order to build up sufficient chill reserve in
the freezer compartment for the interruption in service. Do not open
the freezer compartment door.
0 1. About 12 hours prior to defrosting push the FROSTMATIC button, in
order to build up sufficient chill reserve for the interruption in operation.
Caution! Do not touch frozen goods with wet hands. Hands can freeze
to the goods.
2. Remove frozen goods, pack them in several layers of newspaper, cover
them and store them in a cool place. Place the cold accumulation block
on top of the frozen food to keep it cold.
3. Switch off refrigerator and freezer and remove plug from the mains, or
switch off or turn out the circuit breaker or the fuse.
4. Defrost the freezer compartment (see section: "Defrosting").
5. Clean the inside and accessories with warm water and bicarbonate of
soda (5 ml to 0.5 litre of water).
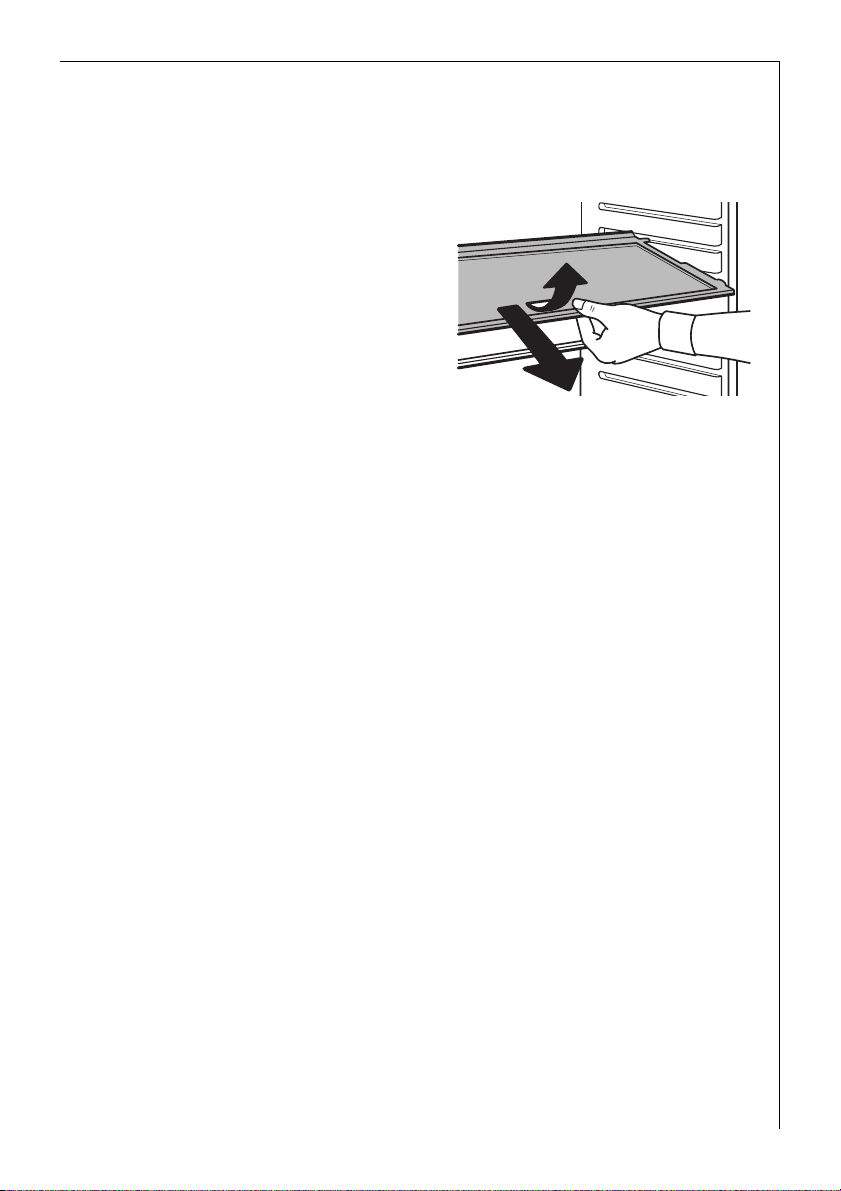
The bottom shelf, which divides the fridge zone from the
3
LONGFRESH 0 °C cold zone, can be removed for cleaning. To do this,
pull the shelf straight out.
The cover over the bottom drawer can be removed for cleaning
purposes. After cleaning, it must be returned to the previous position so
that the function of the LONGFRESH 0 °C cold section can be retained.
6. Rinse and dry thoroughly.
7. Regularly check the door seals and wipe clean to ensure they are clean
and free from debris.
8. Regularly unblock the condensation water drainage hole in the rear
wall of the refrigeration chamber with the aid of a piece of wire.
40 818 41 56-00/1
Page 41

Maintenance and Cleaning
External Cleaning
Warning!
1
• There are sharp edges on the underside of the product so care should
be taken when cleaning.
0 1. Clean the inside and accessories with warm water and bicarbonate of
soda (5 ml to 0.5 litre of water).
2. Rinse and dry thoroughly.
1 Important: Do not use cleaning agents for stainless steel or other
aggressive or abrasive cleaning agents. The protective coat of lacquer
on the stainless steel surface can be damaged by these.
The coat of lacquer protects against finger prints and therefore
additional cleaning agents and maintenance products are no longer
required.
Accumulation of dust at the condenser increases energy consumption.
2
For this reason carefully clean the condenser at the back of the
appliance once a year with a soft brush or a vacuum cleaner.
3. After everything is dry place appliance back into service.
818 41 56-00/1 41
Page 42

What to do if ...
Correcting Malfunctions
A malfunction may be caused by only a minor fault that you can rectify
yourself using the following instructions. Do not perform any other
work on the appliance if the following information does not provide
assistance in your specific case.
Warning! Repairs to refrigerators/freezers may only be performed by
1
qualified service engineers. Improper repairs can give rise to significant
hazards for the user. If your appliance needs repairing, please contact
your specialist dealer or our Customer Service.
Symptom Possible Cause Solution
Appliance is not switched
on.
Mains plug is not plugged
in or is loose.
No power to the appliance.
Appliance cools too much. Temperature is set too cold.
The food is too warm.
Fuse has blown or is defective.
Mains socket is defective.
Temperature is not properly
adjusted.
Door was open for an
extended period.
A large quantity of warm
food was placed in the
appliance within the last
24 hours.
The appliance is near a
heat source.
Switch on the appliance.
Insert mains plug.
Check fuse, replace if
necessary.
Mains malfunctions are to
be corrected by an electrician.
Temporarily select a higher
temperature setting.
Please look in the " Temperature Adjustment" section.
Open the door only as long
as necessary.
Press the COOLMATIC and/
or FROSTMATIC button.
Turn the temperature regulator to a colder setting
temporarily.
Please look in the "Installation" section.
42 818 41 56-00/1
Page 43

Symptom Possible Cause Solution
Temperature display shows
a square or a letter.
Warning tone sounds, red
warning indicator light and
temperature display are
flashing.
Interior illumination does
not function.
Water on the floor or on
storage shelves.
Heavy build up of frost,
possibly also on the door
seal.
The compressor does not
start immediately after
changing the temperature
setting.
Noise
There is a function fault.
Temperature warning.
Light bulb is defective.
Important: The interior
lighting switches off automatically after 7 minutes.
Water drain hole is
blocked.
Door seal is not air tight
(possibly after changing
over the hinges).
This is normal, no error has
occurred.
Appliance is not level.
Fan running.
What to do if ...
Please inform customer
service. Do not open the
doors of the appliance
again.
Please check in "Control
and Information System"
section.
Please refer to "Replacing
the Light Bulb" section.
See the "Maintenance and
Cleaning" section.
Carefully warm the leaking sections of the door
seal with a hair dryer (not
hotter than approx. 50 °C).
At the same time shape the
warmed door seal by hand
such that it sits correctly.
The compressor starts after
a period of time.
Readjust the front levelling
feet.
Refer to Normal Operating
Sounds
Normal operating noise.
The fan provides constant
temperature distribution in
the appliance.
If after the above checks there is still a fault, call your local AEG Service
Force Centre.
818 41 56-00/1 43
Page 44

What to do if ...
In-guarantee customers should ensure that the above checks have been
made as the engineer will make a charge if the fault is not a
mechanical or electrical breakdown.
Please note that proof of purchase is required for in-guarantee service
calls.
Replacing the Light Bulb
For safety reasons the interior lighting switches off after 7 minutes
3
when the door is open. It switches on again the next time the door is
opened.
Warning! Danger of electrical shock! Before replacing the light bulb
1
switch off the appliance and remove the mains plug.
Light bulb specifications: 220-240 V, max. 25 W, fitting: E 14
0 1. To switch the appliance off press and hold the ON/OFF button.
2. Unplug the mains plug.
3. To change the light bulb, undo the
cross head screw and remove the
light bulb cover downwards.
4. Change the defective light bulb.
5. Refit the light bulb cover and the
cross head screw.
44 818 41 56-00/1
Page 45

Normal Operating Sounds
The following noises are characteristic of refrigeration appliances:
• Clicks
Whenever the compressor switches on or off, a click can be heard.
• Humming
As soon as the compressor is in operation, you can hear it humming.
• Bubbling/Splashing
When refrigerant flows into thin tubes, you can hear bubbling or
splashing noises. Even after the compressor has been switched off,
this noise can be heard for a short time.
• Noises
A murmuring noise can be made by the flows of air created by the fan.
Regulations, Standards, Guidelines
This appliance was designed for household use and was manufactured
in accordance with the appropriate standards. The necessary measures
in accordance with appliance safety legislation regulations (GSG),
accident prevention regulations for refrigeration appliances (VBG 20)
and the regulations of the German Society of Electrical Engineers (VDE)
were observed in the manufacture of this appliance.
The refrigerant circuit has been checked for leaks.
This appliance is in accordance with the following EU guidelines:
;
– 73/23/EWG dated 19 February 1973 - low voltage guidelines.
– 89/336/EWG dated 3 May 1989
(including guideline change notice 92/31/EWG) - EMV guideline
818 41 56-00/1 45
Page 46

Technical Terminology
• Refrigerant
Liquids that can be used to a generate a cooling effect are known as
refrigerants. They have a relatively low boiling-point, indeed so low,
that the warmth from the food stored in the fridge or freezer can
cause the refrigerant to boil and vaporise.
• Refrigerant Circuit
Closed circulation system that contains the refrigerant. The
refrigerant circuit comprises primarily of an evaporator, a compressor,
a condenser and pipe work.
• Evaporator
The refrigerant is evaporated in the evaporator. Similar to all other
liquids, refrigerant requires heat to evaporate. This heat is removed
from the interior of the appliance, as a result the interior is cooled.
The evaporator is therefore located inside the appliance or placed in
foam immediately behind the inner wall and thus not visible.
• Compressor
The compressor looks like a small drum. It is driven by a built-in
electric motor and is mounted on the base of the appliance at the
rear. The task of the compressor is to draw in vaporised refrigerant
from the evaporator, to compress it, and to pass it on to the
condenser.
• Condenser
The condenser normally has the form of a grid. The refrigerant
compressed in the compressor is liquefied in the condenser. During
this process, heat is released to the surrounding air at the surface of
the condenser. The condenser is mounted on the base of the
appliance.
46 818 41 56-00/1
Page 47

Customer Service
If you cannot find the remedy for a malfunction in these operating
instructions, please contact your dealer or our customer service department. Addresses and telephone numbers are listed in the accompanying
booklet "Guarantee Conditions/Service Departments".
Selective ordering of replacement parts can save unnecessary travel
and costs. For this reason always provide the following appliance information:
This information can be found on the rating plate in the interior at the
left of the appliance. We recommend that you enter this information
here, so that it is handy if needed.
•Model Name
• Model Number (PNC)
• Serial Number (S-No.)
Note: The customer bears the costs of unjustified customer service
calls even during the guarantee period.
818 41 56-00/1 47
Page 48

Estimados clientes:
I
Es conveniente leer atentamente estas instrucciones de servicio antes
de poner en marcha el nuevo frigorífico. El manual contiene
informaciones importantes para que el aparato frigorífico pueda ser
usado con seguridad, emplazado y mantenido correctamente.
Es recomendable guardar el manual de instrucciones de servicio para
solucionar problemas que posteriormente pudiesen presentarse. Si el
aparato frigorífico cambiara de dueño es conveniente que sea
entregado al nuevo dueño el manual de instrucciones de servicio.
Estas instrucciones de servicio son aplicables a varios modelos similares
desde un punto de vista técnico y con equipamiento diferente. Preste
atención solamente a las advertencias relacionadas con el modelo de su
aparato frigorífico.
El triángulo de advertencia y/o las palabras de alerta (¡Advertencia!,
1
¡Cuidado!, ¡Atención!) poner énfasis en las indicaciones importantes
para su seguridad o para el buen funcionamiento del aparato. Aténgase
a ellas sin falta.
0 1. Este símbolo y números le guían paso a paso en el manejo del aparato.
2. .....
Después de este indicativo recibirá usted información complementaria
3
sobre el manejo y la aplicación práctica de la máquina.
La hoja de trébol se aplica para destacar consejos e indicaciones útiles
2
para trabajar con esta máquina de forma ahorrativa y ecológica.
El capítulo "Definiciones técnicas", al final de las instrucciones de
servicio, contiene las explicaciones de dichos términos.
En caso de eventuales anomalías estas instrucciones para el uso inclu-
yen consejos para remediarlas por cuenta propia; ver apartado
“Qué hacer cuando...“.
De surgir problemas técnicos, el SERVICIO DE ASISTENCIA TECNICA más
cercano a su domicilio estará a su disposición en cualquier momento,
sólo deberá llamar al teléfono:
902 11 63 88
.
mpreso en papel fabricado que no perjudica al medio ambiente
pues quien piensa ecológicamente también obra así ...
48 818 41 56-00/1
Page 49

Indice
Seguridad . . . . . . . . . . . . . . . . . . . . . . . . . . . . . . . . . . . . . . . . . . . . . . . . . . . . 51
Eliminación de desechos . . . . . . . . . . . . . . . . . . . . . . . . . . . . . . . . . . . . . . . 53
Transporte del aparato frigorífico . . . . . . . . . . . . . . . . . . . . . . . . . . . . . . 54
Retirar el protector empleado para el transporte . . . . . . . . . . . . . . . . . 55
Emplazamiento . . . . . . . . . . . . . . . . . . . . . . . . . . . . . . . . . . . . . . . . . . . . . . . 57
Lugar de emplazamiento . . . . . . . . . . . . . . . . . . . . . . . . . . . . . . . . . . . . . . . . 57
El aparato frigorífico necesita ventilación . . . . . . . . . . . . . . . . . . . . . . . . . 58
Alineación del aparato frigorífico . . . . . . . . . . . . . . . . . . . . . . . . . . . . . . . . 58
Conexión eléctrica . . . . . . . . . . . . . . . . . . . . . . . . . . . . . . . . . . . . . . . . . . . . . 58
Filtro de carbón activo . . . . . . . . . . . . . . . . . . . . . . . . . . . . . . . . . . . . . . . . . 59
Para invertir el sentido de la puerta . . . . . . . . . . . . . . . . . . . . . . . . . . . . 60
Descripción de los aparatos frigoríficos . . . . . . . . . . . . . . . . . . . . . . . . . 64
Aspecto de los aparatos frigoríficos . . . . . . . . . . . . . . . . . . . . . . . . . . . . . . 64
Bandeja congeladora . . . . . . . . . . . . . . . . . . . . . . . . . . . . . . . . . . . . . . . . . . . 65
Acumulador de frío . . . . . . . . . . . . . . . . . . . . . . . . . . . . . . . . . . . . . . . . . . . . 65
Panel de mando . . . . . . . . . . . . . . . . . . . . . . . . . . . . . . . . . . . . . . . . . . . . . . . 66
Teclas para la selección de temperaturas . . . . . . . . . . . . . . . . . . . . . . . . . . 66
Indicador de la temperatura . . . . . . . . . . . . . . . . . . . . . . . . . . . . . . . . . . . . . 67
Tecla ALARMA DESCONECTADA . . . . . . . . . . . . . . . . . . . . . . . . . . . . . . . . . . 68
Antes de la puesta en servicio . . . . . . . . . . . . . . . . . . . . . . . . . . . . . . . . . . 68
Puesta en servicio . . . . . . . . . . . . . . . . . . . . . . . . . . . . . . . . . . . . . . . . . . . . 69
Ajustar la temperatura . . . . . . . . . . . . . . . . . . . . . . . . . . . . . . . . . . . . . . . . 69
COOLMATIC/FROSTMATIC . . . . . . . . . . . . . . . . . . . . . . . . . . . . . . . . . . . . . 70
Tecla COOLMATIC . . . . . . . . . . . . . . . . . . . . . . . . . . . . . . . . . . . . . . . . . . . . . . 70
Función de enfriamiento rápido . . . . . . . . . . . . . . . . . . . . . . . . . . . . . . . . . . 71
Tecla FROSTMATIC . . . . . . . . . . . . . . . . . . . . . . . . . . . . . . . . . . . . . . . . . . . . . 71
Desconexión del aparato frigorífico . . . . . . . . . . . . . . . . . . . . . . . . . . . . 72
Interruptor para vacaciones . . . . . . . . . . . . . . . . . . . . . . . . . . . . . . . . . . . 73
Abrir la puerta del congelador . . . . . . . . . . . . . . . . . . . . . . . . . . . . . . . . . 73
818 41 56-00/1 49
Page 50

Indice
Sistema de control y de información . . . . . . . . . . . . . . . . . . . . . . . . . . . . 74
Alarma “Puerta abierta” . . . . . . . . . . . . . . . . . . . . . . . . . . . . . . . . . . . . . . . . 74
Alarma de temperatura . . . . . . . . . . . . . . . . . . . . . . . . . . . . . . . . . . . . . . . . . 74
Fallos funcionales . . . . . . . . . . . . . . . . . . . . . . . . . . . . . . . . . . . . . . . . . . . . . 75
Equipamiento interior . . . . . . . . . . . . . . . . . . . . . . . . . . . . . . . . . . . . . . . . . 76
Paneles de vidrio . . . . . . . . . . . . . . . . . . . . . . . . . . . . . . . . . . . . . . . . . . . . . . 76
Puerta interior variable . . . . . . . . . . . . . . . . . . . . . . . . . . . . . . . . . . . . . . . . . 76
Compartimento de refrigeración LONGFRESH 0 °C . . . . . . . . . . . . . . . . . . 76
Estante de refrigeración rapida . . . . . . . . . . . . . . . . . . . . . . . . . . . . . . . . . . 77
Sostenedor de botellas y latas . . . . . . . . . . . . . . . . . . . . . . . . . . . . . . . . . . . 77
Desmontar el sostenedor de botellas y latas . . . . . . . . . . . . . . . . . . . . . . . . 78
Soporte de botellas . . . . . . . . . . . . . . . . . . . . . . . . . . . . . . . . . . . . . . . . . . . . 78
Almacenar correctamente . . . . . . . . . . . . . . . . . . . . . . . . . . . . . . . . . . . . . 79
Congelación . . . . . . . . . . . . . . . . . . . . . . . . . . . . . . . . . . . . . . . . . . . . . . . . . . 82
Conservación a baja temperatura . . . . . . . . . . . . . . . . . . . . . . . . . . . . . . . 83
Preparación de cubitos de hielo . . . . . . . . . . . . . . . . . . . . . . . . . . . . . . . . 84
Símbolos de productos/calendario de productos congelados . . . . . . . 84
Descongelación . . . . . . . . . . . . . . . . . . . . . . . . . . . . . . . . . . . . . . . . . . . . . . . 84
Frigorífico y el compartimento de refrigeración LONGFRESH 0 °C . . . . . 84
Descongelación del compartimento congelador . . . . . . . . . . . . . . . . . . . . 84
Limpieza y mantenimiento . . . . . . . . . . . . . . . . . . . . . . . . . . . . . . . . . . . . . 86
Interior del aparato . . . . . . . . . . . . . . . . . . . . . . . . . . . . . . . . . . . . . . . . . . . . 86
Aparato por el exterior . . . . . . . . . . . . . . . . . . . . . . . . . . . . . . . . . . . . . . . . . 87
Consejos para el ahorro de energía . . . . . . . . . . . . . . . . . . . . . . . . . . . . . 88
Qué hacer cuando ... . . . . . . . . . . . . . . . . . . . . . . . . . . . . . . . . . . . . . . . . . . 89
Ayuda en caso de fallos . . . . . . . . . . . . . . . . . . . . . . . . . . . . . . . . . . . . . . . . 89
Cambio de bombilla . . . . . . . . . . . . . . . . . . . . . . . . . . . . . . . . . . . . . . . . . . . . 92
Ruidos típicos del aparato frigorífico cuando está en servicio . . . . . 93
Disposiciones, normas y directrices . . . . . . . . . . . . . . . . . . . . . . . . . . . . . 93
Terminología . . . . . . . . . . . . . . . . . . . . . . . . . . . . . . . . . . . . . . . . . . . . . . . . . 94
Servicio de postventa . . . . . . . . . . . . . . . . . . . . . . . . . . . . . . . . . . . . . . . . . 95
50 818 41 56-00/1
Page 51

1 Seguridad
La seguridad de los refrigeradores corresponde a las reglas reconocidas
de la técnica y de la ley de seguridad de aparatos frigoríficos. No obstante es necesario tener en cuenta las medidas de seguridad siguientes:
Aplicación conforme a la finalidad para la cual fue concebido el
aparato.
• El congelador fue concebido para uso doméstico. Sirve para refrigerar
productos, congelarlos y conservarlos a baja temperatura y también
para hacer cubitos de hielo. El fabricante no responde por daños
ocasionados al aparato frigorífico si éste ha sido usado para otros
fines o manejado incorrectamente.
• Se prohibe por motivos de seguridad reequipar o modificar el conge-
lador.
• Hay que respetar los reglamentos legales vigentes cuando el congela-
dor sea empleado comercialmente o para otros fines diferentes al
refrigeración, congelación y conservación a baja temperatura de productos.
Antes de la primera puesta en servicio
• Revisar el congelador por si ocurrieron daños al transportarlo. ¡Jamás
ha de conectarse un aparato frigorífico dañado! Avisar al concesionario en caso de daños.
• Compruebe que el cable de red no queda aprisionado y dañado por el
lado posterior del aparato. Un cable de red defectuoso se puede
sobrecalentar y producir un incendio.
• No introduzca el enchufe de red nunca en una caja de enchufe floja o
defectuosa. ¡Peligro de electrocución e incendio!
Agente para refrigeradores
En el circuito de refrigeración del aparato frigorífico se encuentra el
agente refrigerante Isobutan (R600a), un gas natural con elevada compatibilidad ambiental, que sin embargo es combustible.
• Advertencia - Al transportar y colocar el aparato frigorífico ha de
prestarse atención a que ninguna pieza del circuito refrigerante se
haya dañado.
• Si se dañó alguna pieza del circuito refrigerante es indispensable:
– evitar fuegos y fuentes de inflamación;
– ventilar bien el recinto en donde se halla el aparato frigorífico.
818 41 56-00/1 51
Page 52

Seguridad
Seguridad infantil
• Los materiales de embalaje (p. ej., láminas, icopor) son peligrosos para
los niños. ¡Peligro de asfixia! ¡Mantener fuera del alcance de los niños
los materiales de embalaje!
• Antes de eliminar el aparato frigorífico antiguo es preciso inutilizarlo.
Desenchufar, cortar el cable de la red, retirar o destruir eventualmente las cerraduras de resorte o los cierres de cerrojo corredizo.
Estas medidas preventivas impiden, p. ej., que niños jugando al escondite puedan quedar atrapados dentro del aparato frigorífico (¡peligro
de asfixia!) o arriesgar su vida por motivos similares.
• Los niños no suelen percibir los peligros que pueden acarrear los apa-
ratos domésticos. ¡Por ese motivo hay que vigilar a los niños y no
dejarlos jugar con el aparato frigorífico! Llame la atención de los
niños sobre posibles peligros e instrúyalos con respecto al uso
correcto del aparato.
En funcionamiento cotidiano
• Los recipientes con gases inflamables o líquidos pueden perder su
hermeticidad por el efecto del frío. ¡Peligro de explosión! No deben
depositarse en el aparato frigorífico recipientes que contengan No
colocar jamás aerosoles, cartuchos para recargar encendedores etc. en
el congelador.
• No colocar botellas y latas en el compartimento congelador. ¡Pueden
reventarse cuando se congele su contenido - e incluso explotar en
caso de que contengan gas! No meter jamás refrescos, zumos, cerveza, vino, champán, etc. en el compartimento congelador. Excepción: en el compartimento congelador si pueden meterse
aguardientes con elevado porcentaje de alcohol.
• Helados y cubitos de hielo sacados de el compartimento congelador
no deben llevarse a la boca inmediatamente. El helado puede adherirse en los labios o en la lengua y ocasionar lesiones. ¡Llame la atención de los niños sobre este peligro!
• No tocar productos congelados con las manos mojadas. La piel de las
manos podría lesionarse por congelamiento.
• Advertencia - No obstruya los orificios de ventilación de las cubiertas
del aparato ni de los soportes para muebles empotrados.
• Advertencia - Para acelerar el descongelado no utilice utensilios
mecánicos ni otros medios auxiliares que no sean los que especifique
el fabricante.
• Advertencia - No utilice en el interior de la cámara de conservación
ningún aparato eléctrico de comestibles que no tenga el visto bueno
del fabricante.
52 818 41 56-00/1
Page 53

• Antes de efectuar la limpieza de aparato frigorífico hay que desco-
nectarlo y desenchufarlo o desenroscar el fusible.
• Los productos congelados colocados encima del aparato frigorífico
pueden ocasionar que se forme agua de condensación por el frío en
el espacio vacío de la placa. Ese espacio vacío contiene componentes
electrónicos. Si el agua de condensación moja esos componentes
puede ocurrir un cortocircuito que dañe el aparato frigorífico. Por ese
motivo no hay que colocar productos congelados encima del aparato
frigorífico.
• Para retirar el enchufe de red de la caja de enchufe, no tire nunca del
cable, especialmente si el aparato ha sido retirado de su hueco. Al
dañarse el cable de red se puede producir cortocircuito, incendio y/o
electrocución.
• No coloque objetos pesados o el mismo aparato encima del cable de
red. ¡Peligro de cortocircuito e incendio!
• Un cable de red defectuoso tiene que ser sustituido por un técnico
cualificado o por el Servicio postventa.
En caso de fallos
• Si el aparato frigorífico falla, consultar primeramente las instruccio-
nes de servicio, capítulo "¿Qué hacer cuando ...". No efectuar reparaciones por cuenta propia si las indicaciones contenidas en las
instrucciones de servicio no solucionan el problema.
• Los congeladores únicamente deben ser reparados por técnicos de la
empresa. Reparaciones efectuadas por personas no competentes pueden acarrear graves peligros. En caso de reparaciones hay que dirigirse al concesionario local o al servicio de postventa de la empresa.
Eliminación de desechos
Material de embalaje
2
Los materiales de embalaje respetan el medio ambiente y son reciclables. Los elementos de materia plástica están identificados; por ejemplo, >PE<, >PS< etc. Elimine los materiales de embalaje, según su
identificación, en los contenedores de recogida disponibles en los puntos de gestión de desechos locales.
2 Aparato viejo
El símbolo
to no se puede tratar como desperdicios normales del hogar. Este producto se debe entregar al punto de recolección de equipos eléctricos y
818 41 56-00/1 53
W en el producto o en su embalaje indica que este produc-
Page 54

electrónicos para reciclaje. Al asegurarse de que este producto se deseche correctamente, usted ayudará a evitar posibles consecuencias negativas para el ambiente y la salud pública, lo cual podría ocurrir si este
producto no se manipula de forma adecuada. Para obtener información
más detallada sobre el reciclaje de este producto, póngase en contacto
con la administración de su ciudad, con su servicio de desechos del hogar o con la tienda donde compró el producto.
¡Advertencia! Los aparatos antiguos que hayan cumplido su tiempo de
1
servicio han de inutilizarse antes de ser eliminados. Desenchufar, cortar
el cable de la red, retirar o destruir eventualmente las cerraduras de
resorte o los cierres de cerrojo corredizo. Estas medidas preventivas
impiden, p. ej., que niños jugando al escondite puedan quedar atrapados dentro del aparato frigorífico (¡peligro de asfixia!) o arriesgar su
vida por motivos similares.
Advertencias para la eliminación de aparatos:
• El aparato frigorífico no debe eliminarse junto con la basura domés-
tica o la engorrosa.
• El circuito del agente refrigerante, especialmente del intercambiador
de calor ubicado en la parte trasera del aparato frigorífico, no debe
ser dañado.
• Las oficinas locales de aseo urbano o las de la administración munici-
pal proveen la información sobre las fechas en que se recogen estos
aparatos o sobre los vertederos a utilizar.
Transporte del aparato frigorífico
Para transportar el aparato se necesitan dos personas. Para una mejor
sujeción existen dos escotaduras arriba en la parte posterior del
aparato. Antes del transporte se tiene que quitar la tapa del zócalo para
evitar daños.
0 1. Para soltar la tapa del zócalo de su
bloqueo, bascúlela hacia abajo y
retírela después hacia delante.
Atención: Evite dañar el contacto
de puerta (si existe)
54 818 41 56-00/1
Page 55

2. Agarrar el aparato frigorífico por
las manijas en las posiciones descritas en la figura y transportarlo
seguidamente.
3. Para transportar el aparato frigorífico hasta su lugar de emplazamiento final hay que apretar con
cuidado la puerta de arriba en la
parte superior e inclinarlo un poco hacia atrás. Así recaerá el peso en las
ruedas traseras y se podrá empujar el aparato frigorífico con facilidad.
4. Una vez que el aparato se encuentre
en el sitio deseado, coloque la tapa
del zócalo. Primero sujétela en los
enganches del borde inferior y luego
2
haga presión para encajarla en su
posición. Cuide de que el contacto de
puerta (si existe) no quede dañado y
1
encaje en el correspondiente orificio en la tapa del zócalo.
Retirar el protector empleado para el transporte
El aparato frigorífico y las piezas del equipamiento interno están protegidas contra daños que pudiesen ocurrir durante el transporte.
0 1. Retirar todas las cintas adhesivas y piezas acolchadas del interior del
aparato.
Los residuos que eventualmente pudiesen quedar adheridos se pueden
3
eliminar con alcohol de lavado.
2. Retirar las piezas de protección de la junta en los lados interiores de la
puerta.
818 41 56-00/1 55
Page 56

Retirar el protector empleado para el transporte
3. Desmontar la pieza de protección para el transporte con la puerta
abierta.
Manera de retirar los elementos
protectores de transporte para las
superficies de asentamiento:
4. Empuje hacia adelante los elementos protectores hasta el
ensanchamiento situado al borde
de la superficie.
5. Levante la superficie por la parte
posterior y tírela junto con los
elementos protectores hacia
delante hasta que se pueda
bascular hacia abajo y sea posible
retirar los elementos protectores
de las guías.
56 818 41 56-00/1
Page 57

Emplazamiento
Lugar de emplazamiento
El aparato frigorífico debe colocarse en un recinto seco y bien ventilado.
La temperatura ambiental repercute en el consumo de corriente y en el
funcionamiento del aparato.
Por ese motivo conviene que el aparato frigorífico
– no esté expuesto directamente a la luz solar;
– no esté colocado cerca de radiadores, ni al lado de una cocina u otra
fuente de calor;
– esté colocado solamente en un lugar cuya temperatura ambiental
corresponda a la clase climática para el cual fue diseñado.
La clase climática está indicada en la placa del lado izquierdo del interior del aparato frigorífico.
Las temperaturas ambientales asignadas a las clases climáticas están
determinadas en la tabla siguiente:
Clase climática para temperatura ambiental de
SN +10 hasta +32 °C
N +16 hasta +32 °C
ST +18 hasta +38 °C
T +18 hasta +43 °C
Si no hay otra alternativa que colocar el aparato al lado de una fuente
térmica, han de respetarse las distancias mínimas laterales indicadas a
continuación:
– 3 cm respecto a cocinas eléctricas;
– 30 cm respecto a cocinas de fuel oil o de carbón.
Si no pueden guardarse estas distancias, es preciso colocar una placa
protectora contra calor entre la cocina y el aparato frigorífico.
818 41 56-00/1 57
Page 58

Emplazamiento
El aparato frigorífico necesita ventilación
El aire entra por debajo de la
puerta a través de las ranuras de
ventilación situadas en la base y
sale hacia arriba a lo largo de la
pared trasera. Para que el aire
pueda circular jamás han de
cubrirse o bloquearse los orificios
de ventilación.
¡Cuidado! Si el aparato frigorífico se coloca, p. ej., debajo de un
armario, es necesario que entre el
borde superior del aparato y el
mueble situado encima de él haya
una distancia de 10 cm como
mínimo.
Retire los dos distanciadores de pared
del paquete de piezas adjunto al aparato y fíjelos según la figura arriba en
la parte posterior del aparato para
garantizar la distancia necesaria frente
a la pared para la ventilación en la
parte posterior del aparato.
Alineación del aparato frigorífico
0 1. El aparato frigorífico ha colocarse en un lugar horizontal y firme. Com-
pensar las irregularidades del piso atornillando o desatornillando las
dos patas de ajuste delanteras.
Conexión eléctrica
Es indispensable para la conexión eléctrica disponer de una caja de
enchufe con toma de tierra instalada según las prescripciones vigentes.
El fusible de protección eléctrica ha de tener un mínimo de 10 amperios.
Si después de emplazar el aparato frigorífico no se tiene acceso al
enchufe hay que tomar medidas preventivas en la instalación eléctrica
que permitan separar el aparato de la red (p. ej., fusible, interruptor
automático, interruptor de corriente diferencial o similares provistos de
un espacio de abertura de contactos de un mínimo de 3 mm).
58 818 41 56-00/1
Page 59

Emplazamiento
0 1. Antes de la puesta en funcionamiento del aparato frigorífico hay que
revisar los datos de la placa de características para cerciorarse de que la
tensión de conexión y el tipo de corriente coinciden con los valores de
la red eléctrica del lugar en donde se ha instalado el aparato,
p. ej., CA 220 ... 240 V 50 Hz o bien
220 ... 240 V~50 Hz
(o sea, 220 hasta 240 voltios de corriente alterna, 50 hertzios)
La placa de características se encuentra dentro del aparato frigorífico a
mano izquierda.
Atención: En caso de que el cable de conexión a la red de este aparato
sufriera daños, debe ser cambiado por nuestro Servicio postventa o una
persona con una cualificación similar para evitar riesgos.
Aviso: Bajo ningún concepto, el aparato se debe conectar a un
"conector electrónico de ahorro de energía" o a onduladores que
convierten corriente continua en corriente alterna de 230 V (p.ej.
instalaciones solares, redes de barcos)
Filtro de carbón activo
En la pared posterior del frigorífico se encuentra un filtro de carbón
activo. Éste depura el aire en el interior del frigorífico y del
compartimento LONGFRESH 0°C, reteniendo olores desagradables.
Nota: El filtro de carbón activo es una pieza de desgaste y no está
cubierto por las prestaciones de garantía.
Insertar y cambiar el filtro de carbón activo:
A la entrega del frigorífico, el filtro de carbón está embalado en una
bolsa de plástico para asegurar una larga vida útil. Antes de la puesta
en servicio del aparato se tiene que insertar el filtro de carbón detrás de
la rejilla de salida de aire.
En caso de funcionamiento normal del
frigorífico, el filtro de carbón se debería
cambiar una vez al año para garantizar su
funcionamiento óptimo.
Filtros de carbón nuevos se venden a través
del comercio especializado o servicio
postventa.
0 1. Para abrir la rejilla, presione la palanca a su
derecha (1) y abra la rejilla hacia delante (2).
2. Para cambiar el filtro de carbón usado,
retírelo del riel (3).
818 41 56-00/1 59
Page 60

3. Inserte el nuevo filtro de carbón en el riel de
la rejilla (3) y cierre la rejilla, apretándola
hasta que encaja.
Maneje el filtro con precaución para evitar el
1
desprendimiento de partículas de carbón.
Para invertir el sentido de la puerta
El sentido de la puerta se puede cambiar de derecha (así viene de
fábrica) a izquierda si así lo exige el lugar de instalación.
¡Advertencia! Mientras se invierte el sentido de la puerta el aparato
1
no debe estar conectado a la red de alimentación eléctrica. Desenchúfelo primero.
0 1. Abra la puerta del refrigerador y
retire el panel del zócalo tirando
de él hacia adelante. Invierta de
izquierda a derecha la posición de
la tapa del cojinete de la puerta
que está en el panel del zócalo.
2. Teniendo cerrada la puerta del
congelador desenrosque el tornillo
de estrella de la bisagra inferior de
la puerta y retire la bisagra con
movimiento descendente.
3. Cierre la puerta del congelador.
Abra la puerta del refrigerador y
desenrosque el tornillo de fijación
para el mecanismo de cierre autómatico que está en la parte superior de la puerta del refrigerador.
60 818 41 56-00/1
Page 61

4. Cambie el perno del orificio derecho al izquierdo. Retire la puerta
del refrigerador tirando cuidadosamente hacia adelante y cóloquela a un lado.
5. Desenrosque la bisagra intermedio
de la puerta.
6. Retire la puerta del refrigerador
tirando con cuidado hacia adelante y depósitela a un lado.
7. Desenrosque el tornillo de fijación
para el mecanismo de cierre automático en la parte de abajo de la
puerta del refrigerador.
Para invertir el sentido de la puerta
8. Traslade hacia la izquierda el
perno superior del cojinete.
9. Deslice la cubierta de la manilla
hacia la izquierda y retírela hacia
delante.
818 41 56-00/1 61
Page 62

Para invertir el sentido de la puerta
10. Desatornille la manilla, gírela en
180º y vuelva a atornillarla en el
lado derecho de la puerta.
11. Coloque la cubierta de la manilla y
deslícela hasta el tope hacia la
izquierda.
12. Asegure con el tornillo el mecanismo de cierre automático en la
puerta del refrigerador, abajo a la
izquierda.
13. Coloque con cuidado la puerta del
refrigerador sobre el perno superior de la bisagra y ciérrela.
14. Meta la bisagra intermedio por la
parte inferior de la puerta y asegúrela con tornillo al cuerpo del
aparato.
62 818 41 56-00/1
Page 63

15. Atornille el mecanismo de cierre
automático en la parte superior
izquierda de la puerta.
16. Posicione con cuidado la puerta
del refrigerador sobre el perno
intermedio de la bisagra y ciérrela.
17. Sitúe la bisagra inferior con el
perno en la parte inferior
izquierda de la puerta del congelador y atorníllelo por completo.
18. Abra la puerta del congelador y
coloque el panel del zócalo.
Atención: Evite dañar el contacto
de puerta (si existe).
Para invertir el sentido de la puerta
818 41 56-00/1 63
Page 64

Descripción de los aparatos frigoríficos
Aspecto de los aparatos frigoríficos
(varios modelos)
á Panel de manejo y elementos de control
à Compartimiento con tapa para mantequilla y quesos
â Compartimientos en la puerta para colocar diversos productos
ä Compartimiento para botellas
ã Compartimento de refrigeración LONGFRESH 0 °C
å Paneles para colocar diversos productos
ç Estante de refrigeración rapida
é Sostenedor de botellas y latas
è Placa de características
ê Rejilla de salida de aire con regulador
ë Cubeta para productos congelados (solamente para
almacenamiento). La cubeta del fondo sirve cuando se descongela
el aparato frigorífico para recolectar el agua de condensación
í Cubetas para productos congelados (para almacenamiento y
congelación)
ì Bandeja congeladora
64 818 41 56-00/1
Page 65

Bandeja congeladora
Algunos modelos incluyen una
bandeja congeladora situada
debajo del cajón de arriba del
congelador.
En la bandeja congeladora puede
usted someter a una congelación previa productos tales como
los frutos de baya.
La ventaja estriba en que los frutos no se aplastan, conservando su
forma natural. Las bayas congeladas las puede guardar seguidamente
en los cajones después de porcionarlas y envasarlas.
Acumulador de frío
El aparato tiene dentro de ella un acumulador de frío.
Si sobreviene un corte eléctrico o si el aparato sufre una avería, el
3
acumulador de frío retrasará por varias horas el calentamiento
perjudicial para los productos almacenados. El acumulador de frío
refrigera mejor si se coloca en la parte delantera del cajón superior
encima de los alimentos. Si el congelador sólo está parcialmente
cargado, junte los alimentos al máximo para mantener el frío más
tiempo en caso de un fallo eléctrico.
Al congelar alimentos, coloque el acumulador de frío encima de los
alimentos ya congelados para evitar su descongelación superficial por
el calor de los alimentos a congelar.
Al desescarchar el aparato, coloque el acumulador de frío encima de los
alimentos congelados mientras estén fuera del aparato.
El acumulador de frío también se puede utilizar temporalmente como
elemento refrigerante para neveras portátiles.
Para congelar el acumulador de frío lea por favor el apartado "Antes de
la puesta en servicio".
818 41 56-00/1 65
Page 66

Descripción de los aparatos frigoríficos
Panel de mando
1 Tecla ON / OFF e indicación de control de red (verde)
2 Indicación de temperatura para el frigorífico (no para el
compartimento de refrigeración LONGFRESH 0 °C)
3 Teclas para el ajuste de temperatura para el frigorífico
4 Tecla COOLMATIC e piloto que se enciende al activarse la función
COOLMATIC (amarillo)
• COOLMATIC para enfriamiento intensivo en el refrigerador
5 Tecla FROSTMATIC e piloto que se enciende al activarse la
función FROSTMATIC (amarillo)
• FROSTMATIC para un enfriamiento rápido en el congelador
6 Indicación de temperatura para el congelador
7 Teclas para el ajuste de temperatura para el congelador
8 Tecla ALARMA DESCONECTADA e piloto de alarma (rojo)
(ver apartado "Sistema de control e información")
Teclas para la selección de temperaturas
La temperatura se regula mediante las teclas „+“
(MÁS CALOR) y „-“ (MÁS FRÍO).
Las teclas guardan relación con el indicador de temperaturas.
• Basta con apretar una de las dos teclas „+“(MÁS CALOR) o „-“ (MÁS
FRÍO) para que el indicador pase de la temperatura EFECTIVA (el indicador de temperaturas se enciende) a la temperatura NOMINAL (el
indicador de temperaturas parpadea).
• Pulsando otra vez cualquiera de las dos teclas la temperatura
NOMINAL avanza 1 °C.
• Si no se aprieta ninguna de las teclas, el indicador de temperaturas
retorna a los pocos instantes (unos 5 segundos) a la temperatura
EFECTIVA.
Por temperatura NOMINAL se entiende que:
La temperatura que debe existir en el compartimento frigorífico o en el
compartimento congelador puede ajustarse a las temperaturas presen-
66 818 41 56-00/1
Page 67

Descripción de los aparatos frigoríficos
tes en el indicador. La temperatura NOMINAL se representa con las
cifras parpadeantes.
Por temperatura EFECTIVA se entiende que:
El indicador señala la temperatura que existe en ese mismo momento
en el compartimento frigorífico o en el compartimento congelador. La
temperatura EFECTIVA se representa con las cifras encendidas sin parpadear.
Cuando está activada la función COOLMATIC o FROSTMATIC, no se
3
pueden realizar cambios en el ajuste de temperatura para el frigorífico
o el congelador.
Indicador de la temperatura
El indicador de la temperatura puede
visualizar varias informaciones.
• En el funcionamiento normal, se indica en el frigorífico la
temperatura media (temperatura EFECTIVA). Las variaciones de
temperatura en todo el frigorífico son muy reducidas.
• En el congelador se indica la temperatura más alta (temperatura
EFECTIVA). En caso de carga completa, la zona más caliente se suele
situar arriba en la parte delantera del congelador. Según la carga, las
temperaturas en otras zonas del congelador son más bajas.
• Durante el ajuste de la temperatura aparece parpadeando la
temperatura preseleccionada (temperatura NOMINAL).
Nota: En caso de modificar la consigna de temperatura, es necesario
esperar aprox. 24 horas hasta que se haya estabilizado la indicación
de temperatura.
• Si el aparato sufre una avería, la indicación de temperatura
visualizará lo siguiente:
– un cuadrado o una letra en el indicador de temperatura para el
frigorífico para indicar un fallo en el frigorífico;
– un cuadrado o una letra en el indicador de temperatura para el
congelador para indicar un fallo en el congelador.
818 41 56-00/1 67
Page 68

Tecla ALARMA DESCONECTADA
Con la tecla ALARMA DESCONECTADA se puede desactivar la señal acústica de advertencia, como, por ejemplo,
para desactivar señal de advertencia de “Puerta Abierta”
cuando se colocan o redistribuyen los alimentos en la
nevera durante un tiempo prolongado.
En caso de una alarma de temperatura, el indicador de temperatura
indica, al accionar la tecla ALARMA DESCONECTADA, durante 5
segundos la temperatura más alta hasta la cual se han calentado los
alimentos.
Antes de la puesta en servicio
Antes de enchufar el aparato y de ponerlo en servicio por primera vez
1
déjelo 30 minutos inactivo si ha sido transportado en posición vertical.
Si ha sido transportado en posición horizontal, hay que esperar 4 horas
antes de encenderlo para que el aceite pueda retornar al compresor. De
lo contrario el compresor podría sufrir desperfectos.
0 1. Lavar antes de la primera puesta en servicio el interior del aparato fri-
gorífico y todas las piezas de equipamiento (véase capítulo "Limpieza y
mantenimiento").
2. Antes de la primera puesta en servicio, el aparato se tiene que instalar
correctamente conforme al apartado "Instalación". En particular, se
tiene que prestar atención a que la tensión y la frecuencia de red
coincidan con los datos del aparato.
3. Retire el acumulador de frío del aparato.
4. Espere hasta que el congelador haya alcanzado los 18° C bajo cero, que
es la temperatura óptima de almacenamiento, y meta el acumulador de
frío en uno de los cajones para que se congele.
5. Al cabo de 24 horas coloque el acumulador de frío delante en el cajón
más alto.
6. Por favor, vuelva a congelar de la misma manera el acumulador de frío
cuando se haya descongelado p. ej. después de la limpieza del aparato
frigorífico.
68 818 41 56-00/1
Page 69

Puesta en servicio
0 1. Conectar el enchufe de la red en el tomacorriente.
2. Mantener accionada la tecla ON/OFF. Suena una señal acústica. La
alarma emite señales rojas intermitentes para indicar que todavía no se
ha alcanzado la temperatura requerida. Entonces, el compresor arranca
y funciona automáticamente.
3. Pulse la tecla ALARMA DECONECTADA para suprimir la señal acústica.
4. Ajuste de la temperatura deseada para el compartimento frigorífico
(véase capítulo "Ajuste de temperatura").
Los productos pueden almacenarse inmediatamente después de la
3
conexión del aparato frigorífico porque la temperatura en el compartimento frigorífico se alcanza con rapidez.
5. Ajustar la temperatura a -18 °C o a una más fría para el compartimento
congelador (véase capítulo "Ajustar la temperatura").
¡Importante! Hay que esperar antes de introducir los productos en el
3
congelador a que la temperatura del compartimento congelador haya
alcanzado -18 °C o hasta que se apaguen las señales rojas de la alarma.
Ajustar la temperatura
Con las teclas para la selección de temperaturas puede ajustarse
separadamente la temperatura deseada para el compartimento frigorífico y para el congelador.
La temperatura en el compartimento de refrigeración LONGFRESH 0 °C
3
se regula automáticamente. Se mantiene constante cerca de 0 °C; no es
necesario ningún ajuste.
Nota: Su aparato está equipado con una refrigeración por circulación
de aire dinámica. Para la adaptación óptima a la potencia frigorífica en
el frigorífico y en el compartimento de refrigeración LONGFRESH 0 °C,
el ventilador se utiliza con distintos niveles de potencia. De ello resultan
variaciones en el ruido perceptible del ventilador con relación a la
duración de conexión y la velocidad de giro. Esto es normal; no existe
ningún fallo o defecto.
0 1. Oprima una de las teclas „+“ (MÁS CALOR) o „-“ (MÁS FRÍO).
El indicador de temperaturas cambia de función y visualiza parpadeando la temperatura NOMINAL vigente en ese momento.
2. Para ajustar el aparato a temperaturas más altas, oprima la tecla „+“
(MÁS CALOR). Para ajustarlo a temperaturas más bajas, oprima la tecla
818 41 56-00/1 69
Page 70

„-“ (MÁS FRÍO) (véase capítulo "Teclas para la selección de temperaturas"). El indicador visualiza en seguida el cambio de selección.
La temperatura va avanzando 1 °C cada vez que se vuelve a pulsar la
tecla.
Margen de ajuste para el congelador: de -15 °C a -24 °C.
Margen de ajuste para el frigorífico: de +3 °C a +8 °C, 15 °C (modo de
vacaciones)
Nota: Desde el punto de vista de la dietética, la temperatura de +5 °C
3
en el refrigerador y de -18 °C en el congelador son lo bastante frías
como para mantener almacenados los alimentos.
3. Si usted no vuelve a apretar las teclas una vez seleccionada la temperatura, el indicador recuperará su función previa a los pocos instantes
(unos 5 segundos) para indicar otra vez la temperatura NOMINAL reinante en en refrigerador o en el congelador. La indicación cambia de
números intermitentes a fijos
Indicación: Al cambiarse el ajuste, el compresor no arranca en seguida
3
si está activo el sistema de descongelamiento automático.
¡Importante! No deje de controlar a intervalos regulares el piloto rojo
de alarma y el indicador de temperaturas para ver si el congelador
mantiene la temperatura de almacenaje correcta.
COOLMATIC/FROSTMATIC
Tecla COOLMATIC
La función COOLMATIC es apropiada para enfriar rápidamente grandes cantidades de alimentos en el compartimento frigorífico, p. ej., bebidas, ensaladas para una fiesta.
0 1. La función COOLMATIC se pone en marcha oprimiendo la tecla COOL-
MATIC. Hecho esto se enciende el piloto amarillo.
La función COOLMATIC proporciona ahora una intensiva refrigeración.
La temperatura NOMINAL se mantiene automáticamente a +3 °C. Después del transcurso de 6 horas se finaliza automáticamente la función
COOLMATIC. La temperatura NOMINAL originalmente vuelve a ser
determinante y el indicador de temperatura visualiza nuevamente la
temperatura de refrigeración momentánea.
2. La función COOLMATIC puede desconectarse manualmente y en cualquier momento apretando de nuevo la tecla COOLMATIC. Hecho esto se
apaga el piloto amarillo.
70 818 41 56-00/1
Page 71

COOLMATIC/FROSTMATIC
Función de enfriamiento rápido
La función de enfriamiento rápido se puede utilizar para el enfriamiento
rápido de bebidas en latas o botellas, en la bandeja de enfriamiento
rápido, o de grandes cantidades de alimentos a temperatura ambiente.
El filtro de carbón incorporado reduce la generación de olores.
Enfriamiento rápido de latas o botellas
Colocar las latas o botellas en el soporte en
la bandeja de enfriamiento rápido delante
de la rejilla de salida de aire. Ajustar el
regulador a la posición máxima y pulsar la
tecla COOLMATIC. El piloto amarillo se
enciende.
Enfriamiento rápido de alimentos
Almacenar los alimentos en la cámara de refrigeración.
Ajustar el regulador a la apertura máxima y pulsar la tecla COOLMATIC.
El piloto amarillo se enciende.
Cuando las bebidas o alimentos estén enfriados lo suficiente, volver a
pulsar la tecla COOLMATIC. El piloto amarillo se apaga. Ajustar el
regulador a la posición mínima.
Si usted no cancela manualmente la función COOLMATIC, el circuito
3
electrónico del aparato la desactiva al cabo de 6 horas. El piloto amarillo se apaga.
Tecla FROSTMATIC
La función FROSTMATIC acelera la congelación de los productos frescos, protegiendo al mismo tiempo los comestibles ya almacenados de un calentamiento no deseado.
0 1. La función FROSTMATIC se pone en marcha oprimiendo la tecla FROST-
MATIC. Hecho esto se enciende el piloto amarillo.
2. El proceso de congelación rápido puede concluirse además manualmente y en cualquier momento al oprimir otra vez la tecla FROSTMATIC. Hecho esto se apaga el piloto amarillo.
Si usted no cancela manualmente la función FROSTMATIC, el circuito
electrónico del aparato la desactiva al cabo de 50 horas. El piloto amarillo se apaga.
818 41 56-00/1 72
Page 72

Desconexión del aparato frigorífico
El frigorífico y el congelador se pueden desconectar
3
independientemente el uno del otro.
0 1. Para desconectar el aparato completo, mantener pulsada la tecla
ON/OFF. En ambas indicaciones de temperatura se produce un
denominado “Count down”, contando hacia atrás de “3” a “1”. Al
alcanzar “1”, se desconectan el frigorífico y el congelador. Los
indicadores de temperatura se apagan.
Antes de que haya finalizado el descuento, el proceso de desconexión
3
se puede cancelar, soltando la tecla ON/OFF.
Desconexión del frigorífico:
0 1. Mantenga pulsada la tecla “+” para el frigorífico hasta que aparezca
“OF” en el indicador de temperatura. A continuación, mantenga pulsada
la tecla “+”. En la indicación de temperatura para el frigorífico se
produce un denominado descuento, contando hacia atrás de “3” a “1”.
La indicación deja de parpadear y el frigorífico se desconecta.
Desconexión del congelador:
0 1. Mantenga pulsada la teclas“+” para el congelador hasta que aparezca
“OF” en el indicador de temperatura. A continuación, mantenga pulsada
la tecla “+”. En la indicación de temperatura para el congelador se
produce un denominado descuento, contando hacia atrás de “3” a “1”.
La indicación deja de parpadear y el congelador se desconecta.
La alimentación eléctrica sólo está completamente interrumpida
3
cuando se ha retirado el enchufe de la red.
Nota:
No es posible ajustar el aparato si está desenchufado o si está cortada
la corriente.
Tras la reconexión a la red eléctrica, el aparato frigorífico retorna al
estado en que se hallaba al cortarse la corriente.
Si el aparato frigorífico ha de estar fuera de servicio por mucho
tiempo es preciso:
0 1. Desconectarlo manteniendo oprimido la tecla ON/OFF.
2. Desenchufarlo o desconectarlo o bien desenroscar el fusible.
3. Descongelar el compartimento congelador y limpiar el aparato a fondo
(véase el capítulo "Limpieza y mantenimiento").
4. Luego ha de dejarse abierta las puertas para evitar la formación de olores desagradables.
73 818 41 56-00/1
Page 73

Interruptor para vacaciones
Durante la operación para vacaciones la temperatura prefijada NOMINAL para el compartimento frigorífico es de +15 °C. Por lo tanto, en
casos de largas ausencias (por ejemplo durante las vacaciones) se tiene
la posibilidad de mantener también cerrada el compartimento frigorífico vacía, en vez de dejarla abierta, sin que por ello se produzcan olores
desagradables o moho. La ventaja: se impide que se cierre la puerta por
sí sola o inintencionalmente por otras personas durante la ausencia. Sin
la conmutación para vacaciones se produciría inevitablemente olores
desagradables y/o moho.
0 1. Para activar la función adecuada para salir de vacaciones pulse las
teclas „+“ (MÁS CALOR) o „-“ (MÁS FRÍO).
El indicador de temperaturas cambia de función y visualiza
parpadeando la temperatura NOMINAL vigente en ese momento.
2. Mantenga pulsado la tecla „+“ (MÁS CALOR) hasta que aparezca la
indicación de temperatura H (Holiday). La temperatura visualizada en el
indicador cambia a +8 °C avanzando a saltos de 1 °C. La temperatura
salta luego de +8 °C a +15 °C, al tiempo que aparece la letra H. La
cámara refrigeradora asume el modo de funcionamiento vacacional,
con ahorro de energía.
Para normalizar otra vez el funcionamiento de la cámara frigorífica,
3
presione el pulsador „-“ (MÁS FRÍO).
¡Atención! No dejar alimentos en el compartimento frigorífico mien-
tras el aparato esté conmutado para vacaciones. La temperatura
durante la conmutación para vacaciones se mantiene más o menos a
+15° C, la cual es muy alta para los alimentos.
Si, durante su ausencia, la temperatura ambiente pudiera descender
durante un tiempo prolongado por debajo de los 15 °C, el frigorífico no
se debería utilizar en el modo HOLIDAY, sino que se debería desconectar
y abrir la puerta.
Abrir la puerta del congelador
Si se cierra la puerta del congelador estando éste en servicio no se
podrá abrir nuevamente en seguida porque se habrá formado un vacío
que la mantiene cerrada hasta que la presión se haya compensado. Al
cabo de unos minutos la puerta se podrá abrir de nuevo.
818 41 56-00/1 73
Page 74

Sistema de control y de información
El sistema de control e información comprende indicaciones de temperatura y alarmas de señales ópticas y acústicas
El sistema avisa:
– en la puesta en servicio del aparato (cuando aún no se ha alcanzado
la temperatura de almacenamiento);
– cuando las puertas del aparato frigorífico estén abiertas
– cuando la temperatura en el compartimento congelador o en el com-
partimento frigorífico se caliente demasiado.
– cuando ocurran fallos funcionales en el aparato frigorífico.
Alarma “Puerta abierta”
Si la puerta del frigorífico o del congelador está abierta, suena una
alarma acústica y parpadea la indicación de alarma roja:
– con la puerta del congelador abierta, al cabo de aprox. 80 segundos,
– con la puerta del frigorifico abierta, al cabo de aprox. 5 minutos.
Si necesita más tiempo para colocar o recolocar los alimentos, puede
interrumpir la alarma acústica pulsando la tecla ALARMA DESCONECTADA.
Si las puertas siguen abiertas, la alarma vuelve a aparecer al cabo de 5
minutos (puerta del frigorífico abierta) o 80 segundos (puerta del
congelador abierta).
La indicación de alarma roja se apaga al cerrar las puertas.
Alarma de temperatura
Para el frigorífico:
Suena una alarma acústica y la indicación roja de alarma parpadea en
cuanto la temperatura en el frigorífico sobrepasa 11 °C.
0 1. Con la tecla ALARMA DESCONECTADA puede desconectar la señal
acústica.
Cuando la temperatura en el frigorífico desciende por debajo de 12 °C,
3
la alarma acústica y la indicación roja de alarm se desconectan
automáticamente.
74 818 41 56-00/1
Page 75

Sistema de control y de información
Para el congelador:
Suena una alarma acústica y la indicación roja de alarma parpadea en
cuanto la temperatura en el congelador sobrepasa -11 °C.
Adicionalmente parpadea la indicación de temperatura para el
congelador.
0 1. Con la tecla ALARMA DESCONECTADA puede desconectar la señal
acústica.
La indicación de temperatura para el congelador muestra durante 5
segundos la temperatura más alta que se ha alcanzado durante la
alarma de temperatura en el congelador. A continuación, la indicación
de temperatura deja de parpadear y vuelve a conmutar a la
temperatura actual en el congelador.
La señal acústica se acalla automáticamente en cuanto la temperatura
3
de la cámara congeladora desciende por debajo de los -11 °C. La indicación roja de alarma siguen parpadeando.
Si hay sospechas de descongelación, ha de revisarse la calidad de los
productos y su empleo posterior.
Esta subida de la temperatura obedece probablemente a las siguientes
causas:
– las puertas se abre muy a menudo o permanece abierta largo rato;
– se ha almacenado cantidades regulares de comestibles tibios o calien-
tes;
– temperatura ambiente alta
– el aparato frigorífico ha sufrido un desperfecto.
Fallos funcionales
Si la electrónica del aparato detecta una anomalía técnica que puede
reparar el servicio posventa, la indicación de temperatura visualizará lo
siguiente:
– un cuadrado o una letra en el indicador de temperatura para el
frigorífico para indicar un fallo en el frigorífico;
– un cuadrado o una letra en el indicador de temperatura para el
congelador para indicar un fallo en el congelador.
818 41 56-00/1 75
Page 76

Equipamiento interior
Paneles de vidrio
Los paneles son ajustables según
la altura requerida.
0 1. Para ajustarlas hay que tirar hacia
adelante del panel inclinándolo
hacia arriba o hacia abajo hasta
que se pueda sacar.
2. El procedimiento de colocación
del panel en una altura diferente
se efectúa a la inversa.
Puerta interior variable
Según lo requerido pueden sacarse hacia arriba los compartimientos
ubicados en la puerta y colocarse en otros alojamientos.
Compartimento de refrigeración LONGFRESH 0 °C
El compartimento de refrigeración LONGFRESH 0 °C se compone de dos
cajones, separados por una placa de cubierta. Los cajones están dotados
de reguladores deslizantes para el ajuste de la humedad del aire.
La temperatura en el compartimento de refrigeración LONGFRESH 0 °C
se regula automáticamente. Se mantiene constante cerca de 0 °C; no es
necesario ningún ajuste.
Gracias a la reducida temperatura de almacenamiento próxima a los
0 °C y la humedad del aire regulable se obtienen condiciones de
almacenamiento óptimas para los distintos alimentos.
Por esta razón, en comparación con el frigorífico normal, alimentos
frescos se conservan en el compartimento de refrigeración
LONGFRESH 0 °C con la misma calidad durante un tiempo más largo.
Su sabor, frescura y contenido de vitaminas y minerales se conservan en
gran medida. Se reduce la pérdida de peso en fruta y verdura. Se
posibilita una alimentación de mayor calidad desde el punto de vista de
la fisiología nutricional.
El compartimento de refrigeración LONGFRESH 0 °C también es apto
3
para la descongelación lenta de alimentos congelados. En este caso, los
alimentos descongelados se conservan en el compartimento de
refrigeración LONGFRESH 0 °C hasta dos días más.
76 818 41 56-00/1
Page 77

Equipamiento interior
Ajuste de la humedad del aire
Según las condiciones de almacenamiento deseadas, los dos cajones se
pueden utilizar independientemente con un mayor o menor nivel de
humedad del aire.
La humedad del aire se puede ajustar con la ayuda de los reguladores
deslizantes en el lado delantero de cada cajón.
• Seco: se alcanza una humedad del aire relativa reducida deslizando
ambos reguladores a la posición
están totalmente abiertas.
• Húmedo: se alcanza una elevada humedad del aire relativa deslizando
ambos reguladores a la posición
están totalmente cerradas.
La humedad del aire en los cajones depende del contenido de humedad
de los alimentos almacenados y la frecuencia de la apertura de la
puerta.
c; es decir que las rendijas de aire
a; es decir que las rendijas de aire
Estante de refrigeración rapida
El estante de refrigeración rapida
menos profundo puede ser colocado en alguna de los carriles
superiores. Para mantener un buen
funcionamiento, el estante debe
ser colocado en el segundo carril
contando desde arriba hacia abajo.
Sostenedor de botellas y latas
El sostenedor de botellas y latas se
puede mover horizontalmente,
permitiendo así flexibilidad en el
acomodo de botellas y latas frente
a la rejilla.
Para facilitar el movimiento horizontal del sostenedor, presione el
anaquel hacia atrás.
818 41 56-00/1 77
Page 78

Equipamiento interior
Para facilitar el refrigeramiento de
una botella grande, el soporte
para botellas puede bajarse.
Desmontar el sostenedor de botellas y latas
0 1. Saque del refrigerador el anaquel
de enfriado rápido con el sostenedor.
2. Para descargar el sostenedor del
anaquel, desenganche los garfios
que están en el canto trasero del
anaquel.
Soporte de botellas
En algunos modelos hay montado un
soporte de botellas en el botellero.
Evita que vuelquen las botellas y
puede desplazarse lateralmente.
78 818 41 56-00/1
Page 79

Almacenar correctamente
Los productos siempre han de conservarse cubiertos o empaquetados
en el compartimento frigorífico para evitar que se sequen o que se
transmita a los demás su olor o sabor.
Materiales adecuados para empacar productos:
– Bolsas y láminas de polietileno;
– Envases de plástico con tapa;
– Recipientes especiales de plástico con tensor de goma;
– Láminas de aluminio.
En el compartimento de refrigeración LONGFRESH 0 °C no se pueden
almacenar alimentos sensibles al frío:
• fruta exótica sensible al frío, p.ej. piñas, plátanos, pomelos, melones,
mangos, papayas, naranjas, limones, kiwi.
• queso curado, patatas, verdura sensible al frío como pepinos,
pimientos, berenjenas, aguacates, tomates semimaduros, judías,
calabacines.
¡Atención! No coloque fruta o verdura mojada en el compartimento de
1
refrigeración LONGFRESH 0°C
818 41 56-00/1 79
Page 80

Almacenar correctamente
Valores orientativos para la conservación
de algunos alimentos en el compartimento de refrigeración
LONGFRESH 0 °C:
Almacenamiento en seco:
Alimento Conservación
Mantequilla hasta 30 días
Queso blando hasta 30 días
Leche fresca hasta 7 días
Salchicha, embutidos hasta 7 días
Pescado hasta 4 días
Crustáceos hasta 3 días
Aves hasta 5 días
Cerdo
grandes porciones
en trozos pequeños
Ternera, caza hasta 7 días
Almacenamiento en húmedo:
hasta 7 días
hasta 5 días
Verdura, ensaladas Conservación
Alcachofas hasta 21 días
Coliflor hasta 21 días
Brécol hasta 14 días
Lechuga Iceberg, canónigo hasta 21 días
Guisantes hasta 10 días
Berza hasta 14 días
Zanahorias hasta 150 días
Col hasta 14 días
Puerro hasta 60 días
Setas hasta 7 días
Rabanitos hasta 14 días
Espárragos hasta 7 días
Espinacas hasta 7 días
80 818 40 56-00/1
Page 81

Almacenar correctamente
Fruta Conservación
Albaricoques hasta 14 días
Peras hasta 120 días
Moras hasta 8 días
Dátiles (frescos) hasta 60 días
Fresas hasta 5 días
Arándanos hasta 14 días
Frambuesas hasta 5 días
Cerezas hasta 14 días
Melocotones hasta 30 días
Ciruelas hasta 21 días
Ruibarbo hasta 21 días
Uvas espina hasta 21 días
Uvas hasta 21 días
Consejos:
• A la hora de comprar alimentos, preste atención a que estén frescos.
La calidad y el grado de frescura son decisivos para su conservación.
• Almacene la carne y el pescado siempre embalado y seco.
• Los alimentos con el mayor contenido de proteinas se deterioran
antes: los crustáceos y el marisco se deterioran antes que el pescado,
y el pescado antes que la carne. El almacenamiento en el
compartimento de 0°C permite también prolongar la conservación de
estos alimentos hasta al triple sin mermas de la calidad.
• Todos los alimentos que se almacenan en el compartimento de
refrigeración LONGFRESH 0 °C se deberían retirar de los cajones
aprox. 15 - 30 minutos antes del consumo. A temperatura ambiente
se desarrollan el aroma y el sabor y el valor de consumo aumenta.
818 41 56-00/1 81
Page 82

Congelación
Salvo la cubeta del fondo cuya finalidad es solamente de almacenamiento, sirven para congelar productos todos los demás compartimientos y cubetas.
¡Cuidado!
• Antes de congelar los productos es preciso que la temperatura EFEC-
TIVA en el compartimento congelador corresponda a -18 °C o más
fría.
• Por favor respete la capacidad de congelamiento indicada en la placa
de características. La capacidad de congelamiento corresponde a la
cantidad máxima de productos frescos que pueden congelarse en un
lapso de 24 horas. Si se pretende congelar productos durante varios
días consecutivos, solamente puede colocarse dentro del aparato frigorífico 2/3 hasta 3/4 de la cantidad indicada en la placa de características.
• Cuando congele grandes cantidades, deposite el elemento acumula-
dor de frío, congelado, en la parte delantera del cajón superior del
departamento de congelación.
• Por ningún motivo deben congelarse nuevamente productos descon-
gelados sin haberlos sometido a una preparación ulterior (cocinarlos
como plato listo para servir).
0 1. Cuando se emplee la capacidad de congelamiento máxima de 24 horas-
en el caso de pequeñas cantidades bastan 4 hasta 6 horas - hay que
oprimir la tecla FROSTMATIC antes de efectuar la congelación. La luz de
indicación amarilla se encenderá.
Es innecesario oprimir la tecla FROSTMATIC cuando se trate de peque-
3
ñas cantidades cuyo peso no exceda 3 kg.
2. Todos los productos han de empaquetarse herméticamente antes de
congelarlos para evitar que se sequen, pierdan su sabor o lo transmitan
a los demás productos congelados.
¡Cuidado! No tocar productos congelados con manos mojadas. La piel
de las manos podría lesionarse por congelación.
3. Colocar los productos empacados en las cubetas. Los productos no congelados no deben entrar en contacto con los congelados puesto que
éstos podrían descongelarse.
El sistema electrónico del aparato desconecta la función FROSTMATIC
3
automáticamente al cabo de 50 horas. El piloto amarillo se apaga.
Usted puede desactivar dicha función a mano con sólo apretar
nuevamente la tecla FROSTMATIC.
82 818 41 56-00/1
Page 83

Consejos:
• Materiales adecuados para empaquetar productos congelados:
– bolsas y láminas para congelamiento de polietileno;
– recipientes especiales para congelamiento;
– láminas de aluminio, extra resistentes.
• Recomendable para el cierre de bolsas y folios:
Pinzas plásticas, gomas o cintas adhesivas.
• Extraer el aire de las bolsas o de las láminas antes de cerrarlas porque
contribuye a secar los productos congelados.
• Hacer paquetes planos porque éstos se congelan con mayor rapidez.
• No llenar hasta el tope los recipientes para congelamiento con pro-
ductos líquidos o papillas pues los líquidos se expanden al congelarse.
Instrucción para lugares de prueba:
Pueden solicitarse directamente al fabricante planos de apilamiento
que indiquen la capacidad de congelamiento o el tiempo de calentamiento.
Conservación a baja temperatura
¡Cuidado! Es indispensable que la temperatura del compartimento
congelador haya alcanzado -18 °C antes de cargarla por primera vez
con productos precongelados.
• Sólo deben depositarse productos empaquetados para evitar que se
sequen o pierdan su sabor o lo transmitan a los demás productos.
• Prestar atención a la fecha de caducidad de los productos.
• Si el congelador está sólo medio cargado, junte los alimentos al
máximo. De este modo, el frío se conserva más tiempo en caso de un
fallo del suministro eléctrico.
Colocar por separado los productos y si es posible clasificados. Así se
2
puede supervisar mejor y se evita además dejar la puerta abierta por
mucho tiempo, lo que significa un ahorro de energía.
818 41 56-00/1 83
Page 84

Preparación de cubitos de hielo
0 1. El molde para hacer cubitos de hielo ha de llenarse con ¾ de agua fría y
luego colocarlo en la bandeja congeladora o en una de sus cubetas y
dejar que se congele.
2. Para extraer del molde los cubitos de hielo hay que torcerlo o dejarlo
por breve tiempo bajo agua corriente.
¡Cuidado! Por ningún motivo han de emplearse utensilios puntiagudos
o afilados para extraer los cubitos de hielo del molde. En ese caso hay
que emplear el mango de una cuchara o algo similar.
Símbolos de productos/calendario de productos congelados
(no incluida en todos los modelos)
• Los símbolos indican diferen-
tes tipos de productos congelados.
• Las cifras indican el tiempo de
conservación en meses para cada tipo de producto congelado. La validez del valor máximo o mínimo establecido del tiempo de conservación de los productos congelados depende de la calidad y de la
preparación de ellos antes de ser congelados. El valor mínimo corresponde a víveres con un elevado porcentaje de grasa.
Descongelación
Frigorífico y el compartimento de refrigeración
LONGFRESH 0 °C
El frigorífico y el compartimento de refrigeración LONGFRESH 0 °C se
descongelan automáticamente.
El agua se conduce a la bandeja recogedora en el compresor y se
evapora allí.
Descongelación del compartimento congelador
Durante el servicio del aparato frigorífico y sobre todo al abrir su
puerta se condensa la humedad en forma de escarcha en el comparti-
84 818 41 56-00/1
Page 85

Descongelación
mento congelador y especialmente en los evaporadores Retirar la escarcha de vez en cuando con un raspador blando de plástico, p. ej., con
uno para raspar masa. No emplear por ningún motivo utensilios duros o
puntiagudos para efectuar el descongelación del aparato frigorífico.
La descongelación del compartimento congelación ha de efectuarse por
lo menos una vez al año o cuando la capa de escarcha tenga un espesor
de 4 mm aproximadamente. Un momento apropiado para descongelar
el aparato frigorífico es cuando esté vacío o con poca carga.
¡Advertencia!
1
• No emplear aparatos eléctricos térmicos ni otros medios auxiliares
mecánicos o artificiales para acelerar el proceso de descongelación,
exceptuando los recomendados en estas instrucciones de servicio.
• No emplear aerosoles para descongelamiento pues podrían ser noci-
vos para la salud y/o contener sustancias dañinas para las materias
plásticas.
0 1. Aprox. 12 horas antes del desescarche, oprimir la tecla FROSTMATIC
para crear en los alimentos congelados una reserva de frío suficiente
para la interrupción del funcionamiento.
¡Cuidado! No tocar productos congelados con las manos mojadas. La
piel de las manos podría lesionarse por congelamiento.
2. Sacar los productos congelados, empaquetar con varias capas de papel
de periódico y depositarlos en un lugar fresco. Coloque el acumulador
de frío encima de los alimentos congelados.
3. Desconectar el compartimento frigorífico y el congelador, retirar el
enchufe de la red o desconectar el fusible, o bien, desenroscarlo.
4. Saque todos los cajones. Coloque
delante del aparato el cajón más
bajo para recibir el agua de condensación. Retirar la ranura de
desagüe del agua de condensación
de la escotadura en la base del aparato e insertarla, según la figura, en
el canal de desagüe del agua de
condensación en el aparato.
Consejo: El proceso de descongelación se acelera colocando en el
compartimento congelador una olla con agua caliente. Retirar además
los trozos de hielo que caigan antes de que el aparato frigorífico se
haya descongelado por completo.
5. Una vez descongelado el aparato frigorífico ha de limpiarse a fondo el
compartimento congelador y el equipo interior (véase el capítulo "Limpieza y mantenimiento").
818 41 56-00/1 85
Page 86

Limpieza y mantenimiento
Por motivos higiénicos es recomendable la limpieza frecuente del interior del aparato frigorífico y de su equipamiento.
¡Advertencia!
1
• El aparato frigorífico no debe estar conectado a la red eléctrica mien-
tras se efectúe la limpieza. ¡Cuidado! ¡Peligro de electrocución! Hay
que desconectar el aparato frigorífico y desenchufarlo o desconectar
o desenroscar el fusible antes de efectuar la limpieza.
• El aparato frigorífico jamás ha de limpiarse con aparatos de limpieza
a vapor. La humedad podría entonces mojar los elementos eléctricos.
¡Peligro de electrocución! El vapor caliente también podría perjudicar
las piezas plásticas.
• Es indispensable que el aparato frigorífico esté seco antes de volverlo
a poner en marcha.
¡Cuidado!
• Las piezas plásticas también pueden estropearse al emplear aceites
etéricos y disolventes orgánicos como por ejemplo:
– zumo de limones o cáscaras de naranjas;
– ácido butírico;
– detergentes que contengan ácido acético.
Dichas sustancias no han de entrar en contacto con las piezas del
aparato frigorífico.
• No emplear detergentes abrasivos.
Interior del aparato
Si solamente hay que limpiar el compartimento frigorífico, ha de opri-
3
mirse la tecla FROSTMATIC algunas horas antes para que antes de la
interrupción del funcionamiento se genere suficiente reserva de frío en
el compartimento congelador, no volver a abrir la puerta del compartimento congelador.
0 1. Aproximadamente oprimir la tecla FROSTMATIC 12 horas antes de efec-
tuar la limpieza para que se produzca suficiente reserva refrigerante en
los productos congelados para el tiempo en que esté interrumpido el
funcionamiento del aparato frigorífico.
¡Cuidado! No tocar productos congelados con las manos mojadas. La
piel de las manos podría lesionarse por congelamiento.
2. Sacar los productos congelados, empaquetar con varias capas de papel
de periódico y depositarlos en un lugar fresco. Coloque el acumulador
de frío encima de los alimentos congelados.
86 818 41 56-00/1
Page 87

Limpieza y mantenimiento
3. Descongelar el compartimento congelador antes de efectuar la limpieza
(véase capítulo "Descongelar").
4. Desconectar el compartimento frigorífico y el congelador, retirar el
enchufe de la red o desconectar el fusible, o bien, desenroscarlo.
5. El equipamiento del aparato frigorífico ha de limpiarse con un trapo y
agua tibia. A veces puede emplearse también un detergente comercial
para vajillas.
La bandeja inferior que separa el frigorífico del compartimento de
3
refrigeración LONGFRESH 0 °C se puede retirar para la limpieza. Para
este fin, retire la bandeja en posición horizontal.
La cubierta por encima del cajón inferior se puede retirar para la
limpieza. Después de la limpieza se tiene que volver a colocar en su
posición anterior para mantener el funcionamiento del compartimento
de refrigeración LONGFRESH 0 °C.
6. Seguidamente ha de enjuagarse el aparato frigorífico con agua clara y
después secarlo.
7. Controlar el orificio de desagüe del agua de condensación situado en la
pared trasera del compartimento frigorífico. Si el orificio de desagüe de
agua de condensación está obstruido hay que limpiarlo con un alambre.
8. Comprobar y limpiar regularmente las juntas magnéticas de la puerta.
Aparato por el exterior
1 Atención: No utilice productos de limpieza para acero inoxidable ni
otros productos agresivos o abrasivos. Podrían atacar la capa de barniz
protector de la superficie de acero inoxidable.
La capa de barniz ofrece protección contra huellas dactilares, por lo
cual no se necesitan productos de limpieza y mantenimiento
adicionales.
0 1. Ha de limpiarse el aparato frigorífico con un trapo y agua tibia. A veces
puede emplearse también un detergente comercial para vajillas.
2. Seguidamente ha de enjuagarse el aparato frigorífico con agua clara y
después secarlo.
El polvo acumulado en el condensador disminuye la capacidad de
2
enfriamiento y aumenta el consumo de energía. Por eso hay que limpiar
con cuidado el condensador en la parte trasera una vez al año
empleando para ello un cepillo suave o una aspiradora.
3. Poner en marcha el aparato frigorífico una vez que todo esté seco.
818 41 56-00/1 87
Page 88

2 Consejos para el ahorro de energía
• El aparato frigorífico no debe colocarse cerca de cocinas, radiadores u
otras fuentes de calor. Cuando hay una temperatura ambiental muy
elevada, el compresor funciona con más frecuencia y durante más
tiempo.
• Garantizar suficiente ventilación en la base del aparato frigorífico y
en su parte posterior. Jamás cubrir los orificios de ventilación.
• No colocar platos calientes en el aparato frigorífico. Primeramente
hay dejarlos enfriarse.
• Dejar la puerta abierta solamente por el tiempo requerido.
• No ajustar la temperatura a un grado más frío que lo necesario.
• Colocar los productos congelados en el compartimento frigorífico
para descongelarlos. El frío de estos productos sirve para refrigerar el
compartimento frigorífico.
• Mantener siempre limpio el condensador situado en la parte posterior
del aparato frigorífico.
88 818 41 56-00/1
Page 89

Qué hacer cuando ...
Ayuda en caso de fallos
En muchos casos los fallos pueden ser probablemente subsanadas por
propia cuenta al aplicar las indicaciones enunciadas más adelante. No
seguir esforzándose si las informaciones indicadas más adelante no
ayudan a subsanar el fallo del caso en concreto.
¡Advertencia! Las reparaciones del aparato frigorífico sólo las debe
1
efectuar el personal competente. El usuario podría correr graves riesgos
si las reparaciones han sido efectuadas por personas incompetentes. En
caso de que sea necesario efectuar reparaciones hay que dirigirse al
servicio de postventa de la empresa o al concesionario local.
Avería Posible causa Remedio
El aparato no está trabajando, la indicación de
temperatura está apagada.
La indicación de
temperatura muestra un
cuadrado o una letra.
Suena la alarma acústica y
la indicación de alarma
roja y la indicación de
temperatura para el
congelador parpadean.
La iluminación interior no
funciona.
El aparato no está conectado.
El enchufe no está conectado a la red o se ha aflojado.
El fusible se ha disparado o
está defectuoso.
La caja de enchufe está
defectuosa.
Existe una anomalía funcional.
Alarma de temperatura
para la cámara congeladora.
La lámpara está estropeada.
Atención: La iluminación
interior se apaga de forma
automática al cabo de
7minutos.
Conectar el aparato.
Conectar el enchufe a la
red.
Controlar el fusible y cambiarlo, en caso necesario.
Las averías de la red de alimentación deberán ser eliminadas por su electricista
especializado.
Avise por favor al servicio
posventa. No vuelva a abrir
la puerta del aparato.
Véase el apartado "Sistema
de control e información".
Sírvase consultar en este
capítulo bajo "Cambio de
bombilla".
818 41 56-00/1 89
Page 90

Qué hacer cuando ...
Avería Posible causa Remedio
La temperatura del compartimento congelador o
del compartimento refrigerador es insuficiente.
Hay agua en el fondo del
refrigerador o sobre las
bandejas.
Se ha formado mucha
escarcha en el aparato,
eventualmente también en
la junta de la puerta.
Después de pulsarse la
tecla COOLMATIC o FROSTMATIC o bien después de
modificarse el ajuste de la
temperatura, el compresor
no arranca inmediatamente.
La temperatura no está
ajustada correctamente.
La puerta estuvo abierta
durante mucho tiempo.
En las últimas 24 horas se
introdujeron grandes cantidades de productos
calientes.
El aparato frigorífico está
colocado cerca de una
fuente térmica.
Orificio de desagüe del
condensado obstruido.
La junta de la puerta no es
hermética (quizá después
del cambio del tope).
Eso es normal, no ocurren
fallos.
Sírvase consultar el capítulo "Ajustar la temperatura".
Dejar abierta la puerta
solamente el tiempo necesario.
Pulsar la tecla COOLMATIC
o FROSTMATIC
Sírvase consultar el capítulo "Lugar de emplazamiento".
Mantener libre la salida del
orificio del agua de condensación empleando el
pasador de limpieza verde
(véase el apartado "Limpieza y mantenimiento").
En los lugares no estancos
calentar cuidadosamente la
junta de la puerta con un
secador de pelo (no calentar a más de 50 °C). Al
mismo tiempo extender a
mano la junta de la puerta
de tal forma que quede
apoyada perfectamente.
El compresor se pone en
marcha automáticamente
después de haber transcurrido algún tiempo.
90 818 41 56-00/1
Page 91

Qué hacer cuando ...
Avería Posible causa Remedio
Ruidos desacostumbrados.
El aparato frigorífico no
está en posición recta.
El aparato frigorífico entra
en contacto con la pared o
con otros objetos.
Una pieza, p. ej., un tubo,
en la parte posterior del
aparato frigorífico tropieza con otra pieza del
aparato o con la pared.
El ventilador está en
marcha.
Reajustar las patas delanteras.
Separar un poco el aparato.
En caso dado separar esta
pieza doblándola cuidadosamente.
Ruido de funcionamiento
normal. El ventilador
asegura la distribución
uniforme de la
temperatura en el interior
del aparato.
818 41 56-00/1 91
Page 92

Qué hacer cuando ...
Cambio de bombilla
La iluminación interior se apaga automáticamente a los 7 minutos por
3
razones de seguridad al estar abierta la puerta y se vuelve a encender al
abrirse la puerta la próxima vez.
¡Advertencia! ¡Peligro de electrocución! Hay que desconectar el
1
aparato frigorífico y desenchufarlo o desconectar o desenroscar el
fusible antes de efectuar el cambio de bombillas.
Datos de las bombillas: 220-240 V, máx. 25 W,
casquillo portabombillas: E 14
0 1. Para desconectar el aparato frigorífico han de mantenerse oprimido la
tecla de CONEXIÓN/DESCONEXIÓN.
2. Desconectar el enchufe de la red.
3. Para reemplazar la bombilla desen-
rosque el tornillo de estrella y
retire la tapa hacia abajo.
4. Sustituya la bombilla quemada.
5. Vuelva a colocar la tapa y a enros-
car el tornillo de estrella.
92 818 41 56-00/1
Page 93

Ruidos típicos del aparato frigorífico cuando
está en servicio
Los aparatos frigoríficos producen los siguientes ruidos:
• Chasquido
Siempre que el compresor se conecte o desconecte, se escuchará un
chasquido.
• Zumbido
Tan pronto funcione el compresor se escuchará su zumbido.
• Burbujeo/chapoteo
Cuando penetre agente refrigerante en los tubos delgados, se escuchará un ruido similar al burbujeo o chapoteo. También después de la
desconexión del compresor se escuchará ese ruido durante breve
tiempo.
• Ruido de aire
Las corrientes de aire generados por el ventilador pueden producir ruido.
Disposiciones, normas y directrices
El aparato frigorífico ha sido concebido para uso doméstico y fabricado
conforme a las normas vigentes establecidas para estos aparatos. Para
la fabricación de estos aparatos frigoríficos se han adoptado especialmente las medidas necesarias previstas en la Ley de seguridad de aparatos (GSG), en la Disposición para prevención de accidentes en equipos
frigoríficos (VBG 20) y en las prescripciones de la Asociación de electrotécnicos alemanes (VDE).
El circuito refrigerante se sometió a una prueba de hermeticidad.
Este aparato frigorífico cumple con las siguientes directrices de la CEE:
;
– 73/23/CEE del 19.2.1973 - Directriz para baja tensión
– 89/336/CEE del 3.5.1989
(incluyendo la Directriz de modificación 92/31/CEE) - Directriz de
Compatibilidad electromagnética.
818 41 56-00/1 93
Page 94

Terminología
• Agente refrigerante
Los líquidos empleados para la generación de frío se denominan
agentes refrigerantes. Estos líquidos tienen un punto de ebullición
bajo, tan bajo que el calor de los productos almacenados en el aparato frigorífico ocasiona la ebullición o la evaporación del agente
refrigerante.
• Agente refrigerante circula
Sistema cerrado en el cual el agente refrigerante. El sistema del circuito refrigerante está compuesto fundamentalmente por el evaporador, el compresor, el condensador y los tubos.
• Evaporador
En el evaporador se evapora el agente refrigerante. Se elimina el calor
en el interior del aparato frigorífico y éste se enfría. Al igual que
todos los líquidos, el agente refrigerante necesita calor para evaporarse. Y por eso el evaporador está instalado en el interior del aparato
frigorífico o incorporado en espuma rígida directamente detrás de la
pared interna, motivo por el cual no es visible.
• Compresor
El aspecto del compresor es similar al de un pequeño barril. El compresor se acciona con un motor eléctrico incorporado en la parte trasera, en la zona de la base del aparato frigorífico. La tarea del
compresor consiste en extraer el agente refrigerante en forma de
vapor fuera del evaporador, luego en condensarlo y conducirlo al
condensador.
• Condensador
El condensador suele tener una forma reticulada. En el condensador
se licúa el agente refrigerante condensado en el compresor. Entonces
se produce una liberación de calor que se entrega al aire del entorno
a través de la supeficie del condensador. Por ese motivo el condensador está situado en la parte exterior trasera del aparato frigorífico.
94 818 41 56-00/1
Page 95

Servicio de postventa
En el caso de ocurrir fallos cuya solución no aparezca en estas instrucciones de servicio es preciso dirigirse al concesionario o al servicio de
postventa local. El cuaderno adjunto, "Condiciones de garantía/lugares
de servicio de postventa", contiene las direcciones y los números de
teléfono correspondientes.
La preparación de los respuestos específicos permite evitar viajes innecesarios y costosos. Por eso es necesario indicar los siguientes datos del
aparato frigorífico:
• Denominación del modelo
• Número de artículo (PNC)
• Número de fabricación (S-No.)
Estos datos se encuentran en la placa característica situada a la
izquierda del lado interior del aparato frigorífico. Es recomendable
escribirlos en el manual de instrucciones de servicio para tenerlos a
mano rápidamente.
Advertencia: Las llamadas injustificadas al servicio de postventa se
cobran también durante el período de garantía.
818 41 56-00/1 95
Page 96

818 41 56 – 00/1 - 1207 Subject to change without notice
Salvo modificaciones
 Loading...