

Page 1

SANTO
Kühl-/Gefrierkombination electronic
Electronic Refrigerator/Freezer
Combinaciones de refrigeradores y
congeladores electrónicos
Gebrauchsanweisung
Operating Instructions
Instrucciones para el uso
818 36 47-03/4
Page 2

Dear customer,
Pri
Before placing your new refrigerator/freezer into operation please read
these operating instructions carefully. They contain important
information for safe use, for installation and for care of the appliance.
Please keep these operating instructions for future reference. Pass them
on to possible new owners of the appliance.
Notes which are important for your safety or for the proper function-
1
ing of the appliance are stressed with a warning triangle and/or with
signal words (Warning!, Caution!, Important!). Please observe the following carefully.
0 1. This symbol and numbered instructions guide you step by step in the
operation of the appliance.
2. .....
Supplementary information regarding operation and practical uses of
3
the appliance appear after this symbol.
Tips and notes concerning economical and environmentally sound use
2
of the appliance are marked with the cloverleaf.
Explanations of the technical terminology used in the operating
instructions can be found at the end in the section "Technical
Terminology".
The operating instructions contain instructions for the correction of
possible malfunctions by the user in the section "What to do if ...". If
these instructions should not be sufficient, please contact your local
AEG Service Force Centre.
nted on paper manufactured with environmentally sound processes.
he who thinks ecologically acts accordingly ...
50 818 36 47-03/4
Page 3

Contents
Important Safety Instructions . . . . . . . . . . . . . . . . . . . . . . . . . . . . . . . . . . . . 53
Environmental Information . . . . . . . . . . . . . . . . . . . . . . . . . . . . . . . . . . . . . . 55
Appliance Transport . . . . . . . . . . . . . . . . . . . . . . . . . . . . . . . . . . . . . . . . . . . . 56
Before Use . . . . . . . . . . . . . . . . . . . . . . . . . . . . . . . . . . . . . . . . . . . . . . . . . . . . . 57
Packaging . . . . . . . . . . . . . . . . . . . . . . . . . . . . . . . . . . . . . . . . . . . . . . . . . . . . . . 57
Installation . . . . . . . . . . . . . . . . . . . . . . . . . . . . . . . . . . . . . . . . . . . . . . . . . . . . 59
Installation Location . . . . . . . . . . . . . . . . . . . . . . . . . . . . . . . . . . . . . . . . . . . . . 59
The refrigerator/freezer needs ventilation . . . . . . . . . . . . . . . . . . . . . . . . . . . 60
Appliance Alignment . . . . . . . . . . . . . . . . . . . . . . . . . . . . . . . . . . . . . . . . . . . . . 60
Electrical Connection . . . . . . . . . . . . . . . . . . . . . . . . . . . . . . . . . . . . . . . . . . . . 60
Carbon filter . . . . . . . . . . . . . . . . . . . . . . . . . . . . . . . . . . . . . . . . . . . . . . . . . . . . 61
Reversing The Door . . . . . . . . . . . . . . . . . . . . . . . . . . . . . . . . . . . . . . . . . . . . . 62
Appliance Description . . . . . . . . . . . . . . . . . . . . . . . . . . . . . . . . . . . . . . . . . . . 66
View of Appliance . . . . . . . . . . . . . . . . . . . . . . . . . . . . . . . . . . . . . . . . . . . . . . . 66
Freezer tray . . . . . . . . . . . . . . . . . . . . . . . . . . . . . . . . . . . . . . . . . . . . . . . . . . . . . 67
Cold Accumulation Block . . . . . . . . . . . . . . . . . . . . . . . . . . . . . . . . . . . . . . . . . 67
Control Panel . . . . . . . . . . . . . . . . . . . . . . . . . . . . . . . . . . . . . . . . . . . . . . . . . . . 68
Temperature setting buttons . . . . . . . . . . . . . . . . . . . . . . . . . . . . . . . . . . . . . . 68
Temperature Displays . . . . . . . . . . . . . . . . . . . . . . . . . . . . . . . . . . . . . . . . . . . . 69
ALARM OFF button . . . . . . . . . . . . . . . . . . . . . . . . . . . . . . . . . . . . . . . . . . . . . . 69
Prior to Initial Start-Up . . . . . . . . . . . . . . . . . . . . . . . . . . . . . . . . . . . . . . . . . 70
Initial Start-Up . . . . . . . . . . . . . . . . . . . . . . . . . . . . . . . . . . . . . . . . . . . . . . . . . 70
Temperature Adjustment . . . . . . . . . . . . . . . . . . . . . . . . . . . . . . . . . . . . . . . . 71
COOLMATIC/FROSTMATIC . . . . . . . . . . . . . . . . . . . . . . . . . . . . . . . . . . . . . . . 72
COOLMATIC . . . . . . . . . . . . . . . . . . . . . . . . . . . . . . . . . . . . . . . . . . . . . . . . . . . . 72
Quick chill . . . . . . . . . . . . . . . . . . . . . . . . . . . . . . . . . . . . . . . . . . . . . . . . . . . . . . 72
FROSTMATIC . . . . . . . . . . . . . . . . . . . . . . . . . . . . . . . . . . . . . . . . . . . . . . . . . . . . 73
Holiday Mode . . . . . . . . . . . . . . . . . . . . . . . . . . . . . . . . . . . . . . . . . . . . . . . . . . 73
Switching the Appliance Off . . . . . . . . . . . . . . . . . . . . . . . . . . . . . . . . . . . . . 74
818 36 47-03/4 51
Page 4

Contents
Control and Information Systems . . . . . . . . . . . . . . . . . . . . . . . . . . . . . . . . . 75
"Open Door"-Warning . . . . . . . . . . . . . . . . . . . . . . . . . . . . . . . . . . . . . . . . . . . . 75
Temperature Warning . . . . . . . . . . . . . . . . . . . . . . . . . . . . . . . . . . . . . . . . . . . . 75
Function Errors . . . . . . . . . . . . . . . . . . . . . . . . . . . . . . . . . . . . . . . . . . . . . . . . . . 76
Opening the Freezer Compartment Door . . . . . . . . . . . . . . . . . . . . . . . . . . 76
Interior Accessories . . . . . . . . . . . . . . . . . . . . . . . . . . . . . . . . . . . . . . . . . . . . . 77
Storage Shelves . . . . . . . . . . . . . . . . . . . . . . . . . . . . . . . . . . . . . . . . . . . . . . . . . 77
Variable Inner Door . . . . . . . . . . . . . . . . . . . . . . . . . . . . . . . . . . . . . . . . . . . . . . 77
LONGFRESH 0 °C cold section . . . . . . . . . . . . . . . . . . . . . . . . . . . . . . . . . . . . . 77
Quick Chill Shelf . . . . . . . . . . . . . . . . . . . . . . . . . . . . . . . . . . . . . . . . . . . . . . . . 78
Bottle- and Can Holder . . . . . . . . . . . . . . . . . . . . . . . . . . . . . . . . . . . . . . . . . . . 78
Dismantling of the Bottle- and Can Holder . . . . . . . . . . . . . . . . . . . . . . . . . . 79
Bottle Holder . . . . . . . . . . . . . . . . . . . . . . . . . . . . . . . . . . . . . . . . . . . . . . . . . . . 79
Correct storage . . . . . . . . . . . . . . . . . . . . . . . . . . . . . . . . . . . . . . . . . . . . . . . . . 80
Freezing . . . . . . . . . . . . . . . . . . . . . . . . . . . . . . . . . . . . . . . . . . . . . . . . . . . . . . . 83
Frozen Storage . . . . . . . . . . . . . . . . . . . . . . . . . . . . . . . . . . . . . . . . . . . . . . . . . 84
Storage Goods Symbols/Freezing Calendar . . . . . . . . . . . . . . . . . . . . . . . . . 84
Preparation of Ice Cubes . . . . . . . . . . . . . . . . . . . . . . . . . . . . . . . . . . . . . . . . 85
Energy Saving Advice . . . . . . . . . . . . . . . . . . . . . . . . . . . . . . . . . . . . . . . . . . . 85
Defrosting . . . . . . . . . . . . . . . . . . . . . . . . . . . . . . . . . . . . . . . . . . . . . . . . . . . . . 86
Fridge zone and LONGFRESH 0 °C cold zone . . . . . . . . . . . . . . . . . . . . . . . . . 86
Freezer Compartment Defrosting . . . . . . . . . . . . . . . . . . . . . . . . . . . . . . . . . . . 86
Maintenance and Cleaning . . . . . . . . . . . . . . . . . . . . . . . . . . . . . . . . . . . . . . 87
Internal Cleaning . . . . . . . . . . . . . . . . . . . . . . . . . . . . . . . . . . . . . . . . . . . . . . . . 88
External Cleaning . . . . . . . . . . . . . . . . . . . . . . . . . . . . . . . . . . . . . . . . . . . . . . . . 89
What to do if ... . . . . . . . . . . . . . . . . . . . . . . . . . . . . . . . . . . . . . . . . . . . . . . . . 90
Correcting Malfunctions . . . . . . . . . . . . . . . . . . . . . . . . . . . . . . . . . . . . . . . . . . 90
Replacing the Light Bulb . . . . . . . . . . . . . . . . . . . . . . . . . . . . . . . . . . . . . . . . . . 92
Normal Operating Sounds . . . . . . . . . . . . . . . . . . . . . . . . . . . . . . . . . . . . . . . 93
Regulations, Standards, Guidelines . . . . . . . . . . . . . . . . . . . . . . . . . . . . . . . 93
Technical Terminology . . . . . . . . . . . . . . . . . . . . . . . . . . . . . . . . . . . . . . . . . . 94
Customer Service . . . . . . . . . . . . . . . . . . . . . . . . . . . . . . . . . . . . . . . . . . . . . . . 95
52 818 36 47-03/4
Page 5

1 Important Safety Instructions
The safety of our appliances is in accordance with recognised technological standards and appliance safety legislation. We nevertheless feel
that it is important to acquaint you with the following safety guidelines:
Use for Intended Purpose
• The appliance is intended for use at home. Depending on the preset
operation mode, this appliance becomes suitable for cooling,
freezing, for frozen storage of foods or for ice preparation. The
manufacturer assumes no liability for damages occurring through
improper operation or use of the appliance for unintended purposes.
• Alterations or changes to the appliance are not permitted for reasons
of safety.
• If you should use this appliance in a commercial application or for
purposes other than cooling, freezing, or frozen storage of foods,
please observe all valid legal regulations for your application.
Prior to initial start-up
• Check the appliance for transport damage. Do not under any
circumstances connect a damaged appliance! Please contact your
supplier in the event of damage.
• Make sure that the power plug is not squashed or damaged by the
back of the appliance. A damaged power plug may overheat and
cause a fire.
• If the power plug socket is loose, do not insert the power plug. There
is a risk of electric shock or fire.
Refrigerant
The refrigerant isobutane (R600a) is contained within the refrigerant
circuit of the appliance, a natural gas with a high level of
environmental compatibility, which is nevertheless flammable.
• Warning - During transportation and installation of the appliance,
be certain that none of the components of the refrigerant circuit
become damaged.
• If the refrigerant circuit should become damaged:
– avoid open flames and sources of ignition;
– thoroughly ventilate the room in which the appliance is situated.
818 36 47-03/4 53
Page 6

Important Safety Instructions
Safety for Children
• Packaging materials (e.g. films, styrofoam) can be dangerous for
children. Danger of suffocation! Keep packaging materials away from
children!
• Before disposing of old appliances make them inoperable. Remove
plug from mains, sever the power cable, remove or destroy any snap
or latch closures. This eliminates the danger that playing children lock
themselves into the appliance (danger of suffocation!) or place
themselves into other life-endangering situations.
• Children often do not recognise the dangers involved with household
appliances. Please provide for the necessary supervision and do not
allow children to play with the appliance! Inform children of the possible dangers and instruct them in the correct use of the appliance.
Daily Operation
• Containers with flammable gases or fluids can develop leaks through
contact with the cold. Danger of explosion! Do not store containers
with flammable substances, such as aerosol cans, refill cartridges for
cigarette lighters etc. in the appliance.
• Bottles and cans may not be placed in the freezer compartment. They
can burst when the contents freeze - or even explode if the contents
contain carbonic acid! Never place sodas, juices, beer, wine,
champagne etc. into the freezer compartment. Exception: Spirits with
high alcohol content may be stored in the freezer compartment.
• Do not place ice cream or ice cubes directly from the freezer
compartment into the mouth. Very cold ice can freeze to the lips or
tongue and cause injury. Inform children of this danger.
• Never touch frozen goods with wet hands. Hands can freeze to the
goods.
• Warning - Do not operate any electrical appliances in the appliance
(e.g. electric ice cream makers, mixers etc.).
• Warning - Do not cover or obstruct the ventilation openings as this
will impair the operation of the appliance.
• Warning - Do not use any mechanical devices or other artificial
means to speed up defrosting unless they are recommended by the
manufacturer.
• Before cleaning the appliance switch off and remove the plug from
the mains, or switch off or turn out the circuit breaker or fuse.
• Placing frozen goods on the top of the appliance can lead to the
accumulation of condensation on the top panel through contact with
54 818 36 47-03/4
Page 7

the cold. Electronic components are housed within this top panel. If
water should drip onto these components, the appliance could be
damaged by a short circuit. For this reason do not place frozen goods
on top of the appliance.
• Do not remove the power cord by pulling on its lead, particularly
when the appliance is being pulled out of its niche. Damage to the
cord may cause a short circuit, fire and/or electric shock.
• Do not place heavy articles or the appliance itself on the power cord.
There is a risk of a short circuit and fire.
• If the power cord is damaged, it must be replaced by a certified
service agent or qualified personnel.
In case of malfunction
• If a malfunction should occur at the appliance, refer first to the
section "What to do if ..." in these operating instruction. If the
instructions in this section are not sufficient, do not undertake any
further work on your own.
• Refrigerators or feezers may only be repaired by trained personnel.
Repairs carried out by untrained personnel can lead to substantial
danger. Please contact your dealer or our customer service
department for repairs.
Environmental Information
Packaging material
2
The packaging materials are environmentally friendly and can be recycled. The plastic components are identified by markings, e.g. >PE<,
>PS<, etc. Please dispose of the packaging materials in the appropriate
container at the community waste disposal facilities.
2 Old appliance
The symbol
product may not be treated as household waste. Instead it shall be
handed over to the applicable collection point for the recycling of electrical and electronic equipment. By ensuring this product is disposed of
correctly, you will help prevent potential negative consequences for the
environment and human health, which could otherwise be caused by
inappropriate waste handling of this product. For more detailed information about recycling of this product, please contact your local city
office, your household waste disposal service or the shop where you
purchased the product.
818 36 47-03/4 55
W on the product or on its packaging indicates that this
Page 8

When disposing of your old appliance:
• Make the appliance unusable by cutting off the cable and remove
any door catches to ensure small children cannot be trapped inside.
• The appliance may not be disposed of with domestic waste or bulky
refuse.
• The refrigerant circuit, especially the heat exchanger at the back of
the appliance, may not be damaged.
Help to keep your country tidy - use an authorised disposal site.
Appliance Transport
Two persons are required to transport the appliance. Two handles are
provided on the back of the appliance at the top to enable a better
hold. Before transporting, the plinth cover must be removed to prevent
damage.
0 1. To remove the plinth cover from the
stops, tilt downwards and then pull
forwards.
Important: Do not damage door
contact (if present)
2. When the appliance is standing in
the desired place, attach the plinth
cover. Make sure that the door
contact (if present) is not damaged and that it engages in the
corresponding aperture in the plinth cover.
3. Grip the appliance with the
recessed handles positioned as
in the drawing, and transport
the appliance.
4. When the appliance is standing in
the desired place, attach the plinth
cover. First hook at the hitches on
the lower edge, then press the grid
2
in position. Make sure that the door
contact (if present) is not damaged
and that it engages in the corre-
1
sponding aperture in the plinth cover.
56 818 36 47-03/4
Page 9
Before Use
Packaging
0 1. Remove all adhesive tape and packaging from the interior of the appli-
ance.
Any remnants of adhesive can be removed with white spirit.
3
2. Remove the transport protection pieces and pull off the adhesive tape.
3. Wash the inside of the appliance with lukewarm water with a little
bicarbonate of soda added (5 ml to 0.5 litre of water). Do not use soap
or detergent as the smell may linger. Dry the appliance thoroughly.
818 36 47-03/4 57
Page 10

Remove the transport fittings from
the storage shelves:
4. Slide the fittings securing the shelf
forward to the thicker section on
the edge of the storage shelf.
5. Take hold of the shelf at the back
and together with the fittings slide
the storage shelf far enough forward so that it can be hinged
downwards and the fittings can be
removed from the guides.
58 818 36 47-03/4
Page 11
Installation
Installation Location
The appliance should be installed in a well ventilated, dry room.
Energy use and efficient performance of the appliance is affected by
the ambient temperature.
The appliance should therefore
– not be exposed to direct sunlight;
– not be installed next to radiators, cookers or other sources of heat;
– only be installed at a location whose ambient temperature
corresponds to the climate classification, for which the appliance is
designed.
The climate classification can be found on the rating plate, which is
located at the left on the inside of the appliance.
The following table shows which ambient temperature is correct for
each climate classification:
Climate classification for an ambient temperature of
SN +10 to +32 °C
N +16 to +32 °C
ST +18 to +38 °C
T +18 to +43 °C
If installation next to a source of heat is unavoidable, the following
minimum clearances must be maintained at the sides of the appliance:
– for electric cookers 3 cm;
– for oil and coal fired ranges 30 cm.
If these clearances cannot be maintained a heat insulating pad is required between the cooker and the refrigeration appliance.
818 36 47-03/4 59
Page 12

Installation
The refrigerator/freezer needs ventilation
Air is fed under the door through the
vent slots in the base and is exhausted
upwards along the back wall. To ensure
proper air circulation never cover or
alter the vent openings.
Important! If the appliance is installed
under a hanging cabinet, a clearance of
at least 10 cm between the top of the
appliance and the cabinet above it must
be maintained.
Please check whether, after installing
your appliance and especially after
reversing the door, the door seal seals
tightly. A badly fitting door seal may
lead to heavy frosting and a higher
power consumption (see also "What to
do if ...“).
Remove the two wall spacers from
the appliance accessories pack and,
in accordance with the illustrations,
fix them at the top of the rear of the
appliance so that the distance from
the wall required for the necessary
ventilation is ensured.
Appliance Alignment
0 1. The appliance must be level. Please compensate for unevenness in the
floor by turning the two adjustable feet at the front.
Electrical Connection
A properly installed socket outlet with earthing contact is required for
electrical connection. Electrical fuse protection must be of at least 10
ampere.
If the outlet socket is no longer accessible after installation of the
appliance, appropriate measures must be taken during electrical installation to assure that the appliance can be disconnected from the mains
(e.g. fuse, circuit breaker, non-operate current safety-switch or the like,
with a contact opening of at least 3 mm).
60 818 36 47-03/4
Page 13

Installation
0 1. Before initial start-up, refer to the appliance rating plate to ascertain if
supply voltage and current values correspond with those of the mains
at the installation location.
e.g.: AC 220 ... 240 V 50 Hz or
220 ... 240 V~50 Hz
(i.e. 220 to 240 volts alternating current, 50 Hertz)
The rating plate is inside the appliance at the left.
Warning: To avoid potential danger, if the mains connection lead of
this appliance is damaged, it must be replaced by our customer service
representative or a person with similar qualifications.
Warning: Under no circumstances should the appliance be connected
to electronic “power saving plugs” or to a.c.-d.c. converters which convert direct current to 230 V alternating current (e.g., solar installations,
ship networks)
Carbon filter
There is a active carbon filter in the rear wall of the fridge section. The
carbon filter cleans the air in the fridge section and in the LONGFRESH
0°C cold section by binding unpleasant smells.
Tip: The active carbon filter is a part subject to wear and is not covered
by the warranty.
Inserting and changing the active carbon filter:
When the fridge is delivered, the carbon filter is packed in a plastic bag
to ensure a long life. Before using the appliance for the first time, the
carbon filter must be inserted behind the air discharge grill.
With the fridge operating normally, the
carbon filter should be changed once a year
to ensure optimum function.
New carbon filters can be obtained from
specialist dealers or from the customer care
department.
0
1. To open the grill, press the lever on the right
of the grill (1) and open the grill forwards (2).
2. To change the old carbon filter, pull it from
the runners (3).
818 36 47-03/4 61
Page 14
3. Insert the new carbon filter into the runners
of the grill (3) and press the grill closed until
it snaps into place.
Take care when handling the filter to prevent
1
dislodging carbon particles.
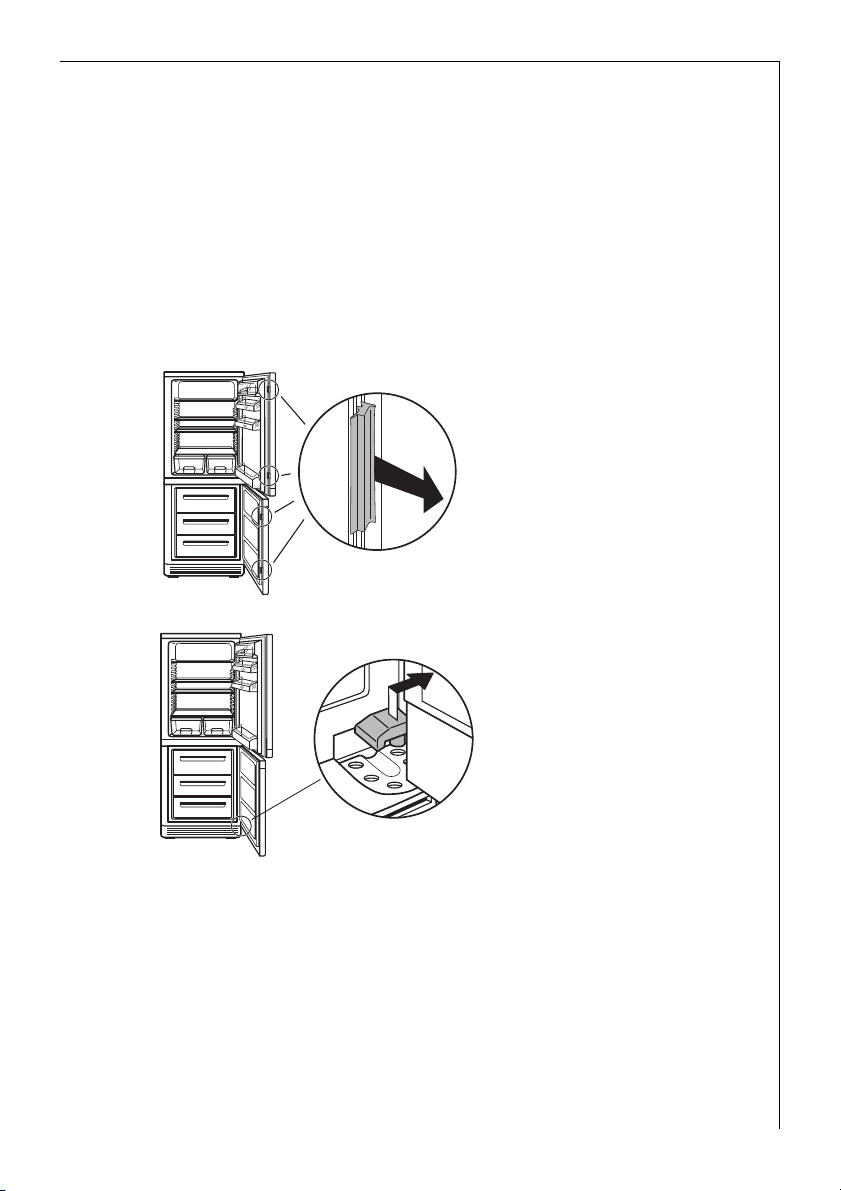
Reversing The Door
The door hinges can be changed from right (as supplied) to left if
required to suit the location where the appliance is installed.
Warning! Unplug from the mains, before reversing the door.
1
0 1. Open the freezer compartment
door and remove the plinth to
the front. Move the door bearing
cover on the plinth from the left
to the right.
2. Close the freezer compartment
door. Open the fridge compartment door and unscrew the
retaining screw for the self-closing mechanism on the top of the
freezer compartment door.
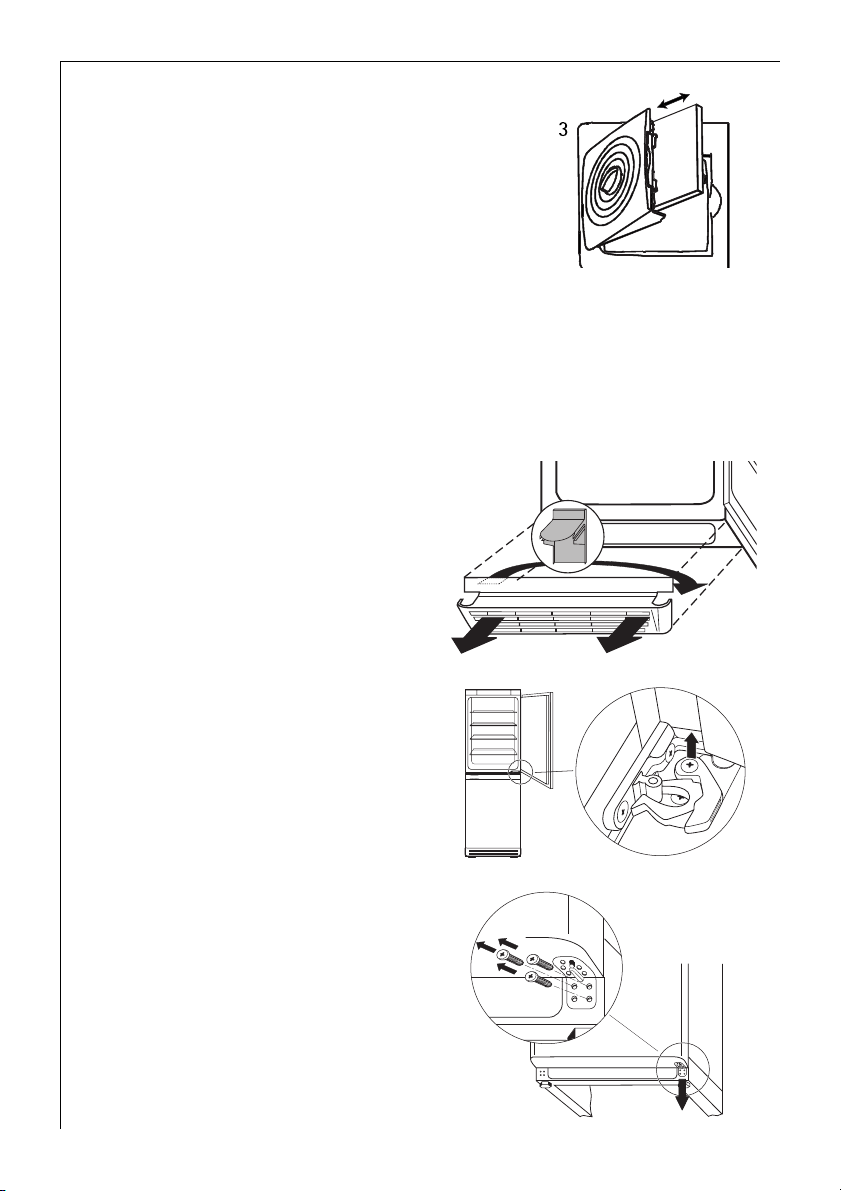
3. With the freezer compartment
door closed, remove the crosshead screws from the lower door
bearing and remove the door
bearing downwards.
62 818 36 47-03/4
Page 15
4. Move the bearing pivot from the
right to the left hand hole.
Remove the freezer compartment
door carefully to the front and
place on one side.
5. Unscrew the centre door bearing.
6. Remove the fridge compartment
door carefully to the front and
place on one side.
7. Unscrew the retaining screw for
the self-closing mechanism on the
bottom of the fridge compartment door.
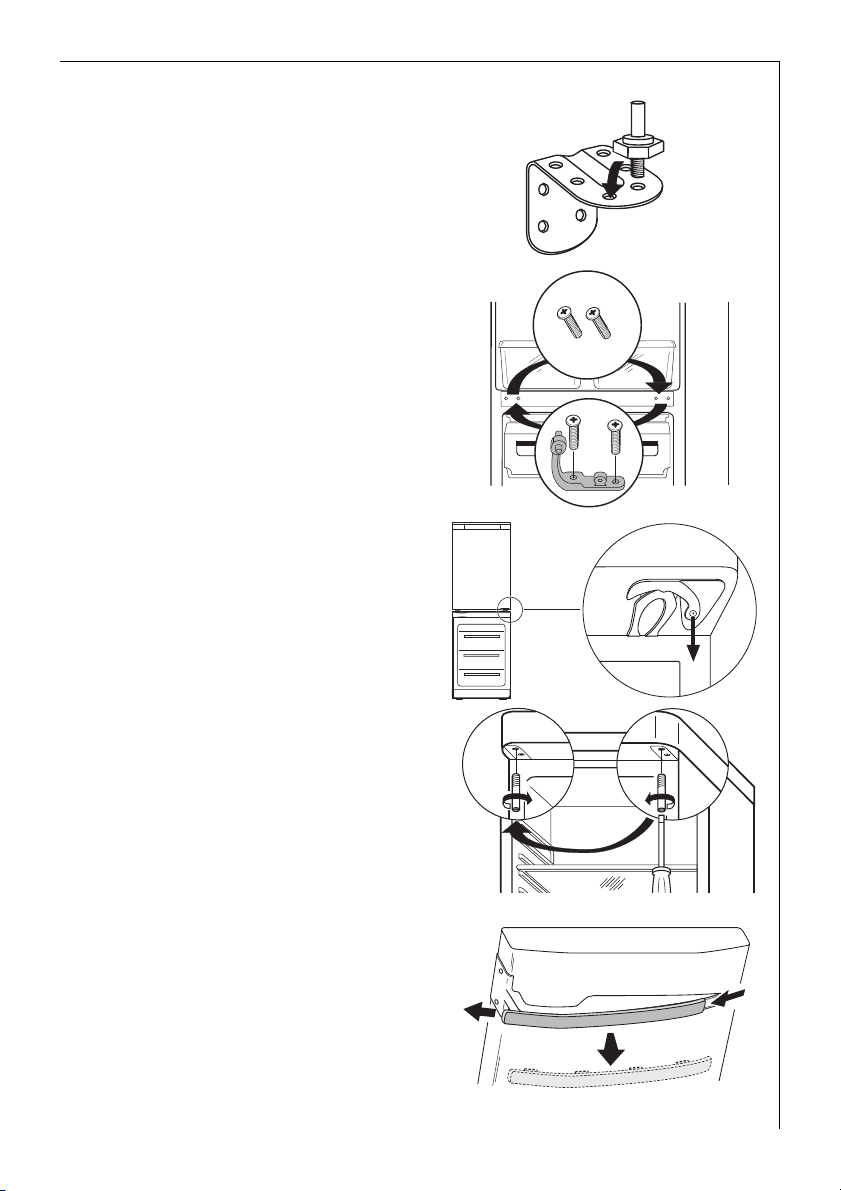
Reversing The Door
8. Move the upper bearing pivot to
the left.
9. Push the cover on the door handle
to the left and remove it by bringing it towards you.
818 36 47-03/4 63
Page 16

Reversing The Door
10. Unscrew the door handle, turn it
180° and screw it back on to the
right-hand side of the door.
11. Replace the cover for the door
handle and push it towards the
left as far as it will go.
12. Fasten the self-closing mechanism
to the bottom left of the fridge
compartment door.
13. Carefully slide the fridge compartment door onto the top bearing pivot and close.
64 818 36 47-03/4
Page 17

14. Slide the centre door bearing into
the bottom left of the fridge compartment door and fasten to the
housing.
15. Fasten the self-closing mechanism
on the top left of the freezer
compartment door,
16. Carefully slide the freezer compartment door onto the centre
bearing pivot and close.
17. Place the lower door bearing with
the bearing pivot in the lower left
of the freezer compartment door
and fasten.
Reversing The Door
18. Open the freezer compartment
door and fit the plinth.
Important: Do not damage door
contact (if present).
818 36 47-03/4 65
Page 18

Appliance Description
View of Appliance
(various models)
á Control panel
à Butter and cheese compartment with lid
â Door storage compartments
ä Bottle compartment
ã LONGFRESH 0 °C cold zone
å Shelves
ç Quick chill shelf
é Bottle and can holder
è Rating plate
ê Air discharge grill with regulator
ë Freezer drawer (only for storage). When defrosting the bottom
drawer also serves as a water collecting vessel
í Freezer drawer (for storage and freezing)
ì Freezer tray
66 818 36 47-03/4
Page 19

Appliance Description
Freezer tray
A freezer tray is included below the
upper drawer in the freezer
compartment.
Berries and vegetables, for example,
can be pre-frozen on the freezer tray.
Advantage: The berries are not squeezed and maintain their natural
form. The frozen berries can then be stored in compartments or drawers
packaged in individual portions.
Cold Accumulation Block
A cold accumulation block is enclosed with the appliance.
In the event of power failure or a malfunction of the appliance, the
3
cold accumulation block will increase the hold over period by several
hours. The cold accumulation block cools best if it is placed in the top
drawer at the front on the frozen food. If the freezer section is only
partially filled, pack the frozen food together as tightly as possible, so
that in the event of a power cut the cold remains in the frozen food for
longer.
When freezing food, place the cold accumulation block on the already
frozen food to prevent defrosting due to the warmth of the food that is
being frozen.
When defrosting the appliance place the cold accumulation block on
top of the frozen food to keep it cold.
The block may also be used in a cool bag to keep the temperature of
food down during transportation.
Refer to the section "Prior to Initial Start-Up" regarding the freezing of
the cold accumulation block.
818 36 47-03/4 67
Page 20

Appliance Description
Control Panel
1 ON/OFF button and ON/OFF indicator light (green)
2 Temperature display for refrigerator (not for LONGFRESH 0 °C
cold zone)
3 Temperature setting buttons for refrigerator
4 COOLMATIC button and COOLMATIC indicator light (yellow)
• COOLMATIC for intensive cooling in the refrigerator
5 FROSTMATIC button and FROSTMATIC indicator light (yellow)
• FROSTMATIC for fast freezing in the freezer compartment
6 Temperature display for freezer compartment
7 Temperature setting buttons for freezer compartment
8 ALARM OFF button and warning indicator light (red)
(see section: "Control and Information Systems")
Temperature setting buttons
The temperature is adjusted using the
„+“ (WARMER) and „-“ (COLDER) buttons.
These buttons are connected to the temperature display.
• The temperature display is switched over from the display of the
ACTUAL temperature (Temperature display is illuminated) to the display of the DESIRED temperature (Temperature display flashes) by
pressing one of the two buttons, „+“ (WARMER) or „-“ (COLDER).
• Each time one of the two buttons is pressed again the DESIRED tem-
perature is adjusted by 1 °C.
• If neither button is pressed, the temperature display automatically
switches back after a short period (approx. 5 sec.) to the display of
the ACTUAL temperature.
DESIRED temperature means:
The temperature that has been selected for inside the fridge or the
freezer compartment. The DESIRED temperature is indicated by flashing
numbers.
68 818 36 47-03/4
Page 21

Appliance Description
ACTUAL temperature means:
The temperature display indicates the current temperature inside the
fridge or the freezer compartment. The ACTUAL temperature is indicated with illuminated numbers.
Once the COOLMATIC- or the FROSTMATIC function has been switched
3
on the DESIRED temperature that was set originally for the fridge or
the freezer cannot be changed.
Temperature Displays
The temperature displays shows several
types of information.
• In normal operation the average temperature in the fridge section is
displayed (ACTUAL temperature). The variations in temperature in the
whole fridge section are small.
• In the freezer section the warmest temperature is displayed (ACTUAL
temperature). When fully filled, the warmest zone is normally located
at the top in the front area of the freezer section. Depending upon
how the section is filled, the temperatures are lower in other areas of
the freezer section.
• When the temperature is being adjusted a flashing display indicates
the fridge or the freezer compartment temperature currently set
(DESIRED temperature).
• Tip: When changing the temperature setting wait about 24 hours
until the temperature display has stabilised.
• If there is a fault in the appliance the temperature display shows:
– a square or a letter in the temperature display of the fridge for a
fault in the fridge,
– a square or a letter in the temperature display of the freezer for a
fault in the freezer.
ALARM OFF button
With the ALARM OFF button, the acoustic warning signal
can be switched off, e.g. the "Open Door" warning when
sorting in or out, the food to be chilled or frozen.
When there is a temperature warning for the freezer compartment, if
the ALARM OFF button is activated, the temperature display will show
the warmest temperature the frozen food has reached.
818 36 47-03/4 69
Page 22

Prior to Initial Start-Up
Before connecting the appliance to the mains and putting it into ope-
1
ration for the first time, leave the appliance to stand for 30 minutes if
was transported upright. After transport on its side, the appliance must
be left to stand for 2 hours before putting it into operation. This is
necessary to allow the oil to flow back into the compressor. Otherwise
the compressor may be damaged.
0 1. Please clean the appliance interior and all accessories prior to initial
start-up (see section: "Maintenance and Cleaning").
2. The appliance must be correctly installed in accordance with the chapter "Installation" before it is put into operation for the first time. Care
should be especially taken that the mains voltage and frequency available correspond with the appliance’s rating plate.
3. Remove the cold accumulation block from the appliance.
4. Place the cold accumulation block into a drawer only after the optimal
storage temperature of -18 °C has been reached, and allow to freeze.
5. After 24 hours place the cold accumulation block at the front of the
upper drawer.
6. Re-freeze the thawed cold accumulation block in the same fashion, e.g.
after cleaning the appliance.
Initial Start-Up
0 1. Insert plug into mains socket.
2. Press the ON/OFF button.
The green power indicator lights up. A warning tone sounds and the
flashing red warning light indicates that the required storage temperature has not yet been reached. The temperature displays shows the current, actual refrigerator and freezer temperature. The compressor will
start and then run automatically.
3. Press the ALARM OFF button to switch off the warning tone.
4. Set the refrigerator to the desired temperature (see section: "Tempera-
ture Adjustment").
Goods to be refrigerated can be loaded immediately after switching on,
3
because the storage temperature in the refrigerator is quickly reached.
5. Set the freezer temperature to -18 °C or colder (see section: "Temperature Adjustment").
Do not load freezer with goods until a temperature of -18 °C has been
3
reached, or until the red warning indicator light has gone out.
70 818 36 47-03/4
Page 23

Temperature Adjustment
With the individual temperature setting buttons the desired
temperatures in the refrigerator and in the freezer compartment can be
adjusted independently of one another.
In the LONGFRESH 0 °C cold zone the temperature is automatically
3
controlled. It remains constant at about 0 °C, no setting is required.
Note: Your appliance is equipped with a dynamic circulating air cooling
function. To adapt the refrigerating capacity required in the fridge zone
and the LONGFRESH 0 °C cold zone in a optimum manner, the fan is
operated at different powers. Because of this, different fan noises are
discernable due to the length of time it is switched on and the speed.
This is normal - there is no malfunction or defect.
0 1. Press either the „+“ (WARMER) or „-“ (COLDER) button for the refriger-
ator or freezer compartment .
The temperature display switches over and the DESIRED temperature
currently set flashes on the temperature display.
2. To adjust to a warmer temperature, press the „+“ (WARMER) button. To
adjust to a colder temperature, press the „-“ (COLDER) button. The
changed setting is immediately displayed on the temperature display.
Each time the button is pressed the temperature is adjusted by 1 °C.
Adjustable temperature range for the freezer compartment:
-15 °C to -24 °C.
Adjustable temperature range for the refrigerator compartment:
+3 °C to +8 °C, +15 °C (Holiday mode)
Note: From a food science point of view, +5 °C for the refrigerator
3
compartment and -18 °C for the freezer compartment should be considered cold enough as a storage temperature.
3. When the buttons are not further pressed after an adjustment has been
made, after a short period (approx. 5 sec.) the temperature display
switches over and again displays the ACTUAL temperature in the refrigerator compartment. The display changes from flashing to illuminated
numbers.
When the setting is changed, the compressor does not start immedi-
3
ately if automatic defrosting is currently taking place.
Important! Please check red warning indicator light and temperature
display regularly to assure maintenance of the storage temperature.
818 36 47-03/4 71
Page 24

COOLMATIC/FROSTMATIC
COOLMATIC
The COOLMATIC function is suited for quick cooling of
large quantities of goods in the refrigerator, e.g. drinks
and salads for a party or wedding.
0 1. The COOLMATIC function is switched on by pressing the COOLMATIC
button. The yellow light illuminates.
The COOLMATIC function now provides for intensive cooling. A DESIRED temperature of +3 °C is automatically selected. The COOLMATIC
function is ended automatically after a period of 6 hours. The originally
selected DESIRED temperature is again valid. The temperature display
shows the ACTUAL refrigerator temperature.
2. The COOLMATIC function can be ended manually at any time by pressing the COOLMATIC button again. The yellow light goes out.
Quick chill
The quick chill function can be used for the fast cooling of drinks in
cans or bottles in the fast cool storage tray or of larger amounts of
room-temperature food. The built-in charcoal filter reduces the
development of any smell.
Chilling of cans or bottles
Place cans or bottles in the holder on the
fast cool storage tray in front of the air
discharge grill. Turn the regulator to
maximum and press the COOLMATIC button.
The yellow indicator light comes on.
Chilling of food
Place the food in the fridge.
Open the regulator to maximum and press the COOLMATIC button. The
yellow indicator light comes on.
When the drinks or the food is sufficiently cooled, press the COOLMATIC
button again. The yellow indicator light goes out. Set the regulator to the
minimum position.
When this function has been activated, forced air will chill the groce-
3
ries, and the temperature in the cabinet reset to +3 °C. After 6 hours
the COOLMATIC function is ended automatically. The yellow light goes
out. Turn the regulator to its minimum position.
72 818 36 47-03/4
Page 25

FROSTMATIC
The FROSTMATIC function provides for quick freezing of
fresh food products, and at the same time protects
previously stored goods against undesired warming in the
freezer compartment.
0 1. The FROSTMATIC function is switched on by pressing the FROSTMATIC
button. The yellow light illuminates.
2. The FROSTMATIC function can be ended manually at any time by pressing the FROSTMATIC button again. The yellow light goes out.
If the FROSTMATIC function is not ended manually, the appliance electronics switch off the FROSTMATIC function after approx. 50 hours. The
yellow light goes out.
Holiday Mode
In the holiday mode the temperature for the refrigerator is approximately +15 °C. In the holiday mode it is therefore possible to leave the
door of the empty refrigerator closed during periods of extended
absence. Advantage: Unintentional closing of the door, or accidental
closing of the door by persons who have access to your home during
your absence, is no longer possible. Without the holiday mode leaving
the door closed would lead to the accumulation of odours and mould.
After emptying and cleaning the appliance, proceed as follows:
0 1. T
o set the holiday mode, press the „+“ (WARMER) or „-“ (COLDER) button.
The temperature display will change and indicate in flashing numbers
the DESIRED temperature that is currently set.
2. Press the „+“ (WARMER) button until the temperature display indicates
H (for holiday). The temperature shown in the temperature display will
change in steps of 1 °C until it reaches +8 °C. After +8 °C the letter H
will appear in the display. The fridge is now operating in energy-saving
holiday mode.
To switch the fridge back to normal operation, press the „-“ (COLDER)
3
button.
Important! Do not store any goods in the refrigerator when the holiday
mode is in operation. The temperature is regulated at about +15 °C
when the holiday mode is in operation. This is too warm for food products.
If, while you are away, the room temperature could fall below 15 °C for
a long period, the fridge should not be operated in the HOLIDAY mode,
but switched off and the door opened.
818 36 47-03/4 73
Page 26

Switching the Appliance Off
Refrigerator and freezer compartments can be switched off
3
independently of one another.
0 1. To switch off the appliance, hold down the ON/OFF button. This will
result in a countdown from "3" to "1" taking place in the temperature
displays. On reaching "1" the fridge and freezer compartment will
switch off. The temperature displays will go off.
Switching off the refrigerator:
0 1. To switch off the refrigerator, hold down the "+" button for the refrig-
erator until „OF“ is shown in the temperature display. Then again press
and hold down the "+" button. After a short time a countdown from
"3" to "1" is taking place in the temperature display for the refrigerator.
On reaching "1" the refrigerator will switch off. The temperature display will go off.
Switching off the freezer:
0 1. To switch off the freezer, hold down the "+" button for the freezer until
„OF“ is shown in the temperature display. Then again press and hold
down the "+" button. After a short time a countdown from "3" to "1" is
taking place in the temperature display for the freezer. On reaching "1"
the freezer will switch off. The temperature display will go off.
The appliance is only completely disconnected from the electricity
3
supply when the power plug has been removed from the power outlet.
Note:
The appliance cannot be switched on or off if unplugged, or if there is
no power being supplied to it.
Following connection to the mains power supply, the appliance returns
to the same operating state as before the interruption of main power.
If the appliance is not to be used for an extended period:
0 1. Switch appliance off by pressing and holding the ON/OFF button (see
above).
2. Remove the mains plug or switch off.
3. Defrost freezer compartment and clean thoroughly (see section: "Main-
tenance and Cleaning").
4. Leave the doors open after defrosting to avoid accumulation of odours.
74 818 36 47-03/4
Page 27

Control and Information Systems
The control and information systems consist of a temperature display,
an optical warning indicator light and an acoustic warning.
The system warns if:
– when first switching on the appliance (when the storage temperature
has not yet been attained);
– when the appliance doors are open
– the temperature in the refrigerator or freezer compartment is too
high;
– functional disturbances at the appliance.
"Open Door"-Warning
If the fridge or freezer door is left open the red warning indicator light
will flash and an acoustic warning tone will sound
– after approx. 80 seconds if the freezer door is left open
– after approx. 5 minutes if the fridge door is left open
If you need more time to load or rearrange refrigerated or frozen foods,
you can switch off the warning tone by pressing the ALARM OFF button.
If the doors are still left open the warning tone will sound again at the
end of the appropriate period of time.
The red warning indicator light will go off when the doors are closed.
Temperature Warning
For the fridge:
The red warning indicator light flashes and a warning tone sounds as
soon as the temperature in the fridge rises to more than +11 °C.
0 1. You can switch off the warning tone using the ALARM OFF button.
The warning indicator light and warning tone switch themselves off
3
automatically when the temperature in the fridge drops to below
+12 °C.
818 36 47-03/4 75
Page 28

For the freezer:
The red warning indicator light flashes and a warning tone sounds as
soon as the temperature in the freezer rises to more than -11 °C. In
addition the freezer temperature display flashes.
0 1. You can switch off the warning tone using the ALARM OFF button.
The freezer temperature display stops flashing and displays the warmest temperature that has been reached in the freezer during the temperature alarm. After approx. 5 seconds the temperature display reverts
to the current freezer temperature.
The warning tone switches itself off automatically if the temperature in
3
the freezer falls to lower than -11 °C. The red warning indicator light
and the temperature display continue to flash.
If the possibility of partial or complete thawing exists, you should
check the quality of the foods.
A rise in temperature may be caused by:
– frequent door opening for long periods of time;
– loading with large quantities of warm foods;
– high ambient temperature;
– an error with the appliance.
Function Errors
If the electronics in the appliance detects a technical defect that has to
be rectified by the customer, the temperature display indicates:
– a square or a letter in the temperature display of the fridge for a fault
in the fridge,
– a square or a letter in the temperature display of the freezer for a
fault in the freezer.
Opening the Freezer Compartment Door
If the freezer compartment door is closed when the appliance is in
operation, it is possible that it cannot be immediately opened again. A
vacuum occurs in the freezer compartment which holds the door closed
until pressure has been equalised. The door can be opened again after
several minutes.
76 818 36 47-03/4
Page 29

Interior Accessories
Storage Shelves
The storage shelves can be adjusted
to various heights:
0 1. Pull the storage shelf forward until
it can be tipped up or down and
removed.
2. To insert at a different height use
the same procedure in reverse.
Variable Inner Door
The door compartments can be pulled up and removed, and inserted at
other positions as needed.
LONGFRESH 0 °C cold section
The LONGFRESH 0 °C cold section consists of two drawers, which are
fitted with sliding regulators to adjust the air humidity.
In the LONGFRESH 0 °C cold section the temperature is automatically
controlled. It remains constant at about 0 °C, no setting is required.
The low storage temperature of around 0 °C and the air moisture that
can be regulated result in optimum storage conditions for various
foodstuffs.
Compared to the normal fridge zone, fresh food can be stored in the
LONGFRESH 0 °C cold section for longer while keeping the same
quality.
High levels of taste and freshness, vitamins and minerals are retained.
Weight loss in fruit and vegetables is reduced. Nutrition levels in your
food are higher as a result.
The LONGFRESH 0 °C cold section is also suitable for slowly defrosting
3
frozen food. If you do this, the defrosted food can be kept in the
LONGFRESH 0 °C cold section for up to two days.
818 36 47-03/4 77
Page 30

Interior Accessories
Setting the air moisture
The two drawers can be used independently of one another with higher
or lower air moisture according to the storage conditions required.
The air moisture can be set with the aid of the slide control on the front
of each drawer.
• Dry: a low relative air moisture is obtained when both controls are
slid to position
• Moist: a high relative air moisture is obtained when both controls are
slid to position
The air moisture in the drawers depends upon the moisture content of
the food stored and upon how often the door is opened.
c, i.e. the air holes are fully opened.
a, i.e. the air holes are fully closed.
Quick Chill Shelf
The quick chill shelf can be placed
in one of the upper grooves. To
maintain the best performance the
shelf should be placed in the
second groove from the top.
Bottle- and Can Holder
The side of the bottle- and can
holder is moveable to enable a
more flexible placement of cans
and bottles in front of the air discharge grill. To allow the holder to
be moved easier when moving
sideways, press the shelf backwards.
The bottle support can be pulled
out when chilling larger bottles.
78 818 36 47-03/4
Page 31

Dismantling of the Bottle- and Can Holder
0 1. Take out the quick chill shelf with
holder from the cabinet.
2. To loosen the holder from the
shelf, bend the hooks/brackets
that surround the backside of the
shelf.
Bottle Holder
Some models are equipped with a
bottle holder in the bottle compartment. This is used to prevent
individual bottles from falling over
and can be slid sideways.
Interior Accessories
818 36 47-03/4 79
Page 32

Correct storage
Food stored in the refrigerator compartment should always be covered
or packed so that they do not dry out, lose their flavour, or transfer
their flavour to any other refrigerated food. The following are suitable
for packing:
– polyethylene bags;
– plastic containers with lids;
– special plastic covers with rubber retainers;
– aluminium foil.
Food that is sensitive to cold temperatures should not be stored in the
LONGFRESH 0 °C cold section:
• citrus and tropical fruits, such as pineapples, bananas, grapefruits,
melons, mangoes, papayas, oranges, lemons, kiwi fruit.
• hard cheese, potatoes, vegetables that are sensitive to cold
temperatures such as cucumbers, peppers, aubergines, avocados, half
ripe tomatoes, beans, courgettes.
Important: Do not store any dripping wet fruit or vegetables in the
1
LONGFRESH 0°C cold section
80 818 36 47-03/4
Page 33

Guidelines for storage times
Some foods in the LONGFRESH 0 °C cold zone:
Dry storage:
Food Storage period
Butter up to 30 days
Cheese, soft up to 30 days
Milk, fresh up to 7 days
Sausage, sliced up to 7 days
Fish up to 4 days
Shellfish up to 3 days
Poultry up to 5 days
Pork
larger joints
cut into smaller pieces
Beef, game up to 7 days
Moist storage:
Correct storage
up to 7 days
up to 5 days
Vegetables, salad stuffs Storage period
Artichokes up to 21 days
Cauliflower up to 21 days
Broccoli up to 14 days
Iceberg lettuce, lamb’s lettuce up to 21 days
Peas up to 10 days
Green cabbage up to 14 days
Carrots up to 150 days
Cabbage up to 14 days
Leeks up to 60 days
Mushrooms up to 7 days
Radishes up to 14 days
Asparagus up to 7 days
Spinach up to 7 days
818 36 47-03/4 81
Page 34

Correct storage
Fruit Storage period
Apricots up to 14 days
Pears up to 120 days
Blackberries up to 8 days
Dates (fresh) up to 60 days
Strawberries up to 5 days
Blueberries up to 14 days
Raspberries up to 5 days
Cherries up to 14 days
Peaches up to 30 days
Plums up to 21 days
Rhubarb up to 21 days
Gooseberries up to 21 days
Grapes up to 21 days
Tips:
• When shopping always look for the freshest foods. Quality and
freshness are crucial to how long food can be kept.
• Always store meat and fish wrapped and dry.
• Foodstuffs rich in protein spoil more quickly: Shellfish and
crustaceans go off more quickly than fish and fish in turn goes off
more quickly than meat. By storing them in the 0°C section, the
storage period even for these foodstuffs can be increased by up to 3
times without loss of quality.
• All food that is stored in the LONGFRESH 0 °C cold section should be
removed from the drawers approx. 15 - 30 minutes before
consumption. Aroma and taste develop at room temperature and the
enjoyment of the food is increased.
To obtain the best performance from your refrigerator/freezer:
• Do not store warm food or evaporating liquids.
• Do not store food uncovered.
• Keep the time between buying chilled food and placing it in your
freezer as short as possible.
• Do not push food together too much, try to allow air to circulate
around each item.
82 818 36 47-03/4
Page 35

Freezing
Except for the bottom drawer, which serves only for storage purposes,
all compartments and drawers in the freezer compartment are suitable
for freezing fresh food.
Warning!
• Before foods are frozen, the actual temperature in the freezer
compartment must be -18 °C or colder.
• Please observe indicated freezing capacity on the rating plate. The
freezing capacity represents the maximum amount of fresh goods
that can be frozen within 24 hours. If you freeze goods on several
days, one after the other, freeze amounts equal to 2/3 to 3/4 of the
capacity indicated on the rating plate.
• When freezing large quantities of food, place the frozen freezing
accumulator at the front into the top compartment in the freezing
chamber.
• Thawed foods which have not been processed further (cooked into
meals) may not under any circumstances be frozen a second time.
0 1. For freezing the maximum capacity press the FROSTMATIC button 24
hours prior to freezing, or 4 to 6 hours for smaller quantities. Yellow
indicator lights up.
The FROSTMATIC button need not be pressed for freezing of small
3
quantities of up to 3 kg.
2. All foods must be packed air tight prior to freezing, so that they do not
dry out or lose their flavour, and so that no flavour contamination of
other frozen goods occurs.
Caution! Do not touch frozen goods with wet hands. Hands can freeze
to the goods.
3. Place packaged goods in the drawers. Unfrozen goods may not come
into contact with already frozen goods, otherwise the frozen goods
may start to thaw.
The appliance electronics automatically switch the FROSTMATIC func-
3
tion off after a period of approx. 50 hours. Yellow indicator light goes
out. You can also stop the FROSTMATIC function manually by pressing
the FROSTMATIC button again.
818 36 47-03/4 83
Page 36

Tips:
• The following are suited for the packaging of frozen goods:
– freezer bags and polyethylene wraps;
– plastic containers for frozen foods;
– extra-thick aluminium foil
• The following are suited for sealing bags and wraps:
plastic clips, rubber bands or adhesive tape.
• Press air out of bags and wraps before sealing, because air
encourages drying of frozen goods.
• Make flat packages, because these freeze more quickly.
• Do not fill plastic containers for frozen foods to the brim with liquid
or paste-like goods, because liquids expand during freezing.
Frozen Storage
Warning! Before initial loading of the freezer compartment with
previously frozen goods, the required storage temperature of -18 °C
must be reached.
• Load freezer only with packaged frozen goods, so that they do not
dry out or lose their flavour, and so that no flavour contamination of
other frozen goods can occur.
• Please observe maximum storage times and expiry dates of frozen
goods.
• If the freezer section is only half filled, pack the frozen food together
as tightly as possible. This ensures that the cold is retained in the
frozen food for longer in the event of a power cut.
When possible store frozen goods separately according to type in
2
drawers.
Storage Goods Symbols/Freezing Calendar
• The symbols on the drawers
show different types of frozen
goods.
• The numbers indicate storage
times in months for the appropriate types of frozen goods. Whether
the upper or lower value of the indicated storage time is valid
depends on the quality of the foods and pre-treating before freezing.
The lower value applies to foods with high fat content.
84 818 36 47-03/4
Page 37

Preparation of Ice Cubes
0 1. Fill ice cube tray 3/4 full with cold water and place in the freezer tray
or a drawer and allow to freeze.
2. To remove the finished ice cubes twist the ice cube tray or hold under
running water for a short time.
Warning! Do not, under any circumstances, free an ice tray which is
frozen to the appliance with pointed or sharp edged objects. Use a
spoon-handle or similar object.
2 Energy Saving Advice
• Do not install the appliance close to sources of heat, such as a cooker,
dishwasher or radiator.
• Locate the appliance in a cool well ventilated room and make sure
that the air openings of the appliance are not obstructed.
• Always leave warm food to cool down to room temperature before
placing in the freezer.
• Try to avoid keeping the door open for long periods or opening the
door too frequently as warm air will enter the cabinet and cause the
compressor to switch on unnecessarily often.
• Ensure there are no obstructions preventing the door from closing
properly.
• Place frozen goods into the refrigerator for thawing. Cold from fro-
zen goods is thus used for cooling in the refrigerator.
• Always keep the condenser at the back of the appliance clean.
818 36 47-03/4 85
Page 38

Defrosting
Fridge zone and LONGFRESH 0 °C cold zone
Fridge section and LONGFRESH 0 °C cold section defrost automatically.
The defrosted water is fed into the drip tray on the compressor and
evaporated there.
Freezer Compartment Defrosting
Moisture is precipitated in the form of white frost in the freezer
compartment during operation and when the door is opened, especially
in the middle at the top. Remove this white frost from time to time
with a soft plastic scraper, e.g. a dough scraper. Do not under any
circumstances use hard or pointed objects for this purpose.
The appliance should be defrosted when the thickness of the white
frost has reached about 4 mm; but at least once a year in any case. A
convenient time for defrosting is any time when the appliance is empty,
or only minimally loaded.
Warning!
1
• Do not use electrical heating appliances or any other mechanical or
artificial devices to speed up the defrosting process, with the
exception of those recommended in these operating instructions.
• Do not use defrosting sprays, because they may be health
endangering and/or contain substances damaging to plastics.
0 1. About 12 hours prior to defrosting push the FROSTMATIC button, in
order to build up sufficient chill reserve for the interruption in operation.
Caution! Do not touch frozen goods with wet hands. Hands can freeze
to the goods.
2. Remove frozen goods, pack them in several layers of newspaper, cover
them and store them in a cool place.
3. Switch off refrigerator and freezer and remove plug from the mains, or
disconnect from the electricity supply.
86 818 36 47-03/4
Page 39

4. Remove all the drawers. Place the
bottom drawer directly in front of
the appliance to collect the water
from defrosting. Take out the
water drain spout from its resting
position at the bottom of the
freezer compartment and place it
as shown.
Tip: In order to speed up the
defrosting process, place a pot of warm water in the freezer
compartment. In addition, remove pieces of ice that break away before
defrosting is complete.
5. After defrosting thoroughly clean the freezer interior, as well as interior
accessories (see section: "Maintenance and Cleaning").
Maintenance and Cleaning
Before any maintenance or cleaning work is carried out DISCONNECT
the appliance from the ELECTRICITY supply.
Warning!
1
• Do not use detergents, abrasive powders, highly perfumed cleaning
products, wax polishes or cleaning products containing bleach or
alcohol.
• Never clean the appliance with a steam cleaner. Moisture could accu-
mulate in electrical components, danger of electrical shock! Hot
vapours can lead to the damage of plastic parts.
• The appliance must be dry before it is placed back into service.
Attention!
• Ethereal oils and organic solvents can attack plastic parts, e. g.
– lemon juice or the juice from orange peals;
– butyric acid;
– cleansers which contain acetic acid.
Do not allow such substances to come into contact with appliance
parts.
• Do not use any abrasive products.
818 36 47-03/4 87
Page 40

Maintenance and Cleaning
Internal Cleaning
If the refrigerator only is to be cleaned, press the FROSTMATIC button
3
several hours in advance, in order to build up sufficient chill reserve in
the freezer compartment for the interruption in service. Do not open
the freezer compartment door.
0 1. About 12 hours prior to defrosting push the FROSTMATIC button, in
order to build up sufficient chill reserve for the interruption in operation.
Caution! Do not touch frozen goods with wet hands. Hands can freeze
to the goods.
2. Remove frozen goods, pack them in several layers of newspaper, cover
them and store them in a cool place. Place the cold accumulation block
on top of the frozen food to keep it cold.
3. Switch off refrigerator and freezer and remove plug from the mains, or
switch off or turn out the circuit breaker or the fuse.
4. Defrost the freezer compartment (see section: "Defrosting").
5. Clean the inside and accessories with warm water and bicarbonate of
soda (5 ml to 0.5 litre of water).
The bottom shelf, which divides the fridge zone from the
3
LONGFRESH 0 °C cold zone, can be removed for cleaning. To do this,
pull the shelf straight out.
The cover over the bottom drawer can be removed for cleaning
purposes. After cleaning, it must be returned to the previous position so
that the function of the LONGFRESH 0 °C cold section can be retained.
6. Rinse and dry thoroughly.
7. Regularly check the door seals and wipe clean to ensure they are clean
and free from debris.
8. Regularly unblock the condensation water drainage hole in the rear
wall of the refrigeration chamber with the aid of a piece of wire.
88 818 36 47-03/4
Page 41

Maintenance and Cleaning
External Cleaning
Warning!
1
• There are sharp edges on the underside of the product so care should
be taken when cleaning.
0 1. Clean the inside and accessories with warm water and bicarbonate of
soda (5 ml to 0.5 litre of water).
2. Rinse and dry thoroughly.
1 Important: Do not use cleaning agents for stainless steel or other
aggressive or abrasive cleaning agents. The protective coat of lacquer
on the stainless steel surface can be damaged by these.
The coat of lacquer protects against finger prints and therefore
additional cleaning agents and maintenance products are no longer
required.
Accumulation of dust at the condenser increases energy consumption.
2
For this reason carefully clean the condenser at the back of the
appliance once a year with a soft brush or a vacuum cleaner.
3. After everything is dry place appliance back into service.
818 36 47-03/4 89
Page 42

What to do if ...
Correcting Malfunctions
A malfunction may be caused by only a minor fault that you can rectify
yourself using the following instructions. Do not perform any other
work on the appliance if the following information does not provide
assistance in your specific case.
Warning! Repairs to refrigerators/freezers may only be performed by
1
qualified service engineers. Improper repairs can give rise to significant
hazards for the user. If your appliance needs repairing, please contact
your specialist dealer or our Customer Service.
Symptom Possible Cause Solution
Appliance is not switched
on.
Mains plug is not plugged
in or is loose.
No power to the appliance.
Appliance cools too much. Temperature is set too cold.
The food is too warm.
Fuse has blown or is defective.
Mains socket is defective.
Temperature is not properly
adjusted.
Door was open for an
extended period.
A large quantity of warm
food was placed in the
appliance within the last
24 hours.
The appliance is near a
heat source.
Switch on the appliance.
Insert mains plug.
Check fuse, replace if
necessary.
Mains malfunctions are to
be corrected by an electrician.
Temporarily select a higher
temperature setting.
Please look in the " Temperature Adjustment" section.
Open the door only as long
as necessary.
Press the COOLMATIC and/
or FROSTMATIC button.
Turn the temperature regulator to a colder setting
temporarily.
Please look in the "Installation" section.
90 818 36 47-03/4
Page 43

Symptom Possible Cause Solution
Temperature display shows
a square or a letter.
Warning tone sounds, red
warning indicator light and
temperature display are
flashing.
Interior illumination does
not function.
Water on the floor or on
storage shelves.
Heavy build up of frost,
possibly also on the door
seal.
The compressor does not
start immediately after
changing the temperature
setting.
Noise
There is a function fault.
Temperature warning.
Light bulb is defective.
Important: The interior
lighting switches off automatically after 7 minutes.
Water drain hole is
blocked.
Door seal is not air tight
(possibly after changing
over the hinges).
This is normal, no error has
occurred.
Appliance is not level.
Fan running.
What to do if ...
Please inform customer
service. Do not open the
doors of the appliance
again.
Please check in "Control
and Information System"
section.
Please refer to "Replacing
the Light Bulb" section.
See the "Maintenance and
Cleaning" section.
Carefully warm the leaking sections of the door
seal with a hair dryer (not
hotter than approx. 50 °C).
At the same time shape the
warmed door seal by hand
such that it sits correctly.
The compressor starts after
a period of time.
Readjust the front levelling
feet.
Refer to Normal Operating
Sounds
Normal operating noise.
The fan provides constant
temperature distribution in
the appliance.
If after the above checks there is still a fault, call your local AEG Service
Force Centre.
818 36 47-03/4 91
Page 44

What to do if ...
In-guarantee customers should ensure that the above checks have been
made as the engineer will make a charge if the fault is not a
mechanical or electrical breakdown.
Please note that proof of purchase is required for in-guarantee service
calls.
Replacing the Light Bulb
For safety reasons the interior lighting switches off after 7 minutes
3
when the door is open. It switches on again the next time the door is
opened.
Warning! Danger of electrical shock! Before replacing the light bulb
1
switch off the appliance and remove the mains plug.
Light bulb specifications: 220-240 V, max. 25 W, fitting: E 14
0 1. To switch the appliance off press and hold the ON/OFF button.
2. Unplug the mains plug.
3. To change the light bulb, undo the
cross head screw and remove the
light bulb cover downwards.
4. Change the defective light bulb.
5. Refit the light bulb cover and the
cross head screw.
92 818 36 47-03/4
Page 45

Normal Operating Sounds
The following noises are characteristic of refrigeration appliances:
• Clicks
Whenever the compressor switches on or off, a click can be heard.
• Humming
As soon as the compressor is in operation, you can hear it humming.
• Bubbling/Splashing
When refrigerant flows into thin tubes, you can hear bubbling or
splashing noises. Even after the compressor has been switched off,
this noise can be heard for a short time.
• Noises
A murmuring noise can be made by the flows of air created by the fan.
Regulations, Standards, Guidelines
This appliance was designed for household use and was manufactured
in accordance with the appropriate standards. The necessary measures
in accordance with appliance safety legislation regulations (GSG),
accident prevention regulations for refrigeration appliances (VBG 20)
and the regulations of the German Society of Electrical Engineers (VDE)
were observed in the manufacture of this appliance.
The refrigerant circuit has been checked for leaks.
This appliance is in accordance with the following EU guidelines:
;
– 73/23/EWG dated 19 February 1973 - low voltage guidelines.
– 89/336/EWG dated 3 May 1989
(including guideline change notice 92/31/EWG) - EMV guideline
818 36 47-03/4 93
Page 46

Technical Terminology
• Refrigerant
Liquids that can be used to a generate a cooling effect are known as
refrigerants. They have a relatively low boiling-point, indeed so low,
that the warmth from the food stored in the fridge or freezer can
cause the refrigerant to boil and vaporise.
• Refrigerant Circuit
Closed circulation system that contains the refrigerant. The
refrigerant circuit comprises primarily of an evaporator, a compressor,
a condenser and pipe work.
• Evaporator
The refrigerant is evaporated in the evaporator. Similar to all other
liquids, refrigerant requires heat to evaporate. This heat is removed
from the interior of the appliance, as a result the interior is cooled.
The evaporator is therefore located inside the appliance or placed in
foam immediately behind the inner wall and thus not visible.
• Compressor
The compressor looks like a small drum. It is driven by a built-in
electric motor and is mounted on the base of the appliance at the
rear. The task of the compressor is to draw in vaporised refrigerant
from the evaporator, to compress it, and to pass it on to the
condenser.
• Condenser
The condenser normally has the form of a grid. The refrigerant
compressed in the compressor is liquefied in the condenser. During
this process, heat is released to the surrounding air at the surface of
the condenser. The condenser is mounted on the base of the
appliance.
94 818 36 47-03/4
Page 47

Customer Service
If you cannot find the remedy for a malfunction in these operating
instructions, please contact your dealer or our customer service department. Addresses and telephone numbers are listed in the accompanying
booklet "Guarantee Conditions/Service Departments".
Selective ordering of replacement parts can save unnecessary travel
and costs. For this reason always provide the following appliance information:
This information can be found on the rating plate in the interior at the
left of the appliance. We recommend that you enter this information
here, so that it is handy if needed.
•Model Name
• Model Number (PNC)
• Serial Number (S-No.)
Note: The customer bears the costs of unjustified customer service
calls even during the guarantee period.
818 36 47-03/4 95
Page 48

From the Electrolux Group
qЬЙ=bдЙЕнкздмс=dкзмй=бл=нЬЙ=пзкдЗ…л=д~кЦЙлн=йкзЗмЕЙк=зС=йзпЙкЙЗ=~ййдб~еЕЙл= Сзк=вбнЕЬЙеI= ЕдЙ~ебеЦ=~еЗ=змнЗззк
млЙK= jзкЙ= нЬ~е= RR= гбддбзе= bдЙЕнкздмс= dкзмй= йкзЗмЕнл= EлмЕЬ= ~л= кЙСкбЦЙк~нзклI= ЕззвЙклI= п~лЬбеЦ= г~ЕЬбеЙлI
о~Еммг=ЕдЙ~еЙклI=ЕЬ~бе=л~пл=~еЗ=д~пе=гзпЙклF=~кЙ=лздЗ=Й~ЕЬ=уЙ~к=нз=~=о~дмЙ=зС=~ййкзсK=rpa=NQ=Дбддбзе=бе=гзкЙ
нЬ~е=NRM=ЕзменкбЙл=~кзмеЗ=нЬЙ=пзкдЗK
K=qЬЙ=пзкдЗ…л=kзKN=ЕЬзбЕЙK
AEG Hausgeräte GmbH
Postfach 1036
D-90327 Nürnberg
http://www.aeg.hausgeraete.de
© Copyright by AEG
818 36 47 – 03/4 - 0406
Änderungen vorbehalten
Subject to change without notice
Salvo modificaciones
 Loading...