

Page 1

SANTO 75428-2 DT
User Manual
Manual de instrucciones
Fridge freezer
Frigorífico-congelador
Page 2

2
Dear Customer
Thank you for choosing one of our high-quality products.
With this appliance you will experience the perfect combination of functional desi-
gn and cutting edge technology.
Convince yourself that our appliances are engineered to deliver the best perfor-
mance and control - indeed we are setting the highest standards of excellence.
In addition to this you find environmental and energy saving aspects as an integral
part of our products.
To ensure optimal and regular performance of your appliance please read this
instruction manual carefully. It will enable you to navigate all processes perfectly
and most efficiently.
To refer to this manual any time you need to, we recommend you to keep it in a
safe place. And please pass it to any future owner of the appliance.
We wish you much joy with your new appliance.
The following symbols are used in this manual
Important information concerning your personal safety and information on
how to avoid damaging the appliance
General information and tips
Environmental information
Page 3

3
Contents
Safety . . . . . . . . . . . . . . . . . . . . . . . . . . . . . . . . . . . . . . . . . . . . . . . . . .4
Disposal . . . . . . . . . . . . . . . . . . . . . . . . . . . . . . . . . . . . . . . . . . . . . . . .5
Appliance Packaging Information . . . . . . . . . . . . . . . . . . . . . . . . . . . . . . .5
Disposal of old Appliances . . . . . . . . . . . . . . . . . . . . . . . . . . . . . . . . . . . . .6
Remove transport safeguard . . . . . . . . . . . . . . . . . . . . . . . . . . . . . . . .6
Installation . . . . . . . . . . . . . . . . . . . . . . . . . . . . . . . . . . . . . . . . . . . . . .6
Installation Location . . . . . . . . . . . . . . . . . . . . . . . . . . . . . . . . . . . . . . . . . .6
Your appliance needs air . . . . . . . . . . . . . . . . . . . . . . . . . . . . . . . . . . . . . .7
Rear spacers . . . . . . . . . . . . . . . . . . . . . . . . . . . . . . . . . . . . . . . . . . . . . . . . .7
Fitting the door Handles . . . . . . . . . . . . . . . . . . . . . . . . . . . . . . . . . . . . . . .8
Rehingeing the door . . . . . . . . . . . . . . . . . . . . . . . . . . . . . . . . . . . . . . . . . .9
Electrical Connection . . . . . . . . . . . . . . . . . . . . . . . . . . . . . . . . . . . . .11
Prior to Initial Start–Up . . . . . . . . . . . . . . . . . . . . . . . . . . . . . . . . . .11
Control panel . . . . . . . . . . . . . . . . . . . . . . . . . . . . . . . . . . . . . . . . . . .12
Operation . . . . . . . . . . . . . . . . . . . . . . . . . . . . . . . . . . . . . . . . . . . . .12
Temperature regulation and Adjusting the temperature . . . . . . . .12
Action Freeze Function . . . . . . . . . . . . . . . . . . . . . . . . . . . . . . . . . . .12
Interior Accessories . . . . . . . . . . . . . . . . . . . . . . . . . . . . . . . . . . . . . .13
Fresh food refrigeration . . . . . . . . . . . . . . . . . . . . . . . . . . . . . . . . . .15
Freezing and storing frozen food . . . . . . . . . . . . . . . . . . . . . . . . . . .16
using of the Twist & Serve ice maker . . . . . . . . . . . . . . . . . . . . . . .17
Freezing Calender . . . . . . . . . . . . . . . . . . . . . . . . . . . . . . . . . . . . . . .17
Installation of the charcoal filter . . . . . . . . . . . . . . . . . . . . . . . . . . .18
Changing the charcoal filter . . . . . . . . . . . . . . . . . . . . . . . . . . . . . . .18
Defrosting . . . . . . . . . . . . . . . . . . . . . . . . . . . . . . . . . . . . . . . . . . . . .19
Cleaning and Care . . . . . . . . . . . . . . . . . . . . . . . . . . . . . . . . . . . . . . .19
Switching off the appliance . . . . . . . . . . . . . . . . . . . . . . . . . . . . . . .20
Energy Saving Tips . . . . . . . . . . . . . . . . . . . . . . . . . . . . . . . . . . . . . . .21
What to do if . . . . . . . . . . . . . . . . . . . . . . . . . . . . . . . . . . . . . . . . . . .21
Changing the light bulb . . . . . . . . . . . . . . . . . . . . . . . . . . . . . . . . . . . . . .23
Regulations, Standards, Guidelines . . . . . . . . . . . . . . . . . . . . . . . . .23
Page 4
4
Safety
The safety aspects of our appliance comply with accepted technical standards and the German Appliance Safety Law. Nevertheless, we consider it
our obligation to make you aware of the following safety information:
Intended use
• The appliance is intended for use in the home. It is suitable for the cooling, freezing and storing of frozen food, as well as for making ice. If the
appliance is used for purposes other than those intended or used incorrectly, no liability can be accepted by the manufacturer for any damage
that may be caused.
• Alterations or changes to the appliance are not permitted for reasons of
safety.
• If you use the appliance in a commercial application or forpurposes other
than the cooling, freezing or frozen storage of foods,please observe all
valid legal regulations for your application.
Prior to initial start–up
• Check the appliance for transport damage. Under no circumstance should
a damaged appliance be plugged in! In the event of damage, please contact
the vendor.
Refrigerant
The refrigerant isobutane (R600a) is contained within the refrigerant circuit
of the appliance, a natural gas with a high level of environmental compatibility, which is nevertheless flammable.
• During transportation and installation of the appliance, be certain that
none of the components of the refrigerant circuit become damaged.
• If the refrigerant circuit should become damaged:
– avoid open flames and sources of ignition;
– thoroughly ventilate the room in which the appliance is situated.
Safety of children
• Packaging (e.g. wraps, polystyrene) can be dangerous for children. There is
a risk of suffocation! Keep packaging material away from children!
• Please make old appliances unusable prior to disposal. Pull out the mains
plug, cut off the mains cable, break or remove spring or boltcatches, if fitted. By doing this you ensure that children cannot lock themselves in the
appliance when playing (there is risk of suffocation!)or get themselves
into other dangerous situations.
• Often children cannot recognise the hazards present in household
appliances. It is therefore important that you ensure adequate supervision
and never let children play with the appliance!
Page 5

5
Daily Operation
• Containers with flammable gases or liquids can leak at low temperatures.
There is a risk of an explosion! Do not store any containers with flammable materials such as, for example, spray cans, fire extinguisher refill cartridges etc in the refrigerator/freezer.
• Bottles and cans must not be placed in the freezer compartment. They can
burst when the contents freeze, high carbonate content drinks can even
explode! Never store lemonade, juices, beer, wine, sparkling wine etc. in
the freezer compartment. Exception: high alcohol content spirits can be
stored in the freezer compartment.
• Do not put ice creams or ice cubes in the mouth immediately after removal from the freezer compartment. Very cold ice can freeze to the lips or
tongue and cause injury.
• Do not touch frozen food with wet hands. Your hands could freeze to the
food.
• Do not operate any electrical appliances in the refrigerator/freezer (e.g.
electric ice cream makers, mixers etc.).
• Before cleaning the appliance, always switch off the appliance and unplug
it, or pull the house fuse or switch off the circuit breaker.
• When unplugging always pull the plug from the mains socket, do not pull
on the cable.
In case of malfunction
• If the a malfunction occurs on the appliance, please look first in the "What
to do if ..." section of these instructions. If the information given there
does not help, please do not perform any further repairs yourself.
• Applianeces may only be repaired by qualified service engineers. Improper
repairs can give rise to significant hazards. If your appliance needs repairing, please contact your specialist dealer or our Customer Service.
Disposal
Appliance Packaging Information
All materials are environmentally sound! They can be dumped or burned at
an incinerating plant without danger!
About the materials: The plastics can be recycled and are identified as follows:
>PE< for polyethylene, e.g. the outer covering and the bags in the interior.
>PS< for polystyrene foam, e.g. the pads, which are all free of chlorofluo-
rocarbon.
The carton parts are made from recycled paper and should be disposed of
at a waste-paper recycling collection location.
Page 6
6
Disposal of old Appliances
For environmental reasons, refrigeration appliances must be disposed of
properly. This applies to your old appliance, and - at the end of its service
life - for your new appliance as well.
Warning! Before disposing of old appliances make them inoperable. Remove plug from mains, sever the power cable, remove or destroy any snap or
latch closures. This eliminates the danger that playing children lock themselves into the appliance (danger of suffocation!) or place themselves into
other life-endangering situations.
Disposal:
• The appliance may not be disposed of with domestic waste or bulky refuse.
• The refrigerant circuit, especially the heat exchanger at the back of the
appliance, may not be damaged.
• The symbol on the product or on its packaging indicates that
this product may not be treated as household waste. Instead it shall
be handed over to the applicable collection point for the recycling
of electrical and electronic equipment. By ensuring this product is
disposed of correctly, you will help prevent potential negative consequences for the environment and human health, which could
otherwise be caused by inappropriate waste handling of this product. For more detailed information about recycling of this product,
please contact your local city office, your household waste disposal
service or the shop where you purchased the product.
Remove transport safeguard
The appliance and the interior fittings are protected for transport.
• Remove all adhesive tape and packing pieces from the interior of the
appliance.
Installation
Installation Location
The appliance should be set up in a well ventilated, dry room.
Energy use is affected by the ambient temperature. The appliance should
therefore
– not be exposed to direct sunlight;
– not be installed next to radiators, cookers or other sources of heat;
– only be installed at a location whose ambient temperature corresponds to
the climate classification, for which the appliance is designed.
The climate classification can be found on the serial plate, which is located
at the left on the inside of the appliance.
Page 7
7
Climate classification for an ambient temperature of
SN +10 bis +32 °C
N +16 bis +32 °C
ST +18 bis +38 °C
T +18 bis +43 °C
The following table shows which ambient temperature is correct for each
climate classification: each climate classification:
If installation next to a source of heat is unavoidable, the following
minimum clearances must be maintained at the sides of the appliance:
– for electric cookers 3 cm;
– for oil and coal fired ranges 30 cm.
If these clearances cannot be maintained a heat insulating pad is required between the cooker and the
refrigeration appliance.
If the refrigeration appliance is
installed next to another refrigerator
or freezer a clearance of 5 cm at the
sides is required, in order to prevent
the formation of condensation on
the outside of the appliance.
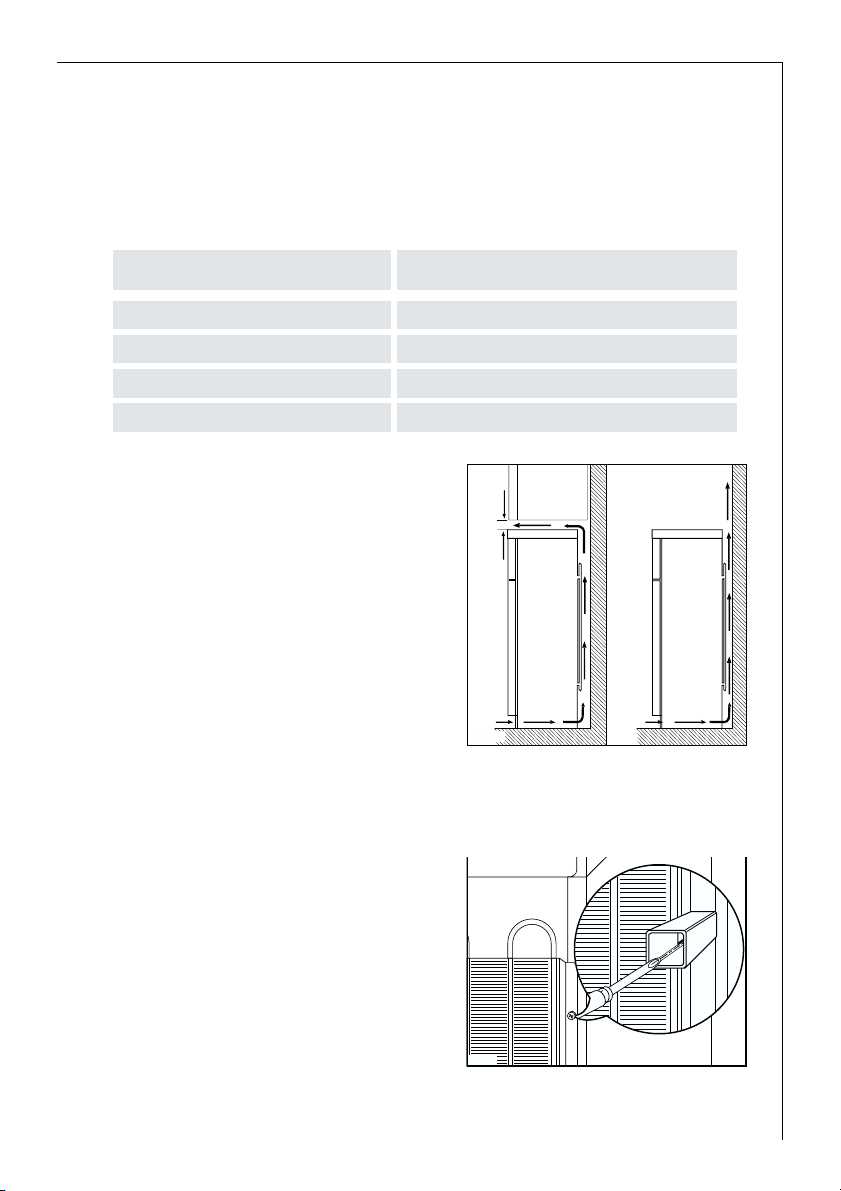
Your appliance needs air
For safety reasons, minimum ventilation must be as shown Fig.
Attention: keep ventilation openings clear of obstruction;
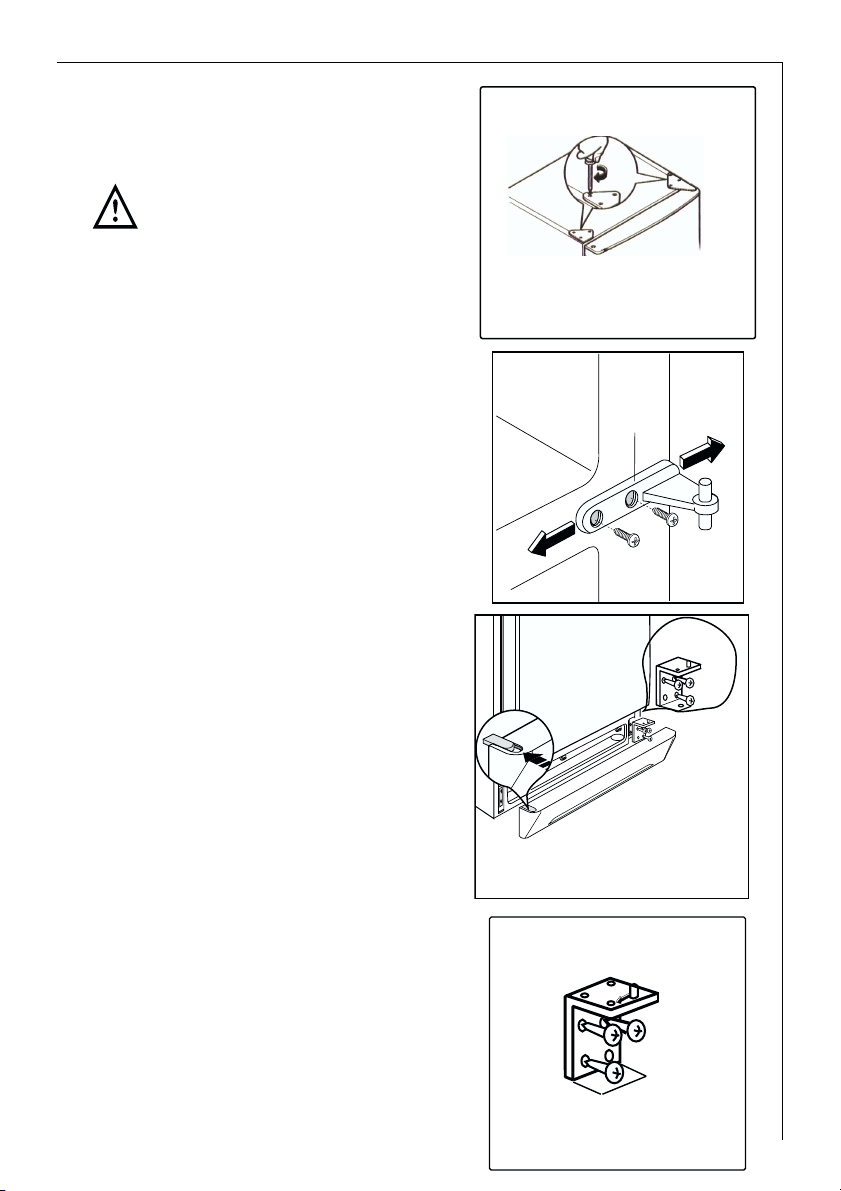
Rear spacers
In the bag with the documentation,
there are two spacers which must be
fitted.
Slacken the screws and insert the
spacer under the screw head, then
re-tighten the screws.
NP005
100 mm10 mm
10 mm
PR153
Page 8
8
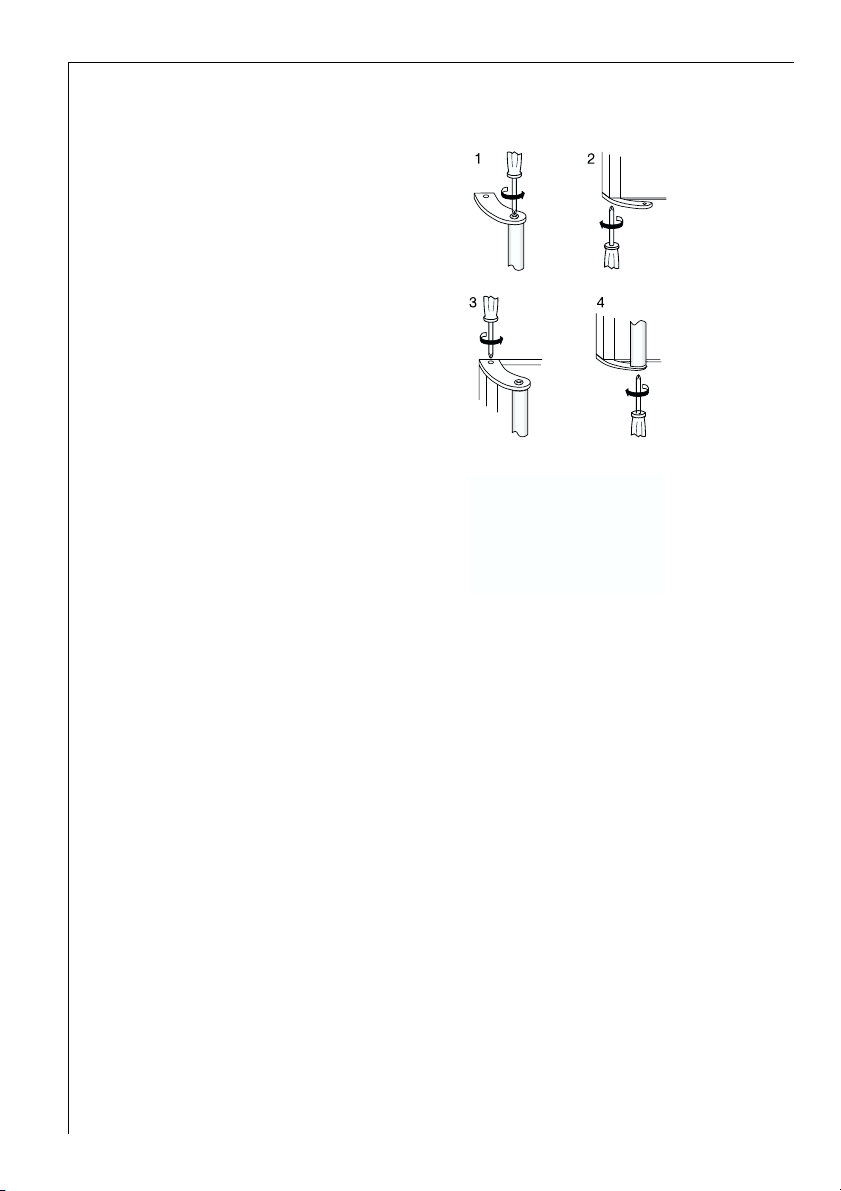
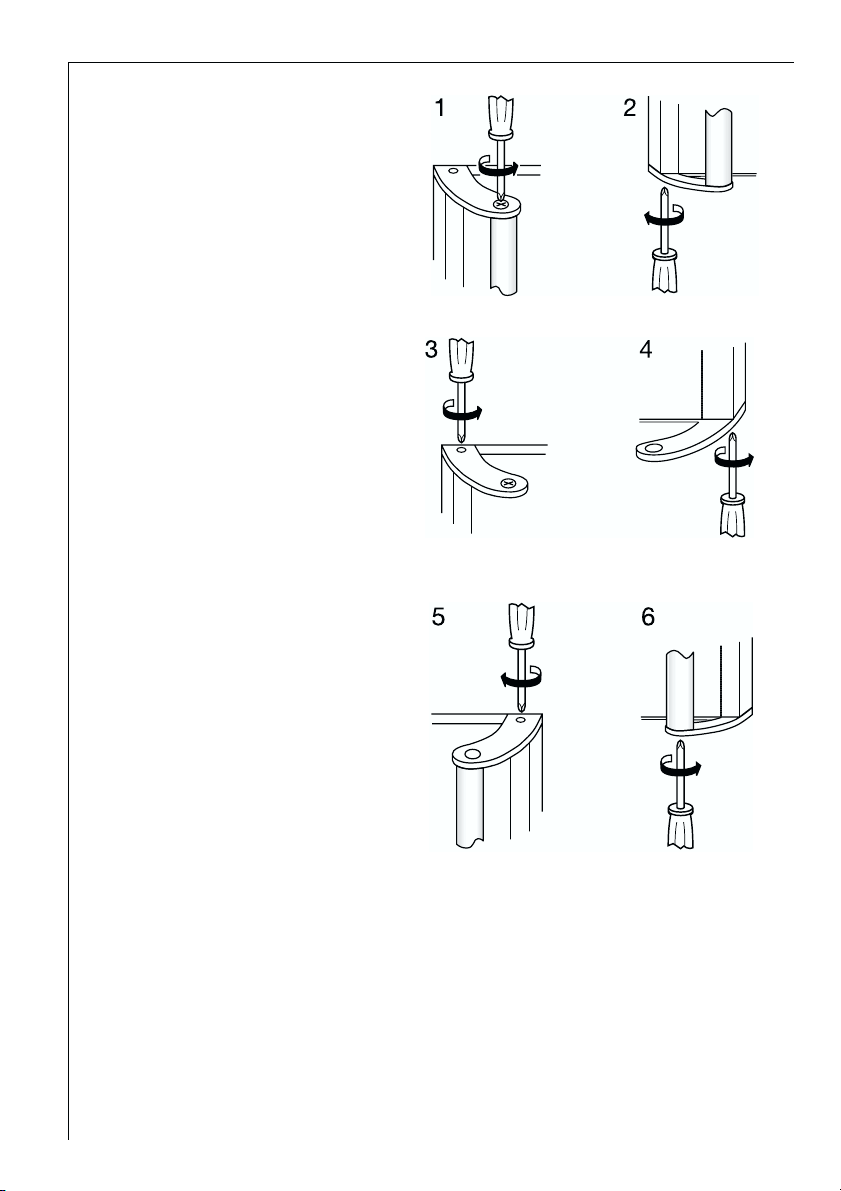
1. Screw the top handle
bracket to the handle rod
(1). Fit the bottom handle
bracket on the lower lefthand side of the door (2).
2. Fit the top handle bracket
on the top left-hand side
of the door (3) and screw
the handle rod to the bottom handle bracket (4).
Attention!
Do not over tighten the
screws (max. 2 Nm) as you
may damage the door
handles.
Fitting the Door Handles
Page 9
9
Rehingeing the door
The side at which the door opens can
be changed from the right side (factory adjustment) to the left side, if
the installation site requires.
Warning! When changing the side at
which the door opens, the appliance
may not be connected to the mains.
Remove plug from the mains beforehand.
Proceede as follows:
1. Remove the upper hinge taking care
for the upper door not to fall off and
keep it for future actions;
Remove the upper support and
mount it in the opposite side
2. remove the upper door;
3. unscrew the middle hinge. Unscrew
the plastic plugs located on the
opposite side of the central hinge and
introduce them in the holes occupied
before by the hinge;
4. remove the lower door;
5. pull off the ventilation grille which is
fixed by two screws;
6. remove the bottom hinge by unscrewing its fixing screws;
7. using a 12 mm spanner, unscrew the
hinge pin and reassemble it on the
opposite side of the hinge;
8. adjust the level of the appliance by
screwing out the adjustable foot, or
feet, at the bottom of the cabinet
using your fingers or a tool;
9. reassemble the lower hinge on the
opposite side, using the screws previously removed. Slide the hole cover
out of the ventilation grille by pushing
it in the direction of the arrow and
reassemble it on the opposite side;
H
Page 10
10
Slide the hole cover out of the
ventilation grille by pushing it
in the direction of the arrow
and reassemble it on the opposite side;
10. refit the ventilation grille, fixing the screws;
11. reassemble the lower door;
12.reassemble the middle hinge
on the opposite side;
13.replace the upper door.
14.In your documentation bag
you will find the upper hinge
necessary to make the
reversibility. Please mount it in
their relevant place.
15)Unscrew the top handle bracket
from the handle rod (1). Unscrew
the bottom handle bracket from
the door (2).
Unscrew the top handle bracket
from the door (3) and screw onto
the bottom right-hand side of
the door (4).
Turn the handle bracket with the
handle rod 180° and screw them
to the door (5) and the fitted
handle bracket (6).
Move the small plug from right to
left. Reposition, level the
appliance, wait for at least one
hour and then connect it to the
mains socket.
In any case you do not want to carry out the above mentioned operations, contact the nearest Service Force Centre. The Service Force specialist will carry
out the reversibility of the doors at your cost.
Attention: After having reversed the opening direction of the doors check that
all the screws are properly tightened and that the magnetic seal adheres to the
cabinet. If the ambient temperature is cold (i.e. in Winter), the gasket may not
fit perfectly to the cabinet. in that case, wait for the natural fitting of the gasket or accelerate this process by heating up the part involved with a normal
hairdryer.
Page 11

11
Electrical connection
Before initial start-up, refer to the appliance rating plate to ascertain if supply voltage and current values correspond with those of the mains at the
installation location.
e.g.: AC 230 ... 240 V 50 Hz or
230 ... 240 V~ 50 Hz
(i.e. 230 to 240 volts alternating current, 50 Hertz)
The rating plate is inside the appliance on the left.
A correctly installed, earthed socket is required for the electrical supply. The
supply must have a fuse rating of at least 10 Amps.
If the socket is not accessible once the appliance is built in, the electrical
installation must include suitable means of isolating the appliance from the
mains (e.g. fuse, cut-out, current trip or similar with a minimum contact
separation of 3 mm).
Attention: The mains connection cable may only be replaced by a skilled
electrician. Please contact your dealer or our customer service department
for repairs.
Prior to Initial Start–Up
• Please clean the appliance interior and all accessories prior to initial start-
up (see section: “Cleaning and Care”).
Page 12
12
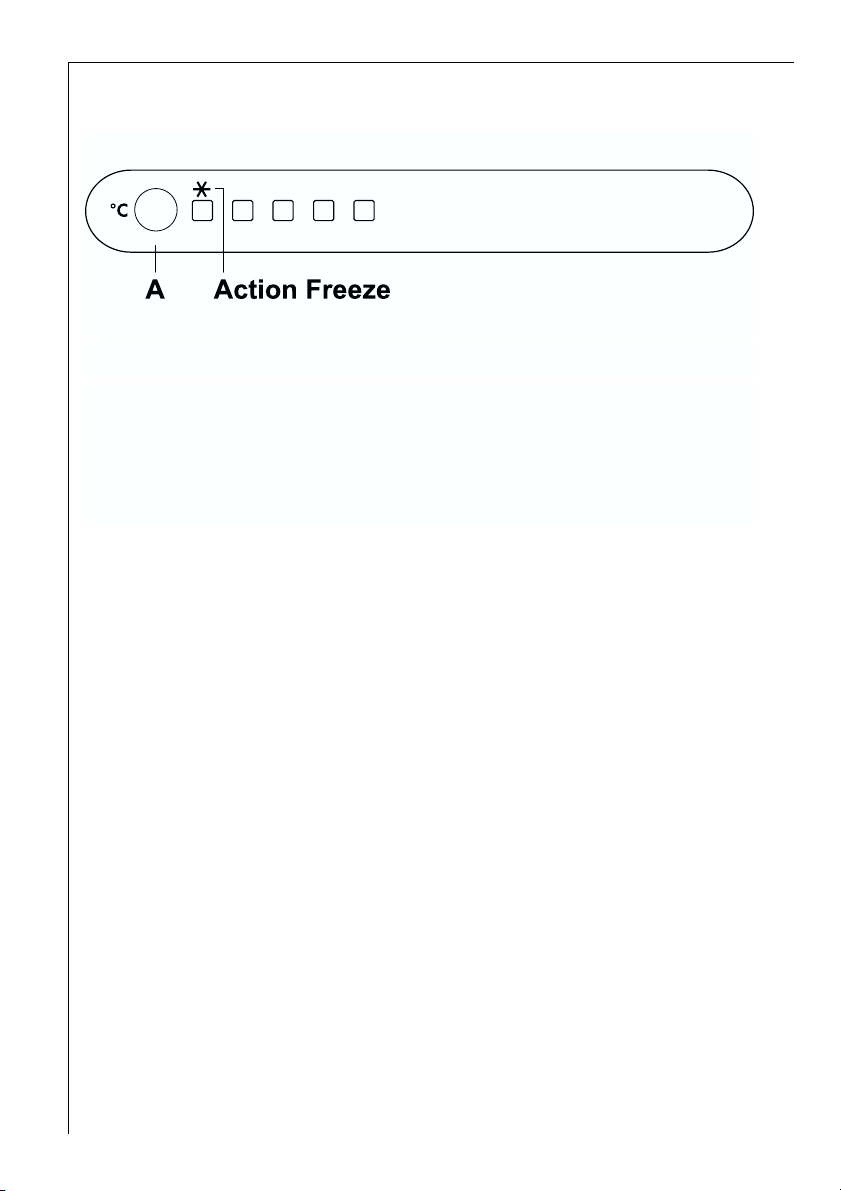
Control panel
A. Button for temperature regulation
OOppeerraattiioonn
Remove, if present, the “Remove” label stuck on the inside of the
freezer compartment.
Insert the plug into the wall socket.
SSwwiittcchhiinngg ooffff
To switch off the appliance remove the mains plug.
Temperatur regulation
The temperature indicated by the LED is selected each time the button is
pressed. The Selection is progressive,varying from +2 °C to +8 °C.
Keep the button pressed until the LED corresponding to the required
temperature lights up.
Adjusting the temperature
The temperature inside may be influenced by these factors.
•room temperature
•how often the doors are opened
•amount of food stored
•appliance position
Action Freeze Function
To quickly lower the freezer compartment temperature activate the
Action Freeze function (*).
Keep pressing the button A until the LED corresponding to the symbol
(*)lights up.
To deselect the Action Freeze function (*) keep pressing the button until
the required temperature is selected.
+2 +4 +5 +6 +8
Page 13
13
Interior Accessories
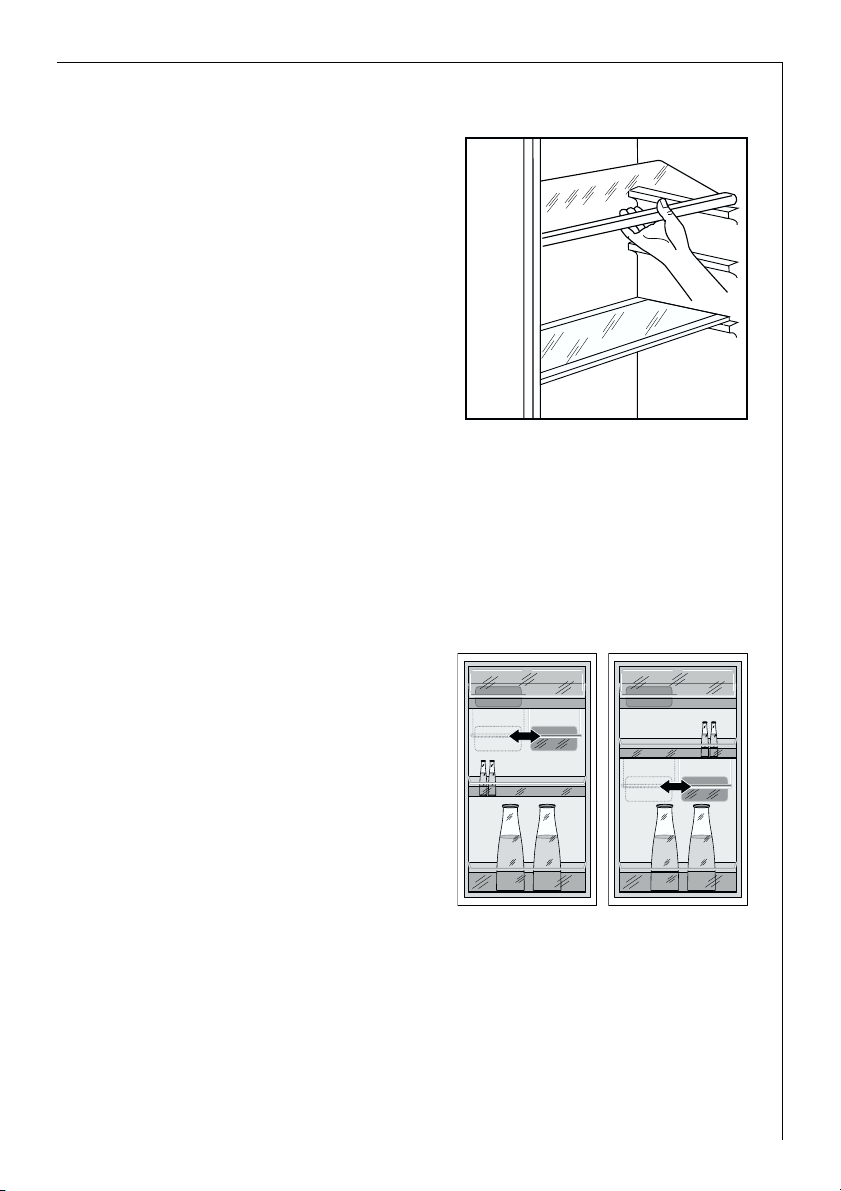
Storage Shelves
The glass shelf above the fruit and
vegetable compartment should
always remain in position, to ensure
fruit and vegetables stay fresh longer.
The remaining storage shelves can be
adjusted to various heights:
Pull the storage shelf forward until it
can be tipped up or down and removed. To insert at a different height
use the same procedure in reverse.
Variable Inner Door
The door compartments can be pulled up and removed, and inserted at
other positions as needed.
D338
Variable Storage Box
Some models are equipped with a variable storage box which is fitted under
a door shelf compartment and can be slid sideways.
The box can be inserted under any
door shelf compartment.
1. To change the position of the storage box; lift the shelf compartment
with the box upwards and out of the
holders in the door and remove the
retaining bracket out of the guide
under the shelf compartment.
2. Reverse the above operation to insert
the shelf at a different height.
Page 14
Drawer
The drawer is suitable for storing
fruit and vegetables. There is a
separator inside the drawer that
can be placed in different positions to allow for the subdivision
best suited to personal needs.
There is a grille on the bottom of
the drawer to separate the fruit
and vegetables from any humidity that may form on the bottom surface.
To remove the drawer, use the side handles (as shown in the Fig.).
All parts inside the drawer can be removed for cleaning purposes.
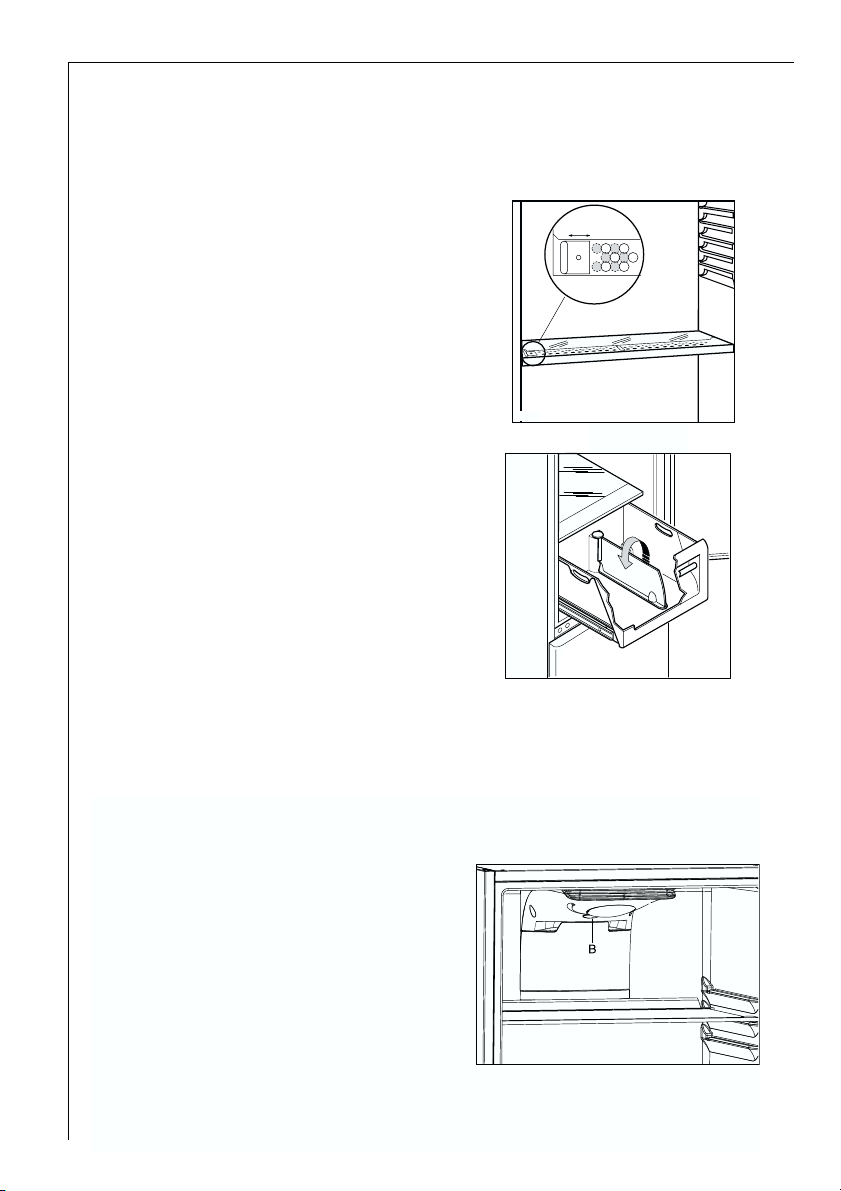
Air recycling
The refrigerator compartment is
equipped with a special
D.A.C.(Dynamic Air Cooling) fan
which can be turned on with the
switch B. The green light, when
on, means that the fan is working.
As a suggestion the fan (D.A.C.)
should be used with ambient
temperature exceeding 25°C .
This device allows for rapid cooling of foods and a more uniform
temperature in the compartment.
Moisture regulator
There is an adjustable air grille in front of the shelf above the fruit and vegetable compartments. The opening in the ventilation slots can be adjusted
with the slider. Right slider: Ventilation slots opened.
With the ventilation slots open, more
air circulation results in a lower air
moisture content in the fruit and
vegetable compartments. Left slider:
Ventilation slots closed. When the
ventilation slots are closed, the natural moisture content of the food in
the fruit and vegetable compartments is preserved for longer.
PR271
Page 15
15
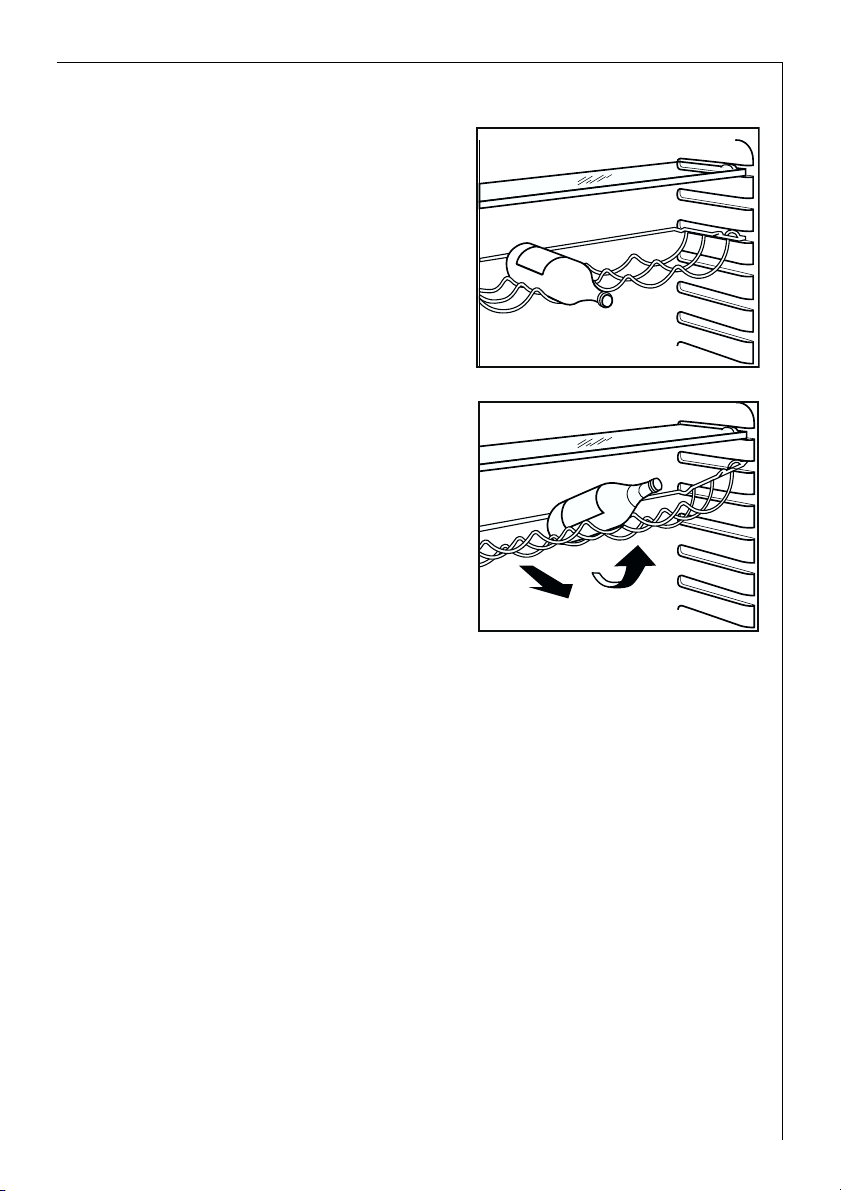
Bottle holder
Place the bottles (with the opening
facing front) in
the pre- positioned shelf.
If the shelf is positioned horizontally,
place only
closed bottles.
This bottle holder shelf can be tilted
in order to store
previously opened bottles.
To obtain this result, pull the shelf up
so it can rotate
upwards and be placed on the next
higher level.
Fresh food refrigeration
To obtain the best performance:
• do not store warm food or evaporating liquide in the refrigeator
• do cover or wrap the food, particularly if it has a strong flavour.
• Position food so that air can circuiate freely round it.
Useful hints:
Meat (all types): wrap in polythene bags and place on the glass shelf above
the vegetable drawer(s)For safety, store in this way only one or two days
at the most.
Cooked foods, cold dishes, etc: these should be covered and may be placed
on any shelf.
Fruit and vegetables: these should be thoroughly cleaned and placed in the
special drawer(s) provided.
Butter and cheese: these should be placed in special airtight containers or
wapped in aluminium foil or polythene bags to exclude as much air as possible.
Milk bootles: these should have a cap and should be stored in the bottle
rack on the door.
Bananas, potatoes, onions and garlic, if not packed, must not be kept in
the refrigerator.
Page 16

16
Freezing and storing frozen food
You can use your freezer for freezing fresh food yourself.
Important!
• The temperature in the freezer compartment must be –18 °C or colder
before freezing food.
• Please observe the freezing capacity given on the rating plate. The free-
zing capacity is the maximum quantity of fresh food that can be frozen
within a period of 24 hours. If you wish to freeze food several days in a
row, please observe a maximum capacity of only 2/3 to 3/4 of that on the
rating plate. The quality of the food is best preserved when it is frozen
right through to the core as quickly as possible.
• Allow warm food to cool down before freezing. The warmth will cause
increased ice formation and increase the power consumption.
• Please note the maximum storage times specified by the manufacturer.
• Thawed foods which have not been processed further (cooked into meals)
may not under any circumstances be frozen a second time.
• Containers with flammable gases or liquids can leak at low temperatures.
There is a risk of an explosion! Do not store any containers with flammable materials such as, for example, spray cans, fire extinguisher refill cartridges etc in the refrigerator/freezer.
• Bottles and cans must not be placed in the freezer. They can burst when
the contents freeze, high carbonate content drinks can even explode!
Never store lemonade, juices, beer, wine, sparkling wine etc. in the freezer. Exception: high alcohol content spirits can be stored in the freezer.
• All foods must be packed air tight prior to freezing, so that they do not
dry out or lose their flavour, and so that no flavour contamination of
other frozen goods occurs.
• Not open the door frequently or leave it open longer than absolutely
necessary.
• Unfrozen food must not touch items already frozen, otherwise the fro-
zen food could begin to defrost.
Caution! Do not touch frozen food with wet hands. Your hands could freeze to the food.
1. Place the food to be frozen on the freezer shelf.
1. To freeze fresh food activate the Action Freeze function (*) at least 24
hours before placing the food to be frozen in the freezer compartment. Move the Twist&Serve ice dispenser to the middle of the shelf
on which it is hooked.
2. Move the shelf to the middle seat, keeping it horizontal.
Page 17

17
Place the fresh food to freeze on the shelf.
After 24 hours,when the freezing process is completed,return to the
required temperature by pressing the button “A”.
When switching on or after an idle period, it is advisable to operate
the appliance to the coldest setting for at least 2 hours before introducing deep-frozen food.
To do this, select the Action Freeze function (*).
To obtain best results it is advisable to keep the freezer shelf on the
middle seats.
Using of the Twist&Serve ice maker
This appliance is equipped with
one or more trays for the production and the storage of ice-cubes.
Twist&Serve ice maker is positioned in the freezer compartment
under the shelf.
It consists of a double ice tray dispenser and of an ice box.
It is possible to shift the Ice Dispenser left or right according to
your space needs.
Pull the double tray Ice Maker and
fill the trays with water at 3/4 of
their maximum capacity.
After the water has been frozen,
twist the trays knob in the direction of the arrow so that the ice
cubes fall directly into the box
below. Pull out the Ice box and
pick up the Ice cubes.
Freezing Calendar
• The symbols show different types of frozen goods.
• The numbers indicate storage times in months for the appropriate types
of frozen goods. Whether the upper or lower value of the indicated storage time is valid depends on the quality of the foods and pre-treating before freezing. The lower value applies to foods with high fat content.
Page 18

18
Installation of the charcoal filter
On delivery the charcoal filter is placed in a plastic bag
to secure the length of life
of the charcoal filter. The
filter should be placed
behind the flap before the
appliance is turned on.
• Pull the cover outward
• The charcoal filter is then
mounted in the slot found
in the back of the cover.
• Close the flap.
Important!
During operation, always keep the air ventilation flap closed.
The filter should be handled carefully so fragments do not loosen from
the surface.
Changing the charcoal filter
To maintain the best performance the carbon filter
should be changed every
year.
New charcoal filters can be
purchased from your local
dealer.
• The filter is placed behind
the cover and can be
reached by pulling the cover outward .
• The charcoal filter is then
pulled out of its slot.
• The new charcoal filter is
placed in the existing slot.
Close the flap.
Important
The filter should be handled carefully so fragments do not loosen from
the surface.
Page 19

19
Defrosting
Refrigerator
Frost is automatically eliminated from the evaporator of the refrigerator
compartment every time the motor compressor stops, during normal use.
The defrost water drains out through a trough into a special container at
the back of the appliance, over the motor compressor, where it evaporates.
Freezer
Your appliance is frost free, which means there is no need to manually
defrost your appliance as this will be carried out automatically.
Cleaning and Care
For hygienic reasons the appliance interior, including interior accessories,
should be cleaned regularly.
Warning!
• The appliance may not be connected to the mains during cleaning. Danger of electrical shock! Before cleaning switch the appliance off and
remove the plug from the mains, or switch off or turn out the circuit
breaker or fuse.
• Never clean the appliance with a steam cleaner. Moisture could accumulate in electrical components, danger of electrical shock! Hot vapours can
lead to the damage of plastic parts.
• The appliance must be dry before it is placed back into service.
Attention!
• Ethereal oils and organic solvents can attack plastic parts, e.g.
– lemon juice or the juice from orange peals;
– butyric acid;
– cleansers which contain acetic acid.
Do not allow such substances to come into contact with appliance parts.
• Do not use any abrasive cleansers.
1. Remove frozen food and the food from the refrigerator. Wrap frozen
food in several layers of newspaper. Store it in a cool place, well covered.
2. Defrost the freezer compartment prior to cleaning (see "Defrosting" section).
3. Switch the appliance off and remove the plug from the mains,
4. Clean the appliance and the interior accessories with a cloth and lukewarm
water. Commercially available dish washing detergents may also be used.
Page 20

20
5. After cleaning wipe with fresh water and rub dry.
Accumulation of dust at the condenser increases energy consumption. For
this reason carefully clean the condenser at the back of the appliance once
a year with a soft brush or a vacuum cleaner.
6. Check the water drain hole on
the rear wall of the fridge. Clear a
blocked drain hole with the aid of
the green peg in the pack of
accessories included with the
appliance.
7. After everything is dry place
appliance back into service.
Switching off the appliance
To switch off the appliance,unplug the mains plug.
If the appliance is not going to be used for an extended period:
1. Remove all refrigerated and deep-frozen packages as well as
Twist&Serve ice maker
2. Switch off the appliance .
D037
Page 21

21
Energy Saving Tips
• Do not install the appliance near cookers, radiators or other sources of
warmth. High ambient temperatures cause longer, more frequent operation of the compressor.
• Ensure sufficient air circulation and exhaust at the appliance base and at
the back wall of the appliance. Never cover air vent openings.
• Do not place warm foods into the appliance. Allow warm foods to cool
first.
• Only leave door open as long as necessary.
• Do not set temperature any colder than necessary.
• Put frozen food in the fridge to defrost. The cold in the frozen food will
then be used to cool the fridge.
• Keep the heat emitting condenser, the metall grille on the rear wall of
your appliance, always clean.
What to do if ...
Correcting Malfunctions
A malfunction may be caused by only a minor fault that you can rectify
yourself using the following instructions. Do not perform any other work on
the appliance if the following information does not provide assistance in
your specific case.
Warning! Repairs to refrigerators/freezers may only be performed by qualified service engineers. Improper repairs can give rise to significant hazards
for the user. If your appliance needs repairing, please contact your specialist dealer or our Customer Service.
Malfunction Possible Cause Remedy
Appliance does not work.
Appliance is not switched on Switch on the appliance.
Mains plug is not plugged in
or is loose.
Insert mains plug.
Fuse has blown or is defective.
Check fuse, replace if necessary.
Socket is defective.
Mains malfunctions are to be
corrected by an electrician.
Appliance cools too much. Temperature is set too cold.
Turn the temperature regulator to a warmer setting temporarily.
Page 22

22
Interior lighting does not
work.
Light bulb is defective. Please look in the "Changing
the Light Bulb" section.
Heavy build up of frost, possibly also on the door seal.
Door seal is not air tight (possibly after changing over the
hinges).
Carefully warm the leaking
sections of the door seal with
a hair dryer (not hotter than
approx. 50 °C). At the same
time shape the warmed door
seal by hand such that it sits
correctly.
Unusual noises.
The appliance is touching the
wall or other objects.
Appliance is not level.
A component, e.g. a pipe, on
the rear of the appliance is
touching another part of the
appliance or the wall.
The compressor starts after a
period of time.
This is normal, no error has
occurred.
The compressor does not start
immediately after changing
the temperature setting.
If necessary, carefully bend
the component out of the
way.
Move the appliance slightly.
Readjust the feet.
See the "Cleaning and Care"
section.
Water on the floor or on storage shelves.
Water drain hole is blocked.
Malfunction Possible Cause Remedy
The food is too warm.
The appliance is near a heat
source.
Temperature is not properly
adjusted.
Please look in the "Initial Start
Up" section.
Turn the temperature regula-
tor to a colder setting tempo-
rarily.
Door was open for an extended period.
Please look in the "Installation
location" section.
A large quantity of warm
food was placed in the
appliance within the last 24
hours.
Open the door only as long as
necessary.
Page 23

23
Regulations, Standards, Guidelines
This appliance was designed for household use and was manufactured in
accordance with the appropriate standards. The necessary measures in
accordance with appliance safety legislation regulations (GSG), accident
prevention regulations for refrigeration appliances (VBG 20) and the regulations of the German Society of Electrical Engineers (VDE) were observed in
the manufacture of this appliance.
The refrigerant circuit has been checked for leaks.
This appliance is in accordance with the following EU guidelines:
– 73/23/EWG dated 19 February 1973 - low voltage guidelines.
– 89/336/EWG dated 3 May 1989
(including guideline change notice 92/31/EWG) - EMV guideline
Changing the light bulb
Warning! There is a risk of electric shocks! Before changing the light bulb,
switch off the appliance and unplug it, or pull the fuse or the circuit breaker.
Light bulb data: 220-240 V
1. To switch off the appliance, unplug the
mains plug.
2. If it becomes necessary to replace the
lamp, prize out the lamp cover as
shown in the figure.
3. Change the defective light bulb with
one of the some power (the maximum power is shown on the light
diffuser).
4. Refit the light bulb cover.
5. Put the appliance back into operation.
Page 24

24
Gracias por elegir uno de nuestros productos de alta calidad.
Con este aparato podrá experimentar la perfecta combinación entre el
diseño funcional y la tecnología más avanzada.
Convénzase de que nuestros electrodomésticos están diseñados para ofrecer el mejor rendimiento y control - En efecto, hemos estableciendo los más
altos niveles de excelencia (calidad)
Además de esto podrá comprobar que el respeto medioambiental y el ahorro de energía son aspecto integrales de nuestros productos.
Para asegurar un funcionamiento optimo y regular de su aparato, por favor,
lea detenidamente este manual de instrucciones. Éste le ayudará a navegar
por todos los procesos de funcionamiento de modo más eficaz.
Le recomendamos que guarde este manual en un lugar seguro, para que, si
es necesario, pueda consultarlo en cualquier momento.
Le deseamos que disfrute al máximo de su nuevo aparato
En este manual se utilizan los símbolos siguientes
Información importante para su seguridad personal y para evitar daños al
electrodoméstico
Información general y consejos
Información medioambiental
Page 25

25
Indice
Seguridad. . . . . . . . . . . . . . . . . . . . . . . . . . . . . . . . . . . . . . . . . . . . . .26
Eliminación . . . . . . . . . . . . . . . . . . . . . . . . . . . . . . . . . . . . . . . . . . . .28
Información sobre el embalaje del aparato . . . . . . . . . . . . . . . . . . . . . .28
Desguace de los aparatos viejos . . . . . . . . . . . . . . . . . . . . . . . . . . . . . . .28
Quitar el seguro para el transporte . . . . . . . . . . . . . . . . . . . . . . . . .29
Instalación . . . . . . . . . . . . . . . . . . . . . . . . . . . . . . . . . . . . . . . . . . . . .29
Lugar de instalación . . . . . . . . . . . . . . . . . . . . . . . . . . . . . . . . . . . . . . . . .29
Colocación . . . . . . . . . . . . . . . . . . . . . . . . . . . . . . . . . . . . . . . . . . . . . . . . .30
Distanciadores posteriores . . . . . . . . . . . . . . . . . . . . . . . . . . . . . . . . . . . .30
Montaje de las manillas . . . . . . . . . . . . . . . . . . . . . . . . . . . . . . . . . . . . . .30
Reversibilidade das portas . . . . . . . . . . . . . . . . . . . . . . . . . . . . . . . . . . . .31
Conexión eléctrica . . . . . . . . . . . . . . . . . . . . . . . . . . . . . . . . . . . . . . .33
Antes de la puesta en servicio . . . . . . . . . . . . . . . . . . . . . . . . . . . . .33
Panel de mando . . . . . . . . . . . . . . . . . . . . . . . . . . . . . . . . . . . . . . . . .34
Puesta en marcha . . . . . . . . . . . . . . . . . . . . . . . . . . . . . . . . . . . . . . .34
Temperatur regula
ción
. . . . . . . . . . . . . . . . . . . . . . . . . . . . . . . . . . .34
Fun
ción Action Freeze . . . . . . . . . . . . . . . . . . . . . . . . . . . . . . . . . . . . . . . . . . . . .34
Accesorios internos . . . . . . . . . . . . . . . . . . . . . . . . . . . . . . . . . . . . . .35
Uso del sistema de fabri
cación de hielo Twist&Serve . . . . . . . . . . . . . . . . .38
Refrigeración de los alimentos y de las bebidas . . . . . . . . . . . . . . .39
Congelación y sobrecongelación . . . . . . . . . . . . . . . . . . . . . . . . . . . .39
Calendario de congelación . . . . . . . . . . . . . . . . . . . . . . . . . . . . . . . . . . . . . . .41
Instalación del filtro de proteción del sabor . . . . . . . . . . . . . . . . . . . . . . . .41
Cambio del filtro de proteción del sabor . . . . . . . . . . . . . . . . . . . . . . . . . . .42
Descongelación . . . . . . . . . . . . . . . . . . . . . . . . . . . . . . . . . . . . . . . . .42
Apagado del aparato . . . . . . . . . . . . . . . . . . . . . . . . . . . . . . . . . . . . .43
Limpieza y cuidados . . . . . . . . . . . . . . . . . . . . . . . . . . . . . . . . . . . . .43
Consejos para ahorrar energía . . . . . . . . . . . . . . . . . . . . . . . . . . . . .44
Qué hacer si... . . . . . . . . . . . . . . . . . . . . . . . . . . . . . . . . . . . . . . . . . .44
Canmbio de la bombilla . . . . . . . . . . . . . . . . . . . . . . . . . . . . . . . . . . . . . .46
Servicio Técnico . . . . . . . . . . . . . . . . . . . . . . . . . . . . . . . . . . . . . . . . .47
Disposiciones, Normas, Directivas . . . . . . . . . . . . . . . . . . . . . . . . . .47
Page 26

26
Seguridad
La seguridad de nuestros aparatos cumple los reglamentos técnicos aprobados y la ley de seguridad de los aparatos. No obstante esto, consideramos
oportuno facilitar vuestra familiaridad con las siguientes advertencias:
Utilización conforme a la finalidad prevista
• El aparato frigorífico es apto para una utilización doméstica. Es apto para
enfriar, congelar y sobrecongelar productos alimentarios y para preparar
helados. Es apto para congelar y conservar productos alimentarios y helados.
• Por motivos de seguridad no se permite en ningún caso aportar modificaciones o transformaciones al aparato.
• Si se desea utilizar el aparato frigorífico en ámbito empresarial o para finalidades que no sean la refrigeración o congelación de productos alimentarios, se ruega ajustarse a las disposiciones de ley vigentes para vuestro
sector.
Antes de la primera puesta en servicio
• Verificar que el aparato no presente eventuales daños debidos al transporte. ¡No conectar a la red, en ningún caso, un aparato estropeado! Si
presenta daños dirigirse al proveedor.
Sustancia refrigerante
El aparato contiene, en el circuito refrigerante, un gas natural denominado
Isobutano (R600a), altamente tolerado por el medio ambiente, pero que de
todas maneras es inflamable.
• Durante el transporte y la instalación del aparato se debe prestar atención
en no estropear ningún elemento del circuito refrigerante.
• En caso de daños al circuito refrigerante:
– evitar terminantemente las llamas libres y las fuentes de ignición;
– proporcionar a una buena ventilación en el sitio donde se encuentra el
aparato.
Seguridad de los niños
• Los elementos del embalaje (por ej. hojas de plástico, poliestireno) pueden
ser peligrosos para los niños. ¡Peligro de sofocación! ¡Mantener el material de embalaje fuera del alcance de los niños!
• Los aparatos que no se van a utilizar más, antes de desguazarlos, se deben
poner inutilizables. Desenchufar la clavija, cortar el cable de red, sacar o
destruir los eventuales cierres de bloqueo. De esta manera se evita que
Page 27

27
niños puedan quedar encerrados en el aparato mientras juegan (¡Peligro
de sofocación!) y se evita que puedan encontrarse en otras situaciones
peligrosas para su vida.
• Muy a menudo los niños no se dan cuenta de los peligros a que se exponen mientras manejan aparatos domésticos. Por tanto es necesario tomar
todas las medidas adecuadas de salvaguardia, y también ¡es necesario
impedir que los niños jueguen con dichos aparatos!
En el servicio diario
• Los contenedores de gases inflamables o de líquidos, por efecto del frío
pueden perder su estanqueidad. ¡Peligro de explosiones! No guardar nunca contenedores con sustancias inflamables, como por ejemplo aerosoles,
encendedores y cartuchos de abastecimiento, etc. en el frigorífico.
• Las botellas y las latas no se deben poner nunca en el congelador. Podrían explotar tan pronto se congela su contenido, mientras que los líquidos
que contienen anhídrido carbónico (bebidas con gas) ¡pueden llegar a
estallar! No poner nunca en el congelador limonada, zumos de fruta, cerveza, vino, cava, etc. Hacen excepción: las bebidas superalcohólicas que se
pueden poner en el congelador.
• No tragarse los helados ni los cubitos de hielo recién sacados del congelador. El helado o el hielo muy fríos se pueden congelar en contacto con
la lengua o los labios provocando heridas.
• No tocar los productos congelados con las manos mojadas. Las manos se
podrían congelar sobre el producto.
• No utilizar nunca pequeños electrodomésticos (por ej. máquinas eléctricas
para hacer helados, batidoras, etc.) dentro del frigorífico.
• Antes de efectuar las operaciones de limpieza es necesario apagar el aparato, desenchufar la clavija de la toma de red, o quitar el fusible.
• Desenchufar la clavija de la toma de red agarrándola siempre por el cuerpo de la clavija y nunca tirando del cable.
En caso de inconvenientes
• Si en el aparato se produjera un inconveniente se ruega leer las instrucciones bajo el epígrafe “Qué hacer si...”. Si dichas instrucciones no bastaran hay que abstenerse de efectuar ulteriores operaciones de reparación.
• Los aparatos frigoríficos deben ser reparados exclusivamente por personal
especializado. Las reparaciones incorrectas pueden acarrear notables riesgos. En caso de necesitar una reparación, se ruega dirigirse al propio proveedor o a un centro de asistencia autorizado.
Page 28

28
Eliminación
Información sobre el embalaje del aparato
Todos los materiales de producción utilizados ¡son tolerados por el ambiente! Se pueden tirar tranquilamente a la basura o pueden ser incinerados en
las plantas para basuras urbanas. En cuanto a los materiales de producción:
Los materiales sintéticos también se pueden reciclar y vienen marcados
como sigue:
>PE< para el polietileno, por ej. en el envoltorio exterior y en las bolsas
internas.
>PS< para el poliestireno expandido, por ej. en los elementos embutidos, en
general exento de propulsores.
Las piezas de cartón están realizadas con papel reciclado y es preciso echarlas a los contenedores destinados a la recogida del papel.
Desguace de aparatos viejos
Para proteger el medio ambiente es necesario desguazar los aparatos viejos
de una manera adecuada. Esto vale también para vuestro aparato que haya
terminado de prestar su servicio.
Atención! Los aparatos que ya no sirven más, antes de desguazarlos se
deben poner inutilizables. Desenchufar la clavija, cortar el cable de red, sacar
o destruir los eventuales cierres de bloqueo. De est manera se evita que
niños puedan quedar encerrados en el aparato mientras juegan (¡Peligro de
sofocación!) y se evita que puedan encontrarse en otras situaciones peligrosas para su vida.
Advertencias acerca del desguace :
• El aparato no debe ser tirado a la basura sino que debe ser entregado a
organizaciones autorizadas para su eliminación.
• El circuito refrigerante, en particular el intercambiador de calor situado en
la parte inferior del aparato, no se debe estropear.
• El símbolo en el producto o en su embalaje indica que este producto no se puede tratar como desperdicios normales del hogar. Este producto se debe entregar al punto de recolección de equipos eléctricos y electrónicos para reciclaje. Al asegurarse de que este producto se deseche
correctamente, usted ayudará a evitar posibles consecuencias negativas
para el ambiente y la salud pública, lo cual podría ocurrir si este producto no se manipula de forma adecuada. Para obtener información más
detallada sobre el reciclaje de este producto, póngase en contacto con la
administración de su ciudad, con su servicio de desechos del hogar o con
la tienda donde compró el producto.
Page 29

29
Quitar el seguro para el transporte
El aparato y los accesorios internos están protegidos para el transporte.
• Quitar las cintas adhesivas situadas en los lados de la puerta
• Quitar todas las cintas adhesivas y los elementos de bloqueo de dentro del
aparato.
Instalación
Lugar de instalación
Es preciso colocar el aparato en un sitio bien ventilado y seco.
La temperatura ambiente influye mucho sobre el consumo de corriente. Por
tanto el aparato no debería:
– quedar expuesto directamente a los rayos del sol;
– ser puesto al lado de elementos caloríficos, de un horno o de otras fuen-
tes de calor similares;
– mientras que debería ser colocado en un sitio en que la temperatura
ambiente se corresponda con la clase climática para la cual ha sido construido.
La clase climática viene indicada en la placa de características, situada dentro de la cámara frigorífica a mano izquierda.
La siguiente tabla indica qué temperaturas ambiente están asociadas con las
clases climáticas:
Clase climática para temperaturas ambiente
SN desde +10 hasta +32 °C
N desde +16 hasta +32 °C
ST desde +18 hasta +38 °C
T desde +18 hasta +43 °C
Si fuese inevitable instalar el aparato al lado de una fuente de calor, es necesario mantener las siguientes distancias mínimas:
– de los hornos eléctricos 3 cm;
– de las estufas de queroseno y leña 30 cm.
Si no fuese posible mantener dichas distancias mínimas, es necesario poner
una plancha protectora contra el calor entre el horno y el frigorífico.
Page 30

30
Distanciadores posteriores
En la bolsa de la documentación
hay dos distanciadores que
deberán ser montados como se
muestra en la figura.
Aflojar los tornillos, introducir el
distanciador debajo de la cabeza
del tornillo y volver a atornillar.
Colocación
Situar el aparato lejos de fuentes de
calor, como: radiadores, estufas,
exposición directa a los rayos del sol,
etc. Por motivos de seguridad la ventilación debe ser efectuada como se
indica en la respectiva figura
Para aparato con mueble pénsil de
encima, debería ser por lo menos de
100 mm. La solución preferible seria la
ilustrada (sin mueble).
Atención: mantener las aperturas para la ventilación libres de
cualquier obstàculo. Dos patas graduables, situadas en la base del
mueble, consienten rivelarlo a la perfección.
Montaje de las Manillas
Atornillar el Soporte superior
de la manilla a la Barra de la
mísma (1). Colocar el Soporte
inferior de la manilla sobre el
lado inferior izquierdo de la
Puerta (2).
Colocar el Soporte superior de
la manilla sobre el lado superior izquierdo de la Puerta (3)
y atornillar la Barra de la
manilla al Soporte inferior de
la mísma (4).
¡Atención! No apretar excesivamente los tornillos (máx.
2Nm) ya que podrían dañarse
las manillas.
100 mm10 mm
A
NP005
PR153
B
10 mm
Page 31

31
Reversibilidade das portas
Antes de qualquer operação tire a
ficha da tomada de corrente.
Para a inversão aja da seguinte
maneira:
Para realizar la siguiente
operación le sugerimos que otra
persona sostenga firmemente las
puertas mientras se lleva a cabo
dicha
1. Desmonte la bisagra y conservela
para futuros cambios
Desmonte cuerpo bisagra superior
y montelo en el ladoopuesto.
Extraiga la puerta superior.
2.. Desmonte la bisagra intermedia
(H) y extraiga la puerta inferior.
Desmonte los dos tapones de
plástico (a rosca).
Monte la bisagra (déjela un poco
suelta)y los tapones de plástico
en el lado opuesto.
3. Desatornille el zocalo (parte plástica inferior de su aparato) y
extraigalo.Desmonte la bisagra
inferior para montarla en el lado
opuesto.Previamente cambie el
perno con una llave de 12mm de
lado en la bisagra inferior para el
ajuste de la puerta.
Importante:La bisagra inferior ha
de llevar el pie nivelador que lleva montado originalmente.Para
extraer el otro pie nivelador,
incline el aparato y desenrosquelo para montarlo en el
lado opuesto.
4. Monte la puerta inferior y fije la
bisagra intermedia.
H
Page 32

32
5. En su bolsa de documentación
encontrará un juego completo
de bisagra superior para
realizar el cambio de sentido.Montelo junto con la puerta superior.
6. Coloque el zócalo y compruebe
que queda bien fijado.
7. Desatornillar la Barra de la
manilla del Soporte superior de
la mísma (1). Desatornillar el
Soporte inferior manilla de la
Puerta (2).
Desatornillar el Soporte superior manilla de la Puerta (3) y
atornillarlo sobre el lado inferior izquierdo de la Puerta (4).
Girar 180 º el Soporte y la Barra de la manilla y atornillarlo
sobre la Puerta (5) y el ya colocado Soporte manilla (6).
Cambiar el pequeño Tapón de
la derecha.
En cualquier caso, si no quiere
realizar el proceso arriba mencionado, puede contactar con
el servicio de asistencia mas
cercano. Un especialista de
nuestro servicio técnico llevara
a cabo dicha reversibilidad a su
costo.
Atención
Terminada la operación de reversibilidad de la puerta, controlar que
la empaquetadura magnética esté adherida al mueble. Si la temperature ambiente es fria (por ejemplo en invierno), puede suceder que la
empaquetadura no adhiera perfectamente al mueble. En este cave
esperar que la empaquetadura se recobre en forma natural o bien
acelerar dicho proceso calentando la parse interesada con un normal
secador de cabellos.
Page 33

33
Conexión eléctrica
Para efectuar la conexión eléctrica es necesario utilizar una toma de corriente con contacto de protección, instalada conforme a las prescripciones
vigentes. El fusible eléctrico debe ser por lo menos de 10 Amperios. Si una
vez instalado el aparato no fuese posible acceder a la toma (para eventualmente desenchufar el aparato), es necesario tomar las medidas adecuadas
para garantizar la desconexión del aparato de la red eléctrica (por ej. fusible, interruptor LS, interruptor de protección contra sobrecorrientes o dispositivos parecidos, que tengan una apertura entre los contactos de por lo
menos 3mm).
• Antes de poner en servicio el aparato hay que comprobar que la tensión
y la frecuencia del aparato, indicados en su placa de características, se cor-
respondan con los de la red eléctrica general de alimentación:
por. ejemplo.
AC 230 ... 240 V 50 Hz o bien
230 ... 240 V~ 50 Hz
(por tanto de 230 a 240 Voltios en corriente alterna, 50 Hertz).
La placa de características se encuentra dentro de la cámara frigorífica, a
mano izquierda.
Antes de la primera puesta en servicio
• Limpiar el interior del aparato y todos los accesorios antes de poner en servicio el frigorífico (ver capítulo “Limpieza y cuidados”).
Page 34

34
Panel de mando
A. Teclas para el ajuste de temperatura
PPuueessttaa eenn mmaarrcchhaa
Quite, si exíste la etiqueta “quitar” pegada sobre el interior del
compartimento de congelador. Introducir el enchufe en la toma de
corriente.
Apagar el aparato
Desenchufar la clavija de la toma de red.
Temperatur Regulación
Cada vez que se presiona el botón,se selecciona la temperatura indicada por el led.
La selección es progresiva y varía de +2 ° C a +8 °C.
Seguir presionando el botón hasta que se encienda el led correspondiente a la temperatura deseada.
Regulación de la temperatura
Los siguientes factores pueden influir en la temperatura interna:
• temperatura ambiente
• frecuencia de apertura de las puertas
• cantidad de alimentos conservados
• ubicación del aparato
Función Action Freeze
Para enfriar rápidamente la temperatura del compartimiento congelador,
activar la función Action Freeze . Seguir presionando el botón indicado por la
flecha hasta que se encienda el led correspondiente al símbolo (*).
Para desactivar la función Action Freeze presionar el botón y mantenerlo pulsado hasta alcanzar la temperatura deseada.
+2 +4 +5 +6 +8
Page 35

35
Acessorios internos
Posicionamento das prateleiras
• A prateleira inteira em cima das
gavetas de verdura/fruta deve permanecer sempre nesta posição para
manter mais frescas a verdura e a
fruta no tempo.
As outras prateleiras são reguláveis na altura:
• Para tal, puxar a prateleira para a
frente até que seja possível deslocála para cima ou para baixo e retirála.
• A introdução em outra altura é efetuada em sentido contrário.
Posicionamento das prateleiras na porta
• Conforme as necessidades, os compartimento de prateleira na porta
podem ser extraidos para cima e portanto inseridos em outros apoios.
Contenedor corredero
Algunos modelos tienen un contenedor que se puede desplazar lateralmente, situado debajo de un contenedor para latas. Este contenedor se
puede poner a cualquier altura.
1. Para el desplazamiento hay que
empujar para arriba el contenedor
para latas y quitar el enganche del
contenedor corredero.
2. Para ponerlo hay que efectuar las
mismas operaciones pero al revés.
D338
Page 36

36
Circulación de aire
El compartimiento frigorífico está
provisto de un ventilador especial
D.A.C. (Dynamic Air Cooling) que
se activa actuando sobre el interruptor B; el piloto verde encendido indica que el ventilador está
en marcha.
Se aconseja el uso del ventilador
(D.A.C.) cuando la temperatura
ambiente exceda de los 25°C.
La activación de este dispositivo
determina la refrigeración rápida
de los alimentos y la máxima uniformidad de temperatura en el
compartimiento.
Compartimiento para botellas
Almacene las botellas con el cuello hacia adelante.
Atención: Coloque echadas sólo
las botellas sin abrir.
Para guardar botellas ya abiertas
puede usted alzar el compartimiento hasta dejarlo inclinado.
Para ello tire del compartimiento
hacia adelante hasta que sea
posible virarlo hacia arriba e
introduzca entonces la superficie
delantera en el nivel inmediato
superior.
Page 37

37
PR271
Control de la humedad
Un dispositivo provisto de ranuras
(que se pueden regular mediante
una palanca corredera), que permite regular la temperatura en el
vano cajón/es de verdura, está
ensamblado en el estante de
cristal.
Con las ranuras cerradas se
obtendrá una temperatura más
caliente y una mayor humedad.
Con las ranuras abiertas se obtendrá una temperatura más fría y
una menor humedad.
Cajón
El cajón es adecuado para conservar fruta y verdura.
En el interior del cajón se encuentra un separador que puede colocarse en varias posiciones para
obtener la distribución más adecuada en cada caso.
En el fondo del cajón hay una rejilla, con el fin de evitar el contacto
de los alimentos con la humedad
que podría formarse y depositarse
en la parte inferior del cajón.
Para su limpieza, puede sacarse el
cajón cogiéndolo por las asas laterales (como se indica en la figura)
y pueden quitarse los componentes internos.
Page 38

38
UUssoo ddeell ssiisstteemmaa ddee ffaabbrriiccaacciióónn ddee hhiieelloo TTwwiisstt&&SSeerrvvee
Este electrodoméstico está provisto de uno o varios recipientes
para fabricar y guardar cubitos de
hielo.El sistema Twist&Serve está
situado debajo del estante en el
compartimiento del congelador.
Consta de un dispensador de hielo
con doble recipiente y de una
cubitera. El dispensador se puede
colocar a la derecha o a la
izquierda en función de los requisitos de espacio. Tire del sistema
de fabricación de hielo y llene los
dos recipientes de agua hasta 3/4
de su capacidad máxima. Cuando
el agua se congele,gire el mando
de los recipientes en la dirección
de la flecha para que los cubitos
caigan en la cubitera situada
debajo. Saque la cubitera y
recoja
los cubitos.
Page 39

39
Refrigeración de los alimentos y de las bebidas
Para utilizar de la mejor manera la sección frigorífico es necesario:
• no poner en la cámara alimentos calientes ni líquidos en evaporación;
• tapar o envolver los alimentos, en particular si tienen aromas;
• colocar los alimentos de manera que el aire pueda circular libremente alre-
dedor de ellos.
Carne (de todas las clases): hay que envolverla en bolsas de plástico y
ponerla sobre el vidrio, encima del cajón de la verdura.
En esta posición se podrá conservar por uno o dos días a lo sumo.
Alimentos cocidos, platos fríos, etc. se deben tapar bien y se pueden poner
en cualquier sitio del frigorífico.
Fruta y verdura: se deben poner, después de lavarlas, en el/los cajón/cajo-
nes previstos.
Mantequilla y queso se deben poner en los contenedores previstos o se
deben envolver en hojas de plástico o aluminio para evitar el contacto con
el aire.
Leche en botella: bien cerradas, se ponen en el portabotellas.
Plátanos, patatas, cebolla y ajo, si no están empaquetados no se deben
poner en el frigorífico.
Congelación y sobrecongelación
Vuestro congelador es apto tanto para conservar sobrecongelados como
para congelar alimentos frescos.
Atención
• La temperatura en la sección congelador debe ser de -18°C o inferior,
antes de poner dentro los alimentos a congelar.
• Para la congelación hay que ajustarse a las cantidades indicadas en la pla-
ca de características. La cantidad para la congelación es la cantidad máxima de alimentos frescos que es posible congelar en 24 horas. Queriendo
congelar alimentos frescos por más días consecutivos, reducir la cantidad
indicada en la placa a 2/3 ó 3/4.
• Dejar enfriar eventuales alimentos calientes antes de congelarlos. El calor
lleva a una fuerte formación de escarcha y conlleva un alto consumo de
energía.
• Respetar las fechas de caducidad indicadas en los paquetes por el pro-
ductor de los sobrecongelados.
• Los alimentos, una vez descongelados, no se pueden congelar de nuevo
previa cocción.
Page 40

40
• Los contenedores de gases inflamables o de líquidos, por efecto del frío
pueden perder su estanqueidad. ¡Peligro de explosión! No guardar nunca
contenedores con sustancias inflamables, como por ejemplo aerosoles,
encendedores y cartuchos de abastecimiento, etc. en el frigorífico.
• Las botellas y las latas no se deben poner nunca en el congelador. Pueden
explotar tan pronto se congela su contenido, mientras que los líquidos
que tienen anhídrido carbónico (bebidas con gas) ¡pueden llegar a estallar! No poner nunca en el congelador limonada, zumos de fruta, cerveza,
vino, cava, etc. Hacen excepción: las bebidas superalcohólicas que se pueden poner en el congelador.
• Envolver herméticamente los alimentos antes de congelarlos, para evitar
que se sequen, pierdan el aroma o que los sabores se mezclen con los de
los otros alimentos congelados.
¡Atención! No tocar nunca los productos congelados con las manos mojadas. La piel podría pegarse al producto.
1. Para congelar alimentos frescos, activar la función Action Freeze (*)
al menos 24 h antes de colocar los alimentos por congelar en el
compartimiento congelador.
Colocar el dispensador de hielo Twist&Serve en el centro del estante
en el que está fijado.
Desplazar el estante del compartimiento congelador hasta la posición
intermedia, manteniéndolo bien plano.
Colocar los alimentos frescos por congelar en dicho estante. Los alimentos no congelados no deben entrar en contacto con los ya congelados, de los contrario los productos congelados podrían descongelarse en
algunos puntos.
2. Poner los productos congelados a ser posible separados en los cajones.
Tras 24 horas, cuando el proceso de congelación ha terminado,
restablecer la temperatura deseada presionando el botón A.
Al poner en marcha el aparato o tras un período de inactividad,se
aconseja hacerlo funcionar a pleno régimen por al menos dos horas
antes de colocar alimentos congelados.
Para esto, activar la función Action Freeze (*).
Después de 2 horas seleccionar la temperatura deseada presionando
el botón A.
Page 41

41
Instalación del filtro de protección del sabor
El filtro de protección del sabor
es un filtro de carbón activo
que absorbe los malos olores y
permite mantener el sabor y el
aroma de todos los alimentos
en condiciones óptimas;
además,evita que se produzca
una contaminación cruzada de
olores. El filtro de carbón activo se suministra en una bolsa
de plástico para garantizar su
duración.
Antes de encender el electrodoméstico, saque el filtro de la bolsa y
colóquelo dentro de la compuerta.
• Tire de la compuerta.
• Introduzca el filtro de carbón activo en la ranura que hay en el reverso de compuerta.
• Cierre la compuerta.
Mantenga cerrada la compuerta de ventilación durante el fun-
cionamiento. El filtro debe manipularse con cuidado para evitar que su
superficie se raye.
Calendario de congelación
• Los símbolos en los cajones indican diversos tipos de productos a conge-
lar.
• Las cifras indican el periodo de almacenamiento, en meses, para cada tipo
de producto a congelar.
• Si vale el valor superior o el valor inferior del periodo de almacenamien-
to indicado, depende de la calidad de los productos alimentarios y del tratamiento a que han sido sometidos antes de la congelación. Para los alimentos notablemente grasos, vale siempre el valor inferior.
Page 42

42
Descongelación
Frigorífico
En la pared trasera de la sección frigorífico, se forma un capa de escarcha
durante el funcionamiento del compresor, que es eliminada automáticamente durante las pausas de funcionamiento del compresor. El agua generada por la descongelación, a través de un encauzador situado en la parte
trasera de la sección frigorífico, por un agujero de desagüe es recogida en
una bandeja situada encima del compresor, donde evapora por efecto del
calor generador por el propio compresor.
Congelador
El compartimento del congelador es de tipo "no frost"; esto significa que
éste se caracteriza por la completa ausencia de escarcha durante el funcionamiento, tanto en las paredes internas del compartimento como en
los alimentos.
La ausencia de escarcha es consecuencia de la circulación continua de aire
frío en el interior del compartimento, provocada por un ventilador controlado automáticamente.
Cambio del filtro de protección del sabor
Para garantizar un rendimiento óptimo, es preciso cambiar el filtro de
carbón activo una vez al año.
En su distribuidor local puede adquirir filtros de carbón activo nuevos.
• Como el filtro está detrás de la
compuerta,es preciso tirar de la
compuerta para acceder al filtro.
• Tire de la ranura del filtro de
carbón vegetal usado.
• Introduzca un filtro nuevo en
la ranura.
• Cierre la compuerta.
Mantenga cerrada la compuer-
ta de ventilación durante el
funcionamiento.El filtro debe
manipularse con cuidado para
evitar que su superficie se raye.
Page 43

43
Apagado del aparato
Si fuese necesario apagar el aparato por un largo plazo:
1. Vaciar las secciones del frigorífico y del congelador y también las bandejas
del hielo.
2. Desenchufar la clavija de la toma de corriente
3. Descongelar la sección congelador y limpiarla (ver párrafo “Limpieza y cuidados”).
4. Dejar abiertas las puertas para evitar que se formen olores desagradables.
Limpieza y cuidados
Por motivos de higiene se debería limpiar siempre y con regularidad el interior del aparato, incluidos los accesorios.
¡Advertencia!
• Durante la limpieza, el aparato debe estar desenchufado de la red eléctri-
ca. ¡Peligro de electrocución! Antes de efectuar las operaciones de limpieza es necesario apagar el aparato, desenchufar la clavija de la toma de
red, o quitar el fusible.
• No limpiar nunca el aparato utilizando hidrolimpiadoras a vapor. La hume-
dad podría penetrar en los elementos eléctricos, ¡Peligro de electrocución!
El vapor hirviente puede dañar las partes en material sintético.
• El aparato debe estar completamente seco antes de ponerlo de nuevo en
servicio.
¡Atención!
• Aceites esenciales y sustancias solventes orgánicas pueden atacar los elementos en material sintético, por ej.
– zumo de limón o cortezas de naranja;
– mantequilla ácida;
– sustancias detergentes que contengan ácido acético.
Evitar el contacto entre los elementos del aparato y dichas sustancias.
• No utilizar nunca sustancias detergentes abrasivas.
1. Quitar los alimentos. Envolver los sobrecongelados con varias hojas de diario. Guardar dichos alimentos en un sitio fresco.
2. Apagar el aparato y desenchufar la clavija de la toma de red o bien desconectar o desenroscar el fusible.
3. Descongelar el congelador.
4. Limpiar el aparato y los accesorios internos con un paño suave empapado
de agua caliente. Eventualmente añadir un poco de detergente para lavar
platos.
Page 44

44
5. Aclarar y secar frotando.
Los depósitos de polvo en el conden-
sador, situado en la parte trasera del
aparato, reducen notablemente la
potencia de enfriamiento por lo que
aumentan el consumo energético. Es
necesario pues limpiarlo esmeradamente, una vez al año, con un cepillo o una aspiradora.
6. Examinar el agujero de desagüe del agua de descongelación, situado en la
parte trasera de la sección frigorífico. Si el agujero está atascado, es posible
destaparlo con el limpiador verde.
7. Una vez que todo está bien seco se puede poner de nuevo en servicio el aparato.
Consejos para ahorrar energía
• No instalar el aparato cerca de hornos, elementos calentadores ni otras
fuentes de calor. Con temperaturas ambiente elevadas, el compresor se
pone en marcha más a menudo y por más tiempo.
• Garantizar una ventilación suficiente en entrada y en salida. No tapar
nunca las ranuras de ventilación.
• No poner nunca alimentos calientes dentro del aparato; primero dejar que
se enfríen.
• Abrir la puerta sólo por el tiempo necesario.
• No seleccionar una temperatura más fría que lo necesario.
• Poner los alimentos a descongelar en la sección frigorífico. El frío genera-
do por la descongelación contribuye en enfriar la sección frigorífico.
• Mantener constantemente limpio el condensador situado en la parte tra-
sera del aparato.
Qué hacer si...
Remedios en caso de inconvenientes
Probablemente se trata de un avería leve que podéis eliminar por cuenta
vuestra, siguiendo estas instrucciones, sin tener que dirigiros al servicio técnico. No tenéis que efectuar ninguna otra operación si las aquí presentadas
no bastan para solucionar el caso indicado.
¡Advertencia! Las reparaciones del frigorífico han de ser efectuadas exclusivamente por personal especialista. Las reparaciones no adecuadas pueden
entrañar graves riesgos para el usuario. Si fuese necesario efectuar una
reparación, dirigiros exclusivamente a vuestro revendedor autorizado o a
nuestro servicio de asistencia al cliente.
D037
Page 45

45
El aparato genera demasiado
frío
La temperatura está regulada
en un valor demasiado frío
Poner el mando sobre una
posición más caliente
Inconveniente Causas posibles Remedio
El aparato no funciona
El aparato no está encendido Encender el aparato
La clavija no está enchufada o
está floja
Enchufar la clavija en la toma
de corriente
El interruptor general está
disparado o está estropeado
Comprobar el interruptor
eventualmente cambiarlo
La toma de corriente está
estropeada
Defectos de la red eléctrica
deben ser reparados por un
electricista autorizado
Alimentos demasiado calientes
La iluminación interna no
funciona
El aparato está instalador al
lado de una fuente de calor
La temperatura no está regulada correctamente
Ver párrafo “Puesta en servi-
cio”
La bombilla está estropeada
Ver párrafo “Cambio de la
bombilla”
Poner el termostato sobre una
posición más fría
La puerta ha quedado abierta
por demasiado tiempo
Ver párrafo “Instalación”
En el arco de las 24 horas se
han puesto grandes cantidades de alimentos
Abrir la puerta sólo lo estric-
tamente necesario
Gran formación de escarcha
en el aparato o en la junta de
la contrapuerta
La junta de la contrapuerta
no es más hermética (eventualmente después de haber
efectuado la reversibilidad de
la puerta)
Calentar con cautela los puntos no
herméticos de la junta utilizando
un secador para el cabello ( no
superar los 50°C) poniendo de nue-
vo en forma la junta, tirando de
ella, de manera que se apoye per-
fectamente
Al cabo de un cierto tiempo el
compresor se pone automáti-
camente en marcha
Ver párrafo “Limpieza y cuida-
dos
Esto es normal, no se trata de
un inconveniente
Después de haber modificado
la regulación de la temperatura el compresor no se pone
en marcha enseguida
Rastros de agua en el fondo
de la sección frigorífico
El agujero de desagüe del agua
de descongelación está atascado
Ruido insólito
El aparato está en contacto
con la pared o con otros
objetos
El aparato no está a nivel
Un componente instalado en
la parte trasera del aparato,
por ej. un tubo, toca otro
componente o la pared
Eventualmente doblarlo con
cuidado
Alejar ligeramente el aparato
Actuar sobre las patas regula-
bles
Page 46

46
Cambio de la bombilla
¡Advertencia! ¡Peligro de electrocución! Antes de cambiar la bombilla es
necesario apagar el aparato, desenchufar la clavija de la toma de red, o quitar el fusible.
Características de la bombilla: 220240 V, máx. 25 W, empalme: E 14
1. Apagar el aparato
2. Desenchufar la clavija de la toma.
3 Sacar la parte móvil como mostrado
en la figura.
4. Cambiar la bombilla por una nueva.
5. Poner el plafón y fijarlo con el tornillo.
6. Encender el aparato.
Page 47

47
Servicio técnico
Si el inconveniente no se logra solucionar con estar instrucciones, dirigiros
a vuestro revendedor autorizado o a nuestro servicio técnico. Las direcciones y números de teléfono los encontráis en el folleto adjunto de “Condiciones de garantía / Direcciones de los centros de asistencia”. Disponer de las
piezas de repuesto adecuadas permite ahorrar tiempo. Por tanto os rogamos que indiquéis los datos siguientes de vuestro aparato:
• Descripción del modelo
• Número de producción (N. P)
• Número de ultimación (N.U)
Estas indicaciones las encontráis en la placa de características situada dentro del aparato. Para tenerlos siempre al alcance de la mano os aconsejamos
apuntarlos aquí.
Advertencia: Una llamada al servicio técnico no justificada está sujeta a la
obligación de pagar los gastos, también durante la garantía.
Disposiciones, Normas, Directivas
El aparato ha sido proyectado para la utilización doméstica y ha sido fabricado según las normas vigentes para esta clase de aparato. Para su producción han sido así mismo tomadas medidas especiales conforme a la ley
de seguridad de los aparatos (GSG), las prescripciones de prevención de
accidentes para equipos de refrigeración (VBG 20) y las disposiciones de la
cooperativa eléctrica alemana (VDE). Se ha comprobado la estanqueidad del
circuito refrigerante.
Este aparato cumple las siguientes Directivas CEE:
– 73/23/CEE del 19.2.1973 - Directiva de baja tensión
– 89/336/CEE del 3.5.1989
(incluidas las sucesivas enmiendas de 92/31/CEE) – Directiva EMW.
Page 48

www.electrolux.com
www.aeg-electrolux.com.es
2223 461-31-00-07052007 Subject to change without notice
Con reserva de modificaciones
 Loading...