

Page 1

SANTO 72430-18 DT
Fridge freezer
Refrigerador-Congelador
Operating Instructions
Instruções de utilização
Page 2
2
Dear customer,
Before placing your appliance into operation please read these operating
instructions carefully. They contain important information for safe use, for
installation and for care of the appliance.
Please keep these operating instructions for future reference. Pass them on
to possible new owners of the appliance.
Notes which are important for your safety or for the proper functioning of
the appliance are stressed with a warning triangle and/or with signal words
(Warning!, Caution!, Attention!). Please observe the following carefully.
Supplementary information regarding operation and practical applications
of the appliance appear after this symbol.
Tips and notes concerning economical and environmentally sound use of
the appliance are marked with the flower.
The operating instructions contain instructions for the correction of possible malfunctions by the user in the section "What to do if ...". If these
instructions should not be sufficient, our customer service department is
always available to you.
Page 3

3
Contents
Safety . . . . . . . . . . . . . . . . . . . . . . . . . . . . . . . . . . . . . . . . . . . . . . . . . .4
Disposal . . . . . . . . . . . . . . . . . . . . . . . . . . . . . . . . . . . . . . . . . . . . . . . .5
Appliance Packaging Information . . . . . . . . . . . . . . . . . . . . . . . . . . . . . . .5
Disposal of old Appliances . . . . . . . . . . . . . . . . . . . . . . . . . . . . . . . . . . . . .6
Remove transport safeguard . . . . . . . . . . . . . . . . . . . . . . . . . . . . . . . .6
Installation . . . . . . . . . . . . . . . . . . . . . . . . . . . . . . . . . . . . . . . . . . . . . .6
Installation Location . . . . . . . . . . . . . . . . . . . . . . . . . . . . . . . . . . . . . . . . . .6
Your appliance needs air . . . . . . . . . . . . . . . . . . . . . . . . . . . . . . . . . . . . . .7
Rear spacers . . . . . . . . . . . . . . . . . . . . . . . . . . . . . . . . . . . . . . . . . . . . . . . . .7
Rehingeing the door . . . . . . . . . . . . . . . . . . . . . . . . . . . . . . . . . . . . . . . . . .8
Electrical Connection . . . . . . . . . . . . . . . . . . . . . . . . . . . . . . . . . . . . . .9
Prior to Initial Start–Up . . . . . . . . . . . . . . . . . . . . . . . . . . . . . . . . . . .9
Starting up and temperature regulation . . . . . . . . . . . . . . . . . . . . .10
Interior Accessories . . . . . . . . . . . . . . . . . . . . . . . . . . . . . . . . . . . . . .10
Storage shelves . . . . . . . . . . . . . . . . . . . . . . . . . . . . . . . . . . . . . . . . . . . .10
Variable Inner Door . . . . . . . . . . . . . . . . . . . . . . . . . . . . . . . . . . . . . . . . . .10
Moisture regulator . . . . . . . . . . . . . . . . . . . . . . . . . . . . . . . . . . . . . . . . . . .11
Drawer . . . . . . . . . . . . . . . . . . . . . . . . . . . . . . . . . . . . . . . . . . . . . . . . . . . . .11
Variable Storage Box . . . . . . . . . . . . . . . . . . . . . . . . . . . . . . . . . . . . . . . . .11
Air recycling . . . . . . . . . . . . . . . . . . . . . . . . . . . . . . . . . . . . . . . . . . . . . . . .12
Bottle holder . . . . . . . . . . . . . . . . . . . . . . . . . . . . . . . . . . . . . . . . . . . . . . .12
Fresh food refrigeration . . . . . . . . . . . . . . . . . . . . . . . . . . . . . . . . . .13
Freezing and storing frozen food . . . . . . . . . . . . . . . . . . . . . . . . . . .13
Preparation of Ice Cubes . . . . . . . . . . . . . . . . . . . . . . . . . . . . . . . . . .14
Freezing Calender . . . . . . . . . . . . . . . . . . . . . . . . . . . . . . . . . . . . . . .14
Defrosting . . . . . . . . . . . . . . . . . . . . . . . . . . . . . . . . . . . . . . . . . . . . .15
Switching off the appliance . . . . . . . . . . . . . . . . . . . . . . . . . . . . . . .15
Cleaning and Care . . . . . . . . . . . . . . . . . . . . . . . . . . . . . . . . . . . . . . .16
Energy Saving Tips . . . . . . . . . . . . . . . . . . . . . . . . . . . . . . . . . . . . . . .17
What to do if . . . . . . . . . . . . . . . . . . . . . . . . . . . . . . . . . . . . . . . . . . .17
Correcting Malfunctions . . . . . . . . . . . . . . . . . . . . . . . . . . . . . . . . . . . . . .17
Changing the light bulb . . . . . . . . . . . . . . . . . . . . . . . . . . . . . . . . . . . . . .19
Regulations, Standards, Guidelines . . . . . . . . . . . . . . . . . . . . . . . . .19
Page 4
4
Safety
The safety aspects of our appliance comply with accepted technical standards and the German Appliance Safety Law. Nevertheless, we consider it
our obligation to make you aware of the following safety information:
Intended use
• The appliance is intended for use in the home. It is suitable for the cooling, freezing and storing of frozen food, as well as for making ice. If the
appliance is used for purposes other than those intended or used incorrectly, no liability can be accepted by the manufacturer for any damage
that may be caused.
• Alterations or changes to the appliance are not permitted for reasons of
safety.
• If you use the appliance in a commercial application or forpurposes other
than the cooling, freezing or frozen storage of foods,please observe all
valid legal regulations for your application.
Prior to initial start–up
• Check the appliance for transport damage. Under no circumstance should
a damaged appliance be plugged in! In the event of damage, please contact
the vendor.
Refrigerant
The refrigerant isobutane (R600a) is contained within the refrigerant circuit
of the appliance, a natural gas with a high level of environmental compatibility, which is nevertheless flammable.
• During transportation and installation of the appliance, be certain that
none of the components of the refrigerant circuit become damaged.
• If the refrigerant circuit should become damaged:
– avoid open flames and sources of ignition;
– thoroughly ventilate the room in which the appliance is situated.
Safety of children
• Packaging (e.g. wraps, polystyrene) can be dangerous for children. There is
a risk of suffocation! Keep packaging material away from children!
• Please make old appliances unusable prior to disposal. Pull out the mains
plug, cut off the mains cable, break or remove spring or boltcatches, if fitted. By doing this you ensure that children cannot lock themselves in the
appliance when playing (there is risk of suffocation!)or get themselves
into other dangerous situations.
• This appliance is not intended for use by persons (including children) with
reduced physical, sensory or mental capabilities, or lack of experience and
knowledge, unless they have been given supervision or instruction concerning use of the appliance by a person responsible for their safety.
Page 5

5
Children should be supervised to ensure that they do not play with the
appliance.!
Daily Operation
• Containers with flammable gases or liquids can leak at low temperatures.
There is a risk of an explosion! Do not store any containers with flammable materials such as, for example, spray cans, fire extinguisher refill cartridges etc in the refrigerator/freezer.
• Bottles and cans must not be placed in the freezer compartment. They can
burst when the contents freeze, high carbonate content drinks can even
explode! Never store lemonade, juices, beer, wine, sparkling wine etc. in
the freezer compartment. Exception: high alcohol content spirits can be
stored in the freezer compartment.
• Do not put ice creams or ice cubes in the mouth immediately after removal from the freezer compartment. Very cold ice can freeze to the lips or
tongue and cause injury.
• Do not touch frozen food with wet hands. Your hands could freeze to the
food.
• Do not operate any electrical appliances in the refrigerator/freezer (e.g.
electric ice cream makers, mixers etc.).
• Before cleaning the appliance, always switch off the appliance and unplug
it, or pull the house fuse or switch off the circuit breaker.
• When unplugging always pull the plug from the mains socket, do not pull
on the cable.
In case of malfunction
• If the a malfunction occurs on the appliance, please look first in the "What
to do if ..." section of these instructions. If the information given there
does not help, please do not perform any further repairs yourself.
• Applianeces may only be repaired by qualified service engineers. Improper
repairs can give rise to significant hazards. If your appliance needs repairing, please contact your specialist dealer or our Customer Service.
Disposal
Appliance Packaging Information
All materials are environmentally sound! They can be dumped or burned at
an incinerating plant without danger!
About the materials: The plastics can be recycled and are identified as follows:
>PE< for polyethylene, e.g. the outer covering and the bags in the interior.
>PS< for polystyrene foam, e.g. the pads, which are all free of chlorofluo-
rocarbon.
The carton parts are made from recycled paper and should be disposed of
at a waste-paper recycling collection location.
Page 6
6
Disposal of old Appliances
For environmental reasons, refrigeration appliances must be disposed of
properly. This applies to your old appliance, and - at the end of its service
life - for your new appliance as well.
Warning! Before disposing of old appliances make them inoperable. Remove plug from mains, sever the power cable, remove or destroy any snap or
latch closures. This eliminates the danger that playing children lock themselves into the appliance (danger of suffocation!) or place themselves into
other life-endangering situations.
Disposal:
• The appliance may not be disposed of with domestic waste or bulky refuse.
• The refrigerant circuit, especially the heat exchanger at the back of the
appliance, may not be damaged.
• The symbol on the product or on its packaging indicates that
this product may not be treated as household waste. Instead it shall
be handed over to the applicable collection point for the recycling
of electrical and electronic equipment. By ensuring this product is
disposed of correctly, you will help prevent potential negative consequences for the environment and human health, which could
otherwise be caused by inappropriate waste handling of this product. For more detailed information about recycling of this product,
please contact your local city office, your household waste disposal
service or the shop where you purchased the product.
Remove transport safeguard
The appliance and the interior fittings are protected for transport.
• Remove all adhesive tape and packing pieces from the interior of the
appliance.
Installation
Installation Location
The appliance should be set up in a well ventilated, dry room.
Energy use is affected by the ambient temperature. The appliance should
therefore
– not be exposed to direct sunlight;
– not be installed next to radiators, cookers or other sources of heat;
– only be installed at a location whose ambient temperature corresponds to
the climate classification, for which the appliance is designed.
The climate classification can be found on the serial plate, which is located
at the left on the inside of the appliance.
Page 7
7
Climate classification for an ambient temperature of
SN +10 bis +32 °C
N +16 bis +32 °C
ST +18 bis +38 °C
T +18 bis +43 °C
The following table shows which ambient temperature is correct for each
climate classification: each climate classification:
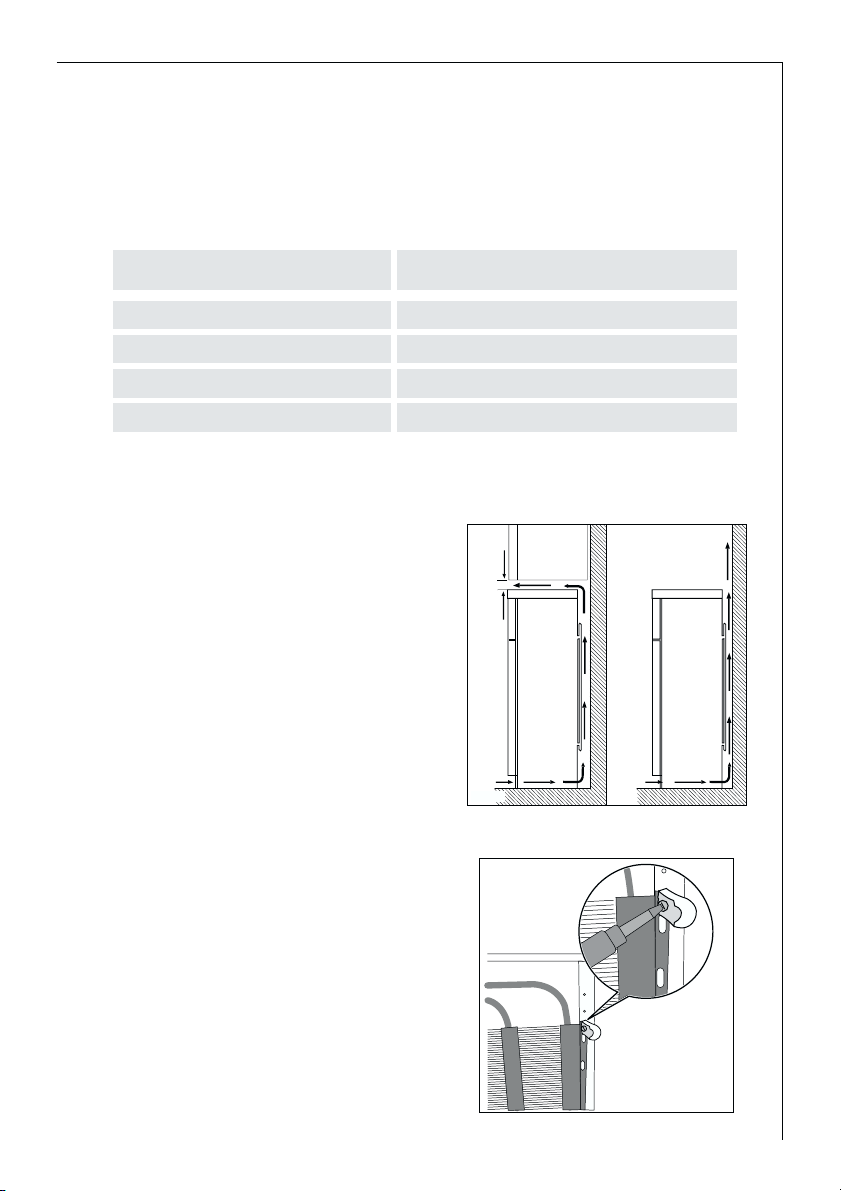
If installation next to a source of heat is unavoidable, the following
minimum clearances must be maintained at the sides of the appliance:
– for electric cookers 3 cm;
– for oil and coal fired ranges 30 cm.
If these clearances cannot be maintained a heat insulating pad is required between the cooker and the
refrigeration appliance.
If the refrigeration appliance is
installed next to another refrigerator
or freezer a clearance of 5 cm at the
sides is required, in order to prevent
the formation of condensation on
the outside of the appliance.
Your appliance needs air
For safety reasons, minimum ventilation must be as shown Fig.
Attention: keep ventilation openings clear of obstruction.
Rear spacers
Inside the appliance you find two
spacers which must be fitted.
Slacken the screws and insert the
spacer under the screw head, then
re-tighten the screws.
100 mm10 mm
NP005
10 mm
Page 8
8
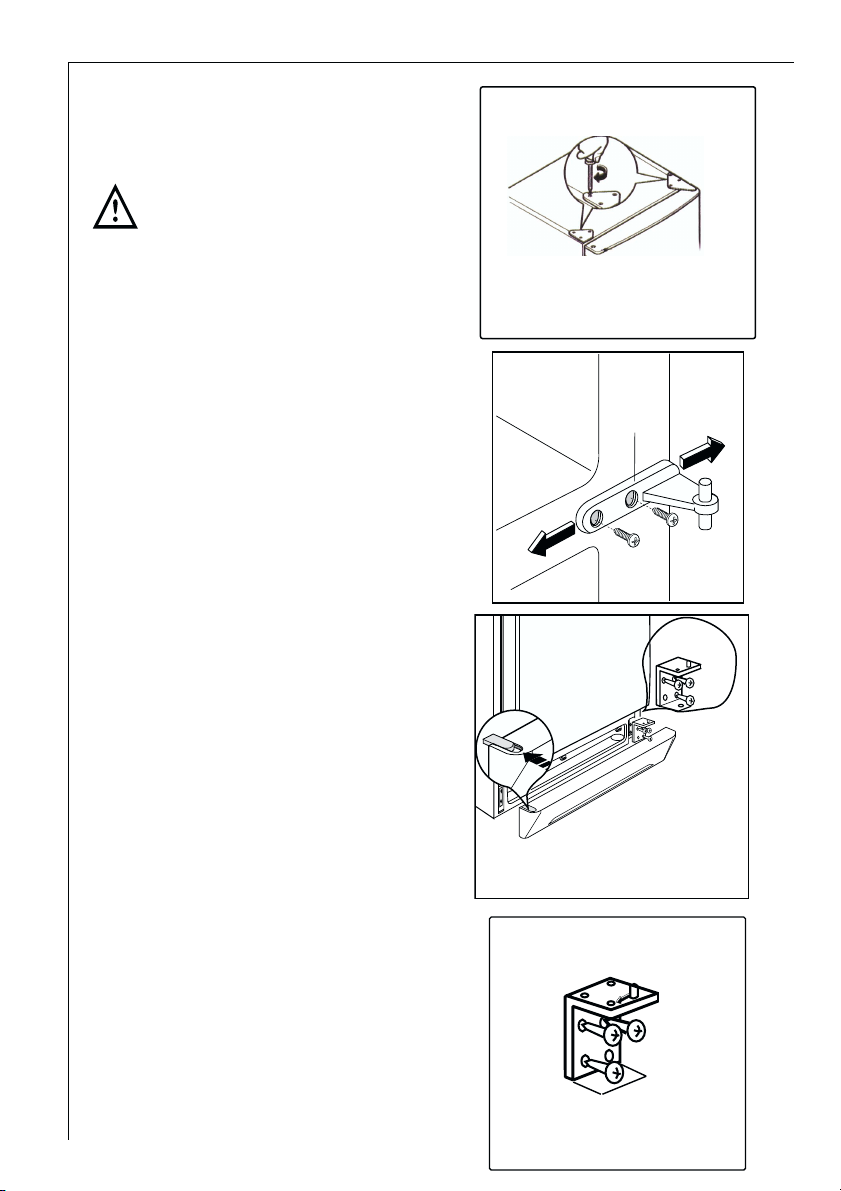
Rehingeing the door
The side at which the door opens can
be changed from the right side (factory adjustment) to the left side, if
the installation site requires.
Warning! When changing the side at
which the door opens, the appliance
may not be connected to the mains.
Remove plug from the mains beforehand.
Proceede as follows:
1. Remove the upper hinge taking care
for the upper door not to fall off and
keep it for future actions;
Remove the upper support and
mount it in the opposite side
2. remove the upper door;
3. unscrew the middle hinge. Unscrew
the plastic plugs located on the
opposite side of the central hinge and
introduce them in the holes occupied
before by the hinge;
4. remove the lower door;
5. pull off the ventilation grille which is
fixed by two screws;
6. remove the bottom hinge by unscrewing its fixing screws;
7. using a 12 mm spanner, unscrew the
hinge pin and reassemble it on the
opposite side of the hinge;
8. adjust the level of the appliance by
screwing out the adjustable foot, or
feet, at the bottom of the cabinet
using your fingers or a tool;
9. reassemble the lower hinge on the
opposite side, using the screws previously removed. Slide the hole cover
out of the ventilation grille by pushing it in the direction of the arrow
and reassemble it on the opposite
side;
H
Page 9
9
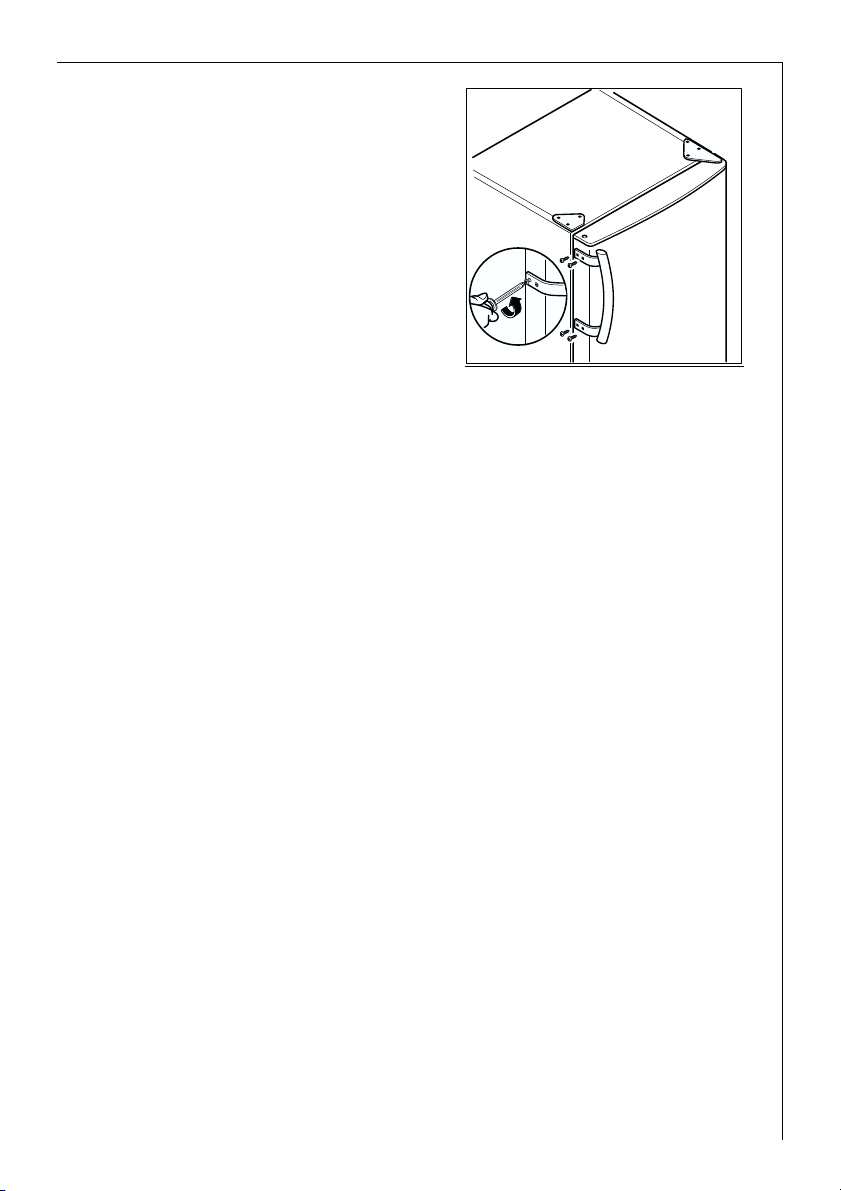
10. refit the ventilation grille, fixing the
screws;
11. reassemble the lower door;
12.reassemble the middle hinge on the
opposite side;
13.replace the upper door.
14.In your documentation bag you will
find the upper hinge necessary to
make the reversibility. Please mount it
in their relevant place.
1. 5 Dismantle the handles by sliding the handle-cover, by unscrewing its
side and middle screws and reassemble them on the opposite side. Cover
the holes left open with the plugs contained in the documentation pack.
Attention: After having reversed the opening direction of the doors check that
all the screws are properly tightened and that the magnetic seal adheres to the
cabinet. If the ambient temperature is cold (i.e. in Winter), the gasket may not
fit perfectly to the cabinet. in that case, wait for the natural fitting of the gasket or accelerate this process by heating up the part involved with a normal
hairdrier.
Electrical connection
Before initial start-up, refer to the appliance rating plate to ascertain if supply voltage and current values correspond with those of the mains at the
installation location.
e.g.: AC 230 ... 240 V 50 Hz or
230 ... 240 V~ 50 Hz
(i.e. 230 to 240 volts alternating current, 50 Hertz)
The rating plate is inside the appliance on the left.
A correctly installed, earthed socket is required for the electrical supply. The
supply must have a fuse rating of at least 10 Amps.
If the socket is not accessible once the appliance is built in, the electrical
installation must include suitable means of isolating the appliance from the
mains (e.g. fuse, cut-out, current trip or similar with a minimum contact
separation of 3 mm).
Attention: The mains connection cable may only be replaced by a skilled
electrician. Please contact your dealer or our customer service department
for repairs.
Prior to Initial Start–Up
• Please clean the appliance interior and all accessories prior to initial start-
up (see section: “Cleaning and Care”).
Page 10

10
Starting up and temperature regulation
• Insert the plug of the connection lead into the plug socket with protective earth contact. When the refrigerator compartment door is opened, the
internal lighting is switched on. The temperature selector knob is located
on the RH side of the refrigerator compartment.
Setting „0“ means: Off.
Setting „1“ means: Hightest temperature, (warmest setting).
Setting „6“ (end-stop) means: Lowest temperature, (coldest setting).
However, the exact setting should be chosen keeping in the mind that the
temperature inside the refrigerator depends on:
-the quantity of food stored
-how often the door is opened
The temperatures in the refrigerator compartment and freezer co partment
cannot be independently regulated.
If you want the freeze fresh food rapidly, select setting „6“, ensuring that the
temperature in the refrigerator compartment does not drop blow 0°C. You
should also promptly reset the temperature regulator to setting „3“ or „4“.
Important!
High ambient temperatures (e.g. on hot summer days) and a cold setting on
the temperature regulator (position"5" to "6") can cause the compressor to
run continuously.
If this happens, turn the temperature regulator back to a warmer setting
(position "3" to "4"). At this setting the compressor will be switched on and
off as usual and automatic defrosting recommenced.
Interior Accessories
Storage Shelves
The glass shelf above the fruit and
vegetable compartment should
always remain in position, to ensure
fruit and vegetables stay fresh longer.
The remaining storage shelves can be
adjusted to various heights:
Pull the storage shelf forward until it
can be tipped up or down and removed. To insert at a different height
use the same procedure in reverse.
Variable Inner Door
The door compartments can be pulled up and removed, and inserted at
other positions as needed.
D338
Page 11

11
Moisture regulator
There is an adjustable air grille in front of the shelf above the fruit and vegetable compartments. The opening in the ventilation slots can be adjusted
with the slider. Right slider: Ventilation slots opened.
With the ventilation slots open, more
air circulation results in a lower air
moisture content in the fruit and
vegetable compartments. Left slider:
Ventilation slots closed. When the
ventilation slots are closed, the natural moisture content of the food in
the fruit and vegetable compartments is preserved for longer.
PR271
Drawer
The drawer is suitable for storing
fruit and vegetables. There is a
separator inside the drawer that
can be placed in different positions to allow for the subdivision
best suited to personal needs.
There is a grille on the bottom of
the drawer to separate the fruit
and vegetables from any humidity that may form on the bottom surface.
To remove the drawer, use the side handles (as shown in the Fig.).
All parts inside the drawer can be removed for cleaning purposes.
Variable Storage Box
Some models are equipped with a variable storage box which is fitted under
a door shelf compartment and can be slid sideways.
The box can be inserted under any
door shelf compartment.
1. To change the position of the storage box; lift the shelf compartment
with the box upwards and out of the
holders in the door and remove the
retaining bracket out of the guide
under the shelf compartment.
2. Reverse the above operation to insert
the shelf at a different height.
Page 12
12
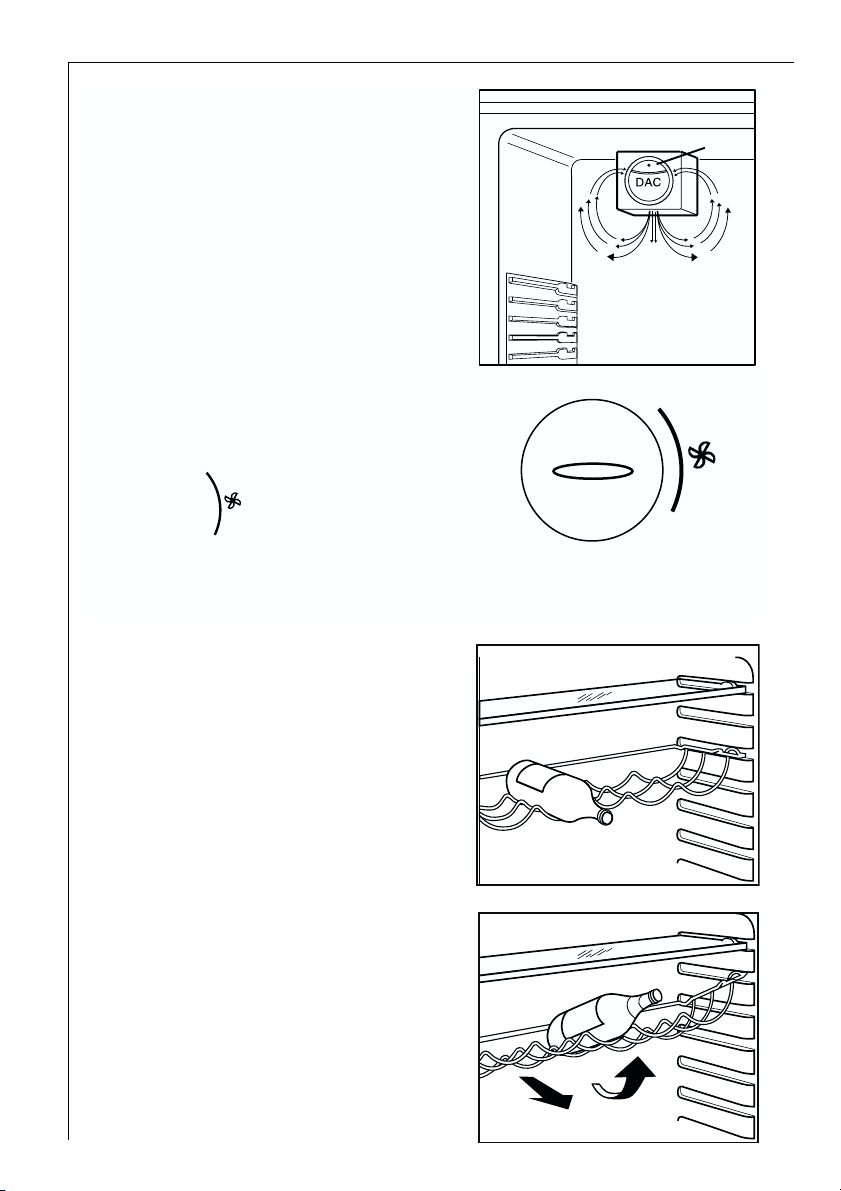
Bottle holder
Place the bottles (with the opening
facing front) in
the pre- positioned shelf.
If the shelf is positioned horizontally,
place only
closed bottles.
This bottle holder shelf can be tilted
in order to store
previously opened bottles.
To obtain this result, pull the shelf up
so it can rotate
upwards and be placed on the next
higher level.
Air recycling
The refrigerator compartment is
equipped with a special
D.A.C.(Dynamic Air Cooling) fan
which can be turned on with the
switch ( see fig1) The green light,
when on, means that the fan is
working.
It is suggested that the fan
(D.A.C.) be used when the ambient temperature exceeds 25°C .
It should be remembered that
the thermostat knob must be
placed (see fig.2) within the sec-
tor .
This device allows for rapid cooling of foods and a more uniform
temperature in the compartment.
Fig. 1
Fig. 2
O
6
5
4
SWITCH
1
2
3
Page 13

13
Fresh food refrigeration
To obtain the best performance:
• do not store warm food or evaporating liquide in the refrigeator
• do cover or wrap the food, particularly if it has a strong flavour.
• Position food so that air can circuiate freely round it.
Useful hints:
Meat (all types): wrap in polythene bags and place on the glass shelf above
the vegetable drawer(s)For safety, store in this way only one or two days
at the most.
Cooked foods, cold dishes, etc: these should be covered and may be placed
on any shelf.
Fruit and vegetables: these should be thoroughly cleaned and placed in
the special drawer(s) provided.
Butter and cheese: these should be placed in special airtight containers or
wapped in aluminium foil or polythene bags to exclude as much air as possible.
Milk bootles: these should have a cap and should be stored in the bottle
rack on the door.
Bananas, potatoes, onions and garlic, if not packed, must not be kept in
the refrigerator.
Freezing and storing frozen food
You can use your freezer for freezing fresh food yourself.
Important!
• The temperature in the freezer compartment must be –18 °C or colder
before freezing food.
• Please observe the freezing capacity given on the rating plate. The free-
zing capacity is the maximum quantity of fresh food that can be frozen
within a period of 24 hours. If you wish to freeze food several days in a
row, please observe a maximum capacity of only 2/3 to 3/4 of that on the
rating plate. The quality of the food is best preserved when it is frozen
right through to the core as quickly as possible.
• Allow warm food to cool down before freezing. The warmth will cause
increased ice formation and increase the power consumption.
• Please note the maximum storage times specified by the manufacturer.
• Thawed foods which have not been processed further (cooked into meals)
may not under any circumstances be frozen a second time.
• Containers with flammable gases or liquids can leak at low temperatures.
There is a risk of an explosion! Do not store any containers with flamma-
Page 14

14
ble materials such as, for example, spray cans, fire extinguisher refill cartridges etc in the refrigerator/freezer.
• Bottles and cans must not be placed in the freezer. They can burst when
the contents freeze, high carbonate content drinks can even explode!
Never store lemonade, juices, beer, wine, sparkling wine etc. in the freezer. Exception: high alcohol content spirits can be stored in the freezer.
• All foods must be packed air tight prior to freezing, so that they do not
dry out or lose their flavour, and so that no flavour contamination of
other frozen goods occurs.
• Not open the door frequently or leave it open longer than absolutely
necessary.
• Unfrozen food must not touch items already frozen, otherwise the frozen
food could begin to defrost.
Caution! Do not touch frozen food with wet hands. Your hands could freeze to the food.
1. Place the food to be frozen on the freezer shelf.
Preparation of Ice Cubes
1. Fill the ice cube tray 3/4 full with cold water, place it in the freezer compartment and leave to freeze.
2. To loosen the frozen cubes, either bend the ice cube tray or hold it under
running water for a few seconds.
Important! Never try to free an ice tray that is frozen to the freezer compartment using pointed or sharp edged objects.
Freezing Calendar
• The symbols show different types of frozen goods.
• The numbers indicate storage times in months for the appropriate types
of frozen goods. Whether the upper or lower value of the indicated storage time is valid depends on the quality of the foods and pre-treating before freezing. The lower value applies to foods with high fat content.
Page 15

15
Defrosting
Refrigerator
Frost is automatically eliminated
during normal use. The defrost water
drains out through a trough into a
special container at the back of the
appliance, where it evaporates.
We recommend that you peridically
clean the defrost-water drainage
outlet with the cleaner provided,
located in the center of the drainage
groove.
Freezer
The freezer compartment, will become progrssively covered with frost. This
should be removed with al plastic scraper. Whenever the tickness of the frost exceeds 4 mm complete defrosting should be carried out as follows:
1. pull out the plug from the wall socket or turn the thermostat knob to th “0”
setting.
2. remove any stored food, wrap it in several layers newspaper and put it in a
coll place.
3. leave the door open.
4. when defrosting is completed, dry the interior thoroughly
5. turn the thermostat knob to the required setting or raplace the plug in the
power socket.
Attention
Never use sharp metal tools to scrape off frost from the evaporator as you
could damage it.
Do not use a mechanical device or any artificial means to speed up the
thawing process other than those recommended by the manufacturer.
A temperature rise of the frozen food packs, during defrosting , may shorten their safe storage life.
Switching off the appliance
To switch off the appliance, turn the temperature regulator to position "0".
If the appliance is not going to be used for an extended period:
1. Remove all refrigerated and deep-frozen packages as well as ice trays.
2. Switch off the appliance .
3. Remove the mains plug or switch off or turn out the circuit breaker or fuse.
4. Defrost freezer compartment and clean thoroughly (see section: “Cleaning
and Care”).
5. Leave the door open to avoid the build up of odours.
D037
Page 16

16
Cleaning and Care
For hygienic reasons the appliance interior, including interior accessories,
should be cleaned regularly.
Warning!
• The appliance may not be connected to the mains during cleaning. Dan-
ger of electrical shock! Before cleaning switch the appliance offand rem
ve the plug from the mains, or switch off or turn out the circuit breaker
or fuse.
• Never clean the appliance with a steam cleaner. Moisture could accumu-
late in electrical components, danger of electrical shock! Hot vapours can
lead to the damage of plastic parts.
• The appliance must be dry before it is placed back into service.
Attention!
• Ethereal oils and organic solvents can attack plastic parts, e.g.
– lemon juice or the juice from orange peals;
– butyric acid;
– cleansers which contain acetic acid.
Do not allow such substances to come into contact with appliance parts.
• Do not use any abrasive cleansers.
1. Remove frozen food and the food from the refrigerator. Wrap frozen food
in several layers of newspaper. Store it in a cool place, well covered.
2. Defrost the freezer compartment prior to cleaning (see "Defrosting" section).
3. Switch the appliance off and remove the plug from the mains, or switch off
or turn out the circuit breaker or fuse.
4. Clean the appliance and the interior accessories with a cloth and lukewarm
water. Commercially available dish washing detergents may also be used.
5. After cleaning wipe with fresh water and rub dry.
Accumulation of dust at the condenser increases energy consumption. For
this reason carefully clean the condenser at the back of the appliance once
a year with a soft brush or a vacuum cleaner.
6. Check the water drain hole on the rear wall of the fridge. Clear a blocked
drain hole with the aid of the green peg included with the appliance.
7. After everything is dry place appliance back into service.
Page 17

17
Energy Saving Tips
• Do not install the appliance near cookers, radiators or other sources of
warmth. High ambient temperatures cause longer, more frequent operation of the compressor.
• Ensure sufficient air circulation and exhaust at the appliance base and at
the back wall of the appliance. Never cover air vent openings.
• Do not place warm foods into the appliance. Allow warm foods to cool
first.
• Only leave door open as long as necessary.
• Do not set temperature any colder than necessary.
• Put frozen food in the fridge to defrost. The cold in the frozen food will
then be used to cool the fridge.
• Keep the heat emitting condenser, the metall grille on the rear wall of
your appliance, always clean.
What to do if ...
Correcting Malfunctions
A malfunction may be caused by only a minor fault that you can rectify
yourself using the following instructions. Do not perform any other work on
the appliance if the following information does not provide assistance in
your specific case.
Warning! Repairs to refrigerators/freezers may only be performed by qualified service engineers. Improper repairs can give rise to significant hazards
for the user. If your appliance needs repairing, please contact your specialist dealer or our Customer Service.
Malfunction Possible Cause Remedy
Appliance does not work.
Appliance is not switched on Switch on the appliance.
Mains plug is not plugged in
or is loose.
Insert mains plug.
Fuse has blown or is defective.
Check fuse, replace if necessary.
Socket is defective.
Mains malfunctions are to be
corrected by an electrician.
Appliance cools too much. Temperature is set too cold.
Turn the temperature regulator to a warmer setting temporarily.
Page 18

18
Interior lighting does not
work.
Light bulb is defective. Please look in the "Changing
the Light Bulb" section.
Heavy build up of frost, possibly also on the door seal.
Door seal is not air tight (possibly after changing over the
hinges).
Carefully warm the leaking
sections of the door seal with
a hair dryer (not hotter than
approx. 50 °C). At the same
time shape the warmed door
seal by hand such that it sits
correctly.
Unusual noises.
The appliance is touching the
wall or other objects.
Appliance is not level.
A component, e.g. a pipe, on
the rear of the appliance is
touching another part of the
appliance or the wall.
The compressor starts after a
period of time.
This is normal, no error has
occurred.
The compressor does not start
immediately after changing
the temperature setting.
If necessary, carefully bend
the component out of the
way.
Move the appliance slightly.
Readjust the feet.
See the "Cleaning and Care"
section.
Water on the floor or on storage shelves.
Water drain hole is blocked.
Malfunction Possible Cause Remedy
The food is too warm.
The appliance is near a heat
source.
Temperature is not properly
adjusted.
Please look in the "Initial Start
Up" section.
Turn the temperature regula-
tor to a colder setting tempo-
rarily.
Door was open for an extended period.
Please look in the "Installation
location" section.
A large quantity of warm
food was placed in the
appliance within the last 24
hours.
Open the door only as long as
necessary.
Page 19

19
Changing the light bulb
Warning! There is a risk of electric shocks! Before changing the light bulb,
switch off the appliance and unplug it, or pull the fuse or the circuit breaker.
Light bulb data: 220-240 V, max. 15 W
1. To switch off the appliance, turn the temperature regulator to position "0".
2. Unplug the mains plug.
3. To change the light bulb, undo the
screw.
4. Press the light bulb cover as shown
and slide it backwards.
5. Change the defective light bulb.
6. Refit the light bulb cover and the
screw.
7. Put the refrigerator back into operation.
Regulations, Standards, Guidelines
This appliance was designed for household use and was manufactured in
accordance with the appropriate standards. The necessary measures in
accordance with appliance safety legislation regulations (GSG), accident
prevention regulations for refrigeration appliances (VBG 20) and the regulations of the German Society of Electrical Engineers (VDE) were observed in
the manufacture of this appliance.
The refrigerant circuit has been checked for leaks.
This appliance is in accordance with the following EU guidelines:
– 73/23/EWG dated 19 February 1973 - low voltage guidelines.
– 89/336/EWG dated 3 May 1989
(including guideline change notice 92/31/EWG) - EMV guideline
D411
Page 20

20
Cara cliente, caro cliente
Antes de colocar o seu novo aparelho frigorífico em funcionamento, leia,
por favor, atentamente estas instruções de utilização. Elas incluem informações importantes sobre a utilização segura, a instalação e a conservação
do aparelho.
Guarde, por favor, as instruções de utilização para uma consulta posterior.
Entregue-as aos eventuais proprietários posteriores do aparelho.
O triângulo de sinalização e/ou as palavras de advertência (Aviso!, Cuidado!,
Atenção!) destacam as indicações importantes para a sua segurança ou
para o funcionamento do aparelho. Observar impreterivelmente.
Este símbolo significa que, em seguida, irá obter informações suplementares sobre a operação e utilização prática do aparelho.
A folha de trevo assinala conselhos e indicações para que o aparelho possa
ser utilizado de forma económica e não prejudicial ao meio ambiente.
As instruções de utilização fornecem-lhe indicações para a eliminação de
falhas eventuais, ver capítulo "O que fazer, se...". Se estas indicações não
forem suficientes, o nosso serviço de assistência técnica está sempre ao seu
dispor.
Page 21

21
Indice
Segurança . . . . . . . . . . . . . . . . . . . . . . . . . . . . . . . . . . . . . . . . . . . . . 22
Remoção de materiais . . . . . . . . . . . . . . . . . . . . . . . . . . . . . . . . . . . 24
Informações sobre a embalagem do aparelho . . . . . . . . . . . . . . . . . . . .24
Remoção de aparelhos usados . . . . . . . . . . . . . . . . . . . . . . . . . . . . . . . . 24
Remoção da proteção de transporte . . . . . . . . . . . . . . . . . . . . . . . . 25
Instalação . . . . . . . . . . . . . . . . . . . . . . . . . . . . . . . . . . . . . . . . . . . . . 25
Local de instalção . . . . . . . . . . . . . . . . . . . . . . . . . . . . . . . . . . . . . . . . . . . 25
Colocación . . . . . . . . . . . . . . . . . . . . . . . . . . . . . . . . . . . . . . . . . . . . . . . . .26
Espaçadores posteriores . . . . . . . . . . . . . . . . . . . . . . . . . . . . . . . . . . . . . .26
Reversibilidade das portas . . . . . . . . . . . . . . . . . . . . . . . . . . . . . . . . . . . . 26
Ligação elétrica . . . . . . . . . . . . . . . . . . . . . . . . . . . . . . . . . . . . . . . . .28
Antes de colocar o aparelho em funcionamento . . . . . . . . . . . . . . .28
Colocação em funcionamento e reulação da temperatura . . . . . . .28
Acessorios internos . . . . . . . . . . . . . . . . . . . . . . . . . . . . . . . . . . . . . .29
Posicionamento das prateleiras . . . . . . . . . . . . . . . . . . . . . . . . . . . . . . . .29
Posicionamento das prateleiras na porta . . . . . . . . . . . . . . . . . . . . . . . .29
Controle de umidade . . . . . . . . . . . . . . . . . . . . . . . . . . . . . . . . . . . . . . . .30
Gaveta . . . . . . . . . . . . . . . . . . . . . . . . . . . . . . . . . . . . . . . . . . . . . . . . . . . .30
Prateleiras de correr . . . . . . . . . . . . . . . . . . . . . . . . . . . . . . . . . . . . . . . . .30
Compartimento para botellas . . . . . . . . . . . . . . . . . . . . . . . . . . . . . . . . .31
Recirculação de ar . . . . . . . . . . . . . . . . . . . . . . . . . . . . . . . . . . . . . . . . . . .31
Refrigeração dos alimentos . . . . . . . . . . . . . . . . . . . . . . . . . . . . . . . .32
Congelar e armazenamento de produtos congelados . . . . . . . . . . .32
Calendàrio de congelamento . . . . . . . . . . . . . . . . . . . . . . . . . . . . . .33
Preparação de cubos de gelo . . . . . . . . . . . . . . . . . . . . . . . . . . . . . .33
Descongelar . . . . . . . . . . . . . . . . . . . . . . . . . . . . . . . . . . . . . . . . . . . .34
Descrição do aparelho . . . . . . . . . . . . . . . . . . . . . . . . . . . . . . . . . . . .35
Limpeza e conservação . . . . . . . . . . . . . . . . . . . . . . . . . . . . . . . . . . .35
Conselhos pràticos para poupar energia . . . . . . . . . . . . . . . . . . . . .36
O que fazer, se... . . . . . . . . . . . . . . . . . . . . . . . . . . . . . . . . . . . . . . . .36
Soluções para a eliminaça o de falhas . . . . . . . . . . . . . . . . . . . . . . . . . .36
Substituição da lâmpada . . . . . . . . . . . . . . . . . . . . . . . . . . . . . . . . . . . . .38
Serviço de assistência técnica . . . . . . . . . . . . . . . . . . . . . . . . . . . . . .39
Prescrições, normas, directivas . . . . . . . . . . . . . . . . . . . . . . . . . . . . .39
Page 22

22
Segurança
A segurança dos nossos aparelhos frigoríficos corresponde aos regulamentos técnicos vigentes e à lei sobre a segurança de aparelhos. Contudo, sentimonos na obrigação de lhe dar a conhecer as seguintes indicações de
segurança:
Utilização conforme às disposições
• O aparelho frigorífico destina-se ao uso doméstico. Ele serve para refrige-
rar e congelar alimentos e para guardar produtos congelados, bem como
para preparar gelo. Se o aparelho for utilizado para outros fins ou operado incorrectamente, o fabricante não assume qualquer responsabilidade
pelos danos eventuais.
• Não é permitido efectuar remodelações ou alterações no aparelho frigorí-
fico, por razões de segurança.
• Se utilizar o aparelho frigorífico para fins comerciais ou para outros fins
além da refrigeração e congelação de alimentos e do armazenamento de
produtos congelados, é favor observar as prescrições legais vigentes na
sua zona.
Antes da primeira colocação em funcionamento
• Verifique se o aparelho frigorífico apresenta danos de transporte. Não
colocar, de modo algum, aparelhos danificados em funcionamento! Em
caso de danos, é favor dirigir-se aos fornecedores.
Agente de refrigeração
O aparelho contém, no circuito de refrigeração, o agente de refrigeração
isobutano (R600a), um gás natural altamente compatível com o meio
ambiente, mas que é, contudo, inflamável.
• Ao transportar e instalar o aparelho, preste atenção para que nenhuma
das peças do circuito de refrigeração seja danificada.
• Se o circuito de refrigeração for danificado:
– É indispensável evitar fogo aberto e fontes de inflamação;
– Arejar bem o compartimento em que se encontra o aparelho.
Segurança das crianças
• Os elementos de embalagem (p. ex. folhas, esferovite) podem ser peri-
gosos para as crianças. Perigo de asfixia! Manter os materiais de embalagem fora do alcance das crianças!
• Antes da remoção de aparelhos usados sem conserto, é favor inutilizá los.
Page 23

23
Retirar a ficha de ligação à rede da tomada, desmontar o cabo de ligação
à rede, retirar ou destruir eventuais fechaduras de mola ou de ferrolho.
Evitará, assim, que quaisquer crianças se fechem por brincadeira no aparelho (perigo de asfixia!) ou que se exponham a quaisquer outras situações
em que possam correr perigo de vida.
• Este aparelho não se destina a ser utilizado por pessoas (incluindo
crianças) com capacidades mentais, sensoriais e físicas reduzidas, ou com
falta de experiência e conhecimento, a não ser que sejam supervisionadas
ou recebam instruções relativamente à utilização do aparelho, por parte
de uma pessoa responsável pela sua segurança. As crianças devem ser
supervisionadas para garantir que não brincam com o electrodoméstico.!
No funcionamento diário
• Recipientes que contenham gases ou líquidos inflamáveis, podem tornar-
se permeáveis por acção do frio. Perigo de explosão! Não guarde no aparelho frigorífico recipientes com latas de spray, recargas para isqueiros, etc.
• Garrafas e latas não podem ser colocadas no congelador. Elas podem
estalar quando o seu conteúdo congela - se o seu conteúdo incluir
gás, elas podem até explodir! Nunca coloque laranjadas, sumos, cerveja, vinho, champanhe, etc., no congelador. Excepção: bebidas com
elevado teor de álcool podem ser postas no congelador.
• Não meter na boca gelado nem cubos de gelo acabados de sair do con-
gelador. O gelado ou gelo muito frio pode ficar agarrado aos lábios ou à
língua e causar ferimentos.
• Não pegar nos produtos congelados com as mãos molhadas. As mãos
poderiam congelar e ficar agarradas aos produtos.
• Não operar aparelhos eléctricos (p. ex. máquinas eléctricas de fazer gela-
dos, batedeiras eléctricas) no aparelho frigorífico.
• Antes de iniciar trabalhos de limpeza, desligar sempre o aparelho e retirar
a ficha da tomada ou desconectar o fusível da casa.
• Para retirar a ficha da tomada, puxar a ficha e não o cabo.
Em caso de avarias
• Se algum dia o aparelho tiver uma avaria, consulte primeiro o capí-tulo
"O que fazer, se ..." destas instruções de utilização. Se as indicações contidas neste capítulo não oferecerem uma solução para o problema, é favor
não proceder a outros trabalhos por sua conta.
• Os aparelhos frigoríficos só podem ser reparados por pessoal especi-aliza-
do. Reparações impróprias podem dar origem a perigos graves. Sendo
necessário efectuar reparações, dirija-se à casa especializada mais próxima ou ao nosso serviço de assistência técnica.
Page 24

24
Remoção de materiais
Informações sobre a embalagem do aparelho
Todos os materiais utilizados são compatíveis com o meio-ambiente! Eles
podem ser depositados numa lixeira ou queimados numa instalação de incineração de lixo, sem perigo!
Quanto aos materiais: os plásticos são recicláveis e estão marcados da
seguinte forma:
>PE< para polietileno, p. ex. nos invólucros exteriores e nos sacos que se
encontram no interior.
>PS< para poliestireno, p. ex. nas peças utilizadas para almofadar, por
princípio sem hidrocarboneto clorofluorado.
As peças de cartão são fabricadas à base de papel reciclado e deveriam ser
novamente entregues num posto de recolha de papel reciclável.
Remoção de aparelhos usados
Por questões de protecção do meio-ambiente, os aparelhos frigoríficos têm
que ser removidos de forma controlada. Isto é válido para o aparelho que
usou até à data e - um dia, depois de servir o seu tempo - para o seu novo
aparelho.
Aviso! É favor inutilizar os aparelhos usados sem conserto, antes de proceder à sua remoção controlada. Retirar a ficha de ligação à rede da tomada,
desmontar o cabo de ligação à rede, retirar ou destruir eventuais fechaduras de mola ou de ferrolho. Evitará, assim, que quaisquer cri-anças se
fechem por brincadeira no aparelho (perigo de asfixia!) ou que se exponham
a quaisquer outras situações em que possam correr perigo de vida.
Indicações relativas à remoção controlada:
• O aparelho não pode ser removido juntamente com o lixo caseiro nem
pelo serviço de recolha de móveis e utensílios domésticos usados.
• O circuito de refrigeração, especialmente o permutador térmico situ-ado
na parte de trás do aparelho, não pode ser danificado.
• O símbolo no produto ou na embalagem indica que este produto não pode ser tratado como lixo doméstico. Em vez disso, deve ser
entregue ao centro de recolha selectiva para a reciclagem de equipamento eléctrico e electrónico. Ao garantir uma eliminação adequada
deste produto, irá ajudar a evitar eventuais consequências negativas
para o meio ambiente e para a saúde pública, que, de outra forma,
poderiam ser provocadas por um tratamento incorrecto do produto.
Para obter informações mais pormenorizadas sobre a reciclagem deste
produto, contacte os serviços municipalizados locais, o centro de
recolha selectiva da sua área de residência ou o estabelecimento onde
adquiriu o produto.
Page 25

25
Remoção da protecção de transporte
Tanto o aparelho como algumas das peças do equipamento interior são protegidos para o transporte.
• Remover todas as fitas adesivas, bem como as peças de almofadar, do
interior do aparelho.
Instalação
Local de instalação
O aparelho deverá ser instalado num local seco e bem arejado.
A temperatura ambiente influencia o consumo de energia eléctrica e o bom
funcionamento do aparelho. Por isso, o aparelho
– não deveria ser exposto à radiação directa do sol;
– não deveria ser instalado perto de radiadores, ao lado de um fogão nem
de outras fontes de calor;
– só deveria ser instalado num local com uma temperatura ambiente corre-
spondente à classe climática para a qual o aparelho foi concebido.
A classe climática é indicada na placa de características, situada à esquerda
no interior do aparelho. A tabela seguinte mostra a temperatura ambiente
correspondente a cada classe climática:
Classe climática para uma temperatura ambiente de
SN +10 a +32 °C
N +16 a +32 °C
ST +18 a +38 °C
T +18 a +43 °C
Se a instalação ao lado de uma fonte de calor não puder ser evitada, terão
que se respeitar os seguintes intervalos laterais mínimos:
– em relação a fogões e aquecedores eléctricos 3 cm;
– em relação a aquecedores a óleo e a carvão 30 cm.
Se estes intervalos não puderem ser respeitados, é necessário instalar uma
placa isotérmica entre o fogão/aquecedor e o aparelho frigorífico.
Page 26

26
Colocação
Coloque o aparelho longe de qualquer fonte de calor (aquecimento,
fogões, ou raios solares demasiado
intensos).Verifique que nas parses
posterior, superior e inferior o ar
pode circular livremente. Para um
melhor funcionamento verifique
que a parse superior têm pelo menos
100 mm de distancia de algum móvel suspenso por cima do aparelho
(A). A solução preferível é indicada
na Fig. B (sem móvel). Um ou vários
pés niveladores situados na base
têm a função de nivelar o aparelho
correctamente.O aparelho deve
poder ser desligado da rede; uma
vez realizada a instalação, portanto,
é necessário que a ficha fique
acessível.
Espaçadores posteriores
No interior do aparelho, existem
dois separadores que devem ser
instalados conforme ilustrado
Desapertar os parafusos, inserir
o espaçador debaixo da cabeça
do parafuso e voltar a apertar.
Reversibilidade das portas
Antes de qualquer operação tire a
ficha da tomada de corrente.
Para a inversão aja da seguinte
maneira:
1. remover a dobradiça superior e o
suporte superior verificando que
a porta superior não se desenganche:
A
NP005
100 mm10 mm
B
10 mm
Page 27

27
2. remover a porta superior;
3. desaparafusar a dobradiça central. Desaparafusar os pinos de
plástico posicionados no lado
oposto da dobradiça central e
inseri-los nos furos antes
ocupados pela dobradiça;
4. remover a porta inferior;
5. extrair a grelha de ventilação fixada por dois parafusos;
6 remover a dobradiça inferior
desaparafusando os relativos parafusos de fixação;
7. usando uma chave de 12
mm,desaparafusar o perno da
dobradiça e remontá-la no lado
oposto da dobradiça;
8. regular o nível do corpo do eletrodoméstico desaparafusando manualmente ou com uma
ferramenta o pé ou os pés reguláveis presentes no fundo;
9. remontar a dobradiça inferior no
lado oposto usando os parafusos
removidos anteriormente.Fazer
deslizar a cobertura dos furos
fora da grelha de ventilação
empurrando-a na direção da seta
e remontá-la no lado oposto;
10. remontar a grelha de ventilação
fixando os parafusos;
11. remontar a porta inferior;
12. remontar a dobradiça central no
lado oposto;
13. recolocar a porta superior;
14. Desmonte os puxadores verticais
e volte a montá-las no lado oposto.Cobra os buracos com as tampas plásticas que estavam situadas no local onde anteriormente se encontravem os puxadores.
H
Page 28

28
Ligação eléctrica
Para a ligação eléctrica é necessária uma tomada com contacto de segurança, devidamente instalada. A protecção eléctrica por fusível terá que perfazer, no mínimo, 10 amperes.
Se, depois de instalado o aparelho, não se tiver mais acesso à tomada, terá
que se tomar uma providência adequada na instalação eléctrica que permita desligar o aparelho da rede (p. ex. fusível, interruptor protector de linha,
interruptor de corrente de defeito ou semelhantes, com uma abertura de
contactos de, pelo menos, 3 mm).
• Antes da colocação em funcionamento, verificar se os valores da rede
eléctrica do local de instalação correspondem à tensão de conexão e ao
tipo de corrente indicados na placa de características.
P. ex.: AC 230 ... 240 V 50 Hz ou
230 ... 240 V~50 Hz
(isto é, corrente alternada de 230 a 240 Volt, 50 Hertz)
A placa de características encontra-se no interior do aparelho, à esquerda.
Antes de colocar o aparelho em funcionamento
• Por favor, antes do primeiro uso, limpe o interior e todas as peças do apa-
relho (vide capítulo “Limpeza e conservação").
Colocação em funcionamento e Regulação da
temperatura
• Encaixar a ficha de ligação à rede na tomada. Apra a porta e coloque o
botão do termòstato além da posição “O”.
Posição „0“: desligada.
Posição „1“: temperatura interna mais alta.
Posição „6“: temperatura interna mais baixa.
Atenção
Depois de mudado o sentido de abertura da porta, controle se a
vedação magnética fica pegada ao móvel. Nesse caso, pode esperar pela natural recuperação da vedação ou tornar mais rápido esse
processo aquecendo a parte interessada com um normal secador
de cabelos.
Page 29

29
Os seguintes factores são importantes para temperatura interna:
– temperatura ambiente;
– quantidade e temperatura dos produtos armazenados;
– abrir a porta muitas vezes ou por longo tempo .
Sin embargo, si se quiere obtener una congelación más rápida de los ali-
mentos, girar el mando del termostato hacia la posición de frío máximo. Con
el mando en dicha posición, la temperatura del compartimento refrigerante puede descender por debajo de 0°C. Si ocurriere esso, volver a poner el
mando del termóstato a una posición que permita una temperatura menos
baja en el frigorífico.
Importante!
Temperaturas ambiente altas (por exemplo, em dias quentes de verão) e ajuste baixo do regulador de temperatura (posição “5” até “6”) podem provocar o funcionamento contìnuo do compressor.
Neste caso, ajuste o regulador para uma temperatura mais alta (posição”4”
até “5”). Com este ajuste, o compressor funciona novamente de forma regular e descongelamento voltar a ocorrer automaticamente.
Acessorios internos
Posicionamento das prateleiras
• A prateleira inteira em cima das
gavetas de verdura/fruta deve permanecer sempre nesta posição para
manter mais frescas a verdura e a
fruta no tempo.
As outras prateleiras são reguláveis na altura:
• Para tal, puxar a prateleira para a
frente até que seja possível deslocála para cima ou para baixo e retirála.
• A introdução em outra altura é efetuada em sentido contrário.
Posicionamento das prateleiras na porta
• Conforme as necessidades, os compartimento de prateleira na porta
podem ser extraidos para cima e portanto inseridos em outros apoios.
D338
Page 30

30
Controle de umidade
Na prateleira de vidro està instalado
um dispositivo com fendas (reguláveis através de uma alavanca corrediça), que permite de regular a temperatura no espaço da gaveta de verduras.
Com as fendas fechadas será obtida
uma temperatura mais quentefria e
major umidade. Com as fendas abertas será obtida uma temperatura
mais fria e menos umidade.
PR271
Gaveta
A gaveta é apropriada para conservar fruta e verdura. Dentro da
gaveta há um separador que pode
ser colocado em várias posições
para criar subcompartimentos a
fim de satisfazer melhor as
próprias necessidades.
Uma grade no fundo da gaveta
permite de separar a fruta e a verdura da humidade que pode-se
formar na superfície do fundo.
Para remover a gaveta use as alças laterais (conforme indicado no
desenho). Todas as partes dentro da gaveta podem ser removidas para
a limpeza.
Prateleiras de correr
Alguns modelos possuem uma prateleira de correr lateralmente, posicinada embaixo de uma prateleira de
recipientes.
Esta prateleira pode ser colocada
sobre qualquer preteleira.
1. Para deslocamento extrair para cima
a prateleira de recipientes e retirar o
prendedor da prateleira de correr.
2. Para recolocar efetuar o processo inverso
Page 31

Recirculação de ar
O compartimento geladeira é
dotado de uma ventoinha especial D.A.C. (Dynamic Air Cooling)
que é ativada agindo no interruptor (ver fig.1), o sinal luminoso aceso significa que a ventoinha está funcionando.
Aconselha-se o uso da ventoinha
(D.A.C.) quando a temperatura
ambiente ultrapassa os 25°C.
Lembramos que o manípulo do
termostato da geladeira deve
estar posicionado (ver fig.2) para
dentro do setor .
Este dispositivo permite um
arrefecimento rápido dos alimentos e uma uniformidade
melhor da temperatura dentro
do compartimento.
31
Compartimiento para botellas
Almacene las botellas con el
cuello hacia adelante.
Atención: Coloque echadas sólo
las botellas sin abrir.
Para guardar botellas ya abiertas puede usted alzar el compartimiento hasta dejarlo inclinado.
Para ello tire del compartimiento hacia adelante hasta que sea
posible virarlo hacia arriba e
introduzca entonces la superficie delantera en el nivel inmediato superior.
Fig. 1
Fig. 2
INTERRUPTOR
O
6
5
1
2
3
4
Page 32

32
Congelar e armazenamento de produtos
congelados
O congelador é destinado à congelação de alimentos frescos e à conservação a longo prazo de alimentos congelados
Atenção!
• Antes de se congelarem géneros alimentícios, a temperatura do congela-
dor tem de ser de -18 ° C ou ainda mais fria.
• É favor respeitar a capacidade de congelaç ã o indicada na placa de carac-
terísticas. A capacidade de congelaç ã o é a quantidade máxima de produtos frescos que pode ser congelada dentro de um período de 24 horas.
Se pretender congelar alimentos em vários dias seguidos, congele apenas
entre 2/3 a 3/4 da quantidade indicada na placa de características.
• Não congelar, de modo algum, uma segunda vez géneros alimentícios já
descongelados, sem que tenham sido previamente preparados (cozinhados).
• Recipientes que contenham gases ou líquidos inflamáveis, podem tornar-
se permeáveis por acção do frio. Perigo de explosão! Não guarde no aparelho frigorífico recipientes com latas de spray, recargas para isqueiros, etc.
Refrigeração dos alimentos
Para obter um melhor rendimento do seu aparelho: reparta as provisões de
maneira a que o ar possa circular, facilmente, à volta delas;
• não introduza, na caixa, alimentos ainda quentes ou líquidos em evaporação;
• cubra os alimentos, de especial modo se são aromáticos;
Conselhos para a refrigeração
Carne (de qualquer tipo): envolva esses alimentos em sacos plásticos e
coloque-as na divisão imediatamente acima das caixas para legumes.
O período de conservação é de 1 a 2 dias, no máximo.
Alimentos cozidos, pratos frios, etc: coloque-os, bem cobertos, numa pra-
teleira qualquer.
Frutas e legumes: nas caixas de legumes depois de lavados.
Bananas, batatas, cebola e alho, se não forem preparados, não se
conservam no refrigerador.
Page 33

33
• Garrafas e latas não podem ser colocadas no congelador. Elas podem
estalar quando o seu conteúdo congela - se o seu conteúdo incluir
gás, elas podem até explodir! Nunca coloque laranjadas, sumos, cerveja, vinho, champanhe, etc., no congelador. Excepção: bebidas com
elevado teor de álcool podem ser postas no congelador.
• Antes de congelar, embalar todos os alimentos hermeticamente para que
não sequem, não percam o seu sabor e não tomem o gosto de outros produtos congelados.
Cuidado! Não pegar nos produtos congelados com as mãos molhadas. As
mãos poderiam congelar e ficar agarradas aos produtos.
1. Colocar os alimentos embalados nas gavetas. Os produtos não congelados
não devem entrar em contacto com os produtos já congelados, caso contrário os produtos congelados poderão descongelar ligeiramente.
2. Guardar, se possível, os produtos congelados nas gavetas, separando os de
acordo com o seu tipo. Alguns modelos possuem marcadores para encaixar
nas gavetas. Para marcar o conteúdo das diferentes prateleiras, encaixar os
marcadores por cima do respectivo símbolo (ver capítulo "Símbolos de congelados/Calendário de congelador"). Temse, assim, uma melhor visão de
conjunto, evitase uma abertura prolongada da porta e poupase energia.
Calendário de congelamento
• Os simbolos nas gavetas indicam diferentes tipos de produtos congelados.
• Os números fornecem, em meses, o tempo de armazenamento para o
respectivo tipo de produto congelado. Se o valor válido do tempo de armazenamento indicado é o superior ou o inferior, depende da qualidade do
género alimenticio e da sua preparação antes do congelamento.
Preparação de cubos de gelo
1. Encher a cuvete de gelo com àgua até 3/4, colocála no tabuleiro de congelar ou numa gaveta do congelador e deixar congelar.
2. Para tirar os cubos de gelo, torcer ligeiramente a cuvete ou colocá-la por
um instante sob àgua corrente.
Atenção! Se a cuvete de gelo ficar presa ao tabuleiro de congelar ou à gaveta, não utilizar objectos pontiagudos ou angulosos para a soltar.
Page 34

34
Descongelar
O frigorífico
Uma vez que a maior incidência de
humidade tem lugar quando se abre
a porta, a frequência das fases de
descongelação é determinada pelo
número de vezes que se abre a porta
e pelo tempo que se mantém a porta aberta.
A água de condensação é recolhida
na calha de escoamento, situada na
parede posterior do frigorífico, é
conduzida através do orifício de
escoamento para o recipiente de
recolha do compressor e é aqui evaporada.
O congelador
Durante o funcionamento e ao abrir a porta deposita-se humidade em forma de geada no congelador, principalmente em cima, no centro.
Remova esta geada de tempos a tempos com uma raspadeira macia de plástico, como p. ex. uma rapadeira de massa. Não utilizar, de modo algum,
objectos duros ou pontiagudos para esse fim.
Deve-se descongelar quando a camada de geada atingir uma espessura de
aproximadamente 4 milímetros; mas, pelo menos, uma vez por ano.
1. coloque o botão do termóstato na posição «O» ou retire a ficha da tomada
de corrente;
2. envolva os alimentos em várias folhas de jornal e guarde-os num lugar fresco;
3. deixe a porta aberta;
4. realizada a descongelação seque cuidadosamente o compartimento congelador e insira a tampa de fecho;
5. volte a colocar o botão do termóstato na posição desejada ou volte a inserir a ficha na tomada da corrente;
6. depois de duas ou três horas de funcionamento o aparelho está novamente pronto para a conservação de alimentos congelados.
Atenção!
Recomenda-se a não empregar objectos metálicos para tirar o gelo, para
evitar graves prejuízos ao aparelho.
D037
Page 35

35
Não utilizar aparelhos eléctricos de aquecimento nem outros meios mecânicos ou artificiais auxiliares para acelerar o processo de descongelação,
exceptuando os que são recomendados nestas instruções de utilização.
Um aumento de temperatura nos alimentos durante a remoção do gelo
pode diminuir o tempo de conservação dos alimentos. Nunca utilize instrumentos pontiagudos para retirar o gelo, pois pode danificar o congelador.
Descrição do aparelho
Se pretender pôr o aparelho fora de serviço por um período de tempo mais
prolongado:
1. Desligar o aparelho.
2. Retirar a ficha de ligaçã o à rede da tomada ou desconectar o fusível.
3. Descongelar o congelador e limpálo a fundo (ver capítulo "Limpeza e conservação").
4. Deixar, por fim, a porta aberta para evitar maus cheiros.
Limpeza e conservação
Por uma questão de higiene, o interior do aparelho e o seu equipa-mento
interior deveriam ser limpos regularmente.
Aviso!
• Durante a limpeza, o aparelho não pode estar ligado à rede. Perigo de cho-
que eléctrico! Antes de iniciar os trabalhos de limpeza, desligar o aparelho
e retirar a ficha da tomada ou desligar o fusível.
• Nunca limpar o aparelho com aparelhos de limpeza a vapor. Poderia pene-
trar humidade nos componentes eléctricos: perigo de choque eléctrico! O
vapor quente poderia danificar as peças de plástico.
• O aparelho tem de estar seco quando voltar a colocá-lo em funciona-
mento.
Atenção!
•Ó leos etéreos e solventes orgânicos podem corroer as peças de plástico, p.
ex.
– Sumo da casca de limão ou de laranja;
– Ácido butírico;
– Detergentes com ácido acético.
Não deixar que estas substâncias entrem em contacto com as peças
do aparelho.
• Não utilizar detergentes abrasivos.
1. Limpar o congelador antes de descongelálo (ver capítulo "Desconge lar").
Page 36

36
Conselhos práticos para poupar energia
• Não instalar o aparelho nas proximidades de fogões, aquecimentos ou de
outras fontes de calor. Com uma temperatura ambiente elevada o com-
pressor trabalha mais frequentemente e por períodos de tempo mais pro-
longados.
• Assegurar uma ventilaçã o e evacuaçã o de ar suficientes na base e na
parte de trás do aparelho. Nunca tapar os orifícios de ventilação.
• Não colocar alimentos quentes no aparelho. Esperar que os alimentos
arrefeçam.
• Deixar a porta aberta apenas o tempo estritamente necessário.
• Não regular uma temperatura mais fria do que o necessário.
• Colocar os produtos congelados na parte frigorífica para os descon-gelar.
O frio dos produtos congelados é, assim, aproveitado para refrescar a par-
te frigorífica.
• Manter o liquefactor, situado na parte de trás do aparelho, sempre limpo.
2. Desligar o aparelho e retirar a ficha da tomada ou desconectar o fusível.
3. Limpar o aparelho e o seu equipamento interior com um pano e água morna. Juntar, eventualmente, um pouco de detergente da louça.
4. Em seguida, limpar novamente com água limpa.
5. Controlar o orifício de escoamento da água de descongelaçã o na parede
posterior do frigorífico. Se o orifício de escoamento da água estiver entupido, desentupilo com o auxílio de um arame.
Grandes camadas de pó no liquefactor reduzem a capacidade frigorífica e
aumentam o consumo de energia. Por isso, limpar uma vez por ano o liquefactor, na parte de trás do aparelho, com uma escova macia ou com o aspirador.
6. Depois de estar tudo seco, ligar novamente o aparelho.
O que fazer, se ...
Soluções para a eliminaçã o de falhas
Caso surja uma avaria, tratase provavelmente de uma pequena falha que
poderá ser reparada por si com o auxílio das indicações seguintes. Não execute outros trabalhos de reparação por sua conta, caso as seguintes informações não dêem solução ao seu problema concreto.
Aviso! O aparelho frigorífico só pode ser reparado por pessoal especializado.
Reparações impróprias podem dar origem a perigos graves para o utilizador.
Sendo necessário efectuar reparações, dirija-se à casa especializada mais
próxima ou ao nosso serviço de assistência técnica.
Page 37

37
Forte formação de geada no
aparelho, eventualmente
também na vedaç ã o da porta.
A vedaç ã o da porta não
veda bem (event. depois de
mudar o lado de abertura da
porta).
Aquecer, cuidadosamente,
com um secador de cabelo os
pontos da vedação da porta
que não vedam bem (não a
uma temperatura superior a
aprox. 50 °C). Esticar, simultaneamente, a vedaç ã o da
porta aquecida para a pôr em
forma, de maneira a ficar correctamente assente.
Os géneros alimentìcios estão
quente demais
A iluminação interior não
funciona.
O aparelho está instalado ao
lado de uma fonte de calor.
A temperatura não está regulada correctamente.
É favor consultaro capítulo
"Regulação da temperatura"
A lâmpada está estragada.
É favor consultar o ponto
"Substituição da lâmpada"
neste capítulo.
Ajustar temporariamente o
reguldor de temperatura em
uma temperatura mais baixa
A porta ficou aberta durante
um período de tempo prolongado.
É favor consultar o capítulo
"Local de instalação"
Nas últimas 24 horas foram
armazenadas grandes quantidades de alimentos quentes.
Deixar a porta aberta só
durante o tempo estritamente
necessário.
Aparelo gela demais
A temperatura ajustada é
munito baixa
Ajustar temporariamente o
regulador de temperatura em
uma temperatura mais alta
Avaria Causa possível Solução
O aparelho não funciona
O aparelho não está ligado. Ligar o aparelho.
A ficha de ligação à rede não
está encaixada ou está mal
encaixada.
Encaixar a ficha de ligação à
rede na tomada.
O fusível disparou ou está
avariado.
Controlar o fusível, substida
tuílo em caso de necessidade.
A tomada está estragada.
As avarias na rede eléctrica
são reparadas pelo seu electricista.
Page 38

38
O compressor funciona automaticamente apòs um certo
tempo
Veja o capìtlo “Limpeza e cuidados
Isto é normal, não se trata de
um defeito
Apòs a modificação do ajuste
de temperatura, o compressor
não funciona imediatamente,
Agua no chão do refrigerador
ou nas pratleiras
O orifìcio de descarga para a
àgua do degel est entupido
Ruídos estranhos.
O aparelho está em tacto com
a parede ou com outros
objectos.
O aparelho não está direito
Um elemento, p. ex. um tubo,
na parte de trás do aparelho,
toca num outro elemento do
aparelho ou na parede.
Curvar, eventualmente, o elemento em causa cuida- dosamente
Afastar o aparelho um pouco
da parede.
Reajustar os pés reguláveis
frontais
Avaria Causa possível Solução
Substituição da lâmpada
Aviso! Perigo de choque eléctrico! Antes de proceder à substituição da lâmpada, desligar o aparelho e retirar a ficha de ligaçã o à rede da tomada ou
desconectar o fusível.
Dados da lâmpada: lâmpada halógena, 220-240 V, máx. 15 W, porta-lâmpadas: E 14
1. Para desligar o aparelho.
2. Retirar a ficha de ligaçã o à rede da
tomada.
3. Para substituir a lâmpada, desatarraxar o parafuso de fendas em cruz e
retirar a cobertura da lâmpada
puxando-a para baixo.
4. Substituir a lâmpada fundida.
5. Instalar novamente a cobertura da
lâmpada e voltar a atarraxar o parafuso de fendas em cruz.
D411
Page 39

39
Serviço de assistência técnica
Se, em caso de avaria, não conseguir solucionar o problema com o auxílio
destas instruções de utilização, é favor dirigirse à casa especializada mais
próxima ou ao nosso serviço de assistência técnica.
Uma listagem precisa das peças sobressalentes necessárias, poderá evitar
perdas de tempo e custos desnecessários. Por isso, é favor indicar os seguintes dados do seu aparelho:
• Designação do modelo
• Número do produto (PNC)
• Número de fabrico (S-No.)
Estas indicações encontramse na placa de características, no interior do aparelho. Para que possa ter estes dados sempre à mão, recomendamos que os
registe aqui.
Se a indicação da temperatura assinalar uma falha (F1, F2, etc.), é favor participar ao serviço de assistência técnica a falha indicada.
Nota: uma deslocação injustificada do serviço de assistência técnica está
sujeita a pagamento, mesmo durante o prazo de garantia.
Prescrições, normas, directivas
Este aparelho frigorífico foi concebido para uso doméstico e fabricado em
conformidade com as normas vigentes para este tipo de aparelhos. Durante a sua produção tomaram-se as providências necessárias, especialmente as
que são prescritas pela lei sobre a segurança de aparelhos (GSG), pelas prescrições para a prevenção de acidentes relativas a instalações frigoríficas
(VBG 20) e pelos regulamentos da Associação dos Electrotécnicos Alemães
(VDE).
O circuito de refrigeração foi testado quanto ao seu estancamento.
Este aparelho corresponde às seguintes directivas da CE:
– 73/23/CEE de 19.2.1973 - Directiva referente à baixa tensão
– 89/336/CEE de 3.5.1989
(inclusivé directiva de rectificação 92/31/CEE) - Directiva referente à com-
patibilidade electromagnética
Page 40

AEG Hausgeräte GmbH
Postfach 1036
D-90327 Nürnberg
http://www.aeg.hausgeraete.de
© Copyright by AEG
Subject to change without notice
2223 401-42 08/07
Sujeito a alterações sem aviso prévio
 Loading...