

Page 1

BBeennuuttzzeerriinnffoorrmmaattiioonn
UUsseerr MMaannuuaall
MMaannuuaall ddee iinnssttrruuççõõeess
ERW 33900 X
ERW 33910 X
Wein-Kühlschrank
Wine refrigerator
Adega
Page 2

Page 3

electrolux
3
Willkommen bei Electrolux!
Wir möchten uns bedanken, dass Sie sich für ein erstklassiges Produkt von
Electrolux entschieden haben, welches Ihnen sicherlich viel Freude bereiten wird.
Es ist unser Bestreben, eine breite Vielfalt von Qualitätsprodukten anzubieten, die
helfen, Ihr Leben etwas komfortabler zu machen. Sie finden einige Beispiele auf
der vorletzten Seite in diesem Heft. Bitte nehmen Sie sich einige Minuten, diese
Benutzerinformation zu lesen, um voll von den Vorteilen Ihres neuen Gerätes
profitieren zu können. Wir sind sicher, dass wird Ihr Leben zukünftig etwas leichter
machen. Wir wünschen eine gute Zeit.
Page 4
4
electrolux
Mit dem Warndreieck und/oder durch Signalwörter
(Warnung!, VVorsicht!,
Achtung!)
sind Hinweise hervorgehoben, die für Ihre Sicherheit oder für die
Funktionsfähigkeit des Gerätes wichtig sind. Bitte unbedingt beachten.
Nach diesem Zeichen erhalten Sie ergänzende Informationen zur Bedienung und
praktischen Anwendung des Gerätes.
Mit der Blume sind Tips und Hinweise zum wirtschaftlichen und
umweltschonenden Einsatz des Gerätes gekennzeichnet.
Das Symbol auf dem Produkt oder seiner Verpackung weist darauf hin, dass
dieses Produkt nicht als normaler Haushaltsabfall zu behandeln ist, sondern an
einem Sammelpunkt für das Recycling von elektrischen und elektronischen
Geräten abgegeben werden muss. Durch Ihren Beitrag zum korrekten Entsorgen
dieses Produkts schützen Sie die Umwelt und die Gesundheit Ihrer Mitmenschen.
Umwelt und Gesundheit werden durch falsches Entsorgen gefährdet. Weitere
Informationen über das Recycling dieses Produkts erhalten Sie von Ihrem
Rathaus, Ihrer Müllabfuhr oder dem Geschäft, in dem Sie das Produkt gekauft
haben.
Page 5

electrolux
5
INHALT
Warnungen uund wwichtige
Hinweise 6
Gebrauch 9
Reinigung der Innenteile 9
Bedienungsblende 9
Display 9
Betrieb 10
Gerätgebrauch 10
Temperatureinstellung 11
Ausschalten 11
Akustischer Alarm offene
Kühlschranktür 11
Innenzubehör- Ablagen 11
Flaschenhalter 12
Luftzirkulation 12
Wartung 113
Abtauen 13
Reinigung 13
Sicherheitshinweise für das
Auswechseln der Lampen 14
Lampen der Innenbeleuchtung 14
Technische DDaten 15
Störungen 115
Installation 16
Austellung 16
Elektrischer Anschluß 16
Montageanleitung für den integrierten
Einbau 17
Montageanleitung des Ausgleichers für
unterer Türseite 19
Garantie/Kundendienst 21
Europäische GGarantie 23
www.electrolux.com 24
Page 6

6
electrolux
WARNUNGEN UND
WICHTIGE HINWEISE
Es iist ssehr wwichtig, ddaß ddiese
Bedienungsanleitung mmit ddem
betreffenden GGerät aaufbewahrt wwird.
Sollte ddieses GGerät vverkauft bbzw. eeiner
anderen PPerson ggegeben wwerden, sso
ist ees nnötig, ddie AAnleitung bbeizufügen,
damit dder nneue BBesitzer üüber dden
Betrieb ddes GGerätes bbzw. ddie
entsprechenden WWarnungen.
Sollte ddieses GGerät mmit MMagnet-
Türverschluß aals EErsatz ffür eein aaltes
Gerät ddienen, ddas nnoch mmit eeinem
Schnappschloß aausgerüstet iist, sso
machen SSie bbitte ddieses SSchloß
unbrauchbar, bbevor SSie ddas GGerät
beiseite sstellen ooder zzum MMüll ggeben.
Sie vverhindern ddamit, ddaß sspielende
Kinder ssich sselbst eeinsperren uund ddamit
in LLebensgefahr kkommen.
Diese WWarnungen wwurden zzu IIhrem bbzw.
dem SSchutz aanderer eerarbeitet. WWir bbitten
Sie ddaher, ddiese aaufmerksam zzu llesen,
bevor ddas GGerät iin BBetrieb ggenommen
wird.
Sicherheit
• Dieses Gerät wurde hergestellt, um
von Erwachsenen benutzt zu
werden. Es ist unbedingt darauf zu
achten, daß Kinder es nicht
anfassen oder es als Spielzeug
verwenden.
• Es ist gefährlich, die Eigenschaften
dieses Gerätes zu ändern.
• Vor der inneren bzw. äußeren
Reinigung des Gerätes sowie beim
Auswechseln der Glühlampe (bei
damit ausgestatteten Geräten) das
Gerät spannungslos machen.
• Eis aus dem Gefrier- bzw. Frosterfach
nicht sofort essen, es könnte KälteBrandwunden verursachen.
• Dieses Gerät ist schwer. Beim
Versetzen bitte darauf achten!
• BBeachten SSie, ddan wwährend dder
Bewegung ddes GGerätes dder
Kältemittelkreislauf nnicht
beschädigt wwird.
• DDas GGerät ddarf nnicht iin
unmittelbarer NNähe vvon
Heizkörpern ooder GGasherden
aufgestellt wwerden.
• Ein SStandort mmit ddirekter
Sonneneinstrahlung ssollte
vermieden wwerden.
• EEine aausreichende LLuftzirkulation
an dder GGeräterückseite mmuß
gewährleistet ssein. JJegliche
Beschädigung ddes KKühlkreislaufes
ist zzu vvermeiden.
• NNUR FFÜR GGEFRIERSCHRÄNKE
(Einbaugeräte aausgenommen): eein
optimaler AAufstellungsort iist dder
Keller.
• Keine EElektrogeräte ((z.B.
Eismaschinen) iin ddas GGerät sstellen.
Störungen-Kundendienst
• Sollte die Installation des Gerätes
eine Änderung der elektrischen
Hausinstallation verlangen, so darf
diese nur von Elektro-Fachkräften
durchgeführt werden.
• Eventuelle Reparaturen dürfen nur
von einem Kundendienst oder
Page 7

electrolux
7
sonstigen autorisierten Stellen
durchgeführt werden.
• Es ist wichtig, daß nur OriginalErsatzteile verwendet werden.
• Dieses Gerät enthält im
Kältekreislauf Kohlenwasserstoff.
Aus diesem Grund darf die
Wartung und das Nachfiillen
ausschließlich von autorisiertem
Fachpersonal durchgeführt werden.
• Benutzen Sie nie
Metallgegenstände um das Gerät
zu reinigen, da es beschädigt
werden könnte.
• Tritt eine Störung oder ein Defekt
ein, versuchen Sie nicht, das Gerät
selbst zu reparieren. Elektrogeräte
dürfen nur von Elektro-Fachkräften
repariert werden, da durch
unsachgemäße Reparaturen
erhebliche Folgeschäden entstehen
können. Wenden Sie sich bitte an
die nächste Kundendienststelle.
Gebrauch
• Die Haushaltskühl- und
Gefriergeräte sind nur zur
Einlagerung bzw. zum Einfrieren
von Nahrungsmitteln bestimmt.
• Die beste Leistung erzielt man bei
Raumtemperaturen von +18°C bis
+43°C (Klasse T); +18°C bis +38°C
(Klasse ST); +16°C bis +32°C
(Klasse N); +10°C bis +32°C
(Klasse SN); die Geräteklasse ist
auf dem Typschild angegeben.
Zu beachten: Wird dieses Gerätes
bei anderen
Umgebungstemperaturen betrieben
als den in der entsprechenden
Klimaklasse angegebenen Werten,
sind folgende Hinweise zu
beachten: sinkt die
Umgebungstemperatur unter den
angegebenen Mindestwert ab,
könnte die Lagertemperatur im
Gefrierabteil nicht mehr garantiert
sein; es wird daher empfohlen, die
eingelagerten Lebensmittel so
rasch als möglich zu verbrauchen.
• Einaufgetautes Produkt darf nicht
wieder eingefroren werden.
• Für das Aufbewahren bzw. das
Einfrieren der Lebensmittel sind die
Anweisungen des Herstellers zu
befolgen.
• In allen Kühl- und Gefriergeräten
bedecken sich im Laufe der Zeit
alle kälteführenden Teile mit einer
Reif bzw. Eissicht. Diese Schicht
wird je nach Modell automatisch
oder mit der Hand abgetaut.
• Die Reifsicht niemals mit
Metallgegenständen abkratzen, das
Gerät könnte beschädigt werden.
Dazu nur den mitgelieferten
Plastikschaber verwenden.
• Zum Lösen der festgefrorenen
Eisschalen keine scharfkantigen
oder spitzn Gegenstände
benutzen.
• Es ist empfehlt, keine
kohlensäurehaltigen Getränke in
das Gefrier- bzw. Frosterfach für
lange Zeit einzustellen: der
Getränke-Behälter könntet sich
brechen.
Page 8
8
electrolux
Aufstellung
• Sich vergewissern, daß das Gerät
nach der Installation nicht auf dem
Netzkabel steht.
Wichtig:
Beschädigte
Versorgungskabel müssen durch
ein Spezialkabel bzw. einen
Spezialsatz ersetzt werden, die
beim Hersteller oder den
Kundendienststellen erhältlich sind.
• Während das Gerät in Betrieb ist,
werden der Verflüssiger und der
Kompressor, die sich auf der
Rückseite des Gerätes befinden,
heiß. Es ist darauf zuachten, dass
die Luft um das Gerät frei
zirkulieren kann, damit die Wärme
abgeführt werden kann. Eine
ungenügende Luftzirkulation kann
einen unregelmässigen Betrieb
bzw. Schäden am Gerät
verursachen. Achten Sie auf die
Installationsanweisungen.
• Teile, die heiß werden (z.B.
Kompressorgehäuse, Verflüssiger
und zugehörige Rohre), sollen nicht
frei zugänglich sein. Wo es auch
immer möglich ist, soll das Gerät
mit der Rückseite gegen eine
Wand gestellt werden.
Umweltnormen
Dieses GGerät eenthält iim KKühlkreislauf
und iin dder IIsolierung kkein
ozonschädigendes GGas. DDas GGerät
darf nnicht mmit ddem HHausmüll eentsorgt
werden. EEine BBeschädigung ddes
Kältemittelkreislaufs, iinsbesondere ddes
Wärmetauschers aauf dder RRückseite
des GGerätes, mmuß vverhindert wwerden.
Auskunft üüber AAbholtermine ooder
Sammelplätze ggibt ddie öörtliche
Gemeindeverwaltung aan. DDie iin ddiesem
Gerät vverwendeten uund mmit ddem
Symbol ggekennzeichneten
Materialien,sind rrecyclingfähig.
Page 9

electrolux
9
Reinigung der Innenteile
Bevor Sie das Gerät in Betrieb
nehmen, beseitigen Sie den typischen
«Neugeruch» am besten durch
Auswaschen der Innenteile mit
lauwarmem Wasser und einem
neutralen Reinigungsmittel.Sorgfältig
nachtrocknen.
Bitte kkeine RReinigungs- bbzw.
Scheuermittel vverwenden, ddie
das GGerät bbeschädigen kkönnten.
GEBRAUCH
Während des Transports kann es
vorkommen, daß das im
Motorkompressor enthaltene Öl in den
Kältekreislauf abläuft. Man sollte
mindestens 2 Std. warten, bevor das
Gerät in Betrieb genommen wird,
damit das Öl in den Kompressor
zurückströmen kann.
Bedienungsblende
A - Ein- / Aus-Taste des Gerätes
B - Temperaturregler des unteren
Fachs
C - Taste für die Auswahl der Fächer
D - Display der Temperaturanzeige
E - Taste der Innenbeleuchtung und
Reset des Alarms offene
Kühlschranktür (Symbole, falls
vorgesehen)
F - Temperaturregler des oberen
Fachs
Display
3
1
2
1. Anzeige des gewählten Fachs
2. Anzeige der positiven Temperatur
3. Temperaturanzeige
Page 10

10
electrolux
Betrieb
Falls das Display nach dem Einstecken
des Netzsteckers nicht aufleuchtet,
drücken Sie die Ein-Taste (A) des
Gerätes.
Gerätegebrauch
Der Weinkühlschrank ist in zwei Fächer
mit unterschiedlichen Temperaturen
unterteilt.
Lagerung ddes WWeins
Oberes FFach:
Die Temperatur ist im Bereich zwischen
+6 und + 11 °C einstellbar. Das Fach
eignet sich besonders für Weine, die
sofort getrunken werden, vor allem für
Weiß- und junge Rotweine.
Unteres FFach:
Die Temperatur ist im Bereich zwischen
+ 12 und + 18 °C einstellbar. Das Fach
ist ideal für die Aufbewahrung und
Reifung von Rot- und Weißweinen über
lange Zeiträume.
Die Temperaturen dieses Fachs sind
für die Lagerung von gealterten und
vollen Weine geeignet.
Die FFlaschen
so in das Fach legen,
dass die Korken nicht austrocknen.
Den WWein iim DDunklen aaufbewahren.
Die Tür des Kühlschranks besteht aus
doppeltem UV absorbierendem
Mattglas, das den Wein vor Licht
schützt, falls der Kühlschrank in einem
hell beleuchteten Raum steht.
Vermeiden SSie, zzu ooft
oder zu lange
die Kühlschrankbeleuchtung
einzuschalten. Wein hält sich besser
im Dunklen.
Die FFlaschen vvorsichtig hhandhaben
,
um den Wein nicht unnötig zu
schütteln.
Halten SSie ssich aan ddie EEmpfehlungen
und Ratschläge, die Sie beim Kauf
erhalten haben oder die Sie den
Unterlagen über die Qualität, die
Haltbarkeit und die optimale
Lagertemperatur entnehmen können.
Empfehlungen ffür ddie LLagerung
Die Haltbarkeit des Weins hängt von der
Ablagerung, der Rebsorte, dem Alkohol-,
Fruchtzucker- und Tanningehalt ab.
Achten Sie beim Kauf darauf, ob der
Wein bereits abgelagert ist oder noch im
Laufe der Zeit reifen kann.
Empfohlene LLagertemperaturen
:
- Champagne und Schaumweine von
6 bis 8 °C
- Weißweine zwischen 10 und 12 °C
- Rosé- und leichte Rotweine von 12
bis 16 °C
- Reife Rotweine von 14 - 16 °C
Falls SSie ddie FFlaschen üübereinander
legen
, vergewissern Sie sich, dass sie
nicht die Kühlplatte des Kühlschranks
berühren.
Oberes Fach
Unteres Fach
Page 11

electrolux
11
Temperatureinstellung
Wählen Sie mit der Taste (C) das Fach
Stellen Sie die Temperatur mit dem
Drehschalter
(B oder F, je nachdem welches Fach
angewählt ist) ein.
Für eine korrekte Einstellung ist zu
berücksichtigen, dass die
Innentemperatur von den folgenden
Faktoren abhängt:
• Raumtemperatur
• Häufigkeit der Türöffnung
• Anzahl der eingelagerten Flaschen
• Standort des Gerätes.
Ausschalten
Drücken Sie zum Ausschalten die Taste
(A) länger als 1 Sekunde. Danach wird
eine Rückwärtszählung der Temperatur
von -3 -2 -1 angezeigt.
Nach dem Abschalten des Gerätes
erlischt auch das Display (D).
Akustischer Alarm offene
Kühlschranktür
Ein Signalton weist Sie darauf hin,
dass die Tür seit ca. 5 Minuten offen
steht.
Der Alarm Offene Kühlschranktür wird
wie folgt angezeigt:
- Blinken des Symbols (1);
- rote Beleuchtung des Displays;
- Ertönen des Summers.
Drücken Sie zum Abschalten des
Summers die Taste (E).
Nach Wiederherstellung der
Normalbedingungen (Tür geschlossen):
- verstummt der Summer.
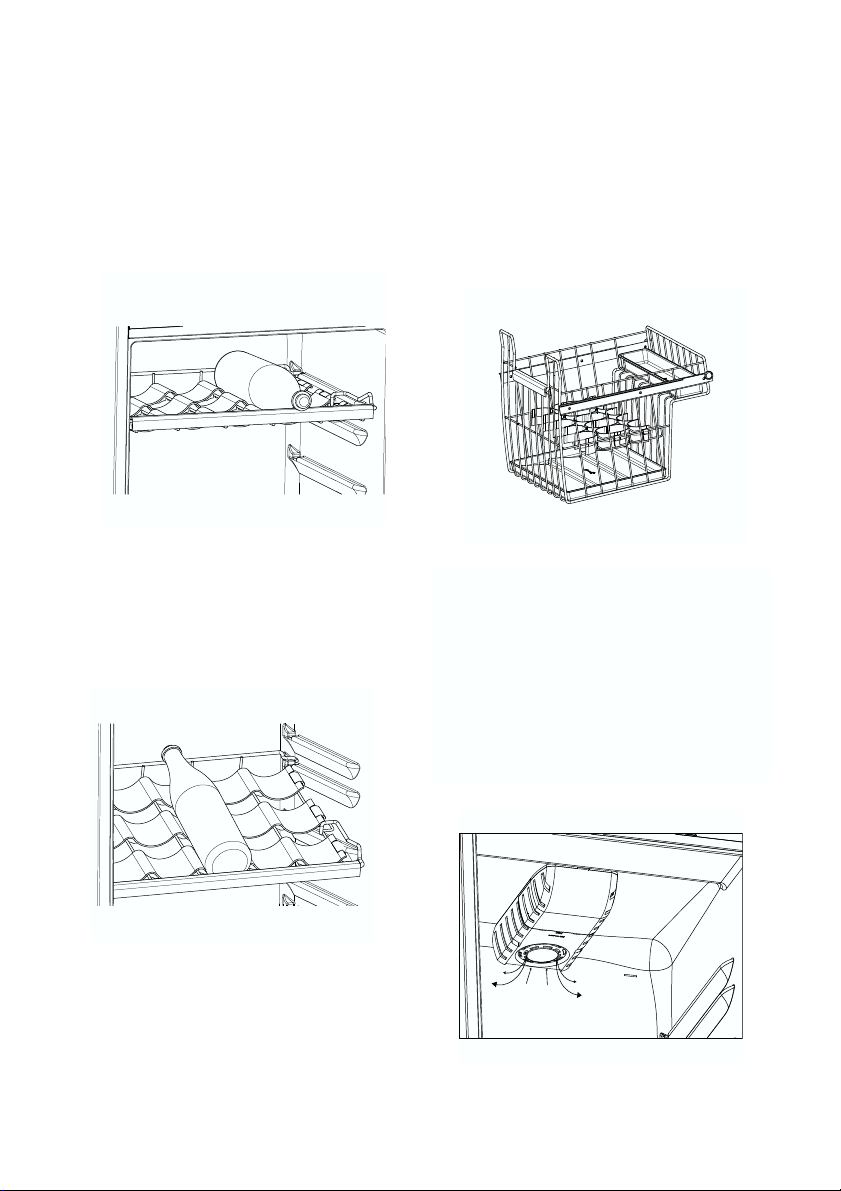
Innenzubehör
Ablagen
Die Ablagen können zur Reinigung
entfernt werden.
Lichttaste und Lichtanzeige
Soll die Lichtfunktion auch bei
geschlossener Tür aktiv sein, öffnen und
schliessen Sie die Tür.
Das Licht bleibt dann für 10 Minuten
eingeschaltet.
Wenn Sie das Licht vorzeitig ausschalten
möchten, öffnen Sie die Tür und drücken
Sie die Taste (E) .
Das Licht hat keine negativen
Auswirkungen auf die Qualität des
eingelagerten Weines.
Page 12
12
electrolux
Flaschenhalter
Die Ablage herausziehen und zwischen
zwei Führungen einschieben.
Die maximale Tragfähigkeit jedes
Weinhalters beträgt 30 Kg.
Die Flaschenhalter können auf um 100
mm gegeneinander versetzte Schienen
angeordnet werden, um die Lage der
Flaschen zu verbessern.
Das untere Fach verfügt über ein
Schubfach, in dem die Flasche vertikal
abgestellt werden können.
Das Schubfach ist mit zwei
Trennwänden für Flaschen mit
unterschiedlichem Durchmesser
versehen.
Luftzirkulation
Das Kühlfach ist mit einem
Spezialgebläse AIRLIGHT
ausgestattet, das nach der
thermostatischen Bedingungen des
Gerätes und den Raumtemeperaturen
automatisch eingeschaltet wird.
Page 13
electrolux
13
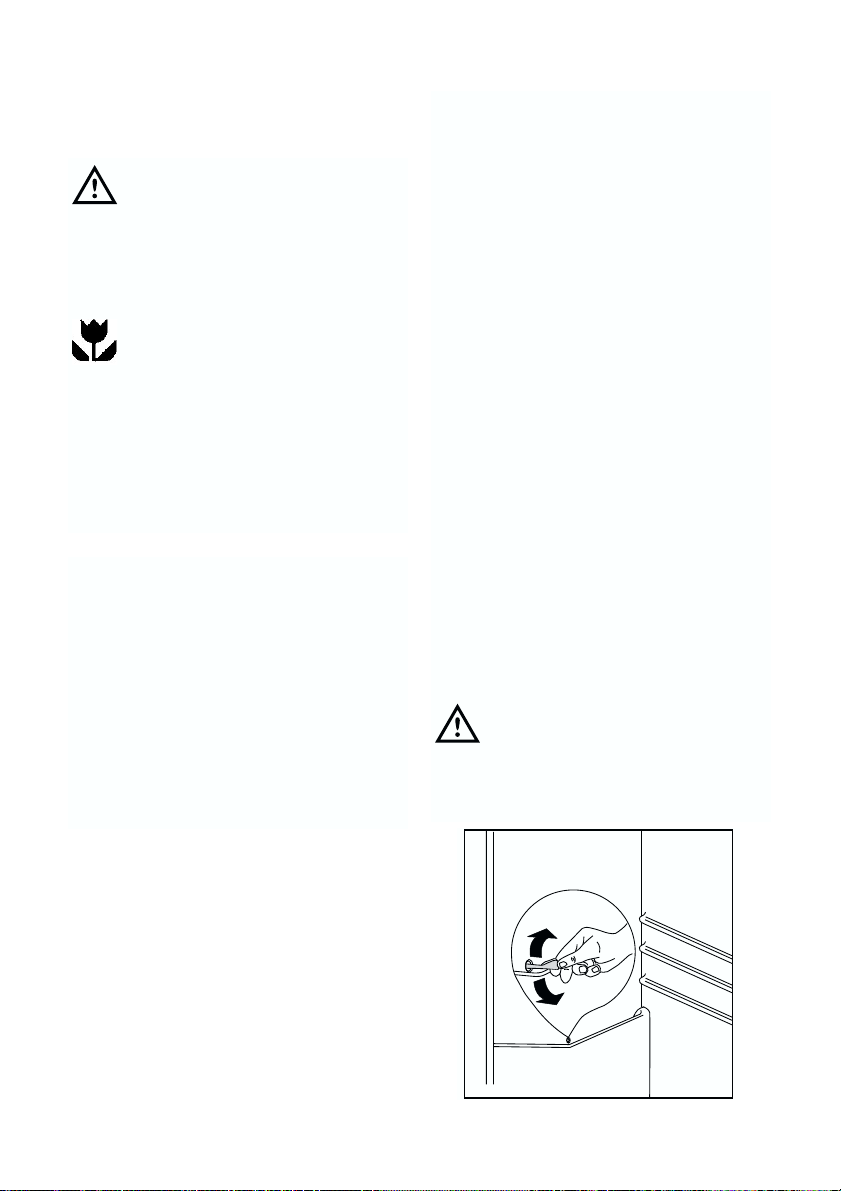
Wartung
Achtung:
Vor jeder Reinigungs- und
Wartungsarbeit den Netzstecker
ziehen.
Wichtiger HHinweis
Der Kältekreis des Gerätes enthält
Kohlenwasserstoffe; Wartungsarbeiten
und Nachfüllen von Kältemittel dürfen
daher nur durch vom Hersteller
autorisiertes Personal ausgeführt
werden.
Abtauen
Das Abtauen des Kühlfachs erfolgt
automatisch. Das Abtauwasser wird in
einem Behälter auf der Rückseite über
dem Kompressor aufgefangen, in dem
es verdunstet.
Reinigen Sie deshalb regelmäßig die
Abflussöffnung des Tauwassers mit
dem mitgelieferten „Reiniger“.
Reinigung
Die Ablagen und Flaschenhalter
entfernen und das Innere mit
lauwarmem Wasser und einem milden
Reinigungsmittel reinigen.
Regelmäßig die Abflussöffnung des
Tauwassers mit dem mitgelieferten
„Werkzeug“ reinigen.
Regelmäßig den Kondensator und den
Verdichter an der Geräterückseite mit
einem Staubsauger oder einer Bürste
reinigen. Mit dieser Arbeit verbessern
Sie den Betrieb des Gerätes und
sparen Sie Energie.
Halten Sie bei längeren Stillstandzeiten
des Gerätes die folgenden
Vorsichtsmaßnahmen ein:
- Den Netzstecker ziehen;
- das Gerät abtauen; den Innenraum
und das Zubehör reinigen;
- die Türen angelehnt lassen, um das
Entstehen unangenehmer Gerüche
zu vermeiden.
Achtung:
Verwenden SSie zzur RReinigung ddes
Gerätes nniemals MMetallgegenstände.
D037
Page 14

14
electrolux
Sicherheitshinweise für
das Auswechseln der
Lampen
Aus Sicherheitsgründen ist das Gerät
mit Speziallampen ausgestattet, die für
den vorgesehenen Zweck besonders
getestet und zertifiziert worden sind.
Die Lampen dürfen nur durch solche
des gleichen Typs und mit denselben
Merkmalen ersetzt werden.
Die Ersatzlampen dürfen nur vom
Hersteller oder von autorisierten
Kundendienststellen bezogen werden.
Die Verwendung von normalen, nicht
zertifizierten Lampen ist untersagt.
Lampen der
Innenbeleuchtung
Für den Austausch der oberen Lampe
die transparente Abdeckung
abnehmen; dazu mit einem passenden
Werkzeug (z. B. einem
Schraubenzieher) die hinteren Haken
ausklinken. Gleichzeitig den mittleren
Haken lösen und die Abdeckung in
Pfeilrichtung herausziehen.
Für den Austausch der unteren Lampe
die transparente Abdeckung entfernen;
dazu mit einem passenden Werkzeug
(z. B. einem Schraubenzieher) auf den
vorderen Haken drücken und
gleichzeitig die Abdeckung in
Pfeilrichtung herausziehen.
Page 15

electrolux
15
STORUNGEN
Falls das Gerät Störungen aufweisen
sollte, überprüfen Sie zuerst folgendes:
• Steckt der Netzstecker in der
Steckdose?
• Befindet sich der Hauptschalter der
elektrischen Anlage in der richtigen
Stellung?
• Ist die Stromzufuhr unterbrochen?
• Ist die Temperatur korrekt?
• Abtauwasserloch verstopft? (siehe
Abschnitt “Abtauen”)
• Ein eventuell beschädigtes
Netzkabel darf nur durch ein
gleichwertiges Spezialkabel ersetzt
werden, das Sie vom Hersteller
oder über den Kundendienst
beziehen können.
TECHNISCHE DATEN
Die Technische Daten können Sie auf dem Typschild feststellen. Das Typschild
befindet sich links unten an der Seitewand.
Sollten Sie nach o.e. Prüfungen zu
keinem Resultat kommen, so wenden
Sie sich bitte an unseren nächsten
Kundendienst.
Um eein rrasches BBeheben ddes
Schadens zzu eermöglichen, iist ees bbeim
Anruf aan dden KKundendienst nnotwendig,
325
0,699
255
1780
560
550
Nutzinhalt des Kühlschrankes in Liter
Energieverbrauch in kWh/Jahr
Energieverbrauch in kWh/24h
Abmessungen des Gerätes in mm
Höhe
Breite
Tiefe
-
Nutzinhalt Flaschen
Page 16
16
electrolux
Leistung vorgeschaltet werden.
Das Gerät muß unbedingt
vorschriftsmäßig geerdet werden. Zu
diesem Zweck ist der Stecker des
Speisekabels mit dem dafür
vorgesehenen Kontakt versehen. Sollte
die Netzleitung im Haus nicht mit einer
Erdleitung versehen sein, so muß das
Gerät an eine getrennte Erdleitung
vorschriftsmäßig und unter
Hinzuziehung eines Fachmanns
angeschlossen werden.
Die EErzeugerfirma llehnt jjede
Verantwortung aab, ffalls ddiese
Unfallverhütungsvorschrift nnicht
beachtet wwird.
Dieses Gerät entspricht der folgende
EWG Richtlinie:
•
87/308 EEWG
vom 2.6.87
(Deutschland-Ausführung) bzw. der
ÖVE-Richtlinie Nr. F 61/84
(Österreich-Ausführung) bezüglich
Funkentstörung.
•
73/23 EEWG
vom 19/02/73
(Niederspannung) und folgende
Änderungen;
•
89/336 EEWG
vom 03/05/89
(Elektromagnetische Verträglichkeit)
und folgende Änderungen.
Achtung
Es muß möglich sein, das Gerät vom
Netz zu trennen; nach der Installation muß
sie Steckdose daher zugänglich bleiben.
die MModell- uund SSeriennummer
anzugeben, ddie SSie ddem
Garantieschein ooder ddem
Typenschild ((– llinke SSeite –– uunten)
entnehmen kkönnen.
Elektrischer Anschluß
Bevor Sie den Stecker in die
Steckdose einstecken, überprüfen Sie
bitte, daß die auf dem Typenschild des
Gerätes angegebene Spannung sowie
Frequenz mit dem Anschlußwert des
Hauses übereinstimmen.
Eine Abweichung von ±6% von der
Nominalspannung ist zulässig. Für die
Anpassung des Gerätes an andere
Spannungen muß ein
Spartransformator angemessener
INSTALLATION
Austellung
Das Gerät sollte nicht in der Nähe von
Wärmequellen wie Heizkörpern oder
Öfen aufgestellt und vor direkter
Sonneneinstrahlung geschützt werden.
Aus Gründen der Sicherheit muß eine
Mindestbelüftung gesichert sein, wie
aus der Abb. hervorgeht.
Anordnung des Gerätes unter den
Oberschränken der Küche.
Anordnung des Gerätes ohne
Oberschränke der Küche.
Achtung
Die VVentilations - ÖÖffnungen mmüssen
immer ssaubergehalten wwerden.
Die Nivellierung erfolgt durch Drehen
der am Unterteil des Gerätes
angebrachten Nivellierfüßchen.
Page 17

electrolux
17
Montageanleitung für
den integrierten Einbau
Nischenmaße
Höhe (1) 1780 mm
Tiefe (2) 550 mm
Breite (3) 560 mm
Aus Gründen der Sicherheit muß eine
Mindestbelüftung gesichert sein, wie
aus der Abb.hervorgeht.
Achtung: DDie VVentilations - ÖÖffnungen
müssen iimmer ssaubergehalten
werden.
Ferner ist auch am hinteren
Einbauschrankteil ein Lüftungskamin
mit folgenden Maßsen notwendig:
Tiefe 50 mm
Breite 540 mm
Fugenabdeckleisten ankleben.
D028
50-min. cm2 200
540
min.
2
cm
200
50
3
2
1
PR01
D765
Page 18

18
electrolux
Gerät einschieben
Gerät festschrauben
Schraubenabdeckungen anbringen.
SAB1ME
Page 19

electrolux
19
MONTAGEANLEITUNG DES AUSGLEICHERS FÜR
UNTERER TÜRSEITE
Mit der geöffneter Türe beide
Schrauben an der unteren Seite
lockern ohne diese vollständig
auszuschrauben.
Gemäss dem Bild positionieren Sie der
Ausgleicher aus Stahl und die obere
Seite setzen unten dem
Schraubenkopf ein.
Der Ausgleicher mit der Platte der Türe
aus Stahl fluchten und beide
Schrauben wiederaufschrauben.
Page 20

20
electrolux
Gemäss dem Bild setzen Sie der
Kasten aus Stahl am Innen des
Ausgleichers ein.
Page 21

electrolux
21
GARANTIE/KUNDENDIENST
Der Endabnehmer dieses Gerätes (Verbraucher) hat bei einem Kauf dieses Gerätes
von einem Unternehmer (Händler) in Deutschland im Rahmen der Vorschriften über
den Verbrauchsgüterkauf gesetzliche Rechte, die durch diese Garantie nicht
eingeschränkt werden. Diese Garantie räumt dem Verbraucher also zusätzliche
Rechte ein. Dies vorausgeschickt, leisten wir, Electrolux Vertriebs GmbH,
gegenüber dem Verbraucher
Garantie ffür ddieses GGerät ffür dden ZZeitraum vvon 224
Monaten aab ÜÜbergabe
zu den folgenden Bedingungen:
1. Mit dieser Garantie haften wir dafür, daß dieses neu hergestellte Gerät zum
Zeitpunkt der Übergabe vom Händler an den Verbraucher die in unserer
Produktbeschreibung für dieses Gerät aufge-führten Eigenschaften aufweist.
Ein Mangel liegt nur dann vor, wenn der Wert oder die Gebrauchstauglichkeit
dieses Gerätes erheblich gemindert ist. Zeigt sich der Mangel nach Ablauf von
sechs (6) Monaten ab dem Übergabezeitpunkt, so hat der Verbraucher
nachzuweisen, daß das Gerät bereits zum Übergabezeitpunkt mangelhaft war.
Nicht unter diese Garantie fallen Schäden oder Mängel aus nicht
vorschriftsmäßiger Handhabung sowie Nichtbeachtung der Einbauvor-schriften
und Gebrauchsanweisungen.
2. Dieses Gerät fällt nur dann unter diese Garantie, wenn es von einem
Unternehmer in einem der Mitgliedstaaten der Europäischen Union gekauft
wurde, es bei Auftreten des Mangels in Deutschlandbetrieben wird und
Garantieleistungen auch in Deutschland erbracht werden können. Mängel
müssen uns innerhalb von zwei (2) Monaten nach Kenntnis angezeigt werden.
3. Mängel dieses Gerätes werden wir innerhalb angemessener Frist nach
Mitteilung des Mangels unentgeltlichbeseitigen; die zu diesem Zweck
erforderlichen Aufwendungen, insbesondere Transport-,Wege-, Arbeits- und
Materialkosten werden von uns getragen. Über diese Nachbesserung
hinausgehende Ansprüche werden durch diese Garantie dem Verbraucher
nicht eingeräumt.
4. Bei Großgeräten (stationär betriebene Geräte) ist im Garantiefall
unter dder ffür
den EEndabnehmer kkostengünstigen RRufnummer 00180 3322 666 222 **
die
nächstgelegene Kundendienststelle zu benachrichtigen, von welcher Ort, Art
und Weise der Garantieleistungen festgelegt werden. Nachbesserungsarbeiten werden, soweit möglich, am Aufstellungsort, sonst in
unserer Kundendienstwerkstatt durchgeführt.
5. Garantieleistungen bewirken weder eine Verlängerung noch einen Neubeginn
der Garantiezeit für dieses Gerät; ausgewechselte Teile gehen in unser
Eigentum über.
Page 22

22
electrolux
6. Mängelansprüche aus dieser Garantie verjähren in zwei (2) Jahren ab dem
Zeitpunkt der Übergabe des Gerätes vom Händler an den Verbraucher, der
durch Original-Kaufbeleg (Kassenzettel, Rechnung) zu belegen ist; wenn dieses
Gerät gewerblich oder-bei Waschgeräten und Wäschetrocknern-in
Gemeinschaftsanlagen genutzt wird, beträgt die Verjährungsfrist sechs (6)
Monate.
Electrolux Vertriebs GmbH
Muggenhofer Straße 135
D-90429 Nürnberg
* EEUR 00,09 // MMinute ((Deutsche TTelekom SStand JJan. 22002)
Page 23

electrolux
23
EUROPÄISCHE GARANTIE
Für dieses Gerät besteht in den am Ende dieses Handbuchs aufgeführten Ländern
eine Garantie von Electrolux für den Zeitraum, der in der Gerätegarantie oder
andernfalls gesetzlich festgelegt ist. Wenn Sie aus einem dieser Länder in ein
anderes der unten aufgeführten Länder ziehen, wird die Gerätegarantie unter
folgenden Voraussetzungen mit übertragen:
• Die Gerätegarantie beginnt an dem Datum, an dem Sie das Gerät gekauft
haben. Dies wird durch ein gültiges Kaufdokument bescheinigt, das von dem
Verkäufer des Gerätes ausgestellt wurde.
• Die Gerätegarantie gilt für denselben Zeitraum und in demselben Ausmaß für
Arbeitszeit und Teile, wie sie für dieses spezielle Modell oder diese spezielle
Gerätereihe in Ihrem neuen Aufenthaltsland gelten.
• Die Gerätegarantie ist personengebunden, d. h. sie gilt für den Erstkäufer des
Geräts und kann nicht auf einen anderen Benutzer übertragen werden.
• Das Gerät wird in Übereinstimmung mit der von Electrolux herausgegebenen
Anleitung installiert und verwendet und wird nur im Privathaushalt eingesetzt, d.
h. nicht für gewerbliche Zwecke genutzt.
• Das Gerät wird in Übereinstimmung mit allen relevanten Bestimmungen
installiert, die in Ihrem neuen Aufenthaltsland gelten.
Die Bestimmungen dieser europäischen Garantie haben keinerlei Auswirkungen
auf die Rechte, die Ihnen gesetzlich zustehen.
Page 24

24
electrolux
Suomi
www.electrolux.fi
Sverige
+46 (0)771 76 76 76
Electrolux Service, S:t Göransgatan 143, S-105 45 Stockholm
Türkiye
+90 21 22 93 10 25
Tarlaba caddesi no : 35 Taksim stanbul
+7 095 937 7837
Albania
+35 5 4 261 450
Rr. Pjeter Bogdani Nr. 7 Tirane
Belgique/België/Belgien
+32 2 363 04 44
Bergensesteenweg 719, 1502 Lembeek
Danmark
+45 70 11 74 00
Sjællandsgade 2, 7000 Fredericia
eská republika
+420 2 61 12 61 12
Bud jovická 3, Praha 4, 140 21
Deutschland
+49 180 32 26 622
Muggenhofer Str. 135, 90429 Nürnberg
Eesti
+37 2 66 50 030
Mustamäe tee 24, 10621 Tallinn
España
+34 902 11 63 88
Carretera M-300,Km.29,900 Alcalá de Henares Madrid
France
Great Britain
+44 8705 929 929
Addington Way, Luton, Bedfordshire LU4 9QQ
Hellas
+30 23 10 56 19 70
4, Limnou Str., 54627 Thessaloniki
Hrvatska
+385 1 63 23 338
Slavonska avenija 3, 10000 Zagreb
Ireland
+353 1 40 90 753
Long Mile Road Dublin 12
Italia
+39 (0) 434 558500
C.so Lino Zanussi, 26 - 33080 Porcia (PN)
Latvija
+37 17 84 59 34
Kr. Barona iela 130/2, LV-1012, Riga
Lietuva
+370 5 2780609
Verki 29, LT-09108 Vilnius
Luxembourg
+35 2 42 43 13 01
Rue de Bitbourg, 7, L-1273 Hamm
Magyarország
+36 1 252 1773
H-1142 Budapest XIV, Erzsébet királyné útja 87
Nederland
+31 17 24 68 300
Vennootsweg 1, 2404 CG - Alphen aan den Rijn
Norge
+47 81 5 30 222
Risløkkvn. 2 , 0508 Oslo
Österreich
+43 18 66 400
Herziggasse 9, 1230 Wien
Polska
+48 22 43 47 300
ul. Kolejowa 5/7, Warsaw
Portugal
+35 12 14 40 39 39
Quinta da Fonte-Edificio Gonçalves Zarco-Q 35-2774-518 Paço de Arcos
Romania
+40 21 451 20 30
Str. Garii Progresului 2, S4, 040671 RO
Schweiz-Suisse-Svizzera
+41 62 88 99 111
Industriestrasse 10, CH-5506 Mägenwil
Slovenija
+38 61 24 25 731
Electrolux Ljubljana d.o.o., Gerbi eva 98, 1000 Ljubljana
Slovensko
+421 2 43 33 43 22
Electrolux Slovakia s.r.o., Electrolux Domáce spotrebi e SK, Seberíniho 1, 821 03 Bratislava
www.electrolux.com
ě
á
ŏ
ŝ
www.electrolux.fr
È
129090 Москва, Олимпийский проспект, 16, БЦ "Олимпик"
ģ
ě
Россия
Page 25

electrolux
25
Welcome to the world of Electrolux
You’ve chosen a first class product from Electrolux, which hopefully will provide
you with lots of pleasure in the future. Electrolux ambition is to offer a wide variety
of quality products that would make your life even more comfortable. You can look
at some examples on the cover in this manual. But now it’s time to study this
manual and start using and enjoying the benefits from your new machine. We
promise that it’ll make your life a little easier. Good luck!
Page 26

26
electrolux
The following symbols are used in this manual:
Important information concerning your personal safety and information on
how to avoid damaging the appliance.
General information and tips
Environmental information
The symbol on the product or on its packaging indicates that this product
may not be treated as household waste. Instead it shall be handed over to the
applicable collection point for the recycling of electrical and electronic equipment.
By ensuring this product is disposed of correctly, you will help prevent potential
negative consequences for the environment and human health, which could
otherwise be caused by inappropriate waste handling of this product. For more
detailed information about recycling of this product, please contact your local city
office, your household waste disposal service or the shop where you purchased
the product.
Page 27

electrolux
27
CONTENTS
Safety IInformation 28
Use 331
Cleaning the interior 31
Control panel 31
Display 32
Operation 33
Use 33
Temperature regulation 34
Switching off 34
Acoustic alarm with door open 34
Inside accessories - Shelves 35
Bottle holder 35
Air circulation 36
Maintenance 336
Defrosting 36
Cleaning 36
Lamp replacement safety instructions 37
Lighting lamps 37
Technical iinformation 38
Customer sservice aand sspare pparts 338
Electrical connection 39
I
nstallation 39
Assembly instructions for the
compensator lower part of the door 41
European GGuarantee 43
www.electrolux.com 44
Page 28

28
electrolux
SAFETY INFORMATION
It iis mmost iimportant tthat tthis
instruction bbook sshould bbe rretained
with tthe aappliance ffor ffuture rreference.
Should tthe aappliance bbe ssold oor
transferred tto aanother oowner, oor
should yyou mmove hhouse aand lleave tthe
appliance, aalways eensure tthat tthe
book iis ssupplied wwith tthe aappliance iin
order tthat tthe nnew oowner ccan bbe
acquainted wwith tthe ffunctioning oof tthe
appliance aand tthe rrelevant wwarnings.
If tthis aappliance ffeaturing mmagnetic
door sseals iis tto rreplace aan oolder
appliance hhaving aa sspring llock ((latch)
on tthe ddoor oor llid, bbe ssure tto mmake
that sspring llock uunusable bbefore yyou
discard tthe oold aappliance. TThis wwill
prevent iit ffrom bbecoming aa ddeath-ttrap
for aa cchild.
These wwarnings aare pprovided iin tthe
interest oof ssafety. YYou mmust rread tthem
carefully bbefore iinstalling oor uusing tthe
appliance.
General Safety
• This appliance is designed to be
operated by adults. Children
should not be allowed to tamper
with the controls or play with the
product.
• It is dangerous to alter the
specifications or modify this
product in any way.
• Before any cleaning or
maintenance work is carried out,
be sure to switch off and unplug
the appliance.
• This appliance is heavy. Care
should be taken when moving it
• Ice lollies can cause frost burns if
consumed straight from the
appliance.
•• Take uutmost ccare wwhen hhandling
your aappliance sso aas nnot tto ccause
any ddamages tto tthe ccooling uunit
with cconsequent ppossible ffluid
leakages.
• The aappliance mmust nnot bbe llocated
close tto rradiators oor ggas ccookers.
• Avoid pprolonged eexposure oof tthe
appliance tto ddirect ssunlight.
• There mmust bbe aadequate vventilation
round tthe bback oof tthe aappliance
and aany ddamage tto tthe rrefrigerant
circuit mmust bbe aavoided.
• For ffreezers oonly ((except bbuilt-iin
models): aan iideal llocation iis tthe
cellar oor bbasement.
• Do nnot uuse oother eelectrical
appliances ((such aas iice ccream
makers) iinside oof rrefrigerating
appliances.
Service/Repair
• Any electrical work required to
install this appliance should be
carried out by a qualified electrician
or competent person
• This product should be serviced by
an authorized Service Centre, and
only genuine spare parts should be
used.
• Under no circumstances should
you attempt to repair the appliance
yourself. Repairs carried out by
inexperienced persons may cause
injury or more serious
malfunctioning. Refer to your local
Page 29

electrolux
29
Service Centre, and always insist
on genuine spare parts.
• This appliance contains
hydrocarbons in its cooling unit;
maintenance and recharging must
therefore only be carried out by
authorized technicians.
Use
• The domestic refrigerators and
freezers are designed to be used
specifically for the storage of edible
foodstuffs only.
• Best performance is obtained with
ambient temperature between
+18°C and +43°C (class T); +18°C
and +38°C (class ST); +16°C and
+32°C (class N); +10°C and +32°C
(class SN). The class of your
appliance is shown on its rating
plate.
Warning:
when the ambient
temperature is not included within
the range indicated for the class of
this appliance, the following
instructions must be observed:
when the ambient temperature
drops below the minimum level, the
storage temperature in the freezer
compartment cannot be
guaranteed; therefore it is advisable
to use the food stored as soon as
possible.
• Frozen food must not be re-frozen
once it has been thawed out.
• Manufacturers’ storage
recommendations should be strictly
adhered to. Refer to relevant
instructions.
• The inner lining of the appliance
consists of channels through which
the refrigerant passes. If these
should be punctured this would
damage the appliance beyond
repair and cause food loss. DO
NOT USE SHARP INSTRUMENTS
to scrape off frost or ice. Frost may
be removed by using the scraper
provided. Under no circumstances
should solid ice be forced off the
liner. Solid ice should be allowed to
thaw when defrosting the
appliance.
• Do not place carbonated or fizzy
drinks in the freezer as it creates
pressure on the container, which
may cause it to explode, resulting
in damage to the appliance.Do not
use a mechanical device or any
artificial means to speed up the
thawing process other than those
recommended by the
manufacturer. Never use metal
objects for cleaning your appliance
as it may get damaged.
Installation
• During normal operation, the
condenser and compressor at the
back of the appliance heat up
considerably. For safety reasons,
minimum ventilation must be as
shown in the instructions.
Attention: kkeep vventilation oopenings
clear oof oobstruction.
• Care must be taken to ensure that
the appliance does not stand on
the electrical supply cable.
Page 30

30
electrolux
Important:
if the supply cord is
damaged, it must be replaced by a
special cord or assembly availa-ble
from the manufacturer or its service
agent.
• If the appliance is transported
horizontally, it is possible that the
oil contained in the compressor
flows in the refrigerant circuit. It is
advisable to wait at least two hours
before connecting the appliance to
allow the oil to flow back in the
compressor.
• There are working parts in this
product which heat up. Always
ensure that there is adequate
ventilation as a failure to do this will
result in component failure and
possible food loss. See installation
instructions.
• Parts which heat up should not be
exposed. Wherever possible the
back of the product should be
against a wall.
Environment
Protection
This aappliance ddoes nnot ccontain
gasses wwhich ccould ddamage tthe oozone
layer, iin eeither iits rrefrigerant ccircuit oor
insulation mmaterials. TThe aappliance
shall nnot bbe ddiscarded ttogether wwith
the uurban rrefuse aand rrubbish. AAvoid
damaging tthe ccooling uunit, eespecially
at tthe rrear nnear tthe hheat eexchanger.
Information oon yyour llocal ddisposal ssites
may bbe oobtained ffrom mmunicipal
authorities. TThe mmaterials uused oon tthis
appliance mmarked bby tthe ssymbol
are rrecyclable.
Page 31

electrolux
31
USE
Cleaning the interior
Before using the appliance for the first
time, wash the interior and all internal
accessories with luke-warm water and
some neutral soap so as to remove
the typical smell of a brand-new
product, then dry thoroughly.
Do nnot uuse ddetergents oor
abrasive ppowders, aas tthese wwill
damage tthe ffinish.
Control panel
A - Appliance On/Off key
B - Bottom compartment
temperature adjustment knob
C - Compartment selection key
D - Temperature display
E - Door open alarm reset and light
switching on key (symbols if
provided for)
F - Top compartment temperature
adjustment knob
Page 32

32
electrolux
1. Selected compartment indicator
2. Positive temperature indicator
3. Temperature indicator
3
1
2
Display
Page 33

electrolux
33
Operation
After inserting the plug in the socket, if
the display is not lit press the appliance
On key (A).
To p
compartment
Bottom
compartment
Use
The wine refrigerator is divided into
two compartments with differentiated
temperatures.
Wine arrangement
Top CCompartment:
the temperature can be adjusted
between +6 and + 11°C. This
compartment is ideal for wines,
especially new reds and whites, to be
consumed immediately.
Bottom CCompartment:
the temperature can be adjusted
between + 12 and + 18°C. This
compartment is ideal for storing and
refining red or white wines for long
periods.
The temperatures of this compartment
are suitable for storing aged and fullbodied wines.
Lay tthe bbottles ddown
in such a way
that the corks do not dry.
Keep tthe wwine iin tthe ddark.
The oven
door is in anti-UV darkened double
glass to protect the wine from the light
in case the refrigerator is located in a
well-lit place.
Avoid sswitching tthe aappliance llight oon
too ooften
or for too long. Wine keeps
better in the dark.
Handle tthe bbottles wwith ccare
, to avoid
agitating the wine.
Follow tthe rrecommendations
and
advice received at the time of
purchase or given in the technical
documentation regarding the quality,
duration and optimum storage
temperature of the wine.
Page 34

34
electrolux
Storage advice
The storage time for wine depends on
ageing, the type of grapes, alcoholic
content and level of fructose and
tannin contained in it. At the time of
purchase, check if the wine is already
aged or if it will improve over time.
Recommended sstorage ttemperatures
:
- for champagne and sparkling wines,
between 6 and 8°C
- for white wines, between 10 and
12°C
- for rose’ and light red wines, between
12 and 16°C
- aged red wines, 14 -16°C
When pplacing vvarious bbottles oon ttop oof
each oother
, make sure they do not
touch the refrigerator cooling plate.
Temperature regulation
Select the compartment by pressing
the key (C)
Set the temperature by turning the
knob (B or F depending on the
compartment to be adjusted).
The correct position must in any case
be determined bearing in mind that the
inside temperature depends on these
factors:
• Room temperature
• How often the doors are opened
• The quantity of bottles stored
• The position of the appliance
Switching off
Press the key (A) for more than 1
second to switch the appliance off. A
temperature countdown of -3 -2 -1 will
then be signalled.
When the appliance is switched off, also
the display (D) goes off.
Acoustic alarm with door
open
An acoustic alarm sounds when the
door remains open for about 5
minutes.
Door open alarm status is indicated
by:
- the symbol (1) flashing;
- the display lighting up red;
- the buzzer sounding.
To stop the acoustic alarm, press the
key (E).
The acoustic signal goes off
- when normal conditions are restored
(door closed).
Button “Light On” and
light indicator
In the case you want to maintain the
light on with the door closed, it is
sufficient to open and close the door
and the light will remain ON
automatically for 10 minutes.
If you want to switch off the light before
the automatic turn off time, open the
door and push the switch button (E).
The light has no negative effect on the
quality on the wine.
Page 35

electrolux
35
Inside accessories
Shelves
The shelves can be removed for
cleaning.
The shelf can be arranged between
guides 100 m apart to favour display
of the bottles.
The bottom compartment is arranged
with a sliding drawer to be used for
placing the bottles upright.
The drawer has two dividers that
adapt to bottles of different diameters.
Bottle holder
Remove the shelf and insert it between
the two guides
The maximum possible weight on the
bottle shelves is 30 kg.
Page 36

36
electrolux
Air circulation
The refrigerator compartment has a
special AIRLIGHT fan which is
automatically activated in function of
the appliance thermostat setting and
ambient conditions.
MAINTENANCE
Important:
Unplug the appliance before carrying
out any operation.
Important
This appliance contains hydrocarbons
in the refrigerant circuit; therefore
maintenance and recharging must only
be carried out by personnel authorised
by the manufacturer.
Defrosting
Defrosting in the refrigerator
compartment occurs automatically. The
defrost water is run into a bowl located
at the back of the appliance, above the
compressor, where it evaporates.
Make sure to periodically clean the
defrost water drain hole, using the
special “cleaner”.
Cleaning
Clean the inside, removing the shelves
and bottle holders, with lukewarm
water and a mild detergent.
Periodically clean the defrost water
drain hole, using the special “cleaner”.
Periodically clean the condenser and
motor compressor with a brush or
vacuum cleaner. This operation will
improve operation, with consequent
energy saving.During periods when
the appliance is not being used, take
the following precautions:
- unplug the appliance;
- defrost and clean the inside and all
the accessories;
- leave the door ajar to prevent the
formation of unpleasant odours.
Important:
Never uuse mmetal oobjects tto cclean
the aappliance.
D037
Page 37

electrolux
37
Lamp replacement safety
instructions
For safety reasons this appliance is
provided with special lamps specifically
tested and certified for the foreseen use.
They can only be replaced with lamps
of the same type and having the same
characteristics.
Replacement lamps must be
requested only from the manufacturer
or its authorised customer service.
Do not use non-certified normal lamps.
Lighting lamps
To replace the top lamp, remove the
transparent cover by pressing it
inwards with a tool (e.g. screwdriver) to
free the rear side hookings. At the
same time, free the middle hook and
slide off the cover in the direction of
the arrows.
To replace the bottom lamp, remove
the transparent cover by pressing the
front hooking with a tool (e.g.
screwdriver) and at the same time pull
in the direction of the arrow.
Page 38

38
electrolux
CUSTOMER SERVICE
AND SPARE PARTS
If the appliance is not functioning
properly, check that:
• the plug is firmly in the wall socket
and the mains power switch is on;
• there is an electricity supply (find
out by plugging in another
appliance);
• If there are water drops on the
bottom of the cabinet, check that
the defrost water drain opening is
not obstructed (see “Defrosting”
section).
• If your appliance is still not working
properly after making the above
checks, contact the nearest service
centre.
• If the power cable is damaged, it
must be replaced with a special
cable or assembly available from
the manufacturer or the technical
assistance service.
To oobtain ffast sservice, iit iis eessential
that wwhen yyou aapply ffor iit yyou sspecify
the mmodel aand sserial nnumber oof yyour
appliance wwhich ccan bbe ffound oon tthe
guarantee ccertificate oor oon tthe rrating
plate llocated iinside tthe aappliance, oon
the bbottom lleft-hhand sside.
TECHNICAL INFORMATION
325
0,699
255
1780
560
550
Net Fridge Capacity lt.
Energy Consumption kWh/year
Dimensions mm
High
Energy Consumption kWh/24h
Width
Depth
The technical infomation are situated in the rating plate on the internal left side of
the appliance.
Page 39

Dimensions oof tthe rrecess
Height of housing mm 1780
Depth of housing mm 550
Width of housing mm 560
It is necessary that the cabinet has a
ventilation recess with the following
dimensions:
Depth 50 mm
Width 540 mm
electrolux
39
Electrical connection
Before plugging in, ensure that the
voltage and frequency shown on the
serial number plate correspond to your
domestic power supply. Voltage can
vary by ±6% of the rated voltage.
For operation with different voltages, a
suitably sized auto-transformer must
be used.
The aappliance mmust bbe eearthed.
The power supply cable plug is provided
with a contact for this purpose.
If the domestic power supply socket is
not earthed, connect the appliance to
a separate earth in compliance with
current regulations, consulting a
specialist technician.
The MManufacturer ddeclines aall
responsibility iif tthe aabove ssafety
precautions aare nnot oobserved.
This appliance complies with
the following E.E.C. Directives:
•
87/308 EEEC
of 2/6/87 relative to
radio interference suppression.
•
73/23 EEEC
of 19.2.73 (Low Voltage
Directive) and subsequent
modifications;
•
89/336 EEEC
of 3.5.89
(Electromagnetic Compatibility
Directive) and subsequent
modifications.
Installation
50
540
3
2
1
PR01
50-min. cm2 200
D028
min.
cm
2
200
Page 40

40
electrolux
Press in the joint covers as indicated in
the figure
Appliance insert
Fix the appliance with the screw
Fix the covers on the screws
D765
GF1MERA
SAB1ME
Page 41

electrolux
41
ASSEMBLY INSTRUCTIONS FOR THE
COMPENSATOR LOWER PART OF THE DOOR
With the door open loosen the two
screws situated in the lower part
without unscrewing completely.
Position the steel compensator as
indicated in the figure and insert the
upper part under the head of the
screws.
Align the compensator with the steel
door panel and tighten the screws.
Page 42

42
electrolux
Insert the steel carter inside the
compensator as indicated in the figure.
Page 43

electrolux
43
EUROPEAN GUARANTEE
This appliance is guaranteed by Electrolux in each of the countries listed at the
back of this user manual, for the period specified in the appliance guarantee or
otherwise by law. If you move from one of these countries to another of the
countries listed, the appliance guarantee will move with you subject to the
following qualifications:
• The appliance guarantee starts from the date you first purchased the appliance
which will be evidenced by production of a valid purchase document issued by
the seller of the appliance.
• The appliance guarantee is for the same period and to the same extent for
labour and parts as exists in your new country of residence for this particular
model or range of appliances.
• The appliance guarantee is personal to the original purchaser of the appliance
and cannot be transferred to another user.
• The appliance is installed and used in accordance with instructions issued by
Electrolux and is only used within the home, i.e. is not used for commercial
purposes.
• The appliance is installed in accordance with all relevant regulations in force
within your new country of residence.
The provisions of this European Guarantee do not affect any of the rights granted
to you by law.
Page 44

44
electrolux
Suomi
www.electrolux.fi
Sverige
+46 (0)771 76 76 76
Electrolux Service, S:t Göransgatan 143, S-105 45 Stockholm
Türkiye
+90 21 22 93 10 25
Tarlaba caddesi no : 35 Taksim stanbul
+7 095 937 7837
Albania
+35 5 4 261 450
Rr. Pjeter Bogdani Nr. 7 Tirane
Belgique/België/Belgien
+32 2 363 04 44
Bergensesteenweg 719, 1502 Lembeek
Danmark
+45 70 11 74 00
Sjællandsgade 2, 7000 Fredericia
eská republika
+420 2 61 12 61 12
Bud jovická 3, Praha 4, 140 21
Deutschland
+49 180 32 26 622
Muggenhofer Str. 135, 90429 Nürnberg
Eesti
+37 2 66 50 030
Mustamäe tee 24, 10621 Tallinn
España
+34 902 11 63 88
Carretera M-300,Km.29,900 Alcalá de Henares Madrid
France
Great Britain
+44 8705 929 929
Addington Way, Luton, Bedfordshire LU4 9QQ
Hellas
+30 23 10 56 19 70
4, Limnou Str., 54627 Thessaloniki
Hrvatska
+385 1 63 23 338
Slavonska avenija 3, 10000 Zagreb
Ireland
+353 1 40 90 753
Long Mile Road Dublin 12
Italia
+39 (0) 434 558500
C.so Lino Zanussi, 26 - 33080 Porcia (PN)
Latvija
+37 17 84 59 34
Kr. Barona iela 130/2, LV-1012, Riga
Lietuva
+370 5 2780609
Verki 29, LT-09108 Vilnius
Luxembourg
+35 2 42 43 13 01
Rue de Bitbourg, 7, L-1273 Hamm
Magyarország
+36 1 252 1773
H-1142 Budapest XIV, Erzsébet királyné útja 87
Nederland
+31 17 24 68 300
Vennootsweg 1, 2404 CG - Alphen aan den Rijn
Norge
+47 81 5 30 222
Risløkkvn. 2 , 0508 Oslo
Österreich
+43 18 66 400
Herziggasse 9, 1230 Wien
Polska
+48 22 43 47 300
ul. Kolejowa 5/7, Warsaw
Portugal
+35 12 14 40 39 39
Quinta da Fonte-Edificio Gonçalves Zarco-Q 35-2774-518 Paço de Arcos
Romania
+40 21 451 20 30
Str. Garii Progresului 2, S4, 040671 RO
Schweiz-Suisse-Svizzera
+41 62 88 99 111
Industriestrasse 10, CH-5506 Mägenwil
Slovenija
+38 61 24 25 731
Electrolux Ljubljana d.o.o., Gerbi eva 98, 1000 Ljubljana
Slovensko
+421 2 43 33 43 22
Electrolux Slovakia s.r.o., Electrolux Domáce spotrebi e SK, Seberíniho 1, 821 03 Bratislava
www.electrolux.com
ě
á
ŏ
ŝ
www.electrolux.fr
È
129090 Москва, Олимпийский проспект, 16, БЦ "Олимпик"
ģ
ě
Россия
Page 45

electrolux
45
Bem-vindo ao mundo Electrolux
Obrigado por ter escolhido adquirir um produto de primeira classe da Electrolux,
que esperamos lhe traga muito prazer no futuro. A ambição da Electrolux é
oferecer uma vasta variedade de produtos de qualidade que tornem a sua vida
ainda mais confortável. Pode encontrar alguns exemplos na capa deste manual.
Tire alguns minutos para estudar este manual para que possa começar a tirar
partido dos benefícios do seu novo aparelho. Nós prometemos que lhe irá
proporcionar uma experiência superior e confortante como utilizador. Boa sorte!
Page 46

46
electrolux
Con el triángulo de aviso y/o mediante señales con palabras
(¡Advertencia!, ¡Precaución!, ¡Atención!), se resaltan algunas advertencias
muy importantes para vuestra seguridad o para la funcionalidad de
vuestro aparato. Es terminantemente necesario ajustarse a cuanto sigue.
Después de este signo hay informaciones muy importantes acerca del
control y las utilizaciones prácticas del aparato.
Con la flor se indican consejos y advertencias importantes acerca de una
utilización económica y tolerable para el medio ambiente.
O símbolo no produto ou na embalagem indica que este produto não pode
ser tratado como lixo doméstico. Em vez disso, deve ser entregue ao centro de
recolha selectiva para a reciclagem de equipamento eléctrico e electrónico.
Ao garantir uma eliminação adequada deste produto, irá ajudar a evitar eventuais
consequências negativas para o
meio ambiente e para a saúde pública, que, de outra forma, poderiam ser
provocadas por um tratamento incorrecto do produto.
Para obter informações mais pormenorizadas sobre a reciclagem deste produto,
contacte os serviços municipalizados locais, o centro de recolha selectiva da sua
área de residência ou o estabelecimento onde adquiriu o produto.
Page 47

electrolux
47
ÍNDICES
Advertências ee cconselhos
importantes 48
Uso ee ffuncionamiento 51
Limpeza das partes internas 51
Painel de comandos 51
Display 51
Funcionamento 51
Utilização do Aparelho 51
Regulação da Temperatura 53
Desligar 53
Alarme sonoro com a porta aberta 53
Accessórios internos- Prateleiras 54
Porta-garrafas 54
Recirculação de ar 55
Manutenção 55
Descongelação 55
Limpeza 55
Avisos de segurança para a
substituição das lâmpadas 56
Lâmpada de iluminação 56
Dados TTécnicos 57
Assistência ttécnica ee ppeças dde
substsuição 57
Ligação eléctrica 58
Instalação 58
Colocação 58
Dimensões do nicho 58
Instruções de montagem do
compensador no lado inferior da porta 60
Garantia/Assistência ttécnica 62
Garantia EEuropeia 64
www.electrolux.com 65
Page 48

48
electrolux
ADVERTÊNCIAS E
CONSELHOS
IMPORTANTES
É mmuito iimportante qque eeste mmanual
de uutilização aacompanhe oo aaparelho
para ggarantir uuma ffutura uutilização
correcta. SSe oo aaparelho ffor vvendido oou
emprestado aa uuma ooutra ppessoa, oo
manual dde uutilização ddeve, ccomo
acima sse ffaz nnotar, aacompanhá-llo, dde
maneira qque oo uutilizador ppossa sser
informado ddo sseu ffuncionamento, ddas
advertências ee cconselhos. SSe eeste
aparelho, mmunido dde ffecho mmagnético,
veio ssubstituir uum ooutro qque ttinha
portas ccom ffecho dde mmola,
aconselhamos aa iinutilizar eeste ffecho,
antes ddo aaparelho sser pposto
definitivamente dde llado. EEsta
precaução pprocura eevitar qque
crianças, bbrincando, sse ppossam ffechar
no aaparelho oo qque sseria aaltamente
perigoso.
Essas aadvertências ttêm ppor ffim
garantir aa ssegurança ddos uutilizadores.
Agradecemos, pportanto, qque lleia oo
manual aatentamente, aantes dde iinstalar
e uutilizar oo aaparelho.
Segurança
• Este aparelho foi concebido para ser
utilizado por adultos. Deve, por isso,
pô-lo ao abrigo das crianças não
consentindo que dele se sirvam como
brinquedo.
• É perigoso modificar ou tentar
modificar as características deste
aparelho.
• Este aparelho é pesado. Tenha o
maior cuidado quando o deslocar
• Não consuma certos produtos, tais
como gelados, imediatamente
após terem saído do aparelho; a
temperatura muito baixa a que se
encontram pode provocar
queimaduras.
• Este aaparelho ccontém
hidrocarbonetos nno ccircuito
refrigerante; pportanto, aa
manutenção ee aa rrecarga ddevem
ser eefectuadas eexclusivamente ppor
pessoal aautorizado ppelo pprodutor.
• Preste aa mmáxima aatenção aao
deslocar oo aaparelho, ppara nnão
danificar aas ppartes ddo ccircuito
refrigerante, eevitando aassim
possíveis ssaídas dde ffluido.
• O aaparelho nnão ddeve sser iinstalado
perto dde eelementos dde
aquecimento oou ffogões dde ggás.
• Evite aa eexposição pprolongada ddo
aparelho aaos rraios ddo ssol.
• A pparte dde ttrás ddo aaparelho ddeve
receber uuma ssuficiente vventilação ee
deve sser eevitado qqualquer ddano aao
circuito rrefrigerante.
• Somente ppara oos ccongeladores
(excepto oos dde eencaixe): aa mmelhor
colocação éé nna ccave.
Assistência
• Se uma eventual modificação da
instalação eléctrica, na casa do
utilizador, tiver de ser feita para tornar
possível a instalação do aparelho,
deve, esta, ser efectuada por pessoal
qualificado.
• Este aparelho deve ser assistido
por um Centro de Assistência
Page 49

electrolux
49
autorizado, sendo apenas
aplicadas peças de origem.
• Em caso de avaria, não tente você
mesmo, reparar o aparelho. As
reparações executadas por
pessoas inexperientes, podem
causar danos físicos e mate-riais
(aumentando as avarias a serem
reparadas). Faça apelo ao seu
Centro de Assistência mais
próximo e insista em peças
genuínas.
Utilização
• Os frigoríficos e/ou congeladores
domésticos destinam-se,
unicamente, à conservação e/ou
congelação de alimentos.
• Os melhores rendimentos são
conseguidos com temperaturas
ambiente incluídas entre +18°C e
+43°C (Classe T); +18°C e +38°C
(Classe ST); +16°C e +32°C
(Classe N); +10°C e +32°C (Classe
SN); a classe a que pertence o
aparelho é indicada na placa de
matrícula (posta na cela ao lado do
compartimento dos legumes).
Atenção: com temperaturas
ambiente não incluídas nas
indicadas para a classe climática a
que pertence o produto, é preciso
cumprir as indicações seguintes:
quando a temperatura ambiente
descer abaixo do valor mínimo,
pode não ser garantida a
temperatura de conservação no
compartimento congelador;
portanto, aconselha-se a
consumar rapidamente os
alimentos nele contidos.
• Um produto descongelado não
deve, em nenhum caso, voltar a
ser congelado.
• Siga as indicações do fabricante
para a conservação e/ou
congelação dos alimentos.
• O revestimento interior do aparelho
em composto de pequenos tubos
por onde passa o refrigerante. Se
estes tubos forem danificados o
aparelho ficará irremediavelmente
avariado, provocando a perda dos
alimentos no seu interior. NÃO
UTILIZE OBJECTOS
PONTEAGUDOS para raspar o gelo
acumulado. Esse gelo pode ser
raspado utilizando a espátula que é
fornecida com o aparelho. Para
eliminar grandes quantidades de gelo
acumulado, é aconselhável deixá-lo
derreter. Veja as instruções para a
descongelação.
• Não coloque no
compartimento/congelador a baixa
temperatura, garrafas ou latas com
bebidas gaseificadas dado que se
cria uma pressão elevada no interior
da garrafa e/ou lata havendo o perigo
de este explodir. Desta explosão
resultariam danos graves para o
aparelho.
Instalação
• Durante o normal funcionamento o
condensador e o compressor,
colocados na parte de trás do
aparelho, aquecem sensivelmente.
Por razões de segurança a
ventilação deve ser como indicado
na respectiva Figura.
Page 50

50
electrolux
Atenção: mmantenha aas aaberturas
para aa vventilação llivres dde qqualquer
obstrução.
• O aparelho aquece, sensivelmente,
ao nível do con-densador e do
compressor. Certifique-se que o ar
circula, livremente, à volta do
aparelho. Uma ventila-ção
insuficiente ocasionaria um mau
funcionamen-to, danos para o
aparelho e perda dos alimentos no
seu interior. Siga as instruções
para a correcta instalação do
aparelho.
• Assegure-se, quando instalar o
aparelho, que este não repousa
sobre o cabo de alimentação
eléctrica.
Importante:
se o cabo de
alimentação se danificar, deverá ser
substituído por um cabo especial ou
por um conjunto, disponíveis junto do
construtor ou do serviço de
assistência técnica.
• Os componentes do aparelho que
aquecem devido ao seu
funcionamento não devem estar
expostos. Sempre que possível as
costas do aparelho devem ficar
encostadas a uma parede
• Desligue sempre a tomada de
corrente antes de proceder à limpeza
ou qualquer operação de
manutenção do aparelho.
• Ao transportar o aparelho na
horizontal, pode acontecer que o
óleo contido no compressor escorra
para o circuito refrigerante. É portanto
aconselhável esperar pelo menos
duas horas antes de ligar o aparelho
à corrente.
Protecão do
ambiente
Este aaparelho nnão ccontem, nno sseu
circuito rrefrigerante ee nnas ssuas
matérias iisolantes, ggases nnocivos àà
camada dde oozono.Mesmo aassim eeste
aparelho ddeve, qquando ffor
destruido,receber oos ccuidados
convenientes, dde aacordo ccom aas
disposições eem vvigor ppara aa pprotecção
do mmelo aambiente. OOs mmateriais
utilizados nneste aaparelho, mmarcados
com oo ssimbolo ssão rreciclàveis.
Page 51

electrolux
51
USO E
FUNCIONAMIENTO
Limpeza das partes
internas
Estando o aparelho convenientemente
instalado, antes de o utilizar,
aconselhamos a sua limpeza
cuidadosa com água tépida e sabão
neutro para retirar o cheiro
característico do “novo”.
Não uutilize ddetergentes oou ppós
abrasivos, qque ppodem ddanificar
os aacabamentos. EEnxague ee
seque ccuidadosamente.
Painel de comandos
Display
3
1
2
A - Tecla ligar / desligar
B - Botão de regulação da
temperatura do compartimento
inferior
C - Tecla de selecção dos
compartimentos
D - Visor da temperatura
E - Tecla para acender a luz e
reiniciar o alarme de porta aperta
(símbolos se disponíveis)
F - Botão de regulação da
temperatura do compartimento
superior
1. Indicador do compartimento
seleccionado
2. Indicador de temperatura positiva
3. Indicador da temperatura
Page 52

52
electrolux
Compartimento
superior
Compartimento
inferior
Funcionamento
Depois de inserir a ficha na tomada de
corrente, se o visor não estiver aceso,
prima a tecla (A) para ligar o aparelho.
Utilização do
aparelho
A adega está dividida em dois
compartimentos com temperaturas
diferentes.
Disposição do vinho
Compartimento ssuperior:
a temperatura pode ser regulada entre
+6 e + 11°C. Este compartimento é
ideal para vinhos que vão ser
consumidos imediatamente,
principalmente brancos ou tintos
jovens.
Compartimento iinferior:
a temperatura pode ser regulada entre
+ 12 e + 18°C. Este compartimento é
ideal para a conservação e
refinamento dos vinhos tintos ou
brancos por longos períodos.
As temperaturas deste compartimento
são próprias para a conservação de
vinhos envelhecidos e incorporados.
Coloque aas ggarrafas
de forma que as
rolhas não fiquem secas.
Conserve oo vvinho nno eescuro.
A porta
da adega possui um vidro duplo fosco
e anti-UV para proteger o vinho da luz
se a adega estiver colocada num local
bem iluminado.
Evite aacender mmuitas
vezes e durante
muito tempo a luz do aparelho. O
vinho conserva-se melhor no escuro.
Manuseie aas ggarrafas ccom ccuidado
para não agitar o vinho.
Tenha eem aatenção aas rrecomendações
e os conselhos que recebeu no
momento da compra ou os indicados
na documentação técnica relativa à
qualidade, duração e temperatura
óptima de conservação do vinho.
Page 53

electrolux
53
Sugestões dde cconservação
O tempo de conservação do vinho
depende do envelhecimento, do tipo
de uva, do teor alcoólico e do nível de
frutose e tanino nele contidos. No
momento da compra, verifique se o
vinho já está envelhecido ou se
melhora com o passar do tempo.
Temperaturas dde cconservação
aconselhadas
:
- para champanhe e vinhos espumantes
entre 6 e 8°C
- para vinhos brancos de 10 a 12°C
- para vinhos rosé e tintos leves de 12
a 16°C
- vinhos tintos envelhecidos 14 -1 6°C
Se ccolocar vvárias ggarrafas uumas eem
cima ddas ooutras
, certifique-se de que
não tocam na placa de refrigeração da
adega.
Regulação da
temperatura
Seleccione o compartimento premindo
a tecla (C)
Programe a temperatura rodando o
botão (B ou F conforme o
compartimento que pretende regular ).
A posição correcta, no entanto, deve
ser seleccionada tendo em conta que a
temperatura interna depende dos
seguintes factores:
• A temperatura ambiente
• A frequência de abertura das portas
• A quantidade de garrafas
conservadas
• A localização do aparelho
Desligar
Para desligar, mantenha premida a tecla
(A) durante mais de 1 segundo. De
seguida, aparecerá uma contagem
decrescente da temperatura de -3 -2 -1.
Quando se desliga o aparelho, desligase também o visor (D).
Alarme sonoro com a
porta aberta
Um alarme sonoro avisa quando a
porta permanecer aberta durante
cerca de 5 minutos.
A condição de alarme de porta
aberta é indicada por:
- símbolo (1) intermitente;
- iluminação vermelha no visor;
- som do besouro.
Para desligar o alarme sonoro, prima
a tecla (E).
Ao retomar as condições normais
(porta fechada):
- o sinal sonoro desliga-se.
Tecla "Luz Acesa" e
indicador luminoso
Se pretende manter a luz acesa com a
porta fechada, basta abrir e fechar a
porta e a luz permanecerá
automaticamente acesa durante 10
minutos.
Se pretende desligar a luz antes desta
se apagar automaticamente passados
os 10 minutos, abra a porta e prima a
tecla (E). A luz não tem qualquer efeito
negativo no vinho.
Page 54

54
electrolux
Acessórios internos
Prateleiras
As prateleiras podem ser retiradas
para limpeza.
Porta-garrafas
Retire a prateleira e insira-a entre as
duas calhas.
Nas consolas porta-garrafas, o peso
máximo permitido é de 30 Kg.
É possível dispor a prateleira entre as
calhas a uma distância de 100 mm
para permitir uma melhor exposição
das garrafas.
O compartimento inferior está
equipado com uma gaveta deslizante
para colocar as garrafas na vertical.
A gaveta possui dois separadores que
se adaptam a garrafas com diâmetros
diferentes.
Page 55

electrolux
55
Recirculação do ar
O frigorífico inclui uma ventoinha
AIRLIGHT especial, automaticamente
activada de
acordo com as definições do
termóstato do aparelho e temperatura
ambiente.
Manutenção
Atenção:
Retire a ficha da tomada antes de
efectuar qualquer operação.
Importante
Este aparelho contém hidrocarbonetos
no circuito de refrigeração; por isso, a
manutenção e a recarga devem ser
efectuadas exclusivamente por
pessoal autorizado pelo fabricante.
Descongelação
A descongelação do compartimento
frigorífico é feita automaticamente. A
água resultante da descongelação é
recolhida num recipiente, colocado na
parte traseira por cima do compressor,
onde evapora. É recomendável limpar
periodicamente o orifício de descarga
da água de descongelação utilizando o
respectivo “raspador”.
Limpeza
Retire as consolas e as prateleiras e
limpe o interior com água tépida e um
detergente suave.
Limpe periodicamente o orifício de
descarga da água de congelação,
utilizando o respectivo “raspador”.
Limpe periodicamente o condensador
e o motocompressor com uma
escova ou com um aspirador. Esta
operação melhora o funcionamento
com consequente poupança de
energia.
Durante os períodos em que o
aparelho não está a trabalhar, observe
as seguintes precauções:
- retire a ficha da tomada;
- descongele e limpe o interior e
todos os acessórios;
- deixe as portas entreabertas para
evitar a formação de odores
desagradáveis.
Atenção:
Nunca uutilize oobjectos mmetálicos
para llimpar oo aaparelho.
D037
Page 56

56
electrolux
Avisos de segurança
para a substituição das
lâmpadas
Por motivos de segurança, este
aparelho possui com lâmpadas
especiais devidamente testadas e
certificadas para a utilização prevista.
A substituição só é permitida se as
lâmpadas forem do mesmo tipo e com
as mesmas características.
As lâmpadas de substituição devem
ser encomendadas unicamente junto
do fabricante ou de um serviço de
assistência autorizado.
Não é permitido o uso de lâmpadas
normais, não certificadas.
Lâmpadas de iluminação
Para a eventual substituição da
lâmpada superior, retire a cobertura
transparente pressionando-a para o
interior com um utensílio (por ex. um
canivete) para libertar os encaixes
laterais traseiros.
Ao mesmo tempo, liberte o gancho
central e retire a tampa respeitando o
sentido das setas.
Para uma eventual substituição da
lâmpada inferior, retire a cobertura
transparente pressionando o encaixe
dianteiro com um utensílio (por ex. um
canivete) e puxando-a ao mesmo
tempo no sentido da seta.
Page 57

electrolux
57
ASSISTÊNCIA
TÉCNICA E PEÇAS
DE SUBSTITUIÇÃO
Se o aparelho não funcionar verifique:
• Se a ficha está bem introduzida na
tomada e se há corrente na rede.
• No caso de haver vibrações ou
ruídos verifique se o aparelho está
em contacto com moveis que
podem transmitir ou ampliar ruídos
e vibrações.
• Verifique também se as tubagens
do sistema refrigerante não vibram.
Se houver restos de água no interior
do frigorifico verifique se o orifício de
descarga não está obstruído.
• Se depois de todas estas
verificações o problema persistir
dirija-se ao seu vendedor ou o
serviço de assistência mais perto
da sua residência.
• Se o cabo de alimentação estiver
danificado, deve ser substituído por
um cabo ou conjunto especial
disponíveis junto do fabricante ou
no serviço de assistência técnica.
Para oobter uuma aassistência mmais
rápida iindique oos ddados dda pplace dde
identificac,ão ddo aaparelho qque sse
encontra nno iinterior ddo
electrodoméstico nna pparede ddo ffundo
no llado eesquerdo, ee ttambém oo mmodelo
número dde sserie ee ccertificado dde
garantia.
DADOS TECNICOS
325
0,699
255
1780
560
550
Capacidade lìquida em litros do frigorìfico
Consumo energético en kWh/ano
Consumo energético en kWh/24h
Dimensões em mm
Altura
Largura
Profundidade
Os dados técnicos são indicados na placa de matrícula que se encontra no lado
esquerdo interno do apareho.
Page 58

58
electrolux
Ligação eléctrica
Verifique, antes de ligar o aparelho, se
a voltagem e a frequência indicadas na
placa sinalética correspondem às da
sua rede. Tolerância admitida na
voltagem nominal: ±6%. Para a
adaptação do aparelho a voltagens
diferentes, é indispensável a adjunção
de um auto-transformador de uma
potência adequada.
Verifique sse aa ttomada dde ccorrente dda
parede eestá eem bbom eestado ee aapta aa
receber aa fficha ddo ffio dde aalimentação
do aaparelho.
Esta última está conforme às normas
em vigor e possui uma entrada para a
ligação à terra. Essa ficha pode ser
ligada a qualquer tomada de corrente
desde que esta tenha uma ponta de
ligação à terra. No caso em que a
tomada não tenha a ligação à terra,
ligar o aparelho a uma instalação de
ligação à terra separada, conforme as
normas em vigor, consultando para
isso um técnico especializado.
A CCasa CConstrutora ddeclina ttoda ee
qualquer rresponsabilidade nno ccaso dde
esta nnorma ccontra oos aacidentes nnão
ser ccumprida ee sse vverificarem
acidentes ooriginados ppor ddeficiente
ligação àà tterra, oou ffalta ddela.
Este aparelho está conforme as
seguintes Directrizes
Comunitárias:
•
87/308
de 2/6/87 respeitante à
supressão das interferências radioeléctricas.
•
73/23 CCEE
19/02/73 (Baixa Tensão)
e sucessivas modificações;
•
89/336 CCEE
03/05/89
(Compatibilidade Electromagnética)
e sucessivas modificações.
Colocación
Por razões de segurança a ventilação
deve ser como indicado na figura.
Atenção:
Mantenha as aberturas para a
ventilação livres de qualquer obstrução.
Para que o ar possa circular, nunca
tapar nem fechar estes orifícios de
ventilação.
Dimensões do nicho
Altura 1780 mm
Profundidade 550 mm
Largura 560 mm
Instalação
50-min. cm2 200
min.
2
cm
200
D028
50
540
3
2
1
PR01
Page 59

electrolux
59
PL09
Insira a junta de vedação conforme
ilustrado no desenho
Introduza o aparelho
Aperte o aparelho
Fixe as coberturas nos parafusos
D765
GF1MERA
SAB1ME
Page 60

60
electrolux
INSTRUÇÕES DE MONTAGEM DO COMPENSADOR
NO LADO INFERIOR DA PORTA
Com a porta aberta, desaperte os dois
parafusos situados no lado inferior
sem os desapertar completamente.
Posicione o compensador de aço
conforme ilustrado na figura e insira o
lado superior sob a cabeça dos
parafusos.
Alinhe o compensador com o painel
da porta de aço e aperte novamente
ambos os parafusos.
Page 61

electrolux
61
Insira a tampa de aço no interior do
compensador conforme indicado na
figura.
Page 62

62
electrolux
GARANTIA/ASSISTÊNCIA TÉCNICA
Estimado Cliente:
Queremos felicitá-lo pela sua compra e agradecer a confiança depositada na
nossa empresa.
O seu electrodoméstico dispõe de uma garantia de 24 meses para mão-de-obra
e peças.
Se durante o período de garantia o seu electrodoméstico tiver uma avaria,
contacte o Serviço Técnico Oficial.
ASSISTÊNCIA TTÉCNICA OOFICIAL
21 4440 339 339
SERVIÇO DDE AAPOIO AAO CCLIENTE
21 4440 339 000
(de 2a a 6a feira. das 10H-13H e das 14H-17H)
CONDIÇÕES DE GARANTIA
1. O aparelho que acaba de adquirir possui uma garantia de dois anos a partir
da data de aquisição. Os pedidos de assistência na garantia são gratuitos,
mediante apresentação do respectivo certificado juntamente com a factura
de compra.
2. A presente garantia do fabricante (2 anos) cobre a substituição de peças,
mão de obra e deslocação.
3. Em caso de imobilização do seu aparelho por período superior a 15 dias, a
garantia será prolongada adicionando o tempo de imobilização à data de
entrega nos nossos serviços.
4. Nos pedidos de assistência na garantia de Pequenos Electrodomésticos, os
aparelhos a reparar deverão ser entregues directamente no ponto de
assistência.
EXCLUSÕES DE GARANTIA
Substituições de peças danificadas por mau manuseamento, instalação
incorrecta, danos de transporte e danos provocados por condições atmosféricas
adversas; Intervenções por pessoal técnico não autorizado pelo
ELECTROLUX
SERVICE
; substituições de lâmpadas, filtros, juntas de borracha, vidros, botões,
puxadores e acessórios de aspiradores; Todos os serviços de manutenção
provocados pelo desgaste ou pela utilização do aparelho; Pedidos de
demonstração de montagem e explicações de funcionamento; Danos no esmalte
e/ou na pintura provocados por cortes ou pancadas; Uso intensivo em locais
Page 63

electrolux
63
públicos ou profissionais, a menos que se trate de um produto adequado para o
efeito; Desobstrução de bombas de limpeza e filtros.
•
MANIPULAÇÃO
nos dados da placa de Matrícula do presente aparelho ou
deste certificado.
•
INSTALAÇÃO IINCORRECTA EE NNÃO RREGULAMENTAR
(tensão, pressão de
gás ou de água, ligações eléctricas ou hidráulicas não adequadas).
Assistência TTécnica - EELECTROLUX SSERVICE - QQuinta dda FFonte, EEdifício
Gonçalves ZZarco - QQ 335, 22774-5518 PPaço dde AArcos.
NOTA 11: DDeve cconservar aa ffactura dde ccompra jjunto ddeste CCertificado dde GGarantia
NOTA 22: PPara aa vvalidade ddesta ggarantia, nno mmomento dda iintervenção ttécnica éé
absolutamente iimprescindível aapresentar aao ppessoal aautorizado oo
presente ccertificado jjunto dda ffactura llegal dde ccompra ddo aaparelho
devidamente ppreenchida.
Page 64

64
electrolux
GARANTIA EUROPEIA
Este aparelho possui garantia da Electrolux em cada um dos países listados na
parte de trás deste manual, para o período especificado na garantia do seu
aparelho ou, caso contrário, pela lei. Se mudar de um destes países para outro
dos países listados em baixo, a garantia do aparelho mudará também, estando
sujeita aos seguintes requisitos:
• A garantia do seu aparelho tem inicio na data em que adquiriu o aparelho, a
qual terá como prova o documento válido de compra emitido pelo vendedor
do aparelho.
• A garantia do aparelho é válida para o mesmo período de tempo e para o
mesmo tipo de trabalho e peças existente no seu novo país de residência para
este modelo em particular ou gama de aparelhos.
• A garantia do aparelho é pessoal, para o comprador original, e não pode ser
transferida para outro utilizador.
• O aparelho é instalado e usado de acordo com as instruções emitidas pela
Electrolux e destina-se apenas ao uso doméstico, ou seja, não é usado para
fins comerciais.
• O aparelho é instalado de acordo com todas as normas relevantes em vigor no
seu novo país de residência.
As condições desta Garantia Europeia não afecta nenhum dos seus direitos
concedidos por lei.
Page 65

electrolux
65
Suomi
www.electrolux.fi
Sverige
+46 (0)771 76 76 76
Electrolux Service, S:t Göransgatan 143, S-105 45 Stockholm
Türkiye
+90 21 22 93 10 25
Tarlaba caddesi no : 35 Taksim stanbul
+7 095 937 7837
Albania
+35 5 4 261 450
Rr. Pjeter Bogdani Nr. 7 Tirane
Belgique/België/Belgien
+32 2 363 04 44
Bergensesteenweg 719, 1502 Lembeek
Danmark
+45 70 11 74 00
Sjællandsgade 2, 7000 Fredericia
eská republika
+420 2 61 12 61 12
Bud jovická 3, Praha 4, 140 21
Deutschland
+49 180 32 26 622
Muggenhofer Str. 135, 90429 Nürnberg
Eesti
+37 2 66 50 030
Mustamäe tee 24, 10621 Tallinn
España
+34 902 11 63 88
Carretera M-300,Km.29,900 Alcalá de Henares Madrid
France
Great Britain
+44 8705 929 929
Addington Way, Luton, Bedfordshire LU4 9QQ
Hellas
+30 23 10 56 19 70
4, Limnou Str., 54627 Thessaloniki
Hrvatska
+385 1 63 23 338
Slavonska avenija 3, 10000 Zagreb
Ireland
+353 1 40 90 753
Long Mile Road Dublin 12
Italia
+39 (0) 434 558500
C.so Lino Zanussi, 26 - 33080 Porcia (PN)
Latvija
+37 17 84 59 34
Kr. Barona iela 130/2, LV-1012, Riga
Lietuva
+370 5 2780609
Verki 29, LT-09108 Vilnius
Luxembourg
+35 2 42 43 13 01
Rue de Bitbourg, 7, L-1273 Hamm
Magyarország
+36 1 252 1773
H-1142 Budapest XIV, Erzsébet királyné útja 87
Nederland
+31 17 24 68 300
Vennootsweg 1, 2404 CG - Alphen aan den Rijn
Norge
+47 81 5 30 222
Risløkkvn. 2 , 0508 Oslo
Österreich
+43 18 66 400
Herziggasse 9, 1230 Wien
Polska
+48 22 43 47 300
ul. Kolejowa 5/7, Warsaw
Portugal
+35 12 14 40 39 39
Quinta da Fonte-Edificio Gonçalves Zarco-Q 35-2774-518 Paço de Arcos
Romania
+40 21 451 20 30
Str. Garii Progresului 2, S4, 040671 RO
Schweiz-Suisse-Svizzera
+41 62 88 99 111
Industriestrasse 10, CH-5506 Mägenwil
Slovenija
+38 61 24 25 731
Electrolux Ljubljana d.o.o., Gerbi eva 98, 1000 Ljubljana
Slovensko
+421 2 43 33 43 22
Electrolux Slovakia s.r.o., Electrolux Domáce spotrebi e SK, Seberíniho 1, 821 03 Bratislava
www.electrolux.com
ě
á
ŏ
ŝ
www.electrolux.fr
È
129090 Москва, Олимпийский проспект, 16, БЦ "Олимпик"
ģ
ě
Россия
Page 66

Page 67

Page 68

2223 434-23-00 03072007
wwwwww..eelleeccttrroolluuxx..ccoomm
www.electrolux.es
www.electrolux.pt
www.electrolux.fi
www.electrolux.ru
 Loading...