

Page 1

EOR3420
EOL3420
................................................ .............................................
EN OVEN USER MANUAL 2
FI UUNI KÄYTTÖOHJE 23
Page 2
www.electrolux.com
2
CONTENTS
1. SAFETY INFORMATION . . . . . . . . . . . . . . . . . . . . . . . . . . . . . . . . . . . . . . . . . . . . . . . . . . . 3
2. SAFETY INSTRUCTIONS . . . . . . . . . . . . . . . . . . . . . . . . . . . . . . . . . . . . . . . . . . . . . . . . . . 4
3. PRODUCT DESCRIPTION . . . . . . . . . . . . . . . . . . . . . . . . . . . . . . . . . . . . . . . . . . . . . . . . . 6
4. BEFORE FIRST USE . . . . . . . . . . . . . . . . . . . . . . . . . . . . . . . . . . . . . . . . . . . . . . . . . . . . . . 6
5. DAILY USE . . . . . . . . . . . . . . . . . . . . . . . . . . . . . . . . . . . . . . . . . . . . . . . . . . . . . . . . . . . . . 7
6. CLOCK FUNCTIONS . . . . . . . . . . . . . . . . . . . . . . . . . . . . . . . . . . . . . . . . . . . . . . . . . . . . . 8
7. USING THE ACCESSORIES . . . . . . . . . . . . . . . . . . . . . . . . . . . . . . . . . . . . . . . . . . . . . . . . 9
8.
ADDITIONAL FUNCTIONS . . . . . . . . . . . . . . . . . . . . . . . . . . . . . . . . . . . . . . . . . . . . . . . . 10
9. HELPFUL HINTS AND TIPS . . . . . . . . . . . . . . . . . . . . . . . . . . . . . . . . . . . . . . . . . . . . . . . 10
10.
CARE AND CLEANING . . . . . . . . . . . . . . . . . . . . . . . . . . . . . . . . . . . . . . . . . . . . . . . . . . . 17
11. WHAT TO DO IF… . . . . . . . . . . . . . . . . . . . . . . . . . . . . . . . . . . . . . . . . . . . . . . . . . . . . . . 20
12.
INSTALLATION . . . . . . . . . . . . . . . . . . . . . . . . . . . . . . . . . . . . . . . . . . . . . . . . . . . . . . . . . 21
13. ENVIRONMENT CONCERNS . . . . . . . . . . . . . . . . . . . . . . . . . . . . . . . . . . . . . . . . . . . . . . 22
WE’RE THINKING OF YOU
Thank you for purchasing an Electrolux appliance. You’ve chosen a product that brings with it
decades of professional experience and innovation. Ingenious and stylish, it has been designed
with you in mind. So whenever you use it, you can be safe in the knowledge that you’ll get great
results every time.
Welcome to Electrolux.
Visit our website for:
Get usage advice, brochures, trouble shooter, service information:
www.electrolux.com
Register your product for better service:
www.electrolux.com/productregistration
Buy Accessories, Consumables and Original spare parts for your appliance:
www.electrolux.com/shop
CUSTOMER CARE AND SERVICE
We recommend the use of original spare parts.
When contacting Service, ensure that you have the following data available.
The information can be found on the rating plate. Model, PNC, Serial Number.
Warning / Caution-Safety information
General information and tips
Environmental information
Subject to change without notice.
Page 3

1. SAFETY INFORMATION
Before the installation and use of the appliance, carefully
read the supplied instructions. The manufacturer is not
responsible if an incorrect installation and use causes injuries and damages. Always keep the instructions with
the appliance for future reference.
1.1 Children and vulnerable people safety
WARNING!
Risk of suffocation, injury or permanent disability.
• This appliance can be used by children aged from 8
years and above and persons with reduced physical,
sensory or mental capabilities or lack of experience and
knowledge if they are supervised by an adult or a person who is responsible for their safety.
• Do not let children play with the appliance.
• Keep all packaging away from children.
• Keep children and pets away from the appliance when
it operates or when it cools down. Accessible parts are
hot.
• If the appliance has a child safety device, we recommend that you activate it.
• Cleaning and user maintenance shall not be made by
children without supervision.
ENGLISH 3
1.2 General Safety
• Internally the appliance becomes hot when in operation. Do not touch the heating elements that are in the
appliance. Always use oven gloves to remove or put in
accessories or ovenware.
• Do not use a steam cleaner to clean the appliance.
• Before maintenance cut the power supply.
Page 4
www.electrolux.com
4
• Do not use harsh abrasive cleaners or sharp metal
• To remove the shelf supports first pull the front of the
scrapers to clean the glass door since they can scratch
the surface, which may result in shattering of the glass.
shelf support and then the rear end away from the side
walls. Install the shelf supports in the opposite sequence.
2.
SAFETY INSTRUCTIONS
2.1 Installation
WARNING!
Only a qualified person must install this appliance.
• Remove all the packaging.
• Do not install or use a damaged appli-
ance.
• Obey the installation instruction sup-
plied with the appliance.
• Always be careful when you move the
appliance because it is heavy. Always
wear safety gloves.
• Do not pull the appliance by the handle.
• Keep the minimum distance from the
other appliances and units.
• Make sure that the appliance is installed
below and adjacent safe structures.
• The sides of the appliance must stay
adjacent to appliances or to units with
the same height.
Electrical connection
WARNING!
Risk of fire and electrical shock.
• All electrical connections should be
made by a qualified electrician.
• The appliance must be earthed.
• Make sure that the electrical information
on the rating plate agrees with the power supply. If not, contact an electrician.
• Always use a correctly installed shock-
proof socket.
• Do not use multi-plug adapters and extension cables.
• Make sure not to cause damage to the
mains plug and to the mains cable.
Contact the Service or an electrician to
change a damaged mains cable.
• Do not let mains cables to come in
touch with the appliance door, specially
when the door is hot.
• The shock protection of live and insulated parts must be fastened in such a
way that it cannot be removed without
tools.
• Connect the mains plug to the mains
socket only at the end of the installation. Make sure that there is access to
the mains plug after the installation.
• If the mains socket is loose, do not
connect the mains plug.
• Do not pull the mains cable to disconnect the appliance. Always pull the
mains plug.
• Use only correct isolation devices: line
protecting cut-outs, fuses (screw type
fuses removed from the holder), earth
leakage trips and contactors.
• The electrical installation must have an
isolation device which lets you disconnect the appliance from the mains at all
poles. The isolation device must have a
contact opening width of minimum 3
mm.
2.2 Use
WARNING!
Risk of injury, burns or electric
shock or explosion.
Page 5
• Use this appliance in a household environment.
• Do not change the specification of this
appliance.
• Make sure that the ventilation openings
are not blocked.
• Do not let the appliance stay unattended during operation.
• Deactivate the appliance after each
use.
• Internally the appliance becomes hot
when in operation. Do not touch the
heating elements that are in the appliance. Always use oven gloves to remove or put in accessories or ovenware.
• Be careful, when you open the appliance door while the appliance is in operation. Hot air can release.
• Do not operate the appliance with wet
hands or when it has contact with water.
• Do not apply pressure on the open
door.
• Do not use the appliance as a work
surface or as a storage surface.
• Always keep the appliance door closed
when the appliance is in operation.
• Open the appliance door carefully. The
use of ingredients with alcohol can
cause a mixture of alcohol and air.
• Do not let sparks or open flames to
come in contact with the appliance
when you open the door.
• Do not put flammable products or items
that are wet with flammable products
in, near or on the appliance.
WARNING!
Risk of damage to the appliance.
ENGLISH 5
– be careful when you remove or install
the accessories.
• Discoloration of the enamel has no effect on the performance of the appliance. It is not a defect in the sense of
the warranty law.
• Use a deep pan for moist cakes. Fruit
juices cause stains that can be permanent.
2.3 Care and Cleaning
WARNING!
Risk of injury, fire or damage to
the appliance.
• Before maintenance, deactivate the appliance and disconnect the mains plug
from the mains socket.
• Make sure the appliance is cold. There
is the risk that the glass panels can
break.
• Replace immediately the door glass
panels when they are damaged. Contact the Service.
• Be careful when you remove the door
from the appliance. The door is heavy!
• Clean regularly the appliance to prevent
the deterioration of the surface material.
• Remaining fat or food in the appliance
can cause fire.
• Clean the appliance with a moist soft
cloth. Only use neutral detergents. Do
not use abrasive products, abrasive
cleaning pads, solvents or metal objects.
• If you use an oven spray, obey the safety instructions on the packaging.
• Do not clean the catalytic enamel (if applicable) with any kind of detergent.
• To prevent damage or discoloration to
the enamel:
– Do not put ovenware or other objects
in the appliance directly on the bottom.
– Do not put aluminium foil directly on
the bottom of the appliance.
– do not put water directly into the hot
appliance.
– do not keep moist dishes and food in
the appliance after you finish the cooking.
2.4 Internal light
• The type of light bulb or halogen lamp
used for this appliance, is only for
household appliances. Do not use it for
house lighting.
WARNING!
Risk of electrical shock.
• Before replacing the lamp, disconnect
the appliance from the power supply.
• Only use lamps with the same specifications.
Page 6
www.electrolux.com
6
2.5 Disposal
WARNING!
Risk of injury or suffocation.
• Disconnect the appliance from the
mains supply.
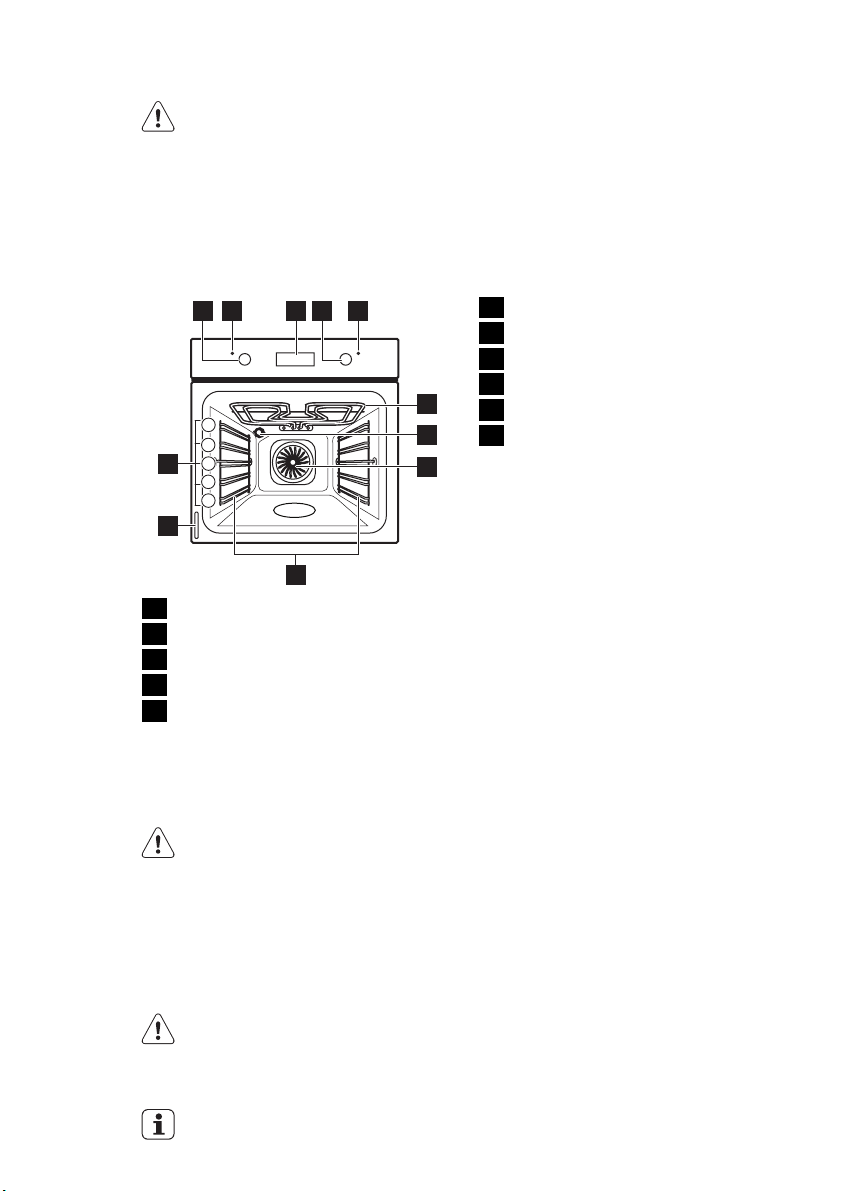
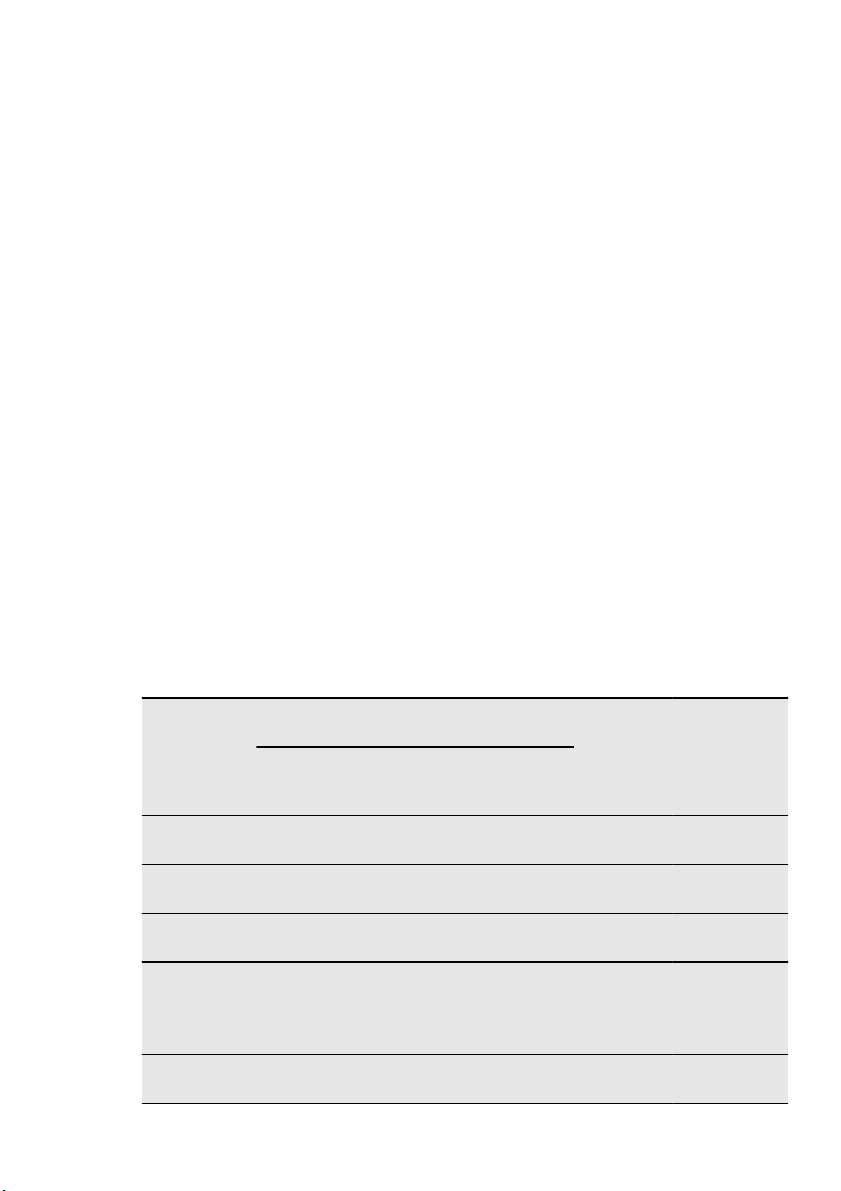
3. PRODUCT DESCRIPTION
3 52 41
5
4
3
11
2
1
10
9
Knob for the oven functions
1
Power indicator
2
Electronic programmer
3
Knob for the temperature
4
Temperature indicator
5
• Cut off the mains cable and discard it.
• Remove the door catch to prevent children and pets to get closed in the appliance.
Grill
6
Oven lamp
7
Fan
8
Shelf support, removable
6
7
8
9
Rating plate
10
Shelf positions
11
3.1 Oven accessories
• Wire shelf
For cookware, cake tins, roasts.
Baking tray
•
For cakes and biscuits.
Grill- / Roasting pan
•
To bake and roast or as pan to collect
fat.
Telescopic runners
•
For shelves and trays.
4. BEFORE FIRST USE
WARNING!
Refer to "Safety information"
chapter.
4.1 Initial cleaning
• Remove all accessories and removable
shelf supports (if applicable).
• Clean the appliance before first use.
Refer to the chapter "Care and
cleaning".
4.2 Setting the time
You must set the time before you
operate the oven.
When you connect the appliance to the
electrical supply or after a power cut, the
indicator for the Time of Day function
flashes.
Press the + or - button to set the correct
time.
Page 7
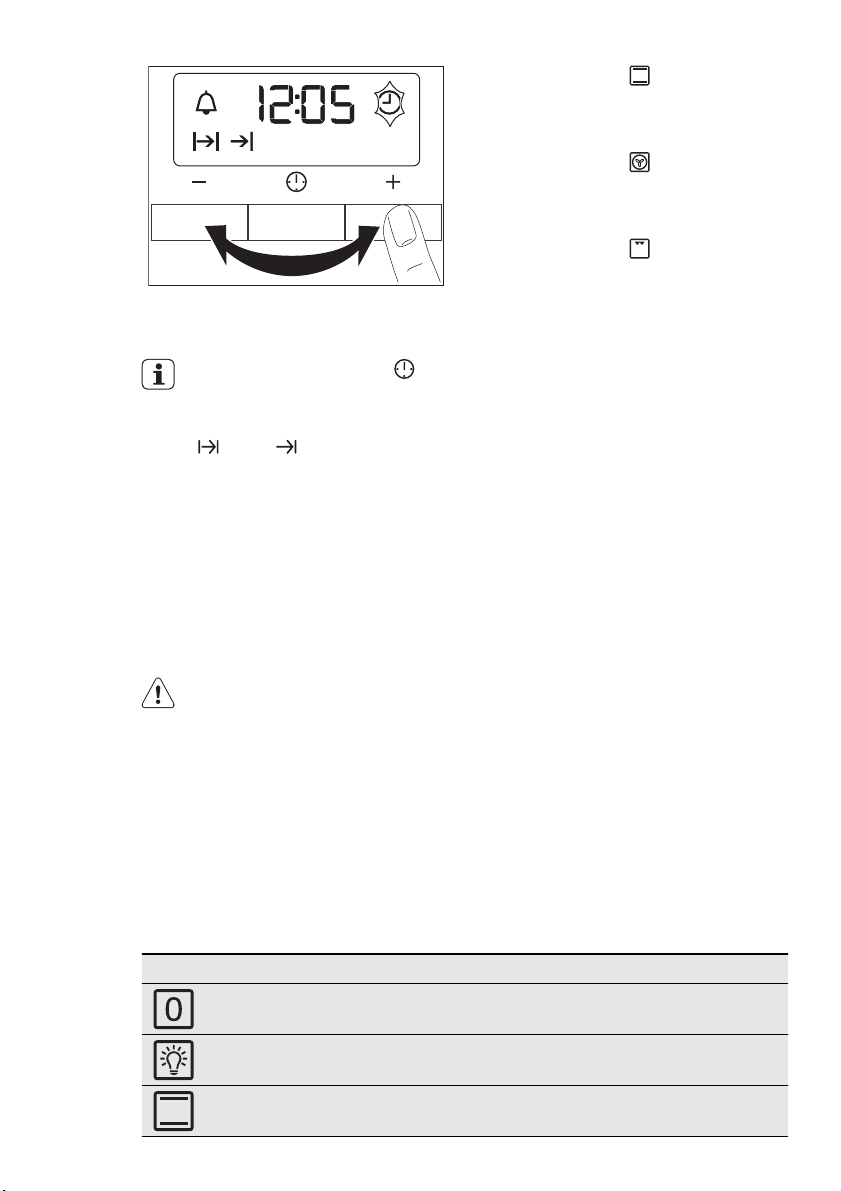
After approximately five seconds, the
flashing stops and the display shows the
time of day you set.
To change the time, press
again and again until the indicator
for the Time of Day function flashes. You must not set the Duration
or End function at the same
time.
4.3 Preheating
Preheat the empty appliance to burn off
the remaining grease.
ENGLISH 7
1.
Set the function and the maximum
temperature.
2.
Let the appliance operate for one
hour.
3.
Set the function and the maximum
temperature.
4.
Let the appliance operate for ten minutes.
5.
Set the function and the maximum
temperature.
6.
Let the appliance operate for ten mi-
nutes.
Accessories can become hotter than usually. The appliance can emit an odour and
smoke. This is normal. Make sure that the
airflow is sufficient.
5. DAILY USE
WARNING!
Refer to "Safety information"
chapter.
5.1 Activating and deactivating
the appliance
1.
Turn the knob for the oven functions
to an oven function.
The power indicator comes on while
the appliance operates.
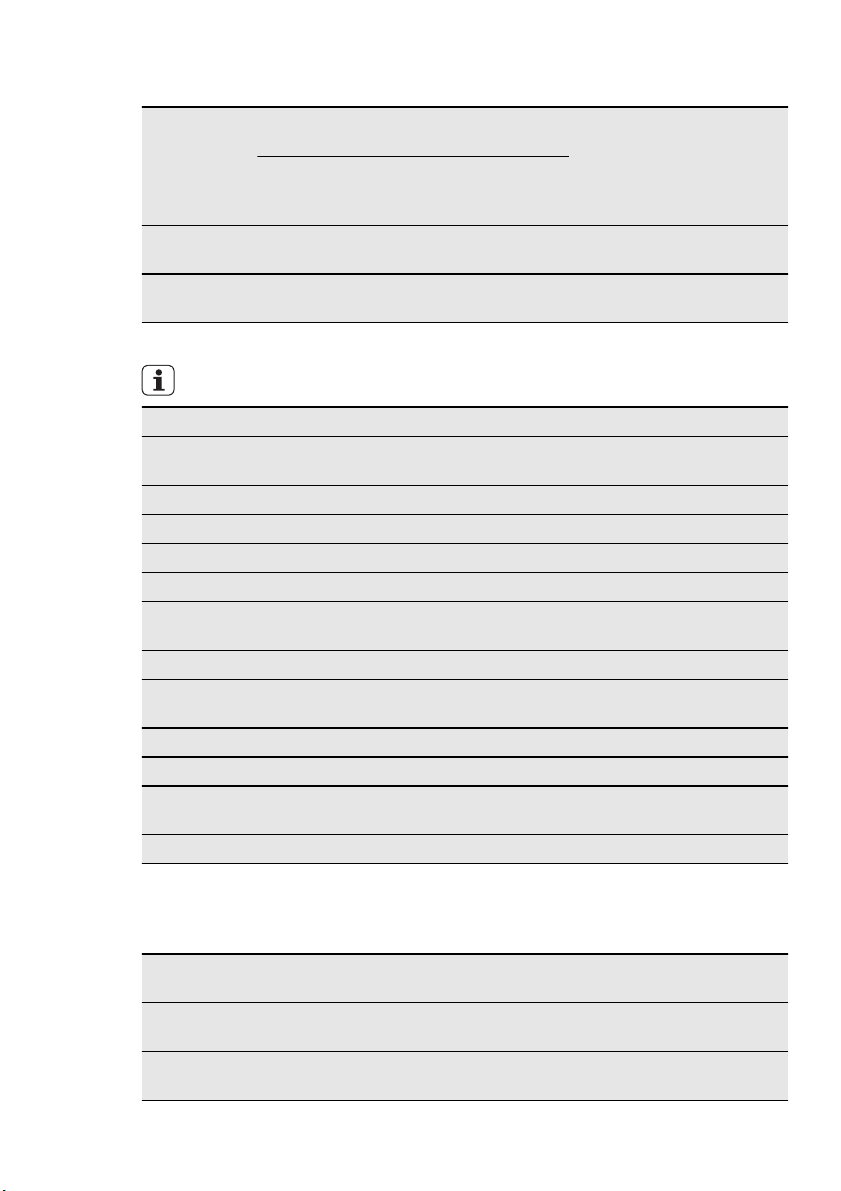
5.2 Oven functions
Oven function Application
2.
Turn the knob for the temperature to
a temperature.
The temperature indicator comes on
while the temperature in the appliance
increases.
3.
To deactivate the appliance, turn the
knob for the oven functions and the
knob for the temperature to the Off
position.
Off position The appliance is off.
Light To activate the oven lamp without a cooking function.
Conventional
Cooking
To bake and roast on one oven level. The top and bot-
tom heating elements operate at the same time.
Page 8
www.electrolux.com
8
Oven function Application
Top Heat
Bottom Heat
Grilling
Fast Grilling
Turbo Grilling
True Fan
Cooking
Pizza Setting
6. CLOCK FUNCTIONS
To finish cooked dishes. Only the top heating element
operates.
To bake cakes with crispy or crusty bottom. Only the
bottom heating element operates.
To grill flat food items in small quantities in the middle
of the shelf. To make toast.
To grill flat food items in large quantities. To make
toast. The full grill element operates.
To cook large pieces of meat. The grill element and the
oven fan operate one after the other and circulate hot
air around the food.
To roast or roast and bake food with the same cooking
temperature, on more than one shelf, without flavour
transference.
To make pizza, quiche or pie. The grill and bottom ele-
ment provide direct heat and the fan circulates the hot
air to cook the pizza toppings or pie filling.
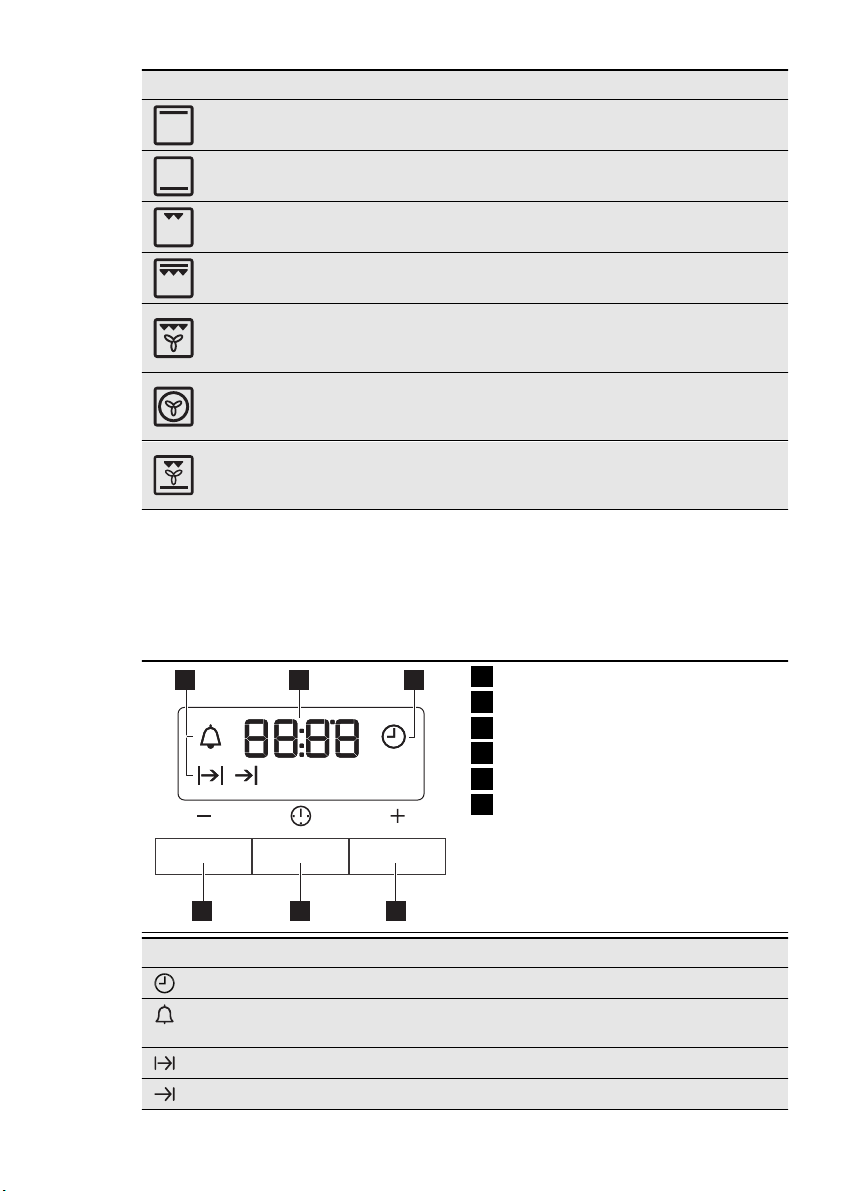
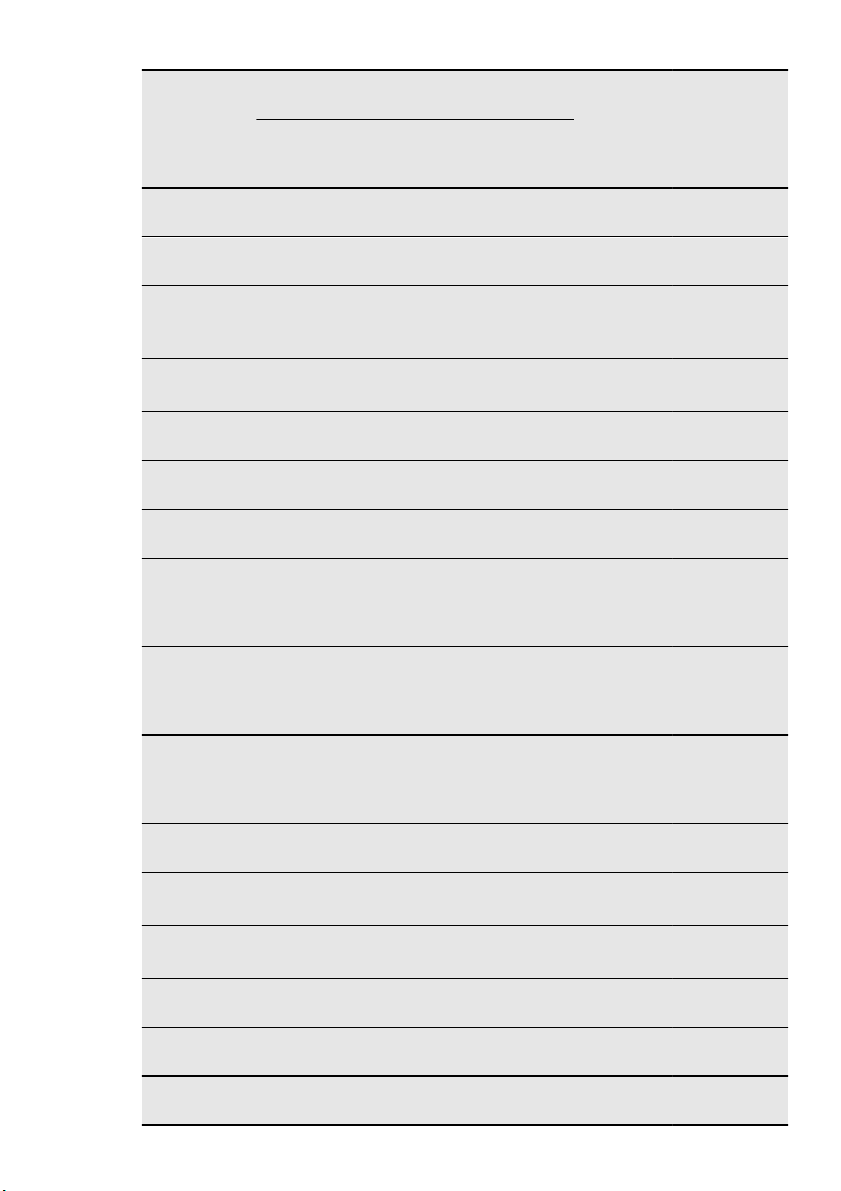
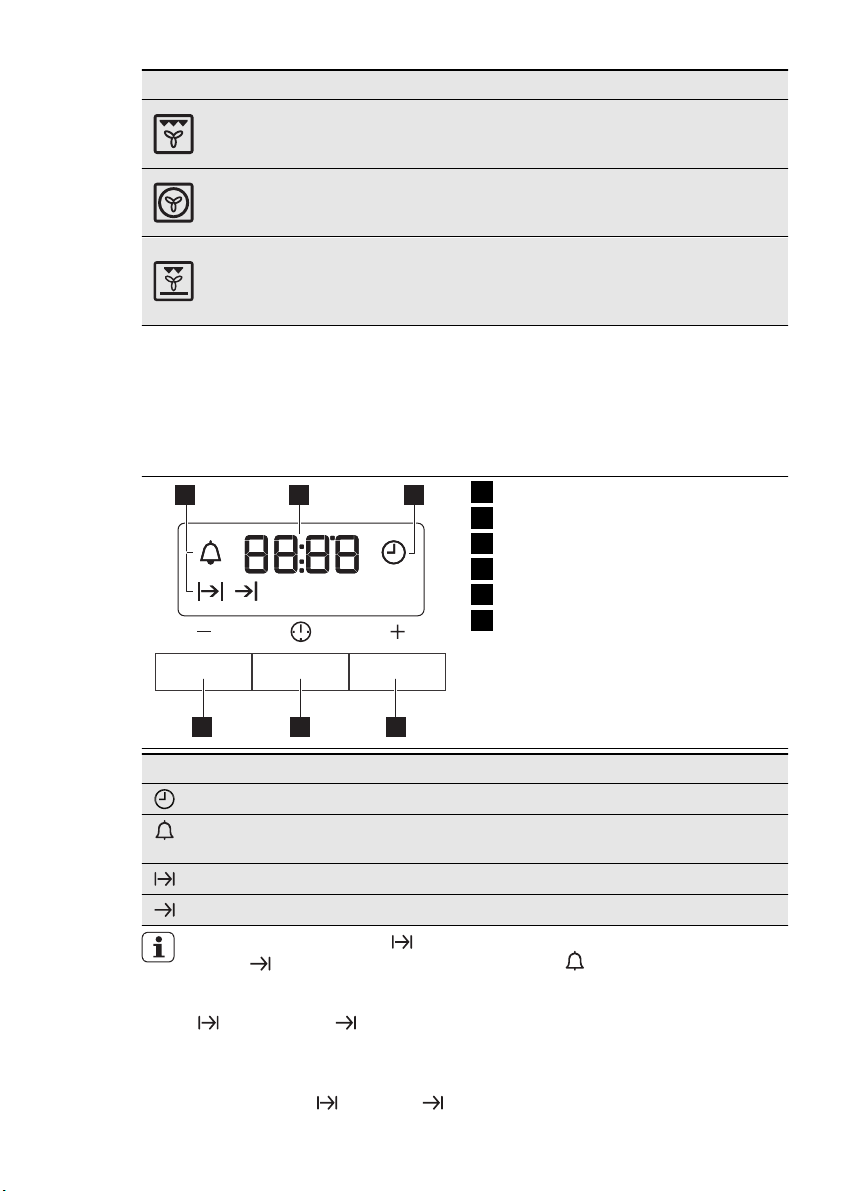
6.1 Electronic programmer
Function indicators
1 2 3
hr min
456
Clock function Application
Time of day To set, change or check the time of day.
Minute Minder To set a countdown time. This function has no effect on
the operation of the oven.
Duration To set how long the appliance must operate.
End To set when the appliance must be deactivated.
1
Time display
2
Function indicator
3
Button +
4
Selection button
5
Button -
6
Page 9
You can use Duration and End
at the same time to set the
time when the appliance must be
activated and then deactivated.
First set Duration
.
, then End
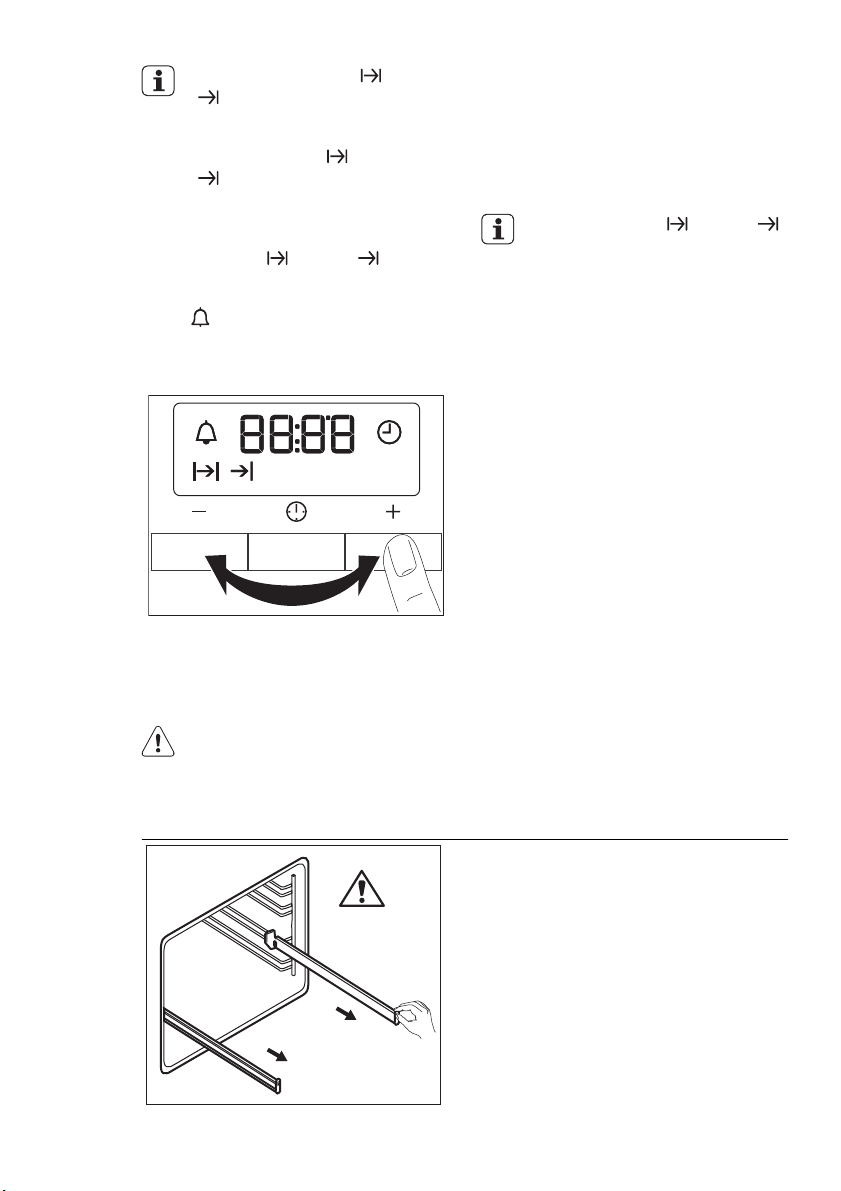
6.2 Setting the clock functions
1.
For Duration and End , set an
oven function and temperature. This
is not necessary for the Minute Mind-
.
er
2.
Press the Selection button again and
again until the indicator for the necessary clock function flashes.
hr minhr min
ENGLISH 9
3.
Press + or - to set the time for the
necessary clock function.
The display shows the indicator for
the clock function you set. When the
set time ends, the indicator flashes
and an acoustic signal sounds for two
minutes.
With the Duration and End
functions, the appliance deactivates automatically.
4.
Press a button to stop the signal.
5.
Turn the knob for the oven functions
and the knob for the temperature to
the off position.
6.3 Cancelling the clock
functions
1.
Press the Selection button again and
again until the necessary function indicator flashes.
2.
Press and hold the button -.
The clock function goes out after
some seconds.
7. USING THE ACCESSORIES
WARNING!
Refer to "Safety information"
chapter.
7.1 Telescopic runners
°C
1.
Pull out the right and left hand telescopic runners.
Page 10
www.electrolux.com
10
°C
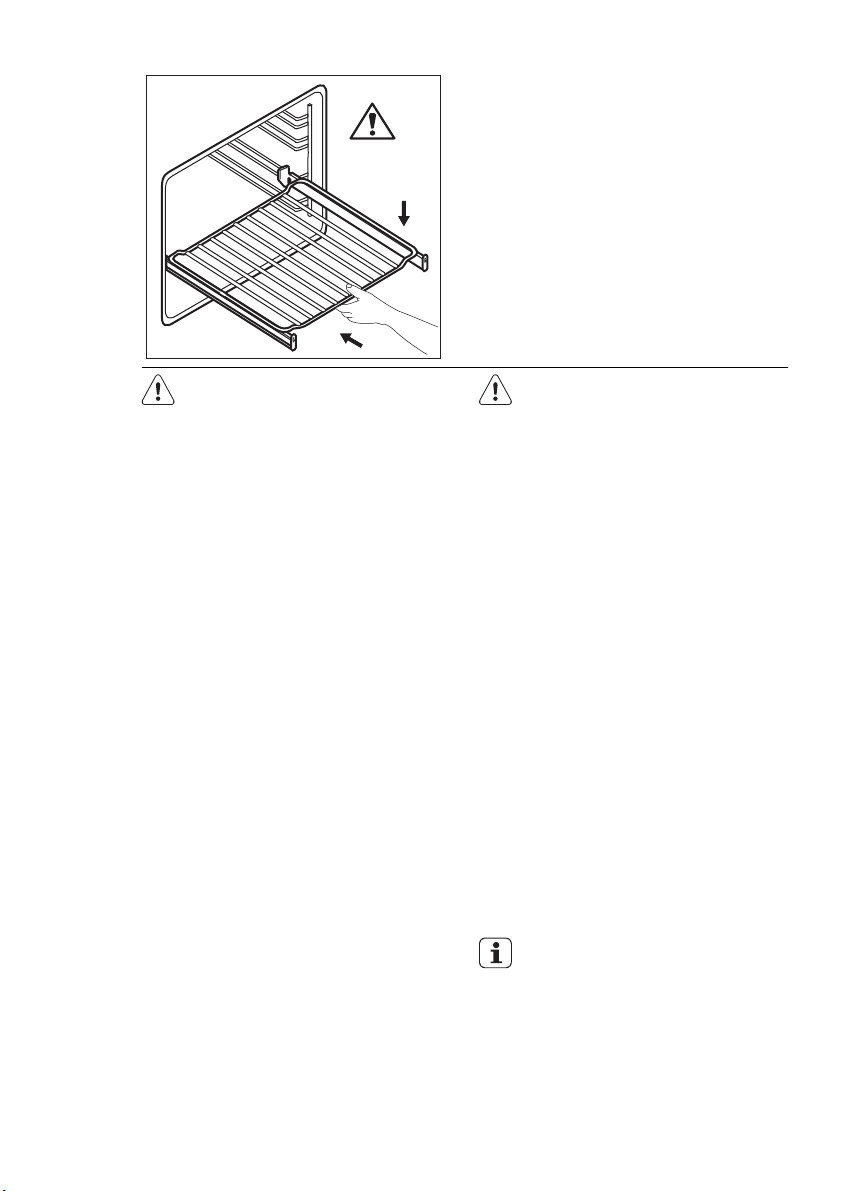
2.
Put the wire shelf on the telescopic
runners and carefully push them into
the appliance.
Make sure you push back the telescopic runners fully in the appliance
before you close the oven door.
Keep the installation instructions
for the telescopic runners for future use.
With telescopic runners you can put in
and remove the shelves more easily.
8. ADDITIONAL FUNCTIONS
8.1 Cooling fan
When the appliance operates, the cooling
fan activates automatically to keep the
surfaces of the appliance cool. If you deactivate the appliance, the cooling fan
continues to operate until the temperature
in the appliance cools down.
8.2 Safety thermostat
Incorrect operation of the appliance or defective components can cause dangerous
9. HELPFUL HINTS AND TIPS
9.1 Inner side of the door
In some models, on the inner side of
the door you can find:
• The numbers of the shelf positions.
• Information about the heating functions,
recommended shelf positions and temperatures for typical dishes.
CAUTION!
Do not clean the telescopic runners in the dishwasher. Do not lubricate the telescopic runners.
overheating. To prevent this, the oven has
a safety thermostat which interrupts the
power supply. The oven activates again
automatically when the temperature
drops.
The temperature and baking times
in the tables are guidelines only.
They depend on the recipes and
the quality and quantity of the ingredients used.
• The appliance has five shelf levels.
Count the shelf levels from the bottom
of the appliance floor.
• The appliance has a special system
which circulates the air and constantly
Page 11
recycles the steam. With this system
you can cook in a steamy environment
and keep the food soft inside and crusty outside. It decreases the cooking
time and energy consumption to a minimum.
• Moisture can condense in the appliance
or on the door glass panels. This is normal. Always stand back from the appliance when you open the appliance
door while cooking. To decrease the
condensation, operate the appliance for
10 minutes before cooking.
• Clean the moisture after each use of
the appliance.
• Do not put the objects directly on the
appliance floor and do not put aluminium foil on the components when you
cook. This can change the baking results and cause damage to the enamel.
9.2 Baking cakes
• Do not open the oven door before 3/4
of the set cooking time is up.
• If you use two baking trays at the same
time, keep one empty level between
them.
ENGLISH 11
9.3 Cooking meat and fish
• Use a deep pan for very fatty food to
prevent the oven from stains that can
be permanent.
• Leave the meat for approximately 15
minutes before carving so that the juice
does not seep out.
• To prevent too much smoke in the oven
during roasting, add some water into
the deep pan. To prevent the smoke
condensation, add water each time after it dries up.
9.4 Cooking times
Cooking times depend on the type of
food, its consistency, and volume.
Initially, monitor the performance when
you cook. Find the best settings (heat setting, cooking time, etc.) for your cookware, recipes and quantities when you
use this appliance.
9.5 Baking and roasting table
CAKES
Conventional
TYPE OF
DISH
Cooking
Shelf po-
Temp
sition
Whisked
2 170 3 (1 and 4) 160 45 - 60 In a cake
recipes
Shortbread
2 170 3 (1 and 4) 160 20 - 30 In a cake
dough
Buttermilk
1 170 2 165 60 - 80 In a 26 cm
cheesecake
Apple cake
2 170 1 (left and
(Apple pie)
Strudel 3 175 2 150 60 - 80 In a baking
[°C]
True Fan Cook-
ing
Shelf po-
sition
Tem
p
[°C]
160 80 - 100 In two 20
right)
Cooking
time
[min]
Notes
mould
mould
cake mould
cm cake
moulds on a
wire shelf
tray
1)
Page 12
www.electrolux.com
12
Conventional
TYPE OF
DISH
Cooking
Shelf po-
Temp
sition
Jam-tart 2 170 2 (left and
Sponge
2 170 2 160 50 - 60 In a 26 cm
cake
Christmas
2 160 1 or 2 140
cake / Rich
fruit cake
[°C]
True Fan Cook-
ing
Shelf po-
sition
Tem
p
[°C]
165 30 - 40 In a 26 cm
right)
–
150
Cooking
time
Notes
[min]
cake mould
cake mould
90 - 120 In a 20 cm
cake
1)
mould
Plum cake 1 175 2 160 50 - 60 In a bread
1)
tin
Small cakes
- one level
Small cakes
- two levels
Small cakes
- three levels
Biscuits /
pastry
3 170 3 150 -
160
- - 2 and 4 150 160
- - 1, 3 and 5 150 160
3 140 3 140 -
150
20 - 30 In a baking
tray
25 - 35 In a baking
tray
30 - 45 In a baking
tray
30 - 35 In a baking
tray
stripes - one
level
Biscuits /
pastry
- - 2 and 4 140 150
35 - 40 In a baking
tray
stripes - two
levels
Biscuits /
pastry
- - 1, 3 and 5 140 150
35 - 45 In a baking
tray
stripes three levels
Meringues one level
Meringuestwo levels
Buns 3 170 –
Eclairs - one
level
Eclairs - two
levels
3 120 3 120 80 - 100 In a baking
tray
- - 2 and 4 120 80 - 100 In a baking
1)
tray
3 190 12 - 20 In a baking
190
tray
1)
3 190 3 170 25 - 35 In a baking
tray
- - 2 and 4 170 35 - 45 In a baking
tray
Plate tarts 2 180 2 170 45 - 70 In a 20 cm
cake mould
Page 13
ENGLISH 13
TYPE OF
DISH
Shelf po-
Rich fruit
cake
Victoria
sandwich
1)
Preheat for 10 minutes.
Conventional
Cooking
Temp
sition
1 160 2 150 110 - 120 In a 24 cm
1 170 2 (left and
[°C]
True Fan Cook-
ing
Shelf po-
sition
Tem
p
[°C]
160 50 - 60 In a 20 cm
right)
Cooking
time
[min]
Notes
cake mould
cake mould
BREAD AND PIZZA
TYPE OF
DISH
Conventional
Cooking
Shelf po-
sition
Temp
[°C]
True Fan Cook-
ing
Shelf po-
sition
Tem
p
[°C]
Cooking
time
[min]
Notes
White bread 1 190 1 190 60 - 70 1 - 2 pieces,
500 gr per
1)
piece
Rye bread 1 190 1 180 30 - 45 In a bread tin
Bread rolls 2 190 2 (2 and 4) 180 25 - 40 6 - 8 rolls in
a baking
1)
tray
Pizza 1 200 -
210
1 200 -
210
10 - 20 In a baking
tray or a
deep pan
Scones 3 200 3 190 10 - 20 In a baking
1)
tray
1)
Preheat for 10 minutes.
1)
FLANS
TYPE OF
DISH
Conventional
Cooking
Shelf po-
sition
Tem
True Fan Cook-
Shelf po-
p
[°C]
sition
ing
Tem
p
[°C]
Cooking
time
[min]
Notes
Pasta flan 2 200 2 180 40 - 50 In a mould
Vegetable
2 200 2 175 45 - 60 In a mould
flan
Quiches 1 180 1 180 50 - 60
Lasagne 2 180 -
190
2 180 -
190
25 - 40
In a mould
In a mould
1)
1)
Page 14
www.electrolux.com
14
Conventional
TYPE OF
DISH
Cooking
Shelf po-
Tem
sition
Cannelloni 2 180 -
1)
Preheat for 10 minutes.
True Fan Cook-
Shelf po-
p
[°C]
190
ing
sition
2 180 -
Tem
p
[°C]
190
Cooking
time
[min]
25 - 40
Notes
In a mould
MEAT
TYPE OF
DISH
Conventional
Cooking
Shelf po-
sition
Tem
p
[°C]
Shelf po-
True Fan Cook-
ing
Tem
sition
p
[°C]
Cooking
time [min]
Notes
Beef 2 200 2 190 50 - 70 On a wire
shelf
Pork 2 180 2 180 90 - 120 On a wire
shelf
Veal 2 190 2 175 90 - 120 On a wire
shelf
English roast
beef, rare
English roast
beef, medi-
2 210 2 200 50 - 60 On a wire
shelf
2 210 2 200 60 - 70 On a wire
shelf
um
English roast
beef, well
2 210 2 200 70 - 75 On a wire
shelf
done
Shoulder of
2 180 2 170 120 - 150 With rind
pork
Shin of pork 2 180 2 160 100 - 120 2 pieces
Lamb 2 190 2 175 110 - 130 Leg
Chicken 2 220 2 200 70 - 85 Whole
Turkey 2 180 2 160 210 - 240 Whole
Duck 2 175 2 220 120 - 150 Whole
Goose 2 175 1 160 150 - 200 Whole
Rabbit 2 190 2 175 60 - 80 Cut in pieces
Hare 2 190 2 175 150 - 200 Cut in pieces
Pheasant 2 190 2 175 90 - 120 Whole
1)
Page 15
ENGLISH 15
FISH
TYPE OF
DISH
Trout / Sea
Conventional
Cooking
Shelf po-
Tem
sition
2 190 2 175 40 - 55 3 - 4 fish
True Fan Cook-
Shelf po-
p
[°C]
sition
ing
Tem
p
[°C]
Cooking
time [min]
Notes
bream
Tuna fish /
2 190 2 175 35 - 60 4 - 6 fillets
Salmon
9.6 Grilling
Preheat the empty oven for 10 minutes, before cooking.
Quantity Grilling Cooking time [min]
TYPE OF DISH Pieces [g] Shelf po-
sition
Fillet steaks 4 800 4 max. 12 - 15 12 - 14
Beef steaks 4 600 4 max. 10 - 12 6 - 8
Sausages 8 - 4 max. 12 - 15 10 - 12
Pork chops 4 600 4 max. 12 - 16 12 - 14
Chicken (cut in
2 1000 4 max. 30 - 35 25 - 30
2)
Kebabs 4 - 4 max. 10 - 15 10 - 12
Breast of chick-
4 400 4 max. 12 - 15 12 - 14
en
Hamburger 6 600 4 max. 20 - 30 Fish fillet 4 400 4 max. 12 - 14 10 - 12
Toasted sand-
4 - 6 - 4 max. 5 - 7 -
wiches
Toast 4 - 6 - 4 max. 2 - 4 2 - 3
Temp
[°C]
1st side 2nd side
9.7 Turbo Grilling
Beef
TYPE OF DISH Quantity
Roast beef or fillet, rare
Roast beef or fillet, medium
per cm of
thickness
per cm of
thickness
Shelf posi-
tion
1
1
Tempera-
ture [°C]
190 - 200
180 - 190
1)
1)
Time [min]
5 - 6
6 - 8
Page 16

www.electrolux.com
16
TYPE OF DISH Quantity
Roast beef or fillet, well done
1)
Preheat the oven.
per cm of
thickness
Shelf posi-
tion
1
Tempera-
ture [°C]
170 - 180
1)
Time [min]
8 - 10
Pork
TYPE OF DISH Quantity
Shoulder, neck,
ham joint
1 - 1.5 kg 1 160 - 180 90 - 120
Shelf posi-
tion
Tempera-
ture [°C]
Time [min]
Chop, spare rib 1 - 1.5 kg 1 170 - 180 60 - 90
Meat loaf 750 g - 1 kg 1 160 - 170 50 - 60
Pork knuckle
(precooked)
750 g - 1 kg 1 150 - 170 90 - 120
Veal
TYPE OF
DISH
Quantity Shelf posi-
tion
Temperature
[°C]
Time [min]
Roast veal 1 kg 1 160 - 180 90 - 120
Knuckle of
1.5 - 2 kg 1 160 - 180 120 - 150
veal
Lamb
TYPE OF
DISH
Leg of lamb,
Quantity Shelf posi-
tion
Temperature
[°C]
Time [min]
1 - 1.5 kg 1 150 - 170 100 - 120
roast lamb
Saddle of
1 - 1.5 kg 1 160 - 180 40 - 60
lamb
Poultry
TYPE OF
DISH
Poultry portions
Chicken , half 400 - 500 g
Quantity Shelf posi-
tion
200 - 250 g
1 200 - 220 30 - 50
each
1 190 - 210 35 - 50
Temperature
[°C]
Time [min]
each
Chicken, pou-
1 - 1.5 kg 1 190 - 210 50 - 70
lard
Duck 1.5 - 2 kg 1 180 - 200 80 - 100
Goose 3.5 - 5 kg 1 160 - 180 120 - 180
Turkey 2.5 - 3.5 kg 1 160 - 180 120 - 150
Page 17

ENGLISH 17
TYPE OF
DISH
Quantity Shelf posi-
tion
Temperature
[°C]
Time [min]
Turkey 4 - 6 kg 1 140 - 160 150 - 240
Fish (steamed)
TYPE OF
DISH
Quantity Shelf posi-
tion
Temperature
[°C]
Time [min]
Whole fish 1 - 1.5 kg 1 210 - 220 40 - 60
9.8 Drying - True Fan Cooking
Cover the oven shelves with baking
parchment.
VEGETABLES
TYPE OF
DISH
Beans 3 1/4 60 - 70 6 - 8
Peppers 3 1/4 60 - 70 5 - 6
Vegetables for
soup
Mushrooms 3 1/4 50 - 60 6 - 8
Herbs 3 1/4 40 - 50 2 - 3
FRUIT
TYPE OF
DISH
Plums 3 1/4 60 - 70 8 - 10
Apricots 3 1/4 60 - 70 8 - 10
Apple slices 3 1/4 60 - 70 6 - 8
Pears 3 1/4 60 - 70 6 - 9
Information on acrylamides
Important! According to the newest
scientific knowledge, if you brown food
(specially the one which contains starch),
Shelf position
1 level 2 levels
Temperature
[°C]
3 1/4 60 - 70 5 - 6
Shelf position
1 level 2 levels
Temperature
[°C]
acrylamides can pose a health risk. Thus,
we recommend that you cook at the
lowest temperatures and do not brown
food too much.
Time [hr]
Time [hr]
10. CARE AND CLEANING
WARNING!
Refer to "Safety information"
chapter.
• Clean the front of the appliance with a
soft cloth with warm water and a cleaning agent.
• To clean metal surfaces use a usual
cleaning agent.
Page 18

www.electrolux.com
18
• Clean the oven interior after each use.
• Clean stubborn dirt with a special oven
• Clean all oven accessories after each
• If you have nonstick accessories, do
Removing the shelf supports
Then you can remove dirt more easily
and it does not burn on.
cleaner.
use and let them dry. Use a soft cloth
with warm water and a cleaning agent.
not clean them using aggressive
agents, sharp-edged objects or a dishwasher. It can destroy nonstick coating.
Stainless steel or aluminium
appliances:
Clean the oven door with a wet
sponge only. Dry it with a soft
cloth.
Do not use steel wool, acids or
abrasive materials, as they can
cause damage to the oven surface. Clean the oven control panel
with the same precautions.
10.1 Cleaning the door gasket
• Regularly do a check of the door gasket. The door gasket is around the
frame of the oven cavity. Do not use the
appliance if the door gasket is damaged. Contact the Service Centre.
• To clean the door gasket, refer to the
general information about cleaning.
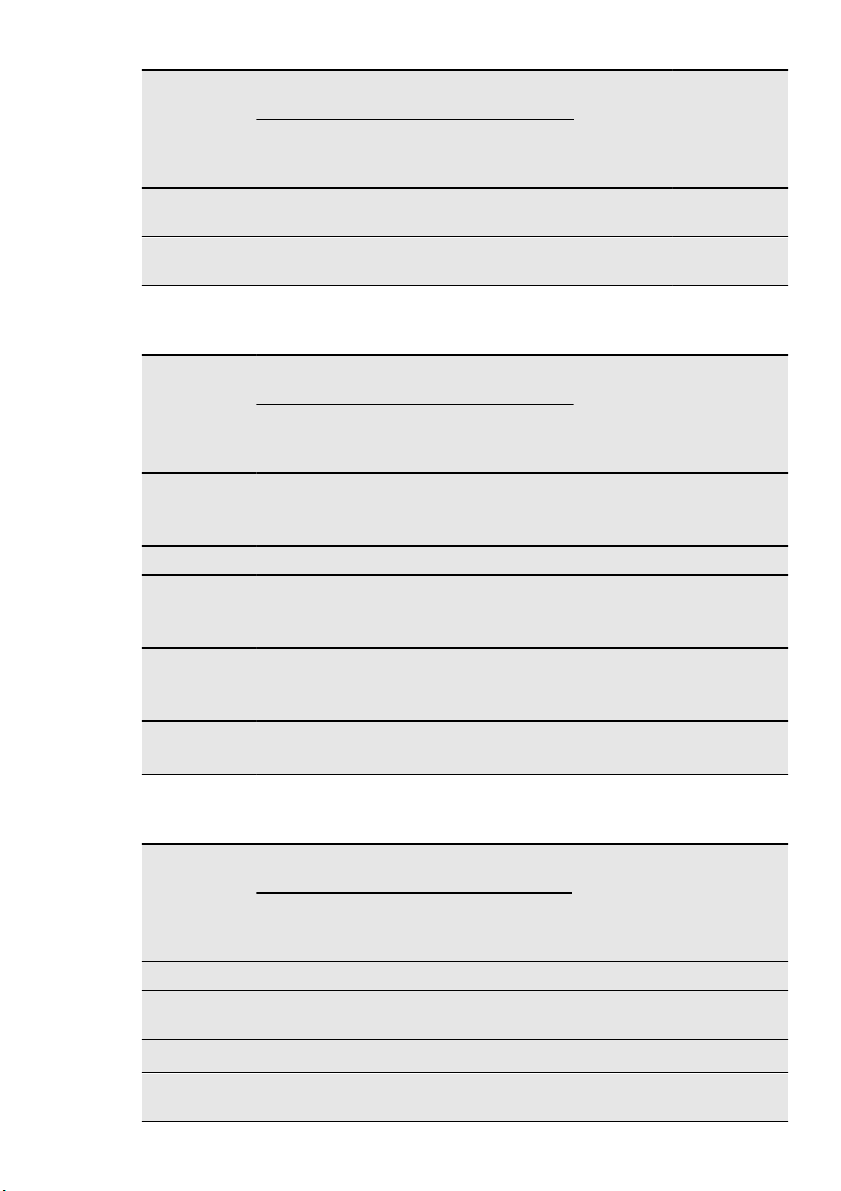
10.2 Shelf supports
You can remove the shelf supports to
clean the side walls.
1.
Pull the front of the shelf support away
from the side wall.
1
2
Installing the shelf supports
Install the shelf supports in the opposite
sequence.
The rounded ends of the shelf
supports must point to the front.
2.
Pull the rear end of the shelf support
away from the side wall and remove
it.
10.3 Oven ceiling
You can remove the grill to clean the oven
ceiling more easily.
Page 19

WARNING!
Deactivate the appliance before
you remove the grill. Make sure
that the appliance is cold. There is
a risk of burns.
1.
Remove the screw which holds the
grill. For the first time, use a screwdriver.
2.
Carefully pull the grill down.
3.
Clean the oven ceiling with a soft
cloth with warm water and a cleaning
agent, and let it dry.
4.
Install the grill in the opposite sequence.
WARNING!
Make sure that the grill is correctly
installed and that it does not fall
down.
10.4 Oven lamp
WARNING!
Be careful when you change the
oven lamp. There is a risk of electrical shock.
ENGLISH 19
Before you change the oven lamp:
• Deactivate the oven.
• Remove the fuses in the fuse box or
deactivate the circuit breaker.
Put a cloth on the bottom of the
oven to prevent damage to the
oven light and glass cover.
Always hold the halogen lamp
with a cloth to prevent grease residue from burning on the lamp.
1.
Turn the glass cover counterclockwise to remove it.
2.
Clean the glass cover.
3.
Replace the oven light bulb with an
applicable 300 °C heat-resistant oven
light bulb.
Use the same oven lamp type.
4.
Install the glass cover.
10.5 Cleaning the oven door
The oven door has three panels of glass
installed one behind the other. You can
remove the oven door and the internal
glass panels to clean them.
CAUTION!
Do not use the appliance without
the glass panels.
The direction in which you open
the door depends on your oven
model. You open the door from
the right side in some models and
from the left side in others.
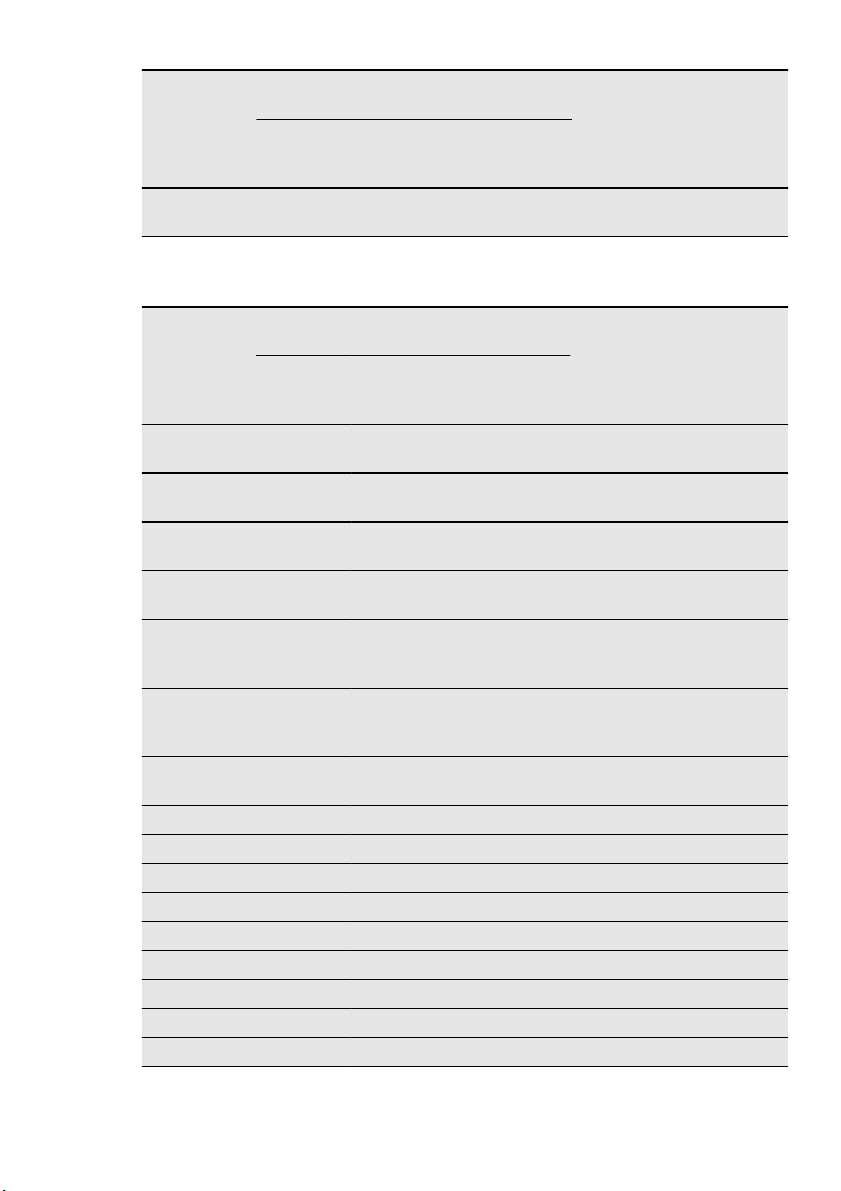
Removing the oven door and the glass panels
1.
A
Press the buttons at the sides of the
door trim (A) on the upper cover and
pull it upwards to remove it.
Page 20

www.electrolux.com
20
Clean the door with a wet sponge and rub
it dry with a soft cloth. Do not use steel
wool, acids or abrasive cleaning agents
because they can damage the surface.
When the oven door is clean, install the
glass panels in the opposite sequence.
The middle glass panel has a small dot on
the top and the second one has screen
printings. Make sure that you put the middle glass panel in the correct seats.
The screen-printing zone must face the
inner side of the door. Make sure that after the installation the surface of the glass
panel frame is not rough when you touch
it.
2.
B
Hold the inner glass B tightly with
both hands and slide it upwards to
remove it from its initial position. Do
the same with the second glass panel.
CAUTION!
Make sure that you tightly hold the
glasses to prevent them from falling.
11. WHAT TO DO IF…
WARNING!
Refer to "Safety information"
chapter.
Problem Possible cause Remedy
The oven does not heat
up.
The oven does not heat
up.
The oven does not heat
up.
The oven does not heat
up.
The appliance is deacti-
Activate the appliance.
vated.
The clock is not set. Set the clock.
The necessary settings
are not set.
The fuse in the fuse box
is released.
Make sure that the settings are correct.
Do a check of the fuse. If
the fuse is released more
than one time, contact a
qualified electrician.
Page 21

Problem Possible cause Remedy
The oven lamp does not
operate.
The display shows 12.00. There was a power cut. Set the clock.
Steam and condensation
settle on the food and in
the oven.
If you cannot find a solution to the problem yourself, contact your dealer or the
service centre.
We recommend that you write the data here:
Model (MOD.) .........................................
Product number (PNC) .........................................
Serial number (S.N.) .........................................
12. INSTALLATION
WARNING!
Refer to "Safety information"
chapter.
The oven lamp is defective.
You left the dish in the
oven for too long.
The necessary data for the service centre
is on the rating plate. The rating plate is
on the front frame of the appliance cavity.
ENGLISH 21
Replace the oven lamp.
Do not keep the dishes in
the oven for longer than
15 - 20 minutes after the
cooking ends.
12.1 Building In
558
573
min. 550
548
20
589
594
5
590
600
20
min. 560
min. 550
20
min. 560
Page 22

www.electrolux.com
22
12.2 Securing the appliance to
the cabinet
1.
2.
Open the appliance door.
Fasten the appliance to the cabinet.
Put the four distance holders (A) into
the holes in the frame and then tighten the four screws (B) supplied with
the appliance.
AB
The manufacturer is not responsible if you do not follow the safety
precautions from the chapter
"Safety Information".
This appliance is supplied with a main
plug and a main cable.
12.4 Cable
Cable types applicable for installation or
replacement: H07 RN-F, H05 RN-F, H05
RRF, H05 VV-F, H05 V2V2-F (T90), H05
BB-F.
For the section of the cable refer to the
total power (on the rating plate) and to the
table:
Total power
maximum 1380W3 x 0.75 mm²
maximum 2300W3 x 1 mm²
maximum 3680W3 x 1.5 mm²
Section of the ca-
ble
12.3 Electrical installation
WARNING!
Only a qualified person must do
the electrical installation.
13. ENVIRONMENT CONCERNS
Recycle the materials with the symbol
. Put the packaging in applicable
containers to recycle it.
Help protect the environment and human
health and to recycle waste of electrical
The hearth cord (green / yellow cable)
must be 2 cm longer than phase and neutral cables (blue and brown cables).
and electronic appliances. Do not dispose
appliances marked with the symbol
with the household waste. Return the
product to your local recycling facility or
contact your municipal office.
Page 23

SUOMI 23
SISÄLLYS
1. TURVALLISUUSTIEDOT . . . . . . . . . . . . . . . . . . . . . . . . . . . . . . . . . . . . . . . . . . . . . . . . . . 24
2. TURVALLISUUSOHJEET . . . . . . . . . . . . . . . . . . . . . . . . . . . . . . . . . . . . . . . . . . . . . . . . . 25
3. LAITTEEN KUVAUS . . . . . . . . . . . . . . . . . . . . . . . . . . . . . . . . . . . . . . . . . . . . . . . . . . . . . 27
4. KÄYTTÖÖNOTTO . . . . . . . . . . . . . . . . . . . . . . . . . . . . . . . . . . . . . . . . . . . . . . . . . . . . . . . 27
5. PÄIVITTÄINEN KÄYTTÖ . . . . . . . . . . . . . . . . . . . . . . . . . . . . . . . . . . . . . . . . . . . . . . . . . . 28
6. KELLOTOIMINNOT . . . . . . . . . . . . . . . . . . . . . . . . . . . . . . . . . . . . . . . . . . . . . . . . . . . . . . 29
7. LISÄVARUSTEIDEN KÄYTTÄMINEN . . . . . . . . . . . . . . . . . . . . . . . . . . . . . . . . . . . . . . . . . 30
8.
LISÄTOIMINNOT . . . . . . . . . . . . . . . . . . . . . . . . . . . . . . . . . . . . . . . . . . . . . . . . . . . . . . . . 31
9. HYÖDYLLISIÄ NEUVOJA JA VINKKEJÄ . . . . . . . . . . . . . . . . . . . . . . . . . . . . . . . . . . . . . . 31
10.
HOITO JA PUHDISTUS . . . . . . . . . . . . . . . . . . . . . . . . . . . . . . . . . . . . . . . . . . . . . . . . . . . 39
11. KÄYTTÖHÄIRIÖT . . . . . . . . . . . . . . . . . . . . . . . . . . . . . . . . . . . . . . . . . . . . . . . . . . . . . . . 42
12.
ASENNUS . . . . . . . . . . . . . . . . . . . . . . . . . . . . . . . . . . . . . . . . . . . . . . . . . . . . . . . . . . . . . 42
13. YMPÄRISTÖNSUOJELU . . . . . . . . . . . . . . . . . . . . . . . . . . . . . . . . . . . . . . . . . . . . . . . . . . 44
WE’RE THINKING OF YOU
Kiitämme teitä Electrolux-laitteen hankinnasta. Olette valinneet tuotteen, joka perustuu
vuosikymmenien aikana saatuun kokemukseen ja innovaatioon. Kekseliäs ja tyylikäs laite, joka on
suunniteltu teitä ajatellen. Laitetta käyttäessänne voitte olla aina varma erinomaisista tuloksista.
Tervetuloa Electroluxin maailmaan.
Vieraile verkkosivullamme:
Saadaksesi käyttöön liittyviä neuvoja, esitteitä, vianmääritysohjeita ja huolto-ohjeita:
www.electrolux.com
Tuotteen rekisteröimiseksi parempaa huoltoa varten:
www.electrolux.com/productregistration
Ostaaksesi laitteesi lisävarusteita, kulutusosia ja alkuperäisiä varaosia:
www.electrolux.com/shop
KULUTTAJANEUVONTA JA HUOLTO
Suosittelemme alkuperäisten varaosien käyttöä.
Pidä seuraavat tiedot saatavilla ottaessasi yhteyttä valtuutettuun huoltoliikkeeseen.
Kyseiset tiedot löytyvät laitteen arvokilvestä. Malli, tuotenumero, sarjanumero.
Varoitukset/huomautukset ja turvallisuusohjeet.
Yleistietoja ja vinkkejä
Ympäristönsuojeluohjeita
Oikeus muutoksiin pidätetään.
Page 24

www.electrolux.com
24
1. TURVALLISUUSTIEDOT
Lue laitteen mukana toimitetut ohjeet ennen laitteen asennusta ja käyttöä. Valmistaja ei ota vastuuta henkilö- tai
omaisuusvahingoista, jotka aiheutuvat laitteen virheellisestä asennuksesta tai käytöstä. Pidä ohjeet aina laitteen
mukana tulevia käyttökertoja varten.
1.1 Lasten ja taitamattomien henkilöiden turvallisuus
VAROITUS!
Tukehtumis-, henkilövamma- tai pysyvän vammautumisen vaara.
• Vähintään 8 vuotta täyttäneet lapset ja sellaiset henkilöt, joiden fyysiset, sensoriset tai henkiset kyvyt eivät
ole tähän riittäviä tai joilla ei ole laitteen tuntemusta tai
kokemusta sen käytöstä, saavat käyttää tätä laitetta ainoastaan silloin, kun heidän turvallisuudestaan vastaava
henkilö valvoo heitä.
• Älä anna lasten leikkiä laitteella.
• Pidä kaikki pakkausmateriaalit lasten ulottumattomissa.
• Pidä lapset ja kotieläimet poissa laitteen luota silloin,
kun laite on toiminnassa tai se jäähtyy. Laitteen osat
ovat kuumia.
• Jos laitteessa on lapsilukko, suosittelemme sen käyttämistä.
• Lapset eivät saa suorittaa puhdistusta tai huoltoa ilman
valvontaa.
1.2 Yleiset turvallisuusohjeet
• Laitteen sisäosa kuumenee käytön aikana. Älä kosketa
laitteen lämpövastuksiin. Käytä aina uunikintaita, kun
käsittelet lisävarusteita tai uunivuokia.
• Laitteen puhdistuksessa ei saa käyttää painepesuria.
• Irrota pistoke pistorasiasta ennen kuin aloitat huoltotoimenpiteet.
Page 25

SUOMI 25
• Älä käytä hankausaineita tai teräviä metallikaapimia lasiluukun puhdistamisessa, sillä ne voivat naarmuttaa pintaa, mistä voi olla seurauksena luukun lasin särkyminen.
• Poista kannatinkiskot vetämällä ensin kannatinkiskon
etuosasta ja sen jälkeen takaosa irti sivuseinistä. Kiinnitä uunipeltien kannatinkiskot takaisin paikalleen suorittamalla toimenpiteet päinvastaisessa järjestyksessä.
2.
TURVALLISUUSOHJEET
2.1 Asennus
VAROITUS!
Asennuksen saa suorittaa vain
ammattitaitoinen henkilö.
• Poista kaikki pakkausmateriaalit.
• Vaurioitunutta laitetta ei saa asentaa tai
käyttää.
• Noudata koneen mukana toimitettuja
ohjeita.
• Siirrä laitetta aina varoen, sillä se on
raskas. Käytä aina suojakäsineitä.
• Älä koskaan vedä laitetta sen kahvasta
kiinni pitäen.
• Noudata mainittuja vähimmäisetäisyyk-
siä muihin laitteisiin ja kalusteisiin.
• Varmista, että laite asennetaan turvallis-
ten rakenteiden alapuolelle ja lähelle.
• Tarkista, että laite on kiinnitetty kunnolla
kaapistoon.
Sähköliitäntä
VAROITUS!
Tulipalo- ja sähköiskuvaara.
• Kaikki sähkökytkennät tulee jättää
asiantuntevan sähköasentajan vastuulle.
• Laite on kytkettävä maadoitettuun pis-
torasiaan.
• Varmista, että arvokilven sähkötiedot
vastaavat kotitalouden sähköverkon arvoja. Ota muussa tapauksessa yhteyttä
sähköasentajaan.
• Kytke pistoke maadoitettuun pistorasiaan.
• Älä käytä jakorasioita tai jatkojohtoja.
• Varmista, ettei pistoke ja virtajohto vaurioidu. Ota yhteyttä huoltoliikkeeseen tai
sähköasentajaan vaurioituneen virtajohdon vaihtamiseksi.
• Älä anna virtajohtojen koskettaa laitteen
luukkuun, varsinkaan luukun ollessa
kuuma.
• Jännitteenalaisten ja eristettyjen osien
suojat tulee asentaa niin, ettei niiden irrotus onnistu ilman työkaluja.
• Kytke pistoke pistorasiaan vasta asennuksen jälkeen. Varmista, että laitteen
verkkovirtakytkentä on ulottuvilla laitteen asennuksen jälkeen.
• Jos pistoke on löysästi kiinni virtajohdossa, älä kiinnitä sitä pistorasiaan.
• Älä vedä virtajohdosta pistoketta irrottaessasi. Vedä aina pistokkeesta.
• Käytä vain asianmukaisia eristyslaitteita:
suojakytkimet, sulakkeet (ruuvattavat
sulakkeet on irrotettava kannasta), vikavirtakytkimet ja kontaktorit.
• Sähköasennuksessa on oltava erotin,
joka mahdollistaa laitteen irrottamisen
sähköverkosta kaikista navoista. Erottimen kontaktiaukon leveys on oltava vähintään 3 mm.
2.2 Käyttö
VAROITUS!
Henkilövahinkojen, palovammojen
tai sähköiskujen tai räjähdyksen
vaara.
Page 26

www.electrolux.com
26
• Käytä laitetta kotiympäristössä.
• Älä muuta laitteen teknisiä ominaisuuk-
• Varmista, ettei tuuletusaukoissa ole es-
• Älä jätä laitetta ilman valvontaa toimin-
• Kytke laite pois toiminnasta jokaisen
• Laitteen sisäosa kuumenee käytön ai-
• Avaa laitteen luukku varoen laitteen ol-
• Älä käytä laitetta märillä käsillä tai kun
• Älä paina avointa uunin luukkua.
• Älä käytä laitetta työtasona tai säilytys-
• Pidä laitteen luukku aina suljettuna, kun
• Avaa laitteen luukku varoen. Alkoholia
• Älä anna kipinöiden tai avotulen päästä
• Älä aseta laitteeseen, sen lähelle tai
• Emalipinnan vaurioitumisen tai värimuu-
• Emalipintojen värimuutokset eivät vaiku-
• Käytä korkeareunaista uunivuokaa kos-
sia.
teitä.
nan aikana.
käyttökerran jälkeen.
kana. Älä kosketa laitteen lämpövastuksiin. Käytä aina uunikintaita, kun käsittelet lisävarusteita tai uunivuokia.
lessa toiminnassa. Laitteesta voi tulla
kuumaa ilmaa.
se on kosketuksissa veteen.
tasona.
laite on toiminnassa.
sisältävät aineet voivat kehittää helposti
syttyvän alkoholin ja ilman seoksen.
laitteeseen avatessasi luukkua.
päälle syttyviä tuotteita tai syttyviin tuotteisiin kostutettuja esineitä.
VAROITUS!
Laite voi muutoin vaurioitua.
toksien estäminen:
– Älä aseta uunivuokia tai muita esineitä
suoraan laitteen pohjalle.
– Älä aseta alumiinifoliota suoraan lait-
teen pohjalle.
– Älä aseta vettä suoraan kuumaan lait-
teeseen.
– Älä säilytä kosteita astioita tai ruokia
laitteessa sen käytön jälkeen.
– Ole varovainen, kun irrotat tai kiinnität
lisävarusteita.
ta laitteen toimintaan. Niitä ei katsota
viaksi takuuoikeudellisessa mielessä.
teiden leivonnaisten paistamisessa. He-
delmä- ja marjamehut voivat jättää pysyviä jälkiä.
2.3 Hoito ja puhdistus
VAROITUS!
Ne voivat aiheuttaa henkilövahinkoja, tulipaloja tai laitteen vaurioitumisen.
• Ennen kuin aloitat hoitoa tai puhdistusta, kytke laite pois toiminnasta ja irrota
pistoke pistorasiasta.
• Tarkista, että laite on kylmä. Vaarana on
lasilevyjen rikkoutuminen.
• Vaihda välittömästi vaurioituneet luukun
lasipaneelit. Ota yhteys valtuutettuun
huoltoliikkeeseen.
• Ole varovainen irrottaessasi luukkua.
Luukku on painava!
• Puhdista laite säännöllisesti, jotta pintamateriaali ei vaurioidu.
• Laitteeseen jäänyt rasva tai ruoka voi aiheuttaa tulipalon.
• Puhdista laite kostealla pehmeällä liinalla. Käytä vain mietoja puhdistusaineita.
Älä käytä hankausainetta, hankaavia
pesulappuja, liuottimia tai metalliesineitä.
• Jos käytät uuninpuhdistussuihketta,
noudata tuotepakkauksessa olevia turvallisuusohjeita.
• Älä puhdista katalyyttistä emalia (jos
olemassa) pesuaineella.
2.4 Sisävalo
• Käytä ainoastaan kodinkoneisiin tarkoitettuja hehkulamppuja tai halogeenilamppua. Älä käytä sitä rakennuksen
valaisemiseen.
VAROITUS!
Sähköiskun vaara.
• Ennen lampun vaihtamista laite on irrotettava pistorasiasta.
• Käytä ainoastaan ominaisuuksiltaan samanlaisia lamppuja.
2.5 Hävittäminen
VAROITUS!
Tällöin on olemassa henkilövahinko- tai tukehtumisvaara.
Page 27

• Irrota pistoke pistorasiasta.
• Leikkaa johto irti ja hävitä se.
3. LAITTEEN KUVAUS
3 52 41
5
4
3
11
2
1
10
9
Uunin toimintojen väännin
1
Virran merkkivalo
2
Elektroninen ohjelmointilaite
3
Lämpötilan valitsin
4
Lämpötilan merkkivalo
5
Grilli
6
• Poista luukun lukitus, jotta lapset ja eläimet eivät voisi jäädä kiinni laitteen sisälle.
Uunin lamppu
7
Puhallin
8
Uunipeltien kannatinkisko, irrotettava
9
Arvokilpi
6
7
8
10
Kannatintasot
11
3.1 Uunin varusteet
Uuniritilä
•
Käytetään keittoastioiden, kakkuvuo-
kien ja paistien alustana.
• Leivinpelti
Kakkuja ja pikkuleipiä varten.
• Grilli / uunipannu
Käytetään leivonnassa, paistamisessa
tai rasvankeruuastiana.
Teleskooppikannattimet
•
Ritilöitä ja leivinpeltiä varten.
SUOMI 27
4. KÄYTTÖÖNOTTO
VAROITUS!
Lue luku "Turvallisuusohjeet".
4.1 Ensimmäinen puhdistus
• Poista kaikki lisävarusteet ja irrotettavat
uunipeltien kannatinkiskot (jos olemassa).
• Puhdista laite ennen ensimmäistä käyttökertaa.
Lue ohjeet kohdasta "Hoito ja
puhdistus".
4.2 Kellonajan asetus
Kellonaika on asetettava ennen
uunin käyttämistä.
Kun laite kytketään sähköverkkoon tai kun
on tapahtunut sähkökatkos, kellotoiminnon merkkivalo vilkkuu.
Aseta kellonaika painamalla painiketta +
tai -.
Vilkkuminen lakkaa noin viiden sekunnin
kuluttua ja näytössä näkyy asetettu aika.
Page 28

www.electrolux.com
28
Säädä aikaa painamalla valintapainiketta
lotoiminnon merkkivalo vilkkuu.
Toimintojen Kestoaika
petus
nasta.
toistuvasti, kunnes kel-
on oltava pois toimin-
4.3 Esikuumennus
Esikuumenna tyhjä laite jäljelle jääneen
rasvan polttamiseksi pois.
1.
Valitse toiminto ja maksimilämpötila.
2.
Anna laitteen käydä yhden tunnin
ajan.
5. PÄIVITTÄINEN KÄYTTÖ
tai Lo-
3.
Valitse toiminto ja maksimilämpötila.
4.
Anna laitteen käydä kymmenen minuuttia.
5.
Valitse toiminto ja maksimilämpötila.
6.
Anna laitteen käydä kymmenen mi-
nuuttia.
Varusteet voivat kuumentua tavallista
enemmän. Laitteesta voi tulla hajua ja savua. Tämä on normaalia. Tarkista, että ilmavirtaus on riittävä.
VAROITUS!
Lue luku "Turvallisuusohjeet".
5.1 Laitteen kytkeminen
toimintaan ja pois toiminnasta
1.
Käännä uunin toimintojen valitsin haluamasi toiminnon kohdalle.
Virran merkkivalo palaa uunin toiminnan aikana.
2.
Käännä lämpötilan valitsin haluamasi
lämpötilan kohdalle.
Lämpötilan merkkivalo palaa uunin
kuumenemisen aikana.
3.
Uuni kytketään pois toiminnasta
kääntämällä uunin toimintojen väännin
ja lämpötilan väännin Off-asentoon.
5.2 Uunin toiminnot
Uunin toiminto Käyttötarkoitus
Pois toimin-
nasta
Valo Lampun sytyttäminen ilman uunitoimintoa.
Ylä + alalämpö
Ylälämpö
Alalämpö
Grilli
Maksigrilli
Paistaminen yhdellä kannatintasolla. Ylä- ja alavastuk-
Valmiiden ruokien loppukypsennys. Vain ylävastus toi-
Rapea- tai mureapohjaisten kakkujen paistaminen. Vain
Matalien ja pienten ruokamäärien grillaus ritilän keskellä.
Matalien ja suurien ruokamäärien grillaus. Leivän paah-
Laitteesta on katkaistu virta.
set toimivat samanaikaisesti.
alavastus toimii.
Leivän paahtaminen.
taminen. Suuri grillivastus on toiminnassa.
mii.
Page 29
Uunin toiminto Käyttötarkoitus
Gratinointi
Kiertoilma
Pizzatoiminto
6. KELLOTOIMINNOT
6.1 Elektroninen ohjelmointilaite
1 2 3
hr min
SUOMI 29
Suurikokoisten lihapalojen paistaminen. Grillivastus ja
uunin puhallin ovat yksi kerrallaan toiminnassa, ja kuu-
ma ilma kiertää ruoan ympärillä.
Saman paistolämpötilan vaativien ruokien paistaminen
samanaikaisesti useammalla kannatintasolla ilman, että
tuoksut sekoittuvat.
Pizzan, juustopiirakan tai muun piirakan valmistaminen.
Grilli- ja alavastus tuottavat suoran lämmön ja puhalti-
men ansiosta kuuma ilma kiertää pizzan tai piirakan
täytteiden kypsentämiseksi.
Toimintojen symbolit
1
Aikanäyttö
2
Toiminnon merkkivalo
3
Painike +
4
Valintapainike
5
Painike -
6
456
Kellotoiminto Käyttötarkoitus
Kellonaika Kellonajan asettaminen, muuttaminen tai tarkistaminen.
Hälytinajastin Hälytinajastimen asettaminen. Tämä toiminto ei vaikuta
millään tavalla uunin toimintaan.
Kestoaika Laitteen toiminta-ajan asettaminen.
Lopetus Laitteen sammumisajan asettaminen.
Voit valita toiminnot Kesto ja
Loppu
taaksesi laitteen käynnistymis- ja
sammumisajan. Aseta ensin Kesto
samanaikaisesti aset-
ja sitten Loppu .
ja lämpötila. Tämä ei koske hälytina-
jastinta
2.
Paina valintapainiketta toistuvasti,
kunnes vastaavan kellotoiminnon
merkkivalo vilkkuu.
6.2 Kellotoimintojen asettaminen
1.
Ohjelmoi Kestoaika ja Lopetus
-toiminnot asettamalla uunin toiminto
.
Page 30

www.electrolux.com
30
hr minhr min
4.
5.
6.3 Kellotoimintojen
peruuttaminen
3.
Aseta haluamasi kellotoiminnon aika
painamalla + tai -.
Näytössä näkyy asettamasi kellotoiminnon merkkivalo. Kun asetettu aika
päättyy, merkkivalo vilkkuu ja laitteesta kuuluu äänimerkki kahden minuutin
ajan.
1.
2.
7. LISÄVARUSTEIDEN KÄYTTÄMINEN
VAROITUS!
Lue luku "Turvallisuusohjeet".
7.1 Teleskooppikannattimet
Kestoaika- ja Lopetus -toiminnoissa laite sammuu automaattisesti.
Voit sammuttaa äänimerkin painamal-
la mitä tahansa painiketta.
Käännä uunin toimintojen valitsin ja
lämpötilan valitsin Off-asentoon.
Paina valintapainiketta toistuvasti,
kunnes haluamasi toiminnon merkki-
valo vilkkuu.
Paina ja pidä painiketta - alhaalla.
Kellotoiminto sammuu joidenkin se-
kuntien jälkeen.
°C
1.
Vedä oikea ja vasen teleskooppikannatin ulos.
Page 31

°C
2.
Aseta ritilä teleskooppikannattimien
päälle ja työnnä ne varovasti laitteeseen.
Varmista, että painat teleskooppikannattimet kokonaan laitteeseen ennen
uuninluukun sulkemista.
SUOMI 31
Säilytä teleskooppikannattimien
asennusohjeet tulevia käyttökertoja varten.
Ritilät voidaan asettaa ja poistaa helpommin teleskooppikannattimien avulla.
HUOMIO
Teleskooppikannattimia ei saa
pestä astianpesukoneessa. Älä
voitele teleskooppikannattimia.
8. LISÄTOIMINNOT
8.1 Jäähdytyspuhallin
Kun laite on toiminnassa, jäähdytyspuhallin kytkeytyy automaattisesti toimintaan
laitteen pintojen pitämiseksi viileinä. Kun
kytket laitteen pois toiminnasta, jäähdytyspuhallin toimii edelleen, kunnes laite on
jäähtynyt.
8.2 Turvatermostaatti
Laitteen virheellinen toiminta tai vialliset
osat voivat aiheuttaa vaarallisen ylikuume-
nemisen. Tämän estämiseksi uunissa on
turvatermostaatti, joka katkaisee virransyötön. Uunin virta kytkeytyy automaattisesti uudelleen, kun lämpötila on laskenut
normaalille tasolle.
9. HYÖDYLLISIÄ NEUVOJA JA VINKKEJÄ
9.1 Luukun sisäosa
Joissakin malleissa luukun
sisäpuolelle on merkitty:
• Kannatintasojen numerot.
• Tietoja uunitoiminnoista, usein valmistettavien ruokien suositellut kannatintasot ja lämpötilat.
Taulukoissa mainitut lämpötilat ja
paistoajat ovat ainoastaan suuntaa antavia. Lämpötila ja paistoaika riippuvat reseptistä sekä käytettyjen ainesten laadusta ja määrästä.
• Uunissa on viisi kannatintasoa. Laske
kannatintasot uunin pohjasta alkaen.
• Laitteessa on erityinen järjestelmä, joka
kierrättää ilmaa ja höyryä jatkuvasti. Ky-
Page 32

www.electrolux.com
32
• Kosteutta voi tiivistyä uunin sisään tai
• Poista kosteus jokaisen käyttökerran
• Älä aseta mitään esinettä suoraan uunin
9.2 Kakkujen leipominen
• Älä avaa uuninluukkua ennen kuin 3/4
• Jos käytät kahta leivinpeltiä samanaikai-
seisen järjestelmän avulla ruoka paistuu
jatkuvasti kosteassa ympäristössä, minkä ansiosta se on sisältä mehevää ja ulkopinnalta rapeaa. Se vähentää paistoajan ja energian kulutuksen minimiin.
luukun lasilevyihin. Tämä on normaalia.
Pysyttele sopivalla etäisyydellä laitteesta
avatessasi luukkua toiminnan aikana.
Tiivistymistä voi vähentää käyttämällä
laitetta 10 minuuttia ennen ruokien kypsentämistä.
jälkeen.
pohjalle, älä myöskään aseta osiin alumiinifoliota kypsennyksen aikana. Tämä
voi vaikuttaa kypsennystuloksiin ja vaurioittaa emalipintaa.
paistoajasta on kulunut.
sesti, jätä niiden väliin yksi tyhjä kannatintaso.
9.3 Lihan ja kalan
kypsentäminen
• Käytä grilli-/uunipannua erittäin rasvaisten ruokien kanssa, jotta uuniin ei jää
pysyviä tahroja.
• Anna lihan olla noin 15 minuuttia ennen
sen leikkaamista, jotta sen neste säilyisi.
• Jotta uuniin ei muodostuisi liikaa käryä
paistamisen aikana, lisää grilli-/uunipannuun hiukan vettä. Jotta käry ei tiivistyisi, lisää vettä aina sen kuivuttua loppuun.
9.4 Paistoajat
Kypsennysaika riippuu ruokalajin tyypistä,
sen koostumuksesta ja määrästä.
Tarkkaile valmistumista alustavasti kypsennyksen aikana. Määritä parhaat asetukset (uunitoiminto, kypsennysaika, jne.)
keittoastioille, resepteille ja määrille laitetta
käyttäessä.
9.5 Paistotaulukko
KAKUT
Ylä + alalämpö Kiertoilma
RUOKALA-
JI
Vatkatut lei-
Kanna-
tintaso
2 170 3 (1 ja 4) 160 45 - 60 Kakkuvuoas-
Läm-
pötila
[°C]
Kannatin-
taso
vonnaiset
Murotaikina 2 170 3 (1 ja 4) 160 20 - 30 Kakkuvuoas-
Piimä-juus-
1 170 2 165 60 - 80 26 cm:n
tokakku
Omenapiiras 2 170 1 (vasen ja
oikea)
Struudeli 3 175 2 150 60 - 80 Leivinpellillä
Läm
pöti-
la
Paistoai-
ka [min]
Muistiinpa-
not
[°C]
sa
sa
kakkuvuoas-
sa
160 80 - 100 Kahdessa
20 cm:n
kakkuvuoassa uuniritilän
päällä
1)
Page 33

SUOMI 33
Ylä + alalämpö Kiertoilma
RUOKALA-
JI
Kanna-
tintaso
Läm-
pötila
[°C]
Kannatin-
taso
Hillotorttu 2 170 2 (vasen ja
oikea)
Läm
pöti-
la
Paistoai-
ka [min]
Muistiinpa-
not
[°C]
165 30 - 40 26 cm:n
kakkuvuoas-
sa
Sokerikakku 2 170 2 160 50 - 60 26 cm:n
kakkuvuoas-
sa
Joulukakku/
hedelmäkakku
2 160 1 tai 2 140
–
150
90 - 120 20 cm:n
kakkuvuoas-
1)
sa
Rusinakakku 1 175 2 160 50 - 60 Leipävuoas-
1)
sa
Pienet kakut
- yksi taso
Pienet kakut
- kaksi tasoa
Pienet kakut
- kolme ta-
3 170 3 150 -
160
- - 2 ja 4 150 160
- - 1, 3 ja 5 150 160
20 - 30 Leivinpellillä
25 - 35 Leivinpellillä
30 - 45 Leivinpellillä
soa
Pikkuleivät /
pasteijat -
3 140 3 140 -
150
30 - 35 Leivinpellillä
yksi taso
Pikkuleivät /
pasteijat -
- - 2 ja 4 140 150
35 - 40 Leivinpellillä
kaksi tasoa
Pikkuleivät /
pasteijat -
- - 1, 3 ja 5 140 150
35 - 45 Leivinpellillä
kolme tasoa
Marengit -
3 120 3 120 80 - 100 Leivinpellillä
yksi taso
Marengit -
kaksi tasoa
Pullat 3 170 –
Eclair-leivok-
- - 2 ja 4 120 80 - 100 Leivinpellil-
1)
lä
3 190 12 - 20 Leivinpellil-
190
1)
lä
3 190 3 170 25 - 35 Leivinpellillä
set - yksi taso
Eclair-leivok-
- - 2 ja 4 170 35 - 45 Leivinpellillä
set - kaksi
tasoa
Page 34

www.electrolux.com
34
RUOKALA-
Piiraat 2 180 2 170 45 - 70 20 cm:n
Hedelmäkakku
Täytekakkupohja
1)
LEIPÄ JA PIZZA
RUOKALA-
Vaalea leipä 1 190 1 190 60 - 70 1- 2 kappa-
Ruisleipä 1 190 1 180 30 - 45 Leipävuoas-
Sämpylät 2 190 2 (2 ja 4) 180 25 - 40 6 - 8 kpl lei-
Pizza 1 200 -
Teeleivät 3 200 3 190 10 - 20 Leivinpellil-
1)
Ylä + alalämpö Kiertoilma
JI
Kanna-
tintaso
1 160 2 150 110 - 120 24 cm:n
1 170 2 (vasen ja
Esilämmitä 10 minuutin ajan.
Ylä + alalämpö Kiertoilma
JI
Esilämmitä 10 minuutin ajan.
Kanna-
tintaso
Läm-
pötila
[°C]
Läm-
pötila
[°C]
210
Kannatin-
taso
oikea)
Kannatin-
taso
1 200 -
Läm
pöti-
la
Paistoai-
ka [min]
Muistiinpa-
not
[°C]
kakkuvuoas-
sa
kakkuvuoas-
sa
160 50 - 60 20 cm:n
kakkuvuoas-
sa
Läm
pöti-
la
Paistoai-
ka [min]
Muistiinpa-
not
[°C]
letta, 500 g/
kpl
sa
vinpellillä
10 - 20 Leivinpellillä
210
tai grilli-/uu-
nipannus-
1)
sa
1)
lä
1)
1)
PAISTOKSET
Ylä + alalämpö Kiertoilma
RUOKALA-
JI
Kanna-
tintaso
Läm-
pöti-
la
[°C]
Kannatin-
taso
Läm
pöti-
la
[°C]
Paistoai-
ka [min]
Muistiinpa-
not
Pastapaistos 2 200 2 180 40 - 50 Vuoassa
Page 35

SUOMI 35
Ylä + alalämpö Kiertoilma
RUOKALA-
JI
Vihannes-
Kanna-
tintaso
pöti-
la
Kannatin-
taso
[°C]
2 200 2 175 45 - 60 Vuoassa
Läm-
Läm
pöti-
la
[°C]
Paistoai-
ka [min]
Muistiinpa-
not
paistos
Piiraat 1 180 1 180 50 - 60
Lasagne 2 180 -
190
Cannelloni 2 180 -
190
1)
Esilämmitä 10 minuutin ajan.
2 180 -
190
2 180 -
190
25 - 40
25 - 40
Vuoassa
Vuoassa
Vuoassa
LIHA
Ylä + alalämpö Kiertoilma
RUOKALA-
JI
Kanna-
tintaso
Läm-
pöti-
la
[°C]
Kannatin-
taso
Läm
pöti-
la
[°C]
Paistoai-
ka [min]
Muistiinpa-
not
Naudanliha 2 200 2 190 50 - 70 Uuniritilällä
Porsaanliha 2 180 2 180 90 - 120 Uuniritilällä
Vasikanliha 2 190 2 175 90 - 120 Uuniritilällä
Englantilai-
2 210 2 200 50 - 60 Uuniritilällä
nen paahtopaisti, raaka
Englantilai-
2 210 2 200 60 - 70 Uuniritilällä
nen paahtopaisti, puolikypsä
Englantilai-
2 210 2 200 70 - 75 Uuniritilällä
nen paahtopaisti, kypsä
Porsaanlapa 2 180 2 170 120 - 150 Mukana ka-
mara
Porsaan
2 180 2 160 100 - 120 2 kpl
potka
Lammas 2 190 2 175 110 - 130 Koipi
Kana 2 220 2 200 70 - 85 Kokonainen
Kalkkuna 2 180 2 160 210 - 240 Kokonainen
Ankka 2 175 2 220 120 - 150 Kokonainen
Hanhi 2 175 1 160 150 - 200 Kokonainen
Jänis 2 190 2 175 60 - 80 Palasina
1)
1)
1)
Page 36

www.electrolux.com
36
RUOKALA-
Jänis 2 190 2 175 150 - 200 Palasina
Fasaani 2 190 2 175 90 - 120 Kokonainen
KALA
RUOKALA-
Taimen/Lahna
Tonnikala/
Lohi
9.6 Grilli
Naudanfileepihvit
Naudanlihapihvit 4 600 4 maks. 10-12 6-8
Makkarat 8 - 4 maks. 12-15 10-12
Porsaankyljyk-
set
Broileri (puolik-
kaat)
Kebab 4 - 4 maks. 10-15 10-12
Broilerin rintapa-la4 400 4 maks. 12-15 12-14
Ylä + alalämpö Kiertoilma
JI
Kanna-
tintaso
pöti-
la
Kannatin-
taso
[°C]
Läm-
Läm
pöti-
la
[°C]
Paistoai-
ka [min]
Ylä + alalämpö Kiertoilma
JI
Kanna-
tintaso
pöti-
la
Kannatin-
taso
[°C]
Läm-
Läm
pöti-
la
[°C]
Paistoai-
ka [min]
2 190 2 175 40 - 55 3 - 4 kalaa
2 190 2 175 35 - 60 4 - 6 fileetä
Esikuumenna tyhjää uunia 10 minuuttia ennen ruokien asettamista
uuniin.
Määrä Grilli Paistoaika [min]
RUOKALAJI Kpl [g] Kanna-
tintaso
Läm-
pötila
1. puoli 2. puoli
[°C]
4 800 4 maks. 12-15 12-14
4 600 4 maks. 12-16 12-14
2 1000 4 maks. 30-35 25-30
Muistiinpa-
not
Muistiinpa-
not
Jauhelihapihvi 6 600 4 maks. 20-30 Kalafile 4 400 4 maks. 12-14 10-12
Lämpimät leivät 4-6 - 4 maks. 5-7 Paahtoleivät 4-6 - 4 maks. 2-4 2-3
Page 37

SUOMI 37
9.7 Gratinointi
Naudanliha
RUOKALAJI Määrä
Paahtopaisti tai filee, raaka
Paahtopaisti tai filee, puolikypsä
Paahtopaisti tai filee, kypsä
1)
Esikuumenna uuni.
per paksuus/
cm
per paksuus/
cm
per paksuus/
cm
Porsaanliha
RUOKALAJI Määrä
Lapa, kinkku, selkä
Kyljykset, siankylki
1-1,5 kg 1 160 - 180 90 - 120
1-1,5 kg 1 170 - 180 60 - 90
Lihamureke 750 g - 1 kg 1 160 - 170 50 - 60
Porsaan potka-
paisti (esikypsen-
750 g - 1 kg 1 150 - 170 90 - 120
netty)
Kannatinta-soLämpötila
[°C]
1
1
1
190 - 200
180 - 190
170 - 180
Kannatinta-soLämpötila
[°C]
1)
1)
1)
Aika [min]
5 - 6
6 - 8
8 - 10
Aika [min]
Vasikanliha
RUOKALAJI Määrä Kannatintaso Lämpötila
Aika [min]
[°C]
Vasikanpaisti 1 kg 1 160 - 180 90 - 120
Vasikanreisi 1,5 - 2 kg 1 160 - 180 120 - 150
Lammas
RUOKALAJI Määrä Kannatintaso Lämpötila
Aika [min]
[°C]
Lampaanreisi,
1 - 1,5 kg 1 150 - 170 100 - 120
lammaspaisti
Lampaanselkä 1 - 1,5 kg 1 160 - 180 40 - 60
Lintupaisti
RUOKALAJI Määrä Kannatintaso Lämpötila
Aika [min]
[°C]
Linnunliha paloina
200 - 250 g/
kpl
1 200 - 220 30 - 50
Page 38

www.electrolux.com
38
RUOKALAJI Määrä Kannatintaso Lämpötila
Aika [min]
[°C]
Puolikas kana 400 - 500 g/
1 190 - 210 35 - 50
kpl
Broileri, kana 1 - 1,5 kg 1 190 - 210 50 - 70
Ankka 1,5 - 2 kg 1 180 - 200 80 - 100
Hanhi 3,5 - 5 kg 1 160 - 180 120 - 180
Kalkkuna 2,5 - 3,5 kg 1 160 - 180 120 - 150
Kalkkuna 4 - 6 kg 1 140 - 160 150 - 240
Kala (haudutettu)
RUOKALAJI Määrä Kannatintaso Lämpötila
Aika [min]
[°C]
Kokonainen
1 - 1,5 kg 1 210 - 220 40 - 60
kala
9.8 Kuivaus - Kiertoilma
Vuoraa leivinpellit leivinpaperilla.
VIHANNEKSET
RUOKALAJI
Kannatintaso
1 tasolla 2 tasolla
Pavut 3 1/4 60 - 70 6 - 8
Paprikat 3 1/4 60 - 70 5 - 6
Keittovihan-
nekset
3 1/4 60 - 70 5 - 6
Sienet 3 1/4 50 - 60 6 - 8
Yrtit 3 1/4 40 - 50 2 - 3
Lämpötila
[°C]
Aika [h]
HEDELMÄT
RUOKALAJI
Kannatintaso
1 tasolla 2 tasolla
Lämpötila
[°C]
Aika [h]
Luumut 3 1/4 60 - 70 8 - 10
Aprikoosit 3 1/4 60 - 70 8 - 10
Omenaviipa-
leet
3 1/4 60 - 70 6 - 8
Päärynät 3 1/4 60 - 70 6 - 9
Tietoa akryyliamidista
Tärkeää Tuoreimpien tieteellisten
tutkimustulosten mukaisesti (erityisesti
tärkkelyspitoisten) ruokien voimakas
ruskistaminen voi aiheuttaa terveysvaaran
akryyliamidin vuoksi. Sen vuoksi
suosittelemme ruokien kypsennystä
mahdollisimman alhaisessa lämpötilassa
sekä liiallisen ruskistamisen välttämistä.
Page 39

10. HOITO JA PUHDISTUS
SUOMI 39
VAROITUS!
Lue luku "Turvallisuusohjeet".
• Puhdista laitteen etupinnat lämpimällä
vedellä ja miedolla pesuaineella käyttäen pehmeää puhdistusliinaa.
• Käytä metallipintojen puhdistuksessa
tavanomaista puhdistusainetta.
• Puhdista uuni sisältä jokaisen käytön
jälkeen. Tällä tavoin se on helpompi
puhdistaa eivätkä roiskeet pala kiinni.
• Poista itsepintaiset tahrat erityisellä uuninpuhdistusaineella.
• Puhdista kaikki uunin lisävarusteet käytön jälkeen ja anna niiden kuivua. Käytä
pehmeää liinaa, lämmintä vettä ja puhdistusainetta.
• Jos käytät tarttumattomia varusteita, älä
puhdista niitä voimakkailla pesuaineilla,
teräväreunaisilla esineillä tai pese niitä
astianpesukoneessa. Tarttumaton pinta
voi vaurioitua.
Ruostumattomat teräs- ja alumiinipintaiset laitteet:
Puhdista uuninluukku käyttäen ainoastaan kosteaa sientä. Kuivaa
pehmeällä liinalla.
Älä käytä teräsvillaa, happoja tai
hankaavia aineita, sillä ne saattavat vahingoittaa uunin pintaa.
Noudata vastaavaa varovaisuutta
käyttöpaneelin puhdistuksen aikana.
10.1 Luukun tiivisteen
puhdistaminen
• Tarkista luukun tiiviste säännöllisesti. Tiiviste sijaitsee uunin sisäosan kehyksen
ympärillä. Älä käytä laitetta, jos luukun
tiiviste on vaurioitunut. Ota yhteyttä
huoltoliikkeeseen.
• Puhdista luukun tiiviste yleisiä puhdistusohjeita noudattaen.
10.2 Uunipeltien kannatinkiskot
Voit poistaa uunipeltien kannatinkiskot sivuseinien puhdistamisen ajaksi.
Uunipeltien kannatinkiskojen irrottaminen
1.
Vedä uunipeltien kannatinkiskon etuosa irti sivuseinästä.
Page 40

www.electrolux.com
40
2.
Vedä uunipeltien kannatinkiskon takaosa irti seinästä ja poista se.
1
2
Uunipeltien kannatinkiskojen
kiinnittäminen
Kiinnitä uunipeltien kannatinkiskot takaisin
paikalleen suorittamalla toimenpiteet päinvastaisessa järjestyksessä.
Uunipeltien kannatinkiskojen pyöristettyjen päiden on oltava eteenpäin.
10.3 Uunin katto
Voit poistaa grillin uunin katon puhdistamisen helpottamiseksi.
VAROITUS!
Kytke laite pois toiminnasta ennen
grillin poistamista. Tarkista, että
laite on kylmä. Olemassa on palovammojen vaara.
1.
Ruuvaa grilliä paikallaan pitävä ruuvi
irti. Käytä ensimmäisellä kerralla ruuvimeisseliä.
VAROITUS!
Varmista, että grilli on asennettu
oikein ja ettei se putoa alas.
10.4 Uunin lamppu
VAROITUS!
Ole varovainen vaihtaessasi uunin
lamppua. Olemassa on sähköiskuvaara.
Ennen uunin lampun vaihtamista:
• Kytke uuni pois toiminnasta.
• Irrota sulakkeet sulaketaulusta tai katkaise virta pääkytkimestä.
Laita uunin pohjalle pyyhe, jotta
lamppu tai suojalasi eivät rikkoudu, jos ne vahingossa putoavat.
Pidä halogeenilamppua aina kankaalla estääksesi rasvajäämien palamisen lamppuun.
1.
Irrota suojalasi kiertämällä sitä vastapäivään.
2.
Puhdista suojalasi.
3.
Vaihda tilalle uunin lamppu, jonka
lämmönkestävyys on 300 °C.
Käytä tyypiltään samanlaista uunin
lamppua.
4.
Kiinnitä suojalasi paikalleen.
2.
Vedä grilliä varovasti alaspäin.
3.
Puhdista uunin katto lämpimällä vedellä ja miedolla puhdistusaineella
käyttäen pehmeää puhdistusliinaa.
Anna pintojen lopuksi kuivua.
4.
Asenna grilli noudattamalla ohjeita
päinvastaisessa järjestyksessä.
10.5 Uuninluukun
puhdistaminen
Uunin luukussa on kolme päällekkäin asetettua lasia. Voit poistaa uuninluukun ja
sen sisällä olevat lasilevyt niiden puhdistamiseksi.
HUOMIO
Älä käytä uunia ilman lasilevyjä.
Page 41

Luukun avautumissuunta riippuu
uunin mallista. Joissakin malleissa
luukku avataan oikealta ja toisissa
malleissa vasemmalta puolelta.
Uunin luukun ja lasilevyjen irrottaminen
A
B
1.
2.
SUOMI 41
Paina luukun kehyksen (A) reunoilla
yläkannessa olevia painikkeita ja vedä
sitä ylöspäin sen poistamiseksi.
Pidä sisälasista B tiukasti kiinni molemmilla käsillä ja liu'uta sitä ylöspäin
sen poistamiseksi paikoiltaan. Toista
toimenpide toisen lasipaneelin kohdalla.
HUOMIO
Varmista, että pidät tiukasti kiinni
laseista, jotta ne eivät putoa.
Puhdista luukku kostealla sienellä ja pyyhi
se kuivaksi pehmeällä liinalla. Älä käytä teräsvillaa, happoja tai hankaavia aineita, sillä ne saattavat vahingoittaa pintaa.
Asenna lasilevyt takaisin paikalleen uuninluukun puhdistuksen jälkeen noudattamalla ohjeita päinvastaisessa järjestyksessä.
Luukun keskimmäisen lasilevyn yläosassa
on pieni piste ja toisessa lasilevyssä on
painokoristelu. Varmista, että keskimmäinen lasilevy asettuu oikeaan kohtaan.
Kehyksen painatuspuolen on osoitettava
luukun sisäpuolelle. Varmista asennuksen
jälkeen, ettei lasilevyn reunus ole karkea
siihen kosketettaessa.
Page 42

www.electrolux.com
42
11. KÄYTTÖHÄIRIÖT
VAROITUS!
Lue luku "Turvallisuusohjeet".
Ongelma Mahdollinen syy Korjaustoimenpide
Uuni ei kuumene. Laite on poistettu käytös-
Uuni ei kuumene. Kelloa ei ole asetettu. Aseta kello.
Uuni ei kuumene. Tarvittavia asetuksia ei ole
Uuni ei kuumene. Sulaketaulun sulake on
Uunin valo ei syty. Uunin lamppu on palanut. Vaihda uunin lamppu.
Digitaalinäytössä näkyy
12.00.
Höyryä ja kosteutta muo-
dostuu ruokaan ja uunin
sisälle.
Jos ratkaisua ei löydy, ota yhteys jälleenmyyjään tai valtuutettuun huoltoliikkeeseen.
Suosittelemme, että kirjoitat tiedot tähän:
Malli (MOD.) .........................................
Tuotenumero (PNC) .........................................
Sarjanumero (S.N.) .........................................
tä.
tehty.
palanut.
On tapahtunut sähkökatkos.
Ruoka on jätetty uuniin
liian pitkäksi ajaksi.
Huoltopalvelun vaatimat tiedot on merkitty
arvokilpeen. Arvokilpi sijaitsee laitteen sisäosan etukehyksessä.
Kytke laite toimintaan.
Varmista, että asetukset
ovat oikein.
Tarkista sulake. Jos sulake palaa useita kertoja,
ota yhteys sähköasentajaan.
Aseta kello.
Älä jätä ruokia uuniin
15-20 minuuttia pitemmäksi ajaksi kypsennyksen jälkeen.
12. ASENNUS
VAROITUS!
Lue luku "Turvallisuusohjeet".
Page 43
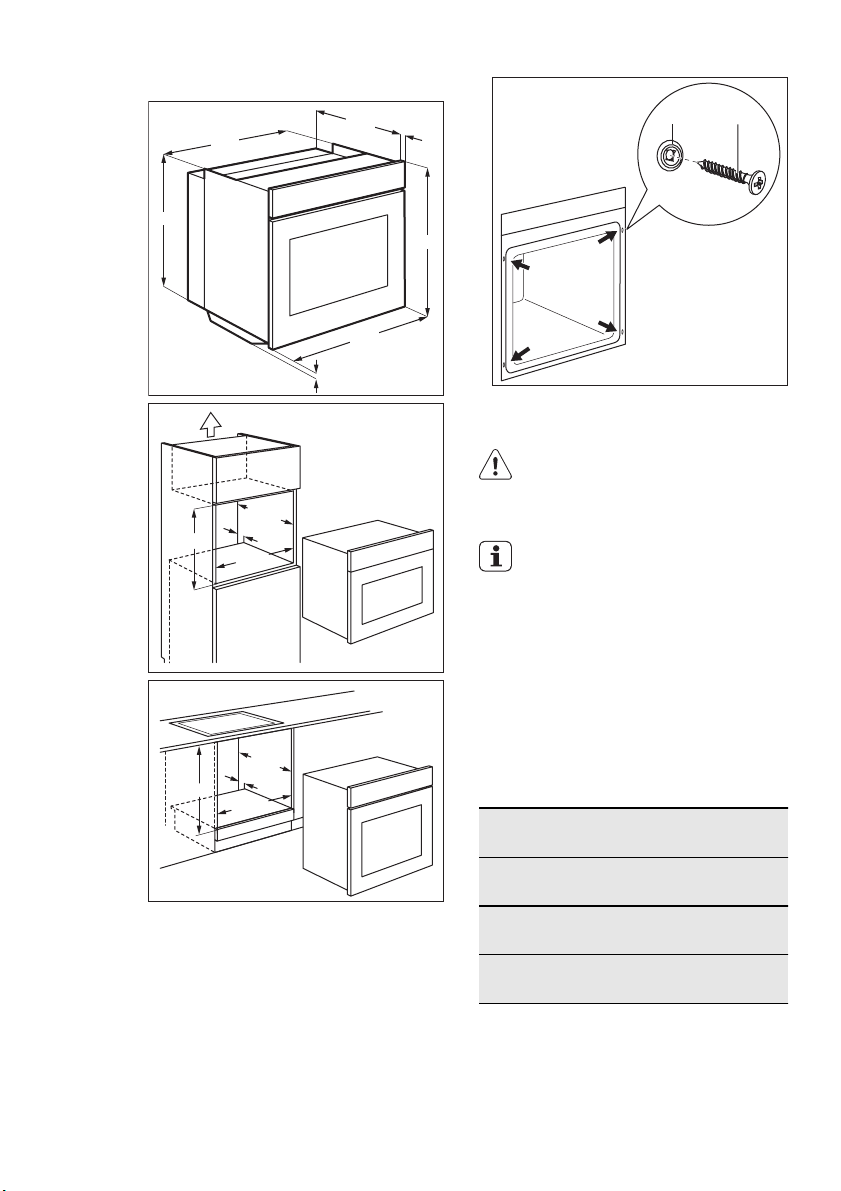
12.1 Asentaminen kalusteeseen
SUOMI 43
573
590
600
558
min. 560
min. 560
min. 550
20
min. 550
20
548
20
589
594
5
AB
12.3 Sähköliitäntä
VAROITUS!
Sähköliitäntä on annettava ammattitaitoisen sähköasentajan tehtäväksi.
Valmistaja ei vastaa vahingoista,
jos kappaleen "Turvallisuusohjeet"
ohjeita ei ole noudatettu.
Laitteen mukana toimitetaan pistoke ja virtajohto.
12.4 johto
Asennuksen tai vaihdon johtotyypit: H07
RN-F, H05 RN-F, H05 RRF, H05 VV-F,
H05 V2V2-F (T90), H05 BB-F.
Määritä johdon läpileikkaus kokonaistehon
(tunnuskilpi) ja taulukon mukaan:
Kokonaisteho
enintään 1380W3 x 0,75 mm²
Johdon läpileik-
kaus
12.2 Kalusteeseen
kiinnittäminen
1.
Avaa laitteen luukku.
2.
Kiinnitä laite kalusteeseen. Aseta neljä
välipidikettä (A) kehyksen reikiin ja kiristä sitten laitteen mukana toimitetut
neljä ruuvia (B).
enintään 2300W3 x 1 mm²
enintään 3680W3 x 1,5 mm²
Maadoitusjohdon (vihreä/keltainen) on oltava 2 cm pitempi vaihejohtimeen ja nollajohtimeen (sininen ja ruskea johto) verrattuna.
Page 44

www.electrolux.com
44
13. YMPÄRISTÖNSUOJELU
Kierrätä materiaalit, jotka on merkitty
merkillä
se asianmukaiseen kierrätysastiaan.
Suojele ympäristöä ja ihmisten terveyttä
kierrättämällä sähkö- ja
. Kierrätä pakkaus laittamalla
elektroniikkaromut. Älä hävitä merkillä
merkittyjä kodinkoneita kotitalousjätteen
mukana. Palauta tuote paikalliseen
kierrätyskeskukseen tai ota yhteyttä
paikalliseen viranomaiseen.
Page 45

SUOMI 45
Page 46

www.electrolux.com
46
Page 47

SUOMI 47
Page 48

www.electrolux.com/shop
397280311-B-282012
 Loading...