


user manual
notice d'utilisation
manual de instruções
manual de instrucciones
Oven
Four
Forno
Horno
EOC55200
2 electrolux
Electrolux. Thinking of you.
Share more of our thinking at www.electrolux.com
CONTENTS
Safety information 2
Product description 5
Before first use 5
Daily use 6
Clock functions 7
Using the accessories 8
SAFETY INFORMATION
Before the installation and use, read this
manual carefully:
•For your personal safety and the safety of
your property
• For the respect of the environment
• For the correct operation of the appliance.
Always keep these instructions with the appliance also if you move or sell it.
The manufacturer is not responsible if incorrect installation or use results in damage.
Children and vulnerable people safety
• This appliance can be used by children
aged from 8 years and above and persons with reduced physical, sensory or
mental capabilities or lack of experience
and knowledge if they have been given
supervision or instruction concerning use
of the appliance in safe way and understand the hazards involved. Children shall
not play with the appliance.
• Keep all packaging away from children.
There is the risk of suffocation or physical
injury.
• Keep children and animals away from the
appliance when the door is open or the
appliance is in operation. There is the risk
of injury or other permanent disability.
• If the appliance has Child Lock or Key
Lock (Control Lock) function, use it. It
prevents children and animals from accidental operation of the appliance.
General safety
• Do not change the specifications of this
appliance. There is the risk of injury and
damage to the appliance.
Additional functions 9
Helpful hints and tips 9
Care and cleaning 13
What to do if… 16
Installation 17
Environment concerns 18
Subject to change without notice
• Do not let the appliance stay unattended
during operation.
• Switch off the appliance after each use.
Installation
• Only an approved electrician can install
and connect the appliance. Contact an
approved service centre. This is to prevent the risks of structural damage or
physical injury.
• Make sure that the appliance is not damaged because of transport. Do not connect a damaged appliance. If necessary,
contact the supplier.
• Remove all packaging, stickers and layers from the appliance before first use.
Do not remove the rating plate. It can invalidate the guarantee.
• Fully obey the laws, ordinances, directives and standards in force in the country where you use the appliance (safety
regulations, recycling regulations, electrical or gas safety rules etc.).
• Make sure that the appliance is disconnected from the power supply during the
installation.
• Be careful when you move the appliance.
The appliance is heavy. Always use safety gloves. Do not pull the appliance by
the handle.
• The electrical installation must have an
isolation device which lets you disconnect the appliance from the mains at all
poles. The isolation device must have a
contact opening width of minimum 3
mm.
• You must have correct isolation devices:
line protecting cut-outs, fuses (screw

electrolux 3
type fuses removed from the holder),
earth leakage trips and contactors.
• The shock protection parts must be fixed
in such a way that they cannot be undone without tools.
• Some parts of the appliance carry current. Close the appliance with furniture
and make sure that there are no free
spaces. It prevents electrical shock because you cannot accidentally touch
dangerous parts.
• Before the installation, make sure that the
kitchen cabinet has the recess dimensions applicable.
• Make sure that the appliance is installed
below and adjacent safe structures.
• Keep the minimum distances to the other
appliances and units.
• Install the appliance with its back and
one side close to the higher appliance.
The other side must be close to appliance with the same height.
• The appliance cannot be positioned on a
base.
• Built in ovens and built in cooking surfaces are attached with special connection
system. To prevent damage to the appliance, only use an appliance with the appliances from the same manufacturer.
Electrical connection
• The appliance must be earthed.
• Make sure that the electrical data on the
rating plate agree with your domestic
power supply.
• Information on the voltage is on the rating
plate.
• Always use a correctly installed shockproof socket.
• When you connect electrical appliances
to mains sockets, do not let cables touch
or come near the hot appliance door.
• Do not use multi-way plugs, connectors
and extension cables. There is the risk of
fire.
• Do not replace or change the mains cable. Contact the service centre.
• Make sure not to squash or cause damage to the mains plug (if applicable) and
cable behind the appliance.
• Make sure that the mains connection is
accessible after the installation.
• Do not pull the mains cable to disconnect
the appliance. Always pull the mains plug
– if applicable.
Use
• The appliance is only for domestic use.
Do not use the appliance for commercial
and industrial use.
• Only use the appliance for domestic
cooking tasks. This is to prevent physical
injury to persons or prevent damage to
property.
• Do not use the appliance as a work surface or storage surface.
• Do not put flammable products or items
that are wet with flammable products,
and/or fusible objects (made of plastic or
aluminium) in, near or on the appliance.
There is the risk of explosion or fire.
• The interior of the appliance becomes hot
during use. There is the risk of burns.
Use gloves when you insert or remove
the accessories or pots.
• Be careful when you remove or install the
accessories to prevent damage to the
oven enamel.
• Always stay away from the appliance
when you open the door while the appliance is in operation. Hot steam can release. There is the risk of skin burns.
• Discoloration of the enamel has no effect
on the performance of the appliance so it
is not a defect in the sense of the warranty law.
• To prevent damage or discoloration to
the enamel:
– do not put any objects directly on the
appliance floor and do not cover it with
aluminium foil;
– do not put hot water directly into the
appliance;
– do not keep moist dishes and food in
the appliance after you finish the cooking.
• Do not use this appliance if it is in contact
with water. Do not operate the appliance
with wet hands.
• Do not apply pressure on the open door.
• Always close the appliance door when
you cook, even while grilling.

4 electrolux
Care and cleaning
• Before maintenance, switch off the appliance and disconnect the appliance from
the power supply.
• Before maintenance, make sure that the
appliance is cold. There is the risk of
burns. There is the risk that the glass
panels can break.
• Keep the appliance clean at all times. A
build-up of fats or other foodstuff can result in a fire.
• Regular cleaning prevents the surface
material from deteriorating
• Use a deep baking tray for very moist
cakes to prevent that fruit juices cause
stains that can be permanent.
•For your personal safety and the safety of
your property, only clean the appliance
with water and a soap. Do not use flammable products or products that can
cause corrosion.
• Do not clean the appliance with steam
cleaners, high-pressure cleaners, sharp
objects, abrasive cleaning agents, abrasive sponges and stain removers
• If you use an oven spray, follow the instructions from the manufacturer.
• Do not clean the glass door with abrasive
cleaning agents or metal scraper. Heat
resistant surface of the inner glass can
break and shatter.
• When the door glass panels are damaged they become weak and can break.
You must replace them. Contact the
service centre.
• Be careful when you remove the door
from the appliance. The door is heavy!
• Do not clean catalytic enamel (if applicable).
Pyrolytic cleaning
• Do not leave the appliance unattended
during Pyrolytic cleaning.
• Do not try to open the door and do not
cut the power supply during Pyrolytic
cleaning.
• Keep children away during pyrolytic
cleaning. The appliance becomes very
hot. There is the risk of burns.
• During pyrolytic cleaning, stubborn dirt
can cause discoloration to the enamel.
Discoloration to the enamel has no effect
on the performance of the appliance
Risk of fire
• Open the door carefully. The use of ingredients with alcohol can cause a mixture
of alcohol and air. There is the risk of fire.
• Do not let sparks or open flames come
near the appliance when you open the
door.
• Do not put flammable products or items
that are wet with flammable products,
and/or fusible objects (made of plastic or
aluminium) in, near or on the appliance.
Oven lamp
• Bulb lamps used in this appliance are
special lamps selected for household appliances use only. They cannot be used
for the full or partial illumination of a
household room.
• If it becomes necessary to replace the
lamp use one of the same power and
specifically designed for household appliances only.
• Disconnect the appliance from the power
supply before the replacement of the
oven lamp. There is the risk of electrical
shock.
Service centre
• Only an approved engineer can repair or
work on the appliance. Contact an approved service centre.
• Use only original spare parts.
Disposal of the appliance
• To prevent the risk of physical injury or
damage
– Disconnect the appliance from the
power supply.
– Cut off the mains cable and discard it.
– Discard the door catch. This prevents
children or small animals from being
closed inside of the appliance. There is
the risk of suffocation.
PRODUCT DESCRIPTION
General overview
1
3
2
4
electrolux 5
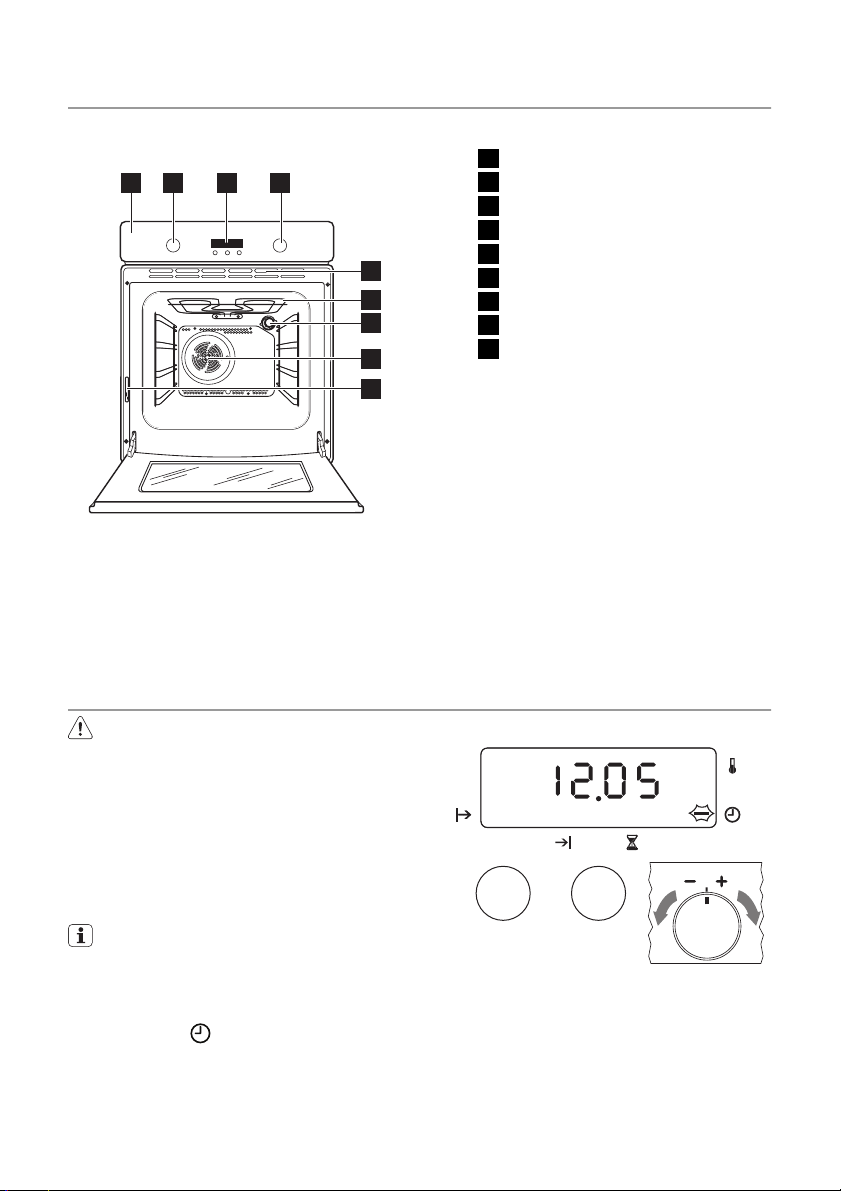
1 Control panel
2 + / - knob
3 Electronic programmer
4 Knob for the oven functions
5 Ventilation openings
5
6
7
8
9
6 Grill
7 Oven lamp
8 Fan
9 Rating plate
Oven accessories
Wire shelf
•
For cookware, cake tins, roasts.
Flat baking tray
•
For cakes and biscuits.
BEFORE FIRST USE
Warning! Refer to "Safety information"
chapter.
Initial Cleaning
• Remove all parts from the appliance.
• Clean the appliance before first use.
Important! Refer to chapter "Care and
Cleaning".
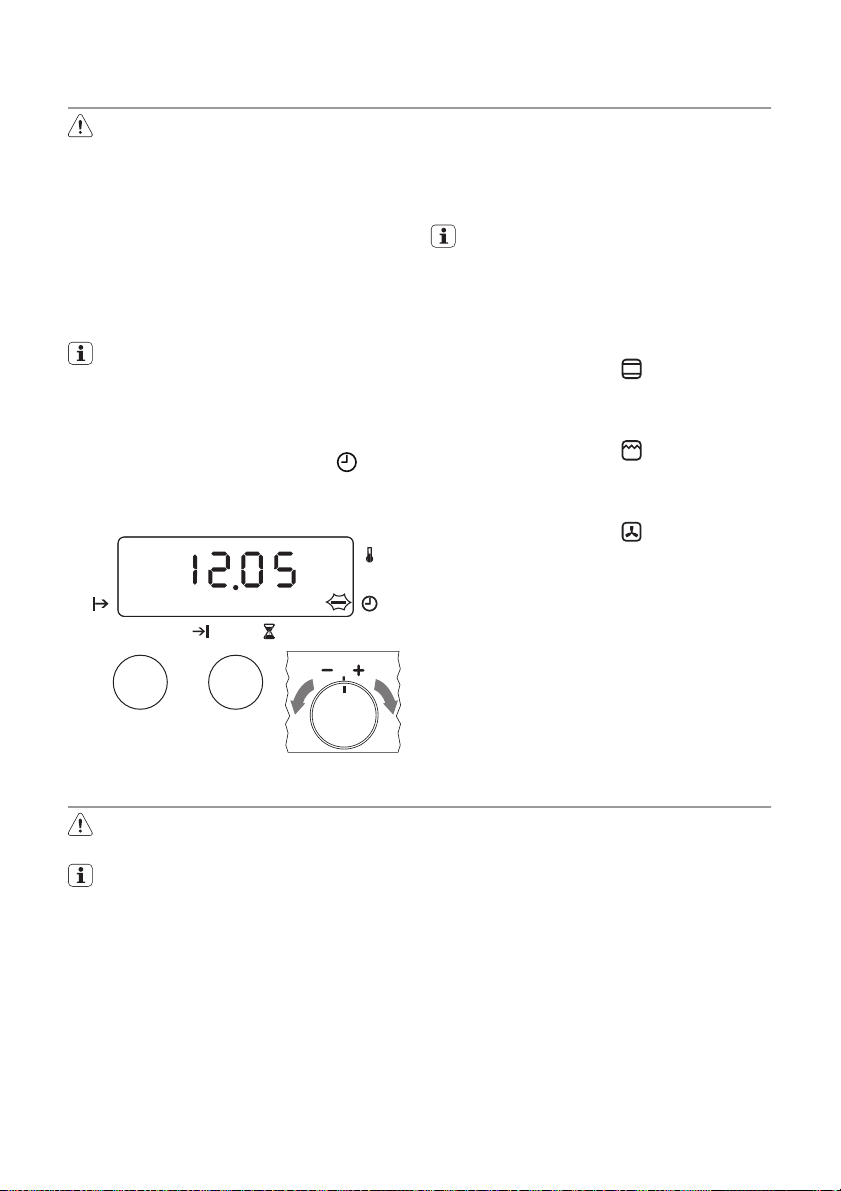
Setting the time
The oven only operates after time set.
1. Push the Selection button (refer to
"Electronic programmer") again and
again until the indicator for the function
Time of day
flashes.
Deep roasting pan
•
To bake and roast or as pan to collect
fat.
Removable telescopic runners
•
To put shelves or trays on it.
2. Use the + / - knob to set the time.
After approximately 5 seconds, the
flashing stops and the display shows
the time of day set.

6 electrolux
When you change the time, you must
not set a clock function (Minute Minder,
Duration or End) or an oven function at
the same time. Make sure that the child
lock is not activated.
Pre-heating
1.
Set function
and maximum tempera-
ture.
2. Let the appliance operate without the
food for approximately 1 hour.
3.
Set function
and maximum tempera-
ture.
DAILY USE
Warning! Refer to "Safety information"
chapter.
To use the oven, push the retractable
knob. The knob then comes out.
Activating the appliance
Turn the knob for oven functions to an oven
function. The display shows the suggested
temperature for the oven function. The oven
starts to heat up. When the appliance is at
the set temperature, an acoustic signal
sounds.
Changing the oven temperature
Turn the + / - knob to raise or lower temperature. The setting changes in 5°C steps.
Controlling the temperature
Push the temperature check button (refer to
"Clock functions"). The temperature display
shows the current oven temperature.
Oven function Application
OFF position
The appliance is OFF.
4. Let the appliance operate without the
food for approximately 10 minutes.
5.
Set function
and maximum tempera-
ture.
6. Let the appliance operate without the
food for approximately 10 minutes.
This is to burn off the residue in the appliance. The accessories can become more
hot than usually. When you pre-heat the
appliance for the first time, the appliance
can make an odour and smoke. This is the
usual effect. Make sure the airflow is sufficient.
Switching the oven off
Turn the oven functions control knob to the
OFF position.
Residual heat indicator
When you switch off the oven, the bars on
the display show the residual heat.
Oven Functions
Oven lamp
Conventional cooking
Fan cooking
Grill
To light up the oven interior, e.g. for cleaning.
To bake and roast on one oven level.
To bake on maximum three oven levels at the same time. Decreases the oven temperatures (20-40°C) compared with
Conventional. And to dry food.
To grill flat food in the middle of the grill and to toast.
Oven function Application
Dual grill
To grill flat food in large quantities and to toast.
electrolux 7
Thermal grilling
Defrost
Pyrolytic cleaning
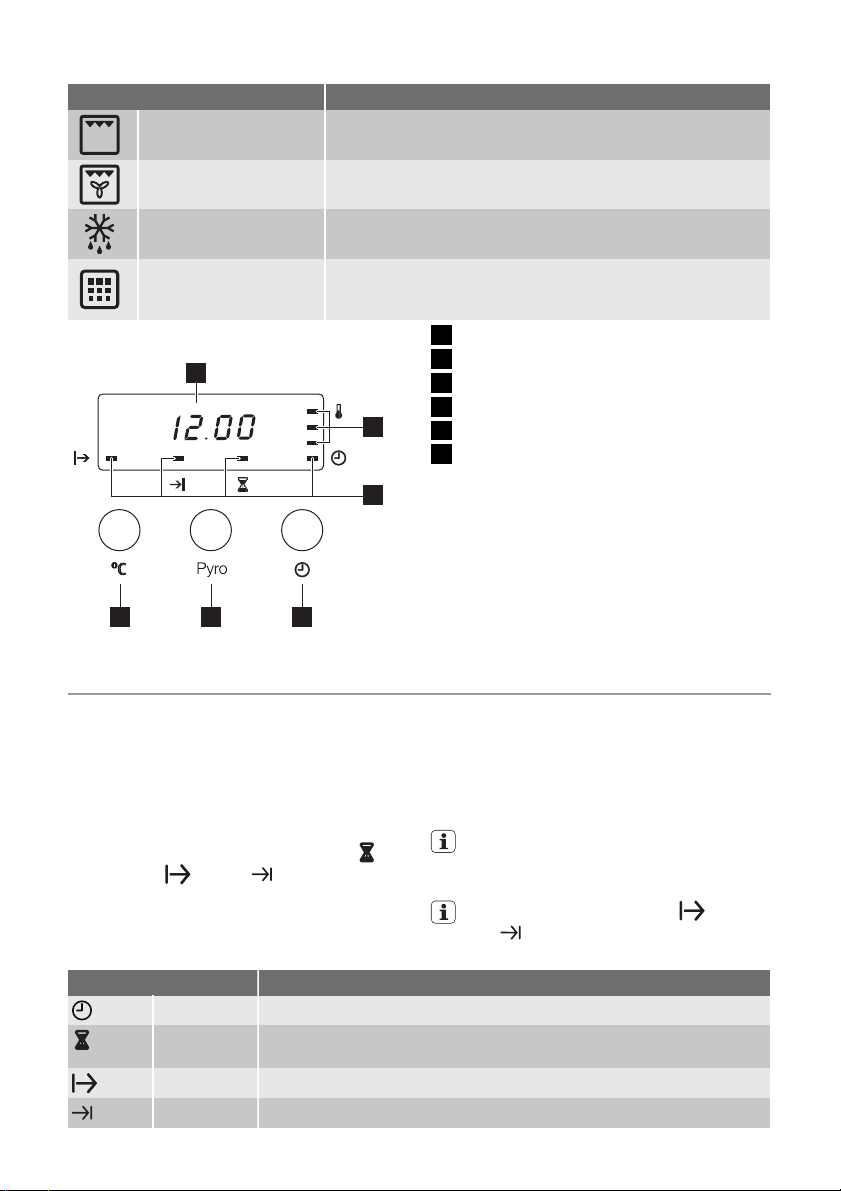
Electronic programmer
1
To roast larger joints of meat or poultry on one level. Also to
gratinate and brown.
To thaw frozen food.
For automatic pyrolytic cleaning of the oven. It burns off residual dirt in the oven. The oven heats up to approximately
500°C.
1 Temperature / Time display
2 Heat indicator
3 Clock function indicators
4 Selection button
2
5 Pyrolyse function button
6 Temperature check buton
3
456
CLOCK FUNCTIONS
Setting the clock functions
1. Set an oven function and temperature
(not necessary for Time of day and Minute Minder).
2. Push the Selection button again and
again until the desired function indicator
flashes.
3.
To set the time for Minute Minder
Duration
or End , use the + / -
,
knob. The related function indicator
comes on.
When the time period is completed, the
related function indicator flashes, the
Clock function Application
Time of day Shows the time. To set, change or check the time.
Minute
Minder
Duration To set how long the oven has to be in operation.
End To set the switch-off time for an oven function.
To set a countdown time. A signal sounds, after the time period is completed. This function has no effect on the operation of the oven.
display shows 0.00 and an acoustic signal sounds.
4. To stop the signal and the flashing:
- with Minute Minder push a button
- with Duration and End turn the oven
functions selector to the position Off.
With Minute Minder an acoustic signal
also sounds when 90% of the time period is completed.
With the functions Duration and
End
cally.
the oven switches off automati-
8 electrolux
Duration and End can be used
at the same time, if the oven is to be
switched on and off automatically later.
First set Duration
Cancelling the clock functions
1. Push the Selection button again and
again until necessary function indicator
flashes.
, then End .
USING THE ACCESSORIES
Warning! Refer to "Safety information"
chapter.
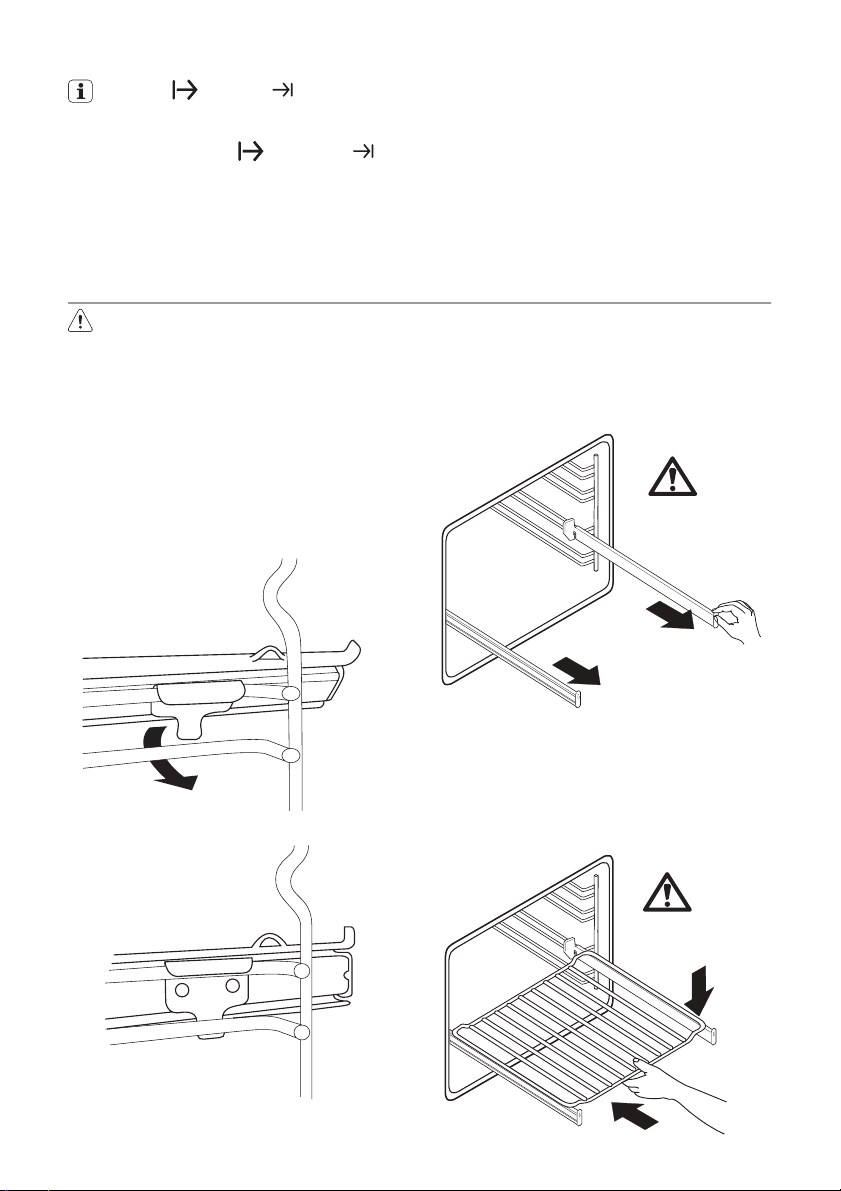
Telescopic runners
Installing telescopic runners
You can put the telescopic runners on each
level.
Make sure that the two telescopic runners
are on the same level.
The stop element that is at one end of the
telescopic runner must point up.
1
2. Turn and hold " +/- " control knob.
After some seconds the clock function
goes out.
Using telescopic runners
With telescopic runners you can put and remove the shelves more easily.
1. Pull out the right and left hand telescopic runners.
°C
2. Put the oven shelf on the telescopic runners and carefully push them in the appliance.
Make sure you push back the telescopic
runners fully in the appliance before you
close the oven door.
2
°C
Caution! Do not clean the telescopic
runners in the dishwasher. Do not
lubricate the telescopic runners.
ADDITIONAL FUNCTIONS
Child lock
When the child lock is on, you cannot operate the oven.
It makes sure that children do not accidentally switch on the appliance.
Important! Do not set an oven function.
Switching on the child lock:
1. Turn + / - control knob to the left and
hold it.
2. Push Selection button until the display
shows "SAFE".
The child lock device is on.
To switch off the child lock repeat the same
procedure as for switching on the child
lock.
Cooling fan
When the appliance operates, the cooling
fan switches on automatically to keep the
surfaces of the appliance cool. If you switch
off the appliance, the cooling fan continues
to operate until the appliance cools down.
Safety thermostat
To prevent dangerous overheating (due to
incorrect use of the appliance or defective
components), the oven has a safety thermostat, which interrupts the power supply.
The oven switches back on again automatically, when the temperature drops.
electrolux 9
Oven automatic switch-off
The appliance deactivates automatically after some time:
• If you do not deactivate the appliance
• If you do not change the oven temperature.
The last temperature set flashes in the
temperature display.
The oven deactivates when the oven
temperature is:
under 120°Cafter 12.0 hours
120 - 195°Cafter 8.5 hours
200 - 245°Cafter 5.5 hours
250 °C after 3.0 hours
After an automatic switch-off, deactivate
the oven fully. Then you can activate it
again.
The automatic switch-off is cancelled if
you set the clock function Duration
or End .
HELPFUL HINTS AND TIPS
• The appliance has four shelf levels. Count
the shelf levels from the bottom of the
appliance floor.
• The appliance has a special system
which circulates the air and constantly recycles the steam. With this system you
can to cook in a steamy environment and
keep the food soft inside and crusty outside. It decreases the cooking time and
energy consumption to a minimum.
• Moisture can condense in the appliance
or on the glass doors. This is normal. Always stand back form the appliance
when you open the appliance door while
cooking. To decrease the condensation,
run the appliance for 10 minutes before
cooking.
• Wipe away moisture after every use of
the appliance.
• Do not put the objects directly on the appliance floor and do not cover the components with aluminium foil when you
cook. This can change the baking results
and damage the enamel coating.
Baking cakes
• The best temperature for baking cakes is
between 150°C and 200°C.

10 electrolux
• Preheat the oven for approximately 10
minutes before baking.
• Do not open the oven door before 3/4 of
the set cooking time is up.
• If you use two baking trays at the same
time, keep one level empty between
them.
Cooking meat and fish
• Do not cook meat with weight below 1
kg. Cooking too small quantities makes
the meat too dry.
• To keep the red meat well cooked outside and juicy inside set the temperature
• For white meat, poultry and fish set the
temperature between 150°C-175°C.
• Use a dripping pan for very fatty food to
prevent the oven from stains that can be
permanent.
• Leave the meat for approximately 15 minutes before carving so that the juice
does not seep out.
• To prevent too much smoke in the oven
during roasting, add some water into the
dripping pan. To prevent the smoke condensation, add water each time after it
dries up.
between 200°C-250°C.
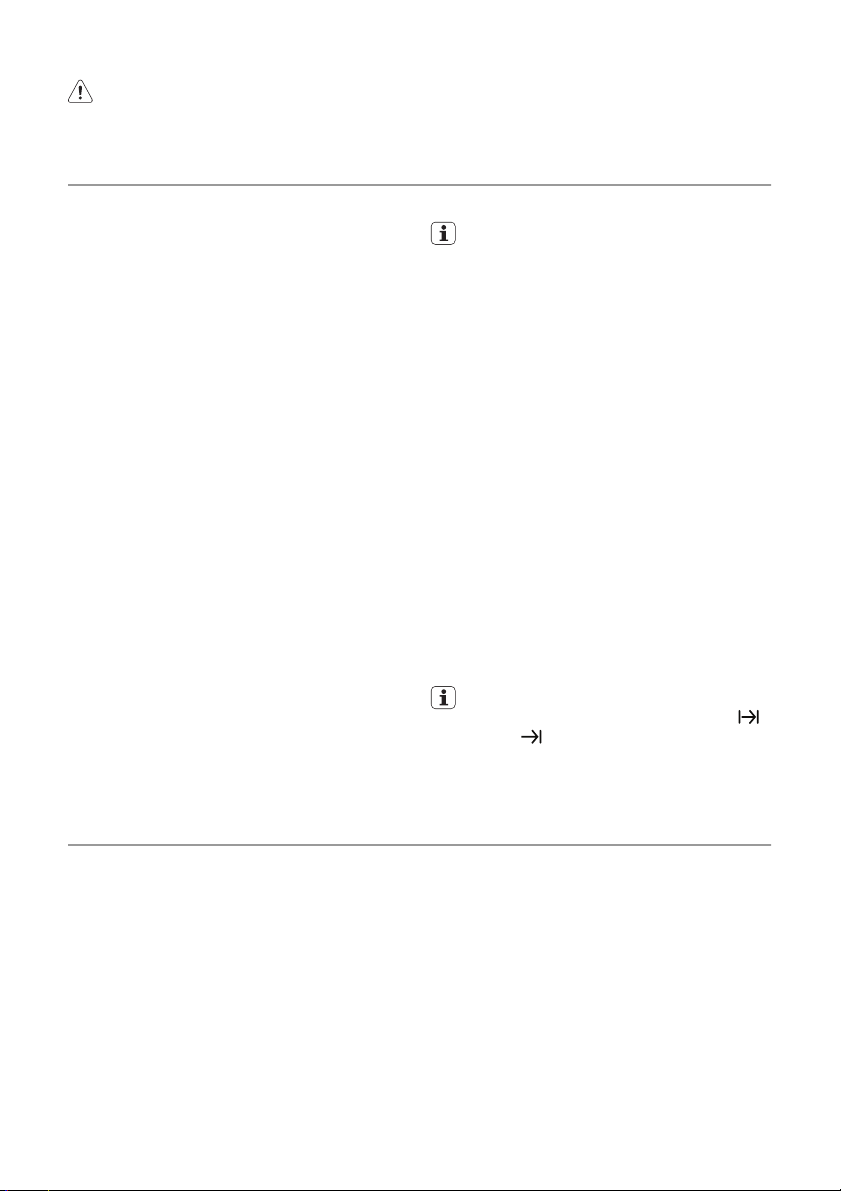
Baking and roasting table
CAKES
Conventional
TYPE OF DISH
Whisked recipies
Shortbread
dough
Butter-milk
cheese cake
Apple cake (Apple pie)
Strudel 2 175 2 150 60-80 On baking tray
Jam-tart 2 170 2 160 30-40 In cake mould 26 cm
Fruit cake 2 170 2 155 60-70 In cake mould 26 cm
Sponge cake
(Fatless sponge
cake)
Christmas
cake/Rich fruit
cake
Plum cake 2 170 2 160 50-60
Small cakes 3 170 3 (1
Biscuits 3 150 3 150 20-30
Meringues 3 100 3 100 90-120 On flat baking tray
Buns 3 190 3 180 15-20
Choux 3 190 3 180 25-35
Plate tarts 3 180 2 170 45-70 In cake mould 20 cm
cooking
Level
Temp
[°C]
2 170 2 (1
2 170 2 (1
1 170 2 160 60-80 In cake mould 26 cm
1 170 2 (1
2 170 2 160 35-45 In cake mould 26 cm
2 170 2 160 50-60 In cake mould 20 cm
Fan cooking
Level
and 3)
and 3)
and 3)
and 3)
Cooking
Temp
time [min]
[°C]
160 45-60 In cake mould
160 24-34 In cake mould
160 100-120 2 cake moulds of 20 cm
160 20-30 On flat baking tray
Notes
on the wire shelf
In bread tin
On flat baking tray
On flat baking tray
On flat baking tray
1)
1)
1)
1)
electrolux 11
TYPE OF DISH
Victoria sand-
Level
1 or 2 180 2 170 40-55 Left + right in cake mould
wich
1) Preheat for 10 minutes.
Conventional
cooking
Temp
[°C]
Fan cooking
Level
Temp
[°C]
Cooking
time [min]
Notes
20 cm
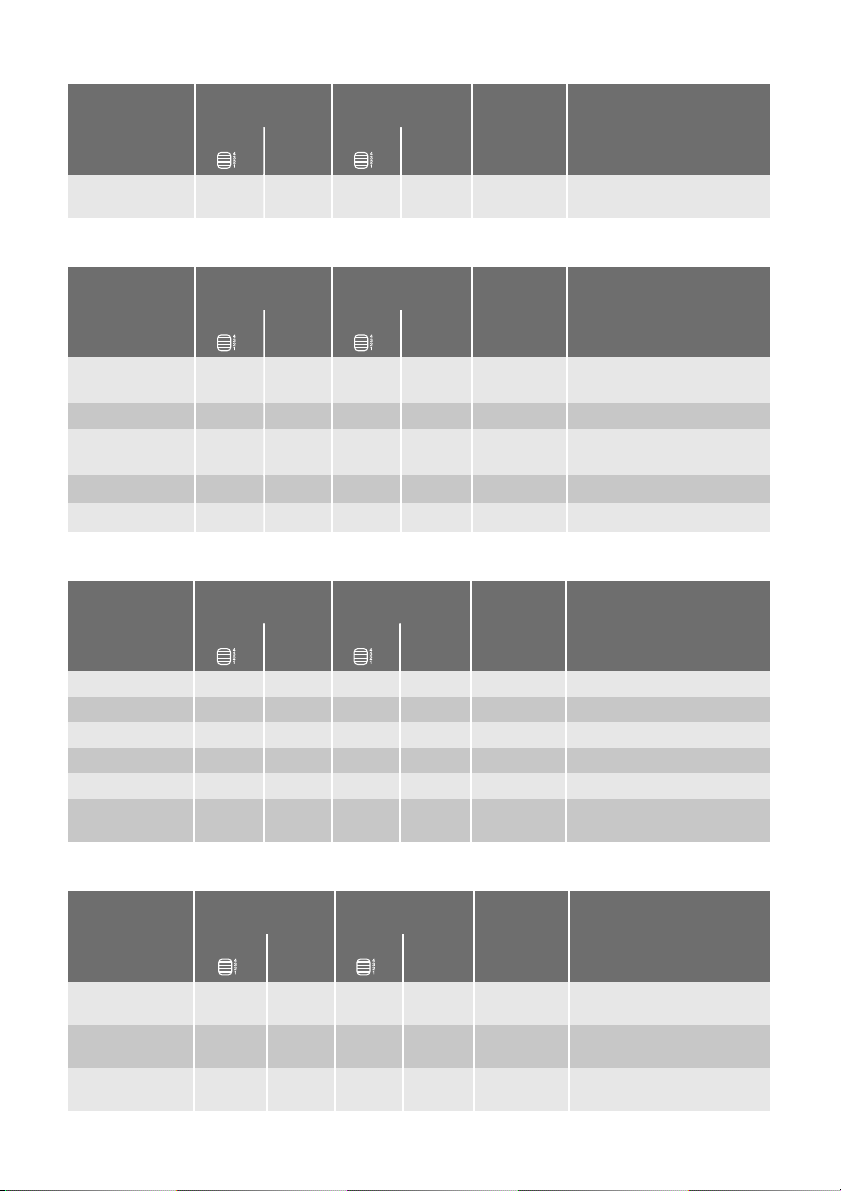
BREAD AND PIZZA
Conventional
TYPE OF DISH
cooking
Level
Temp
[°C]
White bread 1 190 1 190 60-70 1-2 pieces, 500 gr one
Rye bread 1 190 1 180 30-45 In bread tin
Bread rolls 2 190 2 (1
Pizza 1 190 1 190 20-30
Scones 3 200 2 190 10~20
1) Preheat for 10 minutes.
Fan cooking
Level
and 3)
Temp
Cooking
time [min]
Notes
[°C]
1)
piece
180 25-40 6-8 rolls on flat baking tray
1)
On deep roasting pan
On flat baking tray
1)
FLANS
Conventional
TYPE OF DISH
cooking
Level
Temp
[°C]
Pasta flan 2 180 2 180 40-50 In mould
Vegetable flan 2 200 2 175 45-60 In mould
Quiches 1 190 1 190 40-50 In mould
Lasagne 2 200 2 200 25-40 In mould
Cannelloni 2 200 2 190 25-40 In mould
Yorkshire pud-
2 220 2 210 20-30
ding
1) Preheat for 10 minutes.
Fan cooking
Level
Temp
[°C]
Cooking
time [min]
Notes
6 pudding mould
1)
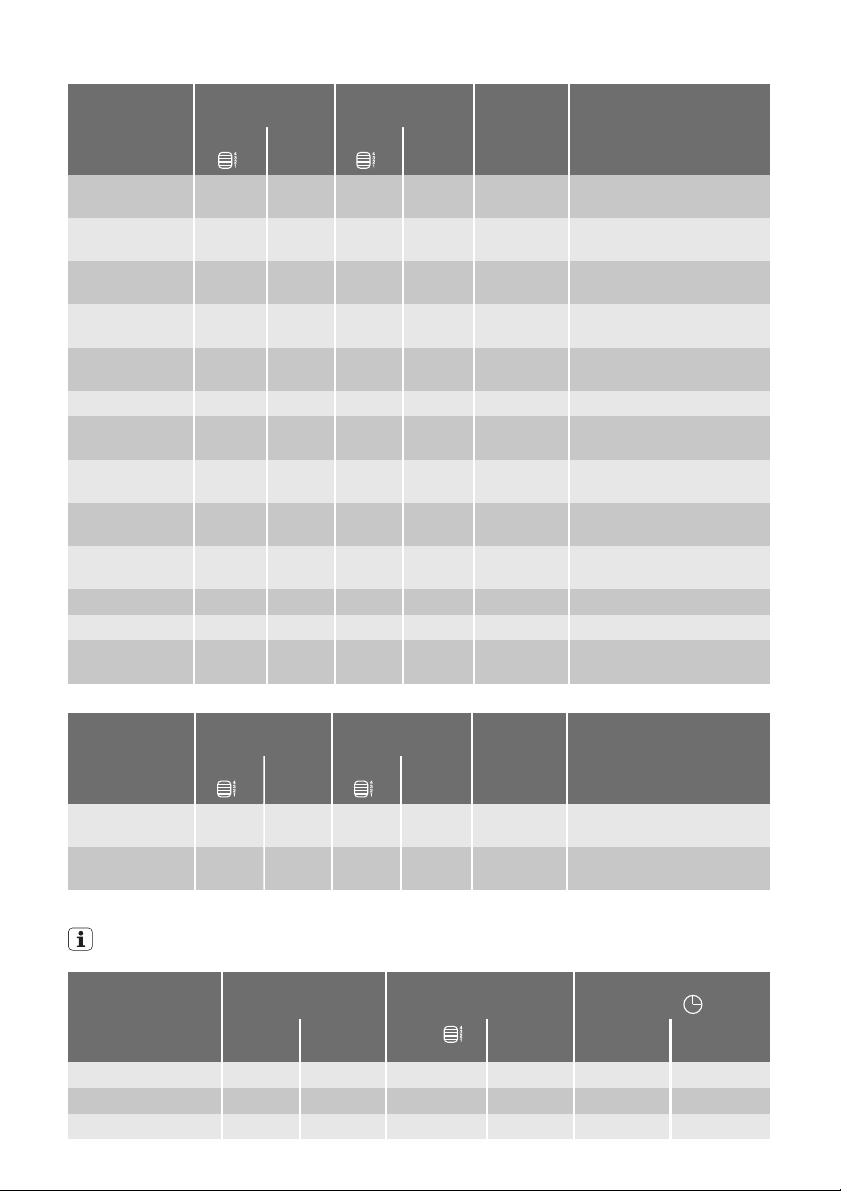
MEAT
Conventional
TYPE OF DISH
cooking
Level
Temp
[°C]
Beef 2 200 2 190 50-70 On oven shelf and deep
Pork 2 180 2 180 90-120 On oven shelf and deep
Veal 2 190 2 175 90-120 On oven shelf and deep
Fan cooking
Level
Temp
[°C]
Cooking
time [min]
Notes
roasting pan
roasting pan
roasting pan
1)
12 electrolux
Conventional
TYPE OF DISH
English roast
beef rare
English roast
beef medium
English roast
beef well done
Shoulder of
pork
Shin of pork 2 180 2 160 100-120 2 pieces on deep roasting
Lamb 2 190 2 190 110-130 Leg
Chicken 2 200 2 200 70-85 Whole on deep roasting
Turkey 1 180 1 160 210-240 Whole on deep roasting
Duck 2 175 2 160 120-150 Whole on deep roasting
Goose 1 175 1 160 150-200 Whole on deep roasting
Rabbit 2 190 2 175 60-80 Cut in pieces
Hare 2 190 2 175 150-200 Cut in pieces
Pheasant 2 190 2 175 90-120 Whole on deep roasting
cooking
Level
Temp
[°C]
2 210 2 200 44-50 On oven shelf and deep
2 210 2 200 51-55 On oven shelf and deep
2 210 2 200 55-60 On oven shelf and deep
2 180 2 170 120-150 On deep roasting pan
Fan cooking
Level
Temp
[°C]
Cooking
time [min]
Notes
roasting pan
roasting pan
roasting pan
pan
pan
pan
pan
pan
pan
FISH
TYPE OF DISH
Trout/Sea
bream
Tuna fish/Salmon
Conventional
cooking
Level
Temp
[°C]
2 190 2 (1
2 190 2 (1
Fan cooking
Level
and 3)
and 3)
Cooking
Temp
time [min]
[°C]
175 40-55 3-4 fishes
175 35-60 4-6 fillets
Notes
Grilling
Preheat the empty oven for 10 minutes, before cooking.
Quantity Grilling Cooking time in mi-
nutes
TYPE OF DISH Pieces g
Fillet steaks 4 800 3 250 12-15 12-14
Beef steaks 4 600 3 250 10-12 6-8
Sausages 8 / 3 250 12-15 10-12
level
Temp.
(°C)
1st side 2nd side
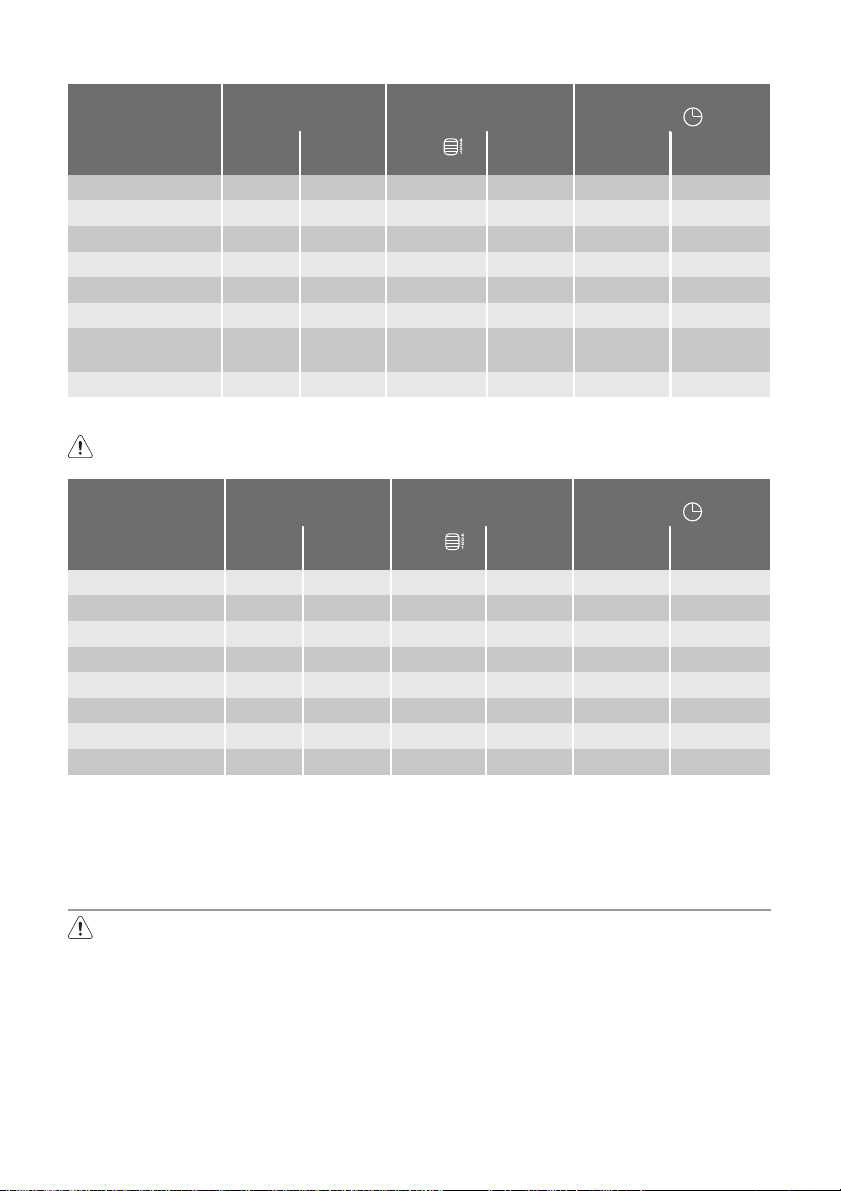
electrolux 13
Quantity Grilling Cooking time in mi-
nutes
TYPE OF DISH Pieces g
Pork chops 4 600 3 250 12-16 12-14
Chicken (cut in 2) 2 1000 3 250 30-35 25-30
Kebabs 4 / 3 250 10-15 10-12
Breast of chicken 4 400 3 250 12-15 12-14
Hamburger 6 600 3 250 20-30
Fish Fillet 4 400 3 250 12-14 10-12
Toasted sandwich-
es
Toast 4-6 / 3 250 2-4 2-3
4-6 / 3 250 5-7 /
level
Temp.
(°C)
1st side 2nd side
Thermal grilling
Warning! Use this function with a
maximum temperature of 200°C.
Quantity Grilling Cooking time in mi-
nutes
TYPE OF DISH Pieces g
Rolled joints (turkey) 1 1000 3 200 30-40 20-30
Chicken (cut in two) 2 1000 3 200 25-30 20-30
Chicken drumsticks 6 - 3 200 15-20 15-18
Quail 4 500 3 200 25-30 20-25
Vegetable gratin - - 3 200 20-25 pieces. Scallops - - 3 200 15-20 Mackerel 2-4 - 3 200 15-20 10-15
Fish slices 4-6 800 3 200 12-15 8-10
Information on acrylamides
Important! According to the newest
scientific knowledge, if you brown food
(specially the one which contains starch),
level
acrylamides can pose a health risk. Thus,
we recommend that you cook at the lowest
temperatures and do not brown food too
much.
Temp.
(°C)
1st side 2nd side
CARE AND CLEANING
Warning! Refer to "Safety information"
chapter.
• Clean the front of the appliance with a
soft cloth with warm water and cleaning
agent.
• To clean metal surfaces use a usual
cleaning agent
• Clean the oven interior after each use.
Thus you can remove dirt more easily
and it does not burn on.
• Clean stubborn dirt with a special oven
cleaner.
• Clean all oven accessories (with a soft
cloth with warm water and cleaning
agent) after each use and let them dry.
• If you have nonstick accessories, do not
clean them using an aggressive agents,
sharp edged objects or dishwasher. It
can destroy nonstick coating!

14 electrolux
Cleaning the door gasket
• Regularly do a check of the door gasket.
The door gasket is around the frame of
the oven cavity. Do not use the appliance
if the door gasket is damaged. Contact
the Service Centre.
• To clean the door gasket refer to the
general information about the cleaning.
Pyrolytic cleaning
1. Remove all parts from the oven.
If you do not remove the shelf support
rails, the clock display shows " AS "
and pyrolytic cleaning procedure cannot start.
2. Remove the worst of the residue man-
ually.
3.
Set oven function Pyroluxe menu
–" Pyro " appears in the display,
–
Duration
5 seconds.
The pyrolytic cleaning process lasts approximately 2,5 hours. If you want it to
end at a specific time, press the Selec-
tion button until the End
dicator flashes. Use the + / - control
knob to set the end time for the procedure. The function calculates the start
time based on the end time you specify. The pyrolytic cleaning then starts
and ends at the required time.
4. Press the Pyro button. Pyrolytic clean-
ing starts.
5. At the end of the process, an accustic
signal sounds and " 0.00 " appears in
the display. Duration
proximately 5 seconds. Turn the oven
control knob to 0 .
During pyrolytic cleaning the light does
not operate.
When the oven reaches pre-set temperature, the door locks.
The bars of the heat indicator come up,
until the door unlocks again.
Shelf Support Rails
Removing the shelf support rails
1. Pull the front of the shelf support rail
away from the side wall.
flashes for approximately
function in-
flashes for ap-
2. Pull the rear shelf support rail away from
the side wall and remove it.
2
1
Installing the shelf support rails
Install the shelf support rails in opposite sequence.
The rounded ends of the shelf support
rails must point to the front!
Oven lamp
Warning! Be careful! There is the risk
of electrical shock!
Before you change the oven lamp:
• Switch off the oven.
• Remove the fuses in the fuse box or
switch off the circuit breaker.
Put a cloth on the bottom of the oven
for protection of the oven light and
glass cover.
1. Turn the glass cover anti-clockwise to
remove it.
2. Clean the glass cover.
3. Replace the oven light bulb with applicable 300°C heat-resistant oven light
bulb.
Use the same oven lamp type.
4. Install the glass cover.
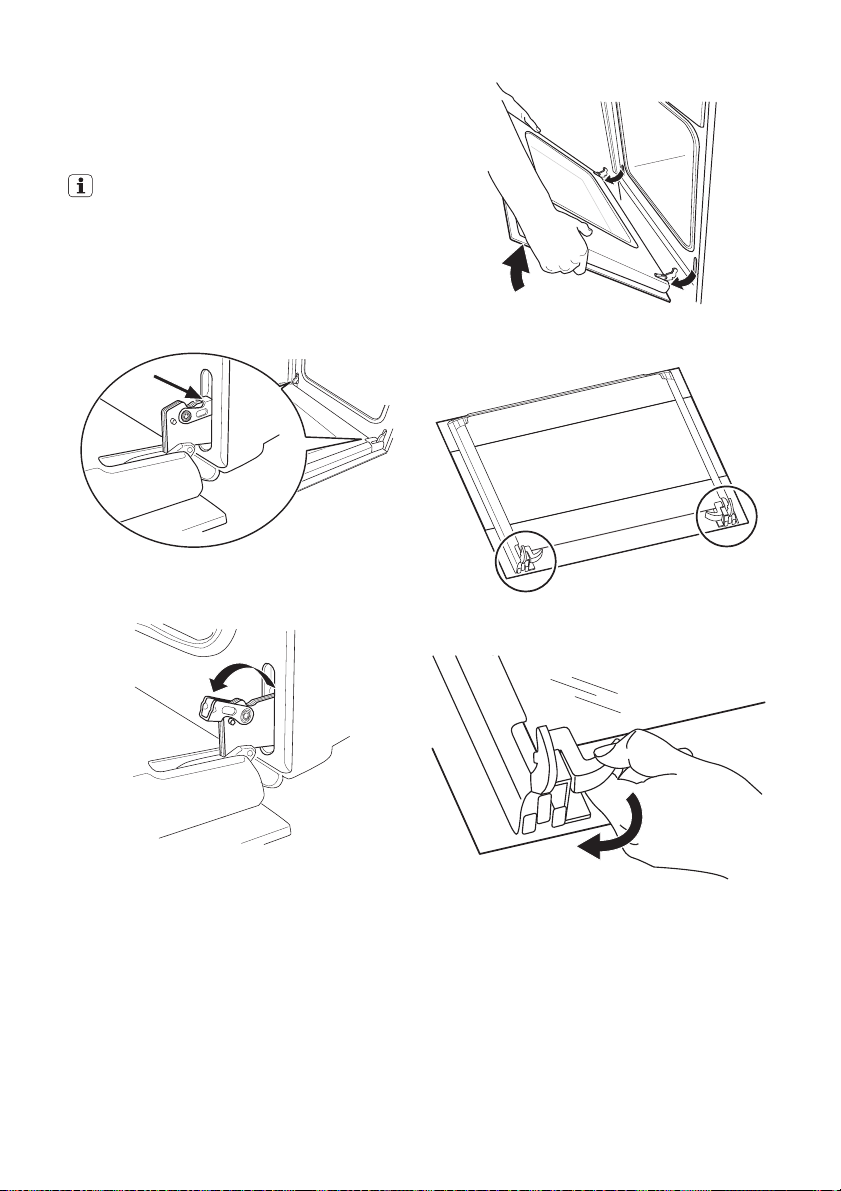
Cleaning the oven door
The oven door has three panels of glass.
You can remove the oven door and the internal panels of glass to clean them.
The oven door can close if you try to
remove the panels of glass before you
remove the oven door.
Removing the oven door and the glass
panel
1. Open the door fully and hold the two
door hinges.
2. Lift and turn the levers on the two hinges.
electrolux 15
4. Put the door on a soft cloth on a stable
surface.
5. Release the locking system to remove
the panels of glass.
3. Close the oven door to the first opening
position (halfway). Then pull forward and
remove the door from its seat.
6. Turn the two fasteners by 90° and remove them from their seats.

16 electrolux
90°
7. Carefully lift (step 1) and remove (step 2)
the panels of glass one by one. Start
from the top panel of glass.
2
1
installation the surface of the glass panel
frame on the screen-printing zones is not
rough when you touch it.
Make sure that you install the middle panel
of glass in the seats correctly (refer to the illustration).
Make sure that you install the top panel of
glass in the seats correctly (refer to the illustration).
Clean the glass panels with water and
soap. Dry the glass panels carefully.
Installing the door and the glass panels
When the cleaning is completed, install the
glass panels and the oven door. Do the
above steps in the opposite sequence.
The middle panel has a decorative frame.
When you install this panel, make sure that
the screen-printing zone looks to the inner
side of the door. Make sure that after the
WHAT TO DO IF…
Warning! Refer to "Safety information"
chapter.
Problem Possible cause Remedy
The oven does not heat up The oven is not switchedonSwitch on the oven
The oven does not heat up The clock is not set Set the clock
The oven does not heat up The necessary settings
are not set
The oven does not heat up The fuse in the fuse box is
released
Control the settings
Control the fuse. If the fuse is released
more than one time, refer to a qualified
electrician.

Problem Possible cause Remedy
The oven lamp does not operate
The pyrolysis function does
not operate (the time display
shows "AS")
The time display shows "Pyro"
The time display shows an
error code which is not in
the list
Steam and condensation
settle on the food and in the
oven cavity
If you cannot find a solution to the problem
yourself, contact your dealer or the service
centre.
The oven lamp is defective
Shelf support rails/oven
shelf runners are not removed
The oven needs pyrolytic
cleaning
Electronic error Switch the appliance off and on again
You left the dish in the
oven for too long
Replace the oven lamp
Remove shelf support rails / oven shelf
runners
Start the pyrolytic cleaning process
through the fuse or the safety switch in
the fuse box. If the display shows the
error message again, refer to the Service Force Centre
Do not leave the dishes in the oven for
longer than 15-20 minutes after the
cooking process ends
The necessary data for the service centre is
on the rating plate. The rating plate is on
the front frame of the oven cavity.
We recommend that you write the data here:
Model (MOD.) .........................................
Product number (PNC) .........................................
Serial number (S.N.) .........................................
electrolux 17
INSTALLATION
Warning! Refer to "Safety information"
chapter.
Building In
20
590
540
560
2
594
570
50
550 min
560÷570
580

18 electrolux
550 min
560-570
593
80÷100
Electrical installation
Warning! Only a qualified and
competent person must do the
electrical installation.
The manufacturer is not responsible if
you do not follow safety precautions
from chapter "Safety".
This appliance is supplied without a main
plug and a main cable.
The cable
Cable types applicable for installation or re-
placement: H07 RN-F, H05 RN-F, H05
RRF, H05 VV-F, H05 V2V2-F (T90), H05
BB-F.
For the section of the cable refer to the total
power (on the rating plate) and to the table:
Total power Section of the cable
maximum 1380 W 3 x 0,75 mm²
maximum 2300 W 3 x 1 mm²
maximum 3680 W 3 x 1,5 mm²
The hearth cord (green/yellow cable) must
be 2 cm longer than phase and neutral ca-
bles (blue and brown cables).
A
B
ENVIRONMENT CONCERNS
The symbol on the product or on its
packaging indicates that this product may
not be treated as household waste. Instead
it should be taken to the appropriate
collection point for the recycling of electrical
and electronic equipment. By ensuring this
product is disposed of correctly, you will
help prevent potential negative
consequences for the environment and
human health, which could otherwise be
caused by inappropriate waste handling of
this product. For more detailed information
about recycling of this product, please
contact your local council, your household
waste disposal service or the shop where
you purchased the product.

electrolux 19
Packaging material
The packaging material is environmentally-friendly and recyclable. Plastic
parts are marked with international ab-
breviations such as PE, PS, etc. Dispose of the packaging material in the
containers provided for this purpose at
your local waste management facility.

20 electrolux
Electrolux. Thinking of you.
Partagez notre imagination sur www.electrolux.com
SOMMAIRE
Consignes de sécurité 20
Description de l'appareil 23
Avant la première utilisation 24
Utilisation quotidienne 24
Fonctions de l'horloge 26
Utilisation des accessoires 27
Fonctions supplémentaires 28
CONSIGNES DE SÉCURITÉ
Lisez attentivement cette notice d'utilisation
avant l'installation et l'utilisation de l'appareil :
• Pour votre propre sécurité et la sécurité
de votre appareil
• Pour le respect de l'environnement
• Pour le bon fonctionnement de l’appareil.
Conservez cette notice d'utilisation avec
l'appareil. Si l'appareil devait être vendu ou
cédé à une autre personne, assurez-vous
que la notice d'utilisation l'accompagne,
afin que le nouvel utilisateur soit correctement informé du fonctionnement de celui-ci
et des avertissements s'y rapportant.
Le fabricant n'est pas responsable des
dommages liés à une mauvaise installation
ou utilisation.
Sécurité des enfants et des personnes
vulnérables
• Cet appareil peut être utilisé par des personnes âgées de plus de 8 ans, ainsi que
des personnes dont les capacités physiques, sensorielles et mentales sont réduites ou dont les connaissances et l'expérience sont insuffisantes, à condition
d'être surveillées ou d'avoir reçu des instructions concernant l'utilisation sécurisée de l'appareil et de comprendre les
risques encourus. Ne laissez pas les enfants jouer avec l'appareil.
• Ne laissez jamais les emballages à la portée des enfants. Risque d'asphyxie ou de
blessure.
• Tenez les enfants et les animaux éloignés
de l'appareil lorsque la porte est ouverte
et pendant ou après le fonctionnement
Conseils utiles 28
Entretien et nettoyage 32
En cas d'anomalie de fonctionnement 36
Installation 36
En matière de protection de
l'environnement 38
Sous réserve de modifications
de l'appareil. Risque de blessure ou d'invalidité permanente.
• Si l'appareil est équipé d'une fonction de
sécurité enfants ou de verrouillage des
touches (blocage des commandes) utilisez-la. Celle-ci empêche les enfants (ou
les animaux) de manipuler l'appareil accidentellement.
Consignes générales de sécurité
• Ne modifiez pas les spécifications de cet
appareil. Vous risqueriez de vous blesser
et d'endommager l'appareil.
• Ne laissez pas l'appareil sans surveillance
en cours de fonctionnement.
• Mettez à l'arrêt l'appareil après chaque
utilisation.
Installation
• Ne confiez l'installation et le raccordement de l'appareil qu'à un électricien
agréé. Contactez votre service aprèsvente. Cela vise à éviter les risques de
dommages structurels ou corporels.
• Vérifiez que l'appareil n'a pas été endommagé au cours du transport. Ne branchez jamais un appareil endommagé. Si
l'appareil est endommagé, veuillez contacter votre magasin vendeur.
• Avant la première utilisation, assurezvous de bien retirer tous les emballages,
les étiquettes et les films protecteurs de
l'appareil. Ne retirez jamais la plaque signalétique. Cela peut annuler la garantie.
• Conformez-vous entièrement aux lois,
décrets, réglementations et normes en vigueur dans le pays d'utilisation de l'ap-

electrolux 21
pareil (réglementations de sécurité, de recyclage, de l'électricité ou du gaz etc.).
• Veillez à débrancher l'appareil au cours
de l'installation.
• Soyez prudent lorsque vous déplacez
l'appareil. En effet, il est lourd. Portez
toujours des gants de sécurité. Ne tirez
jamais l'appareil par la poignée.
• L'installation électrique doit être équipée
d'un dispositif d'isolement à coupure omnipolaire. Le dispositif d'isolement doit
présenter une distance d'ouverture des
contacts d'au moins 3 mm.
• Vous devez disposer de dispositifs d'isolement appropriés : des coupe-circuits,
des fusibles (les fusibles à visser doivent
être retirés du support), des disjoncteurs
différentiels et des contacteurs.
• Les dispositifs de protection doivent être
fixés de telle sorte qu'ils ne puissent pas
être retirés sans outils.
• Certaines parties du four sont électrifiées.
Veillez à ce que l'appareil soit correctement encastré et veillez à ce qu'il n'y ait
pas d'espace. Cela évite les chocs électriques, car vous ne pouvez pas toucher
accidentellement les accessoires dangereux.
• Avant l'installation, vérifiez que les dimensions de votre cuisine sont appropriées
(écartement).
• Vérifiez que l'appareil est installé sous et
à proximité de structures sûres.
• Respectez l'écartement minimal requis
avec les autres appareils.
• Installez l'appareil de telle sorte que sa
face arrière et l'une de ses faces latérales
soient installées contre l'appareil supérieur. Seuls d'autres meubles ayant une
hauteur identique à celle du four peuvent
être installés contre l'autre paroi latérale.
• L'appareil ne peut pas être placé sur un
socle.
• Les fours et plaques de cuisson encastrables sont équipés de connexions particulières. Pour éviter d'endommager l'appareil, veillez à utiliser un appareil du même fabricant que les autres appareils.
Branchement électrique
• L'appareil doit être relié à la terre.
• Vérifiez que les données électriques figurant sur la plaque signalétique correspondent à celles de votre réseau.
• Les informations sur la tension se trouvent sur la plaque signalétique.
• Utilisez toujours une prise correctement
installée, protégée contre les chocs.
• Faites attention lors du raccordement
d'appareils électriques aux prises de
courant situées à proximité de l'appareil.
Veillez à ce que les câbles d'alimentation
électrique ne se coincent pas dans la
porte chaude de l'appareil.
• L'appareil ne doit pas être raccordé à
l'aide d'un prolongateur, d'une prise multiple ou d'un raccordement multiple. Risque d'incendie.
• Ne remplacez pas ou ne changez pas le
câble d'alimentation. Contactez votre
service après-vente.
• Attention à ne pas écraser ou endommager la prise (si tel est le cas) et le câble
d'alimentation situés à l'arrière de l'appareil.
• Vérifiez que la prise est accessible après
l'installation.
• Ne tirez pas sur le câble d'alimentation
électrique pour débrancher l'appareil. Retirez, pour ce faire, la fiche de la prise
secteur (si tel est le cas).
Utilisation
• Cet appareil est destiné à un usage domestique normal. N'utilisez jamais l'appareil à des fins commerciales ou industrielles.
• Votre appareil est destiné à la cuisson
des aliments. Cela vise à éviter tout accident matériel ou corporel.
• N'utilisez jamais l'appareil comme plan
de travail ou comme support.
• Ne placez jamais, sur ou à proximité de
l'appareil, des produits inflammables ou
des articles imprégnés de produits inflammables et/ou des objets susceptibles
de fondre (en plastique ou en aluminium).
Risque d'explosion ou d'incendie.
• Au cours de l'utilisation, l'intérieur de
l'appareil devient chaud. Risque de brûlure. Utilisez des gants pour introduire ou
retirer les accessoires et les plats.
• Une grande prudence s'impose lors du
retrait ou de l'installation des accessoi-

22 electrolux
res, afin d'éviter d'endommager l'émail
du four.
• Si l'appareil est en fonctionnement, écartez-vous toujours de l'appareil avant
d'ouvrir la porte. De la vapeur brûlante
peut s'en échapper. Cette vapeur risque
de provoquer une brûlure de la peau.
• La décoloration de l'émail n'affecte pas la
performance de l'appareil. Par conséquent, il ne s'agit pas d'un défaut dans le
sens de la garantie.
• Pour éviter tout endommagement ou décoloration de l'émail :
– ne placez jamais d'ustensile, plat ou
accessoire directement sur la sole du
four et ne le recouvrez jamais de papier
aluminium (risque d'endommagement
de l'émail) ;
– ne versez jamais d'eau chaude directe-
ment dans l'appareil ;
– une fois la cuisson terminée, ne laissez
jamais d'aliments ou de plats humides
à l'intérieur de l'appareil.
• N'utilisez jamais cet appareil s'il est en
contact avec de l'eau. N'utilisez jamais
cet appareil avec les mains mouillées.
• N'exercez jamais de pression sur la porte
ouverte.
• Toutes les cuissons, même au gril, doivent être effectuées porte fermée.
Entretien et nettoyage
• Avant toute opération de nettoyage ou
intervention technique, assurez-vous que
l'appareil soit débranché électriquement
et complètement refroidi.
• Avant toute opération d'entretien, assurez-vous que l'appareil est froid. Risque
de brûlure. Les vitres risquent de se briser.
• L'appareil doit rester propre en permanence. L'accumulation de graisses ou
d'autres résidus alimentaires pourrait
provoquer un incendie.
• Veillez à nettoyer le four de façon régulière, afin que le revêtement reste en bon
état.
• Utilisez une plaque à pâtisserie profonde
pour les gâteaux très moelleux pour éviter que le jus des fruits ne produise des
taches pouvant être permanentes.
• Pour votre sécurité et celle de vos biens,
nettoyez l'appareil uniquement avec de
l'eau et un détergent doux. N'utilisez ja-
mais de produits inflammables ou corrosifs.
• Ne nettoyez jamais l'appareil à l'aide de
nettoyeurs à vapeur, de nettoyeurs à
haute pression, d'objets coupants, de
produits de nettoyage abrasifs, d'éponges abrasives ou de produits anti-taches.
• Si vous utilisez un vaporisateur pour
fours, respectez les consignes d'utilisation du fabricant.
• N'utilisez jamais de produits abrasifs ou
de grattoirs métalliques pour nettoyer la
vitre de la porte. La surface thermo-résistante du verre intérieur risque de se briser
et d'éclater.
• Quand les vitres de la porte sont endommagées, elles perdent leur résistance et
risquent de se briser. Vous devez les
remplacer. Contactez votre service
après-vente.
• Soyez prudent lorsque vous retirez la
porte de l'appareil. La porte est lourde !
• Ne nettoyez jamais l'émail catalytique (le
cas échéant).
Nettoyage par pyrolyse
• Ne laissez pas l'appareil sans surveillance
lors du nettoyage par pyrolyse.
• N'essayez pas d'ouvrir la porte et ne
coupez pas le courant lors du nettoyage
par pyrolyse.
• Au cours d'un nettoyage par pyrolyse,
maintenez les enfants à distance. L’appareil devient très chaud. Risque de brûlure.
• Au cours d'un nettoyage par pyrolyse, les
salissures tenaces peuvent provoquer
une décoloration de l'émail. La décoloration de l'émail n'a aucune incidence sur
les performances de l'appareil
Risque d'incendie.
• Faites attention en ouvrant la porte. Si
vous utilisez des ingrédients contenant
de l'alcool lors d'une cuisson, un mélange d'alcool et d'air facilement inflammable peut éventuellement se former. Risque d'incendie !
• Ne manipulez pas d'objets incandescents ou provoquant des étincelles ou du
feu.
• Ne placez jamais, dans, sur ou à proximité de l'appareil, des produits inflammables ou des articles imprégnés de pro-

electrolux 23
duits inflammables et/ou des objets susceptibles de fondre (en plastique ou en
aluminium).
Éclairage du four
• Les ampoules utilisées dans cet appareil
sont spéciales et déstinées uniquement à
un usage avec des appareils ménagers.
Elles ne peuvent pas être employées
pour éclairer une habitation.
• Utilisez une ampoule de puissance similaire et spécifiquement conçue pour les
appareils ménagers pour remplacer celle
usagée.
• Débranchez l'appareil électriquement
avant de remplacer l'éclairage du four.
Risque de choc électrique.
Service après-vente
• Toute intervention ou réparation sur votre
appareil ne doit être effectuée que par un
DESCRIPTION DE L'APPAREIL
Vue d'ensemble
1
3
2
4
5
6
7
8
9
professionnel qualifié. Contactez votre
service après-vente.
• Utilisez exclusivement des pièces d'origine.
Mise au rebut de l'appareil
• Pour éviter tout risque corporel ou matériel
– Débranchez l'appareil du secteur.
– Coupez le câble d'alimentation au ras
de l'appareil et mettez-le au rebut.
– Éliminez le dispositif de verrouillage de
porte. Il empêche les enfants ou les
petits animaux de s'enfermer à l'intérieur de l'appareil. Risque d'asphyxie.
1 Bandeau de commande
2 Sélecteur + / -
3 Programmateur électronique
4 Sélecteur des fonctions du four
5 Orifices d'aération
6 Gril
7 Éclairage du four
8 Ventilateur
9 Plaque signalétique
Accessoires du four
Grille métallique
•
Elle permet de poser les plats (rôtis, gratins), les moules à pâtisserie et de faire
des grillades.
Plateau multi-usages
•
Pour gâteaux et biscuits.
Lèchefrite
•
Elle est utilisée pour cuire et rôtir ou recueillir le jus des grillades.
Glissières télescopiques amovibles
•
Pour grilles ou plaques de four
24 electrolux
AVANT LA PREMIÈRE UTILISATION
Avertissement Reportez-vous au
chapitre « Consignes de sécurité ».
Premier nettoyage
• Retirez tous les accessoires de l'appareil.
• Nettoyez l'appareil avant de l’utiliser pour
la première fois.
Important Reportez-vous au chapitre
« Entretien et nettoyage ».
Réglage de l’heure
Le four ne fonctionne que si l'heure du
jour est réglée.
1. Appuyez plusieurs fois sur la touche de
sélection (reportez-vous au paragraphe
« Programmateur électronique ») jusqu'à
ce que le symbole de l'horloge
gnote.
cli-
2. Réglez l'heure à l'aide du sélecteur + / -
.
Après 5 secondes environ, le symbole
cesse de clignoter et l'heure du jour réglée s'affiche.
Pour modifier l'heure, aucune fonction
de l'horloge (minuteur, durée ou fin) ou
sélection d'une fonction du four ne devra être activée. Vérifiez que la sécurité
enfants n'est pas activée.
Préchauffage
1.
Fonction de réglage
maximale.
2. Laissez l'appareil fonctionner sans aliments pendant environ 1 heure.
3.
Fonction de réglage
maximale.
4. Laissez l'appareil fonctionner sans aliments pendant environ 10 minutes.
5.
Fonction de réglage
maximale.
6. Laissez l'appareil fonctionner sans aliments pendant environ 10 minutes.
Cela a pour but de brûler les résidus dans
l'appareil. Les accessoires peuvent devenir
plus chauds que d'habitude. Lorsque l'on
préchauffe l'appareil pour la première fois, il
peut y avoir des dégagements d'odeur et
de fumée. Ceci est tout à fait normal. Vérifiez que la ventilation environnante est suffisante.
et température
et température
et température
UTILISATION QUOTIDIENNE
Avertissement Reportez-vous au
chapitre « Consignes de sécurité ».
Pour utiliser le four, enfoncez la manette rétractable. La manette ressort.
Activation de l'appareil
Tournez la manette de sélecteur des fonctions du four sur la fonction désirée. L'affichage indique la température recommandée pour la fonction du four. Le four commence à chauffer. Lorsque l'appareil atteint
la température réglée, un signal sonore retentit.
Modification de la température du four
Tournez la manette + / - pour augmenter
ou baisser la température. Le réglage se fait
par paliers de 5°C.
Réglage de la température
Appuyez sur le sélecteur de température
(reportez-vous au paragraphe « Fonctions
Horloge »). L'affichage de la température indique la température actuelle du four.

electrolux 25
Mettre le four à l'arrêt Tournez la manette du four sur OFF.
Indicateur de chaleur résiduelle
Lorsque vous mettez le four à l'arrêt, les
barres affichées indiquent la chaleur résiduelle.
Fonctions du four
Fonction du four Utilisation
Position ARRÊT
L'appareil est à l'ARRÊT.
Éclairage du four
Cuisson traditionnelle
Chaleur tournante
Gril
Maxi Gril
Gril à chaleur tournante
Décongélation
Nettoyage par pyrolyse
Pour éclairer l'intérieur du four, par exemple pour le nettoyage.
Pour cuire et rôtir sur un seul niveau.
Pour cuire au maximum sur trois niveaux du four en même
temps. Diminuez les températures du four (20-40°C) par rapport à la cuisson traditionnelle. Et pour sécher des aliments.
Pour griller des aliments peu épais au centre de la grille et faire
des toasts.
Pour griller des aliments peu épais en grandes quantités et faire des toasts.
Pour rôtir de grosses pièces de viande ou de volaille sur un
seul niveau. Également pour gratiner et brunir.
Pour décongeler des aliments surgelés.
Pour nettoyer le four automatiquement par pyrolyse. Cette
chaleur carbonise les salissures résiduelles à l'intérieur du four.
Le four monte à environ 500°C.

26 electrolux
Programmateur électronique
1
1 Indicateur de température / d’heure
2 Indicateur de chauffage
3 Indicateurs de fonctions Horloge
4 Touche de sélection
2
5 Touche de fonction de nettoyage par
pyrolyse
6 Thermostat
3
456
FONCTIONS DE L'HORLOGE
Réglage des fonctions de l'horloge
1. Réglez une fonction et la température
du four (pas nécessairement pour l'heure et le minuteur)
2. Appuyez plusieurs fois sur la touche de
sélection jusqu'à ce que le symbole de
la fonction souhaitée clignote.
3.
Pour régler le minuteur,
, Durée
ou Fin , utilisez la manette + / -. Le
voyant de la fonction correspondante
s'allume.
Dès que la durée est écoulée, le voyant
de la fonction clignote, « 0.00 » s’affiche
et un signal sonore retentit.
Fonction de l'horloge Utilisation
Heure Affiche l'heure. Pour régler, modifier ou vérifier l'heure.
Minuteur Pour régler un décompte. Un signal retentit lorsque la durée est écou-
Duration Pour régler la durée de fonctionnement du four.
Fin Pour régler l'heure d'arrêt d'une fonction du four.
lée. Cette fonction n'a aucune incidence sur le fonctionnement du four.
Les fonctions Durée et Fin peuvent être utilisées simultanément, pour
mettre le four en fonctionnement ou à
l'arrêt automatiquement à une heure
différée. Réglez d’abord la fonction Du-
, puis la fonction Fin .
rée
Annulation des fonctions de l'horloge
1. Appuyez plusieurs fois sur le bouton Sélection jusqu'à ce que le voyant de fonctions clignote.
4. Pour arrêter le signal sonore et le clignotement :
- Avec Minuteur, appuyez sur une touche
- Avec Durée et Fin, mettez le sélecteur
de fonction sur la position Arrêt.
Avec Minuteur, un signal sonore retentit également lorsque 90% de la durée
s’est écoulée.
Avec les fonctions Durée et Fin ,
le four se met à l'arrêt automatiquement.
2. Tournez en appuyant sur la manette de
commande " +/- ".
Au bout de quelques secondes, la fonction horloge disparaît.

UTILISATION DES ACCESSOIRES
Avertissement Reportez-vous au
chapitre « Consignes de sécurité ».
Rails télescopiques
Installation des rails télescopiques
Vous pouvez mettre les rails télescopiques
à chaque niveau.
Assurez-vous d'installer les deux rails télescopiques sur le même niveau.
L'élément d'arrêt situé à une extrémité du
rail télescopique doit être pointé vers le
haut.
1
electrolux 27
1. Tirez les rails télescopiques de droite et
de gauche comme indiqué.
°C
2. Placez la grille du four sur les rails télescopiques, puis poussez délicatement
ces derniers afin de faire entrer la grille à
l'intérieur du four.
Assurez-vous de bien enfoncer entièrement les rails télescopiques dans l'appareil avant de refermer la porte.
2
Utilisation de rails télescopiques
Grâce aux rails télescopiques, les grilles du
four peuvent être insérées et retirées plus
facilement.
°C
Attention Les glissières télescopiques
ne doivent pas être nettoyées dans un
lave-vaisselle. Ne lubrifiez pas les
glissières télescopiques.

28 electrolux
FONCTIONS SUPPLÉMENTAIRES
Sécurité enfants
Lorsque la sécurité enfants est activée, le
four ne peut plus fonctionner.
Cette fonction empêche les enfants de
mettre involontairement l’appareil en fonctionnement.
Important Ne sélectionnez aucune
fonction du four.
Activation de la sécurité enfants :
1. Tournez la manette de commande + / vers la gauche et maintenez-la dans
cette position.
2. Appuyez sur la touche Sélection jusqu'à
l'affichage du message « SAFE ».
La sécurité enfants est activée.
Pour désactiver la sécurité enfants, effectuez la même procédure que pour son activation.
Ventilateur de refroidissement
Lorsque le four est mis en fonctionnement,
le ventilateur de refroidissement s'enclenche automatiquement afin de maintenir les
parois de l'appareil froides. Lorsque le four
est mis à l'arrêt, le ventilateur de refroidissement continue à fonctionner jusqu'à ce que
l'appareil refroidisse.
Thermostat de sécurité
Afin d'éviter tout risque de surchauffe (résultant d'une utilisation incorrecte de l'appareil ou d'un composant défectueux), le
four est doté d'un thermostat de sécurité
destiné à couper l'alimentation électrique.
Le four se remet automatiquement en fonctionnement en cas de baisse de température.
Coupure automatique du four
L'appareil s'arrête automatiquement au
bout d'un certain temps :
• si vous ne mettez pas à l'arrêt l'appareil
• si vous ne modifiez pas la température du four.
Le voyant affichant la dernière température sélectionnée clignote.
Le four s’arrête à une température :
inférieure à
120 °C
de 120 -
195 °C
de 200 -
245 °C
de 250 °C après 3,0 heures
Après un arrêt automatique, désactivez le
four totalement. Vous pouvez ensuite le remettre en fonctionnement.
Si vous réglez les fonctions de l'horloge
Durée
que est annulé.
après 12,0 heures
après 8,5 heures
après 5,5 heures
ou Fin , l'arrêt automati-
CONSEILS UTILES
• Le four dispose de quatre niveaux de
gradins. Comptez les niveaux de gradins
à partir du bas de l'appareil.
• L'appareil est doté d'un système spécial
qui permet à l'air de circuler et qui recycle perpétuellement la vapeur. Dans cet
environnement, ce système permet de
cuisiner des plats tout en maintenant
ceux-ci tendres à l'intérieur et croquants
à l'extérieur. Le temps de cuisson et la
consommation énergétique sont donc réduits au minimum.
• De l'humidité peut se déposer dans l'enceinte de l'appareil ou sur les vitres de la
porte. Ce phénomène est normal. Veillez
à reculer un peu lorsque vous ouvrez la
porte du four en fonctionnement. Pour di-
minuer la condensation, faites fonctionner l'appareil 10 minutes avant d'enfourner vos aliments.
• Essuyez la vapeur avant et après l'utilisation de l'appareil.
• Ne placez jamais d'aluminium ou tout autre ustensile, plat et accessoire directement en contact avec le bas de votre
four (sole). Ceci entraînerait une détérioration de l'émail et modifierait les résultats de cuisson.
Cuisson de gâteaux
• Pour cuire les gâteaux, réglez la température entre 150 et 200 °C.
• Préchauffez le four pendant environ 10
minutes avant la cuisson.

electrolux 29
• N'ouvrez la porte du four qu'aux 3/4 du
temps de cuisson.
• Si vous enfournez simultanément deux
plaques de cuisson, laissez un gradin libre entre les deux.
Cuisson de la viande et du poisson
• Nous vous conseillons de rôtir les viandes et les poissons au four seulement à
partir d'un poids de 1 kg. Des rôtis d'un
poids inférieur risquent de sécher en
cours de cuisson.
• Pour préparer des rôtis tendres et moel-
• Utilisez une lèchefrite pour éviter que les
sucs et les graisses des aliments qui
s'égouttent laissent des taches indélébiles.
• Laissez reposer la viande pendant environ 15 minutes avant de la couper pour
la laisser s'imbiber de jus.
• Pour réduire la formation de fumées dans
le four, versez un peu d'eau dans la lèchefrite. Versez un peu d'eau à plusieurs
reprises pour empêcher que de la condensation ne se forme.
leux, réglez la température entre 200 et
250 °C.
• En revanche, pour les viandes blanches,
les volailles et les poissons, réglez la température entre 150 et 175 °C.
Tableau de référence pour rôtir et cuire
GÂTEAUX
Cuisson tradi-
TYPE DE
PLAT
Pâtes à gâteaux 2 170 2 (1 et3)160 45-60 Dans un moule à gâteaux
Pâte sablée 2 170 2 (1 et3)160 24-34 Dans un moule à gâteaux
tionnelle
Gradin
Temp
[°C]
Chaleur tour-
nante
Gradin
Temp
[°C]
Temps de
cuisson
[min]
Notes
Gâteau au fromage blanc
avec babeurre
Tarte aux pommes
Strudel 2 175 2 150 60-80 Sur plaque à pâtisserie
Tarte à la confi-
ture
Cake aux fruits
secs
Gâteau de Sa-
voie (gâteau
sans matières
grasses)
Gâteau de
Noël/gâteau riche en fruits
Plum cake 2 170 2 160 50-60
Petits gâteaux 3 170 3 (1 et3)160 20-30 Sur la plaque à gâteaux
Biscuits 3 150 3 150 20-30
1 170 2 160 60-80 Dans un moule à gâteaux
de 26 cm
1 170 2 (1 et3)160 100-120 2 moules à gâteaux de 20
cm sur la grille
2 170 2 160 30-40 Dans un moule à gâteaux
de 26 cm
2 170 2 155 60-70 Dans un moule à gâteaux
de 26 cm
2 170 2 160 35-45 Dans un moule à gâteaux
de 26 cm
2 170 2 160 50-60 Dans un moule à gâteaux
de 20 cm
Dans un moule à pain
Sur la plaque à gâteaux
1)
1)

30 electrolux
TYPE DE
PLAT
Cuisson tradi-
tionnelle
Gradin
Temp
[°C]
Chaleur tour-
nante
Gradin
Temp
[°C]
Temps de
cuisson
[min]
Notes
Meringues 3 100 3 100 90-120 Sur la plaque à gâteaux
Petits pains 3 190 3 180 15-20
Choux 3 190 3 180 25-35
Sur la plaque à gâteaux
Sur la plaque à gâteaux
Tartelettes 3 180 2 170 45-70 Dans un moule à gâteaux
de 20 cm
Sandwich Victoria
1) Pré-chauffez pendant 10 minutes.
1 ou 2 180 2 170 40-55 Gauche + droite dans un
moule à gâteaux de 20 cm
PAIN ET PIZZA
Cuisson tradi-
TYPE DE
PLAT
tionnelle
Gradin
Temp
[°C]
Pain blanc 1 190 1 190 60-70 1 - 2 unités, 500 g par uni-
Pain de seigle 1 190 1 180 30-45 Dans un moule à pain
Petits pains 2 190 2 (1 et3)180 25-40 6-8 petits pains sur plaque
Pizzas 1 190 1 190 20-30
Petits pains au
3 200 2 190 10~20
lait
1) Pré-chauffez pendant 10 minutes.
Chaleur tour-
nante
Gradin
Temp
[°C]
Temps de
cuisson
[min]
Notes
1)
té
de cuisson
Sur la lèchefrite
1)
1)
Sur la plaque à gâteaux
FLANS
Cuisson tradi-
TYPE DE
PLAT
tionnelle
Gradin
Temp
[°C]
Gratin de pâtes 2 180 2 180 40-50 Dans un moule
Gratin de légu-
2 200 2 175 45-60 Dans un moule
mes
Quiche 1 190 1 190 40-50 Dans un moule
Lasagnes 2 200 2 200 25-40 Dans un moule
Cannelloni 2 200 2 190 25-40 Dans un moule
Yorkshire pudd-
2 220 2 210 20-30
ing
1) Pré-chauffez pendant 10 minutes.
Chaleur tour-
nante
Gradin
Temp
[°C]
Temps de
cuisson
[min]
Notes
6 moules à pudding
1)
1)
1)
1)

electrolux 31
VIANDES
Cuisson tradi-
TYPE DE
PLAT
Viande de bœuf 2 200 2 190 50-70 Sur la grille de four et au-
Viande de porc 2 180 2 180 90-120 Sur la grille de four et au-
Viande de veau 2 190 2 175 90-120 Sur la grille de four et au-
Rôti de bœuf à
l'anglaise, bleu
Rôti de bœuf à
l'anglaise, saignant
Rôti de bœuf à
l’anglaise bien
cuit
Épaule de porc 2 180 2 170 120-150 Sur la lèchefrite
Jarret de porc 2 180 2 160 100-120 2 morceaux sur la lèchef-
Agneau 2 190 2 190 110-130 Gigot
Poulet 2 200 2 200 70-85 Le tout sur la lèchefrite
Dinde 1 180 1 160 210-240 Le tout sur la lèchefrite
Canard 2 175 2 160 120-150 Le tout sur la lèchefrite
Oie 1 175 1 160 150-200 Le tout sur la lèchefrite
Lapin 2 190 2 175 60-80 En morceaux
Lièvre 2 190 2 175 150-200 En morceaux
Faisan 2 190 2 175 90-120 Le tout sur la lèchefrite
tionnelle
Gradin
Temp
[°C]
2 210 2 200 44-50 Sur la grille de four et au-
2 210 2 200 51-55 Sur la grille de four et au-
2 210 2 200 55-60 Sur la grille de four et au-
Chaleur tour-
nante
Gradin
Temp
[°C]
Temps de
cuisson
[min]
Notes
dessus de la lèchefrite
dessus de la lèchefrite
dessus de la lèchefrite
dessus de la lèchefrite
dessus de la lèchefrite
dessus de la lèchefrite
rite
POISSON
Cuisson tradi-
TYPE DE
PLAT
Truite/Daurade 2 190 2 (1 et3)175 40-55 3-4 poissons
tionnelle
Gradin
Temp
[°C]
Chaleur tour-
nante
Gradin
Temp
[°C]
Temps de
cuisson
[min]
Notes
Thon/Saumon 2 190 2 (1 et3)175 35-60 4-6 filets
Cuisson au gril
Préchauffez le four à vide pendant environ 10 minutes, avant la cuisson.

32 electrolux
Quantité Cuisson au gril Temps de cuisson en
minutes
TYPE DE PLAT Pièces g Niveau de
gradin
Steaks dans le filet 4 800 3 250 12-15 12-14
Biftecks 4 600 3 250 10-12 6-8
Saucisses 8 / 3 250 12-15 10-12
Côtelettes de porc 4 600 3 250 12-16 12-14
Poulet (coupé en
deux)
Brochettes 4 / 3 250 10-15 10-12
Blanc de poulet 4 400 3 250 12-15 12-14
Hamburgers 6 600 3 250 20-30
Filets de poisson 4 400 3 250 12-14 10-12
Sandwichs toastés 4-6 / 3 250 5-7 /
Toasts 4-6 / 3 250 2-4 2-3
2 1000 3 250 30-35 25-30
Temp.
(°C)
1er côté 2ème côté
Gril à chaleur tournante
Avertissement Utilisez cette fonction
avec une température maximum de
200°C.
Quantité Cuisson au gril Temps de cuisson en
minutes
TYPE DE PLAT Pièces g
Rôti roulé (dinde) 1 1000 3 200 30-40 20-30
Poulet (coupé en
deux)
Cuisses de poulet 6 - 3 200 15-20 15-18
Caille 4 500 3 200 25-30 20-25
Gratin de légumes - - 3 200 20-25 pièces. Pétoncles - - 3 200 15-20 Maquereau 2-4 - 3 200 15-20 10-15
Tranches de pois-
son
2 1000 3 200 25-30 20-30
4-6 800 3 200 12-15 8-10
niveau
Temp.
(°C)
1e face 2e face
ENTRETIEN ET NETTOYAGE
Avertissement Reportez-vous au
chapitre « Consignes de sécurité ».
• Nettoyez la façade du four à l'aide d'une
éponge humide additionné d'eau savonneuse.
• Utilisez les produits spécifiques vendus
dans le commerce pour l'entretien des
surfaces en métal.
• Nettoyez l'appareil après chaque utilisation. Les salissures s'éliminent alors plus
facilement et ne risquent pas de brûler.
• En cas de salissures importantes, nettoyez à l'aide de produits spécifiques
pour four.
• Lavez tous les accessoires du four avec
un chiffon doux humide additionné d'eau

electrolux 33
savonneuse après chaque utilisation et
séchez-les.
• Si vous avez des accessoires anti-adhérents, ne les nettoyez pas avec des produits agressifs, des objets pointus, ou en
lave-vaisselle. Vous risqueriez de détruire
le revêtement anti-adhérent !
Nettoyez le joint d'étanchéité de la
porte
• Vérifiez régulièrement le joint d'étanchéité
de la porte. Le joint d'étanchéité de la
porte est posé sur l'encadrement de la
cavité du four. N'utilisez pas l'appareil si
le joint d'étanchéité de la porte est endommagé. Prenez contact avec le service après-vente.
• Pour le nettoyage du joint d'étanchéité
de la porte, consultez les informations
générales concernant le nettoyage.
Nettoyage par pyrolyse
1. Retirez tous les accessoires du four.
Si vous ne retirez pas les gradins télescopiques, le bandeau de l'horloge affichera la mention « AS » et le processus de nettoyage par pyrolyse ne pourra être initié.
2. Éliminez manuellement le plus gros des
salissures.
3. Réglez la fonction du four. Menu Pyroly-
se
– " La mention « Pyro » s'affiche,
–
Durée
secondes.
Le nettoyage par pyrolyse dure environ
deux heures et demie. Si vous souhaitez que le processus de nettoyage par
pyrolyse se termine à une heure spécifique, appuyez sur la touche de sélection jusqu'à ce que le voyant de la
fonction Fin
de fin du processus de nettoyage à l’aide de la manette + / -. La fonction calcule automatiquement l'heure de début
du processus en fonction de l'heure de
fin ainsi définie. Le processus de nettoyage par pyrolyse commence à
l'heure ainsi calculée et se termine à
l'heure précisée.
4. Appuyez sur la touche Pyro . Le net-
toyage par pyrolyse démarre.
clignote pendant environ 5
clignote. Réglez l’heure
5. Une fois le processus de nettoyage terminé, le four émet un bip sonore et la
mention « 0.00 » s'affiche. Durée
clignote pendant environ 5 secondes.
Tournez la manette du four sur 0 .
L'éclairage du four ne fonctionne pas
pendant le nettoyage par pyrolyse.
Lorsque le four atteint la température
préréglée, la porte se verrouille.
Les barres de l’affichage de la température resteront allumées jusqu’à ce
que la porte se déverrouille à nouveau.
Glissières
Retrait des glissières
1. Ecartez l'avant de la glissière de la paroi
latérale.
2. Ecartez l'arrière de la glissière de la paroi latérale et retirez-la.
2
1
Remontage des glissières
Pour remonter les glissières, procédez dans
le sens inverse du retrait.
Les extrémités arrondies des glissières
doivent être orientées vers l'avant !

34 electrolux
Éclairage du four
Avertissement Attention ! Risque de
choc électrique !
Avant de remplacer l'éclairage du four :
• Mettez le four à l'arrêt.
• Retirez les fusibles de la boîte à fusibles
ou coupez le disjoncteur.
Placez un chiffon sur la sole du four
afin de protéger l'ampoule du four et le
cache en verre.
1. Retirez le diffuseur en verre en le tour-
nant dans le sens inverse des aiguilles
d'une montre.
2. Nettoyez-le.
3. remplacez l'ampoule du four par une
ampoule résistant à une chaleur pouvant atteindre les 300 °C.
Utilisez le même type d'ampoule pour
four.
4. Replacez le diffuseur en verre.
Nettoyage de la porte du four
La porte du four est dotée de trois panneaux vitrés. Vous pouvez retirer la porte du
four ainsi que les panneaux internes vitrés
afin de les nettoyer.
Si vous tentez d'extraire les panneaux
internes vitrés sans avoir au préalable
retiré la porte du four, celle-ci peut se
refermer brusquement.
Retrait de la porte du four et de la vitre
1. Ouvrez entièrement la porte et tenez les
deux charnières.
3. Fermez la porte du four jusqu'à la première position d'ouverture (à mi-chemin). Tirez la porte vers l'avant et retirezla de son logement.
4. Déposez la porte sur un support stable
non abrasif, par exemple sur une table
recouverte d'un tissu doux, afin d'éviter
tout risque de rayure.
2. Soulevez le levier sur les 2 charnières et
basculez-les vers l'avant.
5. Libérez le système de verrouillage afin
de retirer les panneaux internes vitrés.

6. Faites pivoter les deux fixations de 90 °
et retirez-les de leur logement.
90°
7. Soulevez avec précaution (étape 1), puis
sortez (étape 2) un par un les panneaux
internes vitrés. Commencez par le panneau interne vitré du haut.
electrolux 35
Répétez les étapes ci-dessus dans l'ordre
inverse.
La vitre du milieu est décorée d'un motif ornemental. Lorsque vous installez cette vitre,
vérifiez que la zone décorée est tournée
vers la paroi interne de la porte. Après l'installation, vérifiez que la surface de la zone
décorée est lisse au toucher (le côté rugueux doit être de l'autre côté).
Veillez à poser correctement le panneau vitré du milieu dans son logement respectif
(voir l'illustration).
Veillez à poser correctement le panneau supérieur vitré dans son logement respectif
(voir l'illustration).
2
1
Lavez les panneaux internes vitrés avec de
l'eau savonneuse. Séchez soigneusement
les panneaux internes vitrés.
Réinstallation de la porte et des vitres
Une fois le nettoyage terminé, replacez les
panneaux internes vitrés et la porte du four.

36 electrolux
EN CAS D'ANOMALIE DE FONCTIONNEMENT
Avertissement Reportez-vous au
chapitre « Consignes de sécurité ».
Problème Cause possible Solution
Le four ne chauffe pas. Le four n'est pas en
Le four ne chauffe pas. L’horloge n'est pas ré-
Le four ne chauffe pas. Les réglages souhaités
Le four ne chauffe pas. Le fusible dans la boîte à
L'éclairage du four ne fonctionne pas.
La fonction de nettoyage par
pyrolyse ne fonctionne pas (le
bandeau de l'horloge affiche la
mention « AS »)
Le bandeau de l'horloge affiche la mention « Pyro ».
Le bandeau de commande affiche un code d’erreur qui
n’apparaît pas dans la liste.
De la vapeur et de l'eau de
condensation se déposent sur
les aliments et dans l'enceinte
du four.
Si l'anomalie persiste, contactez votre service après-vente.
fonctionnement.
glée.
n'ont pas été effectués.
fusibles a disjoncté.
L'éclairage du four est
défectueux.
Les glissières/gradins
n’ont pas été enlevés.
Le four nécessite un nettoyage par pyrolyse.
Problème électronique Déconnectez l’appareil à l’aide du fu-
Le plat est resté trop
longtemps dans le four.
létique. Celle-ci se trouve sur l'encadrement
avant de la cavité du four.
Les informations nécessaires pour le service après-vente figurent sur la plaque signa-
Nous vous recommandons de noter ces informations ici :
Modèle (MOD.) .........................................
Numéro du produit (PNC) .........................................
Numéro de série (S.N.) .........................................
Mettez en fonctionnement le four.
Réglez l’horloge.
Vérifiez les réglages.
Vérifiez le fusible. Si les fusibles disjonctent à plusieurs reprises, faites appel à un électricien agréé.
Remplacez l'ampoule du four.
Enlevez les glissières/gradins.
Entamez un processus de nettoyage
par pyrolyse.
sible de l’installation domestique ou
du disjoncteur situé dans la boîte à fusible, puis reconnectez-le. Si le message d’erreur s’affiche à nouveau,
contactez votre service après-vente.
Une fois la cuisson terminée, ne laissez jamais les plats dans le four plus
de 15 à 20 minutes.
INSTALLATION
Avertissement Reportez-vous au
chapitre « Consignes de sécurité ».

Encastrement
electrolux 37
20
590
594
540
560
570
2
50
A
B
550 min
560÷570
550 min
560-570
593
580
80÷100
Installation électrique
Avertissement Le branchement
électrique doit être confié à un
électricien qualifié.
Le fabricant décline toute responsabilité en cas de non-respect de ces consignes de sécurité.
L'appareil est fourni sans câble d'alimenta-
tion électrique, ni prise.
Câble d'alimentation
Types de câbles applicables pour l'installa-
tion ou le remplacement: H07 RN-F, H05
RN-F, H05 RRF, H05 VV-F, H05 V2V2-F
(T90), H05 BB-F.
Pour la section du câble, consultez la puis-
sance totale (sur la plaque signalétique) et
le tableau :

38 electrolux
Puissance totale Section du câble
maximum 1 380 W 3 x 0,75 mm²
maximum 2 300 W 3 x 1 mm²
maximum 3 680 W 3 x 1,5 mm²
Le fil de masse (fil jaune/vert) doit faire 2 cm
de plus que les fils de phase et le neutre (fils
bleu et marron).
EN MATIÈRE DE PROTECTION DE L'ENVIRONNEMENT
Le symbole sur le produit ou son
emballage indique que ce produit ne peut
être traité comme déchet ménager. Il doit
être remis au point de collecte dédié à cet
effet (collecte et recyclage du matériel
électrique et électronique).
En procédant à la mise au rebut de
l'appareil dans les règles de l’art, nous
préservons l'environnement et notre
sécurité, s’assurant ainsi que les déchets
seront traités dans des conditions
optimum.
Pour obtenir plus de détails sur le recyclage
de ce produit, veuillez prendre contact avec
les services de votre commune ou le
magasin où vous avez effectué l'achat.
Emballage
Les matériaux d'emballage sont conçus dans le respect de l'environnement
et sont recyclables. Les pièces en plastique sont marquées des abréviations
internationales telles que PE, PS, etc.
Eliminez les emballages dans les conteneurs de la commune prévus à cet
effet.

Electrolux. Thinking of you.
Saiba mais sobre a nossa filosofia em www.electrolux.com
ÍNDICE
Informações de segurança 39
Descrição do produto 42
Antes da primeira utilização 42
Utilização diária 43
Funções de relógio 44
Utilizar os acessórios 45
INFORMAÇÕES DE SEGURANÇA
Antes da instalação e utilização, leia atentamente este manual:
• Para a sua segurança pessoal e para a
segurança do seu aparelho.
• Para respeitar o meio ambiente.
• Para o funcionamento correcto do apare-
lho.
Guarde sempre estas instruções com o
aparelho mesmo que seja transferido ou
vendido.
O fabricante não é responsável por danos
resultantes de uma instalação e utilização
incorrectas.
Segurança para crianças e pessoas
vulneráveis
• Este aparelho pode ser utilizado por cri-
anças com 8 anos ou mais e por pes-
soas com capacidades físicas, sensoriais
ou mentais reduzidas ou com pouca ex-
periência e conhecimento se tiverem re-
cebido supervisão ou instruções relativas
à utilização do aparelho de forma segura
e compreenderem os perigos envolvidos.
As crianças não devem brincar com o
aparelho.
• Mantenha todas as embalagens fora do
alcance das crianças. Existe o risco de
asfixia ou ferimentos pessoais.
• Mantenha as crianças e animais afasta-
dos do aparelho quando a porta está
aberta ou este está em funcionamento.
Existe o risco de ferimentos ou outra in-
capacidade permanente.
• Se o aparelho possuir a função de Blo-
queio de Segurança para Crianças ou
Bloqueio de Funções (Bloqueio dos Co-
electrolux 39
Funções adicionais 47
Sugestões e conselhos úteis 47
Manutenção e limpeza 51
O que fazer se… 54
Instalação 55
Preocupações ambientais 57
Sujeito a alterações sem aviso prévio
mandos), utilize-a. Esta evita que as crianças e animais utilizem acidentalmente
o aparelho.
Segurança geral
• Não altere as especificações deste aparelho. Existe o risco de ferimentos e danos no aparelho.
• Não deixe o aparelho sem vigilância durante o seu funcionamento.
• Desligue o aparelho após cada utilização.
Instalação
• Apenas um electricista qualificado pode
instalar e ligar o aparelho. Contacte um
centro de assistência aprovado. Este
procedimento pretende evitar riscos de
danos estruturais ou ferimentos pessoais.
• Certifique-se de que o aparelho não está
danificado devido ao transporte. Não ligue um aparelho danificado. Se necessário, contacte o fornecedor.
• Retire todo o material de embalagem, etiquetas e revestimentos do aparelho antes de o utilizar pela primeira vez. Não retire a placa de características. Este procedimento pode invalidar a garantia.
• Respeite na totalidade as leis, regulamentos, directivas e normas vigentes no
país onde utiliza o aparelho (normas de
segurança, normas de reciclagem, regras
de segurança eléctrica ou de gás, etc.).
• Certifique-se de que o aparelho está desligado da corrente durante a instalação.
• Tenha cuidado quando mover o aparelho. O aparelho é pesado. Utilize sempre

40 electrolux
luvas de protecção. Não puxe o aparelho
pela pega.
• A instalação eléctrica deve possuir um
dispositivo de isolamento que lhe permita
desligar o aparelho da corrente eléctrica
em todos os pólos. O dispositivo de isolamento deve ter uma abertura de contacto com uma largura mínima de 3 mm.
• Deve dispor de dispositivos de isolamento correctos: disjuntores de protecção,
fusíveis (os fusíveis de rosca devem ser
retirados do suporte), barras de fuga à
terra e contactores.
• As peças de protecção contra choques
eléctricos devem estar fixas de modo a
que não possam ser retiradas sem ferramentas.
• Algumas peças do aparelho transportam
corrente eléctrica. Feche o aparelho num
armário, certificando-se de que não existem folgas. Assim evita os choques eléctricos, uma vez que não pode tocar acidentalmente nas peças perigosas.
• Antes da instalação, certifique-se de que
o armário da cozinha possui as dimensões da cavidade aplicáveis.
• Certifique-se de que o aparelho está instalado sob e ao lado de estruturas seguras.
• Respeite as distâncias mínimas relativamente a outros aparelhos e unidades.
• Instale o aparelho com a parte posterior
e um dos lados próximos do aparelho
mais elevado. O outro lado deve estar
junto a um aparelho com a mesma altura.
• O aparelho não pode ser colocado numa
base.
• Os fornos e zonas de trabalho de encastrar estão equipados com sistemas de ligação especiais. Para evitar danos no
aparelho, utilize apenas aparelhos do
mesmo fabricante.
Ligação eléctrica
• A máquina deve ter uma ligação à terra.
• Certifique-se de que os dados sobre a ligação eléctrica na placa de características estão em conformidade com a fonte
de alimentação doméstica.
• A informação relativa à tensão encontra-
-se na placa de características.
• Utilize sempre uma tomada correctamente instalada e à prova de choques eléctricos.
• Quando ligar aparelhos eléctricos à tomada, não deixe que os cabos toquem
ou se aproximem da porta quente do
aparelho.
• Não utilize fichas de contactos múltiplos,
conectores e cabos de extensão. Existe
o risco de incêndio.
• Não substitua ou altere o cabo de alimentação eléctrica. Contacte o centro de
assistência.
• Certifique-se de que não esmaga nem
provoca danos na ficha de alimentação
eléctrica (se aplicável) e no cabo atrás do
aparelho.
• Certifique-se de que a ficha de alimentação eléctrica está acessível após a instalação.
• Não puxe o cabo de alimentação eléctrica para desligar o aparelho. Puxe sempre a ficha de alimentação eléctrica, se
aplicável.
Utilização
• Este aparelho destina-se apenas a uso
doméstico. Não utilize o aparelho para
fins comerciais e industriais.
• Utilize o aparelho exclusivamente para tarefas de cozedura domésticas. Deste
modo, evitará ferimentos pessoais em
pessoas ou danos materiais.
• Não utilize o aparelho como superfície de
trabalho ou armazenamento.
• Não coloque produtos inflamáveis ou
itens molhados com produtos inflamáveis
e/ou objectos fundíveis (em plástico ou
alumínio) no, ao lado ou em cima do aparelho. Existe o risco de explosão ou incêndio.
• O interior do aparelho fica quente durante a utilização. Existe o risco de queimaduras. Utilize luvas quando introduzir ou
retirar os acessórios ou tachos.
• Tenha cuidado quando remover ou instalar os acessórios para evitar danos no
esmalte do forno.
• Mantenha-se afastado do aparelho sempre que abrir a porta enquanto este estiver em funcionamento. Pode ser libertado vapor quente. Existe o risco de queimaduras na pele.

electrolux 41
• A descoloração do esmalte não afecta o
desempenho do aparelho, logo, tal não
representa qualquer defeito em termos
de direito à garantia.
• Para evitar danos ou descoloração do
esmalte:
– não coloque quaisquer objectos direc-
tamente na parte inferior do aparelho e
não o cubra com folha de alumínio;
– não coloque água quente directamen-
te no aparelho;
– não mantenha pratos e alimentos hú-
midos no aparelho após acabar de cozinhar.
• Não utilize este aparelho se este estiver
em contacto com água. Não utilize o
aparelho com as mãos húmidas.
• Não aplique pressão na porta aberta.
• Feche sempre a porta do aparelho quando estiver a cozinhar, mesmo no caso de
grelhados.
Manutenção e limpeza
• Antes da manutenção, desactive o aparelho e desligue-o da corrente.
• Antes da manutenção, certifique-se de
que o aparelho não está quente. Existe o
risco de queimaduras. Existe o risco de
quebra dos painéis de vidro.
• Mantenha sempre o aparelho limpo. Uma
acumulação de gordura ou outros alimentos pode resultar num incêndio.
• A limpeza regular do aparelho evita a deterioração do material da superfície.
• Utilize uma forma funda para bolos muito
húmidos para evitar que os sumos de
fruta provoquem nódoas permanentes.
• Para a sua segurança pessoal e para a
segurança do seu aparelho, limpe o aparelho exclusivamente com água e sabão.
Não utilize produtos inflamáveis ou produtos que possam causar corrosão.
• Não limpe o aparelho com aparelhos de
limpeza a vapor, agentes de limpeza de
alta pressão, objectos pontiagudos,
agentes de limpeza abrasivos, esponjas
abrasivas e tira-nódoas.
• Se utilizar um spray de limpeza do forno,
siga as instruções do fabricante.
• Não limpe a porta de vidro com agentes
de limpeza abrasivos ou raspadores metálicos. A superfície resistente ao calor do
vidro interno pode partir e estilhaçar.
• Quando os painéis de vidro da porta estão danificados, tornam-se fracos e podem partir. É necessário proceder à sua
substituição. Contacte o centro de assistência.
• Tenha cuidado quando retirar a porta do
aparelho. A porta é pesada!
• Não limpe esmalte catalítico (se aplicável).
Limpeza pirolítica
• Não deixe o aparelho sem vigilância durante a limpeza pirolítica.
• Não tente abrir a porta e não desligue a
corrente eléctrica durante a limpeza pirolítica.
• Mantenha as crianças afastadas durante
a limpeza pirolítica. O aparelho fica muito
quente Existe o risco de queimaduras.
• Durante a limpeza pirolítica, a sujidade
profunda pode provocar descoloração
do esmalte. As alterações do esmalte
não afectam o desempenho do aparelho.
Perigo de incêndio
• Abra a porta com cuidado. A utilização
de ingredientes com álcool pode provocar uma mistura de álcool e ar. Existe o
risco de incêndio.
• Não permita que faíscas ou chamas ardentes estejam perto do aparelho quando abrir a porta.
• Não coloque produtos inflamáveis ou
itens molhados com produtos inflamáveis
e/ou objectos fundíveis (em plástico ou
alumínio) no, ao lado ou em cima do aparelho.
Lâmpada do forno
• As lâmpadas utilizadas neste aparelho
são lâmpadas especiais seleccionadas
apenas para electrodomésticos. Não podem ser utilizadas para a iluminação total
ou parcial de uma divisão doméstica.
• Se for necessário substituir uma lâmpada, utilize uma da mesma potência e especificamente concebida apenas para
electrodomésticos.
• Desligue o aparelho da corrente antes de
proceder à substituição da lâmpada do
forno. Existe o risco de choque eléctrico.

42 electrolux
Centro de assistência
• Apenas um técnico autorizado pode
efectuar trabalhos ou reparações na máquina. Contacte um centro de assistência
aprovado.
• Utilize apenas peças sobressalentes originais.
Eliminação do aparelho
• Para evitar riscos de ferimentos pessoais
ou danos
DESCRIÇÃO DO PRODUTO
Descrição geral
1
3
2
4
5
6
7
8
9
– Desligue o aparelho da corrente.
– Corte o cabo de alimentação eléctrica
e elimine-o.
– Elimine o fecho da porta. Isto evita que
as crianças ou animais pequenos fiquem fechados dentro da máquina.
Existe o risco de asfixia.
1 Painel de controlo
2 Botão + / -
3 Programador electrónico
4 Botão das funções do forno
5 Aberturas de ventilação
6 Grelhador
7 Lâmpada do forno
8 Ventoinha
9 Placa de características
Acessórios do forno
Grelha
•
Para tachos, formas de bolos, peças para assar.
Tabuleiro plano
•
Para bolos e bolachas.
ANTES DA PRIMEIRA UTILIZAÇÃO
Advertência Consulte o capítulo
"Informações de segurança".
Limpeza inicial
• Retire todas as partes do aparelho.
• Limpe o aparelho antes da primeira utilização
Importante Consulte o capítulo
"Manutenção e limpeza".
• Tabuleiro de assar
Para cozer e assar ou para recolher a
gordura.
Calhas telescópicas amovíveis
•
Para colocar as grelhas ou tabuleiros.
Definir a hora
O forno apenas funciona depois de definir a hora.
1. Prima o botão de selecção (consulte
"Programador electrónico") várias vezes
até o indicador da função Hora do dia
ficar intermitente.

2. Utilize o botão +/- para definir a hora.
Após cerca de 5 segundos, o indicador
deixa de piscar e o visor indica a hora
do dia definida.
Quando muda a hora, não deve definir
uma função de relógio (Cronómetro,
Duração ou Fim) ou uma função do
forno ao mesmo tempo. Certifique-se
de que o bloqueio de segurança para
crianças não está activado.
UTILIZAÇÃO DIÁRIA
Advertência Consulte o capítulo
"Informações de segurança".
Para utilizar o forno, prima o botão retráctil. O botão depois sai para fora.
Activar o aparelho
Rode o botão das funções do forno para
uma função do forno. O visor apresenta a
temperatura sugerida para a função do forno. O forno começa a aquecer. Quando o
aparelho alcança a temperatura definida,
ouve-se um sinal sonoro.
Alterar a temperatura do forno
Rode o botão + / - para aumentar ou reduzir a temperatura. O ajuste processa-se em
passos de 5 °C.
Controlar a temperatura
Prima o botão de verificação da temperatura (consulte "Funções de relógio"). O visor
da temperatura indica a temperatura actual
do forno.
electrolux 43
Pré-aquecimento
1.
Regule a função
ma.
2. Deixe o aparelho em funcionamento
sem alimentos durante aproximadamente 1 hora.
3.
Regule a função
ma.
4. Deixe o aparelho em funcionamento
sem alimentos durante aproximadamente 10 minutos.
5.
Regule a função
ma.
6. Deixe o aparelho em funcionamento
sem alimentos durante aproximadamente 10 minutos.
Isto deverá queimar os resíduos do aparelho. Os acessórios podem ficar mais quentes do que o habitual. Quando pré-aquecer
o aparelho pela primeira vez, o aparelho
pode libertar odor e fumo. Este é um efeito
normal. Certifique-se de que a circulação
de ar é suficiente.
Desligar o forno
Rode o botão de controlo das funções do
forno para a posição desligado.
Indicador de calor residual
Ao desligar o forno, as barras no visor indicam o calor residual.
Funções do forno
e temperatura máxi-
e temperatura máxi-
e temperatura máxi-

44 electrolux
Função do forno Aplicação
Posição desligado
O aparelho está desligado.
Lâmpada do forno
Cozedura convencional
Cozedura com ventoi-
nha (ar quente)
Grelhador
Grelhador duplo
Grelhador com ar quen-
te
Descongelar
Limpeza pirolítica
Programador electrónico
1
Para iluminar o interior do forno, por exemplo, para limpar.
Para cozer e assar num nível do forno.
Para cozinhar no máximo em três níveis do forno em simultâneo. Diminui as temperaturas do forno (20-40 °C) em comparação com a função Tradicional. E para secar alimentos.
Para grelhar alimentos planos no meio do grelhador e para
tostar.
Para grelhar alimentos planos em grandes quantidades e para
tostar.
Para assar aves ou peças de carne de grandes dimensões
num nível. Também para gratinar e alourar.
Para descongelar alimentos.
Para a limpeza pirolítica automática do forno. Queima a sujidade residual no forno. O forno aquece até aproximadamente
500 °C.
1 Visor de temperatura/hora
2 Indicador de calor
3 Indicadores de funções de relógio
4 Botão de selecção
2
5 Botão de função pirólise
6 Botão de verificação da temperatura
3
456
FUNÇÕES DE RELÓGIO
Regular as funções de relógio
1. Defina uma temperatura e função do
forno (não é necessário para Hora do
dia e Cronómetro).
2. Prima o botão de selecção repetidamente até que o indicador da função
desejada fique intermitente.
3. Para regular o tempo para o Cronóme-
, Duração ou Fim , utilize o
tro
botão + / -. O respectivo indicador de
função acende-se.
Quando o período de tempo terminar, o
respectivo indicador de função fica intermitente, o visor apresenta 0.00 e é
emitido um sinal sonoro.
4. Para desligar o sinal e a intermitência:
- com o Cronómetro, prima um botão

electrolux 45
- com Duração e Fim, rode o selector
de funções do forno para a posição de
Com as funções Duração e Fim
o forno desliga automaticamente.
desligado.
Com o Cronómetro, é também emitido
um sinal sonoro quando está decorrido
90% do tempo.
Função de relógio Aplicação
Hora do dia Apresenta a hora. Para definir, alterar ou verificar a hora.
Cronómetro Para definir um tempo de contagem decrescente. Depois de decorrido
Duração Para definir o tempo durante o qual o forno vai ser utilizado.
Fim Para definir o tempo de desactivação para uma função do forno.
Duração e Fim podem ser utilizados em simultâneo, se o forno for ligado e desligado automaticamente
mais tarde. Primeiro, defina Duração
o tempo, é emitido um sinal acústico. Esta função não tem qualquer
efeito no funcionamento do forno.
2. Rode e mantenha o botão de controlo "
+/- ".
Após alguns segundos, a função de relógio apaga-se.
e, em seguida, Fim .
Cancelar as funções de relógio
1. Prima novamente o botão de selecção
e aguarde até o indicador de função
pretendido ficar intermitente.
UTILIZAR OS ACESSÓRIOS
Advertência Consulte o capítulo
"Informações de segurança".
Calhas telescópicas
Instalar as calhas telescópicas
Pode colocar as calhas telescópicas em
cada nível.
Certifique-se de que as duas calhas telescópicas estão no mesmo nível.
O batente numa das extremidades da calha
telecópica deve apontar para cima.

46 electrolux
1
2
2. Coloque a grelha nas calhas telescópicas e empurre-as cuidadosamente para
o interior do aparelho.
Certifique-se de que volta a colocar as
calhas telescópicas totalmente no interior do aparelho antes de fechar a porta
do forno.
°C
Cuidado Não lave as calhas
telescópicas na máquina de lavar loiça.
Não lubrifique as calhas telescópicas.
Utilizar as calhas telescópicas
Com as calhas telescópicas, pode colocar
e remover as grelhas mais facilmente.
1. Retire as calhas telescópicas direita e
esquerda.
°C

FUNÇÕES ADICIONAIS
Bloqueio de segurança para crianças
Quando o bloqueio de segurança para crianças está activo, o forno não pode ser
operado.
Garante que as crianças não ligam o aparelho acidentalmente.
Importante Não regule uma função do
forno.
Ligar o bloqueio de segurança para
crianças:
1. Rode o botão + / - para a esquerda e
mantenha.
2. Prima o botão de selecção até o visor
apresentar "SAFE".
O dispositivo de bloqueio de segurança para crianças está activado.
Para desligar o bloqueio de segurança para
crianças, repita o procedimento para ligar o
bloqueio de segurança para crianças.
Ventoinha de arrefecimento
Quando o aparelho está em funcionamento, a ventoinha de arrefecimento liga-se automaticamente para manter as superfícies
do aparelho frias. Se desligar o aparelho, a
ventoinha de arrefecimento continua a funcionar até que o aparelho arrefeça.
Termóstato de segurança
Para evitar um sobreaquecimento perigoso
(devido à utilização incorrecta do aparelho
ou componentes com defeitos), o forno
electrolux 47
tem um termóstato de segurança, que interrompe a fonte de alimentação. O forno
torna a ligar-se automaticamente, quando a
temperatura desce.
Desconexão automática do forno
O aparelho desactiva-se automaticamente após algum tempo:
• Se não desactivar o aparelho.
• Se não alterar a temperatura do forno.
A última temperatura definida pisca no
visor da temperatura.
O forno desactiva-se automaticamente quando a temperatura do forno é:
inferior a
120 °C
120 - 195°Capós 8,5 horas
200 - 245°Capós 5,5 horas
250 °C após 3,0 horas
Após uma desactivação automática, desactive totalmente o forno. Em seguida, pode activá-lo novamente.
A desconexão automática é cancelada
se definir a função de relógio Duração
ou Fim .
após 12,0 horas
SUGESTÕES E CONSELHOS ÚTEIS
• O aparelho possui quatro níveis da grelha. Conte os níveis da grelha a partir do
fundo do aparelho.
• O aparelho possui um sistema especial
que circula o ar e renova constantemente
o vapor. Este sistema permite cozinhar
num ambiente a vapor e manter os alimentos macios por dentro e crocantes
por fora. Diminui o tempo de cozedura e
o consumo de energia ao mínimo.
• A humidade pode condensar no aparelho
ou nas portas de vidro. Isto é normal.
Afaste-se sempre do aparelho quando
abrir a porta do mesmo ao cozinhar. Para diminuir a condensação, ligue o apare-
• Limpe a humidade após cada utilização
• Não coloque objectos directamente na
Cozer bolos
• A melhor temperatura para cozer bolos
• Pré-aqueça o forno durante aproximada-
lho pelo menos 10 minutos antes da cozedura.
do aparelho.
parte inferior do aparelho e não cubra os
componentes com folha de alumínio enquanto cozinha. Tal pode alterar os resultados da cozedura e danificar o revestimento de esmalte.
encontra-se entre 150 °C e 200 °C.
mente 10 minutos antes de cozer.

48 electrolux
• Não abra a porta do forno antes de se
esgotarem 3/4 do tempo de confecção
definido.
• Se utilizar dois tabuleiros ao mesmo tempo, deixe um nível vazio entre os tabuleiros.
Confeccionar carne e peixe
• Não confeccione carne com um peso inferior a 1 kg. Confeccionar quantidades
demasiado pequenas torna a carne muito seca.
• Para manter a carne vermelha bem cozinhada por fora e suculenta por dentro,
• Para carne branca, aves e peixe, defina a
temperatura entre 150°C-175°C.
• Utilize um tabuleiro de recolha para todos
os alimentos gordurosos para evitar que
o forno ganhe manchas permanentes,
• Deixe a carne durante aproximadamente
15 minutos antes de trinchar para que
não fique seca.
• Para evitar demasiado fumo no forno durante o assado, acrescente alguma água
no tabuleiro de recolha. Para evitar a
condensação de fumo, acrescente água
sempre que secar.
regule a temperatura entre 200 °C-250
°C.
Tabela para cozedura de bolos/tabela para assar
BOLOS
Cozedura con-
TIPO DE PRA-
TO
Massas batidas 2 170 2 (1 e3)160 45-60 Em forma de bolo
Massa amanteigada
Bolo de queijo 1 170 2 160 60-80 Em forma de bolo de 26
Bolo de maçã
(Tarte de maçã)
Strudel 2 175 2 150 60-80 No tabuleiro
Tarte de com-
pota
Bolo de frutas 2 170 2 155 60-70 Em forma de bolo de 26
Bolo esponja
(Bolo esponja
sem gordura)
Bolo de Natal/
Bolo com frutas
Bolo de ameixa 2 170 2 160 50-60
Bolos peque-
nos
Biscoitos 3 150 3 150 20-30
Merengue 3 100 3 100 90-120 No tabuleiro plano
Pãezinhos 3 190 3 180 15-20
vencional
Nível
Temp.
(°C)
2 170 2 (1 e3)160 24-34 Em forma de bolo
1 170 2 (1 e3)160 100-120 2 formas de bolo de 20 cm
2 170 2 160 30-40 Em forma de bolo de 26
2 170 2 160 35-45 Em forma de bolo de 26
2 170 2 160 50-60 Em forma de bolo de 20
3 170 3 (1 e3)160 20-30 No tabuleiro plano
Cozedura com
ventoinha (ar
quente)
Nível
Temp.
(°C)
Tempo de
cozedura
(min.)
Notas
cm
na grelha
cm
cm
cm
cm
Em forma rectangular
No tabuleiro plano
No tabuleiro plano
1)
1)
1)

electrolux 49
Cozedura com
ventoinha (ar
quente)
Nível
Temp.
(°C)
Tempo de
cozedura
(min.)
Notas
No tabuleiro plano
1)
TIPO DE PRA-
TO
Massa para
éclairs e profite-
Cozedura con-
vencional
Nível
Temp.
(°C)
3 190 3 180 25-35
roles
Tartes 3 180 2 170 45-70 Em forma de bolo de 20
cm
Bolo de duas
camadas
1) Pré-aquecer durante 10 minutos.
1 ou 2 180 2 170 40-55 Esquerda + direita em for-
ma de bolo de 20 cm
PÃO E PIZZA
Cozedura con-
TIPO DE PRA-
TO
vencional
Nível
Temp.
(°C)
Pão branco 1 190 1 190 60-70 1-2 fatias, 500 gr cada fa-
Pão de centeio 1 190 1 180 30-45 Em forma rectangular
Pãezinhos 2 190 2 (1 e3)180 25-40 6-8 pãezinhos no tabuleiro
Pizzas 1 190 1 190 20-30
Scones 3 200 2 190 10~20
1) Pré-aquecer durante 10 minutos.
Cozedura com
ventoinha (ar
quente)
Nível
Temp.
(°C)
Tempo de
cozedura
(min.)
Notas
1)
tia
1)
plano
No tabuleiro de assar
No tabuleiro plano
1)
FLANS
Cozedura con-
TIPO DE PRA-
TO
vencional
Nível
Temp.
(°C)
Empadas 2 180 2 180 40-50 Em forma
Flan de vege-
2 200 2 175 45-60 Em forma
tais
Quiches 1 190 1 190 40-50 Em forma
Lasanha 2 200 2 200 25-40 Em forma
Canelones 2 200 2 190 25-40 Em forma
Pudim Yorkshi-
2 220 2 210 20-30
re
1) Pré-aqueça durante 10 minutos.
Cozedura com
ventoinha (ar
quente)
Nível
Temp.
(°C)
Tempo de
cozedura
(min.)
Notas
6 formas de pudim
1)
1)

50 electrolux
CARNE
Cozedura con-
TIPO DE PRA-
TO
Carne de vaca 2 200 2 190 50-70 Na grelha e tabuleiro de
Carne de porco 2 180 2 180 90-120 Na grelha e tabuleiro de
Carne de vitela 2 190 2 175 90-120 Na grelha e tabuleiro de
Rosbife (mal
passado)
Rosbife (médio) 2 210 2 200 51-55 Na grelha e tabuleiro de
Rosbife (bem
passado)
Pá de porco 2 180 2 170 120-150 No tabuleiro de assar
Joelho de por-
co
Borrego 2 190 2 190 110-130 Perna
Frango 2 200 2 200 70-85 Inteiro no tabuleiro de as-
Peru 1 180 1 160 210-240 Inteiro no tabuleiro de as-
Pato 2 175 2 160 120-150 Inteiro no tabuleiro de as-
Ganso 1 175 1 160 150-200 Inteiro no tabuleiro de as-
Coelho 2 190 2 175 60-80 Em pedaços
Lebre 2 190 2 175 150-200 Em pedaços
Faisão 2 190 2 175 90-120 Inteiro no tabuleiro de as-
vencional
Nível
Temp.
(°C)
2 210 2 200 44-50 Na grelha e tabuleiro de
2 210 2 200 55-60 Na grelha e tabuleiro de
2 180 2 160 100-120 2 pedaços no tabuleiro de
Cozedura com
ventoinha (ar
quente)
Nível
Temp.
(°C)
Tempo de
cozedura
(min.)
Notas
assar
assar
assar
assar
assar
assar
assar
sar
sar
sar
sar
sar
PEIXE
Cozedura con-
TIPO DE PRA-
TO
Truta/Dourada 2 190 2 (1 e3)175 40-55 3-4 peixes
vencional
Nível
Temp.
(°C)
Cozedura com
ventoinha (ar
quente)
Nível
Temp.
(°C)
Tempo de
cozedura
(min.)
Notas
Atum/Salmão 2 190 2 (1 e3)175 35-60 4-6 filetes
Grelhar
Aqueça previamente o forno vazio durante 10 minutos, antes de cozinhar.

electrolux 51
Quantidade Grelhar Tempos de cozedura
em minutos
TIPO DE PRATO Peças g
Bifes do lombo 4 800 3 250 12-15 12-14
Bife de novilho 4 600 3 250 10-12 6-8
Salsichas 8 / 3 250 12-15 10-12
Costeletas de por-
co
Frango (em meta-
des)
Espetadas 4 / 3 250 10-15 10-12
Peito de frango 4 400 3 250 12-15 12-14
Hambúrguer 6 600 3 250 20-30
Filetes de peixe 4 400 3 250 12-14 10-12
Sanduíches tosta-
das
Tostas 4-6 / 3 250 2-4 2-3
4 600 3 250 12-16 12-14
2 1000 3 250 30-35 25-30
4-6 / 3 250 5-7 /
nível
Temp.
(°C)
1.º lado 2.º lado
Grill ventilado
Advertência Utilize esta função com
uma temperatura máxima de 200°C.
Quantidade Grelhar Tempos de cozedura
em minutos
TIPO DE PRATO Peças g
Rolo de carne (peru) 1 1000 3 200 30-40 20-30
Frango (em meta-
des)
Coxa de frango 6 - 3 200 15-20 15-18
Codornizes 4 500 3 200 25-30 20-25
Gratinado de legu-
mes
peças. Amêijoas - - 3 200 15-20 Cavala 2-4 - 3 200 15-20 10-15
Peixe em posta 4-6 800 3 200 12-15 8-10
2 1000 3 200 25-30 20-30
- - 3 200 20-25 -
Informação relativa à acrilamida
Importante De acordo com os
conhecimentos científicos mais recentes,
se deixar tostar alimentos (especialmente
nível
acrilamida pode representar um risco para
a saúde. Assim, aconselhamos que cozinhe
a baixa temperaturas e não deixe tostar
demais os alimentos.
Temp.
(°C)
1.º lado 2.º lado
alimentos que contenham amido), a
MANUTENÇÃO E LIMPEZA
Advertência Consulte o capítulo
"Informações de segurança".

52 electrolux
• Limpe a parte frontal do aparelho com
um pano macio e água quente com produto de limpeza.
• Para limpar superfícies de metal, utilize
um produto de limpeza convencional
• Limpe o interior do forno após cada utilização. Deste modo, é possível remover
mais facilmente a sujidade e evitar que
esta se queime.
• Limpe a sujidade incrustada com um
produto de limpeza especial.
• Limpe todos os acessórios do forno
(com um pano macio e água quente com
produto de limpeza) após cada utilização
e deixe-os secar.
• No caso de acessórios anti-aderentes,
não os limpe com produtos de limpeza
agressivos, objectos afiados ou na máquina de lavar loiça. Pode destruir o revestimento antiaderente!
Limpar a junta da porta
• Verifique regularmente a junta da porta. A
junta da porta encontra-se à volta da
porta do forno. Não utilize o aparelho se
a junta da porta estiver danificada. Contacte o centro de assistência.
• Para limpar a junta da porta, consulte as
informações gerais sobre a limpeza.
Limpeza pirolítica
1. Remova todas as peças do forno.
Se não remover as calhas de apoio da
grelha, o visor do relógio indica " AS "
e não é possível iniciar o processo de
limpeza pirolítica.
2. Remova manualmente os resíduos mais
resistentes.
3.
Definir a função do forno Pirólise
–" Pyro " surge no visor,
–
Duração
damente 5 segundos.
A limpeza pirolítica dura aproximadamente 2,5 horas. Se pretender que esta termine num determinado momento,
prima o botão de selecção até o indicador da função Fim
tente. Utilize o botão de controlo +/para definir a hora final para o procedimento. A função calcula a hora de início com base na hora final especificada. A limpeza pirolítica começa e termina à hora pretendida.
pisca durante aproxima-
ficar intermi-
4. Prima o botão Pyro . É iniciada a limpeza pirolítica.
5. No final do processo, é emitido um sinal
sonoro e " 0.00 " surge no visor. Dura-
pisca durante aproximadamen-
ção
te 5 segundos. Rode o botão de controlo do forno para 0 .
A luz não funciona durante a limpeza
pirolítica.
Quando o forno atinge a temperatura
predefinida, a porta tranca-se.
As barras do indicador de calor surgem até a porta destrancar novamente.
Calhas de Apoio da Grelha
Remover as calhas de apoio da grelha
1. Puxe a parte dianteira da calha de apoio
da grelha da parede lateral.
2. Puxe a calha traseira de apoio da grelha
da parede lateral e remova-a.
2
1
Instalar as calhas de apoio da grelha
Instale as calhas de apoio da grelha na sequência inversa.
As extremidades arredondadas das
calhas de apoio da grelha têm de ficar
viradas para a frente!

Lâmpada do forno
Advertência Atenção! Existe o risco
de choque eléctrico!
Antes de substituir a lâmpada do forno:
• Desligue o forno.
• Retire os fusíveis na caixa de fusíveis ou
desligue o disjuntor.
Coloque um pano no fundo do forno
para proteger a lâmpada e a cobertura
de vidro.
1. Rode a cobertura de vidro para a es-
querda e retire-a.
2. Limpe a cobertura de vidro.
3. Substitua a lâmpada do forno por uma
lâmpada adequada, resistente ao calor
até 300 °C.
Utilize uma lâmpada do forno do mesmo tipo.
4. Instale a cobertura de vidro.
Limpeza da porta do forno
A porta do forno possui três painéis de vidro. Remova a porta do forno e os painéis
internos de vidro para os limpar.
A porta do forno pode fechar-se se
tentar remover os painéis de vidro antes de remover a porta do forno.
Remover a porta do forno e o painel de
vidro
1. Abra a porta por completo e segure nas
duas dobradiças da porta.
electrolux 53
3. Feche a porta do forno para a primeira
posição de abertura (meio). Em seguida,
puxe para a frente e remova a porta do
respectivo lugar.
4. Coloque a porta numa superfície estável
protegida por um pano macio.
2. Levante e rode as alavancas nas duas
dobradiças.
5. Solte o sistema de bloqueio para remover os painéis de vidro.

54 electrolux
6. Rode os dois fixadores em 90° e remova-os dos respectivos alojamentos.
90°
7. Eleve cuidadosamente (passo 1) e remova (passo 2) os painéis de vidro, um
por um. Comece a partir do painel superior de vidro.
Siga os passos descritos em cima na sequência oposta.
O painel central possui uma moldura decorativa. Quando instalar este painel, certifique-se de que a serigrafia fica virada para a
parte interior do forno. Certifique-se de que,
após a instalação, a superfície da moldura
do painel de vidro na zona da serigrafia não
se encontra rugosa quando lhe toca.
Certifique-se de que instala o painel de vidro intermédio nos alojamentos correctos
(consulte a imagem).
Certifique-se de que instala o painel de vidro superior nos alojamentos correctos
(consulte a imagem).
2
1
Limpe os painéis de vidro com água e sabão. Seque cuidadosamente os painéis de
vidro.
Instalar a porta e os painéis de vidro
Quando a limpeza estiver concluída, introduza os painéis de vidro e a porta do forno.
O QUE FAZER SE…
Advertência Consulte o capítulo
"Informações de segurança".

Problema Possível causa Solução
O forno não aquece. O forno não está ligado. Ligue o forno.
O forno não aquece. O relógio não está regulado. Regule o relógio.
O forno não aquece. As definições necessárias
O forno não aquece. O fusível na caixa de fusí-
A lâmpada do forno não
está a funcionar.
A função de pirólise não
funciona (o visor de tempo mostra "AS").
O visor de tempo mostra
"Pyro".
O visor de tempo mostra
um código de erro que
não se encontra na lista.
O vapor e a água condensada depositam-se nos
alimentos e na cavidade
do forno.
não estão configuradas.
veis dispara.
A lâmpada do forno está
avariada.
As calhas de apoio da grelha/calhas telescópicas do
forno não foram removidas.
É necessário efectuar a limpeza pirolítica.
Erro electrónico. Desligue e ligue novamente o aparelho
O prato foi deixado no forno
durante demasiado tempo.
Se não conseguir encontrar uma solução
para o problema, contacte o seu fornece-
Verifique as definições.
Verifique o fusível. Se o fusível se soltar
mais do que uma vez, contacte um técnico electricista qualificado.
Substitua a lâmpada do forno.
Remova as calhas de apoio da grelha/
calhas telescópicas do forno.
Inicie o processo de limpeza pirolítica.
através do fusível ou do disjuntor na caixa de fusíveis. Se o visor mostrar a
mensagem de erro novamente, consulte
o centro de assistência.
Não deixe os pratos no forno por um
período de tempo superior a 15-20 minutos após a conclusão do processo de
cozedura.
terísticas. A placa de característica está na
moldura frontal da cavidade do forno.
dor ou o centro de assistência.
Os dados necessários para o centro de assistência encontram-se na placa de carac-
Recomendamos que anote os dados aqui:
Modelo (MOD.) .........................................
Número do produto (PNC) .........................................
Número de série (S.N.) .........................................
electrolux 55
INSTALAÇÃO
Advertência Consulte o capítulo
"Informações de segurança".

56 electrolux
Instalação
20
590
594
540
560
570
2
50
A
B
550 min
560÷570
550 min
560-570
593
580
80÷100
Instalação eléctrica
Advertência A instalação eléctrica só
deve ser efectuada por uma pessoa
qualificada e competente.
O fabricante não é responsável pelo
não cumprimento das precauções de
segurança do capítulo "Segurança".
Este aparelho é fornecido sem ficha e sem
cabo de alimentação.
O cabo
Tipos de cabos aplicáveis para instalação
ou substituição: H07 RN-F, H05 RN-F, H05
RRF, H05 VV-F, H05 V2V2-F (T90), H05
BB-F.
Para informações sobre a secção do cabo,
consulte a potência total (na placa de ca-
racterísticas) e a tabela:
Potência total Secção do cabo
máximo 1380 W 3 x 0,75 mm²

electrolux 57
Potência total Secção do cabo
máximo 2300 W 3 x 1 mm²
máximo 3680 W 3 x 1,5 mm²
PREOCUPAÇÕES AMBIENTAIS
O símbolo no produto ou na embalagem
indica que este produto não pode ser
tratado como lixo doméstico. Em vez disso,
deve ser entregue ao centro de recolha
selectiva para a reciclagem de
equipamento eléctrico e electrónico. Ao
garantir uma eliminação adequada deste
produto, irá ajudar a evitar eventuais
consequências negativas para o meio
ambiente e para a saúde pública, que, de
outra forma, poderiam ser provocadas por
um tratamento incorrecto do produto. Para
obter informações mais pormenorizadas
sobre a reciclagem deste produto, contacte
O cabo de terra (cabo verde/amarelo) tem
de ser 2 cm mais comprido do que os ca-
bos de fase e neutro (cabos azul e casta-
nho).
os serviços municipalizados locais, o centro
de recolha selectiva da sua área de
residência ou o estabelecimento onde
adquiriu o produto.
Materiais da embalagem
O material utilizado na embalagem é
compatível com o ambiente e reciclável. As peças de plástico estão marcadas com as abreviaturas internacionais,
como por ex., PE, PS etc. Coloque o
material da embalagem nos contentores para o efeito disponibilizados pelos
serviços camarários.

58 electrolux
Electrolux. Thinking of you.
Conozca mejor nuestros conceptos en www.electrolux.com
ÍNDICE DE MATERIAS
Información sobre seguridad 58
Descripción del producto 61
Antes del primer uso 61
Uso diario 62
Funciones de reloj 63
Uso de los accesorios 64
INFORMACIÓN SOBRE SEGURIDAD
Antes de instalar y usar el electrodoméstico, lea atentamente este manual:
• por su seguridad personal y la seguridad
de su hogar
• por respeto al medio ambiente
• para el correcto funcionamiento del elec-
trodoméstico
Guarde estas instrucciones junto al aparato
para que estén siempre a mano, incluso si
se muda o lo vende.
El fabricante no se hace responsable de
daños ocasionados por una instalación o
uso incorrecto.
Seguridad de niños y personas
vulnerables
• Este electrodoméstico puede ser utiliza-
do por niños de 8 años en adelante y
personas cuyas capacidades físicas,
sensoriales o mentales estén disminuidas
o que carezcan de la experiencia y cono-
cimientos suficientes para manejarlo,
siempre que cuenten con las instruccio-
nes o la supervisión sobre el uso del
electrodoméstico de forma segura y
comprendan los riesgos. Los niños no
deben jugar con el electrodoméstico.
• Mantenga los materiales de embalaje ale-
jados de los niños. Existe riesgo de asfi-
xia y de lesiones.
• Mantenga a los niños y animales alejados
del electrodoméstico cuando la puerta se
encuentre abierta o el aparato esté fun-
cionando. Existe riesgo de sufrir lesiones
o incapacidad permanente.
• Si el electrodoméstico cuenta con una
función de bloqueo contra la manipula-
ción por niños o de bloqueo de teclas,
utilícela. Ello evitará que los niños o los
Funciones adicionales 66
Consejos útiles 66
Mantenimiento y limpieza 70
Qué hacer si… 74
Instalación 74
Aspectos medioambientales 76
Salvo modificaciones
animales pongan accidentalmente el
aparato en funcionamiento.
Instrucciones generales de seguridad
• No cambie las especificaciones de este
aparato. Existe riesgo de lesiones y de
daños al aparato.
• No deje ese electrodoméstico nunca sin
la debida vigilancia mientras esté funcionando.
• Apague el aparato después de cada uso.
Instalación
• Solo un electricista cualificado puede instalar y conectar el electrodoméstico.
Póngase en contacto con un servicio
técnico autorizado. De esta manera se
evitarán riesgos de daños materiales y de
lesiones.
• Asegúrese de que el aparato no ha sufrido daños durante el transporte. No enchufe el aparato si está dañado. Si fuera
necesario, póngase en contacto con el
proveedor.
• Retire todo el material de embalaje, adhesivos y láminas de protección del aparato antes de ponerlo en marcha por primera vez. No retire la placa de datos técnicos. Puede anular la garantía.
• Siga rigurosamente las leyes, órdenes,
directivas y normas (por ejemplo, de seguridad, eliminación de residuos, instalaciones eléctricas y de gas, etc.) vigentes
en el país donde se vaya a utilizar el aparato.
• Durante la instalación, asegúrese de que
el aparato no está conectado a la alimentación eléctrica.

electrolux 59
• Tome las debidas precauciones cuando
desplace el aparato. Este aparato es pesado. Utilice siempre guantes de protección. No tire nunca del aparato sujetando
el asa.
• La instalación eléctrica debe tener un dispositivo de aislamiento que permita desconectar el aparato de todos los polos
de la red. El dispositivo de aislamiento
debe tener una apertura de contacto con
una anchura mínima de 3 mm.
• Asimismo, debe contar con los dispositivos de aislamiento correctos: línea con
protección contra los cortocircuitos, fusibles (tipo tornillo que puedan retirarse del
soporte), dispositivos de fuga a tierra y
contactores.
• Los componentes de protección contra
las descargas eléctricas tienen que fijarse
de forma que no puedan desmontarse
sin usar herramientas.
• Algunas partes del aparato tienen corriente. Encajone el aparato en un mueble
y cerciórese de que no quedan espacios
libres. De esta forma evitará descargas
eléctricas al no poder tocarse accidentalmente piezas peligrosas.
• Antes de la instalación, cerciórese de que
el armario de la cocina tiene las dimensiones del hueco necesarias.
• Asegúrese de que el aparato se instala
debajo y junto a estructuras seguras.
• Respete siempre las distancias mínimas
entre el aparato y los demás electrodomésticos y mobiliario.
• Instale el aparato con su parte posterior y
un lateral adyacente a un aparato más alto. El otro lateral debe cerrar el aparato a
la misma altura.
• El aparato no se puede colocar sobre
una base.
• Los hornos y las placas de cocción empotrados se instalan con unos sistemas
de conexión especiales. A fin de impedir
que el aparato se dañe, utilícelo tan sólo
con otros del mismo fabricante.
Conexión eléctrica
• El aparato debe tener conexión a tierra.
• Asegúrese de que las especificaciones
eléctricas de la placa coincidan con las
del suministro eléctrico de su hogar.
• La información sobre la tensión se encuentra en la placa de especificaciones
técnicas.
• Utilice siempre una toma de corriente
con aislamiento de conexión a tierra.
• Impida que los cables de los restantes
aparatos eléctricos entren en contacto o
queden cerca de la puerta del aparato.
• No utilice enchufes o conectores múltiples ni cables prolongadores. Existe riesgo de incendio.
• No sustituya ni cambie el cable de alimentación. Póngase en contacto con el
servicio técnico.
• Asegúrese de no aplastar ni dañar el cable de alimentación (si lo hay) y el enchufe detrás del aparato.
• Asegúrese de que se puede acceder a la
toma de corriente una vez instalado el
aparato.
• No desconecte el aparato tirando del cable de alimentación. Tire siempre del enchufe - si lo hay.
Uso
• Este aparato está diseñado exclusivamente para su uso doméstico. No utilice
el aparato con fines comerciales o industriales.
• Este electrodoméstico debe utilizarse exclusivamente para la elaboración doméstica de alimentos. Evitará lesiones personales y daños materiales.
• No utilice el aparato como superficie de
trabajo o almacenamiento.
• No coloque productos inflamables ni objetos mojados con productos inflamables, como tampoco objetos que se puedan fundir (fabricados con plástico o aluminio) dentro, cerca o encima del aparato. Existe riesgo de incendio o explosión.
• El interior del aparato alcanza temperaturas muy elevadas durante el uso y puede
causar quemaduras. Utilice guantes
cuando introduzca o retire accesorios o
recipientes.
• Preste especial atención al desmontar o
instalar los accesorios para no dañar el
esmalte del horno.
• Manténgase siempre alejado del electrodoméstico cuando abra la puerta mientras el aparato se encuentre en funciona-

60 electrolux
miento. Pueden liberarse vapores calientes. Existe riesgo de quemaduras.
• La decoloración del esmalte no afecta al
rendimiento del aparato; por lo tanto, no
se considera un defecto en cuanto al derecho de garantía.
• Para evitar daños o decoloraciones del
esmalte:
– no coloque objetos directamente en el
suelo del aparato ni lo cubra con papel
de aluminio;
– no coloque agua caliente directamente
dentro del aparato;
– no deje platos húmedos ni comida en
el horno una vez finalizada la cocción.
• No utilice este aparato si está en contacto con el agua. No utilice el aparato con
las manos húmedas.
• No ejerza presión sobre la puerta abierta.
• Cierre siempre la puerta del aparato
cuando cocine, incluso aunque sólo gratine alimentos.
Mantenimiento y limpieza
• Antes de realizar cualquier tarea de mantenimiento, apague el aparato y desenchúfelo de la toma de corriente.
• Antes del mantenimiento, asegúrese de
que está totalmente frío. Existe riesgo de
quemaduras. Los paneles de cristal pueden romperse.
• Mantenga el horno limpio en todo momento. La acumulación de grasas o alimentos puede provocar un incendio.
• Una limpieza periódica evita el deterioro
del material de la superficie.
• Para pasteles muy húmedos, utilice una
bandeja honda a fin de evitar que el zumo de las frutas manche el horno de forma permanente.
• Por su seguridad y la de su hogar, utilice
únicamente agua y jabón para limpiar el
aparato. No utilice productos inflamables
ni corrosivos.
• No limpie el aparato con limpiadores a
vapor, aparatos de limpieza de alta presión, objetos punzantes, productos abrasivos, esponjas abrasivas ni quitamanchas.
• Si utiliza productos específicos para hornos, siga las instrucciones del fabricante.
• No limpie el vidrio de la puerta con productos abrasivos ni rascadores metáli-
cos. Podría dañar la superficie especial
del cristal interior.
• Cuando los paneles de cristal de la puerta están dañados, se debilitan y pueden
romperse. Debe cambiarlos. Póngase en
contacto con el servicio técnico.
• Tenga mucho cuidado al desmontar la
puerta del aparato. ¡La puerta es muy
pesada!
• No limpie el esmalte catalítico (si procede).
Limpieza pirolítica
• No deje ese electrodoméstico nunca sin
la debida vigilancia durante una limpieza
pirolítica.
• No trate de abrir la puerta y no corte la la
toma de red durante la limpieza pirolítica.
• Mantenga a los niños alejados durante la
limpieza pirolítica. El aparato se calienta
mucho. Puede causar quemaduras.
• Durante la limpieza pirolítica, la suciedad
persistente puede causar descoloración
al esmalte. La descoloración del esmalte
no afecta al rendimiento del aparato.
Peligro de incendio
• Abra la puerta con cuidado. El uso de ingredientes con alcohol puede generar
una mezcla de alcohol y aire, Existe riesgo de incendio.
• Procure que no haya chispas ni fuego
encendido cerca cuando se abra la puerta del aparato.
• No coloque productos inflamables ni objetos mojados con productos inflamables, como tampoco objetos que se puedan fundir (fabricados con plástico o aluminio) dentro, cerca o encima del aparato.
Bombilla del horno
• Las bombillas que se utilizan en este
aparato son especiales, y se han seleccionado exclusivamente para uso en
aparatos domésticos. No pueden utilizarse para la iluminación total o parcial del
hogar.
• Si es necesario cambiar la lámpara, use
una de la misma potencia y diseñada específicamente para aparatos domésticos.
• Desenchufe el aparato del suministro de
red antes de cambiar la bombilla del horno. Existe riesgo de descarga eléctrica.

electrolux 61
Servicio técnico
• Sólo el personal técnico autorizado puede reparar o manipular el aparato. Póngase en contacto con un servicio técnico
autorizado.
• Utilice únicamente recambios originales.
Desecho del aparato
• Para evitar el riesgo de lesiones y daños
DESCRIPCIÓN DEL PRODUCTO
Descripción general
1
3
2
4
5
6
7
8
9
– Desconecte el enchufe de la toma de
red.
– Corte el cable de alimentación y desé-
chelo.
– Elimine el cierre de la puerta. Esto evita
que los niños o las mascotas se queden encerrados en el interior del aparato. Puede causar asfixia.
1 Panel de mandos
2 Mando + / -
3 Programador electrónico
4 Mando de las funciones del horno
5 Aberturas de ventilación
6 Grill
7 Bombilla del horno
8 Ventilador
9 Placa de datos técnicos
Accesorios del horno
Estante de rejilla
•
Para bandejas de horno, moldes de pastelería, asados.
Bandeja plana
•
Para pasteles y galletas de pastaflora.
ANTES DEL PRIMER USO
Advertencia Consulte el capítulo
"Información sobre seguridad".
Limpieza inicial
• Retire y limpie todas las piezas del aparato.
• Limpie el interior del aparato antes de utilizarlo por primera vez.
• Bandeja honda para asar
Para hornear y asar y como recoge grasas.
Carriles telescópicos extraíbles
•
Para colocar estantes o bandejas en
ellos.
Importante Consulte el capítulo "Cuidado
y limpieza".
Puesta en hora del reloj
El horno sólo funciona después de haber ajustado la hora.
1. Pulse el botón de selección (consulte
"Programador electrónico") varias veces

62 electrolux
hasta que el indicador horario parpadee.
2. Utilice el mando + / - para ajustar la hora.
Después de 5 segundos, el parpadeo
cesa y el reloj indica la hora ajustada.
Cuando cambie la hora no debe seleccionar ninguna función de reloj (minutero, duración o fin de programa) ni del
horno al mismo tiempo. Cerciórese de
que el dispositivo de seguridad para niños está desactivado.
USO DIARIO
Advertencia Consulte el capítulo
"Información sobre seguridad".
Para utilizar el horno, pulse el mando
retráctil. El mando aparece.
Puesta en marcha del aparato
Gire el mando del horno a la función que
desee. La pantalla muestra la temperatura
propuesta para la función del horno seleccionada. El horno comienza a calentarse
Cuando el aparato alcance la temperatura
programada sonará una señal.
Modificación de la temperatura del
horno
Para aumentar o reducir la temperatura, gire el mando + / -. El ajuste se realiza en tramos de 5 °C.
Control de la temperatura
Pulse el botón de comprobación de la temperatura (consulte la sección "Función de
reloj"). El indicador de temperatura muestra
la temperatura actual del horno.
Precalentamiento
1.
Seleccione la función
ra máxima.
2. Deje el aparato en funcionamiento sin
alimentos durante aproximadamente 1
hora.
3.
Seleccione la función
ra máxima.
4. Deje el aparato en funcionamiento sin
alimentos durante aproximadamente 10
minutos.
5.
Seleccione la función
ra máxima.
6. Deje el aparato en funcionamiento sin
alimentos durante aproximadamente 10
minutos.
Así se queman los residuos que haya en el
aparato. Los accesorios pueden calentarse
más de lo normal. Cuando precaliente el
aparato por primera vez, se pueden producir olores y humos. Este efecto es normal.
Asegúrese de que haya una buena ventilación.
Apagado del horno
Gire el mando de control de las funciones
del horno hasta la posición de apagado.
Indicador de calor residual
Cuando se desconecta el horno, las barras
del indicador muestran el calor residual.
Funciones de horno
y la temperatu-
y la temperatu-
y la temperatu-

Función del horno Uso
Posición de apagado
El aparato está apagado.
electrolux 63
Bombilla del horno
Cocción convencional
Turbo
Grill
Grill doble
Grill + ventilador
Descongelar
Limpieza pirolítica
Programador electrónico
1
Para iluminar el interior del horno, p. ej., para la limpieza.
Para hornear y asar en un nivel.
Para cocinar en un máximo de tres niveles del horno a la vez.
Reduce las temperaturas (20 - 40°C) en comparación con el
horno convencional. También para secar alimentos.
Para asar al grill alimentos de poco espesor en la rejilla central
y tostar.
Para asar al grill grandes cantidades de alimentos de poco espesor y tostar.
Para asar trozos grandes de carne o aves en en un nivel.
También para gratinar y dorar.
Descongelar los alimentos congelados.
Para la autolimpieza pirolítica del horno. Quema los restos de
suciedad en el horno. La temperatura del horno aumenta a
500°C aproximadamente.
1 Indicador de temperatura/tiempo
2 Indicador de temperatura
3 Indicadores de las funciones del reloj
4 Tecla de selección
2
5 Tecla de la función de pirólisis
6 Tecla de comprobación de temperatura
3
456
FUNCIONES DE RELOJ
Ajuste de las funciones del reloj
1. Seleccione una temperatura y una función del horno (no necesario para el Reloj y el Avisador).
2. Pulse el botón de selección varias veces
hasta que comience a parpadear el indicador de la función apropiada.
3. Para ajustar la hora de las funciones de
minutero
grama
, duración o fin de pro-
, utilice el mando + / -. Se enciende el indicador de programa correspondiente.
Cuando transcurre el tiempo establecido, el indicador de la función parpadea,

64 electrolux
el indicador muestra 0.00 y se emite
una señal acústica.
4. Para que la señal acústica y el parpadeo
cesen:
- Con la función de minutero, pulse un
botón.
- Con las funciones de duración y fin de
programa, gire el selector de funciones
del horno hasta la posición de apagado.
Función de reloj Uso
Reloj Muestra la hora. Ajustar, cambiar o comprobar la hora.
Minutero Programar un temporizador. Al final de la cuenta atrás se emite una se-
Duración Programar el tiempo de funcionamiento del horno.
Fin de programa
Duración y Fin se pueden utilizar
ñal acústica. Esta función no afecta al funcionamiento del horno.
Programar la hora de desconexión de una función del horno.
2. Gire y mantenga en posición el selector
al mismo tiempo si el horno se va a conectar y desconectar automáticamente. Ajuste primero la duración
go el fin de programa
.
y lue-
Cancelación de las funciones del reloj
1. Pulse la tecla de selección varias veces
hasta que comience a parpadear el indicador de la función apropiada.
Con el minutero también se emite una
señal acústica al completarse el 90%
del tiempo.
Con las funciones duración y fin
activas, el horno se apaga automáticamente.
" +/- ".
La función de reloj se apagará al cabo
de varios segundos.
USO DE LOS ACCESORIOS
Advertencia Consulte el capítulo
"Información sobre seguridad".
Carriles telescópicos
Instalación de los carriles telescópicos
Puede colocar carriles telescópicos en cada nivel.
Asegúrese de que los dos carriles telescópicos están en el mismo nivel.
El tope de un extremo del carril telescópico
debe quedar orientado hacia arriba.

electrolux 65
2. Coloque la bandeja en los carriles tele-
1
scópicos y luego empuje cuidadosamente para introducirla en el aparato.
Asegúrese de empujar los carriles telescópicos hasta el fondo del aparato antes de cerrar la puerta del horno.
°C
2
Precaución No limpie las guías
telescópicas en el lavavajillas. No
lubrique las guías.
Utilización de los carriles telescópicos
Con los carriles telescópicos es más fácil
colocar y quitar las bandejas.
1. Saque los carriles telescópicos de la derecha y la izquierda.
°C

66 electrolux
FUNCIONES ADICIONALES
Bloqueo contra la manipulación por
niños
Cuando está activado el bloqueo de seguridad para niños, no se puede utilizar el horno.
El bloqueo impide que los niños puedan
encender el aparato de forma accidental.
Importante No ajuste ninguna función del
horno.
Para conectar el bloqueo contra la
manipulación por niños:
1. Gire el mando de control + / - hacia la
izquierda y manténgalo en esa posición.
2. Pulse el botón de selección hasta que
"SAFE" aparezca en el indicador.
El bloqueo contra la manipulación por niños
está activado.
Para desactivar el bloqueo, repita el mismo
procedimiento empleado para activarlo.
Ventilador de refrigeración
El ventilador se enciende automáticamente
para mantener frías las superficies del aparato. Cuando se apaga el aparato, el ventilador sigue funcionando hasta que el aparato se enfría.
Termostato de seguridad
Para evitar que se produzca un calentamiento excesivo peligroso (debido al uso incorrecto del aparato o a un componente
defectuoso), el horno cuenta con un ter-
mostato de seguridad que interrumpe el
suministro de energía eléctrica. El horno se
vuelve a conectar automáticamente cuando
desciende la temperatura.
Desconexión automática del horno
El aparato se apaga automáticamente
al cabo de cierto tiempo:
• Si no apaga el aparato
• Si no cambia la temperatura del horno.
El último ajuste de temperatura parpadea en la pantalla de temperatura.
El horno se desactiva cuando su temperatura es:
inferior a
120 °C
120 - 195°Ctras 8,5 horas
200 - 245°Ctras 5,5 horas
250 °C tras 3,0 horas
Tras una desconexión automática, apague
el horno completamente. Después podrá
encenderlo de nuevo.
La desconexión automática se cancela
si ajusta las funciones del reloj Duración
tras 12,0 horas
o Fin .
CONSEJOS ÚTILES
• El horno tiene cuatro niveles o alturas.
Estos niveles se ordenan contándolos de
abajo a arriba desde la solera del aparato.
• El aparato está dotado con un sistema
especial que hace circular el aire y recicla
constantemente el vapor. Gracias a este
sistema puede cocinar con un entorno
de vapor y mantener los alimentos blandos en su interior y crujientes en su exterior. Ello reduce al mínimo el tiempo de
cocción y el consumo de energía.
• La humedad puede llegar a condensarse
en el aparato o en las puertas de cristal.
Esto es totalmente normal. Manténgase
alejado del aparato siempre que abra la
puerta mientras está en funcionamiento.
Si desea reducir la condensación, ponga
en funcionamiento el aparato 10 minutos
antes de cocinar.
• Limpie la humedad cada vez que termine
de utilizar el aparato.
• No coloque objetos directamente sobre
la solera del aparato ni cubra los componentes con papel de aluminio cuando cocine. De lo contrario puede que se alteren los resultados de la cocción y se dañe el revestimiento de esmalte.
Preparación de pasteles
• La temperatura ideal para hornear repostería es entre 150 °C y 200 °C.
• Precaliente el horno durante aproximadamente 10 minutos.

electrolux 67
• No abra la puerta del horno antes de que
hayan transcurrido las ¾ partes del tiempo de cocción programado.
• Si utiliza dos bandejas a la vez, deje un
nivel vacío entre ellas.
Preparación de carne y pescado
• No cocine carne que pese menos de 1
kg. La carne queda demasiado seca si
se prepara en pequeñas cantidades.
• Para que la carne roja quede hecha en el
exterior y en su punto en el interior, regule la temperatura entre 200 °C y 250 °C.
• Con alimentos muy grasos, utilice una
bandeja de goteo para evitar manchas
permanentes en el horno.
• Deje reposar la carne durante unos 15
minutos antes de trincharla para que el
jugo no gotee.
• Para evitar que se forme mucho vapor en
el horno mientras asa los alimentos, añada un poco de agua en la bandeja de goteo. Si no quiere que el vapor se condense, añada agua cada vez que se evapore.
• La carne blanca, las aves y el pescado
requieren una temperatura de entre
150°C y 175°C.
Tabla para hornear y asar
REPOSTERÍA
Cocción con-
TIPO DE ALI-
MENTO
Masas batidas 2 170 2 (1 y3)160 45-60 En molde de repostería
Masa con mantequilla
Tarta de queso
a base de suero
de leche
Tarta o pastel
de manzana
Strudel 2 175 2 150 60-80 En bandeja de horno
Tarta de mer-
melada
Tarta de frutas 2 170 2 155 60-70 En molde de repostería (26
Bizcocho (bizcocho sin grasa)
Pastel de Navidad/tarta de
frutas
Tarta de ciruelas
Pastelillos 3 170 3 (1 y3)160 20-30 En bandeja de horno plana
vencional
Nivel
Temp.
(°C)
2 170 2 (1 y3)160 24-34 En molde de repostería
1 170 2 160 60-80 En molde de repostería (26
1 170 2 (1 y3)160 100-120 2 moldes de repostería de
2 170 2 160 30-40 En molde de repostería (26
2 170 2 160 35-45 En molde de repostería (26
2 170 2 160 50-60 En molde de repostería (20
2 170 2 160 50-60
Nivel
Turbo
Temp.
(°C)
Tiempo
de coc-
ción (min)
Notas
cm)
20 cm en la parrilla
cm)
cm)
cm)
cm)
En molde de pan
1)
Galletas 3 150 3 150 20-30 En bandeja de horno plana
Merengues 3 100 3 100 90-120 En bandeja de horno plana
1)

68 electrolux
Cocción con-
TIPO DE ALI-
MENTO
vencional
Nivel
Temp.
(°C)
Bollos 3 190 3 180 15-20 En bandeja de horno plana
Masa choux 3 190 3 180 25-35 En bandeja de horno plana
Nivel
Turbo
Temp.
(°C)
Tiempo
de coc-
ción (min)
Notas
1)
1)
Tartaletas 3 180 2 170 45-70 En molde de repostería (20
cm)
Tarta Victoria 1 ó 2 180 2 170 40-55 Izquierda + derecha en
molde de repostería de 20
cm
1) Precalentar durante 10 minutos.
PAN Y PIZZA
Cocción con-
TIPO DE ALI-
MENTO
vencional
Nivel
Temp.
(°C)
Pan blanco 1 190 1 190 60-70 1-2 piezas, 500 g cada
Pan de centeno 1 190 1 180 30-45 En molde de pan
Panecillos 2 190 2 (1 y3)180 25-40 6-8 panecillos en bandeja
Pizza 1 190 1 190 20-30 En fuente de horno honda
Bollitos 3 200 2 190 10~20 En bandeja de horno plana
1) Precalentar durante 10 minutos.
Nivel
Turbo
Temp.
(°C)
Tiempo
de coc-
ción (min)
Notas
1)
pieza
de horno plana
1)
1)
1)
TARTALETAS
Cocción con-
TIPO DE ALI-
MENTO
vencional
Nivel
Temp.
(°C)
Pudin de pasta 2 180 2 180 40-50 En molde
Pudin de verdu-
2 200 2 175 45-60 En molde
ras
Quiches 1 190 1 190 40-50 En molde
Lasaña 2 200 2 200 25-40 En molde
Canelones 2 200 2 190 25-40 En molde
Pudin Yorkshire 2 220 2 210 20-30
1) Precalentar durante 10 minutos.
Nivel
Turbo
Temp.
(°C)
Tiempo
de coc-
ción (min)
Notas
6 moldes de pudin
1)

electrolux 69
CARNES
Cocción con-
TIPO DE ALI-
MENTO
Carne de vacuno
Carne de cerdo 2 180 2 180 90-120 En la bandeja del horno y
Ternera 2 190 2 175 90-120 En la bandeja del horno y
Rosbif poco hecho
Rosbif en su
punto
Rosbif inglés
muy hecho
Paleta de cerdo 2 180 2 170 120-150 En fuente de horno honda
Morcillo de cer-
do
Cordero 2 190 2 190 110-130 Muslo
Pollo 2 200 2 200 70-85 Entero en fuente de horno
Pavo 1 180 1 160 210-240 Entero en fuente de horno
Pato 2 175 2 160 120-150 Entero en fuente de horno
Ganso 1 175 1 160 150-200 Entero en fuente de horno
Conejo 2 190 2 175 60-80 Troceado
Liebre 2 190 2 175 150-200 Troceado
Faisán 2 190 2 175 90-120 Entero en fuente de horno
vencional
Nivel
Temp.
(°C)
2 200 2 190 50-70 En la bandeja del horno y
2 210 2 200 44-50 En la bandeja del horno y
2 210 2 200 51-55 En la bandeja del horno y
2 210 2 200 55-60 En la bandeja del horno y
2 180 2 160 100-120 2 piezas en fuente de hor-
Nivel
Turbo
Temp.
(°C)
Tiempo
de coc-
ción (min)
Notas
fuente de horno honda
fuente de horno honda
fuente de horno honda
fuente de horno honda
fuente de horno honda
fuente de horno honda
no honda
honda
honda
honda
honda
honda
PESCADO
Cocción con-
TIPO DE ALI-
MENTO
Trucha/Besugo 2 190 2 (1 y3)175 40-55 3-4 pescados
vencional
Nivel
Temp.
(°C)
Nivel
Turbo
Temp.
(°C)
Tiempo
de coc-
ción (min)
Notas
Atún/Salmón 2 190 2 (1 y3)175 35-60 4-6 filetes
Asado a la parrilla
Precaliente el horno vacío durante 10
minutos antes de cocinar.

70 electrolux
Cantidad Gratinado Tiempo de cocción (mi-
nutos)
TIPO DE ALIMEN-TOPiezas g
Filetes de ternera 4 800 3 250 12-15 12-14
Filetes de ternera 4 600 3 250 10-12 6-8
Salchichas 8 / 3 250 12-15 10-12
Chuleta de cerdo 4 600 3 250 12-16 12-14
Pollo (cortado en
dos)
Brochetas 4 / 3 250 10-15 10-12
Pechuga de pollo 4 400 3 250 12-15 12-14
Hamburguesa 6 600 3 250 20-30
Filete de pescado 4 400 3 250 12-14 10-12
Sándwiches 4-6 / 3 250 5-7 /
Tostadas 4-6 / 3 250 2-4 2-3
2 1000 3 250 30-35 25-30
nivel
Temp.
(°C)
1ª cara 2ª cara
Grill + ventilador
Advertencia Utilice esta función con
una temperatura máxima de 200°C.
Cantidad Gratinado Tiempo de cocción (mi-
nutos)
TIPO DE ALIMEN-TOPiezas g
Redondos (pavo) 1 1000 3 200 30-40 20-30
Pollo (cortado en
dos)
Muslos de pollo 6 - 3 200 15-20 15-18
Codorniz 4 500 3 200 25-30 20-25
Gratinado de verdu-
ras
Piezas Vieiras - - 3 200 15-20 Caballa 2-4 - 3 200 15-20 10-15
Pescado en rodajas 4-6 800 3 200 12-15 8-10
2 1000 3 200 25-30 20-30
- - 3 200 20-25 -
Información sobre acrilamidas
Importante Según los nuevos
descubrimientos científicos, el tostado
intensivo de los alimentos, especialmente
nivel
puede ser un riesgo para la salud. Por esta
razón, se recomienda cocinar a bajas
temperaturas y no tostar excesivamente los
alimentos.
Temp.
(°C)
1ª cara 2ª cara
de los productos que contienen almidón,
MANTENIMIENTO Y LIMPIEZA
Advertencia Consulte el capítulo
"Información sobre seguridad".
• Limpie la parte delantera del aparato con
un paño suave, agua templada y un producto de limpieza.
• Para limpiar las superficies de metal, utilice un producto de limpieza.

electrolux 71
• Limpie el interior del horno después de
cada uso. La suciedad se elimina con
más facilidad y los residuos quemados
no se pegan.
• Utilice un producto especial para horno
para eliminar la suciedad difícil.
• Limpie todos los accesorios del horno
(con un paño suave, agua templada y un
producto de limpieza) después de cada
uso y deje que se sequen.
• No utilice productos agresivos, objetos
afilados ni el lavavajillas para limpiar los
accesorios antiadherentes. Puede arruinar el revestimiento antiadherente.
Limpieza de las juntas de la puerta
• Verifique periódicamente la junta de la
puerta. Dicha junta enmarca la puerta del
horno. No utilice el aparato si la junta de
la puerta está dañada. Póngase en contacto con el servicio técnico.
• Si desea limpiar la junta de la puerta remítase a la información general sobre limpieza.
Limpieza pirolítica
1. Retire todas las piezas del horno.
Si no quita los carriles de apoyo, en el
indicador del reloj aparece " AS " y la
limpieza pirolítica no puede empezar.
2. Elimine a mano la suciedad más difícil.
3. Seleccione la función de horno Pyroluxe
menu
–" Pyro " aparece en el visor digital
–
Duración
aprox. 5 segundos.
La limpieza pirolítica dura aproximadamente 2,5 horas. Si desea que termine
a una hora específica, pulse la tecla de
Selección hasta que el indicador de la
función
+ / - para ajustar la hora del procedimiento. La función calcula la hora de
inicio en función de la hora final especificada. La limpieza pirolítica empieza y
termina a las horas deseadas.
4. Pulse la tecla Pyro . La limpieza pirolíti-
ca comienza.
5. Al final del proceso, se emite una señal
acústica y " 0.00 " aparece en el visor
digital. Duración
parpadea durante
parpadee. Utilice el mando
parpadea durante
aprox. 5 segundos. Gire el mando del
horno hasta el símbolo 0 .
La luz no funciona durante la limpieza
pirolítica.
Cuando el horno alcanza la temperatura preajustada, la puerta se bloquea.
Las barras del indicador de calentamiento se encienden, hasta que se
desbloquea la puerta.
Guías de apoyo extraíbles
Para retirar las guías de apoyo
1. Tire de la parte delantera de la guía para
despegarla de la pared.
2. Tire de la guía de apoyo trasera para
separarla de la pared y retírela.
2
1
Para instalar las guías de apoyo
Repita las instrucciones anteriores en orden
inverso.
¡Los extremos redondeados de las
guías de apoyo deben quedar en la
parte delantera!
Bombilla del horno
Advertencia ¡Tenga cuidado! ¡Existe
riesgo de descarga eléctrica!

72 electrolux
Antes de cambiar la bombilla del
horno:
• Apague el horno.
• Retire los fusibles o desconecte la instalación eléctrica doméstica.
Coloque un paño en el fondo del horno
para proteger la bombilla y la tapa de
cristal.
1. Gire la tapa de cristal hacia la izquierda
y quítela.
2. Limpie la tapa de cristal.
3. Cambie la bombilla del horno por otra
preparada para soportar temperaturas
de hasta 300°C.
Utilice una bombilla del mismo tipo.
4. Instale la tapa de cristal.
Limpieza de la puerta del horno
La puerta del horno tiene tres paneles de
cristal. Retire la puerta del horno y los paneles internos de cristal para limpiarlos.
La puerta del horno podría cerrarse si
intenta retirar los paneles de cristal antes de quitar la puerta.
Desmontaje de la puerta del horno y de
los paneles de cristal
1. Abra completamente la puerta del horno
y sujete las dos bisagras.
3. Cierre la puerta del horno hasta la primera posición de apertura (hasta la mitad). A continuación, tire de la puerta
hacia adelante para desencajarla.
4. Coloque la puerta sobre una superficie
estable y protegida por un paño suave.
2. Levante y gire las palancas de las dos
bisagras.
5. Suelte el sistema de bloqueo para retirar
los paneles de cristal.

6. Gire los dos pasadores en un ángulo de
90° y extráigalos de sus asientos.
90°
7. Levante con cuidado (paso 1) y retire
(paso 2) los paneles de cristal uno a
uno. Empiece por el panel superior.
electrolux 73
puerta del horno. Lleve a cabo los pasos
anteriores en orden inverso.
El panel central tiene un marco decorativo.
Cuando coloque este panel, asegúrese de
que la cara impresa mira hacia el interior de
la puerta. Después de la instalación, asegúrese de que la superficie del marco del panel de cristal de las caras impresas no esté
áspera cuando la toque.
Asegúrese de que coloca el panel de cristal
central en los soportes correctamente (consulte la figura).
Asegúrese de que coloca el panel de cristal
superior en los soportes correctamente
(consulte la figura).
2
1
Limpie los paneles de cristal con agua y jabón. Seque los paneles de cristal con cuidado.
Instalación de la puerta y los paneles
de cristal
Cuando haya terminado la operación de
limpieza, instale los paneles de cristal y la

74 electrolux
QUÉ HACER SI…
Advertencia Consulte el capítulo
"Información sobre seguridad".
Problema Causa posible Solución
El horno no se calienta El horno no está encendi-doEncienda el horno
El horno no se calienta No se ha ajustado el reloj Ajuste el reloj
El horno no se calienta No se han elegido las fun-
El horno no se calienta Se ha fundido un fusible
La bombilla del horno no
funciona
La función pirolítica no funciona (se muestra "AS" en el
indicador de tiempo)
En el indicador de tiempo
aparece "Pyro"
En el indicador de tiempo
aparece un código de error
que no está en la lista
Se acumula vapor y condensación en los alimentos y en
el interior del horno
ciones necesarias
de la instalación doméstica
La bombilla es defectuosa Cambie la bombilla del horno
No se han quitado los carriles de apoyo o las guías
del horno
El horno necesita una limpieza pirolítica
Error electrónico Utilice el fusible o el interruptor de se-
Los platos han permanecido en el horno durante demasiado tiempo
Si no lograra subsanar el problema, póngase en contacto con el centro de servicio.
Los datos necesarios para el servicio técnico están en la placa de especificaciones
Es conveniente que los anote aquí:
Modelo (Mod.) .........................................
Número de producto (PNC) .........................................
Número de serie (S.N.) .........................................
Seleccione la función adecuada
Compruebe los fusibles. Si el fusible se
rompe más de una vez, póngase en
contacto con un profesional homologado.
Quite los carriles de apoyo o las guías
Inicie el proceso de limpieza pirolítica
guridad de la caja de fusibles para
apagar y encender de nuevo el aparato Si vuelve a aparecer el mensaje de
error, póngase en contacto con el
Centro de servicio técnico
No deje los platos en el horno más de
15 a 20 minutos tras finalizar el proceso de cocción
técnicas. La placa de especificaciones técnica se encuentra en el marco delantero de
la cavidad de horno.
INSTALACIÓN
Advertencia Consulte el capítulo
"Información sobre seguridad".

Encastrado
electrolux 75
20
590
594
540
560
570
2
50
A
B
550 min
560÷570
550 min
560-570
593
580
80÷100
Instalación eléctrica
Advertencia Deje la instalación
eléctrica en manos de un profesional
cualificado y homologado
El fabricante declina toda responsabilidad si la instalación no se hace siguiendo las precauciones del capítulo
sobre seguridad.
El aparato se suministra sin enchufe ni cable de alimentación.
El cable
Tipos de cables aplicables para su instalación o cambio: H07 RN-F, H05 RN-F, H05
RRF, H05 VV-F, H05 V2V2-F (T90), H05
BB-F
En lo que respecta a la sección del cable,
consulte la potencia total (que figura en la
placa de características) y la tabla:

76 electrolux
Potencia total Sección del cable
máximo de 1.380W3 x 0,75 mm²
máximo de 2.300W3 x 1 mm²
ASPECTOS MEDIOAMBIENTALES
El símbolo que aparece en el aparato o
en su embalaje, indica que este producto
no se puede tratar como un residuo normal
del hogar. Se deberá entregar, sin coste
para el poseedor, bien al distribuidor, en el
acto de la compra de un nuevo producto
similar al que se deshecha, bien a un punto
municipal de recolección selectiva de
equipos eléctricos y electrónicos para su
reciclaje. Al asegurarse de que este
producto se desecha correctamente, usted
ayudará a evitar posibles consecuencias
negativas para el medio ambiente y la salud
pública, lo cual podría ocurrir si este
producto no se gestionara de forma
Potencia total Sección del cable
máximo de 3.680W3 x 1,5 mm²
El cable de tierra (cable verde/amarillo) tiene
que tener 2 cm más que los cables del
neutro y de fase (cables azul y marrón).
adecuada. Para obtener información más
detallada sobre el reciclaje de este
producto, póngase en contacto con el
Ayuntamiento de su Municipio, ó con la
tienda donde lo compró.
Material de embalaje
El material de embalaje es respetuoso
con el medio ambiente y reciclable. Las
piezas de plástico están identificadas
con abreviaturas internacionales, como
PE, PS, etc. Deseche el material de
embalaje en los contenedores destinados a tal fin por los servicios de limpieza.

electrolux 77

78 electrolux

electrolux 79

www.electrolux.com/shop
397157501-B-342010
 Loading...