

Page 1

EOC3485
................................................ .............................................
EN OVEN USER MANUAL 2
ES HORNO MANUAL DE
INSTRUCCIONES
26
Page 2

www.electrolux.com
2
CONTENTS
1. SAFETY INFORMATION . . . . . . . . . . . . . . . . . . . . . . . . . . . . . . . . . . . . . . . . . . . . . . . . . . . 3
2. SAFETY INSTRUCTIONS . . . . . . . . . . . . . . . . . . . . . . . . . . . . . . . . . . . . . . . . . . . . . . . . . . 4
3. PRODUCT DESCRIPTION . . . . . . . . . . . . . . . . . . . . . . . . . . . . . . . . . . . . . . . . . . . . . . . . . 6
4. BEFORE FIRST USE . . . . . . . . . . . . . . . . . . . . . . . . . . . . . . . . . . . . . . . . . . . . . . . . . . . . . . 7
5. DAILY USE . . . . . . . . . . . . . . . . . . . . . . . . . . . . . . . . . . . . . . . . . . . . . . . . . . . . . . . . . . . . . 7
6. CLOCK FUNCTIONS . . . . . . . . . . . . . . . . . . . . . . . . . . . . . . . . . . . . . . . . . . . . . . . . . . . . . 9
7. ADDITIONAL FUNCTIONS . . . . . . . . . . . . . . . . . . . . . . . . . . . . . . . . . . . . . . . . . . . . . . . . 10
8.
HELPFUL HINTS AND TIPS . . . . . . . . . . . . . . . . . . . . . . . . . . . . . . . . . . . . . . . . . . . . . . . 11
9. CARE AND CLEANING . . . . . . . . . . . . . . . . . . . . . . . . . . . . . . . . . . . . . . . . . . . . . . . . . . . 18
10.
WHAT TO DO IF… . . . . . . . . . . . . . . . . . . . . . . . . . . . . . . . . . . . . . . . . . . . . . . . . . . . . . . 22
11. INSTALLATION . . . . . . . . . . . . . . . . . . . . . . . . . . . . . . . . . . . . . . . . . . . . . . . . . . . . . . . . . 24
WE’RE THINKING OF YOU
Thank you for purchasing an Electrolux appliance. You’ve chosen a product that brings with it
decades of professional experience and innovation. Ingenious and stylish, it has been designed
with you in mind. So whenever you use it, you can be safe in the knowledge that you’ll get great
results every time.
Welcome to Electrolux.
Visit our website for:
Get usage advice, brochures, trouble shooter, service information:
www.electrolux.com
Register your product for better service:
www.electrolux.com/productregistration
Buy Accessories, Consumables and Original spare parts for your appliance:
www.electrolux.com/shop
CUSTOMER CARE AND SERVICE
We recommend the use of original spare parts.
When contacting Service, ensure that you have the following data available.
The information can be found on the rating plate. Model, PNC, Serial Number.
Warning / Caution-Safety information
General information and tips
Environmental information
Subject to change without notice.
Page 3

1. SAFETY INFORMATION
Before the installation and use of the appliance, carefully
read the supplied instructions. The manufacturer is not
responsible if an incorrect installation and use causes injuries and damages. Always keep the instructions with
the appliance for future reference.
1.1 Children and vulnerable people safety
WARNING!
Risk of suffocation, injury or permanent disability.
• This appliance can be used by children aged from 8
years and above and persons with reduced physical,
sensory or mental capabilities or lack of experience and
knowledge if they are supervised by an adult or a person who is responsible for their safety.
• Do not let children play with the appliance.
• Keep all packaging away from children.
• Keep children and pets away from the appliance when
it operates or when it cools down. Accessible parts are
hot.
• If the appliance has a child safety device, we recommend that you activate it.
• Cleaning and user maintenance shall not be made by
children without supervision.
ENGLISH 3
1.2 General Safety
• Only a qualified person must install this appliance and
replace the cable.
• Internally the appliance becomes hot when in operation. Do not touch the heating elements that are in the
appliance. Always use oven gloves to remove or put in
accessories or ovenware.
• Do not use a steam cleaner to clean the appliance.
• Before maintenance cut the power supply.
Page 4
www.electrolux.com
4
• Do not use harsh abrasive cleaners or sharp metal
• Excess spillage must be removed before the pyrolytic
scrapers to clean the glass door since they can scratch
the surface, which may result in shattering of the glass.
cleaning. Remove all parts from the oven.
2.
SAFETY INSTRUCTIONS
2.1 Installation
WARNING!
Only a qualified person must install this appliance.
• Remove all the packaging.
• Do not install or use a damaged appli-
ance.
• Obey the installation instruction sup-
plied with the appliance.
• Always be careful when you move the
appliance because it is heavy. Always
wear safety gloves.
• Do not pull the appliance by the handle.
• Keep the minimum distance from the
other appliances and units.
• Make sure that the appliance is installed
below and adjacent safe structures.
• The sides of the appliance must stay
adjacent to appliances or to units with
the same height.
Electrical connection
WARNING!
Risk of fire and electrical shock.
• All electrical connections should be
made by a qualified electrician.
• The appliance must be earthed.
• Make sure that the electrical information
on the rating plate agrees with the power supply. If not, contact an electrician.
• Always use a correctly installed shock-
proof socket.
• Do not use multi-plug adapters and ex-
tension cables.
• Make sure not to cause damage to the
mains plug and to the mains cable.
Contact the Service or an electrician to
change a damaged mains cable.
• Do not let mains cables to come in
touch with the appliance door, specially
when the door is hot.
• The shock protection of live and insulated parts must be fastened in such a
way that it cannot be removed without
tools.
• Connect the mains plug to the mains
socket only at the end of the installation. Make sure that there is access to
the mains plug after the installation.
• If the mains socket is loose, do not
connect the mains plug.
• Do not pull the mains cable to disconnect the appliance. Always pull the
mains plug.
• Use only correct isolation devices: line
protecting cut-outs, fuses (screw type
fuses removed from the holder), earth
leakage trips and contactors.
• The electrical installation must have an
isolation device which lets you disconnect the appliance from the mains at all
poles. The isolation device must have a
contact opening width of minimum 3
mm.
• Fully close the oven door before you
connect the appliance to mains.
2.2 Use
WARNING!
Risk of injury, burns or electric
shock or explosion.
• Use this appliance in a household environment.
• Do not change the specification of this
appliance.
Page 5
• Make sure that the ventilation openings
are not blocked.
• Do not let the appliance stay unattended during operation.
• Deactivate the appliance after each
use.
• Be careful when you open the appliance door while the appliance is in operation. Hot air can release.
• Do not operate the appliance with wet
hands or when it has contact with water.
• Do not apply pressure on the open
door.
• Do not use the appliance as a work
surface or as a storage surface.
• Always keep the appliance door closed
when the appliance is in operation.
• Open the appliance door carefully. The
use of ingredients with alcohol can
cause a mixture of alcohol and air.
• Do not let sparks or open flames to
come in contact with the appliance
when you open the door.
• Do not put flammable products or items
that are wet with flammable products
in, near or on the appliance.
WARNING!
Risk of damage to the appliance.
ENGLISH 5
2.3 Care and Cleaning
WARNING!
Risk of injury, fire or damage to
the appliance.
• Before maintenance, deactivate the appliance and disconnect the mains plug
from the mains socket.
• Make sure the appliance is cold. There
is the risk that the glass panels can
break.
• Replace immediately the door glass
panels when they are damaged. Contact the Service.
• Be careful when you remove the door
from the appliance. The door is heavy!
• Clean regularly the appliance to prevent
the deterioration of the surface material.
• Remaining fat or food in the appliance
can cause fire.
• Clean the appliance with a moist soft
cloth. Only use neutral detergents. Do
not use abrasive products, abrasive
cleaning pads, solvents or metal objects.
• If you use an oven spray, obey the safety instructions on the packaging.
• Do not clean the catalytic enamel (if applicable) with any kind of detergent.
• To prevent damage or discoloration to
the enamel:
– do not put ovenware or other objects
in the appliance directly on the bottom.
– do not put aluminium foil directly on
the bottom of the appliance.
– do not put water directly into the hot
appliance.
– do not keep moist dishes and food in
the appliance after you finish the cooking.
– be careful when you remove or install
the accessories.
• Discoloration of the enamel has no effect on the performance of the appliance. It is not a defect in the sense of
the warranty law.
• Use a deep pan for moist cakes. Fruit
juices cause stains that can be permanent.
Pyrolytic cleaning
WARNING!
Risk of fire and burns.
• Before carrying out a Pyrolitic selfcleaning function or the First Use function please remove from the oven cavity:
– Any excess food residues, oil or
grease spills / deposits.
– Any removable objects (including
shelves, side rails etc., provided with
the product) particularly any nonstick pots, pans, trays, utensils etc.
• Read carefully all the instructions for
Pyrolytic cleaning.
• Keep children away from the appliance
while the Pyrolytic cleaning is in operation. The appliance becomes very hot.
• Pyrolitic cleaning is a high temperature
operation that can release fumes from
cooking residues and construction ma-
Page 6
www.electrolux.com
6
• Unlike all humans, some birds and rep-
• Small pets can also be highly sensitive
• Non-stick surfaces on pots, pans,
• Fumes released from all Pyrolytic
terials, as such consumers are strongly
advised to:
– Provide good ventilation during and
after each Pyrolytic cleaning.
– Provide good ventilation during and
after the first use at maximum temperature operation.
– Remove any pets (especially birds)
from the vicinity of the appliance location during and after the Pyrolytic
cleaning and first use maximum temperature operation to a well ventilated
area.
tiles can be extremely sensitive to potential fumes emitted during the cleaning process of all Pyrolytic Ovens.
to the localized temperature changes in
the vicinity of all Pyrolytic Ovens when
the Pyrolytic self cleaning program is in
operation.
trays, utensils etc., can be damaged by
the high temperature Pyrolytic cleaning
operation of all Pyrolytic Ovens and can
be also a source for low level harmful
fumes.
Ovens / Cooking Residues as descri-
bed are not harmful to humans, including infants or persons with medical conditions.
2.4 Internal light
• The type of light bulb or halogen lamp
used for this appliance, is only for
household appliances. Do not use it for
house lighting.
WARNING!
Risk of electrical shock.
• Before replacing the lamp, disconnect
the appliance from the power supply.
• Only use lamps with the same specifications.
2.5 Disposal
WARNING!
Risk of injury or suffocation.
• Disconnect the appliance from the
mains supply.
• Cut off the mains cable and discard it.
• Remove the door catch to prevent children and pets to get closed in the appliance.
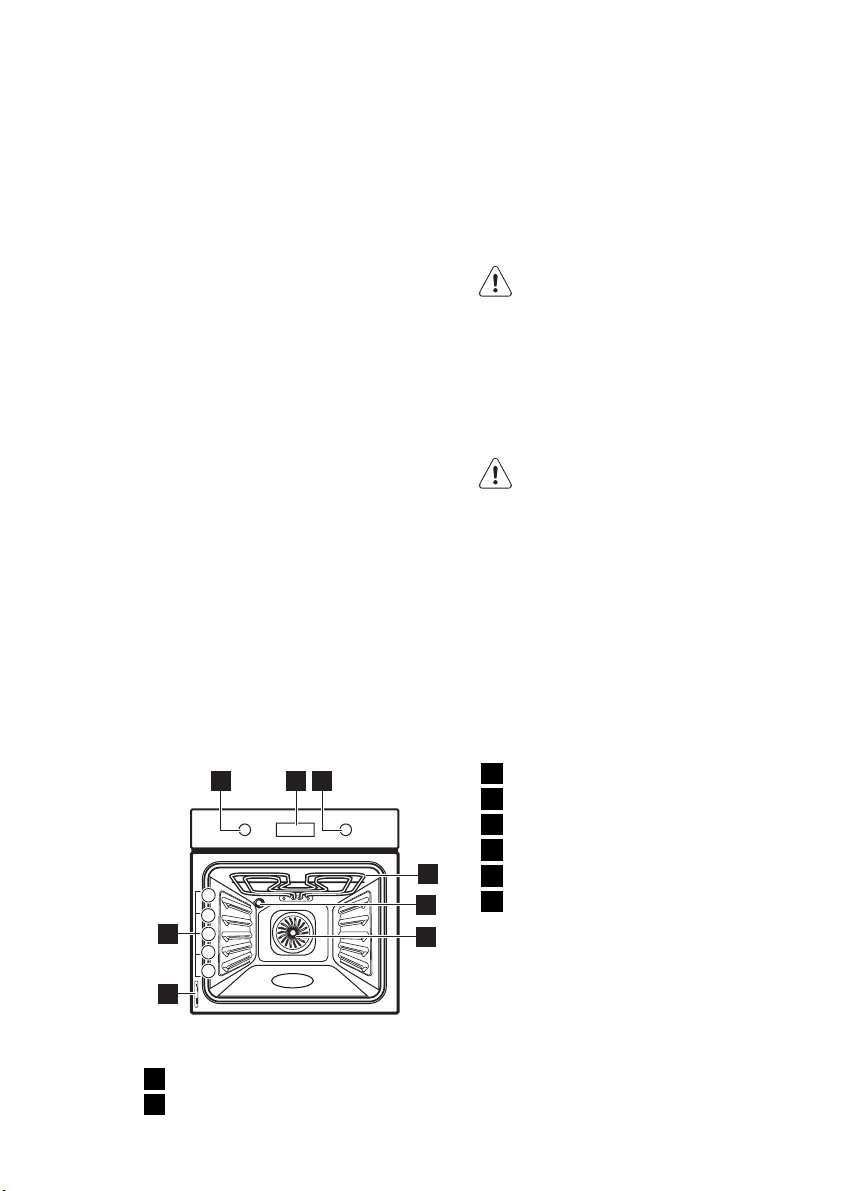
3. PRODUCT DESCRIPTION
2 31
5
4
3
8
2
1
7
Knob for the oven functions
1
Electronic programmer
2
Knob for the temperature
3
Grill
4
Oven lamp
5
Fan
6
4
5
6
Rating plate
7
Shelf positions
8
3.1 Oven accessories
Wire shelf
•
For cookware, cake tins, roasts.
Grill- / Roasting pan
•
To bake and roast or as pan to collect
fat.
Page 7
4. BEFORE FIRST USE
ENGLISH 7
WARNING!
Refer to the Safety chapters.
4.1 Initial cleaning
• Remove all accessories and removable
shelf supports (if applicable).
• Clean the appliance before first use.
Refer to the chapter "Care and
cleaning".
4.2 Setting the time of day
The display shows and 12:00. 12
flashes.
1.
Press + or - to set the correct hour.
2.
Press to confirm. This is necessary only when you first set the time. Afterwards, the new time value is saved
automatically after five seconds.
The display shows
hour. 00 flashes.
3.
Press + or - to set the correct minutes.
4.
Press to confirm. This is necessary only when you first set the time. Afterwards, the new time value is saved
automatically after five seconds.
and the set
The display shows the new time.
Changing the time of day
You can change the time of day
only if the appliance is off.
Press
tor for the time of day
display. To set the new time, follow the
procedure given in "Setting the time of
day".
again and again until the indica-
flashes in the
4.3 Preheating
Preheat the empty appliance to burn off
the remaining grease.
1.
Set the function and the maximum
temperature.
2.
Let the appliance operate for 45 minutes.
3.
Set the function and the maximum
temperature.
4.
Let the appliance operate for 15 mi-
nutes.
Accessories can become hotter than usually. The appliance can emit an odour and
smoke. This is normal. Make sure that the
airflow is sufficient.
5. DAILY USE
WARNING!
Refer to the Safety chapters.
To use the appliance, push the knob. The
knob comes out.
5.1 Activating and deactivating
the appliance
1.
Turn the knob for the oven functions
to an oven function.
2.
Turn the knob for the temperature to
set the temperature.
3.
To deactivate the appliance, turn the
knob for the oven functions to the off
position.
Page 8
www.electrolux.com
8
5.2 Oven functions
Oven function Application
Off position The appliance is off.
True Fan Cook-
ing
Conventional
Cooking
Grilling
Fast Grilling
To roast or roast and bake food with the same cooking
temperature, on more than one shelf, without flavour
transference.
To bake and roast on one oven level. The top and bot-
tom heating elements operate at the same time.
To grill flat food items in small quantities in the middle of
the shelf. To make toast.
To grill flat food items in large quantities. To make toast.
The full grill element operates.
To cook large pieces of meat. The grill element and the
Turbo Grilling
oven fan operate one after the other and circulate hot air
around the food.
Pizza Setting To make pizza, quiche or pie.
Meat To prepare very tender and juicy roasts.
Keep Warm To keep the food warm.
Defrost To thaw frozen food.
To clean the oven. The high temperature burns off the
Pyrolysis
residual dirt. You can then remove it with a cloth when
the appliance is cold.
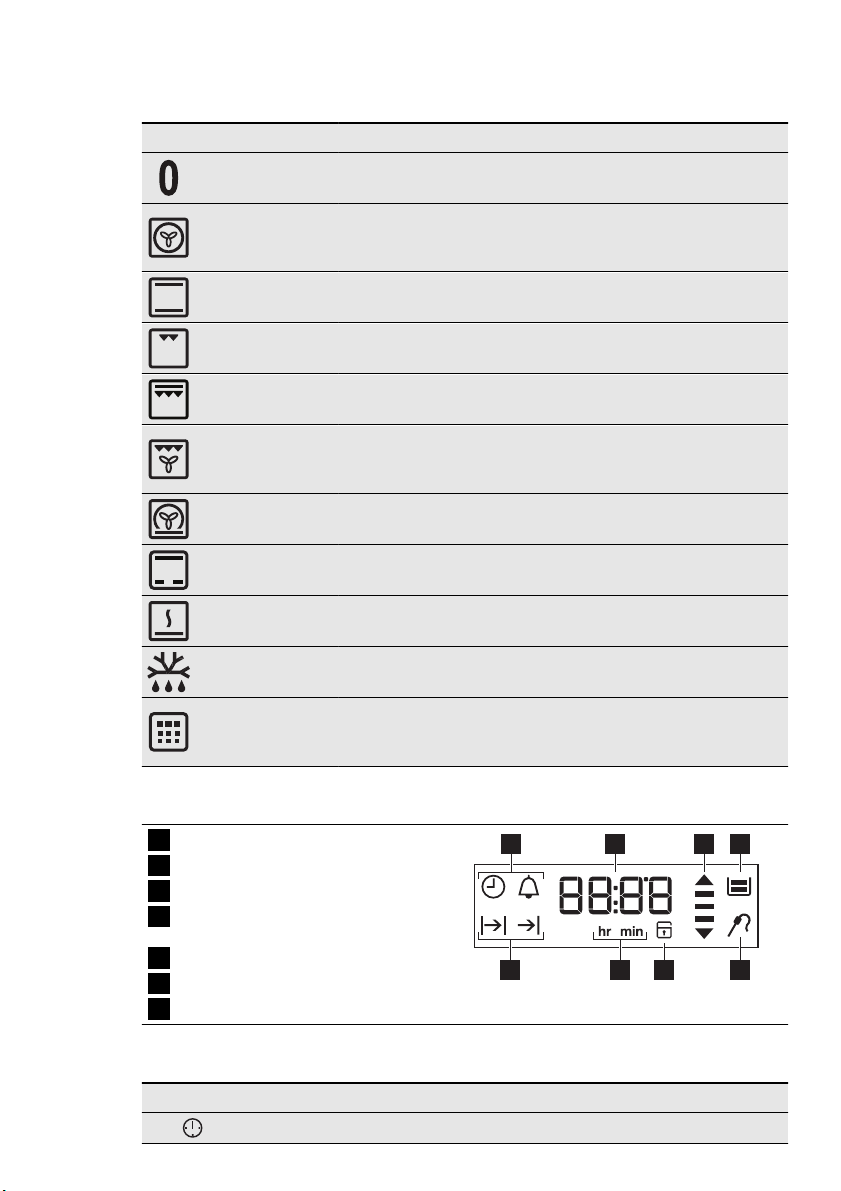
5.3 Display
Timer
1
Heat-up and residual heat indicator
2
Water tank (selected models only)
3
Core temperature sensor (selected
4
models only)
Door lock (selected models only)
5
Hours / minutes
6
Clock functions
7
5.4 Buttons
Button Function Description
Clock To set a clock function.
17 2 3
4567
Page 9
Button Function Description
,
Minus, plus To set the time.
5.5 Heat-up and residual heat
indicator
When you activate an oven function, the
bars in the display
one. The bars show that the oven temperature increases or decreases.
come on one by
6. CLOCK FUNCTIONS
ENGLISH 9
When you deactivate the appliance, the
display shows the residual heat indicator
if the temperature in the oven is more
than 40 °C. Turn the temperature knob
left or right to show the oven temperature
on the display.
Sym-
Function Description
bol
Minute Minder To set a countdown time.
Time of day To set, change or check the time of day. Refer to "Set-
ting the time of day".
Duration To set how long the appliance must operate. First set an
oven function before you set this function.
End To set when the appliance must be deactivated. First set
an oven function before you set this function. You can
use Duration and End at the same time (Time Delay) to
set the time when the appliance must be activated and
then deactivated.
Press again and again to
change the clock function.
Press to confirm the settings
of the clock functions, or wait 5
seconds for the setting to be confirmed automatically.
6.1 Setting the Duration or End
function
1.
Press again and again until the
symbol
play.
2.
Press + or - to set the minutes.
3.
Press to confirm.
4.
Press + or - to set the hour.
5.
Press to confirm.
6.
When the set time ends, the symbol
acoustic signal sounds for two minutes. The appliance deactivates.
or flashes in the dis-
or and the set time flash. The
Press a button or open the appliance
door to stop the signal.
If you press while setting the
time for Duration
ance switches to setting the End
function.
, the appli-
6.2 Setting the Minute Minder
Used to set a countdown time. The maximum time you can set is 23 hours 59 minutes. This function has no effect on the
operation of the oven. You can set the Minute Minder at any time, also if the appliance is off.
1.
Press again and again until and
00 flash in the display.
2.
Press + or - to set the Minute Minder.
At first the time is calculated in minutes and seconds. When the time
you set is longer than 60 minutes, the
symbol
comes on in the display.
Page 10
www.electrolux.com
10
The appliance then calculates the
time in hours and minutes.
3.
The Minute Minder starts automatically after five seconds.
4.
When the set time ends, the acoustic
signal sounds for two minutes. 00:00
and
flash in the display. Press a
button to stop the signal.
If you set the Minute Minder when
the Duration
tion operates, the symbol
comes on in the display.
or End func-
7. ADDITIONAL FUNCTIONS
6.3 Count Up Timer
Use the Count Up Timer to monitor how
long the oven operates. It is on immediately when the oven starts to heat.
To reset the Count Up Timer, press and
hold + and -. The timer starts to count up
again.
You cannot use the Count Up
Timer when the Duration
End
function operates.
or
7.1 Child Lock
When the Child Lock is on, you cannot
operate the oven. This is to make sure
that children do not accidentally activate
the appliance.
Activating and deactivating the Child
Lock function:
1.
Do not set an oven function.
2.
Press and hold and + at the same
time for two seconds.
3.
An acoustic signal sounds. SAFE and
come on or go out in the display
(when you activate or deactivate the
Child Lock).
If the oven has the Pyrolytic cleaning function, the door is locked.
SAFE and
play when you turn a knob or
press a button.
come on in the dis-
7.2 Automatic switch-off
For safety reasons the appliance deactivates after some time:
• If an oven function operates.
• If you do not change the oven temperature.
Oven tempera-
ture
30 -115 °C 12.5 h
Switch-off time
Oven tempera-
Switch-off time
ture
120 - 195 °C 8.5 h
200 - 245 °C 5.5 h
250 - maximum
3.0 h
°C
After an automatic switch-off, press a button to activate the appliance again.
The automatic switch-off works
with all oven functions, except Duration, End and Time Delay.
7.3 Cooling fan
When the appliance operates, the cooling
fan activates automatically to keep the
surfaces of the appliance cool. If you deactivate the appliance, the cooling fan
continues to operate until the temperature
in the appliance cools down.
7.4 Safety thermostat
Incorrect operation of the appliance or defective components can cause dangerous
overheating. To prevent this, the oven has
a safety thermostat which interrupts the
power supply. The oven activates again
automatically when the temperature
drops.
Page 11

8. HELPFUL HINTS AND TIPS
ENGLISH 11
• The appliance has five shelf levels.
Count the shelf levels from the bottom
of the appliance floor.
• The appliance has a special system
which circulates the air and constantly
recycles the steam. With this system
you can cook in a steamy environment
and keep the food soft inside and crusty outside. It decreases the cooking
time and energy consumption to a minimum.
• Moisture can condense in the appliance
or on the door glass panels. This is normal. Always stand back from the appliance when you open the appliance
door while cooking. To decrease the
condensation, operate the appliance for
10 minutes before cooking.
• Clean the moisture after each use of
the appliance.
• Do not put the objects directly on the
appliance floor and do not put aluminium foil on the components when you
cook. This can change the baking results and cause damage to the enamel.
8.1 Baking cakes
• Do not open the oven door before 3/4
of the set cooking time is up.
• If you use two baking trays at the same
time, keep one empty level between
them.
• The Conventional Cooking function at
the default temperature is ideal for
bread baking.
8.2 Cooking meat and fish
• Use a deep pan for very fatty food to
prevent the oven from stains that can
be permanent.
• Leave the meat for approximately 15
minutes before carving so that the juice
does not seep out.
• To prevent too much smoke in the oven
during roasting, add some water into
the deep pan. To prevent the smoke
condensation, add water each time after it dries up.
8.3 Cooking times
Cooking times depend on the type of
food, its consistency, and volume.
Initially, monitor the performance when
you cook. Find the best settings (heat setting, cooking time, etc.) for your cookware, recipes and quantities when you
use this appliance.
8.4 Baking and roasting table
CAKES
Conventional
TYPE OF
DISH
Whisked
recipes
Shortbread
dough
Buttermilk
cheesecake
Apple cake
(Apple pie)
Cooking
Shelf
position
Temp
[°C]
2 170 3 (2 and 4) 160 45 - 60 In a cake
2 170 3 (2 and 4) 160 20 - 30 In a cake
1 170 2 165 60 - 80 In a 26 cm
2 170 2 (left and
True Fan Cook-
ing
Shelf po-
sition
Temp
[°C]
160 80 - 100 In two 20 cm
right)
Cooking
time
[min]
Notes
mould
mould
cake mould
cake moulds
on a wire
1)
shelf
Page 12
www.electrolux.com
12
TYPE OF
DISH
Conventional
Cooking
Shelf
position
Temp
[°C]
True Fan Cook-
ing
Shelf po-
sition
Temp
[°C]
Cooking
time
[min]
Notes
Strudel 3 175 2 150 60 - 80 In a baking
tray
Jam-tart 2 170 2 (left and
right)
Sponge
2 170 2 160 50 - 60 In a 26 cm
cake
Christmas
2 160 2 150 90 - 120 In a 20 cm
cake / Rich
fruit cake
165 30 - 40 In a 26 cm
cake mould
cake mould
cake mould
Plum cake 1 175 2 160 50 - 60 In a bread
1)
tin
Small cakes
- one level
Small cakes
- two levels
Small cakes
- three levels
Biscuits /
pastry
3 170 3 140 -
150
- - 2 and 4 140 150
- - 1, 3 and 5 140 150
3 140 3 140 -
150
20 - 30 In a baking
tray
25 - 35 In a baking
tray
30 - 45 In a baking
tray
30 - 35 In a baking
tray
stripes - one
level
Biscuits /
pastry
- - 2 and 4 140 150
35 - 40 In a baking
tray
stripes - two
levels
Biscuits /
pastry
- - 1, 3 and 5 140 150
35 - 45 In a baking
tray
stripes three levels
Meringues one level
Meringuestwo levels
3 120 3 120 80 - 100 In a baking
tray
- - 2 and 4 120 80 - 100 In a baking
1)
tray
Buns 3 190 3 190 12 - 20 In a baking
1)
tray
Eclairs - one
level
Eclairs - two
levels
3 190 3 170 25 - 35 In a baking
tray
- - 2 and 4 170 35 - 45 In a baking
tray
1)
Page 13

ENGLISH 13
TYPE OF
DISH
Conventional
Cooking
Shelf
position
Temp
[°C]
True Fan Cook-
ing
Shelf po-
sition
Temp
[°C]
Cooking
time
[min]
Notes
Plate tarts 2 180 2 170 45 - 70 In a 20 cm
cake mould
Rich fruit
cake
Victoria
sandwich
1)
Preheat for 10 minutes.
1 160 2 150 110 -
120
1 170 2 (left and
160 50 - 60 In a 20 cm
right)
In a 24 cm
cake mould
cake mould
BREAD AND PIZZA
TYPE OF
DISH
Conventional
Cooking
Shelf
position
Temp
[°C]
True Fan Cook-
ing
Shelf po-
sition
Temp
[°C]
Cooking
time
[min]
Notes
White bread 1 190 1 190 60 - 70 1 - 2 pieces,
500 gr per
1)
piece
Rye bread 1 190 1 180 30 - 45 In a bread tin
Bread rolls 2 190 2 (2 and 4) 180 25 - 40 6 - 8 rolls in a
baking tray
Pizza 1 230 -
250
1 230 -
250
10 - 20 In a baking
tray or a deep
1)
pan
Scones 3 200 3 190 10 - 20 In a baking
1)
tray
1)
Preheat for 10 minutes.
1)
FLANS
TYPE OF
DISH
Conventional
Cooking
Shelf
position
Temp
[°C]
True Fan Cook-
ing
Shelf po-
sition
Temp
[°C]
Cooking
time
[min]
Notes
Pasta flan 2 200 2 180 40 - 50 In a mould
Vegetable
2 200 2 175 45 - 60 In a mould
flan
Quiches 1 180 1 180 50 - 60
Lasagne 2 180 -
190
Cannelloni 2 180 -
190
2 180 -
190
2 180 -
190
25 - 40
25 - 40
In a mould
In a mould
In a mould
1)
1)
1)
Page 14

www.electrolux.com
14
1)
MEAT
Beef 2 200 2 190 50 - 70 On a wire
Pork 2 180 2 180 90 - 120 On a wire
Veal 2 190 2 175 90 - 120 On a wire
English roast
beef, rare
English roast
beef, medium
English roast
beef, well
done
Shoulder of
pork
Shin of pork 2 180 2 160 100 -
Lamb 2 190 2 175 110 -
Chicken 2 220 2 200 70 - 85 Whole
Turkey 2 180 2 160 210 -
Duck 2 175 2 220 120 -
Goose 2 175 1 160 150 -
Rabbit 2 190 2 175 60 - 80 Cut in pieces
Hare 2 190 2 175 150 -
Pheasant 2 190 2 175 90 - 120 Whole
Preheat for 10 minutes.
Conventional
TYPE OF
DISH
Cooking
Shelf
position
2 210 2 200 50 - 60 On a wire
2 210 2 200 60 - 70 On a wire
2 210 2 200 70 - 75 On a wire
2 180 2 170 120 -
Temp
[°C]
True Fan Cook-
ing
Shelf po-
sition
Temp
[°C]
Cooking
time
[min]
150
120
130
240
150
200
200
Notes
shelf
shelf
shelf
shelf
shelf
shelf
With rind
2 pieces
Leg
Whole
Whole
Whole
Cut in pieces
Page 15
ENGLISH 15
FISH
TYPE OF
DISH
Trout / Sea
Conventional
Cooking
Shelf
position
Temp
[°C]
2 190 2 175 40 - 55 3 - 4 fish
True Fan Cook-
ing
Shelf po-
sition
Temp
[°C]
Cooking
time
[min]
Notes
bream
Tuna fish /
2 190 2 175 35 - 60 4 - 6 fillets
Salmon
8.5 Grilling
Preheat the empty oven for 10 minutes, before cooking.
Quantity Grilling Cooking time [min]
TYPE OF DISH Pieces [g] Shelf po-
sition
Fillet steaks 4 800 4 max. 12 - 15 12 - 14
Beef steaks 4 600 4 max. 10 - 12 6 - 8
Sausages 8 - 4 max. 12 - 15 10 - 12
Pork chops 4 600 4 max. 12 - 16 12 - 14
Chicken (cut in
2 1000 4 max. 30 - 35 25 - 30
2)
Kebabs 4 - 4 max. 10 - 15 10 - 12
Breast of chick-
4 400 4 max. 12 - 15 12 - 14
en
Hamburger 6 600 4 max. 20 - 30 Fish fillet 4 400 4 max. 12 - 14 10 - 12
Toasted sand-
4 - 6 - 4 max. 5 - 7 -
wiches
Toast 4 - 6 - 4 max. 2 - 4 2 - 3
Temp
[°C]
1st side 2nd side
8.6 Turbo Grilling
Beef
TYPE OF DISH Quantity
Roast beef or fillet, rare
Roast beef or fillet, medium
Roast beef or fillet, well done
per cm of
thickness
per cm of
thickness
per cm of
thickness
Shelf posi-
tion
1
1
1
Tempera-
ture [°C]
190 - 200
180 - 190
170 - 180
1)
1)
1)
Time [min]
5 - 6
6 - 8
8 - 10
Page 16
www.electrolux.com
16
1)
Pork
Shoulder, neck,
ham joint
Chop, spare rib 1 - 1.5 kg 1 170 - 180 60 - 90
Meat loaf 750 g - 1 kg 1 160 - 170 50 - 60
Pork knuckle
(precooked)
Veal
Roast veal 1 kg 1 160 - 180 90 - 120
Knuckle of
veal
Lamb
Leg of lamb,
roast lamb
Saddle of
lamb
Preheat the oven.
TYPE OF DISH Quantity
1 - 1.5 kg 1 160 - 180 90 - 120
750 g - 1 kg 1 150 - 170 90 - 120
TYPE OF
Quantity Shelf posi-
DISH
1.5 - 2 kg 1 160 - 180 120 - 150
TYPE OF
Quantity Shelf posi-
DISH
1 - 1.5 kg 1 150 - 170 100 - 120
1 - 1.5 kg 1 160 - 180 40 - 60
Shelf posi-
tion
tion
tion
Tempera-
ture [°C]
Temperature
[°C]
Temperature
[°C]
Time [min]
Time [min]
Time [min]
Poultry
TYPE OF
DISH
Poultry portions
Chicken , half 400 - 500 g
Quantity Shelf posi-
tion
200 - 250 g
1 200 - 220 30 - 50
each
1 190 - 210 35 - 50
Temperature
[°C]
Time [min]
each
Chicken, pou-
1 - 1.5 kg 1 190 - 210 50 - 70
lard
Duck 1.5 - 2 kg 1 180 - 200 80 - 100
Goose 3.5 - 5 kg 1 160 - 180 120 - 180
Turkey 2.5 - 3.5 kg 1 160 - 180 120 - 150
Turkey 4 - 6 kg 1 140 - 160 150 - 240
Page 17

ENGLISH 17
Fish (steamed)
TYPE OF
DISH
Whole fish 1 - 1.5 kg 1 210 - 220 40 - 60
Quantity Shelf posi-
tion
Temperature
[°C]
Time [min]
8.7 Defrosting
TYPE OF
DISH
Chicken 1000 100 - 140 20 - 30
Meat 1000 100 - 140 20 - 30 Turn halfway through.
Meat 500 90 - 120 20 - 30 Turn halfway through.
Trout 150 25 - 35 10 - 15 Strawberries 300 30 - 40 10 - 20 Butter 250 30 - 40 10 - 15 -
Cream 2 x 200 80 - 100 10 - 15
Gateau 1400 60 60 -
[g]
Defrosting
time [min]
Further de-
frosting time
[min]
Notes
Place the chicken on
an upturned saucer
placed on a large
plate. Turn halfway
through.
Cream can also be
whipped when still
slightly frozen in pla-
ces.
8.8 Drying - True Fan Cooking
Cover the oven shelves with baking
parchment.
VEGETABLES
TYPE OF
DISH
Beans 3 1/4 60 - 70 6 - 8
Peppers 3 1/4 60 - 70 5 - 6
Vegetables for
soup
Mushrooms 3 1/4 50 - 60 6 - 8
Herbs 3 1/4 40 - 50 2 - 3
Shelf position
1 level 2 levels
3 1/4 60 - 70 5 - 6
Temperature
[°C]
Time [hr]
Page 18

www.electrolux.com
18
FRUIT
TYPE OF
DISH
Shelf position
1 level 2 levels
Plums 3 1/4 60 - 70 8 - 10
Apricots 3 1/4 60 - 70 8 - 10
Apple slices 3 1/4 60 - 70 6 - 8
Pears 3 1/4 60 - 70 6 - 9
9. CARE AND CLEANING
Temperature
[°C]
Time [hr]
WARNING!
Refer to the Safety chapters.
• Clean the front of the appliance with a
soft cloth with warm water and a cleaning agent.
• To clean metal surfaces use a usual
cleaning agent.
• Clean the oven interior after each use.
Then you can remove dirt more easily
and it does not burn on.
• Clean stubborn dirt with a special oven
cleaner.
• Clean all oven accessories after each
use and let them dry. Use a soft cloth
with warm water and a cleaning agent.
• If you have nonstick accessories, do
not clean them using aggressive
agents, sharp-edged objects or a dishwasher. It can destroy nonstick coating.
Stainless steel or aluminium
appliances:
Clean the oven door with a wet
sponge only. Dry it with a soft
cloth.
Do not use steel wool, acids or
abrasive materials, as they can
cause damage to the oven surface. Clean the oven control panel
with the same precautions.
9.1 Pyrolysis
WARNING!
The appliance becomes very hot.
There is a risk of burns.
CAUTION!
If a hob is installed with the appliance, do not use it at the same
times as the Pyrolysis function. It
can cause damage to the appliance.
1.
Remove the removable shelf supports
(if applicable) and accessories from
the appliance. Refer to "Removing the
shelf supports".
CAUTION!
Do not let the removable shelf
supports stay in the appliance
during the cleaning procedure.
There is a risk of damage.
2.
Remove the worst dirt manually.
3.
Fully close the oven door.
The cleaning procedure cannot
start if you do not close the oven
door.
4.
Set the function Pyrolysis. Refer to
"Oven functions".
5.
When flashes, press + or - to set
the necessary procedure:
– P1 - if the oven is not very dirty.
The procedure is 1 h long.
– P2 - if the oven is more dirty. The
procedure is 1 h 30 min long.
6.
Press to start the procedure. You
can use the End function to delay the
start of the cleaning.
When the oven is at the set temperature, the door locks. The display
shows the symbol
the heat indicator.
and the bars of
Page 19

To stop Pyrolysis before it is completed, turn the knob for the oven
functions to the off position.
When Pyrolysis is completed, the display
shows the time of day. The oven door
stays locked. When the appliance is cool
again, an acoustic signal sounds and the
door unlocks.
During the Pyrolysis the oven
lamp is off.
Cleaning reminder
To remind you that Pyrolysis is necessary,
PYR flashes in the display for 10 seconds
after each activation and deactivation of
the appliance.
The cleaning reminder goes off the
display:
• After the end of the Pyrolysis function
• If you press + and - at the same time
while PYR flashes in the display.
9.2 Oven lamp
WARNING!
Be careful when you change the
oven lamp. There is a risk of electrical shock.
Before you change the oven lamp:
• Deactivate the oven.
ENGLISH 19
• Remove the fuses in the fuse box or
deactivate the circuit breaker.
Put a cloth on the bottom of the
oven to prevent damage to the
oven light and glass cover.
Always hold the halogen lamp
with a cloth to prevent grease residue from burning on the lamp.
1.
Turn the glass cover counterclockwise to remove it.
2.
Clean the glass cover.
3.
Replace the oven light bulb with an
applicable 300 °C heat-resistant oven
light bulb.
Use the same oven lamp type.
4.
Install the glass cover.
9.3 Cleaning the oven door
The oven door has four glass panels. You
can remove the oven door and the internal glass panels to clean them.
CAUTION!
Do not use the appliance without
the glass panels.
The oven door can close if you try
to remove the glass panels before
you remove the oven door.
Removing the oven door and the glass panel
1.
Fully open the door and identify the
hinge to the right side of the door.
2.
Push the tightening component until it
pulls back.
Page 20

www.electrolux.com
20
3.
Hold the pushed component with
one hand. Use a screwdriver with the
other hand to lift and turn the right
side hinge lever.
4.
Identify the hinge to the left side of
the door.
5.
Lift and turn the lever on the left
hinge.
Page 21

ENGLISH 21
6.
Close the oven door to the first opening position (halfway). Then pull forward and remove the door from its
seat.
7.
Put the door on a soft cloth on a stable surface.
8.
Release the locking system to remove the glass panels.
90°
9.
Turn the two fasteners by 90° and remove them from their seats.
Page 22

www.electrolux.com
22
Installing the door and the glass panels
10.
Carefully lift (step 1) and remove (step
2) the glass panels one by one. Start
from the top panel.
11.
Clean the glass panels with water
and soap. Dry the glass panels carefully.
2
1
AB C
When the cleaning is completed, install
the glass panels and the oven door. Do
the above steps in the opposite sequence.
Make sure that you put the glass panels
(A, B and C) back in the correct sequence. The middle panel (B) has a decorative frame. The screen-printing zone
must face the inner side of the door.
Make sure that after the installation the
surface of the glass panel frame (B) on the
screen-printing zones is not rough when
you touch it.
Make sure that you install the top panel in
the seats correctly.
10. WHAT TO DO IF…
WARNING!
Refer to the Safety chapters.
Problem Possible cause Remedy
The oven does not heat
up.
The appliance is deactivated.
Activate the appliance.
Page 23

Problem Possible cause Remedy
The oven does not heat
The clock is not set. Set the clock. Refer to
up.
The oven does not heat
up.
The oven does not heat
up.
The oven does not heat
The necessary settings
are not set.
The automatic switch-off
is on.
The Child Lock is on. Refer to "Deactivating the
up.
The oven does not heat
up.
The oven lamp does not
operate.
The Pyrolysis does not
start. The display shows
C3.
The fuse in the fuse box
is released.
The oven lamp is defective.
The door is not fully
closed or the door lock is
defective.
The display shows F102. The door is not fully
closed or the door lock is
defective.
The oven does not heat
up. The display shows
The demo mode is activated.
Demo.
ENGLISH 23
"Setting the time of day".
Make sure that the set-
tings are correct.
Refer to "Automatic
switch-off".
Child Lock".
Do a check of the fuse. If
the fuse is released more
than one time, contact a
qualified electrician.
Replace the oven lamp.
Fully close the door.
1.
Fully close the door.
2.
Deactivate the appliance with the house
fuse or the safety
switch in the fuse box
and activate it again.
3.
If the display shows
F102 again, contact
the service centre.
1.
Deactivate the appliance.
2.
Press and hold the
button +.
3.
When an acoustic
signal sounds, turn
the knob for the oven
functions to the first
function. Demo
flashes in the display.
4.
Turn the knob for the
oven functions to the
off position.
5.
Release the button +.
6.
Turn the knob for the
temperature clockwise three times. The
acoustic signal
sounds three times.
The demo mode is
deactivated.
Page 24

www.electrolux.com
24
The display shows an error code that is not on
this list.
Steam and condensation
collect on the food and in
the oven.
If you cannot find a solution to the problem yourself, contact your dealer or the
service centre.
We recommend that you write the data here:
Model (MOD.) .........................................
Product number (PNC) .........................................
Serial number (S.N.) .........................................
Problem Possible cause Remedy
There is an electronic
fault.
1.
Deactivate the appliance with the house
fuse or the safety
switch in the fuse box
and activate it again.
2.
If the display shows
the error code again,
contact the service
centre.
You left the dish in the
oven for too long.
Do not keep the dishes in
the oven for longer than
15 - 20 minutes after the
cooking ends.
The necessary data for the service centre
is on the rating plate. The rating plate is
on the front frame of the appliance cavity.
11. INSTALLATION
WARNING!
Refer to the Safety chapters.
11.1 Building In
558
573
590
min. 550
20
min. 560
548
20
589
594
5
Page 25

ENGLISH 25
This appliance is supplied with a main
plug and a main cable.
min. 550
20
600
min. 560
A
11.2 Electrical installation
WARNING!
Only a qualified person must do
the electrical installation.
The manufacturer is not responsible if you do not follow the safety
precautions from the chapter
"Safety Information".
11.3 Cable
Cable types applicable for installation or
replacement: H07 RN-F, H05 RN-F, H05
RRF, H05 VV-F, H05 V2V2-F (T90), H05
BB-F.
For the section of the cable refer to the
total power (on the rating plate) and to the
table:
Total power
B
maximum 1380W3 x 0.75 mm²
maximum 2300W3 x 1 mm²
maximum 3680W3 x 1.5 mm²
The earth cord (green / yellow cable) must
be 2 cm longer than phase and neutral
cables (blue and brown cables).
Section of the ca-
ble
12. ENVIRONMENT CONCERNS
Recycle the materials with the symbol
. Put the packaging in applicable
containers to recycle it.
Help protect the environment and human
health and to recycle waste of electrical
and electronic appliances. Do not dispose
appliances marked with the symbol
with the household waste. Return the
product to your local recycling facility or
contact your municipal office.
Page 26

www.electrolux.com
26
ÍNDICE DE MATERIAS
1. INFORMACIÓN SOBRE SEGURIDAD . . . . . . . . . . . . . . . . . . . . . . . . . . . . . . . . . . . . . . . . 27
2. INSTRUCCIONES DE SEGURIDAD . . . . . . . . . . . . . . . . . . . . . . . . . . . . . . . . . . . . . . . . . . 28
3. DESCRIPCIÓN DEL PRODUCTO . . . . . . . . . . . . . . . . . . . . . . . . . . . . . . . . . . . . . . . . . . . 31
4. ANTES DEL PRIMER USO . . . . . . . . . . . . . . . . . . . . . . . . . . . . . . . . . . . . . . . . . . . . . . . . 31
5. USO DIARIO . . . . . . . . . . . . . . . . . . . . . . . . . . . . . . . . . . . . . . . . . . . . . . . . . . . . . . . . . . . 32
6. FUNCIONES DE RELOJ . . . . . . . . . . . . . . . . . . . . . . . . . . . . . . . . . . . . . . . . . . . . . . . . . . 33
7. FUNCIONES ADICIONALES . . . . . . . . . . . . . . . . . . . . . . . . . . . . . . . . . . . . . . . . . . . . . . . 35
8.
CONSEJOS ÚTILES . . . . . . . . . . . . . . . . . . . . . . . . . . . . . . . . . . . . . . . . . . . . . . . . . . . . . 35
9. MANTENIMIENTO Y LIMPIEZA . . . . . . . . . . . . . . . . . . . . . . . . . . . . . . . . . . . . . . . . . . . . . 43
10.
QUÉ HACER SI… . . . . . . . . . . . . . . . . . . . . . . . . . . . . . . . . . . . . . . . . . . . . . . . . . . . . . . . 48
11. INSTALACIÓN . . . . . . . . . . . . . . . . . . . . . . . . . . . . . . . . . . . . . . . . . . . . . . . . . . . . . . . . . 50
PENSAMOS EN USTED
Gracias por adquirir un producto Electrolux. Ha escogido un producto que contiene décadas de
experiencia e innovación profesionales. Ingenioso y elegante, se ha diseñado pensando en usted.
Así que, siempre que lo utilice puede tener la seguridad de que conseguirá excelentes resultados.
Bienvenido a Electrolux.
Visite nuestro sitio web para:
Obtener consejos, folletos, soluciones a problemas e información de servicio:
www.electrolux.com
Registrar su producto para recibir un mejor servicio:
www.electrolux.com/productregistration
Adquirir accesorios, artículos de consumo y recambios originales para su aparato:
www.electrolux.com/shop
ATENCIÓN Y SERVICIO AL CLIENTE
Le recomendamos que utilice recambios originales.
Al contactar con el Servicio, cerciórese de tener la siguiente información a mano.
La información se puede encontrar en la placa de características. Modelo, PNC, Número de
serie.
Advertencia - Precaución-Información sobre seguridad.
Datos y recomendaciones generales
Información medioambiental
Salvo modificaciones.
Page 27

1. INFORMACIÓN SOBRE SEGURIDAD
Antes de instalar y utilizar el aparato, lea atentamente las
instrucciones facilitadas. El fabricante no se hace responsable de los daños y lesiones causados por una instalación y uso incorrectos. Guarde siempre las instrucciones
junto con el aparato para futuras consultas.
1.1 Seguridad de niños y personas vulnerables
ADVERTENCIA
Existe riesgo de sufrir asfixia, lesiones o incapacidad
permanente.
• Este aparato puede ser utilizado por niños de 8 años
en adelante y por personas cuyas capacidades físicas,
sensoriales o mentales estén disminuidas o que carezcan de la experiencia y conocimientos suficientes para
manejarlo, siempre que cuenten con la supervisión de
una persona que se responsabilice de su seguridad.
• No deje que los niños jueguen con el aparato.
• Mantenga los materiales de embalaje alejados de los
niños.
• Mantenga a los niños y mascotas alejados del aparato
cuando esté funcionando o enfriándose. Las piezas de
fácil acceso están calientes.
• Si el aparato dispone de dispositivo de seguridad para
niños, se recomienda activarlo.
• Evite que un niño lleve a cabo la limpieza y el mantenimiento de usuario sin la supervisión adecuada.
ESPAÑOL 27
1.2 Seguridad general
• Solo un electricista cualificado puede instalar este aparato y sustituir el cable.
• El aparato se calienta cuando está en funcionamiento.
No toque las resistencias del aparato. Utilice siempre
guantes de horno cuando introduzca o retire accesorios o utensilios refractarios.
Page 28

www.electrolux.com
28
• No utilice un limpiador a vapor para limpiar el aparato.
• Antes de realizar tareas de mantenimiento, corte la co-
• No utilice limpiadores abrasivos ásperos ni rascadores
• Los restos de derrames deben retirarse antes de la lim-
rriente eléctrica.
de metal afilado para limpiar la puerta de cristal si no
quiere arañar su superficie, lo que podría hacer que el
cristal se hiciese añicos.
pieza pirolítica. Saque todas las piezas del horno.
2.
INSTRUCCIONES DE SEGURIDAD
• Asegúrese de que las especificaciones
2.1 Instalación
ADVERTENCIA
Sólo un técnico cualificado puede
instalar el aparato.
• Retire todo el embalaje.
• No instale ni utilice un aparato dañado.
• Siga las instrucciones de instalación su-
ministradas con el aparato.
• El aparato es pesado, tenga cuidado
siempre cuando lo mueva. Utilice siempre guantes de protección.
• No tire nunca del aparato sujetando el
asa.
• Respete siempre la distancia mínima
entre el aparato y los demás electrodomésticos y mobiliario.
• Asegúrese de que el aparato se instala
debajo y junto a estructuras seguras.
• Los laterales del aparato deben colo-
carse junto a otros aparatos o muebles
de la misma altura.
Conexión eléctrica
ADVERTENCIA
Riesgo de incendios y descargas
eléctricas.
• Todas las conexiones eléctricas deben
realizarse por electricistas cualificados.
• El aparato debe quedar conectado a
tierra.
eléctricas de la placa coinciden con las
del suministro eléctrico de su hogar. En
caso contrario, póngase en contacto
con un electricista.
• Utilice siempre una toma con aislamiento de conexión a tierra correctamente
instalada.
• No utilice adaptadores de enchufes
múltiples ni cables prolongadores.
• Asegúrese de no provocar daños en el
enchufe ni en el cable de red. Póngase
en contacto con un electricista o con el
servicio técnico para cambiar un cable
de red dañado.
• Evite que el cable de red entre en contacto con la puerta del aparato, especialmente si la puerta está caliente.
• Los mecanismos de protección contra
descargas eléctricas de componentes
con corriente y aislados deben fijarse
de forma que no puedan aflojarse sin
utilizar herramientas.
• Conecte el enchufe a la toma de corriente únicamente cuando haya terminado la instalación. Asegúrese de tener
acceso al enchufe del suministro de red
una vez instalado el aparato.
• Si la toma de corriente está floja, no conecte el enchufe.
• No desconecte el aparato tirando del
cable de conexión a la red. Tire siempre
del enchufe.
• Use únicamente dispositivos de aislamiento correctos: línea con protección
Page 29

contra los cortocircuitos, fusibles (tipo
tornillo que puedan retirarse del soporte), dispositivos de fuga a tierra y contactores.
• La instalación eléctrica debe tener un
dispositivo de aislamiento que permita
desconectar el aparato de todos los
polos de la red. El dispositivo de aislamiento debe tener una apertura de
contacto con una anchura mínima de 3
mm.
• Cierre completamente la puerta del horno antes de conectar el aparato a la
corriente eléctrica.
2.2 Uso del aparato
ADVERTENCIA
Riesgo de lesiones, quemaduras,
descargas eléctricas o explosiones.
• Utilice este aparato en entornos domésticos.
• No cambie las especificaciones de este
aparato.
• Cerciórese de que los orificios de ventilación no están obstruidos.
• No deje nunca el aparato desatendido
mientras está en funcionamiento.
• Desactive el aparato después de cada
uso.
• Tenga cuidado al abrir la puerta del
aparato cuando éste esté en funcionamiento. Pueden liberarse vapores calientes.
• No utilice el aparato con las manos mojadas ni cuando entre en contacto con
el agua.
• No ejerza presión sobre la puerta abierta.
• No utilice el aparato como superficie de
trabajo ni de almacenamiento.
• Mantenga siempre cerrada la puerta del
aparato cuando éste esté en funcionamiento.
• Abra la puerta del aparato con cuidado.
El uso de ingredientes con alcohol puede generar una mezcla de alcohol y aire.
• Procure que no haya chispas ni fuego
encendido cerca cuando se abra la
puerta del aparato.
ESPAÑOL 29
• No coloque productos inflamables ni
objetos mojados con productos inflamables dentro, cerca o encima del aparato.
ADVERTENCIA
Podría dañar el aparato.
• Para evitar daños o decoloraciones del
esmalte:
– no coloque recipientes ni otros objetos directamente sobre la base del aparato.
– no coloque papel de aluminio directamente en la parte inferior del aparato.
– No ponga agua directamente en el
aparato caliente.
– No deje platos húmedos ni comida en
el aparato una vez finalizada la cocción.
– Preste especial atención al desmontar
o instalar los accesorios.
• La pérdida de color del esmalte no
afecta al rendimiento del aparato. No se
considera un defecto en cuanto al derecho de garantía.
• Utilice una bandeja honda para pasteles húmedos. Los jugos de las frutas
podrían ocasionar manchas permanentes.
2.3 Mantenimiento y limpieza
ADVERTENCIA
Riesgo de lesiones, incendio o de
ocasionar daños al aparato.
• Antes de proceder con el mantenimiento, apague el aparato y desconecte el
enchufe de la red.
• Asegúrese de que el aparato esté frío.
Los paneles de cristal pueden romperse.
• Cambie inmediatamente los paneles de
cristal de la puerta que estén dañados.
Póngase en contacto con el servicio
técnico.
• Tenga mucho cuidado al desmontar la
puerta del aparato. ¡La puerta es muy
pesada!
• Limpie periódicamente el aparato para
evitar el deterioro del material de la superficie.
• Los restos de comida o grasa en el interior del aparato podrían provocar un
incendio.
Page 30

www.electrolux.com
30
• Limpie el aparato con un paño suave
• Si utiliza aerosoles de limpieza para
• No limpie el esmalte catalítico (en su
Limpieza pirolítica
• Antes de realizar una autolimpieza piro-
• Lea atentamente todas las instruccio-
• Mantenga a los niños alejados del hor-
• La limpieza pirolítica es una operación a
humedecido. Utilice sólo detergentes
neutros. No utilice productos abrasivos,
estropajos duros, disolventes ni objetos
de metal.
hornos, siga las instrucciones del envase.
caso) con ningún tipo de detergente.
ADVERTENCIA
Existe riesgo de quemaduras.
lítica o la función de Primer uso, elimine
de la cavidad del horno:
– Cualquier resto de comida, aceite o
grasa.
– Todos los objetos desmontables (in-
cluidos estantes, carriles laterales,
etc. suministrados con el producto),
en especial todos los recipientes,
sartenes, bandejas, utensilios, etc.
antiadherentes.
nes de la limpieza pirolítica.
no cuando la limpieza pirolítica se encuentre en funcionamiento. El horno se
calienta mucho.
alta temperatura que puede liberar humos de los residuos de cocción y de
los materiales de fabricación, por lo que
recomendamos encarecidamente a los
consumidores:
– Asegurar una correcta ventilación du-
rante y después de cada limpieza pirolítica.
– Asegurar una correcta ventilación du-
rante y después del primer uso a máxima temperatura.
– Retirar cualquier mascota (especial-
mente pájaros) de las proximidades
del horno durante y después de la
limpieza pirolítica y use primero la
temperatura máxima para una zona
bien ventilada.
• A diferencia de los seres humanos, algunas aves y algunos reptiles pueden
ser muy sensibles a los posibles humos
emitidos durante la limpieza de todos
los hornos pirolíticos.
• Las mascotas de pequeño tamaño
también pueden ser muy sensibles a
los cambios de temperatura localizados
cerca de los hornos mientras se realiza
el programa de autolimpieza pirolítica.
• Las superficies antiadherentes de recipientes, sartenes, bandejas, utensilios,
etc., pueden dañarse por las altas temperaturas de la limpieza pirolítica y también pueden ser fuente de humos dañinos de baja intensidad.
• Los humos emitidos por todos los hornos pirolíticos y residuos de cocción
descritos no son dañinos para las personas, incluidos los bebés o personas
con problemas médicos.
2.4 Luz interna
• El tipo de bombilla o lámpara halógena
utilizada para este aparato es específica
para aparatos domésticos. No debe
utilizarse para la iluminación doméstica.
ADVERTENCIA
Riesgo de descargas eléctricas.
• Antes de cambiar la bombilla, desconecte el aparato del suministro de red.
• Utilice sólo bombillas con las mismas
especificaciones.
2.5 Desecho
ADVERTENCIA
Existe riesgo de lesiones o asfixia.
• Desconecte el aparato de la red.
• Corte el cable de conexión a la red y
deséchelo.
• Retire el pestillo de la puerta para evitar
que los niños y las mascotas queden
encerrados en el aparato.
Page 31

3. DESCRIPCIÓN DEL PRODUCTO
2 31
5
4
3
8
2
1
7
Mando de las funciones del horno
1
Programador electrónico
2
4
5
6
4. ANTES DEL PRIMER USO
ESPAÑOL 31
Mando de temperatura
3
Grill
4
Bombilla del horno
5
Ventilador
6
Placa de características
7
Posiciones de las parrillas
8
3.1 Accesorios del horno
• Parrilla
Para utensilios de cocina, pasteles en
molde, asados.
• Grill / Bandeja de asar
Para hornear y asar o como grasera.
ADVERTENCIA
Consulte los capítulos sobre seguridad.
4.1 Limpieza inicial
• Retire todos los accesorios y carriles laterales extraíbles (en su caso).
• Limpie el interior del aparato antes de
utilizarlo por primera vez.
Consulte el capítulo "Mantenimiento y limpieza".
4.2 Programación del reloj
La pantalla muestra y 12:00. 12 parpadea.
1.
Pulse + o - para programar la hora
correspondiente.
2.
Pulse para confirmar. Esto solamente es necesario la primera vez
que se ajusta la hora. Después, la
nueva hora se guarda automáticamente transcurridos 5 segundos).
La pantalla muestra
ajustada. 00 parpadea.
3.
Pulse + o - para programar los minutos correspondientes.
y la hora
4.
Pulse para confirmar. Esto solamente es necesario la primera vez
que se ajusta la hora. Después, la
nueva hora se guarda automáticamente transcurridos 5 segundos).
La pantalla muestra la nueva hora.
Cambio de la hora
Se puede cambiar la hora sólo
cuando el horno está apagado.
Pulse
cador de la hora
repetidamente hasta que el indi-
parpadee en la pantalla. Para ajustar la nueva hora, siga el
procedimiento indicado en "Programación
del reloj".
4.3 Calentamiento previo
Precaliente el aparato vacío para quemar
los restos de grasa.
1.
Ajuste la función y la temperatura
máxima.
2.
Deje que el aparato funcione durante
45 minutos.
3.
Ajuste la función y la temperatura
máxima.
Page 32

www.electrolux.com
32
4.
Deje que el aparato funcione durante
15 minutos.
Los accesorios se pueden calentar más
de lo habitual. El aparato puede emitir
5. USO DIARIO
olores y humos. Esto es totalmente normal. Asegúrese de que haya una buena
ventilación.
ADVERTENCIA
Consulte los capítulos sobre seguridad.
Si se desea usar el aparato, presione el
mando. El mando sale del alojamiento.
2.
Gire el mando del termostato para
ajustar la temperatura.
3.
Para desactivar el aparato, gire el
mando de las funciones del horno
hasta la posición de apagado.
5.1 Encendido y apagado del
aparato
1.
Gire el mando del horno hasta la fun-
ción deseada.
5.2 Funciones del horno
Función del horno Aplicación
Apagado El aparato está apagado.
Turbo
Calor superior
+ inferior
Grill
Grill rápido
Grill + Turbo
Para asar o asar y hornear a la vez alimentos que re-
quieran la misma temperatura de cocción, en más de
una bandeja y sin que se transfieran los sabores.
Para hornear y asar en un nivel del horno. Las resisten-
cias superior e inferior funcionan al mismo tiempo.
Para asar al grill pequeñas cantidades de alimentos de
poco espesor en el centro de la parrilla. Para hacer tos-
tadas.
Para asar al grill alimentos poco gruesos en grandes
cantidades. Para hacer tostadas. Funciona todo el grill.
Para cocinar grandes trozos de carne. El grill y el venti-
lador del horno funcionan de forma alterna para que el
aire caliente circule alrededor de los alimentos.
Pizza Para hacer pizza, quiche o tarta.
Carne Para preparar asados muy tiernos y jugosos.
Mantener ca-
liente
Para mantener calientes los alimentos.
Descongelar Para descongelar alimentos congelados.
Page 33

Función del horno Aplicación
Para limpiar el horno. La elevada temperatura quema la
Pirólisis
suciedad residual. A continuación puede retirarla con un
paño cuando el aparato esté frío.
5.3 Pantalla
Temporizador
1
Indicador de calor residual y calenta-
2
miento
Depósito de agua (solo los modelos
3
seleccionados)
Sonda térmica (solo los modelos se-
4
leccionados)
Bloqueo de puerta (solo los modelos
5
seleccionados)
Horas/minutos
6
Funciones del reloj
7
5.4 Teclas
Tecla Función Descripción
Reloj Para ajustar una función del reloj.
,
5.5 Indicador de calor residual y
calentamiento
Cuando se activa una función del horno,
las barras de la pantalla
de una en una. Las barras indican que la
temperatura del horno aumenta o disminuye.
Menos, más Para ajustar el tiempo.
Al desactivar el aparato, la pantalla muestra el indicador de calor residual
temperatura del horno es superior a 40
°C. Gire el mando del termostato a la de-
se encienden
recha o la izquierda para mostrar la temperatura del horno en la pantalla.
ESPAÑOL 33
17 2 3
4567
si la
6. FUNCIONES DE RELOJ
Sím-
bolo
Función Descripción
Avisador Para programar un temporizador.
Hora Para ajustar, modificar o comprobar la hora. Consulte
"Programación del reloj".
Duración Para ajustar cuánto tiempo debe funcionar el aparato.
Ajuste una función del horno antes de esta función.
Page 34

www.electrolux.com
34
Sím-
Función Descripción
bolo
Fin de progra-maPara configurar cuándo se ha de desactivar el aparato.
Ajuste una función del horno antes de esta función.
Puede utilizar Duración y Fin a la vez (Inicio Diferido) para ajustar la hora a la que debe encenderse y después
apagarse el aparato.
Pulse repetidamente para
cambiar la función del reloj.
Pulse para confirmar los ajustes de las funciones del reloj, o
espere 5 segundos para confirmar
automáticamente el ajuste.
6.1 Ajuste de la función
Duración o Fin
1.
Pulse repetidamente hasta que en
la pantalla parpadee
2.
Pulse + o - para ajustar los minutos.
3.
Pulse para confirmar.
4.
Pulse + o - para ajustar la hora.
5.
Pulse para confirmar.
6.
Cuando termina el tiempo ajustado, el
símbolo
do parpadean. Se emite una señal
acústica durante dos minutos. El apa-
rato se apaga. Pulse cualquier tecla o
abra la puerta del aparato para dete-
ner el sonido.
Si pulsa mientras ajusta el
tiempo de Duración
rato cambia al ajuste de la función
Fin
o y el tiempo ajusta-
.
o .
, el apa-
6.2 Ajuste del Avisador
Utilícelo para programar una cuenta atrás.
El periodo de tiempo máximo es de 23
horas 59 minutos. Esta función no afecta
al funcionamiento del horno. Puede ajustar el Avisador en cualquier momento, incluso si el aparato está apagado.
1.
Pulse repetidamente hasta que
y 00 parpadeen en la pantalla.
2.
Pulse + o - para ajustar el Avisador.
Al principio, el tiempo se calcula en
minutos y segundos. Cuando la hora
ajustada es superior a 60 minutos, el
símbolo
lla. El aparato calcula la hora en horas
y minutos.
3.
El Avisador empieza automáticamente después de cinco segundos.
4.
Cuando termina el tiempo programado, se emite una señal acústica du-
rante dos minutos. 00:00 y
dean en la pantalla. Pulse una tecla
para desactivar la señal.
Si se ajusta el Minutero cuando la
Duración
curso, el símbolo
en la pantalla.
se enciende en la panta-
parpa-
o el Fin están en
se enciende
6.3 Temporizador de avance del
contador
Utilice el temporizador de avance del contador para controlar el tiempo de funcionamiento del horno. Se enciende inmediatamente cuando el horno empieza a
calentarse.
Para reiniciar el temporizador, mantenga
pulsadas + y -. El temporizador empieza
a contar de nuevo.
No se puede utilizar el temporizador cuando están en curso las
funciones Duración
o Fin .
Page 35

7. FUNCIONES ADICIONALES
ESPAÑOL 35
7.1 Bloqueo de seguridad para
niños
Cuando está activado el bloqueo de seguridad para niños, no se puede utilizar el
horno. De este modo se asegura de que
los niños no activen accidentalmente el
aparato.
Activación y desactivación de la
función de Bloqueo de seguridad
para niños:
1.
No ajuste ninguna función del horno.
2.
Mantenga pulsado y + al mismo
tiempo durante dos segundos.
3.
Se emite una señal acústica. SAFE y
se encienden o apagan (cuando
se activa o desactiva la tecla de bloqueo) en la pantalla.
Si el horno dispone de la función
de limpieza pirolítica, la puerta se
bloquea.
SAFE y
pantalla al girar un mando o pulsar un botón.
se encienden en la
7.2 Apagado automático
Por motivos de seguridad, el aparato se
desactiva después de un tiempo:
• Si está activada alguna función del horno.
• Si no cambia la temperatura del horno.
Temperatura
del horno
30 -115 °C 12.5 h
Hora de apaga-
do
Temperatura
del horno
Hora de apaga-
do
120 - 195 °C 8.5 h
200 - 245 °C 5.5 h
250 - máximo °C 3.0 h
Después de un apagado automático, pulse una tecla para activar de nuevo el aparato.
El apagado automático afecta a
todas las funciones del horno salvo a Duración, Fin e Inicio diferido.
7.3 Ventilador de enfriamiento
Cuando el aparato funciona, el ventilador
de refrigeración se pone en marcha automáticamente para mantener frías las superficies del aparato. Si se desactiva el
aparato, el ventilador puede seguir funcionando hasta que se enfríe el aparato.
7.4 Termostato de seguridad
El funcionamiento incorrecto del aparato
o los componentes defectuosos pueden
provocar sobrecalentamientos peligrosos.
Para evitarlo, el horno dispone de un termostato de seguridad que interrumpe la
alimentación. El horno se vuelve a conectar automáticamente cuando desciende la
temperatura.
8. CONSEJOS ÚTILES
• El horno tiene cinco niveles o alturas.
Estos niveles se ordenan contándolos
de abajo a arriba desde la solera del
aparato.
• El aparato está dotado con un sistema
especial que hace circular el aire y recicla constantemente el vapor. Gracias
a este sistema puede cocinar con un
entorno de vapor y mantener los ali-
mentos blandos en su interior y crujientes en su exterior. Ello reduce al mínimo
el tiempo de cocción y el consumo de
energía.
• La humedad puede llegar a condensarse en el aparato o en los paneles de
cristal. Esto es totalmente normal. Manténgase alejado del aparato siempre
que abra la puerta mientras está en
Page 36

www.electrolux.com
36
• Limpie la humedad después de cada
• No coloque objetos directamente sobre
8.1 Repostería
• No abra la puerta del horno antes de
• Si utiliza dos bandejas al mismo tiem-
• La función Calor superior + inferior a la
8.2 Carnes y pescados
• Utilice una bandeja honda con los ali-
funcionamiento. Si desea reducir la
condensación, ponga en funcionamiento el aparato 10 minutos antes de cocinar.
uso del aparato.
la solera del aparato ni cubra los componentes con papel de aluminio cuando cocine. De lo contrario puede que
se alteren los resultados de la cocción y
se dañe el esmalte.
que transcurran 3/4 partes del tiempo
de cocción establecido.
po, deje un nivel libre entre ambas.
temperatura predeterminada es idónea
para hornear pan.
mentos muy grasos para evitar que el
horno quede manchado de forma permanente.
• Antes de trinchar la carne, déjela reposar unos 15 minutos, como mínimo,
para que retenga los jugos.
• Para evitar que se forme mucho humo
en el horno, vierta un poco de agua en
la bandeja honda. Para evitar la condensación de humos, añada agua después de que se seque cada vez.
8.3 Tiempos de cocción
Los tiempos de cocción dependen del tipo de alimento, de su consistencia y del
volumen.
Inicialmente, supervise el rendimiento
cuando cocine. Busque los mejores ajustes (de calor, tiempo de cocción, etc.) para sus recipientes, recetas y cantidades
cuando utilice este aparato.
8.4 Cuadro de especificaciones para hornear y asar
PASTELES
Calor superior +
TIPO DE
PLATO
Masas bati-
inferior
Posición
de la
parrilla
Temp
. [°C]
2 170 3 (2 y 4) 160 45-60 En molde de
das
Masa con
2 170 3 (2 y 4) 160 20-30 En molde de
mantequilla
Tarta de
1 170 2 165 60-80 En molde de
queso (con
suero)
Tarta o pas-
2 170 2 (izquiertel de manzana
Strudel 3 175 2 150 60-80 En bandeja
Turbo
Posición
de la pa-
rrilla
da y dere-
cha)
Tiempo
Temp
. [°C]
de coc-
ción
[min]
Notas
repostería
repostería
repostería de
26 cm
160 80-100 En dos mol-
des de repos-
tería de 20 cm
en una parri-
1)
lla
Page 37

ESPAÑOL 37
TIPO DE
PLATO
Tarta de
mermelada
Calor superior +
inferior
Posición
de la
parrilla
Temp
. [°C]
2 170 2 (izquier-
Turbo
Posición
de la pa-
rrilla
da y dere-
cha)
Tiempo
Temp
. [°C]
de coc-
ción
[min]
Notas
165 30-40 En molde de
repostería de
26 cm
Bizcocho 2 170 2 160 50-60 En molde de
repostería de
26 cm
Pastel de
Navidad/
Pastel de
fruta
Pastel de ciruelas
Pasteles pe-
2 160 2 150 90-120 En molde de
repostería de
1)
20 cm
1 175 2 160 50-60 En molde pa-
1)
ra pan
3 170 3 140-15020-30 En bandeja
queños: un
nivel
Pasteles pe-
- - 2 y 4 140-15025-35 En bandeja
queños: dos
niveles
Pasteles pe-
- - 1, 3 y 5 140-15030-45 En bandeja
queños: tres
niveles
Galletas/ho-
3 140 3 140-15030-35 En bandeja
jaldres - un
nivel
Galletas/ho-
- - 2 y 4 140-15035-40 En bandeja
jaldres - dos
niveles
Galletas/ho-
- - 1, 3 y 5 140-15035-45 En bandeja
jaldres - tres
niveles
Merengues:
3 120 3 120 80-100 En bandeja
un nivel
Merengues:
dos niveles
Bollos 3 190 3 190 12-20
Bollos relle-
- - 2 y 4 120 80-100
En bandeja
En bandeja
3 190 3 170 25-35 En bandeja
nos de crema: un nivel
1)
1)
Page 38

www.electrolux.com
38
TIPO DE
PLATO
Bollos relle-
Calor superior +
inferior
Posición
de la
parrilla
Temp
. [°C]
- - 2 y 4 170 35-45 En bandeja
Turbo
Posición
de la pa-
rrilla
Temp
. [°C]
Tiempo
de coc-
ción
[min]
Notas
nos de crema: dos niveles
Tartaletas 2 180 2 170 45-70 En molde de
repostería de
20 cm
Pastel de
fruta
1 160 2 150 110-120 En molde de
repostería de
24 cm
Tarta Victoria
1)
Precalentar durante 10 minutos.
1 170 2 (izquier-
da y dere-
cha)
160 50-60 En molde de
repostería de
20 cm
PAN Y PIZZA
TIPO DE
ALIMENTO
Cocción con-
vencional
Posición
de la
Temp
parrilla
. (°C)
Cocción con tur-
bo
Posición
de la pa-
rrilla
Temp
. (°C)
Tiempo
de coc-
ción
(min)
Notas
Pan blanco 1 190 1 190 60-70 1-2 piezas,
500 g cada
1)
pieza
Pan de centeno
1 190 1 180 30-45 En molde de
pan
Panecillos 2 190 2 (2 y 4) 180 25-40 6-8 panecillos
en una ban-
deja de repos-
1)
tería
Pizza 1 230-2
50
1 230-25010-20 En una ban-
deja o bande-
ja honda
1)
Bollitos 3 200 3 190 10-20 En bandeja de
1)
1)
Precalentar durante 10 minutos.
repostería
Page 39

ESPAÑOL 39
FLANES
TIPO DE
ALIMENTO
Pudin de
Cocción con-
vencional
Posición
de la
parrilla
Temp
. (°C)
2 200 2 180 40-50 En un molde
Cocción con tur-
bo
Posición
de la pa-
rrilla
Temp
. (°C)
Tiempo
de coc-
ción
(min)
Notas
pasta
Flan de ver-
2 200 2 175 45-60 En un molde
duras
Quiches 1 180 1 180 50-60 En un mol-
1)
de
Lasaña 2 180-1
90
Canelones 2 180-1
90
1)
Precalentar durante 10 minutos.
2 180-19025-40 En un mol-
1)
de
2 180-19025-40 En un mol-
1)
de
CARNE
TIPO DE
ALIMENTO
Carne de vacuno
Cocción con-
vencional
Posición
de la pa-
rrilla
Temp
. (°C)
2 200 2 190 50-70 En un estante
Cocción con tur-
bo
Posición
de la pa-
rrilla
Temp
. (°C)
Tiempo
de coc-
ción
(min)
Notas
de rejilla
Cerdo 2 180 2 180 90-120 En un estante
de rejilla
Ternera 2 190 2 175 90-120 En un estante
de rejilla
Rosbif poco
hecho
Rosbif en su
punto
Rosbif muy
hecho
Paletilla de
2 210 2 200 50-60 En un estante
de rejilla
2 210 2 200 60-70 En un estante
de rejilla
2 210 2 200 70-75 En un estante
de rejilla
2 180 2 170 120-150 con piel
cerdo
Morcillo de
2 180 2 160 100-120 2 piezas
cerdo
Cordero 2 190 2 175 110-130 Pata
Pollo 2 220 2 200 70-85 Entero
Page 40

www.electrolux.com
40
TIPO DE
ALIMENTO
Cocción con-
vencional
Posición
de la pa-
rrilla
Temp
. (°C)
Cocción con tur-
bo
Posición
de la pa-
rrilla
Temp
. (°C)
Tiempo
de coc-
ción
(min)
Notas
Pavo 2 180 2 160 210-240 Entero
Pato 2 175 2 220 120-150 Entero
Ganso 2 175 1 160 150-200 Entero
Conejo 2 190 2 175 60-80 Troceada
Liebre 2 190 2 175 150-200 Troceada
Faisán 2 190 2 175 90-120 Entero
PESCADO
TIPO DE
ALIMENTO
Trucha/Par-
Cocción con-
vencional
Posición
de la pa-
Temp.
rrilla
2 190 2 175 40-55 3-4 piezas
Cocción con tur-
Posición
(°C)
de la pa-
rrilla
bo
Temp
. (°C)
Tiempo
de coc-
ción
(min)
Notas
go
Atún/Sal-
2 190 2 175 35-60 4-6 filetes
món
8.5 Grill
Precaliente el horno vacío durante
10 minutos antes de cocinar.
Cantidad Grill Tiempo de cocción
TIPO DE ALI-
MENTO
Piezas [g] Posición
de la pa-
Temp
[°C]
rrilla
Filetes de solo-
4 800 4 máx. 12-15 12-14
millo
Filetes de vacu-
4 600 4 máx. 10-12 6-8
no
Salchichas 8 - 4 máx. 12-15 10-12
Chuletas de
4 600 4 máx. 12-16 12-14
cerdo
Pollo (cortado
2 1000 4 máx. 30-35 25-30
en dos)
Brochetas 4 - 4 máx. 10-15 10-12
Pechuga de po-
4 400 4 máx. 12-15 12-14
llo
[min]
1ª cara 2ª cara
Page 41

ESPAÑOL 41
Cantidad Grill Tiempo de cocción
[min]
TIPO DE ALI-
MENTO
Piezas [g] Posición
de la pa-
Temp
[°C]
1ª cara 2ª cara
rrilla
Hamburguesa 6 600 4 máx. 20-30 Filete de pesca-
4 400 4 máx. 12-14 10-12
do
Sándwiches
4-6 - 4 máx. 5-7 -
tostados
Tostadas 4-6 - 4 máx. 2-4 2-3
8.6 Grill + Turbo
Carne de vacuno
TIPO DE ALI-
MENTO
Rosbif o filete,
poco hecho
Rosbif o filete, al
punto
Rosbif o filete,
muy hecho
1)
Precaliente el horno.
Cantidad
por cm de
grosor
por cm de
grosor
por cm de
grosor
Posición de
la parrilla
1
1
1
Temperatu-
ra (°C)
190-200
180-190
170-180
1)
1)
1)
Tiempo
(min)
5-6
6-8
8-10
Cerdo
TIPO DE ALI-
MENTO
Paletilla, cuello,
jamón asado
Chuletas, costillas y falda
Cantidad
1-1,5 kg 1 160-180 90-120
1-1,5 kg 1 170-180 60-90
Posición de
la parrilla
Temperatu-
ra (°C)
Tiempo
(min)
Pastel de carne 750 g-1 kg 1 160-170 50-60
Codillo de cerdo
(precocinado)
750 g-1 kg 1 150-170 90-120
Ternera
TIPO DE ALI-
MENTO
Cantidad Posición de
la parrilla
Temperatura
(°C)
Tiempo (min)
Ternera asada 1 kg 1 160-180 90-120
Codillo de ter-
1,5-2 kg 1 160-180 120-150
nera
Page 42

www.electrolux.com
42
Cordero
TIPO DE ALI-
Pata de cordero, cordero
asado
Costillar de
cordero
Aves
TIPO DE ALI-
Aves troceadas
Pollo, medio 400 - 500 g
Pollo, pularda 1-1,5 kg 1 190-210 50-70
Pato 1,5-2 kg 1 180-200 80-100
Ganso 3,5-5 kg 1 160-180 120-180
Pavo 2,5-3,5 kg 1 160-180 120-150
Pavo 4-6 kg 1 140-160 150-240
MENTO
MENTO
Cantidad Posición de
la parrilla
Temperatura
(°C)
Tiempo (min)
1-1,5 kg 1 150-170 100-120
1-1,5 kg 1 160-180 40-60
Cantidad Posición de
la parrilla
200 - 250 g
1 200-220 30-50
Temperatura
(°C)
Tiempo (min)
cada trozo
1 190-210 35-50
cada trozo
Pescado (al vapor)
TIPO DE ALI-
MENTO
Pescado ente-
Cantidad Posición de
la parrilla
Temperatura
(°C)
Tiempo (min)
1-1,5 kg 1 210-220 40-60
ro hasta
8.7 Descongelar
TIPO DE
ALIMENTO
(g)
desconge-
lación
(min)
Pollo 1000 100-140 20-30
Carne 1000 100-140 20-30
Carne 500 90-120 20-30
Trucha 150 25-35 10-15 -
Tiempo de
Tiempo de
descongela-
ción adicional
(min)
Notas
Coloque el pollo sobre
un plato puesto del re-
vés sobre otro mayor.
Déle la vuelta a media
cocción.
Déle la vuelta a media
cocción.
Déle la vuelta a media
cocción.
Page 43

ESPAÑOL 43
TIPO DE
ALIMENTO
Fresas 300 30-40 10-20 Mantequilla 250 30-40 10-15 -
Nata 2 x 200 80-100 10-15
Pasteles 1400 60 60 -
(g)
Tiempo de
desconge-
lación
(min)
Tiempo de
descongela-
ción adicional
(min)
Notas
La nata se puede
montar perfectamente
incluso aunque que-
den puntos ligeramen-
te congelados.
8.8 Secar - Turbo
Cubra las bandejas con papel de hornear.
VERDURAS
TIPO DE ALI-
MENTO
Judías 3 1/4 60-70 6-8
Pimientos 3 1/4 60-70 5-6
Verduras para
sopa
Setas 3 1/4 50-60 6-8
Hierbas aro-
máticas
Posición de la parrilla
1 nivel 2 niveles
3 1/4 60-70 5-6
3 1/4 40-50 2-3
Temperatura
(°C)
Tiempo (h)
FRUTA
TIPO DE ALI-
MENTO
Ciruelas 3 1/4 60-70 8-10
Albaricoques 3 1/4 60-70 8-10
Manzana en
rodajas
Peras 3 1/4 60-70 6-9
Posición de la parrilla
1 nivel 2 niveles
3 1/4 60-70 6-8
9. MANTENIMIENTO Y LIMPIEZA
ADVERTENCIA
Consulte los capítulos sobre seguridad.
Temperatura
(°C)
• Limpie la parte delantera del aparato
con un paño suave humedecido en
agua templada y jabón neutro.
• Limpie las superficies metálicas con jabón neutro.
Tiempo (h)
Page 44

www.electrolux.com
44
• Limpie el interior del horno después de
• Elimine la suciedad resistente con lim-
• Limpie todos los accesorios del horno
• No trate los recipientes antiadherentes
9.1 Limpieza pirolítica
1.
2.
3.
cada uso. Así podrá retirar la suciedad
más fácilmente e impedirá que se queme.
piadores especiales para hornos.
después de cada uso y deje que se sequen. Utilice un paño suave humedecido en agua templada y jabón neutro.
con productos agresivos u objetos
punzantes ni los lave en el lavavajillas.
Podría dañar el esmalte antiadherente.
Aparatos de acero inoxidable
o aluminio:
Limpie la puerta del horno únicamente con una esponja húmeda.
Séquela con un paño suave.
No utilice productos abrasivos,
ácidos ni estropajos de acero, ya
que pueden dañar la superficie del
horno. Limpie el panel de control
del horno teniendo en cuenta las
mismas precauciones.
ADVERTENCIA
El aparato se calienta mucho.
Puede quemarse.
PRECAUCIÓN
No utilice la función de limpieza
pirolítica y la placa de cocción al
mismo tiempo (si está instalada en
el aparato). El aparato podría dañarse.
Retire todos los accesorios y carriles
de apoyo extraíbles (en su caso) del
aparato. Consulte la sección "Retirar
los carriles de apoyo".
PRECAUCIÓN
No deje los carriles de apoyo extraíbles en el aparato durante la
limpieza pirolítica. Podrían producirse daños.
Elimine a mano la suciedad más
gruesa.
Cierre completamente la puerta del
horno.
El procedimiento de limpieza pirolítica no puede empezar hasta que
no cierre la puerta del horno.
4.
Ajuste la función de limpieza pirolítica.
Consulte "Funciones del horno".
5.
Cuando parpadea, pulse + o -
para ajustar el procedimiento necesario:
– P1 - si el horno no está muy sucio.
El procedimiento tiene una duración de 1 hora.
– P2 - si el horno está más sucio. El
procedimiento tiene una duración
de 1 hora y 30 minutos.
6.
Pulse para iniciar el procedimiento. Puede utilizar la función Fin para
retrasar el inicio de la limpieza.
Cuando el horno alcanza la temperatura programada, la puerta se bloquea. La pantalla muestra el símbolo
y las barras del indicador de calor.
Para detener la limpieza Pirolítica
antes de que termine, gire el mando de las funciones del horno
hasta la posición de desconexión.
Al final de la limpieza pirolítica, la pantalla
indica la hora. La puerta del horno permanece bloqueada. Cuando el aparato se
enfría de nuevo, se emite una señal acústica y la puerta se desbloquea.
Durante la limpieza pirolítica, la
lámpara permanece apagada.
Aviso de limpieza
Para recordarle que el necesario realizar
una limpieza Pirolítica, PYR parpadea en
la pantalla durante 10 segundos después
de cada activación y desactivación del
aparato.
El recordatorio de la limpieza se
apaga:
• Cuando termina la función de limpieza
Pirolítica
• Si pulsa + y - al mismo tiempo mientras
PYR parpadea en la pantalla.
9.2 Bombilla del horno
ADVERTENCIA
Tenga cuidado al cambiar la bombilla del horno. Existe riesgo de
descarga eléctrica.
Page 45

Antes de cambiar la bombilla del
horno:
•Apague el horno.
• Retire los fusibles de la caja de fusibles
o desconecte el disyuntor.
Coloque un paño en el fondo del
horno para proteger la luz y la tapa de cristal.
Coja siempre la bombilla halógena
con un paño para evitar quemar
los residuos de grasa.
1.
Gire la tapa de cristal hacia la izquierda para extraerla.
2.
Limpie la tapa de cristal.
3.
Cambie la bombilla del horno por otra
preparada para soportar temperaturas de hasta 300 °C.
Utilice una bombilla de horno del mismo tipo.
4.
Coloque la tapa de cristal.
9.3 Limpieza de la puerta del
horno
La puerta del horno tiene cuatro paneles
de cristal. Es posible retirar la puerta del
horno y los paneles de cristal interiores
para limpiarlos.
PRECAUCIÓN
No utilice el aparato sin los paneles de cristal.
La puerta del horno puede cerrarse si intenta retirar los paneles de
cristal antes de quitar la puerta.
Extracción de la puerta del horno y del panel de cristal
1.
Abra completamente la puerta e identifique la bisagra del lado derecho de
la puerta.
2.
Empuje el componente de apriete
hasta que retroceda.
ESPAÑOL 45
3.
Sujete el componente con una mano.
Utilice un destornillador con la otra
mano para levantar y girar la palanca
de la bisagra derecha.
Page 46

www.electrolux.com
46
4.
Identifique la bisagra del lado izquierdo de la puerta.
5.
Levante y gire la palanca de la bisagra izquierda.
6.
Cierre la puerta del horno hasta la
primera posición de apertura (hasta
la mitad). A continuación, tire de la
puerta hacia adelante para desencajarla.
Page 47

ESPAÑOL 47
7.
Coloque la puerta sobre una superficie estable y protegida por un paño
suave.
8.
Suelte el sistema de bloqueo para retirar los paneles de cristal.
9.
Gire los dos pasadores en un ángulo
de 90° y extráigalos de sus asientos.
90°
10.
Levante con cuidado (paso 1) y retire
(paso 2) los paneles de cristal uno a
uno. Empiece por el panel superior.
11.
Limpie los paneles de cristal con
agua y jabón. Seque los paneles de
cristal con cuidado.
2
1
Page 48

www.electrolux.com
48
Instalación de la puerta y los paneles de cristal
AB C
Una vez finalizada la limpieza, instale los
paneles de cristal y la puerta del horno.
Lleve a cabo los pasos anteriores en orden inverso.
Asegúrese de que vuelve a colocar los
paneles de cristal (A, B y C) en el orden
correcto. El panel central (B) tiene un marco decorativo. La cara impresa debe mirar hacia el interior de la puerta. Después
de la instalación, asegúrese de que la superficie del marco del panel de cristal (B)
de las caras impresas no esté áspera al
tacto.
Asegúrese de que coloca el panel superior en los soportes correctos.
10. QUÉ HACER SI…
ADVERTENCIA
Consulte los capítulos sobre seguridad.
Problema Posible causa Solución
El horno no calienta. El aparato está desactiva-
El horno no calienta. El reloj no está en hora. Ajuste la hora. Consulte
El horno no calienta. No se han elegido las
El horno no calienta. La desconexión automáti-
do.
funciones necesarias.
ca está activada.
Active el aparato.
"Programación del reloj".
Asegúrese de que los
ajustes sean correctos.
Consulte el apartado
"Desconexión automática".
Page 49

Problema Posible causa Solución
El horno no calienta. El bloqueo de seguridad
para niños está activado.
Consulte "Desactivación
del bloqueo de seguridad
para niños".
El horno no calienta. Ha saltado un fusible de
la caja de fusibles.
Compruebe el fusible. Si
el fusible salta más de
una vez, póngase en
contacto con un electricista cualificado.
La bombilla del horno no
funciona.
La Pirólisis no se inicia.
La pantalla muestra C3.
La bombilla del horno está defectuosa.
La puerta no se ha cerrado totalmente o el blo-
Sustituya la bombilla del
horno.
Cierre bien la puerta.
queo de puerta es defectuoso.
La pantalla muestra
F102.
La puerta no se ha cerrado totalmente o el blo-
1.
2.
queo de puerta es defectuoso.
3.
El horno no calienta. La
pantalla muestra Demo.
Está activado el modo de
demostración.
1.
2.
3.
4.
5.
6.
ESPAÑOL 49
Cierre bien la puerta.
Apague el aparato
con el fusible doméstico o el interruptor
de seguridad de la
caja de fusibles y enciéndalo de nuevo.
Si vuelve a aparecer
F102 en pantalla,
póngase en contacto
con el servicio técnico.
Apague el aparato.
Mantenga pulsada la
tecla +.
Cuando se emita una
señal acústica, gire el
mando de las funciones del horno a la primera función. Demo
parpadea en la pantalla.
Gire el mando del
horno a la posición
de apagado.
Suelte la tecla +.
Gire el mando del ter-
mostato hacia la derecha tres veces. La
señal acústica suena
tres veces. Está desactivado el modo de
demostración.
Page 50

www.electrolux.com
50
La pantalla muestra un
código de error que no figura en esta lista.
Se acumulan vapor y
condensación en los alimentos y en el horno.
Si no lograra subsanar el problema, diríjase al Centro de servicio técnico.
Los datos necesarios para el servicio técnico están en la placa de características.
Es conveniente que los anote aquí:
Modelo (MOD.) .........................................
Número de producto (PNC) .........................................
Número de serie (S.N.) .........................................
Problema Posible causa Solución
Hay un fallo electrónico.
1.
Apague el aparato
con el fusible doméstico o el interruptor
de seguridad de la
caja de fusibles y enciéndalo de nuevo.
2.
Si vuelve a aparecer
el código de error,
póngase en contacto
con el Centro de servicio técnico.
Los platos han permanecido en el horno demasiado tiempo.
No deje los platos en el
horno más de 15-20 minutos tras finalizar el proceso de cocción.
La placa de características se encuentra
en el marco delantero de la cavidad del
aparato.
11. INSTALACIÓN
ADVERTENCIA
Consulte los capítulos sobre seguridad.
11.1 Empotrado
558
573
min. 550
548
20
589
594
5
590
20
min. 560
Page 51

min. 550
20
600
min. 560
A
11.2 Instalación eléctrica
ADVERTENCIA
Deje la instalación eléctrica en
manos de un profesional cualificado.
ESPAÑOL 51
El fabricante declina toda responsabilidad si la instalación no se
efectúa siguiendo las instrucciones de seguridad del capítulo “Información sobre seguridad”.
El aparato se suministra con enchufe y
cable de red.
11.3 Cable
Tipos de cables adecuados para su instalación o cambio: H07 RN-F, H05 RN-F,
H05 RRF, H05 VV-F, H05 V2V2-F (T90),
H05 BB-F.
B
En lo que respecta a la sección del cable,
consulte la potencia total (que figura en la
placa de características) y la tabla:
Potencia total Sección del cable
máximo de
3 x 0,75 mm²
1380 W
máximo de
3 x 1 mm²
2300 W
máximo de
3 x 1,5 mm²
3680 W
El cable de tierra (cable verde/amarillo)
debe tener 2 cm más que los cables de
fase y del neutro (cables azul y marrón).
12. ASPECTOS MEDIOAMBIENTALES
residuos de aparatos eléctricos y
Recicle los materiales con el símbolo
Coloque el material de embalaje en los
contenedores adecuados para su
reciclaje.
Ayude a proteger el medio ambiente y la
salud pública, así como a reciclar
.
electrónicos. No deseche los aparatos
marcados con el símbolo
residuos domésticos. Lleve el producto a
su centro de reciclaje local o póngase en
contacto con su oficina municipal.
junto con los
Page 52

www.electrolux.com/shop
397314901-B-102013
 Loading...