

AEG-Electrolux EKM6717X User Manual
Mixed-Fuel Cooker
INSTRUCTION BOOKLET
35692-0501
Mod. EKM 6717 X
PH-VN-TH

Important safety information
This warnings has been given for the safety of you and others. We therefore ask you to carefully read the procedures of
installing and using this cooker.
Installation
• The work of installation must be carried out by
competent and qualified installers according to the
regulations in force.
• Any modifications to the domestic electrical mains
which may be necessary for the installation of the
appliance should be carried out only by competent
personnel.
• Ensure a good ventilation around the appliance. A poor
air supply could cause lack of oxygen.
• This appliance is not connected to a combustion
products evacuation device. It must be installed and
connected in accordance with current installation
regulations. Particular attention shall be given to the
relevant requirements regarding ventilation.
• The use of a gas cooking appliance results in the
production of heat and moisture in the room in which
it is installed. Ensure that the kitchen is well ventilated: keep natural ventilation holes open or install a
mechanical ventilation device (mechanical extractor
hood).
• Prolonged intensive use of the appliance may call for
additional ventilation, for example opening of a window, or more effective ventilation, for example increasing the level of mechanical ventilation where present.
• Avoid installation of the cooker near inflammable
material (e.g. curtains, tea towels, etc.).
• Supply the appliance with the type of gas stamped
on the relevant adhesive label situated in the immediate vicinity of the gas connection tube.
• The appliance has to be placed on the floor and it
cannot be placed on a base.
Child Safety
• This appliance has been designed for use by adults.
Take care, therefore, that children do not attempt to
play with it.
• The appliance remains hot for a long time after being
switched off. Supervise children at all times, paying
attention that they do not touch surfaces or remain
in the vicinity of the appliance when in use or when
not completely cooled.
During Operation
• This product is intended for the cooking of food and
must not be used for other purposes.
• It is dangerous to modify, or attempt to modify, the
characteristics of this appliance.
• The appliance becomes very hot with use, and retain
their heat for a long period after use. Care should be
taken to avoid touching heating elements inside the
oven.
• Always stand back from the oven when opening
the oven door during cooking or at the end of it
to allow any build up of steam or heat to release.
• Unstable or deformed pans should not be placed on
the burners or plates in order to avoid accidents
caused by upsetting or boiling over.
• Particular care should be taken when cooking with
oil or fat.
• If the appliance is fitted with a cover, its function is to
protect the surface from dust when closed and to accumulate splashes of grease when open. Do not use
for other purposes.
• Always clean the cover, if present, before closing.
• Leave the burners and/or plates to cool before closing
the cover (if present).
• All the covers (if present), in plate glass or enamel,
are removable to facilitate cleaning.
• Always ensure that the knobs are in the « »
(Stop) position when the appliance is not in use.
• Always insert the dripping pan when using the grill or
when cooking meat on the grid. Pour a little water
into the dripping pan to avoid grease burning and
creating unpleasant smells.
• Always use oven gloves to remove dishes from the
oven.
• The oven accessories should be washed before using
for the first time.
• Take care when using cleaning products in spray
form: never direct the spray onto the resistance or the
thermostat bulb.
• If, when placing food in the oven, or when removing it,
a large quantity of oil, juice, etc. spills onto the
bottom of the oven, re-clean before starting to cook
to avoid unpleasant smoke and also the possibility
of these substances catching fire.
• For reasons of hygiene and safety this appliance
must always be kept clean. A build up of grease or
other food can cause fires.
• This appliance cannot be cleaned with steam or with
a steam cleaning machine.
• The holes on the bottom of the oven must never be
obstructed. Do not cover the sides of the oven with
aluminium foil, in particular the lower part of the
opening.
• The appliance is heavy, move it carefully.
• Before maintenance and cleaning disconnect the
appliance and allow to cool.
• To facilitate ignition, light the burners before
placing pans on the grid. After having lit the
burners check that the flame is regular.
• Always lower the flame or turn it off before removing
the pan.
• Ensure that the oven grids are inserted correctly.
• If there are self-cleaning panels they should only be
cleaned with soap and water (see cleaning
instructions).
• Only heat-resistant plates may be placed in the
drawer situated under the oven.Do not put
combustible materials there.
Service
• In case of repairs, do not attempt to correct yourself.
Repairs carried out by unqualified persons can cause damage. Contact an authorized Technical
Assistance Centre and insist an original spareparts.
2
Contents
For the user
Important safety information 2
Control panel 4
Using the hob 5
Electric hotplate control 6
Hints and Tips 7
Electric oven 8
Before the first use of the appliance 10
Using the oven 11
Suggestions for using the hob 12
Suggestions for using the oven 13
Cooking tables 16
Cleaning and maintenance 18
Cleaning the oven 19
Something not working 22
Service and spare parts 22
For the installer
Instructions for the installer 23
Installation 24
Gas connection 25
Electrical connection 26
Environmental Information
• After installation, please dispose of the packaging with
due regard to safety and the environment.
• When disposing of an old appliance, make it unusable,
by cutting off the cable.
The symbol on the product or on its packaging
indicates that this product may not be treated as
household waste. Instead it shall be handed over to the
applicable collection point for the recycling of electrical
and electronic equipment. By ensuring this product is
disposed of correctly, you will help prevent potential negative consequences for the environment and human
health, which could otherwise be caused by inappropriate
waste handling of this product. For more detailed
information about recycling of this product, please contact your local city office, your household waste disposal
service or the shop where you purchased the product.
It is very important that this instruction book
should be kept safely for future consultation. If
the appliance should be sold or given to
another person, please ensure that the booklet
goes together with it, so that the new owner
can know of the functions of the machine and
also be aware of the warnings.
Guide to Use the instructions
The following symbols will be found in the text to
guide you throughout the Instructions:
Safety Instructions
Step by step instructions for an operation
!
Hints and Tips
Environmental information
This appliance complies with the following
E.E.C. Directives:
• 73/23 - 90/683 (Low Voltage Directive);
• 89/336 (Electromagnetical Compatibility
Directive);
• 90/396 (Gas Appliance Directive);
• 93/68 (General Directives);
and subsequent modifications.
MANUFACTURER:
ELECTROLUX HOME PRODUCTS ITALY S.p.A.
Viale Bologna 298
47100 FORLÌ (Italy)
These instructions are only for the countries
stated by the symbol printed on the front cover
of this instruction book.
3

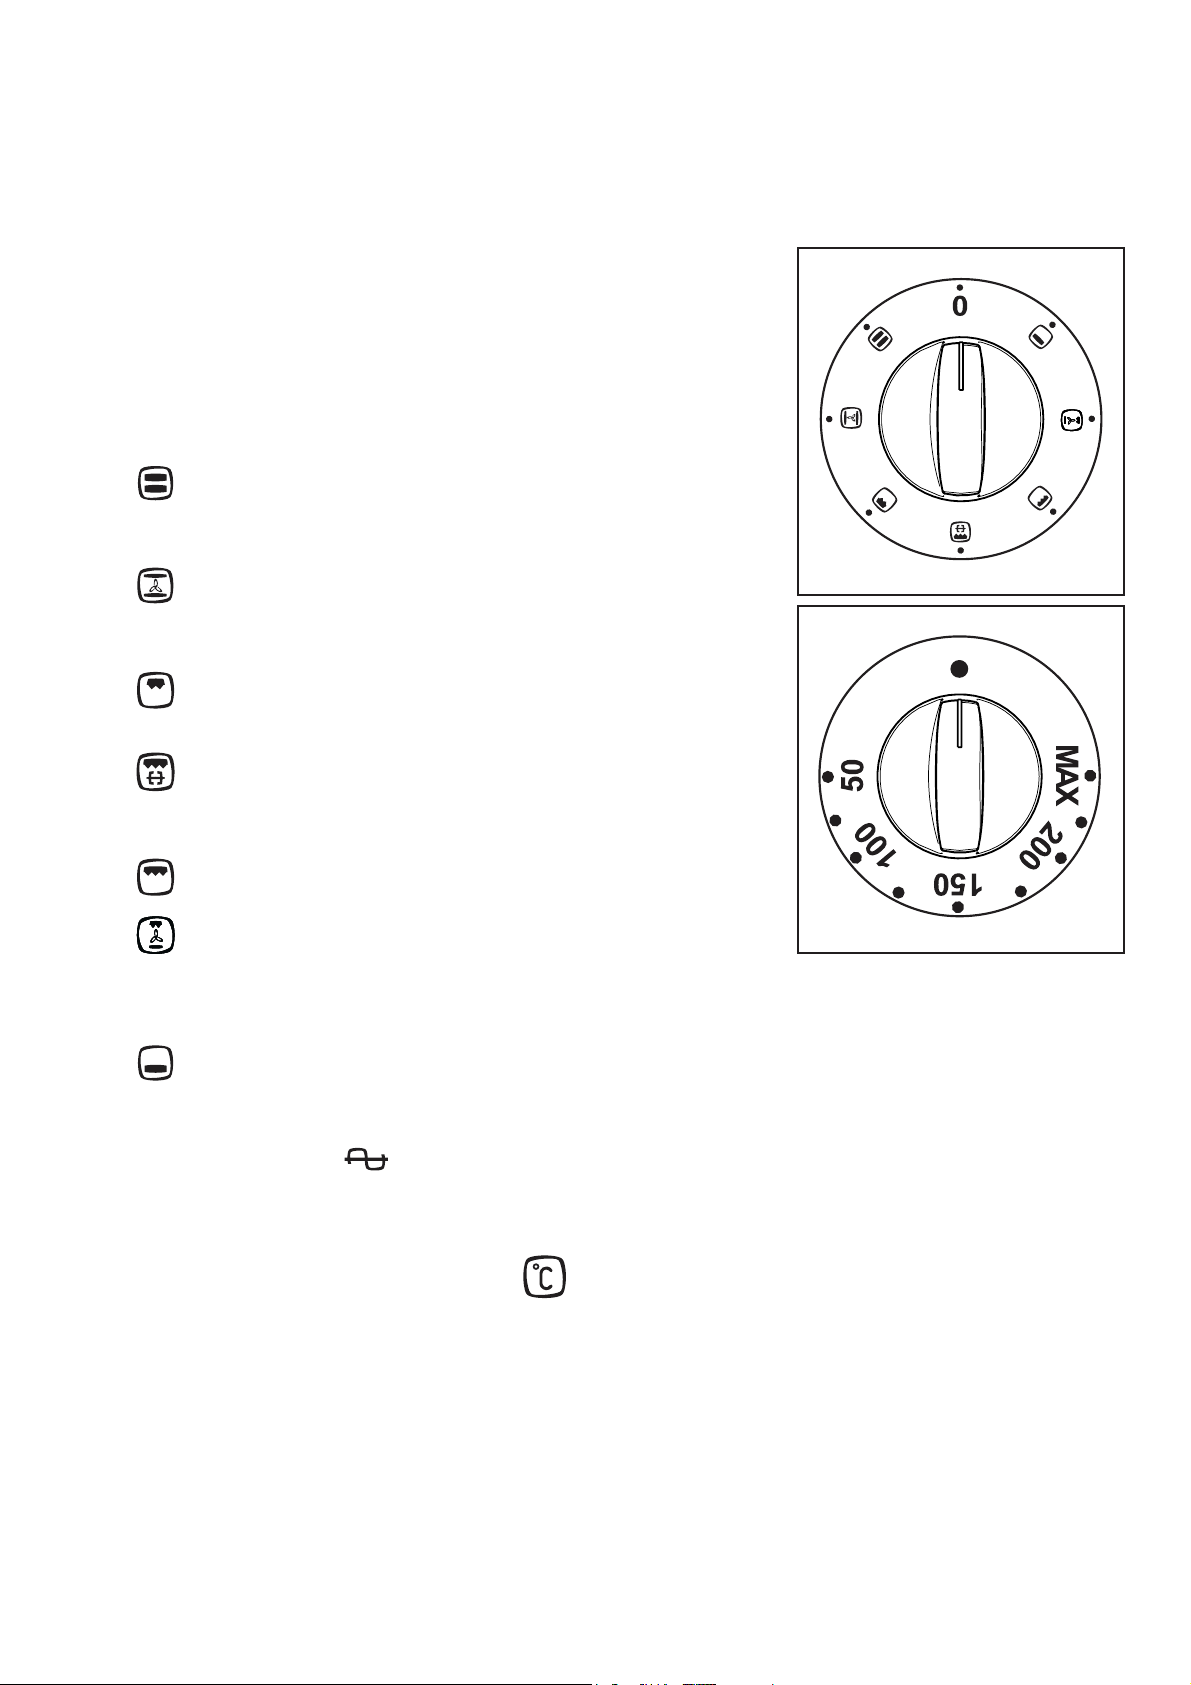
Control panel
1. Back left burner control knob (semi-rapid)
3. Front left burner control knob (rapid-triple crown)
3. Front right burner control knob (auxiliary)
4. Back right cast iron hotplate control knob
5. Oven function control knob
The Oven Cavity
Grill element
Oven Light
54321
6. Oven thermostat control knob
7. Minute minder
7. Mains on Light
9. Oven thermostat pilot light
6 7
Accessories
9
8
Baking Tray
4
Oven fan
Turnspit hole
Oven Shelf
Dripping Pan
Using the hob
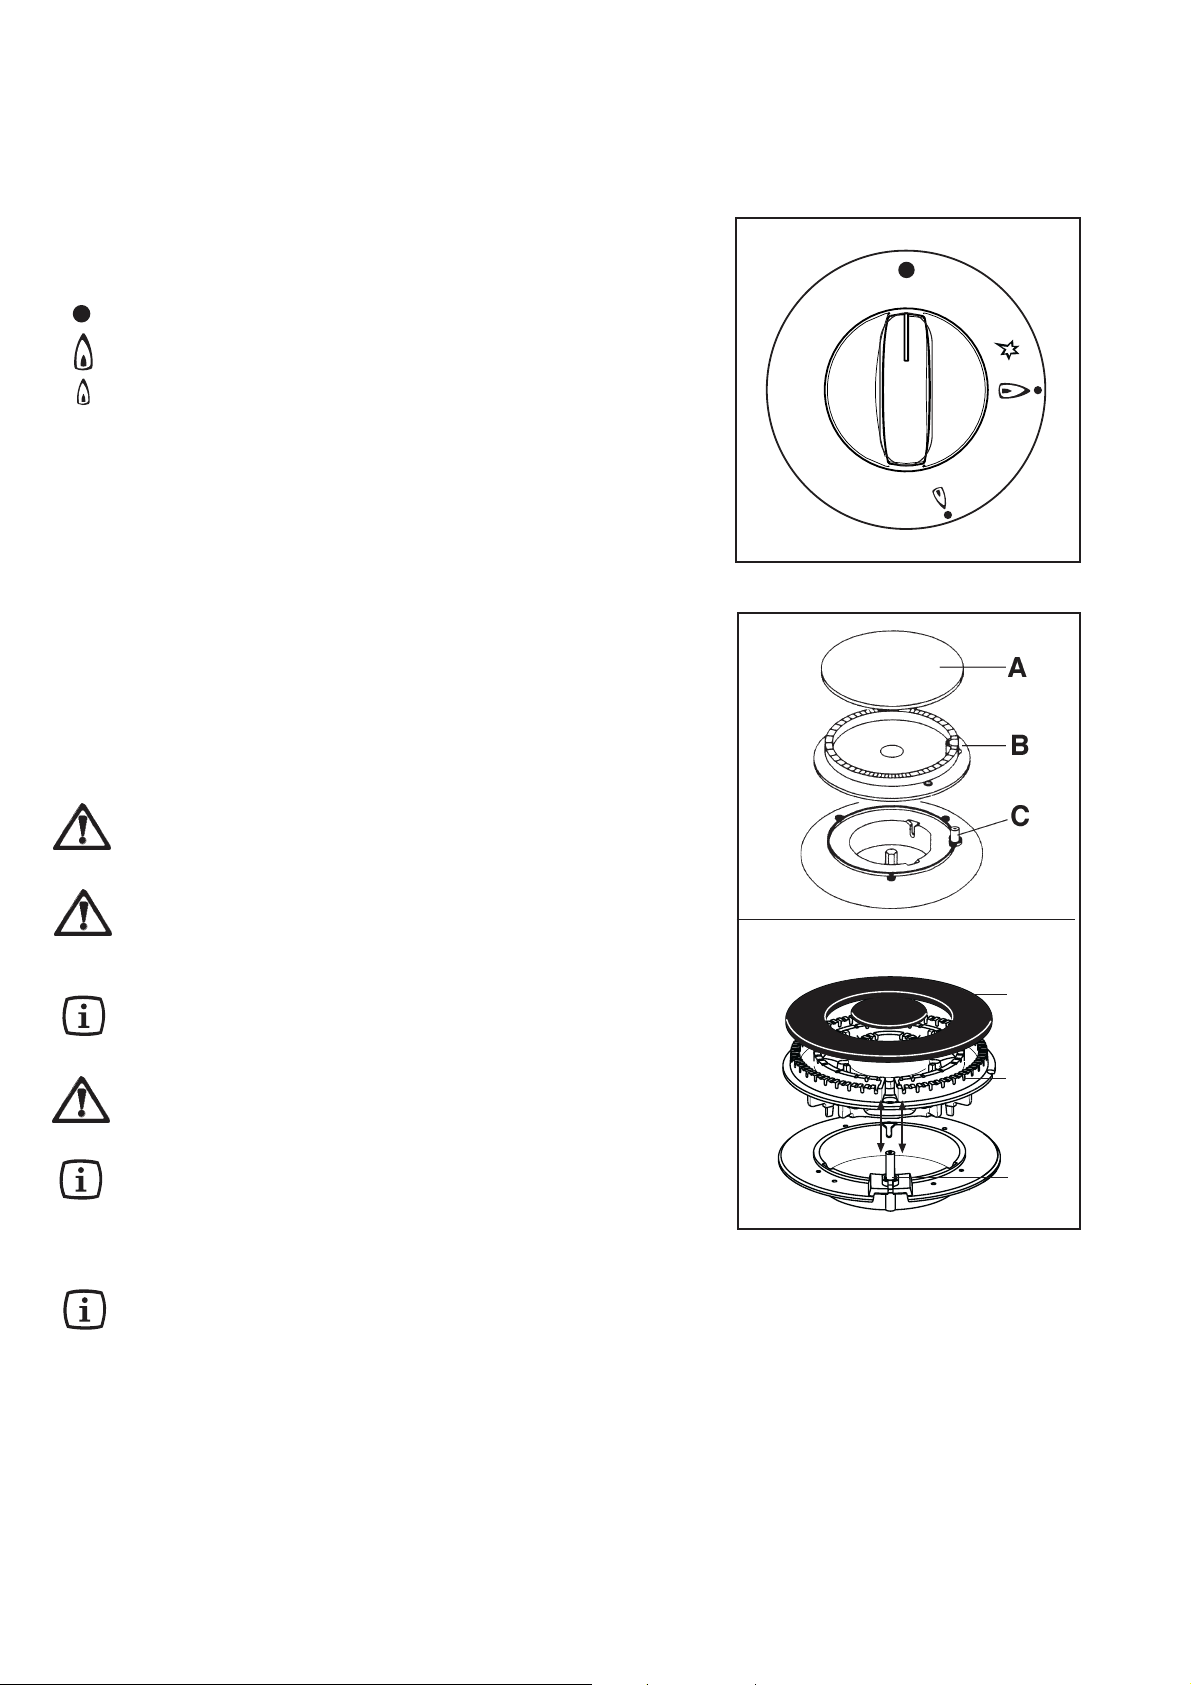
Control knobs on the gas hob
The knobs for using the gas hob of the cooker are found
on the control panel. The regulation knobs could be
turned in anti-clockwise direction until the small flame
symbol, and vice-versa for the larger symbol.
No gas supply
Maximum gas supply
Minimum gas supply
To light a burner:
!
1. push the relevant control knob in completely
and turn it anticlockwise to the maximum
position;
3. then, check the flame is regular and adjust it
as required.
If the burner does not ignite, turn the control knob to zero,
and try again.
If after a few attempts the burner does not ignite, check
that the burner cap and crown (see figure - A,B) are
correctly positioned.
To interrupt the supply of gas, turn the knob in a
clockwise direction to the position """.
When switching on the mains, after installation or
a power cut, it is quite normal for the spark
generator to be activated automatically.
If you use a saucepan which is smaller than
the recommended size, the flame will spread
beyond the bottom of the pan, causing the
handle to overheat.
As soon as a liquid starts boiling, turn down the
flame so that it will barely keep the liquid
simmering.
Take care when frying food in hot oil or fat,
as the overheated splashes could easily
ignite.
If the control knobs become difficult to turn, please
contact your local Service Force Centre.
Triple-crown burner
Always ignite the burner before putting the pans
on.
Triple-crown burner
A
B
C
A - Burner cap
B - Burner crown
C - Spark generator
If after a few attempts the burner does not ignite, check
that the burner cap and crown are correctly positioned.
5
Using the wok stand
A wok stand is provided to enable you to use a round
bottomed wok on the hob.The wok stand must only be
used on the triple crown burner and should not be used
with any other type of wok or pan.
When fitting the wok stand, ensure the recesses in the
frame fit securely onto the bars of the pan supports, as
shown in the picture.
To ensure maximum burner efficiency, you should only
use pots and pans with a flat bottom fitting the size of
the burner used (see table).
Burner minimum maximum
diameter diameter
Large (ultra-rapid
triple crown) 180 mm. 260 mm.
Medium (semi-rapid) 120 mm. 220 mm.
Small (auxiliary) 80 mm. 160 mm.
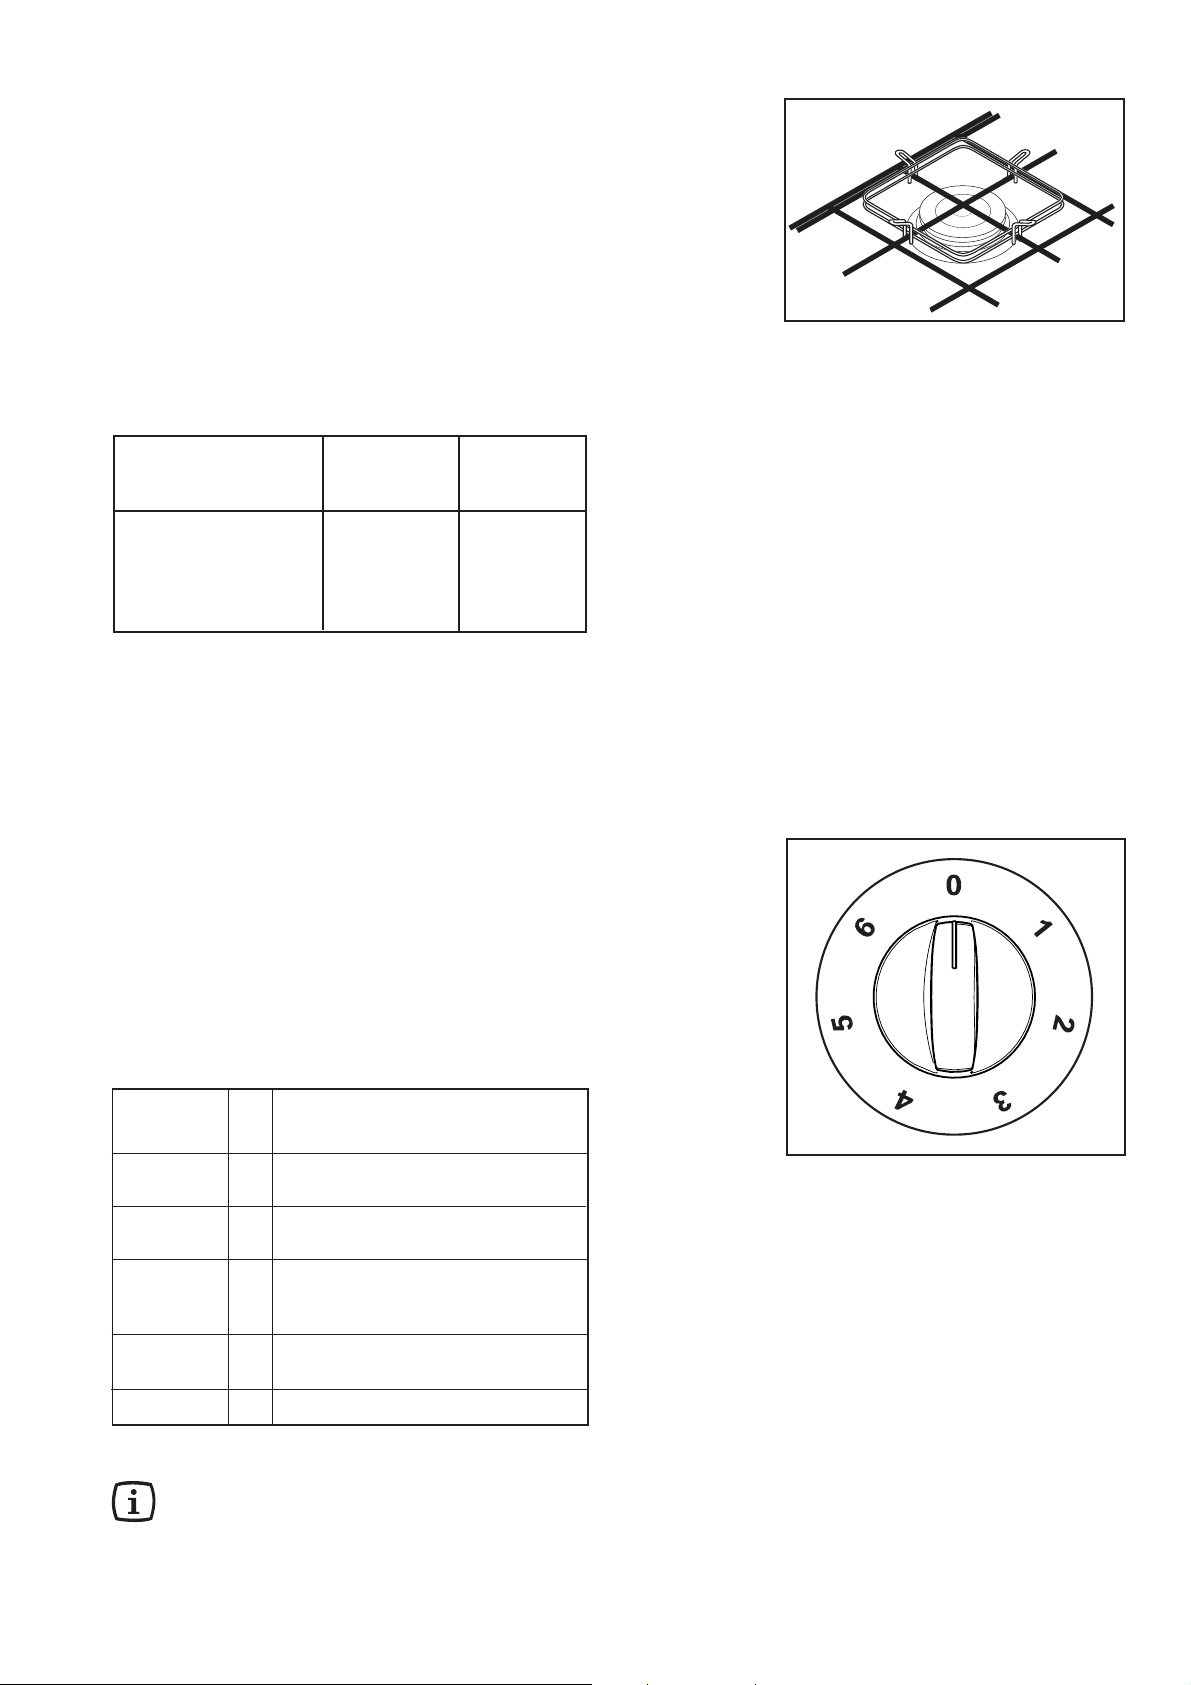
Electric hotplate control
To switch on the hotplate, turn the relevant control knob
to the required heat setting.
The control knob is numbered 1 - 6
0 - OFF
1 - Minimum
6 - Maximum.
We recommend the plate is switched to maximum (6) for
a short while to boost the plate, and then adjusted to the
required setting.
Suggestions for the correct setting of the plates are given
in the following table.
Very Gentle 1 To keep food warm
To melt butter and chocolate
Gentle 2 To prepare cream-sauces, stews
and milk puddings or to fry eggs
Slow 3 Dried vegetables, frozen food, fruit,
boiling water or milk
Medium 4 Boiled potatoes, fresh vegetables,
pâtés, soups, broths, pancakes or
fish
High 5 Larger stews, meat roll, fish,
omelettes, steaks
Fast 6 Steaks, escalopes and frying.
It is important to note that the plate may smoke
and produce a slightly unpleasant odour when used
for the first time. This is quite normal and will
disappear after a short while.
6

Hints and Tips
Saucepans for use on solid plates should have several
characteristics:
• They should be fairly heavy duty
• They should fit the heat area exactly, or be slightly
larger for efficient use, NEVER smaller.
• They should have a flat base to ensure good
contact with the plate.
This is particularly important when using pans for high
temperature frying or pressure cooking.
You can switch off the plate a short while before
you finish cooking, and the final stage will be
completed on the accumulated heat. Similarly,
stews etc. cooked in well covered saucepans cook
at lower temperature which is more economical.
Ensure pans are large enough to avoid liquids
being spilt onto the plates.
Never leave the plates on without a pan on them
or with an empty pan on them.
Take care never to lean or reach over a hot electric
plate. Always point pan handles inward or over the
work surface next to the hob to avoid accidentally
knocking over a pan as you pass by.
In models supplied with a cover, if it is made
of glass, it should not be closed when the
burners are still hot, as it could splinter.
Recommended pottery
Remember that a wide-bottomed pan allows a faster
cooking than a narrow one. Always use pots which
properly fit what you have to cook.
Particularly make sure that the pans are not too small
for liquids, since these could easily overflow.
Moreover, the pans should not be too large for a faster
cooking. In fact, grease and juices may spread on the
bottom and burn easily.
It is better to use non-openable moulds for baking cakes.
In fact, an openable mould lets juices and sugar leak
through, falling on the bottom of the oven and
consequently burning on the bottom of the baking tray,
making cleaning difficult.
Avoid putting plastic-handled pans in the oven as they
are not heat-proof. You should use pans with the right
diameter to fit the burner, in order to make the most out
of it, thus reducing gas consumption.
It is also advisable to cover any boiling casserole and,
as soon as the liquid starts boiling, lower the flame
enough to keep the boiling point.
The effects of dishes on cooking
results
Dishes and tins vary in their thickness, conductivity,
colour, etc. which affects the way they transmit heat to
the food inside them.
A Aluminium, earthenware, oven glassware and bright
shiny utensils reduce cooking and base browning.
B Enamelled cast iron, anodized aluminium, aluminium
with non-stick interior and coloured exterior and dark,
heavy utensils increase cooking and base browning.
7
Electric oven
Oven function and thermostat
control knobs
They enable to select the most appropriate type of
heating for the different cooking requirements by
appropriately connecting the heating elements and
adjusting temperature to the required level.
Turn the thermostat control knob clockwise to select
temperatures between 50°C and 230°C (MAX).
0 The oven is off.
Conventional cooking - The heat comes
from both the top and bottom element,
ensuring even heating inside the oven.
Fan cooking - This allows you to roast or roast
and bake simoultaneously using any shelf,
without flavour transference.
Inner grill - It can be used for grilling small
quantities.
Grill turnspit - The turnspit can be used for
either spit roasting meat or for kebabs and
smaller pieces of meat.
Full grill - The full grill element will be on.
Pizza - The bottom element provides direct
heat to the base of pizzas, quiches or pies,
while the fan ensures air is circulated to cook
the pizza toppings or pie fillings.
Bottom heating element - The heat comes
from the bottom of the oven only.
Mains on Light
The mains on light will come on when the oven function
control knob and/or the cooking zone control knob is set.
Oven thermostat pilot light
The thermostat control light will come on when the
thermostat control knob is turned. The light will remain on
until the correct temperature is reached. It will then cycle
on and off to show the temperature is being maintained.
8
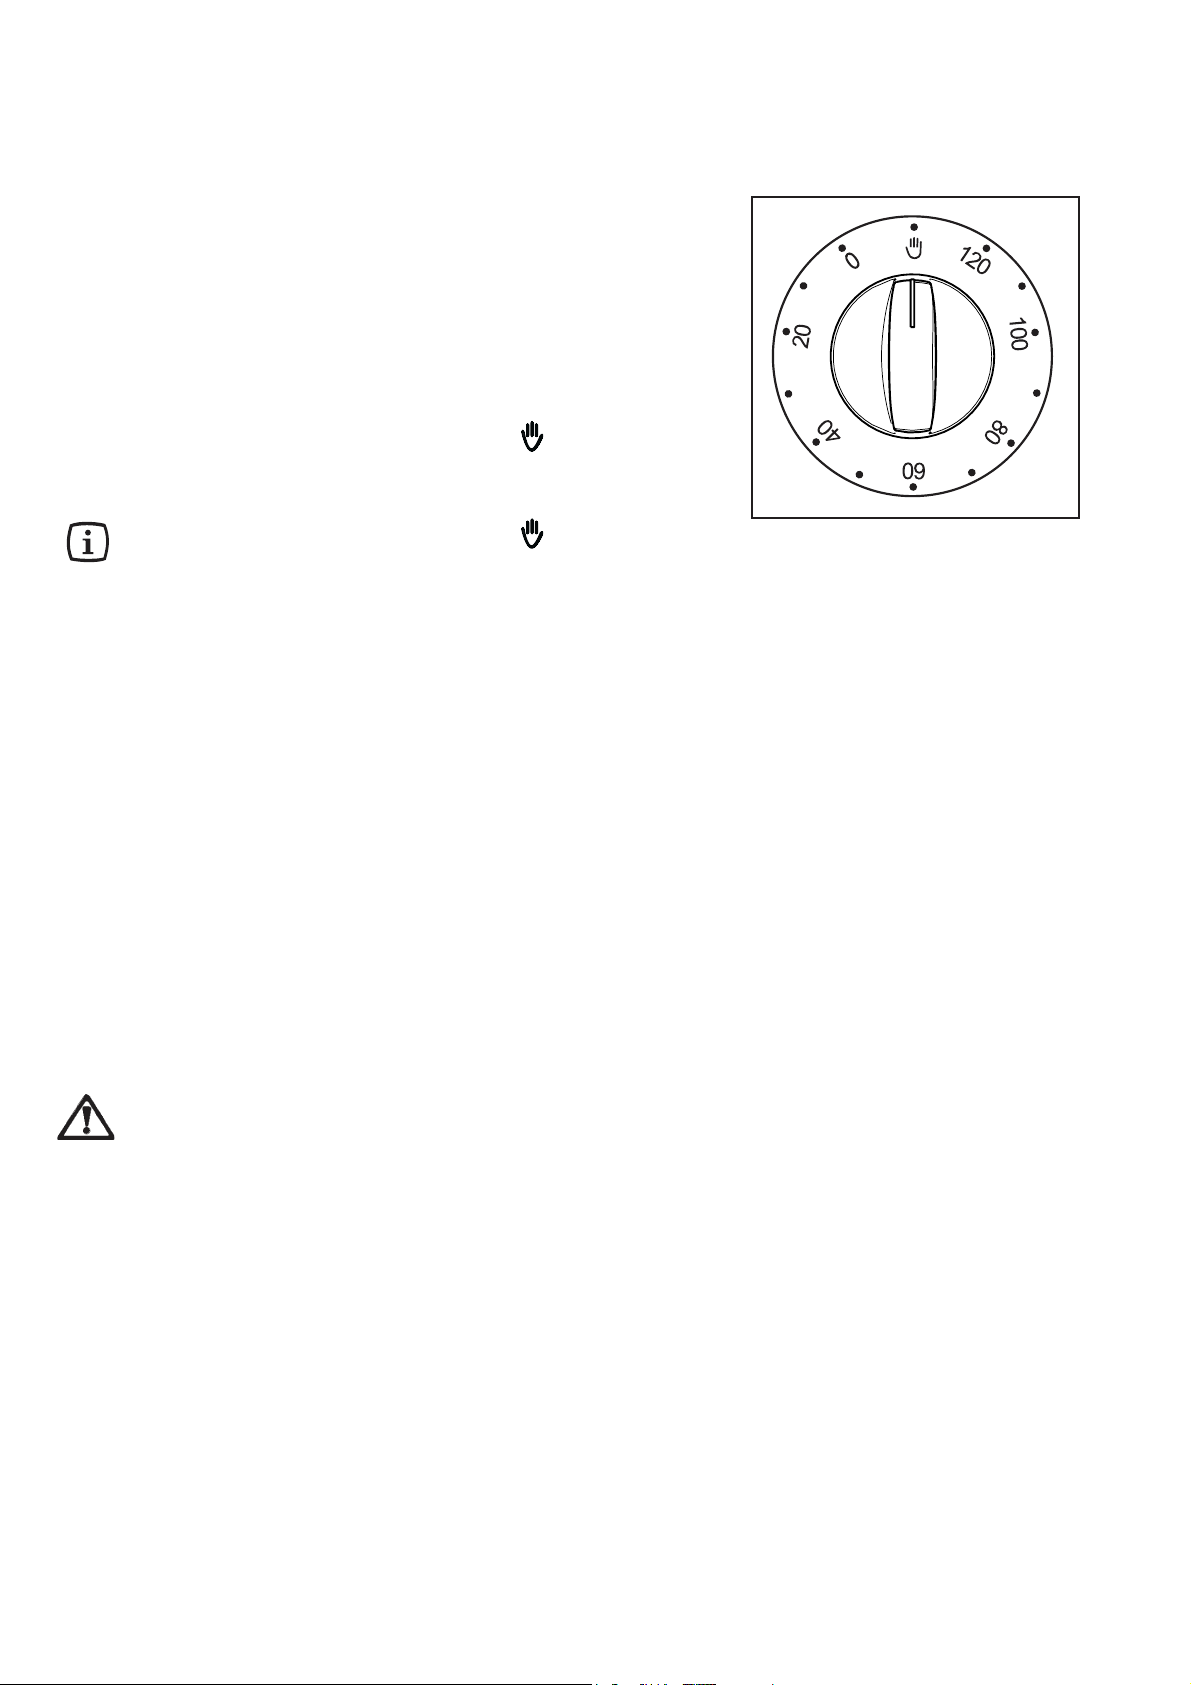
The minute minder
The minute minder will mark the end of a timed period
with an acoustic alarm. The maximum timing is 120
minutes.
To set the minute minder:
1. Select the desired cooking function with the oven
function control knob.
2. Turn the minute minder control knob clockwise
until the 120-minute position and then back to
the required time.
3. Once the pre-set time has elapsed, an acoustic
signal will be heard and the oven will automatically
switch off.
Turn the minute minder control knob to the
position and the oven function and thermostat
control knobs to OFF position.
Turn the minute minder control knob to the
position if you want to cook without setting a
timed period.
The safety thermostat
In order to avoid excessive overheating due to incorrect
use of the appliance or else to a faulty component, the
oven is equipped with a safety thermostat which cuts off
the power supply if necessary. Operation is restored
automatically when the oven temperature decreases to
normal values. Therefore, if the thermostat cuts in because
you have not been using the appliance correctly, the oven
can be used again simply by waiting for the appliance to
cool down. If, instead, the thermostat cuts in because of
a faulty component, you should call the Service
Department.
Storage drawer
The storage drawer is located underneath the oven cavity.
During cooking the storage drawer may become
hot if the oven is on high for a long period of time,
therefore flammable materials such as oven gloves,
tea towels, plastic aprons etc. should not be
stored in the drawer.
Oven accessories such as baking sheets, will also
become hot, therefore care should be taken when
removing these items from the drawer whilst the
oven is in use or still hot.
9
 Loading...