

Page 1
76301K-mn
Glaskeramik-Kochfeld
Ceramic glass hob
Montage- und Gebrauchsanweisung
Installation and Operating Instructions
Page 2

Sehr geehrte Kundin, sehr geehrter Kunde,
lesen Sie bitte diese Gebrauchsanweisung sorgfältig durch und bewahren Sie sie zum späteren Nachschlagen auf.
Geben Sie diese Gebrauchsanweisung an eventuelle Nachbesitzer des
Gerätes weiter.
Folgende Symbole werden im Text verwendet:
1 Sicherheitshinweise
Warnung! Hinweise, die Ihrer persönlichen Sicherheit dienen.
Achtung! Hinweise, die zur Vermeidung von Schäden am Gerät dienen.
3 Hinweise und praktische Tipps
2 Umweltinformationen
2
Page 3

Inhalt
Gebrauchsanweisung. . . . . . . . . . . . . . . . . . . . . . . . . . . . . . . . . . . . . . . 4
Sicherheitshinweise . . . . . . . . . . . . . . . . . . . . . . . . . . . . . . . . . . . . . . . . . . . . . 4
Gerätebeschreibung. . . . . . . . . . . . . . . . . . . . . . . . . . . . . . . . . . . . . . . . . . . . . 6
Ausstattung Kochfeld . . . . . . . . . . . . . . . . . . . . . . . . . . . . . . . . . . . . . . . . . . . . 6
Ausstattung Bedienfeld. . . . . . . . . . . . . . . . . . . . . . . . . . . . . . . . . . . . . . . . . . . 6
Touch Control-Sensorfelder . . . . . . . . . . . . . . . . . . . . . . . . . . . . . . . . . . . . 7
Anzeigen . . . . . . . . . . . . . . . . . . . . . . . . . . . . . . . . . . . . . . . . . . . . . . . . . . . . 8
Restwärmeanzeige . . . . . . . . . . . . . . . . . . . . . . . . . . . . . . . . . . . . . . . . . . . . 8
Bedienung des Geräts . . . . . . . . . . . . . . . . . . . . . . . . . . . . . . . . . . . . . . . . . . . 9
Gerät ein- und ausschalten . . . . . . . . . . . . . . . . . . . . . . . . . . . . . . . . . . . . . . . 9
Kochstufe einstellen . . . . . . . . . . . . . . . . . . . . . . . . . . . . . . . . . . . . . . . . . . . . . 9
Äußere Heizkreise ein- und ausschalten . . . . . . . . . . . . . . . . . . . . . . . . . . . . . 10
STOP+GO-Funktion ein- und ausschalten. . . . . . . . . . . . . . . . . . . . . . . . . . . . 10
Ankoch-Automatik verwenden . . . . . . . . . . . . . . . . . . . . . . . . . . . . . . . . . . . . 11
Kindersicherung verwenden . . . . . . . . . . . . . . . . . . . . . . . . . . . . . . . . . . . . . . . 12
Timer verwenden . . . . . . . . . . . . . . . . . . . . . . . . . . . . . . . . . . . . . . . . . . . . . . . . 13
Sicherheitsabschaltung . . . . . . . . . . . . . . . . . . . . . . . . . . . . . . . . . . . . . . . . . . . 16
Tipps zum Kochen und Braten. . . . . . . . . . . . . . . . . . . . . . . . . . . . . . . . . . . . 17
Kochgeschirr. . . . . . . . . . . . . . . . . . . . . . . . . . . . . . . . . . . . . . . . . . . . . . . . . . . . 17
Energiesparen. . . . . . . . . . . . . . . . . . . . . . . . . . . . . . . . . . . . . . . . . . . . . . . . . . . 17
Anwendungsbeispiele zum Kochen . . . . . . . . . . . . . . . . . . . . . . . . . . . . . . . . . 18
Reinigung und Pflege . . . . . . . . . . . . . . . . . . . . . . . . . . . . . . . . . . . . . . . . . . . 19
Was tun, wenn … . . . . . . . . . . . . . . . . . . . . . . . . . . . . . . . . . . . . . . . . . . . . . . . 20
Entsorgung . . . . . . . . . . . . . . . . . . . . . . . . . . . . . . . . . . . . . . . . . . . . . . . . . . . . 22
Montageanweisung . . . . . . . . . . . . . . . . . . . . . . . . . . . . . . . . . . . . . . . . 23
Service . . . . . . . . . . . . . . . . . . . . . . . . . . . . . . . . . . . . . . . . . . . . . . . . . . . . . . 25
Montage . . . . . . . . . . . . . . . . . . . . . . . . . . . . . . . . . . . . . . . . . . . . . . . . . . . . 50
3
Page 4

Gebrauchsanweisung
1 Sicherheitshinweise
Beachten Sie bitte diese Hinweise, da sonst bei auftretenden Schäden
3
der Garantieanspruch entfällt.
5 Dieses Gerät entspricht den folgenden EG-Richtlinien:
– 73/23/EWG vom 19.02.1973 Niederspannungs-Richtlinie
– 89/336/EWG vom 03.05.1989 EMV-Richtlinie einschließlich
Änderungs-Richtlinie 92/31/EWG
– 93/68/EWG vom 22.07.1993 CE-Kennzeichnungs-Richtlinie
Bestimmungsgemäße Verwendung
• Dieses Gerät darf nur für das haushaltsübliche Kochen und Braten
von Speisen verwendet werden.
• Das Gerät darf nicht als Arbeits- oder Abstellfläche verwendet werden.
• Umbauten oder Veränderungen am Gerät sind nicht zulässig.
• Brennbare Flüssigkeiten, leicht entzündliche Materialien oder
schmelzbare Gegenstände (z.B. Folien, Kunststoff, Aluminium) nicht
auf dem Gerät oder in dessen Nähe abstellen oder lagern.
Sicherheit für Kinder
• Kleinkinder grundsätzlich vom Gerät fernhalten.
• Größere Kinder nur unter Anleitung und Aufsicht am Gerät arbeiten
lassen.
Allgemeine Sicherheit
• Montage und Anschluss des Gerätes dürfen nur durch ausgebildete
und autorisierte Fachkräfte vorgenommen werden.
• Einbaugeräte dürfen nur nach dem Einbau in normgerechte, passende Einbauschränke und Arbeitsplatten betrieben werden.
• Bei Störungen am Gerät oder Schäden an der Glaskeramik (Brüche,
Sprünge bzw. Risse) muss das Gerät ausgeschaltet und vom Stromnetz getrennt werden, um einen möglichen elektrischen Schlag zu
vermeiden.
• Reparaturen am Gerät dürfen nur von ausgebildeten und autorisierten Fachkräften durchgeführt werden.
4
Page 5

Sicherheit während der Benutzung
• Aufkleber und Folien von der Glaskeramik entfernen.
• Am Gerät besteht beim unachtsamen Arbeiten Verbrennungsgefahr.
• Kabel von Elektrogeräten dürfen nicht an die heiße Geräteoberfläche
bzw. heißes Kochgeschirr gelangen.
• Überhitzte Fette und Öle entzünden sich schnell. Kochvorgänge mit
Fett oder Öl (z.B. Pommes frites) nicht unbeaufsichtigt lassen.
• Die Kochzonen nach jedem Gebrauch ausschalten.
Sicherheit beim Reinigen
• Zum Reinigen muss das Gerät ausgeschaltet und abgekühlt sein.
• Die Reinigung des Gerätes mit einem Dampfstrahl- oder Hochdruck-
reiniger ist aus Sicherheitsgründen nicht zugelassen.
Vermeidung von Schäden am Gerät
• Die Glaskeramik kann durch herabfallende Gegenstände beschädigt
werden.
• Stöße mit dem Kochgeschirr können den Rand der Glaskeramik beschädigen.
• Kochgeschirr aus Gusseisen, Aluguss oder mit beschädigten Böden
können beim Verschieben die Glaskeramik verkratzen.
• Schmelzbare Gegenstände und Überkochendes können auf der Glaskeramik einbrennen und sollten sofort entfernt werden.
• Die Kochzonen nicht mit leerem oder ohne Kochgeschirr benutzen.
5
Page 6
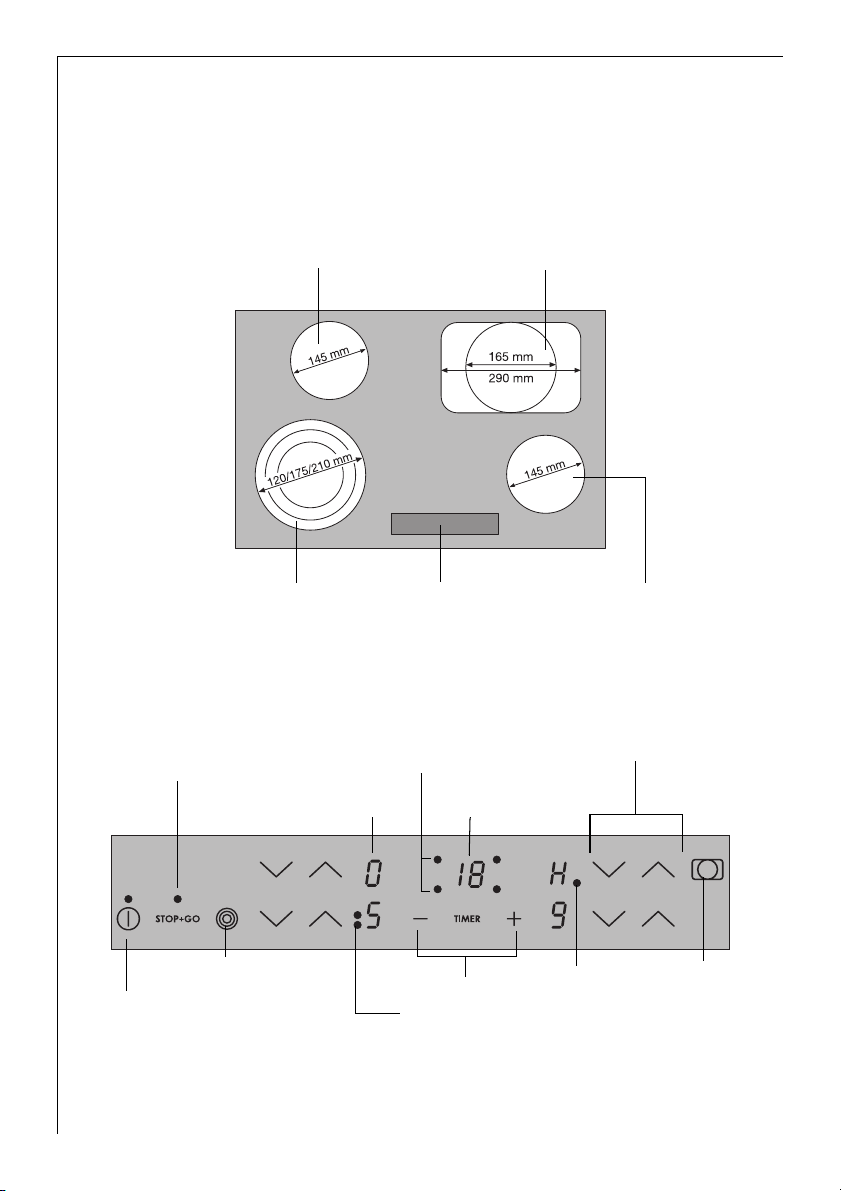
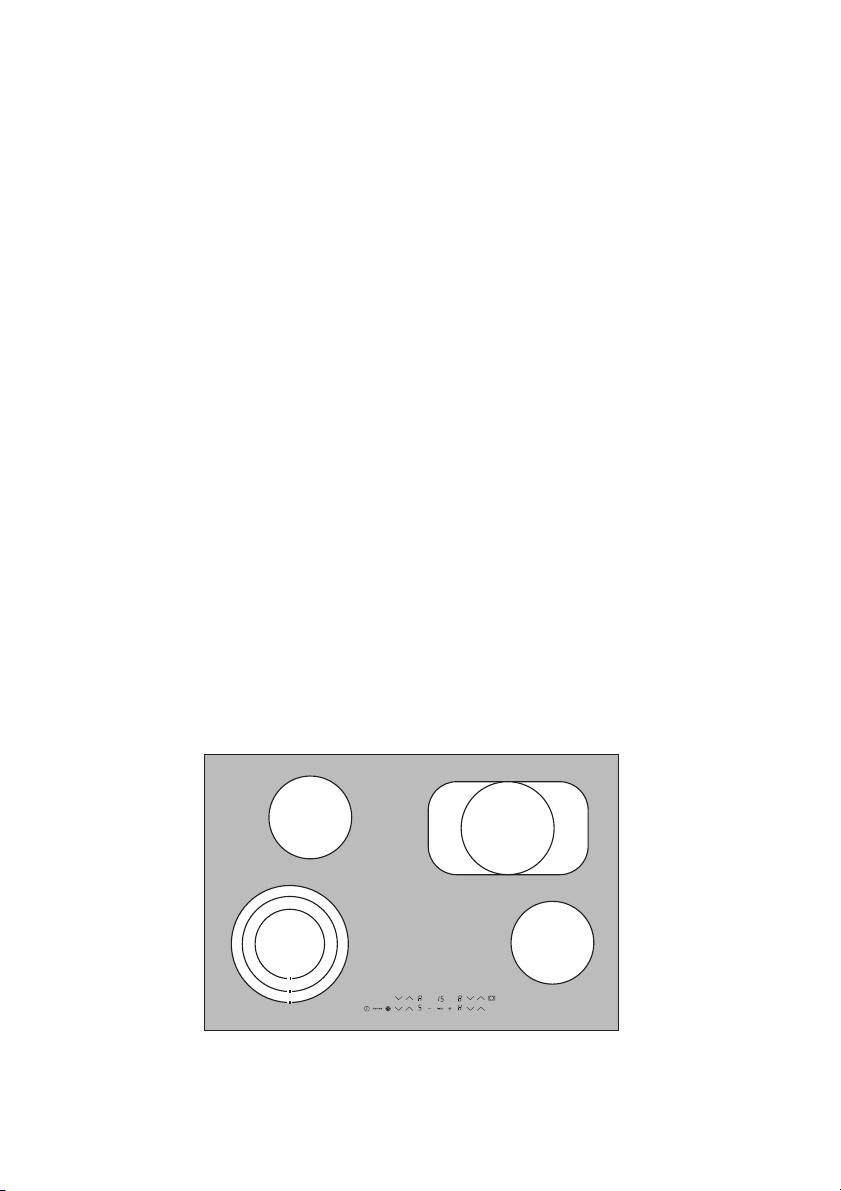
Gerätebeschreibung
Ausstattung Kochfeld
Singlecooking zone
1200W
Triple cooking zone
800/1600/2300W
Ausstattung Bedienfeld
STOP+GO
mit Kontrolllampe
Anzeige
Bräterzone
1500/2600W
Control panel Singlecooking zone
1200W
Kochzonenanzeigen
Timer-Funktion
Timer-Anzeige
Kochstufenwahl
Ein/Aus
mit Kontrolllampe
6
Äußerer/mittlerer Kreis
Ein/Aus
Timer
Kontrolllampen
Dreikreis
Kontrolllampe
Bräterzone
Äußerer Kreis
Ein/Aus
Page 7
Touch Control-Sensorfelder
Das Gerät wird mit Touch Control-Sensorfeldern bedient. Funktionen
werden durch Berühren der Sensorfelder gesteuert und von Anzeigen
und akustischen Signalen bestätigt.
Berührt werden die Sensorfelder von oben, ohne weitere Sensorfelder
zu verdecken.
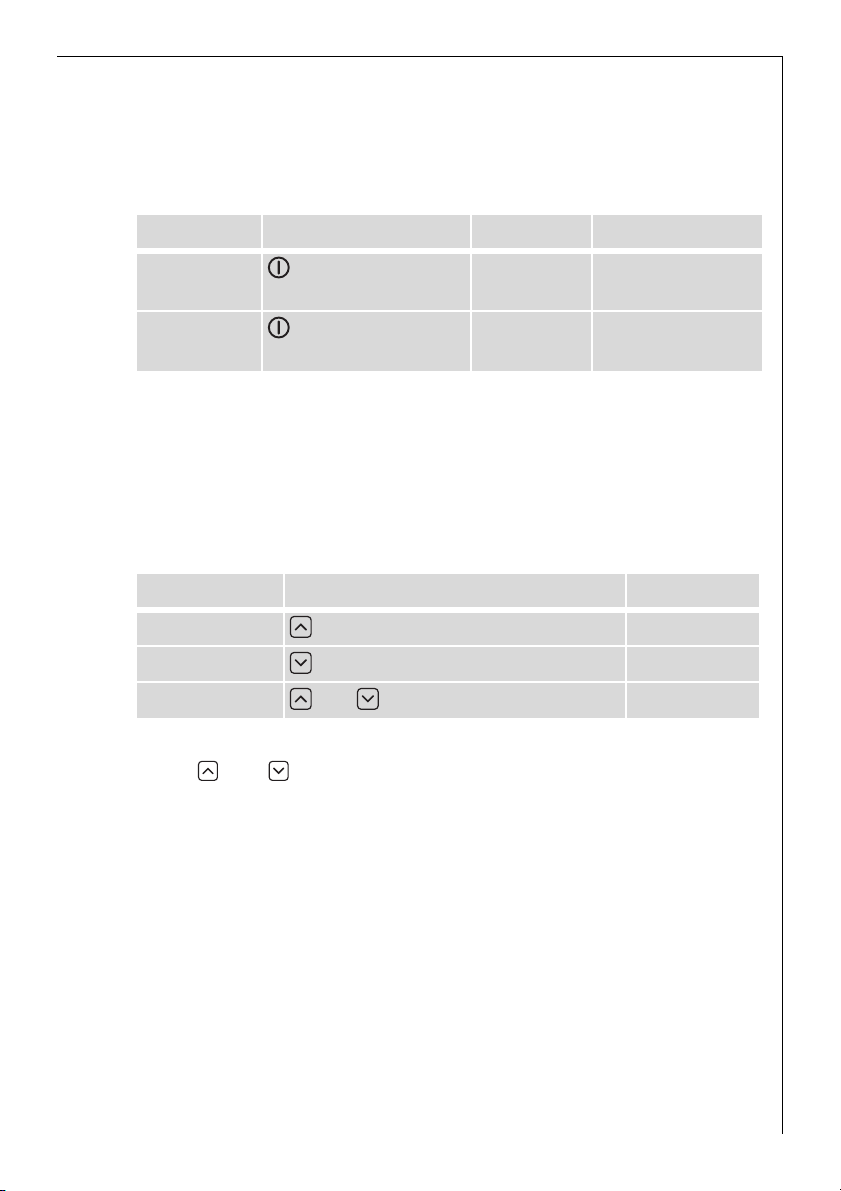
Sensorfeld Funktion
Ein / Aus Gerät ein- und ausschalten
Einstellungen erhöhen Kochstufe erhöhen
Einstellungen verringern Kochstufe verringern
TIMER Timer Timer Auswahl
Einstellungen erhöhen Timer-Zeit erhöhen
Einstellungen verringern Timer-Zeit verringern
Stop+Go Warmhaltestufe ein-/ausschalten
Dreikreis Schaltung Äußere Heizkreise
ein- und ausschalten
Bräterzone Äußeren Heizkreis ein- und aus-
schalten
7
Page 8
Anzeigen
Anzeige Beschreibung
¾ Kochzone ist ausgeschaltet
u Warmhaltestufe Warmhaltestufe/STOP+GO-Funk-
tion ist eingestellt
¿ - Ç Kochstufen Kochstufe ist eingestellt
2 - 6 Kochstufen mit
Dezimalpunkt
a Ankoch-Automatik Ankoch-Automatik ist aktiv
e Fehler Fehlfunktion ist aufgetreten
h Restwärme Kochzone ist noch warm
l Kindersicherung Verriegelung/Kindersicherung ist
_ Sicherheitsabschaltung Sicherheitsabschaltung ist aktiv
Zwischenstufe ist eingestellt
eingeschaltet
Restwärmeanzeige
1 Warnung! Verbrennungsgefahr durch Restwärme. Nach dem Ausschal-
ten brauchen die Kochzonen einige Zeit zum Abkühlen. Restwärmeanzeige
h beachten.
3 Restwärme kann zum Schmelzen und Warmhalten von Speisen genutzt
werden.
8
Page 9
Bedienung des Geräts
Gerät ein- und ausschalten
Bedienfeld Anzeige Kontrolllampe
Einschalten 2 Sekunden
berühren
Ausschalten 1 Sekunde
berühren
¾ / h leuchtet
h / keine erlischt
3 Nach dem Einschalten muss innerhalb von ca. 10 Sekunden eine Koch-
stufe oder eine Funktion eingestellt werden, sonst schaltet sich das Gerät automatisch aus.
Kochstufe einstellen
Bedienfeld Anzeige
Erhöhen berühren u bis Ç
Verringern berühren Ç bis ¾
Ausschalten und gleichzeitig berühren ¾
3 Die Warmhaltestufe u liegt zwischen ¾ und ¿. Die Warmhaltestufe
ist mit oder einstellbar. Sie dient zum Warmhalten von Speisen.
9
Page 10

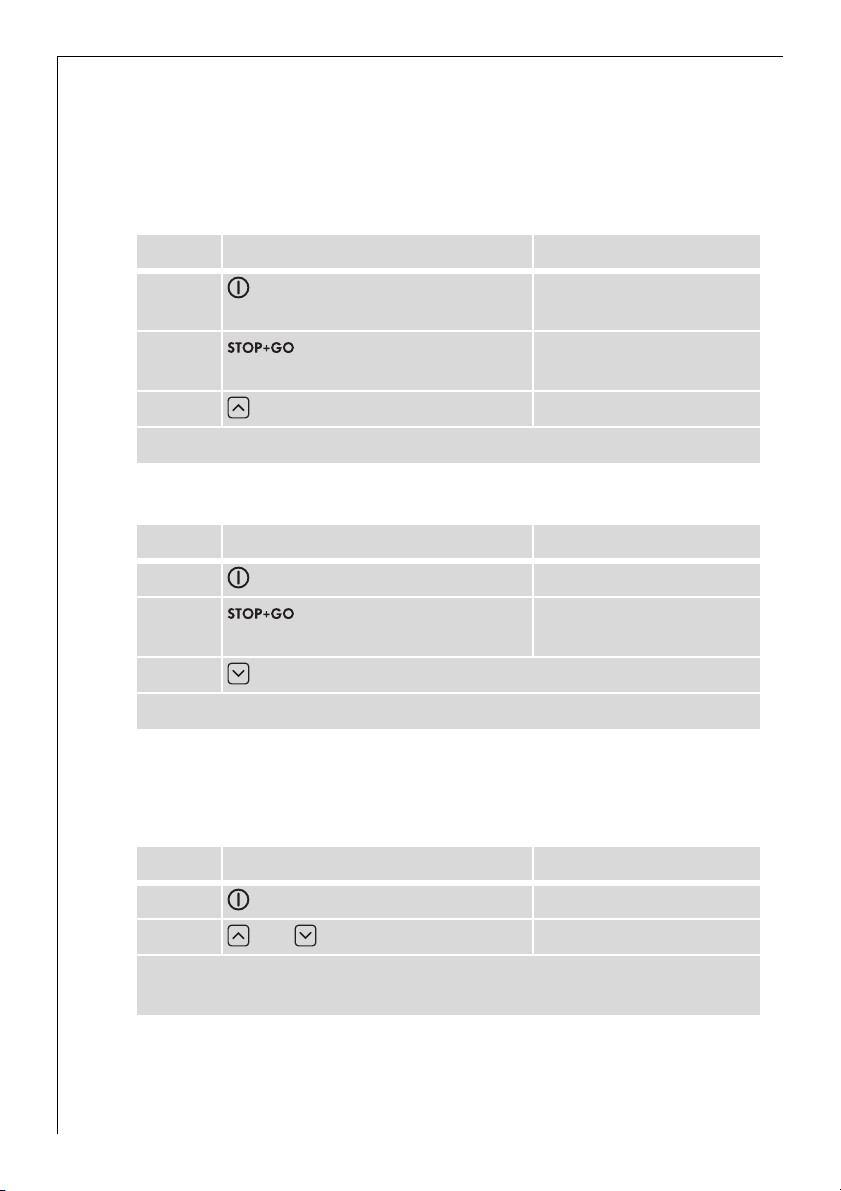
Äußere Heizkreise ein- und ausschalten
Durch Ein- oder Ausschalten der äußeren Heizkreise können die Heizflächen der Größe des Kochgeschirrs angepasst werden.
3 Vor dem Einschalten eines äußeren Heizkreises muss jeweils der innere
Heizkreis eingeschaltet sein.
Dreikreis-Kochzone Sensorfeld Kontrolllampe
Mittleren Heizkreis
einschalten
Äußeren Heizkreis
einschalten
Äußeren Heizkreis
ausschalten
Mittleren Heizkreis
ausschalten
Bräterzone Sensorfeld Kontrolllampe
Äußeren Heizkreis
einschalten
Äußeren Heizkreis
ausschalten
1-2 Sekunden berühren Eine Kontrolllampe leuchtet
1-2 Sekunden berühren Zwei Kontrolllampen leuchten
1-2 Sekunden berühren Zweite Kontrolllampe erlischt
1-2 Sekunden berühren Erste Kontrolllampe erlischt
1-2 Sekunden berühren leuchtet
1-2 Sekunden berühren erlischt
STOP+GO-Funktion ein- und ausschalten
Die STOP+GO-Funktion schaltet alle eingeschalteten Kochzonen gleichzeitig in die Warmhaltestufe und wieder in die vorher eingestellte
Kochstufe. Dieses Funktion eignet sich zur kurzfristigen Unterbrechung
und Fortsetzung des Kochvorgangs, z.B. um einen Telefonanruf entgegenzunehmen.
Bedienfeld Anzeige
Einschalten berühren u
Ausschalten berühren vorher eingestellte Kochstufe
(nicht Ankoch-Automatik)
3 Timer-Funktionen werden durch STOP+GO nicht angehalten.
3 STOP+GO verriegelt das gesamte Bedienfeld bis auf das Sensorfeld .
10
Page 11
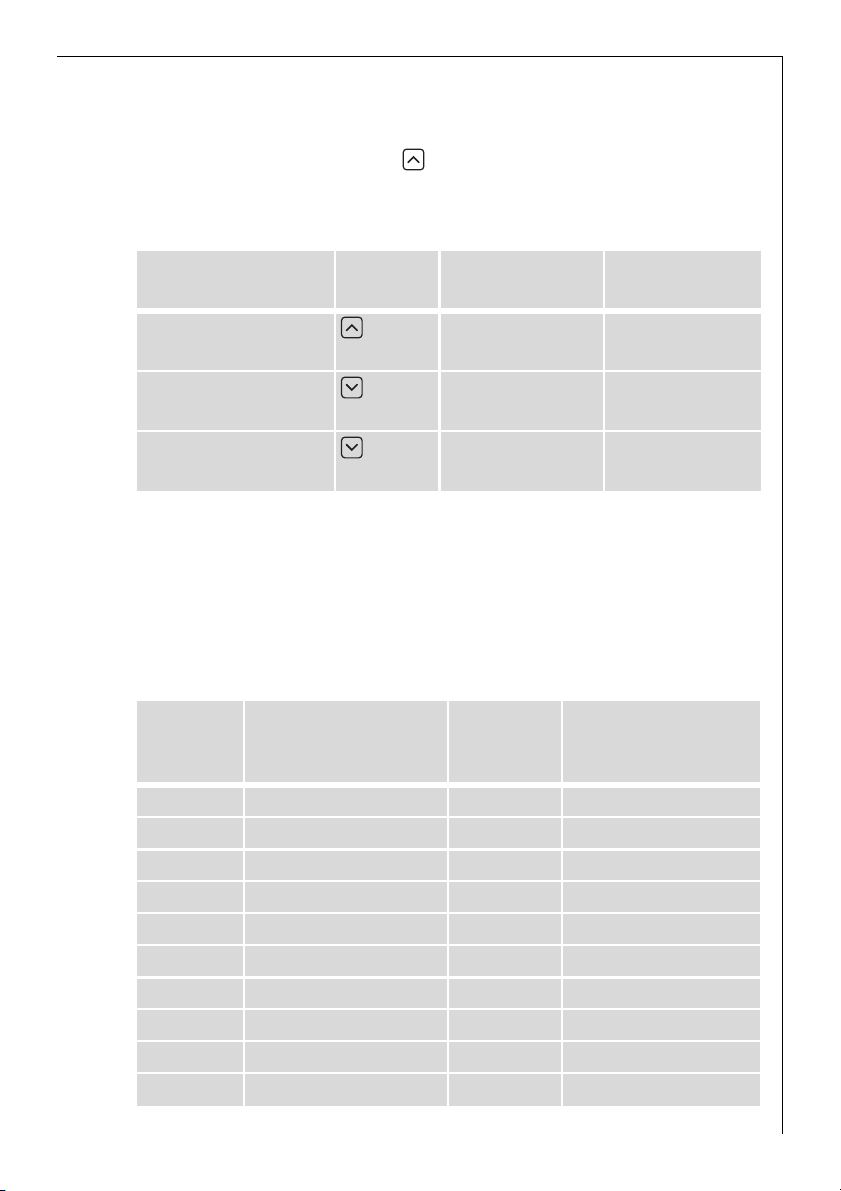
Ankoch-Automatik verwenden
Alle Kochzonen sind mit einer Ankoch-Automatik ausgestattet. Beim
Einstellen einer Kochstufe mit , von
zone für eine bestimmte Zeit auf die volle Leistung und schaltet dann
automatisch auf die eingestellte Kochstufe zurück.
¾ ausgehend, schaltet die Koch-
Bedienfeld
Einschalten
(nur von
¾ aus)
berüh-
ren
Ausschalten berüh-
mögliche Koch-
Anzeige
stufen
¿ bis Æ a (nach
5Sekunden)
Æ bis ¿ / u Æ bis u
ren
nicht verwenden berüh-
Ç bis u Ç bis u
ren
3 Wird während des Ankochstoßes a eine höhere Kochstufe gewählt, z.B.
von
Á nach Ã, wird die Ankochzeit angepasst.
3 Hat die Kochzone noch Restwärme (Anzeige h), wird der Ankochstoß
nicht ausgeführt.
Die Dauer des automatischen Ankochstoßes ist abhängig von der ein-
gestellten Kochstufe.
Kochstufe Dauer des
Ankochstoßes
[min:sek]
v 0:30
1 1:00
2 1:40 2. 2:40
3 4:50 3. 5:30
4 6:30 4. 8:10
5 10:10 5. 12:20
6 2:00 6. 2:30
7 3:30
8 4:30
9 ---
Zwischenstufe
Dauer des
Ankochstoßes
[min:sek]
11
Page 12
Kindersicherung verwenden
Die Kindersicherung verhindert eine unerwünschte Benutzung des Geräts.
Kindersicherung einschalten
Schritt Bedienfeld Anzeige/Signal
1. Gerät einschalten (keine Koch-
stufe einstellen)
2. berühren bis Signal er-
tönt
3. berühren l
Gerät schaltet aus. Die Kindersicherung ist eingeschaltet.
¾
Akustisches Signal
Kindersicherung ausschalten
Schritt Bedienfeld Anzeige/Signal
1. Gerät einschalten l
2. berühren bis Signal er-
tönt
3. berühren
Gerät schaltet aus. Die Kindersicherung ist ausgeschaltet.
Akustisches Signal
Kindersicherung überwinden
Die Kindersicherung kann damit für einen einmaligen Kochvorgang
ausgeschaltet werden; sie bleibt danach weiter aktiv.
Schritt Bedienfeld Anzeige/Signal
1. Gerät einschalten l
2. und gleichzeitig berühren ¾ / Akustisches Signal
Bis zum nächsten Ausschalten des Geräts kann es normal benutzt
werden.
3 Nach dem Überwinden der Kindersicherung muss innerhalb von
ca. 10 Sekunden eine Kochstufe oder eine Funktion eingestellt werden,
sonst schaltet sich das Gerät automatisch aus.
12
Page 13

Timer verwenden
Funktion Voraussetzung Ergebnis nach
Ablauf der Zeit
Abschaltautomatik bei einer eingestellten
Kochstufe
Kurzzeitmesser Kochzonen sind nicht
eingeschaltet
akustisches Signal
00 blinkt
Kochzone schaltet
aus
akustisches Signal
00 blinkt
3 Während der Kurzzeitmesser eingeschaltet ist, kann keine Kochzone
verwendet werden.
3 Der Kurzzeitmesser kann grundsätzlich nicht genutzt werden, wenn
eine Kochzone eingeschaltet ist.
3 Wird eine Kochzone ausgeschaltet wird die eingestellte Timer-Funktion
mit ausgeschaltet.
13
Page 14
Kochzone auswählen
Schritt Bedienfeld Anzeige
1. TIMER 1xberühren Kontrolllampe der ers-
ten Kochzone blinkt
2. TIMER 1xberühren Kontrolllampe der zwei-
ten Kochzone blinkt
3. TIMER 1xberühren Kontrolllampe der drit-
ten Kochzone blinkt
4. TIMER 1xberühren Kontrolllampe der vier-
ten Kochzone blinkt
3 Blinkt die Kontrolllampe langsamer, kann die Kochstufe eingestellt oder
verändert werden.
3 Sind weitere Timer-Funktionen eingestellt, wird nach einigen Sekunden
die kürzeste verbleibende Zeit aller Timer-Funktionen angezeigt und die
zugehörige Kontrolllampe blinkt.
14
Zeit einstellen
Schritt Bedienfeld Anzeige
1. TIMER Kochzone
auswählen
2. oder berühren 00 bis 99 Minuten
Nach einigen Sekunden blinkt die Kontrolllampe langsamer.
Die Zeit ist eingestellt.
Die Zeit läuft rückwärts ab.
Kontrolllampe der ausgewählten
Kochzone blinkt
Page 15
Timer-Funktion ausschalten
Schritt Bedienfeld Anzeige
1. TIMER Kochzone
auswählen
2. berühren Die verbleibende Zeit zählt rückwärts
Die Kontrolllampe erlischt.
Die Timer-Funktion für die ausgewählte Kochzone ist ausgeschaltet.
Kontrolllampe der ausgewählten
Kochzone blinkt schneller
Verbleibende Zeit wird angezeigt
bis 00.
Zeit verändern
Schritt Bedienfeld Anzeige
1. TIMER Kochzone
auswählen
2. oder berühren 01 bis 99 Minuten
Nach einigen Sekunden blinkt die Kontrolllampe langsamer.
Die Zeit ist eingestellt.
Die Zeit läuft rückwärts ab.
Kontrolllampe der ausgewählten
Kochzone blinkt schneller
Verbleibende Zeit wird angezeigt
Verbleibende Zeit einer Kochzone anzeigen
Schritt Bedienfeldfeld Anzeige
1. TIMER Kochzone
auswählen
Nach einigen Sekunden blinkt die Kontrolllampe langsamer.
Kontrolllampe der ausgewählten
Kochzone blinkt schneller
Verbleibende Zeit wird angezeigt
Akustisches Signal ausschalten
Schritt Bedienfeld Akustisches Signal
1. TIMER berühren Akustische Quittierung.
Akustisches Signal verstummt.
15
Page 16

Sicherheitsabschaltung
Kochfeld
• Wird nach dem Einschalten des Kochfeldes nicht innerhalb von ca. 10
Sekunden bei einer Kochzone eine Kochstufe eingestellt, schaltet das
Kochfeld automatisch ab.
• Wird ein oder mehrere Sensorfelder länger als ca. 10 Sekunden verdeckt, z.B. durch einen darauf abgestellten Topf, ertönt ein Signal und
das Kochfeld schaltet automatisch ab.
• Werden alle Kochzonen ausgeschaltet, schaltet sich das Kochfeld
nach ca. 10 Sekunden automatisch aus.
Bedienfeld
3 Feuchtigkeit (z.B. ein nasses Tuch) oder überkochende Flüssigkeiten auf
dem Bedienfeld schalten alle Kochzonen sofort aus.
Kochzonen
• Wird eine der Kochzonen nach einer bestimmten Zeit nicht ausgeschaltet oder die Kochstufe nicht verändert, schaltet sich die entsprechende Kochzone automatisch aus.
Kochstufe Abschaltung nach
16
V, 1 - 2
3 - 4
5
6 - 9
6 Stunden
5 Stunden
4 Stunden
1,5 Stunden
Page 17

Tipps zum Kochen und Braten
Acrylamidhinweis
3
Nach neuesten wissenschaftlichen Erkenntnissen kann eine intensive
Bräunung der Lebensmittel, speziell bei stärkehaltigen Produkten, eine
gesundheitliche Gefährdung durch Acrylamid verursachen. Daher empfehlen wir, möglichst bei niedrigen Temperaturen zu garen und die
Speisen nicht zu stark zu bräunen.
Kochgeschirr
• Gutes Kochgeschirr erkennen Sie am Topfboden. Der Boden sollte so
dick und plan wie möglich sein.
• Geschirr aus Stahlemail oder mit Aluminium- oder Kupferböden kann
Verfärbungen auf der Glaskeramikfläche hinterlassen, die nur schwer
oder gar nicht mehr zu entfernen sind.
Energiesparen
2 Kochgeschirr grundsätzlich vor dem
Einschalten der Kochzone
aufsetzen.
2 Töpfe, wenn möglich, immer mit
dem Deckel verschließen.
2 Kochzonen vor Ende der Garzeit
ausschalten, um die Restwärme zu
nutzen.
2 Topfboden und Kochzone sollten
gleich groß sein.
17
Page 18

Anwendungsbeispiele zum Kochen
Die Angaben in folgender Tabelle sind Richtgrößen.
Koch-
stufe
0 Aus-Stellung
V
1-2
2-3 Quellen
3-4
4-5 Kochen
6-7
7-8
9
Gar-
vorgang
Warm-
halten
Schmelzen
Stocken Schaumomelett, Eierstich 10-40 Min. Mit Deckel garen
Dämpfen
Dünsten
Mildes
Braten
Starkes
Braten
Ankochen
Anbraten
Frittieren
Geeignet für Dauer Hinweise/Tipps
Warmhalten von
gegarten Speisen
Sauce hollandaise,
Schmelzen von Butter,
Schokolade, Gelatine
Quellen von Reis und
Milchgerichten
Erhitzen von Fertig-
gerichten
Dünsten von Gemüse,
Fisch
Schmoren von Fleisch
Dämpfen von Kartoffeln 20-60 Min.
Kochen größerer Speise-
mengen, Eintopfgerichte
und Suppen
Schnitzel, Cordon bleu,
Kotelett, Frikadellen,
Bratwürste, Leber, Mehl-
schwitze, Eier, Eierkuchen,
Krapfen frittieren
Kartoffelpuffer, Lenden-
stücke, Steaks, Flädle
Ankochen großer Mengen Wasser, Spätzle kochen, Anbraten
von Fleisch (Gulasch, Schmorbraten), Frittieren von Pommes
nach Bedarf Abdecken
5-25 Min.
25-50 Min.
20-45 Min.
60-150
Min.
fortlaufend
backen
5-15 Min.
pro Pfanne
frites
Zwischendurch
umrühren
Mindestens doppelte
Menge Flüssigkeit
zum Reis geben,
Milchgerichte zwi-
schendurch umrüh-
ren
Bei Gemüse wenig
Flüssigkeit zugeben
(einige Esslöffel)
Wenig Flüssigkeit
verwenden, z. B.:
¼ l Wasser auf
Max.
750 g Kartoffeln
Bis zu 3 l Flüssigkeit
plus Zutaten
Zwischendurch
wenden
Zwischendurch
wenden
18
Page 19

Reinigung und Pflege
Vorsicht! Verbrennungsgefahr durch Restwärme.
1
1 Achtung! Scharfe und scheuernde Reinigungsmittel beschädigen das
Gerät. Mit Wasser und Spülmittel reinigen.
1 Achtung! Rückstände von Reinigungsmitteln beschädigen das Gerät.
Rückstände mit Wasser und Spülmittel entfernen.
Gerät nach jedem Gebrauch reinigen
1.Gerät mit einem feuchten Tuch und ein wenig Spülmittel abwischen.
2.Gerät mit einem sauberen Tuch trockenreiben.
Verschmutzungen entfernen
1.Den Reinigungsschaber schräg zur Glaskeramikfläche ansetzen.
2.Verschmutzungen mit gleitender Klinge entfernen.
3.Gerät mit einem feuchten Tuch und ein wenig Spülmittel abwischen.
4.Gerät mit einem sauberen Tuch trockenreiben.
entfernen
Art der Verschmutzung sofort bei abgekühltem Gerät mit
Zucker, zuckerhaltige Speisen ja ---
Kunststoffe, Aluminiumfolien ja ---
Kalk- und Wasserränder --- ja
Fettspritzer --- ja
metallisch schimmernde
Verfärbungen
*Reinigungsschaber, Glaskeramik- oder Edelstahlreiniger sind im Fachhandel erhältlich
--- ja
Reinigungsschaber*
Glaskeramik- oder
Edelstahlreiniger*
3 Hartnäckige Verschmutzungen mit einem Glaskeramik- oder Edelstahl-
reiniger entfernen.
3 Kratzer oder dunkle Flecken in der Glaskeramik, lassen sich nicht mehr
entfernen, beeinträchtigen jedoch die Funktion des Geräts nicht.
19
Page 20

Was tun, wenn …
Problem Mögliche Ursache Abhilfe
Die Kochzonen lassen sich
nicht einschalten oder
funktionieren nicht
Die Restwärme-Anzeige
zeigt nichts an
Die Ankoch-Automatik
schaltet sich nicht ein
Signalton ertönt und Gerät schaltet sich ein und
nach 5 Sek. wieder aus;
nach 5 Sek. ertönt ein weiterer Signalton
Seit dem Einschalten des
Geräts sind mehr als 10 Sekunden vergangen
Die Kindersicherung ist
eingeschaltet
Mehrere Sensorfelder wurden gleichzeitig berührt
Die Sensorfelder sind durch
ein feuchtes Tuch oder mit
Flüssigkeit teilweise bedeckt
Sicherheitsabschaltung hat
ausgelöst
STOP+GO ist aktiv u STOP+GO ausschalten
Die Kochzone ist nur kurz
in Betrieb gewesen und daher noch nicht heiß
Die Kochzone hat noch
Restwärme
Die höchste Kochstufe ist
eingestellt
Die Kochstufe wurde mit
dem Sensorfeld eingestellt
Das Ein/Aus Sensorfeld
wurde verdeckt, z.B. durch
einen Lappen
l
h
Ç
_ leuchtet Überhitzungschutz der
Kochzone ist ausgelöst
Gerät wieder einschalten.
Kindersicherung deaktivieren (siehe Kapitel „Kindersicherung“)
Nur ein Sensorfeld berühren
Tuch oder Flüssigkeit entfernen.
Gerät wieder einschalten.
Gerät wieder einschalten
Sollte die Kochzone heiß
sein, den Kundendienst rufen.
Kochzone abkühlen lassen
Die höchste Kochtufe hat
die gleiche Leistung wie die
Ankoch-Automatik
1. Kochzone ausschalten
1. Kochzone über das Sen-
sorfeld einstellen
Keine Gegenstände auf
dem Bedienfeld ablegen
Kochzone ausschalten.
Kochzone wieder einschalten
20
Page 21

Problem Mögliche Ursache Abhilfe
e und Zahl wird angezeigt Fehler in der Elektronik Gerät einige Minuten vom
Netz trennen (Sicherung
der Hausinstallation herausnehmen)
Wird nach dem Einschalten
e angezeigt, den
wieder
Kundendienst rufen
Wenn Sie das Problem mit der oben angegebenen Abhilfemaßnahme nicht beheben können, wenden Sie sich bitte an Ihren Fachhändler oder den Kundendienst.
1 Warnung! Reparaturen am Gerät dürfen nur von Fachkräften durchge-
führt werden. Durch unsachgemäße Reparaturen können erhebliche
Gefahren für den Benutzer entstehen.
3 Bei Fehlbedienungen kann der Besuch des Kundendienst-Technikers
bzw. des Fachhändlers auch während der Garantiezeit nicht kostenlos
erfolgen.
21
Page 22

Entsorgung
Verpackungsmaterial
2
Die Verpackungsmaterialien sind umweltverträglich und wiederverwertbar. Die Kunststoffteile sind gekennzeichnet, z. B. >PE<, >PS< etc.
Entsorgen Sie die Verpackungsmaterialien entsprechend ihrer Kennzeichnung bei den kommunalen Entsorgungsstellen in den dafür vorgesehenen Sammelbehältern.
2 Altgerät
Das Symbol
hin, dass dieses Produkt nicht als normaler Haushaltsabfall zu behandeln ist, sondern an einem Sammelpunkt für das Recycling von elektrischen und elektronischen Geräten abgegeben werden muss. Durch
Ihren Beitrag zum korrekten Entsorgen dieses Produkts schützen Sie die
Umwelt und die Gesundheit Ihrer Mitmenschen. Umwelt und Gesundheit
werden durch falsches Entsorgen gefährdet. Weitere Informationen
über das Recycling dieses Produkts erhalten Sie von Ihrem Rathaus, Ihrer
Müllabfuhr oder dem Geschäft, in dem Sie das Produkt gekauft haben.
W auf dem Produkt oder seiner Verpackung weist darauf
22
Page 23

Montageanweisung
Sicherheitshinweise
Die im Einsatzland geltenden Gesetze, Verordnungen, Richtlinien und
Normen sind einzuhalten (Sicherheitsbestimmungen, sach- und ordnungsgemäßes Recycling etc.).
Die Montage darf nur von einer Fachkraft ausgeführt werden.
Die Mindestabstände zu anderen Geräten sind einzuhalten.
Schubladen dürfen nur mit Schutzboden direkt unter dem Gerät
montiert sein.
Die Schnittflächen an der Arbeitsplatte sind mit einem geeigneten
Dichtungsmaterial gegen Feuchtigkeit zu schützen.
Die Dichtung schließt das Gerät spaltfrei mit der Arbeitsplatte ab.
Zwischen Gerät und Arbeitsplatte keine Silikon-Dichtungsmasse aufbringen.
Vermeiden Sie die Montage des Gerätes direkt neben Türen und unter
Fenstern. Aufklappende Türen und aufspringende Fenster können sonst
heißes Kochgeschirr von der Kochstelle reißen
1 WARNUNG!
Verletzungsgefahr durch elektrischen Strom.
• Die Netzanschlussklemme liegt an Spannung.
• Netzanschlussklemme spannungsfrei machen.
• Anschlussschema beachten.
• Sicherheitsregeln der Elektrotechnik beachten.
• Berührungsschutz durch fachgerechten Einbau sicherstellen.
• Den Elektroanschluss durch eine Elektrofachkraft ausführen lassen.
1 ACHTUNG!
Schäden durch elektrischen Strom.
Lockere und unsachgemäße Steckverbindungen können die Klemme
überhitzen.
• Klemmverbindungen fachgerecht ausführen.
• Kabel zugentlasten.
• Bei 1 oder 2 phasigem Anschluss muss jeweils die passende Netzan-
schlussleitung vom Typ H05BB-F Tmax 90° (oder höherwertig) eingesetzt werden.
• Wenn die Netzanschlussleitung dieses Gerätes beschädigt ist, muss sie
durch eine besondere Anschlussleitung (Typ H05BB-F Tmax 90°; oder
höherwertig) ersetzt werden. Diese ist beim Kundendienst erhältlich.
23
Page 24

In der elektrischen Installation ist eine Einrichtung vorzusehen, die es
ermöglicht, das Gerät mit einer Kontaktöffnungsweite von mind. 3 mm
allpolig vom Netz zu trennen.
Als geeignete Trennvorrichtungen gelten z.B. LS-Schalter, Sicherungen
(Schraubsicherungen sind aus der Fassung herauszunehmen), FI-Schalter und Schütze.
24
Page 25

Service
Wenn Sie einmal unsere Hilfe benötigen, erreichen Sie uns in Deutschland wie folgt:
Bei Fragen zu Bedienung oder Einsatz Ihres Gerätes
Wenden Sie sich an den AEG-Direct Info Service:
Telefon: 0180 555 4 555
Internet: www.aeg-hausgeraete.de
Bei technischen Störungen
Prüfen Sie bitte zunächst, ob Sie mit Hilfe der Gebrauchsanweisung
(Kapitel „Was tun, wenn...“) das Problem selbst beheben können.
Wenn Sie das Problem nicht beheben konnten:
Rufen Sie den Kundendienst:
Telefon: 0180 322 66 22*
Fax: 0180 580 41 41 (0,12 Euro/Min)**
Um Ihnen schnell helfen zu können,
benötigen wir folgende Angaben:
– Modellbezeichnung
– Produkt-Nummer (PNC)
– Serien-Nummer (S-No.)
(Nummern siehe Typschild)
– Art der Störung
– eventuelle Fehlermeldung, die das
Gerät anzeigt
– dreistellige Buchstaben-Zahlenkombination der Glaskeramik
(0,12 Euro/Min)**
(0,09 Euro/Min)**
Ersatzteile, Zubehör und Pflegemittel
Telefon: 0180 500 10 76 (0,12 Euro/Min)**
Internet: www.aeg-hausgeraete.de
*) Unter dieser Rufnummer werden Sie automatisch mit der Ihrem Wohnort nächst-
gelegenen Niederlassung des Werkskundendienstes oder dem nächstgelegenen
Service-Partner verbunden.
**) Deutsche Telekom/Stand Januar 2002
25
Page 26

Dear Customer,
Please read these user instructions carefully and keep them to refer to
later.
Please pass the user instructions on to any future owner of the appliance.
The following symbols are used in the text:
1 Safety instructions
Warning! Information that affects your personal safety.
Important! Information that prevents damage to the appliance.
3 Useful tips and hints
2 Environmental information
26
Page 27

Contents
Operating Instructions. . . . . . . . . . . . . . . . . . . . . . . . . . . . . . . . . . . . . 28
Safety instructions. . . . . . . . . . . . . . . . . . . . . . . . . . . . . . . . . . . . . . . . . . . . . . 28
Description of the Appliance. . . . . . . . . . . . . . . . . . . . . . . . . . . . . . . . . . . . . 30
Cooking surface layout . . . . . . . . . . . . . . . . . . . . . . . . . . . . . . . . . . . . . . . . . . . 30
Control panel layout . . . . . . . . . . . . . . . . . . . . . . . . . . . . . . . . . . . . . . . . . . . . . 30
Touch Control sensor fields . . . . . . . . . . . . . . . . . . . . . . . . . . . . . . . . . . . . . 31
Displays . . . . . . . . . . . . . . . . . . . . . . . . . . . . . . . . . . . . . . . . . . . . . . . . . . . . . 32
Residual heat indicator . . . . . . . . . . . . . . . . . . . . . . . . . . . . . . . . . . . . . . . . 32
Operating the appliance. . . . . . . . . . . . . . . . . . . . . . . . . . . . . . . . . . . . . . . . . 33
Switching the appliance on and off . . . . . . . . . . . . . . . . . . . . . . . . . . . . . . . . 33
Setting the heat setting . . . . . . . . . . . . . . . . . . . . . . . . . . . . . . . . . . . . . . . . . . 33
Switching the outside ring on and off . . . . . . . . . . . . . . . . . . . . . . . . . . . . . . 34
Switching the STOP+GO function on and off. . . . . . . . . . . . . . . . . . . . . . . . . 34
Using the automatic warm-up function . . . . . . . . . . . . . . . . . . . . . . . . . . . . . 35
Using the child safety device . . . . . . . . . . . . . . . . . . . . . . . . . . . . . . . . . . . . . . 36
Using the timer . . . . . . . . . . . . . . . . . . . . . . . . . . . . . . . . . . . . . . . . . . . . . . . . . 37
Safety cut-out . . . . . . . . . . . . . . . . . . . . . . . . . . . . . . . . . . . . . . . . . . . . . . . . . . 40
Tips on Cooking and Frying . . . . . . . . . . . . . . . . . . . . . . . . . . . . . . . . . . . . . . 41
Cookware . . . . . . . . . . . . . . . . . . . . . . . . . . . . . . . . . . . . . . . . . . . . . . . . . . . . . . 41
Energy saving . . . . . . . . . . . . . . . . . . . . . . . . . . . . . . . . . . . . . . . . . . . . . . . . . . . 41
Examples of cooking applications . . . . . . . . . . . . . . . . . . . . . . . . . . . . . . . . . . 42
Cleaning and Care . . . . . . . . . . . . . . . . . . . . . . . . . . . . . . . . . . . . . . . . . . . . . . 43
What to do if … . . . . . . . . . . . . . . . . . . . . . . . . . . . . . . . . . . . . . . . . . . . . . . . . 44
Disposal . . . . . . . . . . . . . . . . . . . . . . . . . . . . . . . . . . . . . . . . . . . . . . . . . . . . . . . 46
Installation Instructions . . . . . . . . . . . . . . . . . . . . . . . . . . . . . . . . . . . 47
Service . . . . . . . . . . . . . . . . . . . . . . . . . . . . . . . . . . . . . . . . . . . . . . . . . . . . . . 49
Assembly . . . . . . . . . . . . . . . . . . . . . . . . . . . . . . . . . . . . . . . . . . . . . . . . . . . . 50
27
Page 28

Operating Instructions
1 Safety instructions
Please comply with these instructions. If you do not, any damage re-
3
sulting is not covered by the warranty.
5 This appliance conforms with the following EU Directives:
– 73/23/EEC dated 19.02.1973 Low Voltage Directive
– 89/336/EEC dated 03.05.1989 EMC Directive inclusive of Amending
Directive 92/31/EEC
– 93/68/EEC dated 22.07.1993 CE Marking Directive
Correct use
• This appliance should be used only for normal domestic cooking and
frying of food.
• The appliance must not be used as a work surface or as a storage surface.
• Additions or modifications to the appliance are not permitted.
• Do not place or store flammable liquids, highly inflammable materials
or fusible objects (e.g. plastic film, plastic, aluminium) on or near the
appliance.
28
Children’s safety
• Small children must be kept away from the appliance.
• Only let bigger children work on the appliance under supervision.
General safety
• The appliance may only be installed and connected by trained, registered service engineers.
• Built-in appliances may only be used after they have built in to suitable built-in units and work surfaces that meet standards.
• In the event of faults with the appliance or damage to the glass ceramic (cracks, scratches or splits), the appliance must be switched off
and disconnected from the electrical supply, to prevent the possibility
of an electric shock.
• Repairs to the appliance must only be carried out by trained registered service engineers.
Page 29

Safety during use
• Remove stickers and film from the glass ceramic.
• There is the risk of burns from the appliance if used carelessly.
• Cables from electrical appliances must not touch the hot surface of
the appliance or hot cookware.
• Overheated fats and oils can ignite quickly. When cooking with fat or
oil (e.g. chips) do not leave the appliance unattended.
• Switch the cooking zones off after each use.
Safety when cleaning
• For cleaning, the appliance must be switched off and cooled down.
• For safety reasons, the cleaning of the appliance with steam jet or
high-pressure cleaning equipment is not permitted.
How to avoid damage to the appliance
• The glass ceramic can be damaged by objects falling onto it.
• The edge of the glass ceramic can be damaged by being knocked by
the cookware.
• Cookware made of cast iron, cast aluminium or with damaged bottoms can scratch the glass ceramic if pushed across the surface.
• Objects that melt and things that boil over can burn onto the glass
ceramic and should be removed straightaway.
• Do not use the cooking zones with empty cookware or without cookware.
29
Page 30

Description of the Appliance
Cooking surface layout
Singlecooking zone
1200W
Triple cooking zone
800/1600/2300W
Control panel layout
STOP+GO
with pilot light
Control panel Singlecooking zone
Cooking zone indicators
Timer function
Display
Roasting zone
1500/2600W
1200W
Heat setting selection
Timer display
On/Off
with power indicator
30
Outside/middle ring
On/Off
Timer
Triple ring pilot light
Multi-purpose
zone pilot light
Outside ring
On/Off
Page 31

Touch Control sensor fields
The appliance is operated using Touch Control sensor fields. Functions
are controlled by touching sensor fields and confirmed by displays and
acoustic signals.
Touch the sensor fields from above, without covering other sensor
fields.
Sensor field Function
On / Off To switch the appliance on and
off
Increase settings To increase heat settings
Reduce settings To reduce heat settings
TIMER Timer Timer selection
Increase settings To increase Timer time
Reduce settings To reduce Timer time
Stop+Go To switch the Keep Warm setting
on/off
Triple ring switch To switch outer rings
on and off
Multi-purpose zone
switch
To switch the outside ring on and
off
31
Page 32

Displays
Display Description
¾ Cooking zone is switched off
u Keep warm setting Keep warm setting/STOP+GO
function is set
¿ - Ç Heat settings Heat setting is set
2 - 6 Heating setting plus
decimal point
a Automatic warm up
function
e Fault Malfunction has occurred
h Residual heat Cooking zone is still hot
l Child safety device Lock/child safety device is en-
_ Safety cut-out Safety cut-out has been activated
Intermediate heat setting is set
Automatic warm-up function is
activated
gaged
Residual heat indicator
1 Warning! Risk of burns from residual heat. After being switched off,
the cooking zones need some time to cool down. Look at the residual
heat indicator
h .
3 Residual heat can be used for melting and keeping food warm.
32
Page 33

Operating the appliance
Switching the appliance on and off
Control panel Display Pilot light
Switch on Touch for 2 seconds ¾ / h lights up
Switch off Touch for 1 second h / none goes out
3 After switching on, within approx. 10 seconds a heat setting or a func-
tion must be set, otherwise the appliance automatically switches itself
off.
Setting the heat setting
3 The keep warm setting u lies between ¾ and ¿. The keep warm set-
ting can be set using or . It is used to keep food warm.
Control panel Indicator
To increase Touch u to Ç
To decrease Touch Ç to ¾
To switch off Touch and at the same time ¾
33
Page 34

Switching the outside ring on and off
By switching the outside rings on or off, the effective heating surface
can be matched to the size of the cookware.
3 Before an outside ring can be switched on, the inside ring must be
switched on.
Triple cooking zone Sensor panel Power indicator
To switch on middle
ring
To switch on outside
ring
To switch off outside
ring
To switch off middle
ring
Roasting zone Sensor panel Power indicator
To switch on outside ring Touch for 1-2 seconds. is lit
To switch off outside ring Touch for 1-2 seconds. goes out
Touch for 1-2 seconds. One power indicator is lit.
Touch for 1-2 seconds. Two power indicators are lit.
Touch for 1-2 seconds. Second power indicator goes out.
Touch for 1-2 seconds. First power indicator goes out.
Switching the STOP+GO function on and off
The STOP+GO function simultaneously switches all cooking zones that
are switched on to the keep warm setting and then back to the heat
setting that was previously set. This function can be used to briefly interrupt and then continue the cooking process e.g. to take a telephone
call.
Control panel Display
To switch onTouch STOP+GO u
To switch
off
Touch STOP+GO heat setting that was previ-
ously set (not automatic
warm up function)
3 Timer functions are not stopped by STOP+GO.
3 STOP+GO locks the whole control panel except the sensor field .
34
Page 35

Using the automatic warm-up function
All cooking zones are equpped with an automatic warm up function
When setting a heat setting using , when starting from
ing zone switches to full power for a certain amount of time and then
automatically switches back to the heat setting set.
¾, the cook-
Control
panel
possible
heat set-
Display
tings
Switch on
(only when starting at
Touch ¿ to Æ a (after 5 sec-
onds)
¾)
Switch off Touch Æ to ¿ / u Æ to u
Not used Touch Ç to u Ç to u
3 If during the automatic warm up a a higher heat setting is selected,
e.g. from
Á to Ã, the automatic warm up is adjusted.
3 If there is still residual heat on the cooking zone (display h), the auto-
matic warm up is not performed.
The length of time that the automatic warm up function operates de-
pends on the heat setting selected.
Heat
setting
v 0:30
1 1:00
2 1:40 2. 2:40
3 4:50 3. 5:30
4 6:30 4. 8:10
5 10:10 5. 12:20
6 2:00 6. 2:30
7 3:30
8 4:30
9 ---
Length of the
automatic warm up
[min:sec]
Intermedi-
ate
heat
setting
Length of the
automatic warm up
[min:sec]
35
Page 36

Using the child safety device
The child safety device prevents unintentional use of the appliance.
Setting the child safety device
Step Control panel Display/Signal
1. Switch on the appliance
¾
(Do not set a heat setting)
2. Touch until the signal
Acoustic signal
sounds
3. Touch l
Appliance switches off. The child safety device is engaged.
Releasing the child safety device
Step Control panel Display/Signal
1. Switch on the appliance l
2. Touch until the signal
Acoustic signal
sounds
3. Touch
Appliance switches off. The child safety device is released.
Overriding the child safety device
The child safety device can be released in this way for a single cooking
session; it remains activated afterwards.
Step Control panel Display/Signal
1. Switch on the appliance l
2. Touch and at the same time ¾ / acoustic signal
Until the appliance is next switched off, it can used as normal.
3 After overriding the child safety device, a heat setting or a function
must be set within approx. 10 seconds, otherwise the appliance automatically switches itself off.
36
Page 37

Using the timer
Function Pre-requisite Result after time
Automatic cut-out With heat setting set Acoustic signal
has elapsed
00 flashes
Cooking zone
switches off
Countdown timer Cooking zones are not
switched on
Acoustic signal
00 flashes
3 While the countdown timer is activated, no cooking zone can be used.
3 The countdown timer basically cannot be used if a cooking zone is
switched on.
3 If a cooking zone is switched off, the timer function set is also switched
off.
Selecting a cooking zone
Step Control panel Display
1. Touch TIMER once Pilot light of the first
cooking zone flashes
2. Touch TIMER once Pilot light of the second
cooking zone flashes
3. Touch TIMER once Pilot light of the third
cooking zone flashes
4. Touch TIMER once Pilot light of the fourth
cooking zone flashes
3 If the pilot light is flashing more slowly, the heat setting can be set or
modified.
3 If other timer functions are set, after a few seconds the shortest re-
maining time of all the timer functions is displayed and the corresponding pilot light flashes.
37
Page 38

Setting the time
Step Control panel Indicator
1. Select TIMER cooking
zone
2. Touch or 00 to 99 minutes
After a few seconds the pilot light flashes more slowly.
The time is set.
The time counts down.
Pilot light for the cooking zone selected flashes
Switching off the timer function
Step Control panel Indicator
1. Select TIMER cooking
zone
2. Touch The time remaining counts backwards
The pilot light goes out.
The Timer function for the selected cooking zone is switched off.
Pilot light of cooking zone selected
flashes faster
Time remaining is displayed
to 00.
Changing the time
Step Control panel Indicator
38
1. Select TIMER cooking
zone
2. Touch or 01 to 99 minutes
After a few seconds, the pilot light flashes more slowly.
The time is set.
The time counts down.
Pilot light of the selected cooking
zone flashes faster
Time remaining is displayed
Page 39

Displaying the time remaining for a cooking zone
Step Control panel field Display
1. TIMER Select cooking
zone
Pilot light of the cooking zone selected flashes faster
The time remaining is displayed
After a few seconds the pilot light flashes more slowly.
Switching off the acoustic signal
Step Control panel field Acoustic signal
1. Touch TIMER Acoustic signal to acknowledge.
Acoustic signal stops.
39
Page 40

Safety cut-out
Cooking surface
• If after switching on the cooking surface, a heat setting is not set for
a cooking zone within approx. 10 seconds, the cooking surface automatically switches itself off.
• If one or more sensor fields are covered for longer than approx. 10
seconds, e.g. by a pan placed upon it, a signal sounds and the cooking
surface switches off automatically.
• If all cooking zones are switched off, the cooking surface automatically switches itself off after approx. 10 seconds.
Control panel
3 Moisture (e.g. a wet cloth) or liquid boiling over onto the control panel
immediately switches all cooking zones off.
Cooking zones
• If one of the cooking zones is not switched off after a certain time, or
if the heat setting is not modified, the relevant cooking zone switches
off automatically.
Heat setting Switches off after
40
V, 1 - 2
3 - 4
5
6 - 9
6 hours
5 hours
4 hours
1.5 hours
Page 41

Tips on Cooking and Frying
Information on acrylamides
3
According to the latest scientific knowledge, intensive browning of
food, especially in products containing starch, can constitute a health
risk due to acrylamides. Therefore we recommend cooking at the lowest
possible temperatures and not browning foods too much.
Cookware
• You can recognise good cookware from the bottoms of the pans. The
bottom should be as thick and flat as possible.
• Cookware made of enamelled steel or with aluminium or copper bottoms can leave discolorations on the glass ceramic surface which are
difficult or impossible to remove.
Energy saving
2 Always place cookware on the cook-
ing zone before it is switched on.
2 If possible, always place lids on the
pans.
2 Switch cooking zones off before the
end of the cooking time, to take advantage of residual heat.
2 Bottom of pans and cooking zones
should be the same size.
41
Page 42

Examples of cooking applications
The information given in the following table is for guidance only.
Heat
Cooking-
setting
process
0 Off position
Keeping
V
1-2
2-3
3-4
4-5 Boiling
6-7
7-8
9
food
warm
Melting
Solidi-
fying
Simmer-
ing on
low heat
Steaming
Braising
Gentle
Frying
Heavy
Frying
Boiling
Searing
Deep
frying
suitable for
Keeping cooked foods
warm
Hollandaise sauce,
melting butter, chocolate,
gelatine
Fluffy omelettes, baked
eggs
Simmering rice and milk-
based dishes
Heating up ready-cooked
meals
Steaming vegetables, fish
braising meat
Steaming potatoes 20-60 mins.
Cooking larger quantities
of food, stews and soups
Frying escalopes, veal
cordon bleu, cutlets, ris-
soles, sausages, liver, roux,
eggs, pancakes, dough-
nuts
Hash browns, loin steaks,
steaks, Flädle (pancakes
for garnishing soup)
Boiling large quantities of water, cooking pasta, searing meat
(goulash, pot roast), deep frying chips
Cooking
time
as required Cover
5-25 mins. Stir occasionally
10-40 mins. Cook with lid on
25-50 mins.
20-45 mins.
60-150
mins.
Steady
frying
5-15 mins.
per pan
Tips/Hints
Add at least twice as
much liquid as rice, stir
milk dishes part way
through cooking
With vegetables add
only a little liquid (a
few tablespoons)
Use only a little liquid,
e. g.: max.
for 750 g potatoes
Up to 3 l liquid plus in-
Turn halfway through
Turn halfway through
¼ l water
gredients
cooking
cooking
42
Page 43

Cleaning and Care
Take care! Risk of burns from residual heat.
1
1 Warning! Sharp objects and abrasive cleaning materials will damage
the appliance. Clean with water and washing up liquid.
1 Warning! Residues from cleaning agents will damage the appliance.
Remove residues with water and washing up liquid.
Cleaning the appliance after each use
1.Wipe the appliance with a damp cloth and a little washing up liquid.
2.Rub the appliance dry using a clean cloth.
Removing deposits
1.Place a scraper on the glass ceramic surface at an angle.
2.Remove residues by sliding the blade over the surface.
3.Wipe the appliance with a damp cloth and a little washing up liquid.
4.Rub the appliance dry using a clean cloth.
Remove
Type of dirt
sugar, food containing sugar yes ---
plastics, tin foil yes ---
limescale and water rings --- yes
fat splashes --- yes
shiny metallic discolorations --- yes
*Scrapers and cleaners for glass ceramic and stainless steel can be purchased in specialist shops
immediately
when the appliance has
cooled down
using
a scraper*
cleaner for glass ce-
ramic or stainless
steel*
3 Remove stubborn residues with a cleaner for glass ceramic or stainless
steel.
3 Scratches or dark stains on the glass ceramic that cannot be removed
do not however affect the functioning of the appliance.
43
Page 44

What to do if …
Problem Possible cause Remedy
The cooking zones will not
switch on or are not functioning
The residual heat indicator
is not displaying anything
The automatic warm up
function is not switching
itself on
Acoustic signal sounds and
appliance switches itself on
and then off again; after 5
seconds another acoustic
signal sounds
More than 10 seconds have
passed since the appliance
was switched on
The child safety device is
switched on
Several sensor fields were
touched at the same time
The sensor fields are partly
covered by a damp cloth or
with liquid
Safety cut-out has been
triggered
STOP+GO is activated Switching off STOP+GO
The cooking zone was only
on for a short time and is
therefore not hot
There is still residual heat
on the cooking zone h
The highest heat setting is
set Ç
The heat setting was set
using the sensor field
The On/Off sensor field has
been covered up, e.g. by a
cloth
l
_ is lit Overheating protection for
the cooking zone has been
triggered
Switch the appliance on
again.
Deactivate the child safety
device (See the section
“Child safety device”)
Only touch one sensor field
Remove the cloth or the
liquid.
Switch the appliance on
again.
Switch the appliance on
again
If the cooking zone is supposed to be hot, call the
Customer Service Department.
Let the cooking zone cool
down
The highest heat setting
has the same power as the
automatic warm up function
1. Switching off the cook-
ing zone
1. Set the cooking zone us-
ing the sensor field
Do not place any objects
on the control panel
Switch off the cooking
zone. Switch the cooking
zone on again
44
Page 45

Problem Possible cause Remedy
e and number are dis-
played
Electronics fault Disconnect the appliance
from the electrical supply
for a few minutes (Take the
fuse out of the house’s wiring system)
If after switching on again,
e is displayed again, call
the customer service department
If you are unable to remedy the problem by following the above
suggestions, please contact your dealer or the Customer Care Department.
1 Warning! Repairs to the appliance are only to be carried out by quali-
fied service engineers. Considerable danger to the user may result from
improper repairs.
3 If the appliance has been wrongly operated, the visit from the customer
service technician or dealer may not take place free of charge, even
during the warranty period.
45
Page 46

Disposal
Packaging material
2
The packaging materials are environmentally friendly and can be recycled. The plastic components are identified by markings, e.g. >PE<,
>PS<, etc. Please dispose of the packaging materials in the appropriate
container at the community waste disposal facilities.
2 Old appliance
The symbol
product may not be treated as household waste. Instead it shall be
handed over to the applicable collection point for the recycling of electrical and electronic equipment. By ensuring this product is disposed of
correctly, you will help prevent potential negative consequences for the
environment and human health, which could otherwise be caused by
inappropriate waste handling of this product. For more detailed information about recycling of this product, please contact your local city
office, your household waste disposal service or the shop where you
purchased the product.
W on the product or on its packaging indicates that this
46
Page 47

Installation Instructions
Safety instructions
The laws, ordinances, directives and standards in force in the country of
use are to be followed (safety regulations, proper recycling in accordance with the regulations, etc.)
Installation may only be carried out by a qualified electrician.
The minimum distances to other appliances are to be observed.
Drawers may only be installed with a with protective board directly
under the appliance.
The cut surfaces of the work top are to be protected against moisture
using a suitable sealant.
The sealant seals the appliance to the work top with no gap.
Do not use silicon sealant between the appliance and the work top.
Avoid installing the appliance next to doors and under windows. Otherwise hot cookware may be knocked off the rings when doors and windows are opened.
1 WARNING!
Risk of injury from electrical current.
• The electrical mains terminal is live.
• Make electrical mains terminal free of voltage.
• Observe connection schematic.
• Observe electrical safety rules.
• Ensure anti-shock protection through correct installation by a quali-
fied electrician.
• The appliance must be connected to the electrical supply by a qualified electrician.
1 IMPORTANT!
Risk of injury from electrical current.
Loose and inappropriate plug and socket connections can make the terminal overheat.
• Have the clamping joints correctedly installed by a qualified electrician.
• Use strain relief clamp on cable.
• In the event of single-phase or two-phase connection, the appropri-
ate mains cable of type H05BB-F Tmax 90° (or higher) must be used.
• If this appliance’s mains cable is damaged, it must be replaced by a
special cable (type H05BB-F Tmax 90°; or higher). The latter is available from the Customer Care Department.
47
Page 48

A device must be provided in the electrical installation which allows the
appliance to be disconnected from the mains at all poles with a contact
opening width of at least 3 mm.
Suitable isolation devices include line protecting cut-outs, fuses (screw
type fuses are to be removed from the holder), earth leakage trips and
contactors.
48
Page 49

Service
In the event of technical faults, please first check whether you can
remedy the problem yourself with the help of the operating instructions (section “What to do if…”).
If you were not able to remedy the problem yourself, please contact the
Customer Care Department or one of our service partners.
In order to be able to assist you
quickly, we require the following
information:
– Model description
– Product number (PNC)
– Serial number (S No.)
(for numbers see rating plate)
– Type of fault
– Any error messages displayed by
the appliance
– three digit letter-number combination for glass ceramic
So that you have the necessary reference numbers from your appliance
at hand, we recommend that you write them in here:
Model description: .....................................
PNC: .....................................
S No: .....................................
49
Page 50

Montage / Assembly
50
Page 51

Typenschild / Rating Plate
76301K-MN
55HBD56AO
AEG - Electrolux
230 V 50 Hz
949 591 666
7,3 kW
51
Page 52

From the Electrolux Group. The world´s No.1 choice.
The Electrolux Group is the world´s largest producer of powered appliances for kitchen, cleaning and outdoor
use. More than 55 million Electrolux Group products (such as refrigerators, cookers, washing machines,
vacuum cleaners, chain saws and lawn mowers) are sold each year to a value of approx. USD 14 billion in more
than 150 countries around the world.
AEG Hausgeräte GmbH
Postfach 1036
D-90327 Nürnberg
http://www.aeg.hausgeraete.de
© Copyright by AEG
822 925 100-A-170205-01
Änderungen vorbehalten
Subject to change without notice
 Loading...