

Page 1
111 K
Einbau-Kochmulde
Electric Built-In Hob
Table de cuisson eléctrique
Encimera eléctrica
Piano di cottura elettrico
Electrische kookplaat
Gebrauchsanweisung
Operating Instructions
Mode d’emploi
Instrucciones para el uso
Istruzioni per l’uso
Gebruiksaanwijzing
AUS ERFAHRUNG GUT
Page 2
ENGLISH
Important Safety Information
You MUST read these warnings carefully before installing or using
the hob.
Keep this instruction book for future reference and ensure it is
passed on to any new owner.
The following symbols will be found in the text to guide you
throughout the Instructions:
Safety Instructions
Step by step instructions for an operation
☞
Hints and Tips
i
Enviromental Information
✤
21
Page 3
Contents
Child Safety............................................................................................................. 23
Disposal .................................................................................................................... 23
During Use............................................................................................................... 24
Description of the appliance ............................................................................25
Using the Hob........................................................................................................25
Operation Pilot Lamp ..........................................................................................25
Cookware ................................................................................................................27
Cleaning and Maintenance ................................................................................. 28
Something Not Working? .................................................................................... 29
Installation ......................................................................................................................... 30
Warnings about the electrical connection...................................................30
Electrical Connection .......................................................................................... 31
Connection of supply cable ..............................................................................32
Warnings about building in the hob..............................................................33
Building in dimensions .......................................................................................34
Cut out size ............................................................................................................34
Securing the Hob into the Cut out.................................................................35
Technical Data ........................................................................................................ 36
Servicing .................................................................................................................. 37
22
Page 4
Child Safety
● This hob is designed to be operated by adults. Do not allow children
to play near or with the hob.
● The hob gets hot when it is in use.
● Children should be kept away until it has cooled.
● Children can also injure themselves by pulling pans or pots off the
hob.
Disposal
Packaging
● After installation, please dispose of the packaging with due regard to
✤
safety and the environment.
Disposal of an old appliance
When disposing of an old appliance, make it unusable, by cutting off the
cable.
23
Page 5

During Use
Warnings
● It is important to note that the plate may smoke a little and produce
a slightly unpleasant odour when used for the first time. This is quite
normal and will disappear after a few minutes.
● Take care when frying food in hot oil or fat, as the overheated
splashes could easily ignite.
● Never leave the plates on without a pan on them or with an empty
pan on them.
● Never use the hob as a space heater.
● Never attempt to repair the hob! Repais carried out by
unexperienced persons can cause damage or injuries. This hob should
only be repaired or serviced by an authorised Service Engineer and
only genuine approved spare parts should be used.
● This hob has been registered as a “Class Y” appliance according to
Fire Risk Protection Regulations. It can be built-in in furniture units
placed near higher walls or units, provided that one of the sides is
adjacent to an unit with the same height.
24
Page 6
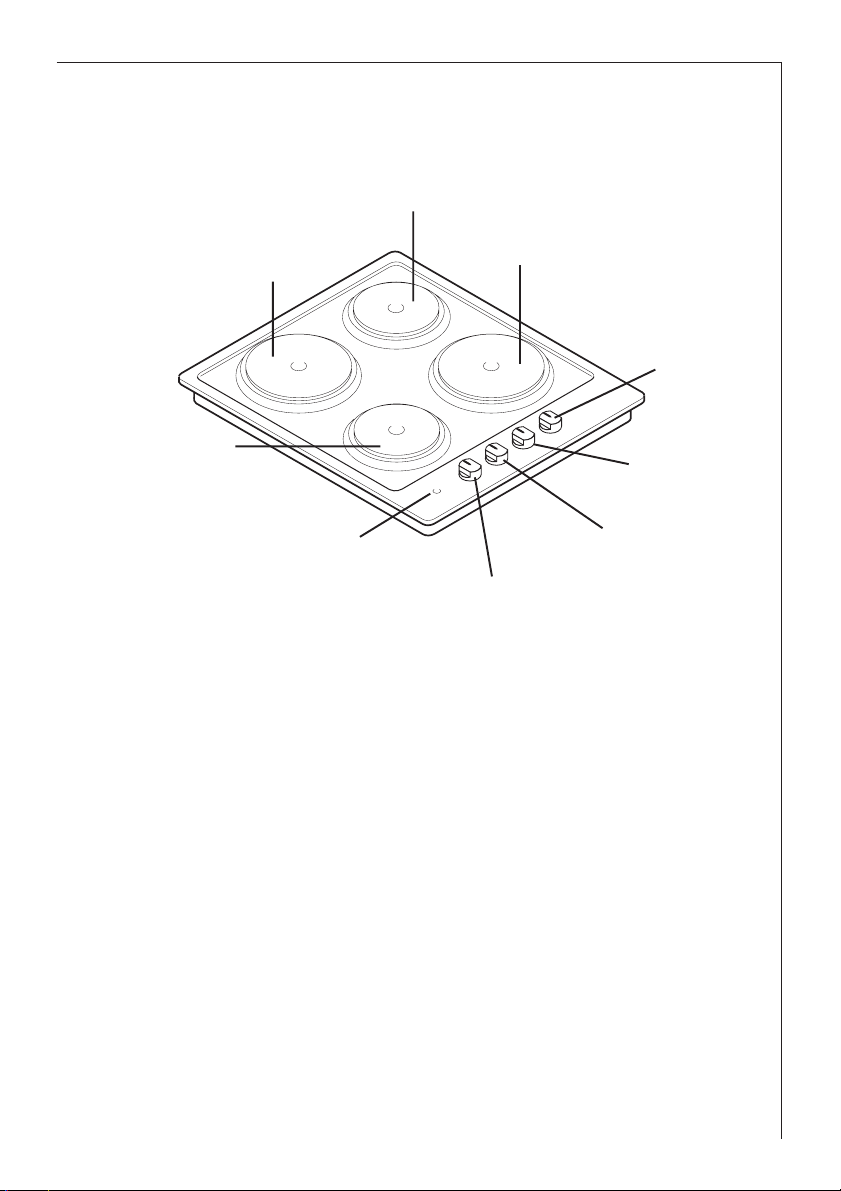
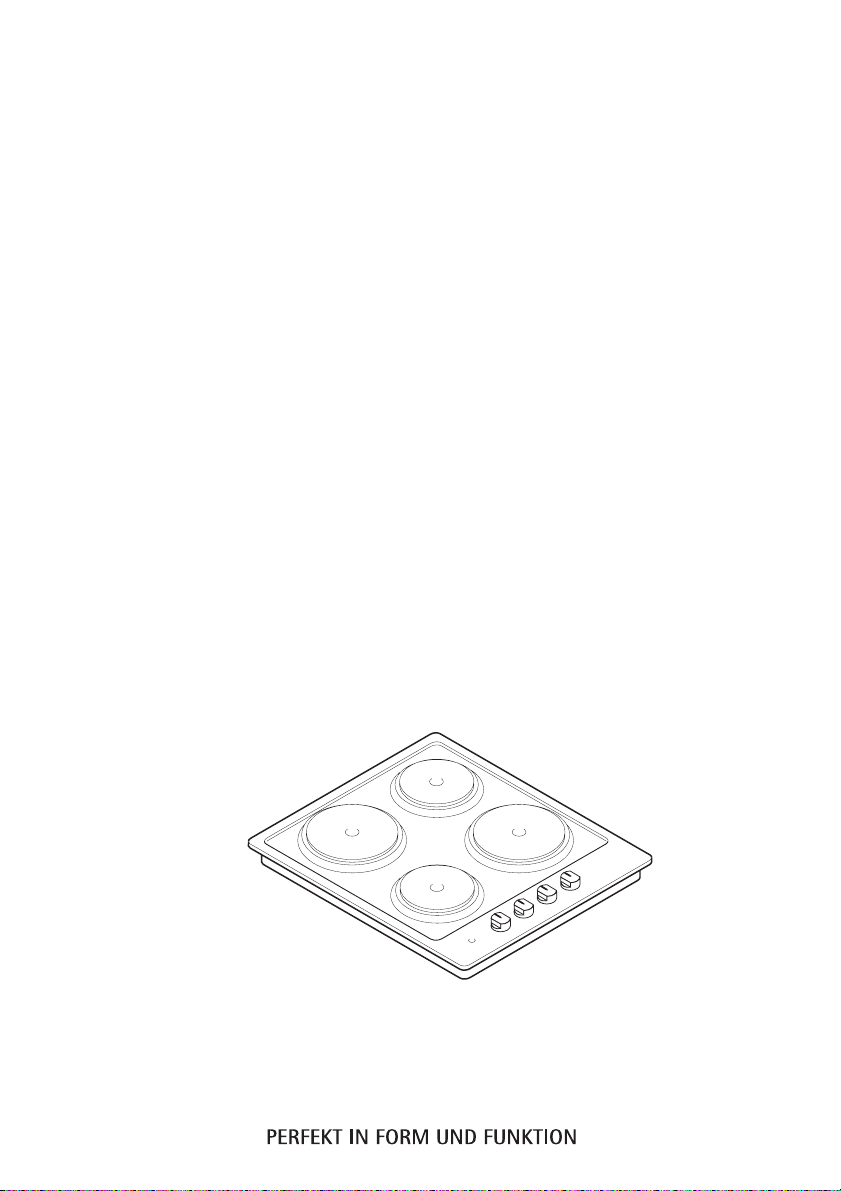
Description of the appliance
Back Left
Hotplate
Front Left
Hotplate
Back Right
Hotplate
Back Left
Hotplate
Control Knob
Front Right
Hotplate
Operating Pilot
Lamp
Front Left Hotplate
Control Knob
Front Right Hotplate
Control Knob
Using the hob
The knobs have 3 main heat settings, from "1" (minimum) to "3"
(maximum), but they can also be set in every intermediate position, to
adjust to personal needs.
To switch on a cooking zone, turn the relevant control knob
anticlockwise to the desired heat setting.
Place a saucepans on the cooking zone before switching it on. Never
leave the plates on without a pan on them or with an empty pan on
them. Avoid leaving an hot saucepan on a cold plate, or leaving a hot
saucepan to cool down on a switched off plate. This could cause
condensation and damage the plate.
Back Right
Hotplate
Control Knob
Operating Pilot Lamp
This lamp comes on each time a cooking zone is switched on.
25
Page 7

Using the Hob
For best cooking zone regulation, refer to the following table.
Boiling
To parboil, select setting 3 and
turn back to 1 for boiling; use
higher or lower setting as required.
Frying
Heat the fat up on setting 3, then
insert food to be fried and turn
back to 2; use higher or lower
setting as required.
Setting Level best for
Control
Knobs
Oprating
Pilot Lamp
3
0
0
0
0
2
1
3
2
1
3
2
1
3
2
1
26
0 OFF
• Simmering vegetables
Fish in its own juice
1 LOW Simmering potatoes or soups
• Boiling large quantities
of food, stews and soups
2 MEDIUM slow frying, making a roux
• Fast frying of meat or fish
3 HIGH Rapid heating up of fat or water
Page 8

Cookware
Utensils with an even bottom should be used in any case, best if made
of heatproof ceramic.
Uneven pots and pans do not allow heat to be spread evenly
throughout food, causing cooking times to be delayed and the hob to
be damaged.
Use utensils of a size matching the hotplates, or slightly larger, and
place them exactly on the hotplates.
Avoid using wet saucepans, or leaving wet saucepan covers on the cold
hotplates, because condensation can damage the plate.
Cookware to be used on the hotplates should have strong, trued
bottom with triple layer, in order to ensure the best heat absorption
cooking results. Covered pans allow you to save time and energy.
Glass pots, cast iron steak pans, such as copper or aluminium pans are
not recommended, because they often leave reasidues which can
damage the the hotplates.
Never use plastic cookware in any case!
Using the Hob
Wrong Wrong Right
27
Page 9

Cleaning and Maintenance
Before any maintenance or cleaning can be carried out, you must
DISCONNECT the hob from the electricity supply and allow it to cool
down.
Wipe over the hob top using a soft cloth well wrung out in warm
water to which a little washing up liquid has been added. Avoid the
use of household detergent and bleaches, impregnated pads unsuitable
for non-stick saucepans, steel wool pads or bath/sink stain removers.
The Hob Top
Regularly wipe over the hob top using a soft cloth well wrung out in
warm water to which a little wasing up liquid has been added. Avoid
the use of the following:
- household detergent and bleaches;
- impregnated pads unsuitable for non-stick saucepans;
- steel wool pads;
- bath/sink stain removers.
Should the hob top become heavily soiled, it is recommended that a
cleaning product such as Hob Brite or Bar Keepers Friend is used.
The control knobs may be removed by carefully pulling them upward
for easier cleaning.
The Hotplates
Spills onto the actual plate should be removed using warm water and
a soft brush, nylon or plastic scourer. To keep the plates looking as
new, hotplate conditioner can be purchased from most hardware
stores, e.g. "4 Hob" by HomeCare Products (follow the manufacturer's
instruction for use).
Alternatively, wipe the plates with a drop of olive oil on a kitchen
towel to avoid rust. It is important to note that the plate will smoke a
little and produce a slightly unpleasant odour when next used.
28
Page 10

Something Not Working?
The operation pilot lamp does not come on.
Check you have followed all points of operating procedure
☞
Check the mains fuses of the installation are not burnt out.
☞
If after all these checks, your hob still does not operate correctly,
contact your local Service Centre.
Please note that it will be necessary to provide proof of purchase for
any in-guarantee service calls.
In-guarantee customers should ensure that the above checks have
been made as the engineer will make a charge if the fault is not a
mechanical or electrical breakdown.
29
Page 11

Installation
Warnings about electrical connection
● Any electrical work required to install this hob should be carried out
by a qualified electrician or competent person, in accordance with
the current regulations.
● Before the appliance is connected:
1) check that the main fuse and the domestic installation can support
the load;
2) check that the power supply is properly earthed in compliance with
the current rules;
3) check the socket or the double pole switch used for the electrical
connection can be easily reached with the appliance built in the
forniture unit.
● This hob is designed to be connected to a 230V single-phase or 400V
three-phase with neautral wire 50Hz AC electrical supply.
● This hob has been registered as a “Class Y” appliance according to
Fire Risk Protection Regulations. It can be built-in in furniture units
placed near higher walls or units, provided that one of the sides is
adjacent to an unit with the same height.
● If connecting the hob directly to the power mains, a double pole
switch should be fitted, with a minimum gap of 3 mm. between the
switch contacts and of a type suitable for the required load in
compliance with the current electric regulations. The switch should
be sited within 2m of the hob and be easily accessible upon
completion of the installation.
● Proper arrangements must be taken in designing the furniture unit,
in order to avoid any contact with the bottom of the hob which can
be heated when it is operated. Before any intervention, ensure the
hob is disconncted from the electricity supply. The connection to the
terminal block and block bridges arrangement must be carried out
according to the available mains supply. Earth wire must be
connected to terminal marked with
.
30
● Once connection has been carried out, test heating elements for
about 3 minutes.
● The minimum distance combustible material can be fitted above the
hob in line with the edges of the hob is 420 mm.
Page 12

Electrical Connection
This appliance is supplied without connection cable. A suitable one
must be fitted, in compliance with the electric supply rate, provided
with a proper plug and able to carry the load specified on the rating
plate. It has to be a three-wired cable, with the earth wire marked
yellow-green. The cable type must be one of the following:
— H07 RN-F
— H05 RN-F
— H07 RR-F
— H05 VV-F
The plug has to be fitted in a proper socket.
If connecting the hob directly to the power mains, a double pole
switch should be fitted, with a minimum gap of 3 mm. between the
switch contacts and of a type suitable for the required load in
compliance with the current electric regulations.
The switch must not break the yellow and green earth cable at any
point.
Ensure that the hob supply cord does not come into contact with
surfaces whose temperature exceed 50°C over room temperature.
The manufacturer disclaims any responsability should all the safety
measures not be carried out.
Terminal Block
This appliance is provided with a 5 poles
terminal block set to operate with a 230
V single-phase electrical supply.
To adapt the the terminal block to a
different electrical supply, carry out the
connection as shown at page 32.
The earth wire must be connected to
terminal marked
Once the connection is carried out, fit the
cable into the the cable clamp.
.
31
Page 13

Installation
Connection of supply cable
Connection single-phase
three-phase
three-phase Y double-phase Y
type 3 poles 2 poles
+ Neutral wire + Neutral wire
Connection
321
21
4L33
321
1L132L24
to terminal
block
L14NPE
L1
L2
PE
L1 L3L24N
PE
NPE
Mains supply 230 V ~ 230 V 3 ~ 400 V 3N ~ 400 V 2N ~
Heating
elements rating
230 V 230 V 230 V 230 V
Cable
section
3 X 2,5 mm 4 X 1,5 mm 5 X 1,5 mm 4 X 1,5 mm
Fuse 24 A 13 A 13 A 13 A
32
Page 14

Warnings about building in the hob
● Ensure the eventual plastic covering of the furniture unit has been
fixed with a heatproof adhesive (100°C heatproof).
● Fitting of solid wood panel borders on the working top or behind the
hob is allowed provided that minimum distances are observed.
● A insulation panel which can only be removed with tools must be
fitted under the hob at a minimum distance of 50 mm.
● If the hob must be installed beside a cupboard, ensure a minimum
distance of 40 mm. is observed and the side of the cupboard is
covered with heatproof material.
● Before making the cut out in the worktop ensure that the edges of
the hob that are to be near the rear wall have a minimum distance
of 55 mm.
● A minimum distance of 100 mm. must be observed between the hob
and an eventual side wall exceeding the working top height.
● Hanging furniture units or cooker hoods must be fitted at a
minimum height of 650 mm. from the hob.
● Combustible or not heatproof materials must be kept away from the
appliance.
Installation
33
Page 15

Installation
Building in Dimensions
580
500
30
100
55
50
550
Cut Out Size
The dimensions of the cut-out are given in the diagram.
Rear wall
55
470
34
Page 16

Installation
30
20 min
a
Securing the hob into the cut out
Before fitting the hob into the cut out, the sealing gasket supplied with the
hob must be fitted to the edge of the cut out. It is essential that no gaps are
left in this seal in order to prevent spillage near the hob seeping into the
cabinet below.
1) Place the sealing gasket
☞
all around the edge of
the cut out.
2) Place the hob into the
cut out and secure it by
means of the relevant
fixing clamps and
screws, as shown in the
diagram. The edge of the
hob top will cut the
exceeding gasket, which
will then be easily
removed.
sealing
gasket
Proper arrangements must be taken in
designing the furniture unit, in order to
avoid any contact with the bottom of the
hob which can be heated when it is
operated.
Removable
50
panel
The recommended solution is shown in
diagram.
The panel fitted under the hob should be
easily removable to allow easy access if
technical assistance is needed.
35
Page 17

Technical Data
Dimensions in mm:
Hob H x W x D 8 x 580 x 500
Cut Out W x D 550 x 470
Heating Elements Ratings in Watt:
Front Right Hotplate Ø 145 mm. 1500
Back Right Hotplate Ø 180 mm. 2000
Back Left Hotplate Ø 145 mm. 1500
Front Left Hotplate Ø 180 mm. 2000
Total rating in Watt 7000
Electrical supply (50 Hz) 230 Volt
This appliance is manufactured according to the following EEC
directives:
73/23 EEC - 90/683 EEC - 93/68 EEC - 89/336 EEC current edition.
36
Page 18

Servicing
If you are not able to find any hint for a fault in this Instruction Book,
you should contact our After-sales Service.
When calling for an engineer, please remember you will be requested
to specify the following data:
E-Nr. _______________________
F-Nr. _______________________
which are quoted on the label attached on the back cover of this
Instruction Book.
These data enable the After-sales Service to make a focused spare part
specification, so that your hob can be repaired at the first engineer
visit.
This will save you the additional costs of any possible repeated visits
by the After-sales engineer.
37
 Loading...