


1020F-W
Cooker
°C
Instruction book

Contents |
|
Contents |
|
Safety ............................................................ |
3 |
The Cooker ................................................ |
4 |
Unpacking .......................................... |
4 |
The accessories ................................. |
4 |
The safety equipment ............................... |
5 |
Non-tip device ................................... |
5 |
The hob guard (optional accessory) |
5 |
The door catch .................................. |
6 |
Before the first use .................................... |
7 |
Cleaning the cooker .......................... |
7 |
Wash the accessories ....................... |
7 |
Heat the hotplates ............................ |
7 |
Heat the oven empty ....................... |
7 |
The control panel....................................... |
8 |
The indicator light bulbs ................... |
8 |
The hob ....................................................... |
9 |
Using the hob .................................... |
9 |
Cleaning the hotplates .................... |
11 |
The oven ................................................... |
12 |
The functions of the oven .............. |
12 |
Practical use ..................................... |
13 |
Cleaning and maintenance ............ |
17 |
Installation ................................................. |
19 |
To adjust the plinth height ............. |
19 |
Levelling the cooker ........................ |
19 |
Electrical connection ....................... |
20 |
Service ....................................................... |
21 |
Technical data .......................................... |
22 |
Practical tips and advice ......................... |
23 |
Problems and actions needed .............. |
24 |
At the end of the cooker’s life ............. |
24 |
2
Safety
Safety
Cooker technology is constantly improving. The way you use your new cooker may be different from the way you used your old one. Please read the whole instruction book before using your new cooker. This cooker is intended for normal domestic use. Take care of the instruction book which will be needed by the new owner if the cooker is sold or passed on to someone else. Do not hesitate to contact us with questions or viewpoints about the cooker and its use.
ANY TEXT MARKED WITH A warning triangle is to do with safety. PLEASE READ THESE TEXTS CAREFULLY, so that you
do not harm yourself, others or the cooker.
Children and the cooker
Children are naturally curious and interested in most things, including the cooker. From a safety point of view, we would like to emphasis the following for those with children at home:
There should be worktops on both sides of the cooker extending at least 40 cm to left and to right. Alternatively the cooker can be installed with a wall or a tall kitchen unit on one side and a worktop on the other side. The NON-TIP DEVICE should be fitted to prevent the cooker from tipping forwards if subjected to an abnormal loading.
The HOB GUARD (included or optional) should be fitted and the DOOR CATCH/DOOR CATCHES should be activated.
Children should be allowed to help with cooking, but teach them that pans, hotplates and ovens become hot and retain their heat for some time after use.
TOUCHING THESE CAN CAUSE BURNS.
Installation
Work on the cooker must be carried out by a qualified electrician. Work performed by unqualified persons can damage the cooker, and may also lead to personal injury and/or damage to property.
The cooker is heavy. Certain edges and corners which will not normally be exposed may be sharp. Use gloves when moving the cooker.
The NON-TIP DEVICE should be fitted, to prevent the cooker from tipping if subjected to an abnormal loading.
When using the cooker
Never leave the cooker unattended while deep frying, or when using it for melting fats, paraffin wax or other flammable substances. In the event of a fire, turn off all the controls and turn off the cooker hood fan.
SMOTHER THE FIRE WITH A PAN LID, never use water.
On the hob, use only pans which are intended for use on hotplates. Use only ovenproof dishes and containers in the oven.
Check that the cooker is switched off when not in use. All controls should be turned off.
Warning! Alcohol and other liquids that can form explosive gases, or other substances that could cause a fire or explosion, must not be used in the oven.
Great care must be taken when using such liquids and substances on the hob. For example, when preparing food on the hob with flaming brandy, or any other type of alcohol, there is always a risk that fat particles in the hob fan may catch fire with serious consequences. Flames and burning fat spills can also cause personal injury.
Cleaning
Keep the ceramic hob and oven clean. Fat and spillages give off smoke and odours when heated, and, at worst, can cause fires.
Maintenance and service
Turn all controls off before changing any bulbs.
Service and repairs should be carried out by a service company approved by the supplier. Use only spare parts supplied by such companies.
At the end of the cooker’s life
Help prevent accidents when the cooker has reached the end of its useful life. Make sure first that the lead is completely disconnected from the electrical supply (pull out the plug, or have the cooker safely disconnected from the wall), then cut the electrical lead at the point where it enters the cooker. Make sure that the door catch/door catches have been deactivated.
3

The Cooker
The Cooker
1 |
Removable oven vent |
|
1 |
|
|
||
2 |
Hob with HOTPLATES |
|
2 |
3 |
Control panel with CONTROLS |
|
|
4 |
Oven |
|
|
5 |
Storage drawer |
|
3 |
6 |
Plinth |
°C |
|
To make it easier to clean behind |
|
|
|
the cooker, it has wheels at the rear. |
|
|
|
To move the cooker forwards, open |
|
|
|
the oven door, lift carefully holding |
|
4 |
|
the upper edge and then pull the |
|
||
cooker out from the wall. |
|
|
|
5
6
Unpacking
Check that the cooker is undamaged and in perfect condition. Any damage occurred during transportation should be reported to the retailer immediately.
The packaging materials can be recycled. Contact your local council to find out where to take them.
The accessories
THE FOLLOWING ACCESSORIES ARE SUPPLIED WITH THE
COOKER:
•Enamelled baking trays and oven dish
•Oven shelf
•Non-tip device, including fittings
•Instruction book
THE FOLLOWING MAY BE PURCHASED AS OPTIONAL ACCESSORIES:
• Hob guard, including fittings
4
|
|
|
|
|
|
|
The safety equipment |
|
The safety equipment |
|
|
|
|
|
|
||
There should be at least 40 cm of worktops on both sides |
min. 40 cm |
|
min. 40 cm |
|||||
of the cooker (SEE PICTURE). Alternatively the cooker can be |
|
|
|
|
|
|
||
installed with a wall or a tall kitchen unit on one side and |
|
|
|
|
|
|
|
|
|
|
|
|
|
|
|
||
a worktop on the other. |
|
|
|
|
|
|
||
Child safety is further improved if the following |
|
|
|
|
|
|
||
equipment is fitted/in use: |
|
|
|
|
|
|
||
|
|
|
|
|
|
|||
|
|
|
|
|
|
|
|
|
|
|
|
|
|
|
|
|
|
|
|
|
|
|
|
|
|
|
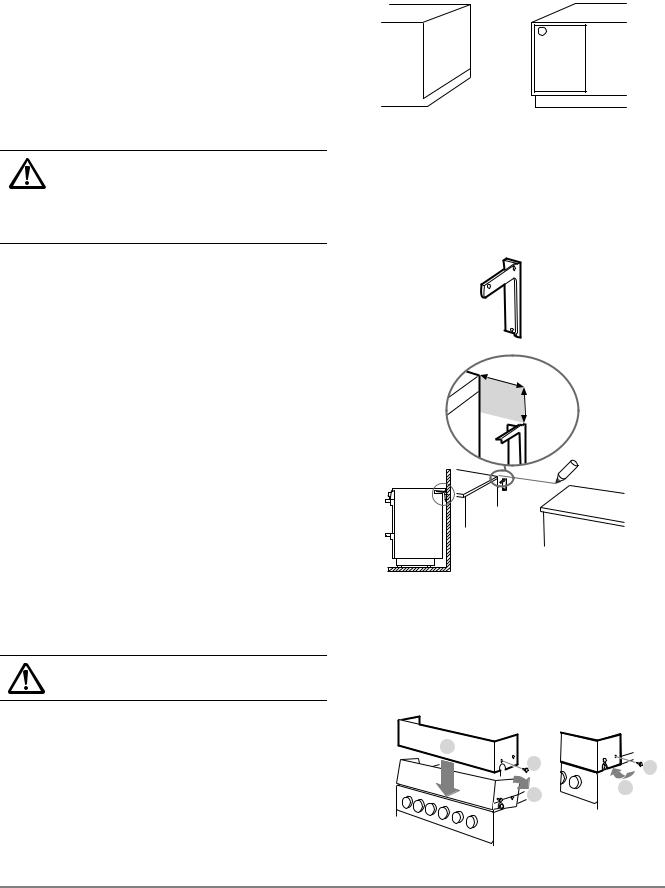
Non-tip device
The non-tip device should be fitted, to prevent the cooker from tipping if subjected to an abnormal loading. The non-tip device can only provide protection when the cooker is pushed into its normal position.
Before fitting the non-tip device, make sure the cooker has been levelled and adjusted to the correct plinth height (see “Installation” on p. 19).
1Draw a line on the wall – after levelling the cooker – along the top edge of the hob (see illustration).
2The measurements shown can be applied whether the non-tip device is fitted on the left or the right (see illustration). Measure and mark where the non-tip device is to be placed, then screw it onto a solid material or a suitable reinforcement or fixings.
NOTE! If the space between kitchen units is wider than the cooker, you will need to alter the measurements shown in the illustration if the cooker is to be centred.
3If you alter the measurements, remember to align the cooker correctly when pushing it into
place, so that the non-tip device enters the hole on the cooker rear.
The hob guard (optional accessory)
35-65 mm
55-60 mm
The hob guard should be fitted to make it harder for children to reach pans on the hob.
1 |
Press the plugs into the front holes. |
|
|
|
2 |
Place the guard on the cooker with the plugs over the |
2 |
|
|
|
edge of the hob. |
|
||
|
1 |
5 |
||
3 |
Angle the guard downwards and then back upwards |
|||
|
||||
|
4 |
|||
|
so the edges on its two sides engage under the edge |
3 |
||
|
of the hob. |
|
|
4 Lock it in place with the rear plugs.
5
The safety equipment
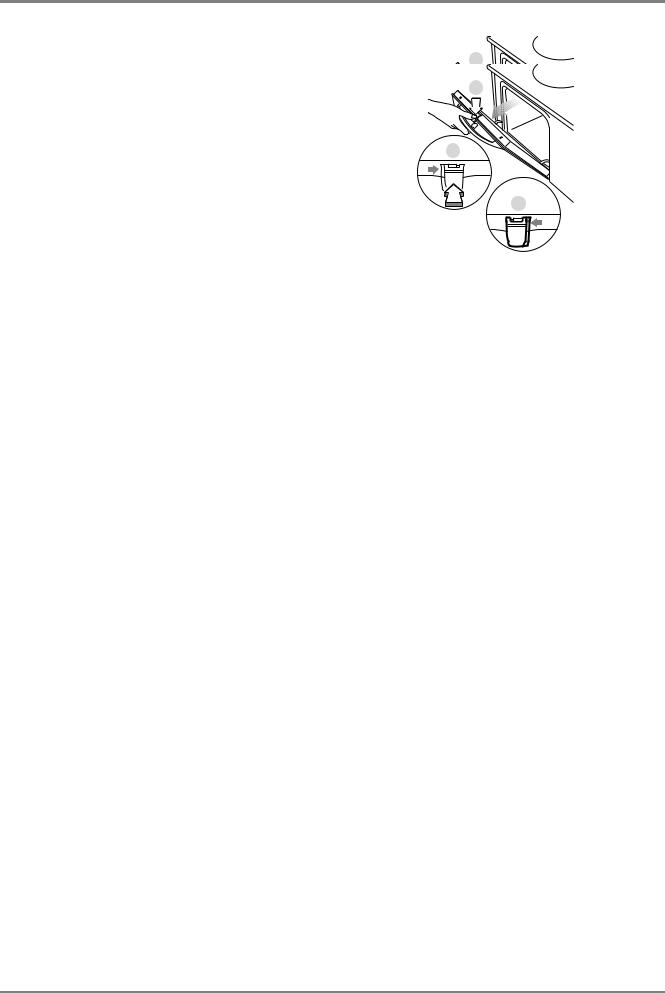
The door catch
The door catch makes it harder for children to open the oven door/storage drawer. The catches are already activated when the cooker is supplied new, but can be deactivated if necessary.
APress the catch down when you want to open the door.
BIf you wish to deactivate the catch, check first that the oven is not hot. Press the catch on the top edge of the door downwards and then a few millimetres to the right.
CIf you wish to activate the catch again, push the catch on the top edge of the door a few millimetres to the left.
A
 A
A
B
B
C
C
6
The safety equipment
Before the first use
Cleaning the cooker
Clean the cooker with a clean cloth, hot water and a little washing-up liquid straight after use. NEVER USE
ABRASIVE CLEANERS OR SCOURING AGENTS. The oven vent
cover can be washed in a dishwasher.
Remember that the non-tip device does not work when the cooker has been pulled forward to clean behind it.
Wash the accessories
Wash the baking tray, oven dish etc. in hot water and washing-up liquid. Rinse and dry.
Heat the hotplates
When supplied, the hotplates have been pretreated with an anti-corrosion product which will provide better protection if the hotplates are heated without pans the first time.
Heat one hotplate at a time on full power for no more than five minutes. The hotplates will get very hot, so be extra mindful of the safety of anyone near the cooker during this procedure. Some smoke and fumes are to be expected as the remaining solvent evaporates. Finish heating the hotplates before you first heat the oven.
Heat the oven empty
Children should be supervised!
The cooker will get very hot.
Before you use the oven for the first time, you need to heat it empty. Follow these instructions:
1Select  (top/bottom heat) and maximum temperature. The oven door should be shut.
2Ventilate the room. Switch off the oven once the “new” smell and fumes have ceased.
3Use hot water and washing-up liquid to wipe the oven, side racks and the inside of the door. Then wipe all of these parts dry.
max. 5 min.
max.°C |
°C |
7
The safety equipment
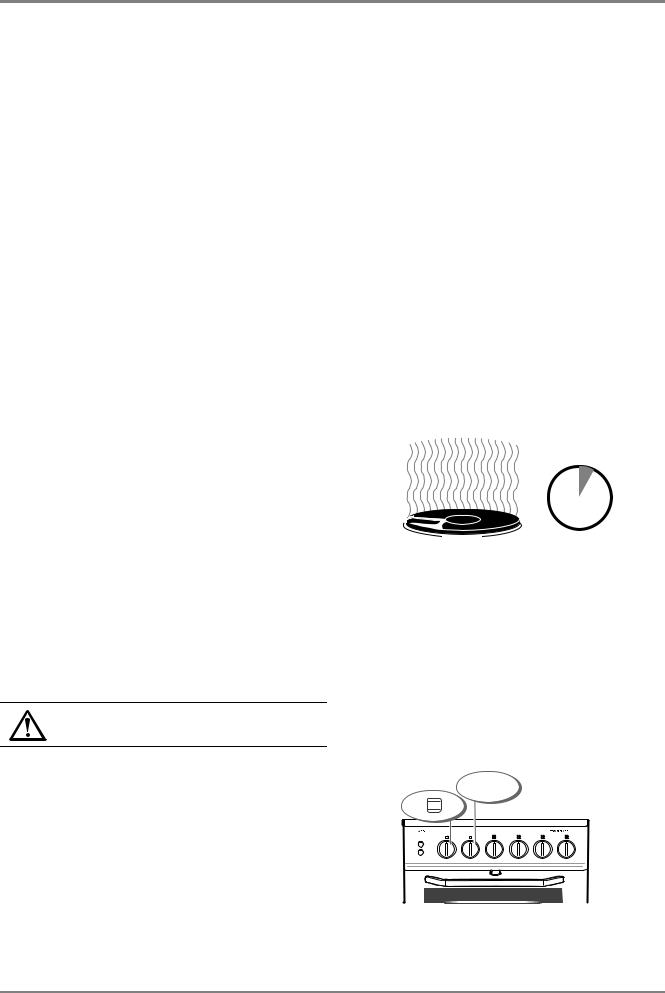
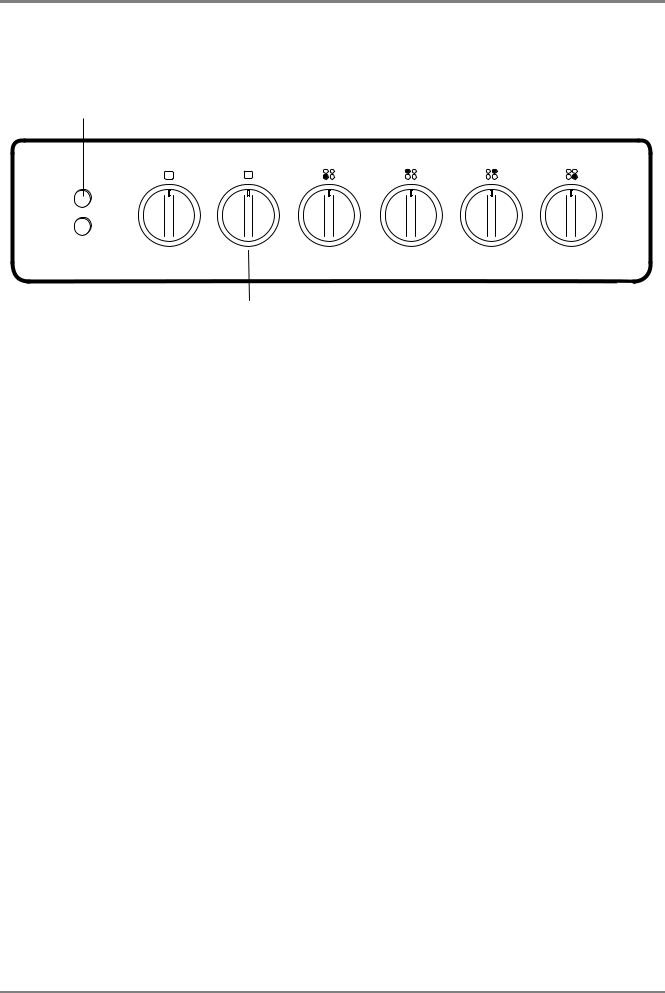
The control panel
1a
°C
|
|
|
|
|
|
|
|
|
|
|
|
|
|
|
|
|
|
|
|
|
|
|
|
|
|
|
|
|
|
|
|
|
|
|
|
|
|
|
|
|
|
|
|
|
|
|
|
|
|
|
|
|
|
|
|
|
|
|
|
|
|
|
|
|
|
|
|
|
|
|
|
|
|
|
3 |
|
|
|
|
|
|
||
|
1b |
2 |
|
|
|
|
|
|
|||||
4 |
|
|
|
||||||||||
|
|
|
|
|
|
|
|
|
|
|
|||
1a COOKER indicator light
1b OVEN indicator light
2OVEN function control
3OVEN temperature control
4HOTPLATE controls
The indicator light bulbs
These are neon indicator lights, which normally have a long service life. If one should fail, contact your service centre.
8
The hob
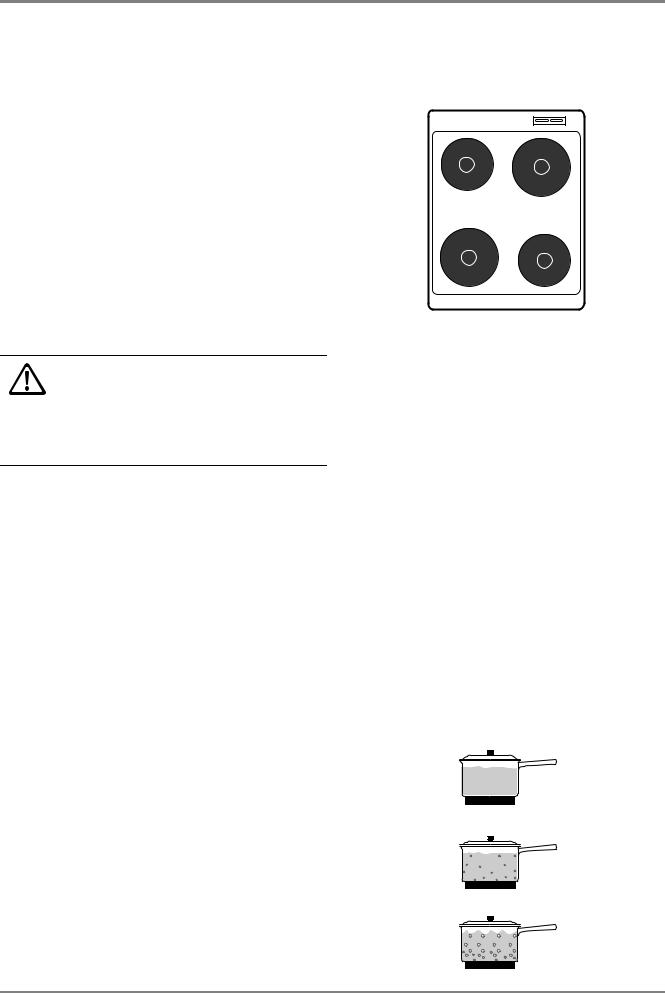
The hob
The cooker has four hotplates. Fast-heating hotplates are marked with a red dot and have an overheating cut-out function.
The back left hotplate cannot be used at the same time as the Swift Start or fan-assisted ; this prevents a surge of power from overloading the mains.
Using the hob
Never leave the cooker unattended while deep frying, or when using it for melting fats, paraffin wax or other flammable substances. In the event of a fire, turn off all the controls and turn off the
cooker hood fan. SMOTHER THE FIRE WITH A PAN
LID, never use water.
The hotplates have fixed settings, 0-6 (6 is the hottest). They can all be turned both clockwise and anticlockwise.
The control setting you choose will depend on your pans, what you are cooking and the quantity. You will soon learn to select the correct control setting. When a hotplate is switched on, the cooker’s red indicator light comes on.
Boiling
You normally start cooking with the hotplate switched to maximum heat before turning it down to a lower heat. The sound and size of the water bubbles can help you to choose the correct setting:
GENTLE HEAT: Simmering with tiny bubbles as in carbonated water. Suitable for cooking rice, fish and vegetables such as sugar peas and broccoli.
MEDIUM HEAT: Gently boiling with larger bubbles. Suitable for boiling most foods, such as meat, root vegetables and potatoes.
HOT: The sound disappears before the water starts bubbling vigorously. Suitable for boiling water for pasta and rice. Then turn the heat down for more gentle cooking.
ø 145 mm |
ø 180 mm |
|
ø 180 mm ø 145 mm
9
 Loading...