


D Anleitung .....................................2–5
Vor der ersten Inbetriebnahme
des Geräts lesen Sie bitte die
Sicherheitshinweise auf Seite 2.
GB Instruction book .....................6–9
Before using the appliance for the
first time, please read the safety
advice on page 6 carefully.
GR Εγχειρίδιο Οδηγιών ......... 10–13
Πριν χρησιμοποιήσετε τη
συσκευή για πρώτη φορά, διαβάστε τις υποδείξεις ασφαλείας στη
σελίδα 10.
Electrolux Hausgeräte Vertriebs GmbH
Fürther Strasse 246
D-90429 Nürnberg
Germany
Share more of our thinking at www.electrolux.com
3483 A STM125x 0201610
STICKMIXER MODEL STM125X
D • GB •GR
ELX13669_IFU_Stickmixer_AEG_3lang_cover.indd 1-4 2010-07-01 11:39:06
4.
A.
B.
C.
5.
A.
B.
C.
6.
51 mm
6 mm
Lock
Lock
Lock
ZSTM310
Deutsch
ZSTM310
Deutsch
1 2
Sehr geehrte Kundin, sehr
geehrter Kunde,
lesen Sie bitte diese Gebrauchsanweisung sorgfältig durch.
Beachten Sie vor allem die Sicherheitshinweise auf den
ersten Seiten dieser Gebrauchsanweisung! Bewahren Sie
bitte die Gebrauchsanweisung zum späteren
Nachschlagen auf. Geben Sie diese an eventuelle
Nachbesitzer des Gerätes weiter.
Mit dem Warndreieck und/oder durch Signalwörter
(Warnung!, Vorsicht!,
hervorgehoben, die für Ihre Sicherheit oder für die
Funktionsfähigkeit des Gerätes wichtig sind. Bitte
unbedingt beachten.
Dieses Zeichen leitet Sie Schritt für Schritt beim Bedienen
des Gerätes.
Nach diesem Zeichen erhalten Sie ergänzende
Informationen zur Bedienung und praktischen Anwendung
des Gerätes.
Mit dem Kleeblatt sind Tipps und Hinweise zum
wirtschaftlichen und umwel
Gerätes gekennzeichnet.
Achtung!) sind Hinweise
tschonenden Einsatz des
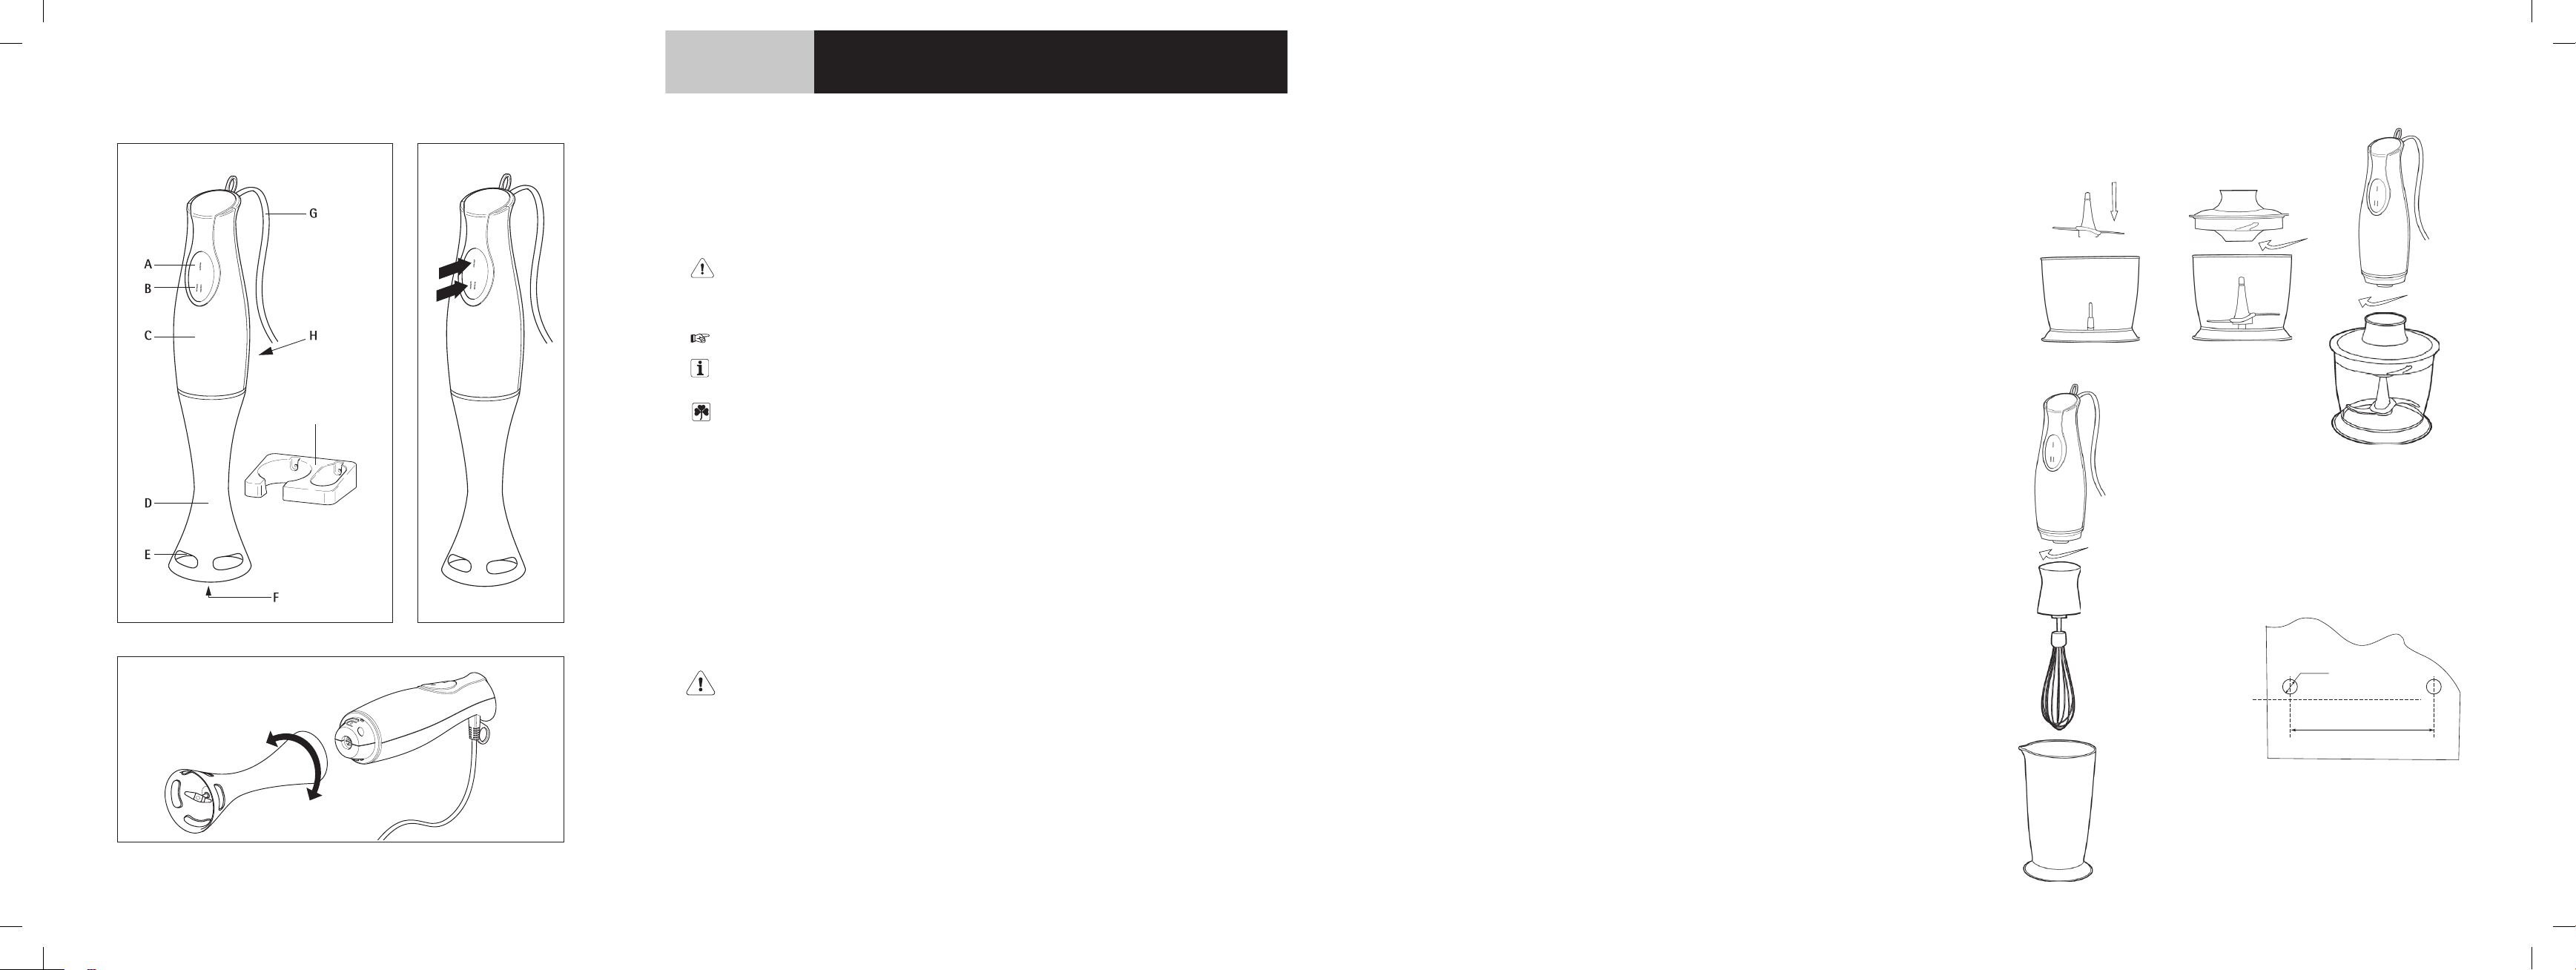
Gerätebeschreibung (Bild 1)
A Schalter für Geschwindigkeit I
B Schalter für Geschwindigkeit II
C Motorteil
D Mixstab
E Messerschutz
F Mixmesser
G Anschlußleitung
H Typschild
J Wandhalter (ZSTM310)
(STM1255)
Sicherheitshinweise
Die Sicherheit dieses Geräts entspricht den anerkannten
Regeln der Technik und dem Gerätesicherheitsgesetz.
Dennoch sehen wir uns als Hersteller veranlasst
den nachfolgenden Sicherheitshinweisen vertraut zu
machen.
, Sie mit
Allgemeine Sicherheit
• Das Gerät darf nur an ein Stromnetz angeschlossen
werden, dessen Spannung und Frequenz mit der Angabe
auf dem Typschild übereinstimmt!
• Nehmen Sie das Gerät niemals in Betrieb, wenn
– die Anschlußleitung beschädigt ist,
– das Gehäuse beschädigt ist.
• Den Netzstecker nie an der Anschlußleitung aus der
Steckdose zi
• Wenn die Anschlußleitung dieses Gerätes beschädigt
wird, muss sie durch den Hersteller oder seinen
Kundendienst oder eine ähnliche qualifizierte Person
ersetzt werden, um Gefährdungen zu vermeiden.
• Reparaturen an diesem Gerät dürfen nur von Fachkräften
durchgeführt werden. Durch unsachgemäße Reparaturen
können erhebliche Gefahren entstehen. Wenden Sie sich
im Reparaturfall an den Kundendiens
autorisierten Fachhändler.
• Der Hersteller haftet nicht für eventuelle Schäden, die
durch nicht bestimmungsgemäßen Gebrauch oder falsche
Bedienung verursacht werden.
• Dieses Gerät ist nicht dazu bestimmt, von Personen
(einschließlich Kinder), die aufgrund Ihrer Unerfahrenheit
oder Unkenntnis nicht in der Lage sind es sicher zu
bedienen oder von Personen (einschließlich Kinder) mit
ei
Fähigkeiten, benutzt oder betrieben zu werden, es sei denn
sie wurden durch eine für sie verantwortliche Person
angewiesen wie das Gerät sicher zu benutzen ist und
anfänglich von ihr beaufsichtigt.
Sicherheit von Kindern
• Personen (einschließlich Kindern) mit eingeschränkten
körperlichen, sensorischen oder geistigen Fähigkeiten
oder mit fehlender
dieses Gerät nur unter Aufsicht oder nach Anleitung durch
eine für ihre Sicherheit verantwortliche Person benutzen.
• Kinder müssen beaufsichtigt werden, um zu
gewährleisten, dass diese mit dem Gerät nicht spielen.
• Lassen Sie das Gerät nicht unbeaufsichtigt laufen und
wahren Sie gegenüber Kindern eine besondere
Aufsichtspflicht!
ehen.
t oder an Ihren
ngeschränkten physischen, sensorischen oder geistigen
Erfahrung und Kenntnissen dürfen
A.
B.
C.
Lock
4.
5.
A.
Lock
6.
B.
Lock
6 mm
51 mm
C.
3
2
ELX13669_IFU_Stickmixer_AEG_3lang_cover.indd 5-8 2010-07-01 11:39:08

Deutsch
Das sollten Sie beim Betrieb des Gerätes
beachten
• Greifen Sie nie bei laufendem Gerät mit den Fingern in
den Bereich des Mixmessers. Es besteht
Verletzungsgefahr!
• Beim Pürieren keine Finger oder Utensilien in den
Behälter stecken, um das Risiko schwerer Verletzungen
bzw. einer Beschädigung des Mixers zu verringern. Ein
Schaber kann verwendet werden, jedoch nur, wenn der
Mixer nicht in Betrieb ist.
• Nehmen Sie das Gerät nie mit nassen Händen in Betrieb.
• Mit dem Gerät dürfen keine Farben (Lacke, Polyester usw.)
gerührt werden – Explosionsgefahr!
• Das Gerät nicht in heissem Fett betreiben – Spritz- und
Verbrennungsgefahr!
• Vor allen Reinigungs- und Pflegearbeiten ist das Gerät
auszuschalten und der Netzstecker zu ziehen.
• Reinigen Sie den Motorteil nie unter fließendem Wasser
oder im Spülwasser.
•
Vermeiden Sie es, den Mixstab länger als max. 15
Sekunden trocken laufen zu lassen.
• Der Mixstab darf nur bei vom Netz getrenntem
Gerät aufgesetzt bzw. vom Gerät abgenommen
werden.
• Der Stabmixer kann die Lebensmittel in jedem Gefäß
verarbeiten. Am besten geeignet sind jedoch
handelsübliche Rührgefäße aus Kunststoff, wenn diese
hoch genug, entsprechend abgerundet und rutschfest sind.
• Zur Verringerun
Aufsetzen der Schneideklinge auf die Basis immer erst den
Arbeitsbehälter ordnungsgemäß aufstellen.
• Vor dem Einschalten des Geräts muss der Deckel des
Zerkleinerers sicher geschlossen sein.
• Das Gerät nur einschalten, wenn sich das Arbeitswerkzeug
in dem Gefäß mit den zu verarbeitenden Lebensmitteln
befinden. Warten Sie immer den Stillstand des Werkzeugs
ab, bevor S
g des Verletzungsrisikos vor dem
ie das Gefäß entfernen.
• Halten Sie keine harten Gegenstände (Löffel, Messer,
Quirle) in das laufende Werkzeug und greifen Sie nicht mit
der Hand hinein. Zerkleiniern Sie mit dem Mixstab keine
harten Lebensmittel, wie Nüsse oder Eiswürfel. Es besteht
Verletzungsgefahr! Das Gerät eignet sich nicht zum
Zerkleinern von Eis oder zum Mahlen harter, trockener
Produkte, wie Nüsse oder Bonbons. Die Klinge
dadurch stumpf werden.
• Die Verwendung von Zubehör, das nicht vom Hersteller
empfohlen wurde, kann zu Verletzungen führen.
• Gerät nur für den vorgesehenen Zweck
verwenden.
• Das ausgeschaltete Gerät zur Ablage nicht aufrecht
abstellen, sondern hinlegen, da sonst Unfallgefahr besteht.
• Nach Beendigung der Arbeiten ist das Gerät auszuschalten
und der Netzstecker zu ziehen.
könnte
Bedienung
Mit dem Stabmixer können Sie z.B.
– Mixgetränke herstellen,
– Flüssigkeiten mischen,
– Obst und Gemüse zerkleinen,
– Emulsionen herstellen (z.B. Mayonnaise, Soßen,
Cremes, Remouladen, Quark- und Joghurtspeisen
etc.),
– gekochte Gemüsesuppe und gekochte Babynahrung
pürieren,
– Cocktails und Shakes zubereiten.
Inbetriebnahme
Vor der ersten Inbetriebnahme sollten Sie den Mixstab
aus hygienischen Gründen reinigen.
Den Mixstab vor d
Mixstab aufsetzen/abnehmen (Bild 3)
Vor dem Aufsetzen bzw. Abnehmen des Mixstabes Gerät
ausschalten und Netzstecker ziehen!
Mixstab auf den Motorteil setzen und durch Drehen im
Uhrzeigersinn einrasten.
Zum Abnehmen den Mixstab mit einer Drehung gegen
den Uhrzeigersinn entriegeln.
em Verwenden gut abtrocknen.
3
ELX13669_IFU_Stickmixer_AEG_3lang_insert.indd 3 2010-07-01 11:21:16

Deutsch
Reinigung und Wartung
Vergewissern Sie sich, dass der Stabmixer vom
Netzstrom getrennt ist, bevor Sie Zubehörteile
für Reinigung oder Wartung anbringen bzw.
entfernen.
Hinweis: Den abnehmbaren Schaft des Mixers nicht in
Wasser tauchen, da dadurch im Laufe der Zeit die
Schmierung der Geräteteile ausgespült werden kann.
Den abnehmbaren Schaft unter fließendem Wasser
abspülen, dabei keine aggressiven
Reinigungsmittel
verwenden. Den abnehmbaren Schaft nach der
Reinigung aufrecht stellen, damit möglicherweise
eingedrungenes Wasser ablaufen kann.
Becher, Arbeitsbehälter, Schlagbesen und Klinge in
warmem Spülwasser abwaschen.
Mixaufsatz, Arbeitsbehälter und Schlagbesen
sollten nicht in der Spülmaschine gereinigt
werden, da die Kunststoffkomponenten durch
häufige Spülmaschinendurchgänge unbrauchbar
werden.
Netzstecker der Motoreinheit ziehen. Motoreinheit mit
einem feuchten Tuch abwischen. Niemals zur Reinigung in
Wasser tauchen, da dies zu Stromschlägen führen könnte.
Gründlich trocknen lassen.
Vorsicht: Die Klingen sind sehr scharf, mit
Vorsicht handhaben.
Schaft des Pürierstabs wieder an der Motoreinheit
anbringen und dann aufrecht in die Wandhalterung
stellen (siehe Abbildung 6) oder, um Pl
atz zu sparen,
aufhängen.
Schnellreinigung
Zwischen mehreren Verarbeitungseinsätzen den
Stabmixer in den halb mit Wasser gefüllten Becher
halten und einige Sekunden laufen lassen.
Technische Daten
Netzspannung: 230 V, 50 Hz
Leistungsaufnahme: 400 W
Maximale Betriebsdauer: 1 Minute
; Dieses Gerät erfüllt folgende EC Normen:
• Niedrig-Spannungs-Norm 2006/95/EC
• EMC Norm 89/336/EEC und Ergänzung 92/31/EEC
sowie 9
3/68/EEC
Entsorgung
Verpackungsmaterial
Die Verpackungsmaterialien sind umweltverträglich und
wiederverwertbar. Die Kunststoffteile sind
gekennzeichnet, z. B. >PE<, >PS< etc Entsorgen Sie die
Verpackungsmaterialien entsprechend ihrer
Kennzeichnung bei den kommunalen Entsorgungsstellen
in den dafür vorgesehenen Sammelbehältern.
Altgerät
Das Symbol
auf dem Produkt oder seiner
Verpackung weist darauf hin, dass dieses Produkt nicht
als normaler Haushaltsabfall zu behandeln ist, sondern an
einem Sammelpunkt für das Recycling von elektrischen
und elektronischen Geräten abgegeben werden muss.
Durch Ihren Beitrag zum korrekten Entsorgen dieses
Produkts schützen Sie die Umwelt und die Gesundheit
Ihrer Mitmenschen. Umwelt und Gesundheit werden durch
falsches Entsorgen gefährdet. Weitere Informationen über
das Recycling dieses Produkts erhalten Sie von Ihrem
Rathaus, Ihrer Müllabfuhr oder dem Geschäft, in dem Sie
das Produkt gekauft haben.
Deutsch
Arbeiten mit dem Stabmixer
Sie können das Gerät bis zu 1 Minute lang ohne
Unterbrechung benutzen. Lassen Sie das Gerät danach
mindestens 1 Minute abkühlen.
Wichtig: Die Klingen sind sehr scharf, mit
Vorsicht handhaben. Vergewissern Sie sich,
dass der Stabmixer vom Netzstrom getrennt ist,
bevor Sie Zubehörteile anbringen bzw.
entfernen.
Stabmixer in das zu verarbeitende Lebensmittel
eintauchen und mi
B (Geschwindigkeit II) einschalten (Bild 2).
Beginnen Sie alle Arbeiten mit Geschwindigkeit I. Sie
vermeiden so das Aufstäuben pulvriger Substanzen und
das Verspritzen von Flüssigkeiten. Durch leichtes Aufund Abbewegen des Mixstabes kann die zu bearbeitende
Masse am besten durchgearbeitet werden. Achten Sie
dabei darauf, dass
– der Mixstab nicht tiefer als 2/3 seiner Länge in der
Mixmasse eintaucht,
– der Mixbecher nicht mehr als 2/3 gefüllt ist
(Spritzgefahr).
Arbeiten mit dem Zerkleinerer
(STM1255)
(ZSTM310) Abbildung 4.
Die maximale Betriebsdauer mit Hochgeschwindigkeit
darf jeweils 1 Minute nicht überschreiten und zwischen
zwei aufeinander folgenden Durchgängen ist eine
Ruhezeit von 1 Minute einzuhalten.
Arbeitsbehälter auf eine saubere, ebene Oberfläche
stellen.
Edelstahlklinge in den Arbeitsbehälter einsetzen, wie in
Position A gezeigt.
Das Gut einfüllen.
Hinweis: Knochen vom Fleisch entfernen, in
Stücke (etwa 10–15 mm) schneiden, dann das
Fleisch in den Behälter geben. Bei jedem
Zerkleinerungsvorgang können jeweils maximal
200 g Fleisch verarbeitet werden.
Deckel am Arbeitsbehälter anbringen und im
Uhrzeigersinn drehen, bis er einrastet (siehe Position B).
Zum Abnehmen des Deckels in die Gegenrichtung
drehen.
t Schalter A (Geschwindigkeit I) bzw.
Den oberen Teil des Zerkleinerers in die Öffnung des
Deckels einführen und im Uhrzeigersinn drehen, bis er
einrastet (siehe Position C).
Gerät einstecken und Schalter drücken, um den Betrieb
zu starten.
Zum Anhalten des Geräts Schalter oben an der
Motoreinheit loslassen.
Vorsicht: Zur Verringerung des
Verletzungsrisikos vor dem Aufsetzen der
Schneideklinge auf die Basis immer erst den
Arbeitsbehälter ordnungsgemäß aufstellen.
Vor dem Einschalten des Geräts muss der Deckel
des Zerkleinerers sicher geschlossen sein.
Arbeiten mit dem Schlagbesen
(ZSTM310) Abbildung 5.
(STM1255)
Die maximale Betriebsdauer mit Hochgeschwindigkeit
darf jeweils 1 Minute nicht überschreiten und zwischen
zwei aufeinander folgenden Durchgängen ist eine
Ruhezeit von 1 Minute einz
Zum Anbringen des Schlagbesens an der Motoreinheit,
Motoreinheit im Uhrzeigersinn festdrehen. Zum Zerlegen
in die Gegenrichtung drehen (siehe Position A).
Stabmixer in eine Steckdose einstecken.
Eiweiß in Becher geben. Im Allgemeinen sind zwei
Eiweiß ausreichend (siehe Position B).
Stabmixer in die Masse absenken und den Schalter oben
an der Motoreinheit drücken (siehe Position C).
Zum Anhalte
Motoreinheit loslassen.
n des Stabmixers Schalter oben an der
Anbringen der Wandhalterung
(ZSTM310) Abbildung 6.
(STM1255)
Die Wandhalterung wird wie folgt angebracht:
Zwei Löcher in die Wand bohren, dabei strikt die
angegebenen Maße beachten.
Zwei Dübel mit einem Hammer einschlagen.
Halterung mit zwei Schauben an der Wand befestigen.
uhalten.
4
ELX13669_IFU_Stickmixer_AEG_3lang_insert.indd 4 2010-07-01 11:21:20

Deutsch
Reinigung und Wartung
Vergewissern Sie sich, dass der Stabmixer vom
Netzstrom getrennt ist, bevor Sie Zubehörteile
für Reinigung oder Wartung anbringen bzw.
entfernen.
Hinweis: Den abnehmbaren Schaft des Mixers nicht in
Wasser tauchen, da dadurch im Laufe der Zeit die
Schmierung der Geräteteile ausgespült werden kann.
Den abnehmbaren Schaft unter fließendem Wasser
abspülen, dabei keine aggressiven
verwenden. Den abnehmbaren Schaft nach der
Reinigung aufrecht stellen, damit möglicherweise
eingedrungenes Wasser ablaufen kann.
Becher, Arbeitsbehälter, Schlagbesen und Klinge in
warmem Spülwasser abwaschen.
Mixaufsatz, Arbeitsbehälter und Schlagbesen
sollten nicht in der Spülmaschine gereinigt
werden, da die Kunststoffkomponenten durch
häufige Spülmaschinendurchgänge unbrauchbar
werden.
Netzstecker der Motoreinheit ziehen. Motoreinheit mit
einem feuchten Tuch abwischen. Niemals zur Reinigung in
Wasser tauchen, da dies zu Stromschlägen führen könnte.
Gründlich trocknen lassen.
Vorsicht: Die Klingen sind sehr scharf, mit
Vorsicht handhaben.
Schaft des Pürierstabs wieder an der Motoreinheit
anbringen und dann aufrecht in die Wandhalterung
stellen (siehe Abbildung 6) oder, um Pl
aufhängen.
Reinigungsmittel
atz zu sparen,
Schnellreinigung
Zwischen mehreren Verarbeitungseinsätzen den
Stabmixer in den halb mit Wasser gefüllten Becher
halten und einige Sekunden laufen lassen.
Technische Daten
Netzspannung: 230 V, 50 Hz
Leistungsaufnahme: 400 W
Maximale Betriebsdauer: 1 Minute
; Dieses Gerät erfüllt folgende EC Normen:
• Niedrig-Spannungs-Norm 2006/95/EC
• EMC Norm 89/336/EEC und Ergänzung 92/31/EEC
sowie 9
3/68/EEC
Entsorgung
Verpackungsmaterial
Die Verpackungsmaterialien sind umweltverträglich und
wiederverwertbar. Die Kunststoffteile sind
gekennzeichnet, z. B. >PE<, >PS< etc Entsorgen Sie die
Verpackungsmaterialien entsprechend ihrer
Kennzeichnung bei den kommunalen Entsorgungsstellen
in den dafür vorgesehenen Sammelbehältern.
Altgerät
Das Symbol
Verpackung weist darauf hin, dass dieses Produkt nicht
als normaler Haushaltsabfall zu behandeln ist, sondern an
einem Sammelpunkt für das Recycling von elektrischen
und elektronischen Geräten abgegeben werden muss.
Durch Ihren Beitrag zum korrekten Entsorgen dieses
Produkts schützen Sie die Umwelt und die Gesundheit
Ihrer Mitmenschen. Umwelt und Gesundheit werden durch
falsches Entsorgen gefährdet. Weitere Informationen über
das Recycling dieses Produkts erhalten Sie von Ihrem
Rathaus, Ihrer Müllabfuhr oder dem Geschäft, in dem Sie
das Produkt gekauft haben.
auf dem Produkt oder seiner
5
ELX13669_IFU_Stickmixer_AEG_3lang_insert.indd 5 2010-07-01 11:21:22

English
When using your appliance
• Ensure fingers are kept away from the moving
mixing blade. This could result in injury!
• Keep hands and utensils out of container while blending
to reduce the risk of severe injury to persons or damage
to the blender. A scraper may be used but must be used
only when the blender is not running.
• Never use the mixer if you have wet hands.
• Do not use this appliance to stir paints (lacquers,
polyesters etc.) This could result in an explosion!
• Never use the appliance in hot fat (there is a
danger of splashes and you could burn yourself).
• The appliance should be switched off and unplugged
before any cleaning or maintenance work is done on it.
• Never clean the motor part under running water or
submerge it in washingup water.
• Avoid letting the mixing attachment runnig dry fo
r more
than max. 15 seconds.
• The mixing attachment is only to be inserted into or
removed from the appliance when it is switched off.
• The blender can be used to mix food in any suitable
bowl. Standard household plastic mixing bowls are the
ideal choice, if these are sufficiently deep, rounded and
non-slip.
• To reduce the risk of injury, never place cutting blade on
base without first putting bowl p
roperly in place.
• Be sure chopper lid is securely locked in place before
operating appliance.
• Never switch on the appliance until the working
attachment is in the mixing bowl with the ingredients to
be processed. Always wait until the attachment stops
before you remove the bowl.
• Do not hold any hard objects (e.g. a spoon, knife or
whisk) against the moving attachment and do not touch
it with your
hand. The appliance cannot be used for
chopping ice or blending hard and dry substance, such
as nut, candy. Otherwise the blade could be blunted.
• The use of accessory not recommended by the
manufacturer may cause injuries to persons.
• Do not operate the appliance for other than its intended
use.
• Do not stand the appliance upright for storage but lay it
down flat, otherwise there is a danger of an a
ccident.
• When you have finished working with the appliance,
switch it off and unplug it from the electricity supply.
Operation
You can use the blender e.g. for
– produce mixed drinks,
– mixing liquids,
– cutting up fruit and vegetables very small,
– producing emulsions (e.g. mayonnaise, sauces,
cremes, toppings, and deserts based on dairy
products),
– making pruée for vegetable soups or boiled baby-
food,
– prep
aring coctails and shakes.
Preparing for use
Before using for the first time, it is advisable for reasons
or hygiene to clean the mixing attachment. Dry the
mixing attachment well before using it.
Inserting/removing the mixing attachment
(Figure
3)
Before inserting or releasing the mixing attachment,
switch off the blender and remove the plug from the
mains socket!
Insert the mixing attachment to the m
otor part and lock it
by turning clockwise.
Tor remove, unlock the mixing attachment by turning it
anticlockwise.
English
Dear customer
Please read these operating instructions through
carefully.
Above all please follow the safety instructions on the first
few pages of these operating instructions! Please keep
the operating instructions for future reference. If
applicable pass these instructions on to the next owner
of the appliance.
With the warning triangle and/or by means of key words
(Danger!, Caution!, Attention!), information is
emphasized which is important for your safety or the
correct functioning of the appliance. It is essential that this
information is observed.
This symbol guides you step by step through the
operating procedure for your appliance.
After this symbol you receive supplementary information
on the practical application and use of the appliance.
Tips and information about the economical and
environmentally friendly use of the appliance are marked
with the clover.
Description of the appliance
(Figure 1)
A Switch for speed I
B Switch for speed II
C Motor part
D Mixing attachment
E Blade guard
F Mixing blade
G Lead
H Type plate
J Wall mounting
Safety instructions
This appliance corresponds to accepted technological
standards with regards to safety and to the Appliance
Safety Law. Nevertheless as
committed to familiarise you with the following safety
instructions:
(STM1255)
(ZSTM310)
a manufacturer we are
General safety
• The appliance may only be connected to a power
supply whose voltage and frequency comply with the
specifications on the rating plate!
• Never pick up the appliance if
– the lead is damaged,
– the housing is damaged.
• Never use the lead to pull the plug out from the
socket.
• In order to avoid danger
appliance is damaged, it must be replaced by the
manufacturer, its customer service department or a
similarly qualified person.
• Repairs to this appliance may only be carried out by
qualified service engineers. Considerable danger may
result from improper repairs. If repairs become
necessary, please contact the Customer Care
Department or your authorised dealer.
• The
manufacturer is not liable for any damages which
are caused by using the appliance for any other
purpose than that intended or incorrect use.
• This appliance is not intended for use by people
(including children) who, due to lack of experience or
knowledge, are unable to operate it safely, or for use
by people (including children) whose physical,
sensory or mental capabilities are reduced, unless
person responsible for them has shown them how to
use it safely, and has supervised them initially.
Safety of children
• This appliance is not intended for use by persons
(including children) with reduced physical, sensory
or mental capabilities, or lack of experience and
knowledge unless they have been given supervision
or instruction concerning use of the appliance by a
person responsible for the
• Children should be supervised to ensure that they do
not play with the appliance.
• Never leave the appliance unattended when on and
supervise particularly carefully if young children are
around!
, if the connection lead of this
ir safety.
a
6
ELX13669_IFU_Stickmixer_AEG_3lang_insert.indd 6 2010-07-01 11:21:26

English
When using your appliance
• Ensure fingers are kept away from the moving
mixing blade. This could result in injury!
• Keep hands and utensils out of container while blending
to reduce the risk of severe injury to persons or damage
to the blender. A scraper may be used but must be used
only when the blender is not running.
• Never use the mixer if you have wet hands.
• Do not use this appliance to stir paints (lacquers,
polyesters etc.) This could result in an explosion!
• Never use the appliance in hot fat (there is a
danger of splashes and you could burn yourself).
• The appliance should be switched off and unplugged
before any cleaning or maintenance work is done on it.
• Never clean the motor part under running water or
submerge it in washingup water.
• Avoid letting the mixing attachment runnig dry fo
than max. 15 seconds.
• The mixing attachment is only to be inserted into or
removed from the appliance when it is switched off.
• The blender can be used to mix food in any suitable
bowl. Standard household plastic mixing bowls are the
ideal choice, if these are sufficiently deep, rounded and
non-slip.
• To reduce the risk of injury, never place cutting blade on
base without first putting bowl p
• Be sure chopper lid is securely locked in place before
operating appliance.
• Never switch on the appliance until the working
attachment is in the mixing bowl with the ingredients to
be processed. Always wait until the attachment stops
before you remove the bowl.
• Do not hold any hard objects (e.g. a spoon, knife or
whisk) against the moving attachment and do not touch
it with your
chopping ice or blending hard and dry substance, such
as nut, candy. Otherwise the blade could be blunted.
• The use of accessory not recommended by the
manufacturer may cause injuries to persons.
• Do not operate the appliance for other than its intended
use.
hand. The appliance cannot be used for
roperly in place.
r more
• Do not stand the appliance upright for storage but lay it
down flat, otherwise there is a danger of an a
• When you have finished working with the appliance,
switch it off and unplug it from the electricity supply.
ccident.
Operation
You can use the blender e.g. for
– produce mixed drinks,
– mixing liquids,
– cutting up fruit and vegetables very small,
– producing emulsions (e.g. mayonnaise, sauces,
cremes, toppings, and deserts based on dairy
products),
– making pruée for vegetable soups or boiled baby-
food,
aring coctails and shakes.
– prep
Preparing for use
Before using for the first time, it is advisable for reasons
or hygiene to clean the mixing attachment. Dry the
mixing attachment well before using it.
Inserting/removing the mixing attachment
3)
(Figure
Before inserting or releasing the mixing attachment,
switch off the blender and remove the plug from the
mains socket!
Insert the mixing attachment to the m
by turning clockwise.
Tor remove, unlock the mixing attachment by turning it
anticlockwise.
otor part and lock it
7
ELX13669_IFU_Stickmixer_AEG_3lang_insert.indd 7 2010-07-01 11:21:29

English
Cleaning and maintenance
Ensure that the hand-held blender is unplugged
from the power outlet before assembling or
removing attachments for cleaning or
maintaining.
Note: Do not immerse the detachable stem of the blender
in water because overtime the lubrication on the bearings
may wash away.
Wash the detachable stem under running water, without
the use of abrasive cleaner or detergents. After fini
shing
cleaning the detachable stem, place it upright so that any
water which may have got in, can drain out.
Wash the cup, bowl, beater and blade in warm soapy
water.
The mixing attachment, the bowl and the beater
are not recommended to place in dishwashing
machine as the plastic component deteriorate
through prolonged use of dishwasher cleaning.
Unplug the motor unit. Wipe the motor unit with a da
mp
cloth. Never immerse it in water for cleaning as an electric
shock may occur.
Dry thoroughly.
Caution: Blades are very sharp, handle with care.
Reassemble the blender shaft to motor unit then place it
upright in wall bracket (see Figure 6.) or hang it up for
saving space.
Quick cleaning
Between processing tasks, hold the hand-held blender in
the cup half filled with water and turn on for a few seconds.
Technical data
Mains voltage: 230 V, 50 Hz
Power consumption: 400 W
Maximum continuous operating time:
1 minute
; This appliance conforms with the following EC Directives:
• Low Voltage Directive 2006/95/EC
• EMC Directive 89/336/EEC with amendments 92/31/EEC
and 93/68/EEC
Disposal
Packaging material
The packaging materials are environmentally friendly
and can be recycled. The plastic components are
identif
ied by markings, e.g. >PE<, >PS<, etc. Please
dispose of the packaging materials in the appropriate
container at the community waste disposal facilities.
Old appliance
The symbol
on the product or on its packaging
indicates that this product may not be treated as
household waste. Instead it shall be handed over to the
applicable collection point for the recycling of electrical
and electronic equipment. By ensuring this product is
disposed of correctly, you will help prevent potential
negative consequences for the environment and human
health, which could otherwise be caus
ed by
inappropriate waste handling of this product. For more
detailed information about recycling of this product,
please contact your local city office, your household
waste disposal service or the shop where you purchased
the product.
English
Working with the blender
The appliance can be used for up to 1 minute without
stopping. It should be allowed to cool afterwards for at
least 1 minute.
Important: Blades are very sharp, handle with
care. Ensure that the hand-held blender is
unplugged from the power outlet before
assembling or removing attachments.
Insert the blender deep into the bowl, then press switch A
(for speed I) or switch B (fo
Start all types of processing at speed I. This will avoid
powdery foods and liquids spraying out.
Light upward and downward movements of the blender
permit the material being worked on to be handled in the
best possible way. Please make sure that:
– the mixing attachment never has more than two-thirds
of its length immersed in the material,
– the mixing bowl is never more than tw
avoid the danger of splashes).
Working with the chopper
(STM1255)
(ZSTM310) Figure 4.
Max operation duration under high speed per time
cannot exceed 1 minute, and 1 minute rest time must be
maintained at two consecutive cycles.
Place the chopper bowl on a clean, level surface.
Assemble the stainless steel blade into the chopper
bowl, as shown in position A.
Place food into the chopper bowl.
Note: remove the bone of the meat, cut small
piece (approximately 10-15 mm), then place the
meat into the bowl, the max quantity of meat
can’t exceed 200g in every blending.
Attach the lid onto the chopper bowl and turn it in
clockwise direction until it locks into position (see
position B).To detach the lid, turn in adverse direction.
Insert the top part of the chopper into the hole of the
chopper lid,
position C).
and turn in clockwise direction to lock (see
r speed II) (Figure 2).
o-thirds full (to
Plug the appliance to power outlet and depress the
switch to begin operation.
To stop the appliance, release the switch at the top of the
motor unit.
Caution: To reduce the risk of injury, never place
cutting blade on base without first putting bowl
properly in place.
Be sure chopper lid is securely locked in place before
operating appliance.
Working with the egg white
(STM1255)
beater
Max operation duration under high speed per time
cannot exceed 1 minute, and 1 minute rest time must be
maintained at two consecutive cycles.
To assemble the egg white beater with the motor unit,
turn the motor unit clockwise direction until tightened.
To disassemble, turn in the adverse direction (see
position A).
Plug the hand-held blender to pow
Place egg white into the cup, generally, put two egg
white is enough (see position B).
Lower the hand-held blender into food and depress the
switch at the top of the motor unit (see position C).
To stop the hand-held blender release the switch at the
top of the motor unit.
Fixing wall bracket (ZSTM310)
Figure 6.
You can fix the wall bracket as following:
Drill two same holes in wall and stri
dimension as indicated.
Knock two plastic tubes in them with hammer.
Secure the bracket on wall with another two screws.
(ZSTM310) Figure 5.
er outlet.
(STM1255)
ctly follow the
8
ELX13669_IFU_Stickmixer_AEG_3lang_insert.indd 8 2010-07-01 11:21:32

English
Cleaning and maintenance
Ensure that the hand-held blender is unplugged
from the power outlet before assembling or
removing attachments for cleaning or
maintaining.
Note: Do not immerse the detachable stem of the blender
in water because overtime the lubrication on the bearings
may wash away.
Wash the detachable stem under running water, without
the use of abrasive cleaner or detergents. After fini
cleaning the detachable stem, place it upright so that any
water which may have got in, can drain out.
Wash the cup, bowl, beater and blade in warm soapy
water.
The mixing attachment, the bowl and the beater
are not recommended to place in dishwashing
machine as the plastic component deteriorate
through prolonged use of dishwasher cleaning.
Unplug the motor unit. Wipe the motor unit with a da
cloth. Never immerse it in water for cleaning as an electric
shock may occur.
Dry thoroughly.
Caution: Blades are very sharp, handle with care.
Reassemble the blender shaft to motor unit then place it
upright in wall bracket (see Figure 6.) or hang it up for
saving space.
shing
mp
Quick cleaning
Between processing tasks, hold the hand-held blender in
the cup half filled with water and turn on for a few seconds.
Technical data
Mains voltage: 230 V, 50 Hz
Power consumption: 400 W
Maximum continuous operating time:
1 minute
; This appliance conforms with the following EC Directives:
• Low Voltage Directive 2006/95/EC
• EMC Directive 89/336/EEC with amendments 92/31/EEC
and 93/68/EEC
Disposal
Packaging material
The packaging materials are environmentally friendly
and can be recycled. The plastic components are
ied by markings, e.g. >PE<, >PS<, etc. Please
identif
dispose of the packaging materials in the appropriate
container at the community waste disposal facilities.
Old appliance
The symbol
indicates that this product may not be treated as
household waste. Instead it shall be handed over to the
applicable collection point for the recycling of electrical
and electronic equipment. By ensuring this product is
disposed of correctly, you will help prevent potential
negative consequences for the environment and human
health, which could otherwise be caus
inappropriate waste handling of this product. For more
detailed information about recycling of this product,
please contact your local city office, your household
waste disposal service or the shop where you purchased
the product.
on the product or on its packaging
ed by
9
ELX13669_IFU_Stickmixer_AEG_3lang_insert.indd 9 2010-07-01 11:21:35

Ελληνικά
Ασφάλεια παιδιών
• Αυτή η συσκευή δεν προορίζεται για χρήση από
άτοµα (συµπεριλαµβανοµένων και παιδιών) µε
µειωµένες σωµατικές, αισθητηριακές ή
πνευµατικές ικανότητες ή µε έλλειψη εµπειρίας
και γνώσης, εκτός αν επιβλέπονται ή
καθοδηγούνται σχετικά µε τη χρήση της
συσκευής από άτοµο υπεύθυνο για την
ασφάλειά τους.
• Πρέπει να επιβλέπετε τα µικρά παιδιά, για να
βεβαιωθείτε ότι δεν παίζουν µε τη συσκευή.
• Μην αφήνετε τη συσκευή από την επίβλεψή σας
όταν βρίσκεται σε λειτουργία και να είστε
ιδιαίτερα προσεκτικοί όταν στο χώρο υπάρχουν
παιδιά!
Τι πρέπει να προσέξετε κατά τη λειτουργία
της συσκευής
• Μην βάζετε σε καµία περίπτωση τα χέρια
σας στην περιοχή της λεπίδας ανάµιξης,
όταν η συσκευή βρίσκεται σε λειτουργία.
Κινδυνεύετε να τραυµατιστείτε!
• Κρατήστε τα χέρια και τα οικιακά σκεύη µακριά
από το δοχε
ίο κατά την ανάµιξη, για να µειώστε
τον κίνδυνο σοβαρού τραυµατισµού κάποιου
ανθρώπου ή ζηµιάς στον αναµίκτη. Μπορείτε να
χρησιµοποιήσετε αποξεστικά µέσα µόνο όταν δε
λειτουργεί ο αναµίκτης.
• Πότε µη θέτετε τη συσκευή σε λειτουργία µε
υγρά χέρια.
• Μη χρησιµοποιείτε τη συσκευή για την ανάµιξη
χρωµάτων (βερνίκια, πολυεστέρες κ.λπ.) -
Κίνδυνος έκρηξης!
• Μη χρησιµοποιείτε τη συσκευή σε καυτά λίπη –
Κίνδυ
νος πιτσιλίσµατος και εγκαύµατος!
• Πριν από κάθε εργασία καθαρισµού και
συντήρησης πρέπει να απενεργοποιείτε τη
συσκευή και να αποσυνδέετε το φις από την
πρίζα.
• Ποτέ µη καθαρίζετε το µοτέρ κάτω από
τρεχούµενο νερό ή βυθίζοντάς το σε
σαπουνόνερο.
• Αποφύγετε την ξηρή λειτουργία του στελέχους
ανάµιξης για περισσότερο από 15 δευτερόλεπτα.
• Τοποθετείτε ή αφαιρείτε το στέλεχος ανάµιξης
µόνο όταν η συσκευή
δεν είναι συνδεδεµένη στο
ηλεκτρικό δίκτυο.
• Με το µπλέντερ χειρός µπορείτε να
επεξεργαστείτε τις τροφές σε κάθε δοχείο.
Ωστόσο για το σκοπό αυτό ενδείκνυνται κυρίως
τα κοινά πλαστικά δοχεία ανάµιξης του
εµπορίου, εφόσον έχουν επαρκές ύψος, έχουν
κατάλληλα αποστρογγυλεµένες άκρες και δε
γλυστράνε.
• Για να µειώσετε τον κίνδυνο τραυµατισµού, µην
τοποθετείτε ποτέ λεπίδα κοπής στη βάση χωρίς
να έχετε πρ
ώτα τοποθετήσει το µπολ στη θέση
του.
• Βεβαιωθείτε ότι το καπάκι τεµαχισµού είναι
κλειδωµένο µε ασφάλεια στη θέση του πριν
ξεκινήσετε τη λειτουργία της συσκευής.
• Θέτετε τη συσκευή σε λειτουργία µόνο εφόσον
το εργαλείο βρίσκεται µέσα στο δοχείο µε τις
τροφές που πρόκειται να επεξεργαστούν.
Περιµένετε πάντα να ακινητοποιηθεί το εργαλείο
πριν αποµακρύνετε τη συσκευή από το δοχείο.
• Μην παρεµβάλλετε σκλ
ηρά αντικείµενα (κουτάλι,
µαχαίρι, σύρµα) σε επαφή µε τη συσκευή, όταν
αυτή βρίσκεται σε λειτουργία και κρατήστε τα
χέρια σας µακριά από τη λεπίδα. Μην
χρησιµοποιείτε το µπλέντερ χειρός για το
θρυµµατισµό σκληρών τροφίµων, όπως είναι οι
ξηροί καρποί ή τα παγάκια. Κινδυνεύετε να
τραυµατιστείτε!
• Η συσκευή δεν µπορεί να χρησιµοποιηθεί για
τεµαχισµό πάγου ή για ανάµιξη σκληρών και
ξηρών ουσιών, όπως κ
αρύδια ή καραµέλες. Σε
αντίθετη περίπτωση, η λεπίδα θα αµβλυνθεί.
• Η χρήση παρελκόµενων εξαρτηµάτων τα οποία
δε συνιστώνται από τον κατασκευαστή, µπορεί
να προκαλέσει τραυµατισµό σε ανθρώπους.
• Μη χρησιµοποιείτε τη συσκευή για λειτουργία
πέρα από αυτή για την οποία έχει σχεδιαστεί.
• Oταν η συσκευή βρίσκεται εκτός λειτουργίας
πρέπει να αποτίθεται σε οριζόντια θέση και όχι
όρθια, καθώς στη δεύτερη περί
πτωση υπάρχει
κίνδυνος τραυµατισµού.
• Εφόσον έχετε ολοκληρώσει την εργασία σας µε
τη συσκευή πρέπει να την απενεργοποιείτε και
να αποσυνδέετε το φις από την πρίζα.
Ελληνικά
Αγαπητή πελάτισσα,
αγαπητέ πελάτη,
Παρακαλούµε να διαβάσετε προσεκτικά το
παρόν εγχειρίδιο οδηγιών χρήσης. ∆ώστε
ιδιαίτερη προσοχή στις υποδείξεις ασφαλείας
στην πρώτη σελίδα του παρόντος εγχειριδίου
οδηγιών χρήσης! Φυλάξτε το παρόν εγχειρίδιο
οδηγιών χρήσης για µελλοντική αναφορά.
Παραχωρήστε το σε επόµενο χρήστη της
συσκευής.
Με το προειδοποιητικό τρίγωνο και/ή τις
προειδοποιητικές λέξεις (Προειδο
Προσοχή!) επισηµαίνονται υποδείξεις, οι οποίες
είναι σηµαντικές για την προσωπική σας
ασφάλεια αλλά και για τη λειτουργικότητα της
συσκευής. Λάβετέ τις οπωδήποτε υπόψη.
Αυτό το σχέδιο σας κατευθύνει βήµα προς βήµα
κατά το χειρισµό της συσκευής.
Μετά από αυτό το σχέδιο, λαµβάνετε
συµπληρωµατικές πληροφορίες σχετικά µε το
χειρισµό και κάποιες πρακτικές εφαρµογές της
συσκευής.
Το σύµβολο τριφυλ
και υποδείξεις για την οικονοµικότερη και φιλική
προς το περιβάλλον χρήση της συσκευής.
Περιγραφή της συσκευής
10
(εικόνα 1)
A ∆ιακόπτης ταχύτητας I
B ∆ιακόπτης ταχύτητας II
C Μοτέρ
D Στέλεχος ανάµιξης
E Προστατευτικό κάλυµµα λεπίδας
F Λεπίδα ανάµιξης
G Καλώδιο τροφοδοσίας
H Πινακίδα τεχνικών χαρακτηριστικών
J Βάση τοίχου (ZSTM310)
λιού επισηµαίνει συµβουλές
(STM1255)
ποίηση!,
Υποδείξεις ασφαλείας
Η ασφάλεια αυτής της συσκευής ανταποκρίνεται
στους αναγνωρισµένους κανόνες τεχνικών
συστηµάτων και στη νοµοθεσία περί ασφάλειας
των συσκευών. Ωστόσο, από την πλευρά µας,
ως κατασκευαστές, θεωρούµε υποχρέωσή µας
να σας γνωστοποιήσουµε τις παρακάτω
υποδείξεις ασφαλείας.
Γενική ασφάλεια
• Η συσκευή πρέπει να συνδέεται αποκλειστικά σε
ηλεκτρικό δίκτυο, η τάση και η συχνότητα του
οποίου συµφωνούν µε τα στοιχεία που
αναγράφονται στην πινακίδα τεχ
χαρακτηριστικών!
• Σε καµία περίπτωση µη θέτετε τη συσκευή σε
λειτουργία, όταν
– το καλώδιο τροφοδοσίας έχει υποστεί φθορές,
– το περίβληµα έχει υποστεί φθορά.
• Μην βγάζετε ποτέ το φις από την πρίζα
τραβώντας το από το καλώδιο τροφοδοσίας.
• Αν το καλώδιο τροφοδοσίας της συσκευής σας
υποστεί φθορές, πρέπει να αντικατασταθεί από
τον κατασκευαστή, το αντίστοιχο τµήµα
εξυπηρέτησης πελατών ή από κάποιο
προκειµένου να αποφευχθεί κάθε κίνδυνος.
• Οι επισκευές αυτής της συσκευής πρέπει να
διεξάγονται µόνο από εξειδικευµένους τεχνικούς.
Μπορεί να προκύψουν σοβαροί κίνδυνοι αν
πραγµατοποιηθούν ακατάλληλες επισκευές στη
συσκευή. Σε περίπτωση που απαιτείται επισκευή
απευθυνθείτε στο τµήµα εξυπηρέτησης πελατών
ή στον εξουσιοδοτηµένο αντιπρόσωπο της
περιοχής σας.
• Ο κατασκευαστής δεν ευθύνεται για
φθορές που οφείλονται σε µη προσήκουσα
χρήση ή σε λανθασµένο χειρισµό.
• Η συσκευή αυτή δεν προορίζεται για τη χρήση
από άτοµα (συµπεριλαµβανοµένων των
παιδιών), που λόγω της απειρίας ή της
ανεπαρκούς γνώσης τους δεν είναισε θέση να τη
χειριστούν µε ασφάλεια ή από άτοµα
(συµπεριλαµβανοµένων των παιδιών) µε
µειωµένες σωµατικές, αισθητηριακές ή
πνευµατικές ικανότητες, παρά µόνο εφόσον η
ασφαλής
για τα άτοµα αυτά πρόσωπο το οποίο αρχικά θα
τα επιτηρεί.
χρήση τους υποδειχθεί από υπεύθυνο
νικών
τυχόν
ν ειδικό,
ELX13669_IFU_Stickmixer_AEG_3lang_insert.indd 10 2010-07-01 11:21:39

Ελληνικά
Ασφάλεια παιδιών
• Αυτή η συσκευή δεν προορίζεται για χρήση από
άτοµα (συµπεριλαµβανοµένων και παιδιών) µε
µειωµένες σωµατικές, αισθητηριακές ή
πνευµατικές ικανότητες ή µε έλλειψη εµπειρίας
και γνώσης, εκτός αν επιβλέπονται ή
καθοδηγούνται σχετικά µε τη χρήση της
συσκευής από άτοµο υπεύθυνο για την
ασφάλειά τους.
• Πρέπει να επιβλέπετε τα µικρά παιδιά, για να
βεβαιωθείτε ότι δεν παίζουν µε τη συσκευή.
• Μην αφήνετε τη συσκευή από την επίβλεψή σας
όταν βρίσκεται σε λειτουργία και να είστε
ιδιαίτερα προσεκτικοί όταν στο χώρο υπάρχουν
παιδιά!
Τι πρέπει να προσέξετε κατά τη λειτουργία
της συσκευής
• Μην βάζετε σε καµία περίπτωση τα χέρια
σας στην περιοχή της λεπίδας ανάµιξης,
όταν η συσκευή βρίσκεται σε λειτουργία.
Κινδυνεύετε να τραυµατιστείτε!
• Κρατήστε τα χέρια και τα οικιακά σκεύη µακριά
από το δοχε
τον κίνδυνο σοβαρού τραυµατισµού κάποιου
ανθρώπου ή ζηµιάς στον αναµίκτη. Μπορείτε να
χρησιµοποιήσετε αποξεστικά µέσα µόνο όταν δε
λειτουργεί ο αναµίκτης.
• Πότε µη θέτετε τη συσκευή σε λειτουργία µε
υγρά χέρια.
• Μη χρησιµοποιείτε τη συσκευή για την ανάµιξη
χρωµάτων (βερνίκια, πολυεστέρες κ.λπ.) -
Κίνδυνος έκρηξης!
• Μη χρησιµοποιείτε τη συσκευή σε καυτά λίπη –
Κίνδυ
• Πριν από κάθε εργασία καθαρισµού και
συντήρησης πρέπει να απενεργοποιείτε τη
συσκευή και να αποσυνδέετε το φις από την
πρίζα.
• Ποτέ µη καθαρίζετε το µοτέρ κάτω από
τρεχούµενο νερό ή βυθίζοντάς το σε
σαπουνόνερο.
• Αποφύγετε την ξηρή λειτουργία του στελέχους
ανάµιξης για περισσότερο από 15 δευτερόλεπτα.
• Τοποθετείτε ή αφαιρείτε το στέλεχος ανάµιξης
µόνο όταν η συσκευή
ηλεκτρικό δίκτυο.
ίο κατά την ανάµιξη, για να µειώστε
νος πιτσιλίσµατος και εγκαύµατος!
δεν είναι συνδεδεµένη στο
• Με το µπλέντερ χειρός µπορείτε να
επεξεργαστείτε τις τροφές σε κάθε δοχείο.
Ωστόσο για το σκοπό αυτό ενδείκνυνται κυρίως
τα κοινά πλαστικά δοχεία ανάµιξης του
εµπορίου, εφόσον έχουν επαρκές ύψος, έχουν
κατάλληλα αποστρογγυλεµένες άκρες και δε
γλυστράνε.
• Για να µειώσετε τον κίνδυνο τραυµατισµού, µην
τοποθετείτε ποτέ λεπίδα κοπής στη βάση χωρίς
να έχετε πρ
του.
• Βεβαιωθείτε ότι το καπάκι τεµαχισµού είναι
κλειδωµένο µε ασφάλεια στη θέση του πριν
ξεκινήσετε τη λειτουργία της συσκευής.
• Θέτετε τη συσκευή σε λειτουργία µόνο εφόσον
το εργαλείο βρίσκεται µέσα στο δοχείο µε τις
τροφές που πρόκειται να επεξεργαστούν.
Περιµένετε πάντα να ακινητοποιηθεί το εργαλείο
πριν αποµακρύνετε τη συσκευή από το δοχείο.
• Μην παρεµβάλλετε σκλ
µαχαίρι, σύρµα) σε επαφή µε τη συσκευή, όταν
αυτή βρίσκεται σε λειτουργία και κρατήστε τα
χέρια σας µακριά από τη λεπίδα. Μην
χρησιµοποιείτε το µπλέντερ χειρός για το
θρυµµατισµό σκληρών τροφίµων, όπως είναι οι
ξηροί καρποί ή τα παγάκια. Κινδυνεύετε να
τραυµατιστείτε!
• Η συσκευή δεν µπορεί να χρησιµοποιηθεί για
τεµαχισµό πάγου ή για ανάµιξη σκληρών και
ξηρών ουσιών, όπως κ
αντίθετη περίπτωση, η λεπίδα θα αµβλυνθεί.
• Η χρήση παρελκόµενων εξαρτηµάτων τα οποία
δε συνιστώνται από τον κατασκευαστή, µπορεί
να προκαλέσει τραυµατισµό σε ανθρώπους.
• Μη χρησιµοποιείτε τη συσκευή για λειτουργία
πέρα από αυτή για την οποία έχει σχεδιαστεί.
• Oταν η συσκευή βρίσκεται εκτός λειτουργίας
πρέπει να αποτίθεται σε οριζόντια θέση και όχι
όρθια, καθώς στη δεύτερη περί
κίνδυνος τραυµατισµού.
• Εφόσον έχετε ολοκληρώσει την εργασία σας µε
τη συσκευή πρέπει να την απενεργοποιείτε και
να αποσυνδέετε το φις από την πρίζα.
ώτα τοποθετήσει το µπολ στη θέση
ηρά αντικείµενα (κουτάλι,
αρύδια ή καραµέλες. Σε
πτωση υπάρχει
11
ELX13669_IFU_Stickmixer_AEG_3lang_insert.indd 11 2010-07-01 11:21:42

Ελληνικά
Συνδέστε τη συσκευή στην πρίζα και πιέστε το
διακόπτη για να ξεκινήσετε τη λειτουργία.
Για να σταµατήστε τη λειτουργία,
απελευθερώστε το διακόπτη που βρίσκεται στο
άνω τµήµα της µονάδας του κινητήρα.
Προσοχή: Για να µειώσετε τον κίνδυνο
τραυµατισµού, µην τοποθετείτε ποτέ λεπίδα
κοπής στη βάση χωρίς να έχετε πρώτα
τοποθετήσει το µπολ στη θέση του.
Βεβαιωθείτε ότι το καπάκι τεµαχισµού είναι
κλειδωµένο
µε ασφάλεια στη θέση του πριν
ξεκινήσετε τη λειτουργία της συσκευής.
Εργασία µε τη συσκευή
χτυπήµατος ασπραδιού
αυγών (ZSTM310) Σχήµα 5.
Η µέγιστη διάρκεια λειτουργίας µε µεγάλη
ταχύτητα κάθε φορά, δεν πρέπει να υπερβαίνει
το 1 λεπτό κάθε φορά και θα πρέπει να
διατηρείται µεσολαβεί 1 λεπτό ηρεµίας µεταξύ
δύο διαδοχικών κύκλων.
Για να συναρµολογήσετε τη συσκευή
χτυπήµατος ασπραδιού αυγών µε τη µονάδα
του κινητήρα, περιστρέψτε τη µονάδα του
κινητήρα προς τα δεξιά µέχρι να σφίξει. Για να
την αποσυναρµολογήσετε, περιστρέψτε την
προς την αντίθετη διεύθυνση (δείτε τη θέση Α).
Συνδέστε τον αναµικτήρα χειρός στην πρίζα.
Τοποθετήστε το ασπράδι των αυγών στο
κύπελλο, γενικά η τοποθέτηση του ασπραδιού
δύο αυγών είναι αρκετή (δείτε τη θέση Β).
Πιέστε τον αναµίκτη χειρός µέσα στην τροφή
και πιέστε το διακόπτ
η στο άνω µέρος της
µονάδας του κινητήρα (δείτε τη θέση Γ).
Για να σταµατήστε τον αναµίκτη χειρός,
απελευθερώστε το διακόπτη που βρίσκεται στο
άνω τµήµα της µονάδας του κινητήρα.
Στερέωση επιτοίχιου
στηρίγµατος
(ZSTM310)
(Σχήµα 6.)
Μπορείτε να στερεώσετε το επιτοίχιο στήριγµα
ως εξής:
Ανοίξτε δύο όµοιες τρύπες στον τοίχο και
τηρήστε πιστά τις διαστάσεις που σηµειώνονται.
Τοποθετήστε στις τρύπες δύο µι
κρούς
πλαστικούς σωλήνες (ούπα) χτυπώντας µε ένα
σφυρί.
Ασφαλίστε το στήριγµα στον τοίχο µε άλλες δύο
βίδες.
Καθαρισµός και συντήρηση
Βεβαιωθείτε ότι ο αναµίκτης χειρός είναι
αποσυνδεδεµένος από την πρίζα πριν από
τη συναρµολόγηση ή την αφαίρεση
εξαρτηµάτων για τον καθαρισµό ή τη
συντήρηση.
Σηµείωση: Μη βυθίζετε το αποσπώµενο
στέλεχος του αναµίκτη σε νερό γιατί µε τον καιρό
µπορεί να ξεπλυθεί η λίπα
νση των εδράνων.
Ξεπλύνετε το αποσπώµενο στέλεχος µε
τρεχούµενο νερό, χωρίς να χρησιµοποιήσετε
λειαντικό καθαριστικό ή απορρυπαντικά. Αφού
τελειώστε τον καθαρισµό του αποσπώµενου
στελέχους, τοποθετήστε το όρθιο ώστε να
αποστραγγιστεί οποιαδήποτε ποσότητα νερού
µπορεί να έχει παραµείνει στο εσωτερικό του.
Ξεπλύνετε το κύπελλο, το µπολ, τη συσκευή
χτυπήµατος και τις λεπίδες µε ζεστό νερό µε
σαπούνι.
Το προσαρτώµενο εξάρτηµα ανάµιξης, το
µπολ και η συσκευή χτυπήµατος δεν
συνιστάται να τοποθετούνται σε πλυντήριο
πιάτων καθώς τα πλαστικά εξαρτήµατα
φθείρονται από τον παρατεταµένο
καθαρισµό στο πλυντήριο πιάτων.
Αποσυνδέστε τη µονάδα του κινητήρα.
Σκουπίστε τη µονάδα του κινητήρα µε ένα υγρό
πανί. Ποτέ να µην τον βυθίζετε στο νερό για να
καθαριστεί, καθώς µπορεί να προκληθεί
ηλεκτροπληξία.
Σκουπίσ
τε επιµελώς.
Ελληνικά
Χειρισµός
Με το µπλέντερ χειρός µπορείτε για παράδειγµα
– να ετοιµάσετε ανάµικτα ποτά,
– να αναµίξετε υγρά,
– να τεµαχίσετε φρούτα και λαχανικά,
– να χτυπήσετε µαγιονέζα, σάλτσες, κρέµες, σος
12
για σαλάτες, παρασκευάσµατα γιαουρτιού και
άλλες τροφές µε κρεµώδη υφή,
– να πολτοποιήσετε χορτόσουπες ή
βρασµένες τροφές για βρέφη,
– να ετοιµάσετε κοκτέιλ ή φραπέ και µιλκσέικ.
Θέση σε λειτουργία
Πριν από την πρώτη θέση σε λειτουργία το
στέλεχος ανάµιξης πρέπει να καθαρίζεται για
λόγους υγιεινής. Πριν το χρησιµοποιήσετε,
φροντίστε να το στεγνώνετε καλά.
Τοποθέτηση και αφαίρεση του στελέχους
ανάµιξης (εικόνα 3)
Πριν τοποθετήσετε ή αφαιρέσετε το στέλεχος
ανάµιξης απενεργοποιήστε τη συσκευή και
αποσυνδέστε το φις από την πρίζα!
Εφαρµόστε το στέλεχος ανάµιξης στο µοτέρ και
περιστρέψτε το δεξιόστροφα µέχρι να
ασφαλίσει.
α να το αφαιρέσετε, απασφαλίστε το µε µία
Γι
αριστερόστροφη περιστροφή.
Εργασία µε το µπλέντερ
χειρός
Μπορείτε να χρησιµοποιήσετε τη συσκευή
µέχρι και 1 λεπτό χωρίς διακοπή. Αφήνετέ τη
στη συνέχεια να κρυώσει για 1 λεπτό
τουλάχιστον.
Σηµαντικό: Οι λεπίδες είναι πολύ αιχµηρές,
χειριστείτε τις µε προσοχή. Βεβαιωθείτε ότι ο
αναµίκτης χειρός είναι αποσυνδεδεµένος από
την πρίζα πριν τη συναρµολόγηση ή την
αίρεση εξαρτηµάτων.
αφ
Βυθίστε το µπλέντερ χειρός στο δοχείο µε την
τροφή που θέλετε να επεξεργαστείτε και
ενεργοποιήστε το µε το διακόπτη A (ταχύτητα I)
ή B (ταχύτητα II) (εικόνα 2).
Ξεκινάτε να δουλεύετε πάντα µε την ταχύτητα I.
Κατ' αυτόν τον τρόπο µπορείτε να αποφύγετε
τηδηµιουργία σκόνης από κονιώδιες ουσίες και
τις πιτσιλιές από υγρά. Μετακινώντας το
στέλεχος ανάµιξης ελαφρώς προς τα πάνω και
ος τα κάτω το υλικό δουλεύεται καλύτερα.
πρ
Ωστόσο προσέξτε
– να µη βυθίζετε το στέλεχος ανάµιξης µέσα
στο υλικό ανάµιξης σε βάθος µεγαλύτερο
από τα 2/3 του µήκους του,
– να µη γεµίζετε το δοχείο ανάµιξης πάνω από
τα 2/3 του (κίνδυνος πιτσιλιών).
Εργασία µε τη συσκευή
τεµαχισµού (ZSTM310)
Σχήµα 4.
Η µέγιστη διάρκεια λειτουργίας µε µεγάλη
ταχύτητα κάθε φορά, δεν πρέπει να υπερβαίνει
το 1 λεπτό και θα πρέπε
ηρεµίας µεταξύ δύο διαδοχικών κύκλων.
Τοποθετήστε το µπολ τεµαχισµού πάνω σε µια
καθαρή, επίπεδη επιφάνεια.
Συναρµολογήστε τη λεπίδα από ανοξείδωτο
ατσάλι στο µπολ τεµαχισµού, όπως φαίνεται
στη θέση Α.
Τοποθετήστε τροφή στο µπολ.
Σηµείωση: αφαιρέστε τα κόκαλα από το
κρέας, κόψτε µικρά κοµµάτια (περίπου 10-15
χιλ.), κατόπιν τοποθετήστε το κρέας µέσα
στο µπολ µε µέγιστη ποσότητα κ
κάθε ανάµιξη 200 γρ.
Προσαρµόστε το κάλυµµα πάνω στη συσκευή
τεµαχισµού και περιστρέψτε το προς τα δεξιά
µέχρι να κλειδώσει στη θέση του (δείτε τη θέση
Β). Για να αφαιρέσετε το κάλυµµα, περιστρέψτε
το προς την αντίστροφη κατεύθυνση.
Εισαγάγετε το άνω τµήµα της συσκευής
τεµαχισµού µέσα στην τρύπα του καλύµµατος
τεµαχισµού και περιστρέψτε προς τα δεξιά για
να κλειδώσει (δείτε τη θέση Γ).
(STM1255)
ι να µεσολαβεί 1 λεπτό
ρέατος σε
ELX13669_IFU_Stickmixer_AEG_3lang_insert.indd 12 2010-07-01 11:21:45

Ελληνικά
Συνδέστε τη συσκευή στην πρίζα και πιέστε το
διακόπτη για να ξεκινήσετε τη λειτουργία.
Για να σταµατήστε τη λειτουργία,
απελευθερώστε το διακόπτη που βρίσκεται στο
άνω τµήµα της µονάδας του κινητήρα.
Προσοχή: Για να µειώσετε τον κίνδυνο
τραυµατισµού, µην τοποθετείτε ποτέ λεπίδα
κοπής στη βάση χωρίς να έχετε πρώτα
τοποθετήσει το µπολ στη θέση του.
Βεβαιωθείτε ότι το καπάκι τεµαχισµού είναι
κλειδωµένο
ξεκινήσετε τη λειτουργία της συσκευής.
µε ασφάλεια στη θέση του πριν
Εργασία µε τη συσκευή
χτυπήµατος ασπραδιού
αυγών (ZSTM310) Σχήµα 5.
Η µέγιστη διάρκεια λειτουργίας µε µεγάλη
ταχύτητα κάθε φορά, δεν πρέπει να υπερβαίνει
το 1 λεπτό κάθε φορά και θα πρέπει να
διατηρείται µεσολαβεί 1 λεπτό ηρεµίας µεταξύ
δύο διαδοχικών κύκλων.
Για να συναρµολογήσετε τη συσκευή
χτυπήµατος ασπραδιού αυγών µε τη µονάδα
του κινητήρα, περιστρέψτε τη µονάδα του
κινητήρα προς τα δεξιά µέχρι να σφίξει. Για να
την αποσυναρµολογήσετε, περιστρέψτε την
προς την αντίθετη διεύθυνση (δείτε τη θέση Α).
Συνδέστε τον αναµικτήρα χειρός στην πρίζα.
Τοποθετήστε το ασπράδι των αυγών στο
κύπελλο, γενικά η τοποθέτηση του ασπραδιού
δύο αυγών είναι αρκετή (δείτε τη θέση Β).
Πιέστε τον αναµίκτη χειρός µέσα στην τροφή
και πιέστε το διακόπτ
µονάδας του κινητήρα (δείτε τη θέση Γ).
Για να σταµατήστε τον αναµίκτη χειρός,
απελευθερώστε το διακόπτη που βρίσκεται στο
άνω τµήµα της µονάδας του κινητήρα.
(STM1255)
η στο άνω µέρος της
Στερέωση επιτοίχιου
στηρίγµατος
(ZSTM310)
(STM1255)
(Σχήµα 6.)
Μπορείτε να στερεώσετε το επιτοίχιο στήριγµα
ως εξής:
Ανοίξτε δύο όµοιες τρύπες στον τοίχο και
τηρήστε πιστά τις διαστάσεις που σηµειώνονται.
Τοποθετήστε στις τρύπες δύο µι
πλαστικούς σωλήνες (ούπα) χτυπώντας µε ένα
σφυρί.
Ασφαλίστε το στήριγµα στον τοίχο µε άλλες δύο
βίδες.
κρούς
Καθαρισµός και συντήρηση
Βεβαιωθείτε ότι ο αναµίκτης χειρός είναι
αποσυνδεδεµένος από την πρίζα πριν από
τη συναρµολόγηση ή την αφαίρεση
εξαρτηµάτων για τον καθαρισµό ή τη
συντήρηση.
Σηµείωση: Μη βυθίζετε το αποσπώµενο
στέλεχος του αναµίκτη σε νερό γιατί µε τον καιρό
µπορεί να ξεπλυθεί η λίπα
Ξεπλύνετε το αποσπώµενο στέλεχος µε
τρεχούµενο νερό, χωρίς να χρησιµοποιήσετε
λειαντικό καθαριστικό ή απορρυπαντικά. Αφού
τελειώστε τον καθαρισµό του αποσπώµενου
στελέχους, τοποθετήστε το όρθιο ώστε να
αποστραγγιστεί οποιαδήποτε ποσότητα νερού
µπορεί να έχει παραµείνει στο εσωτερικό του.
Ξεπλύνετε το κύπελλο, το µπολ, τη συσκευή
χτυπήµατος και τις λεπίδες µε ζεστό νερό µε
σαπούνι.
Το προσαρτώµενο εξάρτηµα ανάµιξης, το
µπολ και η συσκευή χτυπήµατος δεν
συνιστάται να τοποθετούνται σε πλυντήριο
πιάτων καθώς τα πλαστικά εξαρτήµατα
φθείρονται από τον παρατεταµένο
καθαρισµό στο πλυντήριο πιάτων.
Αποσυνδέστε τη µονάδα του κινητήρα.
Σκουπίστε τη µονάδα του κινητήρα µε ένα υγρό
πανί. Ποτέ να µην τον βυθίζετε στο νερό για να
καθαριστεί, καθώς µπορεί να προκληθεί
ηλεκτροπληξία.
Σκουπίσ
τε επιµελώς.
νση των εδράνων.
13
ELX13669_IFU_Stickmixer_AEG_3lang_insert.indd 13 2010-07-01 11:21:48

14
ELX13669_IFU_Stickmixer_AEG_3lang_insert.indd 14 2010-07-01 11:21:49
 Loading...