

Page 1
SCC 101, SCC 102
Instruction book .........................4
g
Mode d’emploi ...........................8
f
Brugsanvisning.........................13
k
Bruksanvisning ......................... 17
s
PAG E
Bruksanvisning ........................... 21
n
Käyttöohje .................................. 25
q
Инструкцию по
u
эксплуатации................................29
Page 2
1
A
H
B
C
F
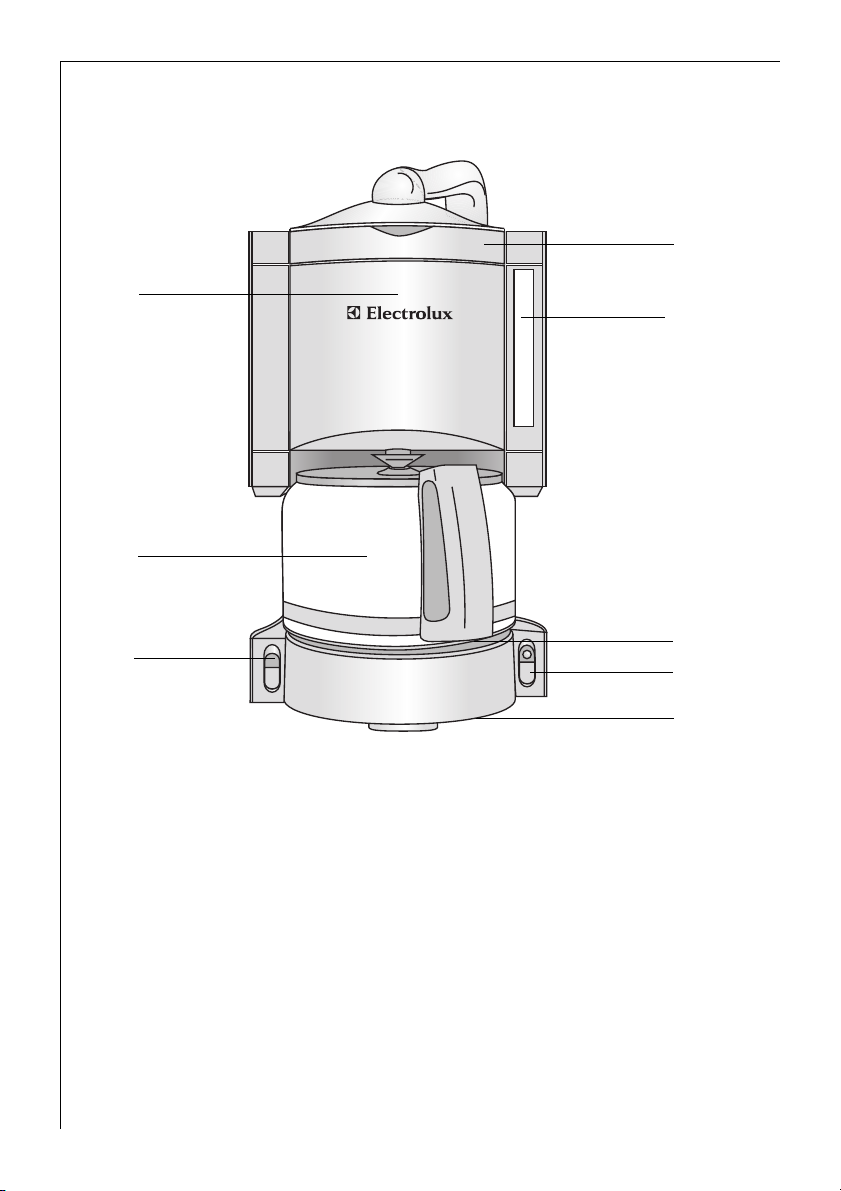
Features
A Fresh water container with lid
B Fresh water gauge
C Coffee jug with cup graduations and lid
D Coated hotplate
E Rating plate (on the underside of the
appliance)
F Aroma switch for number of cups and
strength of the coffee (depending on
model)
G On/Off switch with power light (depending
on model: with automatic switch off after
2hours)
H Swivel filter (depending on model: with
fresh water filter inside)
2
D
G
E
Page 3
2
3
4
11
5
8
6
9
7
10
12
3
Page 4

g
Congratulations ...
g
... on the purchase of your new coffee
machine. You have purchased a modern, reliable appliance with which you
will certainly frequently enjoy preparing fresh, aromatic coffee.
As for all appliances, there are a number of basic points on this coffee
machine that need to be noted and
observed. Therefore, please read the
operating instructions carefully, and
retain them. Above all, please take note
of the safety instructions.
1 Safety instructions
• The appliance operating voltage and
the mains voltage must be the same!
(See the rating plate on the underside
of the coffee machine).
• Never let the mains lead touch the
hotplate when it is hot!
• Never pull the plug from the socket by
means of the mains lead!
• Do not use the appliance if:
– the mains lead is damaged,
– the housing shows visible signs of
damage.
• The hotplate, coffee jar and water
pipes become hot during operation due
to the nature of their function. Keep
children away!
• Do not fill the appliance with water
when hot! Switch off the coffee
machine and leave to cool for approx.
5 minutes!
• Follow the instructions on descaling!
• Prior to performing maintenance or
cleaning, ensure that the appliance is
switched off and unplugged from the
mains!
• Do not submerge the base unit in
water!
• If the appliance needs to be repaired,
including the replacement of the mains
cable, it must be sent to the dealer
(special tools are required) where the
coffee machine was purchased or to an
Electrolux Customer Service Centre.
Repairs to electrical appliances may
only be performed by qualified service
engineers.
Improper repairs can give rise to significant hazards for the user.
If the appliance is used for purposes
other than those intended or used
incorrectly, no liability can be accepted
for any damage that may be caused.
This appliance complies with the fol-
;
lowing EC directives:
• 73/23/EWG dated 19.02.1973 "Low
Voltage Directive", including Directive
Amendment 93/68 /EWG
• 89/336/EWG dated 03.05.1989 "EMC
Directive", including Directive Amendment 92/31/EWG
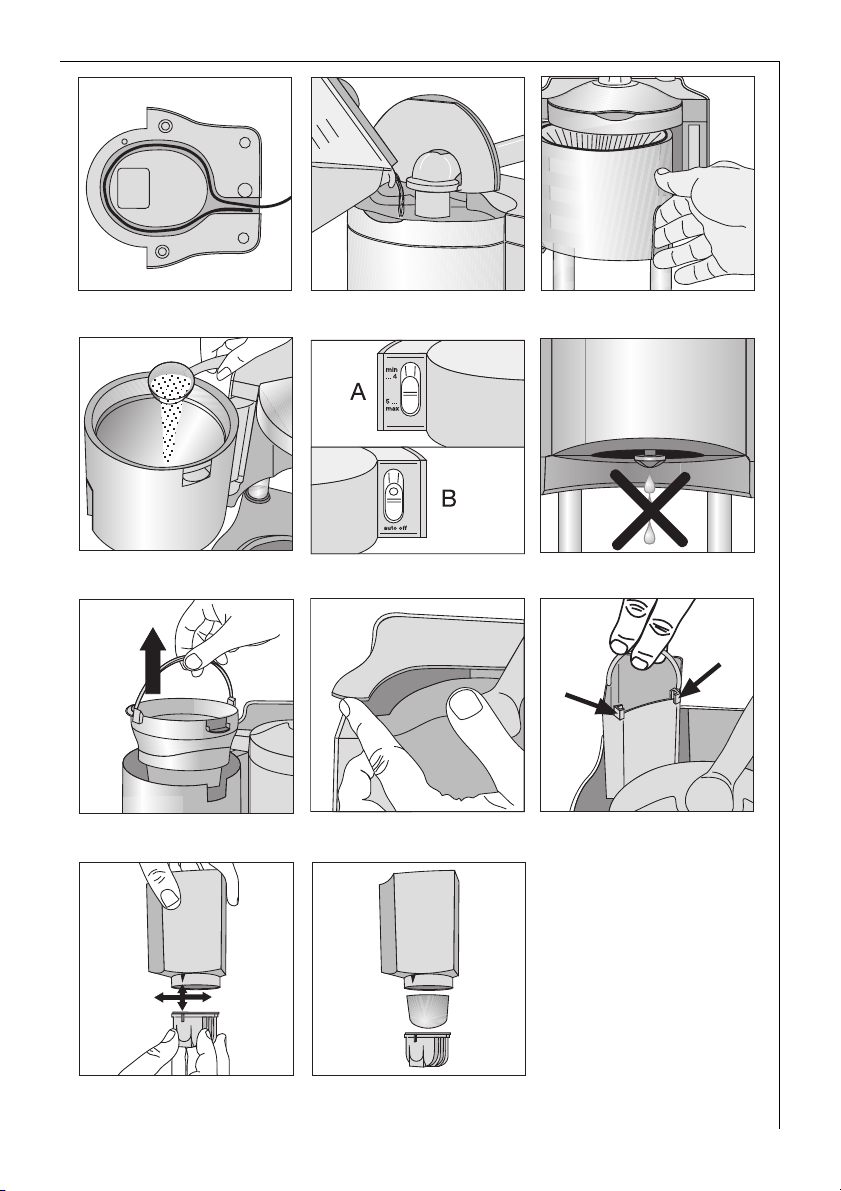
Cable Compartment (Figure 2)
Your coffee machine has a cable compartment. If the mains cable is too
long, you can store cable that is not
required in the base of the housing.
Prior to initial start-up
Depending on the model, your coffee
machine is fitted with a fresh water filter. The first filter element is in a bag
inside the swivel filter (Figure 1/H).
Substances that affect the taste of the
coffee, for example chlorine, are
removed to large degree with the aid
of the fresh water filter. The aroma of
your coffee can thus unfold to the full.
(For information on the usage and
replacement of the fresh water filter,
see the "Using and Replacing the Fresh
Water Filter" section on page 6.)
Before brewing coffee for the first
3
time, you should perform one or two
brews with water only, however with
the full quantity of water:
1. to clean the coffee machine;
2. because a new fresh water filter discolours the water when water first flows
through it. This does not spoil the taste
of coffee brewed subsequently.
4
Page 5

g
Fill the fresh water container with cold
water up to the top cup graduation.
Switch on the appliance and allow the
water to flow into the coffee jug without a filter paper or coffee. Pour away
the water that has run through the
appliance.
Making Coffee
1. Fill with Water (Figure 3)
Lift the lid on the fresh water container. Fill the container with clear,
cold tap water.
Never use hot water. Also, please never
1
fill the fresh water container with milk,
coffee, tea, etc.
You can use the coffee jug to add the
desired amount of water. There are cup
graduations
– on the coffee jug and
– on the water level gauge
(Figure 1/B).
The graduations apply to the quantity
of water used to make the coffee. The
actual quantity of coffee is less
because ground coffee absorbs water.
Close the lid again on the fresh water
container.
2. Insert a Filter Paper (Figure 4)
To open the filter, reach into the
recessed grip and swivel it to the left.
Place a size 4 paper filter in the filter
holder. Before placing in position,
please fold over the perforated sides.
3. Fill with Ground Coffee
(Figure 5)
Please use "medium" ground coffee.
The amount of coffee required depends
on your taste. One measurement spoon
(approx. 6-7 g) per cup is sufficient for
medium strength coffee. Swivel the filter back until it clicks into place.
4. Place the Coffee Jug with Lid
on the Hotplate
5. Switch on the Appliance
(Figure 6)
Your coffee machine has an aroma
switch (depending on the model). The
aroma switch guarantees a full coffee
flavour even with smaller quantities of
coffee (1-4 cups).
– 1-4 cups of coffee: toggle switch in
position "min-4" (Figure 6 A).
– 5-10 cups of coffee: put the toggle
switch in position "5-max"
(Figure 6 A).
Now switch the appliance on at the
On/Off switch (Figure 6 B). The power
light illuminates.
After a few seconds hot water flows
into the filter. Once all the water has
passed through, the coffee is kept
warm on the hotplate.
You should stir the coffee in the jug so
3
that it is of even strength.
6. Remove the Jug
When the jug is removed the filter
valve prevents drips falling onto the
hotplate (Figure 7). It is therefore
important when positioning the inner
filter that you ensure the inner filter is
placed in the holder on the inside of
the swivel filter, and the handle is
locked when folded over (Figure 8).
The hotplate will keep the coffee at the
correct temperature for drinking. It
remains in operation until you switch
off the appliance and the power light
extinguishes. Should you forget to
switch off the coffee machine manually, then the appliance will automatically switch off after approx. 2 hours
(depending on the model). When all
the water has passed through the filter
and you want to add more water for
another brew, you should switch off
the appliance and leave it to cool for
approx. 5 minutes.
5
Page 6

g
Using and Replacing the Fresh
Water Filter
(depending on the model)
After around 60 brews (or 6 weeks,
whichever occurs first), the fresh water
filter must be replaced as follows to
ensure that the filter retains its effectiveness:
1. Open the lid of the fresh water
filter compartment (Figure 9).
2. Remove the container by the handle
(Figure 10).
3. Turn the cap on the bottom of the
container to the left and remove
(Figure 11).
4. Remove the old filter from the cap.
Remove the new filter from its plastic
bag, hold under running water and
then place in position (Figure 12). The
old filter can be treated as general
household rubbish without cause for
concern, the filter is manufactured on
a vegetable base.
5. Place the cap on the container such
that the marker arrows on the cap and
the container are aligned (Figure 11).
Tighten the cap and insert the container such that the hooks on the container and hooks on the coffee
machine mesh together, and the container is firmly seated (arrows in
Figure 10).
6. Close the lid on the fresh water filter
compartment again.
Attach the appropriate section of the
3
date sticker supplied to the inside of
the fresh water container lid. You will
always know when the fresh water filter next needs to be replaced.
Independent of the frequency of use, it
1
is imperative that the fresh water filter
be replaced at the latest every six
months, this is necessary to avoid the
build up of bacteria in the filter.
Descaling – To Make Your Coffee
Machine Last Longer
The life of your coffee machine is
extended by regular descaling. We recommend descaling every three months
as a preventative measure.
If you use a permanent filter, this must
1
be removed from the swivel filter prior
to descaling.
The fresh water filter must not be fit-
1
ted to the coffee machine during descaling. Therefore remove the fresh
water filter container each time prior
to descaling (see Figure 10).
A liquid, environmentally acceptable,
descaler should be used for descaling,
these are generally available in the
shops. Only use the descaler in accordance with the manufacturer’s instructions. Do not use any descaler based on
concentrated formic acid. Fill the fresh
water container and only then add the
descaler – not the other way round!
Swivel the filter into the appliance.
Place the coffee jug with lid on the
hotplate. (Please note that the lid of
the coffee jug is used to open the filter
valve and must therefore be fitted for
the water to flow correctly.) Leave the
descaling solution to act for approx.
15 minutes, then switch on the appliance. Once the descaling solution has
run through, switch off the appliance.
If necessary, repeat the descaling process. Then repeat with plain water at
least twice. Thoroughly rinse the coffee
jug, lid and swivel filter under running
water. Operate the filter valve several
times whilst rinsing.
6
Page 7

g
Cleaning
The swivel filter can be removed for
cleaning. To do this, swivel it to the left
to the stop. The inner filter can be
removed by the handle (Figure 8). For
thorough cleaning, particularly of coffee particles, you should operate the
filter valve several times during rinsing.
Clean the appliance with a damp cloth,
never submerge it in water! The coffee jug and lid are dishwasher-safe.
Spare Parts/Accessories
1. Fresh Water Filter
You can purchase new fresh water filters in three-packs from your dealer or
Electrolux Customer Service.
2. Coffee Jug
If your coffee jug gets broken, you can
purchase a replacement jug from your
dealer or Electrolux Customer Service.
You will need to state the model of
your coffee machine; see the rating
plate (Figure 1). Please retain the jug
lid because replacement jugs are not
supplied with lids.
3. Long-Life Filter
You can purchase an Electrolux longlife filter as an accessory, either from
your dealer or Electrolux Customer
Service. The long-life filter is used in
place of paper filters. It can be cleaned
easily and is also suitable for brewing
tea.
2 Protecting the Environment
Do not simply throw packaging material away.
– The cardboard box can be deposited
in the old paper collection or the relevant refuse collection system.
– Deposit plastic bags made from
polyethylene (PE) at a PE collection
point for recycling.
– Foam polystyrene (PS) padding items
are free of CFCs.
Please inquire with your local authority
about your local recycling centre.
The paper filter and coffee grounds are
excellently suited to composting after
brewing coffee.
Customer Service
The highest quality requirements are
placed on our appliances.
Should you, nevertheless, have questions on the usage of this appliance,
then please write to us. It is only with
your support that we are in a position
to develop appliances that meet your
requirements.
7
 Loading...