

Page 1
PERFEKT IN FORM UND FUNKTION
Microwave oven with grill
Horno Microondas con grill
Operating instructions
Instrucciones de Manjo
MCD2660E / MCD2661E
UK
E
AG-71+72D-EU COVER 14/12/2005 14:26 Page A
Page 2
Dear Customer,
Thank you for buying an AEG-Electrolux microwave oven and putting your
trust in the AEG-Electrolux brand name.
Before using your AEG-Electrolux microwave oven for the first time, please
read the instruction book thoroughly. This will enable you to take advantage
of all the features that the appliance offers. It will also ensure trouble-free
operation and minimize unnecessary service calls.
Important information concerning your safety or the operation of your
appliance is noted by this symbol and/or mentions words such as «Warning»,
«Take care». Be sure to follow all instructions carefully.
Throughout the manual, this symbol guides you step by step when operating
the appliance.
This symbol indicates further information concerning the use of the
appliance.
The clover indicates energy-saving tips and hints for environmentally friendly
use of your appliance.
In the event of malfunctioning, please follow the instructions given in the
section «What to do if...»
1. AG-71+72D-EU English 14/12/2005 14:24 Page B
Page 3

1
UK
Contents
Important safety instructions . . . . . . . . . . . . . . . . . . . . . . . . . . . . . . . . . . . . . . . . . . . . . . . . . .2 - 4
Oven & accessories . . . . . . . . . . . . . . . . . . . . . . . . . . . . . . . . . . . . . . . . . . . . . . . . . . . . . . . . . . . . . .5
Control panel . . . . . . . . . . . . . . . . . . . . . . . . . . . . . . . . . . . . . . . . . . . . . . . . . . . . . . . . . . . . . . . . . . .6
Before operation . . . . . . . . . . . . . . . . . . . . . . . . . . . . . . . . . . . . . . . . . . . . . . . . . . . . . . . . . . . . . . . .7
Setting the clock . . . . . . . . . . . . . . . . . . . . . . . . . . . . . . . . . . . . . . . . . . . . . . . . . . . . . . . . . . . . . . . .7
What are microwaves? . . . . . . . . . . . . . . . . . . . . . . . . . . . . . . . . . . . . . . . . . . . . . . . . . . . . . . . . . . .8
Suitable ovenware . . . . . . . . . . . . . . . . . . . . . . . . . . . . . . . . . . . . . . . . . . . . . . . . . . . . . . . . . . . .8 - 9
Tips & advice . . . . . . . . . . . . . . . . . . . . . . . . . . . . . . . . . . . . . . . . . . . . . . . . . . . . . . . . . . . . . .10 - 14
Microwave power levels . . . . . . . . . . . . . . . . . . . . . . . . . . . . . . . . . . . . . . . . . . . . . . . . . . . . . . . . .15
Microwave cooking . . . . . . . . . . . . . . . . . . . . . . . . . . . . . . . . . . . . . . . . . . . . . . . . . . . . . . . . . . . . .16
Grill & dual grill cooking . . . . . . . . . . . . . . . . . . . . . . . . . . . . . . . . . . . . . . . . . . . . . . . . . . . . . . . .17
Other convenient functions . . . . . . . . . . . . . . . . . . . . . . . . . . . . . . . . . . . . . . . . . . . . . . . . .18 - 19
Auto cook & defrost operation . . . . . . . . . . . . . . . . . . . . . . . . . . . . . . . . . . . . . . . . . . . . . . .20 - 21
Auto cook & defrost charts . . . . . . . . . . . . . . . . . . . . . . . . . . . . . . . . . . . . . . . . . . . . . . . . . .22 - 24
Recipes for auto cook . . . . . . . . . . . . . . . . . . . . . . . . . . . . . . . . . . . . . . . . . . . . . . . . . . . . . . .25 - 26
Cooking charts . . . . . . . . . . . . . . . . . . . . . . . . . . . . . . . . . . . . . . . . . . . . . . . . . . . . . . . . . . . . .27 - 28
Recipes . . . . . . . . . . . . . . . . . . . . . . . . . . . . . . . . . . . . . . . . . . . . . . . . . . . . . . . . . . . . . . . . . . .29 - 35
Care & cleaning . . . . . . . . . . . . . . . . . . . . . . . . . . . . . . . . . . . . . . . . . . . . . . . . . . . . . . . . . . . . . . . .36
What to do if... . . . . . . . . . . . . . . . . . . . . . . . . . . . . . . . . . . . . . . . . . . . . . . . . . . . . . . . . . . . . . . . . .37
Service & spare parts . . . . . . . . . . . . . . . . . . . . . . . . . . . . . . . . . . . . . . . . . . . . . . . . . . . . . . . . . . . .38
Guarantee conditions . . . . . . . . . . . . . . . . . . . . . . . . . . . . . . . . . . . . . . . . . . . . . . . . . . . . . . . . . . .38
Specifications . . . . . . . . . . . . . . . . . . . . . . . . . . . . . . . . . . . . . . . . . . . . . . . . . . . . . . . . . . . . . . . . . .39
Important information . . . . . . . . . . . . . . . . . . . . . . . . . . . . . . . . . . . . . . . . . . . . . . . . . . . . . . . . . .39
Installation . . . . . . . . . . . . . . . . . . . . . . . . . . . . . . . . . . . . . . . . . . . . . . . . . . . . . . . . . . . . . . . .40 - 41
The symbol on the product or on its packaging indicates that this product may not be treated as household
waste. Instead it shall be handed over to the applicable collection point for the recycling of electrical and
electronic equipment. By ensuring this product is disposed of correctly, you will help prevent potential negative
consequences for the environment and human health, which could otherwise be caused by inappropriate waste
handling of this product. For more detailed information about recycling of this product, please contact your
local city office, your household waste disposal service or the shop where you purchased the product.
1. AG-71+72D-EU English 14/12/2005 14:24 Page 1
Page 4

2
Important safety instructions
To avoid the danger of fire
The microwave oven should not be left unattended
during operation. Power levels that are too high or
cooking times that are too long may overheat
foods resulting in a fire.
The electrical outlet must be readily accessible so that
the unit can be unplugged easily in an emergency.
The AC power supply must be 230 V, 50 Hz, with a
minimum 16 A distribution line fuse, or a minimum 16 A
distribution circuit breaker.
It is recommended that a separate circuit serving only
this appliance be provided.
Do not store or use the oven outdoors.
If food being heated begins to smoke, DO NOT
OPEN THE DOOR. Turn off and unplug the oven
and wait until the food has stopped smoking.
Opening the door while food is smoking may cause
a fire.
Only use microwave-safe containers and utensils.
See Page 8 - 9.
Do not leave the oven unattended when using
disposable plastic, paper or other combustible food
containers.
Clean the waveguide cover, the oven cavity, the
turntable and turntable support after use. These
must be dry and free from grease. Built-up grease
may overheat and begin to smoke or catch fire.
Do not place flammable materials near the oven or
ventilation openings. Do not block the ventilation
openings.
Remove all metallic seals, wire twists, etc., from food
and food packages. Arcing on metallic surfaces may
cause a fire.
Do not use the microwave oven to heat oil for deep
frying. The temperature cannot be controlled and the
oil may catch fire.
To make popcorn, only use special microwave popcorn
makers.
Do not store food or any other items inside the oven.
Check the settings after you start the oven to ensure
the oven is operating as desired.
See the corresponding hints in this operation manual.
To avoid the possibility of injury
WARNING:
Do not operate the oven if it is damaged or
malfunctioning. Check the following before use:
a) The door; make sure the door closes properly and
ensure it is not misaligned or warped.
b) The hinges and safety door latches; check to make
sure they are not broken or loose.
c) The door seals and sealing surfaces; ensure that
they have not been damaged.
d) Inside the oven cavity or on the door; make sure
there are no dents.
e) The power supply cord and plug; ensure that they
are not damaged.
Never adjust, repair or modify the oven yourself.
It is hazardous for anyone other than a competent
person to carry out any service or repair operation
which involves the removal of a cover which gives
protection against exposure to microwave energy.
Do not operate the oven with the door open or alter
the door safety latches in any way.
Do not operate the oven if there is an object between
the door seals and sealing surfaces.
Do not allow grease or dirt to build up on the door
seals and adjacent parts. Follow instructions for
“Care & Cleaning”, Page 36. Failure to maintain
the oven in a clean condition could lead to a
deterioration of the surface that could adversely
affect the life of the appliance and possibly result
in a hazardous situation.
Individuals with PACEMAKERS should check with their
doctor or the manufacturer of the pacemaker for
precautions regarding microwave ovens.
To avoid the possibility of electric shock
Under no circumstances should you remove the outer
cabinet.
Never spill or insert any objects into the door lock
openings or ventilation openings. In the event of a spill,
turn off and unplug the oven immediately and call an
authorised AEG-Electrolux service agent.
Do not immerse the power supply cord or plug in water
or any other liquid.
Do not allow the power supply cord to run over any hot
or sharp surfaces, such as the hot air vent area at the
top rear of the oven.
IMPORTANT SAFETY INSTRUCTIONS: READ CAREFULLY AND KEEP FOR FUTURE REFERENCE
1. AG-71+72D-EU English 14/12/2005 14:24 Page 2
Page 5

3
UK
Important safety instructions
Temperature of the container is not a true indication of
the temperature of the food or drink; always check the
food temperature.
Always stand back from the oven door when opening to
avoid burns from escaping steam and heat.
Slice stuffed baked foods after heating to release steam
and avoid burns.
Keep children away from the door and accessible parts
that may become hot when the grill is in use. Children
should be kept away to prevent them burning
themselves.
Do not touch the oven door, outer cabinet, rear cabinet,
oven cavity, ventilation openings, accessories and dishes
during GRILL mode, DUAL GRILL mode and AUTO
COOK operation as they will become hot. Before
cleaning make sure they are not hot.
To avoid misuse by children
Warning: Only allow children to use the oven
without supervision when adequate instructions
have been given so that the child is able to use the
oven in a safe way and understands the hazards of
improper use.
Do not lean or swing on the oven door. Do not play
with the oven or use it as a toy.
Children should be taught all important safety
instructions: use of pot holders, careful removal of food
coverings; paying special attention to packaging (e.g.
self-heating materials) designed to make food crisp, as
they may be extra hot.
Other warnings
Never modify the oven in any way.
This oven is for home food preparation only and may
only be used for cooking food. It is not suitable for
commercial or laboratory use.
To promote trouble-free use of your oven and avoid
damage.
Never operate the oven when it is empty except where
recommended in the operation manual, see page 17
note 2. Doing so may damage the oven.
When using a browning dish or self-heating material,
always place a heat-resistant insulator such as a
porcelain plate under it to prevent damage to the
turntable and turntable support due to heat stress. The
preheating time specified in the dish’s instructions must
not be exceeded.
Do not attempt to replace the oven lamp yourself or
allow anyone who is not authorised by AEG-Electrolux
to do so. If the oven lamp fails, please consult your
dealer or an authorised AEG-Electrolux service agent.
If the power supply cord of this appliance is damaged,
it must be replaced with a special cord. The exchange
must be made by an authorised AEG-Electrolux service
agent.
To avoid the possibility of explosion and sudden
boiling:
WARNING: Liquids and other foods must not be
heated in sealed containers since they are liable to
explode.
Never use sealed containers. Remove seals and lids
before use. Sealed containers can explode due to a
build up of pressure even after the oven has been
turned off.
Take care when microwaving liquids. Use a widemouthed container to allow bubbles to escape.
Microwave heating of beverages can result in
delayed eruptive boiling, therefore care has to be
taken when handling the container.
To prevent sudden eruption of boiling liquid and
possible scalding:
1. Stir liquid prior to heating/reheating.
2. It is advisable to insert a glass rod or similar utensil
into the liquid whilst reheating.
3. Let liquid stand for at least 20 seconds in the oven
at the end of cooking time to prevent delayed
eruptive boiling.
Do not cook eggs in their shells, and whole hard
boiled eggs should not be heated in microwave
ovens since they may explode even after
microwave cooking has ended. To cook or reheat
eggs which have not been scrambled or mixed,
pierce the yolks and the whites, or the eggs may
explode. Shell and slice hard boiled eggs before
reheating them in the microwave oven.
Pierce the skin of such foods as potatoes, sausages and
fruit before cooking, or they may explode.
To avoid the possibility of burns
Use pot holders or oven gloves when removing food
from the oven to prevent burns.
Always open containers, popcorn makers, oven cooking
bags, etc., away from the face and hands to avoid
steam burns.
To avoid burns, always test food temperature and
stir before serving and pay special attention to the
temperature of food and drink given to babies,
children or the elderly.
1. AG-71+72D-EU English 14/12/2005 14:24 Page 3
Page 6

4
Important safety instructions
Do not use plastic containers for microwaving if the
oven is still hot from using the GRILL mode, DUAL
GRILL mode and AUTO COOK operation, because they
may melt. Plastic containers must not be used during
above modes unless the container manufacturer says
they are suitable.
NOTE:
If you are unsure how to connect your oven, please
consult an authorised, qualified electrician.
Neither the manufacturer nor the dealer can accept any
liability for damage to the oven or personal injury
resulting from failure to observe the correct electrical
connection procedure.
Water vapour or drops may occasionally form on the
oven walls or around the door seals and sealing
surfaces. This is a normal occurrence and is not an
indication of microwave leakage or a malfunction.
Do not use metal utensils, which reflect microwaves
and may cause electrical arcing. Do not put cans in the
oven.
Only use the turntable and the turntable support
designed for this oven. Do not operate the oven
without the turntable.
To prevent the turntable from breaking:
(a) Before cleaning the turntable with water, leave the
turntable to cool.
(b) Do not put hot foods or hot utensils on a cold
turntable.
(c) Do not put cold foods or cold utensils on a hot
turntable.
Do not place anything on the outer cabinet during
operation.
1. AG-71+72D-EU English 14/12/2005 14:24 Page 4
Page 7
5
UK
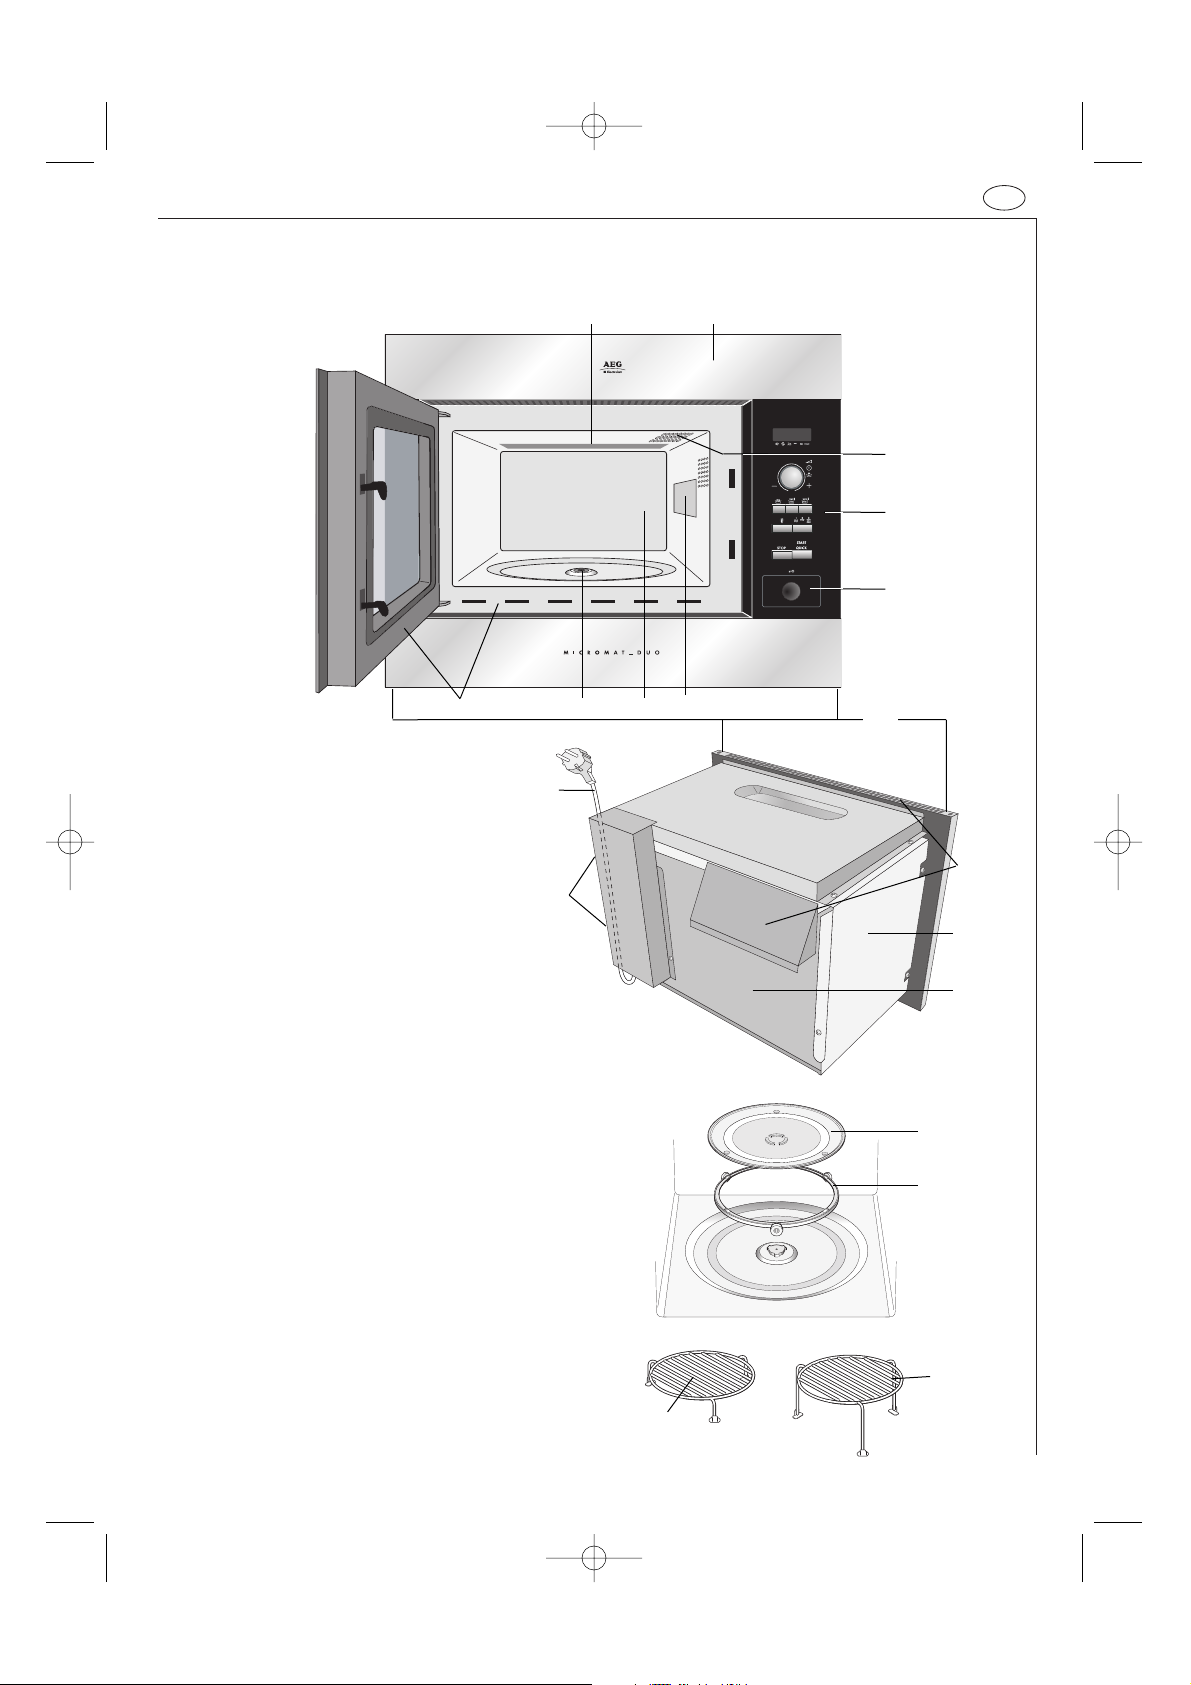
Oven & accessories
ACCESSORIES:
Check to make sure the following accessories are
provided:
(16) Turntable (17) Turntable support (18) High rack
(19) Low rack (20) 4 fixing screws (not shown)
• Place the turntable support in the seal packing on
the floor of the cavity.
• Then place the turntable on the turntable support.
• To avoid turntable damage, ensure dishes or
containers are lifted clear of the turntable rim when
removing them from the oven.
NOTE: When you order accessories, please mention two
items: part name and model name to your dealer or
authorised AEG-Electrolux service agent.
1. Grill heating element
2. Front trim
3. Oven lamp
4. Control panel
5. Door opening button
6. Waveguide cover
7. Oven cavity
8. Seal packing
9. Door seals and sealing surfaces
10. Fixing points (4 points)
11. Ventilation openings
12. Outer cover
13. Rear cabinet
14. Power supply cord support clips
15. Power supply cord
1 2
67
89
11
12
14
15
13
16
17
10
3
4
5
18
19
1. AG-71+72D-EU English 14/12/2005 14:24 Page 5
Page 8
6
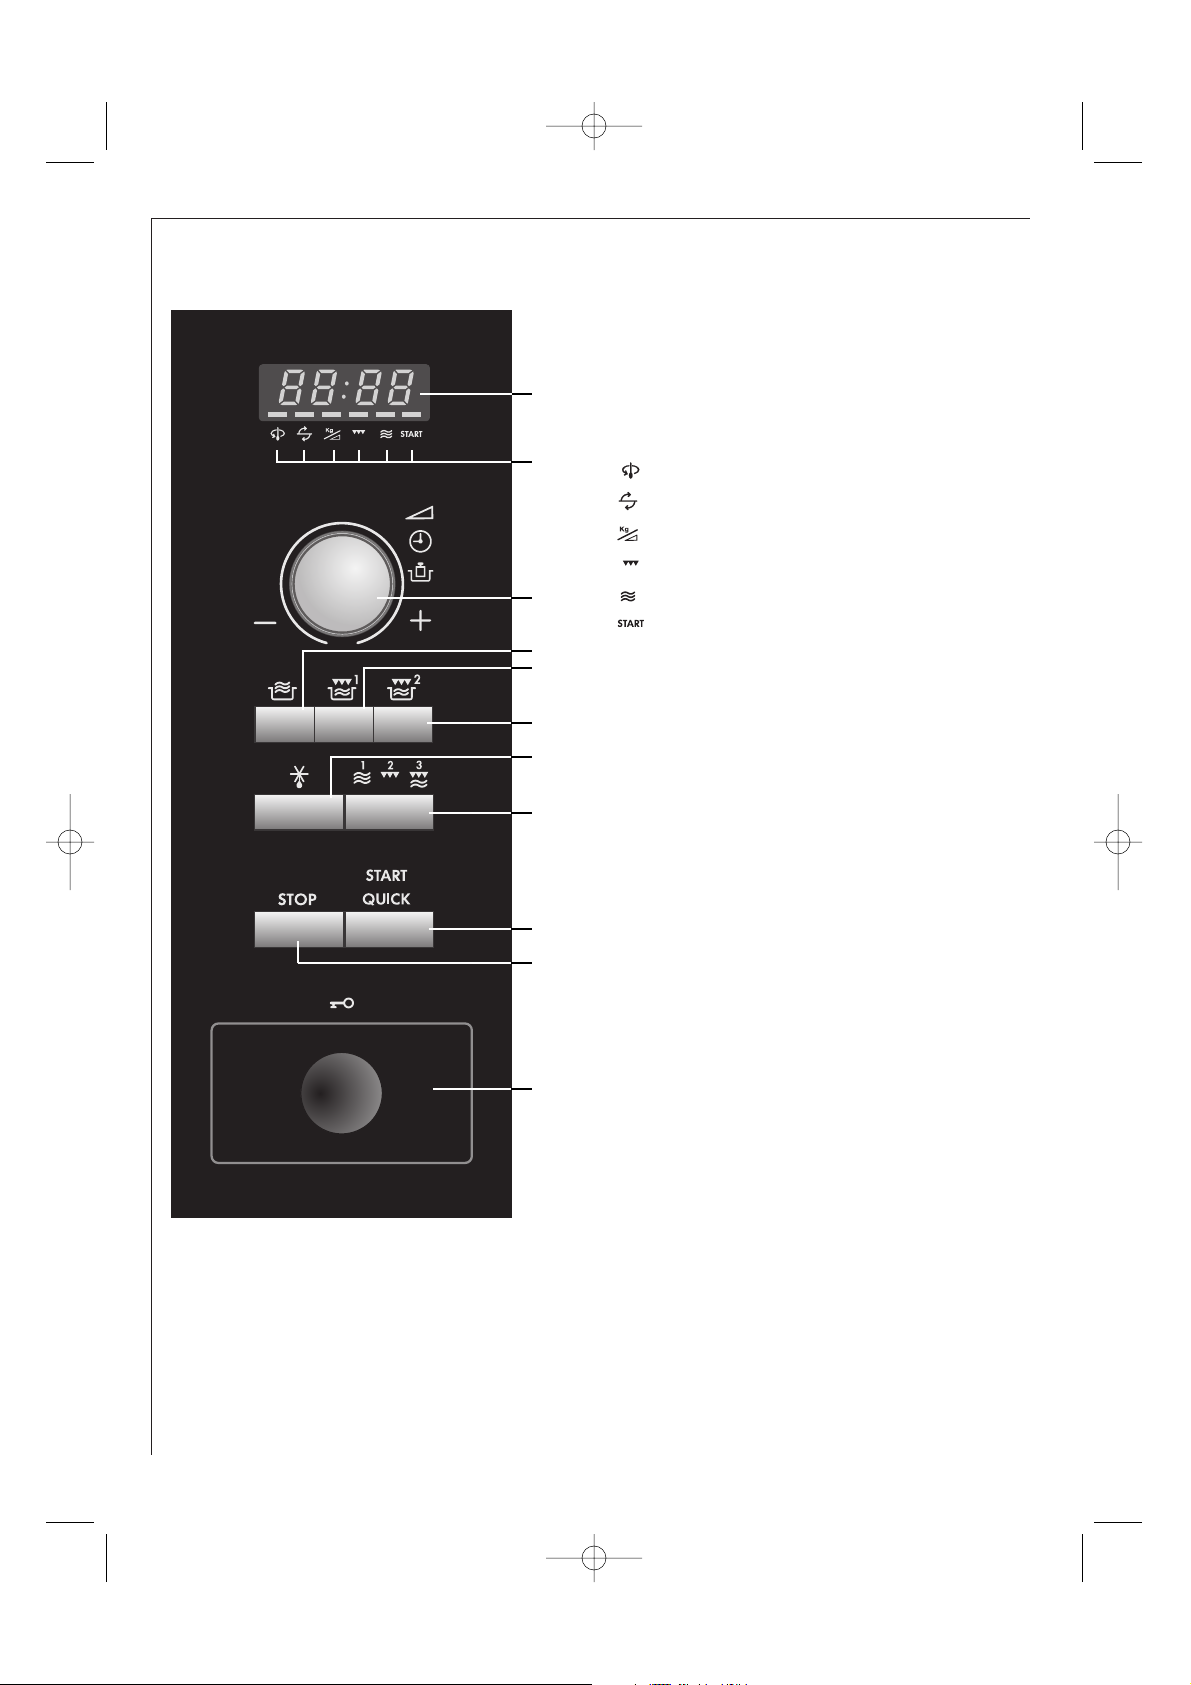
Control panel
1 Digital Display
2 Indicators
The appropriate indicator will flash or light up, just
above each symbol according to the instruction.
When an indicator is flashing, press the appropriate
button (having the same symbol) or carry out the
necessary operation.
Stir
Turn over
Weight/power level
Grill
Microwave
Cooking in progress
3 TIMER/WEIGHT/POWER knob
4 AUTO COOK button
Press to select one of the 2 automatic programmes.
5 AUTO COOK PLUS GRILL 1 button
Press to select one of the 2 automatic programmes.
6 AUTO COOK PLUS GRILL 2 button
Press to select one of the 4 automatic programmes.
7 AUTO DEFROST button
Press to select one of the 4 automatic programmes.
8 COOKING MODE button
Press to select either microwave, grill or dual grill, or
use to set the clock.
1. press once to select microwave function.
2. press twice to select the grill.
3. press three times to select dual grill mode,
microwave with grill.
9 START/QUICK button
10 STOP button
11 DOOR OPENING button
1
2
3
7
9
11
10
6
5
4
8
1. AG-71+72D-EU English 14/12/2005 14:24 Page 6
Page 9

7
UK
Before operation
There are two setting modes: 12 hour clock and 24 hour clock.
1. To set the 12 hour clock, hold the COOKING MODE button down for 3 seconds.
will appear in the display.
2. To set the 24 hour clock, press the COOKING MODE button once more after
Step 1, in the example below will appear in the display.
Setting the clock
Plug in the oven.
1. The oven display will flash:
2. Press the STOP button, the display will show:
3. To set the clock, see below.
4. Heat the oven without food. (See page 17 note 2).
Using the STOP button
Use the STOP button to:
1. Erase a mistake during programming.
2. Stop the oven temporarily during cooking.
3. Cancel a programme during cooking, touch twice.
x1
1. Choose the clock function.
(12 hour clock).
Choose the 24 hour
clock.
3. Press the COOKING
MODE button to
change from hours to
minutes.
4. Set the minutes. Rotate the
TIMER/WEIGHT/POWER
knob until the correct
minute is displayed (35).
5. Press the COOKING
MODE button to start
the clock.
2. Set the hours. Rotate the TIMER/WEIGHT/
POWER knob until the correct hour is
displayed (23).
x1 and hold for 3 seconds
x1
x1 x1
Example: To set the 24 hour clock to 23:35.
x1 and hold for
3 secs.
To set the clock, follow the example below.
NOTES:
1. You can rotate the TIMER/WEIGHT/POWER knob
clockwise or counter-clockwise.
2. Press the STOP button if you make a mistake during
programming.
3. If the electrical power supply to your microwave oven
is interrupted, the display will intermittently show
after the power is reinstated. If this
occurs during cooking, the programme will be
erased. The time of day will also be erased.
4. When you want to reset the time of day, follow the
above example again.
1. AG-71+72D-EU English 14/12/2005 14:24 Page 7
Page 10

8
What are microwaves?
Suitable ovenware
Plastic utensils
Heat resistant plastic utensils which
are suitable for use in the
microwave can be used to thaw,
heat and cook food. Follow the
manufacturer's recommendations.
Paper utensils
Heat resistant paper made for use in a microwave oven
is also suitable. Follow the manufacturer's
recommendations.
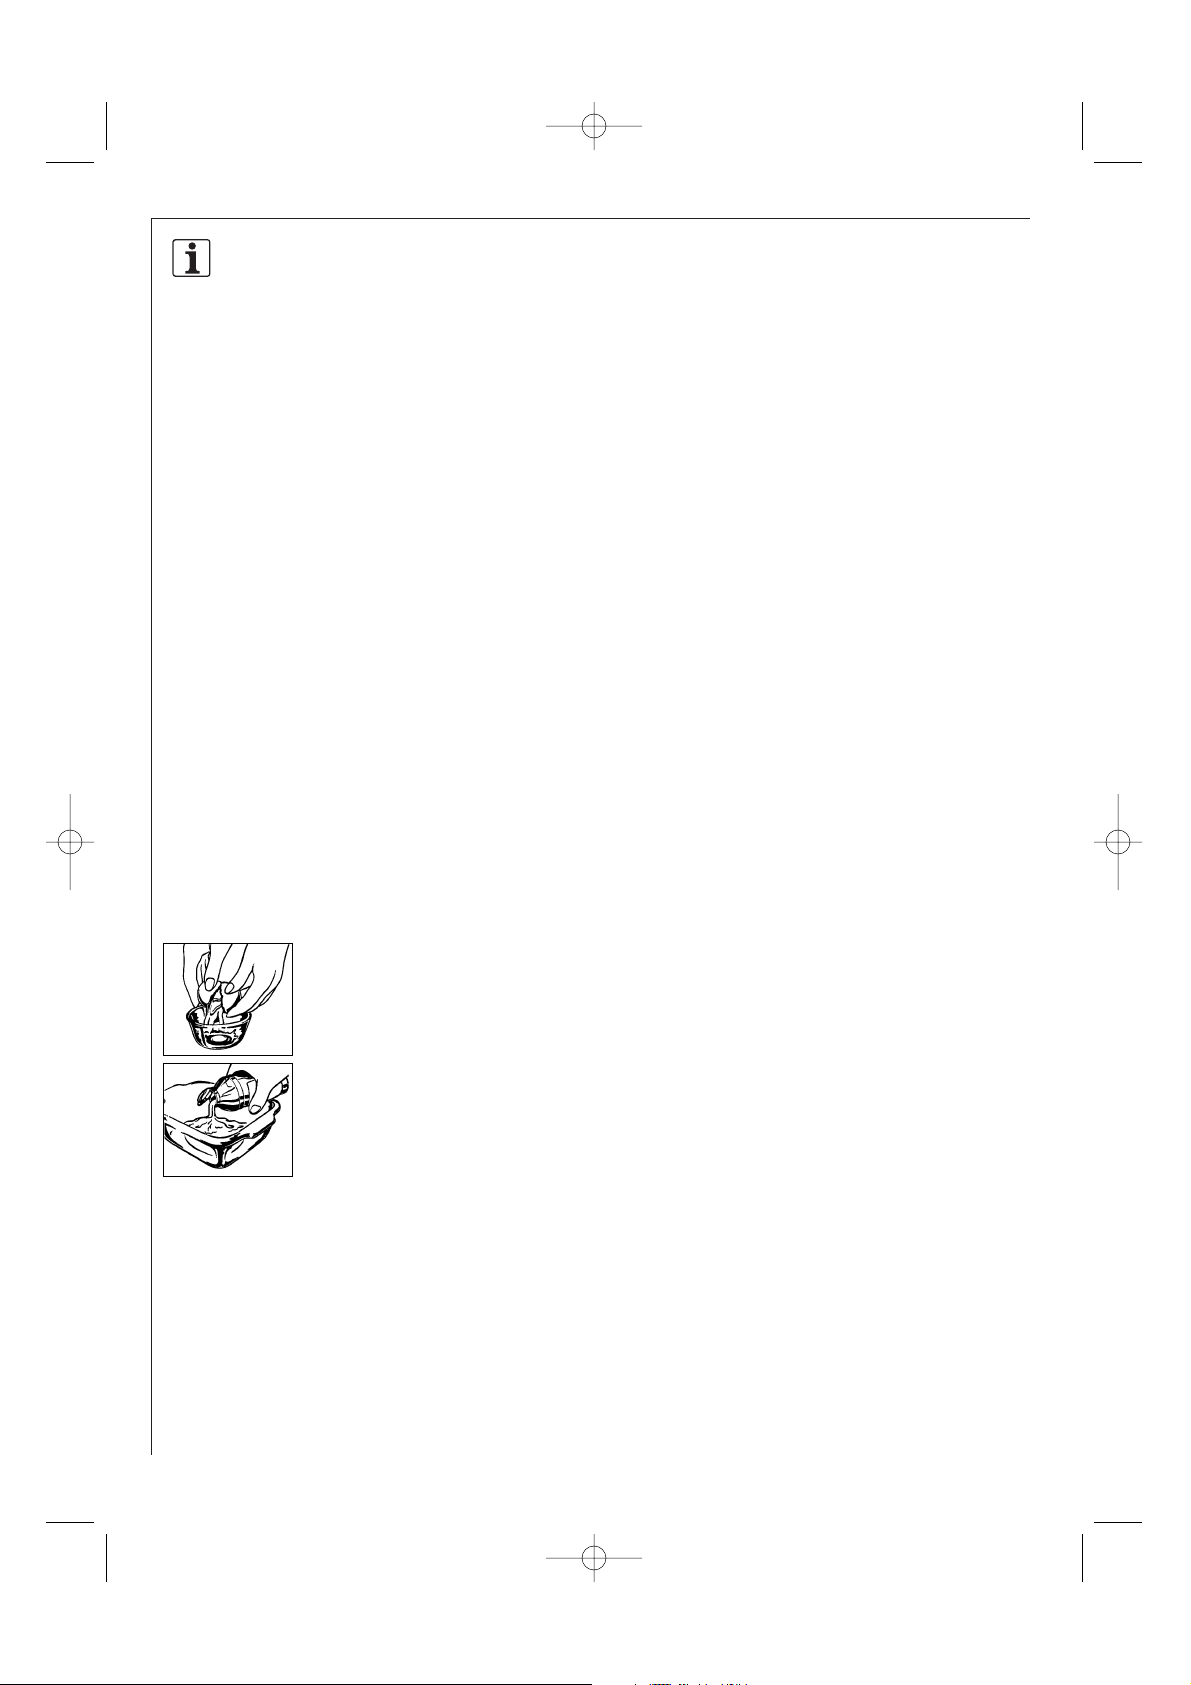
Kitchen paper
can be used to absorb any moisture
which occurs in short heating
methods, e.g. of bread or products
in bread crumbs. Insert the paper
between the food and the revolving
plate. The surface of the food will
stay crispy and dry. Covering greasy food with kitchen
paper will catch splashes.
What are microwaves?
Like radio and television waves, microwaves are
electromagnetic waves.
Microwaves are produced by a magnetron inside the
microwave oven, and these vibrate the molecules of
water present in the food. The friction this causes
produces heat, which ensures that the food is
defrosted, heated or cooked through.
The secret of the reduced cooking times is the fact that
the microwaves penetrate the food from every
direction. Energy is used to the full. In comparison, the
energy from a conventional hob passes from the
burner through the pan and so to the food.
This method wastes a great deal of energy.
The characteristics of microwaves
Microwaves penetrate all non-metal objects made of
glass, china, earthenware, plastic, wood or paper. This is
why the microwaves never make these materials hot.
Dishes become hot only because the food inside them
is hot.
The food absorbs the microwaves and is heated.
Microwaves cannot pass through objects made of
metal and so they are deflected. For this reason metal
objects are not normally suitable for microwave
cookery. There are exceptions where you can actually
make use of the fact that the microwaves cannot pass
through metal. If you cover food with aluminium foil
at specific points while it is defrosting or cooking, you
can prevent those parts from getting too warm, too
hot, or overcooked. Please check out the advice given
in the guide.
Glass & ceramic glass
Heat-resistant glass utensils are very suitable. The
cooking process can be observed
from all sides. They must not,
however, contain any metal (e.g.
lead crystal), nor have a metallic
overlay (e.g. gold edge, cobalt blue
finish).
Ceramics
Generally very suitable. Ceramics must be glazed, since
with unglazed ceramics moisture can get into the
ceramic. Moisture causes the material to heat up and
may make it shatter. If you are not certain whether
your utensil is suitable for the microwave, carry out
the utensil suitability test. (See page 9).
Porcelain
Very suitable. Ensure that the porcelain does not have a
gold or silver overlay and that it does not contain any
metal.
1. AG-71+72D-EU English 14/12/2005 14:24 Page 8
Page 11

Microwave cling film
This, or heat-resistant film, is very suitable for covering
or wrapping. Please follow the manufacturer's
recommendations.
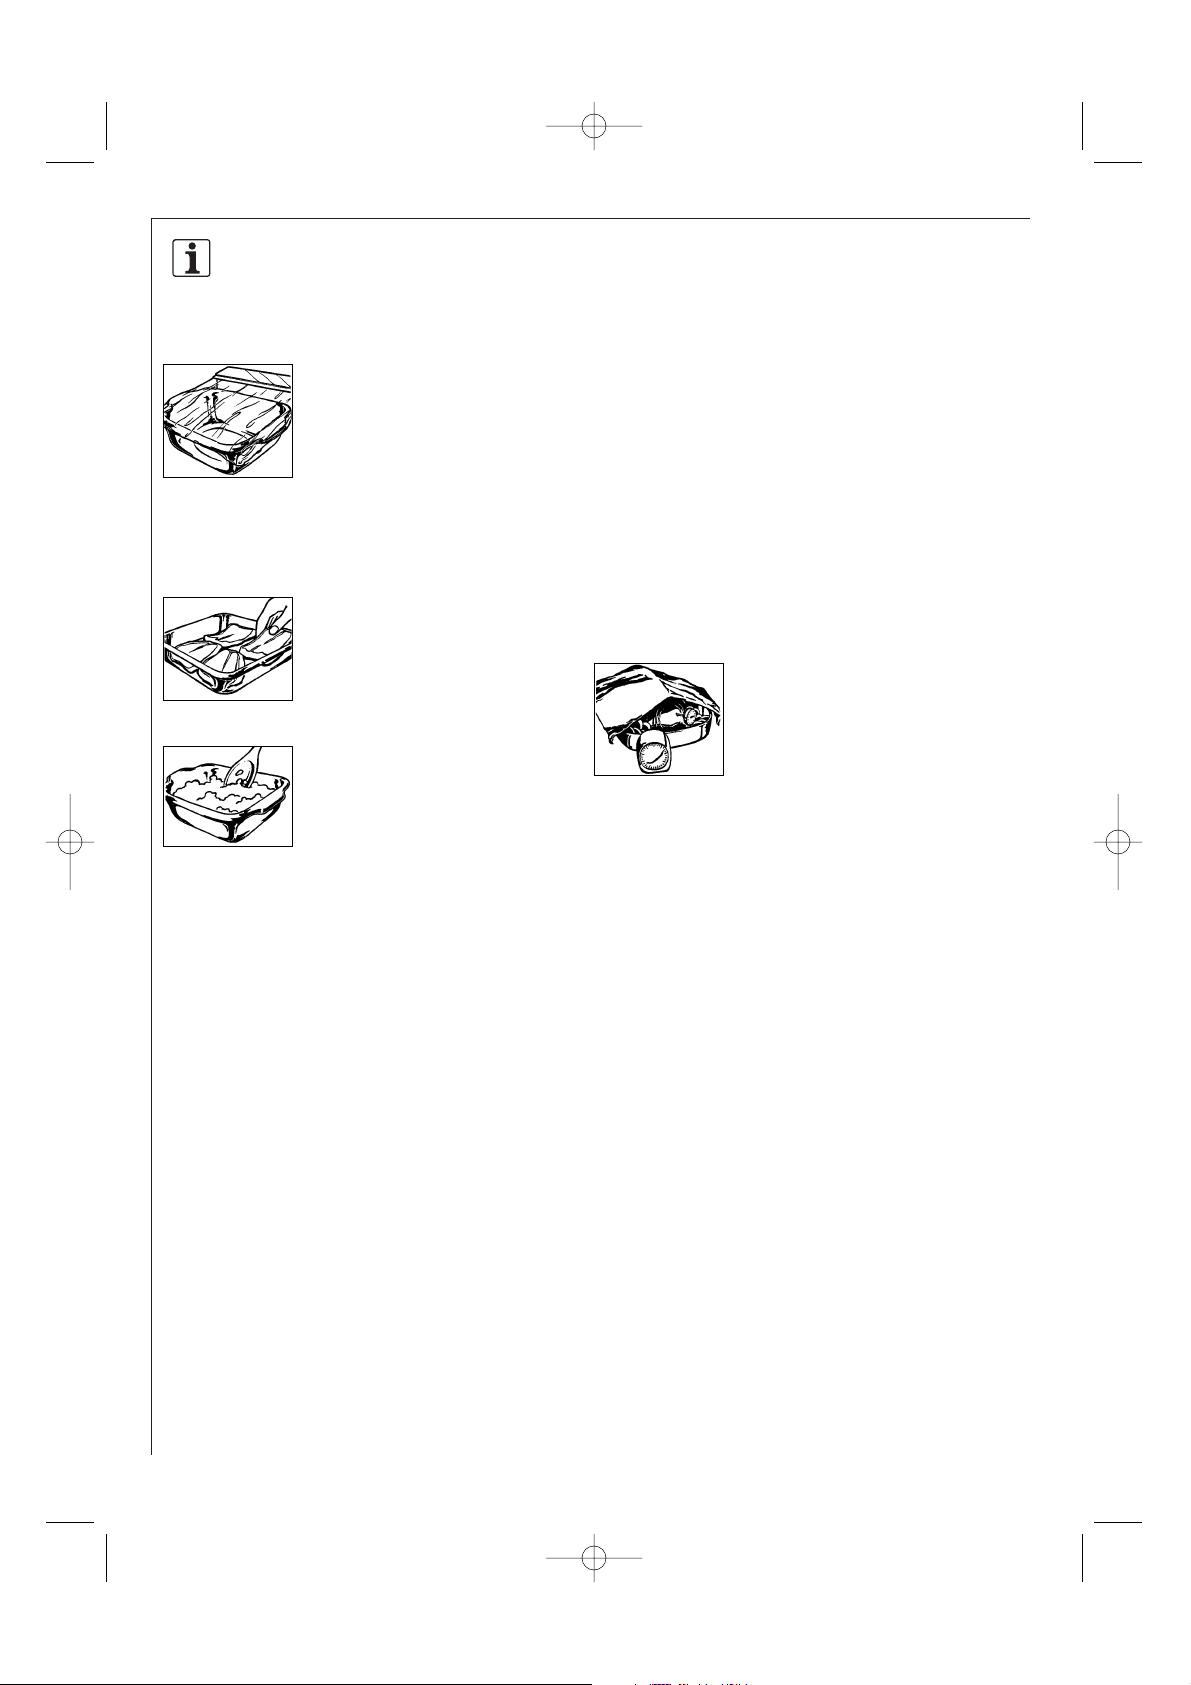
Roasting bags
Can be used in a microwave oven.
Metal clips are not suitable for
fastening them since the roasting
bag foil might melt. Fasten the
roasting bag with string and pierce
it several times with a fork. Non heat-resistant food
wraps are not recommended for use in a microwave
oven.
The right utensils for combined
operation
For combined operation (Microwave + grill) and grill
operation, you can use any heat-resistant accessories,
e. g. porcelain, pottery, glass. It is possible to use metal
accessories only for a simple grill operation.
Browning dish
A special microwave dish made from ceramic glass with
a metal alloy base, which allows food to be browned.
When using the browning dish a suitable insulator, e.g.
a porcelain plate, must be placed between the
turntable and the browning dish. Be careful to adhere
exactly to the pre-heating time given in the
manufacturer's instructions. Excessive pre-heating can
damage the turntable and the turntable stand or can
trigger the safety-device which will switch off the
oven.
Metal
Generally speaking, metal should
not be used, since microwaves do
not pass through metal and
therefore cannot reach the food.
There are, however, exceptions:
small strips of aluminium foil may be used to cover
certain parts of the food, so that these do not thaw
too quickly or begin to cook (e.g. chicken wings). Small
metal skewers and aluminium
containers (e.g. of readycooked
meals) can be used. They must,
however, be small in relation to the
food, e.g. aluminium containers
must be at least 2/3 to 3/4 filled
with food. It is recommended that you transfer the
food into a dish suitable for use in the microwave.
When using aluminium containers or other metal
utensils there must be a gap of approx. 2 cms between
them and the walls of the cooking area, otherwise the
walls could be damaged by possible arcing.
NO UTENSIL SHOULD HAVE A METAL overlay, or
metal parts such as screws, bands or handles.
Utensil suitability test
If you are not sure whether your utensil is suitable for
use in your microwave oven, carry
out the following test: Place the
utensil into the oven. Place a glass
container filled with 150 ml of
water on or next to the utensil.
Switch on the oven at 900 W power for 1 to 2 minutes.
If the utensil stays cool or just warm to the touch, it is
suitable. Do not use this test on a plastic utensil. It
could melt.
9
UK
Suitable ovenware
1. AG-71+72D-EU English 14/12/2005 14:24 Page 9
Page 12
10
Tips & advice
Before you start...
To make it as easy as possible to use the microwave
oven we have put together a few hints and tips for
you. Only switch on the oven when the food is already
inside.
Setting the cooking time
Defrosting, re-heating and cooking times are generally
much shorter than in a conventional oven or hob. So
you will need to consult this book for the
recommended cooking times. It is better to set shorter
rather than longer cooking times. Always test the food
after the cooking time has elapsed. It is better then to
continue cooking it for a little longer, than to have
overcooked food.
Starting temperature
Defrosting, re-heating and cooking times depend on
the temperature of the food when you start. For
example, deep frozen and refridgerated food will need
longer than food that is at room temperature.
Standard storage temperaturs of food are assumed for
re-heating and cooking times (refridgerator
temperature of 5° C, Room temperature of
approximately 20° C). For defrosting food a starting
temperature of -18° C is assumed.
Cook popcorn only in special microwave safe
containers. Refer exactly to the manufacturer’s
instructions. Do not use a normal paper or glass
container.
Do not cook eggs in the unbroken
shells. Pressure builds up inside the
shell and this may result in the egg
exploding.
Do not heat oil or fat for deepfrying inside the microwave oven. It
is impossible to control the
temperature of the oil and it may
suddenly splash out of the pan.
Do not heat sealed containers such
as jars or tins. The pressure inside the container could
cause the container to explode. (The exception is when
you are making preserves).
Cooking times
All the times given in this book are guidelines, which
can be varied according to the initial temperature,
weight and condition of the food (water or fat content
etc.)
Salt, spices & herbs
Food cooked in your microwave retains its individual
flavour better than it does when conventional
preparation methods are used. For this reason you
should use salt sparingly and normally add it only after
cooking. Salt absorbs liquid and dries out the outer
layer of food. Herbs and spices can be used as normal.
Types of use
Microwave: you can defrost frozen foods in a short
time.
Combined operation: With the combination of
microwave and grill you can cook and roast at the
same time. Therefore, the advantages of these
appliances will combine sensibly and mutually. The
heat of the grill quickly seals the pores of the food and
the microwave functions for a short time. The food
keeps its moisture inside and is crispy on the outside.
Grill: Your oven is provided with a quartz grill, which
you can also use without microwave operation like any
other conventional grill.
Cooking test
The cooking status of meals can be tested as with
conventional preparation:
• Food thermometer: Each food has a certain interior
temperature at the end of the heating process. With
a food thermometer you can determine whether
the food is hot or cooked enough.
• Fork: You can check fish with a fork. If the fish
meat is no longer clear and comes easily from the
fishbones, it is. If it is over-cooked, it becomes
tough and dry.
• Wooden skewer: Cakes and bread can be tested by
inserting a wooden skewer. If the skewer remains
clean and dry after pulling it out they are done.
1. AG-71+72D-EU English 14/12/2005 14:24 Page 10
Page 13

11
UK
Tips & advice
Blanching vegetables
Before freezing vegetables, they should be blanched.
This preserves the quality and
flavour at their best. Method: wash
and chop the vegetables. Put 250 g
of vegetables in a dish with 275 ml
water and cover. Heat for 3-5
minutes. After blanching, immerse
immediately in cold water to prevent further cooking
and then allow to drain. Pack vegetables in an airtight
container and freeze.
Preserving fruit and vegetables
Using the microwave for preserving is quick and easy.
There are preserving jars, rubber vacuum seals and
suitable seals made of plastic available specially made
for microwaves. The manufacturers will supply precise
instructions for use.
Large & small quantities
Microwave times are directly
dependent upon the amount of
food which you would like to thaw,
heat or cook. This means that small
portions cook more quickly than
larger ones. As a rule of thumb:
TWICE THE AMOUNT = ALMOST TWICE THE TIME
HALF THE AMOUNT = HALF THE TIME
Deep & shallow containers
Both containers have the same capacity, but the
cooking time is longer for the deeper one. You should
therefore choose as flat a container as possible with a
large surface area. Only use deep containers for dishes
where there is a danger of overcooking, e.g. for
noodles, rice, milk etc.
Round & oval containers
Food cooks more evenly in round or oval containers
than in containers with corners, since the microwave
energy concentrates in the corners and the food in
these areas could become overcooked.
Addition of water
Vegetables and other foods with a high water content
can be cooked in their own juice or with the addition
of a little water. This ensures that many vitamins and
minerals are preserved.
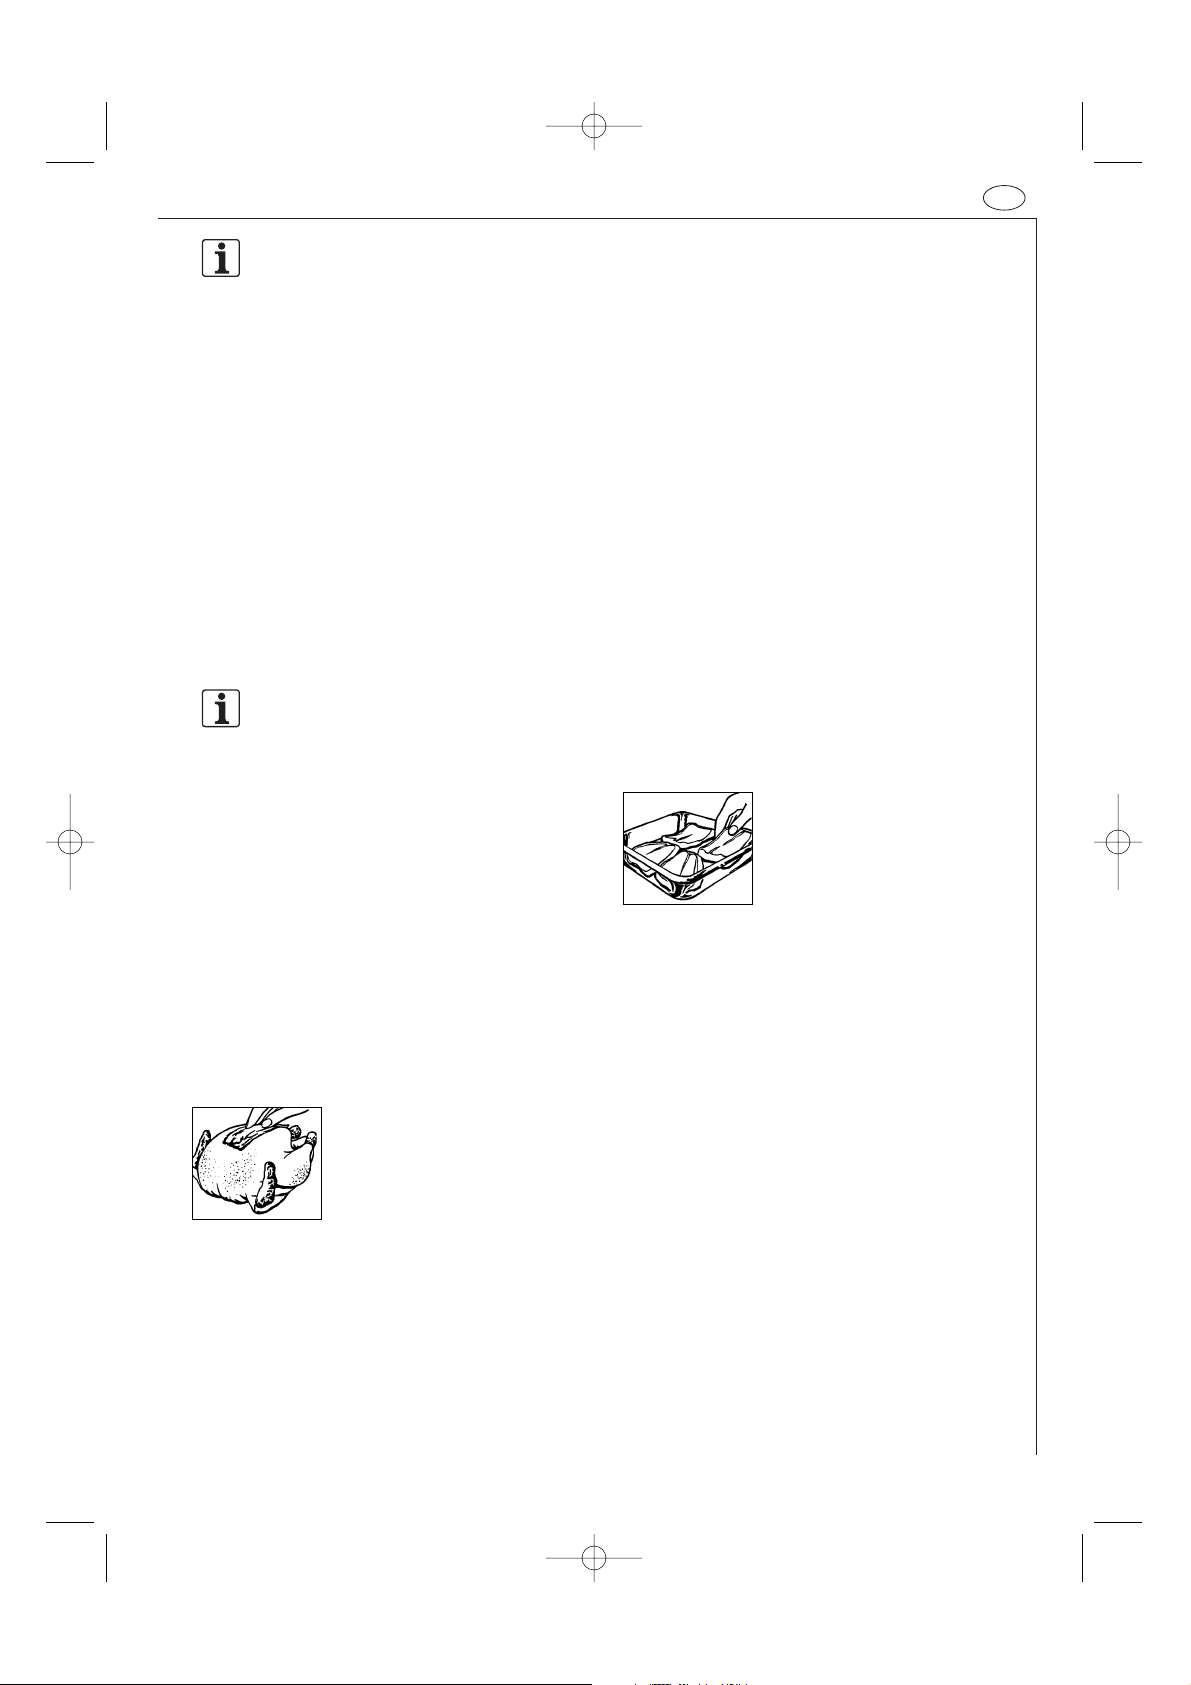
Food in skin or shells
Foods such as sausages, chickens, chicken legs, baked
potatoes, tomatoes, apples, egg yolks or such like
should be pricked or pierced with a fork or small
wooden skewer. This will enable the steam which forms
to dissipate without splitting the skin or shell.
Fatty foods
Fatty meat and layers of fat cook better than lean
portions of meat. Before cooking, cover the fatty
portions with a piece of aluminium foil or place the
food with the fat side down.
Using a food thermometer to
determine cooking time
The internal temperature of food and drink can be
ascertained with a food thermometer. The most
important temperatures are specified in the
temperature table.
Heating drinks
(Coffee, Water, Tea, etc.)
Heating Milk
Heating soup
Heating stew
Poultry
Lamb
Pink
Well done
Roast beef
Rare
Medium
Well done
Pork, Veal
Drink / Food Internal Internal temp.
temperature after 10 - 15 mins
once cooked standing time
65-75 oC
60-65 oC
75-80 oC
75-80 oC
80-85 oC
70 oC
75-80 oC
50-55 oC
60-65 oC
75-80 oC
80-85 oC
85-90 oC
70-75 oC
80-85 oC
55-60 oC
65-70 oC
80-85 oC
80-85 oC
1. AG-71+72D-EU English 14/12/2005 14:24 Page 11
Page 14
12
Tips & advice
Covering
Covering the food retains the moisture within it and
shortens the cooking time. Use a lid,
microwave cling film or a cover.
Foods which are to be crispy, e.g.
roasts or chickens, should not be
covered. As a general rule, whatever
would be covered in a conventional
oven should also be covered in a microwave oven.
Whatever would be uncovered in a conventional oven
can also be left uncovered in a microwave oven.
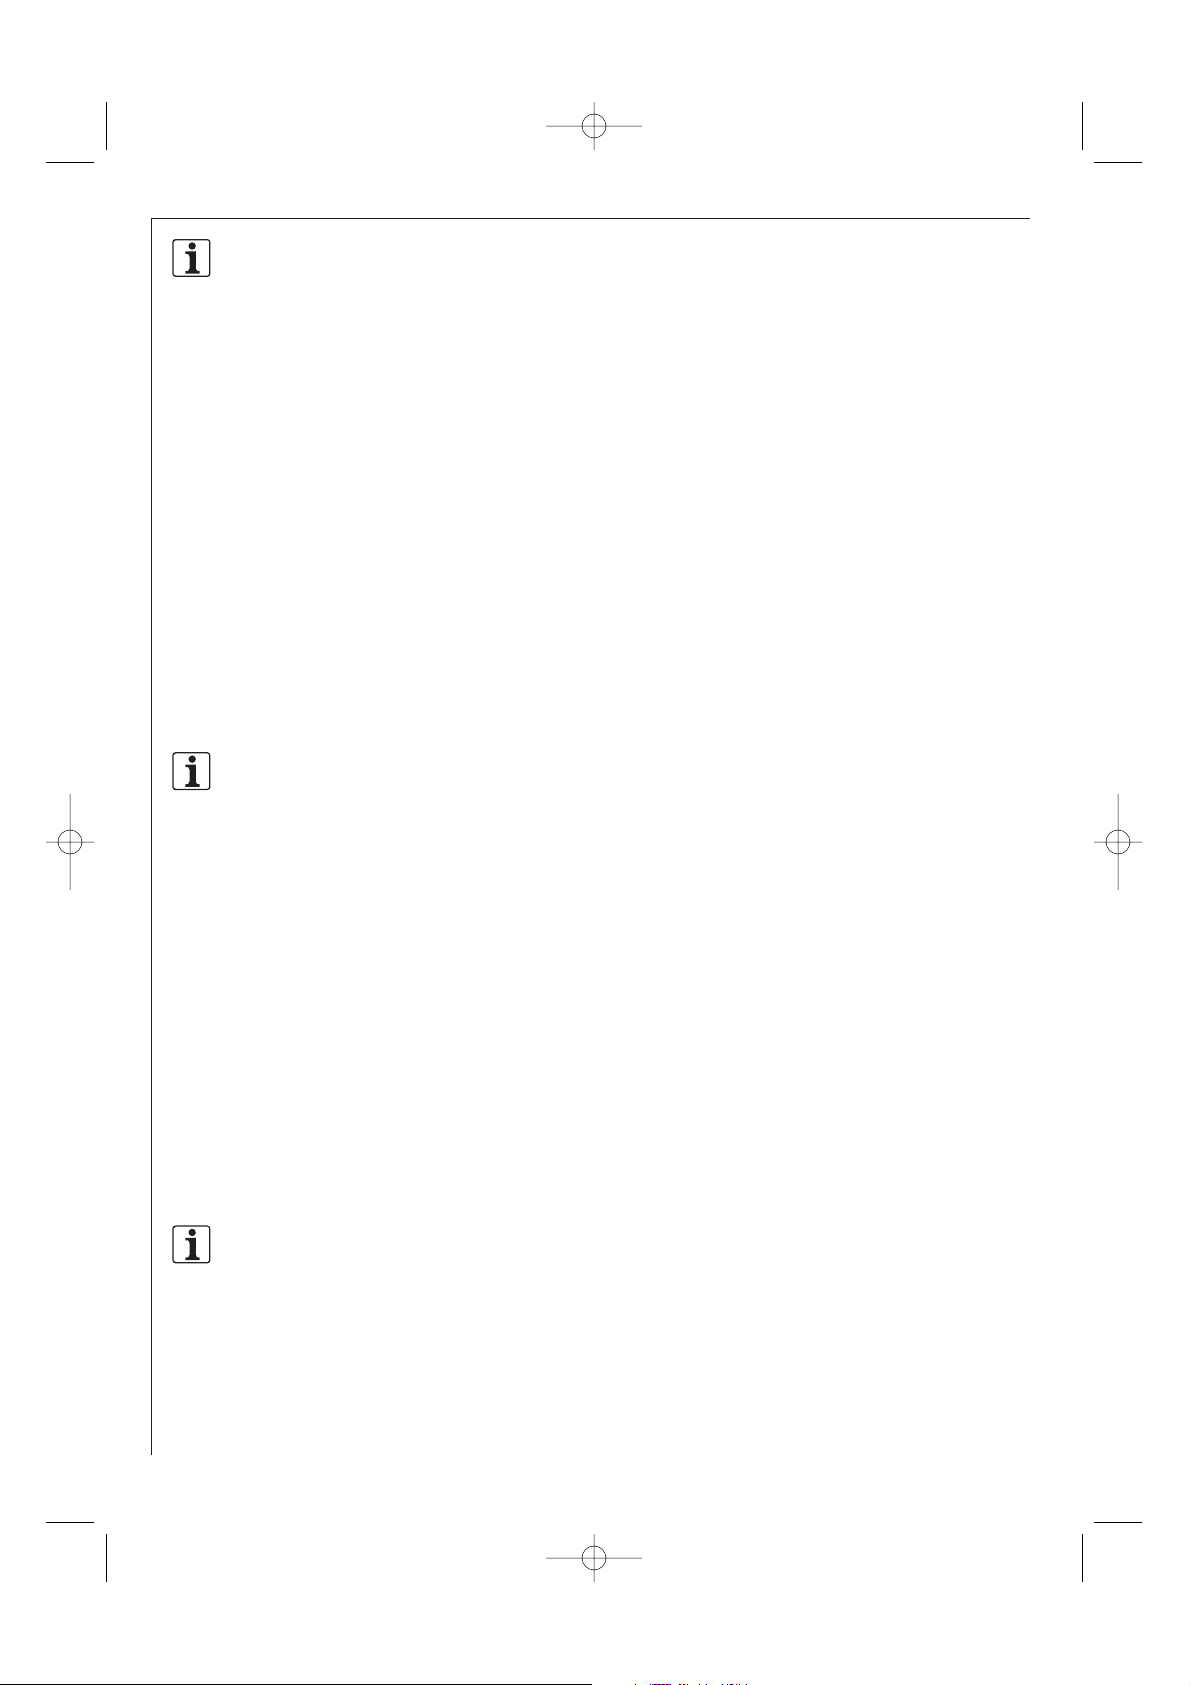
Irregular shaped food
Place the thicker, more compacted
end of the food pointing towards
the outside. Place vegetables (such
as broccoli) with the stalks pointing
outward.
Stirring
Stirring the food is necessary, since
the microwaves begin by heating
the outer areas. The temperature is
thereby equalised and the food
heats up evenly.
Arrangement of food
Place a number of individual portions, such as small
pudding moulds, cups or potatoes in their jackets, in a
circle on the turntable. Keep the portions at a distance
from each other so that the microwave energy can
reach the food from all sides.
Turning
Medium-sized items, such as hamburgers and steaks,
should be turned over once during cooking, in order to
shorten the cooking process. Large items, such as roasts
and chickens, must be turned, since the upper side
receives more microwave energy and could dry out if
not turned.
Standing time
Keeping to the standing time is one
of the most important rules with
microwaves. Almost all foods, which
are thawed, heated or cooked in the
microwave, require a certain
amount of time to stand, during
which temperature equalisation takes place and the
moisture in the food is evenly distributed.
1. AG-71+72D-EU English 14/12/2005 14:24 Page 12
Page 15
Defrosting
13
UK
Heating
Your microwave is ideal for defrosting. Defrosting times
are usually considerably shorter than in traditional
methods. Here are a few tips. Take the frozen item out
of its packaging and place on a plate for defrosting.
Boxes & containers
Boxes and containers suitable for microwaves are
particularly good for defrosting and heating food, since
they can withstand temperatures in a deep freeze
(down to approx. -40 °C) as well as being heat-resistant
(up to approx. 220 °C). You can therefore use the same
container to freeze, defrost, heat and even cook the
food, without having to transfer it.
Covering
Cover thin parts with small strips of aluminium foil
before defrosting. Defrosted or
warm parts should likewise be
covered with aluminium strips
during defrosting. This stops the
thin parts becoming too hot while
thicker parts are still frozen.
Correct setting
It is better to choose a setting which is too low rather
than one which is too high. By so doing you will ensure
that the food defrosts evenly. If the microwave setting
is too high, the surface of the food will already have
begun to cook while the inside is still frozen.
Turning/stirring
Almost all foods have to be turned
or stirred from time to time. As
early as possible, separate parts
which are stuck together and
rearrange them.
Small amounts...
defrost more quickly and evenly than larger ones. We
recommend that you freeze portions which are as small
as possible. By so doing you will be able to prepare
whole menus quickly and easily.
Foods requiring careful handling,
such as gateaux, cream, cheese and bread should only
be partially defrosted and then left to defrost
completely at room temperature. By so doing you will
avoid the outer areas becoming too hot while the
inside is still frozen.
Standing time
This is particularly important after defrosting food, as
the defrosting process continues during this period. In
the defrosting table you will find the standing times
for various foods. Thick, dense foods require a longer
standing time than thinner foods or food of a porous
nature. If the food has not defrosted sufficiently, you
may continue defrosting it in the microwave oven or
lengthen the standing time accordingly. At the end of
the standing time you should process the food as soon
as possible and not re-freeze it.
• Ready-prepared meals in aluminium containers
should be removed from the aluminium container
and heated on a plate or in a dish.
• Food should be covered with microwave cling film, a
plate or cover (obtainable from stores), so that the
surface does not dry out. Drinks need not be
covered.
• Remove the lids from firmly closed containers.
• When boiling liquids such as water, coffee, tea or
milk, place a glass stirrer in the container.
• If possible, stir large quantities from time to time, to
ensure that the temperature is evenly distributed.
• The times are for food at a room temperature of
20 °C. The heating time for food stored in a
refrigerator should be increased slightly.
• After heating allow the food to stand for 1-2
minutes, so that the temperature inside the food
can be evenly distributed (standing time).
• The times given are guidelines which can be varied
according to the initial temperature, weight, water
content, fat content or the result which you wish to
achieve.
1. AG-71+72D-EU English 14/12/2005 14:24 Page 13
Page 16
14
Cooking fresh vegetables
Cooking meat, fish & poultry
Defrosting & cooking
• When buying food items, try to ensure that, as far
as possible, they are of similar size. This will ensure
that they are cooked properly.
• Before preparation wash meat, fish and poultry
thoroughly under cold running water and pat them
dry with kitchen paper. Then continue as normal.
• Beef should be well hung and have little gristle.
• Even though the pieces may be of a similar size,
cooking results may vary. This is due, amongst other
things, to the kind of food, variations in the fat and
moisture content as well as the temperature before
cooking.
• Turn large pieces of meat, fish or poultry half way
through the cooking time, so that they are cooked
evenly from all sides.
• After cooking cover roasts with aluminium foil and
allow them to stand for approx. 10 minutes
(standing time). During this period the roast carries
on cooking and the liquid is evenly distributed, so
that when it is carved a minimum amount of juice is
lost.
• When buying vegetables try to ensure that, as far as
possible, they are of similar size. This is particularly
important when you want to cook the vegetables
whole (e.g. boiled potatoes).
• Wash the vegetables before preparing them, clean
them and only then weigh the required quantity for
the recipe and chop them up.
• Season them as you would normally, but as a rule
only add salt after cooking.
• Add about 5 tbsps of water for 500 g of vegetables.
Vegetables which are high in fibre require a little
more water. You will find information about this in
the table (see page 27).
• Vegetables are usually cooked in a dish with a lid.
Those with a high moisture content, e.g. onions or
boiled potatoes, can be cooked in microwave cling
film without adding water.
• After half the cooking time has elapsed vegetables
should be stirred or turned over.
• After cooking allow the vegetables to stand for
approx. 2 minutes, so that the temperature disperses
evenly (standing time).
• The cooking times given are guidelines and depend
upon the weight, initial temperature and condition
of the type of vegetable in question. The fresher the
vegetables, the shorter the cooking times.
Deep-frozen dishes can be defrosted and cooked at the
same time in one process in your microwave. You will
find some examples in the table (see page 28). Do take
note, however, of the general advice given on "heating"
and "defrosting" food.
Please refer to the manufacturer's instructions on the
packaging when preparing deep- frozen dishes. These
usually contain precise cooking times and offer advice
on preparation.
1. AG-71+72D-EU English 14/12/2005 14:24 Page 14
Page 17

15
UK
Microwave power levels
To set the microwave power level :
Rotate the TIMER/WEIGHT/POWER knob clockwise or counter-clockwise to select cooking time.
Press the COOKING MODE button once (microwave only).
To change the microwave power level rotate the knob until the desired power level is reached.
Press the START/QUICK button.
NOTE: If the power level is not selected, 900 W is automatically set.
Your oven has 5 power levels. To choose the power level
for cooking, follow the advice given in the recipe
section. Generally the following recommendations
apply:
900 W used for fast cooking or reheating e.g. soup,
casseroles, canned food, hot beverages, vegetables, fish,
etc.
630 W used for longer cooking of dense foods such as
roast joints, meat loaf and plated meals, also for
sensitive dishes such as cheese sauce and sponge cakes.
At this reduced setting, the sauce will not boil over and
food will cook evenly without over cooking at the sides.
450 W for dense foods which require a long cooking
time when cooked conventionally, eg. beef dishes, it is
advisable to use this power setting to ensure the meat
will be tender.
270 W (Defrost setting) to defrost, select this power
setting, to ensure that the dish defrosts evenly. This
setting is also ideal for simmering rice, pasta, dumplings
and cooking egg custard.
90 W For gentle defrosting, eg. cream gateaux or
pastry.
W = WATT
1. AG-71+72D-EU English 14/12/2005 14:24 Page 15
Page 18
16
Microwave cooking
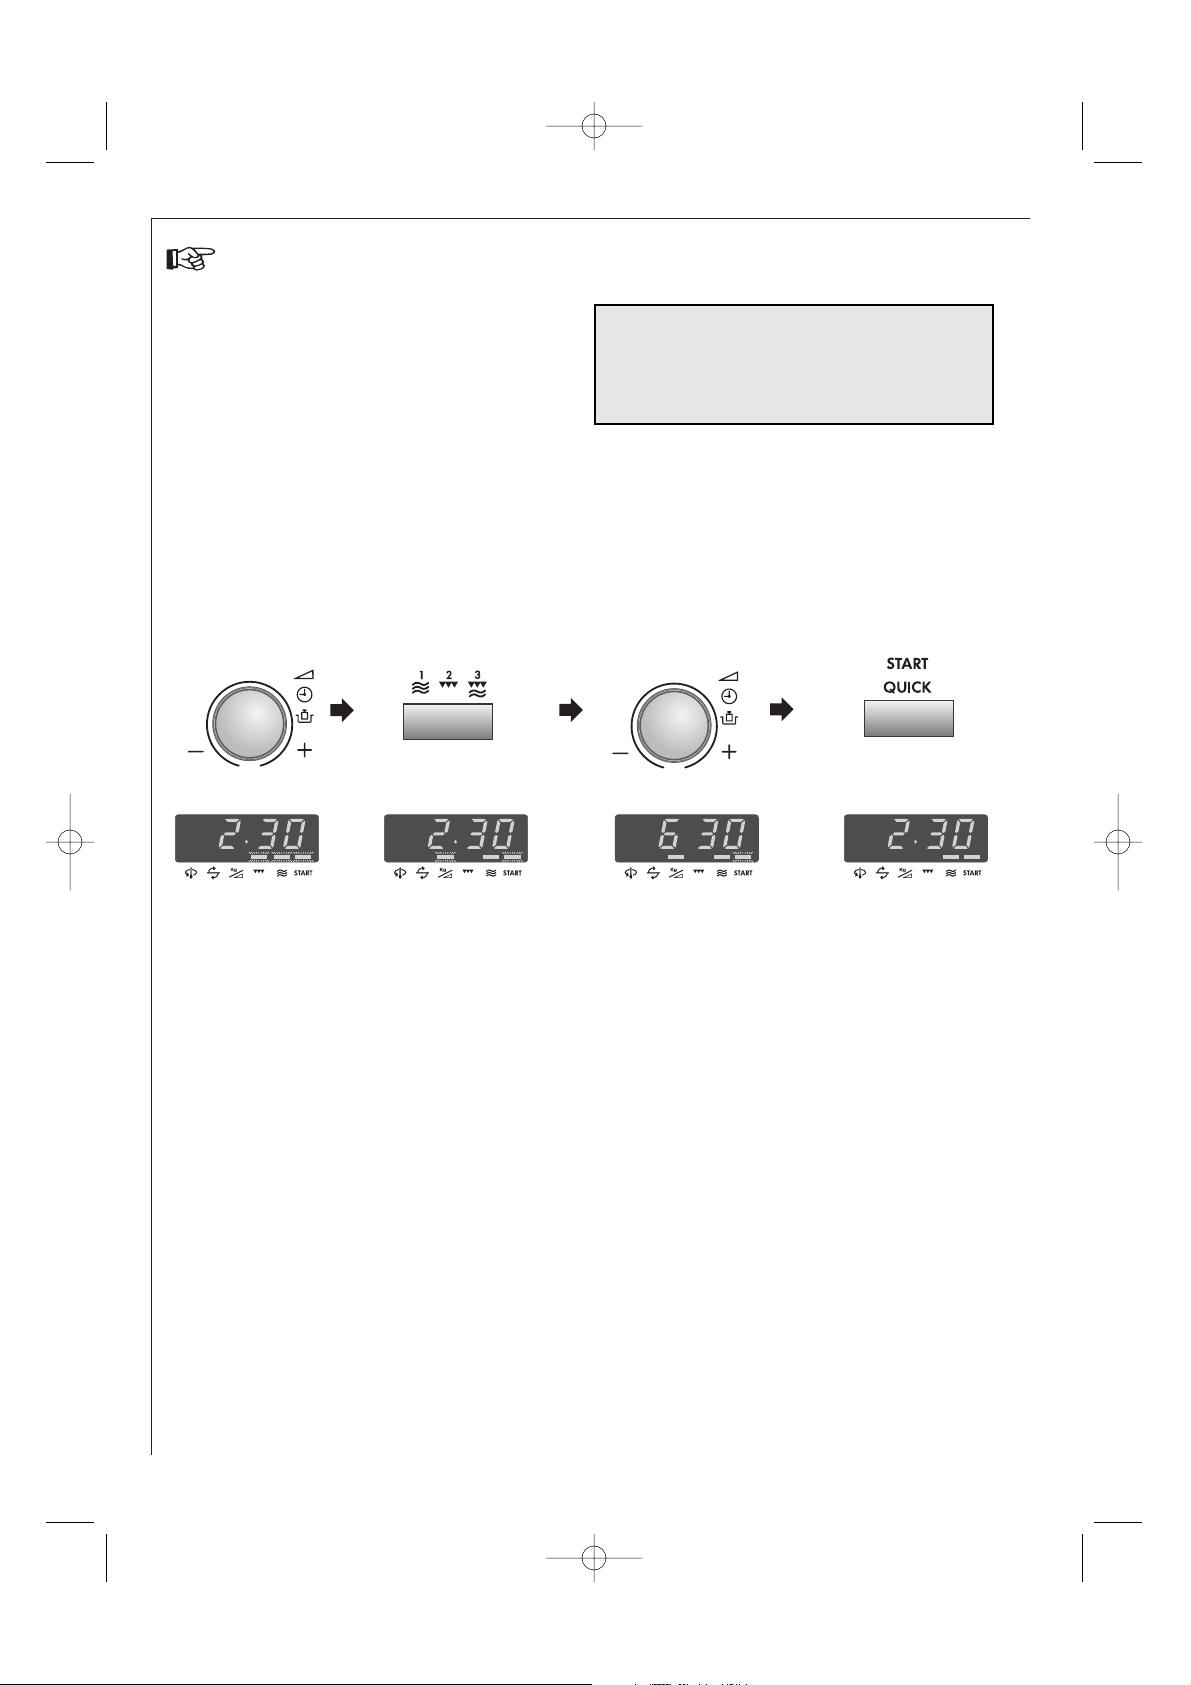
Example:
Suppose you want to heat soup for 2 minutes and 30 seconds on 630 W microwave power.
Your oven can be programmed for up to 90 minutes.
(90.00) The input unit of cooking (defrosting) time
varies from 10 seconds to five minutes. It depends on
the total length of the cooking (defrosting) time as
shown on the table.
Cooking time Increasing unit
0-5 minutes 10 seconds
5-10 minutes 30 seconds
10-30 minutes 1 minute
30-90 minutes 5 minutes
1. Enter desired
cooking time by
rotating TIMER/
WEIGHT/POWER
knob clockwise.
2. Choose desired cooking
mode by pressing
COOKING MODE button
once (microwave only).
3. Choose desired power by
rotating the TIMER/
WEIGHT/POWER knob
clockwise.
4. Press START/QUICK
button once to begin
cooking.
x1
NOTE:
1. When the door is opened during the cooking process, the cooking time on the digital display stops automatically.
The cooking time starts to count down again when the door is closed and the START/QUICK button is pressed.
2. If you wish to know the power level during cooking, press the COOKING MODE button.
As long as your finger is touching the COOKING MODE button, the power level will be displayed.
3. You can rotate the TIMER/WEIGHT/POWER knob clockwise or counter-clockwise.
If you rotate the knob counter-clockwise, the cooking time will decrease from 90 minutes by degrees.
x1
Check the display.
1. AG-71+72D-EU English 14/12/2005 14:24 Page 16
Page 19
17
UK
Grill & dual grill cooking
This microwave oven has two GRILL cooking modes: 1. Grill only. 2. Dual Grill (Grill with microwave).
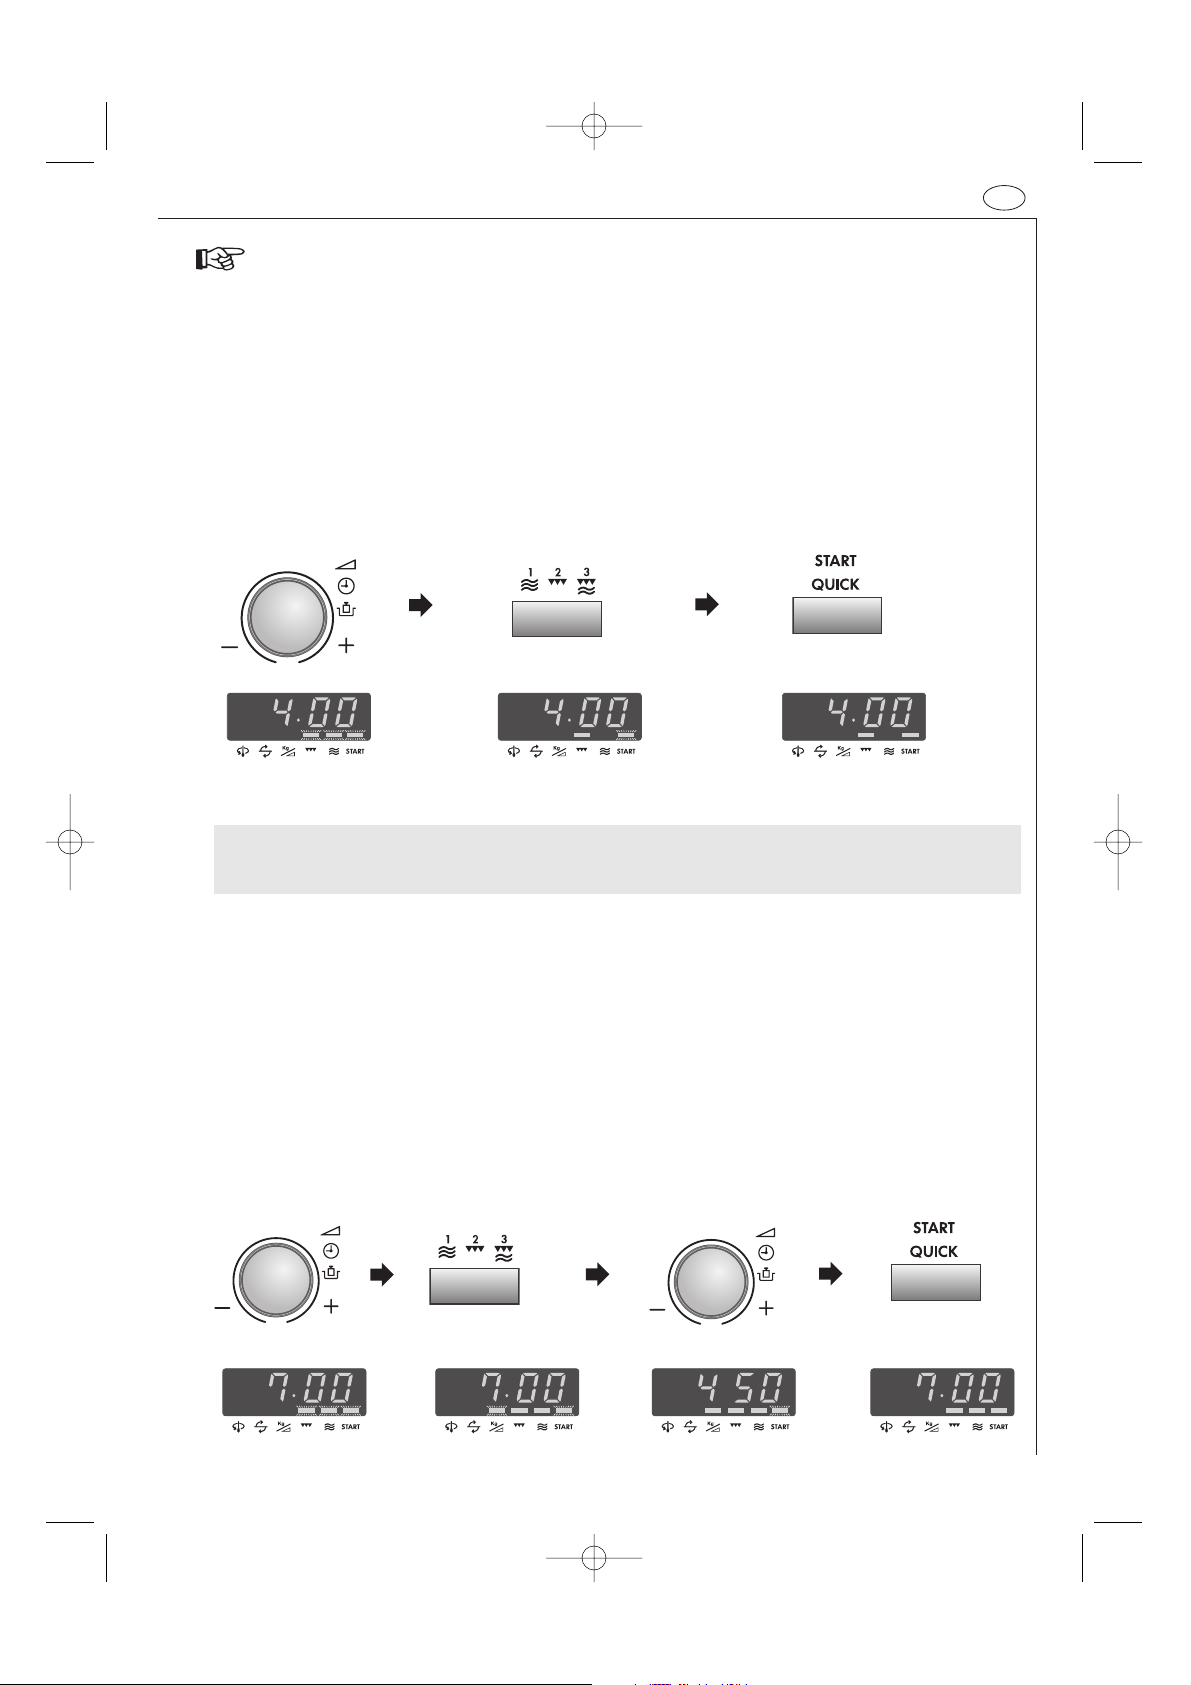
1. GRILL ONLY COOKING
This mode can be used to Grill/Brown food.
Example: To make toast for 4 minutes.
1. Enter desired cooking time
by rotating the TIMER/
WEIGHT/POWER knob.
2. Choose the desired cooking
mode by pressing the
COOKING MODE button
twice. (Grill only).
3. Press the START/QUICK
button once to begin
cooking.
NOTES:
1. The high or the low rack is recommended for grilling.
2. You may detect smoke or a burning smell when using the grill for the first time, this is normal and not a sign
that the oven is out of order.
To avoid this problem, when first using the oven, operate the grill without food for 20 minutes.
This mode uses a combination of Grill power and Microwave power (90 W to 630 W).
The microwave power level is preset to 270 W.
Example: To cook grill skewers (see recipe on page 26) for 7 minutes on DUAL GRILL (450 W).
1. Enter the desired
cooking time by
rotating the TIMER/
WEIGHT/POWER knob.
2. Choose the desired
cooking mode by
pressing the COOKING
MODE button three
times (Dual Grill).
3. Rotate the TIMER/
WEIGHT/POWER knob
to the desired
microwave power level.
4. Press the
START/QUICK
button once to
begin cooking.
2. DUAL GRILL COOKING
Check the display.
x1
x2
x1
x3
Check the display.
1. AG-71+72D-EU English 14/12/2005 14:24 Page 17
Page 20
18
Other convenient functions
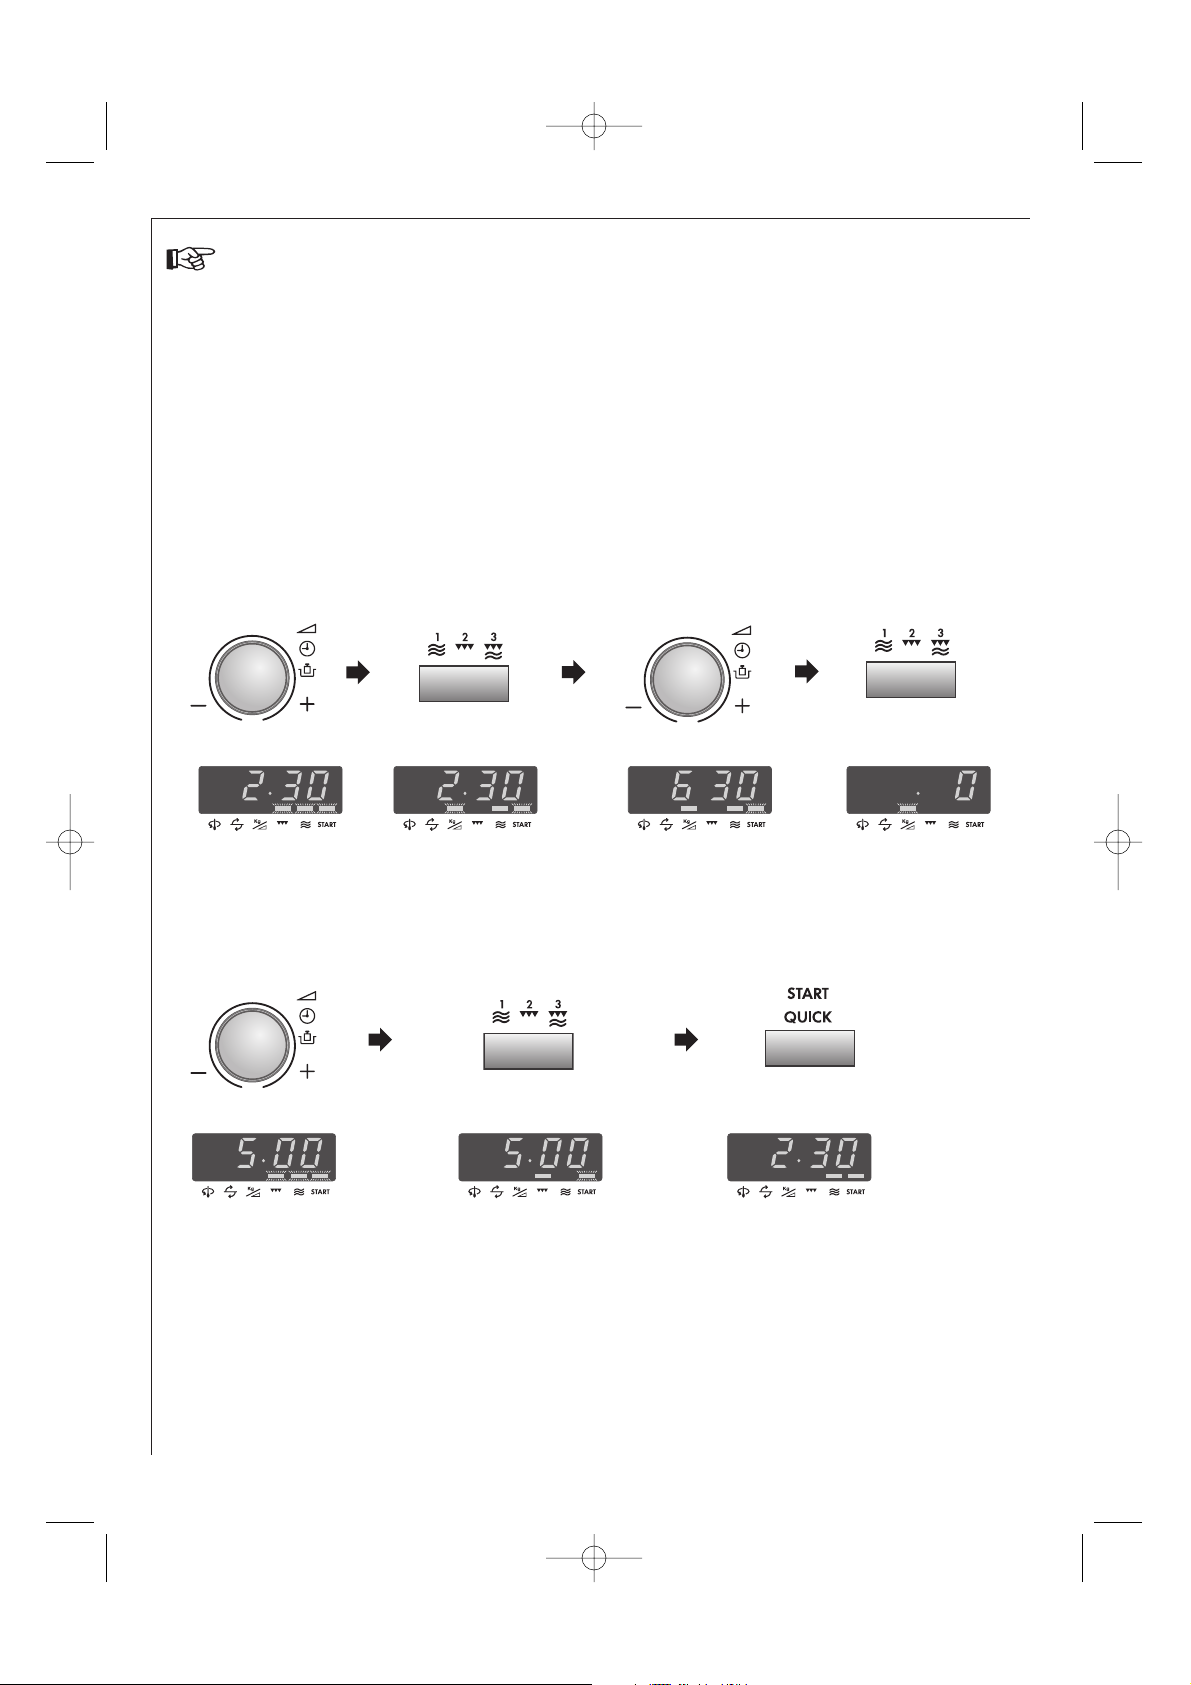
1. MULTIPLE SEQUENCE COOKING
A sequence of 3 stages (maximum) can be programmed using combinations of MICROWAVE, GRILL or DUAL
GRILL.
Example:
To cook: 2 minutes and 30 seconds on 630 W power (Stage 1)
5 minutes Grill only (Stage 2)
STAGE 1
1. Enter the desired
cooking time by
rotating TIMER/
WEIGHT/POWER
knob.
2. Choose the desired
cooking mode by pressing
COOKING MODE button
once (microwave only).
3. Enter the desired power
level by rotating TIMER/
WEIGHT/POWER knob.
4. Press the COOKING
MODE button before
programming Stage 2.
STAGE 2
5. Enter desired time by
rotating TIMER/WEIGHT/
POWER knob.
6. Choose the desired cooking
mode by pressing the COOKING
MODE button twice (Grill only).
7. Press START/QUICK button
once to begin cooking.
(The oven will begin to cook for 2 minutes and 30 seconds at 630 W, and then for 5 minutes on Grill only.)
Example:
To cook 1.0 kg Courgette & Noodle Gratin (see recipe on page 32).
1. 18 minutes at 900 W.
2. 7 minutes Dual Grill at 630 W.
NOTE: If you set any programme after setting GRILL mode, omit the steps 3 and 4.
If you press the COOKING MODEbutton continually after setting GRILL mode, the GRILL mode will
be changed to the DUAL GRILL mode automatically.
Check the display.
x1
x1
Check the display.
x2
x1
1. AG-71+72D-EU English 14/12/2005 14:24 Page 18
Page 21
19
UK
Other convenient functions
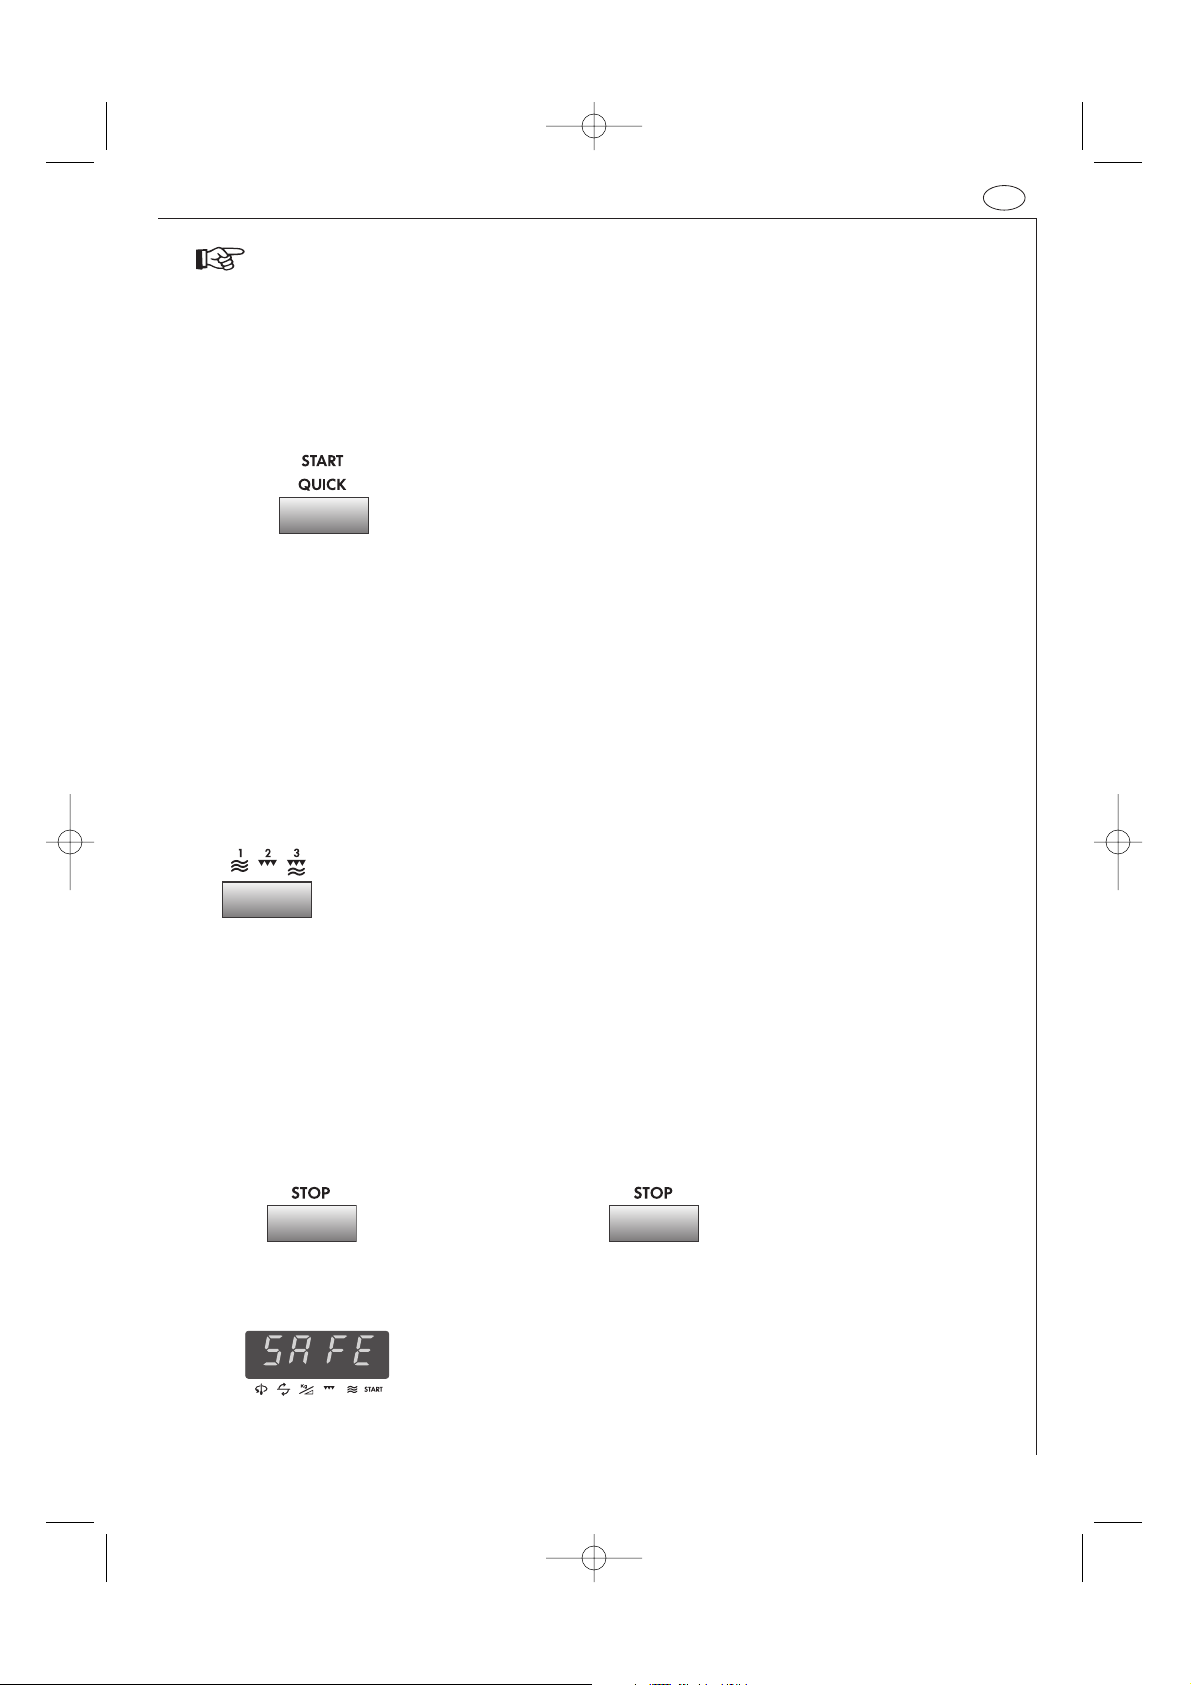
The display will show:
TO SET THE SAFETY LOCK FUNCTION
1. Press and hold the STOP key for 3
seconds.
NOTE: When Safety Lock is set you cannot input any buttons except the STOPbutton.
x1 for 3 seconds
The display will show the
time of day, if set.
TO CANCEL THE SAFETY LOCK FUNCTION
1. Press and hold the STOP key for 3
seconds.
x1 for 3 seconds
4. SAFETY LOCK FUNCTION
2. QUICK START FUNCTION
The START/QUICK button allows you to operate the two following functions:
a. Direct start
You can directly start cooking on 900 W microwave power level for 30 seconds by pressing the
START/QUICK button.
NOTE:
To avoid the misuse by children the START/QUICK button can be used only within 3 minutes after preceding
operation, i.e., closing the door, pressing the STOP button or cooking completion.
b. Extend the cooking time
You can extend the cooking time during manual cooking for multiples of 30 seconds if the START/QUICK button
is pressed while the oven is in operation.
3. TO CHECK THE POWER LEVEL
To check the microwave power level during cooking press the COOKING MODE button.
As long as your finger is touching the COOKING MODE button the power level will be displayed.
The oven continues to count down although the display shows the power level.
x1
1. AG-71+72D-EU English 14/12/2005 14:24 Page 19
Page 22
20
Auto cook & auto defrost operation
AUTOCOOK and AUTO DEFROST automatically work out the correct cooking mode and cooking time. You can
choose from 2 AUTOCOOK, 6 AUTOCOOK plus GRILL and 4 AUTO DEFROST menus.
What you need to know when using this automatic function:
TIMER/WEIGHT/
POWER knob
START/QUICK button
1a.
1b.
x1
2.
3.
Menu number
x1
Menu number
x1
Menu number
x1
Menu number
2. The weight or quantity of the food can be input by
rotating the TIMER/WEIGHT/POWER knob until
the desired weight/quantity is displayed.
• Enter the weight of the food only. Do not include
the weight of the container.
• For food weighing more or less than weights/
quantities given in the AUTOCOOK & AUTO DEFROST
charts, use manual operation. For best results,
follow the cooking charts on pages 27 -28.
3. To start cooking press START/QUICK button.
When action is required (e.g. to turn food over) the
oven stops and the audible signals sound, remaining
cooking time and any indicator will flash on the
display. To continue cooking, press the
START/QUICK button.
For example:
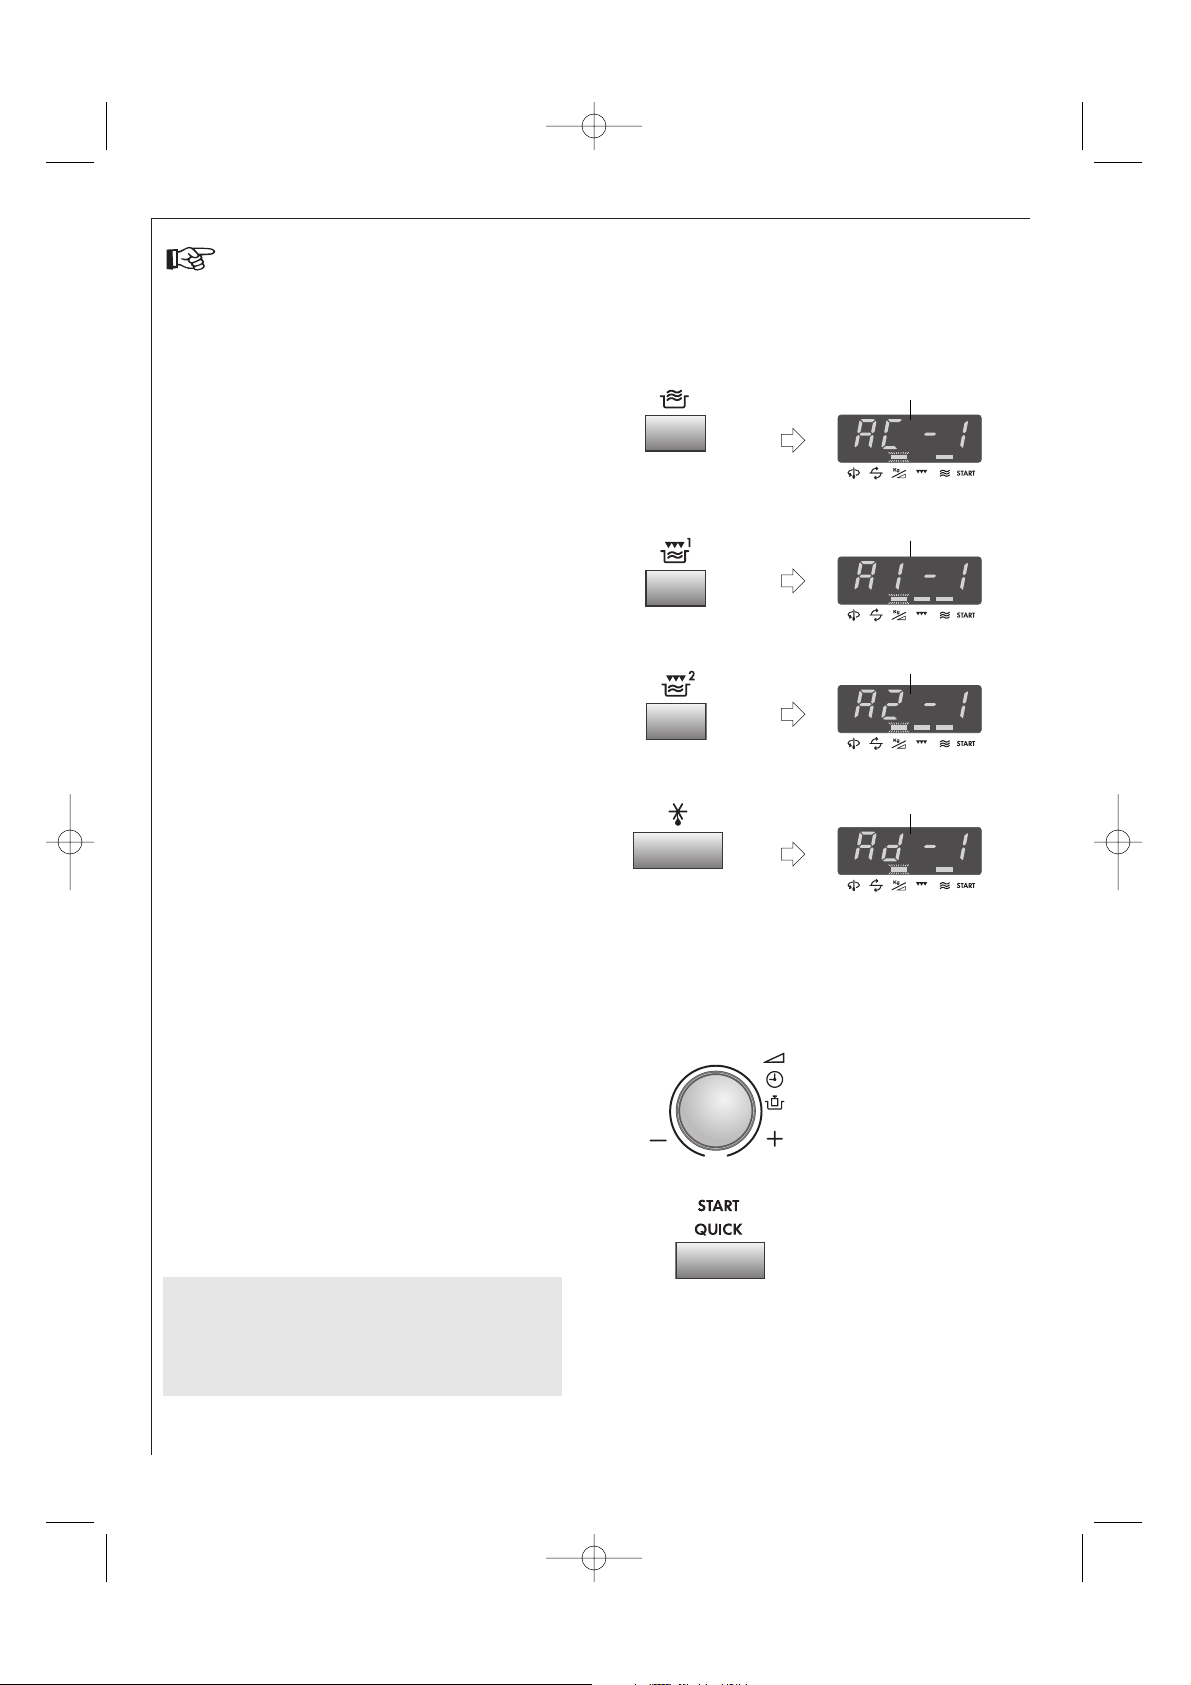
1a. AUTO COOK: The AUTO COOK button has two
menus. Press the AUTO COOK button once, the
display will appear as shown.
1b. AUTO COOK plus GRILL 1: The AUTO COOK PLUS
GRILL 1 button has two menus. Press the AUTO
COOK PLUS GRILL 1 button once, the display will
appear as shown.
1c. AUTO COOK plus GRILL 2: The AUTO COOK PLUS
GRILL 2 button has four menus. Press the AUTO
COOK PLUS GRILL 2 button once, the display will
appear as shown.
1d. AUTO DEFROST: The AUTO DEFROST button has
four menus. Press the AUTO DEFROST button once,
the display will appear as shown.
The menu can be chosen by pressing the AUTO DEFROST or desired AUTO COOK button until the desired menu
number is displayed. See pages 22 - 24 “AUTO COOK & AUTO DEFROST charts”.
The menu will be changed automatically by holding down the AUTO COOK or AUTO DEFROST button.
The final temperature will vary according to the
initial temperature. Check food is piping hot after
cooking. If necessary, you can extend the cooking
time and change the power level.
NOTE: If you use the ADD 30 SECONDS function during
the cooking/defrosting, the food may be overcooked.
x1
1c.
1d.
1. AG-71+72D-EU English 14/12/2005 14:24 Page 20
Page 23
21
UK
Auto cook & auto defrost operation
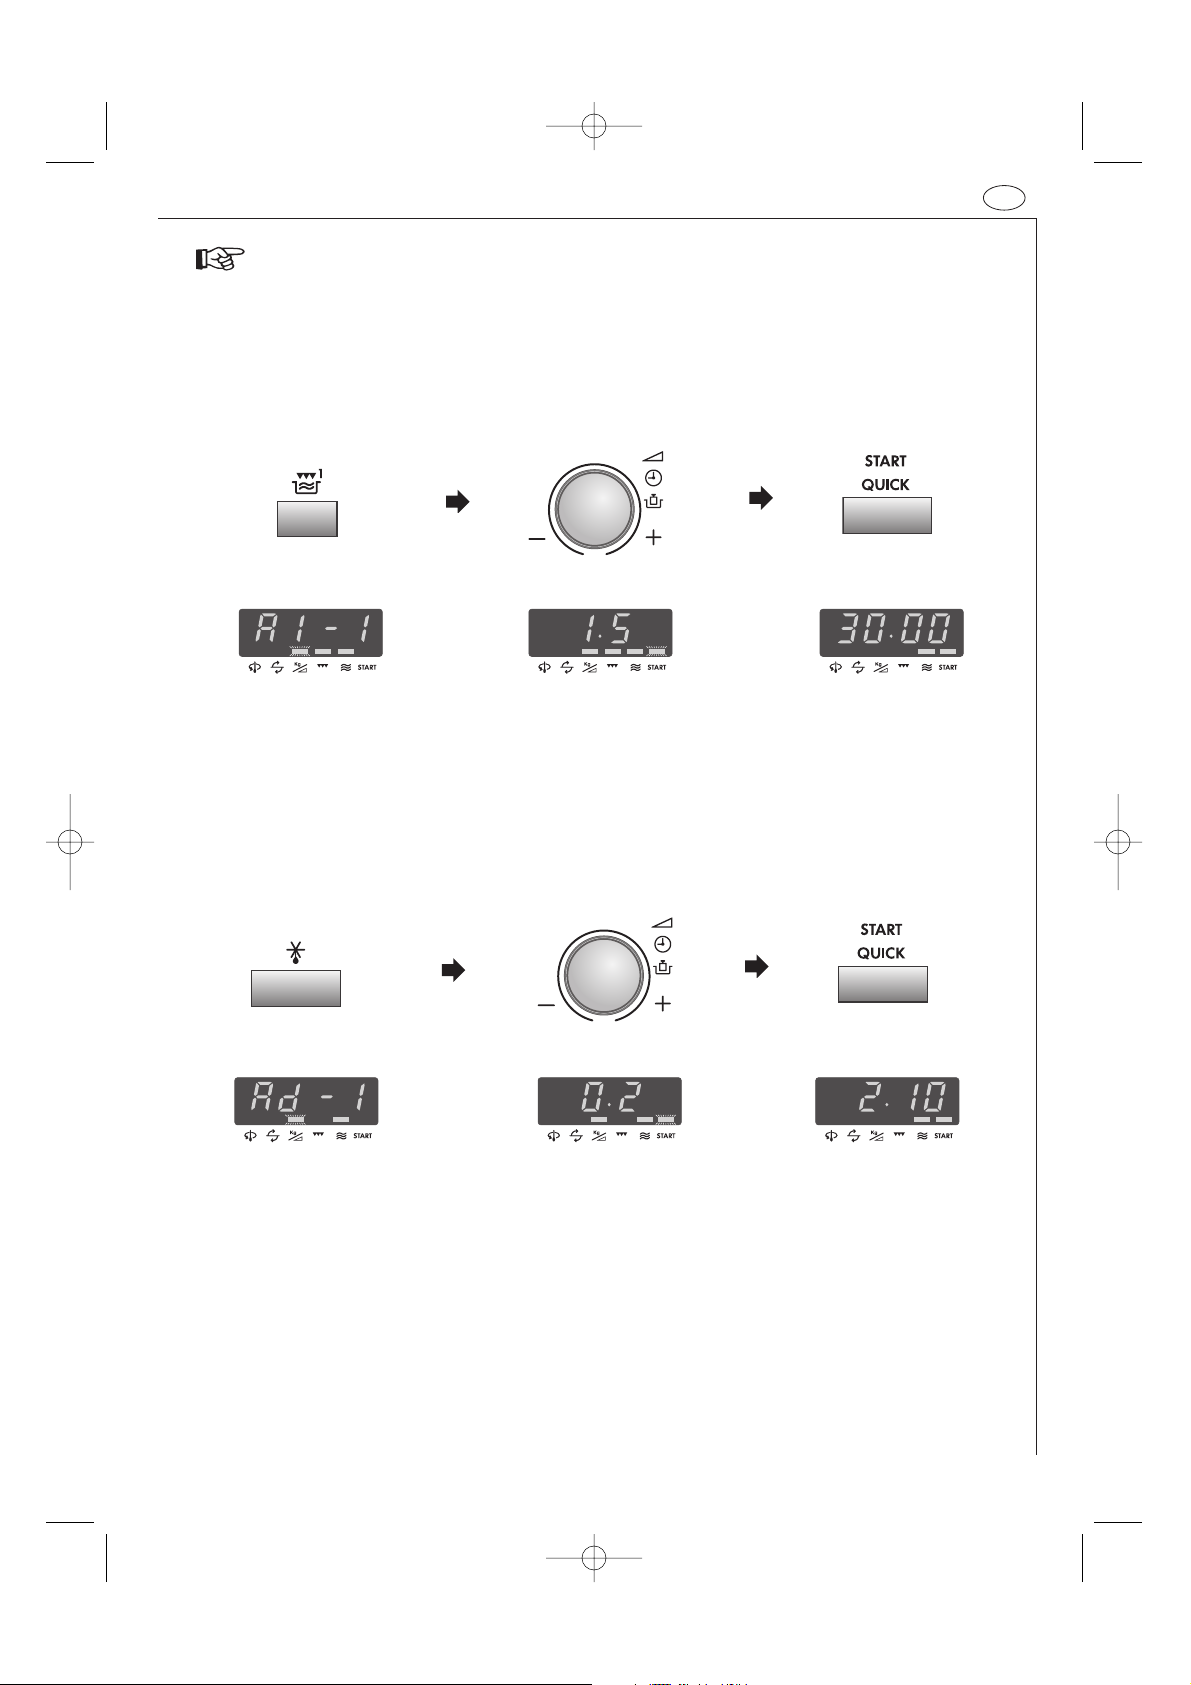
Example 1 for AUTO COOK plus GRILL 1:
To cook Gratinated Fish Fillet 1,5 kg using Auto Cook plus Grill 1 (A1-1).
2. Enter the weight by rotating
the TIMER/WEIGHT/POWER
knob.
x1
3. Press the START/QUICK
button once.
1. Select the menu required by
pressing the AUTO COOK PLUS
GRILL 1 button once.
x1
Check the display.
Example 2 for AUTO DEFROST:
To defrost Steak 0,2 kg using Auto Defrost (Ad-1).
2. Enter the weight by rotating
the TIMER/WEIGHT/POWER
knob.
x1
3. Press the START/QUICK
button once.
1. Select the menu required by
pressing the AUTO DEFROST
button once.
x1
Check the display.
1. AG-71+72D-EU English 14/12/2005 14:24 Page 21
Page 24
22
Auto cook & auto defrost charts
BUTTON
PROCEDURE
• See recipe for “Chicken Pan with Vegetables”
on page 25.
* Total weight of all ingredients.
• See recipe for “Mince and Onion” on page 25.
* Total weight of all ingredients.
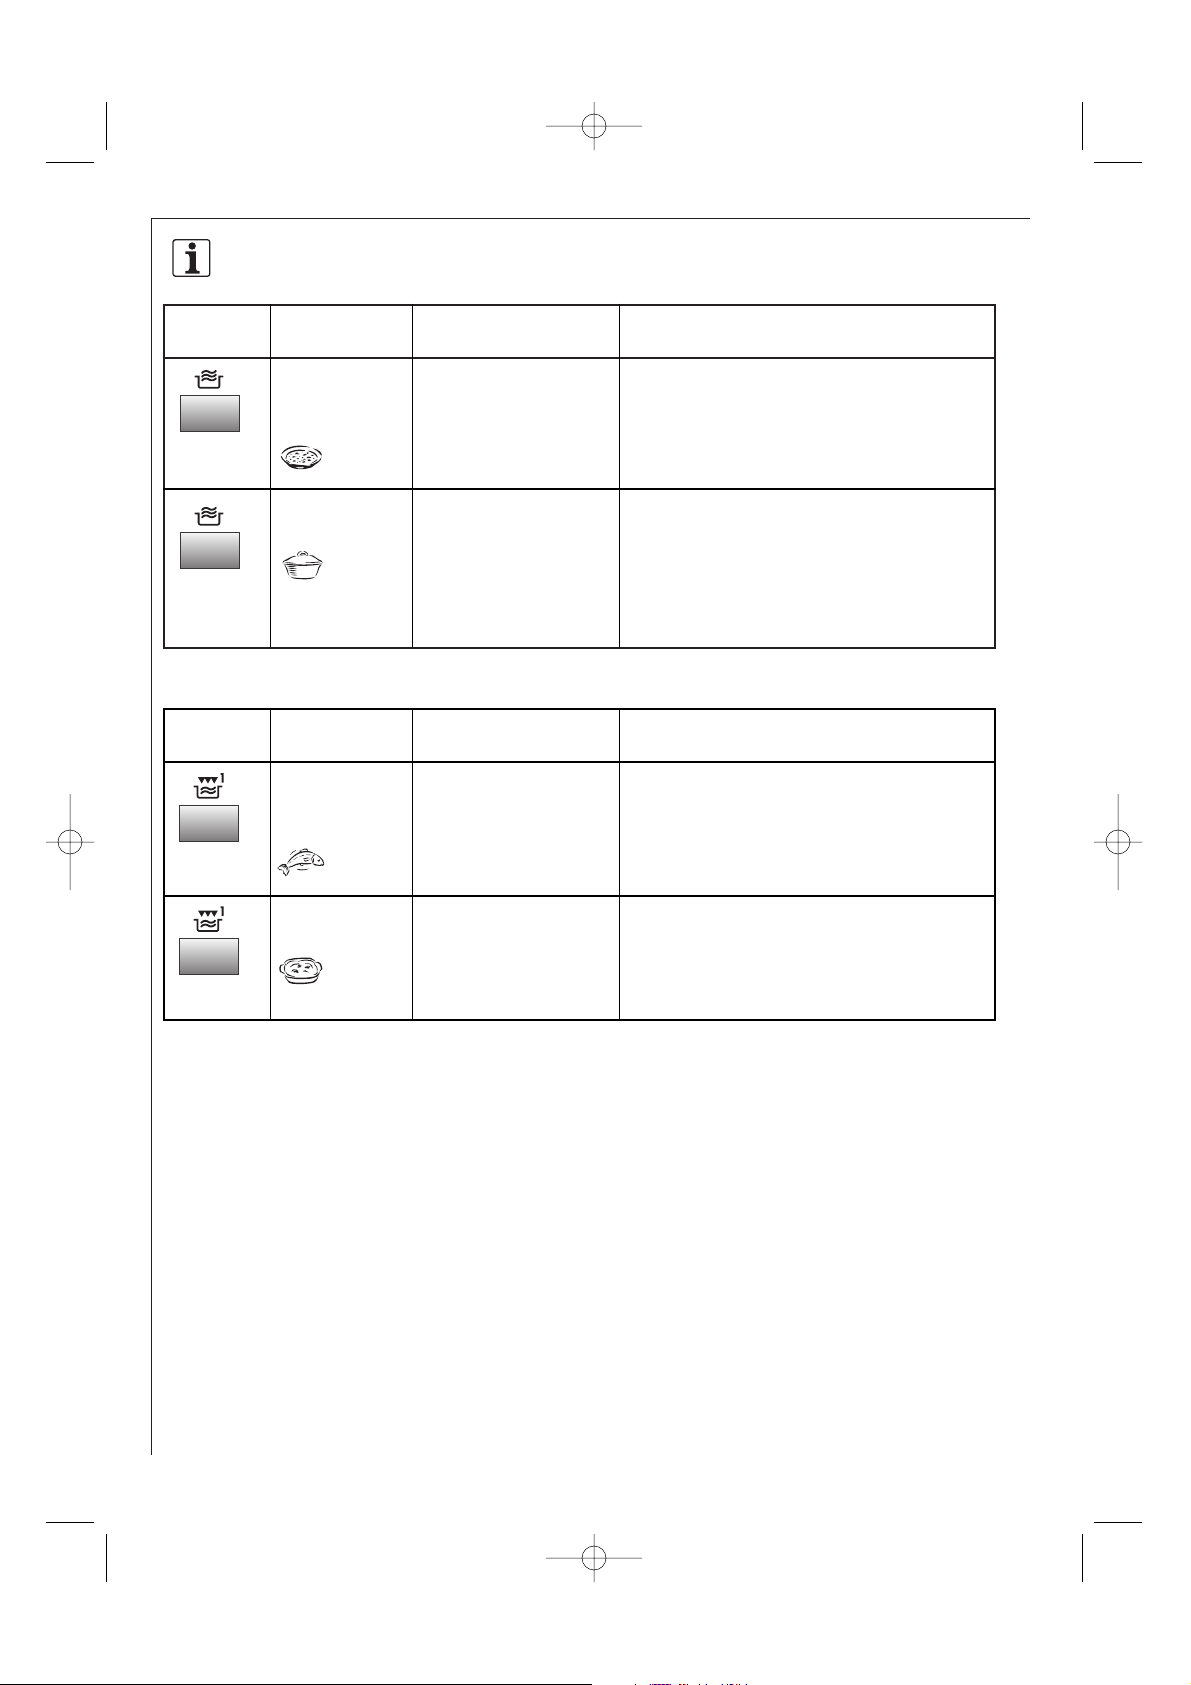
AUTO COOK
AC-1 Cook
Chicken Pan with
Vegetables
AC-2 Cook
Mince and Onion
WEIGHT (Increasing
Unit) / UTENSILS
0,5 - 1,5 kg* (500 g)
(initial temp Chicken 5 °C)
Gratin dish with
microwave cling film
0,5 - 1,5 kg* (500 g)
(initial temp Mince 5 °C)
Casserole dish with lid
x1
x2
BUTTON
PROCEDURE
• See recipes for “Gratinated Fish Fillet” on pages
25 - 26.
* Total weight of all ingredients.
• See recipes for “Gratin” on page 26.
* Total weight of all ingredients.
AUTO COOK
plus GRILL 1
A1-1 Cook
Gratinated Fish
Fillet
A1-2 Cook
Gratin
WEIGHT (Increasing
Unit) / UTENSILS
0,5 - 1,5 kg* (500 g)
(initial temp Fish 5 °C)
Gratin dish
Low rack
0,5 - 1,5 kg* (500 g)
(initial temp 20 °C)
Gratin dish
Low rack
x1
x2
1. AG-71+72D-EU English 14/12/2005 14:24 Page 22
Page 25
23
UK
Auto cook & auto defrost charts
BUTTON
PROCEDURE
• Remove the frozen french fried potatoes from
the package and place them on a flan dish.
• Place the dish on the high rack in the oven.
• When the audible signals sound, turn over.
• After cooking, remove from the dish and put on
a plate for serving.
(No standing time is necessary).
• Add salt to taste.
NOTE: The dish gets very hot during cooking.
To avoid burning yourself, please use oven
gloves for removing the flan dish from the
oven.
• Prepare the grill skewers.
• Place on the high rack and cook.
• When the audible signal sounds turn over.
• After cooking, remove and put on a plate for
serving. (No standing time necessary).
• Mix the ingredients and spread on the chicken
legs.
• Pierce the skin of the chicken legs.
• Put the chicken legs on the high rack, skin side
down, with the thin ends towards the centre.
• When audible signals sound, turn the food over.
• After cooking, remove and stand for
approximately 5 minutes.
• Mix the ingredients and spread on the chicken.
• Pierce the skin of the chicken.
• Put chicken breast side down on the low rack.
• When audible signals sound, turn the chicken
over.
• After cooking, leave for approx. 3 minutes in
the oven, remove and put on a plate for
serving.
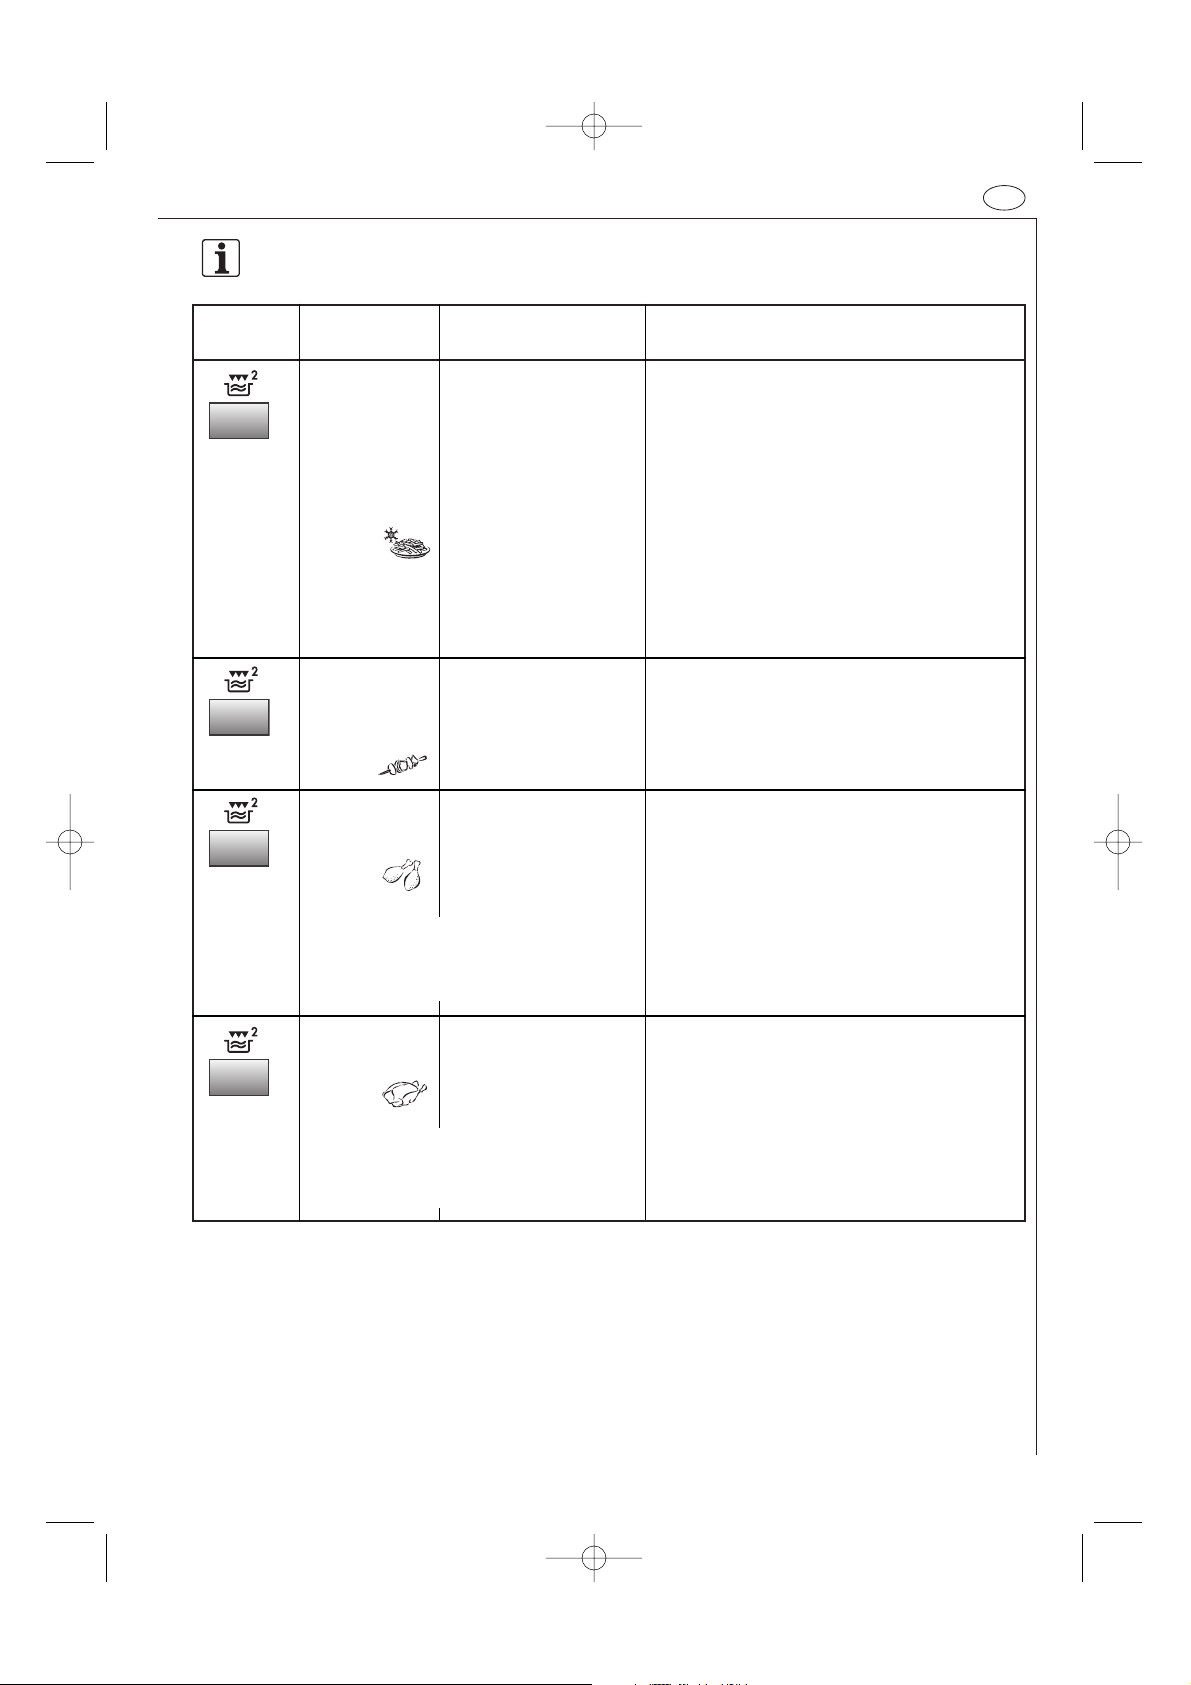
AUTO COOK
plus GRILL 2
A2-1 Cook
French Fried
Potatoes
Thick type
(recommended
for conventional
ovens)
A2-2 Cook
Grill Skewers
See recipe on
page 26.
A2-3 Cook
Chicken Legs
A2-4 Cook
Grilled Chicken
WEIGHT (Increasing
Unit) / UTENSILS
0,20 - 0,40 kg (50 g)
(initial temp -18 °C)
Flan dish
High rack
0,2 - 0,8 kg (100 g)
(initial temp 5 °C)
High rack
0,20 - 0,80 kg (50 g)
(initial temp 5 °C)
High rack
0,9 - 1,8 kg (100 g)
(initial temp 5 °C)
Low rack
x1
x3
x4
x2
Ingredients for 0,6 kg chicken legs:
3 pieces, 1-2 tbsp oil,
1
/
2 tsp salt,
1 tsp sweet paprika, 1 tsp rosemary
Ingredients for 1,2 kg grilled chicken:
Salt & pepper, 1 tsp sweet paprika,
2 tbsp oil
1. AG-71+72D-EU English 14/12/2005 14:24 Page 23
Page 26
24
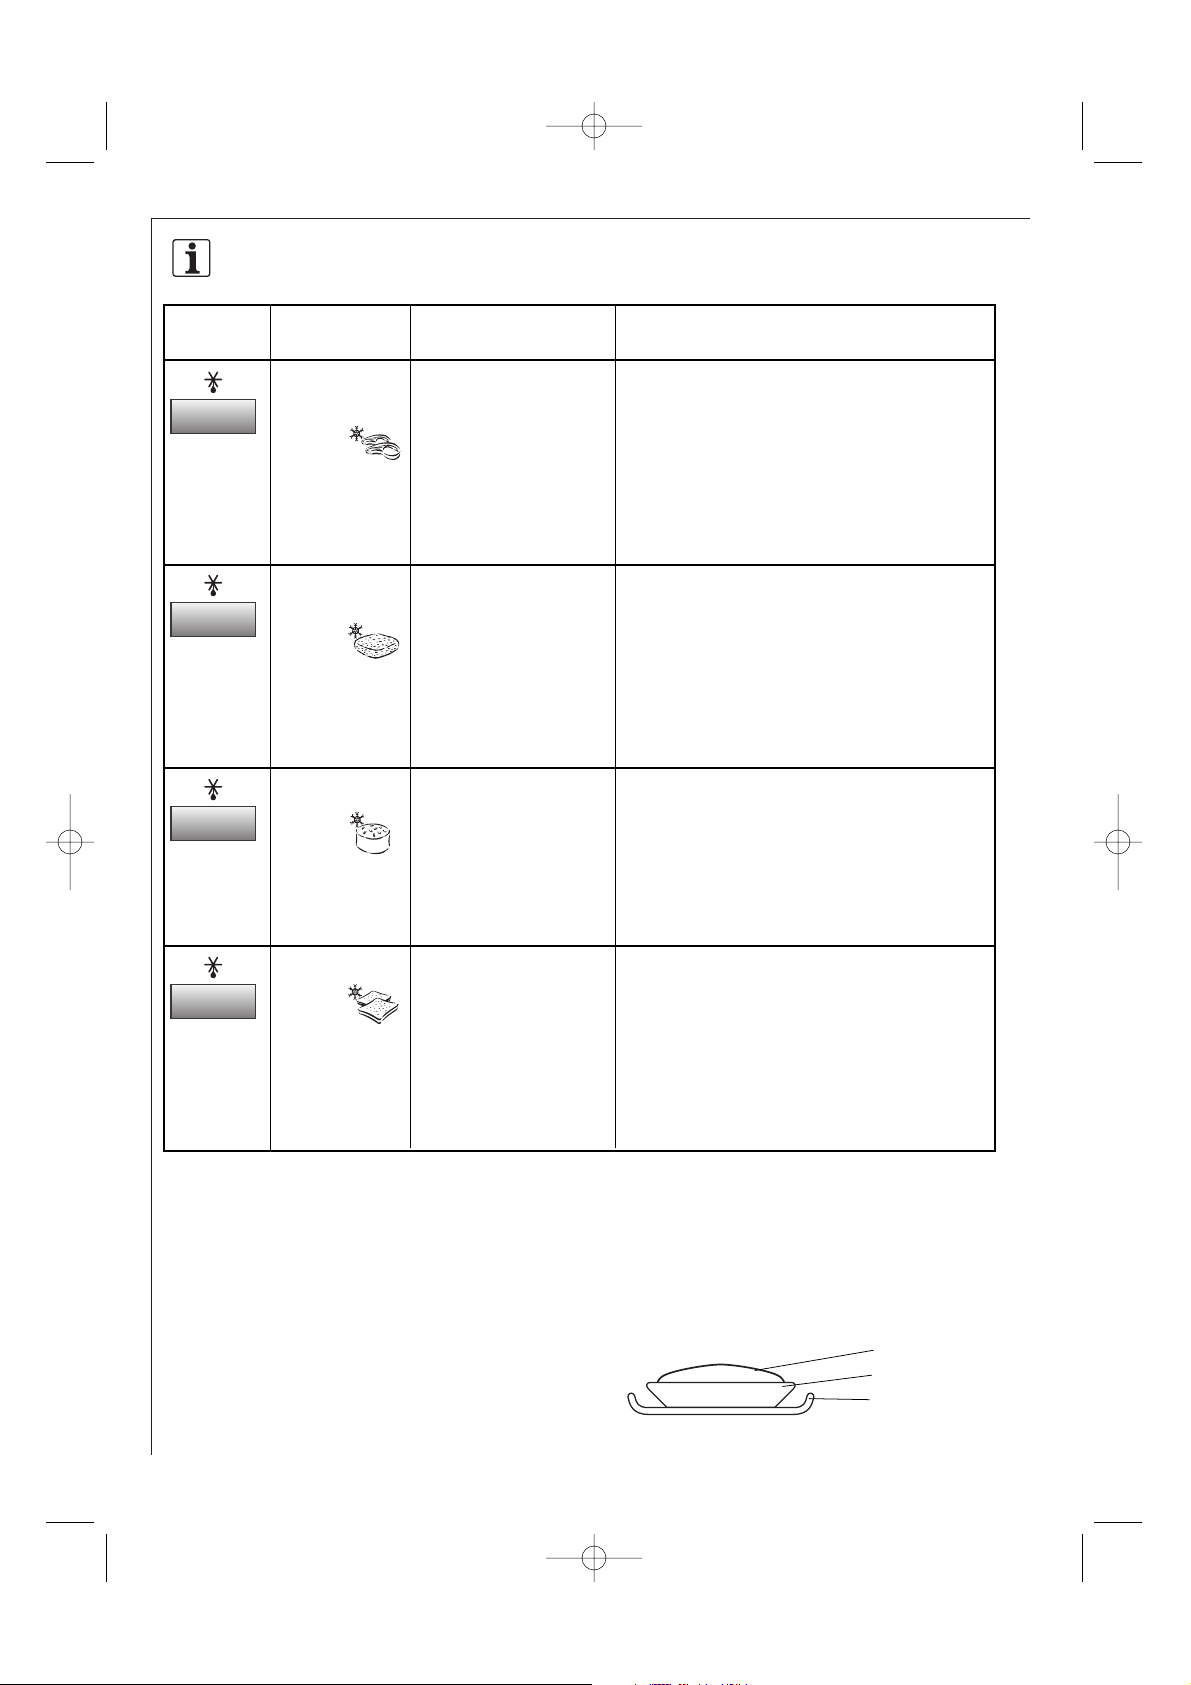
NOTE: Auto Defrost
1. Steaks and Chops should be frozen in one layer.
2. Minced meat should be frozen in a thin shape.
3. After turning over, shield the defrosted portions with small, flat pieces of aluminium foil.
4. Gateaux topped and coated with cream are very sensitive to microwave energy. For the best result, if the cream
begins to soften rapidly, it is best to remove it from the oven immediately and stand for 10 - 30 minutes at room
temperature
5. For Steaks and Chops arrange the food in the oven as shown:
Food
Plate
Turntable
Steaks and Chops
BUTTON
PROCEDURE
• Place the food on a plate in the centre of the
turntable.
• When the oven stops and the audible signals
sound, turn the food over, rearrange and
separate. Shield thin parts and warm spots with
aluminium foil.
• After defrosting, wrap in aluminium foil for 10
- 15 minutes, until thoroughly defrosted.
• Cover the turntable with cling film.
• Place the block of minced meat onto the
turntable.
• When the oven stops and the audible signals
sound, turn the food over. Remove the
defrosted parts if possible.
• After defrosting, stand for 5 - 10 minutes, until
thoroughly defrosted.
• Remove all packaging from the cake.
• Place on a flat dish in the middle of the
turntable.
• After defrosting, cut the cake into similar sized
pieces keeping space between each piece and
let stand for 15 - 60 minutes until evenly
defrosted.
• Distribute on a flat dish in the centre of the
turntable.
• When the audible signal sounds rearrange, and
remove defrosted slices.
• After defrosting separate all slices and
distribute on a large plate. Cover the bread with
aluminium foil and let stand for 5 - 10 minutes
until thoroughly defrosted.
AUTO DEFROST
NO.
Ad-1 Defrost
Steak and Chops
Ad-2 Defrost
Minced Meat
Ad-3 Defrost
Cake
Ad-4 Defrost
Bread
WEIGHT (Increasing
Unit) / UTENSILS
0,2 - 1,0 kg (100 g)
(initial temp -18 °C)
(See note below)
0,2 - 1,0 kg (100 g)
(initial temp -18 °C)
Cling film
(See note below)
0,1 - 1,4 kg (100 g)
(initial temp -18 °C)
Flat dish
0,1 - 1,0 kg (100 g)
(initial temp -18° C)
Flat dish
(Only sliced bread is
recommended for this
programme.)
x1
x2
x3
x4
Auto cook & auto defrost charts
1. AG-71+72D-EU English 14/12/2005 14:24 Page 24
Page 27
25
UK
Recipes for auto cook
CHICKEN PAN WITH VEGETABLES (AC-1)
Spicy chicken fricassee
Ingredients
0,5 kg 1,0 kg 1,5 kg
60 g 120 g 180 g long grain rice (parboiled)
1 1 1 sachet saffron
25 g 50 g 75 g onion (sliced)
50 g 100 g 150 g red pepper (in strips)
50 g 100 g 150 g leek (in strips)
150 g 300 g 450 g fillet of chicken breast (cubed)
pepper, paprika powder
10 g 20 g 30 g butter or margarine
150 ml 300 ml 450 ml meat stock
Preparation
1. Mix the rice and saffron and place in the greased
dish.
2. Mix the onions, red pepper, leek and chicken. Season
and place on the rice.
3. Put butter on the top.
4. Pour the stock over and cover with microwave cling
film and cook on AUTO COOK (AC-1), “Chicken Pan
with Vegetables”.
5. After cooking, let stand for 5-10 minutes.
GRATINATED FISH FILLET (A1-1)
Fish gratin Italian style
Ingredients
0,5 kg 1,0 kg 1,5 kg
200 g 430 g 630 g fish fillet
1
/
2
tbsp 1 tbsp 1
1
/
2
tbsp lemon juice
1
/
2
tbsp 1 tbsp 1
1
/
2
tbsp anchovy butter
30 g 50 g 80 g Gouda (grated)
salt and pepper
150 g 300 g 450 g fresh tomatoes
1 tbsp 1
1
/
2 tbsp 2 tbsp chopped mixed herbs
100 g 180 g 280 g Mozarella
1
/
2
tbsp
3
/
4
tbsp 1 tbsp Basil (chopped)
Preparation
1. Wash and dry the fish and sprinkle with lemon juice,
salt and anchovy butter.
2. Place in a gratin dish (size depends on weight).
3. Sprinkle the Gouda over the fish.
4. Wash the tomatoes and remove the stalk-spore.
Cut into slices and place on top of the cheese.
5. Season with salt, pepper and the mixed herbs.
6. Drain the Mozarella, cut into slices and place on the
tomatoes. Sprinkle the basil over the cheese.
7. Place the gratin dish on the low rack and cook on
AUTO COOK plus GRILL 1 (A1-1), “Gratinated fish
fillet”.
8. After cooking, let stand for approximately 5 minutes.
Preparation
1. Mix together the minced meat, onion, egg and the
breadcrumbs. Season with salt and pepper. Place the
meat dough into a casserole.
2. Mix the meat stock with the tomato purée.
3. Add the liquid, potatoes, carrots and parsley to the
meat, mix it up well.
4. Cover and cook on AUTO COOK (AC-2), “Mince and
Onion”.
5. When the oven stops and the audible signals sound,
stir and re-cover.
6. After cooking, stir and stand for approx. 5 minutes.
Sprinkle with parsley and serve.
MINCE AND ONION (AC-2)
Ingredients
0,5 kg 1,0 kg 1,5 kg
150 g 300 g 450 g minced meat (
1
/
2 beef,
1
/
2 pork)
50 g 100 g 150 g onion (finely chopped)
1
/
2 11
1
/
2 egg
15 g 30 g 45 g white breadcrumbs
salt and pepper
115 ml 230 ml 345 ml meat stock
20 g 40 g 60 g tomato purée
65 g 125 g 190 g potatoes (finely chopped)
65 g 125 g 190 g carrots (finely chopped)
1
/
2
tbsp 1 tbsp 1
1
/
2
tbsp chopped parsley
1. AG-71+72D-EU English 14/12/2005 14:24 Page 25
Page 28

26
Recipes for auto cook
GRATIN (A1-2)
Spinach gratin
Ingredients
0,5 kg 1,0 kg 1,5 kg
150 g 300 g 450 g leaf spinach (defrosted, drained)
15 g 30 g 45 g onion (finely chopped)
salt, pepper, nutmeg
150 g 300 g 450 g boiled potatoes (sliced)
35 g 75 g 110 g cooked ham (diced)
50 g 100 g 150 g crème fraîche
1 2 3 eggs
40 g 75 g 115 g grated cheese
Preparation
1. Mix together the leaf spinach with the onion and
season with salt, pepper and nutmeg.
2. Grease the gratin dish. Place alternate layers of
potato slices, diced ham and spinach in the dish. The
top layer should be spinach.
3. Mix the eggs with crème fraîche, add salt and
pepper and pour over the vegetables.
4. Cover the gratin with the grated cheese.
5. Place on the low rack and cook on AUTO COOK plus
GRILL 1 (A1-2), “Gratin”.
6. After cooking, let stand for 5-10 minutes.
GRATIN (A1-2)
Potato-courgette-gratin
Ingredients
0,5 kg 1,0 kg 1,5 kg
200 g 400 g 600 g boiled potatoes (sliced)
115 g 230 g 345 g courgette (finely sliced)
75 g 150 g 225 g crème fraîche
1 2 3 eggs
1
/
2
1 2 clove of garlic (crushed)
salt, pepper
40 g 80 g 120 g grated Gouda cheese
10 g 20 g 30 g sunflower kernel
Preparation
1. Grease the gratin dish and place alternate layers of
potato slices and courgette in the dish.
2. Mix the eggs with crème fraîche, season with salt,
pepper and garlic and pour over the vegetables.
3. Cover the gratin dish with the grated Gouda cheese.
4. Finally sprinkle the gratin with sunflower kernel.
5. Place on the low rack and cook on AUTO COOK plus
GRILL 1 (A1-2), “Gratin”.
6. After cooking, let stand for 5-10 minutes.
GRATINATED FISH FILLET (A1-1)
Fish esterhazy
Ingredients
0,5 kg 1,0 kg 1,5 kg
230 g 450 g 680 g fish fillet
100 g 200 g 300 g leeks (cut into rings)
20 g 40 g 60 g onion (finely sliced)
40 g 100 g 140 g carrot (grated)
10 g 10 g 20 g butter or margarine
salt, pepper and nutmeg
1 tbsp 1
1
/
2
tbsp 2 tbsp lemon juice
50 g 100 g 150 g crème fraîche
50 g 100 g 150 g Gouda (grated)
Preparation
1. Put vegetables, butter and the spices into a casserole
dish and mix well. Cook for 2-6 minutes on 900 W
depending on weight.
2. Wash the fish, dry and sprinkle with lemon juice and salt.
3. Mix the crème fraîche with the vegetables and season
again.
4. Put half of the vegetables in a gratin dish. Place the fish
on top and cover with the remaining vegetables.
5. Spread the Gouda over the top, place on the low rack
and cook on AUTO COOK plus GRILL 1 (A1-1),
“Gratinated fish fillet”.
6. After cooking, let stand for approximately 5 minutes.
GRILL SKEWERS (A2-2)
Ingredients
4 pieces
400 g pork cutlets
100 g bacon
2 onions (100 g), quartered
4 tomatoes (250 g), quartered
1
/2 green pepper (100 g), in eight pieces
2 tbsp oil
4 tsp sweet paprika
salt
1 tsp cayenne pepper
1 tsp worcester sauce
Preparation
1. Cut the escalope of pork and the pork belly into 2-3
cm cubes.
2. Thread meat and vegetables alternately on four
wooden skewers.
3. Combine the oil with the spices and brush over the
grill skewers.
4. Place the grill skewers on the high rack and cook
AUTO COOK plus GRILL 2 (A2-2), “Grill Skewers”.
1. AG-71+72D-EU English 14/12/2005 14:24 Page 26
Page 29

27
UK
Cooking charts
Coffee, 1 cup 150 900 W approx. 1 Do not cover
Milk, 1 cup 150 900 W approx. 1 Do not cover
Water, 1 cup 150 900 W approx. 2 Do not cover, bring to the boil
6 cups 900 900 W 8-10 Do not cover, bring to the boil
1 dish 1000 900 W 9-11 Cover, bring to the boil
One-plate meal 400 900 W 4-6 Sprinkle sauce with water, cover, stir half
(Veg, Meat + side dishes) way through cooking time
Soup / Stew 200 900 W 1-2 Cover, stir after heating
Vegetables 200 900 W 2-3 Add water if necessary, cover, stir half
500 900 W 3-5 way through cooking time
Side dishes 200 900 W 2-3 Sprinkle with a little water, cover, stir half
500 900 W 4-5 way through cooking time
Meat, 1 slice
1
200 900 W approx. 3 Sprinkle with a little sauce, cover
Fish fillet 200 900 W 3-5 Cover
Cake, 1 slice 150 450 W
1
/2
-1 Place on a plate
Baby food, 1 jar 190 450 W
1
/2-1 Remove lid, stir well after heating
Check the temperature
Melting Margarine or Butter
1
50 900 W
1
/2
Cover
Melting chocolate 100 450 W 3-4 Stir during cooking
1
from chilled
Food / Drink Quantity Setting Power Time Hints
-g/ml- -Level- -Min-
TABLE: HEATING FOOD & DRINK
ABBREVIATIONS USED
tbsp = tablespoon
tsp = teaspoon
Cup = cupful
KG = kilogram
g = gram
l = litre
ml = millilitre
cm = centimetre
min = minutes
The times shown in the table are guidelines which may vary according to freezing temperature, quality and weight of the foodstuffs.
Goulash 500 270 W 8-9 stir halfway through defrosting time 10-15
Sausages, 8 pieces 600 270 W 6-8 place next to each other, turn over halfway 5-10
4 pieces 300 270 W 3-5 through defrosting time 5-10
Chicken legs 200 270 W 3-4 turn over halfway through defrosting time 10-15
Fish fillet 400 270 W 5-7 turn over halfway through defrosting time 5-10
Bread rolls, 2 pieces 80 270 W 1-11/2 only begin to defrost Cake, 1 piece 150 270 W 1-3 place on a plate 5
Fruit e.g. strawberries 250 270 W 3-5 place next to each other, spread out evenly 5
raspberries, cherries, plums turn over halfway through defrosting time
Food Quantity Power Time Hints Standing time
-g- -Setting- -Min- -Min-
TABLE: DEFROSTING
Broccoli 500 900 W 6-8 divide into florets, cover, stir occasionally during cooking 4-5 tbsp
Peas 500 900 W 6-8 cover, stir occasionally during cooking 4-5 tbsp
Onions 250 900 W 4-5 whole, cook in microwave cling film Carrots 500 900 W 9-11 cut into rings, cover, stir occasionally during cooking 4-5 tbsp
Boiled potatoes 500 900 W 7-9 cut into large pieces of a similar size, add a little salt, 150 ml
(salted) cover, stir occasionally during cooking
Vegetable QuantitySetting Power Time Hints Added water
-g- -Level- -Min- -Tbsps/ml-
TABLE: COOKING FRESH VEGETABLES
1. AG-71+72D-EU English 14/12/2005 14:24 Page 27
Page 30

28
Cooking charts
TABLE: COOKING, GRILLING & BROWNING
Food Quantity Setting Power Time Hints Standing time
-g- -Level- -Min- -Min-
Roasts 500 450 W 5-8 Season to taste, place on the low rack, 10
(Pork,Veal, Lamb) 450 W 6-8* turn over after *
450 W 5-8
450 W 4-5
1000 450 W 16-18 10
450 W 5-7*
450 W 14-16
450 W 4-6
1500 450 W 26-28 10
450 W 5-8*
450 W 26-28
450 W 4-5
Roast beef (medium) 1000 630 W 5-8 Season to taste, place fatty side down on the low rack 10
630 W 8-10* tun over after *
630 W 3-5
1500 630 W 12-15 10
630 W 12-15*
630 W 4-6
Chicken 1200 900 W 9-11 Season to taste, place breast side down on the low rack, 3
630 W 5-7* turn over after *
900 W 9-11
630 W 3-5
Chicken legs 200 450 W 6-7* Season to taste, place skin side down on the high rack, 3
4-6 turn over after *
Rump steaks 400 11-12* Place on the high rack, turn over after *,
2 pieces, medium 6-8 season after grilling
Browning of gratin dishes 8-13 Place gratin dish on the low rack.
The grilling time depends on the type of cheese used
Croque Monsieur 1 piece 450 W
1
/2 Toast the bread and spread it with butter;
5-6 top with a slice of cooked ham, a slice of pineapple and
4 pieces 450 W1/2-1 a slice of cheese. Prick the centre and place on the high rack
5-6
Frozen Pizza 300 450 W 4-6 Place on the low rack
450 W 4-6
400 450 W 6-7
450 W 5-7
Food Quantity Power Time Added water Hints Standing time
-g- -Setting- -Min- -
tbsps
- -Min-
TABLE: DEFROSTING AND COOKING
Fish fillet 300 900 W 9-11 - cover 1-2
One Plate Meal 400 900 W 8-10 - cover, stir after 6 minutes 2
Broccoli 300 900 W 6-8 3-5 cover, stir halfway through cooking time 2
Peas 300 900 W 6-8 3-5 cover, stir halfway through cooking time 2
Mixed vegetables 500 900 W 9-11 3-5 cover, stir halfway through cooking time 2
1. AG-71+72D-EU English 14/12/2005 14:24 Page 28
Page 31

29
UK
Recipes
All the recipes in this book are calculated on the basis of
4 servings - unless otherwise stated.
ADAPTING RECIPES FOR THE
MICROWAVE OVEN
If you would like to adapt your favourite recipes for the
microwave, you should take note of the following:
Shorten cooking times by a third to a half. Follow the
example of the recipes in this book.
Foods which have a high moisture content such as meat,
fish, poultry, vegetables, fruit, stews and soups can be
prepared in your microwave without any difficulty.
Foods which have little moisture, such as platters of
food, should have the surface moistened prior to
heating or cooking.
The amount of liquid to be added to raw foods, which
are to be braised, should be reduced to about two thirds
of the quantity in the original recipe. If necessary, add
more liquid during cooking.
The amount of fat to be added can be reduced
considerably. A small amount of butter, margarine or oil
is sufficient to flavour food. For this reason your
microwave is excellent for preparing low-fat foods as
part of a diet.
Onion soup
Total cooking time: approx. 14 - 17 minutes
Utensils: Bowl with lid (2 litre capacity)
4 soup bowls (200 ml)
Ingredients
1 tbsp butter or margarine
2 onions (100 g), sliced
800 ml meat stock
salt & pepper
2 slices of bread for toasting
4 tbsp grated cheese (40 g)
1. Place the butter cut up into pieces in the bowl. Add the
sliced onion, the meat stock and the seasoning. Cover
and microwave.
9-11 min. 900 W
2. Toast the slices of bread, cut them into cubes and
divide them among the soup bowls. Pour the soup over
the toast cubes and sprinkle on the cheese.
3. Place the bowls on the turntable, use the top grill and
brown the cheese topping.
6-7 min.
Mushrooms with rosemary
Total cooking time: approx. 10-17 minutes
Utensils: Bowl with lid (1 litre capacity)
Shallow round dish with lid
(approx. 22 cm diameter)
Ingredients
8 large mushrooms (approx. 225 g), whole
2 tbsp butter or margarine (20 g)
1 onion (50 g), finely chopped
50 g bacon, finely diced
black pepper, ground
fresh rosemary, bruised
125 ml dry white wine
125 ml cream
2 tbsp flour (20 g)
1. Remove the stalks from the mushrooms and chop the
stalks into small pieces.
2. Spread the butter on the bottom of the dish. Add the
onions, the diced bacon and the mushroom stalks.
Season with pepper and rosemary, cover and cook.
3-5 min. 900 W
Leave to cool.
3. Heat 100 ml of the wine and cream in the other dish
with its lid on.
1-3 min. 900 W
4. Mix the remaining wine with the flour, stir into the hot
liquid and cook with the lid on. Stir once during
cooking.
approx. 1 min. 900 W
5. Fill the mushrooms with the bacon mixture, place in
the sauce and cook on the high rack.
6-8 min. 270 W
Allow the mushrooms to stand for approximately 2
minutes once cooked.
1. AG-71+72D-EU English 14/12/2005 14:24 Page 29
Page 32

30
Recipes
Aubergines stuffed with minced meat
Total cooking time: approx. 17-22 minutes
Utensils: Bowl with lid (1 litre size)
Shallow oval gratin dish with lid
(approx. 30 cm long)
Ingredients
2 aubergines, less stalks (app. 250 g)
3 tomatoes (app. 200 g)
1 tbsp olive oil to grease the dish
2 onions (100 g), chopped
4 mild green chillies
200 g mince (beef or lamb)
2 garlic cloves, crushed
2 tbsp parsley, chopped
salt & pepper
pink paprika
60 g Feta cheese, diced
Tip: You can substitute courgettes for the aubergines.
1. Cut the aubergines in half lengthways. Scoop out the flesh
with a teaspoon to leave a shell about 1 cm thick. Sprinkle
the aubergines with salt and dice the scooped-out flesh.
2. Remove the skin from two of the tomatoes and chop
them up, having first cut out the stalks.
3. Grease the bottom of the bowl with the olive oil. Add the
onions. Cover and cook.
approx. 2 min. 900 W
4. Remove the stalks and seeds from the chillies and cut
them into rings. Retain a third for the garnish. Mix the
minced meat with the diced aubergines, onions and
tomatoes, the chilli rings, the crushed garlic clove and
the parsley. Season to taste.
5. Dry the aubergine halves. Fill with half of the mince
mixture, spread the sheep's cheese on top, and then add
the rest of the filling.
6. Arrange the aubergine halves in the greased ovenproof
dish, place the dish on the low rack and cook.
11-13 min. 630 W
Garnish the aubergine halves with the chilli rings and
slices of tomato and continue cooking.
4-7 min. 630 W
Allow the aubergines to stand for about 2 minutes after
cooking.
Zurich veal stew
Total cooking time: approx. 9-14 minutes
Utensils: Bowl with lid (2 Iitre capacity)
Ingredients
600 g veal fillet
1 tbsp butter or margarine
1 onion (50 g), finely chopped
100 ml white wine
gravy thickener to make approx. 1/2 litre
300 ml cream
1 tbsp parsley, chopped
1. Slice the meat into finger-thick strips.
2. Smear the butter evenly around the dish. Add the
onion and the meat to the dish, cover and cook. Stir
once during cooking.
6-9 min. 900 W
3. Add the white wine, the gravy powder and the cream,
stir, cover and continue to cook. Stir once during
cooking.
3-5 min. 900 W
4. Taste the stew, stir again and allow to stand for 5
minutes. Serve with parsley garnish.
Fillet of sole
2 portions
Total cooking time: approx. 11-13 minutes
Utensils: Shallow oval gratin dish with lid
(approx. 26 cm long)
Ingredients
400 g fillet of sole
1 lemon, untreated
2 tomatoes (150 g)
1 tsp butter or margarine to grease the dish
1 tbsp vegetable oil
1 tbsp parsley, chopped
salt & pepper
4 tbsp white wine (30 ml)
2 tbsp butter or margarine (20 g)
1. Wash the fish and pat dry. Remove any bones.
2. Slice the lemon and the tomatoes finely.
3. Grease the gratin dish with butter. Place the fish in it
and drizzle with vegetable oil.
4. Sprinkle the fish with parsley, lay the slices of tomato
on top and season. Lay the slices of lemon on top of
the tomato and pour the white wine over this.
5. Dot the lemon with butter, cover and cook.
11-13 min. 630 W
Leave the fish fillets to stand for 2 minutes after
cooking.
Tip: You can also use rosefish, halibut, mullet, plaice or
cod in this recipe.
1. AG-71+72D-EU English 14/12/2005 14:24 Page 30
Page 33

31
UK
Recipes
Almond trout
Total cooking time: approx. 16-19 minutes
Utensils: Shallow oval gratin dish
(ca. 32 cm lang)
Ingredients
4 trout (200 g), trimmed
juice of one lemon
salt
30 g butter or margarine
5 tbsp flour (50 g)
1 tsp butter or margarine to grease the dish
50 g almond flakes
1. Wash and dry the trout and sprinkle with lemon juice.
Apply salt to the interior and exterior of the fish and
leave to stand for 15 minutes.
2. Melt the butter.
1 min. 900 W
3. Dry the fish, spread on the butter and roll in the flour.
4. Grease the dish. Put the trout in the dish and cook on
the low rack. Two thirds through the cooking period
turn the trout and scatter the almonds over them.
15-18 min. 450 W
Allow the almond trout to stand for 2 minutes after
cooking.
Tip: Suitable accompanying dishes are parsley potatoes
and a green salad.
Stuffed ham
Total cooking time: approx. 13-18 minutes
Utensils: Bowl with lid (2 litre capacity)
Shallow oval gratin dish
(approx. 26 cm long)
Ingredients
150 g fresh spinach, stalks removed
150 g quark, 6 % fat
50 g grated Emmental cheese
pepper, paprika, mild
6 slices cooked ham (300 g)
125 ml water
125 ml cream
2 tbsp flour (20 g)
2 tbsp Butter or Margarine (20 g)
1 tsp Butter or Margarineto grease the dish
Tip: You can also use ready-made béchamel
sauce for this recipe
1. Cut the spinach finely, mix with the quark and the
cheese and season to taste.
2. Place a tablespoon of the filling on each slice of the
cooked ham and roll up. Secure the ham with a
wooden toothpick.
3. Make a béchamel sauce. To do this, pour the liquid into
the dish, cover and heat.
2-4 min. 900 W
Rub the butter into the flour, add to the liquid and
beat with a balloon whisk, until it is smooth. Cover,
bring to the boil until thickened.
1-2 min. 900 W
Stir and taste.
4. Pour the sauce into the greased dish, place the ham
rolls in the dish and cook on the turntable.
10-12 min. 630 W
Allow the ham rolls to stand for approximately 5
minutes after cooking.
Fish fillet with cheese sauce
Total cooking time: approx. 21-25 minutes
Utensils: Bowl with lid (1 litre capacity)
Shallow oval gratin dish
(approx. 25 cm long)
Ingredients
4 fish fillets (approx. 800 g)
(e.g. perch, flounder or cod)
2 tbsp lemon juice
salt
1 tbsp butter or margarine
1 onion (50 g), finely chopped
2 tbsp flour (20 g)
100 ml white wine
1 tsp vegetable to grease the dish
100 g grated Emmental cheese
2 tbsp chopped parsley
1. Wash the fish, pat dry and sprinkle with lemon juice.
Leave to stand for 15 minutes, pat dry again and rub
with salt.
2. Smear the butter on the bottom of the dish. Add the
diced onion, cover with the lid and steam.
1-2 min. 900 W
3. Sprinkle the flour over the onions and stir.
Add the white wine and mix.
4. Grease the gratin dish and place the fish in it. Pour the
sauce over the fish and sprinkle with cheese. Place on
the low rack and cook.
1. 7-8 min. 450 W and then
2. 14-16 min. 450 W
Allow fish to stand for approximately 2 minutes after
cooking. Serve with a garnish of chopped parsley.
1. AG-71+72D-EU English 14/12/2005 14:24 Page 31
Page 34

32
Recipes
Veal cutlet with mozzarella
Total cooking time: approx. 24-31 minutes
Utensils: Shallow square gratin dish with lid
(approx. 25 cm long)
Ingredients
2 mozzarella cheese (150 g)
500 g drained, peeled tinned tomatoes
4 veal cutlets (600 g)
20 ml olive oil
2 cloves of garlic, sliced
pepper, freshly milled
2 tbsp capers (20 g)
oregano, salt
1. Cut the mozzarella into slices. Puree the tomatoes with
the puree attachment of a hand mixer.
2. Wash the cutlets, dry them and beat them flat.
Distribute the oil and the garlic slices over the bottom
of the oven-proof dish. Add the cutlets and pour over
the tomato puree. Sprinkle with pepper, capers and
oregano, cover and cook on the low rack.
15-19 min. 630 W
Turn the meat slices.
3. Place a few slices of mozzarella on each piece of meat,
add salt and cook uncovered on the high rack.
9-12 min. 630 W
After cooking allow to stand for about 5 minutes.
Stuffed Roast Chicken
2 portions
Total cooking time: approx. 36-40 minutes
Utensils: Bowl (2 Iitre capacity)
String
Ingredients
1 chicken (1000 g)
salt
rosemary & majoram, bruised
1 stale bread (roll, 40 g)
1 bunch parsley, finely chopped (10 g)
1 pinch nutmeg
5 tbsp butter or margarine (50 g)
1 egg yolk
1 tbsp sweet paprika
1 tsp butter or margarine to grease the dish
1. Wash the chicken, dry it and season it internally with
salt, rosemary and marjoram.
2. For the filling soak the bread roll in cold water for
about 10 minutes and then squeeze the water out. Mix
with salt, parsley, nutmeg, butter (20 g) and egg yolk
and stuff the chicken with the mixture. Tie up the
opening with string.
3. Heat the butter (30 g).
ca. 1 min. 900 W
Stir the paprika and salt into the butter and spread
over the chicken.
4. Place chicken in the greased dish and cook.
Turn over halfway through cooking.
35-39 min. 630 W
Leave the stuffed roast chicken to stand for approx. 3
minutes after cooking.
Courgette and noodle gratin
Total cooking time: approx. 37-44 minutes
Utensils: Bowl with lid (2 l Inhalt)
Gratin dish (approx. 26 cm long)
Ingredients
500 ml water
1
/2 tsp oil
80 g macaroni
400 g tinned chopped tomatoes
3 onion (150 g), finely chopped
basil, thyme, salt & pepper
1 tbsp oil to grease the dish
450 g courgettes, sliced
150 g sour cream
2 eggs
100 g grated Cheddar cheese
1. Put the water, oil and salt in the bowl, cover and bring
to the boil.
3-4 min. 900 W
2. Break the macaroni into pieces and add them to the
dish. Stir and allow to soak.
9 -11 min. 270 W
Drain the pasta and allow to cool.
3. Mix the tomatoes with the onions and season well.
Add the macaroni and pour over the tomato sauce.
Divide the courgette slices on top.
4. Beat the sour cream and the eggs and pour over the
dish. Sprinkle the grated cheese on top. Place on the
low rack and cook.
1. 18-21 min. 900 W
and then
2. 7-8 min. 630 W
Allow the gratin to stand for about 5-10 minutes after
cooking.
1. AG-71+72D-EU English 14/12/2005 14:24 Page 32
Page 35

33
UK
Recipes
Lasagne al forno
Total cooking time: approx. 18-25 minutes
Utensils: Bowl with lid (2 Iitre capacity)
Shallow, square gratin dish with lid
(approx. 20 x 20 x 6 cm)
Ingredients
300 g canned tomatoes
50 g ham, finely cubed
1 onion (50 g), finely chopped
1 clove of garlic, crushed
250 g minced meat (beef)
2 tbsp mashed tomato (30 g)
salt & pepper, oregano, thyme & basil
150 ml cream (crème fraîche)
100 ml milk
50 g grated Parmesan cheese
1 tsp mixed chopped herbs
1 tsp olive oil
salt & pepper, nutmeg
1 tsp vegetable to grease the dish
125 g green flat pasta
1 tbsp grated Parmesan cheese
1 tbsp butter or margarine
1. Cut the tomatoes into slices, mix with the ham, onion
cubes, garlic, minced meat and mashed tomato.
Season and cook with the lid on.
5-8 min. 900 W
2. Mix the cream with the milk, Parmesan cheese, herbs,
oil and spices.
3. Grease the soufflé mould and cover the bottom of the
mould with about
1
/3 of the pasta. Put half of the
minced meat mixture on the pasta and pour on some
sauce. Put an additional
1
/3 of the pasta on top
followed by another layer of the minced meat mixture
and some sauce, finishing with the remaining pasta on
top. Finally, cover the pasta with lots of sauce and
sprinkle with Parmesan cheese. Place butter flakes on
top and cook with the lid on.
13-17 min. 630 W
After cooking, let the lasagne stand for approximately
5-10 minutes.
Tagliatelle with cream & basil sauce
2 portions
Total cooking time: approx. 16-22 minutes
Utensils: Bowl with lid (2 Iitre capacity)
Round soufflé dish (approx. 20 cm diam.)
Ingredients
1 I water
1 tsp salt
200 g tagliatelle
1 clove of garlic
15-20 basil leaves
200 g cream (crème fraîche)
30 g grated Parmesan cheese
salt & pepper
1. Place the water and the salt into the bowl, cover and
bring to the boil.
9-11 min. 900 W
2. Add the pasta, bring to the boil again, and then
simmer.
1. 1-2 min. 900 W
2. 6-9 min. 270 W
3. Meanwhile rub the garlic cloves over the soufflé dish.
Chop the basil leaves. Keep some aside for garnishing.
4. Drain the pasta well. Stir in the crème fraîche and
sprinkle the basil over the pasta.
5. Add the parmesan cheese, salt and pepper, place into a
soufflé dish and stir. Garnish the dish with basil and
serve hot.
Bread dumplings
5 portions
Total cooking time: approx. 8-11 minutes
Utensils: Bowl with lid (1 Iitre capacity)
5 cups or pudding moulds
Ingredients
2 tbsp butter or margarine (20 g)
1 onion (50 g), finely chopped
500 ml milk
200 g dried bread cubes
(from approx. 5 bread rolls)
3 eggs
1. Cut the bread rolls into small cubes and soak in the milk.
2. Divide the fat on the bottom of the bowl and add the
chopped onion. Cover and cook.
1-2 min. 900 W
3. Add the onion to the bread cubes. Beat the eggs, add
them and mix well to form a workable paste. If
necessary add a little milk.
4. Divide the paste equally into 5 cups or pudding
moulds, cover with microwave cling film, arrange on
the edge of the turntable and cook.
6-8 min. 900 W
Allow the dumplings to stand for about 2 minutes after
cooking. Turn the dumplings into a plate before serving.
1. AG-71+72D-EU English 14/12/2005 14:24 Page 33
Page 36

34
Recipes
Pears in chocolate sauce
Total cooking time: approx. 8-13 minutes
Utensils: Bowl with lid (2 Iitre capacity)
Bowl with lid (1 Iitre capacity)
Ingredients
4 pears (600 g)
60 g sugar
1 pack vanilla sugar (10 g)
1 tbsp pear liqueur, 30 % proof
150 ml water
130 g plain chocolate pieces
100 g cream (crème fraîche)
1. Peel the pears, keeping them whole.
2. Put sugar, vanilla sugar, liqueur and water into the
bowl. Stir and heat.
1-2 min. 900 W
3. Place the pears in the juice, cover and cook.
5-8 min. 900 W
Take the pears out of the juice and allow to cool.
4. Put 50 ml of the juice in the small bowl, add the cream
and chocolate. Cover and heat.
2-3 min. 900 W
5. Stir the sauce well and pour over the pears to serve.
Tip: You could also serve this with vanilla ice cream.
Berry jelly with vanilla sauce
Total cooking time: approx. 8-12 minutes
Utensils: Bowl with lid (2 Iitre capacity)
Ingredients
150 g redcurrants, washed and sorted
150 g strawberries, washed and sorted
150 g raspberries, washed and sorted
250 ml white wine
100 g sugar
50 ml lemon juice
8 gelatine sheets
300 ml milk
flavouring from
1
/2 vanilla pod
30 g sugar
15 g cornflour
Tip: You can also use frozen fruit once it is defrosted.
1. Reserve some of the fruit for decoration. Puree the rest
of the berries with the wine. Put into the bowl and
cook cover.
5-7 min. 900 W
Add sugar and lemon juice.
2. Leave gelatine in cold water for 10 minutes to soften.
Remove and squeeze out water. Stir gelatine into the
hot fruit until it dissolves. Put the jelly into the fridge
to set.
3. To make the vanilla sauce, put the milk in a bowl. Slice
the vanilla pod open and scrape out the vanilla
flavouring. Stir the flavouring, sugar and cornflour
into the milk and cover before cooking. Stir
occasionally during cooking and to finish.
3-5 min. 900 W
4. Tip the set jelly onto a plate and garnish with the
whole berries. Serve with the vanilla sauce.
Fiery drink
for 30 servings
Total cooking time: approx. 8-10 minutes
Utensils: Bowl with lid (2 Iitre capacity)
Ingredients
500 ml white wine
500 ml dry red wine
500 ml rum, 54 % proof
1 whole orange
3 cinnamon sticks
75 g sugar
10 tsp rock candy
1. Pour the alcohol into the bowl. Peel the orange so that
the peel is thin and put this in the alcohol together
with the cinnamon and sugar.
Cover and heat.
8-10 min. 900 W
2. Remove the peel and cinnamon. Put one teaspoon of
the rock candy into each grog glass, top up with the
fiery drink and serve.
1. AG-71+72D-EU English 14/12/2005 14:24 Page 34
Page 37

35
UK
Recipes
Semolina pudding with raspberry sauce
Total cooking time: approx. 15-20 minutes
Utensils: Bowl with lid (2 Iitre capacity)
Ingredients
500 ml milk
40 g sugar
15 g chopped almonds
50 g semolina
1 egg yolk
1 tbsp water
1 egg white
250 g raspberries
50 ml water
40 g sugar
1. Put the milk, sugar and almonds into the bowl, cover
and heat.
3-5 min. 900 W
2. Add the semolina and stir. Cover and microwave. Stir
once during cooking.
10-12 min. 270 W
3. Mix the egg yolk with the water in a cup and fold into
the hot semolina. Beat the egg white until stiff and
lightly fold it in. Transfer the pudding to small bowls.
4. For the sauce wash the raspberries, dry carefully and
put into a bowl with water and sugar.
Cover and heat.
2-3 min. 900 W
5. Puree the raspberries and serve either hot or cold with
the semolina pudding.
Chocolate with cream
1 portion
Total cooking time: approx. 1 minute
Utensils: Large cup (200 ml capacity)
Ingredients
150 ml milk
30 g plain chocolate, grated
30 ml cream
chocolate vermicelli
1. Pour the milk into the cup. Add the chocolate, stir and
heat. Stir occasionally.
approx. 1 min. 900 W
2. Whip the cream until stiff and spoon this on top of the
chocolate. Serve garnished with chocolate vermicelli.
Cheesecake
12 portions
Total cooking time: approx. 21-27 minutes
Utensils: Round baking tin (approx. 26 cm diam.)
Ingredients
300 g flour
1 tbsp cocoa
3 tsp baking powder (9 g)
150 g sugar
1 egg
150 g butter or margarine
1 tsp butter or margarine to grease the dish
100 g butter or margarine
100 g sugar
1 pack vanilla sugar (10 g)
3 eggs
400 g fromage frais, 20 % fat content
1 pack powdered vanilla pudding mix (40 g)
1. Mix the flour and cocoa with the baking flour. Add the
sugar, egg and butter and use the kneading hook on
the hand-held blender to knead.
2. Grease the tin, roll out
2
/3 of the dough and place it in
the tin. Lift the edges 2 cm to form a rim. Pre-bake the
pastry.
6-8 min. 630 W
3. For the filling, whisk the butter until light and fluffy,
add the sugar and eggs one at a time. Finally add the
fromage frais and the powdered vanilla pudding mix.
4. Spread the filling over the pre-baked dough and add
the remaining crumbling dough on the cake and bake.
15-19 min. 630 W
1. AG-71+72D-EU English 14/12/2005 14:24 Page 35
Page 38

Care & cleaning
CAUTION: DO NOT USE COMMERCIAL OVEN
CLEANERS, STEAM CLEANERS, ABRASIVE, HARSH
CLEANERS, ANY THAT CONTAIN SODIUM HYDROXIDE
OR SCOURING PADS ON ANY PART OF YOUR
MICROWAVE OVEN.
CLEAN THE OVEN AT REGULAR INTERVALS AND
REMOVE ANY FOOD DEPOSITS. Failure to maintain
the oven in a clean condition could lead to a
deterioration of the surface that could adversely
affect the life of the appliance and possibly result in a
hazardous situation.
Oven exterior
The outside of your oven can be cleaned easily with
mild soap and water. Make sure the soap is wiped off
with a moist cloth, and dry the exterior with a soft
towel.
Control panel
Open the door before cleaning to de-activate the
control panel. Care should be taken when cleaning the
control panel. Using a cloth dampened with water only,
gently wipe the panel until it becomes clean. Avoid
using excessive amounts of water. Do not use any sort
of chemical or abrasive cleaner.
Oven Interior
1. For cleaning, wipe any splatters or spills with a soft
damp cloth or sponge after each use while the oven
is still warm. For heavier spills, use a mild soap and
wipe several times with a damp cloth until all
residues are removed. Do not remove the waveguide
cover.
2. Make sure that mild soap or water does not
penetrate the small vents in the walls which may
cause damage to the oven.
3. Do not use spray type cleaners on the oven interior.
4. Heat up your oven regularly by using the grill, refer
to note 2 on page 17. Remaining food or fat
splashed can cause smoke or a bad smell.
Turntable and turntable support
Remove the turntable and turntable support from the
oven. Wash the turntable and turntable support in mild
soapy water. Dry with a soft cloth. Both the turntable
and the turntable support are dishwasher safe.
Door
To remove all trace of dirt, regularly clean both sides of
the door, the door seals and sealing surfaces with a
soft, damp cloth.
Racks
These should be washed in a mild washing up liquid
solution and dried. The racks are dishwasher safe.
NOTE: A steam cleaner should not be used.
36
1. AG-71+72D-EU English 14/12/2005 14:24 Page 36
Page 39

37
UK
What to do if...
... the microwave appliance is not working
properly ?
Check that
- the fuses in the fuse box are working,
- there has not been a power outage.
- If the fuses continue to blow, please contact
a qualified electrician.
... the microwave mode is not working ?
Check that
- the door is properly closed,
- the door seals and their surfaces are clean,
- the START/QUICK-button has been pressed.
... the turntable is not turning ?
Check that
- the turntable support is correctly connected
to the drive,
- the ovenware does not extend beyond the
turntable,
- food does not extend beyond the edge of
the turntable preventing it from rotating.
- there is nothing in the well beneath the
turntable.
... the microwave will not switch off ?
- Isolate the appliance from the fuse box.
- Contact an authorised AEG-Electrolux
service agent.
... the interior light is not working ?
- Call an authorised AEG-Electrolux service
agent. The interior light bulb can be
exchanged only by an authorised AEGElectrolux service agent.
... the food is taking longer to heat through
and cook than before ?
- Set a longer cooking time (double quantity
= nearly double time) or
- if the food is colder than usual, rotate or
turn from time to time or
- set a higher power setting.
Cooking Mode
Microwave (900 W)
Grill
Dual Grill
Standard time
20 minutes
30 minutes
Grill - 30 minutes
Reduced power level
Microwave - 630 W
Grill - 50 %
Grill - 50 %
NOTE: If you cook the food over the standard time with only the same cooking mode, the power of the oven will
lower automatically to avoid overheating. (The microwave power level will be reduced or the grill heating
element will begin to light on and off). After pausing for 90 seconds, full power can be reset.
1. AG-71+72D-EU English 14/12/2005 14:24 Page 37
Page 40

38
Guarantee conditions
Service & spare parts
Standard guarantee conditions
We, AEG-Electrolux, undertake that if within 24 months of the date of the purchase this AEG-Electrolux appliance or any
part thereof is proved to be defective by reason only of faulty workmanship or materials, we will, at our discretion repair or
replace the same FREE OF CHARGE for labour, materials or carriage on condition that:
• The appliance has been correctly installed and used only on the electricity or gas supply stated on the rating plate.
• The appliance has been used for normal domestic purposes only, and in accordance with the manufacturer's operating
and maintenance instructions.
• The appliance has not been serviced, maintained, repaired, taken apart or tampered with by any person not authorised
by us.
• All service work under this guarantee must be undertaken by an authorised AEG-Electrolux service agent.
Any appliance or defective part replaced shall become the Company's property.
• This guarantee is in addition to your statutory and other legal rights.
• Home visits are made between 8.30am and 5.30pm Monday to Friday.
Visits may be available outside these hours in which case a premium will be charged.
Exclusions
This guarantee does not cover:
• Damage or calls resulting from transportation, improper use or neglect, the replacement of any light bulbs or
removable parts of glass or plastic.
• Costs incurred for calls to put right an appliance which is improperly installed or calls to appliances outside your
country of residence.
• Appliances found to be in use within a commercial environment, plus those which are subject to rental agreements.
• Products of AEG-Electrolux manufacture which are not marketed by AEG-Electrolux.
European Guarantee
If you should move to another country within Europe then your guarantee moves with you to your new home subject to
the following qualifications:
• The guarantee starts from the date you first purchased your product.
• The guarantee is for the same period and to the same extent for labour and parts as exists in the new country of use
for this brand or range of products.
• This guarantee relates to you and cannot be transferred to another user.
• Your new home is within the European Community (EC) or European Free Trade Area.
• The product is installed and used in accordance with our instructions and is only used domestically, i.e. a normal
household.
• The product is installed taking into account regulations in your new country.
Before you move please contact your nearest Customer Care centre, listed below, to give them details of your new home.
They will then ensure that the local Service Organisation is aware of your move and able to look after you and your
appliances.
France Senlis +33 (0) 3 44 62 29 29
Germany Nürnberg +49 (0) 800 234 7378
Italy Pordenone +39 (0) 800 117511
Sweden Stockholm +46 (0) 8 672 5360
UK Slough +44 (0) 1753 219899
If you wish to purchase spare parts or require an engineer, contact your local authorised service agent.
The telephone number can be obtained from the operator.
1. AG-71+72D-EU English 14/12/2005 14:24 Page 38
Page 41

39
UK
Specifications
AC Line Voltage
Distribution line fuse/circuit breaker
AC Power required: Microwave
Grill
Microwave/Grill
Output power: Microwave
Grill
Microwave Frequency
Outside Dimensions: MCD2660E
MCD2661E
Cavity Dimensions
Oven Capacity
Turntable
Weight
Oven lamp
: 230 V, 50 Hz, single phase
: Minimum 16 A
: 1.37 kW
: 1.00 kW
: 2.35 kW
: 900 W (IEC 60705)
: 1000 W
: 2450 MHz * (Group 2 / Class B)
: 592 mm (W) x 460 mm (H) x 437 mm (D)
: 592 mm (W) x 388 mm (H) x 437 mm (D)
: 342 mm (W) x 207 mm (H) x 368 mm (D) **
: 26 litres **
: ø 325 mm, glass
: approx. 20 kg
: 25 W/240 - 250 V
Important information
Ecologically responsible disposal of packaging materials and old
appliances
Packaging materials
AEG-Electrolux microwave ovens require effective packaging to protect them during transportation.
Only the minimum packaging necessary is used.
Packaging materials (e.g. foil or styrofoam) can place children at risk.
Danger of suffocation. Keep packaging material away from children.
All packaging materials used are environment friendly and can be recycled. The cardboard is made from
recycled paper and the wooden parts are untreated. Plastic items are marked as follows:
«PE» polyethylene eg packaging film
«PS» polystyrene eg packaging (CFC-free)
«PP» polypropylene eg packaging straps
By using and re-using the packaging, raw materials are saved and waste volume is reduced.
Packaging should be taken to your nearest recycling centre.
Contact your local council for information.
Disposal of old appliances
Old appliances should be made safe before disposal by removing the plug, and cutting off and disposing
of the power cable.
It should then be taken to the nearest recycling centre. Check with your local Council or Environmental
Health Office to see if there are facilities in your area for recycling the appliance.
This oven complies with the requirements of Directives 89/336/EEC and 73/23/EEC as amended by 93/68/EEC.
SPECIFICATIONS ARE SUBJECT TO CHANGE WITHOUT NOTICE AS PART OF CONTINUOUS IMPROVEMENT
* This Product fulfils the requirement of the European standard EN55011.
In conformity with this standard, this product is classified as group 2 class B equipment.
Group 2 means that the equipment intentionally generates radio-frequency energy in the form of
electromagnetic radiation for the heat treatment of food.
Class B equipment means that the equipment is suitable to be used in domestic establishments.
** Internal capacity is calculated by measuring maximum width, depth and height.
Actual capacity for holding food is less.
1. AG-71+72D-EU English 14/12/2005 14:24 Page 39
Page 42

40
Installation
INSTALLING THE APPLIANCE
1. Remove all packaging and check carefully for any
signs of damage.
2. If fitting the microwave oven above a conventional
oven (position A) then use the mylar sheet provided.
a. Cut the Mylar sheet to fit the internal width of
the unit.
b. Peel back the protective cover on the tape and fix
to the rear of the shelf
so that it covers
the service
gap. (See
diagram).
3. Fit the appliance into the kitchen cupboard slowly,
and without force, until the front frame of the oven
seals against the front opening of the cupboard.
4. Ensure the appliance is
stable and not leaning.
Ensure that a 5 mm gap is
kept between the cupboard
door above and the top of
the frame (see diagram).
5. Fix the oven in position with the
screws provided.
The fixing points are located on
the top and bottom corners of
the oven (see diagram, item 10,
on page 5).
6. It is important to ensure that the installation of this
product conforms to the instructions in this
operation manual and the conventional oven
manufacturer’s installation instructions.
Mylar sheet
Position A
Position B
Conventional
oven
Conventional
oven
Internal width
Service gap
The microwave can be fitted in position A or B:
POSITION NICHE SIZE CHIMNEY Gap Between
W D H (min) Cupboard & Ceiling
A 560 x 550 x 450 50 50
560 x 550 x 380 50 50
B 560 x 500 x 450 40 50
560 x 500 x 380 40 50
Measurements in (mm)
Chimney Chimney
40
NOTE: Ensure the bottom of the oven is 85 cm or more above the floor.
1. AG-71+72D-EU English 14/12/2005 14:24 Page 40
5 mm
Page 43

41
UK
Installation
• The electrical outlet should be readily accessible so that the unit can
be unplugged easily in an emergency.
• The socket should not be positioned behind the cupboard.
• The best position is above the cupboard, see (A).
When not connecting the power supply cord to position (A) it should be
removed from the support clip (see diagram, item 14, on page 5) and
routed under the oven.
• Connect the appliance to a single phase 230 V/50 Hz alternating current
via a correctly installed earth socket.
The socket must be fused with a 16 A fuse.
• The power supply cord may only be replaced by an electrician.
• Before installing, tie a piece of string to the power supply cord to facilitate connection to point (A) when the
appliance is being installed.
• When inserting the appliance into the high-sided cupboard, DO NOT crush the power supply cord.
• Do not immerse the power supply cord or plug in water or any other liquid.
CONNECTING THE APPLIANCE TO THE POWER SUPPLY
ELECTRICAL CONNECTIONS
WARNING:
THIS APPLIANCE MUST BE EARTHED
The manufacturer declines any liability should
this safety measure not be observed.
If the plug that is fitted to your appliance is not
suitable for your socket outlet, you must call your local
authorised AEG-Electrolux service agent.
(A)
1. AG-71+72D-EU English 14/12/2005 14:24 Page 41
Page 44

42
Estimado cliente,
Le agradecemos la compra de un horno microondas AEG-Electrolux y la
confianza que ha depositado en la marca AEG-Electrolux.
Antes de utilizar por primera vez su horno microondas AEG-Electrolux, sírvase
leer atentamente el libro de instrucciones. Esto le permitirá sacar partido a
todas las funciones que ofrece el aparato. Asimismo, evitará que se produzcan
dificultades durante el funcionamiento y reducirá al mínimo las llamadas de
servicio innecesarias.
La información importante relativa a su seguridad o al funcionamiento del
aparato viene indicada con este símbolo y/o la mención de palabras tales
como «Advertencia» o «Cuidado». Cerciórese de seguir las instrucciones
atentamente.
A lo largo del manual, este símbolo le guía paso a paso para manejar el
aparato.
Este símbolo indica información adicional sobre la utilización del aparato.
El trébol señala recomendaciones y sugerencias para lograr una utilización del
aparato que respete el medio ambiente.
Si se produjeran averías, siga las instrucciones que se proporcionan en el
apartado «¿Qué hacer si...»
2. AG-71+72D-EU Spanish 14/12/2005 14:25 Page 42
Page 45

43
E
Indice
Medidas importantes de seguridad . . . . . . . . . . . . . . . . . . . . . . . . . . . . . . . . . . . . . . . . . . . .44 - 46
Horno y accesorios . . . . . . . . . . . . . . . . . . . . . . . . . . . . . . . . . . . . . . . . . . . . . . . . . . . . . . . . . . . . .47
Panel de mandos . . . . . . . . . . . . . . . . . . . . . . . . . . . . . . . . . . . . . . . . . . . . . . . . . . . . . . . . . . . . . . .48
Antes de la puesta en functionamiento . . . . . . . . . . . . . . . . . . . . . . . . . . . . . . . . . . . . . . . . . . . .49
Puesta en hora del reloj . . . . . . . . . . . . . . . . . . . . . . . . . . . . . . . . . . . . . . . . . . . . . . . . . . . . . . . . .49
¿Que son las microondas? . . . . . . . . . . . . . . . . . . . . . . . . . . . . . . . . . . . . . . . . . . . . . . . . . . . . . . . .50
La vajilla appropiada . . . . . . . . . . . . . . . . . . . . . . . . . . . . . . . . . . . . . . . . . . . . . . . . . . . . . . . .50- 51
Sugerencias tecnicas . . . . . . . . . . . . . . . . . . . . . . . . . . . . . . . . . . . . . . . . . . . . . . . . . . . . . . . .52 - 56
Nivel de potencia de microondas . . . . . . . . . . . . . . . . . . . . . . . . . . . . . . . . . . . . . . . . . . . . . . . . . .57
Cocción con microondas . . . . . . . . . . . . . . . . . . . . . . . . . . . . . . . . . . . . . . . . . . . . . . . . . . . . . . . . .58
Cocción al grill y combinada . . . . . . . . . . . . . . . . . . . . . . . . . . . . . . . . . . . . . . . . . . . . . . . . . . . . .59
Otras funciones cómodas . . . . . . . . . . . . . . . . . . . . . . . . . . . . . . . . . . . . . . . . . . . . . . . . . . . .60 - 61
Funciones de cocción automática y descongelación automática . . . . . . . . . . . . . . . . . . .62 - 63
Cuadros de cocción automática y descongelación automática . . . . . . . . . . . . . . . . . . . .64 - 66
Recetas para cocción automática . . . . . . . . . . . . . . . . . . . . . . . . . . . . . . . . . . . . . . . . . . . . .67 - 68
Tablas de cocción . . . . . . . . . . . . . . . . . . . . . . . . . . . . . . . . . . . . . . . . . . . . . . . . . . . . . . . . . . .69 - 70
Recetas . . . . . . . . . . . . . . . . . . . . . . . . . . . . . . . . . . . . . . . . . . . . . . . . . . . . . . . . . . . . . . . . . . .71 - 77
Cuidado y limpieza . . . . . . . . . . . . . . . . . . . . . . . . . . . . . . . . . . . . . . . . . . . . . . . . . . . . . . . . . . . . .78
¿Qué hacer si... . . . . . . . . . . . . . . . . . . . . . . . . . . . . . . . . . . . . . . . . . . . . . . . . . . . . . . . . . . . . . . . . .79
Certificado de garantía . . . . . . . . . . . . . . . . . . . . . . . . . . . . . . . . . . . . . . . . . . . . . . . . . . . . . . . . . .80
Certificado de compra . . . . . . . . . . . . . . . . . . . . . . . . . . . . . . . . . . . . . . . . . . . . . . . . . . . . . . . . . . .81
Conservar durante toda la vigencia de la garantía la factura de compra . . . . . . . . . . . . . . . . .82
Especificaciones . . . . . . . . . . . . . . . . . . . . . . . . . . . . . . . . . . . . . . . . . . . . . . . . . . . . . . . . . . . . . . . .83
Información importante . . . . . . . . . . . . . . . . . . . . . . . . . . . . . . . . . . . . . . . . . . . . . . . . . . . . . . . . .83
Instalación . . . . . . . . . . . . . . . . . . . . . . . . . . . . . . . . . . . . . . . . . . . . . . . . . . . . . . . . . . . . . . . .84 - 85
El símbolo en el producto o en su empaque indica que este producto no se puede tratar como
desperdicios normales del hogar. Este producto se debe entregar al punto de recolección de equipos
eléctricos y electrónicos para reciclaje. Al asegurarse de que este producto se deseche correctamente, usted
ayudará a evitar posibles consecuencias negativas para el ambiente y la salud pública, lo cual podría ocurrir
si este producto no se manipula de forma adecuada. Para obtener información más detallada sobre el
reciclaje de este producto, póngase en contacto con la administración de su ciudad, con su servicio de
desechos del hogar o con la tienda donde compró el producto.
2. AG-71+72D-EU Spanish 14/12/2005 14:25 Page 43
Page 46

44
Medidas importantes de seguridad
No guarde comida ni ningún otro alimento dentro del
horno. Compruebe las posiciones programadas después
de poner el horno en funcionamiento para asegurarse
de que su operación va a ser la correcta.
Utilice este manual de instrucciones.
Para evitar estropear el horno
ADVERTENCIA:
No haga funcionar el horno si está estropeado o
funciona mal. Compruebe los puntos siguientes antes
de utilizarlo:
a) La puerta; asegúrese de que la puerte cierra bien y
compruebe que no está ni deformada ni combada.
b) Las bisagras y pestillos de seguridad de la puerta;
compruebe que no están ni rotos ni flojos.
c) Los sellos de la puerta y las superficies de sellado;
asegúrese de que no han sufrido daños y están en
perfectas condiciones.
d) Dentro del horno o en la puerta; asegúrese de que
no hay abolladuras.
e) El cable y el enchufe de alimentación de la
corriente; asegúrese de que no están estropeados.
En ningún caso ajuste, repare ni modifique el
horno personalmente. Hacerlo es peligroso para
cualquier persona que carezca de los
conocimientos necesarios para llevar a cabo tareas
de servicio o reparación que requieran la
extracción de una cubierta que impida la
exposición a la energía de microondas.
No ponga el horno a funcionar con la puerta abierta ni
altere de ninguna forma los pestillos (cierres) de la
puerta de seguridad.
No haga funcionar el horno si hay algún objeto
atrapado entre los sellos de la puerta y las superficies
de sellado.
No permita que se acumule grasa o suciedad en las
juntas herméticas de la puerta ni en las superficies
de alrededor. Siga las instrucciones de “Cuidado y
limpieza”, en la página 78. Si el horno no se
mantiene limpio podría deteriorarse su superficie,
lo que podría perjudicar a la vida útil del aparato
así como provocar una situación peligrosa.
Las personas que llevan un MARCAPASOS deben
comprobar con su médico o el fabricante del
marcapasos las precauciones que deben tomar con
respecto a los hornos de microondas.
Para evitar sacudidas eléctricas.
Bajo ningún concepto se deberá desmontar la caja
exterior.
Para evitar incendios
Los hornos de microondas no deben dejarse
funcionando sin que haya alguien controlando su
cocción. Los niveles de potencia que sean
demasiado altos o los tiempos de cocción
demasiado largos pueden calentar excesivamente
los alimentos y originar incendios.
La toma de corriente eléctrica debe estar fácilmente
accesible de forma que la unidad pueda desenchufarse
sin dificultades en caso de emergencia.
El suministro de C.A. debe ser de 230 V, 50 Hz, con un
fusible en la línea de distribución de 16 A como
mínimo, o un interruptor en el circuito de distribución
de 16 A como mínimo.
Se recomienda utilizar un solo circuito separado para
alimentar a este aparato.
No guarde ni use el horno en exteriores.
Si ve que sale humo de la comida que se está
calentando en el horno, NO ABRA LA PUERTA.
Apague y desenchufe el horno y espere hasta que
deje de salir humo. Si abre la puerta mientras sale
humo de la comida podría causar un incendio.
Utilice sólo recipientes, envases y utensilios
adecuados para cocinar con microondas. Vedere
página 50 - 51.
No deje el horno funcionando sin que haya alguien
controlando su cocción cuando emplee envases
desechables de plástico, papel u otros materiales
combustibles para calentar o cocinar la comida.
Limpie la tapa de la guía de ondas, la cavidad del
horno, el plato giratorio y el soporte del rodillo
después de utilizarlos. Quíteles siempre la grasa
dado que ésta podría sobrecalentarse la próxima
vez que use el horno y empezar a echar humo o
prenderse fuego.
No coloque materiales inflamables cerca del horno o de
los orificios de ventilación. No bloquee la entrada de los
orificios de ventilación.
Quite todos los precintos metálicos, envolturas de
alambre, etc. que tenga la comida dado que podrían
formarse arcos o chispas eléctricas en las superficies
metálicas y ocasionar incendios.
No utilice el horno de microondas para freir con aceite
o para calentar aceite con el que va a freir después. No
se puede controlar la temperatura y podría prenderse
fuego.
Para hacer palomitas de maíz (popcorn) utilice sólo un
horno de microondas especial para ello.
INSTRUCCIONES DE SEGURIDAD IMPORTANTES: LÉALAS ATENTAMENTE Y CONSÉRVELAS PARA CONSULTAS
FUTURAS.
2. AG-71+72D-EU Spanish 14/12/2005 14:25 Page 44
Page 47

45
E
Medidas importantes de seguridad
Agujeree la piel o cáscara de alimentos como las
patatas, salchichas y fruta antes de cocinarlos porque si
no podrían explotar.
Para evitar quemaduras
No toque o mueva nunca el grill inferior mientras está
caliente. Utilice agarradores o manoplas especiales para
horno al sacar la comida para evitar quemarse.
Abra siempre los recipientes, paquetes de palomitas de
maíz, bolsas para cocinar en horno, etc., lejos de la cara
y manos para evitar quemarse con el vapor.
Para evitar quemaduras, compruebe siempre la
temperatura de los alimentos y remuévalos antes
de servirlos, prestando especial atención a la
temperatura de comidas y bebidas para bebés,
niños o ancianos.
La temperatura del recipiente no es una buena
indicación de la temperatura de la comida o bebida;
compruebe siempre la temperatura de la comida.
Conviene siempre apartarse de la puerta del horno al
abrirlo para evitar quemarse al salir el vapor y el calor.
Los alimentos rellenos cocidos al horno deben cortarse
en rodajas después de calentarlos para que salga el
vapor y evitar quemaduras.
Mantenga a los niños alejados de la puerta y de las
partes accesibles del aparato que pudieran calentarse al
utilizar el grill. Los niños deben mantenerse alejados
para evitar que sufran quemaduras.
No tocar la puerta del horno, la caja exterior, el grill
inferior, los orificios de ventilación, los accesorios ni los
platos durante el uso en los modos de operación con
GRILL, COMBINADO y COCCIÓN AUTOMÁTICA ya
que se pondrán muy calientes. Antes de limpiar
cerciórese de que no están calientes.
Para evitar que los niños lo utilicen de forma
inadecuada
ADVERTENCIA: Sólo se debe permitir a los niños
utilizar el horno sin supervisión alguna cuando se
les haya dado instrucciones adecuadas para que
puedan usarlo de modo seguro y comprendan los
peligros de un uso incorrecto.
Los niños pueden utilizar los hornos de microondas sólo
cuando estén bajo supervisión de las personas mayores.
No apoyarse ni agarrarse de la puerta del horno. No
juegue con el horno ni lo utilice como un juguete.
A los niños se les debe enseñar todas las medidas de
seguridad importantes tales como la utilización de
guantes o manoplas para no quemarse, retirar con
cuidado las envolturas de las comidas y tener un
cuidado especial con los alimentos (por ej., los
envueltos en materiales autocalentables) diseñados para
tostar la comida porque puede que estén demasiado
calientes.
No derrame nada ni introduzca ningún objeto en los
orificios de los cierres de la puerta o en los orificios de
ventilación. En caso de que cayera algo, apague el
horno, desenchúfelo inmediatamente y llame al técnico
de servicio AEG-Electrolux autorizado.
No sumerja en agua ni en ningún otro líquido el cable
de alimentación ni el enchufe.
No deje que el cable de alimentación cuelgue del borde de
la mesa o de la superficie en la que esté situado el horno.
No permita que el cable de corriente entre en contacto
con superficies calientes o afiladas, como por ejemplo el
aire caliente de la parte superior trasera del microondas.
No procure substituir la lámpara usted mismo del horno
o permitir a cualquier persona que no sea autorizada
por AEG-Electrolux a hacer tan.
Si la lámpara se estropea, consúltelo con su distribuidor
o con un técnico de servicio AEG-Electrolux autorizado.
Si se estropea el cable de alimentación de este aparato,
debrá cambiarlo por un cable especial. El cambio debe
efectuarlo un técnico de servicio AEG-Electrolux
autorizado.
Para evitar el riesgo de explosión y ebullición
repentina
ADVERTENCIA: No caliente líquidos ni otros alimentos
en recipientes cerrados ya que podrían explotar.
No use nunca recipientes o envases sellados. Quite los
cierres y tapas antes de utilizarlos. Los recipientes
sellados pueden explotar al acumularse la presión
incluso después de haber apagado el horno.
Tenga cuidado cuando caliente líquidos en el horno de
microondas. Utilice un recipiente de boca ancha para
que puedan escapar las burbuijas.
El calentamiento de bebidas en el microondas
puede dar lugar a un retraso en la ebullición, por
lo tanto el cuidado tiene que ser tomado al
manejar el envase.
Para evitar la salida repentina de líquido hirviendo y las
posibles quemaduras:
1. Agite el líquido antes de calentarlo/recalentarlo.
2. Es aconsejable introducir una varilla de vidrio o
utensilio similar en el líquido mientras calienta.
3.
Deje el líquido en reposo al final del tiempo de cocción
por 20 segundos, para evitar que hierva y salpique
después.
No cocine huevos con la cáscara ni caliente huevos
cocidos duros enteros en hornos microondas ya que
podrían explotar incluso después de haber terminado
de calentarlos el microondas. Para cocinar o volver a
calentar huevos que no estén mezclados o revueltos,
pinche las yemas y las claras para que no exploten.
Corte también los huevos duros con cáscara antes de
calentarlos en el horno de microondas.
2. AG-71+72D-EU Spanish 14/12/2005 14:25 Page 45
Page 48

46
Medidas importantes de seguridad
No utilice envases o recipientes de plástico para la
cocción a microondas si el horno está todavía caliente
después de haberlo usado en los modos a la GRILL,
COMBINADO y COCCIÓN AUTOMÁTICA dado que
podrían derretirse o fundirse. No debe emplear
recipientes de plástico durante los modos mencionados
a menos que el fabricantes de dichos recipientes afirme
que son adecuados para su uso en la cocción por
microondas.
No coloque nada en la partes exteriores del horno
mientras está funcionando.
NOTAS:
Si no está seguro de cómo conectar el horno, sírvase
consultar a un electricista cualificado.
Ni el fabricante ni el proveedor aceptan responsabilidad
alguna por cualquier avería del horno o heridas
personales sufridas por dejar de observar el
procedimiento correcto de conexión eléctrica.
Puede que se forme vapor o gotas de agua algunas
veces en las paredes del horno o cerca de los sellos de
las puertas y de las superficies de sellado. Esto es
bastante normal y no indica que haya ninguna fuga de
microondas ni ninguna avería.
Otras Notas
No intente nunca hacer ninguna modificación en el
horno.
Este horno es para preparar solamente comidas en el
hogar y debe utilizarse sólo para cocinar alimentos. No
es adecuado para utilizarlo con fines comerciales o de
laboratorio.
Para prevenir averías en el horno y para no
estropearlo, tenga en cuenta lo siguiente:
No haga funcionar el horno cuando esté vacío, vedere
nota 2 en página 59. Si no lo hace así se estropeará el
horno.
Si utiliza algún plato para dorar o materiales
autocalentables, coloque siempre debajo un aislador
termorresistente como, por ejemplo, un plato de
porcelana para evitar que se estropee el plato giratorio
y el soporte del rodillo debido al esfuerzo calorífico. No
debe sobrepasar el tiempo de precalentamiento
especificado en las instrucciones del plato.
No utilice utensilios de metal que reflejan las
microondas y pueden ocasionar arcos o chispas
eléctricas. No ponga nunca latas en el horno.
Utilice sólo el plato giratorio y el soporte del rodillo
diseñados para este horno. No hacer funcionar el horno
sin el plato giratorio.
Para evitar que se rompa el plato giratorio:
(a) Antes de limpiar el plato giratorio con agua, déjelo
enfriar.
(b) No ponga comidas ni utensilios calientes sobre un
plato giratorio frío.
(c) No ponga comidas ni utensilios fríos sobre un plato
giratorio caliente.
2. AG-71+72D-EU Spanish 14/12/2005 14:25 Page 46
Page 49

47
E
Horno y accesorios
ACCESORIOS:
Compruebe que están presentes los siguientes accesorios:
(16) El plato giratorio (17) El soporte de rodillos
(18) Rejilla alta (19) Rejilla baja
(20) 4 tornillos de fijación (no mostrado)
• Coloque el soporte de rodillos en la guarnición en el fondo
del interior.
• Ponga seguidamente el plato giratorio en el soporte de
rodillos.
• Para evitar daños al plato giratorio, al sacar del horno platos
o recipientes conviene levantarlos apartándolos del borde
del plato giratorio.
NOTA: Cuando encargue accesorios al comercio o técnico de
servicio AEG-Electrolux autorizado, sírvase mencionar dos cosas
del nombre de la pieza y la denominación del modelo.
1. Resistencia grill
2. Marco delantero
3. Lámpara del horno
4. Panel de mandos
5. Botón apertura de puerta
6. Tapa de la guía de ondas
7. Cavidad del horno
8. Soporte giraplatos
9. Cierre puerta y superficie cierre
10. Frontal y puntos de fijación (4 puntos)
11. Orificios de ventilación
12. Cubierta externa
13. Respaldo mueble
14. Clip de soporte cable de alimentación
15. Cable de alimentación
1 2
67
89
11
12
14
15
13
16
17
10
3
4
5
18
19
2. AG-71+72D-EU Spanish 14/12/2005 14:25 Page 47
Page 50

48
Panel de mandos
1 Visualizador digital
2 Indicadores
El indicador apropiado destellará o se encenderá
inmediatamente encima de cada símbolo de
conformidad con la instrucción. Cuando un
indicador emita destellos, pulse la tecla apropiada
(que tenga el mismo símbolo) o haga la operación
necesaria.
Remover
Dar vuelta
Peso/Microondas
Parilla
Indicador de microondas
Indicador de cocción en curso
3 Botón de TEMPORIZADOR/PESO/POTENCIA
4 Tecla de COCCIÓN AUTOMÁTICA
Pulsar para seleccionar uno de los 2 programas
automáticos.
5 Tecla de COCCIÓN AUTOMÁTICA Y GRILL 1
Pulsar para seleccionar uno de los 2 programas
automáticos.
6 Tecla de COCCIÓN AUTOMÁTICA Y GRILL 2
Pulsar para seleccionar uno de los 4 programas
automáticos.
7 Tecla de DESCONGELACIÓN AUTOMÁTICA
Pulsar para seleccionar uno de los 4 programas
automáticos.
8 Tecla de MODO DE COCCIÓN
Pulsar para seleccionar el nivel de potencia de
microondas, parrilla o doble parrilla.
1. pulsar una vez para seleccionar microondas.
2. pulsar dos veces para seleccionar la parrilla.
3. pulsar tres veces para seleccionar el modo
doble, microondas y parrilla.
9 Tecla de START/QUICK
10 Tecla de STOP
11 Tecla APERTURA DE PUERTA
1
2
3
7
9
11
10
6
5
4
8
2. AG-71+72D-EU Spanish 14/12/2005 14:25 Page 48
Page 51

49
E
Antes de la puesta en funcionamiento
Enchufar el horno.
1. El visualizador del horno parpadeará:
2. Pulsar la tecla de PARADA, y el visualizador indicará:
3. Para poner en hora el reloj, ver el apartado siguiente.
4. Calentar el horno sin alimentos. (Vea la página 59,
Nota 2.)
Utilización de la tecla de parada (STOP).
1. Borrar los erroes que haya cometido durante la
programación.
2. Parar el horno temporalmente durante la cocción.
3. Cancelar un programa durante la cocción,
pulsándola dos veces.
Ejemplo: Poner el reloj de 24 horas a las 23:35.
NOTA:
1. El botón de TEMPORIZADOR/KG/POTENCIA
puede girarse en sentido horario o antihorario.
2. Si se comete una equivocación durante la
programación basta con pulsar la tecla de PARADA.
3. Si se interrumpe la alimentación de energía eléctrica
al horno de microondas, el visualizador indicará
intermitentemente después de
restablecerse la corriente. Si ocurre esto mientras
está usándose el horno se borrará el programa.
También desaparece la hora del día.
4. Cuando haya que poner nuevamente en hora el reloj
hay que seguir otra vez el ejemplo antes
mencionado.
Hay dos modalidades: reloj de 12 horas y reloj de 24 horas.
1. Para poner en hora el reloj de 12 horas hay que sostener oprimida la tecla de MODO DE
COCCIÓN durante 3 segundos. aparecerá en el visualizador.
2. Para poner en hora el reloj de 24 horas hay que pulsar la tecla de MODO DE COCCIÓN
una vez más después de lo indicado en la operación 1, en el ejemplo que sigue aparecerá
en el visualizador.
x1 durante
3 segundos
Para poner en hora el reloj, seguir el ejemplo que sigue.
1. Elegir la función del reloj.
(reloj de 12 horas)
Elegir el reloj
de 24 horas.
3. Se pulsa la tecla MODO
DE COCCIÓN a cambiar
de horas a minutos.
5. Se pulsa la tecla MODO
DE COCCIÓN a poner en
marcha el reloj.
x1 durante 3 segundos
4. Poner la minutos. Girar el botón de
TEMPORIZADOR/ PESO/POTENCIA
hasta que se vea la minutos correcta
(35).
2. Poner la hora. Girar el botón de
TEMPORIZADOR/PESO/POTENCIA
hasta que se vea la hora correcta
(23).
Comprobar el
visualizador
Puesta en hora del reloj
x1
x1
x1
x1
2. AG-71+72D-EU Spanish 14/12/2005 14:25 Page 49
Page 52

50
¿Que son las microondas?
Plástico
La vajilla de plástico resistente a
altas temperaturas y apropiada para
microondas se puede usar para
descongelar, calentar y cocer.
Observe Vd. las indicaciones del
fabricante.
Vajilla de papel
También es apta la vajilla de papel resistente a altas
temperaturas y apropiada para microondas. Observe Vd.
las indicaciones del fabricante.
Papel de cocina
Se puede emplear para que absorba
la humedad que se produce en
cortos procesos de calentamiento,
por ej. de pan o panecillos.
Intercalar el papel entre el alimento
y el plato giratorio. Así, la superficie
del alimento se conserva bien tostada y seca. Al cubrir
los alimentos grasos se evitan las salpicaduras.
Las microondas son - igual que las ondas de radio y
televisión - ondas electromagnéticas.
En el horno de microondas, el magnetrón genera
microondas haciendo que las moléculas del agua
oscilen dentro de producto alimenticio. La fricción
producida genera calor que, a su vez, hace que las
comidas se descongelen, calienten o cuezan.
El secreto de los cortos tiempos de cocción reside en
que las microondas penetran directamente y de todos
los lados en la comida a cocer. La energía se aprovecha
óptimamente. En comparación con lo expuesto, al
cocinar en el horno eléctrico, la energía sólo llega
indirectamente al producto alimenticio pasando
primero por la hornalla y después por el fondo de la
olla. En este trayecto se pierde mucha energía.
Producto ALIMENTICIO - Las microondas se absorben.
Metal - Las microondas son reflejadas
Vidrio y cerámica de vidrio
La vajilla de vidrio resistente a altas
temperaturas es muy apropiada
porque el proceso de cocción se
puede observar desde todos los
lados. Pero la vajilla no debe tener
ni contenidos metálicos (por ej. no debe ser de cristal
de plomo) ni chapeado metálico (por ej. borde
chapeado de oro, azul cobalto).
Cerámica
Es apropiada por lo general. Pero la cerámica tiene que
ser esmaltada porque, si fuera cerámica no esmaltada,
podría penetrar humedad en el horno. La humedad
calienta el material y puede provocar que reviente. Al
no estar seguro si su vajilla es apropiada o no para el
microondas, realice el ensayo de aptitud de vajilla
(descrito en la página 51).
Porcelana
Muestra una muy buena aptitud. Preste atención a que
la porcelana no tenga aplicaciones de oro o plata ni
contenga metal.
LAS PROPIEDADES DE LAS
MICROONDAS
Las microondas penetran todos objetos no metálicos
fabricados en materiales de vidrio, porcelana, cerámica,
plástico, madera y papel. Este es el motivo por el qué
dichos materiales no se calientan a pesar de estar
expuestos a las microondas. Los recipientes sólo se
calientan de forma indirecta a través de la comida. Las
comidas absorben microondas y por ello se calientan.
Las microondas no penetran materiales metálicos sino
que reflejan. Por eso normalmente no son apropiados
los objetos metálicos para la acción de las microondas.
Hay excepciones, sin embargo, y Vd. puede sacar
partido precisamente de dichas propiedades. Durante la
descongelación o cocción, determinadas superficies de
las comidas se cubren con lámina de aluminio por lo
que se evitan partes calientes, muy calientes o incluso
cocidas en demasía si se trata de trozos desiguales.
Sírvase observar al respecto las demás
recomendaciones mencionadas.
Vidrio, porcelana, cerámica plástico, papel, etc. - Las
microondas penetran.
La vajilla appropiada
2. AG-71+72D-EU Spanish 14/12/2005 14:25 Page 50
Page 53

51
E
Láminas para microondas
o láminas resistentes a altas temperaturas sirven muy
bien para cubrir o envolver alimentos. Sírvase observar
las indicaciones del fabricante.
Bolsas para asados
Pueden ser utilizadas en el horno de microondas. Las
grapas metálicas, en cambio, no son apropiadas para
cerrarlas porque la lámina de la bolsa de cocer puede
fundirse. Para cerrar utilice un hilo y pinche la bolsa
varias veces con un tenedor. No se recomienda el uso
de láminas no resistentes al calor en los hornos
microondas.
platos apropiados
En modalidad de cocción doble (microondas + asador)
y en la modalidad a la parrilla pueda utilizar cualquier
plato ordinario termorresistente como, por ejemplo, los
de porcelana, céramica y vidrio. Los platos metálicos
pueden usarse sólo para asados.
Recipiente para dorar
Es un recipiente especial de asar por microondas que
consiste en cerámica de vidrio con una aleación
metálica en el fondo con la cual se puede dorar la
comida. Al usar tal vajilla para dorar hay que intercalar
un aislante apropiado, por ej. un plato de porcelana,
entre el plato giratorio y la bandeja de dorar. Respete
Vd. minuciosamente el tiempo de calentamiento de
acuerdo con las instrucciones del fabricante. Al
sobrepasar dicho tiempo se pueden producir daños en
el plato giratorio y en el soporte del mismo o se puede
activar el fusible protector del horno, quedando éste
desconectado.
Metal
No se debe usar, normalmente, porque las microondas
no penetran los metales y, consecuentemente, no
llegan a tener contacto con las
comidas. Pero existen excepciones:
se pueden usar estrechas tiras de
papel de aluminio para cubrir
ciertas zonas para que éstas no sean
descongeladas o cocidas demasiado
rápidamente (por ej. las alas de un pollo).
Se pueden usar pequeñas brochetas
metálicas y bandejas de aluminio
(por ej. para preparar platos
precocinados). Dichos utensilios, sin
embargo, deben ser de tamaño
reducido en relación con la comida,
por ej. las bandejas de aluminio se deben llenar como
mínimo entre 2/3 y 3/4 de su volumen.
Es recomendable transvasar la comida a vajilla apta
para la cocción por microondas.
Al usar bandejas de aluminio u otra vajilla metálica hay
que mantener una distancia mínima de unos 2 cm
entre éstas y las paredes de la cámara de cocción
porque, en caso contrario, éstas últimas podrían sufrir
posibles daños producidos por la formación de chispas.
Nunca se debe usar vajilla con revestimiento metálico
o dotada de piezas o accesorios metálicos, como por ej.
tornillos, cintas o asas y mangos de metal.
Ensayo de aptitud de vajilla
Si Vd. no está seguro si su vajilla es
apropiada para la cocción por
microondas, realice el siguiente
ensayo: Ponga el recipiente en el
horno y al lado o encima del mismo
un recipiente de vidrio con 150 ml
de agua. Opere el horno durante 1 ó 2 minutos, a
máxima potencia (900 W). Si la vajilla queda fría o
tibia, entonces es apta. No lleve a cabo este ensayo con
vajilla de plástico porque podría fundirse.
La vajilla appropiada
2. AG-71+72D-EU Spanish 14/12/2005 14:25 Page 51
Page 54

52
Antes de que empiece Vd. ...
Para facilitarle el manejo del horno de microondas lo
máximo posible hemos confeccionado para Vd. la
siguiente lista de las indicaciones y sugerencias más
importantes: Sólo conecte el horno después de haber
puesto alimentos en la cámara de cocción.
Ajuste de los tiempos
En general, los tiempos de descongelación,
calentamiento y cocción son considerablemente más
cortos que los de la hornalla convencional o del horno
común. Por lo tanto respete los tiempos recomendados
en este libro; ajuste más bien tiempos cortos que
prolongados. Terminada la cocción haga la prueba si el
alimento está cocido. Es preferible volver a cocerlo un
poco más que cocerlo en demasía.
Temperatura de partida
Los tiempos de descongelación, calentamiento y
cocción dependen de la temperatura de partida del
alimento. Los alimentos congelados o enfriados en el
frigorífico requieren, por ejemplo, más tiempo que
aquéllos que están a la temperatura ambiente. Para
calentamiento y cocción de los alimentos se suponen
las temperaturas normales de almacenamiento
(temperatura de frigorífico de unos 5˚ C, temperatura
ambiental de unos 20˚ C). Para la descongelación de
alimentos se parte de una temperatura de congelación
de 18˚ C.
Las palomitas de maíz sólo se
deben preparar en recipientes
especiales a tal fin y apropiados
para la cocción por microondas.
Respete minuciosamente las
respectivas indicaciones del
fabricante. No utilice nunca
recipientes normales de papel o
vajilla de vidrio.
No cueza huevos en su cáscara
porque en la misma se forma
presión que podría hacer reventar el huevo. Pinche la
yema antes de cocinar.
No caliente ni aceite ni grasa para freír en el horno de
microondas.
La temperatura del aceite no se puede controlar y éste
podría saltar de repente del recipiente.
Nunca caliente recipientes cerrados, como vasos o
latas. La presión que se genera podría hacer reventar
los recipientes. (Excepción: la preparación de
conservas).
Tiempos de coccion
Todos los tiempos indicados en este libro se entienden
como valores orientativos que pueden variar según la
temperatura de partida, el peso y la naturaleza
(contenido de agua, materia grasa, etc.) de los
alimentos.(Ausnahme: Einkochen).
Sal, especias y hierbas
Las comidas cocidas en el horno por microondas
conservanmejor su sabor propio que aquéllas
preparadas de formaconvencional. Por lo tanto, use
poca sal o, como regla, sólodespués de la cocción. La
sal absorbe el líquido y deseca lasuperficie. Las especias
y hierbas se pueden usar como decostumbre.
Gama de aplicaciones
Cocción por microondas: Esta modalidad pueda
utilizarse para descongelar, calentar y cocinar
rápidamente la comida.
Cocción doble (microondas + asador): Combina el
funcionamiento por microondas y la cocción por
asador para dar, al mismo tiempo, cocción y dorado a
la comida. La cocción combinada le permite aprovechar
por completo las ventajas de las funciones de este
aparato: el calor del grill cierra rápidamente los poros
de las capas exteriores de la comida, mientras que las
microondas cocinan de forma suave y veloz. La comida
permanece jugosa en el interior y se vuelve dorada en
el exterior.
Cocción a la parrilla: Su horno cuenta con un grill de
cuarzo que puede usar también prescindiendo de las
microondas, igual que cualquier otro asador
convencional.
Prueba para comprobar la situación de
cocción
La situación de cocción de los alimentos se puede
probar igual que si se tratara de la preparación
convencional:
• Termómetro de alimentos: Una vez terminado el
proceso de calentamiento o cocción,
respectivamente, cada alimento tiene una
determinada temperatura interior. Mediante el
termómetro Vd. puede comprobar si la comida está
suficientemente caliente, o cocida.
• Tenedor: El pescado se puede comprobar con un
tenedor. Si la carne del pescado ya no tiene aspecto
vidrioso y se puede soltar fácilmente de las espinas,
el pescado está cocido. Al cocerlo en demasía se
pone estropajoso y seco.
• Mondadientes: Los pasteles y el pan se pueden
comprobar pinchándolos con un mondadientes. Si
éste está limpio y seco, después de sacarlo, la
comida está cocida.
Sugerencias tecnicas
2. AG-71+72D-EU Spanish 14/12/2005 14:25 Page 52
Page 55

53
E
Sugerencias tecnicas
Blanqueado de verduras
Las verduras se deben blanquear antes de proceder a su
congelación para conservar mejor así su calidad y
sustancias aromáticas.
Procedimiento:
Lave la verdura y córtela en trozos. Ponga 250 g de
verdura con 275 ml de agua en una fuente para
calentarla, tapada, 3 a 5 minutos. Terminado el
blanqueado, sumerja la verdura en seguida en agua
helada para evitar que siga la cocción; después déjela
escurrir. Envase la verdura blanqueada en recipiente a
prueba de aire y congélela.
Preparación de conservas de frutas y
verduras
Las conservas se pueden preparar de
manera rápida y sencilla usando el
horno de microondas. El comercio
tiene disponibles tarros especiales
para conservas, anillos de goma y
las apropiadas grapas de plástico, todo apto para la
cocción por microondas. Los fabricantes dan
instrucciones de uso exactas.
Pequeñas y grandes cantidades
Los tiempos de cocción de su horno de microondas
están en función directa con la cantidad de alimentos
que desea descongelar, calentar o cocer. Esto significa
que la porciones pequeñas requieren menor tiempo de
cocción que las grandes. Como regla empírica rige:
DOBLE CANTIDAD = CASI EL DOBLE TIEMPO
MEDIA CANTIDAD = MITAD DEL TIEMPO
Recipientes altos y llanos
Ambos recipientes tienen el mismo volumen; el
recipiente alto, sin embargo, exige
mayor tiempo de cocción que e
llano. Seleccione por lo tanto y a ser
posible, recipientes llanos de gran
superficie. Recipientes altos sólo se
deben usar para preparar platos
donde existe el peligro de que rebosen al hervir, p.ej.
pastas, arroz, leche, etc.
Recipientes redondos y ovalados
En los recipientes redondos y ovalados, los alimentos se
cuecen con mayor uniformidad que en los
rectangulares porque la energía de las microondas se
concentra en las esquinas por lo que en estos puntos
existe el peligro de cocción en demasía.
Adición de agua
Las verduras y otros alimentos con mucho contenido de
agua se pueden cocinar en su propio jugo o agregando
muy poca agua. Así se conservan muchas vitaminas y
sustancias minerales en el alimento.
Alimentos en su piel o cáscara,
como salchichas, pollo, muslos de pollo, patatas en su
monda, tomates, manzanas, yema de huevo o
productos similares, se pinchan con tenedor o
mondadiente, pues así puede salir el vapor que se
forma sin que reviente la piel o cáscara.
Comidas grasas
Carnes entreveradas con grasa o capas de grasa se
cuecen con mayor rapidez que las porciones magras.
Por lo tanto conviene recubrir dichas porciones,
durante la cocción, con papel de aluminio o colocar el
lado graso hacia abajo.
Calentar bebidas
(café, té, agua, etc)
Calentar leche
Calentar sopas
Calentar guisados/estofados
Aves
Carne de cordero
asada ligeramente
bien asada
Roast beef
soasado
medio
bien asado
Carne de cerdo, ternera
Bebida/comida Temperatura interior Temperatura interior
al final del tiempo después de 10 a 15
de la cocción minutos de tiempo
de reposo
65-75 oC
60-65 oC
75-80 oC
75-80 oC
80-85 oC
70 oC
75-80 oC
50-55 oC
60-65 oC
75-80 oC
80-85 oC
85-90
o
C
70-75 oC
80-85 oC
55-60 oC
65-70 oC
80-85 oC
80-85 oC
TABLA: DETERMINACIÓN DEL TIEMPO
DE COCCIÓN CON EL TERMÓMETRO
DE ALIMENTOS
Cada bebida y cada plato tiene una determinada
temperatura interior (temperatura en el núcleo), una
vez terminado el proceso de la cocción. Si dicho
proceso de cocción se interrumpe en este punto el
resultado será satisfactorio. Dicha temperatura se
puede leer en un termómetro especial para comidas. La
siguiente tabla de temperaturas informa sobre las
temperaturas más importantes.
2. AG-71+72D-EU Spanish 14/12/2005 14:25 Page 53
Page 56

54
Sugerencias tecnicas
• Los platos preparados contenidos en recipientes de
aluminio se deben sacar de los mismos para
calentarlos en un plato o en una fuente.
• Las tapas se deben quitar de recipientes bien
cerrados. Cubrir los alimentos con lámina apropiada
para microondas, plato o cubierta (disponibles en el
mercado) para que la superficie no se deseque. Las
bebidas no necesitan taparse.
• Al cocer líquidos, como agua, café, té o leche, ponga
una barrita de vidrio en el respectivo recipiente.
• Tratándose de mayores cantidades, removerlas en
ciertos intervalos, a ser posible, para que la
temperatura se distribuya uniformemente.
• Los tiempos indicados para los alimentos se refieren
a una temperatura ambiental de 20 °C. Para
alimentos refrigerados, dichos tiempos se deben
aumentar ligeramente.
• Después de calentar los alimentos, déjelos reposar
durante 1 ó 2 minutos para que la temperatura se
distribuya uniformemente dentro de los mismos
(tiempo de reposo).
• Los tiempos indicados representan valores
orientativos que pueden variar de acuerdo con su
temperatura de partida, peso, contenido de agua,
contenido de materia grasa y el estado final
requerido.
Tapar
Al tapar el recipiente se preserva la
humedad dentro del alimento con
lo que se reduce el tiempo de
cocción. Para cubrir el alimento se
puede usar tapa, lámina apta para
microondas o cubierta. Los alimentos que se deseen
crujientes no deberán taparse, p.ej. asado o pollo.
Como regla empírica rige que todo lo que se prepara
cubierto en el horno convencional, también se debe
cubrir en el horno de microondas; y todo lo que se
cocina sin tapar en el horno convencional, también se
debe cocinar sin tapar en el horno de microondas.
Alimentos irregulares
Se emplazan con el lado más grueso o más compacto
hacia fuera. Verduras (p. ej. brécol)
deben colocarse con el tallo hacia
fuera. Los alimentos más gruesos
necesitan mayor tiempo de cocción
y reciben mayor energía de
microondas en el exterior, de forma que éstos se
cuecen uniformemente.
Remover
Es preciso remover la comida porque, primero, las
microondas calientan la parte
exterior. Removiendo la comida, la
temperatura se equilibra y el
alimento se calienta
uniformemente.
Disposición
Varias porciones individuales, p.ej. moldes de budín o
flan, tazas o patatas con su monda, se disponen en
forma anular sobre el plato giratorio. Deje suficiente
espacio entre las distintas porciones para que la
energía de las microondas pueda penetrar desde todos
los lados.
Darle vuelta al alimento
A alimentos de tamaño medio, como hamburguesas y
chuletas, se les debe dar una vuelta durante la cocción
para abreviar el proceso de cocción. A grandes
porciones, como asado y pollo, se les debe dar vuelta
porque la parte superior recibe mayor cantidad de
energía de microondas y, por lo tanto, podría desecarse
si no se le da la vuelta.
Tiempo de reposo
Una de las reglas más importantes del horno de
microondas es la de mantener el
tiempo de reposo. Casi todos los
alimentos que se descongelan,
calientan o cuecen por microondas
requieren un determinado tiempo
de reposo durante el cual tiene
lugar un equilibrio de temperaturas y durante el cual el
líquido contenido dentro del alimento puede
distribuirse uniformemente en el mismo.
Calentamiento
2. AG-71+72D-EU Spanish 14/12/2005 14:25 Page 54
Page 57

55
E
Descongelación
El horno de microondas es el dispositivo ideal para
descongelar alimentos. Los tiempos de descongelacion
son mucho más cortos que en el caso de descongelar de
manera convencional. He aquí algunos consejos.
Saque el alimento congelado de su envase y póngalo en
un plato para descongelarlo.
Envases y recipientes
Para descongelar y calentar alimentos son muy
apropiados aquellos envases y recipientes aptos para
microondas que a la vez son resistentes a bajas
temperaturas (hasta unos - 40 ˚C) y a altas
temperaturas (hasta unos 220 ˚C). Disponiendo de
recipientes de estas características, puede utilizarlos
para descongelar, calentar e incluso cocinar sin tener
que cambiar de recipiente.
Tapar
Las partes de menor espesor se deben cubrir con
pequeñas tiras de papel aluminio
antes de descongelarlas. También
deben cubrirse con aluminio las
partes descongeladas o templadas.
Así se evita que las porciones más
delgadas se calienten en exceso
mientras que las porciones más gruesas siguen
congeladas.
Ajuste correcto
Es preferible seleccionar una potencia demasiado baja
que una excesivamente alta. Así va a obtener una
descongelación uniforme. Con una potencia demasiado
alta, la superficie del alimento comenzará a cocinarse
mientras que el interior sigue congelado.
Dar vuelta/Remover
A casi todos los alimentos se les debe dar una vuelta
durante su preparación o precisan ser removidos.
Porciones adheridas unas a otras se deben separar
cuanto antes y reorganizar.
Pequeñas cantidades
Pequeñas cantidades se descongelan con mayor uniformidad y
celeridad que las grandes. Por lo
tanto recomendamos congelar, a ser
posible, pequeñas porciones. Así le
va a ser fácil preparar rápida y
sencillamente menús completos.
Alimentos delicados
Alimentos delicados, como tarta, nata, queso y pan, no
se deben descongelar totalmente sino solamente un
poco y dejar la descongelación completa a la
temperatura ambiental. Procediendo de esta forma se
evita que las zonas exteriores se calienten demasiado
mientras que el interior todavía permanece congelado.
Tiempo de reposo
El tiempo de reposo después de la descongelación de
alimentos adquiere importancia especial puesto que,
durante este intervalo, sigue el proceso de la
descongelación. En la tabla sobre la descongelación Vd.
encontrará los tiempos de reposo para los distintos
alimentos.
Alimentos gruesos y compactos requieren tiempos de
reposo más prolongados que los alimentos de reducido
espesor o aquellos de estructura porosa. En el caso de
que algún alimento no esté suficientemente
descongelado, Vd. puede seguir descongelándolo en el
horno de microondas o puede prolongar
correspondientemente el tiempo de reposo.
Transcurrido el tiempo de reposo, los alimentos se
deben elaborar en seguida, a ser posible, y no se deben
volver a congelar.
2. AG-71+72D-EU Spanish 14/12/2005 14:25 Page 55
Page 58

56
Cocción de verduras frescas
• Observe Vd., al comprar carne, que los trozos sean
uniformes, a ser posible. Esto es importante para
obtener un buen resultado de la cocción.
• Antes de la preparación, carne, pescado y aves se
deben lavar bien bajo una corriente de agua fría y
secar ligeramente con papel de cocina. Después
seguir elaborando el alimento como de costumbre.
• Carne vacuna debe ser tierna y con pocos tendones.
• Aunque los trozos sean de tamaño uniforme, el
resultado de la cocción puede variar debido, entre
otras cosas, a la calidad de la carne, diferentes
contenidos de materia grasa y líquido y también a la
temperatura de la carne antes de cocerla.
• A los trozos de mayor tamaño de carne, pescado y
aves se les debe dar vuelta transcurrida la mitad del
tiempo de la cocción para que se cuezan
uniformemente por todos los lados.
• Llevada a cabo la cocción de un asado, cúbralo con
una lámina de aluminio y déjelo reposar durante 10
minutos aprox (tiempo de reposo). Durante este
intervalo, el asado sigue cocinándose y el líquido se
distribuye uniformemente de manera que, al
cortarlo, se pierde menos jugo.
• Observe Vd., al comprar verduras, que los trozos sean
uniformes, a ser posible. Esto es importante, ante
todo, si quiere cocer la verdura en trozos enteros (p.
ej. patatas cocidas).
• Antes de prepararlas, las verduras se deben lavar y
después se debe pesar la cantidad requerida según la
receta y cortarlas.
• Condimente como de costumbre, pero ponga la sal,
como regla general, sólo después de la cocción.
• Agregue por cada 500 g de verdura aprox. 5
cucharadas soperas de agua. Verduras fibrosas
necesitan un poco más de agua. Consulte la tabla al
respecto. Vea la página 69.
• Normalmente, las verduras se cuecen en una fuente
con tapa. Verduras con alto contenido de líquido,
como p.ej. cebollas o patatas cocidas, se pueden
cocer en lámina para microondas sin agregar agua.
• Remover o darle vuelta a la verdura después de
transcurrida la mitad del tiempo de cocción.
• Terminada la cocción, dejar reposar la verdura unos
2 minutos para que la temperatura se distribuya
uniformemente (tiempo de reposo).
• Los tiempos de cocción representan valores
orientativos y dependen del peso, temperatura de
partida y tipo de verdura. Cuanto más fresca sea la
verdura, más cortos serán los tiempos de cocción.
En el horno de microondas, los platos congelados se
pueden descongelar y cocer en una sola operación. La
siguiente tabla le da unos ejemplos al respecto. Vea la
página 70.
Observe Vd., además, las instrucciones generales en lo
referente a "Calentamiento" y "Descongelación".
Para preparar platos congelados, siga las instrucciones
del fabricante, dadas en el envase. Normalmente se
indican tiempos exactos de cocción e instrucciones
para la preparación.
Cocción de carne, pescado y aves
Descongelación y cocción
2. AG-71+72D-EU Spanish 14/12/2005 14:25 Page 56
Page 59

57
E
Nivel de potencia de microondas
El horno tiene 5 niveles de potencia. Para elegir el nivel
conveniente para guisar hay que hacer lo indicado en la
sección de recetas. En general son de aplicación las
siguientes recomendaciones:
900 W utilizado para cocción rápida o para recalentar,
p.ej. sopas, guisos, alimentos enlatados, bebidas
calientes, verduras, pescado, etc.
630 W utilizado para la cocción más prolongada de
alimentos densos, como carne asada, pasteles de carne
y comidas al plato y también para platos sensibles como
salsa de queso y pasteles de bizcocho. En este punto de
ajuste, más reducido, la salsa no hervirá y los alimentos
se cocerán uniformemente sin quemarse en los bordes.
Para seleccionar el nivel de potencia de microondas:
Girar el mando de TEMPORIZADOR/PESO/POTENCIA en sentido horario para seleccionar el tiempo de cocción.
Pulsar la tecla de MODO DE COCCIÓN una vez (sólo microondas).
Para cambiar el nivel de potencia de microondas se gira el mando hasta llegar al nivel de potencia deseado.
Pulsar la tecla START/QUICK.
450 W para alimentos densos que requieren un tiempo
de cocción largo en la cocina convencional, por ejemplo
platos de buey. Se recomienda utilizar este ajuste de la
potencia para asegurar que la carne quede tierna.
270 W (ajuste de descongelación). Seleccione este
ajuste para descongelar asegurando que el plato se
descongela uniformemente.Este ajuste es también ideal
para cocer a fuego lento arroz, pasta, etc.y para cocer
flanes de huevo.
90 W Para descongelación cuidadosa, por ejemplo de
dulces o pasteles de crema.
W = Vatios
NOTA: Si no se selecciona el nivel de potencia se pone automáticamente el nivel 900 W.
2. AG-71+72D-EU Spanish 14/12/2005 14:25 Page 57
Page 60

58
Cocción con microondas
Ejemplo:
Supongamos que se desea calentar sopa durante 2 minutos y 30 segundos empleando una potencia de microondas
de 630 W.
1. Se pone el tiempo de
cocción deseado
girando el mando de
TEMPORIZADOR/
PESO/POTENCIA.
2. Se elige el modo de
cocción deseado
pulsando la tecla
MODO DE COCCIÓN
una vez (sólo
microondas).
3. Se elige la potencia
deseada girando el
mando de
TEMPORIZADOR/PESO/
POTENCIA.
4. Se pulsa la tecla de
START/QUICK una
vez para empezar la
cocción.
NOTA:
1. Cuando se abre la puerta durante el proceso de cocción se para automáticamente el tiempo contado en el
visualizador digital. El tiempo de cocción empieza a contarse de nuevo cuando se cierra la puerta y se pulsa la
tecla de START/QUICK.
2. Si se desea saber el nivel de potencia que se está usando durante la cocción se pulsa la tecla de MODO DE
COCCIÓN. Mientras se toca la tecla de MODO DE COCCIÓN con el dedo se ve en el visualizador el nivel de
potencia.
3. El mando de TEMPORIZADOR/PESO/POTENCIA se puede girar en sentido horario o antihorario. Si se gira en
sentido antihorario se reduce el tiempo de cocción desde 90 minutos en gradaciones.
Comprobar el visualizador
El horno puede programarse para hasta 90 minutos
(90.00). La unidad de entrada de tiempo de cocción
(descongelación) varía de 10 segundos a 5 minutos.
Depende del total de tiempo de cocción
(descongelación), como se indica en la tabla.
Tiempo de cocción Unidad de incrementos
0-5 minutos 10 segundos
5-10 minutos 30 segundos
10-30 minutos 1 minuto
30-90 minutos 5 minutos
x1
x1
2. AG-71+72D-EU Spanish 14/12/2005 14:25 Page 58
Page 61

59
E
Cocción al grill y combinada
NOTA:
1. Se recomienda usar la rejilla alta para asar a la parrilla.
2. Al usar el grill por primera vez puede que se note humo o un olor a quemado, pero eso es normal y no es indicio
de que el horno está averiado.
Para evitar este problema, al usar el horno por primera vez conviene hacer funcionar el grill sin alimentos
durante 20 minutos.
Este horno de microondas tiene dos modos de cocción al GRILL: 1. Sólo grill.
2. grill con microondas.
1. COCCIÓN SÓLO AL GRILL
Este modo puede usarse para asar/dorar alimentos.
Ejemplo: Para hacer tostadas en 4 minuto:
1. Se pone el tiempo de
cocción deseado girando el
mando de
TEMPORIZADOR/PESO/
POTENCIA.
2. Se elige el modo de
cocción deseado pulsando
la tecla MODO DE
COCCIÓN dos veces. (Sólo
parrilla.)
3. Se pulsa la tecla START/QUICK
una vez para empezar la
cocción.
En esta modalidad se usa una combinación de potencia del grill y potencia de microondas (90 W a 630 W).
El nivel de potencia de microondas está prefijado a 270 W.
Ejemplo:
Para hacer Brochetas mixas de carne (receta en la página 68) durante 7 minutos empleando potencia MEDIA DEL
GRILL Y MICROONDAS 450 W.
1. Se pone el tiempo de
cocción deseado girando
el mando de
TEMPORIZADOR/PESO/
POTENCIA.
2. Se elige el modo de
cocción deseado
pulsando la tecla MODO
DE COCCIÓN tres veces
para seleccionar
microondas y grill.
3. Se gira el mando de
TEMPORIZADOR/
PESO/POTENCIA al
nivel de potencia de
microondas deseado.
4. Se pulsa la tecla
de START/QUICK
una vez para
empezar la
cocción.
2. COCCIÓN COMBINADA AL GRILL Y CON MICROONDAS
Comprobar el visualizador
Comprobar el visualizador
x1
x2
x1
x3
2. AG-71+72D-EU Spanish 14/12/2005 14:25 Page 59
Page 62

60
Otras funciones cómodas
1. COCCIÓN EN VARIAS SECUENCIAS
Puede programarse una secuencia de 3 escalones (máximo) empleando combinaciones de MICROONDAS, GRILL o
GRILL Y MICROONDAS.
Ejemplo:
Para cocinar : 2 minutos y 30 segundos con potencia 630 W (Escalón 1)
5 minutos con sólo grill (Escalón 2)
ESCALÓN 1
1. Se pone el tiempo de
cocción deseado
girando el mando de
TEMPORIZADOR/
PESO/POTENCIA.
2. Se elige el modo de
cocción deseado
pulsando la tecla
MODO DE COCCIÓN
una vez (sólo
microondas).
3. Se pone el nivel de
potencia deseado girando
el mando de
TEMPORIZADOR/
PESO/POTENCIA.
4. Se pulsa la tecla de
MODO DE
COCCIÓN antes de
programar el
escalón 2.
ESCALÓN 2
5. Se pone el tiempo deseado
girando el mando de
TEMPORIZADOR/PESO/
POTENCIA.
6. Se elige el modo de
cocción deseado pulsando
la tecla de MODO DE
COCCIÓN dos veces (sólo
grill).
7. Se pulsa la tecla de
START/QUICK una vez
para empezar la cocción.
(El horno empezará a cocinar durante 2 minutos y 30 segundos a 630 W y luego durante 5 minutos con sólo grill).
Ejemplo:
Para hacer 1.0 kg Calabacines y pasta al horno (en la página 74).
1. 18 minutos a 900 W.
2. 7 minutos con grill y microondas a 630 W.
Comprobar el visualizador
NOTA: Si elige cualquier programa después de haber ajustado el MODO GRILL, omita los pasos 3 y 4. Si mantiene
apretado continuamente el botón del MODO DE COCCIÓN después de ajustar PARRILLA, el MODO GRILL cambiará
automáticamente al MODO GRILL DOBLE.
x1
x1
x2
x1
2. AG-71+72D-EU Spanish 14/12/2005 14:25 Page 60
Page 63

61
E
Otras funciones cómodas
2. FUNCIÓN DE COCCIÓN RÁPIDA
La tecla de START/QUICK permite utilizar las dos funciones siguientes :
a. Inicio directo de cocción
Puede empezar la cocción directamente al nivel de potencia de microondas de 900 W durante 30 segundos
pulsando la tecla START/QUICK.
NOTA:
Para evitar manipulaciones indebidas por los niños la tecla de START/QUICK sólo puede usarse dentro de 3 minuto
de la operación inmediatamente precedente, p.ej. el cierre de la puerta o la pulsación de la tecla de STOP.
b. Prolongación del tiempo de cocción.
Durante la cocción manual, puede prolongar el tiempo de cocción en múltiplos de 30 segundos pulsando la tecla
mientras el horno está funcionando.
3. PARA COMPROBAR EL NIVEL DE POTENCIA
Para comprobar el nivel de potencia de microondas durante la cocción se pulsa la tecla de MODO DE COCCIÓN.
Mientras se está tocando la tecla de NIVEL DE POTENCIA DEL MICROONDAS con el dedo se ve en el
visualizador el nivel de potencia.
El horno continúa contando el tiempo aunque el visualizador esté indicando el nivel de potencia.
Comprobar el visualizador
PARA ACTIVAR LA FUNCIÓN DE BLOQUEO DE
SEGURIDAD
1. Pulse y mantenga pulsada la tecla STOP durante 3
segundos.
NOTA: Cuando está activado el Bloqueo de seguridad no funcionará ningún botón a excepción la tecla STOP.
x1 para 3 segundos
Si el reloj está puesto en hora,
podrá verse la hora en la pantalla.
PARA CANCELAR LA FUNCIÓN DE BLOQUEO DE
SEGURIDAD
1. Pulse y mantenga pulsada la tecla STOP durante 3
segundos.
x1 para 3 segundos
4. FUNCIÓN DE BLOQUEO DE SEGURIDAD
x1
2. AG-71+72D-EU Spanish 14/12/2005 14:25 Page 61
Page 64

62
Funciones de cocción automática y
descongelación automática
Las funciones de COCCIÓN AUTOMÁTICA y DESCONGELACIÓN AUTOMÁTICA calculan automáticamente el modo
y el tiempo de cocción apropiados. Puede escoger entre los menús 2 COCCIÓN AUTOMÁTICA, 6 COCCIÓN
AUTOMÁTICA Y GRILL y 4 DESCONGELACIÓN AUTOMÁTICA.
Lo que necesita saber para utilizar esta función automática:
Mando de
TEMPORIZADOR/PESO/
POTENCIA
Tecla de START/QUICK
2.
3.
2. El peso o la cantidad del alimento puede
introducirse girando el mando de
TEMPORIZADOR/PESO/POTENCIA hasta que se
visualice el peso o cantidad deseados.
• Introducir sólo el peso del alimento. No incluir el
peso del envase.
• Utilice el modo de funcionamiento manual para
alimentos que pesen más o menos que los pesos o
las cantidades que se facilitan en los cuadros de
COCCIÓN AUTOMÁTICA Y DESCONGELACIÓN
AUTOMÁTICA. Para obtener mejores resultados, siga
las indicaciones de los cuadros de cocción que se
proporcionan en las páginas 69 - 70.
3. Para empezar a cocinar, pulsar la tecla de
START/QUICK.
Cuando se necesita alguna acción (p.ej. dar vuelta al
alimento) el horno se para y suenan las señales, y en
el visualizador se verá intermitentemente el tiempo
de cocción que queda y cualquier indicador. Para
continuar cocinando hay que pulsar la tecla de
START/QUICK.
El menú puede elegirse pulsando la tecla de DESCONGELACIÓN AUTOMÁTICA o deseado COCCIÓN AUTOMÁTICA
hasta que se vea en el visualizador el número del menú deseado. Ver las páginas 64 - 66 “CUADROS DE COCCIÓN
AUTOMÁTICA Y DESCONGELACIÓN AUTOMÁTICA”.
El menú cambiará automáticamente manteniendo pulsado el tecla COCCIÓN AUTOMÁTICA y DESCONGELACIÓN
AUTOMÁTICA.
La temperatura final variará dependiendo de la
temperatura de partida. Comprobar que el alimento
está muy caliente después de la cocción. Si es necesario
se puede prolongar el tiempo de cocción y variar el
nivel de potencia.
NOTA: Si desea utilizar la función de COCCIÓN
RÁPIDA durante la operación de rápidas, los
alimentos pueden hacerse demasiado.
1a.
1b.
x1
x1
x1
x1
Número del menú
Número del menú
Número del menú
Número del menú
Ejemplo:
1a. COCCIÓN AUTOMÁTICA: El botón de COCCIÓN
AUTOMÁTICA dispone de 2 menús. Pulse el botón de
COCCIÓN AUTOMÁTICA una vez y aparecerá la pantalla
que se ilustra.
1b. COCCIÓN AUTOMÁTICA Y GRILL 1: El botón de
COCCIÓN AUTOMÁTICA Y GRILL 1 dispone de 2 menús.
Pulse el botón de COCCIÓN AUTOMÁTICA Y GRILL 1 una
vez y aparecerá la pantalla que se ilustra.
1c. COCCIÓN AUTOMÁTICA Y GRILL 2: El botón de
COCCIÓN AUTOMÁTICA Y GRILL 2 dispone de 4 menús.
Pulse el botón de COCCIÓN AUTOMÁTICA Y GRILL 2 una
vez y aparecerá la pantalla que se ilustra.
1d. DESCONGELACIÓN AUTOMÁTICA: El botón de
DESCONGELACIÓN AUTOMÁTICA dispone de 4 menús.
Pulse el botón de DESCONGELACIÓN AUTOMÁTICA una
vez y aparecerá la pantalla que se ilustra.
1c.
1d.
x1
2. AG-71+72D-EU Spanish 14/12/2005 14:25 Page 62
Page 65

63
E
Funciones de cocción automática y
descongelación automática
Ejemplo 1 para COCCIÓN AUTOMÁTICA Y GRILL 1:
Para cocinar Pescado gratinado con un peso de 1,5 kg utilizando la Cocción automática y grill 1 (A1-1).
2. Se introduce el peso girando el mando
de TEMPORIZADOR/PESO/POTENCIA
en sentido horario.
3. Se pulsa la tecla de
START/QUICK.
1. Se selecciona el menú requerido
pulsando la tecla de COCCIÓN
AUTOMÁTICA Y GRILL 1.
Comprobar el visualizador.
Ejemplo 2 de DESCONGELACIÓN AUTOMÁTICA:
Para descongelar 0,2 kg de filetes utilizando la función de Descongelación automática (Ad-1).
2. Se introduce el peso girando el
mando de TEMPORIZADOR/PESO/
POTENCIA en sentido horario.
3. Se pulsa la tecla de
START/QUICK.
1. Se selecciona el menú
requerido pulsando la tecla de
COCCIÓN RÁPIDAS.
Comprobar el visualizador.
x1
x1
x1
x1
2. AG-71+72D-EU Spanish 14/12/2005 14:25 Page 63
Page 66

64
Cuadros de cocción automática y
descongelación automática
TECLA PROCEDIMIENTO
• Ver las recetas para “Pollo y Verdura Cacerola”
en la página 67.
* Peso total de ingredientes.
• Ver las recetas para “Picadillo y Cebolla” en la
página 67.
* Peso total de ingredientes.
COCCIÓN
AUTOMÁTICA
AC-1 Cocción
Pollo y Verdura
Cacerola
AC-2 Cocción
Picadillo y Cebolla
CANTIDAD (Unidad de
incremento)/UTENSILIOS
0,5 - 1,5 kg* (500 g)
(Temp. inicial Pollo 5 °C)
Fuente para gratén y film
de plástico para
microondas
0,5 - 1,5 kg* (500 g)
(Temp. inicial
Picadillo 5 °C)
Plato Cacerola y tapa
TECLA PROCEDIMIENTO
• Ver las recetas para “Pescado Gratinado” en la
páginas 67 - 68.
* Peso total de ingredientes.
• Ver las recetas para “Gratén” en la página 68.
* Peso total de ingredientes.
COCCIÓN
AUTOMÁTICA Y
GRILL 1
A1-1 Cocción
Pescado Gratinado
A1-2 Cocción
Gratén
CANTIDAD (Unidad de
incremento)/UTENSILIOS
0,5 - 1,5 kg* (500 g)
(Temp. inicial Pescado 5 °C)
Fuente ovalada para gratén
Tripode baja
0,5 - 1,5 kg* (500 g)
(Temp. inicial 20 °C)
Fuente ovalada para gratén
Tripode baja
x1
x2
x1
x2
2. AG-71+72D-EU Spanish 14/12/2005 14:25 Page 64
Page 67

65
E
Cuadros de cocción automática y
descongelación automática
TECLA PROCEDIMIENTO
• Sacar del paquete las patatas fritas congeladas
y ponerlas en una fuente de porcelana.
• Poner la fuente en la tripode alta en el horno.
• Cuando suenen las señales, dar vuelta.
• Después de la cocción, sacar las patatas fritas de
la fuente y ponerlas en un plato para servir. (No
es necesario tiempo de reposo).
• Añadir sal según el gusto.
NOTA: La fuente se pone muy caliente durante la
cocción. Para evitar quemarse conviene ponerse
guantes de cocina para sacar del horno la fuente.
• Preparar los asadoresen la página 68.
• Poner en una tripode alta y asar.
• Cuando suene la señal, dar vuelta.
• Terminada la cocción, sacar y poner en un plato
para servir. (No es necesario tiempo de reposo).
• Mezclar los ingredientes y esparcirlos sobre las
patas de pollo.
• Perforar la piel de las patas.
• Poner las patas en la tripode alta, con el lado
con piel abajo y con los extremos delgados
hacia el centro.
• Cuando suenen las señales, dar vuelta a las
patas.
• Después de la cocción, dejar en reposo el
alimento durante aprox. 5 minutos.
• Mezclar los ingredientes y esparcirlos sobre el
pollo.
• Perforar la piel del pollo.
• Poner el pollo en en la tripode baja, pechuga
hacia abajo.
• Poner en el plato giratorio y cocer.
• Cuando suenen las señales, dar vuelta al pollo.
• Después de la cocción, dejar durante aprox.
unos 3 minutos en el horno, retirar y poner en
un plato para servir.
COCCIÓN
AUTOMÁTICA Y
GRILL 2
A2-1 Cocción
Patatas fritas
(recomendadas
para hornos
convencionales)
A2-2 Cocción
Brochetas mixtas
de carne
A2-3 Cocción
Patas de pollo
A2-4 Cocción
Pollo asado
CANTIDAD (Unidad de
incremento)/UTENSILIOS
0,20 - 0,40 kg (50 g)
(Temp. inicial -18 °C)
Plato Cacerola
Tripode alta
0,2 - 0,8 kg (100 g)
(Temp. inicial 5 °C)
Tripode alta
0,20 - 0,80 kg (50 g)
(Temp. inicial 5 °C)
Tripode alta
0,9 - 1,8 kg (100 g)
(Temp. inicial 5 °C)
Tripode baja
Ingredientes para 1,2 kg de pollo asado:
Sal y pimienta, 1 cdta. de pimentón dulce,
2 cucharones de aceite
Ingredientes para 600 g de patas de pollo:
(3 piezas), 1-2 cucharones de aceite,
1/2 cdta. de sal, 1 cdta. de pimentón dulce ,1 cdta.
de romero.
x1
x3
x4
x2
2. AG-71+72D-EU Spanish 14/12/2005 14:25 Page 65
Page 68

66
Cuadros de cocción automática y
descongelación automática
NOTA: Descongelación automática
1. Bistecs y chuletas deben congelarse en una sola capa.
2. La carne picada se debe congelar en pequeñas porciones.
3. Después de dar vuelta, proteger las partes descongeladas con trozos pequeños planos de lámina de aluminio.
4. Los pasteles cubiertos y recubiertos de nata son muy sensibles a la potencia del microondas. Para un mejor
resultado, si la nata empieza a ablandarse rápidamente, es mejor sacarlos inmediatamente del horno y dejarlos
por espacio de 10-30 minutos a temperatura ambiente.
5. Bistecs y chuletas disponer los alimentos en el horno como se indica:
Alimento
Plato
Plato
giratorio
Bistecs y chuletas
TASTE PROCEDIMIENTO
• Poner la comida en un plato en el centro del
plato giratorio.
• Cuando se pare el horno y suenen las señales,
dar vuelta al alimento, revolver y separar.
Proteja las partes delgadas y los puntos
calientes con papel de aluminio.
• Después de descongelar, envolver en lámina
de aluminio durante 10 - 15 minutos hasta
que esté totalmente descongelado.
• Cubra la plato giratoria con plástico para
envolver.
• Coloque el bloque de carne picado en la plato
giratoria.
• Cuando se pare el horno y suene la señal
acústica, dé la vuelta al alimento. Retire, si es
posible, la parte descongelada.
• Después de descongelar, déjela en reposo
durante 5 - 10 minutos hasta la
descongelación completa.
• Retire todo el embalaje del pastel.
• Colóquelo en un plato plano en el centro del
plato giratorio.
• Después de descongelarlo, corte el pastel en
trozos de tamaño similar dejando un espacio
entre los trozos y déjelo reposar durante 15 60 minutos hasta que esté descongelado
uniformemente.
• Distribuya el pan sulla plato plano en el
centro del plato giratorio.
• Cuando suene la señal acústica, reordene, y
saque las rebanadas descongeladas.
• Después de descongelar, separe todas las
rebanadas y distribúyalas en un plato grande.
• Cubra el pan con papel de aluminio y déjelo
reposar durante 5 - 10 minutos hasta que
esté totalmente descongelado.
DESCONGELACIÓN
AUTOMÁTICA
Ad-1
Descongelación
Bistec y chuletas
Ad-2
Descongelación
Carne picado
Ad-3
Descongelación
Pastel
Ad-4
Descongelación
Pan
CANTIDAD (Unidad de
incremento)/UTENSILIOS
0,2 - 1,0 kg (100 g)
(Temp. inicial -18 °C)
(Ver la nota que sigue)
0,2 - 1,0 kg (100 g)
(Temp. inicial -18 °C)
Plástico para envolver
(Ver la nota que sigue)
0,1 - 1,4 kg (100 g)
(Temp. inicial -18 °C)
Plato plano
0,1 - 1,0 kg (100 g)
(Temp. inicial -18 °C)
Plato plano
(Para este programa
solamente se recomienda
pan cortado en rebanadas)
x1
x2
x3
x4
2. AG-71+72D-EU Spanish 14/12/2005 14:25 Page 66
Page 69

67
E
Recetas para cocción automática
PICADILLO Y CEBOLLA (AC-2)
Ingredientes
0,5 kg 1,0 kg 1,5 kg
150 g 300 g 450 g picadillo (
1
/
2 mitad de cardo,
1
/
2 mitad de vaca)
50 g 100 g 150 g cebolla (bien picado)
1
/
2 11
1
/
2 huevo
15 g 30 g 45 g de pan rallado
sal y pimienta
115 ml 230 ml 345 ml caldo de carne
20 g 40 g 60 g de puré de tomate
65 g 125 g 190 g patatas (bien picado)
65 g 125 g 190 g zanahorias (bien picado)
1
/
2 tbsp 1 tbsp 1
1
/
2 tbsp de perejil (picado)
POLLO Y VERDURA CACEROLA (AC-1)
Pavo Picante con Arroz
Ingredientes
0,5 kg 1,0 kg 1,5 kg
60 g 120 g 180 g arroz de grano largo
(sancochar)
1 1 1 balsita de hilitos de azafrán
25 g 50 g 75 g cebolla (en rodajas)
50 g 100 g 150 g pimiento morrón (en tiras)
50 g 100 g 150 g puerro pequeño (en tiras)
150 g 300 g 450 g pechuga de pollo (en dados)
pimienta, pimentón
10 g 20 g 30 g mantiquilla o margarina
150 ml 300 ml 450 ml caldo de carne
Preparación
1. Mezclar el arroz con los hilitos de azafrán y poner
la mezcla en la fuente untada.
2. Mezclar las rodajas de cebolla, las tiras de puerro y
pimiento y los dados de pechuga de pavo y
condimentar. Poner esta mezcla encima del arroz.
3. Encima de todo esto se distibuyen los copos de
mantequilla.
4. Verter el caldo de carne sobre todo, tapar y cocer
en COCCIÓN AUTOMÁTICA (AC-1), “Pollo y
Verdura Cacerola”.
5. Después de la cocción, dejar durante 5 - 10
minutos.
PESCADO GRATINADO (A1-1)
Pescado gratinado a la italiana
Ingredientes
0,5 kg 1,0 kg 1,5 kg
200 g 430 g 630 g filetes de pescado
1
/
2
tbsp 1 tbsp 1
1
/
2
tbsp zumo de limón
1
/
2 tbsp 1 tbsp 1
1
/
2 tbsp mantequilla de anchoas
30 g 50 g 80 g queso Gouda (rallado)
sal y pimienta
150 g 300 g 450 g tomates
1 tbsp 1
1
/
2 tbsp 2 tbsp hierbas picados mezcladas
100 g 180 g 280 g Mozarella
1
/
2
tbsp
3
/
4
tbsp 1 tbsp albahaca (picado)
Preparación
1. Lavar y secar el pescado, rociar con el zumo de
limón, sazonar y untar con la mantequilla de
anchoas.
2. Colocar en una fuente ovalada para gratinar.
3. Espolvorear el queso Gouda sobre el pescado.
4. Lavar los tomates y quitarles el rabo. Cortar en
rodajas y colocar sobre el queso.
5. Condimentar con sal, pimienta y las hierbas
mezcladas.
6. Escurrir la mozarella, cortar en rodajas y colocar sobre
los tomates. Espolvorear con la albahaca.
7. Colocar la fuente sobre la tripode baja y cocinar en
COCCIÓN AUTOMÁTICA Y GRILL 1 (A1-1),
“Pescado Gratinado”.
8. Después de la cocción, dejar durante 5 minutos.
Preparación
1. Mezclar la carne picada con le cebolla picado, al
huevo y el pan rallado para obtener.
2. Mezclar el caldo de carne con el puré de tomates.
3. Añadir de patatas y zanahorias con el líquido a la
carne picado, mezclar.
4. Tapar y cocer en COCCIÓN AUTOMÁTICA (AC-2),
“Picadillo y Cebolla”.
5. Cuando se pare el horno ye suenen las señales,
remover y tapar de nuevo.
6. Volver a remover el plato y dejar reposar durante
unos 5 minutos. Servirlo con guarnición de perejil.
2. AG-71+72D-EU Spanish 14/12/2005 14:25 Page 67
Page 70

68
Recetas para cocción automática
GRATÉN (A1-2)
Gratén d’espinaca
Ingredientes
0,5 kg 1,0 kg 1,5 kg
150 g 300 g 450 g espinaca (descongelar y
escurrir)
15 g 30 g 45 g cebolla (bien picados)
sal, pimienta, nuez moscada
150 g 300 g 450 g patatas cocido (en rodajas)
35 g 75 g 110 g de jamón cocido (en dados)
50 g 100 g 150 g crème fraîche (nata)
1 2 3 huevo
40 g 75 g 115 g de queso (rollado)
Preparación
1. Mezclar conjuntamente las espinacas en hoja con la
cebolla y condimentar con sal, pimienta y nuez moscada.
2. Engraser el plato. Poner, alternado, capas de rodajas de
patatas, dados de jamón y espinica. La capa superior
debería ser de espinica.
3. Mezclar los huevo con la crème fraîche (nata),
condimentar la mezcla y verter sobre la verdura.
4. Espolvorear con el queso rallado.
5. Colocar en la tripode baja y cocer en COCCIÓN
AUTOMÁTICA Y GRILL 1 (A1-2), “Gratén”.
6. Después de la cocción, dejar durante 5 - 10 minutos.
Preparación
1. Engrasar el plato y colocar capas alternas de rodajas
de patatas y calabacín en el plato.
2. Mezclar los huevos con crème fraîche (nata),
condimentar con sal, pimienta, ajo y verter encima
las verduras.
3. Esparcirlo el queso Gouda sobre el gratén.
4. Finalmente rociar el gratén con pepitas de girasol.
5. Colocar en el soporte bajo y cocer en COCCIÓN
AUTOMÁTICA Y GRILL 1 (A1-2), “Gratén”.
6. Después de la cocción, dejar durante 5 - 10 minutos.
PESCADO GRATINADO (A1-1)
Fiete de pescado gratinado Esterhazy
Ingredientes
0,5 kg 1,0 kg 1,5 kg
230 g 450 g 680 g filetes de pescado
100 g 200 g 300 g puerros (en rodajas)
20 g 40 g 60 g cebella (bien picados)
40 g 100 g 140 g zanahoria (rallado)
10 g 10 g 20 g mantequilla o margarina
sal, pimienta y nuez moscada
1 tbsp 1
1
/
2
tbsp 2 tbsp zumo de limón
50 g 100 g 150 g crème fraîche (nata)
50 g 100 g 150 g queso Gouda (rallado)
Preparación
1. Poner las verduras, mantequilla y especias en una
cazuela y mesclar bien. Cocinar para 2-6 minutos a
900 W, depende de peso.
2. Lavar el pescado, secar, rociar con zumo de limón y sal.
3. Mezclar na crème fraîche (nata) con las verduras.
4. Poner la mitad de las verduras en una fuente
ovalada para gratinar. Colocar el pescado encima y
cubrir con las verduras restantes.
5. Espolvorear con el queso Gouda y colocar en la
tripode baja y cocer en COCCIÓN AUTOMÁTICA Y
GRILL 1 (A1-1), “Pescado Gratinado”.
6. Después de la cocción, dejar durante 5 minutos.
GRATÉN (A1-2)
Gratén de patatas y calabacin
Ingredientes
0,5 kg 1,0 kg 1,5 kg
200 g 400 g 600 g potatas cocido (en rodajas)
115 g 230 g 345 g calabacin (en rodajas fínas)
75 g 150 g 225 g crème fraîche (nata)
1 2 3 heuvo
1
/
2 1 2 diente de ajo (picado)
sal y pimienta
40 g 80 g 120 g queso Gouda (rallado)
10 g 20 g 30 g pepitas de girasol
Preparación
1. Cortar la carne y el jamón en dados de unos 2-3 cm
de tamaño.
2. Colocar alternando la carne y las hortalizas en los
cuatro pinchos de madera.
3. Mezclar removiendo el aceite con los condimentos y
untar los pinchos con la mezcla.
4. Darlos vuelta una vez transcurridos dos tercios del
tiempo indicado. La cocción:- COCCIÓN
AUTOMÁTICA Y GRILL 2 (A2-2), “Brochetas mixtas
de carne”.
BROCHETAS MIXTAS DE CARNE (A2-2)
Ingredientes
4 tostadas
400 g de filete de cerdo
100 g de jamón
2 cebollas (100 g) en cuartos
4 tomates (250 g) en cuartos
1
/2 pimiento verde (100 g), en 8 secciones
2 CuSop de aceite
4 Cdta. de pimentón
sal
1 Cdta. de pimienta de Cayena
1 Cdta. de salsa Worcester
2. AG-71+72D-EU Spanish 14/12/2005 14:25 Page 68
Page 71

69
E
Tablas de cocción
Bebida/alimento Cantidad Modo Potencia Tiempo Procedimiento
-g/ml- -ajuste- -min-
TABLA: CALENTAMIENTO DE BEBIDAS Y ALIMENTOS
Verdura Cantidad Modo Potencia Tiempo Procedimiento Adición de agua
-g- -ajuste- -min- -CuSop/ml-
TABLA: COCCIÓN DE VERDURAS FRESCAS
Café, 1 taza 150 900 W 1 unos Sin tapar
Leche, 1 taza* 150 900 W 1 unos Sin tapar
Agua, 1 taza 150 900 W 2 unos Sin tapar, hacer hervir
6 tazas 900 900 W 8-10 Sin tapar, hacer hervir
1 tazón 1000 900 W 9-11 Tapar, hacer hervir
Platos 500 900 W 4-6 Salpicar la salsa con poca agua, tapar,
remover en intervalos
Guisados / Sopa 200 900 W 1-2 Tapar, remover después de calentar
Verduras 200 900 W 2-3 Agregar un poco de agua, dado el caso, tapar, remover después
500 900 W 3-5 de transcurrida la mitad del tiempo de calentamiento
Guarniciones 200 900 W 2-3 Salpicar con poca agua, tapar,
500 900 W 4-5 remover en ciertos intervalos
Carne, 1 tajada* 200 900 W 3 unos Añadir con un poco de salsa, tapar
Filete de pescado* 200 900 W 3-5 Tapar
Tarta, 1 porción 150 450 W1/2-1 Poner en una rejilla para pasteles
Productos alimenticios 190 450 W1/2-1 Quitar la tapa, remover bien después de
para bebés, 1 vaso calentar, comprobar la temperatura
Derretir margarina o mantequilla*50 900 W
1
/
2
Tapar
Derretir chocolate 100 450 W 3-4 Remover en ciertos intervalos
Brécol 500 900 W 6-8 Cortar en varios trozos, tapar y remover ocasionalmente 4-5CuSop
Guisantes 500 900 W 6-8 Tapar, remover ocasionalmente 4-5CuSop
Cebolla 250 900 W 4-5 Entera, cocer en lámina apta para microondas Colinabo 500 900 W 9-11 Cortar en cuadraditos, tapar y remover ocasionalmente 4-5CuSop
Patatas cocidas 500 900 W 7-9 Cortar en trozos grandes e iguales, sazonar un poco, 150ml
(sazonadas) tapar y remover ocasionalmente
* a la temperatura del refrigerador
ABREVIATURAS EMPLEADAS
CuSop =
Cucharada sopera
Ctda. = Cucharadita
Tz = Taza
kg = Kilogramo
g = Gramo
l = Litro
ml = Mililitro
cm = Centímetro
min. = Minutos
TABLA: DESCONGELACIÓN DE ALIMENTOS
Alimento Cantidad Potencia Tiempo Procedimiento Tiempo de reposo
-en g- -ajuste- -en minutos- - en minutos -
Los tiempos indicados en esta tabla representan valores orientativos que pueden variar de acuerdo con la temperatura de
congelación, la naturaleza del alimento y su peso.
Puchero húngaro 500 8-9 270 W Separar y remover después de transcurrida la mitad
del tiempo de descongelación 10-15
Salchichas, 8 600 6-8 270 W Poner una al lado de la otra, darle vuelta después de 5-10
4 300 3-5 270 W transcurrida la mitad del tiempo de descongelación 5-10
Pata de pollo 200 3-4 270 W Darle vuelta después de transcurrida la mitad del 10-15
tiempo de descongelación
Filete de pescad 400 5-7 270 W Darle vuelta después de transcurrida la mitad del tiempo
de descongelación 5-10
Panecillos, 2 80 1-1
1
/2270 W Sólo descongelar parcialmente Pastel, 1 porción 150 1-3 270 W Poner en una rejilla de pasteles 5
Frutas, como fresas 250 3-5 270 W Distribuir uniformemente y darles vuelta después de 5
frambuesas, crezas, ciruelas transcurrida la mitad del tiempo de descongelación
2. AG-71+72D-EU Spanish 14/12/2005 14:25 Page 69
Page 72

70
Tablas de cocción
TABLA: DESCONGELACIÓN Y COCCIÓN DE ALIMENTOS
Filete de pescado 400 900 W 9-11 - tapar 1-2
Comida preparada 400 900 W 8-10 -
tapar, remover después de transcurrida la mitad del tiempo
2
Brécol 300 900 W 6-8 3-5
CuSop
tapar, remover después de transcurrida la mitad del tiempo
2
Guisantes 300 900 W 6-8 3-5
CuSop
tapar, remover después de transcurrida la mitad del tiempo
2
Verduras mixtas 500 900 W 9-11 3-5
CuSop
tapar, remover después de transcurrida la mitad del tiempo
2
Alimento Cantidad Potencia Tiempo
Adición de agua
Procedimiento Tiempo de reposo
-en g- -ajuste- -en minutos- -CuSop- -en minutos-
TABELL: TILLAGNING, GRILLNING Y FÄRGSÄTTNING
Food Quantity Setting Power Time Hints Standing time
-g- -Level- -Min- -Min-
Asado 500 450 W 5-8 Condimentar a gusto, ponerlo en el nivel inferior y 10
(cerdo, 450 W 6-8* darlo vuelta después de transcurridos (*)
ternera, cordero) 450 W 5-8
450 W 4-5
1000 450 W 16-18 10
450 W 5-7*
450 W 14-16
450 W 4-6
1500 450 W 26-28 10
450 W 5-8*
450 W 26-28
450 W 4-5
Roast beef, 1000 630 W 5-8 Condimentar a gusto, ponerlo en el nivel inferior con 10
medium 630 W 8-10* el lado graso hacia abajo y darlo vuelta después de
630 W 3-5 transcurridos (*)
1500 630 W 12-15 10
630 W 12-15*
630 W 4-6
Pollo 1200 900 W 9-11 Condimentar a gusto, ponerlo en el nivel inferior con la 3
630 W 5-7* pechuga hacia abajo, darlo vuelta después de transcurridos
900 W 9-11 (*). Colocar un recipiente hondo debajo del asado.
630 W 3-5
Pata de pollo 200 450 W 6-7* Condimentar a gusto, ponerlo en el nivel inferior con la 3
4-6 pechuga hacia abajo, darlo vuelta después de transcurridos
(*). Colocar un recipiente hondo debajo del asado.
Carne de rabadilla, 400 11-12* Poner en el nivel superior y darles vuelta después de (*),
2 piezas (medio) 6-8 condimentar después de asados
Platos gratinados 8-13 Poner el molde para gratinados en el nivel inferior. El tiempo
de cocción, depender de queso tipo
Tostadas de queso 1 tostada 450 W
1
/2 Tostar la rebanada de pan, untarla con mantequilla, poner
5-6 1 loncha de jamón, 1 rodaja de piña y 1 loncha de queso para
4 tostadas 450 W1/2-1 fundir; asar en el nivel superior
5-6
Pizza 300 450 W 4-6 Lugar en el tripode bajo.
450 W 4-6
400 450 W 6-7
450 W 5-7
2. AG-71+72D-EU Spanish 14/12/2005 14:25 Page 70
Page 73

71
E
Recetas
Todas las recetas contenidas en el presente libro se
entienden - si no se indica lo contrario - para 4
porciones.
ADAPTACION DE RECETAS
CONVENCIONALES PARA EL
MICROONDAS
Si Vd. quiere modificar recetas probadas para
adaptarlas al microondas, entonces debe observar lo
siguiente:
Reduzca los tiempos de cocción en un tercio hasta la
mitad. Oriéntese por las recetas indicadas en el
presente libro.
Alimentos con altos contenidos de líquido, como carne,
pescado, aves, verduras, frutas, guisados/estofados y
sopas, se pueden preparar sin problema alguno en el
horno de microondas. En el caso de alimentos con bajo
contenido de líquido, como platos ya preparados, se
debe mojar la superficie antes de calentar o cocerlos.
La adición de líquido a alimentos crudos a brasear se
debe reducir aproximadamente a dos tercios de la
cantidad de la receta original. Si es necesario se puede
agregar líquido durante la cocción.
La adición de materia grasa se puede reducir notablemente.
Una pequeña cantidad de mantequilla, margarina o
aceite es suficiente para darles sabor a los platos. Por lo
tanto, el horno de microondas es excelente para
preparar alimentos con poco contenido de grasa dentro
de un plan dietético.
Sopa de cebolla
Tiempo total de cocción: 14-17 minutos
Utensilios: fuente con tapa (volumen: 2 l)
4 tazas soperas (volumen: 200 ml c/u)
Ingredientes
1 CuSop de mantequilla o margarina (10-20 g)
2 cebollas (100 g) en rodajas
800 ml de caldo de carne
sal y pimienta
2 rebanadas de pan para tostar
4 CuSop de queso rallado (40 g)
1. Distribuir la mantequilla en la fuente. Añadir las
rodajas de cebolla, el caldo de carne y los condimentos;
cocer con la tapa puesta.
9-11 min. 900 W
2. Tostar las rebanadas del pan, cortarlas en dados y
distribuirlas en las tazas soperas. Verter la sopa sobre
éstos y poner el queso por encima.
3. Poner las tazas en el nivel superior para derretir el
queso.
6-7 min.
Champiñones rellenos al romero
Tiempo total de cocción: 10-17 minutos
Utensilios: fuente con tapa (volumen: 1 l)
fuente redonda llana con tapa
(unos 22 cm diámetro)
Ingredientes
8 champiñones grandes enteros (unos 225 g)
2 CuSop de mantequilla o margarina (20 g)
1 cebolla (50 g), bien picada
50 g de jamón crudo, bien troceado
pimienta negra molida,
romero desmenuzado
125 ml de vino blanco, seco
125 ml de nata
2 CuSop de harina (20 g)
1. Sacar tallos de los champiñones antes de cortarlos en
trozos pequeños. Cortar el jamón en pequeños dados.
2. Untar con la mantequilla el fondo de la fuente.
Agregar la cebolla, los trozos de jamón y tallos de los
champiñonesmtroceados, condimentar con pimienta y
romero, tapar y cocer.
3-5 min. 900 W
Dejar enfriar.
3. Calentar en la otra fuente 100 ml de vino y la nata.
1-3 min. 900 W
4. Mezclar el resto del vino con la harina, agregar la
mezcla revolviendo al líquido caliente, tapar y cocer.
Remover en ciertos intervalos.
unos. 1 min. 900 W
5. Rellenar los champiñones con la mezcla de jamón,
colocar en la salsa y dorarlos en el nivel superior.
6-8 min. 270 W
Terminada la cocción, dejar reposar los champiñones
durante 2 minutos aprox.
2. AG-71+72D-EU Spanish 14/12/2005 14:25 Page 71
Page 74

72
Recetas
Berenjenas rellenas con carne picada
Tiempo total de cocción: 17-22 minutos
Utensilios: fuente con tapa (volumen 1 l)
fuente llana y ovalada con tapa
(unos 30cm de longitud)
Ingredientes
2 berenjenas, sin tallo (cada una de unos
250 g)
sal
3 tomates (unos 200 g)
1 Cdta. de aceite de oliva para untar el molde
2 cebollas (100 g), picadas
4 pimientos verdes poco picantes
200 g de carne picada (de vaca o cordero)
2 dientes de ajo, machacados
2 CuSop de perejil, picado
sal y pimienta
pimentón
60 g de queso de oveja griego, en dados
Sugerencia: Las berenjenas se pueden sustituir por
calabacines.
1. Partir longitudinalmente las berenjenas en mitades. Sacar
la pulpa con una cucharita para que quede un borde de
aprox. 1 cm de espesor. Sazonar las berenjenas. Cortar la
pulpa en dados.
2. Pelar 2 tomates, sacar los rabillos y cortar en dados.
3. Untar el fondo de la fuente con el aceite de oliva,
agregar las cebollas picadas, tapar y rehogar ligeramente.
unos. 2 min. 900 W
4. Quitar los tallos de los pimientos, sacar los granos y
cortarlos en anillos. Reservar un tercio para la guarnición.
Mezclar la carne picada con los dados de berenjenas,
cebollas y tomates, los anillos de pimiento, los dientes de
ajo machacados y el perejil, condimentar.
5. Secar cuidadosamente las mitades de las berenjenas.
Rellenarlas con la mitad de la carne picada, repartir el
queso de oveja por encima, y distribuir sobre éste el
relleno restante.
6. Arregle las mitades de la berenjena en el plato engrasado
del ovenproof, coloque el plato en el estante y el
cocinero bajos.
11-13 min. 630 W
Adorne las mitades de la berenjena con los anillos de los
chiles y las rebanadas del tomate y continúe cocinando.
4-7 min. 630 W
Terminado el tiempo de cocción de las berenjenas
dejarlas reposar durante 2 minutos aprox.
Lonchas de ternera a la zurich
Tiempo total de cocción: 9-14 minutos
Utensilios: fuente con tapa (volumen 2 l)
Ingredientes
600 g de filete de ternera
1 CuSop de mantequilla o margarina
1 cebolla (50 g), bien picada
100 ml de vino blanco
espesante para salsas
para aprox. 1/2 l de salsa
300 ml de nata
1 CuSop de perejil, picado
1. Cortar el filete en tiras del grueso de un dedo.
2. Untar uniformemente la fuente con la mantequilla.
Poner la cebolla y la carne en la fuente, taparla y cocer.
Remover una vez durante la cocción.
6-9 min. 900 W
3. Agregar el vino blanco, el espesante para salsas y la
nata, remover y seguir cociendo el plato con la tapa
puesta. Remover ocasionalmente.
3-5 min. 900 W
4. Pruebe la comida, remueva de nuevo la mezcla y déjela
reposar unos 5 minutos. Servir decorada con perejil.
Filetes de lenguado
(2 porciones)
Tiempo total de cocción: 11-13 minutos
Utensilios: fuente llana y ovalada con tapa
(longitud: unos 26 cm)
Ingredientes
400 g de filetes de lenguado
1 limón entero
2 tomates (150 g)
1 Cdta. de mantequilla o margarina para untar
el molde
1 CuSop de aceite vegetal
1 CuSop de perejil, picado
sal y pimienta
4 CuSop de vino blanco (30 ml)
2 CuSop de mantequilla o margarina (20 g)
1. Lavar y secar cuidadosamente los filetes de
enguado. Quitar las espinas.
2. Cortar el limón y los tomates en rodajas finas.
3. Untar la fuente con la mantequilla, poner los filetes de
lenguado y mojar ligeramente con el aceite vegetal.
4. Esparcir el perejil sobre el pescado, cubrir con las
rodajas finas de tomate y condimentar. Las rodajas de
limón se colocan encima de las de tomate y se mojan
con el vino blanco.
5. Colocar copos de mantequilla sobre las rodajas del
limón, tapar y cocer.
11-13 min. 630 W
Terminada la cocción, los filetes de lenguado deben
reposar unos 2 minutos.
Sugerencia: Para preparar este plato, también se puede usar
eglefino, hipogloso, múgol, platija o bacalao.
2. AG-71+72D-EU Spanish 14/12/2005 14:25 Page 72
Page 75

73
E
Recetas
Truchas almendradas
Tiempo total de cocción: 16-19 minutos aprox.
Utensilios: fuente llana ovalada
(unos 32 cm de longitud)
Ingredientes
4 truchas (200 g c/u) listas para su
preparación
zumo de un limón
sal
30 g de mantequilla o margarina
5 CuSop de harina (50 g)
1 CuSop de mantequilla o margarina para untar
la fuente
50 g almendras en laminitas
1. Lavar las truchas, secarlas cuidadosamente y rociarlas
con el zumo de limón. Sazonar el pescado interior y
exteriormente y dejarlo reposar durante 15 minutos.
2. Derretir la mantequilla.
1 min. 900 W
3. Secar cuidadosamente el pescado y untarlo con la
mantequilla; pasarlo por la harina.
4. Untar la fuente, poner las truchas y cocinar en el nivel
inferior. Transcurridos dos tercios del tiempo indicado
se les dará vuelta y cubrirá con las almendra.
15-18 min. 450 W
Terminado el tiempo de cocción de las truchas
almendradas dejarlas reposar durante 2 minutos aprox.
Sugerencia: Se sirven acompañadas de patatas al perejil y
ensalada de lechuga.
Jamón relleno
Tiempo total de cocción:13-18 minutos
Utensilios: fuente con tapa (volumen 2 l)
fuente llana ovalada con tapa
(longitud: unos 26 cm)
Ingredientes
150 g de espinaca, sin tallos
150 g de requesón, 20 % de mat. grasa
50 g de queso suizo rallado
pimienta
pimentón
8 lonjas de jamón cocido (400 g)
125 ml de agua
125 ml de nata
2 CuSop de harina (20 g)
2 CuSop mantequilla o margarina (20 g)
1 Cdta. de mantequilla o margarina para untar
el molde
1. Cortar la espinaca finamente y mezclarla con el
requesón y el queso suizo, condimentar a gusto.
2. Colocar en cada loncha de jamón cocido una
cucharada sopera de relleno y enrollar. Fijar los rollitos
con pinchos de madera.
3. Preparar una salsa bechamel. Para ello poner el líquido
en la fuente, tapar y calentar.
2-4 min. 900 W
Amasar la mantequilla con la harina, poner en el
líquido y remover con el batidor de mano hasta
obtener una mezcla homogénea. Tapar, darle un hervor
y dejar espesar.
1-2 min. 900 W
Revolver y condimentar.
4. Verter la salsa en el molde untado, colocar los rollitos,
tapar y cocer.
10-12 min. 630 W
Dejar reposar los rollitos de jamón durante 5 minutos,
una vez terminada la cocción.
Sugerencia: También puede emplear la salsa bechamel
disponible en el mercado.
Filete de pescado con salsa de queso
Tiempo total de cocción: 21-25 minutos aprox.
Utensilios: fuente con tapa (volumen: 1 l)
fuente llana y ovalada
(unos 25 cm de longitud)
Ingredientes
4 filetes de pescado (unos 800 g)
(p.ej. trucha, platija o bacalao)
2 CuSop de zumo de limón
sal
1 CuSop de mantequilla o margarina
1 cebolla (50 g), bien picada
2 CuSop de harina (20 g)
100 ml de vino blanco
1 Cdta. de aceite vegetal para untar la fuente
100 g de queso suizo rallado
2 CuSop de perejil picado
1. Lavar los filetes, secarlos cuidadosamente y rociarlos
con el zumo de limón. Dejarlos reposar unos 15
minutos, volver a secarlos y sazonarlos.
2. Esparcir la mantequilla en el fondo de la fuente.
Agregar la cebolla picada y rehogar ligeramente con la
tapa puesta.
1-2 min. 900 W
3. Echar la harina sobre la cebolla picada y mezclar
revolviendo. Agregar el vino blanco y mezclar todo.
4. Untar la fuente ovalada y poner los filetes. Verter la
salsa sobre los filetes y esparcir el queso por encima.
Poner en el nivel inferior y cocinar.
1. 7-8 min. 450 W
2. 14-16 min. 450 W
Terminado el tiempo de cocción dejar reposar los
filetes durante 2 minutos aprox. Adornar los filetes de
pescado con el perejil picado y servirlos.
2. AG-71+72D-EU Spanish 14/12/2005 14:25 Page 73
Page 76

74
Recetas
Escalope de ternera con queso
“Mozzarella”
Tiempo total de cocción: 24-31 minutos aprox.
Utensilios: fuente rectangular llana con tapa
(unos 25 cm de longitud)
Ingredientes
2 quesos “Mozzarella” (150 g c/u)
500 g de tomates pelados en conserva
4 escalopes de ternera (600 g)
20 ml de aceite de oliva
2 dientes de ajo, cortados en láminas
pimienta recién molida
2 CuSop de alcaparras (20 g)
orégano y sal
1. Cortar el queso “Mozzarella” en láminas. Hacer puré los
tomates utilizando la batidora de mano.
2. Lavar los escalopes, secarlos cuidadosamente y
achatarlos golpeando. Distribuir el aceite y el ajo en la
fuente. Poner los escalopes y distribuir el puré de
tomates por encima. Añadir la pimienta, alcaparras y
orégano y cocinarlos con la tapa puesta.
15-19 min. 630 W
Dar vuelta los escalopes.
3. Poner en cada escalope unas lonchas de queso,
sazonarlos y dorarlos en el nivel superior sin poner la
tapa.
9-12 min. 630 W
Terminada la cocción, dejar reposar los escalopes
durante 5 minutos aprox.
Sugerencia: Se puede acompañar con spaghetti y una
ensalada fresca.
Pollito relleno
(2 porciones)
Tiempo total de cocción: 36-40 minutos
Utensilios: fuente (volumen 2 l), hilo de cocinar
Ingredientes
1 pollo entero (1000 g)
sal
romero & mejorana desmenuzada
1 panecillo duro (40 g)
1 manojo de perejil, bien picado (10 g)
nuez moscada
5 CuSop de mantequilla o margarina (50 g)
1 yema de huevo
1 CuSop de pimentón
1 Cdta. de mantequilla o margarina para untar
la fuente
1. Lavar y secar cuidadosamente el pollo, condimentarlo
en su interior con sal, romero y mejorana.
2. Para el relleno, remojar el panecillo unos 10 minutos
en agua fría, estrujarlo después. Mezclarlo con sal,
perejil, nuez moscada, mantequilla y la yema de huevo,
y rellenar el pollo. Coser la abertura con hilo o
bramante de carnicero.
3. Derretir la mantequilla.
unos. 1 min. 900 W
Mezclar la mantequilla con el pimentón y la sal y untar
el pollo.
4. Cocer el pollo en la fuente untada sin taparla. Darle
vuelta ocasionalmente transcurrida la mitad del
tiempo de cocción.
35-39 min. 630 W
Después de cocinar dejar que el pollo relleno repose
durante unos 3 minutos.
Calabacines y pasta al horno
Tiempo total de cocción: 37-44 minutos aprox.
Utensilios: fuente con tapa (volumen: 2 l)
fuente para horno
(unos 26 cm de longitud)
Ingredientes
500 ml de agua
1
/
2 Cdta. de aceite
80 g de macarrones
400 g de tomates en conserva, troceados
3 cebollas (150 g)
albahaca bien picada
tomillo, pimienta, sal
1 CuSop de aceite para untar el molde
450 g de calabacines cortados en rodajas
150 g de nata amarga
2 huevos
100 g de queso “Cheddar” rallado
1. Poner el agua, el aceite y la sal en la fuente y hervir
con la tapa puesta.
3-4 min. 900 W
2. Romper los macarrones en trozos, añadirlos al líquido,
remover y dejar que hiervan lentamente.
9 -11 min. 270 W
Escurrir las pasta y dejar enfriar.
3. Mezclar los tomates con las cebollas y condimentar
bien. Untar el molde para soufflés. Echar los
macarrones y verter la salsa de tomates por encima.
Los calabacines en rodajas se distribuyen por encima.
4. Batir la nata con los huevos y verter sobre la mezcla.
Espolvorear el queso rallado por encima y cocer en el
nivel inferior.
1.18-21 min. 900 W
2. 7-8 min. 630 W
Terminada la cocción, dejar reposar el plato durante 510 minutos aprox.
2. AG-71+72D-EU Spanish 14/12/2005 14:25 Page 74
Page 77

75
E
Recetas
Albóndigas de pan
5 albóndigas
Tiempo total de cocción: 8-11 minutos
Utensilios: fuente con tapa (volumen 1 l)
5 tazas o moldecitos de flan
Ingredientes
2 CuSop de mantequilla o margarina (20 g)
1 cebolla (50 g), bien picada
unos 500 ml de leche
200 g de panecillos duros cortados en dados
(unos 5 panecillos)
3 huevos
1. Distribuir la mantequilla en el fondo de la fuente,
agregar la cebolla, tapar y rehogar.
2. Agregar la leche y volver a calentar.
1-2 min. 900 W
3. Cortar los panecillos en pequeños dados y verter la
mezcla de leche por encima. Batir los huevos, añadirlos
y mezclar revolviendo todo bien hasta que se produzca
una masa blanda.
Añadir más leche si fuera necesario.
4. Repartir la masa en las 5 tazas o moldecitos, cubrir con
lámina para microondas, disponer cerca del borde del
plato giratorio del horno y cocer.
6-8 min. 900 W
Terminada la cocción, dejar reposar las albóndigas dos
minutos. Antes de servirlas, desmoldear las albóndigas
sobre un plato.
Lasaña al horno
Tiempo total de cocción: 18-25 minutos
Utensilios: fuente con tapa (volumen 2 l)
fuente cuadrada llana con tapa
(unos 20x20x6 cm)
Ingredientes
300 g de tomates de lata
50 g de jamón crudo, en dados finos
1 cebolla (50 g), bien picada
1 diente de ajo, machacado
250 g de carne picada de vaca
2 CuSop de pulpa de tomate (30 g)
sal y pimienta, orégano, tomillo & albahaca
150 ml de nata (Cräme fraåche)
100 ml de leche
50 g de queso parmesano rallado
1 Cdta. de hierbas mixtas picadas
1 Cdta. de aceite de oliva
nuez moscada
1 Cdta. de aceite vegetal para untar la fuente
125 g de láminas de lasaña verde
1 CuSop de queso parmesano rallado
1 CuSop de mantequilla o margarina
1. Cortar los tomates en rodajas y mezclarlos con el
jamón, cebolla, ajo, carne picada y la pulpa de tomate,
condimentar, tapar y rehogar.
5-8 min. 900 W
2. Mezclar la nata y la leche con el queso parmesano, las
hierbas y el aceite; condimentar esta mezcla.
3. Untar la fuente cuadrada y poner un tercio de la pasta
en su fondo. Poner la mitad de la carne picada sobre la
pasta y mojar con un poco de la salsa. Encima de la
carne se coloca otra capa de pasta, seguida de mezcla
de carne y de salsa, poniendo el resto de la pasta por
encima como capa final.
Cubrirlo todo con mucha salsa y el queso parmesano.
Se adorna con copos de mantequilla; tapar y cocer.
13-17 min. 630 W
Terminada la cocción dejar reposar la lasaña de 5-10
minutos.
Tagliatelle a la nata y albahaca
(2 porciones)
Tiempo total de cocción: 16-22 minutos
Utensilios: fuente con tapa (volumen 2 l)
fuente redonda para soufflé
(unos 20 cm de diámetro)
Ingredientes
1 l de agua
1 Cdta. de sal
200 g de tagliatelle (tallarines)
1 diente de ajo
15 - 20 hojas de albahaca
200 g de nata (Cräme fraåche)
30 g de queso parmesano rallado
sal y pimienta
1. Poner agua salada en la fuente, tapar y hervir.
9-11 min. 900 W
2. Agregar los tallarines, volver a iniciar la cocción y dejar
cocer lentamente.
1. 1-2 min. 900 W
2. 6-9 min. 270 W
3. En el interín untar el molde para soufflé con el diente
de ajo y picar las hojas de albahaca. Guardar un poco
de la albahaca para la guarnición posterior.
4. Escurrir bien los tallarines y mezclarlos con la nata y la
albahaca distribuida por encima.
5. Agregar el queso parmesano, sal y pimienta, poner en
el molde para soufflé y remover. Adornar el plato con
guarnición de albahaca y servirlo en caliente.
2. AG-71+72D-EU Spanish 14/12/2005 14:25 Page 75
Page 78

76
Recetas
Peras al chocolate
Tiempo total de cocción: 8-13 minutos
Utensilios: fuente con tapa (volumen 2 l)
fuente con tapa (volumen 1 l)
Ingredientes
4 peras (600 g)
60 g de azúcar
1 bolsita de azúcar de vainilla (10 g)
1 CuSop de licor de peras (de 270 W en volumen)
150 ml de agua
130 g de chocolate amargo
100 g de nata (Cräme fraåche)
Sugerencia: Se puede acompañar con helado de vainilla.
1. Pelar las peras enteras.
2. Poner el azúcar, el azúcar de vainilla, el licor y el agua
en la fuente (más grande), mezclar removiendo, tapar y
calentar.
1-2 min. 900 W
3. Colocar las peras en este líquido, tapar y cocer.
5-8 min. 900 W
Sacar las peras del líquido y dejarlas enfriar en un
lugar frío.
4. Echar 50 ml de este líquido de las peras en la fuente
menor. Agregar el chocolate cortado en trozos
pequeños y la nata. Tapar y calentar.
2-3 min. 900 W
5. Remover bien la salsa y verterla sobre las peras, servir.
Ponche
(10 porciones)
Tiempo total de cocción: 8-10 minutos
Utensilios: fuente con tapa (volumen 2 l)
Ingredientes
500 ml de vino blanco
500 ml de vino tinto, seco
500 ml de ron, de 54 % en volumen
1 naranja entera
3 barritas de canela
75 g de azúcar
10 Cdtas azúcar almibarada
1. Primero echar el alcohol en la fuente. Sacar una
cáscara delgada de la naranja y poner esta cáscara en
el alcohol, junto con la canela y el azúcar. Tapar y
calentar el ponche.
8-10 min. 900 W
2. Sacar la cáscara de naranja y la canela. Poner una
cucharadita de azúcar almibarada en vasos para
"grog", rellenar con el ponche y servir.
Jalea de bayas con salsa de vainilla
Tiempo total de cocción: 8-12 minutos
Utensilios: fuente con tapa (volumen 2 l)
Ingredientes
150 g de grosellas, limpias y sin tallo
150 g de fresas, limpias y sin tallo
150 g de frambuesas, limpias y sin tallo
250 ml de vino blanco
100 g de azúcar
50 ml de zumo de limón
8 hojas de gelatina
300 ml de leche
Pulpa de 1/2 vaina de vainilla
30 g de azúcar
15 g de fécula (espesante de alimentos)
Sugerencia: La jalea de frutas se puede acompañar muy
bien con nata fría o yogur.
1. Lavar las frutas, quitar los tallos y secarlas
cuidadosamente. Retener algunas frutas para usarlas
de guarnición. Hacer un puré con las frutas restantes
junto con el vino blanco; poner el puré en la fuente,
tapar y calentar.
5-7 min. 900 W
Agregar revolviendo el azúcar y el zumo de limón.
2. Remojar la gelatina unos 10 minutos en agua fría,
sacarla ocasionalmente transcurrido ese lapso de
tiempo y estrujarla. Mezclar revolviendo la gelatina
con el puré caliente de frutas hasta que se disuelva.
Poner la jalea en el frigorífico para que adquiera
consistencia.
3. Para la salsa de vainilla: Poner la leche en la otra
fuente, abrir la vaina de vainilla y sacar la pulpa.
Mezclar revolviendo esta pulpa, el azúcar y la fécula
con la leche, tapar y cocer. Remover durante la cocción
y también al final.
3-5 min. 900 W
4. Desmoldear la jalea sobre un plato y adornar con las
frutas enteras retenidas. Servir con la salsa de vainilla.
2. AG-71+72D-EU Spanish 14/12/2005 14:25 Page 76
Page 79

77
E
Recetas
Chocolate con nata
(1 porción)
Tiempo total de cocción: 1 minuto
Utensilios: taza grande (volumen: 200 ml)
Ingredientes
150 ml de leche
30 g de chocolate de taza amargo rallado
30 ml de nata
Fideos de chocolate para decoración
1. Verter la leche en la taza. Añadir el chocolate, revolver
y calentar. Volver a remover una vez mientras se
calienta.
unos. 1 min. 900 W
2. Batir la nata hasta montarla, ponerla sobre el
chocolate y adornar con guarnición de fideos de
chocolate; servir.
Budín de sémola con salsa de
frambuesas
Tiempo total de cocción: unos 15-20 minutos
Utensilios: fuente con tapa (volumen 2 l)
Ingredientes
500 ml de leche
40 g de azúcar
15 g de almendras picadas
50 g de sémola
1 yema de huevo
1 CuSop de agua
1 clara de huevo
250 g de frambuesas
50 ml de agua
40 g de azúcar
1. Poner la leche, azúcar y almendras en la fuente, tapar y
calentar.
3-5 min. 900 W
2. Añadir la sémola, remover, tapar y cocer.
10-12 min. 270 W
3. En una taza batir la yema de huevo con una cucharada
sopera de agua y agregarla a la mezcla caliente
revolviendo. Batir la clara de huevo hasta montarla y
añadirla a la mezcla. Poner el budín de sémola en
moldecitos.
4. Para la salsa: Lavar y secar cuidadosamente las
frambuesas y ponerlas, junto con agua y azúcar, en
una fuente; tapar y calentar.
2-3 min. 900 W
5. Preparar un puré con las frambuesas que, con el budín
de sémola, se puede servir tanto frío o caliente.
Tarta de queso
(12 porciones)
Tiempo total de cocción: 21-27 minutos
Utensilios: molde redondo (unos 26cm de diámetro)
Ingredientes
300 g de harina
1 CuSop de cacao
3 Cdtas de levadura en polvo (9 g)
150 g de azúcar
1 huevo
150 g de mantequilla o margarina
1 Cdta de mantequilla o margarina para untar
el molde
100 g de mantequilla o margarina
100 g de azúcar
1 bolsita de azúcar de vainilla (10 g)
3 huevos
400 g de requesón, 20P de mat. grasa
1 bolsita de polvo para flan, sabor de
vainilla (40 g)
1. Mezclar la harina con el cacao y la levadura en polvo,
agregar el azúcar, el huevo y la mantequilla; amasar
todo bien usando los accesorios amasadores de la
batidora de mano.
2. Untar el molde y llenarlo con aprox. 2/3 de la masa
que se aplica bien sobre el fondo. Subir un borde de 2
cm de altura y prehornear dicha masa.
6-8 min. 630 W
3. Para el relleno: Batir la mantequilla con el batidor de
mano, agregar el azúcar y gradualmente añadir los
huevos. Al final mezclar revolviendo el requesón y el
polvo para flan.
4. Distribuir el requesón preparado sobre la base
prehorneada seguido del resto de la masa y hornear.
15-19 min. 630 W
2. AG-71+72D-EU Spanish 14/12/2005 14:25 Page 77
Page 80

Cuidado y limpieza
78
PRECAUCIÓN: NO UTILICE PRODUCTOS COMERCIALES
PARA LA LIMPIEZA DE HORNOS, APARATOS DE
LIMPIEZA A VAPOR, PRODUCTOS ABRASIVOS,
PRODUCTOS FUERTES, NINGÚN PRODUCTO QUE
CONTENGA HIDRÓXIDO DE SODIO NI ESTROPAJOS
PARA LIMPIAR NINGUNA PARTE DEL HORNO.
LIMPIE EL HORNO EN LOS INTERVALOS REGULARES
Y QUITE CUALQUIER DEPÓSITO DEL ALIMENTO. Si el
horno no se mantiene limpio podría deteriorarse su
superficie, lo que podría perjudicar a la vida útil del
aparato así como provocar una situación peligrosa.
Exterior del horno
El exterior de su horno puede limpiarse fácilmente con
jabón suave y agua. No se olvide de eliminar el jabón
con un paño y de secar el exterior del horno con una
toalla suave.
Panel de mandos
Abra la puerta antes de limpiar para que se desactive el
panel de mandos. Hay que tener cuidado al limpiar el
panel de mandos. Utilizando un paño humedecido
solamente en agua, y páselo suavemente por el panel
hasta que éste quede limpio. No emplee ningún
producto de limpieza químico o abrasivo.
Interior del horno
1. Para limpiar el horno, quite las partes de comida
derramada y las salpicaduras con un paño
humedecido o con una esponja, después de usarlo y
mientras está todavía caliente. Para limpiar las
salpicaduras o manchas más grandes, utilice jabón
suave y quítelas frotando varias veces con un paño
humedecido hasta que desaparezcan por completo.
2. Tenga cuidado de que el jabón o el agua no se
introduzca por los pequeños orificios de las paredes
porque el horno podría sufrir daños.
3. No utilice productos pulverizadores de limpieza en el
interior del horno.
4. Caliente regularmente el horno haciendo uso de la
parrilla, vea la nota 2 de la página 59. Los restos de
comida o las salpicaduras de grasa pueden producir
humo o mal olor.
Plato giratorio y soporte del rodillo
Retire primero el plato giratorio y el soporte del rodillo
del horno. Lave después tanto el plato giratorio como el
soporte del rodillo en agua jabonosa y séquelos con un
paño seco. Tanto el plato giratorio como el soporte del
rodillo pueden lavarse también en un lavaplatos.
Puerta
Limpie frecuentemente la puerta, los sellos de la puerta,
zanas adyacentes y los dos lados de la ventana con un
paño húmedo para limpiar los alimentos derramados o
las salpicaduras.
Rejillas
Deben lavarse con una solución jabonosa suave y
secarse. Puede lavarlas también en el lavaplatas.
NOTA: No deben utilizarse aparatos de limpieza a vapor.
2. AG-71+72D-EU Spanish 14/12/2005 14:25 Page 78
Page 81

79
E
NOTA: Sacar la taza del horno y abrir la puerta. Si cocina el alimento pasándose del tiempo normal usando sólo el
mismo modo de cocción, la potencia del horno disminuirá automáticamente para evitar un
sobrecalentamiento. (El nivel de potencia del microondas se reducirá y las resistencias (grills) se encenderán
y apagarán.) Tras una pausa de 90 segundos, puede volver a seleccionarse el nivel alto de potencia.
¿Qué hacer si...
... el aparato microondas no funciona
correctamente?
Cerciórese de que
- funcionen los fusibles de la caja de fusibles,
- no haya habido algún corte de energía.
- Si se siguen fundiendo los fusibles, póngase
en contacto con un electricista cualificado.
... el modo microondas no funciona?
Cerciórese de que
- la puerta esté bien cerrada,
- el cierre hermético de la puerta y sus
superficies estén limpios,
- se haya pulsado el botón START/QUICK.
... el plato giratorio no gira?
Cerciórese de que
- el soporte del plato giratorio esté
correctamente enganchado al mecanismo
impulsor,
- el recipiente colocado en el interior no
sobresalga del plato giratorio,
- los alimentos no sobresalgan del borde del
plato giratorio impidiendo que gire.
- no haya ningún objeto en el hueco bajo el
plato giratorio.
... el microondas no se apaga?
- Aísle el aparato de la caja de fusibles.
- Póngase en contacto con un agente
autorizado de servicio de AEG-Electrolux.
... la iluminación interior no funciona?
- Llame a un agente autorizado de servicio de
AEG-Electrolux. La bombilla interior solo
puede ser sustituida por un agente
autorizado de servicio de AEG-Electrolux.
... los alimentos tardan más de lo normal en
calentarse por completo y cocinarse?
- Aumente el tiempo de cocción (a cantidad
doble, casi el doble de tiempo) o
- si los alimentos están más fríos que de
costumbre, gírelos o deles la vuelta de vez en
cuando o
- aumente el nivel de potencia.
Modo de cocción
900 W de microondas
Grill
Grill combinado
Tiempo normal
20 minutos
30 minutos
Grill - 30 minutos
Potencia reducida
630 W de microondas
Grill - 50 %
Grill - 50 %
2. AG-71+72D-EU Spanish 14/12/2005 14:25 Page 79
Page 82

80
Certificado de garantía,
Estimado Usuario :
Queremos felicitarle por su compra y agradecerle la confianza depositada en nuestra Compañía.
Su electrodoméstico dispone de una garantía de 24 meses para piezas, mano de obra y
desplazamiento.
Para poder beneficiarse de este garantía NO OLVIDE REGISTRAR SU ELECTRODOMÉSTICO:
a) Cumplimente el Certificado de Compra adjunto y envíelo dentro de los 0 días siguientes a la fecha de
la compra o
b) Regístrese por teléfono, Ilamando al
☎
902 11 76 93 Registro y Ampliación de Garantía
En caso de avería, póngase en contacto con el servicio Técnico Oficial
☎
902 11 63 88 SERVICIO TÉCNICO OFICIAL
... Contrate el Plan de Ampliación de Garantia
El Plan de Ampliación de Garantía prolonga hasta 5 años la protección y ventajas que le ofrece el Grupo
Electrolux nos seusen su producto. VD. NO TENDRÁ QUE PAGAR LA FACTURA en caso de avería, ni
preocuparse por reclamaciones. Domestic & General protegerá sus intereses.
¿Qué beneficios le ofrece?
Tranquilidad garantizada y seguridad total durante el período de cobertura.
Cobertura completa: mano de obra, piezas, componentes y desplazamiento.
Sin límite en el número de reparaciones.
Atención especializada por Técnicos Oficiales del Grupo Electrolux.
Posibilidad de renovación una vez terminado el período de cobertura.
Cuánto cuesta el Plan de Ampliación de Garantía?
Este plan le protegerá durante 3 años adicionales, a la garantía del fabricante por sólo:
Si su electrodoméstico es una LAVADORA,
LAVAVAJILLAS, LAVADORA-SECADORA.
79 €
Si su electrodoméstico es una SECADORA, FRIGORÍFICO,
MICROONDAS, ASPIRADORA, CAMPANA, COCINA,
HORNO, COMBI, CONGELADOR, ENCIMERA.
49 €
Tarifas válidas hasta el 31 Diciembre de 2005. Posteriormente, Ud. deberá validar nuevas tarifas poniéndose en
contacto con el teléfono 902 11 76 93.
2. AG-71+72D-EU Spanish 14/12/2005 14:25 Page 80
Page 83

Solicitud del Plan de Ampliación de Garantía
ENVIAR
DATOS PERSONALES (Por favor, rellene estos datos en letra de imprenta) Certificado de Compra
NÚMERO DE PRODUCTO
MODELO
NÚMERO DE SERIE
TIPO DE APARATO
FECHA DE COMPRA
PRECIO DE COMPRA
El presente Certificado de Garantía se compone de dos partes, separadas por la línea punteada. Tras haberlo cumplimentado, el usuario deberá ENVIAR Esta
parte al Centro de Recepción de Garantías para su registro DENTRO DE LOS 30 DÍAS SIGUIENTES A LA FECHA DE COMPRA. Si lo prefiere, también puede
registrar por teléfono Ilamando al 902 11 76 93.
El Garantizado queda enterado que los datos que se recogen son necesarios para registrar su GarantÍa. La confidencialidad de esta información está protegida
por la Ley. En caso de no estar de acuerdo en que estos datos sean cedidos a otras empresas para el envió de ofertas promocionales u otras, deberá señalarlo
marcando con una cruz el espacio reservado para ello.
Nombre y
Apellidos:
Dirección:
Código
Postal: Población:
Provincia: Teléfono:
Móvil:
Sí, deseo contratar el Plan de Ampliación:
Rellene esta solicitud y envíela a la dirección siguiente (sin sello): Respuesta Comercial - F.D. Autorización n°14.773 - B.O. de Correos N°31 de 27/03/96
Electrolux Service - Recepción de Garantías - Apartado n°4 FD - 28800 Alcalá de Henares - Madrid ESPAÑA, o bien
Llampe directamente a nuestra Línea de Atención al Cliente
al teléfono 902 11 76 93.
Formas de pago:
Tipo de Aparato:
Cheque: Deberá enviar, junto con esta solicitud, un cheque nominativo a favor de Domestic & General al Apartado de Correos 36.355, 28080 Madrid
DECLARACIÓN: Por la presente, solicito de DOMESTIC & GENERAL un Plan de Seguros, de acuerdo con los términos y condiciones de la
Póliza. Declaro que el aparato está en buenas condiciones de funcionamiento y es utilizado únicamente para uso doméstico.
Tarjeta de Crédito
Domiciliación
Bancaria:
Banco/
Caja:
N° de cuenta:
Entidad Oficina D.C. Número de Cuenta
Titular:
Visa
Mastercard Nº Tarjeta: Caducidad:
Fecha: . . . . . . . . . . . . . . . . . . . . .
Firma: . . . . . . . . . . . . . . . . . . . . .
☎
✁
✁
2. AG-71+72D-EU Spanish 14/12/2005 14:25 Page 81
Page 84

Conservar durante toda la vigencia de la
garantía la factura de compra
Condiciones de Garantía:
ELECTROLUX HOME PRODUCTS ESPAÑA, S.A. garantiza al usuario del aparato cuyos datos de identificación
figuran en el presente documento, durante el plazo de dos (2) años desde la fecha de su entrega, la reparación
totalmente gratuita de las averías que experimente el aparato, incluyendo la presente garantía tanto el coste de las
piezas de recambio como el de la mano de obra y, en su caso, el del desplazamiento del personal técnico del Servicio
Oficial de la Marca al domicilio del usuario.
En el supuesto de que el producto, por su tamaño y movilidad, fuera susceptible de ser trasportado por el usuario al
Taller Oficial de la Marca, éste quedará liberado de la obligación de trasladar su personal técnico al domicilio del
usuario.
Para hacer uso del derecho de garantía aquí reconocido, será requisito necesario que el aparato se destine al uso
privado. También será necesario presentar al personal técnico de la marca, antes de su intervención, la factura o
ticket de compra del aparato o el albarán de entrega correspondiente si éste fuera posterior, en unión del presente
documento. La garantía quedará sin efecto en los casos de averías producidas como consecuencia de:
• Fuerza mayor (fenómenos atmosféricos, geológicos, etc.).
• Instalación y/o conexión incorrectas o no reglamentarias (voltaje, presión de gas o agua, conexión eléctrica o
hidráulica no adecuadas, nivelación inadecuada del aparato).
• Intervención de personal técnico no autorizado o no perteneciente al Servicio Oficial de la marca.
• Manipulación de los datos que figuren en factura, ticket de compra o albarán de entrega del aparato o en este
documento.
• Uso no acorde con las instrucciones del fabricante.
Esta garantía no cubre las aperaciones de mantenimiento periódico del producto (limpieza de filtros,
condensadores, etc.).
Se informa al usuario que, además de la garantía reconocida en este documento, tiene la protección que le concede
la Ley respecto a la necesidad de que el bien adquirido sea conforme con el contrato de compraventa, pudiendo
reclamar al vendedor, en caso de disconformidad, por las faltas que se pongan de manifiesto en el plazo de dos (2)
años desde la entrega. En ese supuesto, tendrá derecho a solicitar la reparación gratuita del bien o a la sustitución
de éste, salvo que una de esas opciones resulte imposible o desproporcionada.
ELECTROLUX HOME PRODUCTS ESPAÑA, S.A. Sociedad Unipersonal
Méndez Alvaro, 20 - 28045 MADRID - CIF A08145872
Condiciones del Plan de Ampliación de Garantía:
El Plan de Ampliación de Garantía es válido para electrodomésticos nuevos y es aplicable dentro de los 30 días
siguientes a la fecha de compra.
La cobertura no es transferible a terceras partes sin el consentimiento por escrito del Asegurador.
El plan cubre electrodomésticos destinados a uso doméstico solamente.
Un ejemplar del Certificado dando detalles completos de las exclusiones y condiciones puede ser obtenido bajo
petición. El usuario deberá mantener copias de cualquier correspondencia relativa a esta propuesta. Una copia de la
propuesta está disponible hasta tres meses después de su implementación. La contratación de un Plan de
Ampliación de Garantía no limita su protección bajo la garantía del fabricante, ni afecta sus derechos.
El Plan de Ampliación de Garantía está asegurado por Domestic & General Insurance. Sucursal en España,
C/Orense, 16 2° E 28020 Madrid.
82
2. AG-71+72D-EU Spanish 14/12/2005 14:25 Page 82
Page 85

83
E
Especificaciones
Tensión de CA
Fusible/disyuntor de fase
Requisitos potencia de CA: Microondas
Grill
Microondas/Grill
Potencia de salida: Microondas
Grill
Frecuencia microondas
Dimensiones exteriores: MCD2660E
MCD2661E
Dimensiones interiores
Capacidad del horno
Plato giratorio
Peso
Lámpara del horno
: 230 V, 50 Hz, monofásico
: 16 A como mínimo
: 1.37 kW
: 1.00 kW
: 2.35 kW
: 900 W (IEC 60705)
: 1000 W
: 2450 MHz * (Grupo 2 / Clase B)
: 592 mm (W) x 460 mm (H) x 437 mm (D)
: 592 mm (W) x 388 mm (H) x 437 mm (D)
: 342 mm (W) x 207 mm (H) x 368 mm (D) **
: 26 litros **
: ø 325 mm, vidrio
: aprox. 20 kg
: 25 W/240 - 250 V
Información importante
Desechar los materiales de embalaje y los aparatos viejos de un
modo responsable con el medio ambiente
Material de embalaje
Los hornos microondas AEG-Electrolux vienen eficazmente embalados para protegerlos durante el transporte.
Solo se utiliza el embalaje imprescindible.
Los materiales de embalaje (p. ej. papel metalizado o espuma de estireno) pueden suponer un riesgo para
los niños.
Peligro de asfixia. Mantenga el material de embalaje fuera del alcance de los niños.
Todos los materiales de embalaje que se utilizan respetan el medio ambiente y pueden reciclarse. El cartón
se fabrica con papel reciclado y las piezas de madera están sin tratar. Los elementos de plástico están
señalados del modo siguiente:
«PE» polietileno, p.ej. cinta de embalaje
«PS» poliestireno, p.ej. embalaje (sin CFC)
«PP» polipropileno, p.ej. correas de embalaje
Al utilizar y reutilizar el embalaje, se ahorra materia prima y se reduce el volumen de desechos.
Debe llevar el embalaje al centro de reciclaje más cercano.
Póngase en contacto con su ayuntamiento para obtener información.
Desechar aparatos viejos
Antes de desechar aparatos viejos, debe cerciorarse de que quedan seguros quitando el enchufe, cortando
y tirando el cable de alimentación.
A continuación, debe llevarse al centro de reciclaje más cercano. Consulte a su ayuntamiento o a su
Oficina del Medio Ambiente para comprobar si en su localidad hay un servicio para reciclar el aparato.
* Este Producto cumple el requisito de la norma europea EN55011.
De acuerdo con dicha norma, este producto está clasificado como equipamiento del grupo 2, clase B.
El grupo 2 significa que el equipamiento genera intencionadamente energía por radiofrecuencia en forma de
radiación electromagnética para el tratamiento por calentamiento de alimentos.
La clase B significa que el equipamiento resulta adecuado para su uso en establecimientos domésticos.
** La capacidad interna calculada mejorando el largo, la profundidad y la altura máxima.
La capacidad efectiva de los recipientes para los alimentos es menor.
Este horno cumple con las exigencias de las directivas 89/336/EEC y 73/23/EEC según la modificación 93/68/EEC.
LAS CARACTERÍSTICAS TÉCNICAS PUEDEN CAMBIAR SIN PREVIO AVISO AL IR INTRODUCIÉNDOSE MEJORAS EN EL
APARATO.
2. AG-71+72D-EU Spanish 14/12/2005 14:25 Page 83
Page 86

84
Instalación
INSTALACIÓN DEL APARATO
1. Retire todo el embalaje y compruebe con cuidado si
hay alguna señal de desperfectos.
2. Si desea instalar el horno microondas sobre un
horno convencional (posición A) utilice la lámina
mylar que se proporciona.
a. Corte la lámina mylar a la medida del ancho
interno del aparato.
b. Retire la cubierta
protectora de la
cinta y
péguela en la
parte trasera
del estante de
modo que
cubra el
hueco de
servicio.
(Consulte el
diagrama).
3. Instale el aparato en el armario de la cocina,
lentamente y sin ejercer presión, hasta que el marco
frontal del horno quede encajado en la apertura
frontal del armario.
4. Cerciórese de que el aparato
esté estable y no se incline.
Cerciórese de que haya un
hueco de 5 mm entre la
puerta del armario superior
y la parte de arriba del
marco (consulte el diagrama).
5. Fije el horno en su posición con
los tornillos que se suministran.
Los puntos de sujeción se
encuentran en las esquinas
superiores e inferiores del horno (consulte el
diagrama, elemento 10, en la página 47).
6. Es importante asegurarse de que este producto se
instala siguiendo las instrucciones del presente
manual de funcionamiento y las instrucciones de
instalación facilitadas por el fabricante del horno
convencional.
Lámina mylar
Posición A
Posición B
Horno
convencional
Horno
convencional
Ancho del interior
Hueco de servicio
La microonda se puede caber en la posición A o B:
Posición
Tamaño del habitáculo
Chimenea Espacio entre el
W D H (min) armario y el techo
A 560 x 550 x 450 50 50
560 x 550 x 380 50 50
B 560 x 500 x 450 40 50
560 x 500 x 380 40 50
Medidas expresadas en (mm)
Chimenea Chimenea
NOTA: Instale el aparato a unos 85 cm del suelo como mínimo.
2. AG-71+72D-EU Spanish 14/12/2005 14:25 Page 84
5 mm
Page 87

85
E
Instalación
• La salida eléctrica debería ser fácilmente accesible de forma que la
unidad pueda desenchufarse fácilmente en caso de emergencia.
• La toma no debería estar situada detrás del armario.
• La mejor posición es encima del armario, véase (A).
Cuando el cable eléctrico no esté conectado en posición (A), debería
extraerse del clip de soporte (véase el diagrama, punto 14, en la página 47)
y hacerse pasar por debajo del horno.
• Conecte el aparato a una corriente alterna de 230 V / 50 Hz. de fase única
mediante una toma de tierra correctamente instalada.
La toma debe estar provista de un fusible de 16 A.
• El cable de suministro de energía sólo puede ser reemplazado por un electricista.
• Antes de la instalación, ate un trozo de cuerda en el cable de suministro de energía para facilitar la conexión en
el punto (A) cuando se esté instalando el aparato.
• Al insertar el aparato en un armario de lados altos, NO aplaste el cable de suministro de energía.
• No sumerja el cable de suministro de energía en agua ni en ningún otro líquido.
CONEXIÓN DEL APARATO AL SUMINISTRO DE ENERGÍA
(A)
CONEXIÓN ELÉCTRICA
ADVERTENCIA:
DEBE CONECTARSE ESTE APARATO A TIERRA
El fabricante rechaza responsabilidad alguna en caso
de incumplimiento de esta medida de seguridad.
Si el enchufe instalado en su aparato no es adecuado para la
toma de corriente de que dispone, debe llamar a su agente local
autorizado de servicio de AEG-Electrolux.
2. AG-71+72D-EU Spanish 14/12/2005 14:25 Page 85
Page 88

From the Electrolux Group. The World’s No.1 choice.
The Electrolux group is the world’s largest producer of powered appliances for the kitchen, cleaning and outdoor use.
More than 55 million Electrolux Group products (such as refrigerators, cookers, washing machines, vacuum cleaners,
chain saws and lawn mowers) are sold each year to a value of approx. USD 14 billion in more than 150 countries around
the world.
AEG-Electrolux Hausgeräte GmbH
Postfach 1036
D-90327 Nürnberg
http://www.aeg.hausgeraete.de
© Electrolux plc 2005
TINS-A469URR0
Printed on paper manufactured with
environmentally sound processes.
He who thinks ecologically acts accordingly ...
AG-71+72D-EU COVER 14/12/2005 14:26 Page 86
 Loading...