

AEG MCD2460EM, MCD2460EW User Manual
MCD 2460 E
Microwave oven
User manual

2
Thank you for buying this microwave oven and for the confidence you have
placed in the AEG brand.
To benefit from the advantages of this appliance first read carefully this user
manual. Then keep it somewhere safe to consult if necessary.
Your new microwave will repay you with impeccable functioning. And you
will avoid the pointless expense of calling in the after sales service.
The warning triangle and/or the corresponding indications (Warning!
Prudence! Careful!) signal information that is important for your safety or
the correct functioning of your appliance. These instructions must be followed.
This symbol guides you through the user stages of the appliance.
This symbol precedes additional information on the practical use of the
appliance.
This user manual contains instructions that enable you to repair any defects
on your own. See chapter 'What to do if'.
Printed on paper that protects the environment. Don't just think
ecologically. Act ecologically.
Dear customer,
!
☞
i
s
s
s
)

3
Important instructions
Recycling the packaging and old microwaves . . . . . . . . . . . . . . . . . . . . . 5
Assembly and connection . . . . . . . . . . . . . . . . . . . . . . . . . . . . . . . . . . . . . . . 5
Safety instructions
Generalities . . . . . . . . . . . . . . . . . . . . . . . . . . . . . . . . . . . . . . . . . . . . . . . . . . . 8
How to avoid damage to the microwave . . . . . . . . . . . . . . . . . . . . . . . . . . 8
Microwaves . . . . . . . . . . . . . . . . . . . . . . . . . . . . . . . . . . . . . . . . . . . . . . . . . . . 9
General instructions for functioning
The right dishes to use . . . . . . . . . . . . . . . . . . . . . . . . . . . . . . . . . . . . . . . . . 10
Some words of advice . . . . . . . . . . . . . . . . . . . . . . . . . . . . . . . . . . . . . . . . . . 10
Description
The appliance . . . . . . . . . . . . . . . . . . . . . . . . . . . . . . . . . . . . . . . . . . . . . . . . . 11
The control panel . . . . . . . . . . . . . . . . . . . . . . . . . . . . . . . . . . . . . . . . . . . . . . 12
The accessories . . . . . . . . . . . . . . . . . . . . . . . . . . . . . . . . . . . . . . . . . . . . . . . 13
Before using your microwave
Pre-cleaning . . . . . . . . . . . . . . . . . . . . . . . . . . . . . . . . . . . . . . . . . . . . . . . . . . 14
Setting the time . . . . . . . . . . . . . . . . . . . . . . . . . . . . . . . . . . . . . . . . . . . . . . . 14
Brief instructions . . . . . . . . . . . . . . . . . . . . . . . . . . . . . . . . . . . . . . . . . . . . . 15
Summary

4
Types of functioning . . . . . . . . . . . . . . . . . . . . . . . . . . . . . . . . . . . . . . . . . 17
Microwaves alone . . . . . . . . . . . . . . . . . . . . . . . . . . . . . . . . . . . . . . . . . . . . . 18
Equivalence of microwave power . . . . . . . . . . . . . . . . . . . . . . . . . . . . . . . . 19
Start/Quick . . . . . . . . . . . . . . . . . . . . . . . . . . . . . . . . . . . . . . . . . . . . . . . . . . . 20
Automatic programmes . . . . . . . . . . . . . . . . . . . . . . . . . . . . . . . . . . . . . . . . . 21
Using automatic programmes . . . . . . . . . . . . . . . . . . . . . . . . . . . . . . . . . . . 22
Grill . . . . . . . . . . . . . . . . . . . . . . . . . . . . . . . . . . . . . . . . . . . . . . . . . . . . . . . . . 23
Combination microwave + grill cooking . . . . . . . . . . . . . . . . . . . . . . . . . . . 24
CRUNCH . . . . . . . . . . . . . . . . . . . . . . . . . . . . . . . . . . . . . . . . . . . . . . . . . . . . . 25
Child Lock . . . . . . . . . . . . . . . . . . . . . . . . . . . . . . . . . . . . . . . . . . . . . . . . . . . . 26
Timer . . . . . . . . . . . . . . . . . . . . . . . . . . . . . . . . . . . . . . . . . . . . . . . . . . . . . . . . 26
Tables/indicators
Defrosting . . . . . . . . . . . . . . . . . . . . . . . . . . . . . . . . . . . . . . . . . . . . . . . . . . . . 27
Reheating . . . . . . . . . . . . . . . . . . . . . . . . . . . . . . . . . . . . . . . . . . . . . . . . . . . . 28
Cooking . . . . . . . . . . . . . . . . . . . . . . . . . . . . . . . . . . . . . . . . . . . . . . . . . . . . . . 30
Practical instructions for use . . . . . . . . . . . . . . . . . . . . . . . . . . . . . . . . . . . . 31
Practical instructions for the microwave . . . . . . . . . . . . . . . . . . . . . . . . . . 32
Sample dishes . . . . . . . . . . . . . . . . . . . . . . . . . . . . . . . . . . . . . . . . . . . . . . . . . 33
Cooking table for grilling alone . . . . . . . . . . . . . . . . . . . . . . . . . . . . . . . . . . 34
Grill + microwave cooking table . . . . . . . . . . . . . . . . . . . . . . . . . . . . . . . . . 35
Practical instructions for use of the grill . . . . . . . . . . . . . . . . . . . . . . . . . . 35
Cleaning and maintenance . . . . . . . . . . . . . . . . . . . . . . . . . . . . . . . . . . . . 36
What to do if ... . . . . . . . . . . . . . . . . . . . . . . . . . . . . . . . . . . . . . . . . . . . . . . 37
After-sales service . . . . . . . . . . . . . . . . . . . . . . . . . . . . . . . . . . . . . . . . . . . . 38
Summary

Recycling packaging and old microwaves
Packaging
Our microwaves are efficiently packaged to guard against transit risks. To respect the
environment packaging has been reduced to its strictest necessity. Packaging parts
(e.g. sheets, polystyrene) can be dangerous to children. There is a risk of suffocation!
Keep children away from these parts of the packaging.
All the packaging materials used respect the environment and can be recycled.
The cardboard parts are made from recycled paper. The synthetic parts are
characterised as follows:
>PE< for polyethylene e.g. packaging sheets
>PS< for polystyrene e.g. stuffing parts (with CFCs)
>PP< for polypropylene e.g. taping.
Recycling makes it possible to save raw materials and reduces the volume of waste
to dispose of.
Take the packaging of your microwave to a recycling centre whose address will be
given to you by your district or municipal authority.
Old microwaves
Before recycling your old microwave make it unusable. Remove the plug.
Then give it to your reseller when a new microwave is delivered or take it to a
recycling centre.
Important instructions
s
s
s
)
!
s
s
s
)
i
!
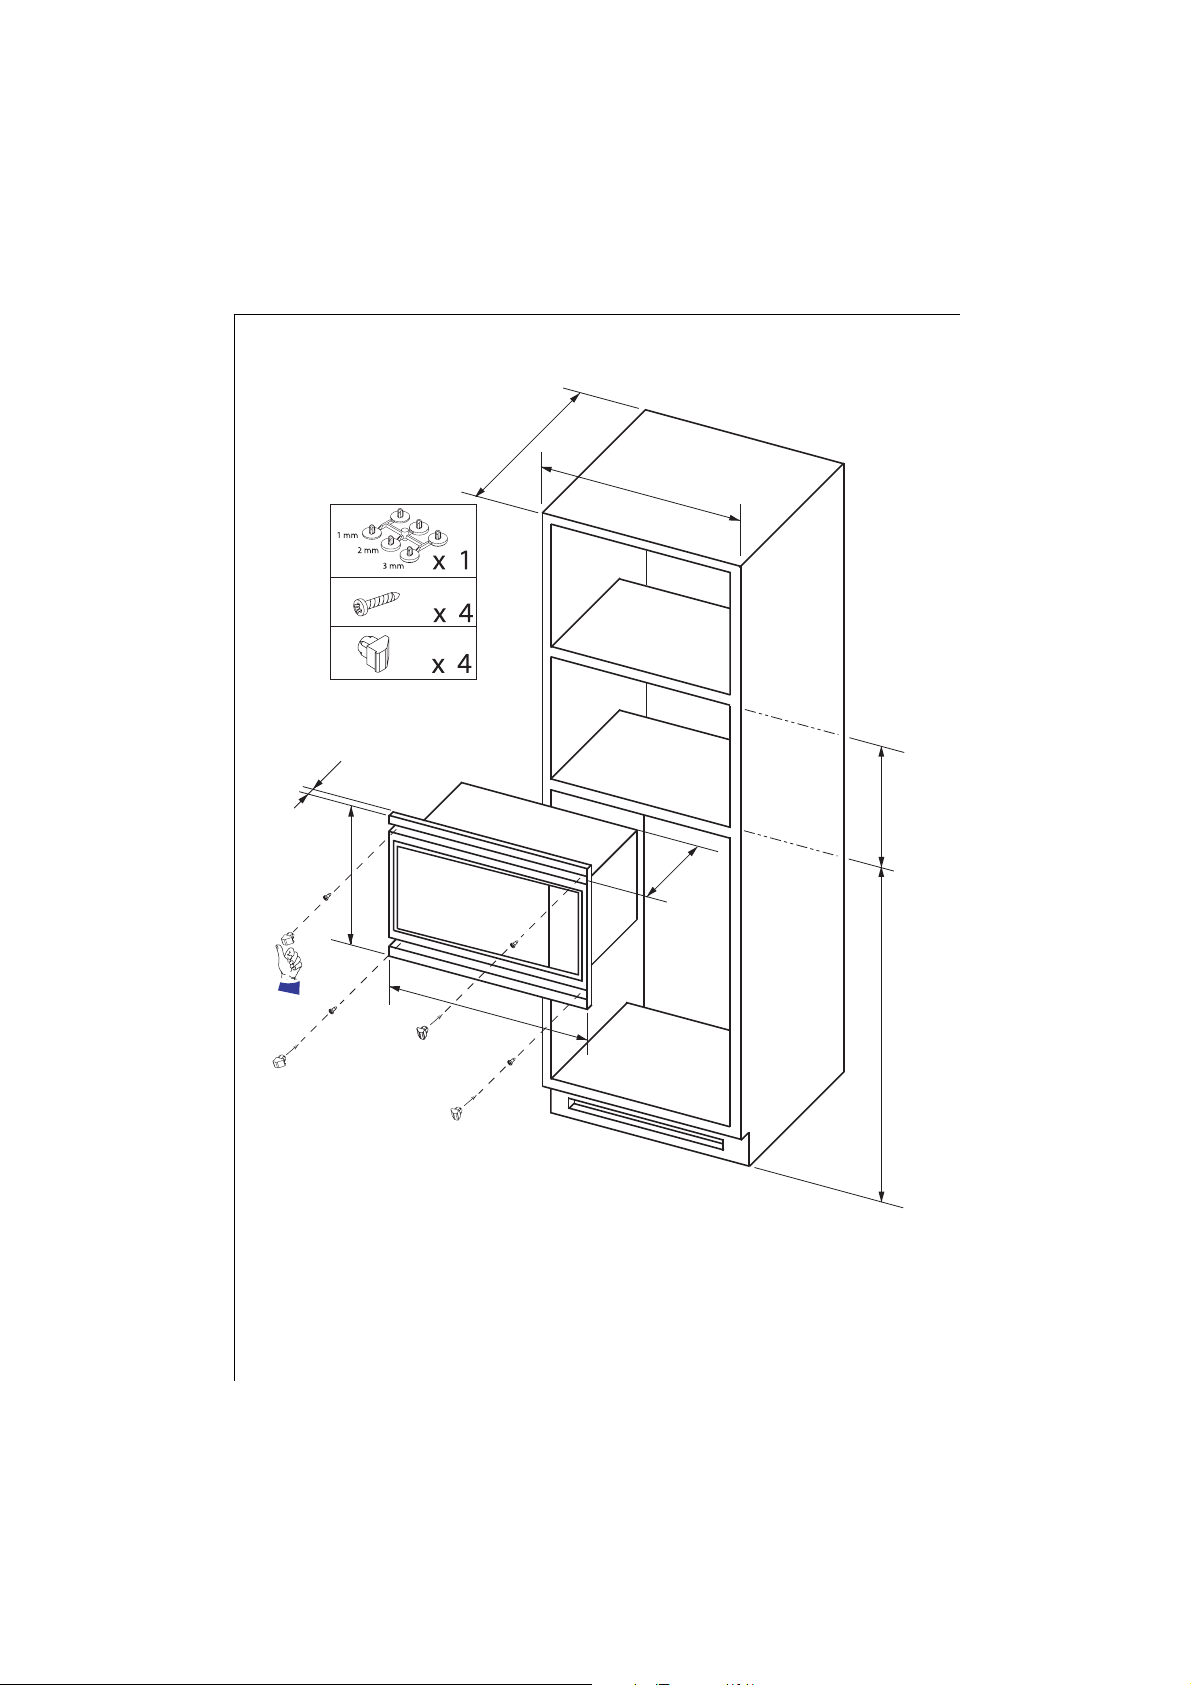
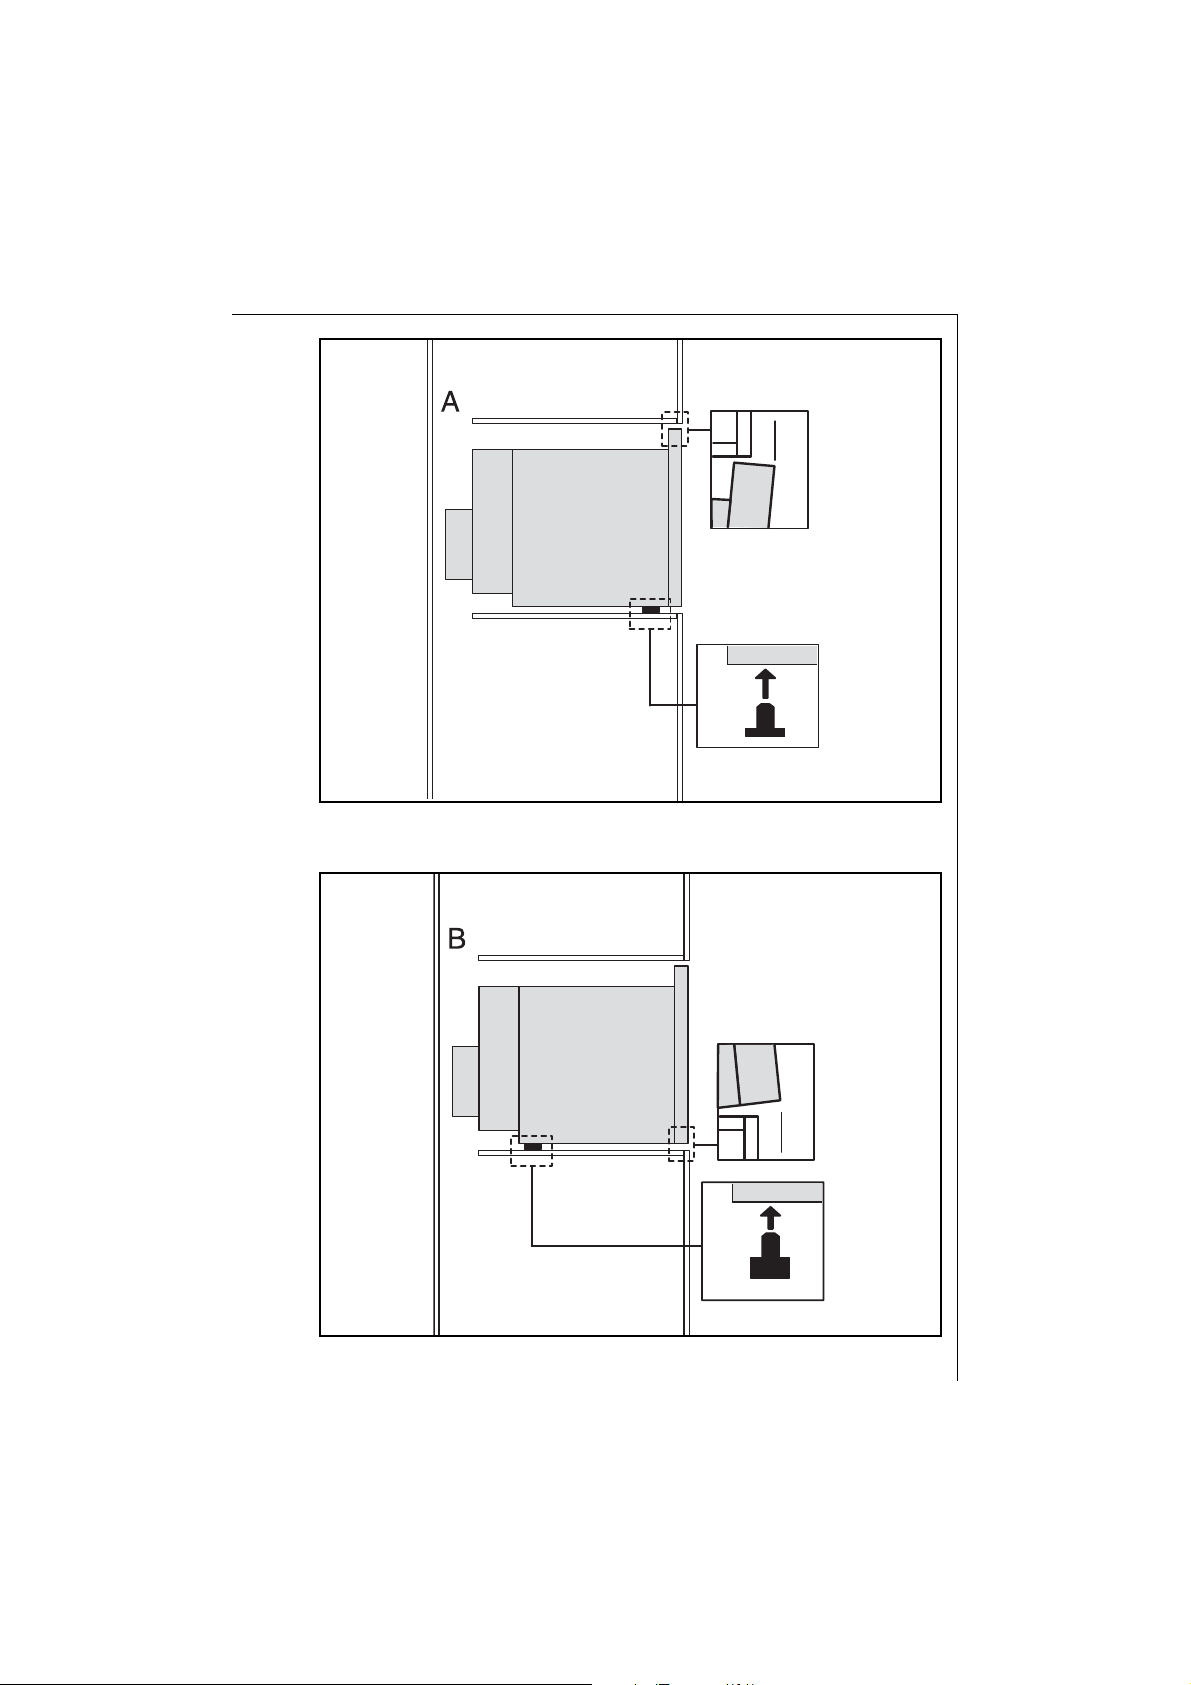
Assembly and connection
Do not use your microwave immediately (wait an hour or two) after transferring it
from a cold place to a hot place because condensation can cause it to malfunction.
This microwave is intended to be fitted at least 85 cm from the ground. Ensure there
is free circulation of air around the oven. Choose a location allowing a minimum free
space of 5 cm between the sides of the microwave and the walls, 14 cm above your
microwave and 10 cm for the rear wall. Make sure not to obstruct the air vents underneath and at the back of the microwave and make sure that the electrical plug is
accessible after installation.
• Caution: you must use an outlet with an earth terminal. The manufacturer is not
responsible for usage contrary to this advice.
This appliance conforms to the following European directives:
- Low tension directive: 73/23/EWG of 19.02.1973
- EMV directive: 89/336/EWG of 03.05.1989
(including the modification directive 92/31/EWG)
s
s
s
)
5
Assembly and connection
6
550
600 ext
23
450 int
460
507
592
850 mini
7

8
Generalities
• Only operate the microwave after having put the turntable and the drive shaft
in position.
• Only use dishes suited to microwaves.
• Regularly monitor the oven when food is heated or cooked in disposable containers
made of plastic, paper or other combustible material.
• If smoke is detected switch off or disconnect the oven and keep the door of the
microwave closed to smother any smoke. Contact your AEG after-sales service. Do
not use the microwave under any circumstances if it does not function correctly.
• If the microwave's feeder cable is damaged, change it for an identical cable.
• This appliance conforms to the safety standards in force. Repairs can only be
made by AEG after sales technicians. WARNING: it is dangerous for anyone other
than a trained technician to carry outmaintenance or repair operations which
require the removal of a cover protecting from exposure to microwave energy.
• In the event of malfunction: contact your stockist or your AEG after sales service.
If the area around the door and cavity or the flex or plug is damaged contact a
specialist technician before using your microwave.
• WARNING: Do not allow children to use the oven without supervision until
adequate instructions have been given so that the child is able to safely operate the microwave and understands the hazards of improper use.
• In order to evacuate the steam from waste water your microwave is provided
with a delayed ventilation function. Depending on the cooking mode selected
(solo / grill / combination), the fan may continue running after cooking has
finished.
How to avoid damage to the microwave
• Do not wedge anything between the door and the door frame.
• Always keep the seals of the door and their surfaces clean.
• Do not keep flammable objects in the oven area. They can ignite when the oven
is on.
• To avoid wearing down your microwave never operate it when it is empty or
without the turntable.
• Never preheat your oven using the microwave function.
Safety instructions
!
!

9
Safety instructions
Microwaves
• Heating drinks by microwave can cause a sudden and delayed gushing of boiling
water. Also precautions should be taken when handling the container. You might
get burnt.
• Food with a 'skin' or a 'peel' like potatoes, tomatoes, sausages etc should be pier-
ced with a fork to allow the steam that forms to evaporate and to prevent the bursting of foodstuffs.
• Make sure that a minimum temperature of 70° C is reached for cooking/
reheating food. Just follow the data in the cooking tables (time/temperature).
Never use mercury or liquid thermometers to measure the temperature of food.
• Baby food in jars (glass) or bottles must always be reheated without a lid or top
and well stirred or shaken so that the heat is evenly distributed. Always check the
temperature before feeding your child so as to avoid scalding.
• Remember that hot food in a microwave oven will heat up the oven ware. Use
oven gloves or hotpads to handle hot dishes.
• Never cook your food for too long or at too high a power setting. Some parts of
the food can dry out or even ignite. To avoid this never use the same times
recommended for cooking in a conventional oven.
• WARNING: liquids or other foods should not be heated in hermetic containers
because they can explode.
Do not use microwaves for the following:
– Boiling eggs. They can burst open!
– Heating cooking oil (fondue or deep frying) and drinks containing a high level of
alcohol. There is a danger of spontaneous combustion!
– Drying animals, textiles or paper.
– Crockery (porcelain, ceramics, pottery etc) with hollows that can fill with water
and create steam pressure when the microwave is operating.
MICROWAVE OUTPUT POWER: 900 W
!
!
i
10
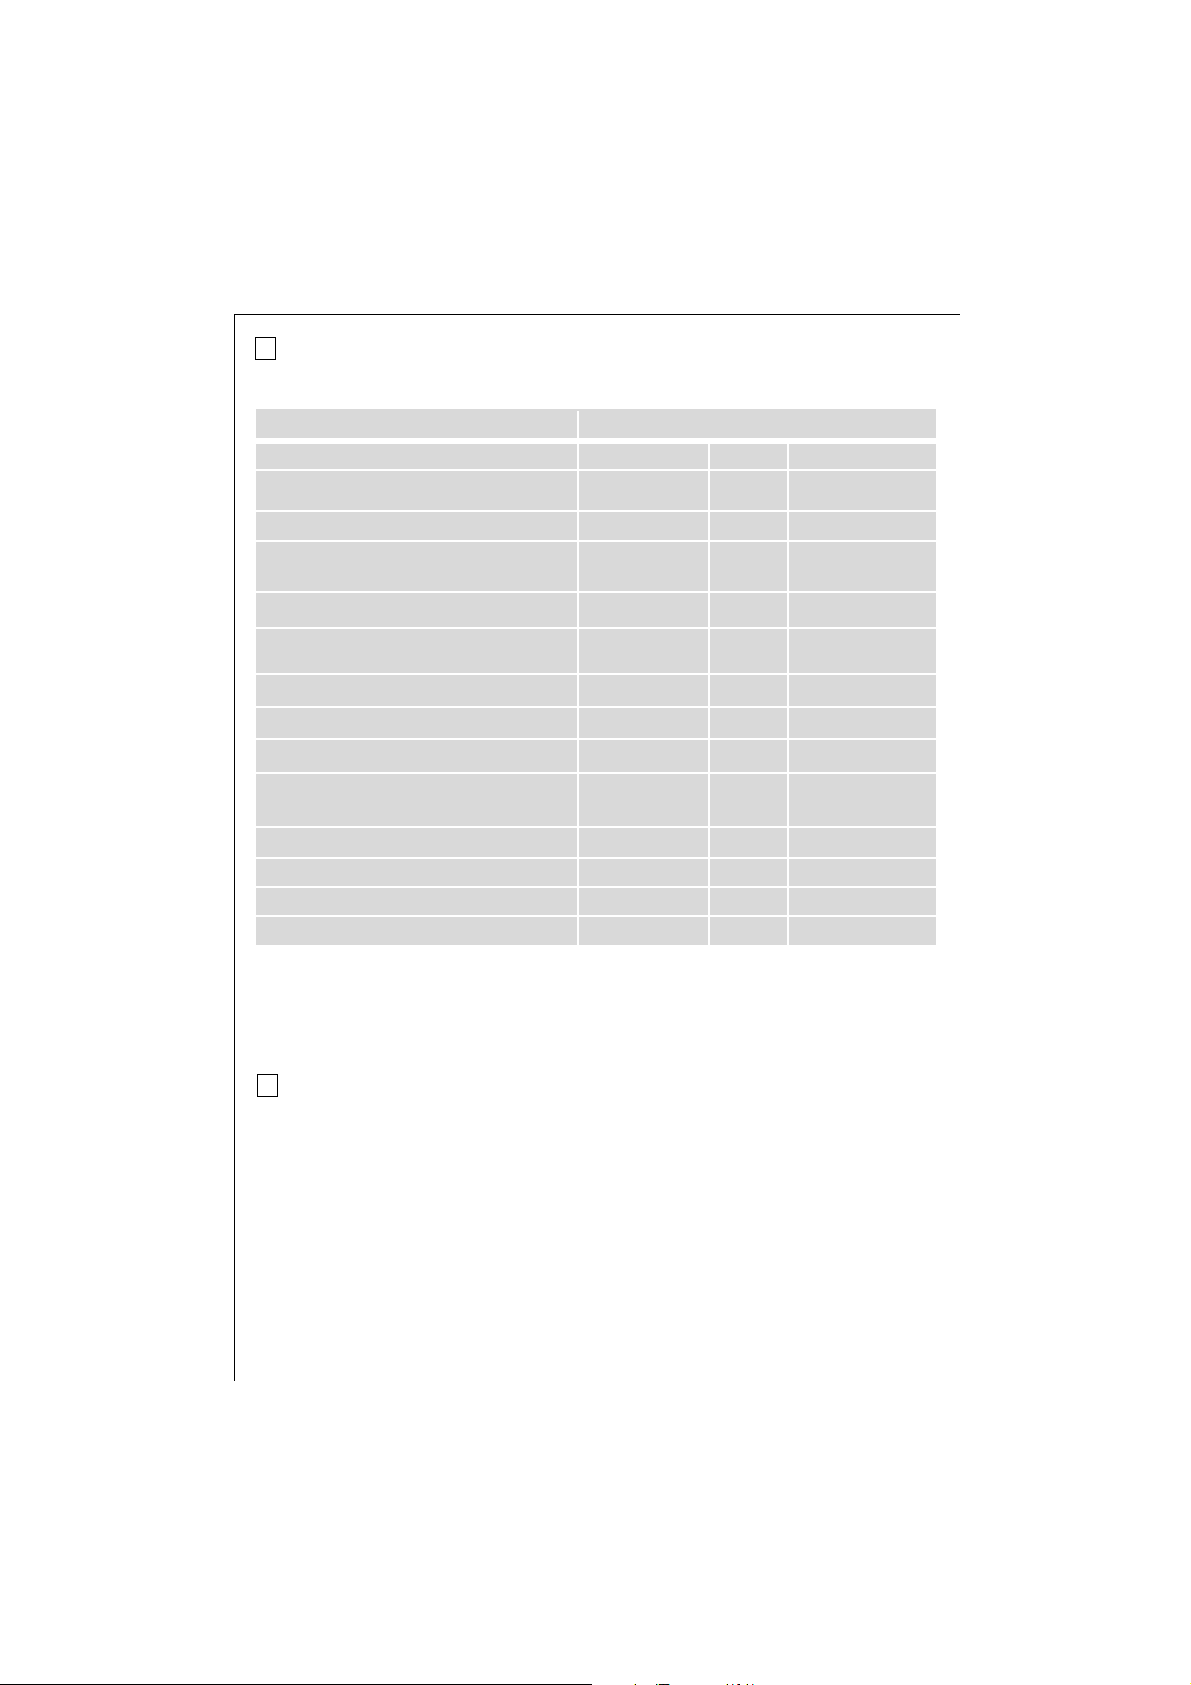
X suitable - not suitable
1) Excluding silver, gold, platinum or metal decoration.
2) Excluding glaze containing metal.
3) Please note the maximum temperatures stated by the manufacturer.
4) Do not use the grill at the same time as a metallic container.
i
Tips
• Foods are of different shapes and types. They are prepared in different
quantities. This is why the cooking times and power needed for defrosting, reheating or cooking vary individually. Rule of thumb:
Double the amount = nearly double the time
• Follow the cooking tables. Always programme the shortest time first of all. Then if
necessary programme a longer time.
• When using microwaves heat forms in the food itself. As a result not all places can
be heated at the same time. For larger amounts especially, turn or mix the food
during the cooking cycle.
• In the cooking tables a "standing time" is indicated. Let the food stand in the
appliance or outside it so that the heat can be distributed more uniformly in the
food.
i
General operational instructions
The right crockery
Ovenware material Functions
Micro- wave Grill Combination
Ovenproof glass and ceramic dishes (without any
metal parts), dripping pan X X X
Non-ovenproof glass and Porcelain
1)
X- -
Glass ceramic and vitroceramic made fire X X X
frostproof material (e.g. Arcoflam)
Ceramics 2), earthenware
2)
X- X
Plastic, heat-resistant to X
-
X
3)
200 °C
3)
Cardboard, paper X - -
Plastic wrap X - -
Microwaveable roasting bags X
3)
-X
3)
Metal roasting pans e.g. enamel - X cast-iron dishes
Black lacquered or silicone coated baking tins - - -
Grill shelf
4)
- XX
Glass dripping-pan X X X
CRUNCH dish X X X
11
F
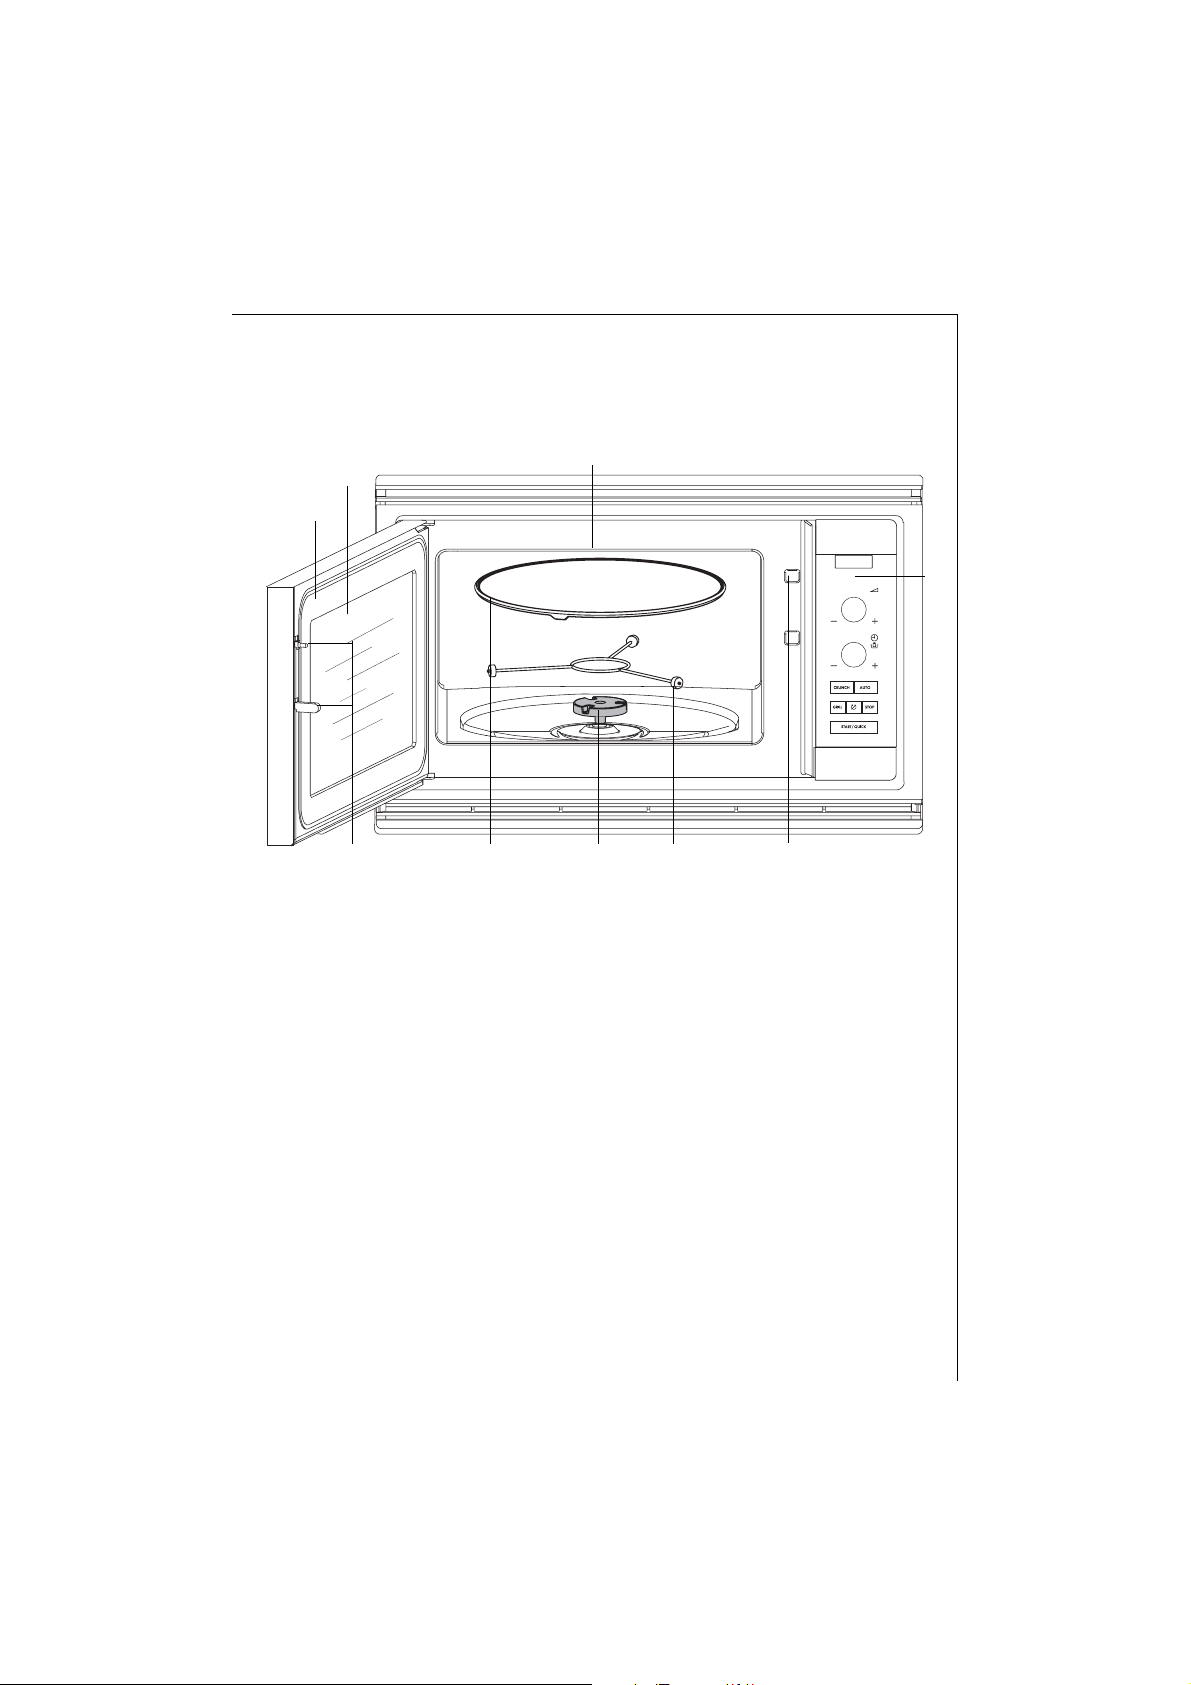
Description
Appliance
A Control panel
B Door seal
C Door catch and safety system
D Viewing window
E Grill
F Turntable
G Turntable support
H Drive shaft
C
B
C
H GF
D
A
E
12
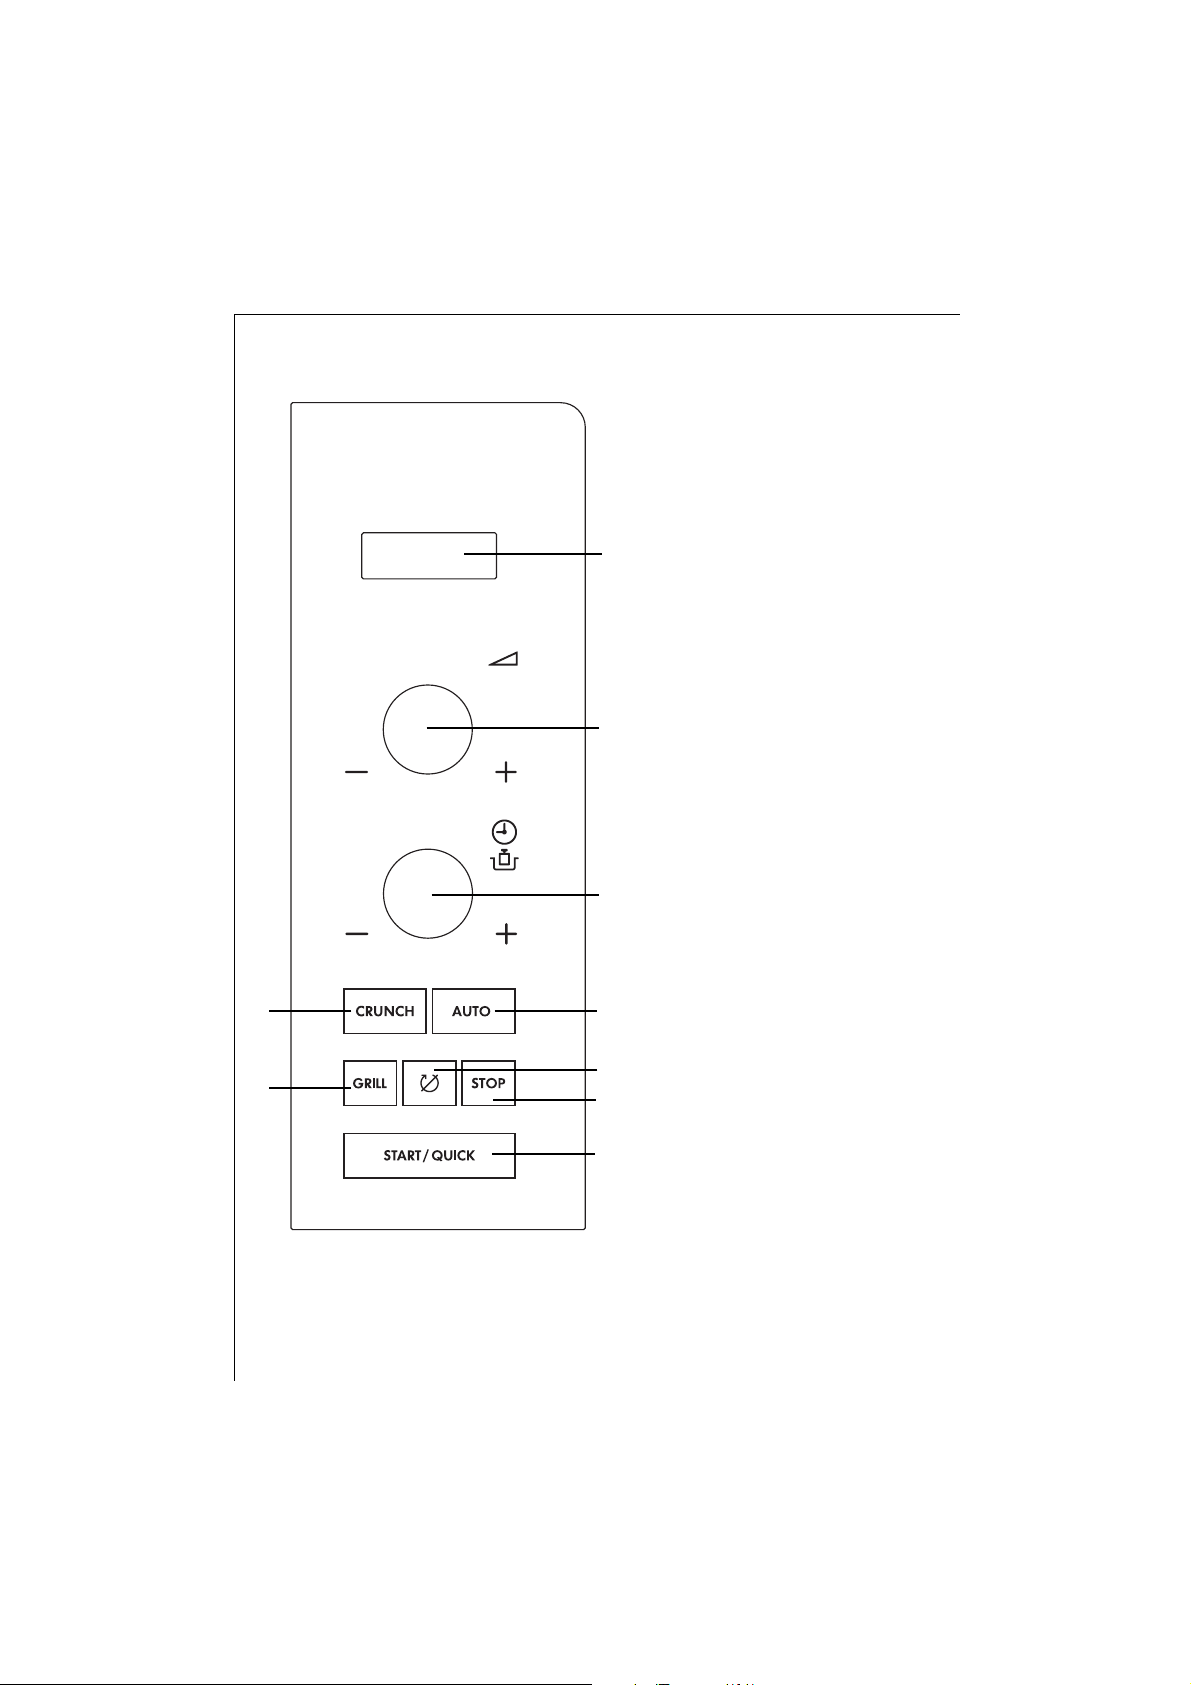
Control panel
A Display window:
To indicate the time of day, the
cooking time, the function, the power
etc...
B Power knob:
The microwave power.
C The timer knob:
To regulate the time, cooking time or
to enter the weight when an
automatic programme is used.
D CRUNCH knob:
Allows you to use the CRUNCH dish.
E AUTO knob:
For automatic defrosting and
cooking programmes.
F GRILL knob:
To use the grill functions.
G TURNTABLE OFF knob:
To switch off the turntable.
H STOP knob:
To interrupt or cancel a programme in
operation (press once to pause, twice
to cancel).
I START/QUICK knob:
To start the oven.
A
B
G
I
F
C
H
E
D
 Loading...