

Page 1
MCC257
User Manual
Microwave Oven
Page 2

2
Dear Customer
Thank you for choosing one of our high-quality
products.
With this appliance you will experience the
perfect combination of functional design and
cutting edge technology.
Convince yourself that our appliances are
engineered to deliver the best performance
and control - indeed we are setting the highest
standards of excellence.
In addition to this you find environmental and
energy saving aspects as an integral part of
our products.
To ensure optimal and regular performance of
your appliance please read this instruction
manual carefully. It will enable you to navigate
all processes perfectly and most efficiently.
To refer to this manual any time you need to,
we recommend you to keep it in a safe place.
And please pass it to any future owner of the
appliance.
We wish you much joy with your new
appliance.
Page 3
Contents
Safety information 4
Product description 9
Accessories 10
Before first use 11
Operation 12
Programme charts 16
Hints and tips 17
Care and cleaning 18
Technical data 19
Installation 20
Environmental information 22
European guarantee 22
Service 82
The following symbols are used in this
user manual:
Important information concerning
your personal safety and
information on how to avoid
damaging the appliance.
General information and tips
3
Environmental information
Page 4
4
Safety information
The built-in safety interlock switches
prevent the microwave oven from
operating when the door is open.
Do not tamper with them, or attempt
to operate the oven with the door open
as open door operation can result in
exposure to microwave energy.
Do not allow food spills or cleaner
residue to accumulate on door sealing
surfaces. See the Cleaning and Care
section for cleaning instructions.
It is particularly important that the
oven door closes properly and that
there is no damage to the: (1) door
(warped), (2) hinges and latches
(broken or insecure), (3) door seals and
sealing surface.
Warning: If the door, hinges/latches
or door seals are damaged, the
microwave must not be operated
until it has been repaired by an
authorized service person.
Warning: It is hazardous for anyone
except factory trained service
personnel to service or make
adjustments to this oven. Contact
your nearest authorised service
agent if service should be required.
Do not remove the outer case, door or
control panel at any time. Doing so may
cause exposure to extremely high voltage.
Install or locate this oven only in
accordance with ‘installation instructions’
found in this manual.
Use the appliance for its intended use
as described in this manual. Do not use
corrosive chemicals in this appliance.
This type of oven is specifically designed
to heat, cook, or defrost food. It is not
designed for industrial or laboratory use
neither for commercial use as this will
invalidate the guarantee.
Do not operate the oven empty. If food
or water is not present to absorb the
microwave energy, the magnetron tube
can be damaged.
Do not store this appliance outdoors.
Do not use this product near water.
Do not attempt to dry clothing or
newspapers in the microwave oven.
These items can ignite.
Do not use the cavity for storage
purposes. Do not leave paper products,
cooking utensils, or food in the cavity
when not in use.
Microwave oven is a Group 2 ISM
equipment in which radio frequency
energy is intentionally generated and
used in the form of electromagnetic
radiation for the treatment of material.
This oven is a Class B equipment
suitable for use in domestic
establishments and in establishments
directly connected to a low voltage
power supply network which supplies
buildings used for domestic purposes.
Page 5

5
The microwave oven shall not be
placed in a cabinet unless it has been
tested in a cabinet.
Warning: If smoke is observed,
switch off or unplug the appliance
and keep the door closed in order
to stifle any flames. Never use
water.
Warning: Only allow children or
infirm persons to use the
microwave, without supervision,
when adequate instructions have
been given so that the child or
infirm person is able to use the
microwave in a safe way and
understand the hazards of
improper use.
It is quite normal for steam to be
emitted around the door, or for misting
to occur on the door, or even for water
droplets to appear below the door
during the cooking cycle. This is merely
condensation from the heat of the food
and does not affect the safety of your
oven. The door is not intended to seal
the oven cavity completely.
Do not force the turntable to rotate by
hand. This may cause malfunctioning.
Arcing in the oven during microwave
operation usually occurs from use of
metallic utensils. Continuous arcing,
however, can damage the unit. Stop
the programme and check the utensil.
Care should be taken not to obstruct
any air vents located on the top, rear,
side and bottom of the oven.
Warning: Do not use this oven for
commercial purposes. This oven is
made for domestic use only.
Unpacking
When you unpack the oven, check that
the product is free from damage.
Damage or any missing parts must be
reported immediately to the retailer.
The oven, parts of the oven or the
accessories may be wrapped by a
protection foil. If so, you must remove
this foil before using the oven. Do not
leave packing material so that small
children can play with it. This can be
hazardous.
Utensil safety
Most glass, glass ceramic and heat-
resistant glassware utensils are
excellent for use in the microwave oven.
Although microwave energy will not
heat most glass and ceramic items,
these utensils can become hot as heat
transfers from the food to th e container.
The use of oven gloves to remove
dishes is recommended.
Page 6
6
Oven utensils and accessories guide
A variety of Utensils and Materials may be used for cooking in your microwave
oven. For your safety and to prevent damaging utensils and your oven choose
appropriate utensils and materials for each cooking method. The list below is a
general guide.
Material Utensils
Ceramic &
Glass
Corning ware YES
Heat resistant
glass ware
Mode of operation
Microwave Grill
YES*1
YES
YES
Glass ware
China
Pottery*2
with metal
decoration
Lead crystal
glass
Without metal
decoration
NO
NO
YES
YES
NO
NO
YES
YES
Microwave
Plastic
Metal
Paper
Wood
Accessories
oven
heat-proof
wear
Plastic wrap YES
Baking pan
Aluminium
foil*3
Cups, plates,
towels
Waxed paper YES
Grill rack
Turntable
YES
NO YES
YES
YES
NO
NO YES
YES
NO
YES
NO
NO
NO
YES
YES: Utensils and accessories to use NO: Utensils and accessories to avoid
*1 Only if there is no metal trim.
*2 Only if it does not have a glaze containing metal.
*3 Use aluminium foil only for shielding purposes, over use may cause arcing.
Page 7
Testing suitability of cookware
Utensils should be checked to ensure they
are suitable for use in Microwave Ovens.
Place the cookware in the microwave
along with a glass half full of water. Heat on
full power for one minute. If the cookware
feels hot, you should not use it. If it is just
slightly warm, you can use it for reheating
but not for cooking. If the dish is room
temperature, it is suitable for microwave
cooking.
Paper napkins, wax paper, paper towels,
plates, cups, cartons, freezer wrap and
cardboard are great convenience utensils.
Always be sure containers are filled with
food to absorb energy and thus avoid the
possibility of overheating or ignition.
Many plastic dishes, cups, freezer
containers and plastic wraps may be used
in the microwave oven. Follow
manufacturer’s instructions when using
plastics in the oven. Avoid using plastic
utensils with foods that have high fat or
sugar content since these foods reach high
temperatures and could melt some plastics.
Do not leave oven unattended, and look
at it from time to time when heating or
cooking food in plastic, paper or other
combustible containers.
Metal utensils and utensils with metallic
trim should not be used in the microwave
oven, unless specifically recommended for
microwave use.
Containers with restricted openings, such
as bottles, should not be used for
microwave cooking.
Use caution when removing a lid or cover
from a dish to avoid steam burns.
Foil containers
Shallow foil containers may safely be used
to reheat foods in your microwave oven
providing the following rules are observed:
7
1. Foil containers should not be more
than 3 cms (1 1/4”) deep.
2. Foil lids must not be used.
3. The foil containers must be at least
two-thirds full of food. Empty
containers must never be used.
4. Foil containers should be used singly
in the microwave oven and should
not be allowed to touch the sides. If
your oven has a metal turntable or
cooking rack, the foil container
should be placed on an upturned
ovenproof plate.
5. Foil containers should never be re-
used in the microwave oven.
If the microwave oven has been in use for
15 minutes or more, allow it to cool before
using it again.
The container and turntable may become
hot during use; take great care when
removing either from the oven. It is
advisable to use an oven cloth or glove
when doing so.
Remember when using an aluminium foil
container that the reheating or cooking
times may be longer than you are used to,
always ensure that the food is piping hot
before serving.
Food safety
Do not heat food in a can in the microwave
oven. Always remove the food to a suitable
container.
Deep fat frying should not be done in the
microwave oven, because the fat
temperature cannot be controlled,
hazardous situations can result.
Popcorn may be prepared in the
microwave oven, but only in special
packages or utensils designed specifically
for this purpose. This cooking operation
should never be unattended.
Pierce foods with non-porous skins or
membranes to prevent steam build-up and
Page 8
8
bursting. Apples, potatoes, chicken livers,
and egg yolks are examples of items that
should be pierced.
The contents of feeding bottles and baby
food jars are to be stirred or shaken and the
temperature is to be checked before
consumption, in order to avoid burns.
Warning: Liquids or other foods must
not be heated in sealed containers
since they are liable to explode.
Warning: Microwave heating of
beverages can result in delayed
eruptive boiling; therefore care must be
taken when handling the container.
Warning: When heating liquids, e.g.
soups, sauces and beverages in your
microwave oven, overheating the liquid
beyond boiling point can occur without
evidence of bubbling. This could result
in a sudden boil over of the hot liquid.
To prevent this possibility the following
steps should be taken:
Avoid using straight-sided containers
with narrow necks.
Do not overheat.
Stir the liquid before placing the container
in the oven and again halfway through the
heating time.
After heating, allow standing in the oven
for a short time, stirring again before
carefully removing the container.
Warning: Some products such as
whole eggs and sealed containers – for
example, closed glass jars – may
explode and should not be heated in
this oven. Occasionally, poached eggs
may explode during cooking. Always
pierce the yolk, then cover and allow
the standing time of one minute before
removing cover.
Safety instructions when cooking with
grill or combination modes.
The glass-viewing window may break if
water is spilled on it during grill cooking.
Be sure to use an oven glove when
loading and unloading the oven. Containers
get very hot in the oven, so be careful not
to burn yourself. The turntable and metal
rack also get very hot so be sure to use an
oven glove when handling them.
Do not touch the inner or outer viewing
window with metal components when
loading or unloading the oven. The inside of
the door and oven get very hot so take care
when attending food in the oven.
Do not put the turntable or containers in
cold water or try to cool them quickly after
use.
Do not place items on top of the cabinet.
The top of the cabinet gets very hot, so
anything placed on it may be damaged by
the heat.
Preheat your oven only when using the
Grill mode, never when using microwave or
combination modes (Microwave + Grill)
Keep these instructions!
WARNING : Oven case and door may get hot
during grill, convection or combination
cooking.
Page 9
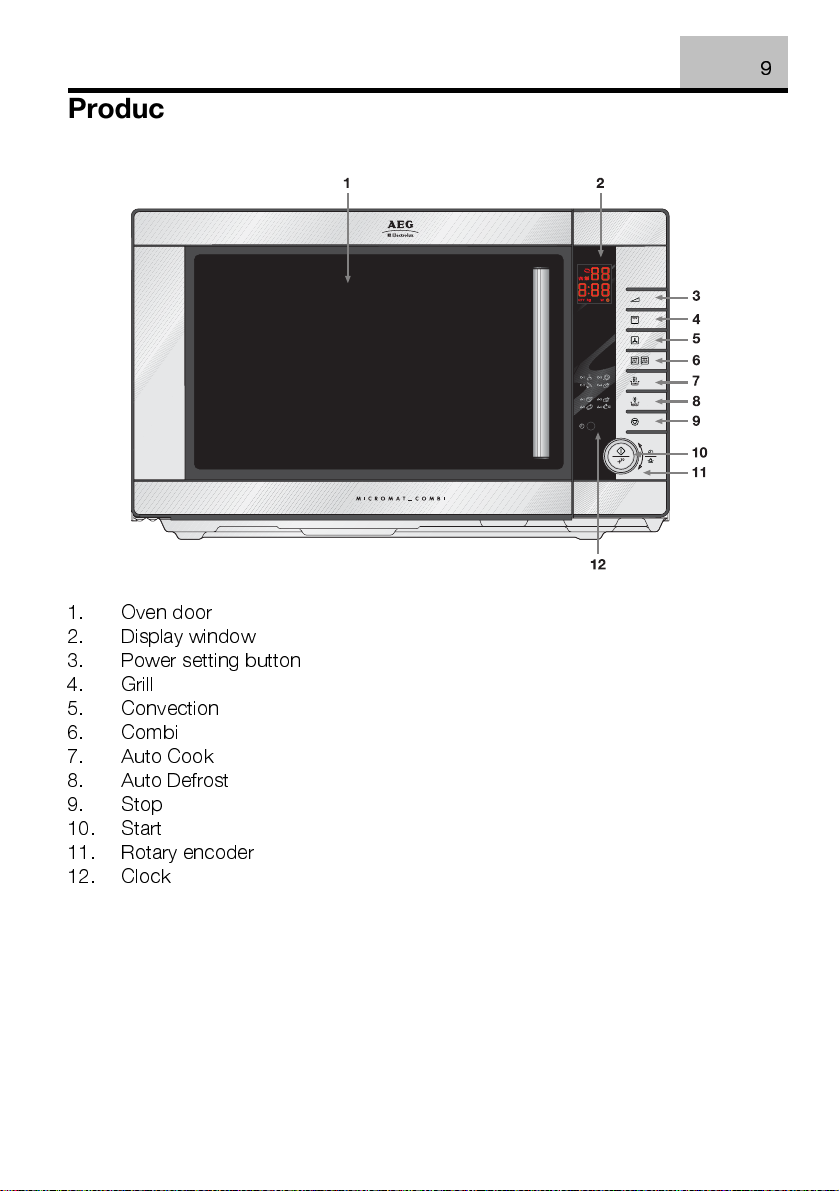
Product description
1. Oven door
2.
Display window
3.
Power setting button
4.
Grill
5.
Convection
6.
Combi
7.
Auto Cook
8.
Auto Defrost
9.
Stop
10.
Start
11.
Rotary encoder
12.
Clock
9
o
C
Page 10
10
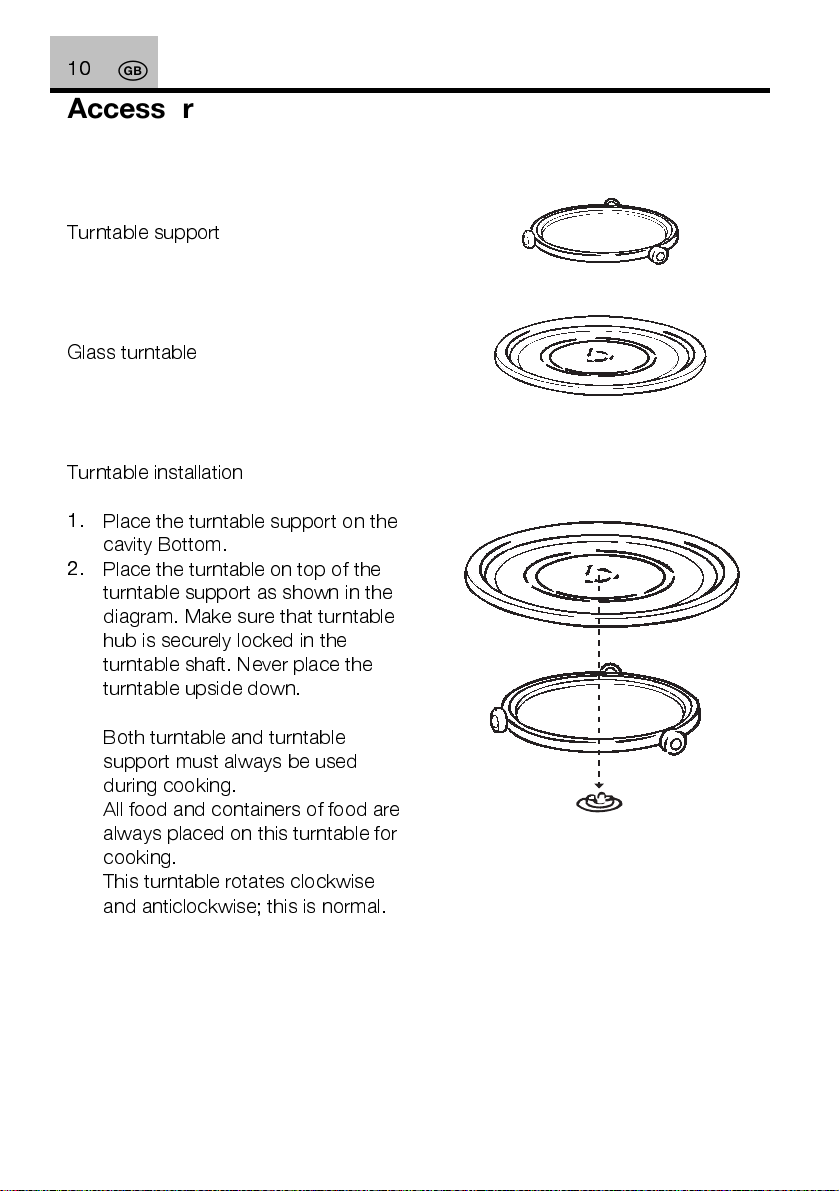
Accessories
Turntable support
Glass turntable
Turntable installation
1.
Place the turntable support on the
cavity Bottom.
2.
Place the turntable on top of the
turntable support as shown in the
diagram. Make sure that turntable
hub is securely locked in the
turntable shaft. Never place the
turntable upside down.
•
Both turntable and turntable
support must always be used
during cooking.
•
All food and containers of food are
always placed on this turntable for
cooking.
•
This turntable rotates clockwise
and anticlockwise; this is normal.
Page 11
Before first use
Setting the clock
When your oven is plugged in for the
first time or when power resumes after
a power interruption, the display
window will show " : 0 "
1.
Touch the Clock button twice
2.
Set the time to " 4:00 " using the
setting control knob
3.
Touch the Clock Button
4.
Set the time to " 4:30 " using the
setting control knob
5.
Touch the Clock button. (The Time
will now be set)
Child safety lock
This oven has a safety feature which
prevents the accidental running of the
oven by a child. After the lock has been
set, no part of the microwave oven will
operate until the child lock feature has
been cancelled.
1.
Touch the ' Stop ' button for 3
seconds. ‘L’ will appear in the
display.
To cancel the child lock, simply touch
the ' Stop ' button for 3 seconds.
To stop the oven
11
There are two way to stop the oven
whilst it is in use.
1.
Press the Stop/Clear button
•
You may restart the oven by
pressing the Start button
•
Pressing Stop/Clear again will
reset the current programme
2.
Open the door
•
You may restart the oven by
closing the door and pressing
the Start button
•
Pressing Stop/Clear again will
cancel the current programme
Timer
1.
Touch the Clock button once.
2.
Set the required time using the
setting control knob
3.
Press Start
The timer will countdown. No
microwave function will be in operation
Page 12
12
Operation
Microwave cooking
1.
Open the door; place the food on
the turntable.
2.
Close the door.
3.
Set the required power by pressing
the power setting knob
4.
Set the required cook time by
turning the rotary encoder.
5.
Press Start.
At the end of all functions please press
stop twice to ensure that microwave is
reset to the time of day.
Microwave power setting guide
Power Setting Suggested use
Keeping warm : Keeping foods warm
100W
.
Quick start
Pressing the ' Start ' button allows you
to start your microwave at full power
(800W) for 30 seconds.
Each time you press the ' Start ' button
you will increase the cooking time by
30 seconds.
At the end of this function a beep will
be heard to signal the end of the
program.
250W
400W
550W
800W
Defrost :
Simmer :
Casseroles and stews.
Baked custards or cheesecakes.
Reheat :
Reheating pre-cooked foods.
Roasting joints of meat and poultry.
Max Power : Boiling or reheating liquids. Cooking vegetables.
Preheating a browning dish.
Thawing frozen foods.
Completing the cooking cycle of some pot roasts.
Reheating of casseroles and stews..
Page 13

13
Auto defrost
For manual defrosting select the
defrost power setting
To defrost
1.
Open the door, place the food on
the turntable.
2.
Press the ' Auto Defrost ' button
until the desired programme is
reached.
3.
Turn the setting control knob until
the required quantity is reached.
4.
Close the door.
5.
Press Start (The oven begins
defrosting.)
.
To speed up the defrosting of dense
foods over 450g (1lb), the oven may be
started on full power
1 - 3 minutes, and then reduced to
defrost until defrosting is complete.
At the end of this function a beep will
be heard to signal the end of the
program.
Selection Chart for Auto Defrost functions :-
for
Defrosting Tips
It is better to underestimate defrosting
time if you are unsure. Food will
continue to defrost during the standing
time.
Separate food as soon as possible.
Turn large items, e.g. joints, halfway
through the defrosting time.
Remove any thawed food as soon as
possible.
Remove or open any packaging
before defrosting.
Place food in a larger container than
that which it was frozen in, this will
allow for easy stirring.
Begin thawing poultry, breast side
down and turn over halfway through
defrosting time or at pause. Delicate
areas such as wing tips can be
shielded with small pieces of smooth
foil.
Standing time is very important,
particularly for large, dense foods
which cannot be stirred to ensure that
the centre is completely defrosted
before cooking.
Auto Programme Press Button Display Portion Size / Time
Meat Joint X 1
Steak X 2
Chicken Quarters X 3
Fish X 4
d - 1
d - 2
d - 3
d - 4
0.2kg – 2.0kg
0.2kg – 2.0kg
0.2kg – 2.0kg
0.2kg – 2.0kg
Page 14
14
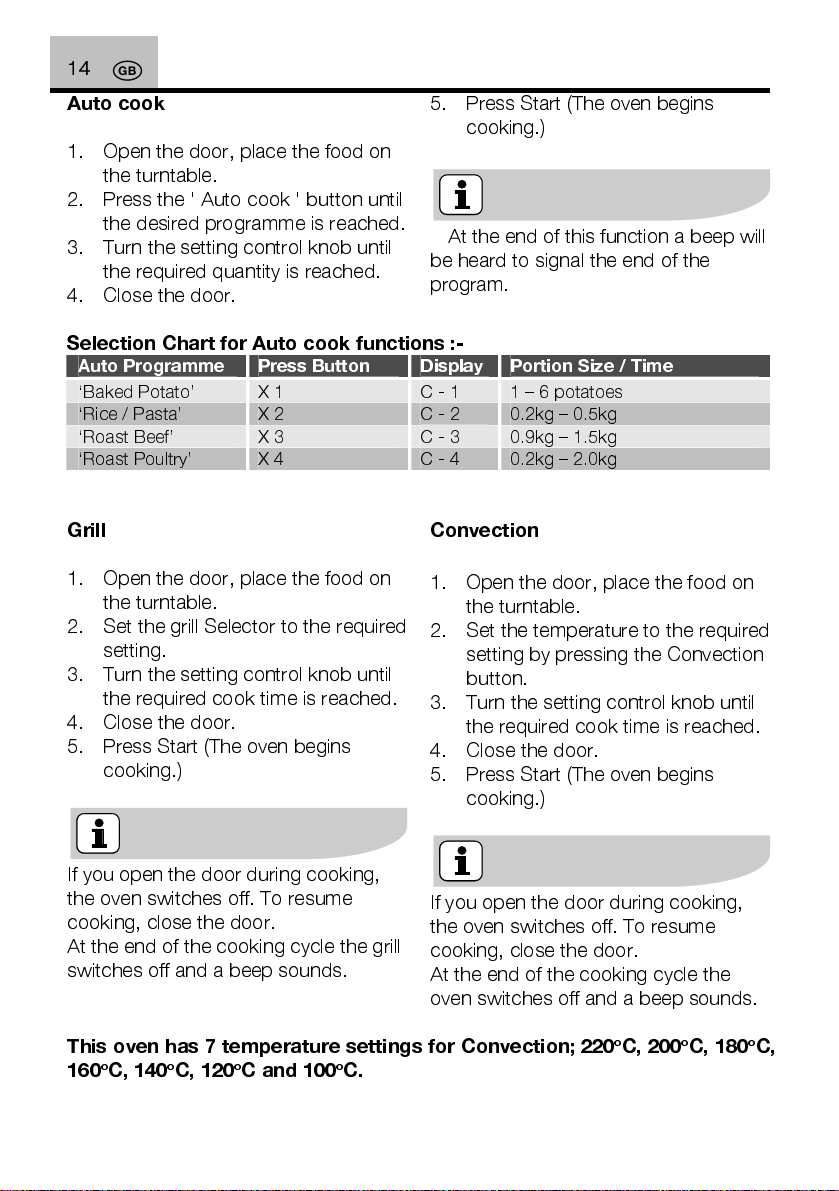
Auto cook
1.
Open the door, place the food on
Press Start (The oven begins
5.
cooking.)
the turntable.
2.
Press the ' Auto cook ' button until
the desired programme is reached.
3.
Turn the setting control knob until
the required quantity is reached.
4.
Close the door.
At the end of this function a beep will
be heard to signal the end of the
program.
Selection Chart for Auto cook functions :-
Auto Programme Press Button Display Portion Size / Time
‘Baked Potato’ X 1
‘Rice / Pasta’ X 2
‘Roast Beef’ X 3
‘Roast Poultry’ X 4
C - 1
C - 2
C - 3
C - 4
1 – 6 potatoes
0.2kg – 0.5kg
0.9kg – 1.5kg
0.2kg – 2.0kg
Grill
1.
Open the door, place the food on
the turntable.
2.
Set the grill Selector to the required
setting.
3.
Turn the setting control knob until
the required cook time is reached.
4.
Close the door.
5.
Press Start (The oven begins
cooking.)
Convection
1. Open the door, place the food on
the turntable.
2.
Set the temperature to the required
setting by pressing the Convection
button.
3.
Turn the setting control knob until
the required cook time is reached.
4.
Close the door.
5.
Press Start (The oven begins
cooking.)
If you open the door during cooking,
the oven switches off. To resume
cooking, close the door.
At the end of the cooking cycle the grill
switches off and a beep sounds.
If you open the door during cooking,
the oven switches off. To resume
cooking, close the door.
At the end of the cooking cycle the
oven switches off and a beep sounds.
This o
ven has 7 temperature settings for Convection; 220
o
160
C, 140oC, 120oC and 100oC.
o
C, 200oC, 180oC,
Page 15
15
Grill + Microwave (Combi 1)
1.
Open the door, place the food on
the turntable.
2.
Press the combi button untill the
required setting is reached.
3.
Press the power button untill the
required setting is reached
4.
Turn the setting control knob until
the required time is reached.
5.
Close the door.
6.
Press Start (The oven begins
cooking.)
In microwave and grill mode, power
selection and cooking time can be
changed whilst the microwave is
operating.
Selection Chart for Combi functions :-
Combi
setting
‘Combi 1’ X 1
‘Combi 1’ X 1
‘Combi 1’ X 1
‘Combi 1’ X 1
‘Combi 1’ X 1
‘Combi 2’ X 2
‘Combi 2’ X 2
‘Combi 2’ X 2
‘Combi 2’ X 2
‘Combi 2’ X 2
Press
Combi
Button
Press
Power
X 1 Max Grill
X 2 Max Grill
X 3 Max Grill
X 4 Max Grill
X 5 Max Grill
X 1 Convection 100oC – 220oC
X 2 Convection 100oC – 220oC
X 3 Convection 100oC – 220oC
X 4 Convection 100oC – 220oC
X 5 Convection 100oC – 220oC
Element Power Microwave
Convection + Microwave (Combi 2)
1.
Open the door, place the food on
the turntable.
2.
Press the combi button untill the
required setting is reached
3.
Press the convection button untill
the required setting is reached
4.
Press the power button untill the
required setting is reached
5.
Turn the setting control knob until
the required time is reached.
6.
Close the door.
7.
Press Start (The oven begins
cooking.)
In convection and microwave mode,
power selection and cooking time can
be changed whilst the microwave is
operating.
Power
800W
550W
400W
250W
100W
800W
550W
400W
250W
100W
Page 16
16
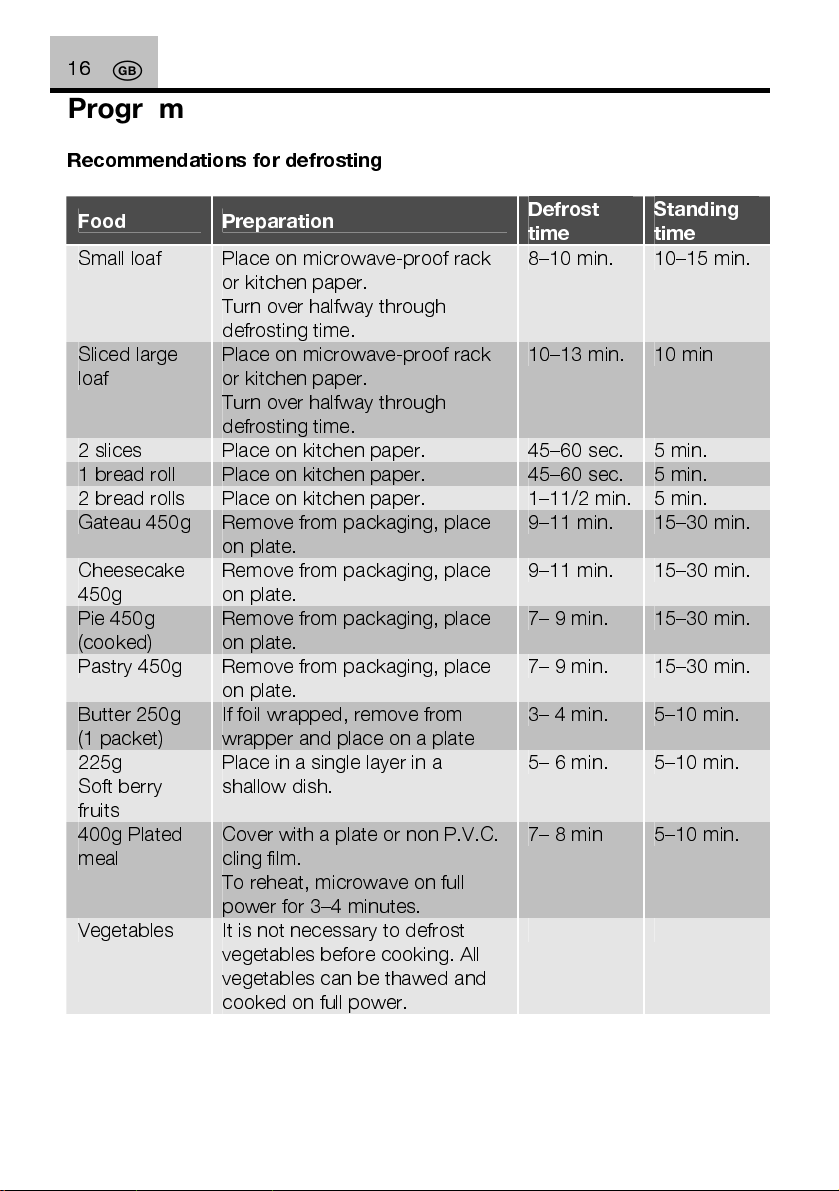
Programme charts
Recommendations for defrosting
Food Preparation
Small loaf Place on microwave-proof rack
or kitchen paper.
Turn over halfway through
defrosting time.
Sliced large
loaf
2 slices Place on kitchen paper. 45–60 sec. 5 min.
1 bread roll Place on kitchen paper. 45–60 sec. 5 min.
2 bread rolls Place on kitchen paper. 1–11/2 min. 5 min.
Gateau 450g Remove from packaging, place
Cheesecake
450g
Pie 450g
(cooked)
Pastry 450g Remove from packaging, place
Butter 250g
(1 packet)
225g
Soft berry
fruits
400g Plated
meal
Vegetables It is not necessary to defrost
Place on microwave-proof rack
or kitchen paper.
Turn over halfway through
defrosting time.
on plate.
Remove from packaging, place
on plate.
Remove from packaging, place
on plate.
on plate.
If foil wrapped, remove from
wrapper and place on a plate
Place in a single layer in a
shallow dish.
Cover with a plate or non P.V.C.
cling film.
To reheat, microwave on full
power for 3–4 minutes.
vegetables before cooking. All
vegetables can be thawed and
cooked on full power.
Defrost
time
8–10 min. 10–15 min.
10–13 min. 10 min
9–11 min. 15–30 min.
9–11 min. 15–30 min.
7– 9 min. 15–30 min.
7– 9 min. 15–30 min.
3– 4 min. 5–10 min.
5– 6 min. 5–10 min.
7– 8 min 5–10 min.
Standing
time
Page 17

Hints and tips
Always keep the oven clean – avoid
spillovers and do not forget to clean
under the glass tray and the inside of
the door.
Preferably use round or oval
casseroles with a lid when cooking in
your microwave oven.
Do not use metal or metal decorated
casseroles. Certain plastic materials
can melt and be warped by hot food.
Cover the food when cooking. Use a
glass lid, a plate or greaseproof paper.
Pastry, bread and the like can be
defrosted directly in a breadbasket or
on a paper towel.
If frozen food is heated in it’s
packaging, the packaging should be
opened.
Packaging containing metal or metal
decoration must not be used unless
specifically recommended for use in
the microwave. Remove metal clips
and wire ties.
Smaller pieces of aluminium foil can
be used to cover parts that easily over
cook such as chicken legs.
Food with peel or skin should be
pierced with a fork – e.g. potatoes and
sausages. Do not boil eggs in the
microwave oven as they can explode.
Put large, thick pieces close to the
edge of the casserole and try to cut the
food in to even sized pieces. Always
place the food in the centre of the oven.
The food will be evenly cooked if you
stir or turn it a few times.
Always set a shorter cooking time
than indicated in your recipe to avoid
17
over cooking. The larger the amount of
food the longer it takes.
Use little or no water for vegetables.
Use less salt and spices than for
‘normal’ cooking.
Season afterwards.
Allow a few minutes ‘standing’ time
after the oven has switched off to
ensure complete and even cooking
results.
Always ensure food is piping hot
throughout before serving.
Use potholders or gloves when
taking dishes and food from the oven.
Melting Chocolate
Break 100g of chocolate into
squares, place in A bowl and heat on
high power for 1-2 minutes and stir
well.
Softening or Melting Butter
Melting takes a few seconds on high
power. Softening is best done more
gently on low power.
Freshen or Warm Bread
Use medium power for few seconds.
Peeling Garlic easily
Heat 3 or 4 cloves of garlic on high
power for 15 seconds. Squeeze at
one end until the clove pops out.
Fruit Juice
Citrus fruits will yield more juice if
they are heated on high power for 15
seconds before squeezing.
Cooking Porridge
Porridge is easily cooked in the
serving dish with no sticky pan to
wash. Follow food manufacturers’
recommendations
Page 18
18
Care and cleaning
The oven must always be clean.
Residue of food from spillovers or
spatters will attract microwave energy
causing it to burn on. This could
reduce the efficiency of the oven and
may cause bad odours.
Do not attempt to tamper with or
make any adjustments or repairs to any
part of the oven.
Repairs should only be done by a
qualified service technician.
Be sure the oven is off or the unit is
unplugged before cleaning.
Cleaning the accessories (turntable,
support and Grill rack)
Clean them with mild detergent after
removing them for the cavity. Turntable
support should be carefully handled.
The inside of the oven and turntable
get very hot; so do not touch them
immediately after use.
Cleaning the interior
Always keep the inside of the oven
clean. Wipe up spillovers and food
spatters immediately. Deposits that are
allowed to remain on the oven walls,
door seal and door surface will absorb
microwave energy, reduce the
efficiency of the oven, and possibly
damage the oven interior. Use mild,
liquid detergent, warm water and a s oft,
clean cloth to remove deposits from
the base of the oven. For the side of
the oven use a soft damp cloth only, no
liquids should be used near the venting
holes.
Never use abrasive cleaners,
commercial oven cleaners or steel
wool pads on any part of the
microwave oven.
To loosen difficult deposits, boil a
cup of water in the microwave oven for
2 or 3 minutes.
Never use a knife or any utensil
to remove deposits from the oven
surfaces.
To remove odours from the oven
interior, boil a cup of water plus 2
tablespoons of lemon juice for 5
minutes.
Cleaning the door seals
Wipe up spillovers and food spatters
immediately. Deposits that are allowed
to remain on the door seals will absorb
microwave energy, reduce the
efficiency of the oven, and possibly
damage the oven interior. You can only
use mild, liquid detergent, warm water
and a soft, clean cloth to remove
deposits from the door seals.
Page 19
19
Cleaning the exterior
Open the oven door when cleaning the
control panel. This will prevent the oven
from being turned on accidentally. You
should clean outside surfaces of the
oven with mild liquid detergent and
water followed by a wiping with clear
water to remove any excess detergent.
Dry with a soft cloth.
Spray-on window cleaners or all-
purpose spray-on kitchen cleaners can
also be used. Never use abrasive
cleaners, scouring pads or harsh
chemicals on outside surfaces of your
oven. To prevent damage to the
working parts, do not allow water to
seep into ventilation openings.
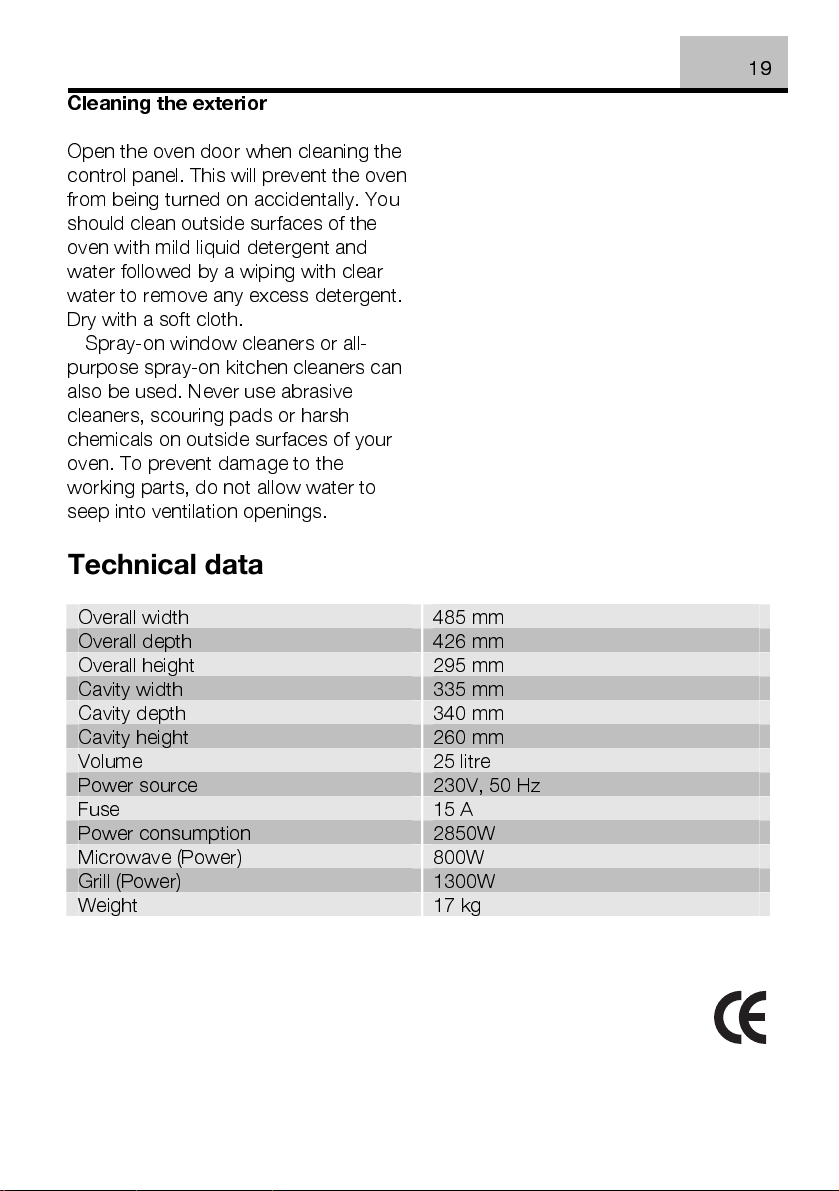
Technical data
Overall width 485 mm
Overall depth 426 mm
Overall height 295 mm
Cavity width 335 mm
Cavity depth 340 mm
Cavity height 260 mm
Volume 25 litre
Power source 230V, 50 Hz
Fuse 15 A
Power consumption 2850W
Microwave (Power) 800W
Grill (Power) 1300W
Weight 17 kg
Page 20
20
Installation
1.
Remove any promotion label from
the door.
2.
The oven should be installed on a
flat, level surface. The surface must
be strong enough to safely bear
the weight (13.5 kg) of the oven,
and the contents. To avoid the
possibility of causing vibration or
noise the oven must be in a stable
position.
3.
Keep the oven away from heat and
water. Exposure to heat and water
can lower oven efficiency and lead
to malfunctioning, so be sure to
install the oven away from heat and
water sources.
4.
Do not block air vents on the top
and the sides of the cabinet and
also do not place any articles on
the top of the oven. If air vents are
blocked during operation, the oven
may overheat, and this may lead to
malfunctioning. Hot air escapes
from the vents so be sure not to
obstruct it or let curtains come
between the oven and the rear wall.
5.
Place the oven as far away from
radios and TV’s as possible. This
oven does conform to EEC
requirements of radio interference
suppression, but some interference
may occur if it is placed too close
to a radio or TV, so keep them as
far apart as possible.
6.
If positioned in a corner, leave a
gap of at least 15cm from the walls
and 15cm above the microwave.
The oven can be placed almost
anywhere in the kitchen. Make sure the
oven is placed on a flat, level surface
and that vents as well as the surface
underneath the oven are not blocked
(for sufficient ventilation).
Connecting to the mains
The oven is delivered with the power
cord and a plug for 230V, 50Hz,
earthed socket outlet.
Earth protection minimises the risks
should a short circuit occur. Check to
ensure the voltage of the oven matches
the supply.
If the oven is connected to the
socket via an extension cord, make
sure the cord is earthed.
This appliance must not be used on
a non-earth protected power
supply.
Contact an electrician if you are
uncertain regarding electrical
connection of the oven or provision
of earth protection of the
supply.
Page 21
This appliance must be earthed. If
this appliance is fitted with a non-
rewireable plug for which your
socket is unsuitable, the plug
should be cut off and the
appropriate plug fitted. If it is
necessary to change the fuse in a
non-rewireable plug, the fuse cover
must be refitted. If the fuse cover is
lost or damaged, the plug must not
be used until a replacement is
obtained.
Electrical connections
WARNING! THIS APPLIANCE MUST
BE EARTHED.
The manufacturer declines any
liability should this safety measure
not be observed.
If the plug that is fitted to your
appliance is not suitable for your
socket outlet, please contact service
force.
21
Page 22
22
Environmental information
The symbol
its packaging indicates that this
product may not be treated as
household waste. Instead it shall be
handed over to the applicable
collection point for the recycling of
electrical and electronic equipment. By
ensuring this product is disposed of
correctly, you will help prevent potential
negative consequences for the
environment and human health, which
could otherwise be caused by
inappropriate waste handling of this
product. For more detailed information
about recycling of this product, please
contact your local city office, your
household waste disposal service or
the shop where you purchased the
product.
European guarantee
This appliance is guaranteed by Electrolux
in each of the countries listed below for the
period specified in the appliance guarantee
or otherwise by law. If you move from one
of these countries to another of the
countries listed below the appliance
guarantee will move with you subject to the
following qualifications: -
•
The appliance guarantee starts from the
date you first purchased the appliance
which will be evidenced by production of
a valid purchase document issued by the
seller of the appliance.
•
The appliance guarantee is for the same
period and to the same extent for labour
and parts as exists in your new country
of residence for this particular model or
range of appliances.
on the product or on
•
The appliance guarantee is personal to
the original purchaser of the appliance
and cannot be transferred to another
user.
•
The appliance is installed and used in
accordance with instructions issued by
Electrolux and is only used within the
home, i.e. is not used for commercial
purposes.
•
The appliance is installed in accordance
with all relevant regulations in force
within your new country of residence.
The provisions of this European Guarantee do
not affect any of the rights granted to you by law.
Page 23

I
23
I
Gentile Cliente,
Grazie per aver scelto i nostri prodotti di alta
qualità.
Con questa apparecchiatura sperimenterete la
perfetta combinazione fra il design funzionale
e la tecnologia d’avanguardia.
Le nostre apparecchiature sono state
progettate per avere le migliori prestazioni e il
massimo controllo raggiungendo i più alti
standard di eccellenza.
Inoltre, e’ parte integrante dei nostri prodotti
l’attenzione per gli aspetti ambientali e per il
risparmio energetico.
Per assicurare prestazioni ottimali e un
corretto utilizzo della vostra apparecchiatura,
Vi invitiamo a leggere attentamente questo
libretto istruzioni.
Vi permetterà di seguire tutte le fasi di utilizzo
perfettamente e nel modo più efficace.
Per consultare questo libretto ogni volta che lo
desiderate, Vi consigliamo di tenerlo in un
luogo a portata di mano. Ricordatevi di
consegnarlo ad eventuali futuri proprietari
dell’apparecchiatura.
Page 24
24
I
Indice
Norme di sicurezza 25
Il forno a microonde 30
Accessori 31
Come regolare l'ora 32
Cottura a microonde 33
Istruzioni per lo scongelamento 37
Consigli pratici 38
Manutenzione e pulizia 40
Dati tecnici 41
Installazione 42
Informazioni in materia di sicurezza
ambientale 44
Garanzia Europea 44
Service 82
In questo manuale sono riportati i
seguenti simboli:
Informazioni importanti relative
alla prevenzione dei rischi per la
salute perso-nale e dei danni alle
apparecchiature.
Informazioni e consigli generali
Informazioni in materia di
sicurezza ambientale
Page 25
I
25
Norme di sicurezza
•
I ganci di chiusura a scatto
impediscono il funzionamento del
forno a microonde quando lo
sportello è aperto.
•
Quindi questi ganci non vanno
manomessi, né si dovrà tentare di
far funzionare il forno con lo
sportello aperto, perché in questo
caso potrebbe risultare
un'esposizione all'energia delle
microonde.
•
Non lasciare che sulle guarnizioni
dello sportello si depositino residui
di cibo o resti di detergente. Per
indicazioni sulla pulizia del forno,
vedi il capitolo Manutenzione e
Pulizia.
•
E' di primaria importanza che il
forno si possa chiudere
perfettamente e che non ci siano
danni a: (1) sportello (deformato),
(2) cerniere e chiusure (rotte o
instabili), (3) o cornici interno porta.
Qualora si riscontrassero danni
sullo sportello, sulle
cerniere/chiusure dello sportello, il
forno non dovrà essere utilizzato
finchè non verrà riparato da
personale del servizio assistenza
autorizzato.
E' rischioso far effettuare
operazioni di manutenzione a
persone che non siano tecnici del
servizio assistenza . In caso di
necessità, contattare il più vicino
centro di assistenza tecnica
autorizzato.
•
Non rimuovere mai l'involucro
esterno del forno, né lo sportello o
il quadro comandi. Tali operazioni
porterebbero ad un'esposizione a
tensioni estremamente elevate.
•
Installare o collocare questo forno
seguendo scrupolosamente le
"istruzioni d'installazione" che
troverete in questo libretto.
•
Usare questo elettrodomestico
esclusivamente per gli scopi
descritti nel presente libretto. Non
usare mai sostanze chimiche
corrosive. Questo tipo di forno è
stato progettato specificatamente
per riscaldare, cuocere o
scongelare alimenti. Quindi non è
stato progettato per essere usato a
livello industriale o in laboratori, né
per scopi commerciali, dal
momento che tali usi andrebbero
ad invalidare la garanzia.
•
Non far mai funzionare il forno
vuoto. Se nel forno non ci sono né
cibo né acqua ad assorbire
Page 26
26
I
l'energia delle microonde, il
magnetron potrebbe danneggiarsi.
•
Non conservare questo
apparecchio all'esterno. Non usare
mai questo forno vicino all'acqua.
•
Non tentare di asciugare indumenti
o giornali nel forno, perché questi
articoli potrebbero prender fuoco.
•
Non usare il vano di cottura del
forno come ripostiglio. Quando non
si usa il forno, non lasciare articoli
di carta, utensili, o alimenti nel vano
di cottura.
Se si nota del fumo, spegnere
l'apparecchio o staccarlo dalla rete
e tenere lo sportello chiuso onde
soffocare eventuali fiamme. Mai
usare acqua.
Non permettete ai bambini l’utilizzo
del forno
Sicurezza nell'uso degli utensili
•
La maggior parte delle stoviglie in
vetro, vetroceramica o in vetro
termoresistente sono eccellenti per
il forno a microonde. Sebbene
l'energia delle microonde non vada
a riscaldare la maggior parte degli
utensili in vetro e ceramica, queste
stoviglie si possono comunque
riscaldare, dal momento che il
calore si strasferisce dall'alimento
al recipiente. Quindi si consiglia
l'uso di guanti da cucina per
togliere i piatti dal forno.
Prova della conformità degli
utensili di cottura
•
Mettere le stoviglie nel forno a
microonde con un bicchiere per
metà pieno d'acqua. Far andare il
forno al livello di potenza 100% per
un minuto. Se le stoviglie scottano,
non si possono usare. Se invece
sono solo leggermente calde,
allora si potranno usare per
riscaldare, ma non per cucinare.
Se infine il piatto è a temperatura
ambiente, esso è adatto per la
cottura a microonde.
•
Tovaglioli di carta, carta paraffinata,
piatti, tazze di carta, scatole di
cartone, involucri per congelatore
ed articoli in cartone sono utensili
di grande utilità. Accertarsi sempre
che i recipienti siano riempiti con gli
alimenti affinché possano assorbire
l'energia delle microonde ed evitare
così la possibilità di surriscaldarsi.
•
Nel forno a microonde si possono
usare molti piatti, tazze, contenitori
in plastica, nonché altri involucri in
plastica. Quando si usano articoli
di plastica nel forno, seguire
sempre le istruzioni del produttore.
Evitare di usare stoviglie in plastica
quando si devono trattare alimenti
con un elevato contenuto di grassi
o zuccheri, dal momento che
questi raggiungono temperature
elevate e possono fondere alcune
resine plastiche.
Page 27

•
Quando si riscaldano o si cuociono
alimenti in recipienti di plastica,
carta o di altro materiale
combustibile, non si può lasciare il
forno incustodito. Se si nota del
fumo, tenere lo sportello chiuso,
spegnere il forno e staccare la
spina finchè non cessa di emettere
fumo.
•
Non mettere in forno stoviglie in
metallo o con bordi metallici, a
meno che non siano
specificatamente indicate per la
cottura a microonde.
•
Nella cottura a microonde non
usate recipienti con aperture
strette, come bottiglie.
•
Prestare la massima cautela nel
togliere un coperchio o una
copertura da un piatto, onde
evitare di scottarsi con il vapore.
Recipienti in carta metallizzata
In questo forno a microonde si
potranno, in tutta sicurezza, riscaldare
alimenti in vassoi di carta metallizzata,
purché si osservino le seguenti
istruzioni:
1.
i recipienti in carta metallizzata non
dovranno avere una profondità
superiore a 3 cm (1 1/4”).
2.
Non si potranno usare coperchi in
carta metallizzata.
3.
I recipienti in carta metallizzata
vanno riempiti di cibo per almeno
due terzi. Non si dovranno mai
usare contenitori vuoti.
4.
I contenitori in carta metallizzata
vanno usati individualmente nel
forno a microonde e non dovranno
entrare in contatto con le pareti del
vano di cottura. Se il forno è dotato
di piatto rotante o griglia di cottura
in metallo, bisognerà sistemare il
recipiente in carta metallizzata
sopra un piatto capovolto.
5.
Non riutilizzare mai nel forno a
microonde recipienti in carta
metallizzata già usati.
6.
Se si è utilizzato il forno a
microonde per 15 minuti o oltre,
attendere che si raffreddi prima di
usarlo di nuovo.
7.
Il recipiente ed il piatto rotante si
possono riscaldare durante il loro
uso, quindi prestare grande cautela
nel toglierli dal forno. E'
consigliabile usare presine o guanti
da forno.
8.
Ricordarsi che, quando si usa un
contenitore in carta alluminizzata, i
tempi di cottura o di riscalda-
mento possono essere più lunghi
del solito, accertarsi sempre che le
pietanze siano fumanti prima di
servire.
Sicurezza negli alimenti
•
Non riscaldare in forno cibi in
scatola. Togliere sempre l'alimento
e versarlo in un recipiente adatto.
•
Nel forno a microonde non si
possono friggere alimenti in molto
grasso, perché non si può
controllare la temperatura del
grasso e ne possono risultare
situazioni pericolose.
I
27
Page 28

28
I
•
Nel forno a microonde si possono
preparare anche i popcorn, ma
solamente in confezioni speciali o
in stoviglie appositamente previste
per questo scopo. Comunque le
operazioni di cottura vanno
eseguite sotto stretta sorveglianza.
•
Gli alimenti provvisti di bucce, pelli
o membrane non porose vanno
punzecchiati, onde prevenire che si
accumuli vapore e scoppino.
Esempi di alimenti che vanno
punzecchiati sono le mele, le
patate, i fegatini di pollo ed i tuorli
d'uovo.
•
Il contenuto di biberon e vasetti di
omogeneizzati va mescolato o
agitato, e bisogna controllare la
temperatura prima del consumo,
onde evitare scottature.
Quando nel forno a microonde si
devono scaldare alimenti liquidi,
come zuppe,
liquido si potrà surri-
la temperatura d'ebollizione
alcun
alla fuoriuscita del liquido in
ebollizione. Per prevenire questa
eventualità bisogna
seguente modo:
1.
Evitare l'uso di recipienti a collo
stretto.
2.
Non lasciar surriscaldare.
salse e bevande, il
scaldare oltre
senza
gorgoglio. Ciò potrà portare
procedere nel
3.
Mescolare il liquido prima di
versarlo nel contenitore e poi di
nuovo a metà del tempo di
riscaldamento.
4.
Una volta scaldato, lasciar
riposare il liquido per un po',
quindi mescolare di nuovo
prima di togliere con cautela il
recipiente dal forno.
Alcuni prodotti, quali le uova intere
ed i contenitori
esempio,
possono scoppiare e quindi non si
possono riscaldare
forno. Occasionalmente possono
scoppiare
Quindi forare
coprire e lasciar
prima di
sigillati – come, per
i vasetti in vetro chiusi –
in questo
anche le uova in camicia.
sempre il tuorlo,
passare un minuto
togliere la copertura.
Disimballaggio
Nota: Controllate che il forno non sia
danneggiato.
Eventuali danni di trasporto vanno
immediatamente
comunicati al responsabile del
trasporto.
Dopo aver rimosso l’imballo, controllate
che il prodotto sia privo di difetti.
Eventuali danni, difetti o parti mancanti
vanno comunicati subito al ri- venditore.
Non lasciate i materiali dell’imballo alla
portata dei bambini , perchè possono
essere molto
Pericolosi.
Conservare queste istruzioni!
ATTENZIONE: il mobile e la porta del forno
possono diventare molto caldi sia durante
la cottura con il grill che con la cottura a
convezione o combinatal
Page 29

I
29
Guida agli utensili ed accessori utilizzabili nel forno a
microonde
Per la cottura nel forno a microonde vi è un vario assortimento di utensili
Per la vostra stessa sicurezza e per evitare danni sia al forno che agli utensili è
necessario adoperare utensili e materiali appropriati. La Guida generale riportata
qui di seguito vi potrà essere d’aiuto in questa scelta.
Materiale Utensili Microonde Grill
Ceramica e
vetro
Porcellana
Terracotta*2
Plastica
Metallo
Carta
Legno
Accessori
Pirofile
Stoviglie in vetro con
decorazioni in metallo
Stoviglie in cristallo al
piombo
Senza decorazioni in
metallo
Stoviglie termoresistenti
per forno a microonde
Pellicola di plastica
Teglia da forno
Carta stagnola*3
Tazze, piatti, tovaglioli
Carta paraffinata
Piatto rotante
Supporto del piatto rotante
SI'*1
NO
NO
SI'
SI'
SI'
SI'
NO
SI'
SI'
SI'
NO
SI'
SI'
SI'
NO
NO
SI'
SI'
NO
SI'
SI'
NO
NO
NO
SI'
SI'
SI': Utensili ed accessori che si possono usare
NO: Utensili ed accessori da evitare
*1 solo se sono senza bordo in metallo.
*2 solo se non hanno smalto a base di metalli.
*3 NOTA: usare la carta metallizzata solo per schermare, un suo abuso potrebbe
provocare scariche elettriche con scintillamento.
Page 30

30 I
Il forno a microonde
1. Sportello del forno
2. Display
3. Tasto selezione potenza livello microonde
4. Tasto selezione funzionalità grill
5. Forno convezione
6. Cottura combinata
7. Programmi di cottura automatici
8. Scongelamento automatico
9. Tasto di Stop
10. Tasto d'avvio
11. Manopola di regolazione
12. Orologio
o
C
Page 31

Accessori
Base di supporto del piatto rotante.
Piatto rotante in vetro speciale
termoresistente.
Come montare il piatto rotante
1.
Posizionare il supporto del piatto
rotante sulla base del vano cottura.
2.
Quindi posizionare il piatto rotante
sullo speciale supporto come
indicato nel disegno. Accertarsi
che l’invito del piatto rotante sia
perfettamente agganciato al perno
situato al centro del vano cottura.
Non montare mai il piatto
rotante al rovescio.
•
Durante le operazioni di cottura sia
il piatto rotante che il suo supporto
devono essere sempre usati
contemporaneamente.
•
Durante la cottura gli alimenti ed i
rispettivi contenitori vanno sempre
sistemati sul piatto rotante.
•
Il piatto rotante può girare sia in
senso orario che antiorario.
I
31
Page 32

32
I
Come regolare l'ora
Quando si collega il forno per la prima volta, o
dopo un’interruzione di corrente, il display
lampeggia e visualizza: " : 0 "
1. Premere il tasto dell ' Orologio ' 2 volta
2. Girare la Manopola del Comando di
Regolazione fino a visualizzare 4:00
minuti
3. Premere il tasto dell ' Orologio ' una
volta
4. Girare la Manopola del Comando di
Regolazione fino a visualizzare 4:30
minuti
5. Premere il tasto dell ' Orologio ' una
volta (La procedura di impostazione
dell’ora è completata)
Blocco di sicurezza bambini
Questo forno è dotato di un dispositivo di
sicurezza per impedire ai bambini di utilizzare
il forno.
Una volta attivato il dispositivo di sicurezza il
forno blocca tutte le funzioni. Per utilizzare il
forno a microonde occorre prima disattivare il
dispositivo di sicurezza.
1. Per attivare la sicurezza, premere il
pulsante STOP per 3 secondi. Sul display
appare la lettera L.
2. Per disattivare il dispositivo di sicurezza
basta premere il pulsante Stop per 3
secondi.
Arresto/Cancellazione
Se si desidera spegnere il forno durante la
cottura senza aprire lo sportello, premere il
tasto d'Arresto/Cancellazione una volta. Per
continuare la cottura, premere il tasto d'Avvio.
Se si desidera togliere la pietanza dal forno
prima del termine del tempo di cottura
programmato, premere il tasto
d'Arresto/Cancellazione due volte. Durante la
cottura è possibile fermare il forno per poter
mescolare oppure risistemare gli alimenti.
Quest'operazione si può eseguire in due modi:
1. Basta aprire lo sportello del forno, il
dispositivo di sicurezza bloccherà
immediatamente l'emissione delle
microonde. Quindi, per continuare la
cottura, chiudere lo sportello e premere il
tasto d'Avvio;
2. Premere il tasto d'Arresto/Cancellazione
una volta ed aprire lo sportello. Quindi,
per continuare la cottura, chiudere lo
sportello e premere il tasto d'Avvio.
Timer
1. Premere il tasto dell ' Orologio ' una
volta
2. Ruotare la manopola fino a selezionare il
tempo desiderato.
3. Chiudere lo sportello e premere il
pulsante d'Avvio
Page 33

I
Cottura a microonde
1. Aprire lo sportello del forno e posizionare
l’alimento sul piatto girevole.
2. Premere più volte il tasto "Potenza" fino a
selezionare il livello voluto.
3. Ruotare la manopola fino a selezionare il
tempo desiderato.
4. Chiudere lo sportello e premere il
pulsante d'Avvio (Il forno inizia la
cottura)
Al termine del ciclo di cottura, il forno si
spegne automaticamente e si attiva un
segnale acustico.
Per incrementare il tempo di cottura
durante il funzionamento, premere il
pulsante Avvio (Step di 30").
Guida alla regolazione del livello di potenza delle microonde
Regolazione della
potenza
Uso consigliato
Avvio Rapido
Il forno a microonde permette un rapido
riscaldamento semplicemente premendo il
tasto Avvio . Per 30" verrà erogata la massima
potenza (800 Watt).
Si tratta di una comoda caratteristica
specialmente quando si ha fretta ed è l'ideale
per il riscaldamento di quantità ridotte di
liquido tipo una tazza di caffè o una scodella di
minestra oppure una piccola porzione di cibo
che si è leggermente raffreddata prima di
essere servita.
Al termine il forno si spegne automaticamente
e si attiva un segnale acustico.
33
100W Tenere le pietanze al caldo.
250W Scongelare cibi surgelati.
400W
550W
800W
Scongelamento rapido e riscaldamento di fricassee e stufati.
Cottura al forno di torte e pan di Spagna.
Riscaldare cibi precotti.
Far bollire o riscaldare liquidi.
Cuocere verdure.
Preriscaldare un piatto con rosolatura.
Page 34

34
I
Scongelamento automatico
1. Aprire lo sportello del forno e posizionare
l’alimento sul piatto girevole.
2. Premere più volte il pulsante
Scongelamento automatico fino a
selezionare il programma voluto.
3. Ruotare la manopola fino a selezionare il
peso voluto.
4.
Chiudere lo sportello e premere il
pulsante d'Avvio (Il forno inizia lo
scongelamento)
Defrosting Tips
It is better to underestimate defrosting time if
you are unsure. Food will continue to defrost
during the standing time.
Separate food as soon as possible.
Turn large items, e.g. joints, halfway
through the defrosting time.
Remove any thawed food as soon as
possible.
Remove or open any packaging before
defrosting.
Place food in a larger container than that
which it was frozen in, this will allow for easy
stirring.
In alternativa allo scongelamento
automatico, è possibile scongelare
manualmente gli alimenti impostando la
potenza del forno a microonde su 250 W. Per
scongelare più rapidamente alimenti di peso
superiore a 450 g, impostare la potenza del
forno su 800 W (100%) per 1 - 3 minuti e poi
ridurre a 250 W per completare il ciclo di
scongelamento.
Begin thawing poultry, br
east side down and turn over halfway
through defrosting time or at pause. Delicate
areas such as wing tips can be shielded with
small pieces of smooth foil.
Standing time is very important, particularly for
large, dense foods which cannot be stirred to
ensure that the centre is completely defrosted
before cooking.
Tabella di selezione delle impostazioni Scongelamento automatico
Programma
automatico
Carne
Bistecche
Pollo a pezzi
Pesce
Premere il
pulsante
X 1
X 2
X 3
X 4
Display
d - 1
d - 2
d - 3
d - 4
PESO (Quantità)
0.2kg – 2.0kg
0.2kg – 2.0kg
0.2kg – 2.0kg
0.2kg – 2.0kg
Page 35

Programmi automatici
1. Aprire lo sportello del forno e posizionare
l’alimento sul piatto girevole.
2. Premere più volte il pulsante Programmi
4.
Chiudere lo sportello e premere il
pulsante Avvio (Il forno inizia la
cottura)
di cottura automatici fino a selezionare il
programma voluto.
Ruotare la manopola fino a
3.
selezionare il peso voluto.
A fine cottura, il forno si spegne
automaticamente e si attiva un segnale
acustico.
Tabella di selezione delle impostazioni di Cottura automatica :-
Programma
automatico
Patate Arrosto
Riso/Pasta
Roastbeef
Pollo arrosto
Premere il
pulsante
X 1
X 2
X 3
X 4
Display
C - 1
C - 2
C - 3
C - 4
PESO (Quantità)
1 – 6 potatoes
0.2kg – 0.5kg
0.9kg – 1.5kg
0.2kg – 2.0kg
Cottura con Grill
1. Aprire lo sportello del forno e posizionare
l’alimento sul piatto girevole.
2. Premere il pulsante " Grill" per selezionare
la funzione solo Grill.
3. Ruotare la manopola fino a selezionare il
tempo desiderato.
4. Chiudere lo sportello e premere il pulsante
Start (Il forno inizia la cottura)
Cottura con convection
1. Aprire lo sportello del forno e posizionare
l’alimento sul piatto girevole.
2. Premere più volte il pulsante "Convezione"
fino a selezionare la temperatura
desiderata..
3. Ruotare la manopola fino a selezionare il
tempo desiderato.
4. Chiudere lo sportello e premere il pulsante
d'Avvio (Il forno inizia la cottura)
I
35
Se si apre la porta durante la cottura il
funzionamento si interrompe automaticamente.
Per riprendere la cottura chiudere la porta.
Al termine del ciclo di cottura il forno si spegne
automaticamente e si attiva un segnale acustico.
NOTA: dopo l’uso, premere sempre il
pulsante Stop/Pausa due volte per azzerare le
impostazioni del microonde.
Se si apre la porta durante la cottura il
funzionamento si interrompe automaticamente.
Per riprendere la cottura chiudere la porta.
Al termine del ciclo di cottura il forno si spegne
automaticamente e si attiva un segnale acustico.
Questo forno ha 7 livelli di temperatura "a
convezione": 220°C, 200°C, 180°C, 160°C,
140°C, 120°C e 100°C.
Page 36

36
I
Cottura combinata a Microonde e con il
Grill
1. Aprire lo sportello del forno e posizionare
l’alimento sul piatto girevole.
2. Premere il pulsante "Cottura combinata
" fino a selezionare il programma voluto.
3. Premere più volte il pulsante "Potenza"
fino a selezionare il livello voluto.
4. Ruotare la manopola fino a selezionare il
tempo desiderato.
5. Chiudere lo sportello e premere il
pulsante d'Avvio (Il forno inizia la
cottura)
Per la cottura combinata grill/microonde
non occorre preriscaldare il grill.
Nella cottura combinata Microonde e Grill, i
livelli di potenza e tempo possono essere
modificati durante il funzionamento.
Livelli di potenza della Cottura combinata
Impostazione
di cottura
combinata
‘Combi 1’ X 1
‘Combi 1’ X 1
‘Combi 1’ X 1
‘Combi 1’ X 1
‘Combi 1’ X 1
‘Combi 2’ X 2
‘Combi 2’ X 2
‘Combi 2’ X 2
‘Combi 2’ X 2
‘Combi 2’ X 2
Premere il
pulsante
"Cottura
combinata"
Premere il
pulsante
potenza
X 1
X 2
X 3
X 4
X 5 Massima Grill
X 1 Convezione 100oC – 220oC
X 2 Convezione 100oC – 220oC
X 3 Convezione 100oC – 220oC
X 4 Convezione 100oC – 220oC
X 5 Convezione 100oC – 220oC
Cottura combinata a Microonde e con il
Convection
1. Aprire lo sportello del forno e posizionare
l’alimento sul piatto girevole.
2. Premere il pulsante "Cottura combinata"
fino a selezionare il programma voluto.
3. Premere più volte il pulsante
"Convezione" fino a selezionare la
temperatura voluta.
4. 4. Premere più volte il pulsante "Potenza"
fino a selezionare il livello voluto.
5. Ruotare la manopola fino a selezionare il
tempo desiderato.
6. Chiudere lo sportello e premere il
pulsante d'Avvio (Il forno inizia la
cottura)
Nella cottura combinata Microonde e
Convezione, i livelli di potenza e tempo
possono essere modificati durante il
funzionamento.
Potenza
Massima Grill
Massima Grill
Massima Grill
Massima Grill
Potenza
microonde
800W
550W
400W
250W
100W
800W
550W
400W
250W
100W
Page 37

I
37
Istruzioni per lo scongelamento
Il metodo di scongelamento a peso non è adatto per alcuni alimenti come il pane e la frutta.
Comunque questi alimenti si scongelano perfettamente con un ciclo di scongelamento manuale
impostando il livello di potenza a 250 W. Le informazioni su pagnotte e panini riportate sulla
tabella qui sotto offrono un metodo di
scongelamento del pane diverso da quello del programma di Scongelamento automatico (Auto
Defrost).
Alimento Preparazione (180W) Temp
Sistemarle su una griglia o su un foglio di
Pagnottelle
Pagnotta grande a
2 fette di pane Sistemarle su un foglio di carta da cucina. 45–60 sec. 5 min.
1 panino Sistemarle su un foglio di carta da cucina. 45–60 sec. 5 min.
2 panini Sistemarle su un foglio di carta da cucina. 1–11/2 min. 5 min.
Pasticcini
450g/1 lb
Tortino di
formaggio 450g/1
Torta (precotta)
450g/1 lb
Pasta per dolci
450g/1 lb
BURRO 250g/8.8
(1 confezione)
FRUTTA 225g/8
(bacche)
FRUTTA 450g/1
(bacche)
PASTI PRECOTTI
400g/14 oz
carta da cucina. Rigirare a metà del tempo
di scongelamento.
Sistemarle su una griglia o su un foglio di
carta da cucina. Rigirare a metà del tempo
fette
di scongelamento.
Togliere dalla confezione e sistemare su
un piatto.
Togliere dalla confezione e sistemare su
un piatto.
lb
Togliere dalla confezione e sistemare su
un piatto.
Togliere dalla confezione e sistemare su
un piatto.
Se è avvolto in carta stagnola, togliere la
oz
confezione e metterlo su un piatto.
Sistemarla su un piatto piano in un unico
oz
strato.
Sistemarla su un piatto piano in un unico
lb
strato.
Coprire con un piatto o con una pellicola
adesiva non in PVC. Per riscaldare,
passate in forno con microonde a livello
alto per 3–4 minuti.
8–10 min. 10–15 min.
10–13 min. 10 min
9–11 min. 15–30 min.
9–11 min. 15–30 min.
7– 9 min. 15–30 min.
7– 9 min. 15–30 min.
3– 4 min. 5–10 min.
5– 6 min. 5–10 min.
7– 8 min. 5–10 min.
7– 8 min 5–10 min.
Page 38

38
I
Consigli pratici
•
Tenere sempre pulito il forno –
evitare di far gocciolare gli alimenti
e non dimenticare di pulire sotto il
vassoio di vetro ed all'interno dello
sportello.
•
Quando si usa il forno a microonde
per cucinare, utilizzare
preferibilmente tegami rotondi od
ovali, muniti di coperchio.
•
Non usare tegami di metallo o con
decorazioni metalliche. Inoltre
alcune plastiche possono fondere
o deformarsi a causa del calore del
cibo.
•
Coprire gli alimenti durante la
cottura servendosi di un coperchio
di vetro, di un piatto o di carta
oleata.
•
Pane, dolci ed alimenti simili si
possono far scongelare
direttamente nel cestino per il pane,
o su un tovagliolo di carta.
•
Se si mettono a scongelare i
surgelati nei loro involucri, sarà
bene aprire queste confezioni.
Vanno evitate le confezioni
contenenti metallo o con
decorazioni metalliche, a meno che
non sia espressamente indicato
che si possono usare nel forno a
microonde. Togliere eventuali punti
metallici e legacci in filo metallico.
•
Però si possono usare pezzi più
piccoli di carta alluminizzata per
coprire parti di alimenti che
rischiano facilmente di cuocersi
troppo, come le cosce di pollo.
•
Gli alimenti con buccia o pelle (ad
es.: patate e salsicce) vanno
punzecchiati con una forchetta.
Non tentare mai di far bollire le
uova nel forno a microonde perché
potrebbero scoppiare.
•
Collocare i pezzi più grandi e di
maggior spessore vicino al bordo
del tegame e cercar di tagliare il
cibo in parti di grandezza uniforme.
Sistemare sempre l'alimento da
cuocere al centro del forno.
•
Per ottenere una cottura uniforme
è meglio mescolare o girare
l'alimento ogni tanto.
•
Impostare sempre un tempo di
cottura inferiore a quello indicato
nella ricetta per evitare il rischio di
sovracottura. Maggiore è la
quantità di cibo e più lungo sarà il
tempo di cottura.
•
Per cuocere le verdure, usare poca
acqua o non usarne affatto.
•
Ridurre l'uso di sale e spezie
rispetto alla cottura tradizionale.
•
Insaporire a cottura ultimata.
•
Una volta spento il forno, lasciare
riposare la pietanza per qualche
minuto, per ottenere una cottura
completa ed uniforme.
•
Accertarsi sempre che gli alimenti
siano veramente caldi fumanti,
prima di servire.
•
Per togliere piatti e pietanze dal
forno, usare presine o guanti da
cucina.
Page 39

I
39
Consigli utili
•
Liquefare il miele
Se il miele di un vasetto si è
cristallizzato, togliere il coperchio e
lasciare il vasetto in forno, con le
microonde a livello di potenza
medio, per 2 minuti.
•
Fondere cioccolato
Spezzare 100 g di cioccolato a
quadretti, quindi mettere i
pezzetti in una ciotola e farli
riscaldare a livello di potenza
alto per 1-2 minuti; mescolare
bene.
•
Ammorbidire o fondere il burro
Per fondere il burro, occorrono
solo pochi secondi a livello di
potenza alto.
Per ammorbidirlo, è meglio
scaldarlo in forno a livello di
potenza basso.
•
Far rinvenire o riscaldare il pane
Usare potenza media per pochi
secondi.
•
Per pelare facilmente l'aglio
Riscaldare 3 or 4 spicchi d'aglio
a livello di potenza alto per 15
secondi. Quindi far pressione su
una delle estremità finchè lo
spicchio non sguscia fuori.
•
Succhi di frutta
Per ottenere il massimo dalle
spremute di agrumi, è meglio far
scaldare i frutti a livello di potenza
alto per 15 secondi prima di
spremerli.
•
Per cuocere le farinate
Le farinate si possono cuocere
semplicemen-te nel piatto di
portata, senza avere pentole
attaccaticce da lavare. Seguire le
istruzioni del produttore
dell'alimento.
Page 40

40
I
Manutenzione e pulizia
Il forno va sempre tenuto pulito.
Residui di alimenti da schizzi e
versamenti attirano l'energia delle
microonde e così bruciano. Ciò
potrebbe ridurre l'efficienza del forno,
oltre a causare cattivi odori.
Non tentare di manomettere né
eseguire adattamenti o riparazioni su
qualsiasi parte del forno.
Le riparazioni vanno fatte
esclusivamente da un tecnico
qualificato del servizio assistenza.
Prima di ogni operazione di pulizia,
accertarsi che il forno sia spento e con
la spina staccata.
Toglierli dal vano cottura e pulirli con
un detergente delicato. Maneggiare
con cura il supporto del piatto rotante.
L'interno del forno ed il piatto rotante
raggiungono temperature elevate,
quind inon toccateli mai subito dopo
l'uso.
Pulizia dell'interno
La cavità interna del forno va sempre
tenuta pulita. Pulire subito eventuali
schizzi o versamenti di cibo. Se si
permette l'accumulo di depositi sulle
pareti del forno, sulla guarnizione e
sulla superficie dello sportello, ciò
andrà a ridurre il rendimento del forno
ed eventualmente a danneggiare il suo
interno. Per togliere depositi ed
incrostazioni usare un detergente
delicato liquido, acqua calda ed un
panno morbido pulito.
NON USARE MAI SU ALCUNA
PARTE DEL FORNO A
MICROONDE DETERGENTI
ABRASIVI, NE' PRODOTTI
COMMERCIALI PER LA PULIZIA
DEL FORNO, NE' PAGLIETTE IN
LANA D'ACCIAIO.
Per ammorbidire i depositi più duri, far
bollire per 2 o 3 minuti una tazza
d'acqua nel forno a microonde.
NON USARE MAI COLTELLI O
SIMILI UTENSILI PER TOGLIERE I
DEPOSITI DALLE SUPERFICI DEL
FORNO
Per togliere gli odori dalla cavità interna
del forno, far bollire per 5 minuti una
tazza d'acqua con due cucchiai di
succo di limone.
Pulizia delle guarnizioni dello
sportello
Pulire subito eventuali schizzi o
versamenti di cibo. Se si permette
l'accumulo di depositi sulle guarnizioni
dello sportello, ciò andrà a ridurre il
rendimento del forno ed eventualmente
a danneggiare il suo interno. Per
togliere depositi ed incrostazioni dalle
guarnizioni dello sportello usare un
detergente delicato liquido, acqua
calda ed un panno morbido pulito.
Page 41

I
41
Pulizia dell'esterno
Quando si pulisce il quadro comandi,
aprire sempre lo sportello del forno. Ciò
andrà ad impedire che si accenda per
sbaglio il forno. Le superfici esterne del
forno vanno lavate con un detergente
delicato liquido ed acqua, quindi si
risciacquano con acqua pulita per
togliere ogni residuo di detergente. Alla
fine asciugare con un panno morbido.
A questo proposito si possono usare
i detergenti spray per finestre, oppure
qualsiasi tipo di prodotto spray per la
pulizia della cucina. Non applicare mai
sulle superfici esterne del forno
detersivi abrasivi, né pagliette abrasive
e neppure prodotti chimicicorrosivi.
Onde prevenire eventuali danni ai
meccanismi interni del forno, impedire
ogni infiltrazione d'acqua attraverso i
fori di ventilazione.
Dati tecnici
Dimensioni esterne Larghezza
Dimensioni esterne Profondità
Dimensioni esterne Altezza
Dimensioni vano Larghezza
Dimensioni vano Profondità
Dimensioni vano Altezza
Volume 25 litre
Tensione
Fusibile
Potenza assorbita
Potenza microonde
Potenza grill
Peso
485 mm
426 mm
295 mm
335 mm
340 mm
260 mm
230V, 50 Hz
15 A
2850W
800W
1300W
17 kg
Page 42

42
I
Installazione
Posizione del forno
1.
Il forno va collocato su una
superficie piana e stabile, con
buona ventilazione attorno al forno.
Non collocate il forno vicino ad
altre fonti di calore, come il fornello
o un termosifone. Non usate il
forno se si è formata della
condensa sull’esterno dello
sportello: ciò significa che
nell’ambiente vi è troppa umidità.
2.
Non bloccate le aperture di
ventilazione del forno: esso
potrebbe surriscaldarsi e spegnersi
automaticamente in seguito allo
scatto della protezione
antisurriscaldamento. In questo
caso, il forno non può essere
messo in funzione se non quando
è ritornato alla normale
temperatura. Tra il forno e la parete
più vicina ad esso deve esservi uno
spazio libero di almeno 5 cm
perché la ventilazione sia
sufficiente. I piedini non devono
essere tolti.
3.
Togliete tutti i materiali
d’imballaggio dall’interno del forno,
e sistemate il supporto del piatto di
vetro ed il piatto stesso sul fondo
del vano del forno. Il forno non può
essere usato senza che il supporto
ed il piatto siano montati al loro
posto.
4.
Prima di usare il forno, passate un
panno umido nel suo interno, sullo
sportello e sulle superfici di tenuta.
5.
Collocate il forno il più possibile
lontano da apparecchi radio o
televisori. Se il forno è installato
troppo vicino a questi apparecchi,
possono verificarsi delle
interferenze.
6.
Se si posiziona il forno in un angolo
della cucina, lasciare uno spazio
libero di almeno 15 cm dalle pareti
e di altri 15 cm sopra il forno a
microonde.
Il forno si può installare dovunque
in cucina. Accertarsi però che il
forno venga collocato su una base
piana ed uniforme e che i fori di
ventilazione e la superficie di fondo
sotto il forno non siano ostruiti (per
garantire una ventilazione
adeguata).
Collegamento alla rete elettrica
Il forno è completo di cavo e spina per
il collegamento a presa di corrente per
230V, 50 Hz, 10A, con fusibile a parte.
Il collegamento a terra riduce al minimo
i rischi in caso di un eventuale corto
circuito. Assicuratevi che la tensione
della rete corrisponda a quella
dell’apparecchio.
Page 43

Se per collegare il forno alla presa
è necessaria una prolunga,
accertatevi che anche la prolunga
abbia la messa a terra.
Se il forno viene collegato ad una
presa senza messa a terra, si
rischia una scossa elettrica e
quindi eventuali danni alle persone
e/o alle cose.
Il forno è munito di un cavo speciale.
Se il cavo si danneggia, va sostituto
con un cavo equivalente da personale
specializzato. In caso di dubbi sul
collegamento elettrico del forno,
rivolgetevi ad un centro di Assistenza
Tecnico Autorizzato.
Importante! Grazie alle sue
dimensioni compatte, il forno può
essere collocato dovunque sul
piano di lavoro della cucina o su un
tavolo; inoltre lo potrete facilmente
portare con voi, ad esempio nella
vostra casa di villeggiatura.
Assicuratevi sempre che il forno
venga collocato su una base piana
e stabile ed accertatevi che i suoi
piedini siano sempre al loro posto,
in modo da consentire una
ventilazione adeguata.
I
43
Page 44

44
I
Informazioni in materia di sicurezza ambientale
Il simbolo
sul prodotto o sulla
confezione indica che il prodotto non
deve essere considerato come un
normale rifiuto domestico, ma deve
essere portato nel punto di raccolta
appropriato per il riciclaggio di
apparecchiature elettriche ed
elettroniche. Provvedendo a smaltire
questo prodotto in modo appropriato,
si contribuisce a evitare potenziali
conseguenze negative per l’ambiente e
per la salute, che potrebbero derivare
da uno smaltimento inadeguato del
prodotto. Per informazioni più
dettagliate sul riciclaggio di questo
prodotto, contattare l’ufficio comunale,
il servizio locale di smaltimento rifiuti o il
negozio in cui è stato acquistato il
prodotto.
Garanzia Europea
Questo elettrodomestico è garantito da
Electrolux in ciascuno dei paesi elencati alla fine
di questo manuale per il periodo specificato nella
garanzia dell'apparecchiatura o, in alternativa,
dalla legislazione vigente nel paese di utilizzo. Se
vi trasferite da un paese ad un altro, tra quelli
sotto elencati, anche la garanzia
dell'apparecchiatura sarà trasferita alle seguenti
condizioni:
•
La garanzia dell'apparecchiatura inizia a
decorrere a partire dalla data del primo
acquisto, che dovrà essere dimostrato
presentando un documento d'acquisto
valido emesso dal venditore.
•
La durata della garanzia e le condizioni
offerte (es. manodopera e/o ricambi)
faranno riferi-mento alle condizioni esistenti
nel nuovo paese di residenza per la stessa
tipologia di prodotti.
•
La garanzia è strettamente personale ed è
intestata all'acquirente originale
dell'apparecchia-tura e non può essere
trasferita ad un altro utilizzatore.
•
'apparecchiatura deve essere installata e
utilizzata in conformità alle istruzioni fornite
da Electrolux ed utilizzata solo in ambito
domestico e comunque non per attività
imprenditoriali o professionali.
•
L'apparecchiatura deve essere installata in
conformità a tutte le normative vigenti nel
nuovo paese di residenza.
Le disposizioni della presente Garanzia Europea
non pregiudicano i diritti previsti dalla legislazi-
one di cui il consumatore è e rimane titolare.
Page 45

Tartalomjegyzék
ő
Biztonsági el
Hogyan használjuk a
mikrohullámú süt
Forgótányér behelyezése 51
Az óra beállítása 52
Mikrohullámú f
Kézi felolvasztási tudnivalók 57
Mikrózási tanácsok 58
Tisztítás és ápolás 59
M
ű
szaki adatok 60
Elhelyezés 61
Weee 62
Service 82
írások 46
ő
t? 50
ő
zés 53
H
45
Page 46

46
H
Biztonsági előírások
• A beépített ajtózár kapcsoló
megakadályozza, hogy mikrohullám jöjjön
ű
ködő készülékből, amikor az ajtót
ki a m
kinyitja.
• Ne javítgassa saját maga a készüléket és
ne próbálja meg azt nyitott ajtóval
üzemeltetni, mert mikrohullám jöhet ki a
ő
készülékb
• Ne hagyja, hogy az élelmiszer-, vagy
tisztítószer-maradványok összegy
a süt
figyelembe a tisztításra vonatkozó
tudnivalókat.)
• Soha ne üzemeltesse a megsérült süt
várja meg amíg a szerviz szakembere
ellen
• Különösen fontos, hogy a süt
záródása tökéletes legyen és ne legyen
sérülés, vagy vetemedés az ajtón (3), a
zsanéron és az ajtózáron (4), valamint az
ajtó záródó felületén.
• A meghibásodott készüléket, beleértve a
csatlakozó vezetéket is, csak a jótállási
jegyben feltüntetett szerviz javíthatja!
Bármilyenilletéktelen beavatkozás a
készülékbe rendkívül kockázatos.
l.
ő
ajtó tömítő felületén. (Vegye
ő
rzi és megjavítja.
ő
ajtó
ű
ljenek
ő
t,
felolvasztásához készült. A mikró nem
alkalmas ipari, vagy laboratóriumi
használatra és a jótállás egyik esetre sem
ő
érvényes. A gyártó minden felel
sséget
elhárít magától, ha a készüléket nem a
ő
rendeltetésének megfelel
• Ne m
ű
ködtesse a sütőt üresen. Ha nincs
en használják.
benne élelmiszer, vagy folyadék, amelyek
elnyelik a mikrohullámú energiát, akkor
károsodhat a magnetron.
ő
• A gyerekek a süt
t csak felügyelet mellett
használhatják.
• Ne tárolja a készüléket a szabadban és ne
használja vizes, nedves környezetben.
ű
• Ne próbáljon meg papírt, vagy ruhanem
t
szárítani a mikróban, mert
meggyulladhatnak.
ő
• Ne használja a süt
teret más célra.
Használaton kívül ne tároljon benne
őző
papírtárgyat, f
edényt, vagy
élelmiszereket.
ő
• Soha ne távolítsa el a küls
ő
ajtót, vagy a kezel
panelt. Bármelyik
burkolatot, az
eltávolítása komoly sérülést okozhat
(nagyfeszültség).
• A készülék elhelyezésekor tartsa be az
ű
„Elhelyezés” cím
fejezetben leírtakat.
• Ez a készülék kizárólag a háztartásokban
ő
használt ételek f
zéséhez, sütéséhez és
Page 47

Edények biztonsága
ő
• A legtöbb üveg, üvegkerámia és h
üvegedény kifejezetten alkalmas a
mikrohullámú süt
Habár a mikrohullámú energia nem
melegíti fel a legtöbb h
üvegkerámiát, a bennük lév
élelmiszert
átforrósodhatnak. Ezért feltétlenül
használjon edényfogó keszty
edények kivételéhez.
A f
őző
edények alkalmasságának
ellen
ő
rzése
• Helyezze a f
pohár vízzel. 1 percig 800 W-os (100%-os)
teljesítménnyel üzemeltesse a készüléket.
Ha a f
őző
használja. Ha csak éppen, hogy meleg,
akkor felmelegítésre alkalmas, de f
nem. Ha az edény szobah
marad, akkor alkalmas mikrohullámú
f
ő
zésre.
• A papírtálca, a zsírpapír, a papírtörölköz
papírcsésze és tányér, a kartonpapír és a
fagyasztó csomagolás használata
rendkívül kényelmes. Ügyeljen azonban
arra, hogy a bennük lév
elnyelje a mikrohullámú energiát, mert
csak így kerülheti el a túlmelegedésüket.
• Számos m
a fagyasztókban használatos tároló
edények használhatók a mikrohullámú
süt
ő
ben. Mindig tartsa be a műanyag
edények gyártóinak az útmutatásait.
Kerülje a m
olyan esetben, amikor magas zsír-vagy
cukortartalmú étel van bennük, mert a
magas h
megolvadhatnak.
ő
ő
ben történő használatra.
ő
álló üveget és
ő
l azonban mégis
őző
edényt a mikróban egy fél
edény felforrósodik, akkor ne
ő
ő
élelmiszer
ű
anyag edény, csésze, valamint
ű
anyag edények használatát
hatására ilyenkor az edények
álló
ő
forró
ű
t az
ő
zésre
mérsékletű
ű
anyag, vagy papír edényben történő
• M
melegítéskor ne hagyja a süt
nélkül. Ha füstöt észlel, tartsa zárva az
ajtót és húzza ki a dugót a konnektorból.
• Fémedények és fémdíszítés
nem használhatók a mikrohullámú
süt
ő
ben. Kivételt csak azok az edények
képeznek, amelyeket kizárólag mikróban
történ
ő
használatra javasol a gyártója.
ű
k szájnyílású edények, üvegek nem
• Sz
használhatók a mikrohullámú süt
• Legyen nagyon óvatos, amikor az
edényfed
kicsapódó g
Élelmiszerek biztonsága
• Ne melegítsen ételt lezárt edényben, pl.
konzervdobozban. Mindig tegye át az ételt
egy megfelel
• A mikróban frit
történ
zsiradék h
ő
,
meggyulladhat.
• Kukorica pattogtatása végezhet
készülékben, de kizárólag olyan
csomagolásban, amelyet a gyártója
mikrózásra készített. Ez a m
kizárólag felügyelet mellett végezhet
• A "b
pl. burgonya, paradicsom, virsli - a f
el
a keletkez
távozhassanak és ne roncsolják szét
• FIGYELEM: Folyadékok (levesek, italok)
melegítése közben el
forrási h
g
g
csekély forrásnál is képes hirtelen heves
ő
t eltávolítja, hogy elkerülhesse a
ő
z miatti égési sérülést.
ő
tartóba.
ő
zés (bő zsiradékban
ő
sütés) nem végezhető, mert a
ő
foka nem ellenőrizhető és
ő
rös" és "héjas" élelmiszereket, - mint
ő
tt többször szurkálja meg villával, hogy
ő gő
zök könnyebben
ő
fordulhat, hogy a
ő
mérséklet elérése ellenére sincs
ő
zképződés. Ez az úgynevezett
ő
zkésleltetés a betett folyadékot már
H
ő
t felügyelet
ű
edények
ő
ben.
ő
a
ű
velet
ő
ő
.
zés
ő
47
ket.
Page 48

48
H
forrássá változtatni. A veszély elkerülése
érdekében kövesse az alábbi lépéseket:
ű
1. Kerülje az egyenes oldalú, sz
k
szájnyílású edények használatát.
2. Ne melegítse túl.
ő
3. Az edénybe való behelyezés el
tt keverje
fel és a melegítés félidejében ismételje
meg a keverést.
4. Felmelegítés után rövid ideig hagyja állni a
ő
felmelegített folyadékot a süt
ő
edény kivétele el
tt óvatosan keverje meg
ben, majd az
ismét.
• Néhány ételféleség, pl. egész tojás,
lekvárosüveg, stb. szétdurranhat a
ő
ben. Ha tojást akar sütni, akkor szúrja
süt
ki a sárgáját, takarja le és a sütés után
ő
hagyja 1 percig állni, miel
ő
t.
tet
tt eltávolítja a
VIGYÁZAT:
ő
• Ne er
ltesse kézzel a forgótányér forgását.
ő
lteti, hibás működést okozhat.
Ha er
• Fémedények használatánál gyakran
ő
dés jelentkezhet a sütőtérben. A
ívképz
ő
folyamatos ívképz
dés (szikrázás)
károsíthatja a készüléket. Ilyen esetben
ű
állítsa le a készülék m
ő
rizze a benne lévő edényt.
ellen
ködését és
• Ügyeljen arra, hogy ne takarja le és ne
ő
hagyja eltöm
dni a szellőző nyílásokat a
készülék tetején, hátoldalán, oldalán és az
alján.
Ne használja a készüléket ipari célra.
A készüléket kizárólag háztartási
használatra tervezték.
őző
Tartsa be az el
ekben ismertetett fontos
tudnivalókat.
Kicsomagolás
A készülék kicsomagolása után feltétlenül
ő
rizze, hogy nem érte-e valamilyen
ellen
sérülés. Ha bármilyen károsodást, vagy hiányt
észlel, azonnal forduljon ahhoz a
ő
keresked
süt
boríthatja, amelyet a használatot megel
höz, ahol a készüléket vásárolta. A
ő
t is és a tartozékokat is védőfólia
őző
en
el kell távolítani. Ügyeljen ara, hogy a
gyerekek ne tudjanak játszani a csomagoló
anyagokkal. Fulladásveszély.
FIGYELMEZTETÉS: grillezés, holégkeverés
és kombinált funkció használata esetén a
készülék burkolata és ajtaja felmelegedhet.
Page 49

Használható edények és tartozékok
Az alábbi táblázatban segítséget adunk az eszközök és az anyagok kiválasztásának
megkönnyítéséhez és ahhoz, hogy a kiválasztott edényben a f
legyen.
Anyag Eszköz Sütés
mikrohullámmal
Kerámia és üveg Hőálló üvegáru IGEN
Porcelán Fémdíszítés
Cserépedény IGEN
Műanyag Mikrohullám-álló IGEN
Fém Fémserpeny
Papír Pohár, tányér,
Zsírpapír IGEN
Fa NEM
Tartozékok Forgótányér
Üveg IGEN
Üvegáru
fémdíszítéssel
Ólomkristály NEM
nélkül
Műanyag edények IGEN
ő
Alumíniumfólia IGEN*
szalvéta
Görgőtámasz
NEM
IGEN
NEM
IGEN
IGEN
IGEN
IGEN = Alkalmas eszközök és tartozékok.
NEM = Nem alkalmazható eszközök és tartozékok.
MEGJEGYZÉS: * Az alufólia csak lefedésre alkalmas a mikrohullámú készülékben.
ő
zés biztonsággal végezhető
H
49
Page 50

50
H
Hogyan használjuk a mikrohullámú sütőt?
ő
1. Süt
2. Kijelz
3. Teljesítmény
4. Grill
5. Convection
6. Combi
7. Automatikus felmelegítés
8. Automatikus felolvasztás
9. Stop
10. Start
11. Id
12. Óra
ajtó
ő
beállító gomb
ő
ablak
o
C
Page 51

Forgótányér behelyezése
Forgótányér támasz
Forgótányér. Speciális h
1. Helyezze a forgótányér támaszt a süt
aljára.
2. Helyezze rá a forgótányért a támaszra a
képen látható módon. Ügyeljen arra, hogy
a forgótányér aljának közepén lév
kialakítás pontosan illeszkedjen a
meghajtó tengelyre. Soha ne használja a
forgótányért a fels
forgatva.
• F
ő
zésnél a forgótányér támasznak is és a
forgótányérnak is a mikróban kell lennie.
• A melegítend
forgótányérra kell ráhelyezni.
• A forgótányér az óramutató járásával
megegyez
foroghat. Ez teljesen normális jelenség.
ő
en és azzal ellentétesen is
ő
álló üvegből készült.
ő
oldalával lefelé
ő
, főzendő ételt mindig a
ő
tér
ő
H
51
Page 52

52
H
Az óra beállítása
ő
Amikor el
süt
ször csatlakoztatja a mikrohullámú
ő
t az elektromos hálózatra, vagy
áramszünet után ismét van áramellátás a
ő
lakásban, akkor a kijelz
ablakban a „ : 0„
villog.
1. Érintse meg az óra (2) gombot.
2. Érintse meg az óra gombot 3 mp-ig.
3. A szabályzó gomb segítségével állítsa be
ő
a „4:00” id
t
4. Érintse meg az óra gombot.
5. A szabályzó gomb segítségével állítsa be
ő
a „4:30” id
t.
6. Érintse meg az óra gombot. (A leírt
ő
lépések elvégzését követ
en az óra
beállításra került.)
Gyermekbiztonsági zár
ő
Az Ön által vásárolt mikrohullámú süt
egy
olyan gyermekbiztonsági zárfunkcióval
rendelkezik, amely megakadályozza, hogy a
gyerekek véletlenül bekapcsolják a készüléket.
A funkció beállítása után a készülék addig
ű
ködik, ameddig a zárolást nem törli.
nem m
Érintse meg egyszerre a Stop 3 mp-ig a
gombokat..
A zárolás törléséhez nyomja meg újra
egyszerre a Stop 3 mp-ig a gombokat.
ő
leállítása
A süt
ő
A használatban lév
sütő kétféle módon
állítható le:
1. Nyomja meg a Stop gombot.
ő
• A süt
a Start (gyors kezdés) gomb
megnyomásával indítható újra.
• A Stop/Clear gomb ismételt
megnyomásával folytatódik az
aktuális program.
2. Nyissa ki az ajtót
ő
• A süt
az ajtó zárásával és a Start
(gyors kezdés) gomb
megnyomásával indítható újra.
• A Stop gomb megnyomásával
ő
dik az aktuális progran.
törl
Minden egyes sütési folyamat
ő
befejez
désekor a hűtőventilátor tovább
üzemel az ajtó nyitásáig
Page 53

Mikrohullámú főzés
1. Nyissa ki az ajtót, helyezze be az ételt a
forgótányérra és zárja be az ajtót.
2. Nyomogassa addig a Teljesítmény
gombot, amíg a szükséges
teljesítményfokozatot eléri.
3. A beállító gomb elforgatásával állítsa be
a szükséges f
ő
zési időt.
4. Nyomja meg a Start gombot. A készülék
ű
ködése megkezdődik.
m
H
Gyors kezdés
A Start gomb megnyomása lehet
hogy a mikrohullámú süt
ő mű
ő
vé teszi,
ködését 30 mp-ig
teljes teljesítményen (800 W) indítsa el.
A Start gomb minden egyes megnyomásával
ő
zési időt 30 mp-enként növelheti.
a f
53
A süt
ő
kikapcsolásához nyomja meg a
Stop/Clear gombot.
Mikrohullámú teljesítmény táblázat
Teljesítmény
beállítás
Felhasználási javaslat
100W Melegentartó funkció: Ételek melegen tartásához
250W Felolvasztó funkció: Fagyasztott élelmiszerek felolvasztásához
400W
550W
Közepes fokozat: Gyorsabb felolvasztáshoz, casserole és ragu
felmelegítéséhez
Felmelegítő fokozat: Kekszek sütéséhez, puddingok készítéséhez,
készételek felmelegítéséhez.
Maximális teljesítmény: Forraláshoz, levesek felmelegítéséhez,
800W
főzéséhez, zöldségek főzéséhez, barnító tálban készült ételek
felmelegítéséhez.
Vigyázat: Minden használat után figyeljen
arra, hogy ne felejtse el kétszer megnyomni
a Stop/Clear gombot. Ezzel biztosíthatja,
ő
hogy a süt
kikapcsolt állapotba kerül.
Page 54

54
H
Automatikus felolvasztás
1. Nyissa ki az ajtót és helyezze az ételt a
forgótányérra.
2. Nyomja addig az „Auto Defrost”
(automatikus felolvasztás) gombot, amíg
a kívánt programot eléri.
3. Forgassa el addig a beállító gombot,
amíg az élelmiszer mennyiségének
ő
megfelel
értéket eléri.
4. Zárja be az ajtót.
5. Nyomja meg a Start gombot. A
ő
felolvasztási folyamat megkezd
dik.
Felolvasztási javaslatok
1. Ha bizonytalan, akkor jobb alábecsülni a
ő
felolvasztási id
ő
alatt tovább folytatódik.
állásid
t. Az étel felolvadása az
2. Válassza szét az élelmiszert amilyen
hamar csak lehetséges.
ő
3. A felolvasztási id
felénél forgassa meg
az ételt.
4. A felolvadt részeket - amilyen hamar
lehetséges - távolítsa el.
ő
5. Felolvasztás el
tt távolítsa el, vagy
nyissa ki a csomagolást.
6. Helyezze minél nagyobb edénybe az ételt,
hogy a felolvasztás alatti forgatás és
kavargatás minél könnyebb legyen.
7. A baromfi felolvasztását lefelé fordított
en -
ő
mellel végezze, félid
ben fordítsa meg,
vagy tartson szünetet. Az érzékeny
felületek, mint pl. a szárnyak, lábak
ű
felolvasztását kisméret
fóliával
beburkolva végezze.
ő
Nagyon fontos az állásid
ő
zésnek. Erre azért van szükség, hogy az étel
f
teljes tömegében egyenletes h
felolvadjon a sütést megel
, amely része a
ő
fokúra
őző
en.
ő
Kézi felolvasztásra is van lehet
ség, ebben
az esetben 180 W-os teljesítményt használjon.
450 g-nál nagyobb mennyiség
felolvasztásakor - az étel fajtájától függ
ő
meggyorsítható a felolvasztást oly módon,
hogy a készüléket 1-3 percig 100%-os (800
W) teljesítményen üzemelteti, majd 180 W-on
ű
folytatja tovább a m
ködését az étel teljes
felolvasztásig
FIGYELEM: Az automatikus felolvasztási funkciót az alábbi táblázat alapján állítsa be:
Automatikus
program
Meat Joint X 1
Steak X 2
Chicken Quarters X 3
Fish X 4
Nyomja meg a
gombot
Kijelző ablak Adag
d - 1
d - 2
d - 3
d - 4
0.2kg – 2.0kg
0.2kg – 2.0kg
0.2kg – 2.0kg
0.2kg – 2.0kg
Page 55

Automatikus felmelegítés
1. Nyissa ki az ajtót és helyezze az ételt a
4. Zárja be az ajtót.
5. Nyomja meg a Start gombot. A
felolvasztási folyamat megkezd
forgótányérra.
2. Nyomja addig az „Auto Cook”
(automatikus felmelegítés) gombot, amíg
a kívánt programot eléri.
3. Forgassa el addig a beállító gombot,
amíg az élelmiszer mennyiségének
ő
megfelel
értéket eléri.
Figyelem! Vegye figyelembe az alábbi
táblázat ajánlásait.
Az automatikus felolvasztási funkciót az alábbi táblázat alapján állítsa be:
Automatikus
program
‘Baked Potato’ X 1
‘Rice / Pasta’ X 2
‘Roast Beef’ X 3
‘Roast Poultry’ X 4
Nyomja meg a
gombot
Kijelző
ablak
C - 1
C - 2
C - 3
C - 4
Adag
1 – 6 potatoes
0.2kg – 0.5kg
0.9kg – 1.5kg
0.2kg – 2.0kg
ő
zés grillel
F
1. Nyissa ki az ajtót és helyezze az ételt a
forgótányérra.
2. A teljesítménybeállító gombbal válassza
ki a grill funkciót.
3. Forgassa el addig a beállító gombot,
amíg az élelmiszer mennyiségének
ő
megfelel
értéket eléri.
4. Zárja be az ajtót.
5. Nyomja meg a Start gombot. A
ő
felolvasztási folyamat megkezd
dik.
Convection
1. Nyissa ki az ajtót és helyezze az ételt a
forgótányérra.
2. A teljesítménybeállító gombbal válassza
ki a convection funkciót.
3. Forgassa el addig a beállító gombot,
amíg az élelmiszer mennyiségének
ő
megfelel
értéket eléri.
4. Zárja be az ajtót.
5. Nyomja meg a Start gombot. A
felolvasztási folyamat megkezd
H
ő
dik.
ő
dik.
55
Ha a sütési folyamat alatt kinyitja az ajtót,
ő
akkor a süt
zárja be az ajtót. A sütési id
kikapcsol. A sütés folytatásához
ő
leteltekor a
mikrohullám és a grill kikapcsol és ezt egy
ő
hang jelzi.
cseng
o
Convection; 220
C, 200oC, 180oC, 160oC, 140oC, 120oC & 100oC.
Ha a sütési folyamat alatt kinyitja az ajtót,
ő
akkor a süt
zárja be az ajtót. A sütési id
kikapcsol. A sütés folytatásához
ő
leteltekor a
mikrohullám és a grill kikapcsol és ezt egy
ő
hang jelzi.
cseng
Page 56

56
H
Sütés mikrohullám és grill kombinálásával
(Combi 1)
1. Nyissa ki az ajtót és helyezze az ételt a
forgótányérra.
2. A teljesítménybeállító gombbal válassza
ki a combi funkciót.
3. Nyomja addig az „ Teljesítmény” gombot,
amíg a kívánt programot eléri.
4. Forgassa el addig a beállító gombot,
amíg az élelmiszer mennyiségének
megfelel
ő
értéket eléri.
5. Zárja be az ajtót.
6. Nyomja meg a Start gombot. A
felolvasztási folyamat megkezd
ő
dik.
Sütés mikrohullám és convection
kombinálásával (Combi 2)
1. Nyissa ki az ajtót és helyezze az ételt a
forgótányérra.
2. A teljesítménybeállító gombbal válassza
ki a combi funkciót.
3. Nyomja addig az „ convection” gombot,
amíg a kívánt programot eléri.
4. Nyomja addig az „ Teljesítmény” gombot,
amíg a kívánt programot eléri.
5. Forgassa el addig a beállító gombot,
amíg az élelmiszer mennyiségének
megfelel
ő
értéket eléri.
6. Zárja be az ajtót.
7. Nyomja meg a Start gombot. A
felolvasztási folyamat megkezd
A mikrohullám és grill kombinációs
üzemmódban a teljesítmény beállítása és a
sütési id
ő
addig változtatható meg, ameddig a
süt
ő
mikrohullámú üzemmódban dolgozik.
A mikrohullám és grill kombinációs
üzemmódban a teljesítmény beállítása és a
sütési id
ő
addig változtatható meg, ameddig a
ő
mikrohullámú üzemmódban dolgozik.
süt
Az combi funkciót az alábbi táblázat alapján állítsa be:
Combi Nyomja
meg a
combi
Nyomja meg a
Teljesítmény
gombot
Teljesítmény Microwave
Teljesítmény
gombot
‘Combi 1’ X 1 X 1 Max Grill 800W
‘Combi 1’ X 1 X 2 Max Grill 550W
‘Combi 1’ X 1 X 3 Max Grill 400W
‘Combi 1’ X 1 X 4 Max Grill 250W
‘Combi 1’ X 1 X 5 Max Grill 100W
‘Combi 2’ X 2 X 1 Convection 100oC – 220oC 800W
‘Combi 2’ X 2 X 2 Convection 100oC – 220oC 550W
‘Combi 2’ X 2 X 3 Convection 100oC – 220oC 400W
‘Combi 2’ X 2 X 4 Convection 100oC – 220oC 250W
‘Combi 2’ X 2 X 5 Convection 100oC – 220oC 100W
ő
dik.
Page 57

H
Kézi felolvasztási tudnival ók
Néhány ételfajta (kenyér, gyümölcs) felolvasztása jobb eredményt ad ezen a 180 W
teljesítményen való felolvasztáskor.
Étel Előkészítés Időszükséglet Állásidő
57
Kis méretű egész
kenyér
Nagy méretű
szeletelt kenyér
2 szelet Tegye papírtörölközőre. 45-60 mp 5 perc
1 zsemlye Tegye papírtörölközőre. 45-60 mp 5 perc
2 zsemlye Tegye papírtörölközőre. 1-1,5 perc 5 perc
Torta (450 g) Távolítsa el a csomagolást és tegye
Sajtos sütemény
(450 g)
Pite (450 g) Távolítsa el a csomagolást és tegye
Tészta (450 g) Távolítsa el a csomagolást és tegye
250 g (1 csomag) Távolítsa el róla a fóliát és tegye tányérra. 3-4 perc 5-10 perc
Puha bogyós
gyümölcs (225 g)
Puha bogyós
gyümölcs (450 g)
Tányéros készétel
450 g
Zöldségek Főzés előtt nem szükséges a zöldségeket
Mikrohullámálló rácsra, vagy
papírtörölközőre tegye. A felolvasztás
félidejében fordítsa meg.
Mikrohullámálló rácsra vagy
papírtörölközőre tegye. A felolvasztás
félidejében fordítsa meg.
tányérra.
Távolítsa el a csomagolást és tegye
tányérra.
tányérra.
tányérra.
Egy rétegben helyezze lapos tányérra. 5-6 perc 5-10 perc
Egy rétegben helyezze lapos tányérra. 7-8 perc 5-10 perc
Takarja le tányérral. Melegítse elő 100%-
os (9800 W) mikrohullámú teljesítményen
3-4 percig.
felolvasztani. Indokolt esetben minden
zöldség felolvasztható 100 %-on (800 Won).
8-10 perc 10-15 perc
10-13 perc 10 perc
9-11 perc 15-30 perc
9-11 perc 15-30 perc
7-9 perc 15-30 perc
7-9 perc 15-30 perc
7-8 perc 5-10 perc
Page 58

58
H
Mikrózási tanácsok
• Mindig tartsa a mikrót tisztán, lehet
kerülje el az ételek kifröccsenését és ne
felejtkezzen el megtisztítani a forgótányért,
valamint a süt
• Mikrózásnál részesítse el
rendelkez
• Ne használjon fém, vagy fémdíszítés
edényeket. Bizonyos m
az étel forróságától megolvadhatnak.
• F
ő
zéskor takarja le az ételeket.
Használjon erre a célra üvegfed
vagy zsírálló papírt.
• Tésztát, kenyeret és hasonlókat
közvetlenül a kenyértartó kosárban is,
vagy szalvétán is felolvaszthat.
• Ha a fagyasztott ételt a c somagolásában
melegíti fel, akkor a csomagolást el
ki kell nyitni. Ha a csomagolás fémet, vagy
fémdekorációt is tartalmaz, akkor azt csak
akkor nem kell eltávolítani, ha a gyártó
kifejezetten erre a célra ajánlja. Távolítsa
el a fém zárókapcsot is.
ő
belsejét.
ő
ő
kerek, vagy ovális edényeket.
ű
anyag edények
ő
leg
nyben a fedővel
ű
ő
t, tányért,
ő
ször
• Mindig rövidebb f
mint amennyit a receptkönyvek írnak,
hogy a túlf
mennyiségek hosszabb f
igényelnek.
• Zöldségek párolásánál ne használjon vizet,
vagy ha kell, akkor csak kis mennyiséget.
• Kevesebb sót és f
amennyit a hagyományos f
szokott.
• F
ű
szerezzen később.
ő
• A f
• Mindig t
• Mindig használjon edényfogót, vagy
zés befejezése után hagyja állni az
ételt, hogy jobb eredményt kapjon.
tálalja.
keszty
ű
t, amikor az edényt kiveszi a
készülékb
ő
zési időt állítson be,
ő
zést elkerülje. A nagyobb
ő
zési időt
ű
szert használjon, mint
ő
zésnél
ű
zforró legyen az étel, mielőtt
ő
l.
• Kisebb darab alumínium fólia használható
a mikróban olyan részek burkolására, ahol
a túlf
ő
zés elkerülése a cél (pl. csirkeláb).
• A nagyobb, sovány darabokat a h
edény szélére tegye és ha lehet, próbálja
a nagyobb darabokat kisebb méret
felvágni. Az edényt mindig a készülék
közepére helyezze.
• Az étel egyenletesen fog elkészülni, ha
id
ő
nként megkeveri, vagy megforgatja.
ő
álló
ű
ekre
Page 59

Tisztítás és ápolás
A süt
ő
nek mindig tisztának kell lennie. Az
ételmaradványok elnyelik a mikrohullámú
energiát és eléghetnek. Ez csökkenti a süt
hatékonyságát és kellemetlen szagokat
eredményezhet. Ne próbálja meg saját maga
a süt
ő
javítását, vagy beállítását. A
meghibásodott készülék javítását, beleértve a
csatlakozó vezeték cseréjét is, csak a jótállási
jegyben megjelölt szerviz végezheti.
Ügyeljen arra, hogy bármilyen tisztítási
ő
munka el
választva az elektromos hálózatról!
Tartozékok tisztítása (forgótányér és
A süt
mosogatószeres vízben tisztítsa meg a
tartozékokat. A forgótányér támaszát óvatosan
kell tisztítani.
VIGYÁZAT! A süt
nagyon felforrósodhat, ezért a használat
után ne érintse meg azonnal!
Bels
A süt
felületén visszamaradó szennyez
elnyelik a mikrohullámú energiát, ezáltal
csökkentik a süt
károsíthatják a süt
A szennyez
kevés folyékony mosószert, meleg vizet és
puha ruhát.
tt a mikrohullámú sütő le legyen
támasz)
ő
térből történő eltávolításuk után
ő
tér és a forgótányér
ő
tisztítás
ő
oldalfalain, az ajtó tömítésén és az ajtó
ő
ő
hatékonyságát, sőt
ő
belsejét is.
ő
dés eltávolításához használjon
dések
ő
H
59
SOHA NE HASZNÁLJON MARÓ
TISZTÍTÓSZERT, KERESKEDELMI SÜT
TISZTÍTÓT, VAGY FÉMSZÁLAS TISZTÍTÓ
PÁRNÁT A MIKROHULLÁMÚ SÜT
EGYETLEN RÉSZÉNEK A TISZTÍTÁSÁHOZ
SEM.
A makacs szennyez
3 percig forraljon egy csésze vizet a mikróban.
SOHA NE HASZNÁLJON KÉST, VAGY
BÁRMILYEN MÁS ESZKÖZT A
SZENNYEZ
Ő
TÖRTÉN
A süt
eltávolításához a következ
egy csésze vízbe 2 ev
azt 5 percig forralja a mikróban.
Küls
A kezel
Ezzel elkerülheti a véletlenszer
A küls
meleg vízzel tisztítsa meg egy puha ruha
segítségével. A mosogatószeres ruhával való
letörlés után tiszta vizes ruhával, majd száraz
ruhával törölje át a felületeket.
Ablaktisztító, vagy hasonló konyhai tisztítóspray is használható az ajtó ablakához. Soha
ne használjon maró, karcoló vegyszert, mert
károsíthatja a felületet. A károsodás elkerülése
érdekében fokozottan ügyelni kell arra, hogy a
szell
körülmények között ne juthasson be.
ELTÁVOLÍTÁSÁHOZ.
ő
ben lévő kellemetlen szagok
ő
tisztítás
ő
panel tisztításakor nyissa ki az ajtót.
ő
felületeket enyhe mosogatószeres
őző
nyílásokba víz semmilyen
ő
dések eltávolításához 2-
Ő
DÉS SÜTŐFELÜLETRŐL
ő
t ajánljuk: tegyen
ő
kanál citromlevet és
ű
bekapcsolást.
Ő
Ő
Page 60

60
H
Műszaki adatok
Szélesség 485 mm
Mélység 426 mm
Magasság 295 mm
Sütőtéri méretek Szélesség 335 mm
Sütőtéri méretek Mélység 340 mm
Sütőtéri méretek Magasság 260 mm
Ű
rtartalom 25 litre
Feszültség 230V, 50 Hz
Biztosíték igény 15 A
Teljesítmény-felvétel 2850W
Mikrohullámú teljesítmény 800W
Grill 1300W
Tömeg 17 kg
Zajkibocsátás 60 dB(A)
Page 61

Elhelyezés
1. Távolítson el minden reklámfóliát az ajtóról.
2. Helyezze a süt
A felületnek er
lennie, hogy biztonsággal megtartsa a
süt
ő
(13,5 kg-os) és a benne lév
élelmiszer tömegét. A vízszintbe állítással
elkerülheti a vibrációs és egyéb
kellemetlen zajokat.
3. A süt
ő
t víztől és hőtől tartsa távol. A
sugárzó h
hatékonyságát és hibás m
vezet. Ugyanezt eredményezi a víz is.
Mindkett
helyezze el a készüléket.
ő
t egy vízszintes felületre.
ő
snek és stabilnak kell
ő
ő
csökkenti a sütő
ű
ködéshez
őtő
l megfelelő távolságban
edény +
H
61
ő
távolságra, valamint a megfelel
szell
ő
zésre feltétlenül ügyelni kell.
Elektromos csatlakoztatás
A készüléket 230 V / 50 Hz-es hálózathoz
csatlakoztatható földelt csatlakozó vezetékkel
és dugóval szállítják. A földelés minimálisra
csökkenti egy esetleges rövidzár miatti
kockázatot.
Ha a süt
csatlakoztatja a hálózatra, akkor ügyeljen arra,
hogy a hosszabbítónak is földeltnek kell lennie.
A hosszabbító terhelhet
felelnie a készülék teljesítményének.
ő
t egy hosszabbítón keresztül
ő
ségének meg kell
4. Ne zárja le a készülék szell
ű
Ha a m
eltöm
hibás m
nyílásokon forró leveg
készülék hátoldala és a fal között is
megfelel
biztosítani. Ne tegyen a függöny háta
mögé függönyt.
5. A süt
rádió és TV-készülékt
megfelel az EEC direktíva szerinti rádió
zavarsz
interferencia zavar azonban felléphet, ha
túl közel helyezi el a rádió, vagy TV
készülékhez.
6. Sarokban történ
legalább 5 cm-es rést hagyjon a fal és a
szell
Fontos: A süt
konyhában. Az elhelyezésnél azonban a
vízszintre, a h
ködés alatt a szellőző nyílások
ő
dnek, akkor a sütő túlmelegszik és
ű
ködést eredményez. A szellőző
ő
szabad távolságot kell
ő
t a lehető legtávolabb helyezze el a
ű
rési követelményeknek. Néhány
ő
elhelyezésnél is
őző
nyílások között.
ő
bárhol elhelyezhető a
ő
forrástól és víztől való
őző
nyílásait.
ő
jön ki, ezért a
ő
l. A készülék
Figyelem: A készülék földeletlen
ő
konnektorból nem üzemeltethet
.
Ha a megfelelő konnektor nem áll a
rendelkezésére, akkor szakemberrel
kell a megfelelő kiépíttetést
elvégeztetni.
Page 62

62
H
Weee
A terméken vagy a csomagoláson található
szimbólum aztjelzi, hogy a termék nem kezelhető
háztartási hulladékként.Ehelyett a terméket el kell
szállítani az elektromos éselektronikai készülékek
újrahasznosítására szakosodottmegfelelő begyűjtő
helyre.Azzal, hogy gondoskodik ezen termék helyes
hulladékbahelyezéséről, segít megelőzni azokat, a
környezetre és az emberiegészségre gyakorolt
potenciális kedvezőtlen
következményeket,amelyeket ellenkező esetben a
termék nem megfelelőhulladékkezelése
okozhatna.Ha részletesebb tájékoztatásra van
szüksége a termékújrahasz nosítására vonatkozóan,
kérjük, lépjen kapcsolatba ahelyi önkormányzattal,
a háztartási hulladékok kezelését végzőszolgálattal
vagy azzal a bolttal, ahol a terméket vásárolta.
Page 63

Conţinut
ISiguran
G
Cum s
Setarea ceasului 70
G
Recomand
automat
Sugestii pentru utilizarea microundelor 76
Ingrijire
Date tehnice 78
Instalare 79
Weee 81
Garan
Service 82
ţ
a utilizării- instrucţiuni 64
ă
titul la microunde 68
ă
utilizaţi cuptorul cu microunde 69
ă
titul cu microunde 71
ă
ri pentru decongelarea
ă
75
ş
i Curăţire 77
ţ
ie Europeană 81
63
Page 64

64
ISiguranţa utilizării- instrucţiuni
ă
• Intrerup
ş
i încorporate împiedică cuptorul cu
microunde s
deschis
• Nu v
sau nu încerca
cuptorul când u
întrucât operarea lui cu u
ă
poate expune energiei
v
microundelor.
• Nu l
ăş
impr
ă
se acumuleze pe suprafeţele
s
izolatoare ale u
ăţ
Cur
ăţ
cur
• Nu pune
este defect pân
un personal calificat
• Este deosebit de important ca u
cuptorului s
ş
a (ondulări), 2) balamalele şi zăvoarele
u
(stricate sau nesigure), 3) etan
ş
ilor şi suprafeţele de etanşare su să nu
u
prezinte defec
• Sub nici un pretext sa nu încerca
• Nu disloca
• Instala
toarele de siguranţă cuplate
ă
funcţioneze când uşa este
ă
.
ă
atingeţi de întrerupătoare,
ţ
i să puneţi în funcţiune
ş
a este deschisă
ş
a deschisă
ăsaţ
i ca stropii de mâncare
tiaţi sau scamele lăsate de lavetă
ş
ii. Vezi secţiunea
ire şi Ingrijire pentru instrucţiunile de
ire.
ţ
i în funcţiune cuptorul dacă
ă
când nu este reparat de
ş
a
ă
se închidă complet şi ca 1)
şă
rile
ţ
iuni.
ţ
ă
reparaţi cuptorul prin forţe
s
ţ
proprii. Repara
persoane f
provoca accidente sau func
necorespunz
Contacta
localitate.
sau tabloul de comand
expune
ţ
în conformitate cu
iile efectuate de
ără
experienţă pot
ţ
ionarea
ă
toare a aparatului.
ţ
i Atelierul de Service din
ţ
i carcasa exterioară, uşa
ă
întrucât vă
ţ
i unui voltaj extrem de înalt.
i sau poziţionaţi acest cuptor
i
“INSTRUCTIUNILE DE INST ALARE” pe
ăsiţ
care le g
• Utiliza
Nu utiliza
cuptorului pentru a stoca produse. Nu l
ăţ
i de hârtie, ustensile de bucătărie sau
buc
alimente în interiorul cuptorului când acesta nu
este utilizat.
Testarea compatibilit
ă
tit
g
i în manual.
ţ
i aparatul pentru destinaţia lui
ş
a cum este ea descrisă în manual.
a
ţ
Nu utiliza
acest cuptor conceput pentru a
înc
preparatele culinare. El nu a fost
proiectat pentru utilizare industrial
sau în laborator
comercial
invalida garan
• Nu pune
• Este nevoie de o supraveghere
• Nu p
• Nu încerca
i chimicale corozive în
ă
lzi, găti sau decongela
ş
i nici pentru una
ă
întrucât acest lucru ar
ţ
ia.
ţ
i cuptorul în funcţiune
când este gol. Dac
ţ
ine alimente sau apă care
con
ă
absoarbă energia
s
microundelor, tubul
magnetronului se poate
deteriora.
ă
a cuptorului când este
atent
utilizat de copii.
ă
straţi acest aparat în
exterior. Nu-l folosi
apropierea apei.
ţ
i să uscaţi haine
sau ziare în cuptor. Aceste
articole se pot aprinde.
ţ
i spaţiul gol din interiorul
ăţ
ii veselei utilizate la
ă
el nu
ţ
i în
ăsaţ
ă
i
Page 65

65
• Puneţi un vas de gătit în cavitate
ă
împreun
ap
timp de un minut. Dac
înfierbântat, nu trebuie folosit. Dac
înc
reînc
Dac
poate fi folosit la g
• Serve
farfuriile, ce
de produse congelate sunt ustensile
extrem de utile. Asigura
c
care s
posibilitatea supraînc
Multe tipuri de farfurii de plastic, ce
recipiente pentru produse congelate
ambalaje din plastic pot fi utilizate în
cuptorul cu microunde.
• Nu l
uita
înc
hârtie sau alte recipiente combustibile.
Dac
opri
oprirea fumului.
• Ustensilele metalice
margini metalice nu ar trebui introduse în
cuptorul cu microunde, dac
recomandate special în acest sens.
• Recipientele cu deschideri mici, de
exemplu sticlele, nu trebuie utilizate la
g
îndep
evita arsurile provocate de aburi.
cu un pahar pe jumătate plin cu
ă
. Acţionaţi cuptorul la 800W (100%)
ă
vasul s-a
ă
lzit uşor, poate fi utilizat la
ă
lzirea mâncării dar nu şi la gătit.
ă
a rămas la temperatura încăperii,
ă
titul cu microunde.
ţ
elele de hârtie, hărtia de parafină,
ş
tile cartoanele, ambalajele
ţ
i-vă întotdeauna
ă
recipientele sunt pline cu alimente
ă
absoarbă energia, evitând astfel
ă
lzirii.
ăsaţ
i cuptorul nesupraveghiat, şi
ţ
i-vă la el din timp în timp atunci când
ă
lziţi sau gătiţi mâncare în plastic,
ă
observaţi fum, ţineţi uşa închisă şi
ţ
i sau deconectaţi cuptorul până la
ş
i ustensilele cu
ă
nu sunt
ă
titul cu microunde. Fiţi precauţi când
ă
rtaţi capacul unei farfurii pentru a
Siguranţa alimentel o r
• Nu înc
ă
lziţi mâncare în căni. Transferaţi
întotdeauna alimentele în recipiente
potrivite.
ă
ş
s-a
ti,
ş
i
• Nu pr
• Pute
• In
ATENTIE: Când înc
b
ă
supraînc
fierbere poate avea loc f
ce poate duce la darea în clocot a lichidului
fierbinte. Pentru a împiedica aceast
posibilitate este bine s
• Unele produse cum ar fi ou
ăjiţ
i carne foarte grasă în cuptorul
cu microunde întrucât temperatura
gr
ă
similor nu poate fi controlată, existând
riscul apari
microunde, îns
ustensile special desemnate în acest
scop. Aceast
trebuie l
ţ
epaţi alimentele cu suprafeţe sau
membrane neporoase pentru a împiedica
acumularea de abur
Merele, cartofii, fic
ă
lbenuşurile de ou sunt exemple de
g
produse care trebuie în
uturi în cuptorul cu microunde,
1. Evita
2. Nu supraînc
3. Agita
4. Dup
recipientele sigilate – de exemplu
borcanele de sticl
exploda
cuptorul cu microunde. Ocazional,
ochiurile pot exploda în timpul g
In
ţ
epaţi întotdeauna gălbenuşul, apoi
acoperi
înainte de a îndep
ţ
iei unor situaţii neprevazute.
ţ
i pregăti popcorn în cuptorul cu
ă
doar în pachete sau
ă
operaţie de preparate nu
ă
sată nesupravegheată.
ş
i crăparea lor.
ăţ
eii de pui şi
ţ
epate..
ă
lziţi lichide, ex. supe, sau
ă
lzirea lichidului dincolo de punctul de
ără
barbotare, ceea
ă
ă
urmaţi paşii următori:
ţ
i folosirea recipientelor cu
ţ
ii drepţi şi gâtul subţire.
pere
ă
lziţi.
ţ
i lichidul înainte de a introduce
ş
recipientul în cuptor
jum
ă
tatea timpului afectat încălzirii.
ă
încălzire , lăsaţi lichidul în
cuptor o perioada scurt
amestecându-l cu grij
scoate recipientul.
ă
ş
i nu ar trebui încălzite în
ţ
i-le şi lăsaţi-le aşa un minut
ă
i încă odată la
ă
de timp,
ă
înainte de a
ă
le întregi sau
cu capac – pot
ă
rta capacul.
tirii.
Page 66

66
NOTĂ:
ţaţ
• Nu for
Acest lucru poate duce la func
necorespunz
• Formarea unui arc electric în cuptor
atunci când microundele sunt în stare de
func
ustensilelor metalice.Totu
continu
aparatul. Opri
ustensila.
• Trebuie s
aerisire plasate în p
spate, laterale
Nu folosi
Acest cuptor a fost proiectat doar pentru uz
casnic.
ă
straţi aceste instrucţiuni
P
Despachetare
N.B. C
ă
aparatul nu este deteriorat. Deteriorările
dac
sau orice p
raportatedetailistului.
Cuptorul, p
accesoriile ar putea fi protejate de o folie ce
trebuie îndep
cuptorul. Nu abandona
putea c
poate provoca accidente.
i rotirea manuală a platanului.
ţ
ionarea
ă
toare a aparatului.
ţ
iune se datorează utilizării
ş
i, formarea
ă
a acestor arcuri poate deteriora
ţ
i programul şi verificaţi
ă
evitaţi obturarea orificiilor de
ărţ
ile de sus, din
ş
i de jos ale cuptorului.
ţ
i acest cuptor în scopuri comerciale.
ă
nd despachetaţi cuptorul , verificaţi
ărţ
i lipsă trebuie imediat
ărţ
i componente ale cuptorului sau
ă
rtată înainte de a utiliza
ţ
i ambalajele care ar
ă
dea în mâna copiilor. Acest lucru
Atentie: Pe timpul gatirii cu grilul,
combinate si conventionale carcasa
si usa cuptorului devin calde.
Page 67

Ghidul ustensile l or şi accesoriilor cuptorului
ă
Pentru a g
Pentru siguran
ustensile
DA: Ustensile
ti în cuptorul cu microunde pot fi utilizate mai multe tipuri de ustensile şi materiale.
ţ
a d-voastră şi pentru a preveni deteriorarea ustensilelor şi a cuptorului alegeţi
ş
i materiale potrivite pentru fiecare metodă de gătit.
Materiale Ustensile
Ceramică &
Sticlă
Portelan
Ceramică*2 DA
Materiale
plastice
Metal
Folie de alumuniu*3 DA
Hârtie Ceşti, farfurii, şervete DA
Hărtie ceruită DA
Lemn NU
Accesorii Grilaj grătar NU
ş
i accesorii utilizabile NU: Ustensile şi accessorii de evitat
Corning ware DA
Sticlă rezistentă la
căldură
Vase de sticlă cu
decoraţii de metal
Sticla de cristal
plumbuit
Porţelanuri fără
decoraţii de metal
Cuptorul de microunde DA
Ambalaje din materiale
plastice
Tigaie metalică pentru
copt
Microunde
Mod de operare
DA*1
NU
NU
DA
DA
NU
67
*1 Doar dac
*2 Doar dac
*3 NOTA: Utiliza
electrice
ă
nu au margine metalică.
ă
nu are email care conţine metal.
ţ
i folie de aluminiu doar în scopuri de protecţie, suprautilizarea poate crea arcuri
Page 68

68
Gătitul la microunde
o
C
ş
a cuptorului.
1. U
ş
2. Fereastra de afi
aj
3. Puterea
ă
4. Gr
tar
5. Convection
6. Combi
ă
7. Reînc
8. Decongelarea automat
lzirea automată
ă
9. Stop
10. Pornirea
11. Setarea butonului de comand
12. Ceasul
ă
Page 69

Cum să utiliza
Suport rotativ
Platan
1. Pune
2. Pune
ar
ă
tat în diagramă. Asiguraţi-vă că butucul
este bine fixat în axul platanului. Nu a
niciodat
Atât platanul cât şi suportul trebuie folosite în
permanen
Atât mâncarea cât şi recipientele vor fi puse
pe platan în timpul g
Platanul se roteşte atât în sensul acelor de
ceasornic cât
normal.
ţ
i cuptorul cu microunde
ţ
i suportul platanului în cavitate.
ţ
i platanul pe suport aşa cum este
ş
ezaţi
ă
platanul cu faţa în jos.
ţă
în timpul gătitului.
ă
titului.
ş
i invers. Acest lucru este
69
Page 70

70
Setarea ceasului
Când cuptorul este pus în priz
ă
dat
fereatra de afi
1. Ac
2. Ac
3. Seta
4. Ac
5. Seta
6. Ac
Dispozitiv pentru siguran
Acest cuptor are un dispozitiv de siguran
care împiedic
accidental
ce blocarea fost setat
component
ce aceast
aparatului- nu va fi fost anulat
1. Ac
Pentru a anula m
aparatului, atinge
Stop ’ cu 3 de secunde.
ă
pentru prima
sau când curentul revine după o pană,
ş
aj pâlpâie şi arată " : 0 "
ţ
ionaţi prin atingerei butonul Clock
(Ceas).
ţ
ionaţi prin atingerei butonul Clock cu 3
de secunde
ţ
i timpul la " 4:00 " folosind butonul
ă
de comand
ţ
ionaţi prin atingerei butonul Clock
de comand
ţ
ionaţi prin atingere butonul Clock (
timpul va fi setat în acest moment)
ţ
ionaţi prin atingere butoanele ’ Stop ’
cu 3 de secunde.
a setării
ţ
i timpul la " 4:30 " folosind butonul
ă
a setării
ţ
a copilului
ă
punerea în funcţiune
ă
a aparatului de către copii. După
ă
, nici o parte
ă
a cuptorului nu va funcţiona până
ă mă
sură de prevedere-blocarea
ă
.
ă
sura de blocare a
ţ
i pur şi simplu butoanele ’
Pentru a opri cuptorul
ă
două moduri de a opri cuptorul în stare
Exist
ţ
ionare.
de func
1. Ac
ţ
ionaţi prin apăsare butonul Stop
• Pute
• Reap
2. Deschide
• Pute
ţă
• Reap
ţ
i reporni cuptorul acţionând prin
ă
sare butonul Start
ap
ă
sarea butonului Stop va reseta
programul curent.
ţ
i uşa
ţ
i reporni cuptorul prin închiderea uşii
ş
i acţionarea prin apăsare a butonului
Start
ă
sarea butonului Stop va anula
programul curent.
Page 71

Gătitul cu microunde
ţ
1. Deschide
platan. Inchide
2. Ac
(Putere) pân
i uşa, puneţi mâncarea pe
ţ
i uşa.
ţ
ionaţi prin apăsare butonul ’ Power ’
ă
se atinge nivelul de putere
dorit.
3. Seta
4. Ac
ţ
i timpul dorit prin acţionarea
butonului de comand
ţ
ionaţi prin apăsare butonul Start
ă
a setării.
Start rapid
ţ
ionarea prin apăsare a butonului ’ Start ’
Ac
ă
permite să porniţi cuptorul la puterea
v
ă
(800W) timp de 30 de secunde.
maxim
De fiecare dat
butonul’ Start ’, timpul de g
ă
când acţionaţi prin apăsare
ă
tit va creşte cu 30
de secunde.
71
Pentru a închide cuptorul în timpul g
pur
ş
i simplu acţionaţi prin atingere butonul
ă
titului,
Stop.
Ghid de setare a puterii microundelor
Setare putere Utilizare recomandată
100W
Incălzire mâncare : păstrează mâncarea caldă
250W Dezgheaţă alimentele congelate.
400W
550W
800W
Medie : Decongelare mai rapidă pentru musacale şi ghiveciuri
Reîncălzire : Reîncălzire musacale şi ghiveciuri
Putere maximă : Fierbere sau reîncălzire lichide
ă
: După utilizare, nu uitaţi să apăsaţi de
Not
ă
ori butonul Stop/Clear; procedând astfel,
dou
reseta
ţ
i cuptorul cu microunde.
Page 72

72
Decongelare automată
1. Deschide
2. Ac
3. Intoarce
4. Inchide
5. Ac
ţ
i uşa şi puneţi mâncarea pe
platan.
ţ
ionaţi prin apăsare butonul ’ Auto
ă
Reheat ’(reînc
ţ
ajunge
ajunge la cantitatea dorit
ţ
ionaţi prin apăsare butonul Start
(Cuptorul intr
lzire automată) până
i la programul dorit.
ţ
i butonul de comandă până se
ă
.
ţ
i uşa.
ă
în funcţiune)
Sfaturi pentru decongelare
ă
1. Este mai bine s
decongelare dac
Mâncarea va continua s
subestimaţi timpul de
ă
sunteţi în dubiu.
ă
parcursul ‘timpului de sta
ţ
2. Separa
i mâncarea cât mai repede
posibil.
ţ
3. Intoarce
h
i bucăţile mari, de exemplu
ă
lcile de carne, la jumătatea timpului de
decongelare.
ă
4. Indep
rtaţi orice aliment dezgheţat cât
mai repede posibil.
ă
5. Indep
rtaţi sau deschideţi orice ambalaj
înainte de decongelare.
ţ
i mâncarea într-un recipient mai
mare decât în cel în care a fost
ă
congelat
; acest lucru va facilita
manevrarea ei.
ţaţ
i un pui, puneţi-l cu
ş
pieptul în jos
i întoarceţi-l la jumătatea
timpului afectat decongel
ţ
iunile delicate cum ar fi vărfurile aripilor
ăţ
i mici de folie netedă.
ţ
ionare este foarte important, mai
ăţ
ilor mari, dense de carne
ă
tite.
ă
Pentru decongelarea manual
, utilizaţi o
putere a microundelor de 180W . Pentru a
accelera decongelarea alimentelor compacte
de peste 450g
ş
(1lb), cuptorul poate fi pornit
i acţionat timp
de 1-3 minute la o putere de 800W (100%),
ă
apoi puterea poate fi redus
decongelarea devine complet
la (180W) până
ă
.
6. Pune
7. Când dezghe
Por
por fi protejate cu buc
Timpul de sta
ales în cazul buc
care nu pot amestecate, pentru a fi siguri c
centrul lor este complet decongelat înainte de
a fi g
ţ
Tabel de selectare pentru func
iile gătitului automat:-
Program automat Apăsare butonul Fereastra de afişaj Mărime porţie
Meat Joint X 1
Steak X 2
Chicken Quarters X 3
Fish X 4
d - 1
d - 2
d - 3
d - 4
0.2kg – 2.0kg
0.2kg – 2.0kg
0.2kg – 2.0kg
0.2kg – 2.0kg
se dezgheţe pe
ţ
ionare’.
ă
rii.
ă ş
i
Page 73

Reîncălzire automată
5. Ac
ţ
1. Deschide
i uşa şi puneţi mâncarea pe
platan.
ţ
ionaţi prin apăsare butonul Reîncălzire
2. Ac
ă
automat
dorit.
3. Intoarce
ajunge la cantitatea dorit
4. Inchide
până ajungeţi la programul
ţ
i butonul de comandă până se
ă
.
ţ
i uşa.
Pentru a închide cuptorul în timpul g
pur
Stop.
ţ
Tabel de selectare pentru func
Program automat Apăsare butonul Fereastra
‘Baked Potato’ X 1
‘Rice / Pasta’ X 2
‘Roast Beef’ X 3
‘Roast Poultry’ X 4
iile Reîncălzire automată:-
de afişaj
C - 1
C - 2
C - 3
C - 4
ă
titul pe grătar
G
1. Deschide
ţ
i uşa şi puneţi mâncarea pe
Convection
6. Deschide
platan.
ţ
2. Fixa
3. Intoarce
4. Inchide
5. Ac
i selectorul de putere pe setarea
ă
Grill (Gr
ajunge la cantitatea dorit
(Cuptorul intr
tar).
ţ
i butonul de comandă până se
ă
.
ţ
i uşa.
ţ
ionaţi prin apăsare butonul Start
ă
în funcţiune)
7. Fixa
8. Intoarce
9. Inchide
10. Ac
ţ
ionaţi prin apăsare butonul Start
ă
(Cuptorul intr
ş
i simplu acţionaţi prin atingere butonul
platan.
ţ
i selectorul de putere pe setarea
Convection.
ajunge la cantitatea dorit
ţ
ionaţi prin apăsare butonul Start
(Cuptorul intr
în funcţiune)
ă
Mărime porţie
1 – 6 potatoes
0.2kg – 0.5kg
0.9kg – 1.5kg
0.2kg – 2.0kg
ţ
i uşa şi puneţi mâncarea pe
ţ
i butonul de comandă până se
ă
.
ţ
i uşa.
ă
în funcţiune)
titului,
73
Pentru a închide cuptorul în timpul g
ş
i simplu acţionaţi prin atingere butonul
pur
Stop.
o
Convection; 220
C, 200oC, 180oC, 160oC, 140oC, 120oC and 100oC.
ă
titului,
Pentru a închide cuptorul în timpul g
ş
i simplu acţionaţi prin atingere butonul
pur
Stop.
ă
titului,
Page 74

74
Gătitul cu microunde şi grătar
1. Deschide
ţ
i uşa şi puneţi mâncarea pe
platan.
2. Ac
ţ
ionaţi prin apăsare butonul ’ combi ’
pân
ă
se atinge nivelul de putere dorit.
3. Ac
ţ
ionaţi prin apăsare butonul ’ Power ’
ă
(Putere) pân
se atinge nivelul de putere
dorit.
4. Intoarce
5. Inchide
6. Ac
ţ
i butonul de comandă până se
ă
ajunge la cantitatea dorit
ţ
i uşa.
ţ
ionaţi prin apăsare butonul Start
(Cuptorul intr
ă
în funcţiune)
.
Pentru a închide cuptorul în timpul g
pur
ş
i simplu acţionaţi prin atingere butonul
ă
titului,
ă
titul cu microunde şi grătar
G
1. Deschide
ţ
i uşa şi puneţi mâncarea pe
platan.
2. Ac
ţ
ionaţi prin apăsare butonul ’ combi ’
pân
ă
se atinge nivelul de putere dorit.
3. Ac
ţ
ionaţi prin apăsare butonul ’
convection ’ pân
putere dorit.
4. Ac
ţ
ionaţi prin apăsare butonul ’ Power ’
(Putere) pân
dorit.
5. Intoarce
ţ
i butonul de comandă până se
ajunge la cantitatea dorit
6. Inchide
7. Ac
ţ
i uşa.
ţ
ionaţi prin apăsare butonul Start
(Cuptorul intr
ă
se atinge nivelul de
ă
se atinge nivelul de putere
ă
ă
în funcţiune)
Stop.
Pentru a închide cuptorul în timpul g
pur
ş
i simplu acţionaţi prin atingere butonul
Stop.
Tabel de selectare pentru func
Combi
Apăsare
butonul
Combi
ţ
iile Combi:-
Apăsare
butonul
Putere
Putere Microwave
Putere
‘Combi 1’ X 1 X 1 Max Grill 800W
‘Combi 1’ X 1 X 2 Max Grill 550W
‘Combi 1’ X 1 X 3 Max Grill 400W
‘Combi 1’ X 1 X 4 Max Grill 250W
‘Combi 1’ X 1 X 5 Max Grill 100W
‘Combi 2’ X 2 X 1 Convection 100oC – 220oC 800W
‘Combi 2’ X 2 X 2 Convection 100oC – 220oC 550W
‘Combi 2’ X 2 X 3 Convection 100oC – 220oC 400W
‘Combi 2’ X 2 X 4 Convection 100oC – 220oC 250W
‘Combi 2’ X 2 X 5 Convection 100oC – 220oC 100W
.
ă
titului,
Page 75

Recomandări pentru decongelare a aut om a t ă
Unele alimente, de exemplu pâinea
ş
i fructele, pot fi decongelate manual utilizând setările de
putere.
ALIMENTE
Puneţi franzela pe suportul de siguranţă
Franzelă mică
Franzelă mare
feliată
2 felii Puneţi-le pe un şerveţel de bucătărie. 45–60 sec. 5 min.
1 chiflă de pâine
2 chifle de pâine Puneţi chiflele pe şerveţele de bucătărie. 1–11/2 min. 5 min.
Prăjitură 450g/1 lb
Prăjitură cu
brânză 450g/1 lb
Plăcintă (gata
preparată) 450g/1
lb
Produse de
patiserie 450g/1 lb
Unt 250g/8.8 oz (1
pachet)
225g/8 oz Fructe
boabe moi.
450g/1 lb Fructe
boabe moi
Măncare acoperită
400g/14 oz
Legume
al cuptorului sau pe un şerveţel de
jumătatea timpului de decongelare
Puneţi franzela pe suportul de siguranţă
Intoarceţi franzela la jumătatea timpului
Scoateţi prăjitura din ambalaj şi puneţi-o
Scoateţi prăjitura din ambalaj şi puneţi-o
Scoateţi plăcinta din ambalaj şi puneţi-o
Scoateţi produsele din ambalaj şi puneţi-
Dacă este ambalat, scoateţi untul din
Puneţi-le pe un singur strat într-o
Puneţi-le pe un singur strat într-o farfurie
Acoperiţi mâncarea cu o farfurie sau cu
o peliculă adezivă non-CPV.Pentru a o
reîncălzi, folosiţi microundele 100%
Nu este necesar să dezgheţaţi legumele
înainte de a fi gătite. Toate legumele pot
fi dezgheţate şi gătite 100% la (800W)
PREPARARE decongelarea
bucătărie Intoarceţi franzela la
sau pe un şerveţel de bucătărie.
de decongelare.
Puneţi chifla pe un şerveţel de
bucătărie.
pe farfurie
pe farfurie.
pe farfurie.
le pe farfurie.
ambalaj şi puneţi-l pe o farfurie
farfurie întinsă.
întinsă.
(800W) timp de 3–4 minute
8-10 min. 10-15 min.
10-13 min. 10 min.
45–60 sec. 5 min.
9-11 min. 15–30 min.
9–11 min. 15–30 min.
7– 9 min. 15–30 min.
7– 9 min. 15–30 min.
3– 4 min. 5–10 min.
5– 6 min. 5–10 min.
7– 8 min. 5–10 min.
7– 8 min 5–10 min.
TIMP de
STATIONARE
75
Page 76

76
Sugestii pentru util izarea microundel or
• P
ă
straţi întotdeauna cuptorul curat -evitaţi
scurgerile
de sticl
• De preferin
sau ovale cu capac când g
cu microunde.
• Nu utiliza
decora
plastice pot fi topite
mâncarea fierbinte.
• Acoperi
un capac de sticl
carton rezistent la gr
ş
i nu uitaţi să curăţaţi sub tava
ă ş
i interiorul uşii.
ţă
utilizaţi caserole rotunde
ătiţ
ţ
i caserole de metal sau cu
ţ
ii metalice. Anumite materiale
ş
i deformate de
ţ
i mâncarea când gătiţi. Utilizaţi
ă
, o farfurie sau un
ă
sime.
• Produsele de patiserie, pâinea
produse înrudite pot fi decongelate întrun co
ş
de pâine sau pe un prosop de
hârtie.
• Dac
• Buc
• Alimentele cu coaj
• Pune
ă
mâncarea congelată este încălzită
în ambalajul propriu, ambalajul trebuie
deschis. Ambalajul care con
sau decora
(în lipsa unor recomand
cuptorul cu microunde. Indep
clemele de metal
utilizate pentru a acoperi p
ard u
ţ
epate cu o furculiţă –e.g. cartofi sau
în
cârna
microunde întrucât acestea pot exploda.
caserolei
p
ărţ
în centrul cuptorului.
ţ
ii metalice nu trebuie utilizat
ş
i legăturile de sârmă.
ăţ
i din folie de aluminiu mai mici pot fi
ş
or (picioarele de pui etc.)
ă
sau pieliţă trebuie
ţ
i. Nu fierbeţi ouă în cuptorul cu
ţ
i bucăţile mari, groase la marginea
ş
i încercaţi să tăiaţi carnea în
i egale. Intotdeauna puneţi mâncarea
ţ
ine metal
ă
ri contrare) Iîn
ărţ
i în cuptorul
ş
i alte
ă
rtaţi
ile care se
• Mâncarea va fi g
o amesteca
ori.
• Fixa
scurt decât cel indicat în re
pentru a nu arde mâncarea. Cu cât
cantitatea este mai mare cu atât ave
nevoie de mai mult timp pentru a g
de mâncare dorit.
• Folosi
vegetale.
• Folosi
decât pentru un “g
• Asezona
• Acorda
sta
pentru a asigura un g
• Asigura
întregime extrem de fierbinte înainte de a
fi servit
• Folosi
protec
mâncarea din cuptor.
ă
tită egal peste tot dacă
ţ
i sau o întoarceţi de câteva
ţ
i întotdeauna un timp de gătit mai
ţ
eta d-voastră
ţ
i apă puţină sau chiar de loc pentru
ţ
i sare şi condimente mai puţine
ă
tit” normal.
ţ
i ulterior.
ţ
i mâncării câteva minute “timp de
ţ
ionare” daupă ce aţi oprit cuptorul
ă
tit complet şi egal.
ţ
i-vă că mâncarea este în
ă
.
ţ
i mănuşi sau alte ustensile de
ţ
ie când scoateţi recipientele şi
ţ
i
ă
ti felul
Page 77

Ingrijire şi Curăţire
ţ
Cuptorul trebuie men
curat. Resturile de mâncare v
împro
ş
cate atrag energia microundelor
care le vor arde.Acest lucru reduce
eficien
ţ
a cuptorului şi poate produce
mirosuri nepl
ă
sau s
componente ale . Repara
doar de un tehnician calificat.
Asigura
la sursa de electricitate
înainte de cur
Cur
ăţ
irea accesoriilor (platan şi suport)
Cur
ăţiţ
scos din cavitate. Suportul platanului trebuie
manipulat cu grij
ATENTIE: Interiorul cuptorului
devin foarte fierbin
imediat dup
ăţ
irea interiorului
Cur
Men
ţ
ineţi interiorul cuptorului întotdeauna
curat. Sterge
sau împro
ţ
ii cuptorului, pe izolaţia uşii şi pe
pere
suprafe
microundelor, reduce eficien
posibil, deteriora interiorul cuptorului. Folosi
un detergent slab, lichid, ap
moale
NU FOLOSITI NICIODAT
ABRAZIVE, CUR
DIN COMER
STICLA PENTRU A CUR
A CUPTORULUI CU MICROUNDE.
ă
aduceţi ajustări unor părţi
ţ
i-vă că aparatul este deconectat de
ăţ
i-le cu un detergent slab după ce le-aţi
ă
utilizare.
ţ
i depunerile de mâncare vărsate
ş
cate imediat. Resturile lăsate pe
ţ
ele de etanşarei vor absorbi energia
ş
i uscată pentru a îndepărta depunerile..
Ţ
SAU PERNIŢE DIN VATA DE
inut întotdeauna
ă
rsate sau
cute.Nu încercaţi să reparaţi
ţ
iile trebuie făcute
ire.
ă
.
ş
i platanul
ţ
i, aşa că nu le atingeţi
ţ
a cuptorului şi,
ă
caldă şi o cârpă
Ă
CURĂŢITOARE
ĂŢ
ITOARE DE CUPTOR
ĂŢ
I ORICE PARTE
ă
Pentru a facilita îndep
dificile, fierbe
de 2-3 minute.
NU UTILIZATI NICIODAT
ORICE ALTE USTENSILE PE N TRU A
INDEP
SUPRAFA
Pentru a îndep
interiorul cuptorului, fierbe
cu 2 linguri de suc de l
ăţ
Cur
Deschide
tabloul de comand
întoarcerea accidental
Suprafe
cur
ăţ
ş
i apoi clătite cu apă curată pentru a
îndep
trebuie f
pentru cur
pot fi de asemenea utilizate. Nu folosi
niciodat
dure pentru a cur
cuptorului. Pentru a preveni deteriorarea
p
ărţ
ilor lucrătoare nu lăsaţi să intre apă în
orificiile de ventila
ţ
i
ţ
i o ceaşcă de apă în cuptor timp
Ă
RTA DEPUNERILE DE PE
Ţ
A CUPTORULUI.
ă
irea exteriorului
ţ
i uşa cuptorului când controlaţi
ţ
ele exterioare ale cuptorului ar trebui
ate cu un detergent lichid uşor şi cu apă
ă
rta excesul de detergent. Uscarea
ă
cută cu o cârpă moale. Spray-urile
ăţ
irea ferestrelor sau a bucătăriilor
ă
curăţitoare abrazive sau chimicale
rtarea depunerilor
Ă
rta mirosurile neplăcute din
ţ
i o ceaşcă de apă
ă
mâie timp de 5 minute.
ă
. Acest lucru va împiedica
ă
a cuptorului.
ăţ
a suprafeţele exterioare ale
ţ
ie.
CUŢITE SAU
ţ
i
77
Page 78

78
Date tehnice
Lătime 485 mm
Adâncime 426 mm
Inălţime 295 mm
Dimensiunea Cavităţii Lătime 335 mm
Dimensiunea Cavităţii Adâncime 340 mm
Dimensiunea Cavităţii Inălţime 260 mm
Volum 25 litre
Sursă de energie 230V, 50 Hz
Siguranţă 15 A
Consum energie 2850W
Energie furnizată 800W
Grătar 1300W
Greutate 17 kg
Page 79

Instalare
1. Indep
promo
2. Instala
plat
suficient de rezistent
suporta f
cuptorului (13.5 kg.)
ulterior al acestuia. Pentru a evita
posibilitatea producerii de vibra
sau zgomote, cuptorul trebuie s
într-o pozi
ş
3. A
c
ă
ş
i umezeală poate reduce eficienţa
ş
i randamentul, aşa că instalaţi
cuptorul departe de sursele
men
4. Nu bloca
p
ărţ
cuptorului
cuptor. Dac
sunt blocate în timpul func
cuptorul se poate supraînc
ce poate duce la un randament
necorespunz
fierbinte iese prin aceste orificii
consecinta, asigura
obtura
între cuptor
Aşezaţi cuptorul căt mai departe
posibil de aparate de radio
televizoare. Acest aparat se
conformeaz
referitoare la suprimarea
interferen
interferen
este plasat prea aproape de radio
sau televizor.
5. Dac
l
ăsaţ
ă
rtaţi orice etichetă
ţ
ională de pe uşă.
ţ
i cuptorul pe o suprafaţă
ă
. Suprafaţă trebuie să fie
ă
pentru a
ără
probleme greutatea
ş
i conţinutul
ţ
ii
ă
fie
ţ
ie stabilă.
ezaţi cuptorul departe de surse de
ldură şi apă. Expunerea la căldură
ţ
ionate.
ţ
i orificiile de ventilaţie din
ile de sus şi laterale ale
ş
i nu puneţi obiecte pe
ă
orificiile de aerisire
ţ
ionării,
ă
lzi, ceea
ă
tor al aparatului. Aerul
ş
i in
ţ
i-vă că nu le
ţ
i sau că nu există ecranări
ş
i peretele din spate.
ş
i
ă
cerinţelor CEE*
ţ
elor radio, dar unele
ţ
e pot apare dacă aparatul
ă aş
ezaţi cuptorul într-un colţ,
i un spaţiu de cel puţin 10 cm.
Între aparat
ventila
Important! Cuptorul poate fi plasat aproape
oriunde în buc
a
ş
ezat pe o suprafaţă plată şi că orificiile de
ţ
ie şi suprafaţa de sub cuptor nu sunt
ventila
blocate (pentru a se ob
ă
suficient
*Acest aparat se conformeaz
Directivei 87/308/CEE referitoare la
Interferen
Conectarea la re
Cuptorul este livrat împreun
electric
cu impamantare de 230V, 50Hz. Protec
oferit
riscurile în cazul unui scurt-circuit.
Verifica
aliment
N.B. Dac
printr-un prelungitor, verifica
de prelungire este împ
ATENTIE! Acest aparat nu trebuie alimentat
de la o surs
Apela
referitoare la conectarea electric
sau la asigurarea protec
a furniz
Acest aparat trebuie împ
este prev
recablabil
nepotrivit
prev
siguran
schimbat
).
ţ
ele Radio.
ş
i o fisa de contact pentru o priza
ă
de împământare minimalizează
ţ
i dacă voltajul corespunde
ă
rii.
ă
cuptorul este conectat la priză
ă
de energie neîmpământată.
ţ
i la un electrician pentru orice problemă
ă
rii de curent.
ă
zut cu o fisa de contact ne-
ă
pentru care priza d-voastră este
ă
, fisa trebuie tăiată şi cuptorul
ă
zut cu o fisa corespunzătoare. Dacă
ţ
a dintr-o fisa ne-recablabilă trebuie
ă
, învelişul siguranţei trebuie
ş
i perete din motive de
ţ
ie.
ătă
rie. Asiguraţi-vă că este
ţ
ine o ventilaţie
ă
cerinţelor
ţ
ea
ă
cu un cablu
ţ
i dacă cablul
ă
mântat.
ă
a cuptorului
ţ
iei prin împământare
ă
mântat. Dacă el
ţ
ia
79
Page 80

80
reajustat. Dacă învelişul este pierdut sau
deteriorat, fisa nu trebuie utilizat
ş
când acest inveli
Conexiuni electrice
Acest aparat este livrat echipat cu o fisa euro
standard cu 2
ATENTIE! ACEST APARAT TREBUIE
ÎMP
Ă
MÂNTAT.
Produc
ă
torul îşideclină orice responsabilitate
dac
ă
această măsură de siguranţă nu este
ă
în considerare.
luat
• Dac
Indep
înlocuit
curent
întâmplare ar fi introdus
parte a casei.
ă
fisa cu care este echipat aparatul
nu este potrivit
dispune
cu una potrivit
ă
rtaţi siguranţa din fisa înlocuită. Fisa
ă
trebuie aruncată pentru a preveni
ă
rile care s-ar produce dacă din
nu este înlocuit.
ş
tifturi !!!!
ă
pentru priza de care
ţ
i , ea trebuie tăiată si înlocuită
ă
.
ă
într-o priza în altă
ă
până
Page 81

Weee
Simbolul
ambalaj indic
aruncat împreun
de pe produs sau de pe
ă
faptul că produsul nu trebuie
ă
cu gunoiul menajer. Trebuie
predat la punctul de colectare corespunz
pentru reciclarea echipamentelor electrice
electronice. Asigurându-v
mod corect produsul, ajuta
ţ
ialelor consecinţe negative pentru
poten
mediul înconjur
ă
tor şi pentru sănătatea
persoanelor, consecin
din aruncarea necorespunz
produs. Pentru mai multe informa
despre reciclarea acestui produs, v
contacta
eliminarea de
l-a
ţ
i biroul local, serviciul pentru
ş
eurilor sau magazinul de la care
ţ
i achiziţionat.
ă că aţ
i eliminat în
ţ
i la evitarea
ţ
e care ar putea deriva
ă
toare a acestui
ţ
ii detaliate
ă
rugăm să
Garanţie Europeană
Acest aparat este garantat de Electrolux în
fiecare din ţările enumerate la sfârşitul acestui
manual, pentru perioada specificată în fişa de
garanţie a aparatului sau în alt fel prin lege. În
cazul în care vă mutaţi dintr-una din aceste ţări
într-o altă ţară enumerată mai jos, garanţia
aparatului se va muta o dată cu dvs., cu
condiţia respectării următoarelor:
81
tor
ş
i
ă
Garanţia aparatului este personală
torului original al aparatului, şi nu
cumpăr
ă
poate fi transferată altui utilizator.
Aparatul este instalat şi utilizat în concordanţă
cu instrucţiunile emise de Electrolux, şi este
utilizat numai în scopuri casnice, cu alte
cuvinte nu este utilizat în scopuri comerciale.
Garanţia aparatului începe de la data la care
aţi achiziţionat prima dată aparatul, care este
evidenţiată prin prezentarea documentului
valabil de cumpărare emis de vânzătorul
aparatului.
Garanţia aparatului este pentru aceeaşi
perioadă şi are aceeaşi acoperire pentru
manoperă şi piese de schimb cu cea existentă
în noua dvs. ţară de rezidenţă pentru acest
model anume sau gamă de aparate.
Aparatul este instalat în concordanţă cu toate
reglementările relevante în vigoare în noua
dvs. ţară de rezidenţă.
Prevederile acestei Garanţii europene nu
afectează nici unul din drepturile care vă sunt
garantate prin lege.
Page 82

82
www.electrolux.com
Albania +35 5 4 261 450 Rr. Pjeter Bogdani Nr. 7 Tirane
Belgique / België /
Belgien
Česká republika +420 2 61 12 61 12 Budějovická 3, Praha 4, 140 21
Danmark +45 70 11 74 00 Sjællandsgade 2, 7000 Fredericia
Deutschland +49 250 32 26 622 Muggenhofer Str. 135, 90429 Nürnberg
Eesti +37 2 66 50 030 Mustamäe tee 24, 10621 Tallinn
España +34 902 11 63 88
France www.electrolux.fr
Great Britain +44 8705 929 929 Addington Way, Luton, Bedfordshire LU4 9QQ
Hellas +30 23 10 56 19 70 4, Limnou Str., 54627 Thessaloniki
Hrvatska +385 1 63 23 338 Slavonska avenija 3, 10000 Zagreb
Ireland +353 1 40 90 753 Long Mile Road, Dublin 12
Italia +39 (0) 434 558500 C.so Lino Zanussi, 26 - 33080 Porcia (PN)
Latvija +37 17 84 59 34 Kr. Barona iela 130/2, LV-1012, Riga
Lituania +370 5 27 80 609 Verkiu 29, 09108 Vilnius, Lithuania
Luxembourg +35 2 42 43 13 01 Rue de Bitbourg, 7, L-1273 Hamm
Magyarország +36 1 252 1773 H-1142 Budapest XIV, Erzsébet királyné útja 87
Nederland +31 17 24 68 300 Vennootsweg 1, 2404 CG - Alphen aan den Rijn
Norge +47 81 5 30 222 Risløkkvn. 2 , 0508 Oslo
Österreich +43 18 66 400 Herziggasse 9, 1230 Wien
Polska +48 22 43 47 300 ul. Kolejowa 5/7, Warsaw
Portugal +35 12 14 40 39 39
Romania +40 21 44 42 581 B-dul Timisoara 90, S6, Bucharest
Schweiz - Suisse -
Svizzera
+32 2 363 04 44 Bergensesteenweg 719, 1502 Lembeek
+41 62 88 99 111 Industriestrasse 10, CH-5506 Mägenwil
Carretera M-300, Km. 29,900 Alcalá de
Henares Madrid
Quinta da Fonte - Edificio Gonçalves Zarco -
Q 35 -2774-518 Paço de Arcos
Page 83

83
Slovenija +38 61 24 25 731 Tržaška 132, 1000 Ljubljana
Slovensko +421 2 43 33 43 22
Suomi +35 8 26 22 33 00 Konepajanranta 4, 28100 Pori
Sverige
Türkiye +90 21 22 93 10 25 Tarlabaşı caddesi no: 35 Taksim İstanbul
Россия
+46 (0) 771 76 76
76
+7 095 937 7837
Electrolux Slovakia s.r.o., Electrolux Domáce
spotrebiče SK, Seberíniho 1, 821 03 Bratislava
Electrolux Service, St Göransgatan 143,
S-105 45 Stockholm
129090
Москва, Олимпийский проспект
"
Олимпик
"
, 16, БЦ
Page 84

www.electrolux.com
www.aeg-electrolux.it
www.aeg-electrolux.h
www.aeg-electrolux.ro
8221916 -00 - 00 - 092006
 Loading...