

Page 1
822 949 413_M8000_AEG.book Seite 1 Mittwoch, 5. November 2008 3:43 15
M 8000
d Standmixer
g Stand-Blender
r Μπιέληεξ
Gebrauchsanweisung
Operating instructions
Εγχειρίδιο οδηγιών χρήσης
Page 2
822 949 413_M8000_AEG.book Seite 1 Mittwoch, 5. November 2008 3:34 15
Deutsch . . . . . . . . . . . . . . . . . . . . . 4
English . . . . . . . . . . . . . . . . . . . . . 11
Ελληνικά . . . . . . . . . . . . . . . . . . 19
Page 3
822 949 413_M8000_AEG.book Seite 2 Mittwoch, 5. November 2008 3:34 15
A
B
C
D
F
G
E
H
J
K
1
Page 4
822 949 413_M8000_AEG.book Seite 3 Mittwoch, 5. November 2008 3:34 15
23
45
Page 5
822 949 413_M8000_AEG.book Seite 2 Mittwoch, 5. November 2008 3:34 15
d
Sehr geehrte Kundin,
d
sehr geehrter Kunde,
lesen Sie bitte diese Gebrauchsanweisung sorgfältig durch. Beachten Sie vor
allem die Sicherheitshinweise auf den
ersten Seiten dieser Gebrauchsanweisung! Bewahren Sie bitte die Gebrauchsanweisung zum späteren Nachschlagen auf. Geben Sie diese an eventuelle Nachbesitzer des Gerätes weiter.
Mit dem Warndreieck und/oder durch
1
Signalwörter (Warnung!, Vorsicht!,
Achtung!) sind Hinweise hervorgeho-
ben, die für Ihre Sicherheit oder die
Funktionsfähigkeit des Gerätes wichtig
sind. Bitte unbedingt beachten.
0 Dieses Zeichen leitet Sie Schritt für
Schritt beim Bedienen des Gerätes.
Nach diesem Zeichen erhalten Sie er-
3
gänzende Informationen zur Bedienung und praktischen Anwendung des
Gerätes.
Mit dem Kleeblatt sind Tipps und Hin-
2
weise zum wirtschaftlichen und umweltschonenden Einsatz des Gerätes
gekennzeichnet.
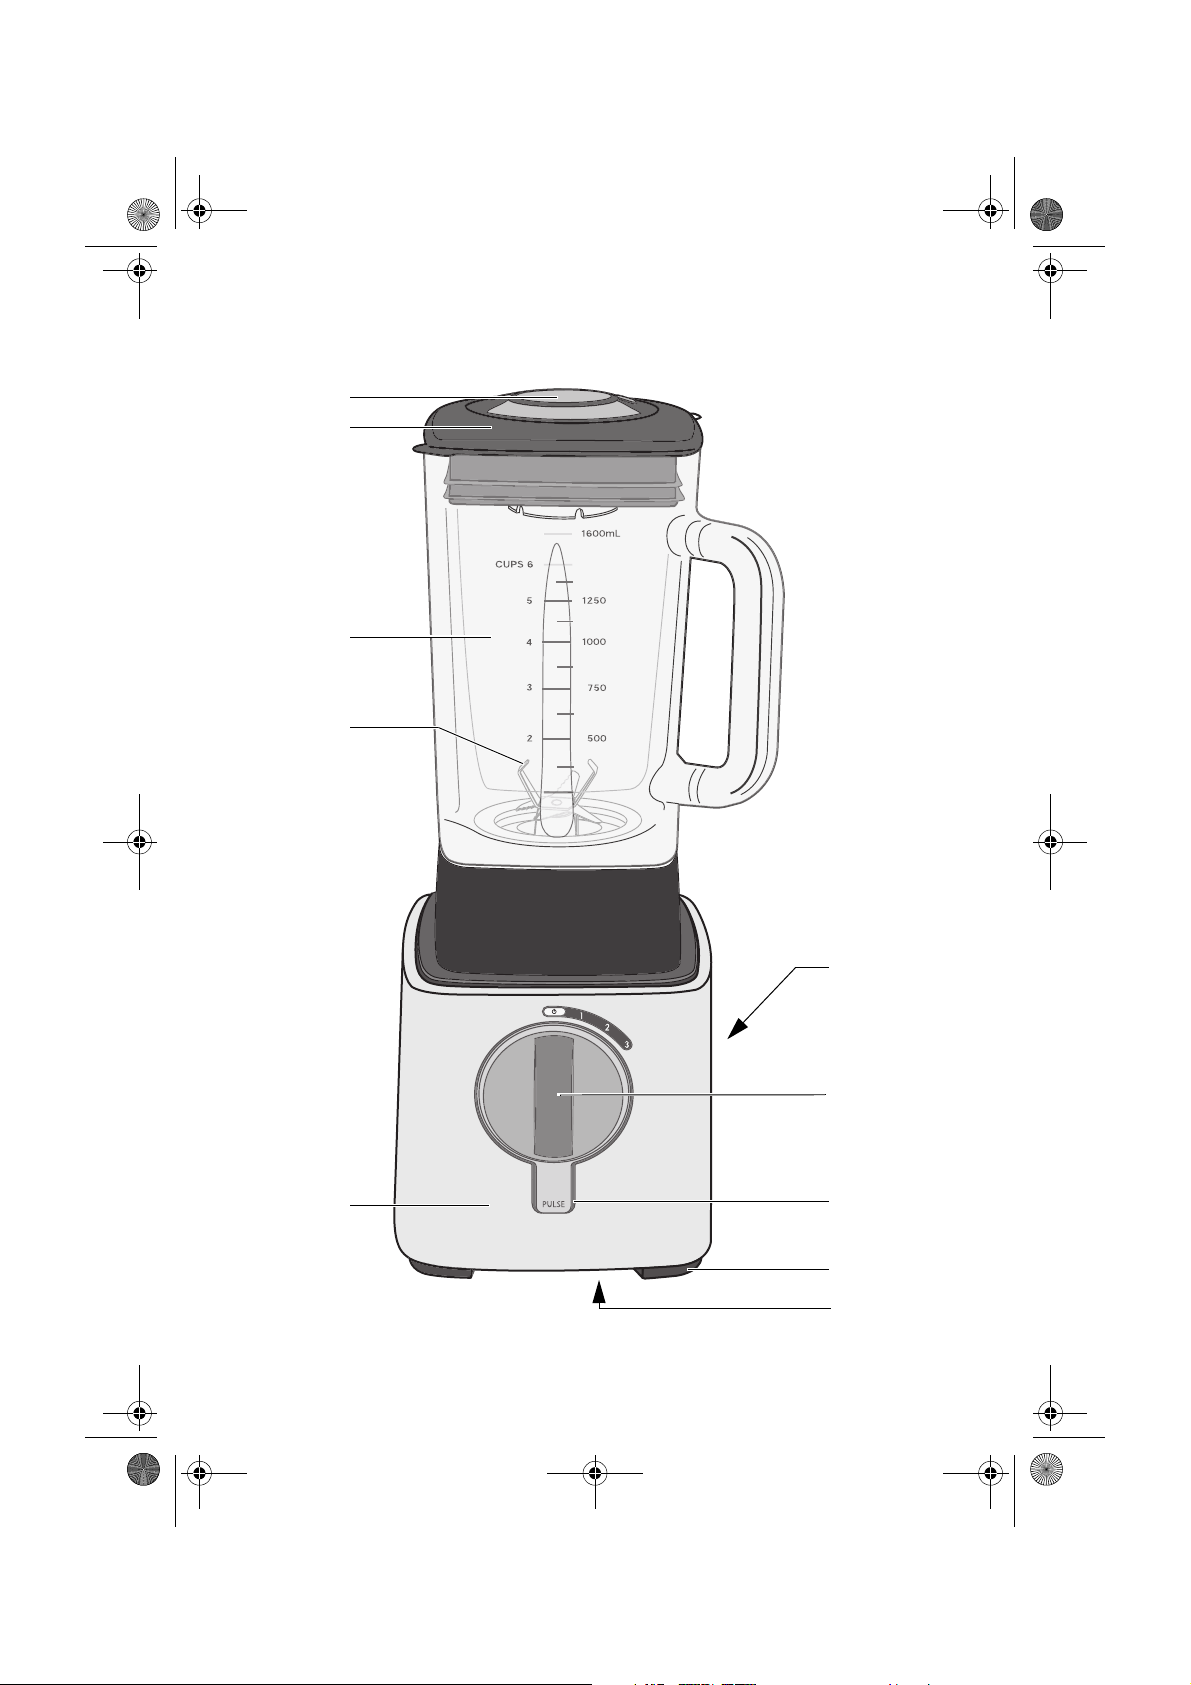
Gerätebeschreibung (Abb. 1)
A Füllbecher (ca. 70 ml)
B Flexibler Deckel mit Einfüllöffnung
C Mixbehälter (Füllmenge 1,6 Liter)
D Messervorrichtung, abnehmbar
E Motorgehäuse
F Typschild (Rückseite des Geräts)
G Drehwähler für Geschwindigkeitsstu-
fen
H PULSE-Taste
J Rutschfeste Gummifüße
K Fach für Kabelaufwicklung
(Geräteunterseite)
1 Sicherheitshinweise
Die Sicherheit dieses Geräts entspricht
den anerkannten Regeln der Technik.
Dennoch sehen wir uns als Hersteller
veranlaßt, Sie mit den nachfolgenden
Sicherheitshinweisen vertraut zu machen.
Allgemeine Sicherheit
• Das Gerät darf nur an ein Stromnetz
angeschlossen werden, dessen Spannung und Frequenz mit der Angabe auf
dem Typschild übereinstimmt!
• Ziehen Sie stets den Stecker aus der
Steckdose, wenn das Gerät nicht
gebraucht wird.
•
Ziehen Sie im Falle einer Störung zuerst
den Gerätestecker aus der Steckdose!
• Den Netzstecker nie an der Anschlußleitung aus der Steckdose ziehen.
• Nehmen Sie den Mixer niemals in
Betrieb, wenn
– das Gehäuse beschädigt ist,
– die Anschlußleitung beschädigt ist.
• Wenn die Anschlußleitung dieses Gerätes beschädigt wird, muß sie durch den
Hersteller oder seinen Kundendienst
oder eine ähnliche qualifizierte Person
ersetzt werden, um Gefährdungen zu
vermeiden.
• Reparaturen an diesem Gerät dürfen
nur von Fachkräften durchgeführt
werden. Durch unsachgemäße Reparaturen können erhebliche Gefahren entstehen. Wenden Sie sich im Reparaturfall an den Kundendienst oder an Ihren
autorisierten Fachhändler.
• Dieses Gerät ist nicht dazu bestimmt,
von Personen (einschließlich Kinder),
die aufgrund Ihrer Unerfahrenheit oder
Unkenntnis nicht in der Lage sind es
sicher zu bedienen oder von Personen
(einschließlich Kinder) mit eingeschränkten physischen, sensorischen
oder geistigen Fähigkeiten, benutzt
oder betrieben zu werden, es sei denn
sie wurden durch eine für sie verantwortliche Person angewiesen wie das
Gerät sicher zu benutzen ist und
anfäglich von ihr beaufsichtigt.
2
Page 6

822 949 413_M8000_AEG.book Seite 3 Mittwoch, 5. November 2008 3:34 15
d
• Wird das Gerät zweckentfremdet oder
falsch gebraucht, kann keine Haftung
für eventuell verursachte Schäden
übernommen werden.
Sicherheit von Kindern
• Lassen Sie das Gerät nicht unbeaufsichtigt laufen, und wahren Sie gegenüber Kindern eine besondere
Aufsichtspflicht!
• Kinder müssen beaufsichtigt werden,
um sicherzustellen, dass sie nicht mit
dem Gerät spielen.
• Verpackungsmaterial, wie z.B. Folienbeutel, gehören nicht in Kinderhände.
Beim Betrieb des Geräts
• Stellen Sie das Gerät stets auf eine flache ebene Oberfläche.
• Nehmen Sie den Mixer nie mit nassen
Händen in Betrieb.
• Vergewissern Sie sich, dass sich der
Geschwindigkeitswähler in der AusStellung befindet, bevor der Stecker
in die Steckdose gesteckt wird.
• Plastikteile dürfen nicht auf oder in
unmittelbarer Nähe von Heizkörpern
getrocknet werden.
• Mit dem Gerät dürfen keine Farben
(Lacke, Polyester usw.) gerührt werden
– Explosionsgefahr!
• Nach Beendigung der Arbeiten sowie
vor allen Reinigungs- und Pflegearbeiten das Gerät ausschalten und den
Netzstecker ziehen.
• Die Messervorrichtung darf nur von
autorisiertem Fachpersonal zerlegt
werden.
• Reinigen Sie das Motorgehäuse nie
unter fließendem Wasser oder im Spülwasser.
• Achtung: Die Messervorrichtung ist
sehr scharf. Seien Sie vorsichtig beim
Aufbau und Auseinandernehmen des
Standmixers. Verletzungsgefahr.
• Halten Sie keine harten Gegenstände
(z.B. Löffel) in das laufende Messer und
greifen Sie nicht mit der Hand in den
Behälter. Es besteht Verletzungsge-
fahr!
Anwendungsbeispiele
Der Standmixer dient zur Zubereitung
verschiedenster Mixgetränke, zum Zerstoßen von Eis, Zerkleinern von Früchten und Gemüse, Sahne schlagen usw.
Kabelfach
Das Gerät verfügt an seiner Unterseite
über eine Kabelaufwicklung. Ist die
schlussleitung zur Steckdose zu lang,
kann sie um die Kabelaufwicklung gewickelt werden, bis sie die erforderliche
Länge hat.
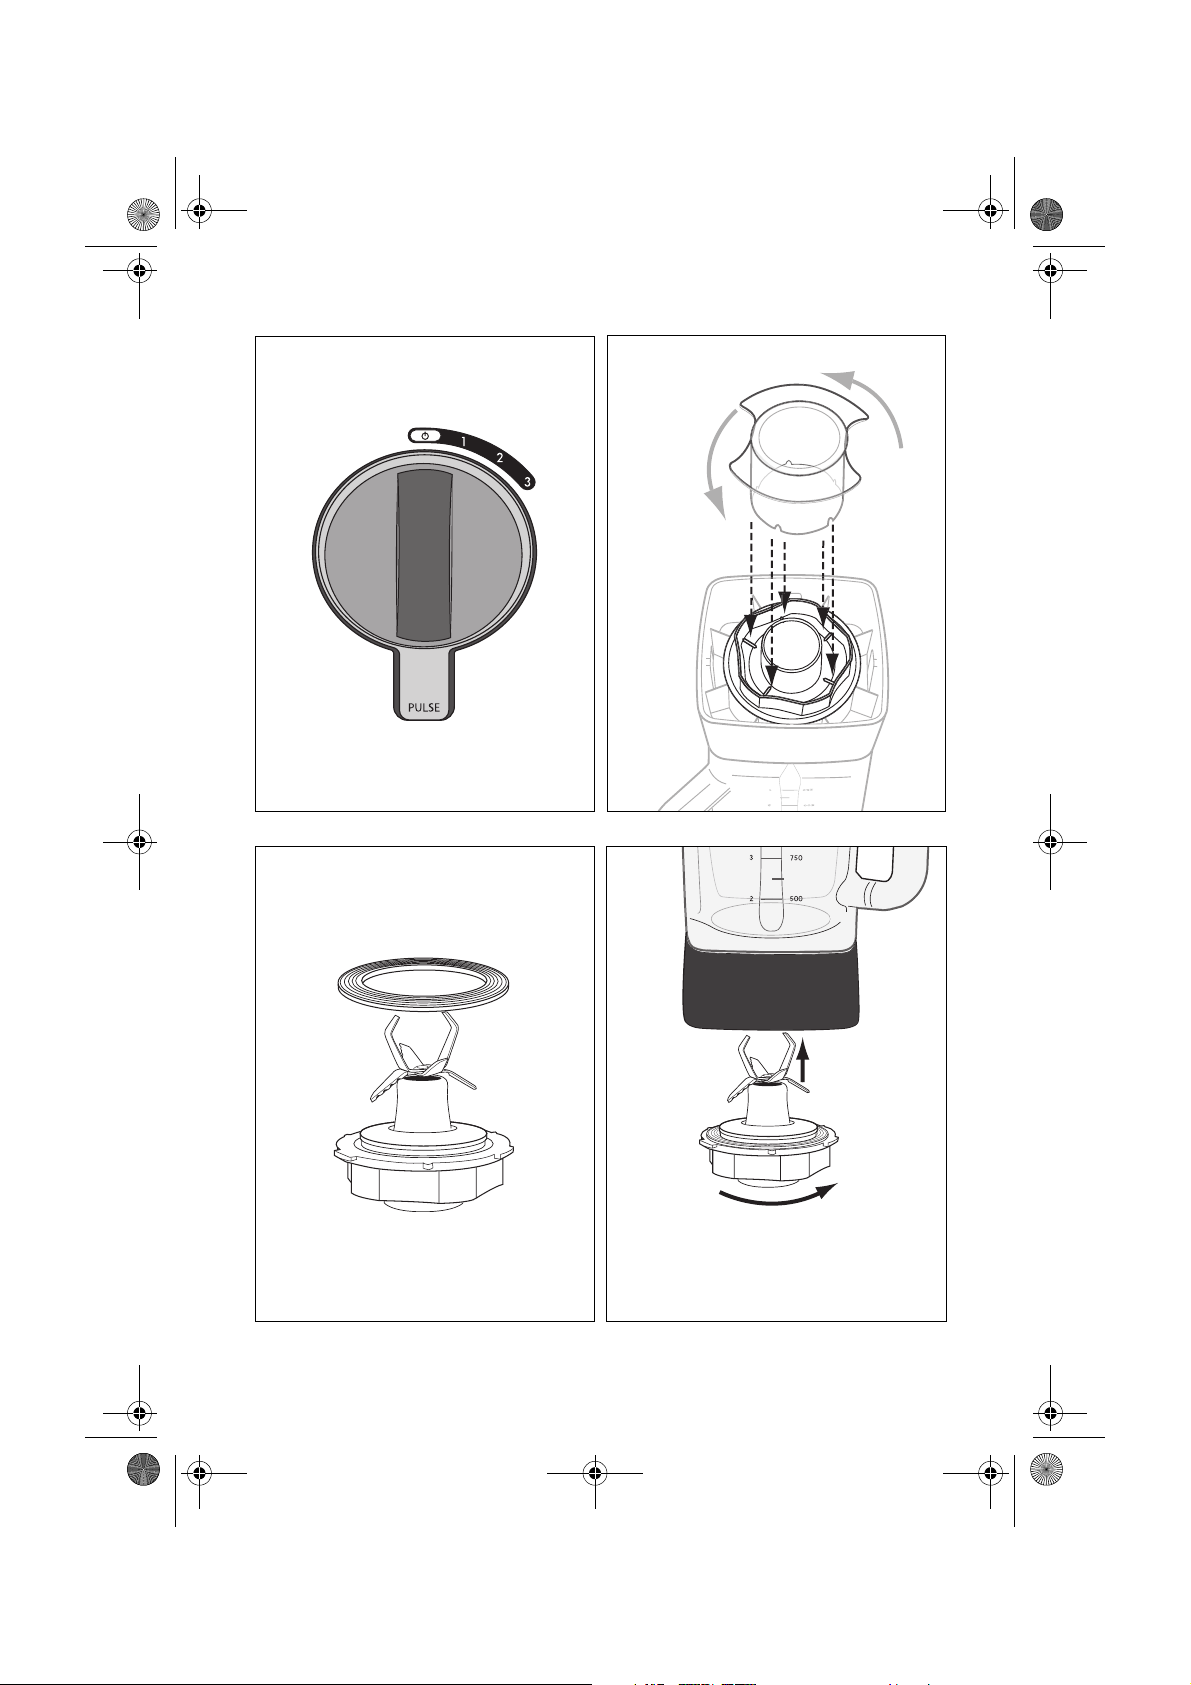
Mixer auseinandernehmen
0
Netzstecker ziehen.
0 Deckel (Abb. 1/B) abnehmen.
0 Mixbehälter (Abb. 1/C) abnehmen.
0 Drehen Sie den Mixbehälter auf den
Kopf.
0 Messervorrichtung mit Hilfe des Füll-
bechers (Bild 1/A) gegen den Uhrzei-
gersinn drehen und abnehmen. Die
Vertiefungen des Füllbechers passen in
die Rippen der Messervorrichtung.
0 Nun kann die Gummidichtung entfernt
werden (Abb. 4).
Vorsicht! Die Messervorrichtung ist
1
sehr scharf! Bei falscher Handhabung
können Verletzungen verursacht werden! Die
das Messer
digt werden.
Vorsicht! Die Messervorrichtung nicht
mit Gewalt aus dem Mixbehälter entnehmen, da diese sonst beschädigt
werden könnte! Messervorrichtung
beim Entnehmen ggf. leicht schräg
halten.
Versuchen Sie nicht, die Edelstahlklingen
von der Messervorrichtung zu entfernen.
Gummidichtung kann durch
leicht irreparabel beschä-
An-
3
Page 7

822 949 413_M8000_AEG.book Seite 4 Mittwoch, 5. November 2008 3:34 15
d
Zusammenbau des Mixers
0 Setzen Sie die Gummidichtung auf die
Messervorrichtung.
0 Setzen Sie die Messervorrichtung von
unten in den Behälter. Drehen Sie sie
im Uhrzeigersinn, um sie zu befestigen (Abb. 5). Vorsicht! Gehen Sie
behutsam vor!
Sie können den Füllbecher als Werk-
3
zeug verwenden.
Der Mixbehälter ist undicht, wenn die
Messervorrichtung nicht richtig zusammengebaut wird.
0 Setzen Sie den Behälter auf das Motor-
gehäuse.
0 Setzen Sie den Deckel auf den Mixbe-
hälter.
0 Setzen Sie den Füllbecher ein und ver-
riegeln Sie ihn.
Bedienung des Mixers
Stellen Sie den Mixer auf eine ebene
3
und trockene Arbeitsfläche.
0 Stecken Sie das Netzkabel in eine
Steckdose.
0 Öffnen Sie den Deckel (Abb. 1/B) und
füllen Sie alle benötigten Zutaten in
den Mixbehälter.
Wichtig! Maximale Füllmenge von
1,6 Liter nicht überschreiten.
Während des Betriebes können Sie
3
weitere Zutaten durch die Einfüllöffnung hinzugeben. Hierzu können Sie
den Füllbecher im Deckel verwenden
(Abb. 1/A). Schließen Sie die Einfüllöffnung danach sofort, um ein Spritzen
zu vermeiden.
Starten Sie den Mixer nicht ohne auf-
1
gesetzten Deckel (Abb. 1/B).
Obwohl der Deckel fest auf dem
hälter sitzt, empfehlen wir beim
flüssiger Zutaten, beim Start des Mixvorgangs die Hand auf den Deckel zu
halten, da der leistungsstarke Motor
bewirken könnte, dass die Flüssigkeit
überläuft. Sobald der Mixvorgang ge-
Mixbe-
Mixen
startet ist, können Sie die Hand wegnehmen.
0 Starten Sie den Standmixer, indem Sie
den Drehwähler (Abb. 1/G) nach rechts
drehen oder die Pulse-Taste (Abb. 1/H)
drücken.
Es empfiehlt sich, mit Geschwindig-
3
keitsstufe 1 zu beginnen und dann zur
Stufe 2 oder 3 überzugehen. Durch
Drükken der Pulse-Taste läuft der
Standmixer mit höchster Geschwindigkeit.
Aus dem „Leitfaden für das Mixen“ auf
Seite 7 gehen die möglichen Funktionen sowie die empfohlenen Geschwindigkeiten hervor.
0 Nach Beendigung des Mixvorgangs
drehen Sie den Geschwindigkeitswähler
auf Position „AUS .
0 Entfernen Sie nach dem Mixvorgang
zunächst den Mixbehälter, bevor Sie
den Deckel abnehmen.
Lassen Sie den Mixer bei starker Belas-
1
tung nicht länger als 2 Minuten
terbrochen laufen. Nach 2minütigem
Betrieb mit starker Belastung muss sich
der Mixer mindestens 10 Minuten lang
abkühlen.
unun-
Sicherheitssystem
Das Sicherheitssystem verhindert, dass
der Mixer betrieben werden kann,
wenn der Mixbehälter nicht richtig
aufgesetzt ist.
Dennoch sollten Sie Kinder vom Gerät
1
fernhalten.
Eis-crushen
Der Mixer kann zum Zerkleinern von
Eis verwendet werden.
0 Geben Sie einfach Eis in den Mixer und
drücken Sie anschließend auf die PULSETaste, halten Sie sie 1-2 Sekunden lang
fest und lassen Sie sie dann los.
Fahren Sie auf diese Weise fort und Ihr
Eis ist in Sekunden zerkleinert.
4
Deutsch
Page 8
822 949 413_M8000_AEG.book Seite 5 Mittwoch, 5. November 2008 3:34 15
d
Verarbeitung von heißen
Flüssigkeiten
Wenn Sie heiße Flüssigkeiten verarbeiten
möchten, lassen Sie sie abkühlen, bis
sie lauwarm sind, befüllen Sie den Mixbehälter nur zur Hälfte und beginnen
Sie die Verarbeitung mit niedriger Geschwindigkeit.
Werden heiße Flüssigkeiten verarbeitet,
1
kann der Mixbehälter sehr warm
Schützen Sie daher Ihre Hände.
den.
Werden heiße Flüssigkeiten verarbeitet,
entsteht Dampf. Gehen Sie vorsichtig
vor, um Verbrennungen zu vermeiden.
Vergewissern Sie sich, dass der Dampf
aus dem Deckel oder der Öffnung für
den Füllbecher entweichen kann.
wer-
Nützliche Hinweise für das Mixen
• Zu mixende Lebensmittel sollten in
Würfel (ca. 2-3 cm) geschnitten werden.
Dadurch wird ein einheitliches Ergebnis
erzielt.
• Um beim Mixen von trockenen Substanzen einen effizienten Mixvorgang
sicherzustellen, kann es erforderlich
sein, den Mixer auszuschalten und die
Zutaten mit einem Spachtel an den
Seiten des Mixbehälters herunterzuschieben.
• Verwenden Sie zur Herstellung von
Brotpanade 2 bis 3 Tage altes Brot, um
die Möglichkeit der Klumpenbildung zu
verringern. Steht nur frisches Brot zur
Verfügung, trocknen Sie es in einem
schwach beheizten Ofen einige Minuten
lang.
Wird eine Vielzahl von Zutaten verarbei-
•
mixen Sie zunächst die Flüssigkei-
tet,
ten und fügen Sie anschließend die
trockenen Substanzen hinzu.
• Vergewissern Sie sich stets, dass aus
Früchten die Kerne und von Fleisch die
Knochen entfernt werden, da andernfalls
die Messervorrichtung beschädigt werden kann.
• Lassen Sie einen benutzten Mixer nicht
zu lange in diesem Zustand stehen, da
das Lebensmittel an den Messern
antrocknet und die Reinigung dadurch
schwierig wird. Falls Sie den Mixer
nicht unmittelbar nach dem Gebrauch
reinigen können, gießen Sie etwas warmes Wasser hinein und lassen Sie die
Teile einweichen.
Pflege und Reinigung
Ziehen Sie vor der Reinigung des Mixers
1
den Stecker aus der Steckdose.
Stellen Sie sicher, daß keine Flüssigkeit
1
in das Motorgehäuse gelangt!
Reinigen Sie das Gehäuse mit einem
1
feuchten Lappen.
niemals in Wasser ein und reinigen Sie
es niemals unter fließendem Wasser.
Mixbehälter und Messer können unter
3
Verwendung der PULSE-Taste schnell
und sicher gereinigt werden.
0 Gießen Sie warmes Wasser mit einigen
Tropfen Spülmittel in den Mixbehälter.
0 Mixen Sie Wasser und Spülmittel,
indem Sie kurz auf die PULSE-Taste
drücken.
0 Spülen Sie den Mixbehälter anschlie-
ßend unter fließendem Wasser.
Sollte es notwendig sein, kann die
3
Messervorrichtung auch separat gereinigt werden.
Gehen Sie beim Abspülen der Messer-
1
vorrichtung
sind scharf!
ser und Spülmittel.
Wenn Sie die Messervorrichtung wie-
der einsetzen, drehen Sie sie mit Hilfe
des Füllbechers (Abb. 1/A) im Uhrzei-
gersinn. Siehe Abschnitt „Zusammenbau des Mixers“ auf Seite 4.
Alle entfernbaren Teile (Mixerdeckel,
3
Füllbecher, Gummidichtung, Messervorrichtung und Mixbehälter) können
in der Spülmaschine gereinigt werden.
Tauchen Sie das Gerät
vorsichtig vor (
).
Verwenden Sie nur Was-
die Klingen
5
Page 9
822 949 413_M8000_AEG.book Seite 6 Mittwoch, 5. November 2008 3:34 15
d
Technische Daten
Netzspannung: 230 – 240 V / 50 Hz
Leistungsaufnahme: 600 W
Dieses Gerät erfüllt folgende EC
;
Normen:
• Niedrig-Spannungs-Norm
2006/95/EC
• EMC Norm 89/336/EEC und Ergänzung 92/31/EEC sowie 93/68/EEC
Entsorgung
2 Verpackungsmaterial
Die Verpackungsmaterialien sind umweltverträglich und wiederverwertbar.
Die Kunststoffteile sind gekennzeichnet, z. B. >PE<, >PS< etc. Entsorgen Sie
die Verpackungsmaterialien entsprechend ihrer Kennzeichnung bei den
kommunalen Entsorgungsstellen in den
dafür vorgesehenen Sammelbehältern.
2 Altgerät
Das Symbol W auf dem Produkt
oder seiner Verpackung weist darauf
hin, dass dieses Produkt nicht als normaler Haushaltsabfall zu behandeln ist,
sondern an einem Sammelpunkt für
das Recycling von elektrischen und
elektronischen Geräten abgegeben
werden muss. Durch Ihren Beitrag zum
korrekten Entsorgen dieses Produkts
schützen Sie die Umwelt und die Gesundheit Ihrer Mitmenschen. Umwelt
und Gesundheit werden durch falsches
Entsorgen gefährdet. Weitere Informationen über das Recycling dieses Produkts erhalten Sie von Ihrem Rathaus,
Ihrer Müllabfuhr oder dem Geschäft, in
dem Sie das Produkt gekauft haben.
6
Page 10
822 949 413_M8000_AEG.book Seite 7 Mittwoch, 5. November 2008 3:34 15
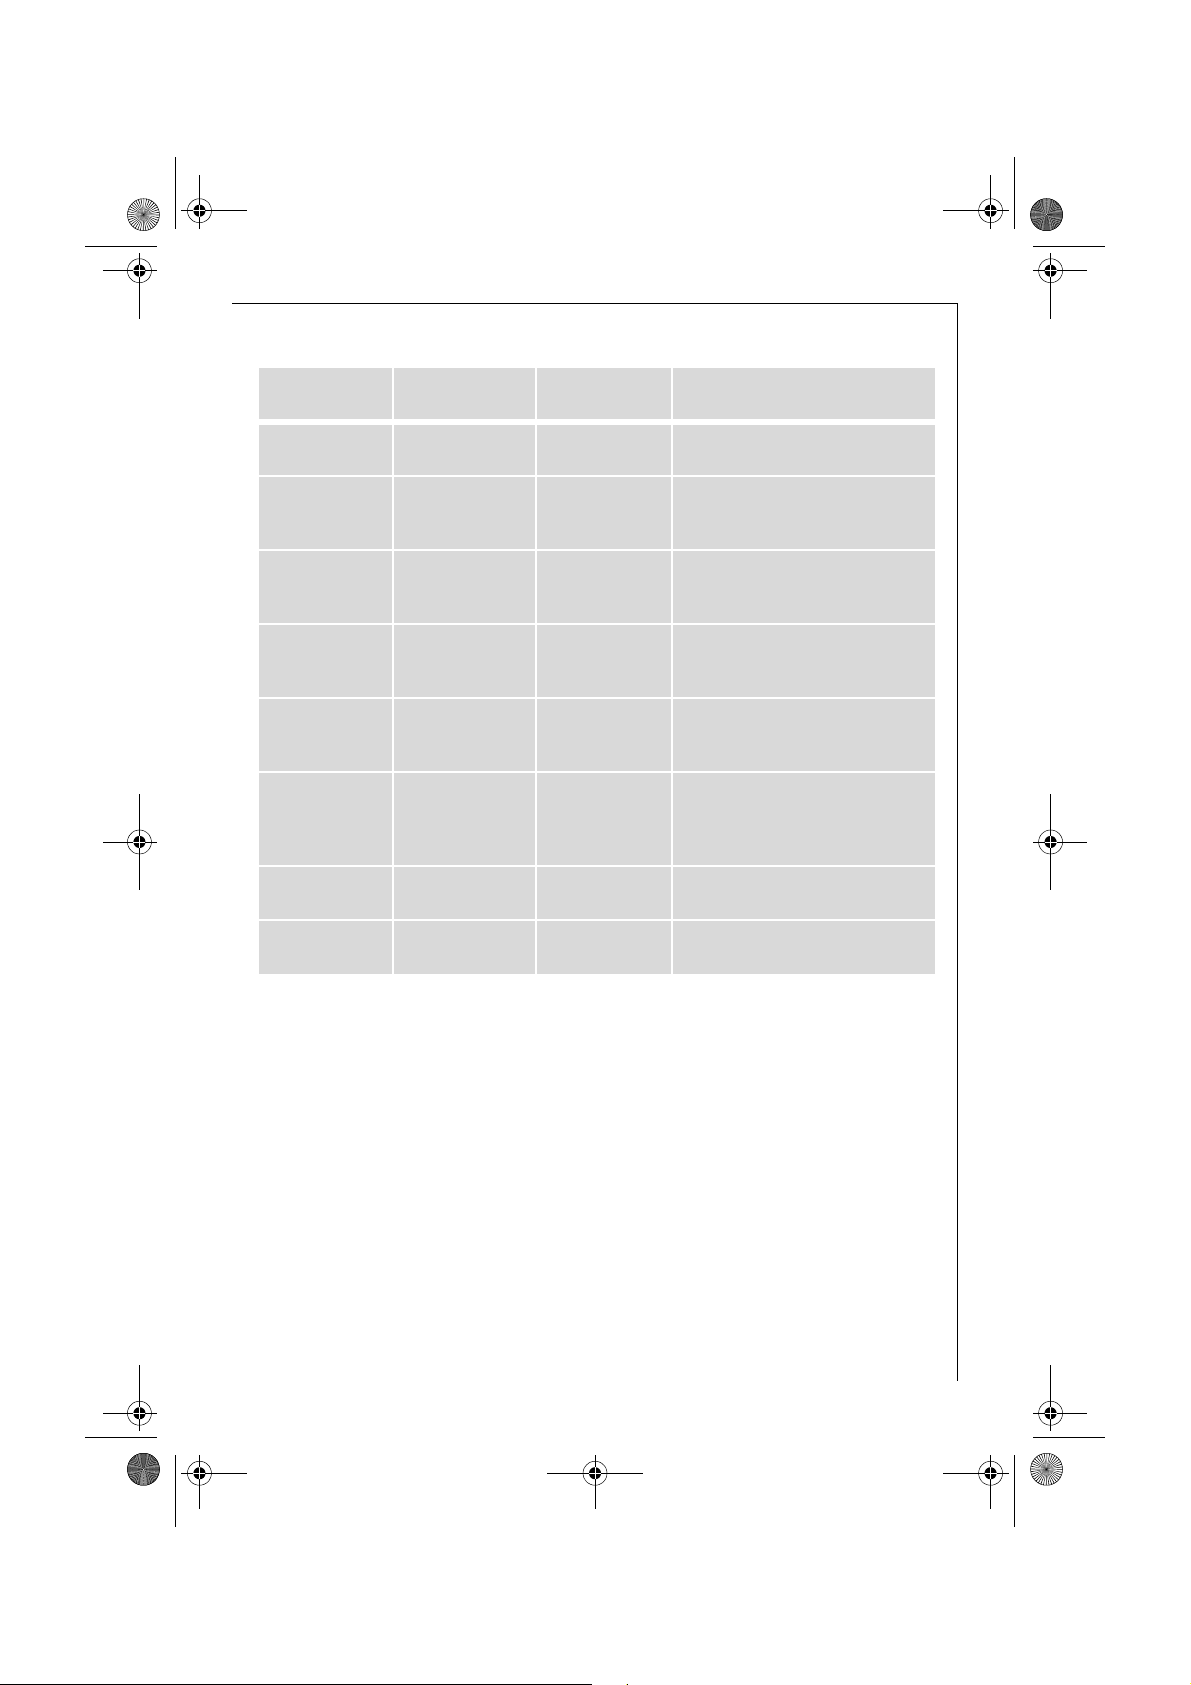
Leitfaden für das Mixen
d
Verarbeitungs-
aufgabe
Sauerstoffanrei-
cherung
Zerkleinern
Herstellen von
Panade
Zerkleinern von
Eis
Emulgieren Salatdressing 1
Mixen Teigwaren, Kuchen 1 und 2
Pürieren
Lebensmittel
Milkshakes, Fruchts-
hakes
Nüsse, Schokolade,
Knoblauch oder
Kräuter
Brotpanade PULSE und 2
Kekskrumen PULSE und 2
Suppen, Gemüse,
Früchte
Empfohlene
Einstellung
2 und 3
PULSE
PULSE
2 und 3 Mixen, bis die Speise fein ist.
Empfohlene Verarbeitungsmaßnahme
Gekühlte Milch verwenden. Mixen, bis
die gewünschte Konsistenz erreicht ist.
½ Tasse auf einmal im Pulse-Betrieb
mixen, um gleichmäßig große Stücke
zu erhalten.
Das Brot grob zerreißen.
Mixen, bis die gewünschte Konsistenz
erreicht ist.
In Stücke zerbrechen und je nach
Wunsch im Pulse- oder Normalbetrieb
zerkleinern.
Verwenden Sie die PULSE-Taste mehr-
mals, bis die gewünschte Zerkleine-
rungskonsistenz erzielt ist.
Mixen, bis eine gute Vermengung
erzielt ist. Während der Verarbeitung
kann der Mischung über die Einfüllöff-
nung im Deckel Öl hinzugefügt werden.
Zutaten mixen, bis sie gerade vermengt
sind. Verarbeitung nicht übertreiben.
7
Page 11
822 949 413_M8000_AEG.book Seite 8 Mittwoch, 5. November 2008 3:34 15
d
Empfohlene Mixgeschwindigkeit
Geschwindigkeitseinstellung 1
• Schlagen von Sahne
• Pürieren von Gemüse und Früchten
• Currypasten
• Kaffeebohnen
• Mayonnaise
Geschwindigkeitseinstellung 2
•Fruchtshakes
• Suppen
•Rohes Gemüse
• Kuchenteig
Rezeptbeispiele
Zutaten Zubereitung
Geschwindigkeitseinstellung 3
• Cocktails
• Laksa-Pasten
•Milkshakes
PULSE
•Eiswürfel
• Fleisch
•Brotkrumen
•Kekse
• Feine Bodennüsse
•Schokolade
• Selbstreinigung des Geräts
Suppen/Vorspeisen
Gemüse-Cremesuppe
250 g Kartoffeln Kartoffeln, Karotten, Sellerie und Zwiebeln waschen, schälen
125 g Karotten
100 g Sellerie
1 Zwiebel
1l Fleischbrühe
1Tasse Crème Fraîche
oder Sahne
1 EL gehackte Kräuter
Salz, Pfeffer
Kalte Tomatensuppe
750 g Tomaten Tomaten kreuzweise einschneiden und mit heißem Wasser
1 Zwiebel
3EL Olivenöl
1 Becher Crème Fraîche
1 Zitrone
2 EL Balsamico-Essig
1 EL gehackte Basili-
kumblätter
Salz, Pfeffer, Zucker
und in Würfel schneiden. Zerkleinertes Gemüse in 1/3 der
Fleischbrühe zum Kochen bringen und 10 Min. kochen.
Brühe und Gemüse kurz abkühlen lassen und im Mixer auf
Stufe 2 fein pürieren. Restliche Fleischbrühe in einem Topf
zum Kochen bringen, püriertes Gemüse zufügen und kurz
aufkochen lassen.
Suppe mit Crème fraîche, Salz und Pfeffer abschmecken.
Vor dem Servieren gehackte Kräuter darüber streuen.
überbrühen. Tomaten häuten und in grobe Stücke schneiden.
Zwiebel schälen und ebenfalls in Stücke schneiden.
Tomaten und Zwiebel im Mixer auf Stufe 2 fein pürieren.
Zitronensaft, Öl und Essig hinzufügen. Mit Salz, Pfeffer und
Zucker abschmecken. Crème fraîche unterziehen.
8
Page 12

822 949 413_M8000_AEG.book Seite 9 Mittwoch, 5. November 2008 3:34 15
Zutaten Zubereitung
Möhren-Cremesuppe
500 g Möhren Möhren waschen, schälen und in Stücke schneiden. In 1/4 l
1/2 l Gemüsebrühe
1/8 l Sahne
1/8 l Weißwein
Kerbel, Petersilie,
Salz, Pfeffer, Zucker
Gurken-Kaltschale
750 g Salatgurke Salatgurke waschen, schälen, der Länge nach halbieren und
500 g Natur-Joghurt
1 Knoblauchzehe
1Pr.
1 Bund Schnittlauch
1 Bund Dill
Hummus (Hommos)
Zucker, Salz, Pfeffer
Gemüsebrühe ca. 15 Min. kochen. Kurz abkühlen lassen. Im
Mixer auf Stufe 2 pürieren und zurück in den Topf geben.
Restliche Gemüsebrühe zugeben und die Suppe nochmal
erhitzen. Weißwein und Sahne zugeben und abschmecken.
entkernen. Gurkenfleisch in Stücke schneiden und mit dem
Knoblauch im Mixer auf Stufe 2 pürieren. Joghurt zufügen
und gut vermischen. Mit Zucker, Salz und Pfeffer abschmecken.
Kaltschale mit Dill und Schnittlauchröllchen garnieren.
d
250 g gekochte Kicher-
erbsen (Kichererbsen in Dosen
können gut
gespült verwen-
det werden)
3 EL Olivenöl
30 ml Zitronensaft
4 Knoblauchzehen
30 ml Wasser
Gebäck
Pfannkuchenteig
500 ml Milch Zutaten in angegebener Reihenfolge in den Mixer füllen.
3 Eier
1 Pr. Salz
250 g Mehl
Alle Zutaten auf der Stufe 2 für 40 Sekunden, oder bis die
Masse glatt ist, durchmixen.
Den Teig auf Stufe 2 gut durchmixen. Zwischendurch am
Becherrand anhaftendes Mehl abschaben.
Teig vor der Weiterverarbeitung ca. 15 Min. zum Ausquellen
ruhen lassen.
9
Page 13

822 949 413_M8000_AEG.book Seite 10 Mittwoch, 5. November 2008 3:34 15
d
Zutaten Zubereitung
Melt’n’Mix Cake
150 g Mehl Den Backofen auf 180° C vorheizen. Eine runde Kuchenform
140 g Zucker
125 g zerlassene Butter
oder Margarine
2 Eier
1 TL Vanille
60 ml Milch
Drinks/Cocktails
Iced Coffee
2 EL löslichen Kaffee Kaffeepulver in kochendem Wasser auflösen, abkühlen lassen.
50 ml kochendes Wasser
250 ml Milch
½ Tasse zerstoßenes Eis
100 ml Schlagsahne
mit ca. 20 cm Durchmesser einfetten.
Geben Sie alle Zutaten in den Mix-Behälter. Alles auf Stufe 2
für 50 Sekunden, oder bis die Masse glatt ist, durchmixen.
Die Mischung in der vorbereiteten Kuchenform verteilen und
etwa 30-35 Minuten goldbraun backen. Abkühlen lassen und
nach Wunsch mit einer Glasur versehen.
Etwas Wasser in den Behälter füllen, Eiswürfel zugeben und
auf Stufe 3 zerkleinern. Alle Zutaten, bis auf die Schlagsahne,
auf Stufe 1 30-60 Sekunden lang durchmixen.
Sahne etwa 40 Sekunden lang steif schlagen.
In Gläser gießen und mit Schlagsahne versehen.
Mit Trinkschokolade verzieren.
Egg Nog
250 ml heiße Milch Milch, Rum und Honig auf Stufe 2 30-60 Sekunden lang
2 TL Rum
2 TL Honig
1 Ei
Muskatnuss
durchmixen.
Das Ei hinzufügen und auf Stufe 2 für weitere 20 Sekunden
mixen.
Mit Muskatnuß bestreut servieren.
10
Page 14

822 949 413_M8000_AEG.book Seite 11 Mittwoch, 5. November 2008 3:34 15
g
Dear Customer,
g
Please read these instructions carefully.
Pay special attention to the safety in-
structions on the first pages. Keep the
instructions in a safe place for future
reference. Give them to any new owners
of the appliance.
Using the warning triangle and/or the
1
key words (Danger!, Caution!, Important!), information that is important
for your safety or the correct functioning of the appliance is highlighted. It is
essential that this information is
observed.
0 This symbol guides you step by step
through the operation of the appliance.
Next to this symbol you will find addi-
3
tional information and practical tips on
using the appliance.
Tips and information about the eco-
2
nomical and environmentally friendly
use of the appliance are marked with
the clover.
Appliance Description (Fig. 1)
A Filler cup (capacity 70 ml)
B Flexible lid with pouring hole
C Blender tank (capacity 1.6 litre)
D Blade assembly, detachable
E Motor housing
F Rating label (rear side of appliance)
G Speed Selector
H PULSE Button
J Non-slip rubber feet
K Cord storage facility (underside of
appliance)
1 Safety Instructions
This appliance corresponds to accepted
technological standards with regards
to safety. Nevertheless, as a manufacturer we consider it our obligation to
make you aware of the following safety information.
General Safety
• The appliance should only be connected to mains supplies with the same
voltage and frequency ratings as those
indicated on the Ratings Label.
• Always remove the plug when the
appliance is not in use.
• In the event of a malfunction, unplug
the appliance first!
• Never pull the plug out of the power
socket by pulling on the cord.
• Never try to operate the blender if
– the casing has been damaged,
– the cord has been damaged.
• If the power cord for this appliance has
been damaged, it should only be
replaced, for safety reasons, by the
manufacturer or Customer Service, or
by a suitably qualified person.
• Repairs to this appliance may only be
carried out by qualified service engineers. Considerable danger may result
from improper repairs. If repairs
become necessary, please contact the
Customer Care Department or your
authorised dealer.
• This appliance is not intended for use
by persons (including children) with
reduced physical, sensory or mental
capabilities, or lack of experience and
knowledge, unless they have been
given supervision or instruction concerning use of the appliance by a person responsible for their safety.
• If the appliance is used for purposes
other than those intended or used
incorrectly, no liability can be accepted
for any damage that may be caused.
English
11
Page 15

822 949 413_M8000_AEG.book Seite 12 Mittwoch, 5. November 2008 3:34 15
g
Child Safety
• Do not leave the appliance running
while unattended, or let children near
the appliance unsupervised!
• Children should be supervised to
ensure that they do not play with the
appliance.
• Packaging material, e.g. plastic bags,
should not be accessible to children.
When operating the appliance
• Always place the unit on a flat, level
surface.
• Never operate the appliance with wet
hands.
• Ensure the Speed Selector is in the off
position before plugging into the
power outlet.
• Plastic parts should never be dried at
or near direct sources of heat.
• The appliance must not be used for
mixing dyes (paints, or lacquer, etc,).
This can cause explosions!
• When you have finished using the
appliance, before cleaning, switch off
and pull the plug out of the socket.
• The blade assembly should only be disassembled by an authorised technician.
• Never clean the motor casing under
running water or soapy water.
• Caution! The blade assembly is very
sharp. Be careful when taking the
blender apart and re-assembling. It
may cause injury if handled incorrectly.
• Do not leave hard objects (for example
spoons) in the blade assembly while
running, and do not grasp the appliance with the hand inside the blender
tank. This may cause injury!
Possible applications
The blender can be used for mixing a
wide variety of drinks, crushing ice, reducing fruit and vegetables, whipping
cream, etc.
Cord storage
The appliance is fitted with a cord storage facility at the bottom. If the connection cord to the power outlet is too
long, it can be wraped around the cord
storage until it is the required length.
Disassembling the Appliance
0 Take the plug out of the socket.
0 Remove the lid (Fig. 1/B).
0 Remove the blender tank (Fig. 1/C).
0 Turn the blender blender tank upside
down.
0 Turn the blade assembly counterclock-
wise using the filler cup (Fig. 1/A) as
tool and remove (Fig. 3). The grooves of
the filler cup fit the ribs of the blade
assembly.
0 You can now remove the rubber seal
(Fig. 4).
Caution! The blade assembly is very
1
sharp. It can cause injury if handled
incorrectly! The rubber seal can easily
be irreparably damaged by the blade
assembly.
Caution! Do not use force when taking
the blade assembly out of the blender,
as this might cause damage. If necessary, tilt it slightly when removing.
Do not attempt to remove the stainless
steel blades from the blade assembly.
Assembling the Blender
0 Place the rubber seal on the blade
assembly.
0 Insert the blade assembly into the
blender tank from the bottom. Turn it
clockwise to fasten it (Fig. 5). Caution!
Handle carefully!
You can use the filler cup as tool.
3
The blender tank will leak if the blade
assembly is not assembled correctly.
0 Seat the tank on the motor housing.
0 Set the lid on the blender tank.
0 Insert the filler cup, and lock it in.
12
Page 16

822 949 413_M8000_AEG.book Seite 13 Mittwoch, 5. November 2008 3:34 15
g
Operating the Blender
Place the blender on a level, dry sur-
3
face.
0 Plug the power cord into a power
outlet.
0 Open the lid (Fig. 1/B) and put all the
required ingredients in the blender
tank.
Important! Do not exceed the maximum capacity of 1.6 litres.
You can add other ingredients through
3
the filler hole while the blender is running. You can use the filler cup in the
lid to do this (Fig. 1/A). Close the filler
hole immediately after, to avoid
splashing.
Do not start the blender without the
1
lid (Fig. 1/B) in position.
Although the lid fits firmly to the
blender tank, we advise when blending
liquid ingredients, to place your hand
on the lid as you initially start blending. As the powerful motor could cause
the liquid to surge up causing leakage.
Once you have started blending you
can remove your hand.
0 Start the blender by turning the Speed
Selector (Fig. 1/G) to the right, or by
pressing the PULSE Button (Fig. 1/H).
We recommend starting with blender
3
Speed 1, then progressing to Speed 2
or 3. The PULSE Button runs the
blender at full speed.
The „Blending guide“ on page 15 shows
the functions that can be performed
and the suggested speeds to use.
0 After you have completed blending,
turn the Speed Selector off to
position .
0 After mixing, first remove the blender
tank, before taking off the lid.
Do not let the blender run for more
1
than 2 minutes at a time using heavy
loads. After running for 2 minutes with
heavy loads, the blender should be left
to cool for at least 10 minutes.
Safety System
The safety system prevents the blender
from being operated if the blender
tank is not correctly seated.
You should nevertheless still keep
1
children away from the appiance.
Ice crushing
The blender can be used for crushing
ice.
0 Simply add ice to the blender then
press the PULSE button and hold for 12 seconds and release.
Continue this process and in seconds
your ice is crushed.
Processing hot liquids
If you would like to process hot liquids
please allow to cool down until lukewarm, fill the blender tank only half
full and start processing on low speed.
When processing hot liquids the blend-
1
er tank can become very warm, please
take care to protect your hands.
When processing hot liquids steam is
generated, please take care to avoid
burns. Ensure that the steam is allowed
ventilate out trough the lid or the hole
for the filler cup.
Handy Blending Hints
• Food items for blending should be cut
into cubes (approximately 2-3 cm), this
will assist in achieving an even result.
• To ensure efficient mixing when blending dry mixtures, it may be necessary
to stop the blender and push ingredients down the sides of the blender
tank with a spatula.
• When making bread crumbs, use 2 to
3 day old bread, to minimise the possibility of clumping. If only fresh bread is
available, dry it out for a few minutes
in a low heated oven.
13
Page 17

822 949 413_M8000_AEG.book Seite 14 Mittwoch, 5. November 2008 3:34 15
g
• When blending a variety of ingredients
together, blend the liquids first, then
add dry ingredients.
• Always ensure stones are removed
from fruit and bones from meat as
these can harm the blades.
• Don’t allow a used blender to sit for
too long as the food will dry onto the
blades, making it difficult to clean. If
you can’t clean the blender straight
away, pour some warm water in it and
allow to soak.
Care and Cleaning
Before cleaning the blender, take the
1
plug out of the socket.
Make sure that no liquids get inside
1
the motor housing!
Clean the housing with a damp cloth.
1
Never immerse in water or clean under running water.
The blender tank and blade assembly
3
can be cleaned quickly and safely using
the PULSE Button.
0 Pour warm water into the blender
tank, with a few drops of washing-up
liquid.
0 Mix the water and wahing-up liquid,
by pushing the PULSE Button briefly.
0 Finally, rinse the blender tank under
running water.
If necessary, the blade assembly can al-
3
so be cleaned separately.
Be careful when rinsing the blade as-
1
sembly (The blades are sharp!). Use
only water and washing-up liquid.
When replacing the blade assembly,
turn it clockwise using the filler cup
(Fig. 1/A) as tool. See paragraph „Assembling the Blender“ on page 12.
All removable parts (blender lid, filler
3
cup, rubber seal, blade assembly and
blender tank) can be cleaned in the
dishwasher.
Technical Data
Mains voltage: 230 – 240 V / 50 Hz
Power consumption: 600 W
This appliance conforms with the fol-
;
lowing EC Directives:
• Low Voltage Directive 2006/95/EC
• EMC Directive 89/336/EEC with
amendments 92/31/EEC and
93/68/EEC
Disposal
Packaging material
2
The packaging materials are environmentally friendly and can be recycled.
The plastic components are identified
by markings, e.g. >PE<, >PS<, etc.
Please dispose of the packaging materials in the appropriate container at the
community waste disposal facilities.
Old appliance
2
The symbol
its packaging indicates that this product may not be treated as household
waste. Instead it shall be handed over
to the applicable collection point for
the recycling of electrical and electronic equipment. By ensuring this
product is disposed of correctly, you
will help prevent potential negative
consequences for the environment and
human health, which could otherwise
be caused by inappropriate waste handling of this product. For more detailed
information about recycling of this
product, please contact your local city
office, your household waste disposal
service or the shop where you purchased the product.
W on the product or on
14
Page 18

822 949 413_M8000_AEG.book Seite 15 Mittwoch, 5. November 2008 3:34 15
Blending guide
Processing Task Food Suggested Setting Suggested Processing Procedure
g
Aerating
Chopping
Crumbing Bread Crumbs PULSE and 2
Crushing Ice PULSE
Emulsifying Salad Dressing 1
Mixing Batters, Cakes 1 and 2
Pureeing
Milkshakes,
Smoothies
Nuts, Chocolate,
Garlic or Herbs
Biscuit Crumbs PULSE and 2
Soups, Vegetables,
Fruits
2 and 3
PULSE
2 and 3 Blend until smooth.
Recommended blending speed
Speed Setting 1
• Whipping cream
• Puree vegetables & fruit
•Curry pastes
• Coffee beans
•Mayonnaise
Speed Setting 2
• Smoothies with fruit
• Soups
• Raw vegetables
• Cake batters
Use chilled milk. Blend until
desired consistency is achieved.
Pulse ½ cup at a time,
to ensure evenly sized pieces.
Tear bread roughly.
Blend until desired consistency.
Break into pieces and as desired pulse
or blend until crumbed.
Use the PULSE button several times
until crushed as desired consistency.
Blend until well combined. Oil may be
added to the mixture during processing
through the pouring hole in the lid.
Blend ingredients until just combined.
Do not overprocess.
Speed Setting 3
• Cocktails
• Laksa pastes
• Milkshakes
PULSE
• Ice cubes
•Meat
•Breadcrumbs
• Biscuits
• Finely ground nuts
• Chocolate
• Self cleaning the unit
15
Page 19

822 949 413_M8000_AEG.book Seite 16 Mittwoch, 5. November 2008 3:34 15
g
Example recipes
Ingredients Instructions
Soups/Starters
Cream of Vegetable Soup
250 g potatoes Wash and peel the potatoes, carrots, celery, and onion, and
125 g carrots
100 g celery
1 onion
1l meatstock
1Cup Crème fraîche
or cream
1 tablespoon
Cold tomato soup
750 g tomatoes Cut the tomatoes open crosswise and blanch with hot water.
1 onion
3 table-
spoons
1 cup Crème fraîche
1 lemon
2 tablespoons
1 table-
spoon
chopped herbs
salt, pepper
olive oil
Balsamic vinegar
chopped basil leaves
salt, pepper, sugar
chop them into pieces. Add the chopped vegetables to 1/3 of
the meat stock and bring to the boil. Cook for 10 minutes.
Leave the vegetables and stock to cool, then blend finely at
blender Speed 2. Bring the rest of the meat stock to the boil
in a pot, add the vegetable purée, and bring briefly to the boil
again.
Season to taste with the Crème fraîche, salt and pepper
Sprinkle with the chopped herbs, and serve.
Skin the tomatoes and cut into large pieces. Peel the onions
and cut into pieces.
Put the tomatoes and onion in the blender and mix to a fine
pure at Speed 2.
Add the lemon juice, oil, and vinegar. Season to taste with the
salt, pepper, and sugar. Stir in the Crème fraîche.
Cream of Carrot soup
500 g carrots Wash and peel the carrots, and chop into pieces. Boil in 1/4 l
1/2 l vegetable stock
1/8 l cream
1/8 l white wine
chervil, parsley, salt,
pepper, sugar
vegetable stock for around 15 minutes. Leave to cool for a
short time. Mix at blender Speed 2, then put them back in the
pot. Add the rest of the stock and heat up the soup again.
Add the white wine and cream to taste.
16
Page 20

822 949 413_M8000_AEG.book Seite 17 Mittwoch, 5. November 2008 3:34 15
Ingredients Instructions
Cold cucumber soup
750 g cucumber Wash and peel the cucumber, halve lengthwise and core it.
500 g natural joghourt
1 clove garlic
1 pinch sugar, salt, pepper
1 bunch
1 bunch
Humus (Hommos)
chives
dill
Chop the flesh into pieces and put in the blender with the
garlic. Mix at blender Speed 2. Add the joghourt and mix well.
Season with sugar, salt, and pepper to taste.
Garnish with the dill and chives.
g
250 g cooked chick peas
(canned chick peas
can be used - rinse
well)
3 tablespoons
30 ml lemon juice
4 cloves
30 ml water
Cakes and pastries
Pancake mix
500 ml milk Add the ingredients to the blender in the above order.
3 eggs
1 pinch salt
250 g flour
Melt’n’Mix Cake
150 g S.R. flour Pre-heat oven to 180 °C. Grease a 20 cm round cake tin.
140 g caster sugar
125 g butter or margarine,
2 eggs
1 tea-
spoon
60 ml milk
olive oil
garlic
melted
vanilla
Blend all ingredients on setting 2 for 40 seconds or until
smooth.
Mix to a paste at blender Speed 2.
Meanwhile, scrape off any flour sticking to the sides of the
cup.
Leave the paste to rise for around 15 minutes before using.
Place all ingredients into blender jug. Blend on setting 2 for
50 seconds, or until smooth.
Spread mixture into prepared tin and bake for approximately
30-35 minutes, until golden. Cool and ice as desired.
17
Page 21

822 949 413_M8000_AEG.book Seite 18 Mittwoch, 5. November 2008 3:34 15
g
Ingredients Instructions
Drinks/Cocktails
Iced Coffee
2 tablespoons
50 ml boiling water
250 ml milk
½ cup crushed ice
100 ml whipped cream
Egg Nog
250 ml hot milk Blend milk, rum and honey on setting 2 for 30-60 seconds.
2 tablespoons
2 table-
spoons
1 egg
instant coffee Dissolve the coffee powder in boiling water, then leave to
cool. Pour a little water into the tank, then add the ice and
crush on Speed 3. Blend all ingredients except cream on setting 1 for 30-60 seconds.
Whip cream for 40 seconds. Pour into glasses and top with
cream. Sprinkle with drinking chocolate.
Rum
honey
nutmeg
Add egg and blend on setting 2 for a further 20 seconds.
Sprinkle with nutmeg and serve.
18
Page 22

822 949 413_M8000_AEG.book Seite 19 Mittwoch, 5. November 2008 3:34 15
r
Αγαπητέ Πελάτη,
r
Παρακαλούµε διαβάστε προσεκτικά
αυτές τις οδηγίες.
∆ώστε ιδιαίτερη προσοχή στις
οδηγίες ασφαλείας στις πρώτες
σελίδες. Κρατήστε τις οδηγίες σε ένα
ασφαλές µέρος για µελλοντική
αναφορά. ∆ώστε τις σε οποιοδήποτε
µελλοντικό ιδιοκτήτη της ηλεκτρικής
συσκευής.
Χρήση του τρίγωνου
1
προειδοποίησης και/ή λέξεων κλειδί
(Κίνδυνος!, Προσοχή!,
Σηµαντικό!), είναι επιλεγµένες
σηµαντικές πληροφορίες για την
ασφάλεια σας ή τη σωστή χρήση της
συσκευής. Είναι πολύ σηµαντικό να
παρατηρηθούν αυτές οι
πληροφορίες.
0 Το σύµβολο αυτό σας καθοδηγεί
βήµα προς βήµα στη χρήση της
συσκευής.
∆ίπλα από το σύµβολο αυτό θα
3
βρείτε πρόσθετες πληροφορίες και
χρήσιµες συµβουλές για τη χρήση
της συσκευής.
Οι συµβουλές και πληροφορίες περί
2
την οικονοµική και φιλική χρήση
προς το περιβάλλον της συσκευής
έχουν σηµαδευτεί µε τριφύλλι.
Περιγραφή της συσκευής
(εικ. 1)
A
Καπάκι στοµίου (χωρητικότητα 70 ml)
B Εύκαµπτο καπάκι µε τρύπα εκροής
G ∆οχείο του µπλέντερ
(χωρητικότητα 1,6 ml)
D ∆ιάταξη λεπίδων κοπής,
αποσπώµενο
E Περίβληµα κινητήρα
F Ονοµαστική ετικέτα (πίσω µέρος
της ηλεκτρικής συσκευής)
G Επιλογέας ταχύτητας
H Κουµπί PULSE
J
Αντιολισθητικά πόδια από καουτσούκ
K Σύστηµα αποθήκευσης καλωδίου
(στο κάτω µέρος της ηλεκτρικής
συσκευής)
Ελληνικά
1 Οδηγίες ασφαλείας
Αυτή η συσκευή αντιστοιχεί σε
αποδεχόµενα τεχνολογικά πρότυπα
ασφαλείας. Παρόλα αυτά, ως
κατασκευαστές θεωρούµε ευθηνή
µας να σας ενηµερώσοµε για τις
πληροφορίες ασφαλείας που
ακολουθούν.
Γενική ασφάλεια
• Η ηλεκτρική συσκευή πρέπει να
συνδέεται µε κύρια τροφοδοσία ίδιας
τάσης και συσχνότητας όπως αυτή
που ενδείκνεται στην Ονοµαστική
Ετικέτα.
• Να βγάζετε πάντα το βύσµα όταν η
συσκευή δεν είναι σε χρήση.
Σε περίπτωση βλάβης, αποσυδέστε
•
αρχικά το βύσµα της συσκευής!
• Μην βγάζετε ποτέ την πρίζα από
την πρίζα στον τοίχο τραβώντας το
καλώδιο.
• Μη προσπαθήσετε ποτέ να
λειτουργήσετε το µπλέντερ εάν
– ο σκελετός έχει φθαρεί;
– το καλώδιο έχει φθαρεί.
• Εάν το καλώδιο τροφοδοσίας της
συσκευής έχει φθαρεί, πρέπει να
αντικατασταθεί για λόγους ασφαλείας
από τον κατασκευαστή ή από την
Εξυπηρέτηση Πελατών ή από ένα
κατάλληλο αρµόδιο άτοµο.
• Οι επισκευές της συσκευής πρέπει
να πραγµατοποιούνται µόνο από
αρµόδιος µηχανικούς επισκευών.
Μη κατάλληλες επισκευές µπορεί να
έχουν ως αποτέλεσµα σηµαντικό
κίνδυνο. Αν είναι απαραίτητη η
επισκευή, παρακαλούµε να
επικοινωνήσετε µε το Τµήµα
Υποστήριξης Πελατών ή τον
εξουσιοδοτηµένο έµπορο σας.
• Αυτή η συσκευή δεν προορίζεται
για χρήση από άτοµο
(συµπεριλαµβάνοντας παιδιά) µε
µειωµένες σωµατικές, αισθητήριες ή
ψυχικές δυνατότητες ή έλλειψη
εµπειρίας και γνώσης εκτός αν έχουν
λάβει αρχική επίβλεψη ή οδηγίες
σχετικά µε τη χρήση της συσκευής
19
Page 23

822 949 413_M8000_AEG.book Seite 20 Mittwoch, 5. November 2008 3:34 15
r
από ένα άτοµο, υπεύθυνο για την
ασφάλεια τους.
• Αν η συσκευή χρησιµοποιείται για
λόγους στους οποίους δεν
προορίζεται ή χρησιµοποιείται
λανθασµένα, καµία ευθύνη δε
λαµβάνεται υπόψη για πιθανές
ζηµιές που µπορεί να έχουν συµβεί.
Ασφάλεια Παιδιών
• Μην αφήνετε τη συσκευή να
λειτουργεί χωρίς επίβλεψη, ή να
αφήνετε τα παιδιά κοντά της χωρίς
επίβλεψη!
•
Τα παιδιά πρέπει να βρίσκονται κάτω
από επίβλεψη για να εξασφαλιστεί
ότι δεν παίζουν µε τη συσκευή.
• Τα παιδιά δεν πρέπει να έχουν
πρόσβαση στα υλικά συσκευασίας,
π.χ. πλαστικές σακούλες.
Κατά τη λειτουργία της
συσκευής
•
Να τοποθετείτε πάντα τη συσκευή σε
µία επίπεδη επιφάνεια.
•
Μη λειτουργείτε ποτέ τη συσκευή µε
υγρά χέρια.
• Βεβαιωθείτε ότι ο επιλογέας
ταχύτητας βρίσκεται στη θέση off
πριν αποσυνδέσετε τη συσκευή από
την πρίζα στον τοίχο.
• Τα πλαστικα µέρη δεν πρέπει ποτέ
να στεγνώνουν πάνω ή κοντά σε
άµεσες πηγές θερµότητας.
• Η συσκευή δεν πρέπει να
χρησιµοποιείται για την ανάµειξη
βαφών (µπογιές, ή βερνίκια, κτλ.).
Αυτό µπορεί να προκαλέσει
εκρήξεις!
• Όταν τελειώσετε να χρησιµοποιείτε
τη συσκευή,
απενεργοποιήστε την και τραβήξτε
το βύσµα από την πρίζα στον τοίχο.
• Η διάταξη λεπίδων κοπής πρέπει
να αποσυναρµολογείται από έναν
εξουσιοδοτηµένο τεχνικό.
• Μην καθαρίζετε ποτέ το σκελετό
κάτω από τρεχούµενο νερό ή από
νερό µε σαπούνι.
• Προσοχή! Η διάταξη λεπίδων
κοπής είναι
πριν την καθαρίσετε,
πολύ κοφτερή.
Προσέχετε όταν αφαιρείτε τη λεπίδα
και την συναρµολογείτε ξανά.
Μπορεί να προκαλέσει
τραυµατισµό εάν δεν
χρησιµοποιηθεί σωστά.
•
Μην αφήνετε σκληρά αντικείµενα (για
παράδειγµα κουτάλια) στη διάταξη
λεπίδων κοπής ενώ αυτή λειτουργεί,
και µην πιάνετε τη συσκευή µε το
χέρι µέσα στο δοχείο του µπλέντερ.
Αυτό µπορεί να προκαλέσει
τραυµατισµό!
Πιθανές εφαρµογές
Το µπλέντερ µπορεί να
χρησιµοποιηθεί για την ανάµειξη
πολλών ειδών ποτών, για τριµµένο
πάγο, για τη συµπύκνωση φρούτων
και λαχανικών, για σαντιγί, κτλ.
Ψυχρός θάλαµος
Η συσκευή περιλαµβάνει ένα
σύστηµα ψυχρού θαλάµου στο κάτω
µέρος. Εάν είναι πολύ µακρύ το
καλώδιο σύνδεσης της πρίζας
τροφοδοσίας, µπορεί να τυλιχθεί
γύρω από το ψυχρό θάλαµο µέχρι
να είναι στο επιθυµητό µήκος.
Αποσυναρµολόγηση της
συσκευής
0 Αποσύνδεση της συσκευής από
την πρίζα στον τοίχο.
0 Αφαίρεση του καπακιού (εικ. 1/Β).
0
Αφαίρεση του δοχείου του µπλέντερ
(εικ. 1/C).
0 Γυρίστε το δοχείο του µπλέντερ
ανάποδα.
0
Στρέψτε την διάταξη λεπίδων κοπής
αριστερόστροφα
το κύπελλο (εικ.1/C) ως εργαλείο
και αφαιρέστε (εικ.3). Οι ραβδώσεις
στο κύπελλο ταιριάζουν µε τις
ραβδώσεις στη διάταξη λεπίδων
κοπής.
0 Μπορείτε τώρα να αφαιρέσετε την
στεγανοποίηση (εικ. 4)
χρησιµοποιώντας
20
Page 24

822 949 413_M8000_AEG.book Seite 21 Mittwoch, 5. November 2008 3:34 15
r
Προσοχή!
1
είναι πολύ κοφτερή. Μπορεί να
προκαλέσει τραυµατισµό εάν
δεν χρησιµοποιηθεί σωστά! Η
στεγανοποίηση µπορεί εύκολα
να φθαρεί ανεπανόρθωτα από
τη διάταξη λεπίδων κοπής.
Προσοχή! Μη χρησιµοποιείται
δύναµη κατά την αφαίρεση της
διάταξης λεπίδων κοπής από το
µπλέντερ, καθώς µπορεί να
προκαλέσει ζηµιά. Εάν
απαραίτητο, γύρτε το ελαφρά κατά
την αφαίρεση.
Μην προσαθήσετε να αφαιρέσετε
τις ανοξείδωτες ατσάλινες λεπίδες
από τη διάταξη λεπίδων κοπής.
Η διάταξη λεπίδων κοπής
είναι
Συναρµολόγηση του
µπλέντερ
0 Τοποθετήστε τη στεγανοποίηση
πάνω στη διάταξη λεπίδων κοπής.
0 Εισάγετε τη διάταξη λεπίδων κοπής
µέσα στο δοχείου του µπλέντερ
από το κάτω µέρος. Στρέψτε το
δεξιόστροφα για να το σφίξτε
(εικ. 5). Προσοχή! Χειριστείτε το
µε προσοχή!
Μπορείτε να χρησιµοποιήσετε το
3
κύπελλο ως εργαλείο.
Το δοχείο του µπλέντερ θα έχει
διαρροή εάν η διάταξη λεπίδων
κοπής δεν έχει συναρµολογηθεί
σωστά.
0 Τοποθετήστε το δοχείο πάνω στο
περίβληµα του κινητήρα.
0 Τοποθετήστε το καπάκι πάνω στο
δοχείο του µπλέντερ.
0 Εισάγετε το κύπελλο, και κλειδώστε
το µέσα.
Λειτουργία του µπλέντερ
Τοποθετήστε το µπλέντερ πάνω σε
3
µία επίπεδη στεγνή επιφάνεια.
0 Συνδέστε το καλώδιο τροφοδοσίας
µέσα στην πρίζα.
0 Ανοίξτε το καπάκι (εικ. 1/Β) και
τοποθετήστε µέσα στο δοχείο του
µπλέντερ όλα τα απαραίτητα
συστατικά.
Σηµαντικό! Μην υπερβείτε τη
µέγιστη χωρητικότητα των 1.6 λίτρων.
Μπορείτε να εισάγετε άλλα συστατικά
3
µέσω τις τρύπας γεµίσµατος ενώ το
µπλέντερ λειτουργεί. Μπορείτε να
χρησιµοποιήσετε το κύπελλο στο
καπάκι για να το πραγµατοποιήσετε
αυτό (εικ. 1/Α). Κλείστε την τρύπα
γεµίσµατος αµέσως µετά για να
αποφύγετε το πιτσίλισµα.
Μην ενεργοποιείτε το µπλέντερ εάν
1
δεν είναι στη θέση του το καπάκι
(εικ. 1/Β).
Αν και το καπάκι ταιριάζει ακριβώς
στο δοχείο του µπλέντερ, προτείνεται
κατά την ανάµειξη υγρών
συστατικών, να τοποθετείτε το χέρι
σας πάνω από το καπάκι κατά την
αρχικοποίηση της µύξης. Καθώς ο
δυνατός κινητήρας µπορεί να
προκαλέσει το φούσκωµα του υγρού
προκαλώντας διαρροή. Μόλις
ξεκινήσει η ανάµειξη µπορέιτε να
αφαιρέσετε το χέρι σας.
0
Ξεκινήστε το µπλέντερ γυρίζοντας τον
επιλογέας ταχύτητας (εικ. 1/G) προς
τα δεξιά, ή πιέζοντας το κουµπί
PULSE (εικ. 1/H).
Προτείνεται να ξεκινάτε µε την
3
ταχύτητα µπλέντερ στο 1 και στη
συνέχεια να συνεχίζεται µε ταχύτητα
2 ή 3. Το κουµπί PULSE λειτουργεί
το µπλέντερ σε πλήρη ταχύτητα.
Το „Οδηγός ανάµειξης“ στη σελίδα 24
εµφανίζει τις λειτουργίες που
µπορούν να πραγµατοποιηθούν
και οι προτεινόµενες ταχύτητες που
χρησιµοποιούν.
0 Μετά την ολοκλήρωση της µείξης,
γυρίστε τον επιλογέα ταχύτητας στη
θέση off .
0 Μετά τη µείξη, αφαιρέστε πρώτα το
δοχείο του µπλέντερ, πριν
αφαιρέσετε το καπάκι.
21
Page 25

822 949 413_M8000_AEG.book Seite 22 Mittwoch, 5. November 2008 3:34 15
r
Μην αφήνετε το µπλέντερ να
1
λειτουργεί για πάνω από 2 λεπτά
κάθε φορά που είναι φορτωµένο
πολύ. Μετά από δύο λεπτά
λειτουργίας µε πολύ φορτίο, πρέπει
να αφήνετε το µπλέντερ να κρυώσει
για τουλάχιστον 10 λεπτά.
Σύστηµα ασφαλείας
Το σύστηµα ασφαλείας αποτρέπει
το µπλέντερ από το να λειτουργεί
εάν το δοχείο του µπλέντερ δεν
είναι σωστά τοποθετηµένο.
Πρέπει ούτως ή άλλως να κρατάτε
1
τα παιδιά µακρυά από τη συσκευή.
Θρυµµατισµός πάγου
Το µπλέντερ µπορεί να
χρησιµοποιηθεί για το θρυµµατισµό
πάγου.
0 Απλά προσθέστε πάγο και στη
συνέχει πιέστε το κουµπί PULSE και
πατήστε το για 1-2 δευτερόλεπτα
και στη συνέχεια ελευθερώστε το.
Συνεχίστε αυτή τη διαδικασία και
µέσα σε δευτερόλεπτα ο πάγος θα
έχει θρυµµατιστεί.
Επεξεργασία ζεστών υγρών
Αν θέλετε να επεξεργαστείτε ζεστά
υγρά αφήστε να κρυώσουν έως
χλιαρά, γεµίστε µισό το δοχείο του
µπλέντερ και αρχίστε την
επεξεργασία σε χαµηλή ταχύτητα.
Όταν επεξεργάζεστε ζεστά υγρά, το
1
δοχείο του µπλέντερ µπορεί να γίνει
πολύ ζεστό. Προσέξτε τα χέρια σας.
Όταν επεξεργάζεστε ζεστά υγρά,
δηµιουργείται ζεστός ατµός.
Προσέξτε να αποφύγετε τα
εγκαύµατα. Βεβαιωθείτε ότι ο ατµός
µπορεί να διαφύγει µέσο του
καπακιού η την οπή για το κύπελλο.
Χρήσιµες συµβουλές
ανάµειξης
•
Τα κοµµάτια φαγητού προς ανάµειξη
πρέπει να είναι κοµµένα σε κύβους
(περίπου 2-3 cm), αυτό θα βοηθήσει
στη δηµιουργία ενός οµαλού
αποτελέσµατος.
• Για να βεβαιώσετε την
αποτελεσµατική µείξη κατά την
ανάµειξη στεγνών µειγµάτων, µπορεί
να είναι απαραίτητο να σταµατήσετε
το µπλέντερ και να σπρώξετε τα
συστατικά κάτω από τις πλευρές
του δοχείου του µπλέντερ µε µία
σπάτουλα.
• Κατά τη δηµιουργία ψίχουλων
ψωµιού, χρησιµοποιήστε ξερό ψωµί
2 µε 3 ηµερών, για να
ελαχιστοποιήσετε την πιθανότητα
δηµιουργίας µίας συµπαγής µάζας.
Εάν είναι διαθέσιµο µόνο φρέσκο
ψωµί, στεγνώστε το για λίγα λεπτά σε
έναν χαµηλά θερµαινόµενο φούρνο.
• Όταν αναµειγνύεται µία ποικιλία
συστατικών µαζί, αναµείξτε πρώτα τα
υλικά και στη συνέχεια προσθέστε
τα στεγνά συστατικά.
• Να βεβαιώνετε πάντα ότι οι πέτρες
αφαιρούνται από τα φρούτα και τα
κόκκαλα από το κρέας καθώς αυτά
µπορούν να βλάψουν τις λεπίδες.
• Μην επιτρέπετε σε ένα
χρησιµοποιηµένο µπλέντερ να κάθετε
για πολύ καιρί καθώς το φαγητό θα
στεγνώσει µέσα στις λεπίδες και θα
είναι δύσκολο µετά να καθαριστεί.
Εάν δεν µπορέιτε να καθαρίσετε το
µπλέντερ αµέσως µετά, ρίξτε λίγο
ζεστό νερό σε αυτό και αφήστε το να
µουσκέψει.
Καθάρισµα και συντήρηση
Πριν καθαρίσετε το µπλέντερ,
1
αφαιρέστε το βύσµα από την πρίζα.
Βεβαιωθείτε ότι δεν έχουν µπεει υγρά
1
µέσα στο περίβληµα του κινητήρα!
22
Page 26

822 949 413_M8000_AEG.book Seite 23 Mittwoch, 5. November 2008 3:34 15
r
Καθαρίστε το περίβληµα µε ένα
1
νοτισµένο ύφασµα.
ποτέ σε νερό ή να το καθαρίσετε
κάτω από τρεχούµενο νερό.
Το δοχείο του µπλέντερ και η
3
διάταξη
να καθαριστούν γρήγορα και µε
ασφάλεια χρησιµοποιώντας το
κουµπί PULSE.
0
Ρίξτε λίγο νερό µέσα στο δοχείο του
µπλέντερ, µαζί µε λίγες σταγόνες
από υγρό καθαρισµού.
0 Αναµείξτε το νερό µε το υγρό
καθαριστικό, πιέζοντας ελαφρά το
κουµπί PULSE.
0 Τελ ικ ά, ξεπλύνετε το δοχείο του
µπλέντερ κάτω από τρεχούµενο νερό.
Εάν είναι απαραίτητο, η διάταξη
3
λεπίδων κοπής µπορεί να καθαριστεί
χωριστά.
Προσέχετε όταν ξεπλένετε τη διάταξη
1
λεπίδων κοπής (Οι λεπίδες είναι
κοφτερές!). Χρησιµοποιείτε µόνο
νερό και υγρό καθαρισµού.
Κατά την αντικατάσταση της διάταξης
λεπίδων, στρέψτε την
χρησιµοποιώντας το κύπελλο
(εικ.1/Α) ως εργαλείο. Βλέπε
παράγραφο „Συναρµολόγηση του
µπλέντερ“ στη σελίδα 21.
Όλα τα αφαιρούµενα µέρη (καπάκι
3
µπλέντερ, στεγανοποίηση από
καουτσούκ, διάταξη λεπίδων κοπής
και δοχείο του µπλέντερ) µπορούν να
καθαριστούν στο πλυντήριο πιάτων.
λεπίδων κοπής µπορούν
Μην το βυθίσετε
δεξιόστροφα
Τεχνικά στοιχεία
Τάσ η γενικής παροχής ρεύµατος:
230–240V / 50Hz
Κατανάλωση ρεύµατος:600W
Αυτή η συσκευή συµµορφώνεται µε
;
τις παρακάτω Οδηγίες ΕΚ:
• Οδηγία Χαµηλής Τάσ ης
2006/95/ΕΚ
• Οδηγία EMC 89/336/ΕΟΚ
µε τις τροποποιήσεις 92/31/ΕΟΚ
και 93/68/ΕΟΚ
Απόρριψη
Υλικά συσκευασίας
2
Τα υλικά συσκευασίας είναι φιλικά
προς το περιβάλλων και µπορεί να
ανακυκλωθούν. Τα πλαστικά µέρη
αναγνωρίζονται από τα σηµάδια, π.χ.
>PE<, >PS<, κλπ. Παρακαλώ,
απορρίψτε τα υλικά συσκευασίας
στους κατάλληλους κάδους της
απόρριψης της κοινότητας.
Παλιές συσκευές
2
Το σύµβουλο
στη συσκευασία του δείχνει ότι το
προϊόν δεν µπορεί να χειριστεί ως
οικιακό απόρριµµα. Πρέπει να
παραδοθεί στο σηµείο συλλογής
για την ανακύκλωση ηλεκτρικού και
ηλεκτρονικού εξοπλισµού.
Εξασφαλίζοντας ότι το προϊόν έχει
απορριφθεί σωστά, βοηθάτε την
αποτροπή πιθανών αρνητικών
συνεπειών για το περιβάλλον και την
υγειά ανθρώπων, τα οποία µπορεί
να δηµιουργηθούν από ακατάλληλη
απόρριψη αυτού του προϊόν. Για
περισσότερες πληροφορίες για την
ανακύκλωση αυτού του προϊόν,
παρακαλούµε να επικοινωνήσετε µε
το τοπικό γραφείο σας, την υπηρεσία
απόρριψης οικιακών απορριµµάτων
ή το κατάστηµα οπού αγοράσατε το
προϊόν.
W στο προϊόν ή
23
Page 27

822 949 413_M8000_AEG.book Seite 24 Mittwoch, 5. November 2008 3:34 15
r
Οδηγός ανάµειξης
Καθήκον
επεξεργασίας
Αερισµός
Κόψιµο σε λεπτά
κοµµάτια
∆ηµιουργία
ψίχουλων
Θρυµµατισµένος
πάγος
Γαλάκτωµα
Ανάµειξη
Τρόφιµα
Μιλκσέικ,
γρανίτες
Καρύδια,
σοκολάτα,
σκόρλο
ή βότανα
Ψίχουλα
ψωµιών
Ψίχουλα
µπισκότου
Ντρεσινγκ
σαλάτας
Κουρκούτι,
κέικ
Προτεινόµενη
ρύθµιση
2 και 3
PULSE
PULSE και 2
PULSE και 2
PULSE
1
1 και 2
Πρετεινόµενη διαδικασία
επεξεργασίας
Χρησιµοποιήστε κρύο γάλα.
Ανακατέξτε µέχρι να επιτευχθεί η
επιθυµητή συνάφεια.
Ρίξτε ½ φλυτζάνι κάθε φορά, για να
βεβαιωθείτε ότι τα κοµµάτια είναι
οµοίου µεγέθους.
Κόψτε βίαια το ψωµί. Αναµείξτε το
µέχρι να αποκτήσει την επιθυµητή
αυνάφεια.
Σπάσ τε τα µπισκότα σε κοµµάτια και
αναµείξτε το µέχρι να γίνει ψίχουλα.
Χρησιµοποιήστε το κουµπί PULSE
πολλές φορές µέχρι να σπάσει στην
επιθυµητή συνάφεια.
Αναµείξτε µέχρι να αναµειχθεί καλά.
Μπορεί να προστεθεί λάδι στο
µείγµα κατά την επεξεργασία µέσω
της τρύπας απόρριψης στο καπάκι.
Αναµείξτε τα συστατικά µέχρι να είναι
καλά αναµειγµένα. Μην τα
αναµείξετε πολύ.
24
Πουρές
Σούπες,
λαχανικά,
φρούτα
2 και 3 Αναµείξετε µέχρι να γίνουν λεία.
Page 28

822 949 413_M8000_AEG.book Seite 25 Mittwoch, 5. November 2008 3:34 15
Προτεινόµενη ταχύτητα ανάµειξης
Ρύθµιση ταχύτητας 1
• Σαντιγί
• Πουρέ από λαχανικά και φρούτα
• Μείγµα ζύµης
• Κόκκοι καφέ
• Μαγιονέζα
Ρύθµιση ταχύτητας 2
• Γρανίτες µε φρούτα
• Σούπες
• Ωµά λαχανικά
• Κουρκούτι για κέικ
Ρύθµιση ταχύτητας 3
• Κοκτέιλ
• Πολτός Laksa
• Μιλκσέικ
PULSE
• Κύβοι πάγου
• Κρέας
• Ψίχουλα ψωµιού
• Μπισκότα
• Εξαιρετικά αλεσµένα καρύδια
• Σοκολάτα
• Αυτοκαθαρισµός
Παραδείγµατα συνταγών
Συστατικά Οδηγίες
r
της συσκευής
Σούπες/Πρώτα πιάτα
Σούπα λαχανικών βελουτέ
250 g πατάτες Πλύνετε και ξεφλουδίστε τις πατάτες, τα καρότα και τα
125 g καρότα
100 g σέλινο
1 κρεµµύδι
1l ζωµός
κρέατος
1 Κύπελλο Κρέµα
γάλακτος
1 κουτάλι κοµµένα
λαχανικά
αλάτι, πιπέρι
κρεµύδια και κόψτε τα σε µικρά κοµµάτια. Προσθέστε
τα κοµµένα λαχανικά στο 1/3 του ζωµού κρέατος και
τοποθετήστε τα στο µπολ. Μαγειρέψτε για 10 λεπτά.
Αφήστε τα λαχανικά και το χωµό να κρυώσουν, στη
συνέχεια αναµείξτε τελικά σε
Φτάστε το ζωµό κρέατος σε κατάσταση βρασµού µέσα
σε ένα µπολ, προσθέστε τον πουρέ λαχανικών και
φέρτε το ξανά σε κατάσταση βρασµού.
Συνοδεύεται εποχικά µε κρέµα γάλακτος, αλάτι και
πιπέρι για να του δώσετε γεύση.
Ραντίστε µε κοµµένα βότανα και σερβίρετε.
ταχύτητα ανάµειξης 2.
25
Page 29

822 949 413_M8000_AEG.book Seite 26 Mittwoch, 5. November 2008 3:34 15
r
Συστατικά Οδηγίες
Κρύα σούπα τοµάτας
750 g τοµάτες
1 κρεµµύδι
3 κουτάλι ελαιόλαδο
1 φλυτζάνι κρέµα
γάλακτος
1 λεµόνι
2 κουτάλια ξύδι
µπαλσάµικο
1 κουτάλι κοµµένα
φύλλα
βασιλικού
αλάτι, πιπέρι,
ζάχαρη
Σούπα καρότο βελουτέ
500 g καρότα Πλύνετε και ξεφλουδίστε τα καρότα και κόψτε τα σε
1/2 l ζωµός
λαχανικών
1/8 l κρέµα
1/8 l άσπρο κρασί
µαϊντανός,
αλάτι, πιπέρι,
ζάχαρι
Κρύα σούπα από αγγούρι
Κόψτε τις τοµάτες. Ανοίξτε τις δεξιόστροφα και ζεµατίστε
µε ζεστό νερό. Βγάλτε τη φλούδα από τις τοµάτες και
κόψτε τις σε µεγάλα κοµµάτια. Ξεφλουδίστε τα κρεµµύδια
και κόψτε τα κοµµάτια.
Τοποθετήστε τις τοµάτες και τα κρεµµύδια στο µπλέντερ
και αναµείξτε µέχρι να γίνουν ένα πολύ καλό µείγµα µε
ταχύτητα 2.
Προσθέστε τιο χυµό λεµονιού, το λάδι και ξύδι. Συνοδεύεται
εποχικά µε κρέµα γάλακτος, αλάτι και πιπέρι για να του
δώσετε γεύση. Ανακατέψτε τη κρέµα γάλακτος.
µικρά κοµµάτια. Βράστε σε 1/4 l ζωµό λαχανικών για
περίπου 15 λεπτά. Αφήστε το να κρυώσει για λίγο.
Αναµείξτε σε ταχύτητα ανάµειξης 2, και τοποθετήστε τα
πάλι ξανά στο δοχείο. Προσθέστε το υπόλοιπο του
ζωµού και ζεστάνετε ξανά τη σούπα.
άσπρο κρασί και την κρέµα για να δοκιµάσατε.
Προσθέστε το
750 g αγγούρι Πλύνετε και ξεφλουδίστε το αγγούρι, διχοτοµείστε
500 g φυσικό
γιαούρτι
1 γαρύφαλο σκόρδο
1 πρέζα ζάχα ρ η,
αλάτι, πιπέρι
1 δέσµη
1 δέσµη
πράσα
άνηθο
στρίβοντας το προς τα αριστερά και αφαιρέστε το
εσωτερικό του. Κόψτε το εσωτερικό σε κοµµάτια και
τοποθετήστε το στο µπλέντερ µε το σκόρδο. Αναµείξτε
µε ταχύτητα ανάµειξης 2. Προσθέστε το γιαούρτι και
αναµείξτε καλά. Συνοδεύεται εποχικά µε κρέµα γάλακτος,
αλάτι και πιπέρι για να δώσετε γεύση.
Γαρνίρετε µε άνηθο και πράσο.
26
Page 30

822 949 413_M8000_AEG.book Seite 27 Mittwoch, 5. November 2008 3:34 15
Συστατικά Οδηγίες
Χούµους
r
250 g Μαγειρεµένα
ρεβίθια
(µπορούν να
χρησιµοποιη
θούν ρεβίθια
σε κονσέρβα
- πλύνετε
καλά)
3 κουτάλια ελαιόλαδο
30 ml χυµός
λεµονιού
4 γαρίφαλα
30 ml νερό
Κέικ και γλυκά
Μείγµα τηγανίτας
500 ml γάλα
3 αυγά
1 πρέζα αλάτι
250 g αλεύρι
Κέικ Melt’n’Mix
σκόρδο
Αναµείξτε όλα τα συστατικά στη ρύθµιση 2 για 40
δευτερόλεπτα ή µέχρι να γίνει πολύ λείο.
Προσθέστε τα συστατικά στο µπλέντερ µε την παραπάνω
σειρά.
Αναµείξτε µέχρι να γίνει πολτός σε ταχύτητα ανάµειξης 2.
Εν τω µεταξύ, αποξύστε το αλεύρι που κολλάει στις
πλευρές του φλυτζανιού.
Αφήστε τον πολτό να φουσκώσει για περίπου 15 λεπτά
πριν τον χρησιµοποιήσετε.
150 g αλεύρι που
φουσκώνει
µόνο του
140 g ζάχαρη άχνη
125 g βούτυρο ή
µαργαρίνη,
λιωµένη
2 αυγά
1 κουτάλι βανίλια
60 ml γάλα
Προ-θερµάνετε το φούρνο στους 180 °C. Αλείψτε µε
βούτυρο ένα ταψί για κέικ.
Τοπο θε τή στ ε όλα τα συστατικά µέσα στην κανάτα
ανάµειξης. Αναµείξτε όλα τα συστατικά στη ρύθµιση 2 για
50 δευτερόλεπτα ή µέχρι να γίνει πολύ λείο.
Τοπο θε τή στ ε το µείγµα µέσα στο ταψί και ψήστε το
περίπου 30-35 λεπτά, µέχρι να ροδίσει. Αφήστε το να
κρυώσει όσο είναι επιθυµητό.
27
Page 31

822 949 413_M8000_AEG.book Seite 28 Mittwoch, 5. November 2008 3:34 15
r
Συστατικά Οδηγίες
Ποτά/Κοκτέιλ
Παγωµένος καφές
2 κουτάλια στιγµιαίος
καφές
50 ml βραστό νερό
250 ml γάλα
½ φλυτζάνι θρυµµατισµέ
νος πάγος
100 ml σαντιγί
Egg Nog (ποτό µε βάση το γάλα και τα αυγά)
250 ml ζεστό γάλα
2 κουτάλια Ρούµι
2 κουτάλια µέλι
1 αυγό
µοσχοκάρυδο
∆ιαλύστε τη σκόνη του καφέ σε βραστό νερό, στη συνέχεια
αφήστε το να κρυώσει. Ρίξτε λίγο νερό µέσα στο δοχείο,
στη συνέχεια προσθέστε τον πάγο και θρυµµατίστε σε
Ταχ ύ τητ α 3. Αναµείξτε όλα τα συστατικά εκτός από την
κρέµα στη ρύθµιση 1 για 30-60 δευτερόλεπτα.
Χτυπήστε την κρέµα για 40 δευτερόλεπτα. Ρίξτε το σε
ποτήρια και βάλτε από πάνω την
σοκολάτα.
Αναµείξτε το γάλα, το ρούµι και το µέλι στη ρύθµισε 2 για
30-60 δευτερόλεπτα.
Προσθέστε το αυγό και αναµείξτε στη ρύθµιση 2 για
επιπλέον 30-60 δευτερόλεπτα.
Ραντίστε µε µοσχοκάρυδο και σερβίρετε.
κρέµα. Ραντίστε µε
28
Page 32

822 949 413_M8000_AEG.book Seite 29 Mittwoch, 5. November 2008 3:34 15
r
29
Page 33

822 949 413_M8000_AEG.book Seite 30 Mittwoch, 5. November 2008 3:34 15
30
Page 34

822 949 413_M8000_AEG.book Seite 31 Mittwoch, 5. November 2008 3:34 15
31
Page 35

822 949 413_M8000_AEG.book Seite 32 Mittwoch, 5. November 2008 3:34 15
Electrolux Hausgeräte Vertriebs GmbH
Muggenhofer Str. 135
D-90429 Nürnberg
http://www.electrolux.de
© Copyright by Electrolux
822 949 413 -01- 1108
Share more of our thinking at
www.electrolux.com
Änderungen vorbehalten
Subject to change without notice
 Loading...