

Page 1
Page 2
2
FOR PERFECT RESULTS
Thank you for choosing this AEG product. We have
created it to give you impeccable performance for many
years, with innovative technologies that help make life
simpler -- features you might not find on ordinary
appliances. Please spend a few minutes reading to get
the very best from it.
ACCESSORIES AND CONSUMABLES
keep all your AEG appliances looking spotless and
working perfectly. Along with a wide range of
accessories designed and built to the high quality
standards you would expect, from specialist cookware
to cutlery baskets, from bottle holders to delicate
need to
Visit the webshop at:
www.aeg-electrolux.com/shop
Page 3

3
Contents
4
6
8
9
12
13
14
28
Installation instructions
Safety Instructions
Appliance Description
Use
Load capacity
Cleaning and Maintenance
What should I do if the crockery
Installation
Contents
The following symbols are used in this user
manual:
Important information concerning your personal
safety and information on how to avoid
damaging the appliance.
General information and tips.
Environmental information.
Page 4
4
Installation instructions
INSTALLATION INSTRUCTIONS
Before installation
Check that the input voltage indicated on the characteristics plate is the same as the
voltage of the power outlet you are going to use.
Open the drawer and take out all the accessories and remove the packing material.
Attention! The front surface of the crockery heater may be wrapped in a protective film.
Before using the crockery warmer for the first time, remove this film carefully.
Make sure that the crockery warmer is not damaged in any way. Check that the drawer
opens and closes correctly. If you find any damage, contact the Technical Assistance
Service.
Attention: the power socket should be easily accessible after the crockery warmer has
been installed.
The crockery warmer should only be built-in in combination with those appliances
indicated by the manufacturer. If it is fitted in combination with other appliances, the
guarantee is no longer valid since it is impossible to guarantee that the crockery warmer
will work correctly.
Installation
To build-in the crockery warmer in combination with another appliance there must be a
fixed, interim shelf in the housing unit to support the weight of both appliances.
The appliance to be combined with the crockery warmer will be placed directly on the
latter without any need to have a separating shelf.
To build-in the appliance which is combined with the crockery warmer, follow the
instructions set out in the respective instructions and fitting booklet.
The relevant installation dimensions are indicated in mm in the diagrams shown at the
end of this booklet. Proceed as follows:
1. Place the crockery warmer on the shelf and
slide it towards the interior of the niche in
such a way that it is centred and
completely lined up with the front of the
unit.
2. Check that the crockery warmer’s frame is
properly levelled and is sitting evenly on the
shelf.
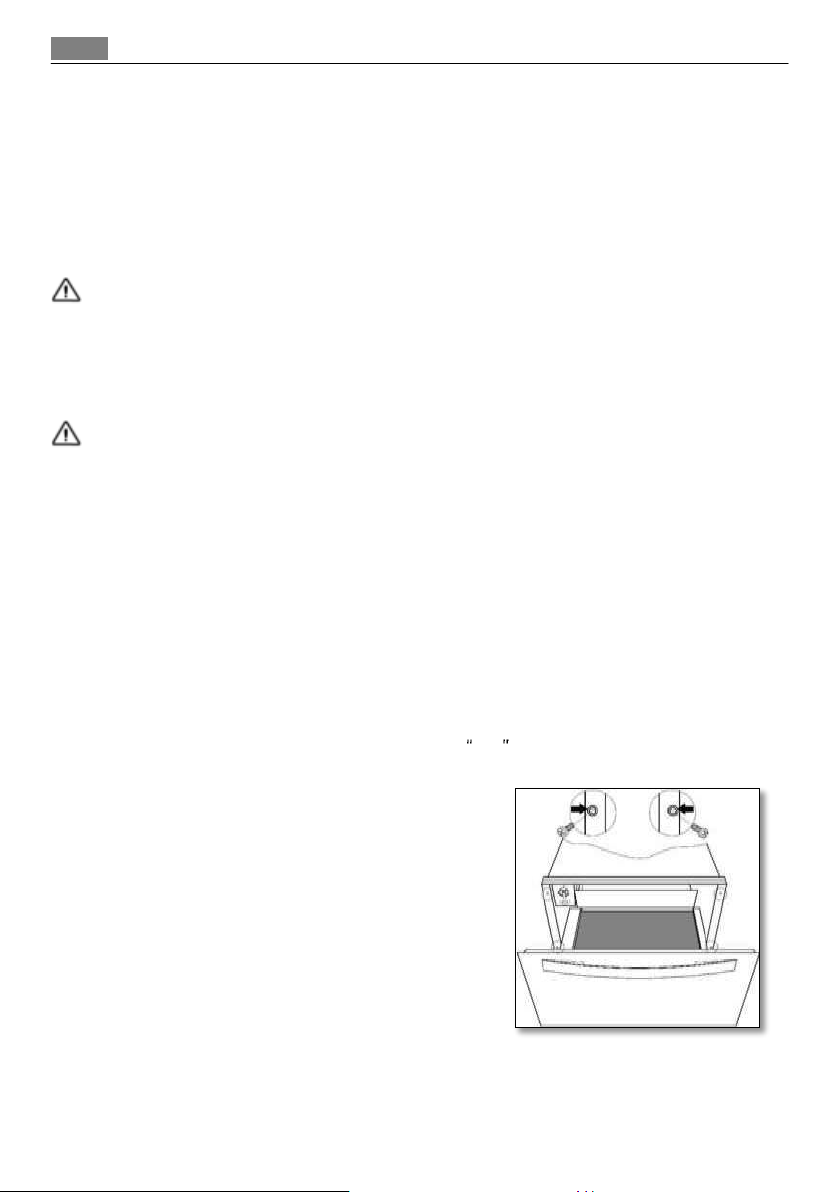
3. Open the drawer and fix the crockery
warmer to the sides of the unit using the
provided screws.
Page 5

5
Installation instructions
Electrical Connection
Electrical installation must be performed by an electrician qualified in accordance with
the legislation in force.
Before connecting the crockery warmer to the electric mains, check that the voltage and
frequency of the mains matches that which is shown on the rating plate located in the
heating block inside.
The electric connection is made via an omnipolar switch, which is suitable for the
intensity to be tolerated and which has a minimum gap of 3mm between its contacts,
which will ensure disconnection in case of emergency or when cleaning the crockery
warmer.
If a plug is used for the electric connection, then it must be accessible after installation.
The connection should include correct earthing, in compliance with current norms.
WARNING: THE CROCKERY WARMER MUST BE EARTHED.
If the flexible supply cable fitted to the crockery warmer ever needs to be changed, it
should be replaced by an official After Sales Service, because it requires special tools.
The manufacturer and retailers do not accept responsibility for any damage that
may be caused to people, animals or property if these installation instructions are not
observed.
Page 6
6
Safety instructions
SAFETY INSTRUCTIONS
Warning! Before connecting the appliance compare the power data (voltage and
frequency) indicated on the characteristics plate with those of the power supply in
question. If these data do not match there may be problems. In case of doubt, contact an
electrician.
Warning! If the electrical wire plug is removed, the appliance must be installed and
connected by a technician. Contact a qualified electrician who knows and respects
current safety standards. The manufacturer cannot be held responsible for damage
resulting from fitting or connecting errors.
Warning! The electrical safety of the appliance can only be guaranteed if it is earthed.
The manufacturer cannot be held responsible for damage resulting from the absence of
Warning! Only use the appliance once it has been fitted into its built-in position. Only in
this manner can it be guaranteed that users cannot access the electrical components.
Warning!
conducting parts or changes to electrical or mechanical components may represent a
Warning! Repairs and maintenance, especially of parts carrying electrical current, must
only be done by technicians authorised by the manufacturer. The manufacturer and
retailers do not accept responsibility for any damage caused to people, animals or
property as a result of repairs and maintenance carried out by non-authorised personnel.
Warning! Repairs undertaken during the guarantee period must only be done by
technicians authorised by the manufacturer. If this is not the case then any damage
resulting from the repair in question is excluded from the guarantee.
Warning! The appliance must be disconnected from the electrical current when
installation and repair work is being done. To disconnect the appliance from the current,
one of the following conditions must apply:
The switchboard fuses / circuit breakers must be disconnected.
The plug should be removed from the socket. To remove the plug from the
socket do not pull on the electric cable but rather pull out the plug itself directly.
Page 7

7
Safety instructions
Precautions during use
This appliance complies with current safety standards. Improper use of the appliance
may put the user at risk.
Read the operating instructions carefully before using the appliance for the first time.
In this way you will avoid the risk of injuring yourself or damaging the appliance.
The crockery warmer is solely for domestic use!
The manufacturer does not accept responsibility for breakdowns or faults arising from
improper or erroneous use of the appliance.
Depending on the temperature selected and the operating time, the temperature
inside the appliance may reach 80 ºC. To take crockery out of the crockery warmer
protect your hands by using oven gloves or an oven cloth.
Take special care with children and do not allow them to play close to the appliance. If
the appliance is inadvertently switched on it will heat up and may cause serious burns.
Children should only be allowed to use the appliance without direct adult supervision
if they have been given instructions on how to use the appliance safely and how to
identify dangerous situations that may arise if the appliance is used in an improper
manner.
Do not sit or hang on the drawer. The telescopic runners will be damaged. The
maximum load capacity of the drawer is 25 kg.
Do not store synthetic containers or easily inflammable objects inside the crockery
warmer. When you switch on the appliance such containers and objects may melt or
catch fire. Fire danger.
Do not use the appliance to heat up the air temperature in the kitchen. The high
temperatures reached may cause easily inflammable objects close to the appliance to
catch fire.
Do not use high pressure or steam jet cleaning devices. The steam may affect electrical
components and cause a short circuit. The steam pressure may also cause damage to
the appliances surface and components in the long term.
When you stop using the appliance at the end of its working life, disconnect it from
the power supply and render the electrical cable unusable so that the appliance is not
a danger if, for example, children use it for playing.
This appliance is not intended for use by persons (including children) with reduced
physical, sensory or mental capabilities; or lack of experience and knowledge, unless
they have been given supervision or instruction concerning use of the appliance by a
person responsible for their safety. Children should be supervised to ensure that they
do not play with the appliance.
Warning: Accessible parts may become hot during use. Children should be kept away.
Page 8
8
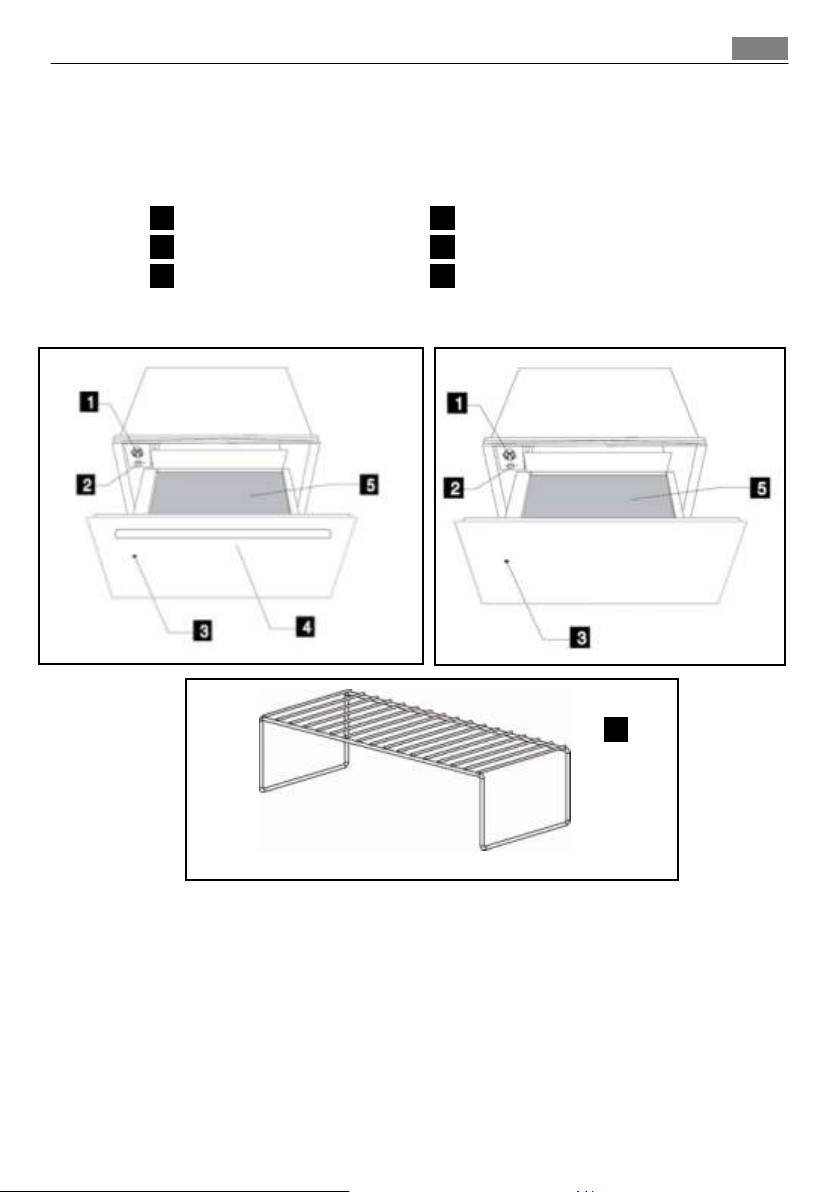
Appliance description
Function selector
Handle
On/Off switch
Anti-Slip mat
Control Lamp
Drawer Grid *
6 3 5 2 4
1
KD91403E / KD92903E
KD91404E
6
*Drawer Grid only available with the model KD92903E
APPLIANCE DESCRIPTION
Main Components
How the crockery warmer works
This appliance is equipped with a warm air circulation system. A fan distributes the heat
generated by an electrical heating element throughout the interior of the appliance.
The thermostat allows the user to define and control the temperature wanted for the
crockery.
The circulating hot air that is generated heats up the crockery quickly and evenly.
A metal grille protects both the heating element and the fan.
The base of the drawer is fitted with a non-slip mat to prevent plates and dishes
sliding around when the drawer is opened and closed.
Page 9
9
Use
USE
Before using for the first time
Before using the appliance for the first time you should clean the interior and the
Then heat the crockery warmer for at least 2 hours. For this, turn the temperature
Make sure the kitchen is well-ventilated when you are doing this.
heating an odour will be released. Both the odour and any smoke that may form will
disappear after a short time and neither signifies that there is anything wrong with the
connection or the appliance.
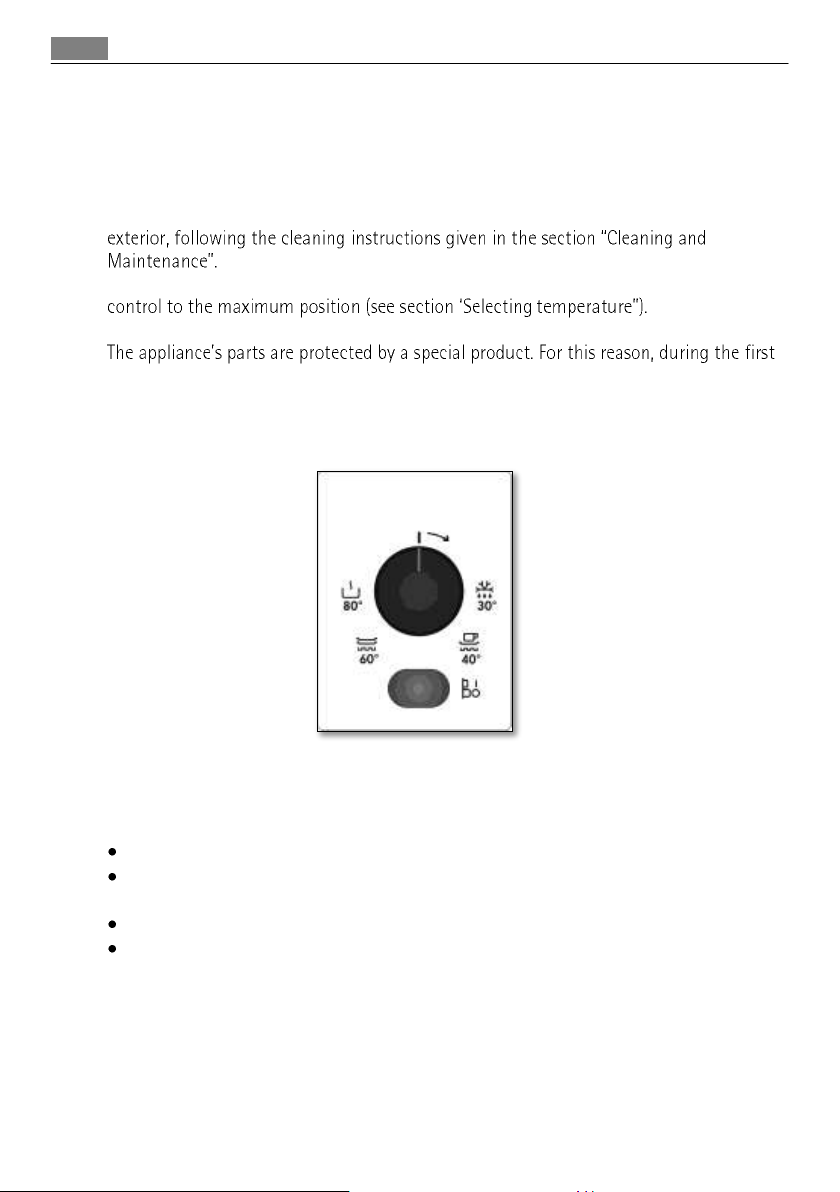
Control Panel
The control panel has a function and the on/off switch. The control panel is only visible
when the drawer is open.
Using the crockery warmer
To use the crockery warmer, proceed as follows:
Put the crockery in the drawer.
Select the function you want by turning the thermostat control to the desired
position.
Switch on the appliance by pressing the switch, which will light up.
Close the drawer.
Be careful not to use too much force when closing the drawer since it may open up
again. Before taking out the warm crockery you must switch off the crockery warmer by
pressing the switch again.
Page 10
10
Use
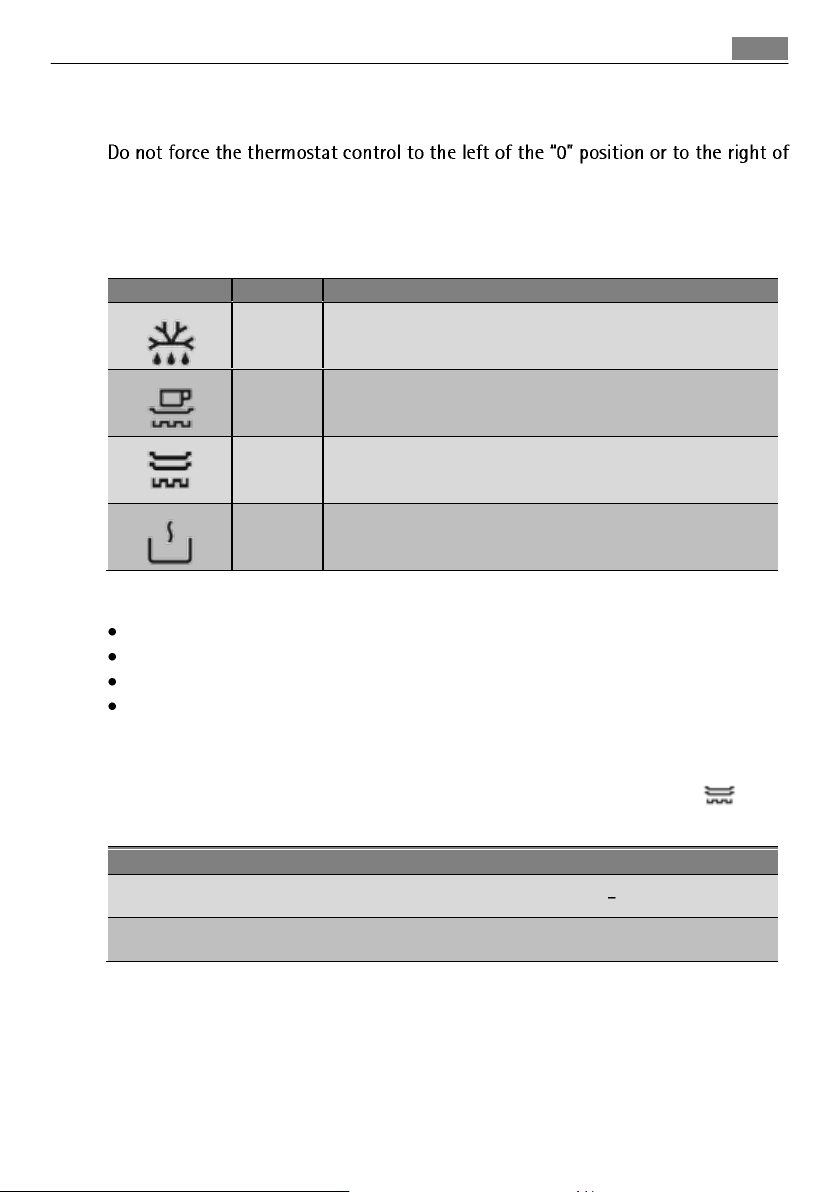
Symbol
ºC
Function
30ºC
Defrosting
40ºC-
50ºC
Proving dough
Cups / glasses warming
60ºC-
70ºC
Crockery warming
Keep food warm
80ºC
Low temperature cooking
Food Warming
Load
Time (min)
Crockery for 6 people
30 35
Crockery for 12 people
40 – 45
Selecting function
By turning the thermostat control you can select temperatures between 30 and 80 °C.
the maximum position since this may damage the appliance.
As soon as the temperature selected is reached, the heating is turned off. When the
temperature drops to a value below that selected, the heating is turned back on.
The temperature scale is not marked with absolute temperatures in ºC but instead has
symbols which correspond to the optimum temperatures for groups of crockery:
Heating times
Various factors affect heating times:
Material and thickness of the crockery;
Load quantity;
How the crockery is arranged;
Temperature setting.
It is therefore not possible to give any precise heating times.
As you use the crockery warmer more and more you will learn the best settings for your
crockery.
However, as a guide, the following times are given for the thermostat setting and
for uniform heating of the crockery:
Suggestions for the function Keep Food Warm and Food Warming:
Preheat the Warming Drawer 15 minutes to ensure the interior space has the required
temperature.
Page 11
11
Use
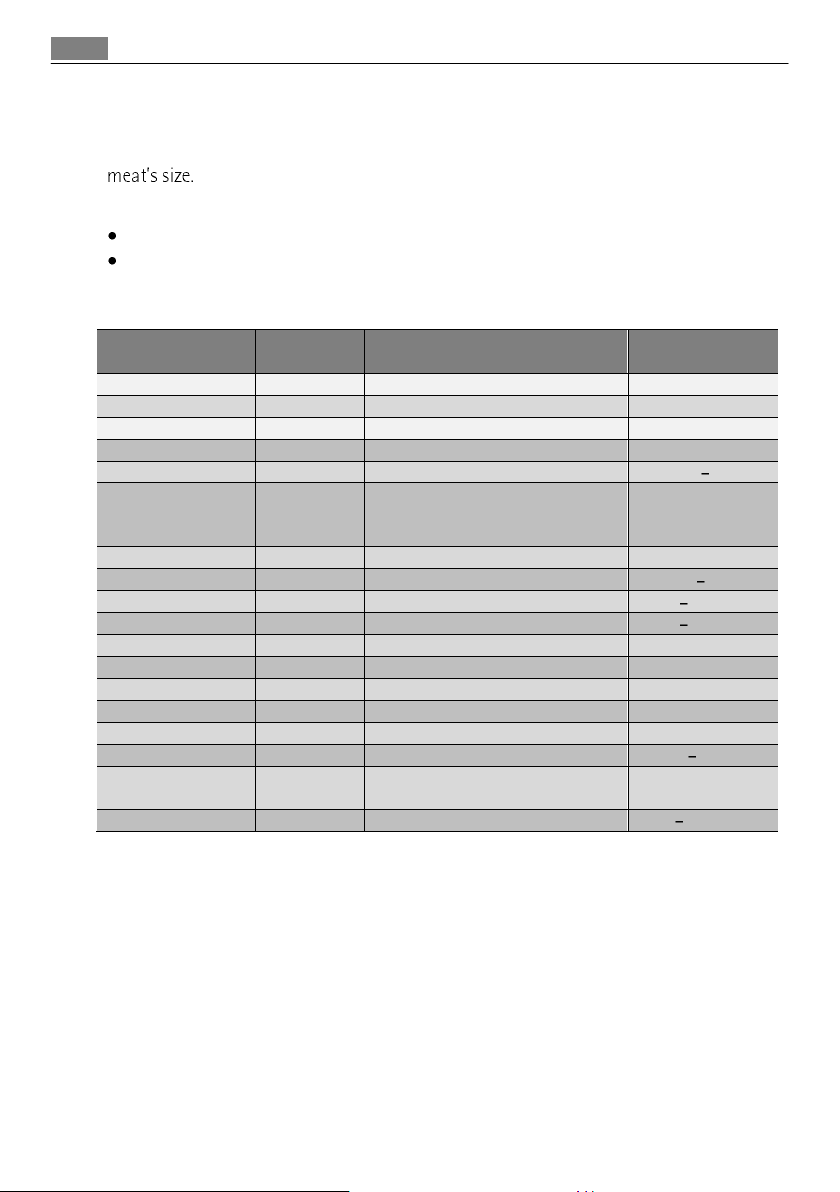
Low temperature cooking 80° C
Application
Quantity
Roast gently on the cooking
plate
Cooking times
Beef
Completely rare
1kg
on all sides, on each 2min.
1hr
Rare
1kg
on all sides, on each 3min
1.25hrs
Medium
1kg
on all sides, on each 3min
1.75 hrs
Well-done
1kg
on all sides, on each 3min
2.25hrs 2.5hrs.
Roast beef in one
piece
1kg
on all sides, on each 3min
3 hrs rare
4.5 hrs medium
Veal
Filet, whole
1kg
on all sides, on each 2min.
1.75 2hrs.
Loin, in one piece
1kg
on all 4 sides, on each 3min.
2 2.5hrs.
Roast, vat
1kg
on all sides, on each 3min.
2 2.5hrs.
Roast, shoulder
1kg
on all sides, on each 3min.
2.5hrs.
Porc
Filet, whole
500-600 g
on all sides, on each 2min.
1.5hrs
Loin
600 -1000g
all around 10-15min.
2 - 3hrs
Lamb
Gigot with haunch
2kg
on all sides, on each 4min.
3 4hrs
Gigot steak of the
haunch
2kg
on all sides, on each 2min
0.75-1hr
Filet
400g
on all sides, on each 2min
1 1.25hrs.
With the low temperature cooking meat can be gently prepared at low temperatures
over a longer period of cooking time. The cooking time is dependent on the piece of
Use dishes made of glass, china or ceramics.
Preparation:
Preheat the device with the dishes at 80°C for 10 minutes.
Sear the meat in a pan using fat and place it into the heat drawer on the preheated
dishes. Keep the setting at 80° C.
Table: Low Temperature Cooking (Reference Values)
If you wish to keep the cooked meat warm, put the setting back to 60° C. We
recommend not to use the warming function for more than 1hr.
Page 12

12
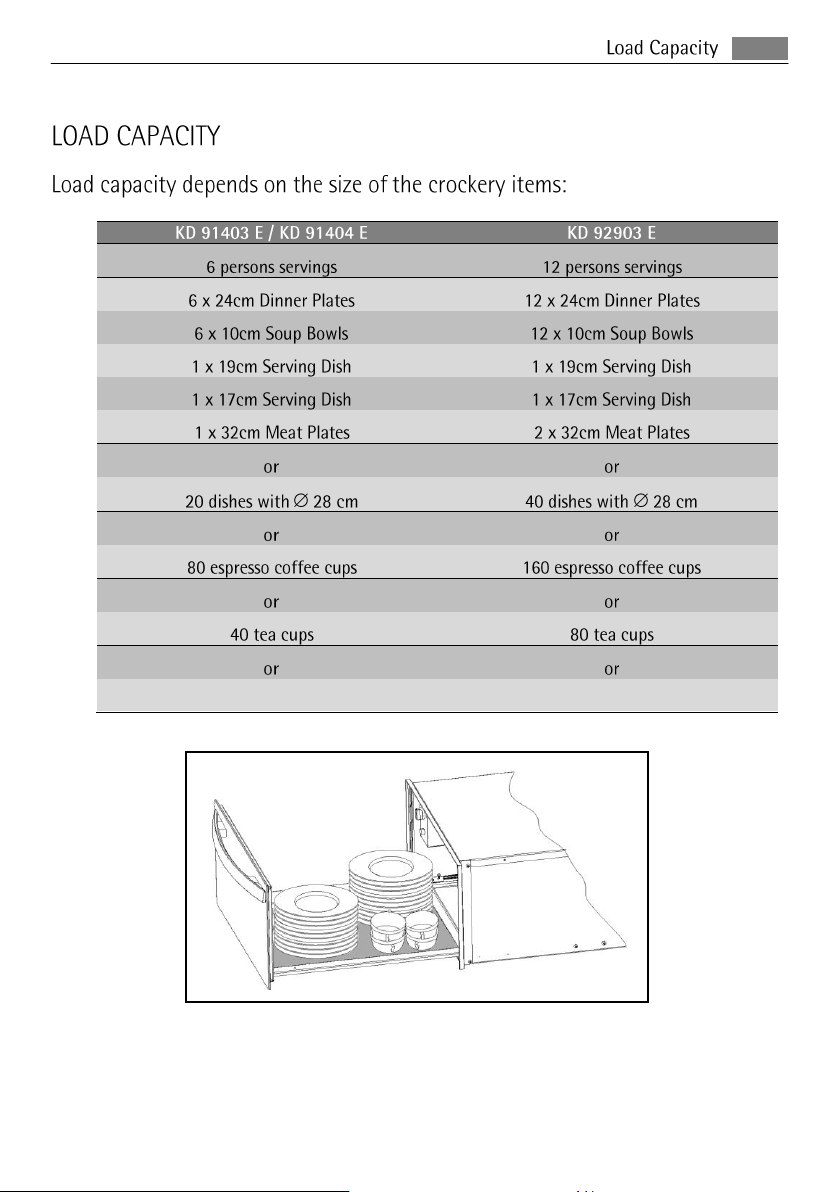
Load Capacity
KD 91403 E / KD 91404 E
KD 92903 E
6 persons servings
12 persons servings
6 x 24cm Dinner Plates
12 x 24cm Dinner Plates
6 x 10cm Soup Bowls
12 x 10cm Soup Bowls
1 x 19cm Serving Dish
1 x 19cm Serving Dish
1 x 17cm Serving Dish
1 x 17cm Serving Dish
1 x 32cm Meat Plates
2 x 32cm Meat Plates
or
or
20 dishes with 28 cm
40 dishes with 28 cm
or
or
80 espresso coffee cups
160 espresso coffee cups
or
or
40 tea cups
80 tea cups
or
or … …
LOAD CAPACITY
Load capacity depends on the size of the crockery items:
Page 13

13
Cleaning and maintenance
CLEANING AND MAINTENANCE
Cleaning is the only maintenance action that is required normally.
Warning! Cleaning must be done with the crockery warmer disconnected from the
electrical power supply. Remove the plug from the power socket or disconnect the
crockery warmer power supply circuit.
Do not use aggressive or abrasive cleaning products, abrasive sponges or pointed
objects since stains or abrasion marks may appear.
Do not use high pressure or steam jet cleaning appliances.
Appliance front and control panel
The crockery warmer can be cleaned using just a damp cloth. If it is very dirty, add a
few drops of washing-up liquid to the washing water.
Wipe the surfaces dry using a dry cloth.
For stainless steel fronted crockery warmers, special products for treatment of
stainless steel surfaces can be used. These products prevent the surfaces becoming
dirty again for some time. Apply a thin layer of such a product on the surface using
a soft cloth.
On aluminium fronted crockery warmers use a gentle glass cleaning product and a
soft cloth that does not release fluff. Wipe horizontally without pressing on the
surface since aluminium is sensitive to scratches and cuts.
Interior of the crockery warmer
Clean the inside of the crockery warmer regularly using a damp cloth. If it is very
dirty add a few drops of washing-up liquid to the washing water.
Wipe the surfaces dry using a dry cloth.
Avoid water entering through the air circulation opening.
Only use the crockery warmer again when it is completely dry.
Mat with non-slip surface
The non-slip surface mat can be removed to facilitate cleaning of the drawer.
The mat can be cleaned by hand using hot water with a few drops of washing-up
liquid. Dry thoroughly.
The non-slip mat should only be replaced when it is completely dry.
Page 14
14
WHAT SHOULD I DO IF THE CROCKERY WARMER
WARNING! Any type of repair must only be done by a specialised technician. Any repair
done by a person not authorised by the manufacturer is dangerous.
Before contacting Technical Assistance, check on the following:
The c Check whether:
The appliance has been switched on.
The appropriate temperature has been selected.
The air circulation orifices are covered by the crockery.
The crockery was left to heat up for sufficient time.
Heating time depends on several factors, such as, for example:
Crockery material type and thickness.
Quantity of crockery.
How the crockery is arranged.
You can hear the noise of a fan. If the fan is operating then the heating
element is broken; if the fan is not operating then the fan is broken.
The switchboard fuses / circuit breakers have fused / tripped out.
The crockery is heating up too much:
The temperature selector is broken.
The on/off switch does not light up:
Page 15

15
FÜR PERFEKTE ERGEBNISSE
Danke, dass Sie sich für dieses AEG Produkt entschieden
haben. Wir haben es geschaffen, damit Sie viele Jahre
von seiner ausgezeichneten Leistung und den
innovativen Technologien, die Ihnen das Leben
erleichtern, profitieren können. Es ist mit Funktionen
ausgestattet, die in gewöhnlichen Geräten nicht
vorhanden sind. Nehmen Sie sich ein paar Minuten Zeit
zum Lesen, um seine Vorzüge kennen zu lernen.
ZUBEHÖR UND VERBRAUCHSMATERIALIEN
Im AEG Webshop finden Sie alles, was Sie für ein
makelloses Aussehen und perfektes Funktionieren
Ihrer AEG Geräte benötigen. Wir bieten auch ein
umfangreiches Zubehörsortiment, das Ihre höchsten
Qualitätsansprüche erfüllt, vom Profi-Kochgeschirr bis
zu Besteckkörben, von Flaschenhaltern bis hin zu
Wäschebeuteln für empfindliche Wäsche...
Besuchen Sie den Webshop unter:
www.aeg-electrolux.com/shop
Page 16
16
Inhaltsverzeichnis
17
19
21
22
25
26
27
28
Installationsanleitung
Sicherheitshinweise
Gerätebeschreibung
Bedienung
Fassungsvermögen
Reinigung und Pflege
Was ist im Falle einer
Funktionsstörung zu tun?
Einbau
INHALTSVERZEICHNIS
Die folgenden Symbole werden in diesem
Handbuch verwendet:
Wichtige Informationen für ihre persönliche
Sicherheit wie auch Informationen darüber wie
das Gerät benutzt werden soll um es nicht zu
beschädigen.
Allgemeine Informationen und Tipps.
Informationen über Umwelt.
Page 17
17
Installationsanleitung
INSTALLATIONSANLEITUNG
Vor der Installation
Überprüfen Sie, dass die Versorgungsspannung, die auf dem Typenschild angegeben
ist, mit Ihrer Netzspannung übereinstimmt.
Öffnen Sie die Schublade und entnehmen Sie alle Zubehörteile sowie das
Verpackungsmaterial.
Achtung! Die Vorderseite der Schublade kann mit einer Schutzfolie versehen sein. Ziehen
Sie diese Folie vor der ersten Benutzung des Gerätes Ofens vorsichtig ab, indem Sie an
deren Unterseite beginnen.
Vergewissern Sie sich, dass die Wärmeschublade nicht beschädigt ist. Überprüfen Sie, ob
die Schublade richtig schließt Benachrichtigen Sie den Kundendienst im Falle von
vorhandenen Schäden.
Achten Sie darauf, dass die Steckdose nach Einbau des Gerätes leicht zugänglich ist,
ausserhalb der Gerätenische.
Der Geschirrwärmer darf ausschließlich in Kombination mit den vom Hersteller
angegeben Geräten eingebaut werden. Bei Kombination mit anderen Geräten erlischt der
Garantieanspruch, da die Gewähr für einen ordnungsgemäßen Betrieb nicht mehr
gegeben ist.
Einbau
Für den Einbau von Geschirrwärmer und Kombinationsgerät muss ein fest eingebauter
Zwischenboden vorhanden sein, der die erforderliche Tragfähigkeit für beide Geräte
gewährleistet.
Das Kombinationsgerät wird ohne weiteren Zwischenboden direkt auf den eingebauten
Geschirrwärmer gestellt.
Beachten Sie für den Einbau des Kombinationsgerätes unbedingt die Informationen der
jeweiligen Gebrauchs- bzw. Montageanweisung.
Die wichtigen Masse für den Einbau werden in mm auf den letzten Seiten dargestellt.
Wie folgt vorgehen:
1. Stellen Sie das Gerät bis zur Schwadenleiste in
den Umbauschrank und richten Sie es aus.
2. Achten Sie darauf, dass das Gehäuse des
Gerätes rechtwinklig ausgerichtet wird.
3. Öffnen Sie die Schublade und befestigen Sie
das Gerät mit den mitgelieferten Schrauben
an den Seitenwänden des Schrankes.
Page 18

18
Installationsanleitung
Elektroanschluss
Der Elektroanschluss muss von einem qualifizierten Techniker gemäß der geltenden
Gesetzgebung durchgeführt werden.
Vor Anschluss der Wärmeschublade an das Hauptnetz muss sichergestellt werden, dass
Spannung und Frequenz des Hauptnetzes den Angaben des Typenschilds entsprechen.
Dieses befindet sich im Innern des Heizblocks.
Der Elektroanschluss erfolgt über einen allpoligen Schalter, der für die entsprechende
Stromstärke geeignet ist. Dieser Schalter sollte einen Mindestabstand von 3 mm
zwischen den Kontakten aufweisen, sodass eine Unterbrechung im Notfall bzw. bei einer
Reinigung der Wärmeschublade möglich ist. Falls für den Elektroanschluss ein Stecker
verwendet wird, so muss nach der
Installation der Zugriff auf diesen Stecker gewährleistet sein.
Der Anschluss muss mit einer angemessenen Erdung gemäß dem geltenden Vorschriften
ausgestattet sein.
ACHTUNG: DIE WÄRMESCHUBLADE MUSS GEERDET SEIN.
Das Auswechseln des biegsamen Stromkabels an der Wärmeschublade sollte nur von
einem qualifizierten Kundendienstmitarbeiter vorgenommen werden, da hierfür
besonderes Werkzeug erforderlich ist.
Der Hersteller und der Wiederverkäufer lehnen jegliche Haftung für eventuelle
Schäden ab, die Personen, Tieren oder Sachen infolge der Nichtbeachtung der
vorliegenden Installationsanleitung zugefügt werden.
Page 19

19
Sicherheitshinweise
SICHERHEITSHINWEISE
Achtung! Vergleichen Sie vor dem Anschließen des Gerätes die Anschlussdaten
(Spannung und Frequenz) auf dem Typenschild mit denen des Elektronetzes. Diese Daten
müssen unbedingt übereinstimmen, damit keine Schäden am Gerät auftreten. Im
Zweifelsfall fragen Sie Ihren Elektroinstallateur.
Achtung! Wird der Stecker von der Netzanschlussleitung entfernt, muss das Gerät von
einer Elektrofachkraft eingebaut und angeschlossen werden. Beauftragen Sie bitte eine
Elektrofachkraft, die die landesüblichen Vorschriften und die Zusatzvorschriften der
örtlichen Elektroversorgungsunternehmen genau kennt und sorgfältig einhält. Der
Hersteller kann nicht für Schäden verantwortlich gemacht werden, die durch Fehler beim
Einbau oder Anschluss verursacht werden.
Achtung! Die elektrische Sicherheit des Gerätes ist nur dann gewährleistet, wenn es an
ein vorschriftsmäßig installiertes Schutzleitersystem angeschlossen wird. Der Hersteller
kann nicht für Schäden verantwortlich gemacht werden, die durch eine fehlende oder
unterbrochene Schutzleiterverbindung verursacht werden (z. B. elektrischer Schlag).
Achtung! Benutzen Sie das Gerät nur im eingebauten Zustand. Nur so ist sichergestellt,
dass Sie nicht mit Strom führenden Teilen in Berührung kommen.
Achtung! Öffnen Sie auf keinen Fall das Gehäuse des Gerätes. Eventuelles Berühren
spannungsführender Teile sowie Verändern des elektrischen und mechanischen Aufbaus
gefährden Sie und führen möglicherweise zu Funktionsstörungen des Gerätes.
Achtung! Installations- und Wartungsarbeiten sowie Reparaturen dürfen nur
qualifizierte Fachleute durchführen. Durch unsachgemäße Installations- und
Wartungsarbeiten oder Reparaturen können erhebliche Gefahren für den Benutzer
entstehen, für die der Hersteller nicht haftet.
Achtung! Eine Reparatur des Gerätes während der Garantiezeit darf nur von einem vom
Hersteller autorisierten Kundendienst vorgenommen werden, sonst besteht bei
nachfolgenden Schäden kein Garantieanspruch mehr.
Achtung! Bei Installations- und Reparaturarbeiten muss das Gerät vom Netz getrennt
sein. Das Gerät ist nur dann elektrisch vom Netz getrennt, wenn eine der folgenden
Bedingungen erfüllt ist:
die Sicherungen der Hausinstallation ausgeschaltet sind,
die Netzanschlussleitung vom Elektronetz getrennt ist. Ziehen Sie bei Geräten
mit Netzstecker nicht an der Anschlussleitung, sondern am Stecker, um das Gerät vom
Netz zu trennen.
Page 20

20
Sicherheitshinweise
Vorsichtsmaßnahme während Benutzung
Dieses Gerät entspricht den vorgeschriebenen Sicherheitsbestimmungen. Ein
unsachgemäßer Gebrauch kann jedoch zu Schäden an Personen und Sachen führen.
Lesen Sie vor dem ersten Benutzen aufmerksam die Gebrauchsanweisung. Dadurch
schützen Sie sich selbst und vermeiden Schäden an Ihrem Gerät.
Benutzen Sie das Gerät ausschließlich im Haushalt.
Dieses Gerät ist nicht für den Gebrauch durch Personen (gilt auch für Kinder) mit
eingeschränkten körperlichen, sensorischen oder geistigen Fähigkeiten oder
mangelnder Erfahrung und Sachkenntnis geeignet, es sei denn, diese Personen
unterliegen in Bezug auf den Gebrauch des Geräts der Aufsicht oder Unterweisung
einer für die Sicherheit zuständigen Person. Kinder müssen Überwacht werden um
sicher zu stellen, dass Sie nicht mit dem Gerät Spielen.
Das Gerät kann im Innenraum je nach gewählter Temperatur und Benutzungsdauer bis
zu ca. 80 °C heiß werden. Verwenden Sie zum Herausnehmen des erwärmten Geschirrs
bei Bedarf Topfhandschuhe.
Beachten Sie, dass Kinderhaut erheblich empfindlicher auf hohe Temperaturen
reagiert. Hindern Sie daher Kinder daran, mit dem Gerät zu spielen. Bei
versehentlichem Einschalten erwärmt sich das Gerät, und es kann zu Verbrennungen
kommen.
Kinder dürfen das Gerät nur ohne Aufsicht benutzen, wenn Ihnen die Bedienung so
erklärt wurde, dass sie das Gerät sicher bedienen können.
Stellen oder setzen Sie sich nicht auf die geöffnete Geschirrschublade. Der
Teleskopauszug wird beschädigt. Die Belastbarkeit der Geschirrschublade beträgt max.
25kg.
Bewahren Sie keine Kunststoffbehälter oder brennbare Gegenstände im Gerät auf.
Beim Einschalten können sie schmelzen oder sich entzünden. Brandgefahr!
Benutzen Sie das Gerät nicht zum Beheizen von Räumen. Durch die
Temperaturentwicklung können leicht entzündbare Gegenstände in der Nähe zu
brennen beginnen.
Verwenden Sie keinesfalls einen Dampfreiniger. Zum einen kann der Dampf an
spannungsführende Teile gelangen und einen Kurzschluss auslösen. Zum anderen kann
der Dampfdruck zu dauerhaften Beschädigungen von Oberflächen und Bauteilen
führen, für die der Hersteller keinen Schadenersatz leistet.
Nicht mehr benutzte Geräte müssen vom Elektronetz getrennt und alle wegführenden
elektrischen Leitungen entfernt werden, damit sie z. B. für spielende Kinder keine
Gefahr darstellen.
Es muss sichergestellt werden, dass Kinder das Gerät nicht zum Spielen benutzen.
Warnung! Zugängliche Teile können während der Benutzung heiß werden. Kinder
fernhalten.
Page 21

21
Gerätebeschreibung
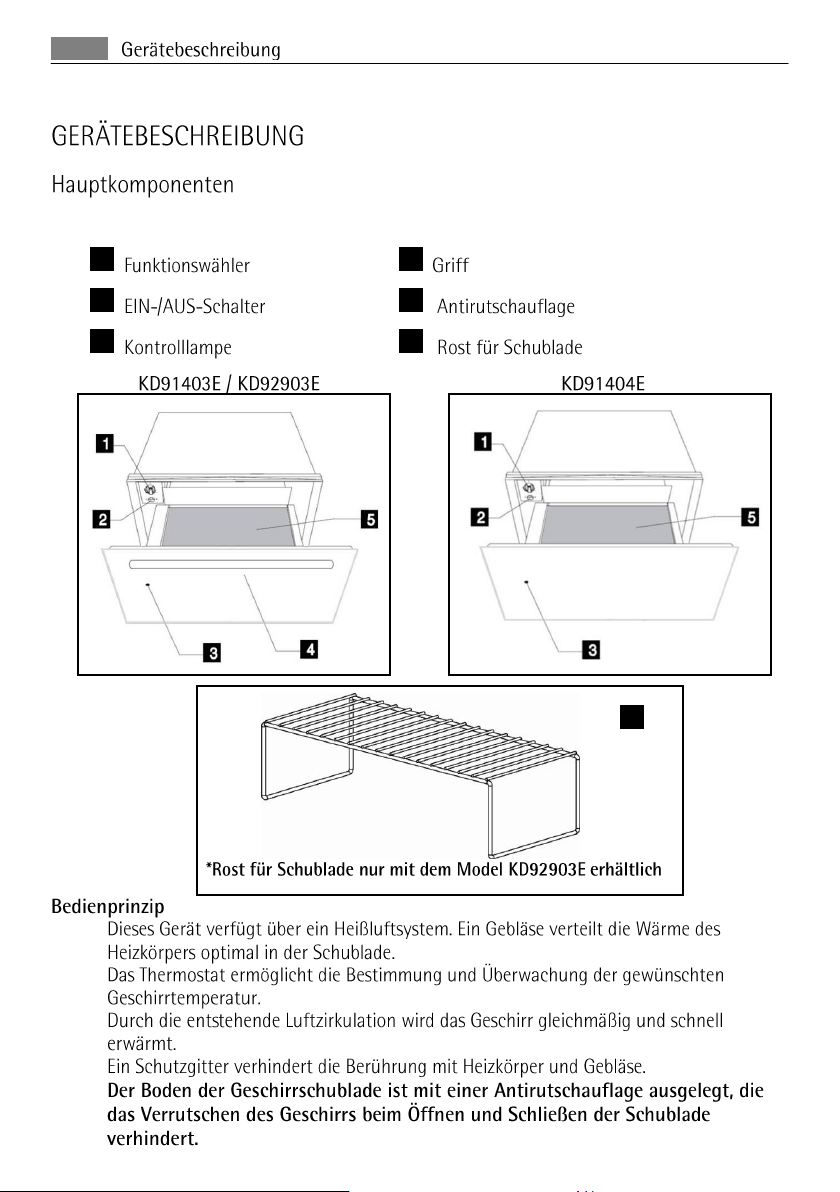
GERÄTEBESCHREIBUNG
Funktionswähler
Griff
EIN-/AUS-Schalter
Antirutschauflage
Kontrolllampe
Rost für Schublade
6 3 5 2 4
1
KD91403E / KD92903E
KD91404E
6
*Rost für Schublade nur mit dem Model KD92903E erhältlich
Hauptkomponenten
Bedienprinzip
Dieses Gerät verfügt über ein Heißluftsystem. Ein Gebläse verteilt die Wärme des
Heizkörpers optimal in der Schublade.
Das Thermostat ermöglicht die Bestimmung und Überwachung der gewünschten
Geschirrtemperatur.
Durch die entstehende Luftzirkulation wird das Geschirr gleichmäßig und schnell
erwärmt.
Ein Schutzgitter verhindert die Berührung mit Heizkörper und Gebläse.
Der Boden der Geschirrschublade ist mit einer Antirutschauflage ausgelegt, die
das Verrutschen des Geschirrs beim Öffnen und Schließen der Schublade
verhindert.
Page 22

22
Bedienung
BEDIENUNG
Vor dem ersten Gebrauch
Vor dem ersten Benutzen sollten Sie wie folgt vorgehen:
Wischen Sie Ihr Gerät mit einem feuchten Tuch ab und trocken Sie es anschließend,
Heizen Sie die leere Schublade mindestens 2 Stunden lang auf. Stellen Sie dazu den
Temperaturknebel auf Maximum (siehe Kapitel "Temperatur wählen").
Sorgen Sie dabei für eine gute Belüftung der Küche.
Die Bauteile sind mit einem Pflegemittel geschützt. Deshalb kommt es beim ersten
Aufheizen vorübergehend zur Geruchsbildung. Die Geruchsbildung und eventuell
auftretender Dunst vergehen nach kurzer Zeit und weisen nicht auf einen
Falschanschluss oder Gerätedefekt hin.
Bedienelemente
Bedienprinzip
Die Bedienelemente bestehen aus dem Funktionswähler und dem Ein-/Aus- Schalter. Sie
sind nur sichtbar, wenn die Geschirrschublade geöffnet ist.
Um die Wärmeschublade zu verwenden verfahren wie folgt:
Stellen Sie das Geschirr in die Schublade.
Um die Funktion zu wählen, bitte drehen Sie den Schalter auf die gewünschte Position.
Schalten Sie das Gerät durch drücken des EIN-/AUS-Schalters ein. Der Schalter
leuchtet auf.
Schließen Sie die Schublade.
Beachten Sie, dass sich die Schublade wieder öffnen kann, wenn sie mit übermäßigem
Schwung geschlossen wird. Schalten Sie das Gerät aus, bevor Sie das erwärmte Geschirr
entnehmen.
Page 23

23
Bedienung
Funktion wählen
Symbol
ºC
Funktion
30ºC
Antauen
40ºC-
50ºC
Teig gehen lassen
Tassen/Gläser vorwärmen
60ºC-
70ºC
Geschirr vorwärmen
80ºC
Speisen warm halten
Speisen Erhitzen
Fassungsvermögen
Zeit (min)
Geschirr für 6 Personnen
30 35
Geschirr für 12 Personnen
40 – 45
Der Funktionswähler ermöglicht die stufenlose Einstellung der Temperatur zwischen ca.
30 und 80 °C.
bis zum Anschlag, den sonst wird der Wähler zerstört.
Ist die gewählte Temperatur erreicht, schaltet sich die Heizung ab. Sobald die Temperatur
unter den eingestellten Wert sinkt, schaltet sich die Heizung wieder ein.
Auf der Temperaturskala sind keine absoluten Temperaturwerte in °C markiert, sondern
Symbole, die die optimale Temperatur für die jeweilige Geschirrgruppe darstellen:
Aufheizzeiten
Unterschiedliche Faktoren beeinflussen die Aufheizzeit:
Material und Dicke des Geschirrs
Beladungsmenge
Beladungsanordnung
Temperatureinstellung
Absolute Angaben sind daher nicht möglich.
Bitte ermitteln Sie im praktischen Gebrauch die optimalen Einstellungen für Ihren
Haushalt.
Bei der Einstellung auf der Position und um eine gleichmäßige Erwärmung zu
erreichen können folgende Werte als Anhaltspunkte genannt werden:
Vorschlähe für die Funktion Speisen warmhalten:
Heizen Sie das Gerät grundsätzlich 15 Minuten vor, um sicherzustellen, dass im
Innenraum die erfoderliche Temperatur vorliegt.
Page 24

Bedienung
24
Anwendung
Menge
Anbraten auf der Kochstelle
Garzeiten
Rind Ganzbleu
1kg
Auf allen Seiten je 2 Min.
1 Std.
Nicht ganz
durchgebraten
1kg
Auf allen Seiten je 3 Min.
1 ¼ Std
À point
1kg
Auf allen Seiten je 3 Min.
1 ¾ Std
durchgebraten
1kg
Auf allen Seiten je 3 Min.
2 ¼ - 2 ½ Std
Roastbeef am
Stück
1kg
Auf allen Seiten je 3 Min.
3 Std blutig
4.5 Std. rosa
Kalb
Filet, ganz
1kg
Auf allen Seiten je 2 Min.
1 ¾ - 2 Std
Karree am Stück
1kg
Auf allen 4 Seiten je 3 Min.
2 ¼ - 2 ½ Std
Braten, Stotxen
1kg
Auf allen Seiten je 3 Min.
2 - 2 ½ Std
Braten Schulter
1kg
Auf allen Seiten je 3 Min.
2 ½ Std.
Schwein
Filet, ganz
500-600 g
Auf allen Seiten je 2 Min.
1 ½ Std.
Karree am Stück
600 -1000g
Auf allen 4 Seiten je 3 Min.
2 –2 ½ Std
Lamm Rundherum 10-15 min
2–3 Std
Gigot mit Keule
2kg
Gigotsteak aus
Keule
2kg
Auf allen Seiten je 4 Min.
3-4 Std.
RückenfiletFilet
400g
Auf beiden Seiten je 2 Min.
¾ - 1 Std
Niedertemperaturgaren 80°C
Beim Niedertemperaturgaren lässt sich Fleisch bei niedrigen Temperaturen schonend
über eine längere Garzeit zubereiten.
Die Gardauer ist abhängig von der Grösse des Fleischstückes.
Verwenden Sie Geschirr aus Glass,Porzelan oder Cheramik
Zubereitung:
Heizen Sie das Gerät mit dem Geschirr bei 80°C für 10 Minuten vor.
Das Fleisch in einer Pfanne mit Fett scharf anbraten und auf dem vorgewärmten
Geschirr in die Wärmeschublade stellen. Einstellung bleibt bei 80°C.
Tabelle: Niedertemperaturen (Referenzwerte)
Wenn Sie das gegarte Fleisch warm halten wollen, stellen Sie auf Einstellung 60°C
zurück. Wir empfehlen nicht länger als 1 Std Warmzuhalten.
Page 25

25
Fassungsvermögen
FASSUNGSVERMÖGEN
KD 91403 E / KD 91404 E
KD 92903 E
Geschirr für 6 Personnen
Geschirr für 12 Personnen
6 x 24 cm flache Teller
12 x 24 cm flache Teller
6 x 10 cm Suppenteller
12 x 10 cm Suppenteller
1 x 19 cm Servierteller
1 x 19 cm Servierteller
1 x 17 cm Servierteller
1 x 17 cm Servierteller
1 x 32 cm Fleischteller
2 x 32 cm Fleischteller
oder
oder
20 Teller mit 28 cm
40 Teller mit 28 cm
oder
oder
80 Espressotassen
160 Espressotassen
oder
oder
40 Teetassen
80 Teetassen
oder
oder
…
…
Das Fassungsvermögen hängt von der Größe der Geschirrstücke ab:
Page 26

Reinigung und Pflege
26
REINIGUNG UND PFLEGE
Die Reinigung stellt die einzige, normalerweise erforderliche Wartung dar.
Achtung! Die Reinigung muss an dem von der Stromversorgung getrennten
Gerät durchgeführt werden. Ziehen Sie den Stecker aus der Steckdose oder
schalten Sie den Stromversorgungskreis des Gerätes ab.
Benutzen Sie keine aggressiven Reinigungs- oder Scheuermittel, keine
kratzenden Scheuertücher noch spitze Gegenstände, denn es können Flecken
entstehen.
Stirnseite und Bedienblende
Es reicht, das Gerät mit einem feuchten Lappen zu reinigen. Geben Sie, falls das
Gerät sehr verschmutzt sein sollte, einige Tropfen Geschirrspülmittel ins
Waschwasser. Wischen Sie danach das Gerät mit einem trockenen Lappen ab.
Für Wärmeschubladen mit Edelstahlvorderseite können Spezialmittel für
Edelstahloberflächen verwendet werden. Diese Mittel vermeiden dass die
Oberflächen schnell wieder schmutzig werden. Tragen Sie das Mittel mit einem
weichen Tuch flächig und sparsam auf.
Benutzen Sie bei Wärmeschubladen mit einer Aluminiumvorderseite ein mildes
Glasreinigungsmittel und einen weichen, fusselfreien Lappen. Wischen Sie diese in
horizontaler Richtung ab, ohne Druck auf die Oberfläche auszuüben.
Innenraum
Reinigen Sie nach jeder Nutzung die Innenwände mit einem feuchten Lappen.
Geben Sie, falls das Gerät sehr verschmutzt sein sollte, einige Tropfen
Geschirrspülmittel ins Waschwasser. Wischen Sie danach die Oberflächen mit
einem trockenen Lappen ab. Verhindern Sie das Eindringen von Wasser in die
Belüftungslöcher. Nutzen Sie die Wärmeschublade nur nachdem sie trocken ist.
Antirutschauflage
Die Antirutschauflage kann zur Reinigung des Schubladenbodens
herausgenommen werden.
Die Auflage reinigen Sie am besten von Hand mit warmem Wasser und einem
milden Spülmittel. Trocknen Sie sie im Anschluss gut ab. Legen Sie die
Antirutschauflage erst wieder in die Schublade, wenn sie ganz trocken ist.
Page 27

27
Was ist im Falle einer Funktionsstörung zu tun?
WAS IST IM FALLE EINER FUNKTIONSSTÖRUNG ZU TUN?
ACHTUNG! Jegliche Art von Reparatur darf nur von spezialisierten Fachleuten
ausgeführt werden. Jeder Eingriff, der durch nicht vom Hersteller autorisierte
Personen vorgenommen wird, ist gefährlich.
Folgende Probleme können behoben werden, ohne den Kundendienst zu
benachrichtigen:
Das Geschirr erwärmt nicht ausreichend? Prüfen Sie, ob:
das Gerät eingeschaltet ist.
die richtige Temperatureinstellung gewählt wurde.
Sie die Austrittsöffnungen durch große Platten oder Schüsseln verdeckt haben.
Sie das Geschirr lange genug erwärmt haben.
Unterschiedliche Faktoren beeinflussen die Aufheizzeit, zum Beispiel:
Material und Dicke des Geschirrs
Beladungsmenge
Beladungsanordnung
Temperatureinstellung
Das Geschirr erwärmt nicht? Prüfen Sie, ob:
Sie ein Gebläsegeräusch hören.
Falls das Gebläse läuft, ist der Heizkörper defekt. Falls das Gebläse nicht läuft ist das
Gebläse defekt.
die Sicherung der Hausinstallation ausgelöst hat.
Temperatur lässt sich nicht mehr regeln.
Der Temperaturregler ist defekt.
Beim Einschalten des Gerätes leuchtet der Ein-/Aus-Schalter nicht?
Die Kontrolllampe des Schalters ist defekt.
Page 28

28
Installation
BEWARE! If the door of the oven, when
opening interferes with the drawer´s
frame, it is necessary to insert some
spacers for a maximal total height of
5mm .
ACHTUNG! Wenn die Tür des Backofens
beim Öffnen der Schublade mit dem
Rahmen der Schublade stösst, bitte legen
Sie einige Abstandshalter für eine
Gesamthöhe von max 5 mm.
INSTALLATION/ EINBAU
KD 92903 E
KD 91403 E / KD 91404 E
Page 29

Cód:943306-d
Page 30

943306
Page 31

2
Page 32

3
Page 33

4
’
Page 34

5
Page 35

6
Page 36

7
Page 37

8
6 3 5 2 4 1 6
Page 38

9
Page 39

10
–
Page 40

11
Page 41
12
…
…
Page 42

13
Page 43
14
Page 44
15
Page 45

16
Page 46

17
Page 47

18
Page 48

19
Page 49
20
Page 50
21
6 3 5 2 4 1 6
Page 51

22
Page 52

23
–
Page 53

24
¼¾¼ ½
¾
¼ ½½½½– ½
–
¾
Page 54

25
ü
ü
…
…
Page 55

26
Page 56
27
Page 57

28
Page 58

Cód:943306-e
Page 59

943306
 Loading...