

Page 1

USER
MANUAL
IPE64571FB
EN User Manual
Hob
Page 2

Important Information that may impact your Manufacturer’s Warranty
Adherence to the directions for use in this manual is extremely important for health and
safety. Failure to strictly adhere to the requirements in this manual may result in personal
injury, property damage and affect your ability to make a claim under the AEG manufacturer’s
warranty provided with your product. Products must be used, installed and operated in
accordance with this manual. You may not be able to claim on the AEG manufacturer’s
warranty in the event that your product fault is due to failure to adhere this manual.
Page 3

www.aeg.com
2
CONTENTS
1. SAFETY INFORMATION.............................................................................................2
2. CONDITIONS OF USE................................................................................................4
3. SAFETY INSTRUCTIONS.............................................................................................4
4. INSTALLATION............................................................................................................7
5. PRODUCT DESCRIPTION...........................................................................................8
6. DAILY USE....................................................................................................................9
7. FLEXIBLE INDUCTION COOKING AREA............................................................... 13
8. HINTS AND TIPS........................................................................................................16
9. CARE AND CLEANING.............................................................................................18
10. TROUBLESHOOTING.............................................................................................19
11. TECHNICAL DATA..................................................................................................22
12. ENERGY EFFICIENCY.............................................................................................22
13. WARRANTY .............................................................................................................23
FOR PERFECT RESULTS
Thank you for choosing this AEG product. We have created it to give you
impeccable performance for many years, with innovative technologies that help
make life simpler features you might not find on ordinary appliances. Please
spend a few minutes reading to get the very best from it.
Visit our website for:
Get usage advice, brochures, trouble shooter, service information:
www.aeg.com/webselfservice
Register your product for better service:
www.registeraeg.com
CUSTOMER CARE AND SERVICE
Always use original spare parts.
When contacting our Authorised Service Centre, ensure that you have the
following data available: Model, PNC, Serial Number.
The information can be found on the rating plate.
Warning / Caution-Safety information
General information and tips
Environmental information
Subject to change without notice.
SAFETY INFORMATION
1.
Before the installation and use of the appliance,
carefully read the supplied instructions. The
manufacturer is not responsible for any injuries or
damages that are the result of incorrect installation or
Page 4

ENGLISH
usage. Always keep the instructions in a safe and
accessible location for future reference.
1.1 Children and vulnerable people safety
• This appliance can be used by children aged from 8
years and above and persons with reduced physical,
sensory or mental capabilities or lack of experience
and knowledge if they have been given supervision or
instruction concerning the use of the appliance in a
safe way and understand the hazards involved.
• Children between 3 and 8 years of age and persons
with very extensive and complex disabilities shall be
kept away unless continuously supervised.
• Children of less than 3 years of age should be kept
away unless continuously supervised.
• Do not let children play with the appliance.
• Keep all packaging away from children and dispose of
it appropriately.
• Keep children and pets away from the appliance when
it operates or when it cools down. Accessible parts are
hot.
• If the appliance has a child safety device, it should be
activated.
• Children shall not carry out cleaning and user
maintenance of the appliance without supervision.
3
General Safety
1.2
• WARNING: The appliance and its accessible parts
become hot during use. Care should be taken to
avoid touching heating elements.
• Do not operate the appliance by means of an external
timer or separate remote-control system.
• WARNING: Unattended cooking on a hob with fat or
oil can be dangerous and may result in fire.
• NEVER try to extinguish a fire with water, but switch
off the appliance and then cover flame e.g. with a lid
or a fire blanket.
Page 5

www.aeg.com4
• CAUTION: The cooking process has to be supervised.
A short term cooking process has to be supervised
continuously.
• WARNING: Danger of fire: Do not store items on the
cooking surfaces.
• Metallic objects such as knives, forks, spoons and lids
should not be placed on the hob surface since they
can get hot.
• Do not use a steam cleaner to clean the appliance.
• After use, switch off the hob element by its control
and do not rely on the pan detector.
• If the glass ceramic surface / glass surface is cracked,
switch off the appliance and unplug it from the mains.
In case the appliance is connected to the mains
directly using junction box, remove the fuse to
disconnect the appliance from power supply. In either
case contact the Authorised Service Centre.
• If the supply cord is damaged, it must be replaced by
the manufacturer, an authorized Service or similarly
qualified persons in order to avoid a hazard.
• WARNING: Use only hob guards designed by the
manufacturer of the cooking appliance or indicated by
the manufacturer of the appliance in the instructions
for use as suitable or hob guards incorporated in the
appliance. The use of inappropriate guards can cause
accidents.
2.
CONDITIONS OF USE
This appliance is intended to be used in
household and similar applications such
as:
• Farm houses
3. SAFETY INSTRUCTIONS
3.1 Installation
WARNING!
Only a qualified person must
install this appliance.
• By clients in serviced apartments,
holiday apartments and other
residential type environments.
WARNING!
Risk of injury or damage to
the appliance.
• Remove all the packaging.
Page 6

ENGLISH
5
• Do not install or use a damaged
appliance.
• Follow the installation instructions
supplied with the appliance.
• Keep the minimum distance from
other appliances and units.
• Always take care when moving the
appliance as it is heavy. Always use
safety gloves and enclosed footwear.
• Seal the cut surfaces with a sealant to
prevent moisture to cause swelling.
• Protect the bottom of the appliance
from steam and moisture.
• Do not install the appliance adjacent
to a door or under a window. This
prevents hot cookware falling from
the appliance when the door or the
window is opened.
• Each appliance has cooling fans on
the bottom.
• If the appliance is installed above a
drawer:
– Do not store any small pieces or
sheets of paper that could be
pulled in, as they can damage the
cooling fans or impair the cooling
system.
– Keep a distance of minimum 2 cm
between the bottom of the
appliance and parts stored in the
drawer.
3.2 Electrical Connection
WARNING!
Risk of fire and electric
shock.
• All electrical connections should be
made by a qualified electrician.
• The appliance must be earthed.
• Before carrying out any operation
make sure that the appliance is
disconnected from the power supply.
• Make sure that the parameters on the
rating plate are compatible with the
electrical ratings of the mains power
supply.
• Make sure the appliance is installed
correctly. Loose and incorrect
electricity mains cable or plug (if
applicable) can make the terminal
become too hot.
• Use the correct electricity mains
cable.
• Do not let the electricity mains cable
tangle.
• Make sure that a shock protection is
installed.
• Use the strain relief clamp on the
cable.
• Make sure the mains cable or plug (if
applicable) does not touch the hot
appliance or hot cookware, when you
connect the appliance to the near
sockets.
• Do not use multi-plug adapters and
extension cables.
• Make sure not to cause damage to
the mains plug (if applicable) or to the
mains cable. Contact our Authorised
Service Centre or an electrician to
change a damaged mains cable.
• The shock protection of live and
insulated parts must be fastened in
such a way that it cannot be removed
without tools.
• Connect the mains plug to the mains
socket only at the end of the
installation. Make sure that there is
access to the mains plug after the
installation.
• If the mains socket is loose, do not
connect the mains plug.
• Do not pull the mains cable to
disconnect the appliance. Always pull
the mains plug.
• Use only correct isolation devices: line
protecting cut-outs, fuses (screw type
fuses removed from the holder), earth
leakage trips and contactors.
• The electrical installation must have
an isolation device which lets you
disconnect the appliance from the
mains at all poles. The isolation
device must have a contact opening
width of minimum 3 mm.
3.3 Use
WARNING!
Risk of injury, burns and
electric shock.
• Remove all the packaging, labelling
and protective film (if applicable)
before first use.
• Use this appliance in a household
environment.
• Do not change the specification of
this appliance.
Page 7

6
www.aeg.com
• Make sure that the ventilation
openings are not blocked.
• Do not let the appliance stay
unattended during operation.
• Set the cooking zone to “off” after
each use.
• Do not rely on the pan detector.
• Do not put cutlery or saucepan lids on
the cooking zones. They can become
hot.
• Do not operate the appliance with
wet hands or when it has contact with
water.
• Do not use the appliance as a work
surface or as a storage surface.
• If the surface of the appliance is
cracked, disconnect immediately the
appliance from the power supply. This
to prevent an electrical shock.
• Users with a pacemaker must keep a
distance of minimum 30 cm from the
induction cooking zones when the
appliance is in operation.
• When you place food into hot oil, it
may splash.
WARNING!
Risk of fire and explosion
• Fats and oil when heated can release
flammable vapours. Keep flames or
heated objects away from fats and oils
when you cook with them.
• The vapours that very hot oil releases
can cause spontaneous combustion.
• Used oil, that can contain food
remnants, can cause fire at a lower
temperature than oil used for the first
time.
• Do not put flammable products or
items that are wet with flammable
products in, near or on the appliance.
WARNING!
Risk of damage to the
appliance.
• Do not keep hot cookware on the
control panel.
• Do not put a hot pan cover on the
glass surface of the hob.
• Do not let cookware to boil dry.
• Be careful not to let objects or
cookware fall on the appliance. The
surface can be damaged.
• Do not activate the cooking zones
with empty cookware or without
cookware.
• Do not put aluminium foil on the
appliance.
• Cookware made of cast iron,
aluminium or with a damaged bottom
can cause scratches on the glass /
glass ceramic. Always lift these
objects up when you have to move
them on the cooking surface.
• This appliance is for cooking
purposes only. It must not be used for
other purposes, for example room
heating.
3.4 Care and cleaning
• Clean the appliance regularly to
prevent the deterioration of the
surface material.
• Deactivate the appliance and let it
cool down before you clean it.
• Disconnect the appliance from the
electrical supply before maintenance.
• Do not use water spray and steam to
clean the appliance.
• Clean the appliance with a moist soft
cloth. Only use neutral detergents. Do
not use any abrasive products,
abrasive cleaning pads, solvents or
metal objects.
3.5 Service
• To repair the appliance contact an
Authorised Service Centre.
• Use original spare parts only.
3.6 Disposal
WARNING!
Risk of injury or suffocation.
• Contact your municipal authority for
information on how to discard the
appliance correctly.
• Disconnect the appliance from the
mains supply.
• Cut off the mains electrical cable
close to the appliance and dispose of
it.
Page 8

4. INSTALLATION
min.
50mm
min.
500mm
min. 12min.
60
min.
28
620
590
+1
280
WARNING!
Refer to Safety chapters.
4.1 Before the installation
Before you install the hob, write down
the information bellow from the rating
plate. The rating plate is on the bottom
of the hob.
Serial number ...........................
4.2 Built-in hobs
Only use the built-in hobs after you
assemble the hob into correct built-in
units and work surfaces that align to the
standards.
4.3 Connection cable
• The hob is supplied with a connection
cable.
• To replace the damaged mains cable,
use the cable type: H05V2V2-F which
withstands a temperature of 90°C or
higher. Speak to your local Service
Centre.
ENGLISH 7
If the appliance is installed
above a drawer, the hob
ventilation can warm up the
items stored in the drawer
during the cooking process.
4.4 Assembly
Page 9

1
2
1
3
6 7 8
10
1
11
2
345
9
www.aeg.com8
5. PRODUCT DESCRIPTION
5.1 Cooking surface layout
5.2 Control panel layout
Induction cooking zone
1
Control panel
2
Flexible induction cooking area
3
consisting of four sections
To see the control panel and the zone positions activate the appliance with
Use the sensor fields to operate the appliance. The displays, indicators and sounds tell
which functions operate.
Sensor
field
1
2
3
4
5
- Timer display To show the time in minutes.
6
7
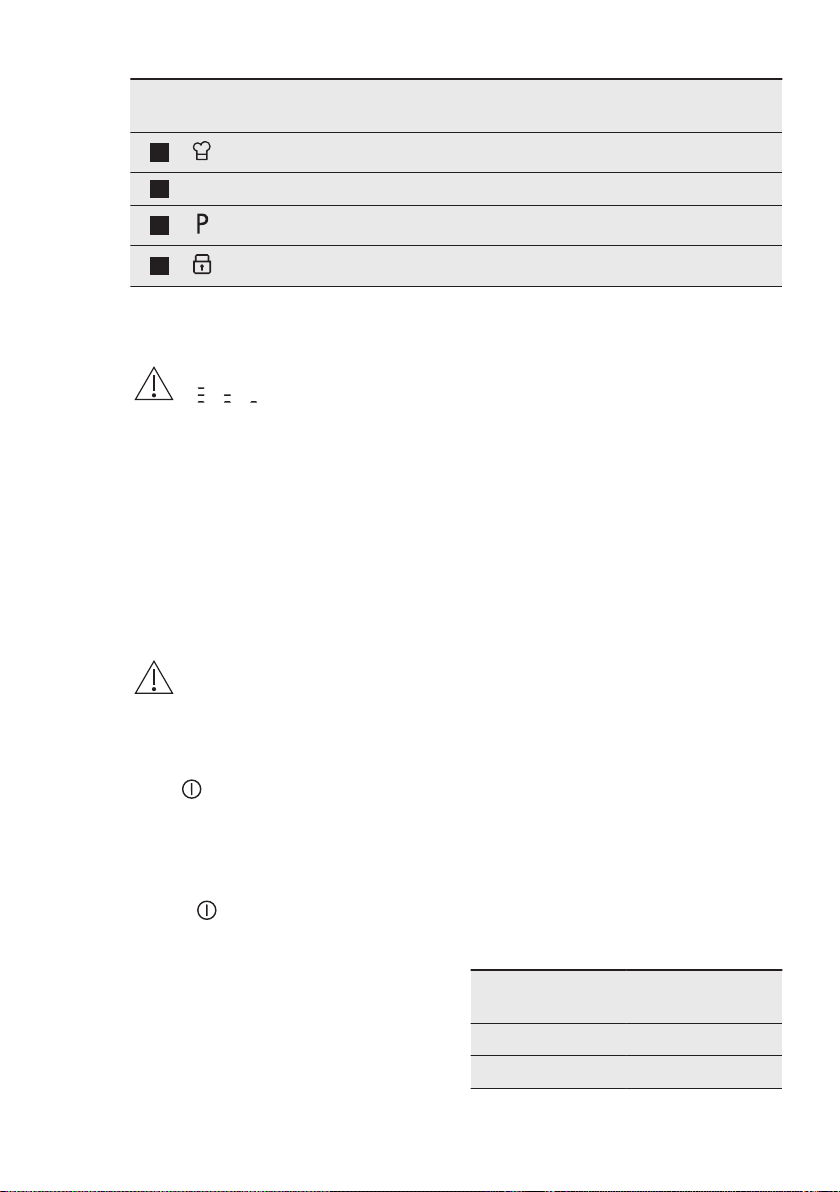
Function Comment
ON / OFF To activate and deactivate the hob.
Hob²Hood To activate and deactivate the manual mode
Pause To activate and deactivate the function.
- To increase or decrease the time.
/
- To set the timer function.
FlexiBridge To switch between three modes of the func-
of the function.
tion.
Page 10
ENGLISH 9
Sensor
field
8
- Control bar To set a heat setting.
9
10
11
5.3 OptiHeat Control (3 step
Residual heat indicator)
WARNING!
/ / There is a risk of
burns from residual heat.
The indicators show the level
of the residual heat for the
cooking zones you are
currently using. The
indicators may also come on
for the neighbouring
cooking zones even if you
are not using them.
6. DAILY USE
WARNING!
Refer to Safety chapters.
6.1 Activating and deactivating
Touch for 1 second to activate or
deactivate the hob.
The control bars come on after you
activate the hob and go off after you
deactivate the hob.
When the hob is deactivated you can
only see .
6.2 Automatic Switch Off
The function deactivates the hob
automatically if:
• you do not place any cookware on the
hob for 50 seconds,
• you do not set the heat setting for 50
seconds after you place the cookware,
Function Comment
PowerSlide To activate and deactivate the function.
PowerBoost To activate the function.
Lock / Child Safety Device To lock / unlock the control panel.
The induction cooking zones produce
the heat necessary for the cooking
process directly in the bottom of the
cookware. The glass ceramic is heated by
the heat of the cookware.
When the hob is deactivated, the
indicators are still visible. When the hob
is cold enough, they disappear.
• you spill something or put something
on the control panel for more than 10
seconds (a pan, a cloth). When you
hear the acoustic signal, the hob
deactivates. Remove the object or
clean the control panel.
• the hob gets too hot (e.g. when a
saucepan boils dry). Let the cooking
zone cool down before you use the
hob again.
• you do not deactivate a cooking zone
or change the heat setting. After
some time, the hob deactivates.
The relation between the heat setting
and the time after which the hob
deactivates:
Heat setting The hob deacti-
vates after
1 - 2 6 hours
3 - 4 5 hours
Page 11
10
www.aeg.com
Heat setting The hob deacti-
vates after
5 4 hours
6 - 9 1.5 hours
6.3 Using the cooking zones
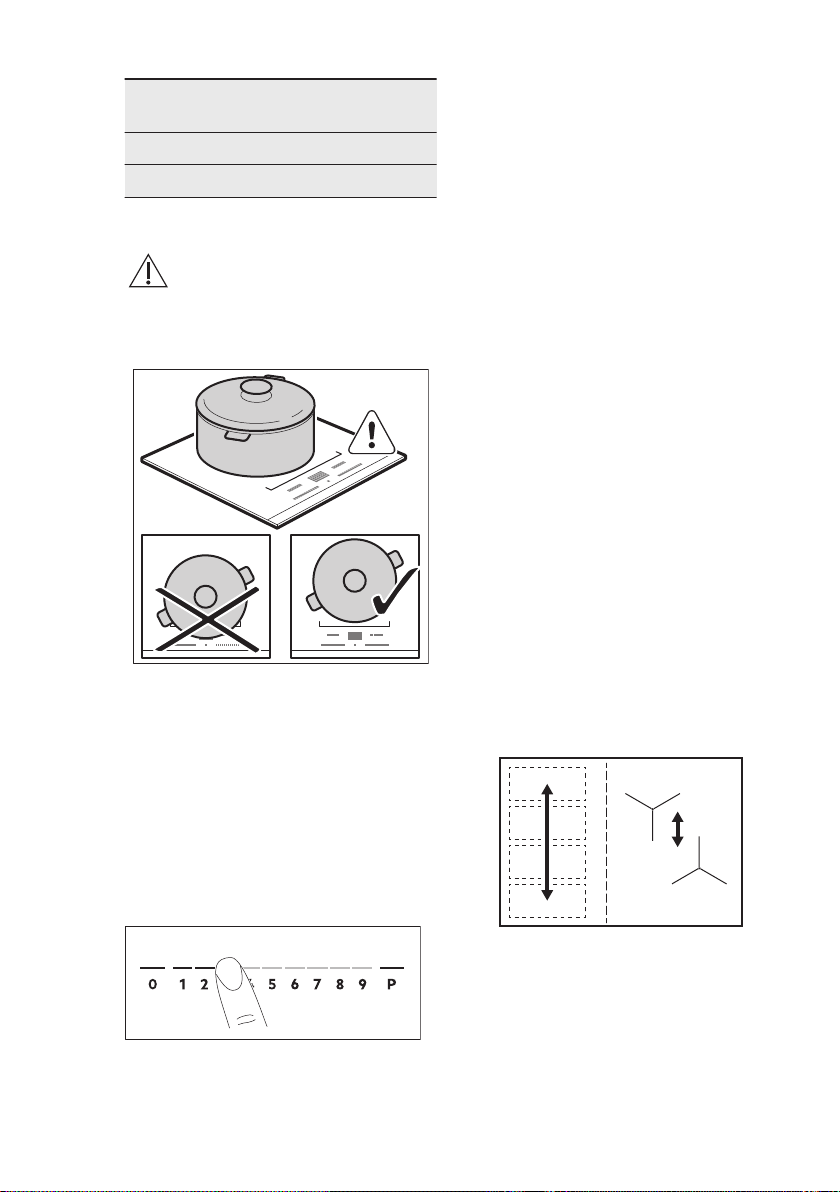
CAUTION!
Do not place hot cookware
on the control panel. There
is a risk of damage to the
electronic parts.
Place the cookware in the centre of the
selected zone. Induction cooking zones
adapt to the dimension of the bottom of
the cookware automatically.
Once the pot is detected, the heat
setting 0 comes on.
remove the pot. The control bar blinks
for the second half of that time. If you
place the pot on the cooking zone again
within this time, the heat setting
reactivates. Otherwise the cooking zone
deactivates.
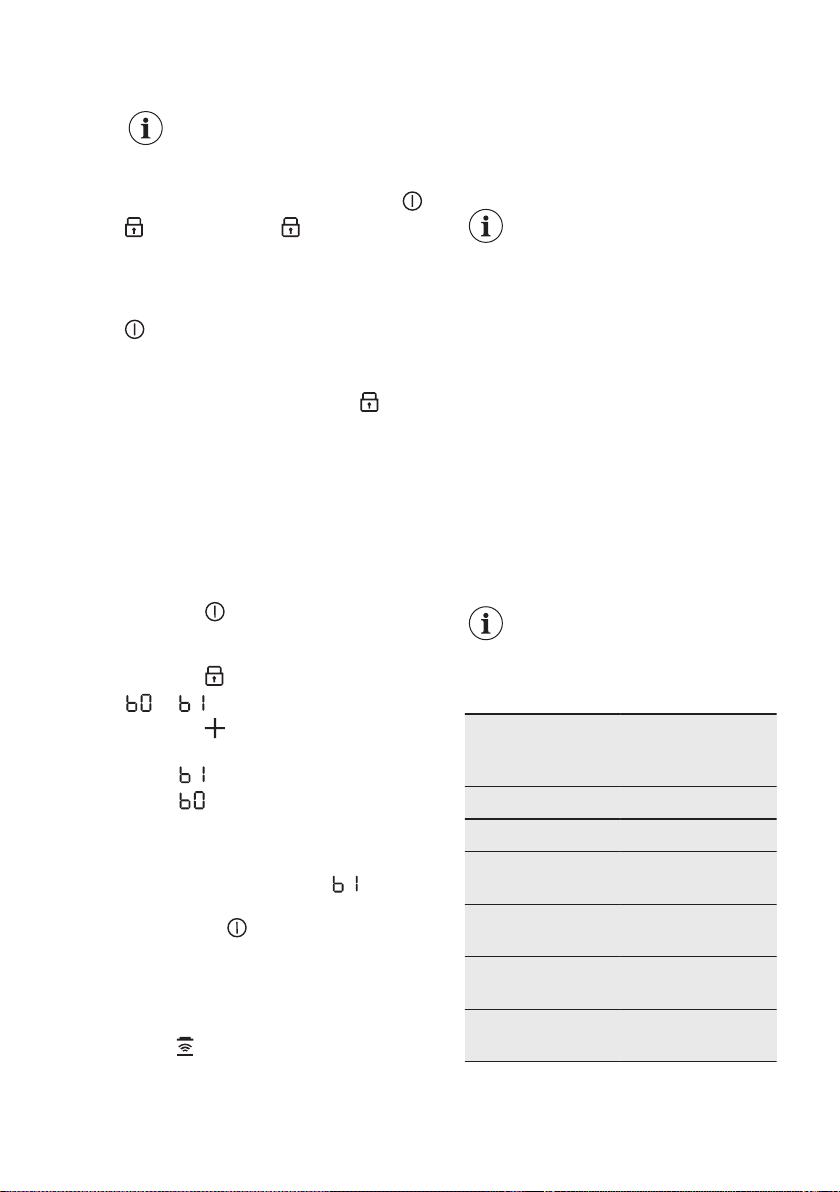
6.5 Power management function
• Cooking zones are grouped
according to the location and number
of the phases in the hob. See the
illustration.
• Each phase has a maximum electricity
loading of 3680 W.
• The function divides the power
between cooking zones connected to
the same phase.
• The function activates when the total
electricity loading of the cooking
zones connected to a single phase
exceeds 3680 W.
• The function decreases the power of
the other cooking zones connected to
the same phase.
• For cooking zones that have a
reduced power, the control panel
shows the maximum possible heat
settings.
• If a higher heat setting is not available
reduce it for the other cooking zones
first.
• The activation of the function
depends on the number and size of
pots.
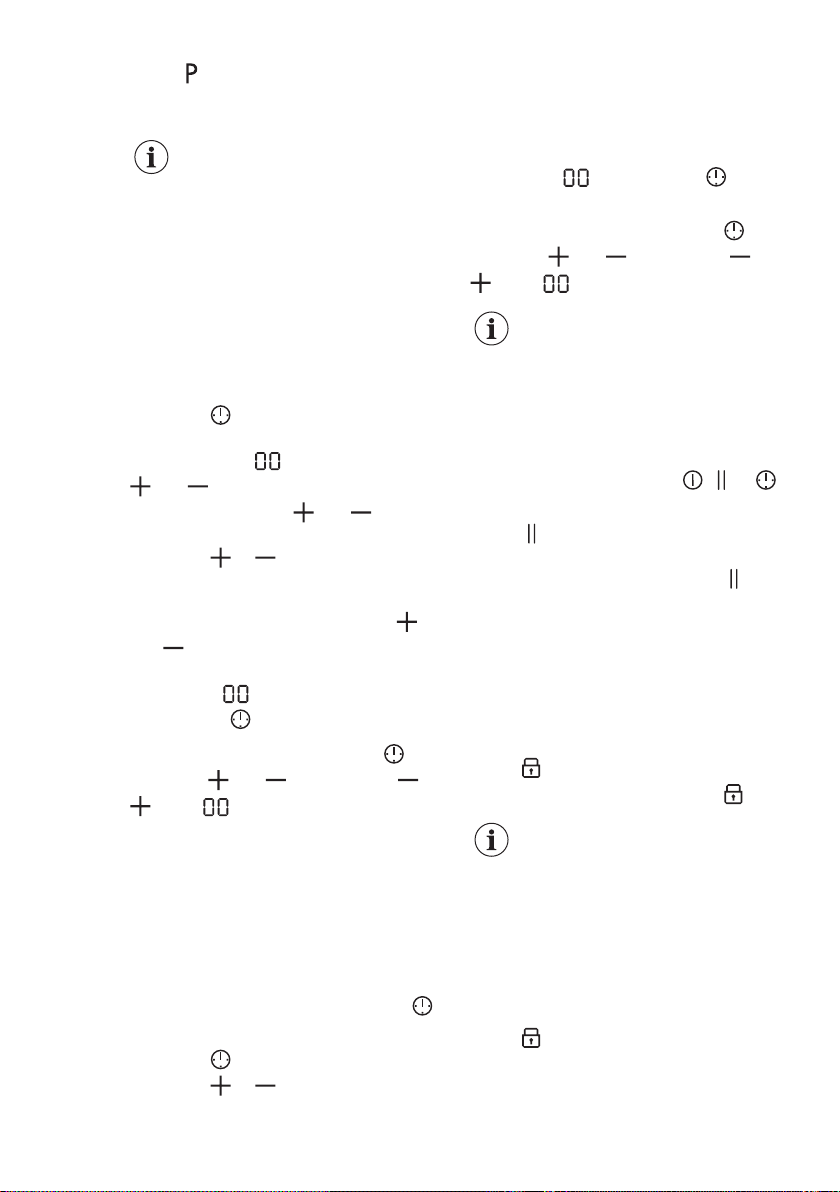
6.4 The heat setting
Touch the control bar at the desired heat
setting or move your finger along the
control bar to set or change the heat
setting for a cooking zone.
Once you place a pot on the cooking
zone and set the heat setting, it remains
the same for 50 seconds after you
6.6 PowerBoost
This function activates more power for
the appropriate induction cooking zone,
depending on the cookware size. The
function can be activated only for a
limited period of time.
Page 12
ENGLISH
11
Touch to activate the function for the
cooking zone.
The function deactivates automatically.
For maximum duration
values, refer to "Technical
data".
6.7 Timer
Count Down Timer
Use this function to specify how long a
cooking zone should operate during a
single cooking session.
Set the heat setting for the appropriate
cooking zone and then set the function.
1. Touch to activate the function or
change the time.
The timer digits and the indicators
and come on the display.
If the timer is not set,
disappear after 3 seconds.
2. Touch or to set the time (00 -
99 minutes).
After 3 seconds, the timer starts to count
down automatically. The indicators
disappear.
and
When the time comes to an end, a signal
sounds and flashes. To stop the
signal, touch
To deactivate the function: touch . The
indicators and come on. Use or
to set on the display.
Alternatively, set the heat level to 0. As a
result, a signal sounds and the timer is
cancelled.
.
and
,
The function starts automatically after 4
seconds.
When you set the function, you can
remove the pot.
When the time comes to an end, a signal
sounds and flashes. Touch to
stop the signal.
To deactivate the function: touch . The
indicators
to set on the display.
and light up. Use or
The function has no effect
on the operation of the
cooking zones.
6.8 Pause
This function sets all cooking zones that
operate to the lowest heat setting.
When the function is active, , or
symbols can be used.
Touch
The heat setting is lowered to 1.
To deactivate the function, touch . The
previous heat setting comes on.
to activate the function.
6.9 Lock
You can lock the control panel while the
hob operates. It prevents an accidental
change of the heat setting.
Set the heat setting first.
Touch
To deactivate the function, touch
to activate the function.
.
When you deactivate the
hob, you also deactivate this
function.
Minute Minder
You can use this function when the hob is
activated but the cooking zones do not
operate.
Place a pot on a cooking zone to see
symbol.
1. Touch to activate the function.
2. Touch
or to set the time.
6.10 Child Safety Device
This function prevents an accidental
operation of the hob.
Activate the hob first and do not set the
heat setting.
Touch
indicator comes on to activate the
function.
until signal sounds and the
Page 13
www.aeg.com12
The control bars disappear. Deactivate
the hob.
When you deactivate the
hob, the function is still
active.
To deactivate the function for only one
cooking time: Activate the hob with .
comes on. Touch until signal
sounds and the indicator comes off. The
control bar appears. Set the heat setting
within 50 seconds.You can operate the
hob. When you deactivate the hob with
the function is still active.
To deactivate the function
permanently: Activate the hob and do
not set the heat setting. Touch
until
signal sounds and the indicator comes
off. The control bars appear. Deactivate
the hob.
6.11 OffSound Control (Deactivating and activating the sounds)
Deactivate the hob first.
1. Touch for 3 seconds to activate
the function.
The display comes on and goes out.
2. Touch for 3 seconds.
or comes on.
3. Touch
of the following:
• - the sounds are off
• - the sounds are on
4. Wait until the hob deactivates
automatically to confirm your
selection.
When the function is set to
hear the sounds only when:
• you touch
• Minute Minder comes down
• Count Down Timer comes down
• you put something on the control
panel.
6.12
It is an advanced automatic function
which connects the hob to a special
of the timer to choose one
you can
Hob²Hood
hood. Both the hob and the hood have
an infrared signal communicator. Speed
of the fan is defined automatically on the
basis of the mode setting and
temperature of the hottest cookware on
the hob. You can also operate the fan
from the hob manually.
For most of the hoods, the
remote system is originally
deactivated. Activate it
before you use the function.
For more information refer
to the hood user manual.
Operating the function automatically
To operate the function automatically set
the automatic mode to H1 – H6. The hob
is originally set to H5. The hood reacts
whenever you operate the hob. The hob
recognizes the temperature of the
cookware automatically and adjusts the
speed of the fan.
Activating the light
You can set the hob to activate the light
automatically whenever you activate the
hob. To do so set the automatic mode to
H1 – H6.
The light on the hood
deactivates 2 minutes after
deactivating the hob.
Automatic modes
Auto-
Mode H0 Off Off Off
Mode H1 On Off Off
Mode H2
Mode H3 On Off Fan
Mode H4 On Fan
Mode H5 On Fan
3)
Boiling1)Frying
matic
light
On Fan
speed 1
speed 1
speed 1
2)
Fan
speed 1
speed 1
Fan
speed 1
Fan
speed 2
Page 14
Auto-
Mode H6 On Fan
1)
The hob detects the boiling process and activates the fan speed in accordance with the automatic mode.
2)
The hob detects the frying process and activates the fan speed in accordance with the automatic mode.
3)
This mode activates the fan and the light and
does not rely on the temperature.
matic
light
Boiling1)Frying
speed 2
2)
Fan
speed 3
Changing the automatic mode
Deactivate the appliance.
1.
2. Touch for 3 seconds.
The display comes on and goes off.
3. Touch
4. Touch a few times until comes
on.
5. Touch of the Timer to select an
automatic mode.
When you finish cooking and deactivate
the hob, the hood fan may still operate
for a certain period of time. After that
for 3 seconds.
ENGLISH 13
time the system deactivates the fan
automatically and prevents you from an
accidental activation of the fan for the
next 30 seconds.
To operate the hood directly
on the hood panel
deactivate the automatic
mode of the function.
Operating the fan speed manually
You can also operate the fan from the
hob manually.
Touch when the hob is active.
This deactivates automatic operation of
the function and allows you to change
the fan speed manually.
When you press
speed by one. When you reach an
intensive level and press again, you
set the fan speed to 0 which deactivates
the hood fan. To start the fan again with
the fan speed 1 touch
To activate an automatic
operation of the function,
deactivate the hob and
activate it again.
, you raise the fan
.
7. FLEXIBLE INDUCTION COOKING AREA
WARNING!
Refer to Safety chapters.
7.1 FlexiBridge function
The flexible induction cooking area
consists of four sections. The sections
can be combined into two cooking zones
with different size, or into one large
cooking area. The sides of the zones
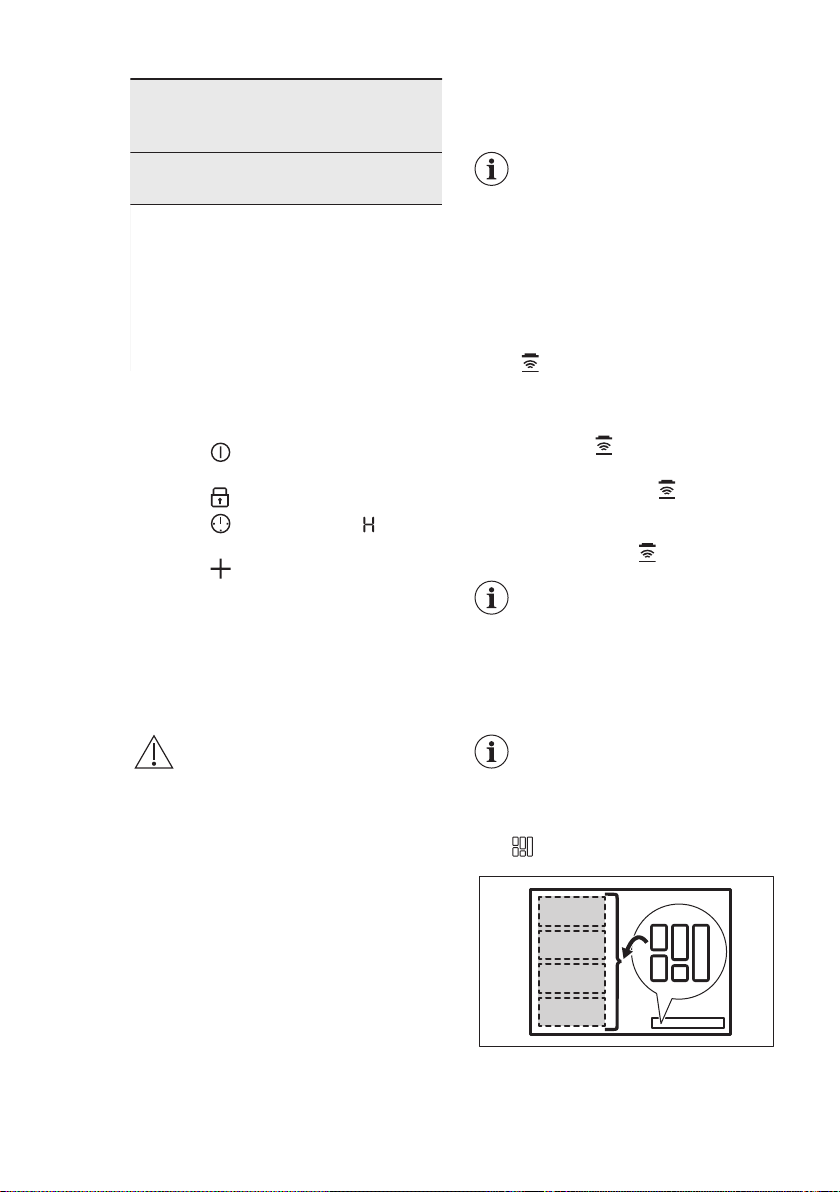
which operate together light up, and
they are linked with shorter illuminated
lines. You choose the combination of the
sections by choosing the mode
applicable to the size of the cookware
you want to use. There are three modes:
Standard (activated automatically when
you activate the hob), Big Bridge and
Max Bridge.
Switching between the modes
To switch between the modes use sensor
field: .
To set the heat setting use
two left side control bars.
Page 15
100-160mm
> 160 mm
14
www.aeg.com
When you switch between
the modes the heat setting
is set back to 0.
Diameter and position of the
cookware
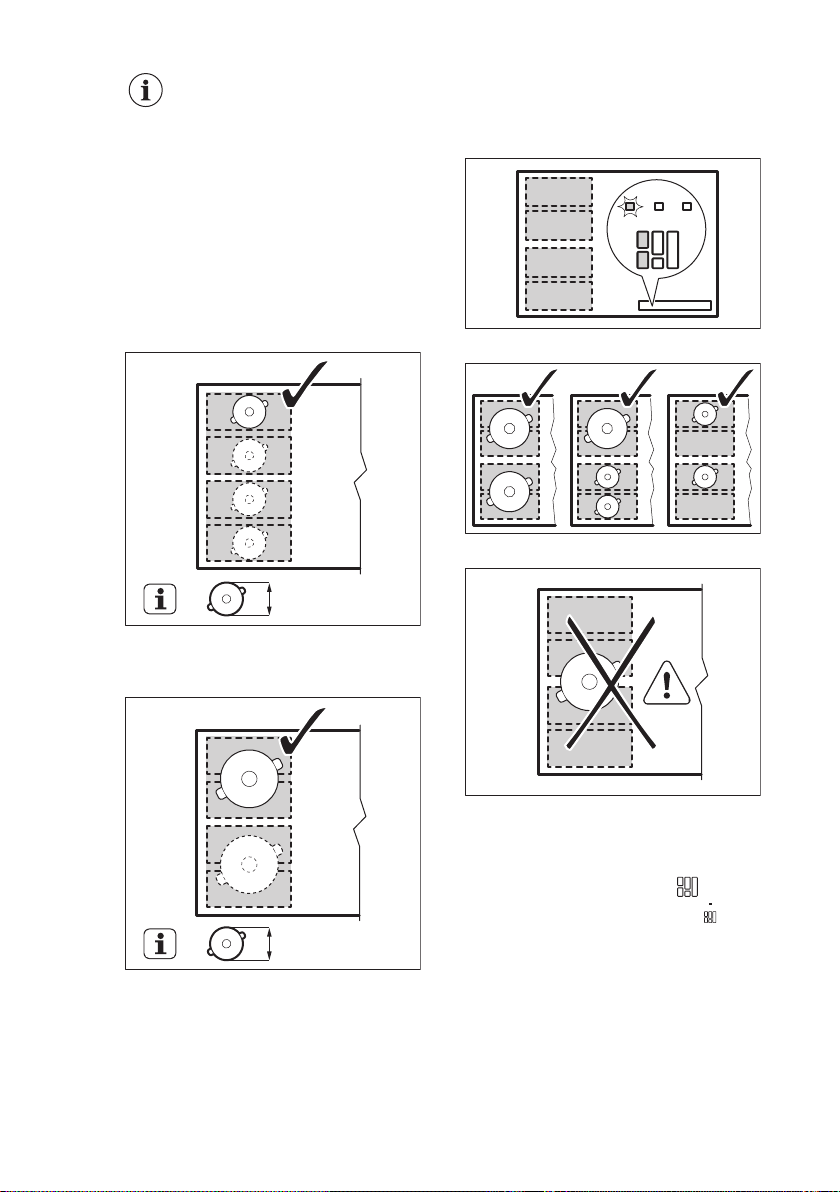
Choose the mode applicable to the size
and the shape of the cookware. The
cookware should cover the selected area
as much as possible. Place the cookware
centrally on the selected area!
Place the cookware with the bottom
diameter smaller than 160 mm centrally
on a single section.
Place the cookware with the bottom
diameter larger then 160 mm centrally
between two sections.
zones which operate together in this
mode light up, and they are linked with
shorter illuminated lines. You can set the
heat setting for each zone separately.
Use two left side control bars.
Correct cookware position:
Incorrect cookware position:
7.2 FlexiBridge Standard
mode
This mode is active when you activate
the hob. It connects the sections into two
separate cooking zones. The sides of the
7.3 FlexiBridge Big Bridge mode
To activate the mode touch until you
see the correct mode indicator
mode connects three rear sections into
one cooking zone. The front section is
not connected and operates as a
separate cooking zone. You can set the
heat setting for each zone separately.
. This
Page 16
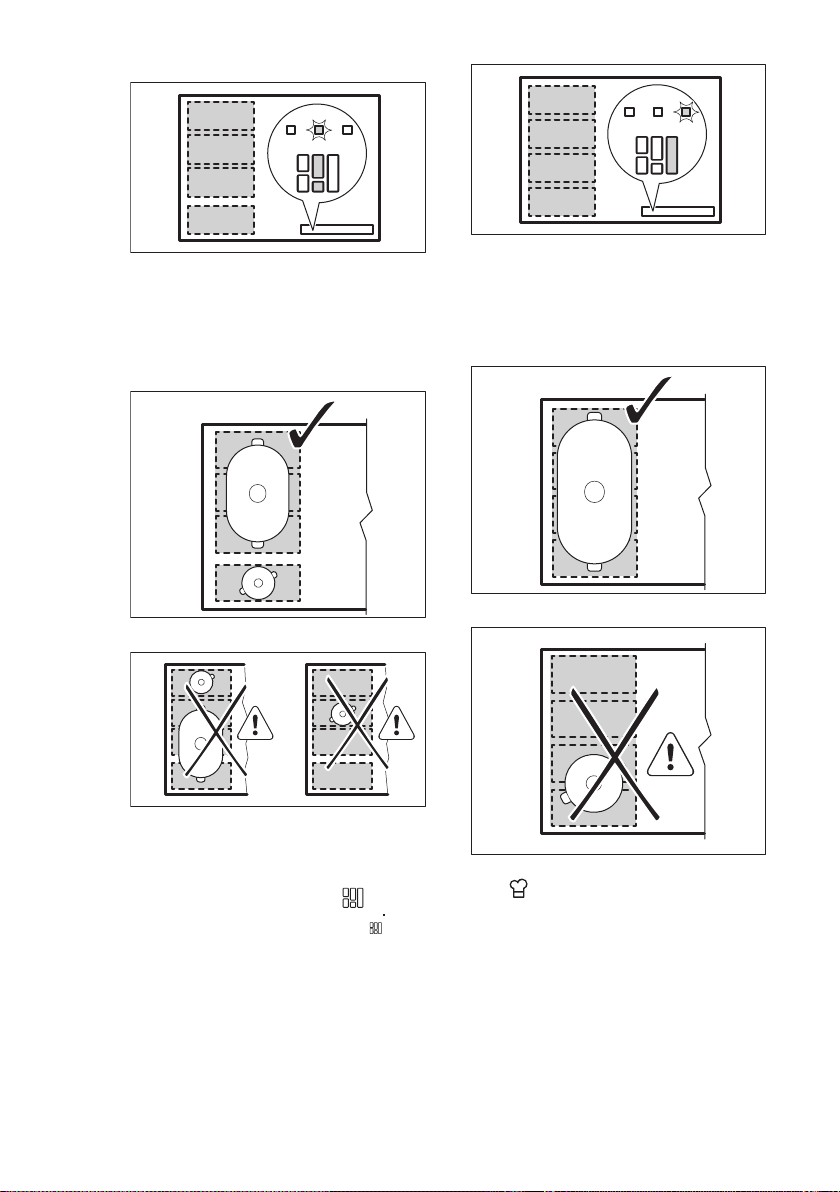
Use two left side control bars.
Correct cookware position:
To use this mode you have to place the
cookware on the three connected
sections. If you use cookware smaller
than two sections the control bar blinks
and after 2 minutes the zone switches off.
ENGLISH
Correct cookware position:
To use this mode you have to place the
cookware on the four connected
sections. If you use cookware smaller
than three sections the control bar blinks
and after 2 minutes the zone switches off.
15
Incorrect cookware position:
7.4 FlexiBridge Max Bridge
mode
To activate the mode touch until you
see the correct mode indicator . This
mode connects all sections into one
cooking zone. To set the heat setting use
any of the two control bars on the left
side.
Incorrect cookware position:
7.5 PowerSlide
This function allows you to adjust the
temperature by moving the cookware to
a different position on the induction
cooking area.
The function divides the induction
cooking area into three areas with
different heat settings. The hob detects
the position of the cookware and adjust
the heat setting corresponding with the
Page 17
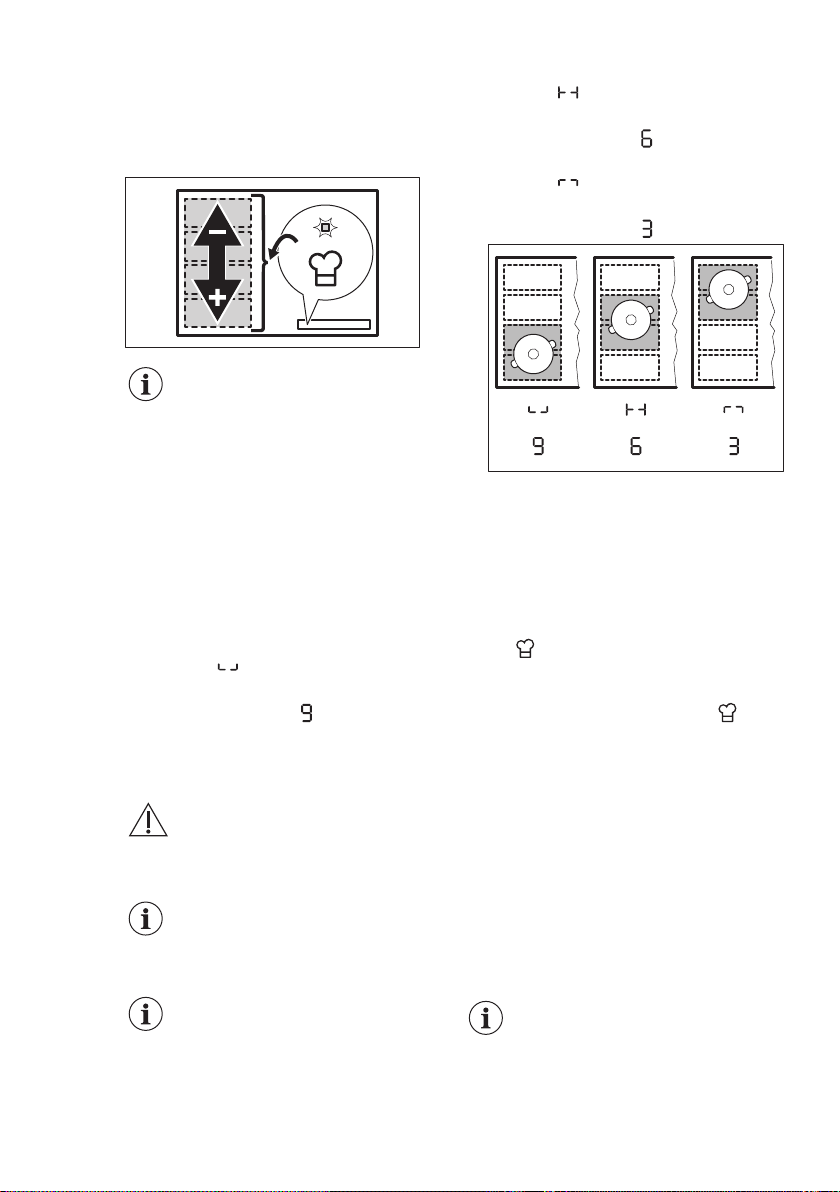
www.aeg.com16
position. You can place the cookware in
the front, middle or rear position. If you
place the cookware in the front you get
the highest heat setting. To decrease it,
move the cookware to middle or rear
position.
Use only one pot when you
operate the function.
If you want to change the
heat setting, lift up the
cookware and place it on a
different zone. Sliding the
cookware can cause
scratches and discolouration
of the surface.
General information:
• 160 mm is the minimum bottom
diameter of the cookware for this
function.
• If you place the pot in the front
position,
panel. The control bar displays the
default heat setting .
lights up on the control
• If you place the pot in the middle
position, lights up on the control
panel. The control bar displays the
default heat setting .
• If you place the pot in the rear
position, lights up on the control
panel. The control bar displays the
default heat setting
• To change the default heat setting
use left front control bar. You may
change the default heat setting only if
the function is active. You can change
the heat settings for each position
separately. The hob will remember
your settings next time you activate
the function.
Touch to activate the function.
The indicator comes on and the control
bar displays the default heat setting.
To deactivate the function, touch .
.
HINTS AND TIPS
8.
WARNING!
Refer to Safety chapters.
8.1 Cookware
For induction cooking zones
a strong electro-magnetic
field creates the heat in the
cookware very quickly.
Use the induction cooking
zones with suitable
cookware.
Cookware material
• correct: cast iron, steel, enamelled
steel, stainless steel, multi-layer
bottom (with a correct marking from a
manufacturer).
• not correct: aluminium, copper,
brass, glass, ceramic, porcelain.
Cookware is suitable for an induction
hob if:
• water boils very quickly on a zone set
to the highest heat setting.
• a magnet pulls on to the bottom of
the cookware.
The bottom of the cookware
must be as thick and flat as
possible.
Ensure pan bases are clean
and dry before placing on
the hob surface.
Page 18
ENGLISH 17
Cookware dimensions
Induction cooking zones adapt to the
dimension of the bottom of the
cookware automatically.
The cooking zone efficiency is related to
the diameter of the cookware. The
cookware with a diameter smaller than
the minimum receives only a part of the
power generated by the cooking zone.
Refer to "Technical data".
• hissing, buzzing: the fan operates.
The noises are normal and do not
indicate any malfunction.
8.3 Öko Timer (Eco Timer)
To save energy, the heater of the
cooking zone deactivates before the
count down timer sounds. The difference
in the operation time depends on the
heat setting level and the length of the
cooking operation.
8.4 Examples of cooking
8.2 The noises during
operation
If you can hear:
• crack noise: cookware is made of
different materials (a sandwich
construction).
• whistle sound: you use a cooking
zone with a high power level and the
cookware is made of different
materials (a sandwich construction).
• humming: you use a high power level.
• clicking: electric switching occurs.
Heat setting Use to: Time
1 Keep cooked food warm. as nec-
1 - 2 Hollandaise sauce, melt: but-
ter, chocolate, gelatine.
1 - 2 Solidify: fluffy omelettes,
baked eggs.
2 - 3 Simmer rice and milkbased
dishes, heat up ready-cooked
meals.
3 - 4 Steam vegetables, fish, meat. 20 - 45 Add a couple of tablespoons
4 - 5 Steam potatoes. 20 - 60 Use max. ¼ l of water for 750 g
4 - 5 Cook larger quantities of food,
stews and soups.
applications
The correlation between the heat setting
of a zone and its consumption of power
is not linear. When you increase the heat
setting, it is not proportional to the
increase of the consumption of power. It
means that a cooking zone with the
medium heat setting uses less than a half
of its power.
The data in the table is for
guidance only.
Hints
(min)
Put a lid on the cookware.
essary
5 - 25 Mix from time to time.
10 - 40 Cook with a lid on.
25 - 50 Add at least twice as much liq-
uid as rice, mix milk dishes
halfway through the procedure.
of liquid.
of potatoes.
60 - 150 Up to 3 l of liquid plus ingredi-
ents.
Page 19
www.aeg.com18
Heat setting Use to: Time
(min)
6 - 7 Gentle fry: escalope, veal cor-
don bleu, cutlets, rissoles,
sausages, liver, roux, eggs,
pancakes, doughnuts.
7 - 8 Heavy fry, hash browns, loin
steaks, steaks.
9 Boil water, cook pasta, sear meat (goulash, pot roast), deep-fry chips.
Boil large quantities of water. PowerBoost is activated.
as necessary
5 - 15 Turn halfway through.
8.5 Hints and Tips for Hob²Hood
When you operate the hob with the
function:
• Protect the hood panel from direct
sunlight.
• Do not spot halogen light on the
hood panel.
• Do not cover the hob control panel.
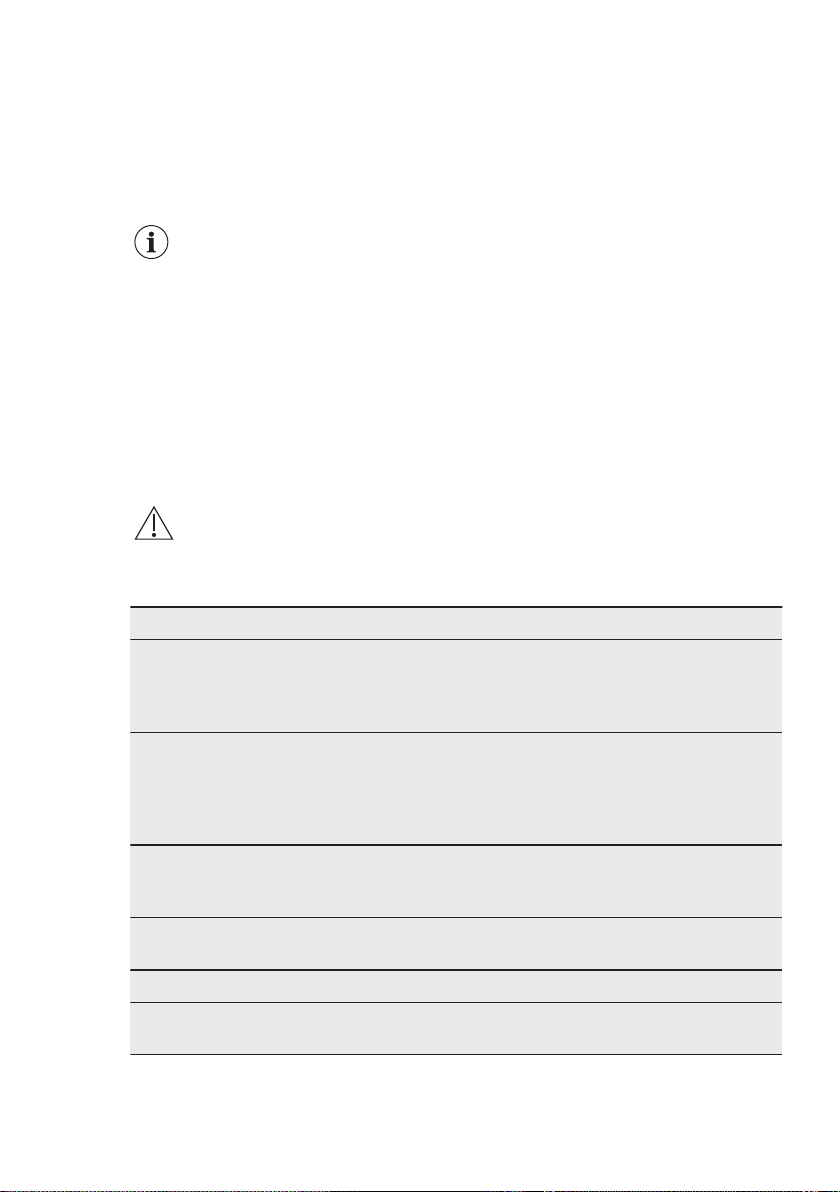
• Do not interrupt the signal between
the hob and the hood (e.g. with the
hand, a cookware handle or a tall
pot). See the picture.
The hood in the picture is only
exemplary.
Cooker hoods with the Hob²Hood
function
To find the full range of cooker hoods
which work with this function refer to our
consumer website. The AEG cooker
hoods that work with this function must
have the symbol .
Hints
Turn halfway through.
Other remotely controlled
appliances may block the
signal. Do not use any
remotely controlled
appliances at the time when
you use the function on the
hob.
9. CARE AND CLEANING
WARNING!
Refer to Safety chapters.
9.1 General information
• Clean the hob after each use.
Page 20
ENGLISH 19
• Always use cookware with a clean
base.
• Scratches or dark stains on the surface
have no effect on how the hob
operates.
• Use a special cleaner suitable for the
surface of the hob.
• Use a special scraper for the glass.
The printing on the flexible
induction cooking area may
become dirty or change its
colour from sliding the
cookware. You can clean the
area in a standard way.
9.2 Cleaning the hob
• Remove immediately: melted plastic,
plastic foil, sugar and food with sugar,
10. TROUBLESHOOTING
WARNING!
Refer to Safety chapters.
10.1 What to do if...
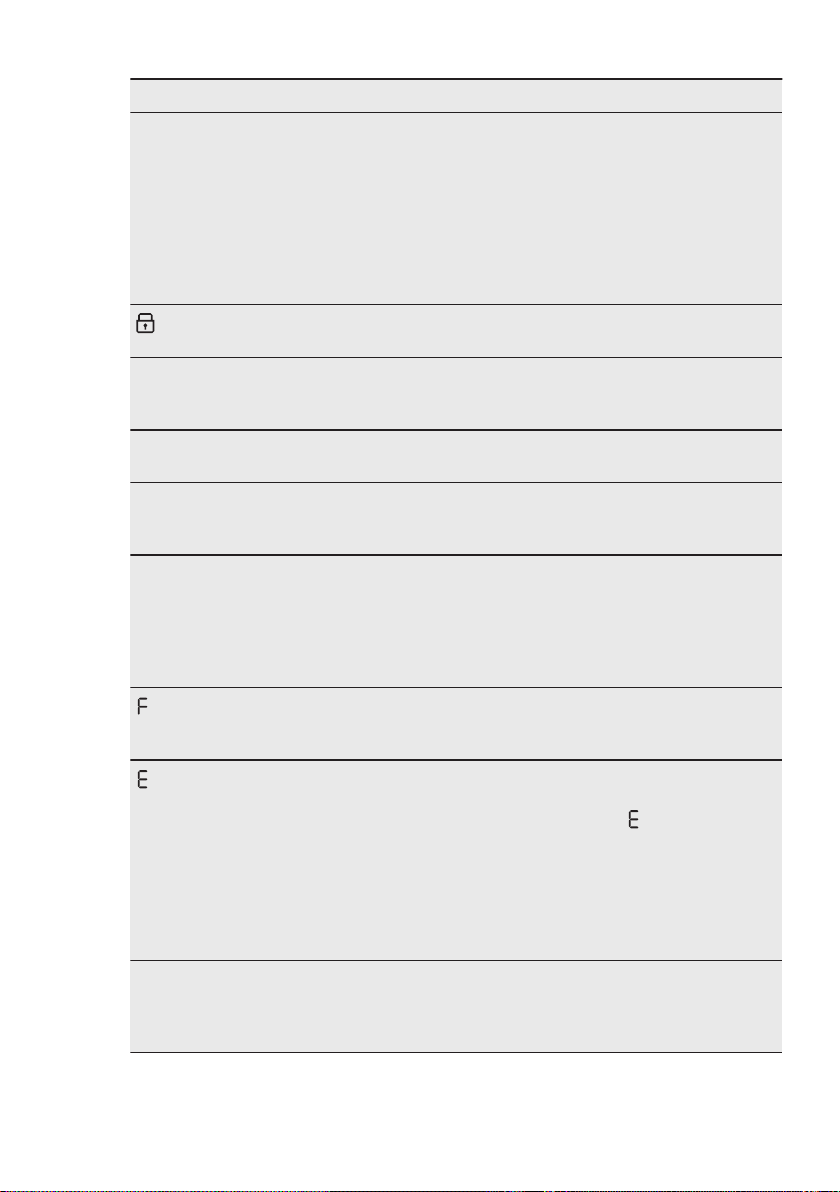
Problem Possible cause Remedy
You cannot activate or operate the hob.
The fuse is blown. Make sure that the fuse is
You do not set the heat set-
You touched 2 or more sen-
Pause operates. Refer to "Daily use".
There is water or fat stains
The hob is not connected to
an electrical supply or it is
connected incorrectly.
ting for 50 seconds.
sor fields at the same time.
on the control panel.
otherwise, the dirt can cause damage
to the hob. Take care to avoid burns.
Use a special hob scraper on the glass
surface at an acute angle and move
the blade on the surface.
• Remove when the hob is sufficiently
cool: limescale rings, water rings, fat
stains, shiny metallic discoloration.
Clean the hob with a moist cloth and
a non-abrasive detergent. After
cleaning, wipe the hob dry with a soft
cloth.
• Remove shiny metallic
discoloration: use a solution of water
with vinegar and clean the glass
surface with a cloth.
Check if the hob is correctly
connected to the electrical
supply. Refer to the connection diagram.
the cause of the malfunction.
If the fuse is blown again
and again, contact a qualified electrician.
Activate the hob again and
set the heat setting in less
than 50 seconds.
Touch only one sensor field.
Clean the control panel.
Page 21
www.aeg.com20
Problem Possible cause Remedy
You cannot select the maximum heat setting for one of
the cooking zones.
The other zones consume
the maximum available power.
Your hob works properly.
An acoustic signal sounds
and the hob deactivates.
You put something on one
or more sensor fields.
An acoustic signal sounds
when the hob is deactivated.
The hob deactivates. You put something on the
sensor field .
Residual heat indicator does
not come on.
The zone is not hot because
it operated only for a short
time or the sensor is dam-
aged.
Hob²Hood does not work. You covered the control
panel.
You use a very tall pot which
blocks the signal.
The sensor fields become
hot.
The cookware is too large or
you put it too near to the
controls.
There is no sound when you
The sounds are deactivated. Activate the sounds. Refer to
touch the panel sensor
fields.
The flexible induction cooking area does not heat up
the cookware.
The cookware is in a wrong
position on the flexible in-
duction cooking area.
Reduce the heat setting of
the other cooking zones
connected to the same
phase.
Refer to "Power management".
Remove the object from the
sensor fields.
Remove the object from the
sensor field.
If the zone operated sufficiently long to be hot, speak
to an Authorised Service
Centre.
Remove the object from the
control panel.
Use a smaller pot, change
the cooking zone or operate
the hood manually.
Put large cookware on the
rear zones, if possible.
"Daily use".
Place the cookware in the
correct position on the flexible induction cooking area.
The position of the cookware depends on the activated function or function
mode. Refer to "Flexible induction cooking area".
Page 22
ENGLISH 21
Problem Possible cause Remedy
The diameter of the bottom
of the cookware is incorrect
for the activated function or
function mode.
Use cookware with a diameter applicable to the activated function or function
mode. Use cookware with a
diameter smaller than 160
mm on a single section of
the flexible induction cooking area. Refer to "Flexible
induction cooking area".
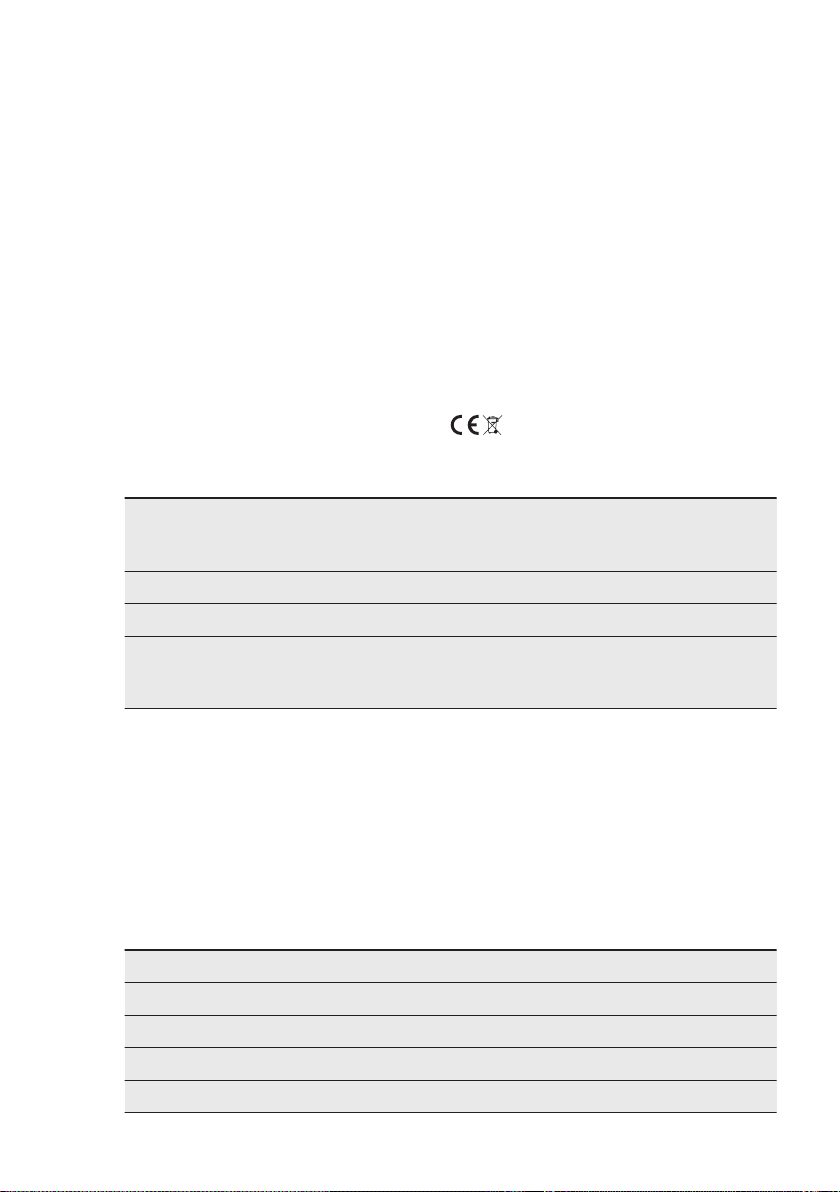
comes on.
Child Safety Device or Lock
operates.
The control bar blinks. There is no cookware on the
zone or the zone is not fully
covered.
Refer to "Daily use".
Put cookware on the zone so
that it fully covers the cooking zone.
The cookware is unsuitable. Use suitable cookware. Refer
to "Hints and tips".
The diameter of the bottom
of the cookware is too small
for the zone.
FlexiBridge operates. One
or more sections of the function mode which operates
are not covered by the cookware.
Use cookware with correct
dimensions. Refer to "Technical data".
Place the cookware on the
correct number of sections
of the function mode which
operates or change the function mode. Refer to "Flexible induction cooking area".
comes on.
and a number come on.
PowerSlide operates. Two
pots are placed on the flexible induction cooking area.
There is an error in the hob. Deactivate the hob and acti-
Use only one pot. Refer to
"Flexible induction cooking
area".
vate it again after 30 seconds. If comes on again,
disconnect the hob from the
electrical supply. After 30
seconds, connect the hob
again. If the problem continues, speak to an Authorised
Service Centre.
You can hear a constant
beep noise.
The electrical connection is
incorrect.
Disconnect the hob from the
electrical supply. Ask a qualified electrician to check the
installation.
Page 23
www.aeg.com22
10.2 If you cannot find a
solution...
If you cannot find a solution to the
problem yourself, contact your dealer or
an Authorised Service Centre. Give the
data from the rating plate. Make sure,
you operated the hob correctly. If not the
11. TECHNICAL DATA
11.1 Rating plate
Model IPE64571FB PNC 949 597 483 00
Typ 62 B4A 21 AA 220 - 240 V / 400 V 2N 50 - 60 Hz
Induction 7.35 kW Made in Germany
Ser.Nr. ................. 7.35 kW
AEG
11.2 Cooking zones specification
Cooking zone Nominal power
(maximum heat
setting) [W]
Right front 1400 2500 4 125 - 145
Right rear 1800 2800 10 145 - 180
Flexible induction cooking
area
2300 3200 10 minimum 100
PowerBoost
[W]
servicing by a service technician or
dealer will not be free of charge, also
during the warranty period. The
instructions about the Service Centre and
conditions of guarantee are in the
guarantee booklet.
PowerBoost
maximum duration [min]
Cookware diameter [mm]
The power of the cooking zones can be
different in some small range from the
data in the table. It changes with the
material and dimensions of the
cookware.
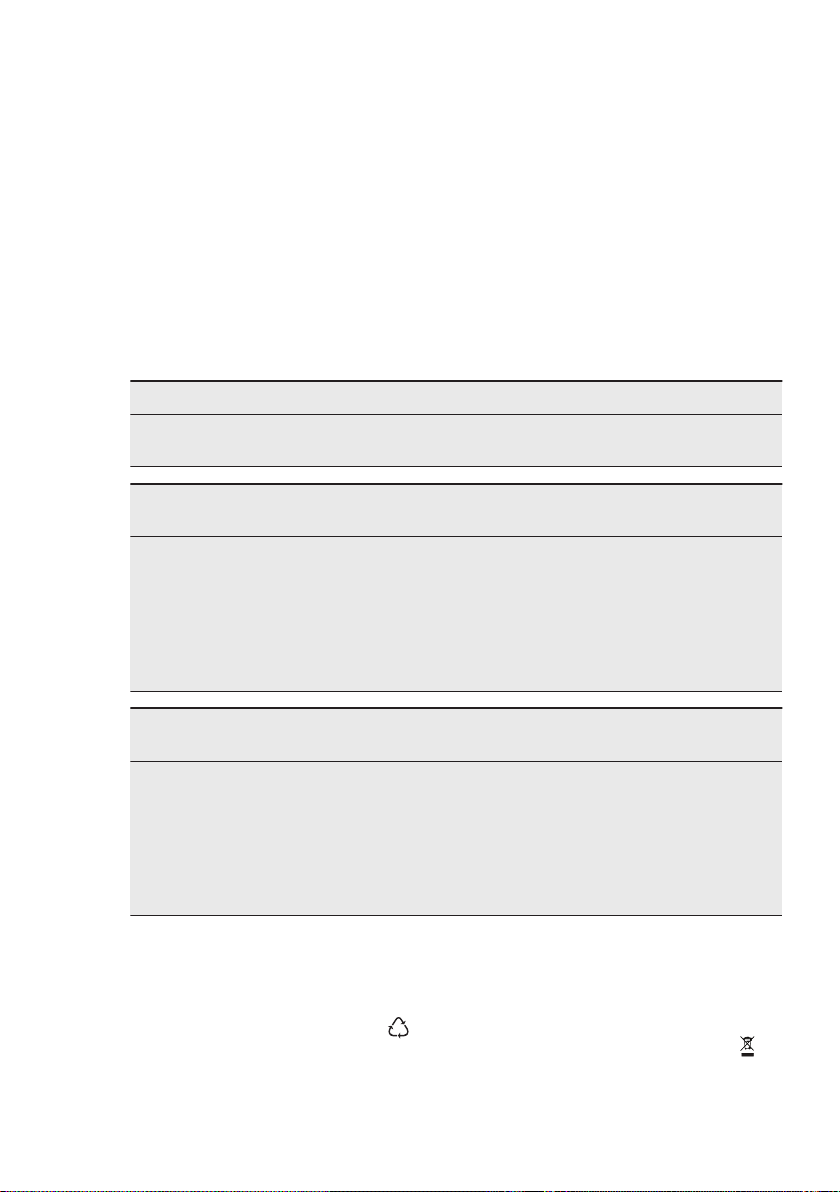
12. ENERGY EFFICIENCY
12.1 Product information according to EU 66/2014 valid for EU
market only
Model identification IPE64571FB
Type of hob Built-In Hob
Number of cooking zones 2
Number of cooking areas 1
Heating technology Induction
For optimal cooking results use
cookware no larger than the diameter in
the table.
Page 24

ENGLISH
23
Diameter of circular cooking zones (Ø)
Lenght (L) and width (W) of
the cooking area
Energy consumption per
cooking zone (EC electric
cooking)
Energy consumption of the
cooking area (EC electric
cooking)
Energy consumption of the
hob (EC electric hob)
EN 60350-2 - Household electric cooking
appliances - Part 2: Hobs - Methods for
measuring performance
12.2 Energy saving
You can save energy during everyday
cooking if you follow below hints.
• When you heat up water, use only the
amount you need.
13. WARRANTY
FOR SALES IN AUSTRALIA AND NEW
ZEALAND
ALL AEG BRANDED APPLIANCES
This document sets out the terms and
conditions of the product warranties
for AEG Appliances. It is an important
document. Please keep it with your
proof of purchase documents in a safe
place for future reference should there
be a manufacturing defect in your
Appliance. This warranty is in addition
to other rights you may have under
the Australian Consumer Law.
1. In this warranty:
a) ‘ACL’ or ‘Australian Consumer
Law’ means Schedule 2 to the
Competition and Consumer Act
2010;
b) ‘Appliance’ means any Electrolux
product purchased by you and
accompanied by this document;
c) ‘ASC’ means Electrolux’s
authorised serviced centres;
Right front
Right rear
Left L 41.8 cm
Right front
Right rear
Left 187.0 Wh / kg
184.6 Wh / kg
14.5 cm
18.0 cm
W 24.8 cm
187.5 Wh / kg
174.6 Wh / kg
• If it is possible, always put the lids on
the cookware.
• Before you activate the cooking zone
put the cookware on it.
• Put the smaller cookware on the
smaller cooking zones.
• Put the cookware directly in the
centre of the cooking zone.
• Use the residual heat to keep the
food warm or to melt it.
d) ‘AEG’ is the brand controlled by
Electrolux Home Products Pty
Ltd of 163 O’Riordan Street,
Mascot NSW 2020, ABN 51 004
762 341 in respect of Appliances
purchased in Australia and
Electrolux (NZ) Limited
(collectively “Electrolux”) of 3-5
Niall Burgess Road, Mount
Wellington, in respect of
Appliances purchased in New
Zealand;
e) ‘Warranty Period’ means the
period specified in clause 3 of
this warranty;
f) ‘you’ means the purchaser of the
Appliance not having purchased
the Appliance for re-sale, and
‘your’ has a corresponding
meaning.
2. Application: This warranty only
applies to new Appliances,
purchased and used in Australia or
New Zealand and is in addition to
(and does not exclude, restrict, or
Page 25

24
www.aeg.com
modify in any way) other rights and
remedies under a law to which the
Appliances or services relate,
including any non-excludable
statutory guarantees in Australia and
New Zealand.
3. Warranty Period: Subject to these
terms and conditions, this warranty
continues for in Australia for a period
of 60 months and in New Zealand for
a period of 60 months, following the
date of original purchase of the
Appliance.
4. Repair or replace warranty: During
the Warranty Period, Electrolux or its
ASC will, at no extra charge if your
Appliance is readily accessible for
service, without special equipment
and subject to these terms and
conditions, repair or replace any
parts which it considers to be
defective. Electrolux may, in its
absolute discretion, choose whether
the remedy offered for a valid
warranty claim is repair or
replacement. Electrolux or its ASC
may use refurbished parts to repair
your Appliance. You agree that any
replaced Appliances or parts
become the property of Electrolux.
5. Travel and transportation costs:
Subject to clause 7, Electrolux will
bear the reasonable cost of
transportation, travel and delivery of
the Appliance to and from Electrolux
or its ASC. Travel and transportation
will be arranged by Electrolux as part
of any valid warranty claim.
6. Proof of purchase is required before
you can make a claim under this
warranty.
7. Exclusions: You may not make a
claim under this warranty unless the
defect claimed is due to faulty or
defective parts or workmanship. This
warranty does not cover:
a) light globes, batteries, filters or
similar perishable parts;
b) parts and Appliances not
supplied by Electrolux;
c) cosmetic damage which does
not affect the operation of the
Appliance;
d) damage to the Appliance caused
by:
– negligence or accident;
– misuse or abuse, including
failure to properly maintain or
service;
– improper, negligent or faulty
servicing or repair works done
by anyone other than an
Electrolux authorised repairer
or ASC;
– normal wear and tear;
– power surges, electrical storm
damage or incorrect power
supply;
– incomplete or improper
installation;
– incorrect, improper or
inappropriate operation;
– insect or vermin infestation;
– failure to comply with any
additional instructions
supplied with the Appliance;
In addition, Electrolux is not
liable under this warranty if:
– the Appliance has been, or
Electrolux reasonably believes
that the Appliance has been,
used for purposes other than
those for which the Appliance
was intended, including
where the Appliance has
been used for any non-
domestic purpose;
– the Appliance is modified
without authority from
Electrolux in writing;
– the Appliance’s serial number
or warranty seal has been
removed or defaced.
8. How to claim under this warranty:
To enquire about claiming under this
warranty, please follow these steps:
a. carefully check the operating
instructions, user manual and the
terms of this warranty;
b. have the model and serial
number of the Appliance
available;
c. have the proof of purchase (e.g.
an invoice) available;
d. telephone the numbers shown
below.
9. Australia: For Appliances and
services provided by Electrolux in
Australia: Electrolux goods come
with guarantees that cannot be
excluded under the Australian
Consumer Law. You are entitled to a
Page 26
ENGLISH
25
replacement or refund for a major
failure and for compensation for any
other reasonably foreseeable loss or
damage. You are also entitled to
have the Appliance repaired or
replaced if the Appliance fails to be
of acceptable quality and the failure
does not amount to a major failure.
‘Acceptable quality’ and ‘major
failure’ have the same meaning as
referred to in the ACL.
10. New Zealand: For Appliances and
services provided by Electrolux in
pursuant to the provisions of the
Consumer Guarantees Act, the Sale
of Goods Act and the Fair Trading
Act. Where the Appliance was
purchased in New Zealand for
commercial purposes the Consumer
Guarantee Act does not apply.
11. Confidentiality: You accept that if
you make a warranty claim, Electrolux
and its agents including ASC may
exchange information in relation to
you to enable Electrolux to meet its
obligations under this warranty.
New Zealand, the Appliances come
with a guarantee by Electrolux
Important Notice
Before calling for service, please ensure that the steps listed in clause 8 above have been
followed.
SERVICE AUSTRALIA
aeg.com/au
FOR SERVICE
or to find the address of your nearest au-
thorised service centre in Australia
PLEASE CALL 1300 363 664
OR EMAIL
For the cost of a local call (Australia only)
or to find the address of your nearest spare
FOR SPARE PARTS
parts centre in Australia
PLEASE CALL 13 13 50
OR EMAIL
For the cost of a local call (Australia only)
SERVICE NEW ZEALAND
aegnewzealand.co.nz
FOR SERVICE
or to find the address of your nearest au-
thorised service centre in New Zealand
PLEASE CALL 0800 234 234
OR EMAIL
(New Zealand only)
or to find the address of your nearest spare
AEG_Warr_May_17
14. ENVIRONMENTAL CONCERNS
Recycle materials with the symbol .
Put the packaging in relevant containers
to recycle it. Help protect the
environment and human health by
recycling waste of electrical and
electronic appliances. Do not dispose of
appliances marked with the symbol
with the household waste. Return the
product to your local recycling facility or
contact your municipal office.
*
FOR SPARE PARTS
parts centre in New Zealand
PLEASE CALL 0800 10 66 20
OR EMAIL
(New Zealand only)
Page 27

www.aeg.com26
Page 28

ENGLISH 27
Page 29
www.aeg.com/au
867350543-B-052019
 Loading...