

AEG F88070VIL User Manual
FAVORIT 88070 VIL
Dishwasher
Instruction book
PERFEKT IN FORM UND FUNKTION
152954 73/0en 24-08-2005 8:45 Pagina 1
2
Dear customer,
Please read this User Information carefully and keep it to refer to at a
later date.
Pass it on to any subsequent owner of the appliance.
The following symbols are used in the text:
Safety instructions
Warning! Notes that concern your personal safety.
Attention! Notes that show how to avoid damage to the appliance.
Useful tips and hints
Environmental information
Your dishwasher has the new washing system ”IMPULSE WASHING”.
With this dishwashing system the motor speed and spray pressure
are varied during the wash cycle to achieve better cleaning of the
dishes. It is for this reason that the noise level varies during the
dishwashing cycle.
152954 73/0en 24-08-2005 8:45 Pagina 2

CONTENTS
Operating instructions 4
Safety instructions 4
Disposal 6
Economical and ecological dishwashing 6
Description of the appliance 7
The control panel 8
First use 12
Prior to using for the first time 13
The water softener 13
Filling with dishwasher salt 15
Rinse aid 16
In daily use 18
Loading cutlery and dishes 18
The lower basket 20
Racks for beer glasses 21
The cutlery basket 22
The upper basket 23
Adjusting the height of the upper basket 25
Use of detergent 26
Different kinds of detergent 27
Washing programmes 29
Starting a washing programme 31
Maintenance and cleaning 34
Cleaning the filters 34
What to do, when... 37
Service 40
Technical specifications 41
Installation instructions 42
Building-in 42
Levelling 42
Fixing to the adjacent units 42
Water supply connections 43
Water inlet hose with safety valve 44
Water outlet hose connection 45
Electrical connection 46
Hints for test centres 47
Contents
3
152954 73/0en 24-08-2005 8:45 Pagina 3

OPERATING INSTRUCTIONS
Safety instructions
The safety of AEG electrical appliances conforms to accepted rules of
technology and the Appliance Safety Act. We as manufacturers,
however, see ourselves as being obliged to familiarise you with the
following safety instructions.
It is most important that this instruction book should be retained
with the appliance for future reference. Should the appliance be
sold or transferred to another owner, or should you move house
and leave the appliance, always ensure that the book is left with
the appliance in order that the new owner can get to know the
functioning of the appliance and the relevant safety information.
This information has been provided in the interest of your safety.
You MUST read it carefully before installing or using the
appliance.
Installation
● Check your dishwasher for any transport damage. Never connect a
damaged machine. If your dishwasher is damaged, you should
contact your supplier.
● For safety reasons it is dangerous to alter the specifications or
attempt to modify this product in any way.
● Any electrical and plumbing work required to install this appliance
should be carried out by a qualified and competent person.
● Care must be taken to ensure that the appliance does not stand on
the electrical supply cable.
● The sides of the dishwasher must never be drilled to prevent
damage to hydraulic components.
Child safety
● This appliance is designed to be operated by adults.
● Children should not be allowed to tamper with the controls or play
with the product.
● Packaging parts may be dangerous for children, who could even be
suffocated! You should therefore keep all packaging well away
from children.
Operating instructions
4
152954 73/0en 24-08-2005 8:45 Pagina 4

● The water in your dishwasher is not for drinking. Detergent residues
may still be present in your machine. Keep children well away from
your dishwasher when the door is open.
● Keep all detergents in a safe place out of children’s reach.
Your dishwasher in day-to-day use
● Items that are contaminated by petrol, paint, steel or iron debris,
corrosive, acidic or alkaline chemicals must not be washed in this
dishwasher.
● Under no circumstances should you open the door whilst the
appliance is in operation, especially during the washing phase, hot
water may escape. However, if the door is opened, a safety device
ensures that the machine stops.
● Only use products (detergent, salt and rinse aid) specifically
designed for use in dishwashers.
● Long bladed knives stored in an upright position are a potential
hazard.
● Long and/or sharp items of cutlery such as carving knives must be
positioned horizontally in the upper basket.
● Ensure that the door of the dishwasher is always closed when it is
not being loaded or unloaded. In this way you will avoid anybody
tripping over the open door and hurting themeselves.
● When finishing loading or unloading close the door, as an open
door can be a hazard.
● Do not sit or stand on the open door.
● Isolate the appliance from the power supply and turn off the water
supply after use.
● This product should be serviced by an authorised service engineer,
and only genuine spare parts should be used.
● Under no circumstances should you attempt to repair the machine
yourself. Repairs carried out by inexperienced persons may cause
injury or serious malfunctioning. Contact your local Service Force
Centre. Always insist on genuine spare parts.
Operating instructions
5
152954 73/0en 24-08-2005 8:45 Pagina 5
Disposal
Dispose of the dishwasher packaging material correctly.
All packaging materials can be recycled.
Plastic parts are marked with standard international abbreviations:
>PE< for polyethylene, e.g. sheet wrapping material.
>PS< for polystyrene, e.g. padding material (always CFC-free).
>POM< for polyoxymethylene, e.g. plastic clips.
Cardboard packaging is manufactured from recycled paper and should
be deposited in the waste paper collection for recycling.
As and when you cease to use your dishwasher and withdraw it from
service, your should render it unserviceable before having it disposed of.
Warning! Children at play could lock themselves in your dishwasher or
otherwise endanger their lives. Therefore cut off the power supply
cable and make the door closing device unusable to prevent children
from being trapped inside.
For the disposing of the appliance please take it to a recycling centre
or to your dealer who may, for a small contribution to the costs,
dispose it for you.
The symbol on the product or on its packaging indicates that this
product may not be treated as household waste. Instead it shall be
handed over to the applicable collection point for the recycling of
electrical and electronic equipment. By ensuring this product is
disposed of correctly, you will help prevent potential negative
consequences for the environment and human health, which could
otherwise be caused by inappropriate waste handling of this product.
For more detailed information about recycling of this product, please
contact your local city office, your household waste disposal service or
the shop where you purchased the product.
Economical and ecological dishwashing
● Ensure that the water softener is correctly adjusted.
● Do not pre-wash under running water.
● Select the wash programme to suit the nature and degree of the
soiling on the dishes.
● Do not use more detergent, special salt and rinse aid than is
recommended in these operating instructions and by the
manufacturer of the respective product.
Operating instructions
6
152954 73/0en 24-08-2005 8:45 Pagina 6
Operating instructions
7
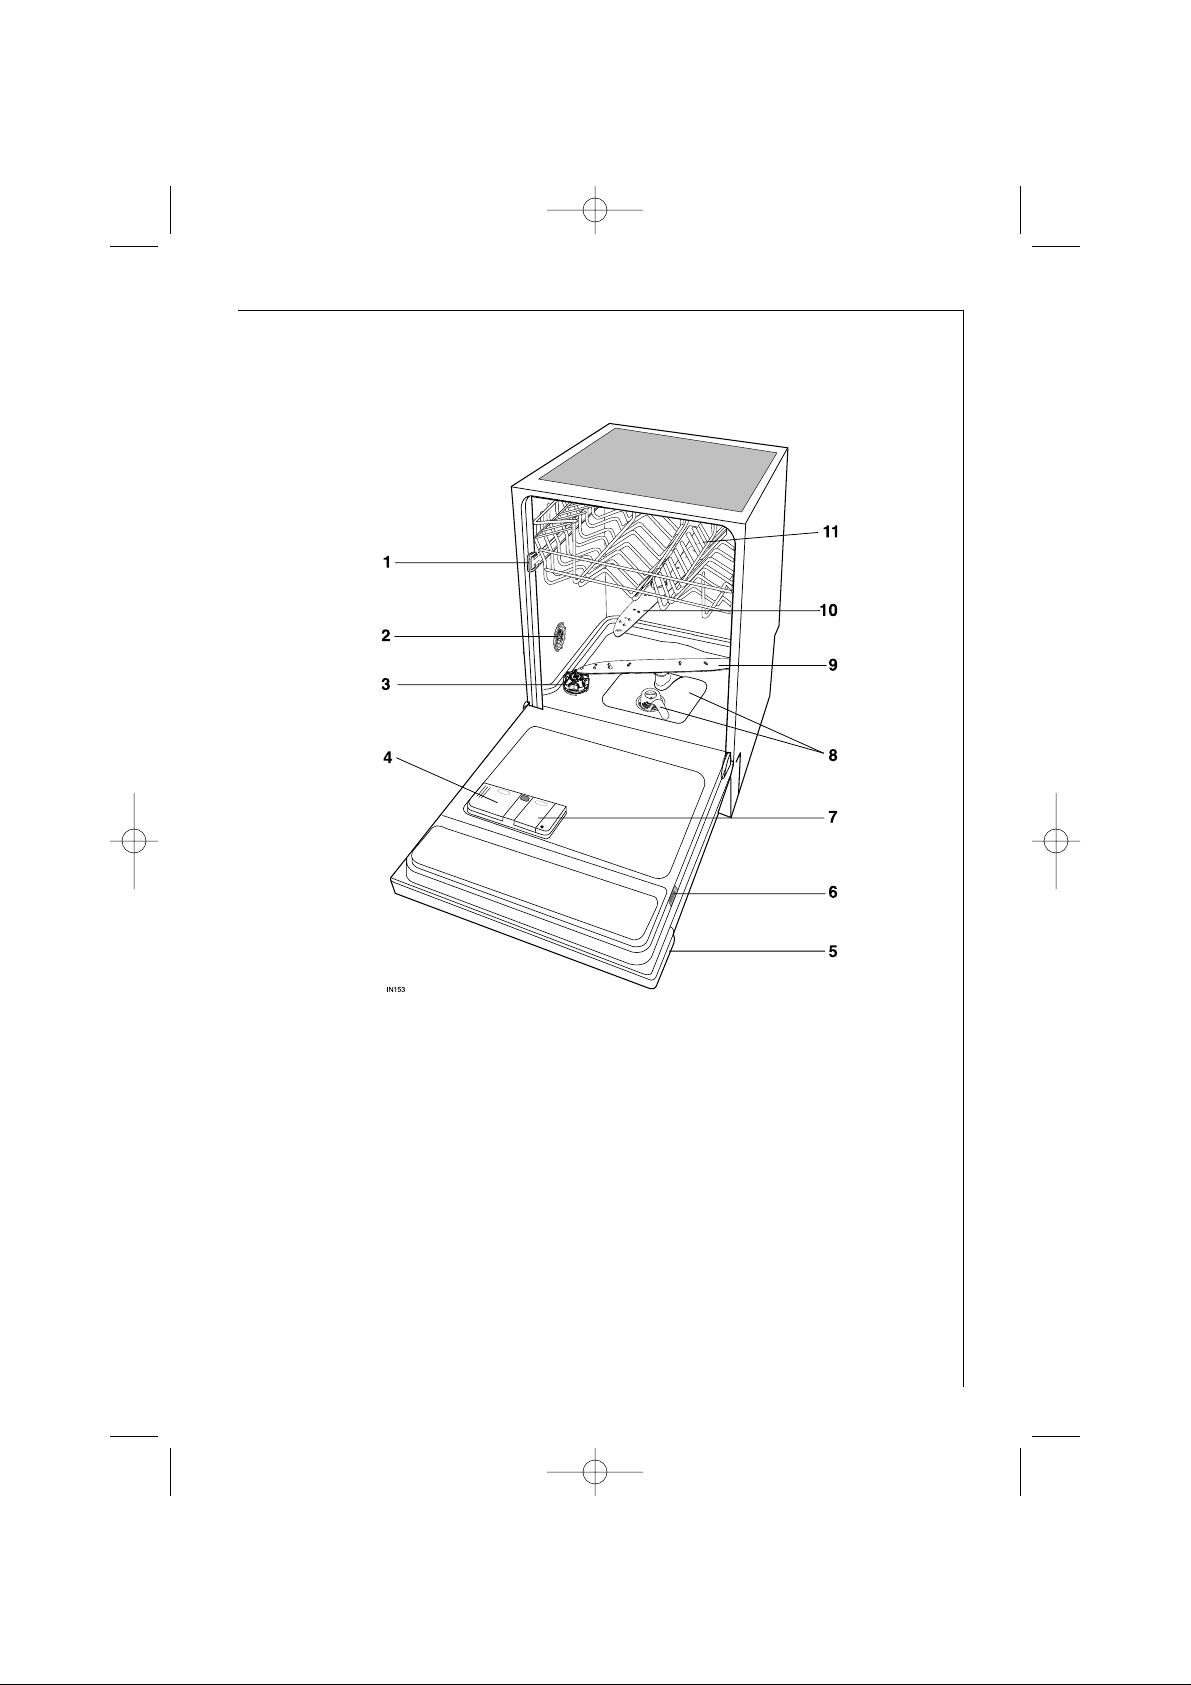
Description of the appliance
1. Upper basket stop
2. Water hardness dial
3. Salt container
4. Detergent dispenser
5. Control panel
6. Rating plate
7. Rinse aid dispenser
8. Filters
9. Lower spray arm
10. Upper spray arm
11. Upper basket
NOTE: this dishwasher has an
internal light that turns on and off
when the opening and closing of the
dishwasher’s door occurs.
In case that this light has to be
replaced, please contact your local
Service Force Centre.
152954 73/0en 24-08-2005 8:45 Pagina 7
Operating instructions
8
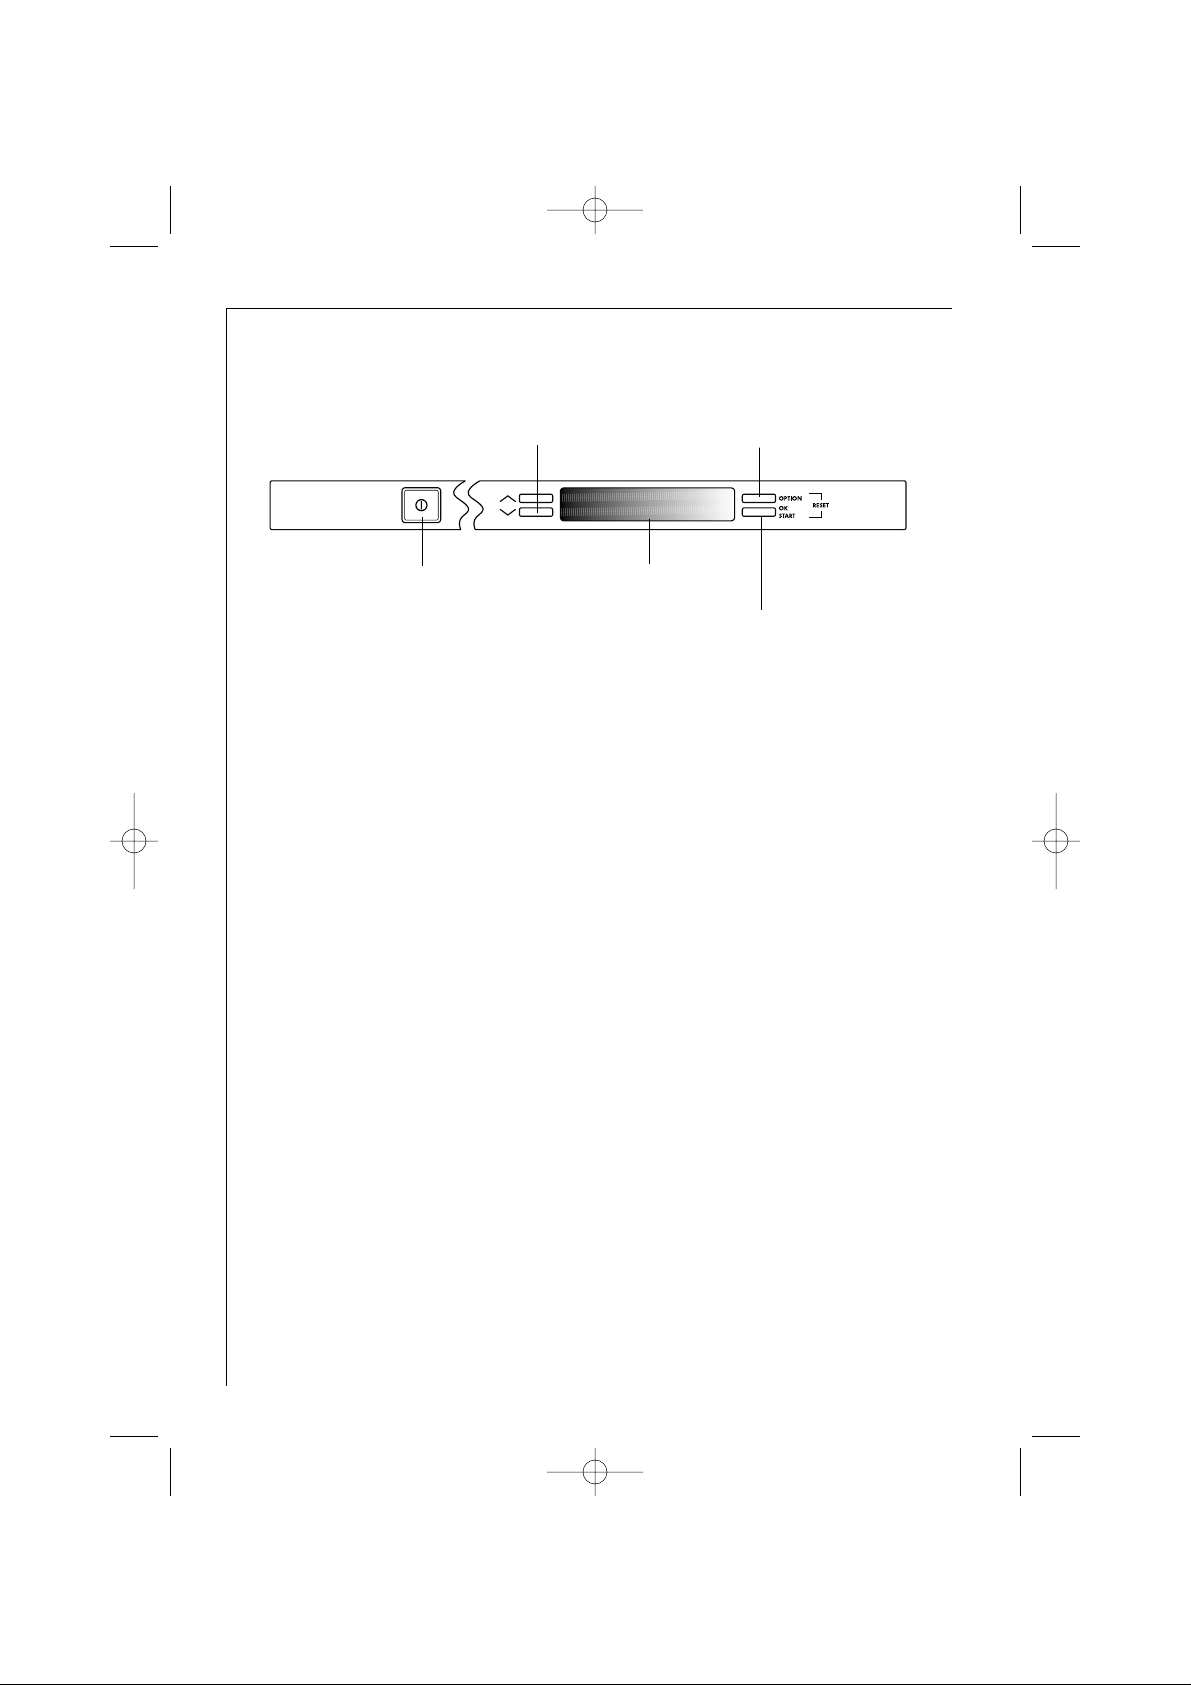
“Direction” buttons: these 2 buttons have a double function:
- selecting within the Programmes menu
- selecting within the Options menu and the submenu.
“Ok start“ button: is necessary for:
- confirm / memorise any option,
- start a washing programme.
NOTE: the ok start and option selection buttons, if pressed
simultaneously have the RESET function.
This function allows to:
- cancel a washing programme in progress
It is also possible to return to the factory setting for the following
options:
LANGUAGE (factory setting: english).
BRIGHTNESS (factory setting: level 10).
In setting mode press for about 6 seconds these two buttons
simultaneously.
On/Off button
DIRECTION buttons
OK START button
OPTION selection button
The control panel
Display
152954 73/0en 24-08-2005 8:45 Pagina 8

Operating instructions
9
Option selection button: allows you to enter a menu of options
with relative submenu, press again to exit from menu.
How to set the several options:
1. Press the option selection button.
2. Press the direction buttons until the desired option is displayed:
- DELAY START
- 3 IN 1
- SETTINGS . . .
3. Press the ok start button to select the option.
4. Press the direction buttons until the selection of the desired
submenu is displayed.
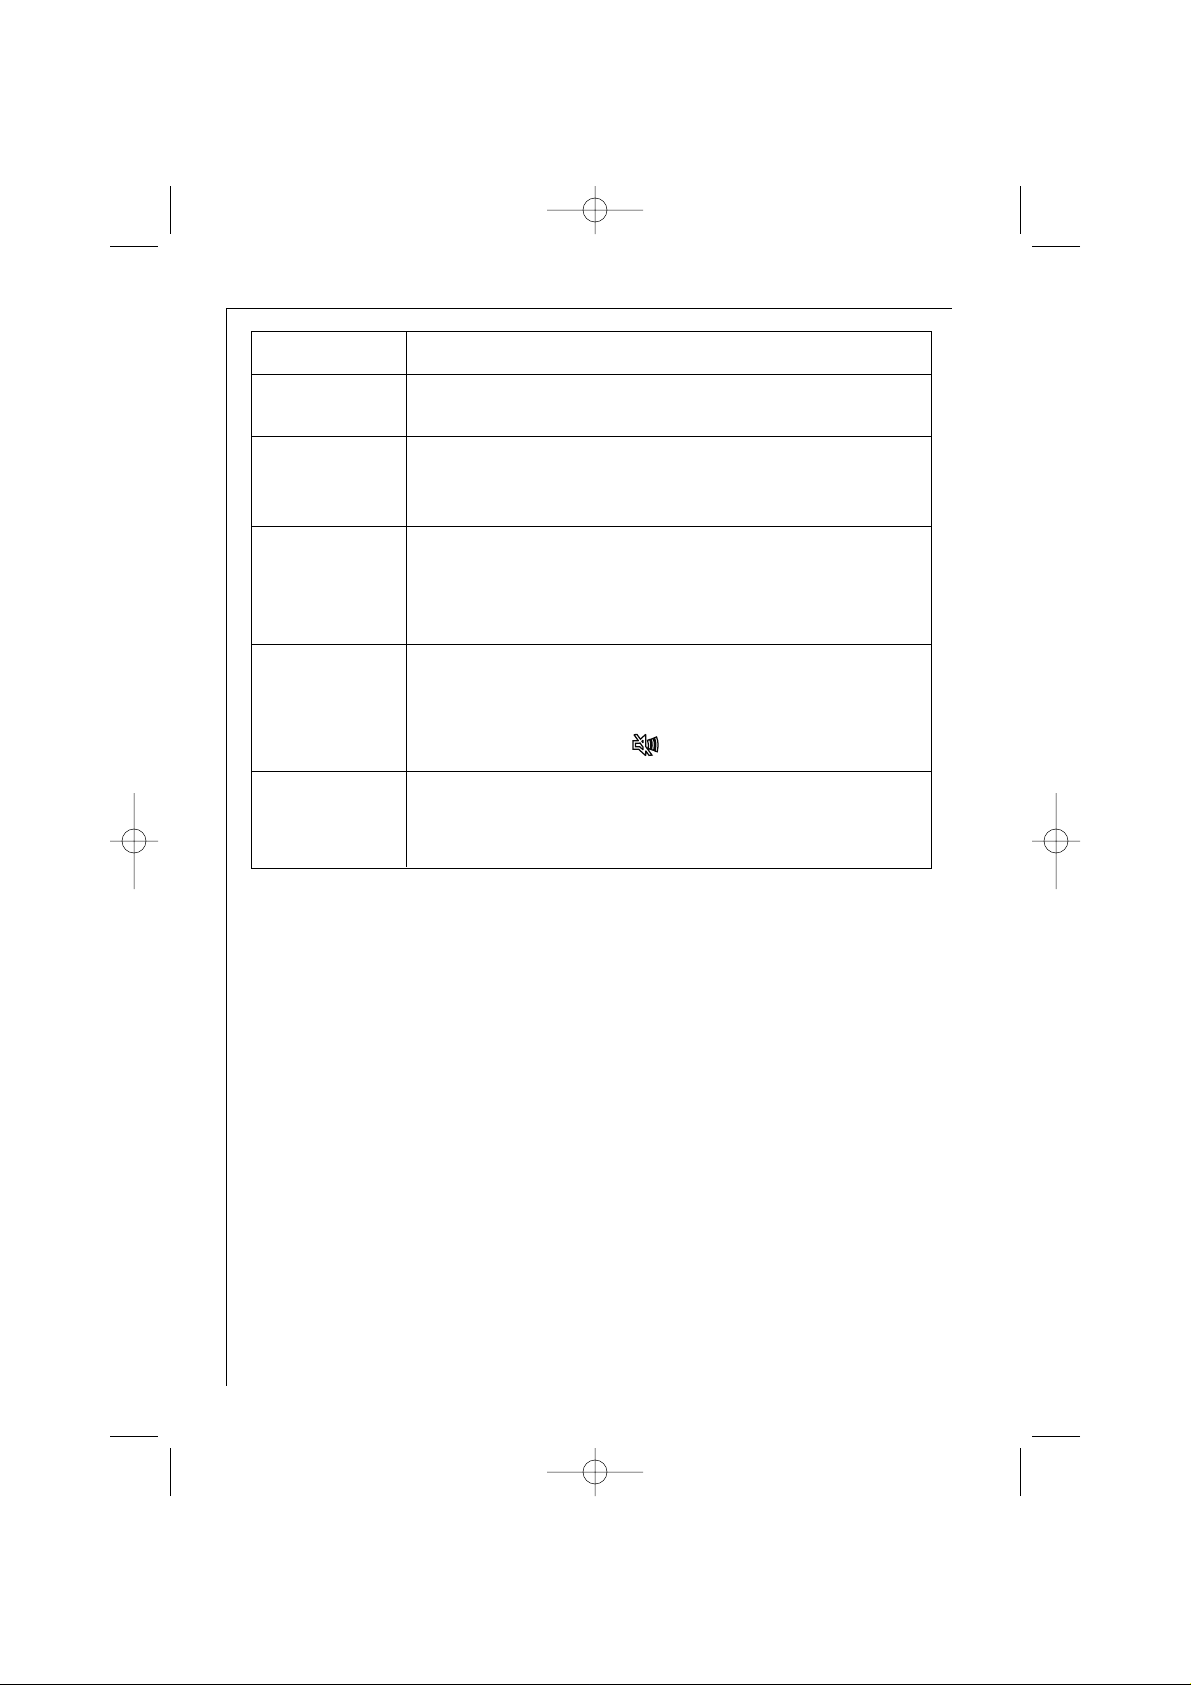
MENU SUBMENU
DELAY START Allows the start of the washing programme to be
delayed from 1 hour up to 19 hours.
3 -IN- 1 Sets the dishwasher for the use of conventional,
concentrated detergents or combi detergents (3in1).
-ON
function activated; allows the use of the 3in1 combi
detergents, which incorporate detergent, rinse aid and
salt functions.
The symbol appears in the display.
With the activation of this function, the rinse aid
dispenser and salt container are automatically
deactivated and consequently also the display
indications for the refilling of salt and rinse aid
are deactivated.
-OFF
- for conventional, alkaline detergents with caustic
components,
- for low alkaline concentrated detergents with
natural enzymes.
SETTINGS . . . allows you to enter another menu of options with
relative submenu (see following table): to set the options it is
necessary to repeat the setting from point 3.
152954 73/0en 24-08-2005 8:45 Pagina 9
10
5. Press the ok start button: the option is memorised.
6. For each option it is necessary to repeat the setting from point 2.
7. To exit from menu, press option selection button.
If a programme has been set:
- press ok start button and close the door: the programme will
start automatically.
If a programme has not been set:
- press direction buttons until is displayed the desired washing
programme
- press ok start button and close the door: the programme will
start automatically.
The options can only be set before the start of a washing
programme.
Once set, these options will remain activated for the following
cycles, until they will be deactivated, except for DELAY START
Operating instructions
MENU SUBMENU
LANGUAGE Allows you to view messages that appear in the display
in the required language. (Factory setting: english).
WATER Allows you to set electronically the water softener
HARDNESS according to the hardness of the local area water:
water hardness is measured in 10 levels.
RINSE AID Allows you to deactivate or activate the rinse aid
dosage:
-ONrinse aid dosage activated,
-OFFrinse aid dosage deactivated.
SOUND Allows you to adjust the volume of the alarm signals
VOLUME and of the end of programme signal (from 0 to 5).
Level 0 means the deactivation of the volume of all
signals and the symbol appears in the display.
BRIGHTNESS Allows you to increase or decrease the brightness of the
background of the display, 10 different levels can be
selected.
(this option can
be selected ONLY
with the 3 in 1
function active)
152954 73/0en 24-08-2005 8:45 Pagina 10
Operating instructions
11
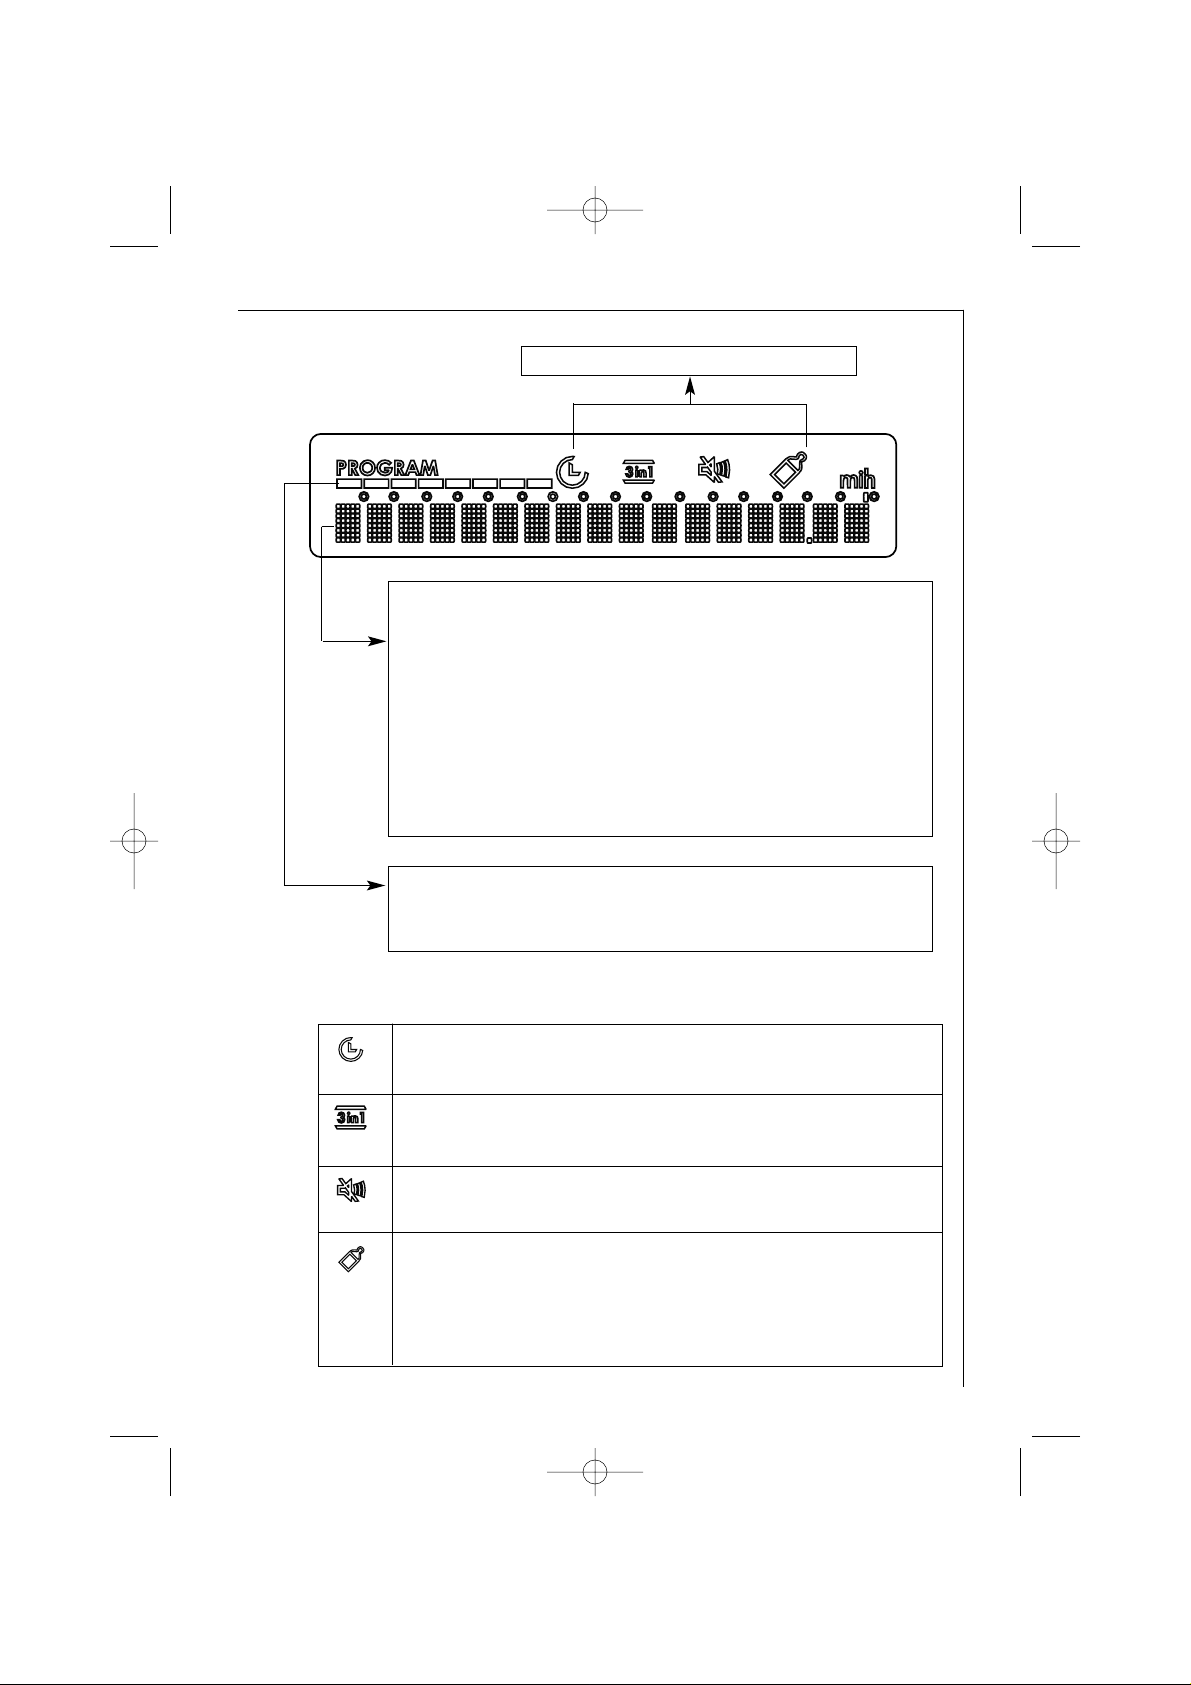
The symbols have the following meaning:
Symbols: indicate the various options.
In this row several details are displayed:
- setting mode, guide to the selection of the washing
programmes, duration time of the programme, options,
(when together with the washing programme one or more
options are set, the update of the programme duration will
occur automatically).
- Once the programme has started, indicates the sequence of
the running phases and the running time of the programme in
progress.
Washing phases: during the progress of the programme these
little bars indicate the phases of the washing programme:
prewash, main wash, rinses, drying.
Delay start: fixed in setting mode; flashing when in
progress.
3 in 1 detergent option: is illuminated when the function
for the use of 3 in 1 combi detergents is active.
Exclusion of the volume for alarm and end of programme
audible signals.
Is illuminated when the 70°C Intensive washing programme
is set. This programme makes it possible to thoroughly
disinfect dishes and glasses, such as baby bottles or jam
jars.
152954 73/0en 24-08-2005 8:45 Pagina 11

First use
The first time the dishwasher is switched on, it is possible to select a
different language in which the machine will display the messages.
The factory setting is in english therefore the message LANGUAGE
ENGLISH will appear in the display; the word ENGLISH flashes.
Press the direction buttons until the language required appears in the
display.
To confirm the selection press ok start button.
If, instead of a different language, a washing programme is
immediately set, the dishwasher will memorise the display of the
messages in English.
It will always be possible to select another language another time,
simply follow the instructions given for the setting of the options (see:
"Option selection button").
Operating instructions
12
152954 73/0en 24-08-2005 8:45 Pagina 12
Operating instructions
13
Prior to using for the first time
Before using your dishwasher for the first time:
1. Ensure that the electrical and water connections comply with the
installation instructions
2. Remove all packaging from inside the appliance
3. Set the water softener
4. Pour 1 litre of water inside the salt container and then fill with
dishwasher salt
5. Fill the rinse aid dispenser.
The water softener
The dishwasher is equipped with a water softener designed to remove
minerals and salts from the water supply, which would have a
detrimental or adverse effect on the operation of the appliance.
The higher the content of these minerals and salts, the harder your
water is.
Water hardness is measured in equivalent scales, German degrees,
French degrees and mmol/l (millimol per litre).
The softener should be adjusted according to the hardness of the water
in your area. Your local Water Authority can advise you on the
hardness of the water in your area.
The water softener must be set in both ways: manually, using the water
hardness dial and electronically, using the option selection button:
option WATER HARDNESS.
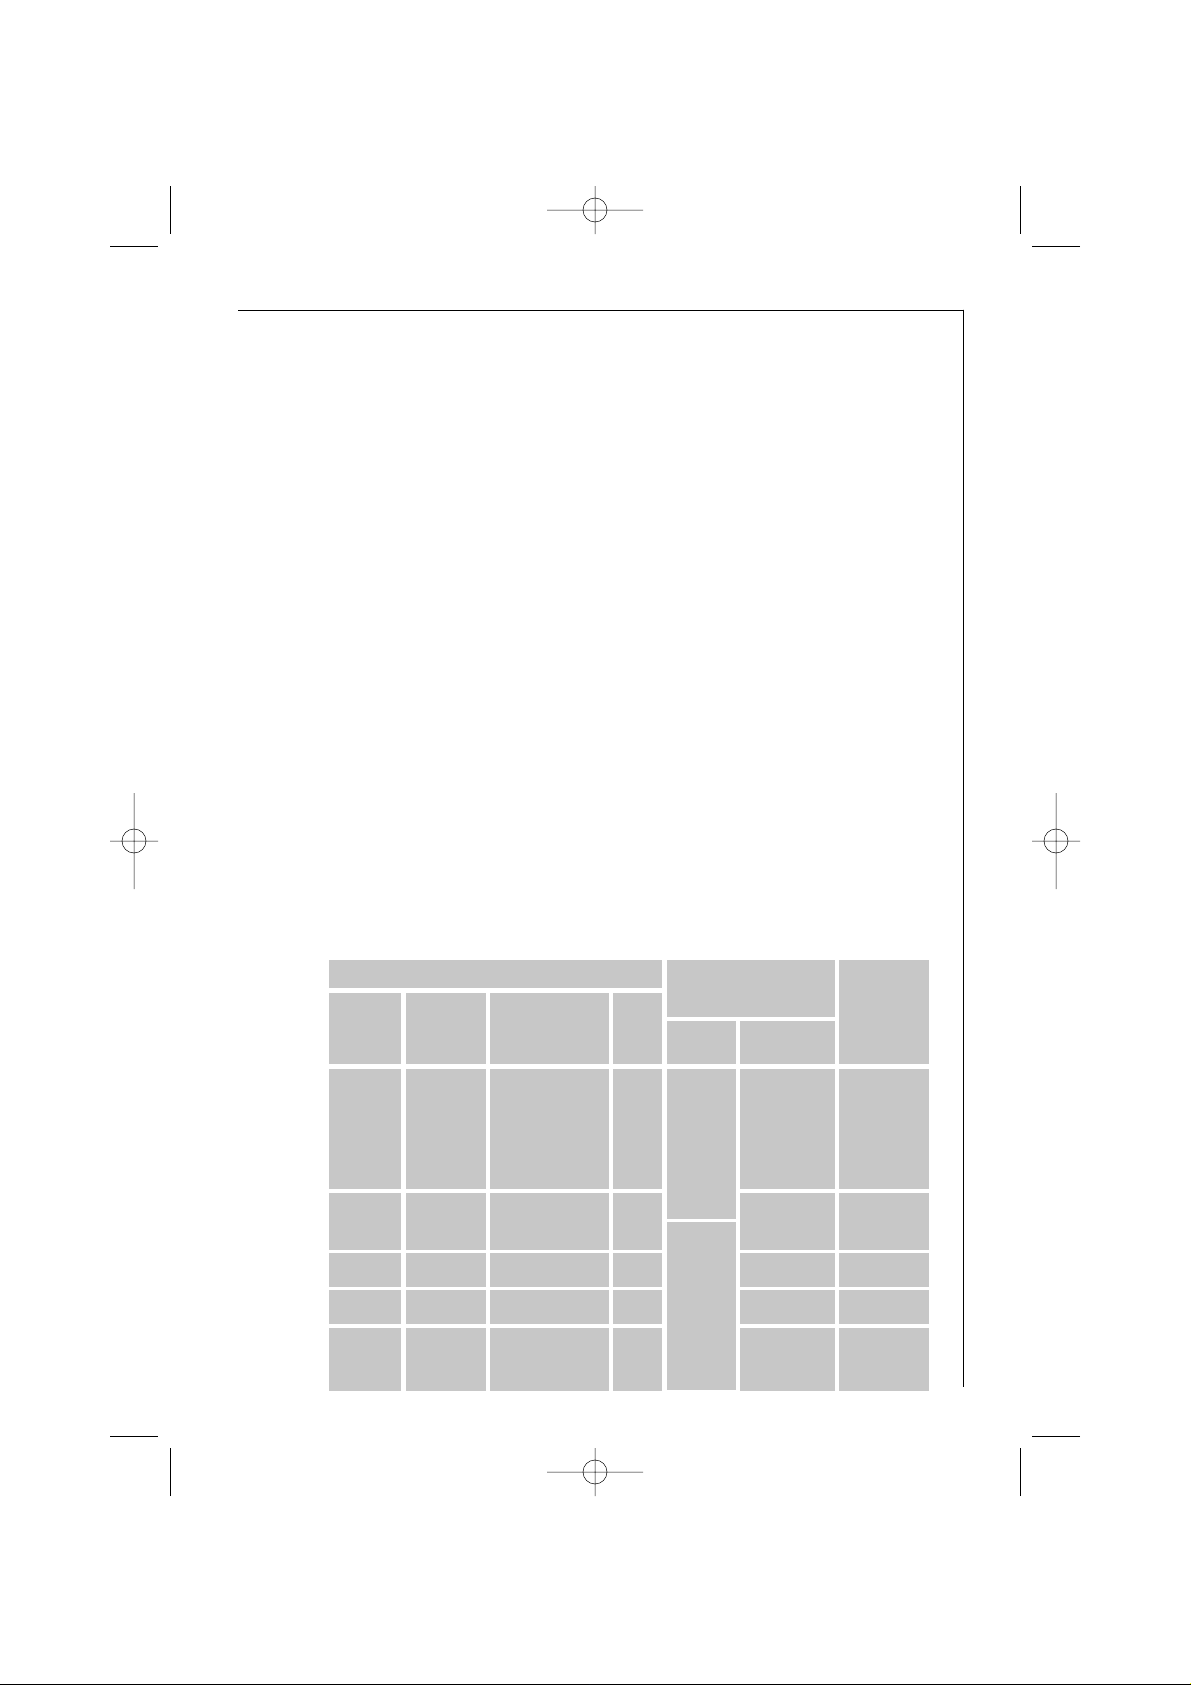
Adjusting the water
hardness setting
10
9
8
7
6
3
1
no salt
necessary
Manually
Electronically
2
1
2
Water hardness
51 - 70
43 - 50
37 - 42
29 - 36
23 - 28
9,0 - 12,5
7,6 - 8,9
6,5 - 7,5
5,1 - 6,4
4,0 - 5,0
IV
11 - 14 1,9 - 2,5 II
< 4 < 0,7 I
4 - 10 0,7 - 1,8 I/II
19 - 22
15 - 18
3,3 - 3,9
2,6 - 3,2
III
5
4
10
9
8
7
6
3
1
Level
indicated in
the digital
display
3
5
4
°dH
(german
degrees)
91 - 125
76 - 90
65 - 75
51 - 64
40 - 50
19 - 25
< 7
7 - 18
33 - 39
26 - 32
°TH
(french degrees)
mmol/l
(millimol per litre,
international unit for
the hardness of water)
Range
152954 73/0en 24-08-2005 8:45 Pagina 13
Operating instructions
14
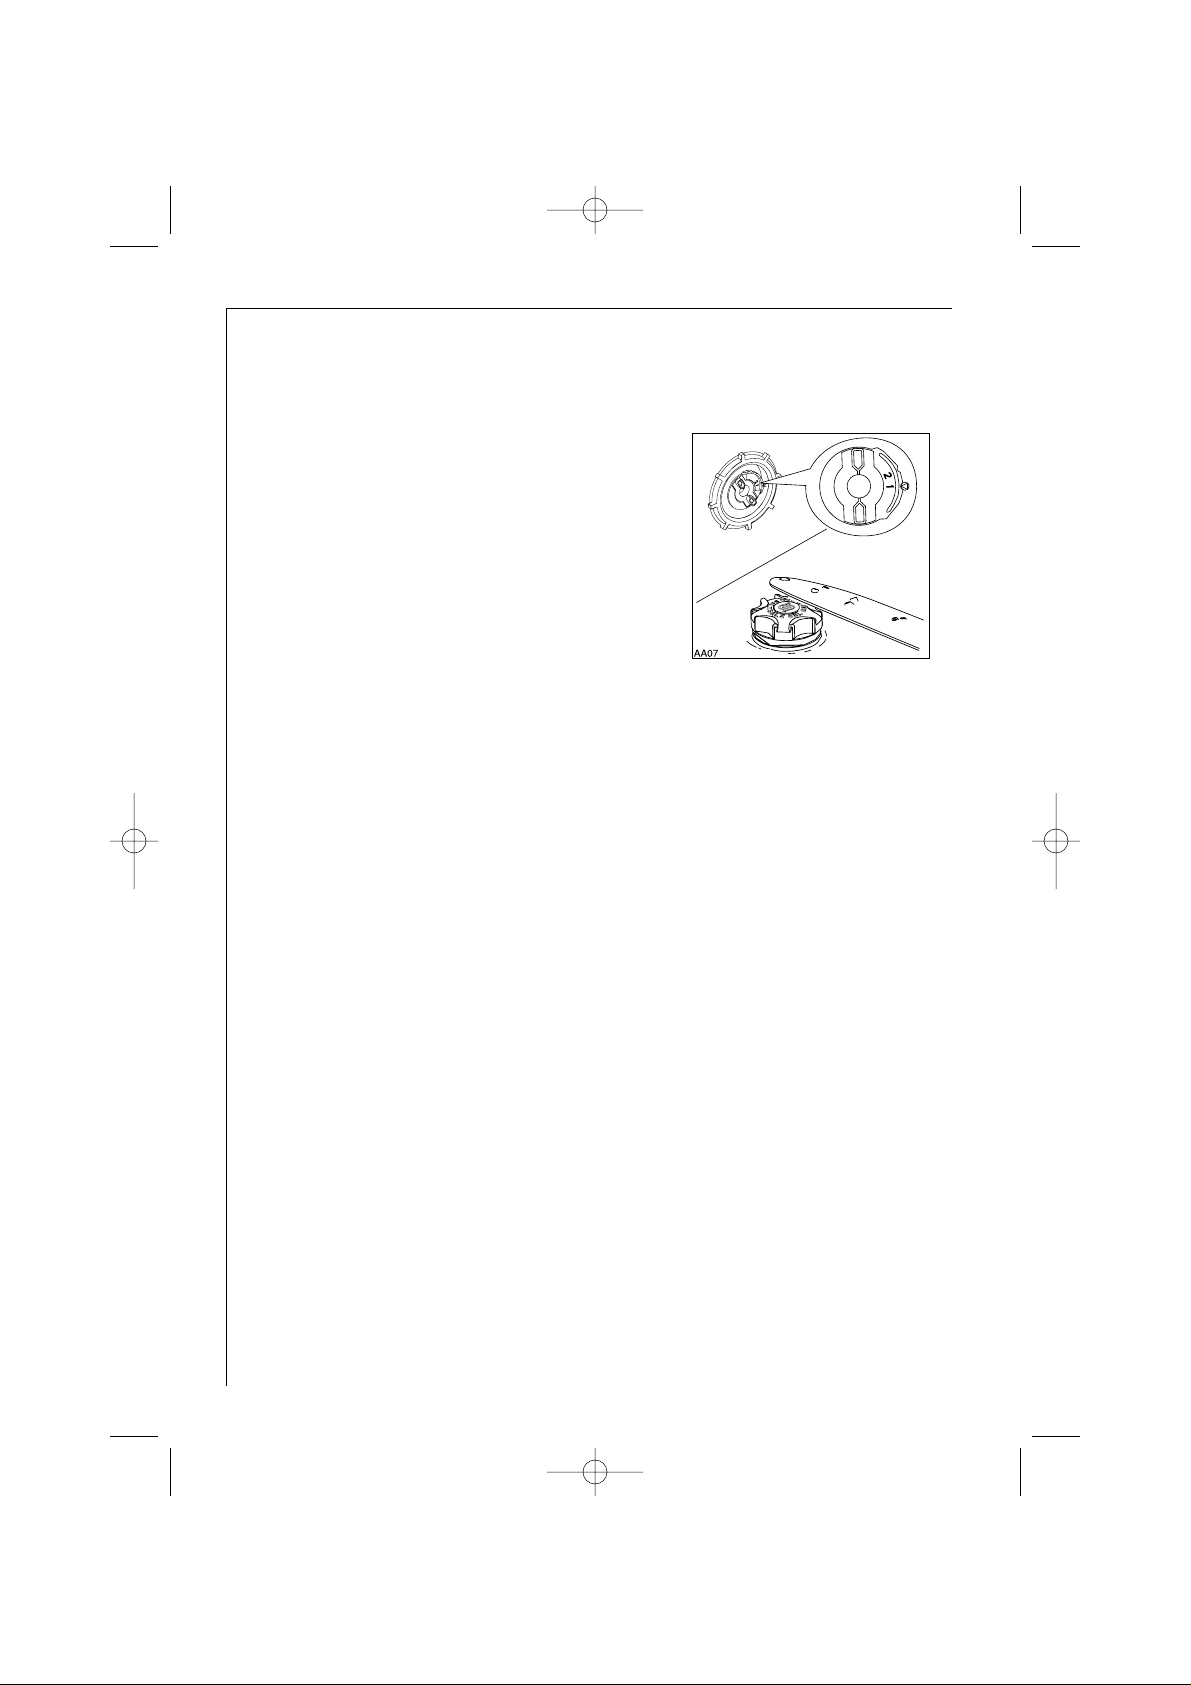
a)Setting manually
1. Open the dishwasher door.
2. Remove the lower basket from the dishwasher.
3. Turn the water hardness dial to
position 1 or 2 (see table).
4. Replace the lower basket.
The dishwasher is factory set at
position 2.
b)Setting electronically
NOTE: the electronic setting of the water softener is possible ONLY
with the 3 in 1 function deactivated.
The dishwasher is factory set al level 5.
1. Press the option selection button.
2. Press the direction buttons until SETTING . . . is displayed.
3. Press the ok start button.
4. Press the direction buttons until WATER HARDNESS is displayed.
5. Press the ok start button.
6. Press the direction buttons until the level corresponding to
hardness of the water in your area is displayed.
7. Press the ok start button to confirm the setting.
8. Press the option selection button to exit the Option menu.
152954 73/0en 24-08-2005 8:45 Pagina 14
Operating instructions
15
Filling with dishwasher salt
Only use salt specifically designed for use in dishwashers.
All other types of salt not specifically designed for use in a
dishwasher, especially table salt, will damage the water softener.
Only fill with salt just before starting one of the complete washing
programmes.
This will prevent any grains of salt or salty water, which may have
been spilt, remaining on the bottom of the machine for any period
of time, which may cause corrosion.
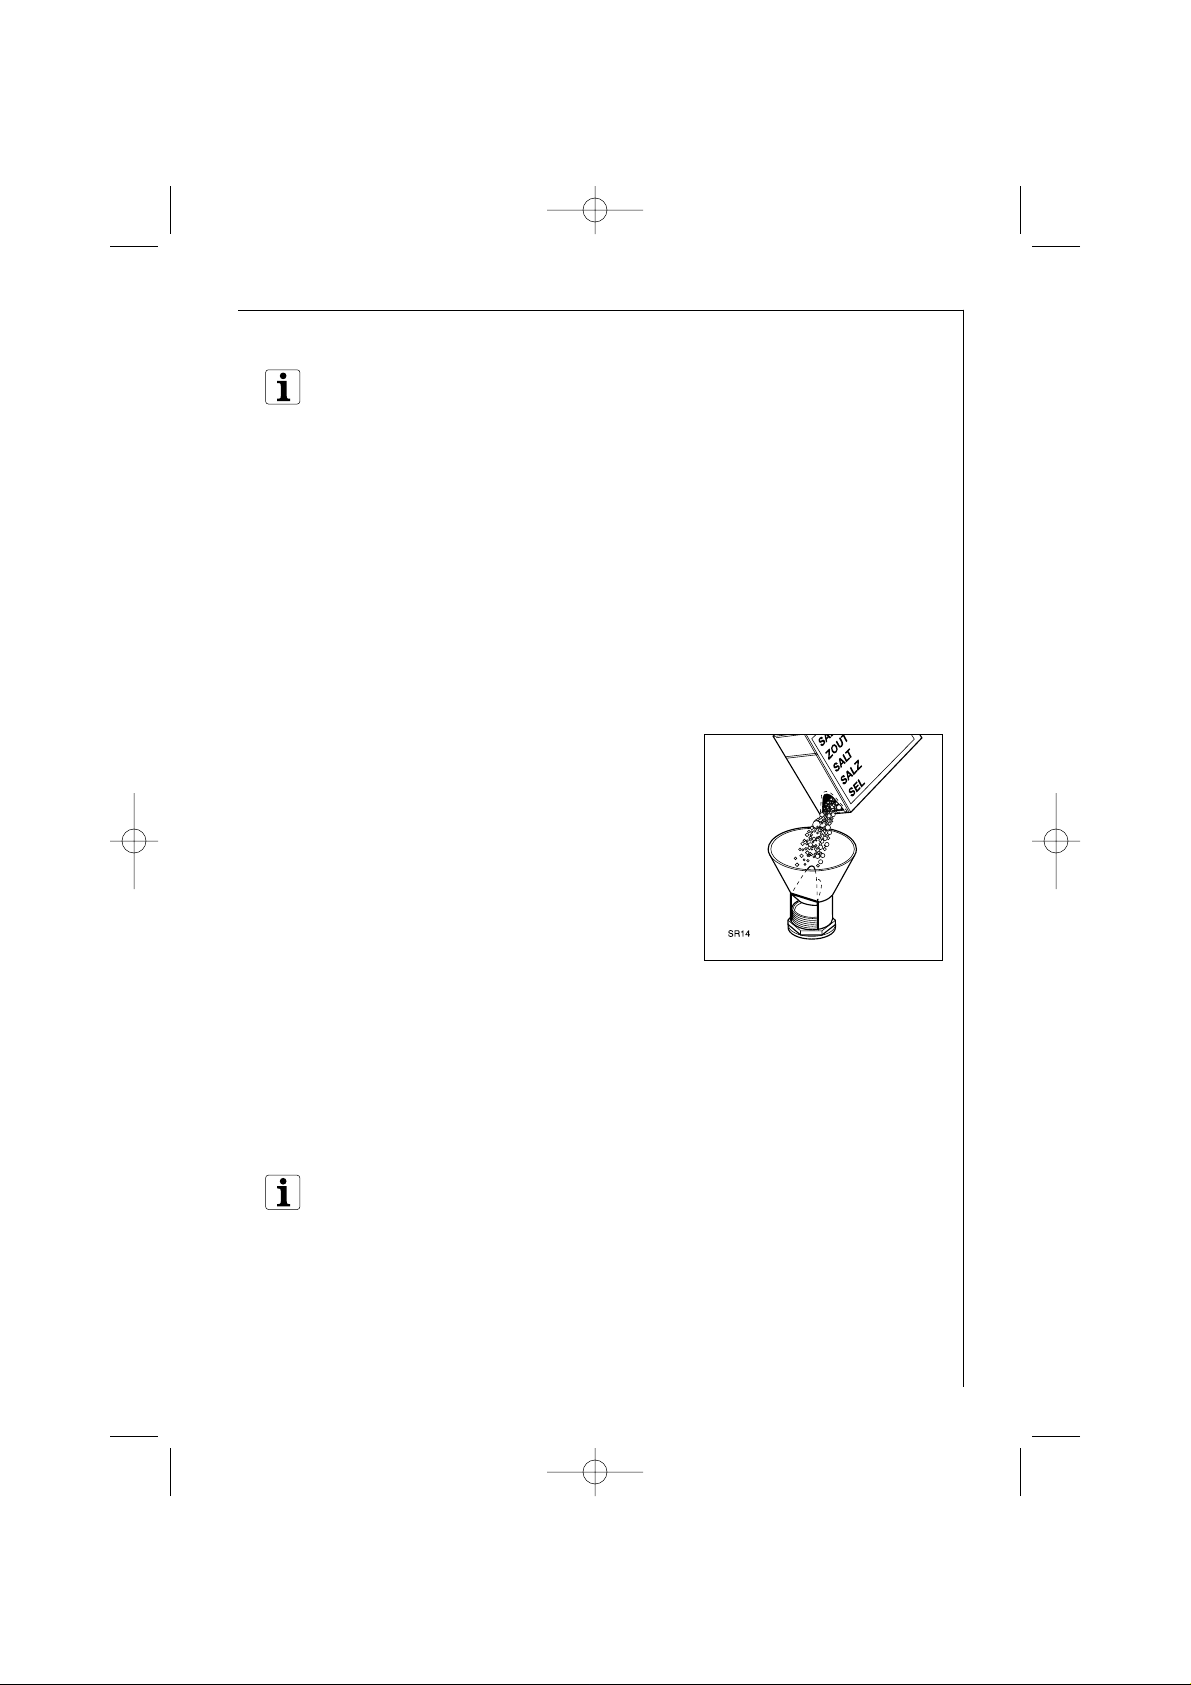
To fill:
1. Open the door, remove the lower basket and unscrew the cap of
the salt container by turning it anticlockwise.
2. Pour 1 litre of water inside the container (this is necessary only
before filling with salt for the first time).
3. Using the funnel provided, pour in the
salt until the container is full.
4. Replace the cap making sure that
there is no trace of salt on the screw
thread or on the gasket.
5. Replace on the cap tightly turning it
clockwise until it stops with a click.
The salt container will require topping up periodically.
The salt refilling is indicated by a flashing message in the display
REFILL SALT.
This occurs only during the setting mode and at the end of the
washing programme, during the progress of the washing programme
the indication for salt refilling is not active.
The salt refilling indication can remain active from 2 to 6 hours
after the salt has been replenished, assuming the dishwasher
remains switched on. If you are using salts that take longer to
dissolve then this can take longer. The function of the machine is
not affected.
Do not worry if water over flows from the unit when filling with salt,
this is quite normal.
152954 73/0en 24-08-2005 8:45 Pagina 15
 Loading...