

AEG ESI6230W, ESI6230B User Manual
D i s h w a s h e r
User information
ESI 6230
822 612 774-00-130705-01 |
g |
Dear customer,
Please read this User Information carefully and keep it to refer to at a later date.
Pass this User Information on to any subsequent owner of the appliance.
The following symbols are used in the text:
1
3
Safety instructions
Warning: Notes that concern your personal safety.
Attention: Notes that show how to avoid damage to the appliance.
Useful tips and hints
2 Environmental information
2
Contents |
|
Operating Instructions . . . . . . . . . . . . . . . . . . . . . . . . . . . . . . . . . . . . . . . . . . . . . . . . . . . . . . . . . . . . . |
4 |
Safety . . . . . . . . . . . . . . . . . . . . . . . . . . . . . . . . . . . . . . . . . . . . . . . . . . . . . . . . . . . . . . . . . . . . . . . . . . . . . . . |
4 |
Diagram of appliance . . . . . . . . . . . . . . . . . . . . . . . . . . . . . . . . . . . . . . . . . . . . . . . . . . . . . . . . . . . . . . . . . . |
5 |
Control panel . . . . . . . . . . . . . . . . . . . . . . . . . . . . . . . . . . . . . . . . . . . . . . . . . . . . . . . . . . . . . . . . . . . . . . . . . |
5 |
Prior to using for the first time. . . . . . . . . . . . . . . . . . . . . . . . . . . . . . . . . . . . . . . . . . . . . . . . . . . . . . . . . . . |
7 |
Setting the water softener. . . . . . . . . . . . . . . . . . . . . . . . . . . . . . . . . . . . . . . . . . . . . . . . . . . . . . . . . . . . . . . . |
7 |
Adding special salt . . . . . . . . . . . . . . . . . . . . . . . . . . . . . . . . . . . . . . . . . . . . . . . . . . . . . . . . . . . . . . . . . . . . . |
9 |
Filling up with rinse aid . . . . . . . . . . . . . . . . . . . . . . . . . . . . . . . . . . . . . . . . . . . . . . . . . . . . . . . . . . . . . . . . . . |
10 |
In daily use. . . . . . . . . . . . . . . . . . . . . . . . . . . . . . . . . . . . . . . . . . . . . . . . . . . . . . . . . . . . . . . . . . . . . . . . . . . |
13 |
Loading cutlery and dishes. . . . . . . . . . . . . . . . . . . . . . . . . . . . . . . . . . . . . . . . . . . . . . . . . . . . . . . . . . . . . . . |
13 |
Adjusting the height of the upper basket . . . . . . . . . . . . . . . . . . . . . . . . . . . . . . . . . . . . . . . . . . . . . . . . . . . . |
16 |
Adding detergent . . . . . . . . . . . . . . . . . . . . . . . . . . . . . . . . . . . . . . . . . . . . . . . . . . . . . . . . . . . . . . . . . . . . . . |
17 |
Using 3in1 detergents . . . . . . . . . . . . . . . . . . . . . . . . . . . . . . . . . . . . . . . . . . . . . . . . . . . . . . . . . . . . . . . . . . . |
19 |
Selecting the dishwashing cycle (Cycle Table) . . . . . . . . . . . . . . . . . . . . . . . . . . . . . . . . . . . . . . . . . . . . . . . . |
20 |
Starting a dishwashing cycle . . . . . . . . . . . . . . . . . . . . . . . . . . . . . . . . . . . . . . . . . . . . . . . . . . . . . . . . . . . . . |
22 |
Setting the Delay Timer. . . . . . . . . . . . . . . . . . . . . . . . . . . . . . . . . . . . . . . . . . . . . . . . . . . . . . . . . . . . . . . . . . |
22 |
Switching off the dishwasher . . . . . . . . . . . . . . . . . . . . . . . . . . . . . . . . . . . . . . . . . . . . . . . . . . . . . . . . . . . . . |
22 |
Care and cleaning . . . . . . . . . . . . . . . . . . . . . . . . . . . . . . . . . . . . . . . . . . . . . . . . . . . . . . . . . . . . . . . . . . . . . |
23 |
What to do if... . . . . . . . . . . . . . . . . . . . . . . . . . . . . . . . . . . . . . . . . . . . . . . . . . . . . . . . . . . . . . . . . . . . . . . . . |
26 |
Remedying small malfunctions . . . . . . . . . . . . . . . . . . . . . . . . . . . . . . . . . . . . . . . . . . . . . . . . . . . . . . . . . . . . |
26 |
If the dishwashing results are not satisfactory . . . . . . . . . . . . . . . . . . . . . . . . . . . . . . . . . . . . . . . . . . . . . . . . |
28 |
Disposal . . . . . . . . . . . . . . . . . . . . . . . . . . . . . . . . . . . . . . . . . . . . . . . . . . . . . . . . . . . . . . . . . . . . . . . . . . . . . |
29 |
Technical data . . . . . . . . . . . . . . . . . . . . . . . . . . . . . . . . . . . . . . . . . . . . . . . . . . . . . . . . . . . . . . . . . . . . . . . . |
30 |
Notes for Test Institutes . . . . . . . . . . . . . . . . . . . . . . . . . . . . . . . . . . . . . . . . . . . . . . . . . . . . . . . . . . . . . . . . |
31 |
Installation and connection instructions. . . . . . . . . . . . . . . . . . . . . . . . . . . . . . . . . . . . . . . . . . . . |
32 |
Safety information for the installation. . . . . . . . . . . . . . . . . . . . . . . . . . . . . . . . . . . . . . . . . . . . . . . . . . . . . |
32 |
Installing the dishwasher . . . . . . . . . . . . . . . . . . . . . . . . . . . . . . . . . . . . . . . . . . . . . . . . . . . . . . . . . . . . . . . |
33 |
Connecting the dishwasher . . . . . . . . . . . . . . . . . . . . . . . . . . . . . . . . . . . . . . . . . . . . . . . . . . . . . . . . . . . . . |
34 |
Service. . . . . . . . . . . . . . . . . . . . . . . . . . . . . . . . . . . . . . . . . . . . . . . . . . . . . . . . . . . . . . . . . . . . . . . . . . . . . |
39 |
3
Operating Instructions
1Safety
Prior to using for the first time
•Follow the ”Instructions for installation and connection”.
Correct use
•The dishwasher is only intended for washing domestic dishes.
•Additions or modifications to the dishwasher are not permitted.
•Use only special salt, detergent and rinse aid suitable for domestic dishwashers.
•Do not put any solvents in the dishwasher. This could cause an explosion.
Child safety
•Keep packaging away from children. There is a risk of suffocation.
•Children often do not recognise the hazards associated with electrical appliances. Don’t allow children to use the dishwasher unsupervised.
•Make sure that children and pets don’t climb into the dishwasher. Could endanger life!
•Dishwasher detergents can cause chemical burns to the eyes, mouth and throat. Could endanger life! Comply with the safety instructions of the dishwasher detergent manufacturer.
•The water in the dishwasher is not for drinking. Risk of chemical burns.
General safety
•Repairs to the dishwasher are only to be carried out by qualified service engineers.
•When the dishwasher is not being used, switch it off and shut off the water tap.
•Never unplug the appliance by pulling on the cable. Always pull the plug.
•Ensure that the door of the dishwasher is always closed when it is not being loaded or unloaded. In this way you will avoid anybody tripping over the open door and hurting themselves.
•Never sit or stand on the open door.
•If the dishwasher is located in a room where there may be a frost, remove the connection hose from the tap after each use of the dishwasher.
4

Diagram of appliance
Top Spray Nozzle
Upper basket spray arm and floor spray arm
Water hardness dial
Dispenser
for special salt
Dispenser for detergent
Dispenser for rinse aid
Rating plate
Filters
Control panel
ON/OFF button
The ON/OFF button is used to turn the dishwasher on and off.
5
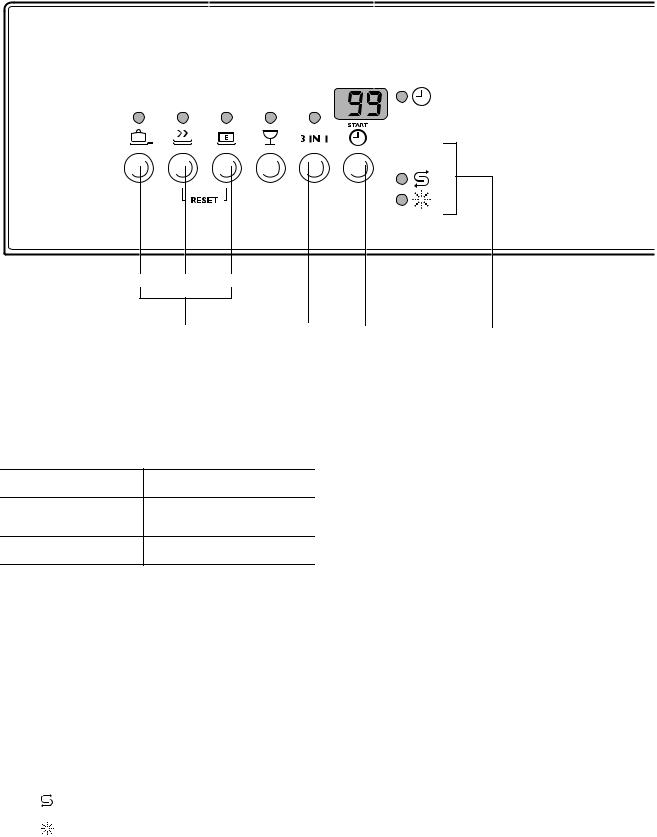
Programme buttons |
Multi-display |
||
|
|
|
|
|
|
|
|
|
|
|
|
|
|
|
|
1 2 3
|
Select |
Function buttons |
3 in1 function |
The Programme buttons are used to select the desired dishwashing cycle.
Function buttons: In addition to the pre-set dishwashing cycle, the following functions can also be set using these buttons:
Function button 1 |
Set the water softener |
Function button 2
Activates/deactivates rinse aid inflow when 3in1 on
Function button 3 |
- not programmed - |
The multi-display can indicate:
–the level of hardness to which the water softener is set.
–whether the rinse aid inflow has been activated/deactivated.
–the start delay that has been set.
–the estimated time remaining for the current dishwashing cycle.
–what type of error has occurred with the dishwasher.
The control indicators have the following meanings:
1) |
Refill with special salt |
|
|
1) |
Refill with rinse aid |
|
|
1)These control indicators are never illuminated while a dishwashing cycle is running.
6
Set |
Control |
delay timer |
indicators |
Prior to using for the first time
3If you wish to use 3 in 1 detergent:
–First read the section “Using 3in1 detergents”.
–Do not fill up with special salt or rinse aid.
If you do not use 3in1 detergent, before using for the first time
1.Set the water softener
2.Fill up with special salt for water softeners
3.Fill up with rinse aid
Setting the water softener
The water softener must be set manually and electronically:
3To avoid scale deposits on the dishes and in the dishwasher, the dishes must be washed with soft water, i.e. water with a low lime content. The water softener must be set according to the table to the water hardness in the area where you live. Your local water company will be able to give you information about the water hardness in your area.
The dishwasher must be switched off.
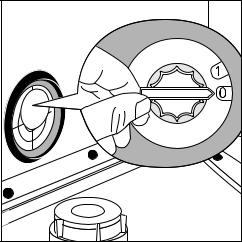
Setting manually:
1.Open the dishwasher door.
2.Remove the lower basket from the dishwasher.
3.Turn water hardness dial on the left wall of the dishwasher interior to O or 1 (see table).
7
Setting electronically:
1. Press the ON/OFF button.
3If indicators for the programme buttons are lit, a dishwashing cycle is activated. The cycle must be deactivated:
Press function buttons 2 and 3 simultaneously for approx. 2 seconds.
All additional wash programme button indicators will go out.
2.Press function buttons 2 and 3 simultaneously and keep them pressed.
The LED indicators for function buttons 1 to 3 will flash.
3.Press function button 1.
The LED indicator for function button 1 will flash. The multi-display will indicate the hardness setting.
4.Pressing function button 1 increases the hardness setting by 1.
(Exception: hardness setting 1 follows hardness setting 10).
5.When the hardness setting is correct, press the ON/OFF button.
The hardness setting is now saved.
If the water softener is set electronically to “1”, this switches off the control indicator for special salt.
|
Water hardness |
|
Adjusting the hardness setting |
Indication on the |
|
|
|
|
|
|
|
in °d1) |
in mmol/l2) |
Range |
Manual |
Electronic |
multi-display |
51 - 70 |
9,0 - 12,5 |
|
|
103) |
10L . |
43 - 50 |
7,6 - 8,9 |
|
|
9 |
9L |
37 - 42 |
6,5 - 7,5 |
IV |
1 |
8 |
8L |
29 - 36 |
5,1 - 6,4 |
|
|
7 |
7L |
23 - 28 |
4,0 - 5,0 |
|
|
6 |
6L |
|
|
||||
|
|
|
|
|
|
19 - 22 |
3,3 - 3,9 |
III |
|
5 |
5L |
15 - 18 |
2,6 - 3,2 |
|
4* |
4L |
|
|
|
||||
|
|
|
|
|
|
11 - 14 |
1,9 - 2,5 |
II |
0* |
3 |
3L |
4 - 10 |
0,7 - 1,8 |
I/II |
|
2 |
2L |
|
|
|
|
|
|
below 4 |
below 0.7 |
I |
|
1 |
1L |
|
no salt necessary |
||||
|
|
|
|
|
|
|
|
|
|
|
|
1)(°d) German degree, measure of the hardness of water
2)[mmol/l] millimol per litre, international unit for water hardness
3)On this setting the length of the dishwashing cycle may be slightly longer. *) factory setting
8

Adding special salt
To decalcify the water softener, it must be filled up with special salt. Use only special salt suitable for domestic dishwashers.
If you do not use 3 in1 detergent, fill up with special salt:
–Before using the dishwasher for the first time.
–When the control indicator for special salt is illuminated on the control panel.
1.Open the door and remove the lower basket.
2.Screw open the lid on the salt dispenser by turning it anti-clockwise.
3.Only when using the dishwasher for the first time:
Fill the salt dispenser with water.
4.Place the funnel (supplied) over the dispenser opening.
Fill the dispenser with special salt; the capacity of the dispenser is approx. 1.0-1.5 kg, depending on the size of the grains. Do not overfill the dispenser.
3If water overflows when filling up with special salt, this is completely harmless.
5.Clean away any salt remnants from the dispenser opening.
6.Screw the lid back on in a clockwise direction.
7.Run a dishwashing cycle after filling the salt dispenser with special salt. This will wash away salt water and salt crystals that have been spilt.
3Depending on the size of the salt grains, it can take several hours for the salt to dissolve in the water and for the control indicator for special salt to go out.
9
Filling up with rinse aid
With rinse aid the rinsing water drains away better and so you get smear-free, gleaming dishes and clear glasses.
If you do not use 3in1 detergent, fill up with rinse aid:
–Before using the dishwasher for the first time.
–When the control indicator for rinse aid is illuminated on the control panel.
Use only special rinse aid for dishwashers and no other liquid detergents.
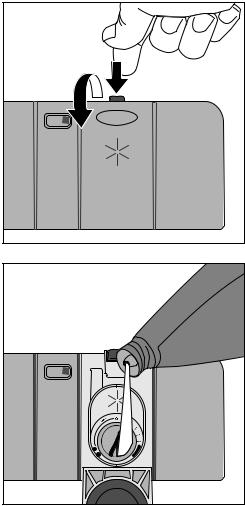
1.Open the door.
The rinse aid compartment is located on the inside of the dishwasher door.
2.Press the release button on the rinse aid compartment.
3.Open the cover.
4.Pour rinse aid in slowly right up to the broken “max” line;
this corresponds to a volume of approx. 140 ml when full.
5.Press the lid shut until it clicks into place.
6.Wipe up any spilt rinse aid with a cloth. Otherwise there will be too much foam when rinsing.
10
Setting the amount of rinse aid required
3Only change the amount dispensed, if smears, milky spots (reduce the amount) or dried on water spots (increase the amount) can be seen on glasses and dishes. (See section “If dishwashing results are not satisfactory”.) The dosage can be set from 1-6. The dosage is pre-set to “4” in the factory.
1.Open the dishwasher door.
2.Press the release button on the rinse aid compartment.
3.Open the cover.
4.Set the dosage level.
5.Press the lid shut until it clicks into place.
6.If rinse aid has leaked out, wipe it away with a cloth.
11
Activating rinse aid inflow when 3in1 function is selected
3If the 3in1 function is not selected, the rinse aid inflow is always activated.
If the 3in1 function is selected due to the use of 3in1 detergent, the rinse aid inflow is deactivated. If the dishes then do not dry sufficiently, you should re-ac- tivate the rinse aid inflow (see also section “Using 3in1 detergents”).
1. Press the ON/OFF button.
3If indicators for the programme buttons are lit, a dishwashing cycle is activated. The cycle must be deactivated:
Press function buttons 2 and 3 simultaneously for approx. 2 seconds.
All additional wash programme button indicators will go out.
2.Press function buttons 2 and 3 simultaneously and keep them pressed.
The LED indicators for function buttons 1 to 3 will flash.
3.Press function button 2.
The LED indicator for function button 2 will flash. The multi-display will indicate the current setting:
0d |
Rinse aid inflow deactivated when |
|
3in1 on (factory setting) |
||
|
||
|
|
|
1d |
Rinse aid inflow activated when 3in1 |
|
on |
||
|
||
|
|
4.Pressing function button 2 activates and deactivates the rinse aid dispensing function.
5.Once the multi-display is indicating the required setting, press the ON/OFF button. The setting is now saved.
12
 Loading...