


EOB2200BOX
EEB3210POX
EOB2200DOX
................................................ .............................................
EN OVEN USER MANUAL 2
PL PIEKARNIK INSTRUKCJA OBSŁUGI 18

www.electrolux.com
2
CONTENTS
1. SAFETY INFORMATION . . . . . . . . . . . . . . . . . . . . . . . . . . . . . . . . . . . . . . . . . . . . . . . . . . . 3
2. SAFETY INSTRUCTIONS . . . . . . . . . . . . . . . . . . . . . . . . . . . . . . . . . . . . . . . . . . . . . . . . . . 4
3. PRODUCT DESCRIPTION . . . . . . . . . . . . . . . . . . . . . . . . . . . . . . . . . . . . . . . . . . . . . . . . . 6
4. BEFORE FIRST USE . . . . . . . . . . . . . . . . . . . . . . . . . . . . . . . . . . . . . . . . . . . . . . . . . . . . . . 6
5. DAILY USE . . . . . . . . . . . . . . . . . . . . . . . . . . . . . . . . . . . . . . . . . . . . . . . . . . . . . . . . . . . . . 7
6. CLOCK FUNCTIONS . . . . . . . . . . . . . . . . . . . . . . . . . . . . . . . . . . . . . . . . . . . . . . . . . . . . . 7
7. ADDITIONAL FUNCTIONS . . . . . . . . . . . . . . . . . . . . . . . . . . . . . . . . . . . . . . . . . . . . . . . . . 8
8.
HELPFUL HINTS AND TIPS . . . . . . . . . . . . . . . . . . . . . . . . . . . . . . . . . . . . . . . . . . . . . . . . 8
9. CARE AND CLEANING . . . . . . . . . . . . . . . . . . . . . . . . . . . . . . . . . . . . . . . . . . . . . . . . . . . 12
10.
WHAT TO DO IF… . . . . . . . . . . . . . . . . . . . . . . . . . . . . . . . . . . . . . . . . . . . . . . . . . . . . . . 15
11. TECHNICAL DATA . . . . . . . . . . . . . . . . . . . . . . . . . . . . . . . . . . . . . . . . . . . . . . . . . . . . . . 16
12.
INSTALLATION . . . . . . . . . . . . . . . . . . . . . . . . . . . . . . . . . . . . . . . . . . . . . . . . . . . . . . . . . 16
13. ENVIRONMENT CONCERNS . . . . . . . . . . . . . . . . . . . . . . . . . . . . . . . . . . . . . . . . . . . . . . 17
WE’RE THINKING OF YOU
Thank you for purchasing an Electrolux appliance. You’ve chosen a product that brings with it
decades of professional experience and innovation. Ingenious and stylish, it has been designed
with you in mind. So whenever you use it, you can be safe in the knowledge that you’ll get great
results every time.
Welcome to Electrolux.
Visit our website for:
Get usage advice, brochures, trouble shooter, service information:
www.electrolux.com
Register your product for better service:
www.electrolux.com/productregistration
Buy Accessories, Consumables and Original spare parts for your appliance:
www.electrolux.com/shop
CUSTOMER CARE AND SERVICE
We recommend the use of original spare parts.
When contacting Service, ensure that you have the following data available.
The information can be found on the rating plate. Model, PNC, Serial Number.
Warning / Caution-Safety information
General information and tips
Environmental information
Subject to change without notice.

1. SAFETY INFORMATION
Before the installation and use of the appliance, carefully
read the supplied instructions. The manufacturer is not
responsible if an incorrect installation and use causes injuries and damages. Always keep the instructions with
the appliance for future reference.
1.1 Children and vulnerable people safety
WARNING!
Risk of suffocation, injury or permanent disability.
• This appliance can be used by children aged from 8
years and above and persons with reduced physical,
sensory or mental capabilities or lack of experience and
knowledge if they are supervised by an adult or a person who is responsible for their safety.
• Do not let children play with the appliance.
• Keep all packaging away from children.
• Keep children and pets away from the appliance when
it operates or when it cools down. Accessible parts are
hot.
• If the appliance has a child safety device, we recommend that you activate it.
• Cleaning and user maintenance shall not be made by
children without supervision.
ENGLISH 3
1.2 General Safety
• Internally the appliance becomes hot when in operation. Do not touch the heating elements that are in the
appliance. Always use oven gloves to remove or put in
accessories or ovenware.
• Do not use a steam cleaner to clean the appliance.
• Before maintenance cut the power supply.

www.electrolux.com
4
• Do not use harsh abrasive cleaners or sharp metal
scrapers to clean the glass door since they can scratch
the surface, which may result in shattering of the glass.
2.
SAFETY INSTRUCTIONS
2.1 Installation
WARNING!
Only a qualified person must install this appliance.
• Remove all the packaging.
• Do not install or use a damaged appli-
ance.
• Obey the installation instruction sup-
plied with the appliance.
• Always be careful when you move the
appliance because it is heavy. Always
wear safety gloves.
• Do not pull the appliance by the handle.
• Keep the minimum distance from the
other appliances and units.
• Make sure that the appliance is installed
below and adjacent safe structures.
• The sides of the appliance must stay
adjacent to appliances or to units with
the same height.
Electrical connection
WARNING!
Risk of fire and electrical shock.
• All electrical connections should be
made by a qualified electrician.
• The appliance must be earthed.
• Make sure that the electrical information
on the rating plate agrees with the power supply. If not, contact an electrician.
• Always use a correctly installed shock-
proof socket.
• Do not use multi-plug adapters and ex-
tension cables.
• Make sure not to cause damage to the
mains plug and to the mains cable.
Contact the Service or an electrician to
change a damaged mains cable.
• Do not let mains cables to come in
touch with the appliance door, specially
when the door is hot.
• The shock protection of live and insulated parts must be fastened in such a
way that it cannot be removed without
tools.
• Connect the mains plug to the mains
socket only at the end of the installation. Make sure that there is access to
the mains plug after the installation.
• If the mains socket is loose, do not
connect the mains plug.
• Do not pull the mains cable to disconnect the appliance. Always pull the
mains plug.
• Use only correct isolation devices: line
protecting cut-outs, fuses (screw type
fuses removed from the holder), earth
leakage trips and contactors.
• The electrical installation must have an
isolation device which lets you disconnect the appliance from the mains at all
poles. The isolation device must have a
contact opening width of minimum 3
mm.
2.2 Use
WARNING!
Risk of injury, burns or electric
shock or explosion.
• Use this appliance in a household environment.
• Do not change the specification of this
appliance.
• Make sure that the ventilation openings
are not blocked.
• Do not let the appliance stay unattended during operation.
• Deactivate the appliance after each
use.

• Internally the appliance becomes hot
when in operation. Do not touch the
heating elements that are in the appliance. Always use oven gloves to remove or put in accessories or ovenware.
• Be careful, when you open the appliance door while the appliance is in operation. Hot air can release.
• Do not operate the appliance with wet
hands or when it has contact with water.
• Do not apply pressure on the open
door.
• Do not use the appliance as a work
surface or as a storage surface.
• Always keep the appliance door closed
when the appliance is in operation.
• Open the appliance door carefully. The
use of ingredients with alcohol can
cause a mixture of alcohol and air.
• Do not let sparks or open flames to
come in contact with the appliance
when you open the door.
• Do not put flammable products or items
that are wet with flammable products
in, near or on the appliance.
WARNING!
Risk of damage to the appliance.
• To prevent damage or discoloration to
the enamel:
– Do not put ovenware or other objects
in the appliance directly on the bottom.
– Do not put aluminium foil directly on
the bottom of the appliance.
– do not put water directly into the hot
appliance.
– do not keep moist dishes and food in
the appliance after you finish the cooking.
– be careful when you remove or install
the accessories.
• Discoloration of the enamel has no effect on the performance of the appliance. It is not a defect in the sense of
the warranty law.
• Use a deep pan for moist cakes. Fruit
juices cause stains that can be permanent.
ENGLISH 5
2.3 Care and Cleaning
WARNING!
Risk of injury, fire or damage to
the appliance.
• Before maintenance, deactivate the appliance and disconnect the mains plug
from the mains socket.
• Make sure the appliance is cold. There
is the risk that the glass panels can
break.
• Replace immediately the door glass
panels when they are damaged. Contact the Service.
• Be careful when you remove the door
from the appliance. The door is heavy!
• Clean regularly the appliance to prevent
the deterioration of the surface material.
• Remaining fat or food in the appliance
can cause fire.
• Clean the appliance with a moist soft
cloth. Only use neutral detergents. Do
not use abrasive products, abrasive
cleaning pads, solvents or metal objects.
• If you use an oven spray, obey the safety instructions on the packaging.
• Do not clean the catalytic enamel (if applicable) with any kind of detergent.
2.4 Internal light
• The type of light bulb or halogen lamp
used for this appliance, is only for
household appliances. Do not use it for
house lighting.
WARNING!
Risk of electrical shock.
• Before replacing the lamp, disconnect
the appliance from the power supply.
• Only use lamps with the same specifications.
2.5 Disposal
WARNING!
Risk of injury or suffocation.
• Disconnect the appliance from the
mains supply.
• Cut off the mains cable and discard it.
www.electrolux.com
6
• Remove the door catch to prevent children and pets to get closed in the appliance.
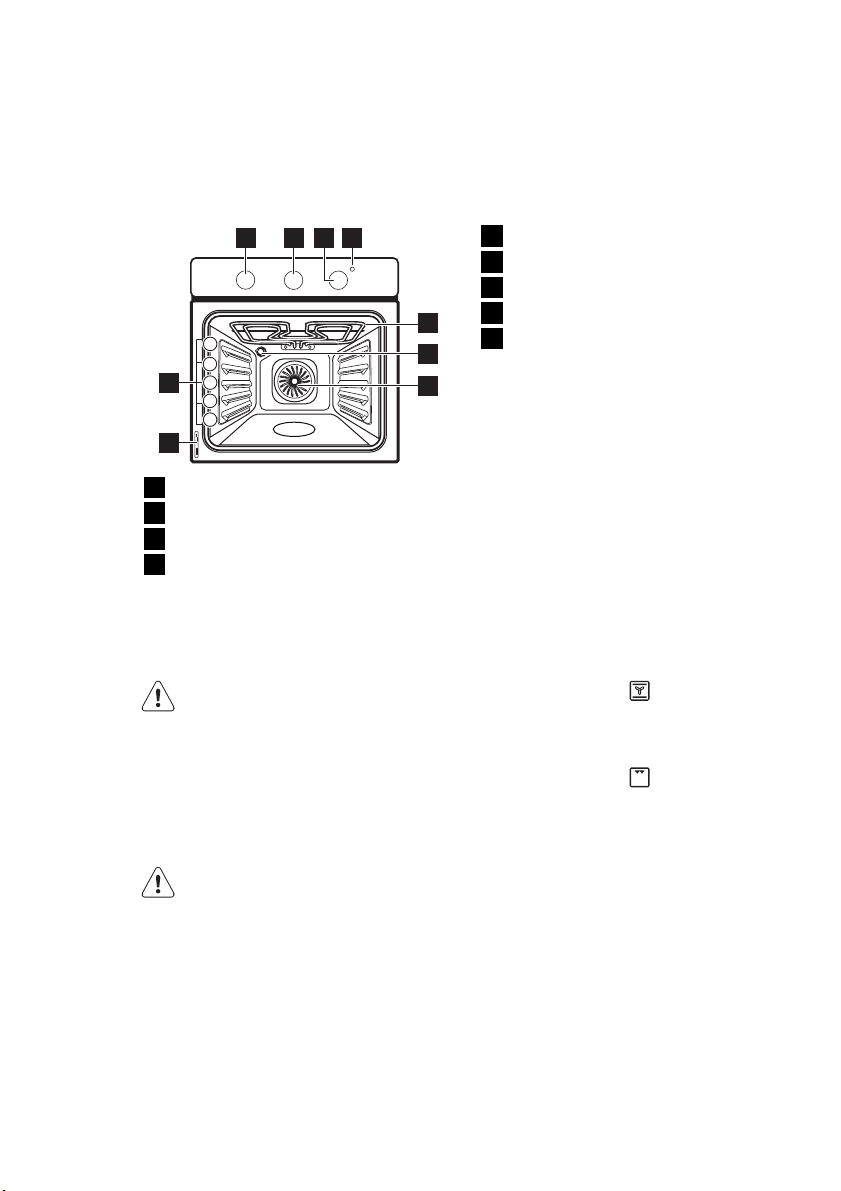
3. PRODUCT DESCRIPTION
1 42 3
5
4
3
9
2
1
8
Knob for the oven functions
1
Knob for the timer
2
Knob for the temperature
3
Temperature indicator
4
Grill
5
Oven lamp
6
Fan
7
Rating plate
5
6
7
8
Shelf positions
9
3.1 Oven accessories
Wire shelf
•
For cookware, cake tins, roasts.
• Baking tray
For cakes and biscuits.
• Grill- / Roasting pan
To bake and roast or as pan to collect
fat.
4. BEFORE FIRST USE
WARNING!
Refer to "Safety information"
chapter.
4.1 Initial cleaning
• Remove all accessories and removable
shelf supports (if applicable).
• Clean the appliance before first use.
Refer to the chapter "Care and
cleaning".
4.2 Preheating
Preheat the empty appliance to burn off
the remaining grease.
1.
Set the function and the maximum
temperature.
2.
Let the appliance operate for 45 minutes.
3.
Set the function and the maximum
temperature.
4.
Let the appliance operate for 15 mi-
nutes.
Accessories can become hotter than usually. The appliance can emit an odour and
smoke. This is normal. Make sure that the
airflow is sufficient.
5. DAILY USE
ENGLISH 7
WARNING!
Refer to "Safety information"
chapter.
5.1 Activating and deactivating
the appliance
1.
Turn the oven functions control knob
to an oven function.
2.
Turn the temperature control knob to
a temperature.
The temperature indicator comes on
while the temperature in the appliance
increases.
3.
To deactivate the appliance, turn the
oven functions control knob and the
temperature control knob to the Off
position.
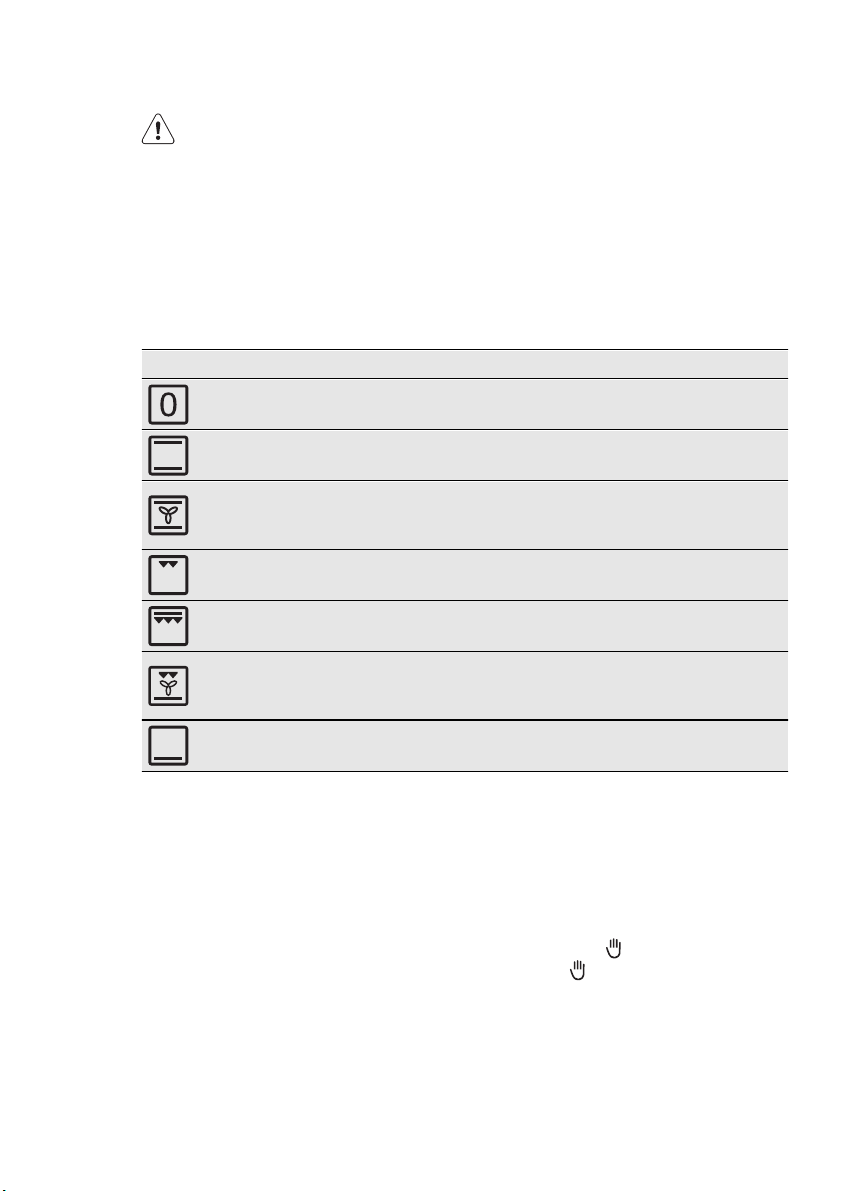
5.2 Oven functions
Oven function Application
Off position The appliance is off.
Conventional
Cooking
Fan Cooking
Grilling
Fast Grilling
Pizza Setting
Bottom Heat
To bake and roast on one oven level. The top and bot-
tom heating elements operate at the same time.
To roast or roast and bake food with the same cooking
temperature, on more than one shelf, without flavour
transference.
To grill flat food items in small quantities in the middle of
the shelf. To make toast.
To grill flat food items in large quantities. To make toast.
The full grill element operates.
To make pizza, quiche or pie. The grill and bottom ele-
ment provide direct heat and the fan circulates the hot
air to cook the pizza toppings or pie filling.
To bake cakes with crispy or crusty bottom. Only the
bottom heating element operates.
6. CLOCK FUNCTIONS
6.1 Minute Minder + End of
Cooking
Use it to set an automatic switch-off time
for an oven function.
1.
Set an oven function and the temperature.
2.
Turn the knob for the timer as far as it
goes, then turn it to necessary time
period.
3.
After the time period is completed, an
acoustic signal sounds. The appliance
deactivates.
Normal setting
the timer to
ate the appliance manually. The Minute
Minder + End of Cooking is off.
: Turn the knob for
. In this position you oper-

www.electrolux.com
8
7. ADDITIONAL FUNCTIONS
7.1 Cooling fan
When the appliance operates, the cooling
fan activates automatically to keep the
surfaces of the appliance cool. If you deactivate the appliance, the cooling fan
continues to operate until the temperature
in the appliance cools down.
7.2 Safety thermostat
Incorrect operation of the appliance or defective components can cause dangerous
8. HELPFUL HINTS AND TIPS
• The appliance has five shelf levels.
Count the shelf levels from the bottom
of the appliance floor.
• The appliance has a special system
which circulates the air and constantly
recycles the steam. With this system
you can cook in a steamy environment
and keep the food soft inside and crusty outside. It decreases the cooking
time and energy consumption to a minimum.
• Moisture can condense in the appliance
or on the door glass panels. This is normal. Always stand back from the appliance when you open the appliance
door while cooking. To decrease the
condensation, operate the appliance for
10 minutes before cooking.
• Clean the moisture after each use of
the appliance.
• Do not put the objects directly on the
appliance floor and do not put aluminium foil on the components when you
cook. This can change the baking results and cause damage to the enamel.
8.1 Baking cakes
• Do not open the oven door before 3/4
of the set cooking time is up.
overheating. To prevent this, the oven has
a safety thermostat which interrupts the
power supply. The oven activates again
automatically when the temperature
drops.
• If you use two baking trays at the same
time, keep one empty level between
them.
8.2 Cooking meat and fish
• Use a deep pan for very fatty food to
prevent the oven from stains that can
be permanent.
• Leave the meat for approximately 15
minutes before carving so that the juice
does not seep out.
• To prevent too much smoke in the oven
during roasting, add some water into
the deep pan. To prevent the smoke
condensation, add water each time after it dries up.
8.3 Cooking times
Cooking times depend on the type of
food, its consistency, and volume.
Initially, monitor the performance when
you cook. Find the best settings (heat setting, cooking time, etc.) for your cookware, recipes and quantities when you
use this appliance.

ENGLISH 9
8.4 Baking and roasting table
CAKES
Conventional
TYPE OF
DISH
Whisked
Cooking
Shelf po-
sition
Temp
[°C]
2 170 3 160 45 - 60 In a cake
recipes
Shortbread
2 170 3 160 20 - 30 In a cake
dough
Buttermilk
1 170 1 160 70 - 80 In a 26 cm
cheesecake
Apple cake
2 170 2 (left and
(Apple pie)
Strudel 3 175 2 150 60 - 80 In a baking
Jam-tart 2 170 2 (left and
Sponge
2 170 2 160 50 - 60 In a 26 cm
cake
Christmas
2 170 2 150 90 - 120 In a 20 cm
cake / Rich
fruit cake
Plum cake 1 175 2 160 50 - 60 In a bread tin
Fan Cooking
Shelf po-
sition
right)
right)
Cooking
Temp
[°C]
time
[min]
Notes
mould
mould
cake mould
on a wire shelf
160 80 - 100 In two 20 cm
cake moulds
on a wire
1)
shelf
tray
165 30 - 40 In a 26 cm
cake mould
cake mould
cake mould
1)
1)
Small cakes
- one level
Small cakes
- two levels
Biscuits /
pastry strips
3 170 3 140 -
150
- - 2 and 4 140 150
3 140 3 140 -
150
20 - 30 In a baking
tray
25 - 35 In a baking
tray
30 - 35 In a baking
tray
- one level
Biscuits /
pastry strips
- - 2 and 4 140 150
35 - 40 In a baking
tray
- two levels
Meringues 3 120 3 120 80 - 100 In a baking
tray
Buns 3 190 3 180 15 - 20 In a baking
1)
tray

www.electrolux.com
10
TYPE OF
DISH
Conventional
Cooking
Shelf po-
sition
Temp
[°C]
Fan Cooking
Shelf po-
sition
Temp
[°C]
Cooking
time
[min]
Notes
Eclairs 3 190 3 170 25 - 35 In a baking
tray
Plate tarts 2 180 2 170 45 - 70 In a 20 cm
cake mould
Rich fruit
cake
Victoria
sandwich
1)
Preheat the oven for 10 minutes.
1 160 2 150 110 - 120 In a 24 cm
cake mould
1 170 1 (left and
right)
160 50 - 60 In a 20 cm
cake mould
BREAD AND PIZZA
TYPE OF
DISH
Conventional
Cooking
Shelf po-
sition
Temp
[°C]
Fan Cooking
Shelf po-
sition
Temp
[°C]
Cooking
time
[min]
Notes
White bread 1 190 1 190 60 - 70 1 - 2 pieces,
500 gr per
1)
piece
Rye bread 1 190 1 180 30 - 45 In a bread tin
Pizza 1 230 -
250
1 230 -
250
10 - 20 In a baking
tray or a deep
1)
pan
Scones 3 200 3 190 10 - 20 In a baking
1)
tray
1)
Preheat for 10 minutes.
1)
FLANS
TYPE OF
DISH
Conventional
Cooking
Shelf
position
Temp
[°C]
Fan Cooking
Shelf po-
sition
Temp
[°C]
Cooking
time
[min]
Notes
Pasta flan 2 200 2 180 40 - 50 In a mould
Vegetable
2 200 2 175 45 - 60 In a mould
flan
Quiches 1 180 1 180 50 - 60
Lasagne 2 180 -
190
Cannelloni 2 180 -
190
2 180 -
190
2 180 -
190
25 - 40
25 - 40
In a mould
In a mould
In a mould
1)
1)
1)

ENGLISH 11
1)
Preheat for 10 minutes.
MEAT
TYPE OF
DISH
Conventional
Cooking
Shelf
position
Temp
[°C]
Fan Cooking
Shelf
position
Temp
[°C]
Cooking
time
[min]
Notes
Beef 2 200 2 190 50 - 70 On a wire shelf
Pork 2 180 2 180 90 - 120 On a wire shelf
Veal 2 190 2 175 90 - 120 On a wire shelf
English roast
2 210 2 200 50 - 60 On a wire shelf
beef, rare
English roast
2 210 2 200 60 - 70 On a wire shelf
beef, medium
English roast
2 210 2 200 70 - 75 On a wire shelf
beef, well
done
Shoulder of
2 180 2 170 120 - 150 With rind
pork
Shin of pork 2 180 2 160 100 - 120 Two pieces
Lamb 2 190 2 175 110 - 130 Leg
Chicken 2 220 2 200 70 - 85 Whole
Turkey 2 180 2 160 210 - 240 Whole
Duck 2 175 2 220 120 - 150 Whole
Goose 2 175 1 160 150 - 200 Whole
Rabbit 2 190 2 175 60 - 80 Cut in pieces
Hare 2 190 2 175 150 - 200 Cut in pieces
Pheasant 2 190 2 175 90 - 120 Whole
FISH
Conventional
TYPE OF
DISH
Cooking
Shelf
position
Trout / Sea
2 190 2 175 40 - 55 3 - 4 fish
bream
Tuna fish /
2 190 2 175 35 - 60 4 - 6 fillets
Salmon
8.5 Grilling
Preheat the empty oven for 10 minutes, before cooking.
Temp
[°C]
Fan Cooking
Shelf
position
Temp
[°C]
Cooking
time
[min]
Notes

www.electrolux.com
12
TYPE OF DISH Pieces [g] Shelf po-
Fillet steaks 4 800 4 max. 12 - 15 12 - 14
Beef steaks 4 600 4 max. 10 - 12 6 - 8
Sausages 8 - 4 max. 12 - 15 10 - 12
Pork chops 4 600 4 max. 12 - 16 12 - 14
Chicken (cut in
2)
Kebabs 4 - 4 max. 10 - 15 10 - 12
Breast of chicken
Hamburger 6 600 4 max. 20 - 30 -
Fish fillet 4 400 4 max. 12 - 14 10 - 12
Toasted sandwiches
Toast 4 - 6 - 4 max. 2 - 4 2 - 3
Information on acrylamides
Important! According to the newest
scientific knowledge, if you brown food
(specially the one which contains starch),
Quantity Grilling Cooking time [min]
sition
Temp
[°C]
1st side 2nd side
2 1000 4 max. 30 - 35 25 - 30
4 400 4 max. 12 - 15 12 - 14
4 - 6 - 4 max. 5 - 7 -
acrylamides can pose a health risk. Thus,
we recommend that you cook at the
lowest temperatures and do not brown
food too much.
9. CARE AND CLEANING
WARNING!
Refer to "Safety information"
chapter.
• Clean the front of the appliance with a
soft cloth with warm water and a cleaning agent.
• To clean metal surfaces use a usual
cleaning agent.
• Clean the oven interior after each use.
Then you can remove dirt more easily
and it does not burn on.
• Clean stubborn dirt with a special oven
cleaner.
• Clean all oven accessories after each
use and let them dry. Use a soft cloth
with warm water and a cleaning agent.
• If you have nonstick accessories, do
not clean them using aggressive
agents, sharp-edged objects or a dishwasher. It can destroy nonstick coating.
Stainless steel or aluminium
appliances:
Clean the oven door with a wet
sponge only. Dry it with a soft
cloth.
Do not use steel wool, acids or
abrasive materials, as they can
cause damage to the oven surface. Clean the oven control panel
with the same precautions.
9.1 Cleaning the door gasket
• Regularly do a check of the door gasket. The door gasket is around the
frame of the oven cavity. Do not use the
appliance if the door gasket is damaged. Contact the Service Centre.
• To clean the door gasket, refer to the
general information about cleaning.

2.
9.2 Oven lamp
WARNING!
Be careful when you change the
oven lamp. There is a risk of electrical shock.
Before you change the oven lamp:
• Deactivate the oven.
• Remove the fuses in the fuse box or
deactivate the circuit breaker.
Put a cloth on the bottom of the
oven to prevent damage to the
oven light and glass cover.
Always hold the halogen lamp
with a cloth to prevent grease residue from burning on the lamp.
1.
Turn the glass cover counterclockwise to remove it.
Clean the glass cover.
3.
Replace the oven light bulb with an
applicable 300 °C heat-resistant oven
light bulb.
Use the same oven lamp type.
4.
Install the glass cover.
9.3 Cleaning the oven door
The oven door has two glass panels. You
can remove the oven door and the internal glass panel to clean it.
The oven door can close if you try
to remove the internal glass panel
before you remove the oven door.
Removing the oven door and the glass panel
1.
Open the door fully and hold the two
door hinges.
ENGLISH 13
2.
Lift and turn the levers on the two
hinges.

www.electrolux.com
14
3.
Close the oven door to the first opening position (halfway). Then pull forward and remove the door from its
seat.
4.
Put the door on a soft cloth on a stable surface.
5.
Release the locking system to remove the internal glass panel.
90°
6.
Turn the two fasteners by 90° and remove them from their seats.

7.
8.
2
1
Installing the door and the glass panel
When the cleaning is completed, install
the glass panel and the oven door. Do the
above steps in the opposite sequence.
The screen-printing zone must face the
inner side of the door. Make sure that after the installation the surface of the glass
panel frame on the screen-printing zones
is not rough when you touch it.
Make sure that you install the internal
glass panel in the seats correctly. Refer to
the illustration.
ENGLISH 15
Carefully lift (step 1) and remove (step
2) the glass panel.
Clean the glass panel with water and
soap. Dry the glass panel carefully.
10. WHAT TO DO IF…
WARNING!
Refer to "Safety information"
chapter.
Problem Possible cause Remedy
The appliance does not
operate.
The appliance does not
operate.
The appliance does not
operate.
The oven lamp does not
operate.
The appliance is not activated.
The Minute Minder + End
of Cooking programmer
is not set.
The fuse in the fuse box
is released.
The oven lamp is defective.
Activate the appliance.
Refer to the chapter "Daily Use".
Set the Minute Minder +
End of Cooking programmer. Refer to the chapter
"Clock functions".
Do a check of the fuse. If
the fuse is released more
than one time, contact a
qualified electrician.
Replace the oven lamp.

www.electrolux.com
16
Problem Possible cause Remedy
Steam and condensation
collect on the food and in
the oven.
If you cannot find a solution to the problem yourself, contact your dealer or the
service centre.
We recommend that you write the data here:
Model (MOD.) .........................................
Product number (PNC) .........................................
Serial number (S.N.) .........................................
11. TECHNICAL DATA
Voltage 230 V
Frequency 50 Hz
You left the dish in the
oven for too long.
The necessary data for the service centre
is on the rating plate. The rating plate is
on the front frame of the appliance cavity.
Do not keep the dishes in
the oven for longer than
15 - 20 minutes after the
cooking ends.
12. INSTALLATION
WARNING!
Refer to "Safety information"
chapter.
12.1 Building In
558
573
min. 550
548
20
589
594
5
590
20
min. 560

ENGLISH 17
This appliance is supplied with a main
plug and a main cable.
min. 550
20
600
min. 560
A
12.2 Electrical installation
WARNING!
Only a qualified person must do
the electrical installation.
The manufacturer is not responsible if you do not follow the safety
precautions from the chapter
"Safety Information".
12.3 Cable
Cable types applicable for installation or
replacement: H07 RN-F, H05 RN-F, H05
RRF, H05 VV-F, H05 V2V2-F (T90), H05
BB-F.
For the section of the cable refer to the
total power (on the rating plate) and to the
table:
Total power
B
maximum 1380W3 x 0.75 mm²
maximum 2300W3 x 1 mm²
maximum 3680W3 x 1.5 mm²
The hearth cord (green / yellow cable)
must be 2 cm longer than phase and neutral cables (blue and brown cables).
Section of the ca-
ble
13. ENVIRONMENT CONCERNS
Recycle the materials with the symbol
. Put the packaging in applicable
containers to recycle it.
Help protect the environment and human
health and to recycle waste of electrical
and electronic appliances. Do not dispose
appliances marked with the symbol
with the household waste. Return the
product to your local recycling facility or
contact your municipal office.

www.electrolux.com
18
SPIS TREŚCI
1. INFORMACJE DOTYCZĄCE BEZPIECZEŃSTWA . . . . . . . . . . . . . . . . . . . . . . . . . . . . . . . . . . . . . . . . . . . 19
2. WSKAZÓWKI DOTYCZĄCE BEZPIECZEŃSTWA . . . . . . . . . . . . . . . . . . . . . . . . . . . . . . . . . . . . . . . . . . . 20
3. OPIS URZĄDZENIA . . . . . . . . . . . . . . . . . . . . . . . . . . . . . . . . . . . . . . . . . . . . . . . . . . . . . . . . . . . . . . . . . . . 22
4. PRZED PIERWSZYM UŻYCIEM . . . . . . . . . . . . . . . . . . . . . . . . . . . . . . . . . . . . . . . . . . . . . . . . . . . . . . . . . 22
5. CODZIENNA EKSPLOATACJA . . . . . . . . . . . . . . . . . . . . . . . . . . . . . . . . . . . . . . . . . . . . . . . . . . . . . . . . . . 23
6. FUNKCJE ZEGARA . . . . . . . . . . . . . . . . . . . . . . . . . . . . . . . . . . . . . . . . . . . . . . . . . . . . . . . . . . . . . . . . . . . 24
7. DODATKOWE FUNKCJE . . . . . . . . . . . . . . . . . . . . . . . . . . . . . . . . . . . . . . . . . . . . . . . . . . . . . . . . . . . . . . . 24
8. PRZYDATNE RADY I WSKAZÓWKI . . . . . . . . . . . . . . . . . . . . . . . . . . . . . . . . . . . . . . . . . . . . . . . . . . . . . . 24
9. KONSERWACJA I CZYSZCZENIE . . . . . . . . . . . . . . . . . . . . . . . . . . . . . . . . . . . . . . . . . . . . . . . . . . . . . . . 29
10. CO ZROBIĆ, GDY… . . . . . . . . . . . . . . . . . . . . . . . . . . . . . . . . . . . . . . . . . . . . . . . . . . . . . . . . . . . . . . . . . . . 32
11. DANE TECHNICZNE . . . . . . . . . . . . . . . . . . . . . . . . . . . . . . . . . . . . . . . . . . . . . . . . . . . . . . . . . . . . . . . . . . 33
12. INSTALACJA . . . . . . . . . . . . . . . . . . . . . . . . . . . . . . . . . . . . . . . . . . . . . . . . . . . . . . . . . . . . . . . . . . . . . . . . 33
13. OCHRONA ŚRODOWISKA . . . . . . . . . . . . . . . . . . . . . . . . . . . . . . . . . . . . . . . . . . . . . . . . . . . . . . . . . . . . . 34
Z MYŚLĄ O TOBIE
Dziękujemy za zakup urządzenia Electrolux. Jest ono owocem dziesięcioleci doświadczeń i innowacji. To
pomysłowe i stylowe urządzenie zaprojektowano z myślą o Tobie. Użytkując je masz zawsze pewność uzyskania
wspaniałych efektów.
Witamy w świecie marki Electrolux!
Odwiedź naszą witrynę internetową, aby uzyskać:
Wskazówki dotyczące użytkowania, broszury, pomoc w rozwiązywaniu problemów oraz informacje
dotyczące serwisu:
www.electrolux.com
Zarejestruj swój produkt, aby uprościć jego obsługę serwisową:
www.electrolux.com/productregistration
Kupuj akcesoria, materiały eksploatacyjne i oryginalne części zamienne do swojego urządzenia:
www.electrolux.com/shop
OBSŁUGA KLIENTA
Zalecamy stosowanie oryginalnych części zamiennych.
Kontaktując się z serwisem, należy przygotować poniższe dane.
Informacje można znaleźć na tabliczce znamionowej. Model, numer produktu, numer seryjny.
Ostrzeżenie/przestroga – informacje dotyczące bezpieczeństwa.
Informacje i wskazówki ogólne
Informacje dot. ochrony środowiska
Producent zastrzega sobie możliwość wprowadzenia zmian bez wcześniejszego powiadomienia.

1. INFORMACJE DOTYCZĄCE BEZPIECZEŃSTWA
Przed instalacją i rozpoczęciem eksploatacji urządzenia należy do‐
kładnie przeczytać dołączoną instrukcję obsługi. Producent nie od‐
powiada za uszkodzenia i obrażenia ciała spowodowane niepra‐
widłową instalacją i eksploatacją. Należy zachować instrukcję wraz
z urządzeniem do wykorzystania w przyszłości.
1.1 Bezpieczeństwo dzieci i osób o ograniczonych
zdolnościach ruchowych, sensorycznych lub umysłowych
OSTRZEŻENIE!
Występuje zagrożenie uduszeniem lub odniesieniem obrażeń
mogących skutkować trwałym kalectwem.
• Urządzenie mogą obsługiwać dzieci po ukończeniu ósmego ro‐
ku życia oraz osoby o ograniczonych zdolnościach fizycznych,
sensorycznych lub umysłowych bądź nieposiadające odpowied‐
niej wiedzy i doświadczenia, jeśli będą one nadzorowane przez
dorosłą osobę lub osobę odpowiedzialną za ich bezpieczeń‐
stwo.
• Nie należy pozwalać, aby dzieci bawiły się urządzeniem.
• Wszystkie opakowania należy przechowywać poza zasięgiem
dzieci.
• Dzieci i zwierzęta nie powinny zbliżać się do pracującego lub
stygnącego urządzenia. Łatwo dostępne elementy urządzenia
mocno się nagrzewają.
• Jeśli urządzenie jest wyposażone w blokadę uruchomienia, zale‐
ca się jej włączenie.
• Czyszczeniem i konserwacją nie mogą zajmować się dzieci bez
nadzoru dorosłych.
POLSKI 19
1.2 Ogólne zasady bezpieczeństwa
• Podczas pracy urządzenia jego wnętrze mocno się nagrzewa.
Nie dotykać elementów grzejnych w urządzeniu. Podczas wy‐
jmowania i wkładania akcesoriów lub naczyń należy zawsze
używać rękawic kuchennych.
• Nie używać do czyszczenia urządzenia myjki parowej.

www.electrolux.com
20
• Przed przystąpieniem do konserwacji urządzenia należy odłą‐
• Do czyszczenia szyb w drzwiach nie należy używać ściernych
czyć je od zasilania.
środków czyszczących ani ostrych, metalowych myjek, ponie‐
waż mogą one porysować powierzchnię, co może skutkować
pęknięciem szkła.
2.
WSKAZÓWKI DOTYCZĄCE BEZPIECZEŃSTWA
• Nie stosować rozgałęźników ani przedłużaczy.
2.1 Instalacja
OSTRZEŻENIE!
Urządzenie może zainstalować wyłącz‐
nie wykwalifikowana osoba.
• Usunąć wszystkie elementy opakowania.
• Nie instalować ani nie używać uszkodzonego
urządzenia.
• Postępować zgodnie z instrukcją instalacji do‐
starczoną wraz z urządzeniem.
• Zachować ostrożność podczas przenoszenia
urządzenia, ponieważ jest ono ciężkie. Za‐
wsze używać rękawic ochronnych.
• Nigdy nie ciągnąć urządzenia za uchwyt.
• Zachować minimalne odstępy od innych urzą‐
dzeń i mebli.
• Należy zadbać o to, aby meble itp. znajdujące
się obok urządzenia i nad nim spełniały odpo‐
wiednie wymogi bezpieczeństwa.
• Boki urządzenia powinny sąsiadować z urzą‐
dzeniami lub meblami o tej samej wysokości.
Podłączenie do sieci elektrycznej
OSTRZEŻENIE!
Występuje zagrożenie pożarem i pora‐
żeniem prądem elektrycznym.
• Wykwalifikowany elektryk powinien wykonać
wszystkie połączenia elektryczne.
• Urządzenie musi być uziemione.
• Należy upewnić się, że informacje o podłącze‐
niu elektrycznym podane na tabliczce znamio‐
nowej są zgodne z parametrami instalacji za‐
silającej. W przeciwnym razie należy skontak‐
tować się z elektrykiem.
• Należy zawsze używać prawidłowo zamonto‐
wanych gniazd elektrycznych z uziemieniem.
• Należy zwrócić uwagę, aby nie uszkodzić
wtyczki ani przewodu zasilającego. Wymianę
uszkodzonego przewodu zasilającego należy
zlecić przedstawicielowi serwisu lub wykwalifi‐
kowanemu elektrykowi.
• Przewody zasilające nie mogą dotykać drzwi
urządzenia, zwłaszcza gdy drzwi są mocno
rozgrzane.
• Zarówno w przypadku elementów znajdują‐
cych się pod napięciem, jak zaizolowanych
części zabezpieczenie przed porażeniem prą‐
dem należy zamocować w taki sposób, aby
nie można go było odłączyć bez użycia narzę‐
dzi.
• Podłączyć wtyczkę do gniazda elektrycznego
dopiero po zakończeniu instalacji. Należy za‐
dbać o to, aby po zakończeniu instalacji urzą‐
dzenia wtyczka przewodu zasilającego była
łatwo dostępna.
• Jeśli gniazdo elektryczne jest obluzowane, nie
wolno podłączać do niego wtyczki.
• Przy odłączaniu urządzenia nie ciągnąć za
przewód zasilający. Zawsze ciągnąć za wtycz‐
kę.
• Konieczne jest zastosowanie odpowiednich
wyłączników obwodu zasilania: wyłączników
automatycznych, bezpieczników topikowych
(typu wykręcanego – wyjmowanych z opraw‐
ki), wyłączników różnicowo-prądowych (RCD)
oraz styczników.
• W instalacji elektrycznej należy zastosować
wyłącznik obwodu umożliwiający odłączenie
urządzenia od zasilania na wszystkich biegu‐
nach. Wyłącznik obwodu musi mieć rozwarcie
styków wynoszące minimum 3 mm.

2.2 Obsługa
OSTRZEŻENIE!
Zagrożenie odniesieniem obrażeń, opa‐
rzeniem lub wybuchem.
• Z urządzenia należy korzystać w warunkach
domowych.
• Nie zmieniać parametrów technicznych urzą‐
dzenia.
• Upewnić się, że otwory wentylacyjne nie są
zablokowane.
• Nie pozostawiać włączonego urządzenia bez
nadzoru.
• Wyłączać urządzenie po każdym użyciu.
• Podczas pracy urządzenia jego wnętrze moc‐
no się nagrzewa. Nie dotykać elementów
grzejnych w urządzeniu. Podczas wyjmowania
i wkładania akcesoriów lub naczyń należy za‐
wsze używać rękawic kuchennych.
• Podczas pracy urządzenia należy zachować
ostrożność przy otwieraniu jego drzwi. Może
dojść do uwolnienia gorącego powietrza.
• Nie obsługiwać urządzenia mokrymi rękoma
lub jeśli ma ono kontakt z wodą.
• Nie opierać się na otwartych drzwiach urzą‐
dzenia.
• Nie używać urządzenia jako powierzchni robo‐
czej ani miejsca do przechowywania przed‐
miotów.
• Gdy urządzenie jest wyłączone, jego drzwi po‐
winny być zamknięte.
• Należy ostrożnie otwierać drzwi drzwi urzą‐
dzenia. Stosowanie składników zawierających
alkohol może spowodować powstanie mie‐
szanki alkoholu i powietrza.
• Podczas otwierania drzwi urządzenia nie wol‐
no zbliżać do niego iskrzących przedmiotów
ani otwartego płomienia.
• Nie umieszczać łatwopalnych produktów lub
przedmiotów nasączonych łatwopalnymi pro‐
duktami w urządzeniu, na nim lub w jego po‐
bliżu.
OSTRZEŻENIE!
Występuje zagrożenie uszkodzenia
urządzenia.
• Aby zapobiec uszkodzeniu lub odbarwieniu
się emalii:
– Nie należy kłaść naczyń ani innych przed‐
miotów bezpośrednio na dnie urządzenia.
– Nie należy kłaść folii aluminiowej bezpośred‐
nio na dnie urządzenia.
POLSKI 21
– Nie należy wlewać wody bezpośrednio do
rozgrzanego urządzenia.
– Nie należy pozostawiać wilgotnych naczyń
ani potraw w urządzeniu po zakończeniu pie‐
czenia.
– Należy zachować ostrożność podczas wy‐
jmowania i wkładania akcesoriów.
• Odbarwienie emalii nie ma wpływu na działa‐
nie urządzenia. Nie stanowi to wady w rozu‐
mieniu warunków gwarancji.
• Do pieczenia wilgotnych ciast należy używać
głębokiej blachy. Sok z owoców może trwale
zaplamić emalię.
2.3 Konserwacja i czyszczenie
OSTRZEŻENIE!
Występuje zagrożenie odniesieniem ob‐
rażeń, pożarem lub uszkodzeniem urzą‐
dzenia.
• Przed przystąpieniem do konserwacji należy
wyłączyć urządzenie i wyjąć wtyczkę przewo‐
du zasilającego z gniazda elektrycznego.
• Upewnić się, że urządzenie ostygło. Występu‐
je zagrożenie pęknięcia szyb w drzwiach urzą‐
dzenia.
• W przypadku pęknięcia szyb należy je nie‐
zwłocznie wymienić. Należy skontaktować się
z punktem serwisowym.
• Przy zdejmowaniu drzwi urządzenia należy
zachować ostrożność. Drzwi są ciężkie!
• Aby zapobiec uszkodzeniu powierzchni urzą‐
dzenia, należy regularnie ją czyścić.
• Pozostałości tłuszczu lub potraw w urządzeniu
mogą stać się przyczyną pożaru.
• Czyścić urządzenie za pomocą wilgotnej
szmatki. Stosować wyłącznie neutralne środki
czyszczące. Nie używać produktów ściernych,
myjek do szorowania, rozpuszczalników ani
metalowych przedmiotów.
• W przypadku stosowania aerozolu do piekar‐
ników należy przestrzegać wskazówek doty‐
czących bezpieczeństwa umieszczonych na
opakowaniu.
• Nie używać do czyszczenia emalii katalitycz‐
nej (jeśli dotyczy) żadnych detergentów.
2.4 Wewnętrzne oświetlenie
piekarnika
• Żarówka zwykła lub halogenowa zastosowana
w tym urządzeniu jest przeznaczona wyłącz‐

www.electrolux.com
22
nie do urządzeń domowych. Nie należy uży‐
wać jej do oświetlania pomieszczeń.
OSTRZEŻENIE!
Niebezpieczeństwo porażenia prądem.
• Przed przystąpieniem do wymiany żarówki na‐
leży odłączyć urządzenie od źródła zasilania.
• Używać wyłącznie żarówek tego samego ty‐
pu.
2.5 Utylizacja
OSTRZEŻENIE!
Występuje zagrożenie odniesieniem ob‐
rażeń lub uduszeniem.
3. OPIS URZĄDZENIA
1 42 3
5
4
3
9
2
1
8
Pokrętło wyboru funkcji piekarnika
1
Pokrętło zegara
2
Pokrętło regulacji temperatury
3
Wskaźnik temperatury
4
Grill
5
• Odłączyć urządzenie od źródła zasilania.
• Odciąć przewód zasilający i wyrzucić go.
• Wymontować zatrzask drzwi, aby uniemożli‐
wić zamknięcie się dziecka lub zwierzęcia w
urządzeniu.
Oświetlenie piekarnika
6
Wentylator
7
Tabliczka znamionowa
8
Poziomy umieszczenia potrawy
5
6
7
9
3.1 Akcesoria piekarnika
• Ruszt
Do ustawiania naczyń, foremek do ciast oraz
do pieczenia mięs.
• Blacha do pieczenia ciasta
Do pieczenia ciast i ciastek.
• Blacha do pieczenia/opiekania mięsa
Do pieczenia mięsa lub ciasta oraz do zbiera‐
nia skapującego tłuszczu.
4. PRZED PIERWSZYM UŻYCIEM
OSTRZEŻENIE!
Zapoznać się z rozdziałem „Informacje
dotyczące bezpieczeństwa”.
4.1 Czyszczenie wstępne
• Wyjąć wszystkie akcesoria i wyjmowane pro‐
wadnice blach (jeśli dotyczy).
• Przed pierwszym użyciem należy wyczyścić
urządzenie.
Patrz rozdział „Konserwacja i czyszcze‐
nie”.
4.2 Nagrzewanie wstępne
Należy wstępnie nagrzać puste urządzenie w ce‐
lu wypalenia pozostałości smaru.
1.
Ustawić funkcję i temperaturę maksy‐
malną.

2.
Pozostawić włączone urządzenie na 45 mi‐
nut.
3.
Ustawić funkcję i temperaturę maksy‐
malną.
4.
Pozostawić włączone urządzenie na 15 mi‐
nut.
5. CODZIENNA EKSPLOATACJA
POLSKI 23
Akcesoria mogą rozgrzać się mocniej niż zwykle.
Z urządzenia może wydobywać się nieprzyjemny
zapach i dym. Jest to normalne zjawisko. Należy
zapewnić wystarczający dopływ świeżego powie‐
trza.
OSTRZEŻENIE!
Zapoznać się z rozdziałem „Informacje
dotyczące bezpieczeństwa”.
5.1 Włączanie i wyłączanie
urządzenia
1.
Obrócić pokrętło wyboru funkcji piekarnika
na żądaną funkcję.
2.
Obrócić pokrętło regulacji temperatury na
żądaną temperaturę.
Wskaźnik temperatury włącza się, gdy tem‐
peratura w urządzeniu wzrasta.
3.
Aby wyłączyć urządzenie, należy obrócić
pokrętło wyboru funkcji piekarnika oraz po‐
krętło regulacji temperatury do położenia
wyłączenia.
5.2 Funkcje piekarnika
Funkcja piekarnika Zastosowanie
Położenie wyłą‐
czenia
Pieczenie trady‐
cyjne
Pieczenie kon‐
wekcyjne
Grill
Szybki grill
Pizza
Do pieczenia mięsa lub ciasta na jednym poziomie. Jednocześnie
Do pieczenia mięsa lub do pieczenia mięsa i ciast wymagających
jednakowej temperatury, na więcej niż jednym poziomie, bez
Do grillowania niewielkich ilości płaskich potraw na środku rusztu.
Do grillowania płaskich potraw w dużych ilościach. Do przyrzą‐
Do pieczenia pizzy, quiche i placków. Grzałka grilla i dolna grzał‐
ka zapewniają bezpośredni dopływ ciepła, natomiast wentylator
wymusza obieg gorącego powietrza wspomagającego pieczenie
Urządzenie jest wyłączone.
działają górna i dolna grzałka.
przenikania zapachów.
Do przyrządzania tostów.
dzania tostów. Działa cała grzałka grilla.
dodatków lub nadzienia.
Grzałka dolna Do pieczenia ciast z kruchym spodem. Działa tylko dolna grzałka.

www.electrolux.com
24
6. FUNKCJE ZEGARA
6.1 Minutnik + programator
zakończenia czasu pieczenia
Służy do ustawiania czasu automatycznego wy‐
łączenia danej funkcji piekarnika.
1.
Ustawić funkcję piekarnika i temperaturę.
2.
Obrócić pokrętło zegara do oporu, a następ‐
nie ustawić je na wymaganą wartość czasu.
7. DODATKOWE FUNKCJE
3.
Gdy upłynie ustawiony czas, rozlegnie się
sygnał dźwiękowy. Urządzenie wyłączy się.
Normalne ustawienie
gara do pozycji
nie jest sterowane ręcznie. Funkcja minutnik +
programator zakończenia czasu pieczenia jest
wyłączona.
: Obrócić pokrętło ze‐
. W tym ustawieniu urządze‐
7.1 Wentylator chłodzący
Podczas pracy urządzenia wentylator chłodzący
włącza się automatycznie, aby utrzymać po‐
wierzchnie urządzenia w niskiej temperaturze.
Po wyłączeniu urządzenia wentylator chłodzący
kontynuuje działanie do czasu schłodzenia urzą‐
dzenia.
pieczne przegrzanie urządzenia. Aby temu zapo‐
biec, piekarnik wyposażono w termostat bezpie‐
czeństwa, który w razie potrzeby wyłącza zasila‐
nie. Po obniżeniu temperatury piekarnik automa‐
tycznie włączy się ponownie.
7.2 Termostat bezpieczeństwa
Nieprawidłowe działanie urządzenia lub uszko‐
dzone podzespoły mogą spowodować niebez‐
8. PRZYDATNE RADY I WSKAZÓWKI
• Potrawy można umieszczać w urządzeniu na
pięciu różnych poziomach. Poziomy umie‐
szczania potraw liczy się od dołu.
• Urządzenie wyposażono w specjalny układ
obiegu powietrza oraz stałej recyrkulacji pary.
System ten, dzięki obecności pary, umożliwia
przygotowanie delikatnych potraw z chrupiącą
skórką. Zmniejsza on do minimum czas pie‐
czenia i zużycie energii.
• Wewnątrz urządzenia lub na szklanych
drzwiach może skraplać się wilgoć. Jest to
normalne zjawisko. Otwierając drzwi podczas
pieczenia, należy zawsze odsunąć się od
urządzenia. Aby ograniczyć zjawisko skrapla‐
nia pary wodnej, należy uruchamiać urządze‐
nie na 10 minut przed rozpoczęciem piecze‐
nia.
• Wycierać nadmiar wilgoci po każdym użyciu
urządzenia.
• Podczas pieczenia nie należy kłaść przedmio‐
tów bezpośrednio na dnie urządzenia ani nie
8.1 Pieczenie ciast
• Drzwi piekarnika nie należy otwierać przed
• Jeśli wykorzystywane są dwie blachy do pie‐
8.2 Pieczenie mięsa i ryb
• Do pieczenia bardzo tłustych potraw należy
• Po upieczeniu mięsa należy odczekać około
zakrywać jego elementów folią aluminiową.
Może to wpłynąć na efekty pieczenia i spowo‐
dować uszkodzenie emaliowanej powłoki.
upływem co najmniej 3/4 ustawionego czasu
pieczenia.
czenia jednocześnie należy pozostawić jeden
pusty poziom między nimi.
używać głębokiej blachy, aby nie dopuścić do
trwałego zabrudzenia piekarnika.
15 minut przed jego pokrojeniem, aby nie wy‐
ciekły soki.

POLSKI 25
• Aby uniknąć nadmiaru dymu w piekarniku
podczas pieczenia, należy do głębokiej blachy
wlać nieco wody. Aby zapobiec gromadzeniu
się dymu, należy dolewać wody po trochu, za
każdym razem, gdy wyparuje.
W początkowym okresie należy kontrolować wy‐
niki pieczenia. Pozwoli to odnaleźć najlepsze us‐
tawienia (mocy grzania, czasu pieczenia itp.) dla
posiadanych naczyń, przepisów i ilości potraw
pieczonych przy użyciu omawianego urządzenia.
8.3 Czasy pieczenia
Czasy pieczenia zależą od rodzaju potrawy, jej
konsystencji oraz ilości.
8.4 Tabela pieczenia
CIASTA
Pieczenie tradycyjne
RODZAJ PO‐
TRAWY
Ciasta uciera‐
Poziom pie‐
karnika
2 170 3 160 45 - 60 W foremce do
Tem‐
peratu‐
ra [°C]
ne
Kruche ciasto 2 170 3 160 20 - 30 W foremce do
Sernik 1 170 1 160 70 - 80 W foremce do
Jabłecznik
2 170 2 (po lewej
(szarlotka)
Strudel 3 175 2 150 60 - 80 Na blasze do
Tarta z dże‐
2 170 2 (po lewej
mem
Biszkopt 2 170 2 160 50 - 60 W foremce do
Keks/ciasto
2 170 2 150 90 - 120 W foremce do
owocowe
Ciasto ze śliw‐
1 175 2 160 50 - 60 W formie do
kami
Pieczenie konwek‐
cyjne
Poziom
piekarnika
Tem‐
peratu‐
ra [°C]
160 80 - 100 W dwóch forem‐
i po prawej)
165 30 - 40 W foremce do
i po prawej)
Czas pie‐
czenia [mi‐
nuty]
Uwagi
ciasta
ciasta
ciasta o średnicy
26 cm umie‐
szczonej na
ruszcie
kach do ciasta
o średnicy 20 cm
umieszczonych
na ruszcie
pieczenia
ciasta o średnicy
26 cm
ciasta o średnicy
26 cm
ciasta o średnicy
1)
20 cm
1)
chleba
1)

www.electrolux.com
26
Pieczenie konwek‐
cyjne
Poziom
piekarnika
Tem‐
peratu‐
ra [°C]
150
Czas pie‐
czenia [mi‐
Uwagi
nuty]
20 - 30 Na blasze do
pieczenia
RODZAJ PO‐
TRAWY
Małe ciastecz‐
ka – jeden po‐
Pieczenie tradycyjne
Poziom pie‐
karnika
Tem‐
peratu‐
ra [°C]
3 170 3 140 -
ziom
Małe ciastecz‐
ka – dwa po‐
- - 2 i 4 140 150
25 - 35 Na blasze do
pieczenia
ziomy
Ciasteczka/pa‐
luchy – jeden
3 140 3 140 -
150
30 - 35 Na blasze do
pieczenia
poziom
Ciasteczka/pa‐
luchy – dwa
- - 2 i 4 140 150
35 - 40 Na blasze do
pieczenia
poziomy
Bezy 3 120 3 120 80 - 100 Na blasze do
pieczenia
Bułeczki 3 190 3 180 15 - 20 Na blasze do
pieczenia
1)
Eklery 3 190 3 170 25 - 35 Na blasze do
pieczenia
Tarty płaskie 2 180 2 170 45 - 70 W foremce do
ciasta o średnicy
20 cm
Ciasto owoco‐
we
1 160 2 150 110 - 120 W foremce do
ciasta o średnicy
24 cm
Biszkopt królo‐
wej Wiktorii
1)
Rozgrzewać piekarnik wstępnie przez 10 minut.
1 170 1 (po lewej
i po prawej)
160 50 - 60 W foremce do
ciasta o średnicy
1)
20 cm
CHLEB I PIZZA
Pieczenie konwek‐
cyjne
Poziom pie‐
karnika
Tem‐
peratu‐
ra [°C]
Czas pie‐
czenia [mi‐
nuty]
Uwagi
RODZAJ PO‐
TRAWY
Pieczenie tradycyjne
Poziom
piekarnika
Tem‐
peratu‐
ra [°C]
Biały chleb 1 190 1 190 60 - 70 1-2 sztuki po
1)
500 g
Chleb żytni 1 190 1 180 30 - 45 W formie do
chleba

POLSKI 27
Poziom pie‐
250
Pieczenie konwek‐
cyjne
Tem‐
karnika
peratu‐
ra [°C]
1 230 -
250
Czas pie‐
czenia [mi‐
Uwagi
nuty]
10 - 20 Na blasze do
pieczenia ciasta
Pieczenie tradycyjne
RODZAJ PO‐
TRAWY
Poziom
piekarnika
Tem‐
peratu‐
ra [°C]
Pizza 1 230 -
lub głębokiej bla‐
1)
sze
Drożdżówki 3 200 3 190 10 - 20 Na blasze do
pieczenia
1)
Rozgrzewać wstępnie przez 10 minut.
ZAPIEKANKI
Pieczenie konwek‐
cyjne
Poziom
piekarnika
Tem‐
peratu‐
ra [°C]
Czas pie‐
czenia [mi‐
nuty]
Uwagi
RODZAJ PO‐
TRAWY
Zapiekanka
Pieczenie tradycyjne
Poziom
piekarnika
Tem‐
peratu‐
ra [°C]
2 200 2 180 40 - 50 W formie
makaronowa
Zapiekanka
2 200 2 175 45 - 60 W formie
warzywna
Quiche 1 180 1 180 50 - 60
Lasagne 2 180 -
190
Cannelloni 2 180 -
190
1)
Rozgrzewać wstępnie przez 10 minut.
2 180 -
190
2 180 -
190
25 - 40
25 - 40
W formie
W formie
W formie
1)
1)
1)
1)
MIĘSO
Pieczenie konwek‐
cyjne
Poziom
piekarnika
Tem‐
peratu‐
ra [°C]
Czas pie‐
czenia [mi‐
nuty]
Uwagi
RODZAJ PO‐
TRAWY
Pieczenie tradycyjne
Poziom
piekarnika
Tem‐
peratu‐
ra [°C]
Wołowina 2 200 2 190 50 - 70 Na ruszcie
Wieprzowina 2 180 2 180 90 - 120 Na ruszcie
Cielęcina 2 190 2 175 90 - 120 Na ruszcie
Rostbef (krwis‐
2 210 2 200 50 - 60 Na ruszcie
ty)
Rostbef (śred‐
2 210 2 200 60 - 70 Na ruszcie
nio wypieczo‐
ny)

www.electrolux.com
28
Pieczenie konwek‐
cyjne
Poziom
piekarnika
Tem‐
peratu‐
ra [°C]
Czas pie‐
czenia [mi‐
nuty]
Uwagi
RODZAJ PO‐
TRAWY
Rostbef (do‐
Pieczenie tradycyjne
Poziom
piekarnika
Tem‐
peratu‐
ra [°C]
2 210 2 200 70 - 75 Na ruszcie
brze wypieczo‐
ny)
Łopatka wie‐
2 180 2 170 120 - 150 Ze skórą
przowa
Goleń wie‐
2 180 2 160 100 - 120 Dwa kawałki
przowa
Jagnięcina 2 190 2 175 110 - 130 Udziec
Kurczak 2 220 2 200 70 - 85 W całości
Indyk 2 180 2 160 210 - 240 W całości
Kaczka 2 175 2 220 120 - 150 W całości
Gęś 2 175 1 160 150 - 200 W całości
Królik 2 190 2 175 60 - 80 W kawałkach
Zając 2 190 2 175 150 - 200 W kawałkach
Bażant 2 190 2 175 90 - 120 W całości
RYBY
Pieczenie konwek‐
cyjne
Poziom
piekarnika
Tem‐
peratu‐
ra [°C]
Czas pie‐
czenia [mi‐
nuty]
Uwagi
RODZAJ PO‐
TRAWY
Pieczenie tradycyjne
Poziom
piekarnika
Tem‐
peratu‐
ra [°C]
Pstrąg/dorada 2 190 2 175 40 - 55 3-4 ryby
Tuńczyk/łosoś 2 190 2 175 35 - 60 4-6 filetów
8.5 Grill
Przed rozpoczęciem pieczenia należy
nagrzewać wstępnie pusty piekarnik
przez 10 minut.
Ilość Grill Czas pieczenia (min)
RODZAJ POTRA‐WYKawałki (g) Poziom pie‐
karnika
Steki 4 800 4 maks. 12-15 12-14
Befsztyki 4 600 4 maks. 10-12 6-8
Kiełbaski 8 - 4 maks. 12-15 10-12
Kotlety wieprzowe 4 600 4 maks. 12-16 12-14
Kurczak (połówki) 2 1000 4 maks. 30-35 25-30
Tempera‐
tura (°C)
1. strona 2. strona

Ilość Grill Czas pieczenia (min)
RODZAJ POTRA‐WYKawałki (g) Poziom pie‐
karnika
Kebaby 4 - 4 maks. 10-15 10-12
Pierś z kurczaka 4 400 4 maks. 12-15 12-14
Hamburger 6 600 4 maks. 20-30 Filet rybny 4 400 4 maks. 12-14 10-12
Zapiekane kanapki 4-6 - 4 maks. 5-7 Tosty 4-6 - 4 maks. 2-4 2-3
Informacja na temat akryloamidów
Ważne! Zgodnie ze stanem najnowszej wiedzy
naukowej akryloamidy powstające podczas
przyrumieniania potraw (zwłaszcza
zawierających skrobię) mogą stanowić
zagrożenie dla zdrowia. Z tego powodu zaleca
się pieczenie i smażenie potraw w jak
najniższych temperaturach oraz unikanie ich
nadmiernego przyrumieniania.
9. KONSERWACJA I CZYSZCZENIE
Tempera‐
tura (°C)
POLSKI 29
1. strona 2. strona
OSTRZEŻENIE!
Zapoznać się z rozdziałem „Informacje
dotyczące bezpieczeństwa”.
• Przód urządzenia należy myć miękką ście‐
reczką zwilżoną ciepłą wodą z dodatkiem pły‐
nu do mycia naczyń.
• Do czyszczenia powierzchni metalowych nale‐
ży używać zwykłego płynu do mycia naczyń.
• Po każdym użyciu należy oczyścić wnętrze
piekarnika. Dzięki temu można łatwiej usunąć
zabrudzenia i uniknąć ich przypalenia.
• Trudne do usunięcia zabrudzenia należy usu‐
wać za pomocą specjalnego środka do czy‐
szczenia piekarników.
• Po każdym użyciu akcesoriów piekarnika na‐
leży je wyczyścić i pozostawić do wyschnię‐
cia. Do czyszczenia należy użyć miękkiej ście‐
reczki zwilżonej ciepłą wodą z dodatkiem pły‐
nu do mycia naczyń.
• Akcesoriów nieprzywierających nie wolno
czyścić agresywnymi środkami, ostrymi przed‐
miotami ani myć w zmywarce. Może to spo‐
wodować uszkodzenie powłoki nieprzywiera‐
jącej.
Urządzenia wykonane ze stali nie‐
rdzewnej lub aluminium:
Drzwi piekarnika należy czyścić wyłącz‐
nie za pomocą wilgotnej gąbki. Osuszyć
miękką ściereczką.
Nie należy używać myjek stalowych,
kwasów ani produktów ściernych, po‐
nieważ mogą one uszkodzić powierzch‐
nię piekarnika. Panel sterowania piekar‐
nika należy czyścić stosując się do tych
samych zaleceń.
9.1 Czyszczenie uszczelki drzwi
• Należy regularnie sprawdzać uszczelkę drzwi.
Uszczelka drzwi jest założona wokół obramo‐
wania komory piekarnika. Nie wolno korzystać
z urządzenia, jeśli uszczelka drzwi jest uszko‐
dzona. Należy skontaktować się z punktem
serwisowym.
• Aby wyczyścić uszczelkę drzwi, należy zapo‐
znać się z ogólnymi informacjami na temat
czyszczenia.
9.2 Oświetlenie piekarnika
OSTRZEŻENIE!
Zachować ostrożność podczas wymia‐
ny żarówki oświetlenia piekarnika. Wy‐
stępuje zagrożenie porażeniem prą‐
dem.

www.electrolux.com
30
Przed wymianą żarówki oświetlenia piekarnika:
• Wyłączyć piekarnik.
• Wykręcić bezpieczniki ze skrzynki bezpieczni‐
1.
2.
Demontaż drzwi i szyby piekarnika
ków lub wyłączyć wyłącznik obwodu.
Na dnie piekarnika umieścić szmatkę,
aby zapobiec uszkodzeniu żarówki i
szklanego klosza.
Aby uniknąć zabrudzenia żarówki halo‐
genowej tłuszczem, należy chwytać ją
przez szmatkę.
Obrócić szklany klosz w kierunku przeciw‐
nym do ruchu wskazówek zegara, aby go
zdjąć.
Wyczyścić klosz.
3.
Wymienić żarówkę na nową, odpowiednią
do piekarnika, odporną na działanie wyso‐
kich temperatur do 300°C.
Użyć żarówki tego samego typu.
4.
Zamontować klosz.
9.3 Czyszczenie drzwi piekarnika
W drzwiach piekarnika znajdują się dwie szyby.
Drzwi piekarnika i wewnętrzną szybę można wy‐
montować w celu ich wyczyszczenia.
Jeśli drzwi nie zostaną uprzednio zde‐
montowane, mogą się gwałtownie za‐
mknąć podczas wyjmowania z nich
wewnętrznej szyby.
1.
Otworzyć całkowicie drzwi i chwycić za oba
zawiasy.
2.
Unieść i obrócić dźwignie umieszczone na
obu zawiasach.

POLSKI 31
3.
Przymknąć drzwi piekarnika do pierwszej
pozycji otwarcia (do połowy). Następnie po‐
ciągając drzwi do siebie, wyjąć je z moco‐
wania.
4.
Umieścić drzwi na stabilnej powierzchni
przykrytej miękką szmatką.
5.
Zwolnić system blokujący w celu wymonto‐
wania wewnętrznej szyby.
90°
6.
Obrócić oba elementy mocujące o 90° i wy‐
jąć je z mocowań.

www.electrolux.com
32
Montaż szyby i drzwi
7.
Ostrożnie podnieść (krok 1) i wyjąć (krok 2)
szybę.
8.
Umyć szybę wodą z dodatkiem mydła. Os‐
trożnie wytrzeć szybę do sucha.
2
1
Po umyciu należy najpierw włożyć szybę, a na‐
stępnie zamontować drzwi piekarnika. Wykonać
powyższe czynności w odwrotnej kolejności.
Nadruk na szybie powinien być skierowany ku
wewnętrznej stronie drzwi. Należy sprawdzić,
czy po zamontowaniu powierzchnia obramowa‐
nia szyby w miejscu nadruku nie jest szorstka w
dotyku.
Upewnić się, że wewnętrzna szyba została osa‐
dzona prawidłowo. Patrz ilustracja.
10. CO ZROBIĆ, GDY…
OSTRZEŻENIE!
Zapoznać się z rozdziałem „Informacje
dotyczące bezpieczeństwa”.
Problem Prawdopodobna przyczyna Środek zaradczy
Urządzenie nie działa. Urządzenie nie jest włączone. Włączyć urządzenie. Patrz
Urządzenie nie działa. Funkcja minutnik + programa‐
Urządzenie nie działa. Zadziałał bezpiecznik w
Nie działa oświetlenie piekar‐
nika.
tor zakończenia czasu piecze‐
nia jest wyłączona.
skrzynce bezpiecznikowej.
Oświetlenie piekarnika jest
uszkodzone.
rozdział „Codzienna eksploa‐
tacja”.
Ustawić funkcję minutnik +
programator zakończenia
czasu pieczenia. Patrz roz‐
dział „Funkcje zegara”.
Sprawdzić bezpiecznik. Jeżeli
bezpiecznik zadziała więcej
niż jeden raz, należy skontak‐
tować się z wykwalifikowanym
elektrykiem.
Wymienić żarówkę oświetle‐
nia piekarnika.

Problem Prawdopodobna przyczyna Środek zaradczy
Na potrawach i w komorze
piekarnika skrapla się para
wodna i zbierają się skropliny.
Jeżeli rozwiązanie problemu we własnym zakre‐
sie nie jest możliwe, należy skontaktować się ze
sprzedawcą lub punktem serwisowym.
Dane niezbędne dla punktu serwisowego znajdu‐
ją się na tabliczce znamionowej. Tabliczka zna‐
Zaleca się wpisanie danych w tym miejscu:
Model (MOD.) .........................................
Numer produktu (PNC) .........................................
Numer seryjny (S.N.) .........................................
11. DANE TECHNICZNE
Napięcie 230 V
Częstotliwość 50 Hz
Potrawa zbyt długo znajdowa‐
ła się w piekarniku.
mionowa znajduje się na przednim obramowaniu
komory urządzenia.
POLSKI 33
Nie należy pozostawiać po‐
traw w urządzeniu dłużej niż
przez 15–20 minut po zakoń‐
czeniu pieczenia.
12. INSTALACJA
OSTRZEŻENIE!
Zapoznać się z rozdziałem „Informacje
dotyczące bezpieczeństwa”.
12.1 Zabudowa urządzenia
558
573
min. 550
548
20
589
594
5
590
20
min. 560

www.electrolux.com
34
Urządzenie wyposażono w przewód zasilający
oraz wtyczkę.
min. 550
20
600
min. 560
A
12.2 Instalacja elektryczna
OSTRZEŻENIE!
Instalację elektryczną musi wykonać
wykwalifikowana osoba.
Producent nie ponosi odpowiedzialności
za nieprzestrzeganie zaleceń dotyczą‐
cych bezpieczeństwa, które zawarto w
rozdziale „Informacje dotyczące bezpie‐
czeństwa”.
12.3 Przewody
Rodzaje przewodów przeznaczonych do monta‐
żu lub wymiany: H07 RN-F, H05 RN-F, H05
RRF, H05 VV-F, H05 V2V2-F (T90), H05 BB-F.
Dobór przekroju przewodu należy przeprowadzić
na podstawie mocy całkowitej podanej na tab‐
liczce znamionowej oraz w tabeli:
Moc całkowita Przekrój przewodu
maksymalnie
1380 W
B
maksymalnie
2300 W
maksymalnie
3680 W
Przewód ochronny (żółto-zielony) musi być o 2
cm dłuższy od przewodu fazowego i neutralnego
(niebieski i brązowy).
3 x 0,75 mm²
3 x 1 mm²
3 x 1,5 mm²
13. OCHRONA ŚRODOWISKA
Materiały oznaczone symbolem
poddać utylizacji. Opakowanie urządzenia
włożyć do odpowiedniego pojemnika w celu
przeprowadzenia recyklingu.
Należy zadbać o ponowne przetwarzanie
odpadów urządzeń elektrycznych i
elektronicznych, aby chronić środowisko
należy
naturalne oraz ludzkie zdrowie. Nie wolno
wyrzucać urządzeń oznaczonych symbolem
razem z odpadami domowymi. Należy zwrócić
produkt do miejscowego punktu ponownego
przetwarzania lub skontaktować się z
odpowiednimi władzami miejskimi.

POLSKI 35

www.electrolux.com/shop
397295501-D-282012
 Loading...