

AEG ENN2914COW User Manual [de]

ENN2914COW
.................................................. ...............................................
EN Fridge-Freezer User manual 2
DE Kühl - Gefrierschrank Benutzerinformation 25
KK Тоңазытқыш-мұздатқыш Қолдану туралы нұсқаулары 51
ES Frigorífico-congelador Manual de instrucciones 76
2
CONTENTS
4 SAFETY INFORMATION
7 CONTROL PANEL
10 DAILY USE
13 HELPFUL HINTS AND TIPS
14 CARE AND CLEANING
16 WHAT TO DO IF…
18 INSTALLATION
24 TECHNICAL DATA
ENVIRONMENT CONCERNS
Recycle the materials with the symbol
recycle it.
Help protect the environment and human health and to recycle waste of electrical and
electronic appliances. Do not dispose appliances marked with the symbol
household waste. Return the product to your local recycling facility or contact your
municipal office.
VISIT OUR WEBSITE FOR:
- Products
- Brochures
- User manuals
- Trouble shooter
- Service information
www.electrolux.com
LEGEND
Warning - Important Safety information.
General information and tips
Environmental information
Subject to change without notice.
. Put the packaging in applicable containers to
with the
WE’RE THINKING OF YOU
Thank you for purchasing an Electrolux appliance. You’ve chosen a product that brings
with it decades of professional experience and innovation. Ingenious and stylish, it has
been designed with you in mind. So whenever you use it, you can be safe in the
knowledge that you’ll get great results every time.
Welcome to Electrolux.
ACCESSORIES AND CONSUMABLES
In the Electrolux webshop, you’ll find everything you need to keep all your Electrolux
appliances looking spotless and working perfectly. Along with a wide range of
accessories designed and built to the high quality standards you would expect, from
specialist cookware to cutlery baskets, from bottle holders to delicate laundry bags…
ENGLISH 3
Visit the webshop at:
www.electrolux.com/shop
CUSTOMER CARE AND SERVICE
We recommend the use of original spare parts.
When contacting Service, ensure that you have the following data available. The
information can be found on the rating plate.
Model
PNC
Serial Number
4
SAFETY INFORMATION
In the interest of your safety and to ensure
the correct use, before installing and first
using the appliance, read this user manual
carefully, including its hints and warnings.
To avoid unnecessary mistakes and accidents, it is important to ensure that all people using the appliance are thoroughly familiar with its operation and safety features.
Save these instructions and make sure that
they remain with the appliance if it is moved
or sold, so that everyone using it through
its life will be properly informed on appliance use and safety.
For the safety of life and property keep the
precautions of these user's instructions as
the manufacturer is not responsible for
damages caused by omission.
CHILDREN AND VULNERABLE
PEOPLE SAFETY
• This appliance is not intended for use by
persons (including children) with reduced
physical, sensory or mental capabilities,
or lack of experience and knowledge,
unless they have been given supervision
or instruction concerning use of the appliance by a person responsible for their
safety.
Children should be supervised to ensure
that they do not play with the appliance.
• Keep all packaging well away from children. There is risk of suffocation.
• If you are discarding the appliance pull
the plug out of the socket, cut the connection cable (as close to the appliance
as you can) and remove the door to prevent playing children to suffer electric
shock or to close themselves into it.
• If this appliance featuring magnetic door
seals is to replace an older appliance
having a spring lock (latch) on the door
or lid, be sure to make that spring lock
unusable before you discard the old appliance. This will prevent it from becoming a death trap for a child.
GENERAL SAFETY
WARNING!
Keep ventilation openings, in the appliance
enclosure or in the built-in structure, clear
of obstruction.
• The appliance is intended for keeping
foodstuff and/or beverages in a normal
household as explained in this instruction
booklet.
• Do not use a mechanical device or any
artificial means to speed up the thawing
process.
• Do not use other electrical appliances
(such as ice cream makers) inside of refrigerating appliances, unless they are
approved for this purpose by the manufacturer.
• Do not damage the refrigerant circuit.
• The refrigerant isobutane (R600a) is contained within the refrigerant circuit of the
appliance, a natural gas with a high level
of environmental compatibility, which is
nevertheless flammable.
During transportation and installation of
the appliance, be certain that none of the
components of the refrigerant circuit become damaged.
If the refrigerant circuit should become
damaged:
– avoid open flames and sources of igni-
tion
– thoroughly ventilate the room in which
the appliance is situated
• It is dangerous to alter the specifications
or modify this product in any way. Any
damage to the cord may cause a shortcircuit, fire and/or electric shock.
WARNING!
Any electrical component (power
cord, plug, compressor) must be
replaced by a certified service
agent or qualified service personnel
to avoid hazard.
1.
Power cord must not be lengthened.
2.
Make sure that the power plug is not
squashed or damaged by the back
of the appliance. A squashed or
damaged power plug may overheat
and cause a fire.
3.
Make sure that you can come to the
mains plug of the appliance.
4.
Do not pull the mains cable.

5.
If the power plug socket is loose, do
not insert the power plug. There is a
risk of electric shock or fire.
6.
You must not operate the appliance
without the lamp cover (if foreseen)
of interior lighting.
• This appliance is heavy. Care should be
taken when moving it.
• Do not remove nor touch items from the
freezer compartment if your hands are
damp/wet, as this could cause skin
abrasions or frost/freezer burns.
• Avoid prolonged exposure of the appliance to direct sunlight.
• Bulb lamps (if foreseen) used in this appliance are special purpose lamps selected for household appliances use only.
They are not suitable for household room
illumination.
DAILY USE
• Do not put hot pot on the plastic parts in
the appliance.
• Do not store flammable gas and liquid in
the appliance, because they may explode.
• Do not place food products directly
against the air outlet on the rear wall. (If
the appliance is Frost Free)
• Frozen food must not be re-frozen once
it has been thawed out.
• Store pre-packed frozen food in accordance with the frozen food manufacturer's
instructions.
• Appliance's manufacturers storage recommendations should be strictly adhered to. Refer to relevant instructions.
• Do not place carbonated or fizzy drinks
in the freezer compartment as it creates
pressure on the container, which may
cause it to explode, resulting in damage
to the appliance.
• Ice lollies can cause frost burns if consumed straight from the appliance.
CARE AND CLEANING
• Before maintenance, switch off the appliance and disconnect the mains plug
from the mains socket.
• Do not clean the appliance with metal
objects.
ENGLISH 5
• Do not use sharp objects to remove frost
from the appliance. Use a plastic scraper.
• Regularly examine the drain in the refrigerator for defrosted water. If necessary,
clean the drain. If the drain is blocked,
water will collect in the bottom of the appliance.
INSTALLATION
For electrical connection carefully
follow the instructions given in specific paragraphs.
• Unpack the appliance and check if there
are damages on it. Do not connect the
appliance if it is damaged. Report possible damages immediately to the place
you bought it. In that case retain packing.
• It is advisable to wait at least four hours
before connecting the appliance to allow
the oil to flow back in the compressor.
• Adequate air circulation should be
around the appliance, lacking this leads
to overheating. To achieve sufficient ventilation follow the instructions relevant to
installation.
• Wherever possible the back of the product should be against a wall to avoid
touching or catching warm parts (compressor, condenser) to prevent possible
burn.
• The appliance must not be located close
to radiators or cookers.
• Make sure that the mains plug is accessible after the installation of the appliance.
• Connect to potable water supply only (If
a water connection is foreseen).
SERVICE
• Any electrical work required to do the
servicing of the appliance should be carried out by a qualified electrician or competent person.
• This product must be serviced by an authorized Service Centre, and only genuine spare parts must be used.

6
ENVIRONMENT PROTECTION
This appliance does not contain
gasses which could damage the
ozone layer, in either its refrigerant
circuit or insulation materials. The
appliance shall not be discarded
together with the urban refuse and
rubbish. The insulation foam contains flammable gases: the appliance shall be disposed according
to the applicable regulations to obtain from your local authorities.
Avoid damaging the cooling unit,
especially at the rear near the heat
exchanger. The materials used on
this appliance marked by the sym-
are recyclable.
bol
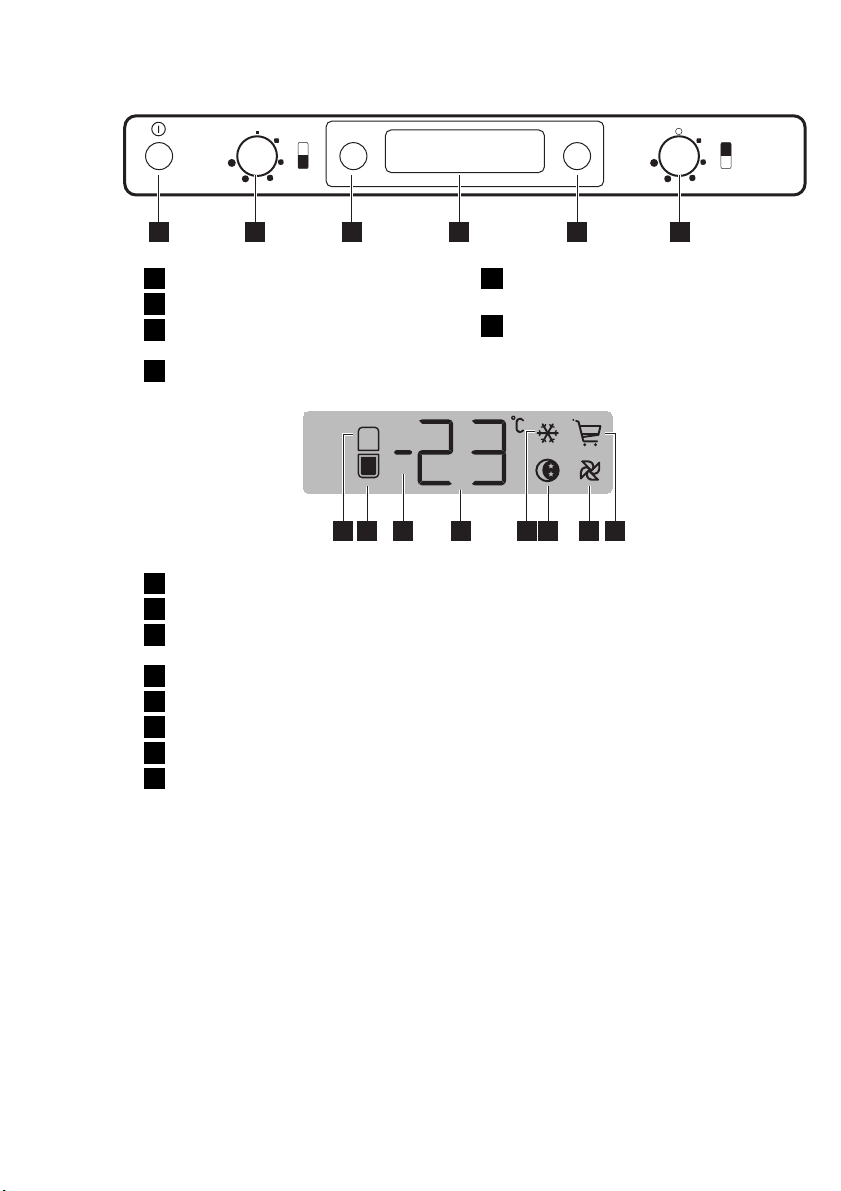
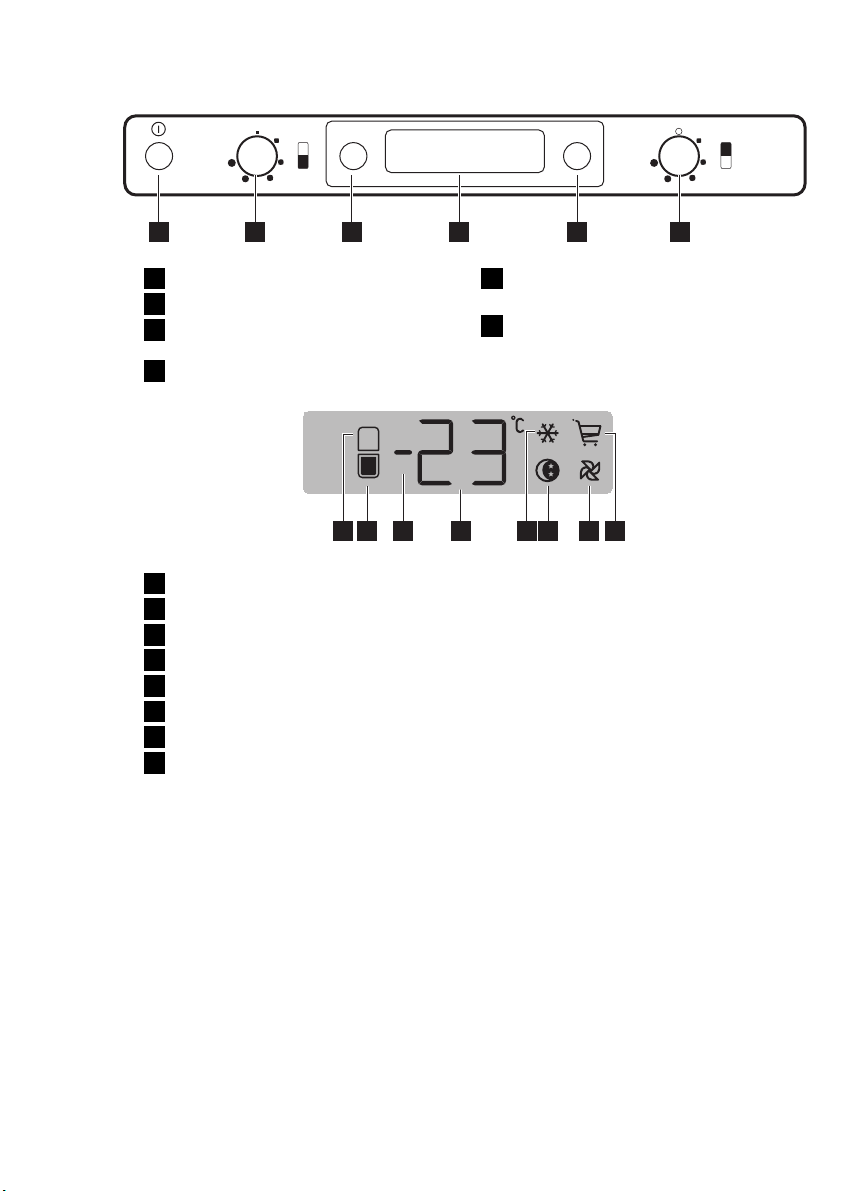
CONTROL PANEL
123 4 5 6
ENGLISH 7
MODE˚C
ON/OFF switch
1
Freezer temperature regulator
2
Fridge-Freezer temperature indication
3
button
Display
4
Display
1 2 3 4 5 8 7 6
Fridge compartment indicator
1
Freezer compartment indicator
2
Positive or negative temperature indi-
3
cator
Temperature indicator
4
Action Freeze function
5
Shopping function
6
D.A.C. function
7
Performance Optimization function
8
SWITCHING ON
After plugging the plug into the power outlet, if the display is not illuminated, press
ON/OFF switch.
As soon as the appliance is turned on, the
following signals will appear on the control
panel:
• Positive or negative temperature indicator will be positive, indicating that the
temperature is positive
• the temperature flashes, the background
of the display is red and you will hear a
buzzer.
1)
In normal conditions.
Function button
5
Alarm reset switch
Fridge temperature regulator
6
Press Function button and the buzzer will
go off (also refer to "Excessive temperature
alarm" ).
Set the desired temperature (refer to "Temperature regulation").
SWITCHING OFF
The appliance is shut off by pressing ON/
OFF switch for more than 1 second.
After this, a countdown of the temperature
from -3 -2 -1 will be shown.
When the appliance is switched off, Display
also goes off.
TEMPERATURE INDICATION
Each time the Fridge-Freezer temperature
indication button is pressed, the display indicates in sequence:
1.
– The Fridge compartment indicator is
on.
– The display indicates the fridge tem-
perature.
2.
– The Freezer compartment indicator
1)
is on.
– The display indicates the freezer
temperature.
8
In any case, after 10 seconds normal display conditions are restored.
FUNCTIONS MENU
Each time Function button is pressed, the
following functions are activated in a clockwise direction:
• Action Freeze function
• Shopping function
• D.A.C. function
• Performance Optimization function
• no symbol: normal operation.
You can set one function ON at a
time.
To set the functions OFF, press the Function button several times until no icon appears.
TEMPERATURE REGULATION
The temperature within the appliance is
controlled by the Temperature regulator situated at the top of the appliance.
The temperature of the fridge compartment
may be regulated by rotating the Fridge
temperature regulator, and may vary between more or less +2°C and +8°C.
The temperature of the freezer compartment may be regulated by rotating the
Freezer temperature regulator, and may
vary between more or less -15°C and
-24°C.
By turning the Temperature regulator, the
display flashes and shows the desired temperature.
For a correct storage of the food the following temperatures should be set:
+5°C in the fridge
-18°C in the freezer.
After having set the desired temperature, if
the Temperature regulator is not rotated
within 5 seconds, the temperature of the
freezer compartment will be indicated.
To operate the appliance, proceed as follows:
• turn the Temperature regulator clockwise
to obtain the maximum coldness
• turn the Temperature regulator counterclockwise to obtain the minimum coldness.
The intermediate position is usually the
most suitable.
However, the exact setting should be
chosen keeping in mind that the temperature inside the appliance depends on:
• room temperature
• how often the door is opened
• the quantity of food stored
• the location of the appliance.
PERFORMANCE OPTIMIZATION
FUNCTION
The Performance optimization function is
activated by pressing Function button (several times if necessary) until the corre-
sponding icon appears
In this condition the chosen temperatures
are automatically set, in the best conditions
for storing food and therefore any possible
operation through the keys does not cause
any change as long as this function is activated.
It is possible to deactivate the function at
any time by pressing Function button (see
"Activation of functions" ) .
.
SHOPPING FUNCTION
If you need to insert a large amount of
warm food, for example after doing the
grocery shopping, we suggest activating
the Shopping function to chill the products
more rapidly and to avoid warming the other food which is already in the refrigerator.
The Shopping function is activated by
pressing Function button (several times if
necessary) until the corresponding icon ap-
pears
The Shopping function shuts off automatically after approximately 6 hours.
During the Shopping function also the fan
inside the refrigerator compartment is automatically activated.
It is possible to deactivate the function at
any time by pressing Function button (refer
to "Functions Menu").
.
The fan inside the refrigerator compartment is automatically activated
also when the room temperature is
high (over 38°C), even though the
Shopping function is not activated.

ACTION FREEZE FUNCTION
To freeze fresh foods, you will need to activate the Action Freeze function. Press
Function button (several times if necessary)
until the corresponding icon appears.
This function stops automatically after 52
hours.
It is possible to deactivate the function at
any time by pressing Function button (refer
to "Functions Menu").
EXCESSIVE TEMPERATURE
ALARM
An increase in the temperature in the freezer compartment (for example due to a
power failure) is indicated by:
• flashing temperature
• freezer compartment flashing (Freezer
compartment indicator )
• red illumination of display
• sounding of buzzer
• alarm symbol.
When normal conditions are restored:
• the acoustic signal shuts off
• the temperature value continues to flash
• the display illumination remains red.
When you press Function button / Alarm
reset switch to deactivate the alarm, the
highest temperature reached in the com-
partment appears on indicator
some seconds.
At this point the flashing stops and the display illumination changes over from red to
white.
During the alarm phase, the buzzer can be
switched off by pressing Function button /
Alarm reset switch.
The illumination of the display remains red
until normal storage conditions are restored.
for
ENGLISH 9
10
DAILY USE
CLEANING THE INTERIOR
Before using the appliance for the first time,
wash the interior and all internal accessories with lukewarm water and some neutral
soap so as to remove the typical smell of a
brand-new product, then dry thoroughly.
TEMPERATURE INDICATOR
FREEZING FRESH FOOD
The freezer compartment is suitable for
freezing fresh food and storing frozen and
deep-frozen food for a long time.
To freeze fresh food activate the Action
Freeze function at least 24 hours before
placing the food to be frozen in the freezer
compartment.
Place the fresh food to be frozen in the in
the upper part of the freezer, as this is the
coldest point.
The maximum amount of food that can be
frozen in 24 hours is specified on the rat-
ing plate, a label located on the inside of
the appliance.
The freezing process lasts 24 hours: during
this period do not add other food to be frozen.
STORAGE OF FROZEN FOOD
When first starting-up or after a period out
of use, before putting the products in the
compartment let the appliance run at least
12 hours on the Action Freeze setting.
If large quantities of food are to be stored,
remove all drawers and baskets from appliance and place food on cooling shelves to
obtain the best performance.
Do not use detergents or abrasive
powders, as these will damage the
finish.
This appliance is sold in France.
In accordance with regulations valid in this
country it must be provided with a special
device (see figure) placed in the lower compartment of the fridge to indicate the coldest zone of it.
WARNING!
Make sure that foods do not exceed the load limit stated on the
side of the upper section (where
applicable)
In the event of accidental defrosting, for example due to a power
failure, if the power has been off for
longer that the value shown in the
technical characteristics chart under "rising time", the defrosted food
must be consumed quickly or
cooked immediately and then refrozen (after cooling).
THAWING
Deep-frozen or frozen food, prior to being
used, can be thawed in the refrigerator
compartment or at room temperature, depending on the time available for this operation.
Small pieces may even be cooked still frozen, directly from the freezer: in this case,
cooking will take longer.
COLD ACCUMULATORS
The freezer contains at least one cold accumulator which increases storage time in
the event of a power cut or breakdown.
ICE-CUBE PRODUCTION
This appliance is equipped with one or
more trays for the production of ice-cubes.
Fill these trays with water, then put them in
the freezer compartment.
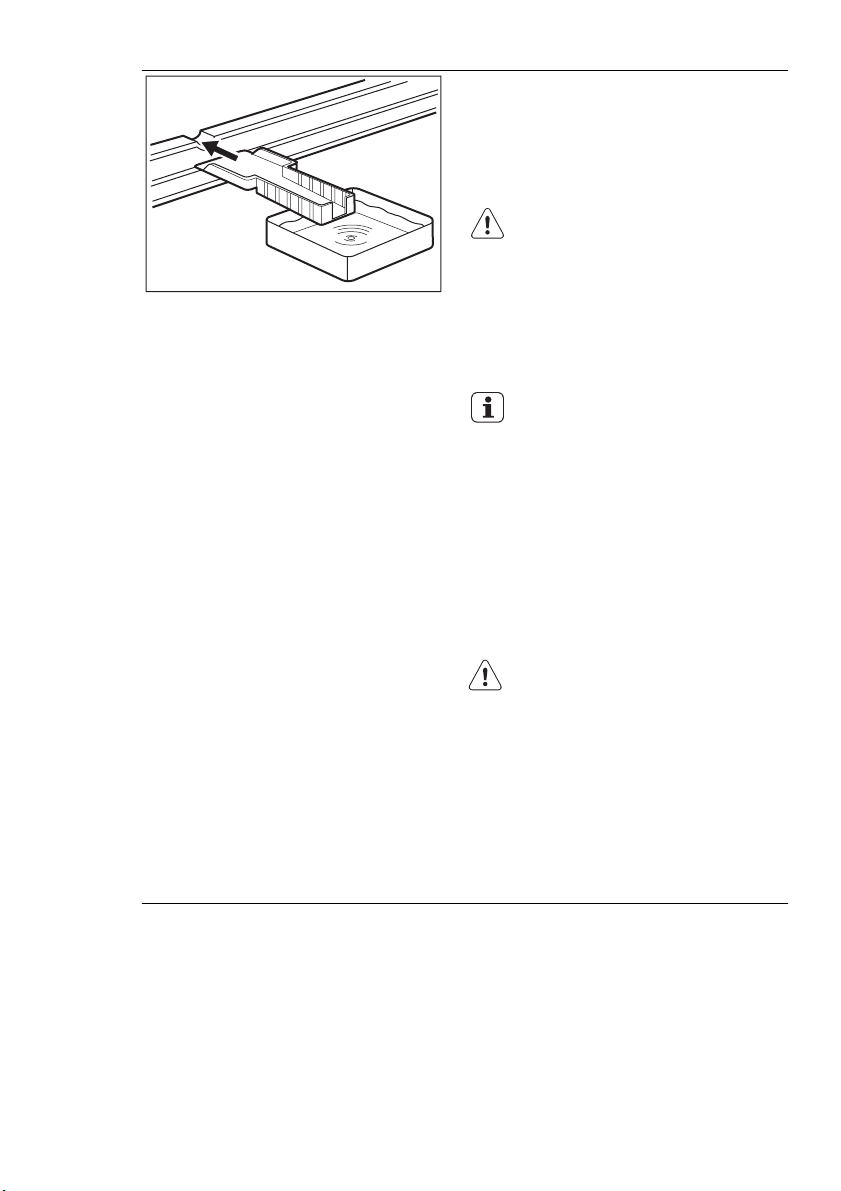
MOVABLE SHELVES
POSITIONING THE DOOR SHELVES
ENGLISH 11
Do not use metallic instruments to
remove the trays from the freezer.
The walls of the refrigerator are equipped
with a series of runners so that the shelves
can be positioned as desired.
For better use of space, the front halfshelves can lie over the rear ones.
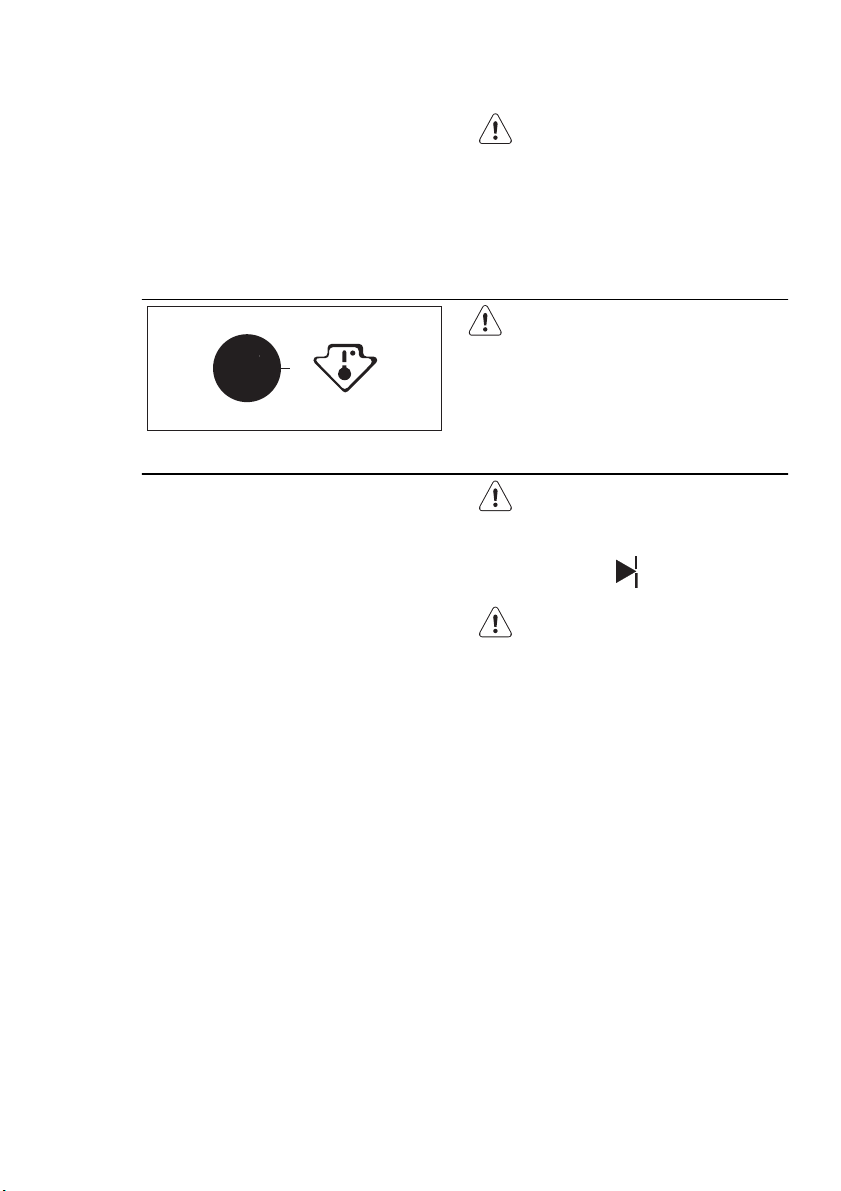
To permit storage of food packages of various sizes, the door shelves can be placed
at different heights.
To make these adjustments proceed as follow: gradually pull the shelf in the direction
of the arrows until it comes free, then reposition as required.
1
2
12
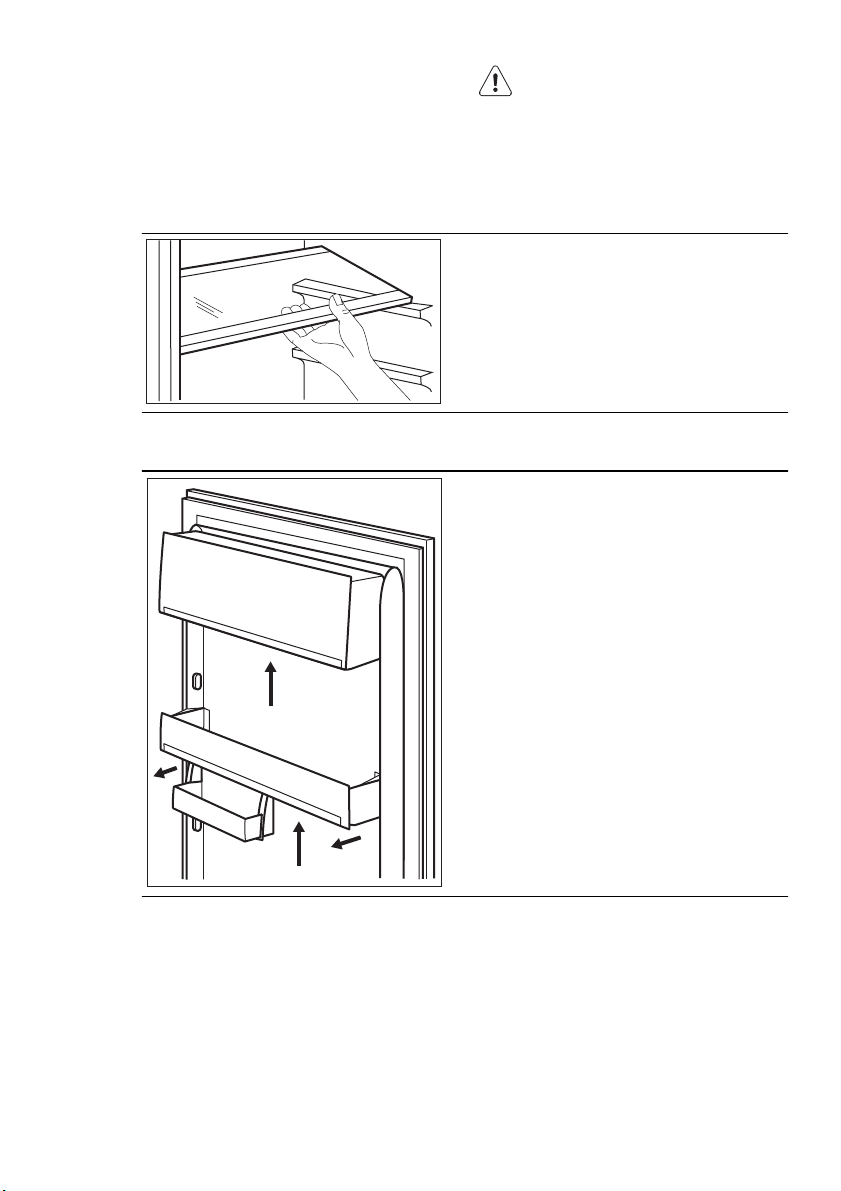
HUMIDITY CONTROL
The glass shelf incorporates a device with
slits (adjustable by means of a sliding lever),
which makes it possible to regulate the
temperature in the vegetable drawer(s).
When the ventilation slots are closed:
the natural moisture content of the food in
the fruit and vegetable compartments is
preserved for longer.
When the ventilation slots are opened:
more air circulation results in a lower air
moisture content in the fruit and vegetable
compartments.
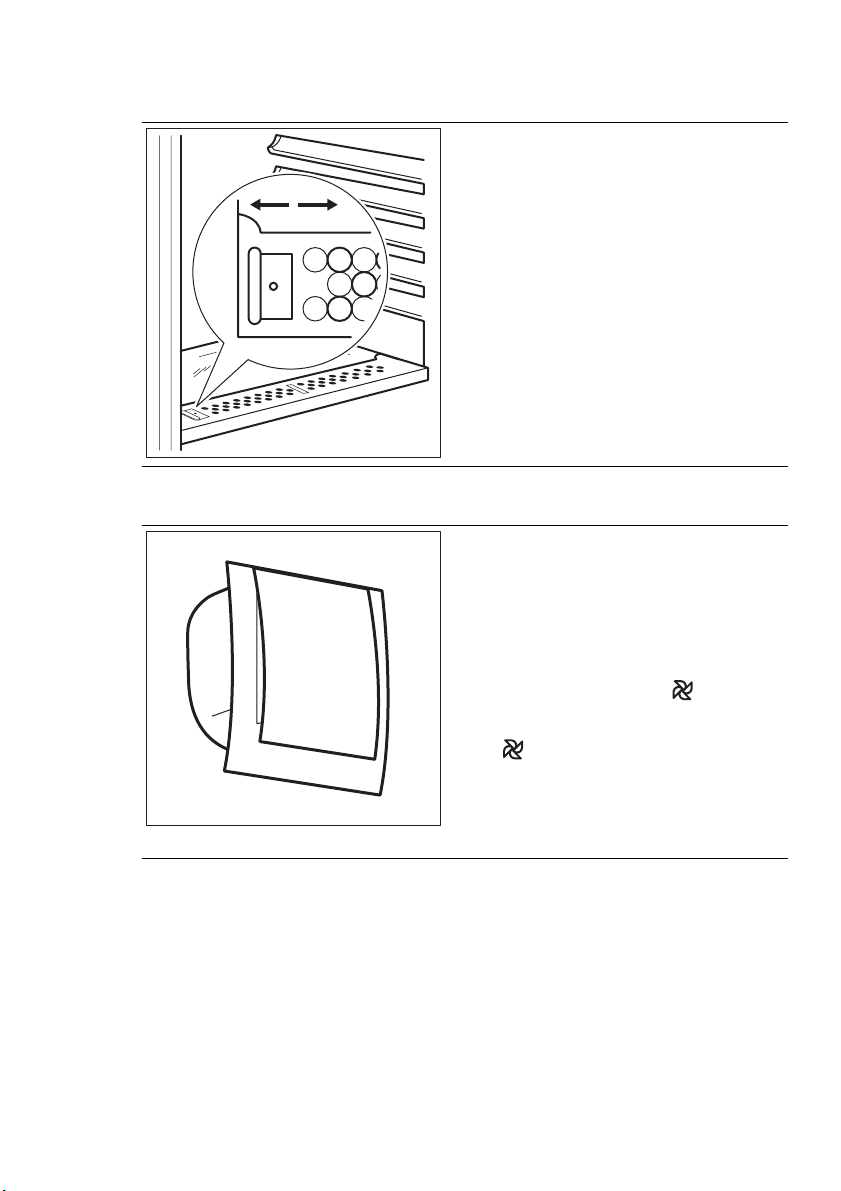
AIR RECYCLING - (D.A.C. FUNCTION)
The refrigerator compartment is equipped
with a special D.A.C. (Dynamic Air Cooling)
fan.
This device allows rapid cooling of foods
and a more uniform temperature in the
compartment.
Set the fan to ON by pressing the Function
button (several times if necessary) until the
corresponding icon appears
It is possible to set the fan OFF at any time
by pressing the Function button until the
goes out of view.
icon
When the ambient temperature exceeds
25°C, set the fan to ON.
When the room temperature is higher than
38°C or when the Shopping function is ON,
the fan is automatically ON.
.

HELPFUL HINTS AND TIPS
ENGLISH 13
HINTS FOR ENERGY SAVING
• Do not open the door frequently or leave
it open longer than absolutely necessary.
• If the ambient temperature is high and
the Temperature Regulator is set to low
temperature and the appliance is fully
loaded, the compressor may run continuously, causing frost or ice on the evaporator. If this happens, set the Temperature Regulator toward warmer settings to
allow automatic defrosting and so a saving in electricity consumption.
HINTS FOR FRESH FOOD
REFRIGERATION
To obtain the best performance:
• do not store warm food or evaporating
liquids in the refrigerator
• do cover or wrap the food, particularly if
it has a strong flavour
• position food so that air can circulate
freely around it
HINTS FOR REFRIGERATION
Useful hints:
Meat (all types) : wrap in polythene bags
and place on the glass shelf above the vegetable drawer.
For safety, store in this way only one or two
days at the most.
Cooked foods, cold dishes, etc..: these
should be covered and may be placed on
any shelf.
Fruit and vegetables: these should be thoroughly cleaned and placed in the special
drawer(s) provided.
Butter and cheese: these should be placed
in special airtight containers or wrapped in
aluminium foil or polythene bags to exclude
as much air as possible.
Milk bottles: these should have a cap and
should be stored in the bottle rack on the
door.
Bananas, potatoes, onions and garlic, if not
packed, must not be kept in the refrigerator.
• the maximum quantity of food which can
be frozen in 24 hrs. is shown on the rating plate;
• the freezing process takes 24 hours. No
further food to be frozen should be added during this period;
• only freeze top quality, fresh and thoroughly cleaned, foodstuffs;
• prepare food in small portions to enable
it to be rapidly and completely frozen
and to make it possible subsequently to
thaw only the quantity required;
• wrap up the food in aluminium foil or polythene and make sure that the packages
are airtight;
• do not allow fresh, unfrozen food to
touch food which is already frozen, thus
avoiding a rise in temperature of the latter;
• lean foods store better and longer than
fatty ones; salt reduces the storage life of
food;
• water ices, if consumed immediately after removal from the freezer compartment, can possibly cause the skin to be
freeze burnt;
• it is advisable to show the freezing in
date on each individual pack to enable
you to keep tab of the storage time.
HINTS FOR STORAGE OF
FROZEN FOOD
To obtain the best performance from this
appliance, you should:
• make sure that the commercially frozen
foodstuffs were adequately stored by the
retailer;
• be sure that frozen foodstuffs are transferred from the foodstore to the freezer
in the shortest possible time;
• not open the door frequently or leave it
open longer than absolutely necessary;
• once defrosted, food deteriorates rapidly
and cannot be refrozen;
• do not exceed the storage period indicated by the food manufacturer.
HINTS FOR FREEZING
To help you make the most of the freezing
process, here are some important hints:
14
CARE AND CLEANING
CAUTION!
Unplug the appliance before carrying out any maintenance operation.
This appliance contains hydrocarbons in its cooling unit; maintenance and recharging must therefore only be carried out by authorized technicians.
PERIODIC CLEANING
The equipment has to be cleaned regularly:
• clean the inside and accessories with
lukewarm water and some neutral soap.
• regularly check the door seals and wipe
clean to ensure they are clean and free
from debris.
• rinse and dry thoroughly.
Do not pull, move or damage any
pipes and/or cables inside the cabinet.
Never use detergents, abrasive
powders, highly perfumed cleaning
products or wax polishes to clean
the interior as this will damage the
surface and leave a strong odour.
Clean the condenser (black grill) and the
compressor at the back of the appliance
with a brush. This operation will improve
the performance of the appliance and save
electricity consumption.
Many proprietary kitchen surface cleaners
contain chemicals that can attack/damage
the plastics used in this appliance. For this
reason it is recommended that the outer
casing of this appliance is only cleaned with
warm water with a little washing-up liquid
added.
After cleaning, reconnect the equipment to
the mains supply.
DEFROSTING OF THE REFRIGERATOR
Take care of not to damage the
cooling system.
DEFROSTING THE FREEZER
A certain amount of frost will always form
on the freezer shelves and around the top
compartment.
Defrost the freezer when the frost layer reaches a thickness of about 3-5 mm.
Frost is automatically eliminated from the
evaporator of the refrigerator compartment
every time the motor compressor stops,
during normal use. The defrost water drains
out through a trough into a special container at the back of the appliance, over the
motor compressor, where it evaporates.
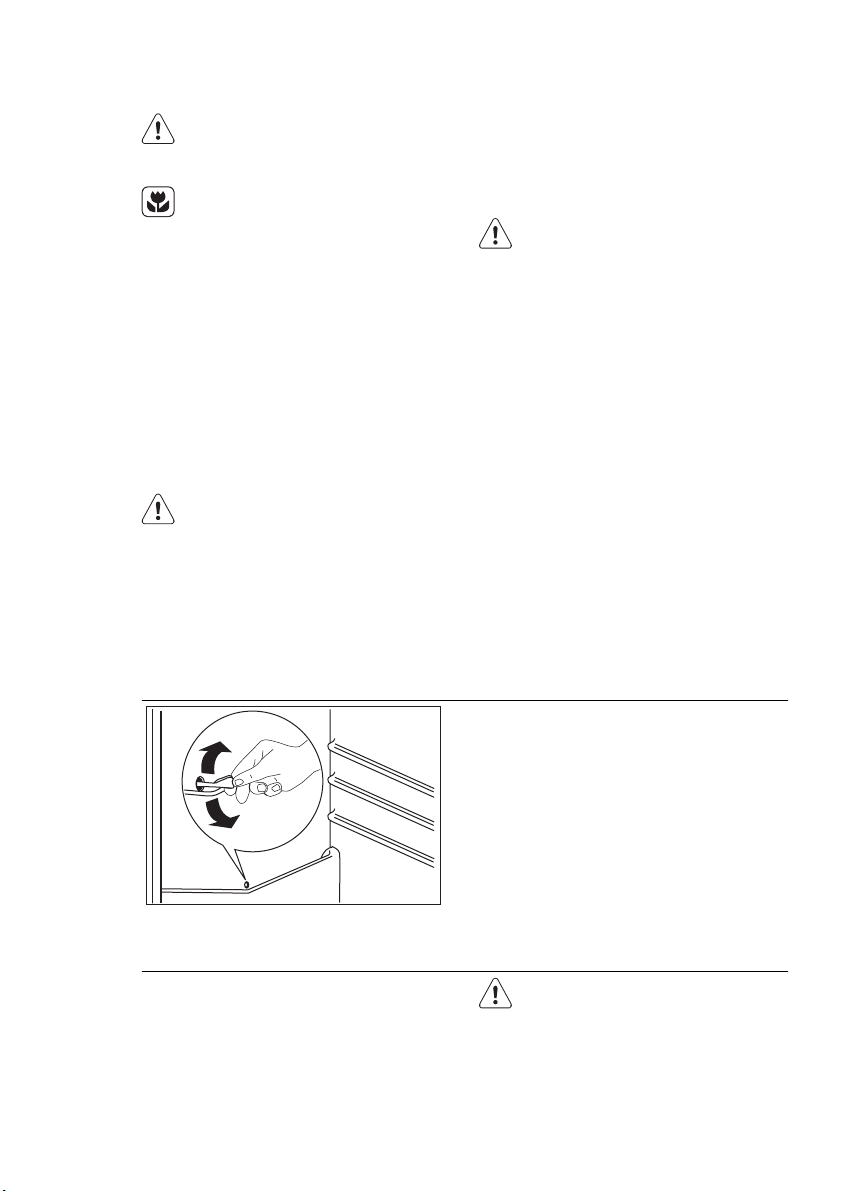
Periodically clean the defrost water drain
hole in the middle of the refrigerator compartment channel to prevent the water
overflowing and dripping onto the food inside. Use the special cleaner provided,
which you will find already inserted into the
drain hole.
About 12 hours prior to defrosting,
set the Temperature regulator toward higher settings, in order to
build up sufficient chill reserve for
the interruption in operation.
ENGLISH 15
To remove the frost, follow the instructions
below:
1.
Switch off the appliance.
2.
Remove any stored food, wrap it in
several layers of newspaper and put it
in a cool place.
CAUTION!
Do not touch frozen goods with
wet hands. Hands can freeze to
the goods.
3.
Leave the door open and insert the
plastic scraper in the appropriate seating at the bottom centre, placing a basin underneath to collect the defrost
water.
In order to speed up the defrosting
process, place a pot of warm water
in the freezer compartment. In addition, remove pieces of ice that
break away before defrosting is
complete.
4.
When defrosting is completed, dry the
interior thoroughly and keep the scraper for future use.
5.
Switch on the appliance.
6.
After two or three hours, reload the
previously removed food into the compartment.
PERIODS OF NON-OPERATION
When the appliance is not in use for long
periods, take the following precautions:
• disconnect the appliance from elec-
tricity supply
• remove all food
• defrost (if foreseen) and clean the appliance and all accessories
• leave the door/doors ajar to prevent unpleasant smells.
Never use sharp metal tools to scrape off
frost from the evaporator as you could
damage it.
Do not use a mechanical device or any artificial means to speed up the thawing process other than those recommended by the
manufacturer.
A temperature rise of the frozen food
packs, during defrosting, may shorten their
safe storage life.
If the cabinet will be kept on, ask somebody to check it once in a while to prevent
the food inside from spoiling in case of a
power failure.
16
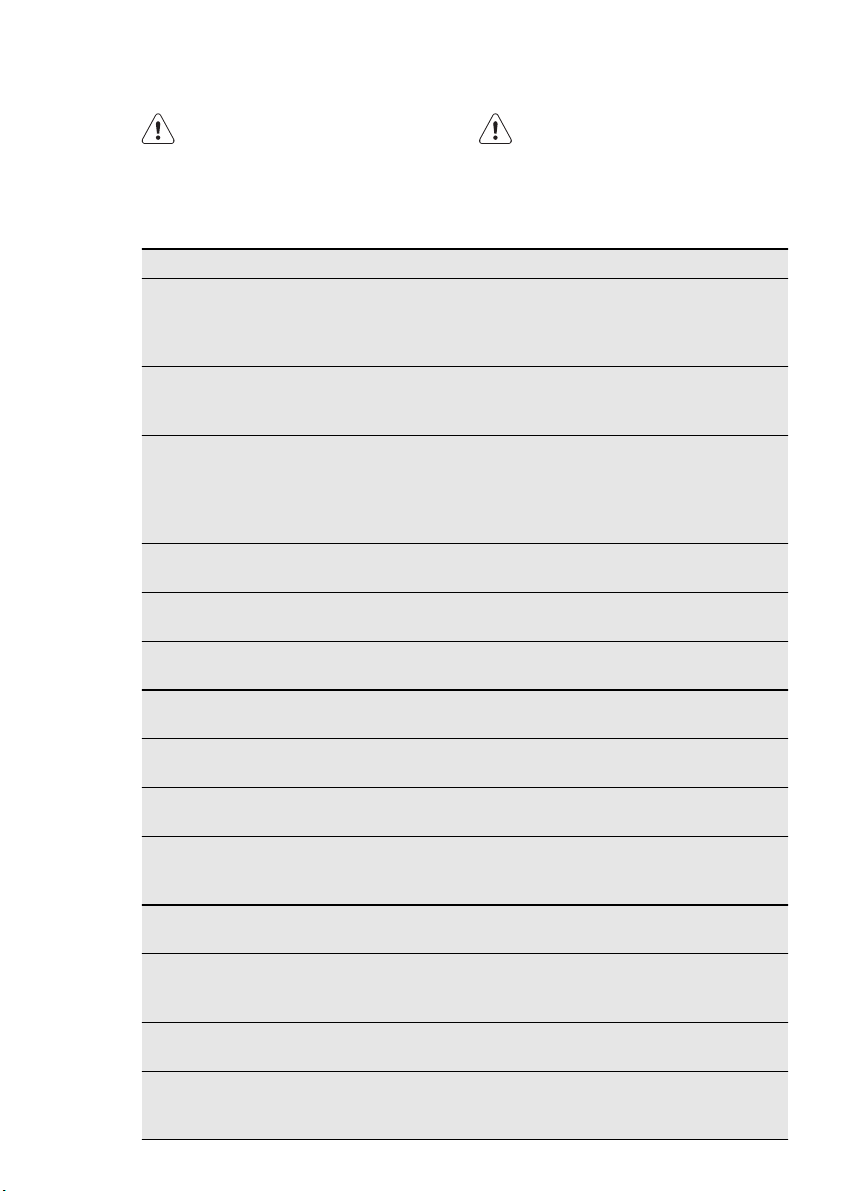
WHAT TO DO IF…
WARNING!
Before troubleshooting, disconnect
the mains plug from the mains
socket.
Only a qualified electrician or competent person must do the troubleshooting that is not in this manual.
There are some sounds during normal use (compressor, refrigerant
circulation).
Problem Possible cause Solution
The appliance does
not operate. The
The appliance is switched
off.
Switch on the appliance.
lamp does not operate.
The mains plug is not con-
nected to the mains socket
Connect the mains plug to
the mains socket correctly.
correctly.
The appliance has no pow-
er. There is no voltage in
the mains socket.
Connect a different electrical
appliance to the mains socket.
Contact a qualified electrician.
The buzzer sounds. The temperature in the
freezer is too high.
The lamp does not
The lamp is in stand-by. Close and open the door.
Refer to "Excessive Temperature Alarm"
work.
The lamp is defective. Refer to "Replacing the
lamp".
The compressor operates continually.
The door is not closed cor-
The temperature is not set
correctly.
Set a higher temperature.
Refer to "Closing the door".
rectly.
The door has been opened
too frequently.
The product temperature is
too high.
Do not keep the door open
longer than necessary.
Let the product temperature
decrease to room temperature before storage.
The room temperature is
too high.
Water flows on the
rear plate of the refrigerator.
Water flows into the
During the automatic defrosting process, frost defrosts on the rear plate.
The water outlet is clogged. Clean the water outlet.
Decrease the room temperature.
This is correct.
refrigerator.
Products prevent that wa-
ter flows into the water col-
Make sure that products do
not touch the rear plate.
lector.
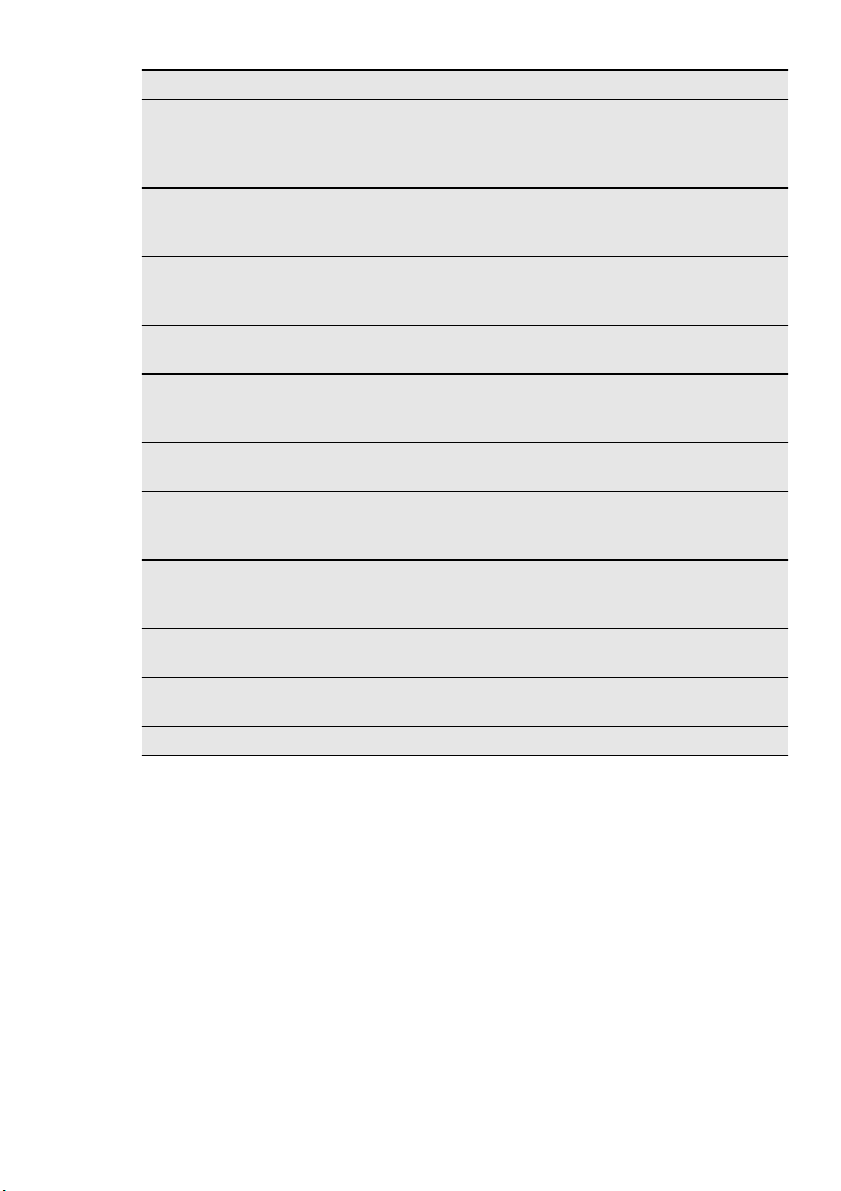
Problem Possible cause Solution
Water flows on the
ground.
The melting water outlet
does not flow in the evaporative tray above the com-
Attach the melting water
outlet to the evaporative
tray.
pressor.
The temperature in
the appliance is too
The temperature regulator
is not set correctly.
Set a higher temperature.
low.
The temperature in
the appliance is too
The temperature regulator
is not set correctly.
Set a lower temperature.
high.
The door is not closed cor-
Refer to "Closing the door".
rectly.
The product temperature is
too high.
Let the product temperature
decrease to room temperature before storage.
Many products are stored
at the same time.
The temperature in
the refrigerator is too
There is no cold air circulation in the appliance.
high.
The temperature in
the freezer is too
Products are too near to
each other.
Store less products at the
same time.
Make sure that there is cold
air circulation in the appliance.
Store products so that there
is cold air circulation.
high.
There is too much
frost.
The door is not closed cor-
Food is not wrapped correctly.
Wrap the food correctly.
Refer to "Closing the door".
rectly.
REPLACING THE LAMP
The appliance is equipped with a longlife
LED interior light.
Only service is allowed to replace the lighting device. Contact your Service Center .
ENGLISH 17
CLOSING THE DOOR
1.
Clean the door gaskets.
2.
If necessary, adjust the door. Refer to
"Installation".
3.
If necessary, replace the defective door
gaskets. Contact the Service Center.
18
INSTALLATION
WARNING!
Read the "Safety Information" carefully for your safety and correct operation of the appliance before installing the appliance.
POSITIONING
Install this appliance at a location where the
ambient temperature corresponds to the
climate class indicated on the rating plate
of the appliance:
Cli-
Ambient temperature
mate
class
SN +10°C to + 32°C
N +16°C to + 32°C
ST +16°C to + 38°C
T +16°C to + 43°C
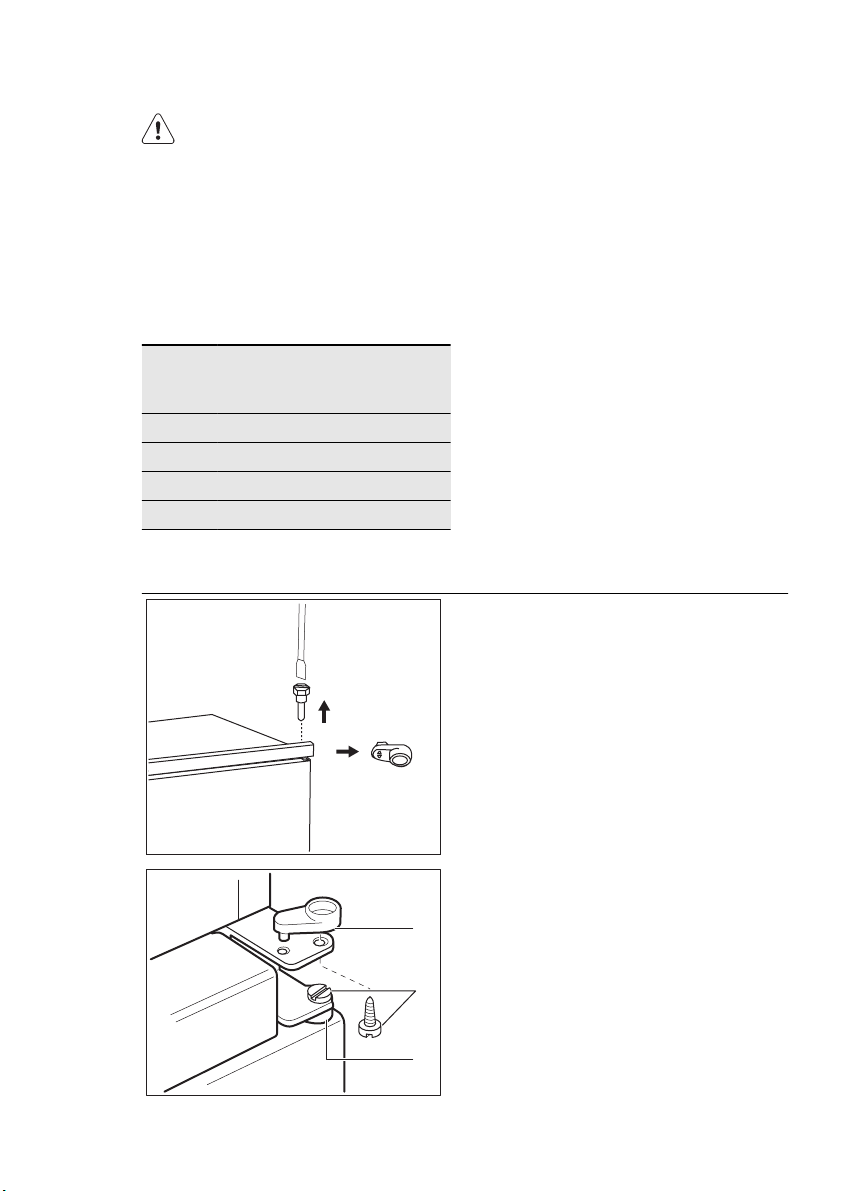
DOOR REVERSIBILITY
ELECTRICAL CONNECTION
Before plugging in, ensure that the voltage
and frequency shown on the rating plate
correspond to your domestic power supply.
The appliance must be earthed. The power
supply cable plug is provided with a contact for this purpose. If the domestic power
supply socket is not earthed, connect the
appliance to a separate earth in compliance with current regulations, consulting a
qualified electrician.
The manufacturer declines all responsibility
if the above safety precautions are not observed.
This appliance complies with the E.E.C. Directives.
The door of the appliance opens to the
right. If you want to open the door to the
left, do these steps before you install the
appliance:
• Loosen the upper pin and remove the
spacer.
• Remove the upper pin and the upper
door.
• Unscrew the pins (B) and spacers (C).
C
B
C
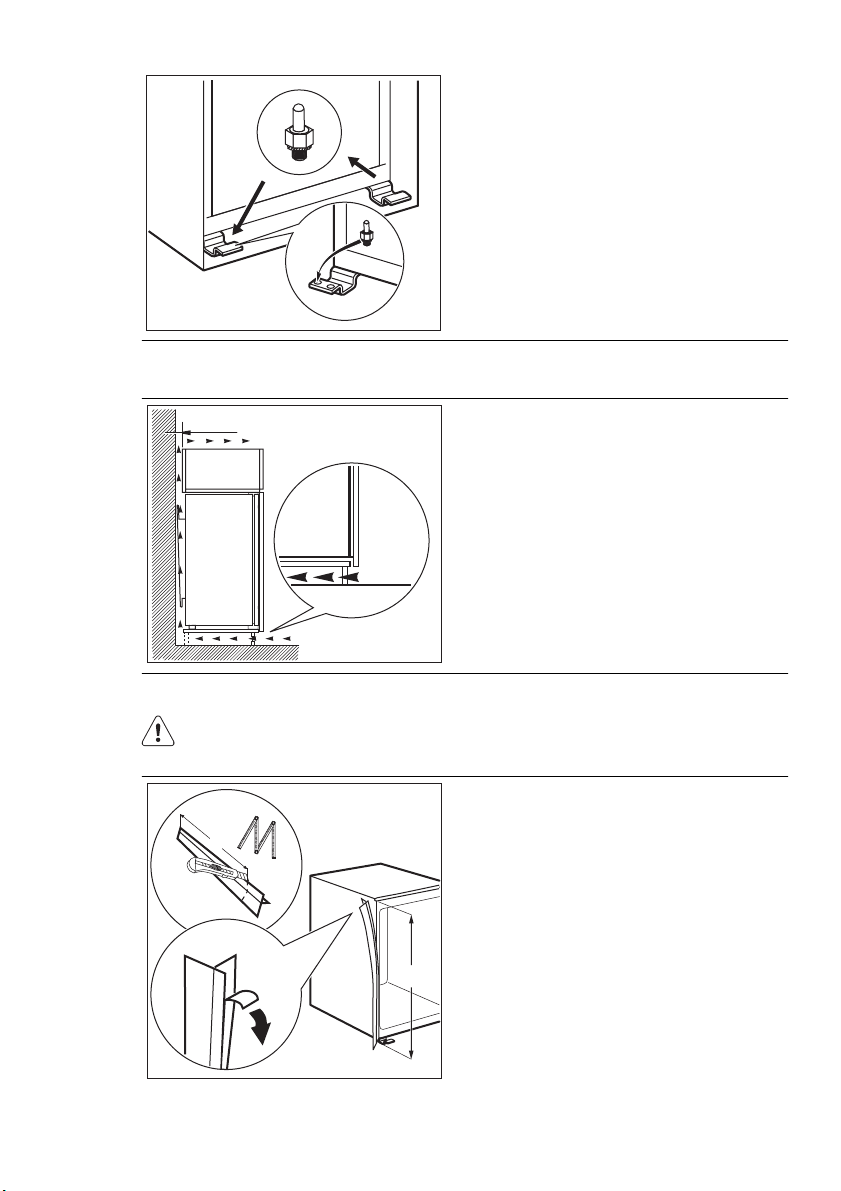
VENTILATION REQUIREMENTS
ENGLISH 19
• Remove the lower door.
• Loosen the lower pin.
On the opposite side:
• Install the lower pin.
• Install the lower door.
• Refit the pins (B) and the spacers (C) on
the middle hinge on the opposite side.
• Install the upper door.
• Tighten the spacer and the upper pin.
5 cm
min.
200 cm
2
min.
200 cm
INSTALLING THE APPLIANCE
CAUTION!
Make sure that the mains cable
can move freely.
x
x
The airflow behind the appliance must be
sufficient.
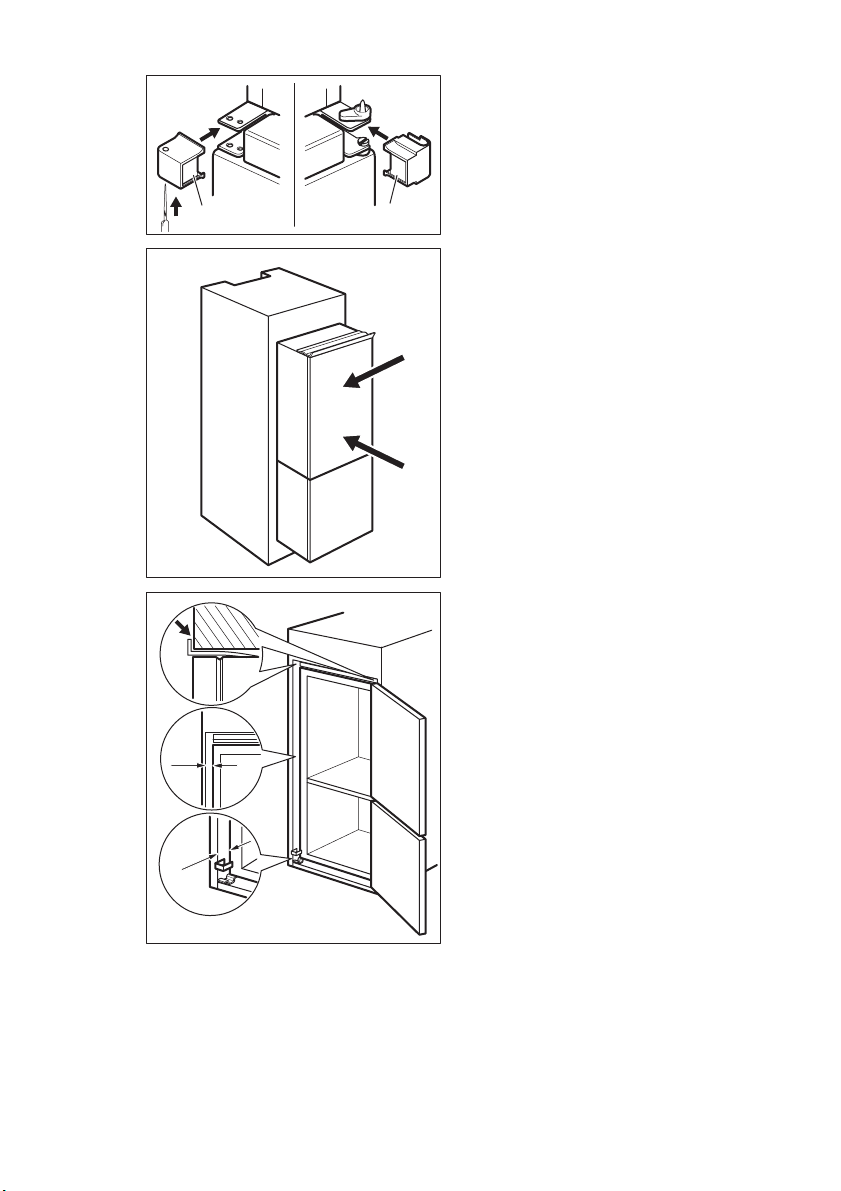
2
Do these steps.
If necessary cut the adhesive sealing strip
and then apply it to the appliance as shown
in figure.
20
Drill the hinge cover A, as shown in figure.
Apply the covers A and A1 (in the accessories bag) in to the middle hinge.
A1A
Install the appliance in the niche.
Push the appliance in the direction of the arrow (1) until the upper gap cover stops
against the kitchen furniture.
2
Push the appliance in the direction of the arrow (2) against the cupboard on the opposite side of the hinge.
1
Adjust the appliance in the niche.
Make sure that the distance between the appliance and the cupboard front-edge is 44
mm.
The lower hinge cover (in the accessories
bag) makes sure that the distance between
the appliance and the kitchen furniture is
correct.
4 mm
Make sure that the clearance between the
appliance and the cupboard is 4 mm.
Open the door. Put the lower hinge cover in
position.
44 mm
ENGLISH 21
Attach the appliance to the niche with 4
screws.
I
I
Remove the correct part from the hinge cover (E). Make sure to remove the part DX, in
the case of right hinge, SX in opposite case.
Attach the covers (C, D) to the lugs and the
hinge holes.
Install the vent grille (B).
C
Attach the hinge covers (E) to the hinge.
D
E
E
B
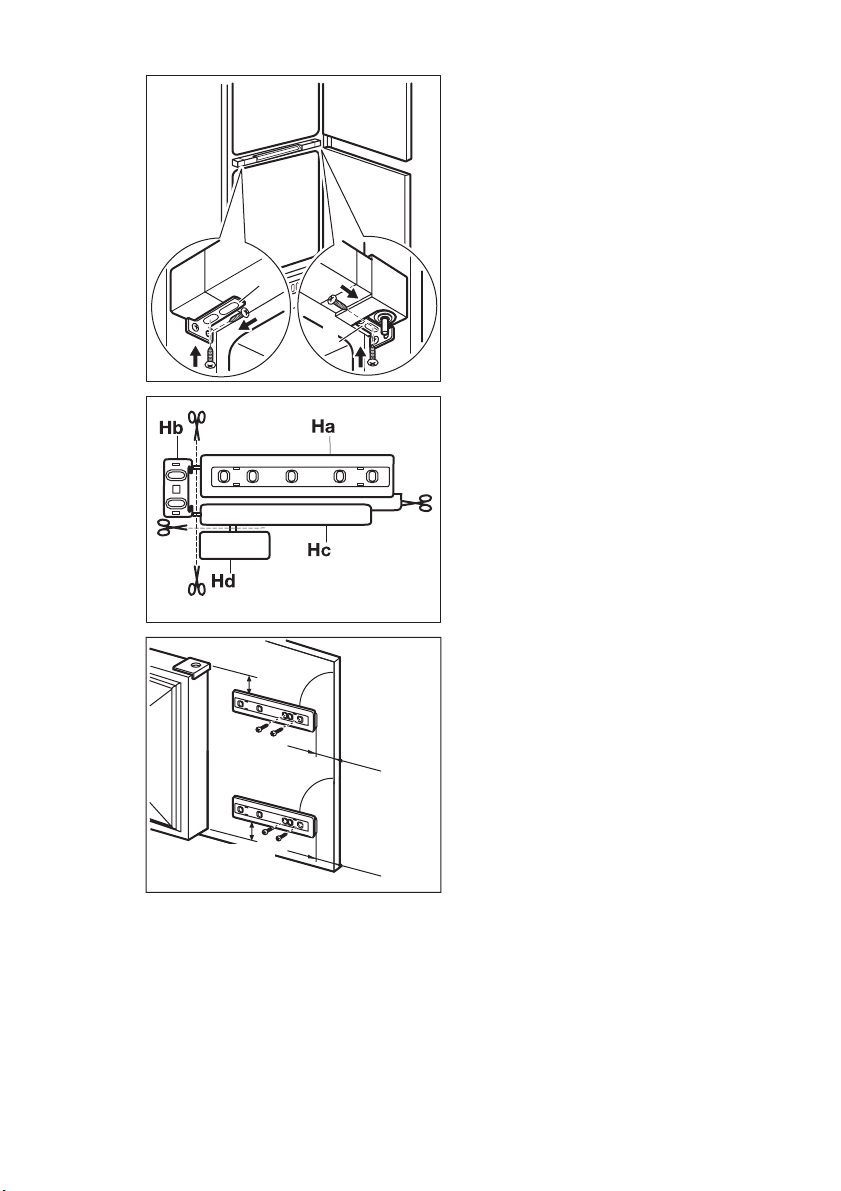
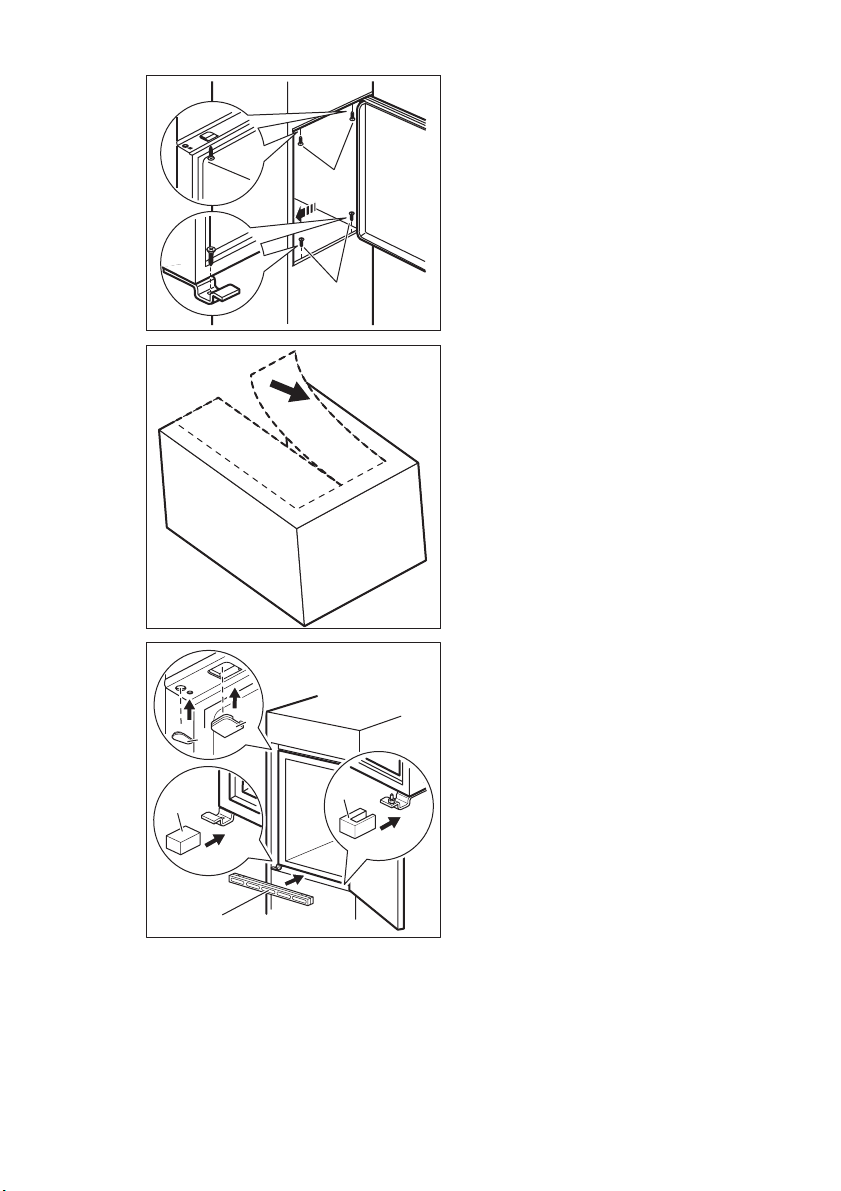
22
If the appliance must connect laterally to the
kitchen furniture door:
1.
Slacken the screws in fixing brackets
(H).
2.
Move the brackets (H).
3.
Retighten the screws.
H
H
Disconnect the parts (Ha), (Hb), (Hc) and
(Hd).
ca. 50 mm
ca. 50 mm
Install the part (Ha) on the inner side of the
kitchen furniture.
90°
21 mm
90°
21 mm
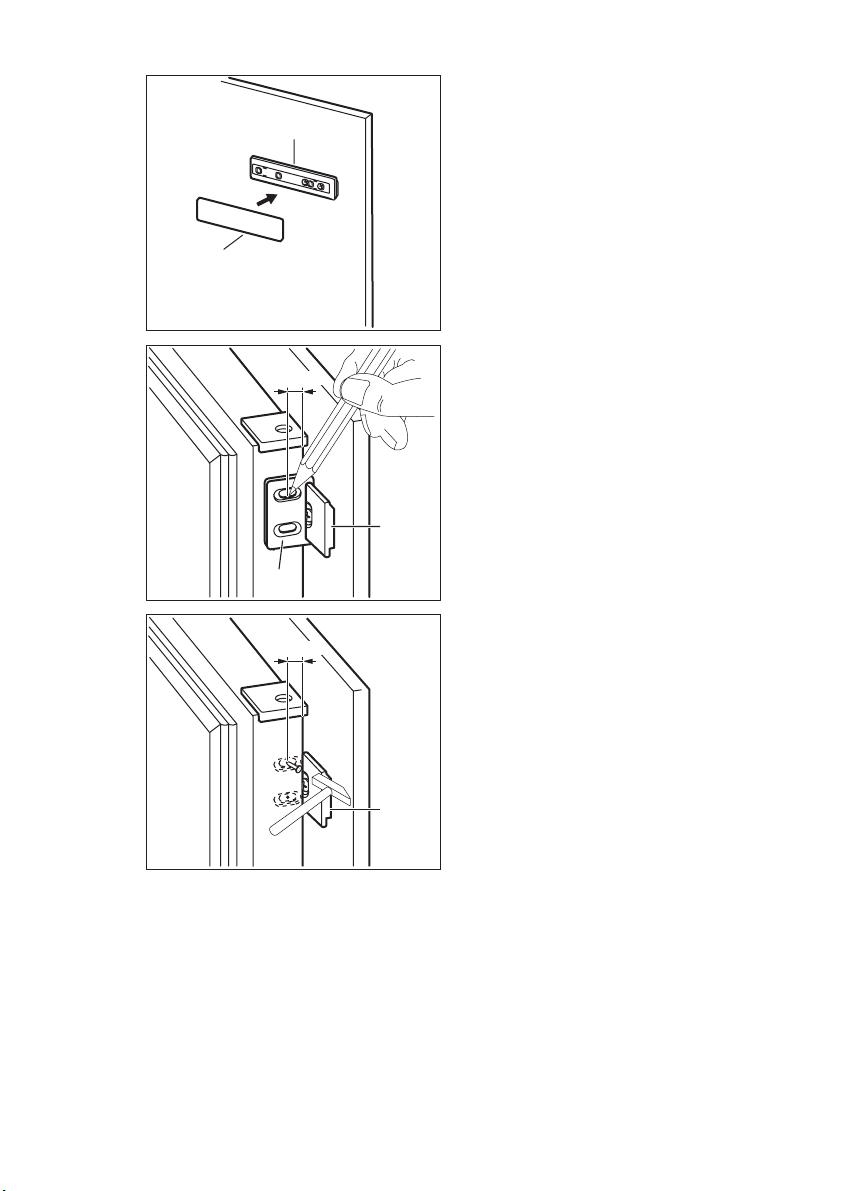
Hc
Ha
8 mm
Hb
8 mm
ENGLISH 23
Push the part (Hc) on the part (Ha).
Open the appliance door and the kitchen
furniture door at an angle of 90°.
Insert the small square (Hb) into guide (Ha).
Put together the appliance door and the furniture door and mark the holes.
Ha
Remove the brackets and mark a distance
of 8 mm from the outer edge of the door
where the nail must be fitted (K).
K
Ha
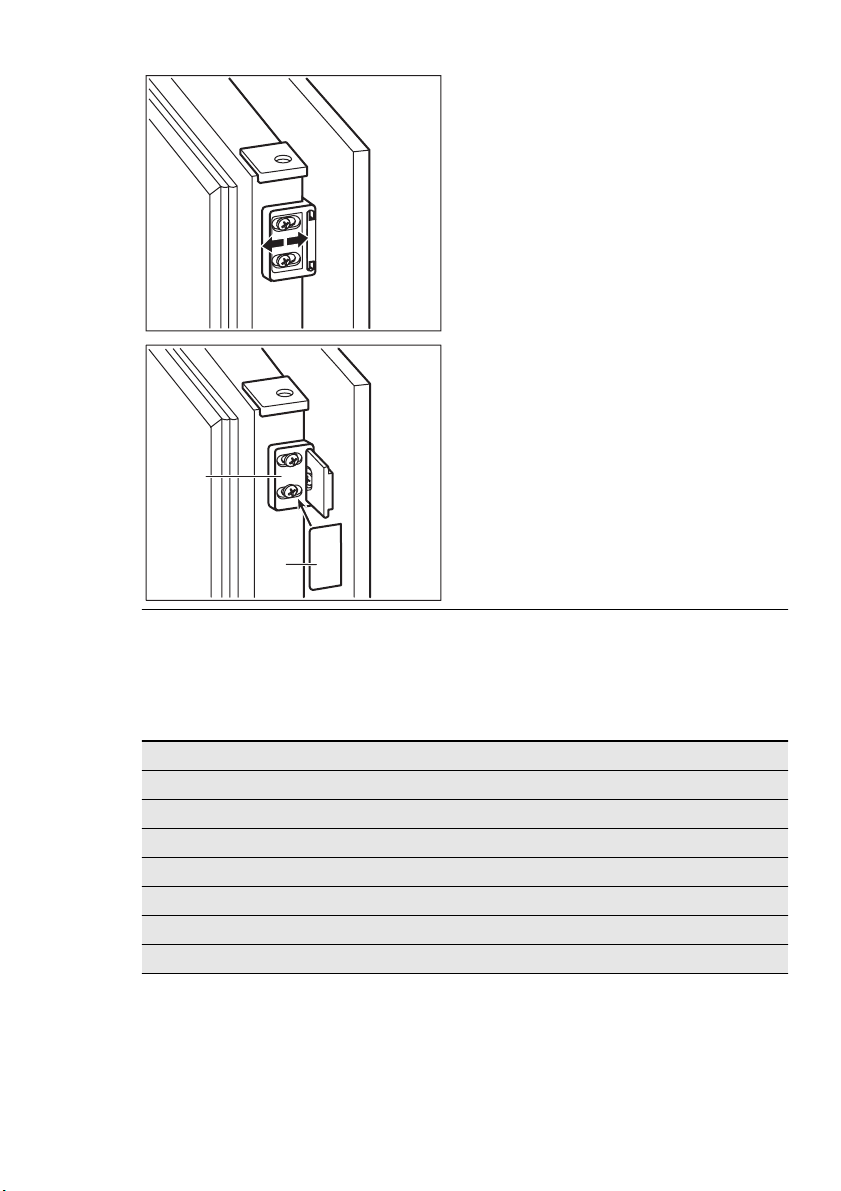
24
Place the small square on the guide again
and fix it with the screws supplied.
Align the kitchen furniture door and the appliance door by adjusting the part (Hb).
Hb
Press the part (Hd) on the part (Hb).
Hb
Hd
Do a final check to make sure that:
•All screws are tightened.
TECHNICAL DATA
Dimension of the recess
Height 1780 mm
Width 560 mm
Depth 550 mm
Rising Time 24 h
Voltage 230-240 V
Frequency 50 Hz
The technical information are situated in the
rating plate on the internal left side of the
appliance and in the energy label.
• The sealing strip is attached tightly to the
cabinet.
• The door opens and closes correctly.
INHALT
27 SICHERHEITSHINWEISE
30 BEDIENFELD
33 TÄGLICHER GEBRAUCH
36 PRAKTISCHE TIPPS UND HINWEISE
38 REINIGUNG UND PFLEGE
42 WAS TUN, WENN …
44 MONTAGE
50 TECHNISCHE DATEN
UMWELTTIPPS
DEUTSCH 25
Recyceln Sie Materialien mit dem Symbol
entsprechenden Recyclingbehältern.
Recyceln Sie zum Umwelt- und Gesundheitsschutz elektrische und elektronische Geräte.
Entsorgen Sie Geräte mit diesem Symbol
zu Ihrer örtlichen Sammelstelle oder wenden Sie sich an Ihr Gemeindeamt.
. Entsorgen Sie die Verpackung in den
nicht mit dem Hausmüll. Bringen Sie das Gerät
AUF UNSERER WEBSITE FINDEN SIE:
- Produkte
- Prospekte
- Gebrauchsanweisungen
- Problemlöser
- Service-Informationen
www.electrolux.com
LEGENDE
Warnung - Wichtige Sicherheitshinweise.
Allgemeine Hinweise und Ratschläge
Hinweise zum Umweltschutz
Änderungen vorbehalten.

26
WIR DENKEN AN SIE
Vielen Dank, dass Sie sich für ein Electrolux Gerät entschieden haben. Sie haben ein
Produkt gewählt, hinter dem eine jahrzehntelange professionelle Erfahrung und
Innovation steht. Bei der Entwicklung dieses großartigen und eleganten Geräts haben
wir an Sie gedacht. So haben Sie bei jedem Gebrauch die Gewissheit, dass Sie stets
großartige Ergebnisse erzielen werden.
Willkommen bei Electrolux.
ZUBEHÖR UND VERBRAUCHSMATERIALIEN
Im Electrolux Webshop finden Sie alles, was Sie für ein makelloses Aussehen und
perfektes Funktionieren Ihrer Electrolux Geräte benötigen. Wir bieten auch ein
umfangreiches Zubehörsortiment, das Ihre höchsten Qualitätsansprüche erfüllt, vom
Profi-Kochgeschirr bis zu Besteckkörben, von Flaschenhaltern bis hin zu
Wäschebeuteln für empfindliche Wäsche...
Besuchen Sie den Webshop unter
www.electrolux.com/shop
KUNDENDIENST UND -BETREUUNG
Wir empfehlen die Verwendung von Originalersatzteilen.
Halten Sie folgende Angaben bereit, wenn Sie sich an den Kundendienst wenden.
Die Informationen finden Sie auf dem Typenschild.
Modell
Produkt-Nummer (PNC)
Seriennummer

SICHERHEITSHINWEISE
DEUTSCH 27
Lesen Sie zu Ihrer Sicherheit und für die
optimale Geräteanwendung vor der Installation und dem Gebrauch des Gerätes die
vorliegende Benutzerinformation aufmerksam durch, einschließlich der Ratschläge
und Warnungen. Es ist wichtig, dass zur
Vermeidung von Fehlern und Unfällen alle
Personen, die das Gerät benutzen, mit der
Bedienung und den Sicherheitsvorschriften
vertraut sind. Heben Sie die Benutzerinformation gut auf und übergeben Sie sie bei
einem Weiterverkauf des Gerätes dem neuen Besitzer, so dass jeder während der gesamten Lebensdauer des Gerätes über
Gebrauch und Sicherheit informiert ist.
Halten Sie sich zu Ihrer Sicherheit und zum
Schutz Ihres Eigentums strikt an die Vorsichtsmaßnahmen der vorliegenden Benutzerinformation, da der Hersteller bei Missachtung derselben von jeder Haftung freigestellt ist.
SICHERHEIT VON KINDERN
UND HILFSBEDÜRFTIGEN
PERSONEN
•Das Gerät darf von Personen (einschließlich Kindern), deren physische, sensorische Fähigkeiten und deren Mangel an
Erfahrung und Kenntnissen einen sicheren Gebrauch des Gerätes ausschließen
nur unter Aufsicht oder nach ausreichender Einweisung durch eine verantwortungsbewusste Person benutzt werden,
die sicherstellt, dass sie sich der Gefahren des Gebrauchs bewusst sind.
Kinder müssen beaufsichtigt werden, damit sie nicht am Gerät herumspielen können.
• Halten Sie das Verpackungsmaterial unbedingt von Kindern fern. Erstickungsgefahr!
• Ziehen Sie vor der Entsorgung des Gerätes den Netzstecker, schneiden Sie das
Netzkabel (so nah wie möglich am Gerät)
ab und entfernen Sie die Tür, so dass
spielende Kinder vor elektrischem Schlag
geschützt sind und sich nicht in dem Gerät einschließen können.
• Wenn dieses Gerät mit magnetischer
Türdichtung ein älteres Modell mit
Schnappverschluss (Türlasche) an der
Tür oder auf dem Deckel ersetzt, ma-
chen Sie den Schnappverschluss vor
dem Entsorgen des Altgerätes unbrauchbar. So verhindern Sie, dass das
Gerät nicht zu einer Todesfalle für Kinder
wird.
ALLGEMEINE
SICHERHEITSHINWEISE
WARNUNG!
Achten Sie darauf, dass die Belüftungsöffnungen im Gehäuse oder in der Einbaunische nicht blockiert sind.
• Das Gerät ist für die Aufbewahrung von
Lebensmitteln und/oder Getränken in einem normalen Haushalt bestimmt, wie in
der vorliegenden Gebrauchsanweisung
beschrieben wird.
• Benutzen Sie keine mechanischen oder
sonstigen Hilfsmittel, um den Abtauprozess zu beschleunigen.
• Verwenden Sie keine anderen Elektrogeräte (wie Speiseeisbereiter) in Kühlgeräten, wenn solche Geräte nicht ausdrücklich vom Hersteller für diesen Zweck zugelassen sind.
• Beschädigen Sie nicht den Kältekreislauf.
• Das Kältemittel Isobutan (R600a) im Kältekreislauf des Gerätes ist ein natürliches
und sehr umweltfreundliches Gas, das
jedoch leicht entflammbar ist.
Achten Sie beim Transport und bei der
Aufstellung des Gerätes darauf, nicht die
Komponenten des Kältekreislaufs zu beschädigen.
Bei einer eventuellen Beschädigung des
Kältekreislaufs:
– Offene Flammen und Zündfunken ver-
meiden
– Den Raum, in dem das Gerät installiert
ist, gut lüften
• Technische und anderweitige Änderungen am Gerät sind gefährlich. Ein defektes Netzkabel kann Kurzschlüsse und einen Brand verursachen und/oder zu
Stromschlägen führen.

28
WARNUNG!
Elektrische Bauteile (Netzkabel,
Stecker, Kompressor) dürfen zur
Vermeidung von Gefahren nur vom
Kundendienst oder einer Fachkraft
ausgewechselt werden.
1.
Das Netzkabel darf nicht verlängert
werden.
2.
Vergewissern Sie sich, dass der
Netzstecker nicht von der Geräterückseite geklemmt oder beschädigt
wird. Ein geklemmter oder beschädigter Netzstecker überhitzt und
kann einen Brand verursachen.
3.
Vergewissern Sie sich, dass der
Netzstecker des Geräts frei zugänglich ist.
4.
Ziehen Sie nicht am Netzkabel.
5.
Stecken Sie den Netzstecker nie in
eine lockere Steckdose. Es besteht
Brand- und Stromschlaggefahr.
6.
Betreiben Sie das Gerät nicht ohne
Lampenabdeckung (wenn vorgesehen) der internen Beleuchtung.
• Dieses Gerät ist schwer. Vorsicht beim
Transport.
• Entnehmen oder berühren Sie nie mit
nassen/feuchten Händen Tiefkühlgut, da
dies zu Hautverletzungen oder Kälteverbrennungen führen kann.
• Das Gerät nicht direkter Sonneneinstrahlung aussetzen.
• Die Leuchtmittel (wenn vorgesehen) in
diesem Gerät sind Speziallampen, die
nur für Haushaltsgeräte geeignet sind.
Sie eignen sich nicht zur Raumbeleuchtung.
TÄGLICHER GEBRAUCH
• Stellen Sie keine heißen Töpfe auf die
Kunststoffteile des Gerätes.
• Lagern Sie keine feuergefährlichen Gase
oder Flüssigkeiten in dem Gerät. Explosionsgefahr.
• Legen Sie Lebensmittel nicht direkt vor
den Luftauslass in der Rückwand. (Wenn
es ein No-Frost-Gerät ist)
• Ein aufgetautes Produkt darf nicht wieder eingefroren werden.
• Abgepackte Tiefkühlkost immer entsprechend den Herstellerangaben aufbewahren.
• Die Lagerempfehlungen des Geräteherstellers sollten strikt eingehalten werden.
Halten Sie sich an die betreffenden Anweisungen.
• Keine kohlensäurehaltigen Getränke oder
Sprudel in den Tiefkühlschrank stellen,
da der Druckanstieg in den Behältern zur
Explosion führen und das Gerät beschädigen kann.
• Eis am Stiel kann Kälteverbrennungen
verursachen, wenn es direkt nach der
Entnahme aus dem Gefrierschrank gegessen wird.
REINIGUNG UND PFLEGE
• Schalten Sie vor Wartungsarbeiten immer das Gerät ab und ziehen Sie den
Netzstecker aus der Steckdose.
• Reinigen Sie das Gerät nicht mit Metallgegenständen.
• Keine scharfen Gegenstände zum Entfernen von Reif und Eis im Gerät verwenden. Verwenden Sie einen Kunststoffschaber.
• Kontrollieren Sie den Tauwasserabfluss
im Kühlraum in regelmäßigen Abständen.
Reinigen Sie den Ablauf, falls nötig. Bei
verstopftem Wasserabfluss sammelt sich
das Wasser auf dem Boden des Geräts
an.
MONTAGE
Halten Sie sich für den elektrischen
Anschluss strikt an die Anweisungen der betreffenden Abschnitte.
• Kontrollieren Sie nach dem Auspacken
das Gerät auf eventuelle Beschädigungen. Nehmen Sie das Gerät nicht in Betrieb, wenn es beschädigt ist. Melden Sie
die Schäden umgehend dem Händler,
bei dem Sie es erworben haben. Bewahren Sie in diesem Fall die Verpackung
auf.
• Lassen Sie das Gerät mindestens vier
Stunden stehen, bevor Sie es elektrisch
anschließen, damit das Öl in den Kompressor zurückfließen kann.
• Ausreichenden Freiraum zur Luftzirkulation um das Gerät lassen; anderenfalls
besteht Überhitzungsgefahr. Halten Sie
sich für die Belüftung an die Installationsanweisungen.
• Das Gerät sollte zur Vermeidung von
Verbrennungen durch Berührung von
heißen Bauteilen (Kompressor, Kondensator) möglichst mit der Rückseite gegen
eine Wand aufgestellt werden.
• Das Gerät darf nicht in der Nähe von
Heizkörpern oder Kochern installiert werden.
• Vergewissern Sie sich, dass der Netzstecker des Gerätes nach der Installation
frei zugänglich ist.
• Wenn ein Wasseranschluss vorgesehen
ist, verbinden Sie das Gerät nur mit dem
Trinkwasseranschluss.
KUNDENDIENST
• Sollte die Wartung des Gerätes elektrische Arbeiten verlangen, so dürfen diese
nur von einem qualifizierten Elektriker
oder einem Elektro-Fachmann durchgeführt werden.
• Wenden Sie sich für Reparaturen und
Wartung nur an Fachkräfte der autorisierten Kundendienststellen und verlangen Sie stets Original-Ersatzteile.
UMWELTSCHUTZ
Das Gerät enthält im Kältekreis
oder in dem Isoliermaterial keine
ozonschädigenden Gase. Das Gerät darf nicht wie normaler Hausmüll entsorgt werden. Die Isolierung enthält entzündliche Gase:
das Gerät muss gemäß den geltenden Vorschriften entsorgt werden;
sie erhalten diese bei Ihrer Gemeindeverwaltung. Nicht das Kälteaggregat beschädigen, insbesondere
nicht in der Nähe des Wärmetauschers. Die Materialien, die bei der
Herstellung dieses Geräts verwendet wurden und mit dem Symbol
markiert sind, können recycelt
werden.
DEUTSCH 29
30
BEDIENFELD
123 4 5 6
MODE˚C
EIN/AUS-Taste
1
Temperaturregler Gefriergerät
2
Kühl-/Gefrierschrank-Taste für Tempe-
3
raturanzeige
Display
4
Display
1 2 3 4 5 8 7 6
Anzeige Kühlraum
1
Anzeige Gefrierraum
2
Temperaturvorzeichen
3
Temperaturanzeige
4
Action Freeze-Funktion
5
Shopping-Funktion
6
D.A.C.-Funktion
7
Performance Optimization-Funktion
8
EINSCHALTEN DES GERÄTS
Stecken Sie den Netzstecker in die Netzsteckdose. Sollte das Display nicht aufleuchten, drücken Sie die EIN/AUS-Taste.
Nach dem Einschalten des Geräts wird auf
dem Bedienfeld Folgendes angezeigt:
• Die Temperaturvorzeichenanzeige zeigt
ein Pluszeichen an
• Die Temperaturanzeige blinkt, der Hintergrund des Displays leuchtet rot und es
ertönt ein Signalton.
Drücken Sie die Funktionstaste, um den
Summton abzuschalten (siehe auch „Temperaturwarnung”).
Stellen Sie die gewünschte Temperatur ein
(siehe "Temperaturregulierung").
2)
Unter normalen Bedingungen.
Funktionstaste
5
Lösch-Schalter für den Alarmton
Temperaturregler Kühlgerät
6
AUSSCHALTEN
Das Gerät wird ausgeschaltet, wenn Sie
die EIN/AUS-Taste länger als 1 Sekunde
lang betätigen.
Danach wird ein Temperatur-Countdown
(-3 -2 -1) angezeigt.
Nach dem Abschalten des Gerätes erlischt
auch das Display.
TEMPERATURANZEIGE
Wenn die Taste für die Temperaturanzeige
des Kühl-/Gefrierschranks gedrückt wird,
zeigt das Display nacheinander Folgendes
an:
1.
– Die Anzeige des Kühlschranks
leuchtet.
– Das Display zeigt die Kühlschrank-
temperatur an.
2.
– Die Anzeige des Gefrierschranks
leuchtet.
– Das Display zeigt die Temperatur im
Gefrierschrank an.
Nach 10 Sekunden werden stets die normalen Anzeigebedingungen wiederhergestellt.
2)
 Loading...