

Page 1
Glasskeramikk koketopp
Ceramic glass hob
Monterings- og
bruksanvisning
Installation and
Operating instructions
822 924 462-A-131103
EHS 6691 U
EHS 6691 X
N
GB
Page 2
Kjære kunde !
Vennligst les nøye gjennom denne
bruksanvisningen.
Vær spesielt oppmerksom på avsnittet "Sikkerhet"
på de første sidene. Oppbevar denne
bruksanvisningen for å kunne slå opp i den senere.
Lever den videre til en eventuell neste eier.
Følgende symboler benyttes i
teksten:
Sikkerhetsinstruksjoner
Advarsel ! Henvisninger som tjener din
personlige sikkerhet.
OBS ! Henvisninger som skal minske
risikoen for skader på apparatet.
Henvisninger og praktiske tips
Miljøinformasjoner
1. Disse tallene leder deg steg for steg ved
betjening av apparatet.
2. ...
3. ...
Bruksanvisningen inneholder henvisninger om
utbedringer som man kan utføre på egenhånd hvis
det evt. skulle oppstå feil, se avsnittet "Hva må
gjøres..."
Trykket på miljøvennlig papir.
Den som tenker økologisk, viser det også i
handling....
2
Page 3

Innholdsfortegnelse
Bruksanvisning.............................................. 4
Sikkerhet ....................................................... 4
Elektrisk sikkerhet .......................................... 4
Sikkerhet for barn .......................................... 4
Sikkerhet under bruk ...................................... 4
Sikkerhet under rengjøring ............................ 4
Slik unngår du skader på apparatet ............... 5
Deponering ................................................... 5
Deponering av emballasje ............................. 5
Deponering av brukt apparat ......................... 5
Apparatets viktigste egenskaper ............... 6
Beskrivelse av koketopp ............................. 7
Utrustning med kokesone og kontrollfelt ........ 7
Digitale display ............................................. 8
Sikkerhetsutkopling av kokesonene ............ 8
Før første bruk ........................................... 9
Første rengjøring ......................................... 9
Betjening av koketoppen .......................... 9
Touch Control-sensorfelt ............................. 9
Slå apparatet på .......................................... 9
Slå apparatet av ........................................... 10
Innstilling av koketrinn ................................ 10
Innstilling av varmetrinn .............................. 10
Skru av og på stekesonen ........................... 11
Skru av og på den trippel kokesonen .......... 12
Slå av kokesone .......................................... 14
Restvarmevarsler ......................................... 14
Koking med oppkokingsautomatikk ............ 15
Koking uten oppkokingsautomatikk ............ 15
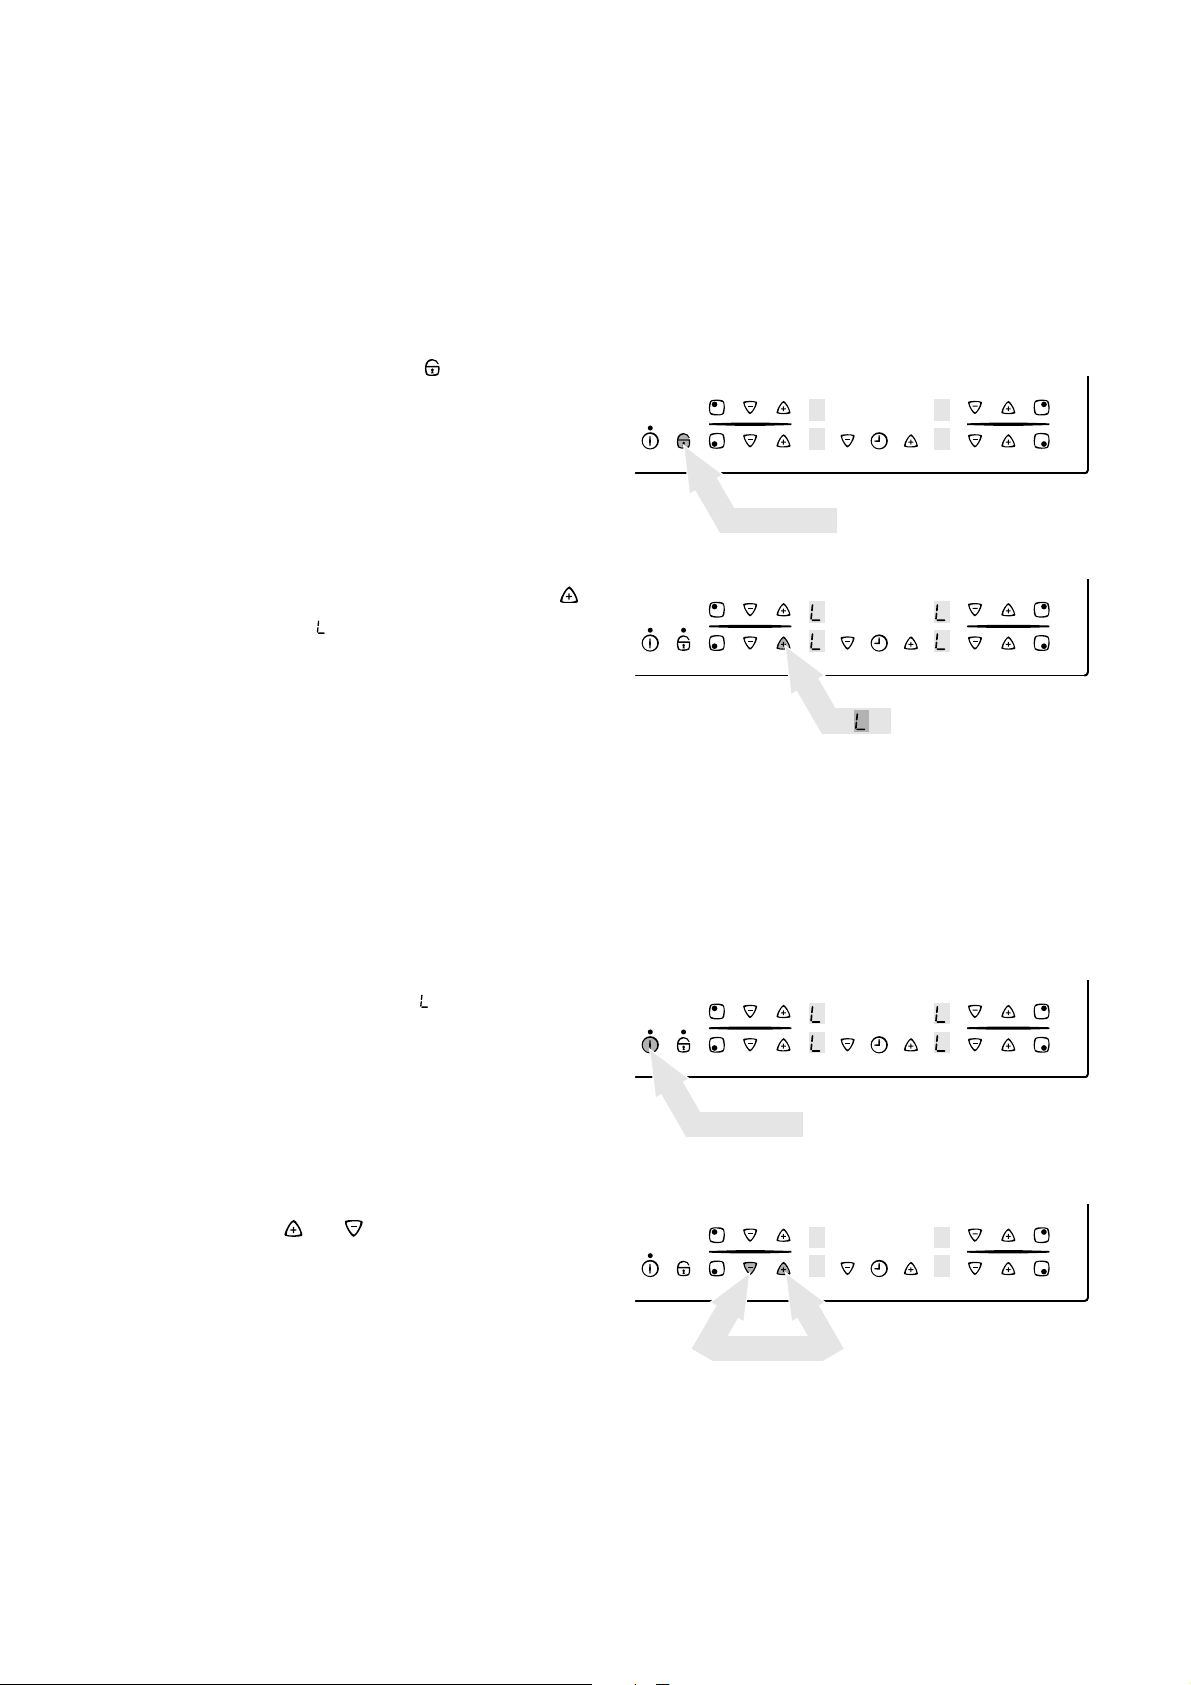
Barnesikring ................................................. 16
Timer ............................................................ 18
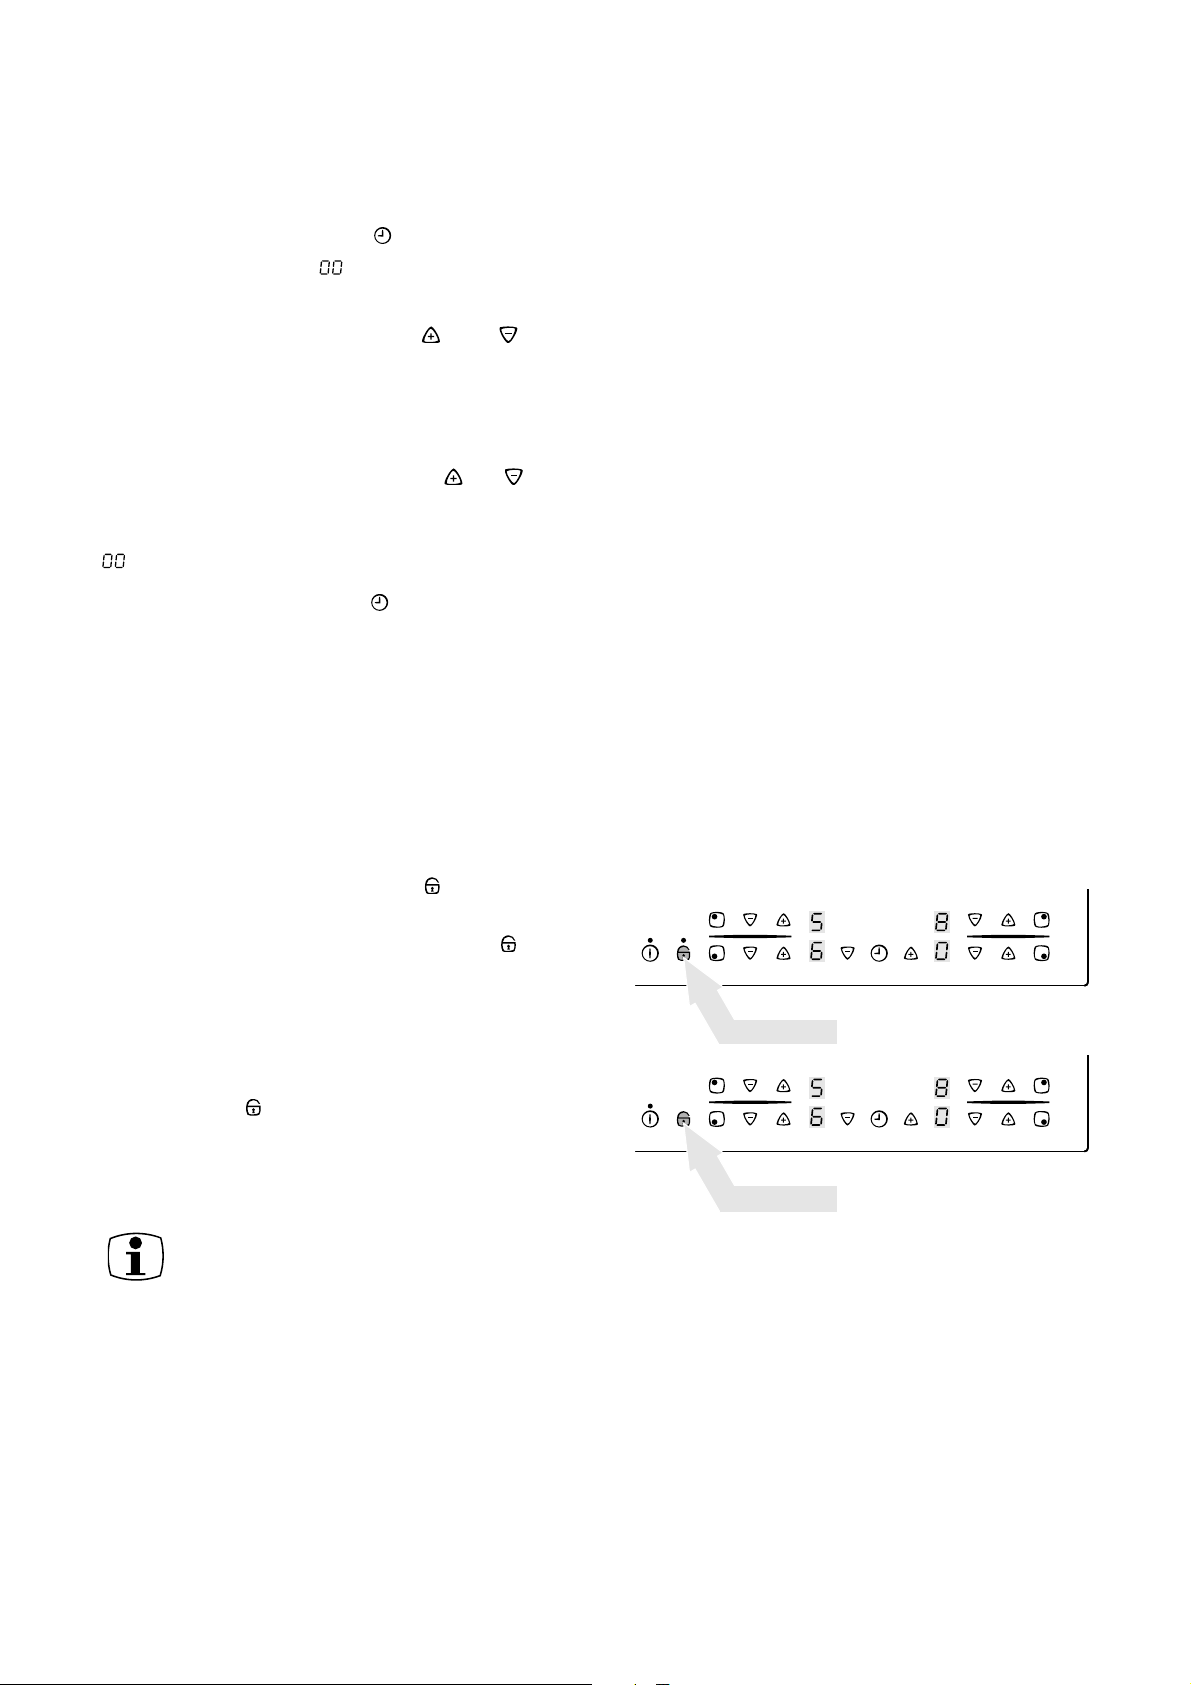
Sperring/frigjøring av kontrollfelt .................. 20
Bruk, tabeller, tips ...................................... 21
Kokekar ........................................................ 21
Tips om energisparing .................................. 22
Tips for matlaging med og uten
oppkokingsautomatikk .................................. 23
Rengjøring og vedlikehold ........................ 25
Koketopp ...................................................... 25
Dekorasjonsstriper i metall ........................... 27
Hva må gjøres..... ........................................ 28
Hjelp ved feil ................................................. 28
Hva må gjøres..... ......................................... 28
Monteringsanvisning ...................................30
Tekniske data .............................................. 30
Apparatets dimensjoner ............................... 30
Utskjæringsens dimensjoner ........................ 30
Kokesoner .................................................... 30
Tilkoplingsverdier ......................................... 30
Bestemmelser, normer, direktiver ............ 31
Sikkerhetsinstrukser for installatøren ...... 32
Elektrisk tilkopling ..................................... 33
Service ......................................................... 34
Montering......................................................71
3
Page 4
Bruksanvisning
Sikkerhet
Dette apparatets sikkerhet svarer til teknikkens
anerkjente regler og gjeldende lov om sikkerhet
for apparater. I tillegg anser vi oss, i egenskap av
produsent, forpliktet til å gjøre deg fortrolig med
følgende sikkerhetsinstrukser.
Elektrisk sikkerhet
• Montering og tilkopling av det nye apparatet
skal kun utføres av autorisert elektriker.
• Reparasjoner på apparatet skal kun utføres
av fagfolk. Ved ukyndige reparasjoner kan
det oppstå alvorlige farer. Henvend deg til vår
kundeservice eller til spesialisert forhandler
hvis det er nødvendig å utføre en reparasjon.
Følg disse instruksjonene, hvis ikke
taper man garantien hvis det oppstår
skade.
• Innbyggingssapparater får kun benyttes etter
at de er montert inn i innbyggingsskap og
arbeidsplater som oppfyller standardene.
Derved blir det berøringsvernet for elektriske
apparater som VDE fordrer sikret.
• Hvis det oppstår feil ved apparatet, brudd,
sprekker eller riss:
- Slå av alle kokesoner.
- Kople ut sikringen for kokefeltet eller ta
den ut.
Sikkerhet for barn
• Når du koker og steker, blir kokesonene
varme. Derfor må du prinsipielt holde
småbarn på avstand og større barn får kun
arbeide med apparatet under tilsyn.
• Dette apparatet er utstyrt med en
låsemekanisme som også kan aktiveres for å
hindre at bryterne blir betjent på grunn av
barns lek.
Sikkerhet under bruk
• Dette apparatet skal kun brukes til koking og
steking av matretter i husholdningen.
• Bruk ikke kokefeltet til oppvarming av
rommet.
• Vær forsiktig med å kople elektroutstyr til
stikkontakter i nærheten av apparatet.
Strømledninger må ikke komme i berøring
med varme komfyrtopper.
• Overopphetet fett eller olje kan lett antennes.
Når du tilbereder mat i fett eller olje (f.eks.
pommes frites) må du holde deg i nærheten.
• Slå av kokesonene etter hver bruk.
• Sensorteknikken gir maks. sikkerhet under
betjening av apparatet, men den krever også
at innstillingene av kokesoner, ytelse eller
tider utføres med omhu.
Sikkerhet under rengjøring
• Apparatet må være slått av under rengjøring.
• Av sikkerhetsgrunner er det ikke tillatt å
vaske apparatet med dampstråle- eller
høytrykkssprøyte.
4
Page 5
Slik unngår du skader på apparatet
Deponering
• Kokefeltet skal ikke brukes til oppbevaring
eller som arbeidsbenk.
• Den rammeløse kanten til
glasskeramikkplaten er utsatt for støt. Vær
forsiktig i omgangen med kjeler og panner.
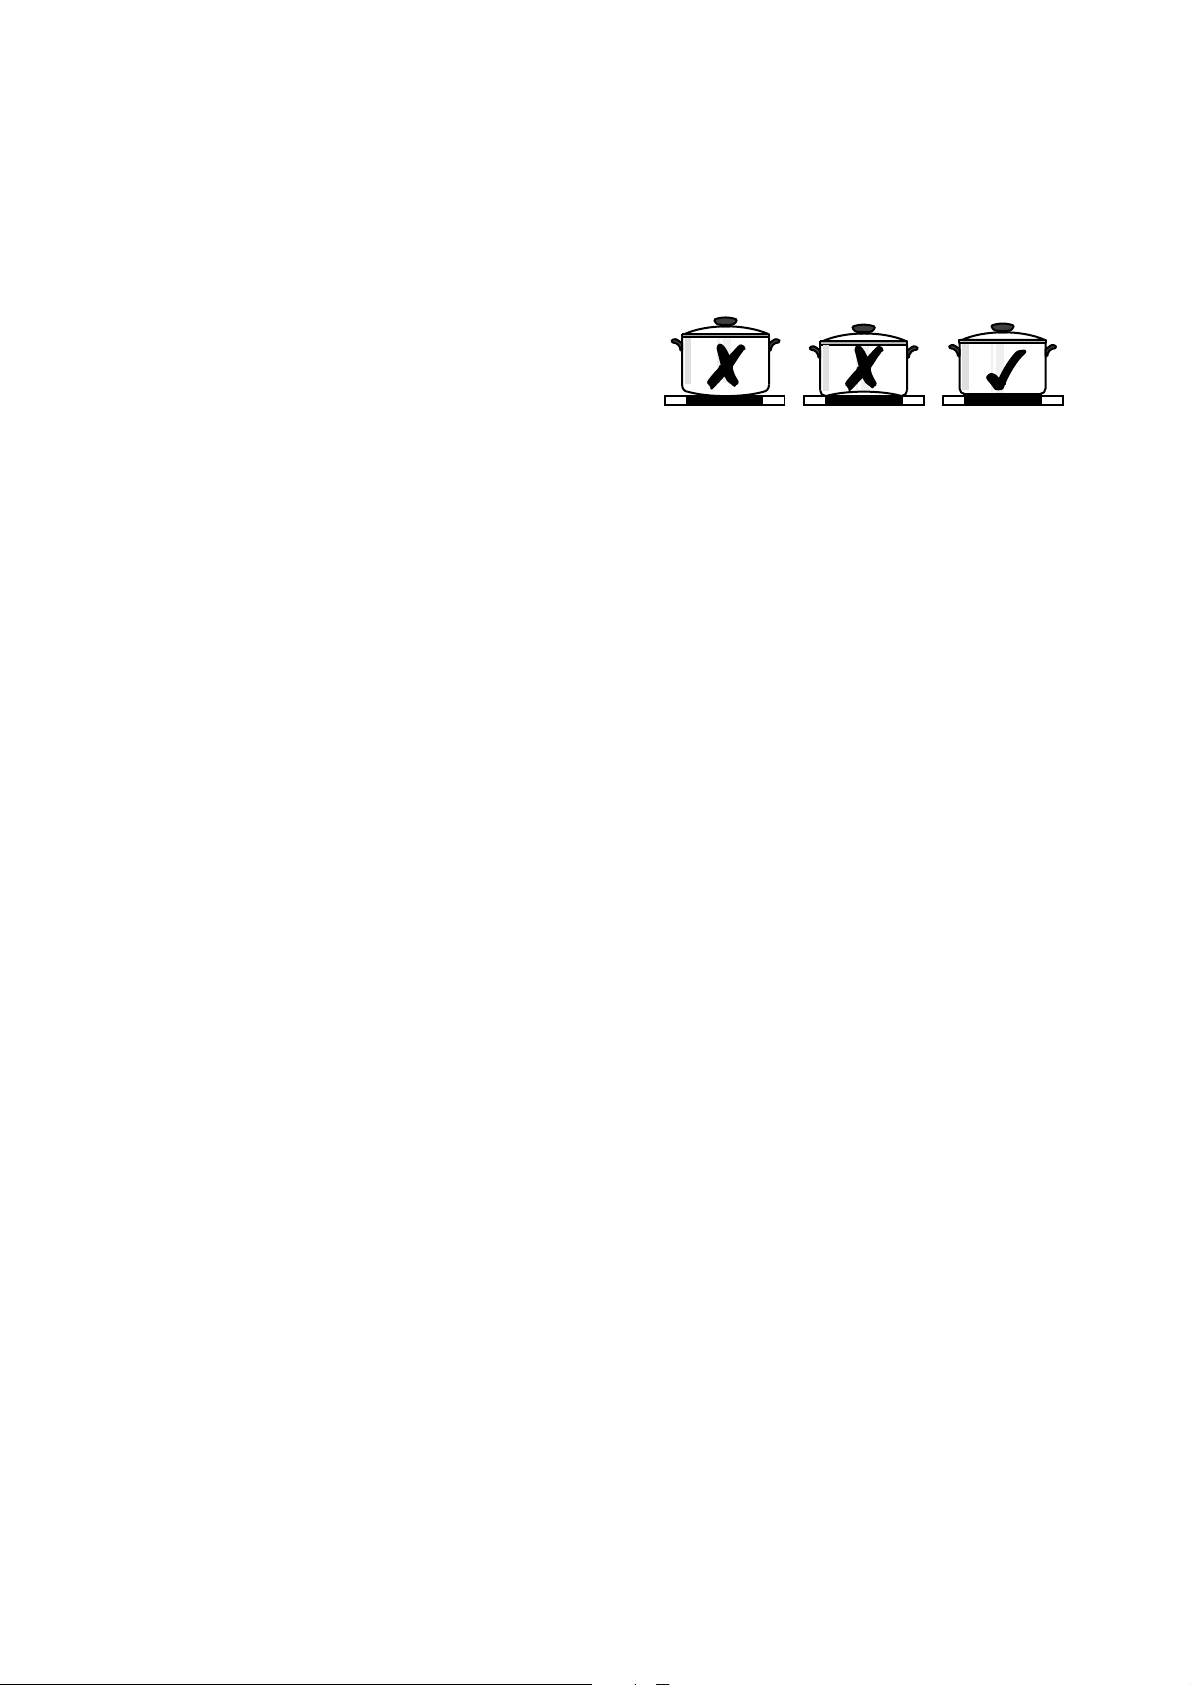
• Bruk ikke kokesonene med tomme kokekar
eller uten kokekar og unngå at gryter eller
panner koker tørre. Kokekaret eller
kokesonen kan bli skadet.
• Glasskeramikk er ømfintlig overfor
temperatursjokk og svært motstandsdyktig,
men ikke uknuselig. Spesielt kan spisse eller
harde gjenstander som faller ned på
kokeflaten forårsake skader.
• Bruk ikke gryter av smijern eller med skadet
bunn, som er ru eller har grater. Når slike
gryter forskyves, kan det oppstå riper.
• Sett ikke panner eller gryter på kokefeltets
ramme. Det kan oppstå riper eller lakkskader.
• Pass på at det ikke kommer væsker som
inneholder syre, f. eks. eddik, sitron, eller
kalkløsende midler, på kokefeltets ramme, da
det i så fall kan oppstå matte flekker.
• Hvis sukker eller en tilberedning med sukker
kommer på den hete kokesonen og smelter,
må du fjerne dette umiddelbart, mens det
fortsatt er varmt, ved hjelp av en
rengjøringsskraper. Hvis massen blir hard,
kan overflaten bli skadet når massen fjernes.
• Hold alle gjenstander og materialer som kan
smelte borte fra glasskeramikkflaten, f. eks.
kunststoff, aluminiumsfolie eller ovnsfolie.
Skulle likevel noe smelte på
glasskeramikkflaten, må dette likeledes
umiddelbart fjernes med
rengjøringsskraperen.
Deponering av emballasje
Alle deler av emballasjen kan leveres til
gjenvinning.
Kunststoff er merket på følgende måte:
• >PE< for polyethylen, f. eks. det ytterste laget
og poser i indre deler.
• >PS< for ekspandert polystyrol, f.eks. ved
polsterdeler, prinsipielt FCKW-fri.
Materialene må deponeres forskriftsmessig.
Overhold nasjonale og regionale forskrifter for
deponering av emballasje og kjennemerking av
materialene (materialdeling, avfallsdeponi,
deponier for materialer som kan gjenvinnes)
Deponering av brukt apparat
Advarsel ! For at det brukte apparatet
ikke lenger skal være en potensiell
fare, gjør det ubrukelig før deponering.
Til dette bes du trekke ut
strømforsyningen og fjerne
strømkabelen fra apparatet.
Av miljøhensyn må alle utbrukte apparater
deponeres på kyndig måte.
• Det er ikke tillatt å kaste apparatet sammen
med husholdningsavfallet.
• Du får alle informasjoner om deponier fra
lokale renovasjonsselskaper eller
kommuneadministrasjonen.
5
Page 6

Apparatets viktigste egenskaper
• Glasskeramikkokesone: Apparatet er
utstyrt med glasskeramikkokesoner og
4 HiLight kokesoner. I denne forbindelse
reduseres kokesonenes oppvarmingstid
vesentlig takket være spesielt effektive
strålevarmeelementer.
• Sensorfelt: Betjeningen av apparatet skjer
ved hjelp av TOUCH-CONTROL-sensorfelt.
• Rengjøring: Fordelen med glasskeramik-
kokesonene og sensorfeltene er at de er lette
å holde rene. Den glatte overflaten gjør at de
er lette å rengjøre.
• Sensorfelt ” På/Av“ Med sensorfeltet "På/
Av" har apparatet en separat hovedbryter og
ved å berøre denne kan apparatets
strømtilførsel slås komplett på eller av.
• Displays: Digitale display og kontrollamper
informerer om innstilte koketrinn, aktiverte
funksjoner og evt. restvarme som måtte
finnes i den respektive kokesonen.
• Sikkerhetsutkopling: En
sikkerhetsutkopling sørger for at alle
kokesoner slås av automatisk etter en viss tid
hvis innstillingen ikke forandres i
mellomtiden.
• Timer: Med den integrerte timeren kan alle
kokesonene skrus av automatisk. Hvis
koketiden er utgått, skrus kokesonen av.
• Barnesikring: Med denne funksjonen kan
man sperre kokesonen slik at det ikke slås
utilsiktet på.
• Varmetrinn: er det koketrinnet du kan
holde maten varm på.
• Restvarmedisplay: En for indikering av
restvarme lyser på displayet hvis kokesonen
har en temperatur som innebærer fare for å
brenne seg.
• Stekesone (kokesone til flere formål):
Koketoppen er utstyrt med en stekesone
(kokesone til flere formål). Ettersom hvilken
innstilling man velger kan den benyttes som
rund eller oval kokesone, f. eks. til stekeform
eller for å holde kokekar og mat varmt.
• Trippel kokesone: Koketoppen har en
trippel kokesone. Dermed tilbyr ditt apparat
en kokesone med variabel størrelse, f. eks. til
mindre kjeler. Ved hjelp av dette kan man
spare energi.
6
Page 7
Beskrivelse av koketopp
Utrustning med kokesone og kontrollfelt
7
Page 8
Digitale display
De fire displayfeltene, som er tilordnet de fire
kokesonene, viser:
• etter at apparatet er slått på,
• ved valg av varmetrinn,
• til , ettersom hvilket koketrinn som er
valgt,
• ved oppkokingsautomatikk,
• ved restvarme,
• ved aktivert barnesikring
• ved feilfunksjon / overoppheting
Sikkerhetsutkopling av kokesonene
Hvis en av kokesonene ikke er slått av etter en
bestemt tid eller koketrinnet ikke endres, koples
kokesonen av automatisk.
Restvarmen som er tilstede vises med ("het") i
det digitale displayet.
Kokesonen slås av ved:
• Koketrinn , , etter 6 timer
• Koketrinn , etter 5 timer
• Koketrinn etter 4 timer
• Koketrinn , , , etter 1,5 timer
Hvis en eller flere av kokesonene slås av
før den fastlagte tiden har gått, se kap.
"Hva må gjøres...."
Utkopling på grunn av andre årsaker
Væske som koker over og havner på kontrollfeltet
gjør at kokesoner slås av automatisk.
Samme virkning oppnås hvis du legger fra deg en
våt klut på kontrollfeltet. I begge tilfeller må
apparatet slås på igjen med hovedbryteren
etter at væsken eller kluten er fjernet.
8
Page 9
Før første bruk
Første rengjøring
Tørk av glasskeramikkokesonen med en våt klut.
OBS ! Bruk ikke for sterke eller skurende
rengjøringsmidler !
Overflaten kan bli skadet.
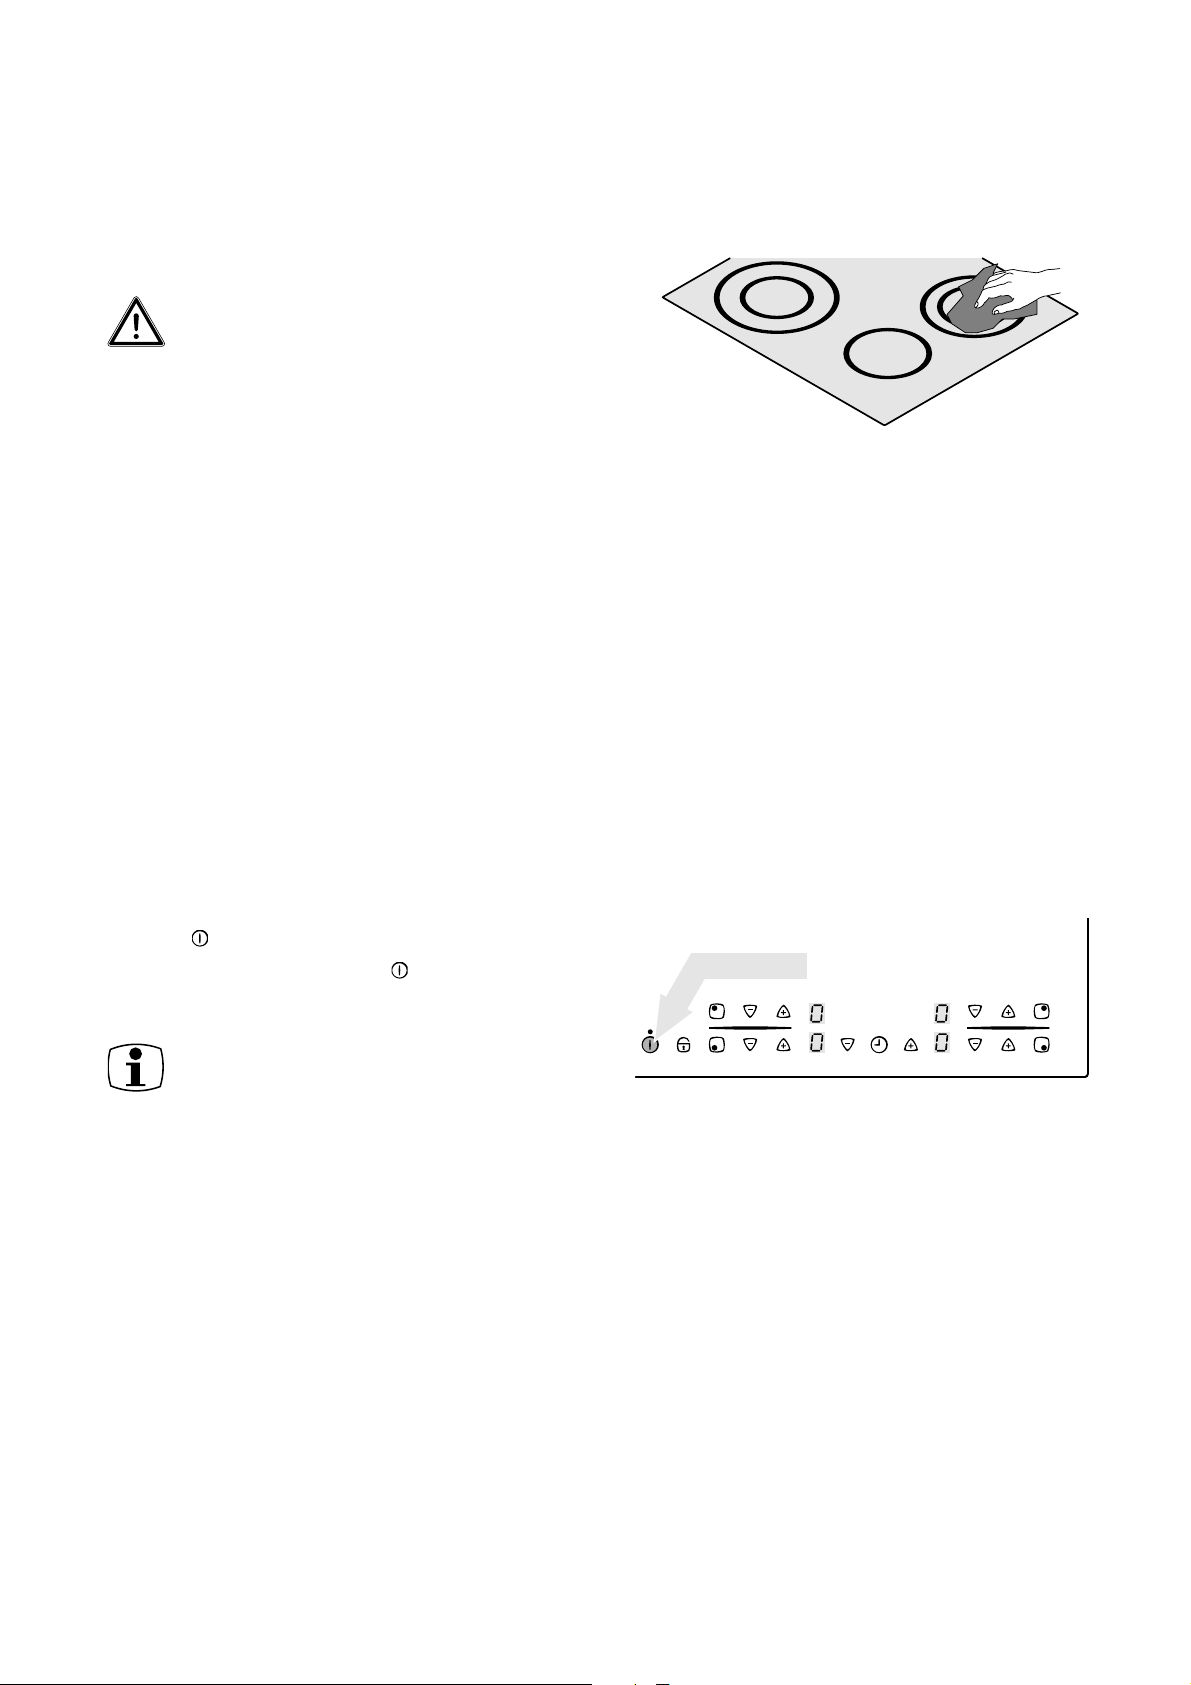
Betjening av koketoppen
Touch Control-sensorfelt
For å betjene Touch Control-sensorfeltet må du
legge fingrene flatt oppå det ønskede feltet til den
respektive indikator begynner å lyse eller slukkes,
eller til ønsket funksjon utføres.
Slå apparatet på
Det komplette apparatet slås på med sensorfeltet
"PÅ/AV"
Berør sensorfeltet "PÅ/AV" i ca. 2 sekunder.
De digitale displayene viser.
.
Etter at man har betjent sensorfeltet PÅ/
AV for å slå apparatet på, må man
innstille et koketrinn ved en kokesone
innen ca. 10 sekunder eller fastlegge en
tid med timeren. Ellers slår apparatet
seg av sikkerhetsgrunner av igjen.
~ 2 sec.
9
Page 10
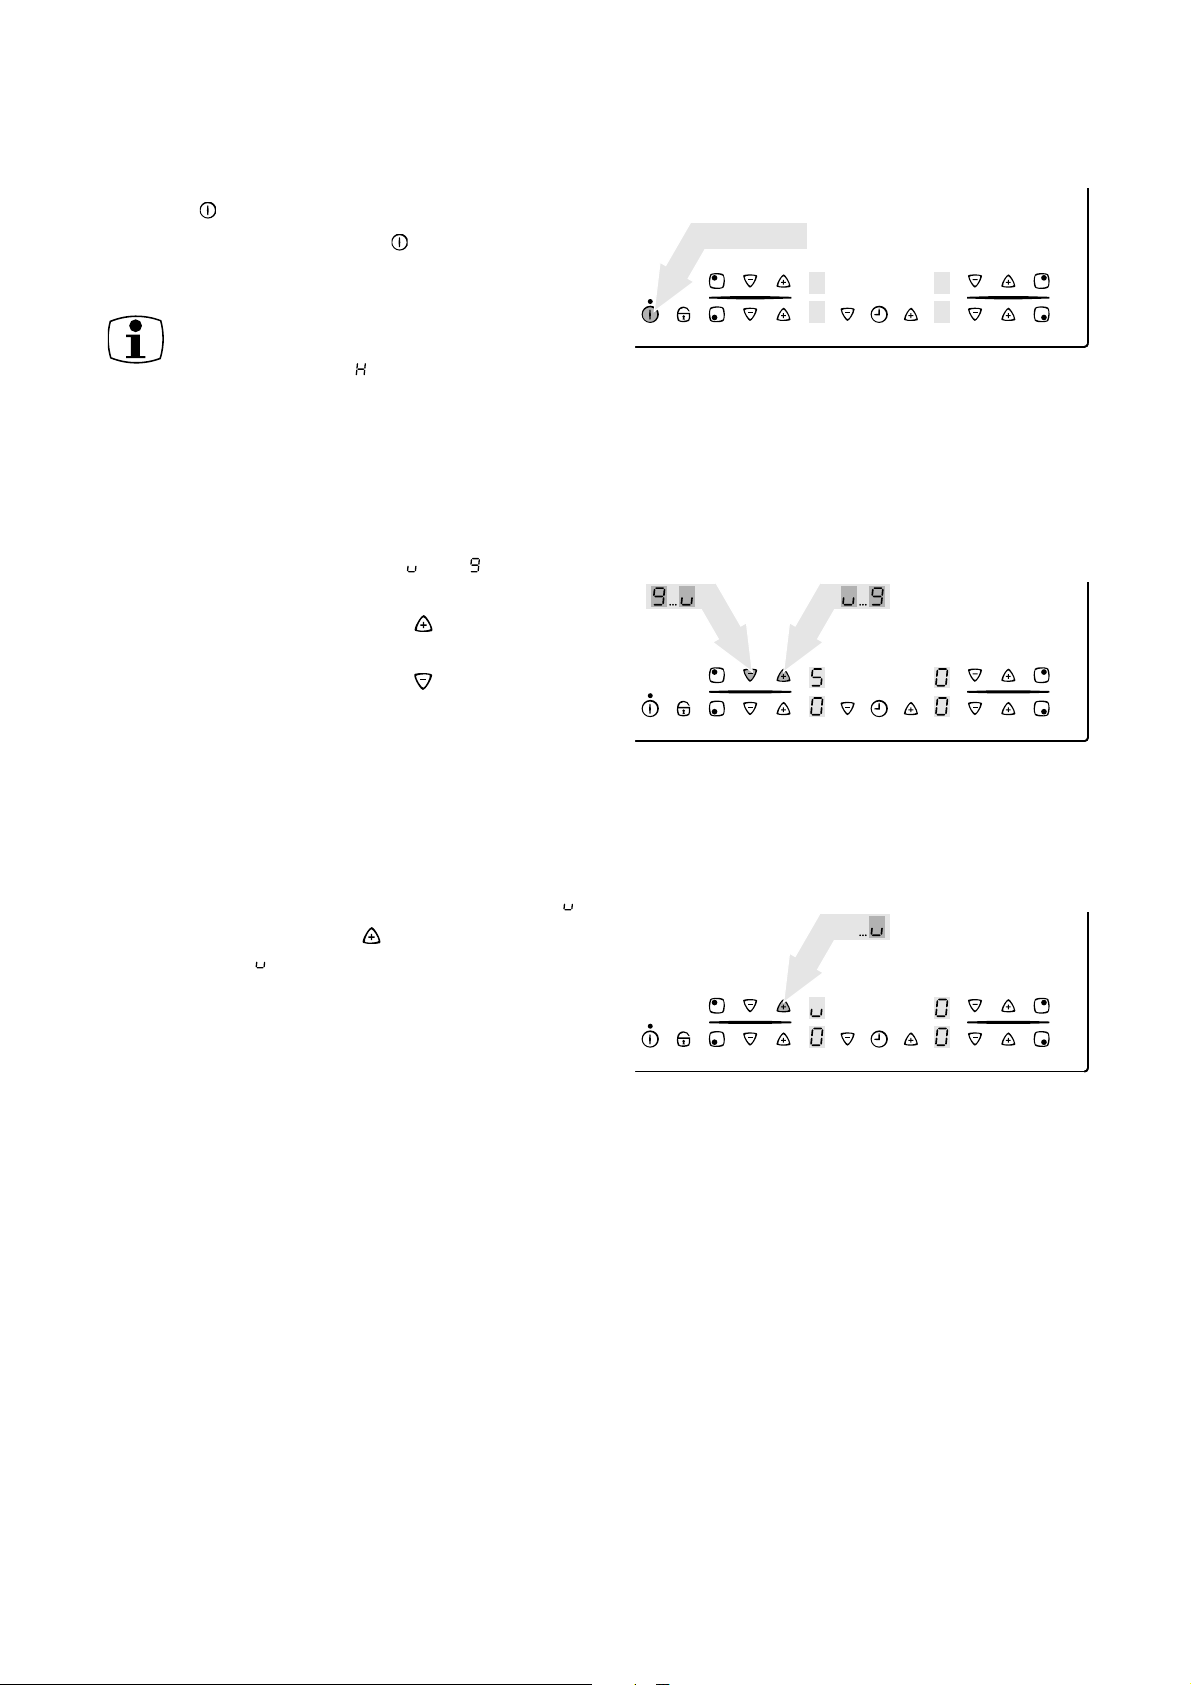
Slå apparatet av
Det komplette apparatet slås av med sensorfeltet
"PÅ/AV" .
Berør sensorfeltet "PÅ/AV" i ca. ett sekund.
Slett informasjonen i det digitale displayet.
Når man har slått av en enkelt kokesone
eller hele kokefeltet, vises eksisterende
restvarme med ("het") på de digitale
displayene til de respektive kokesonene.
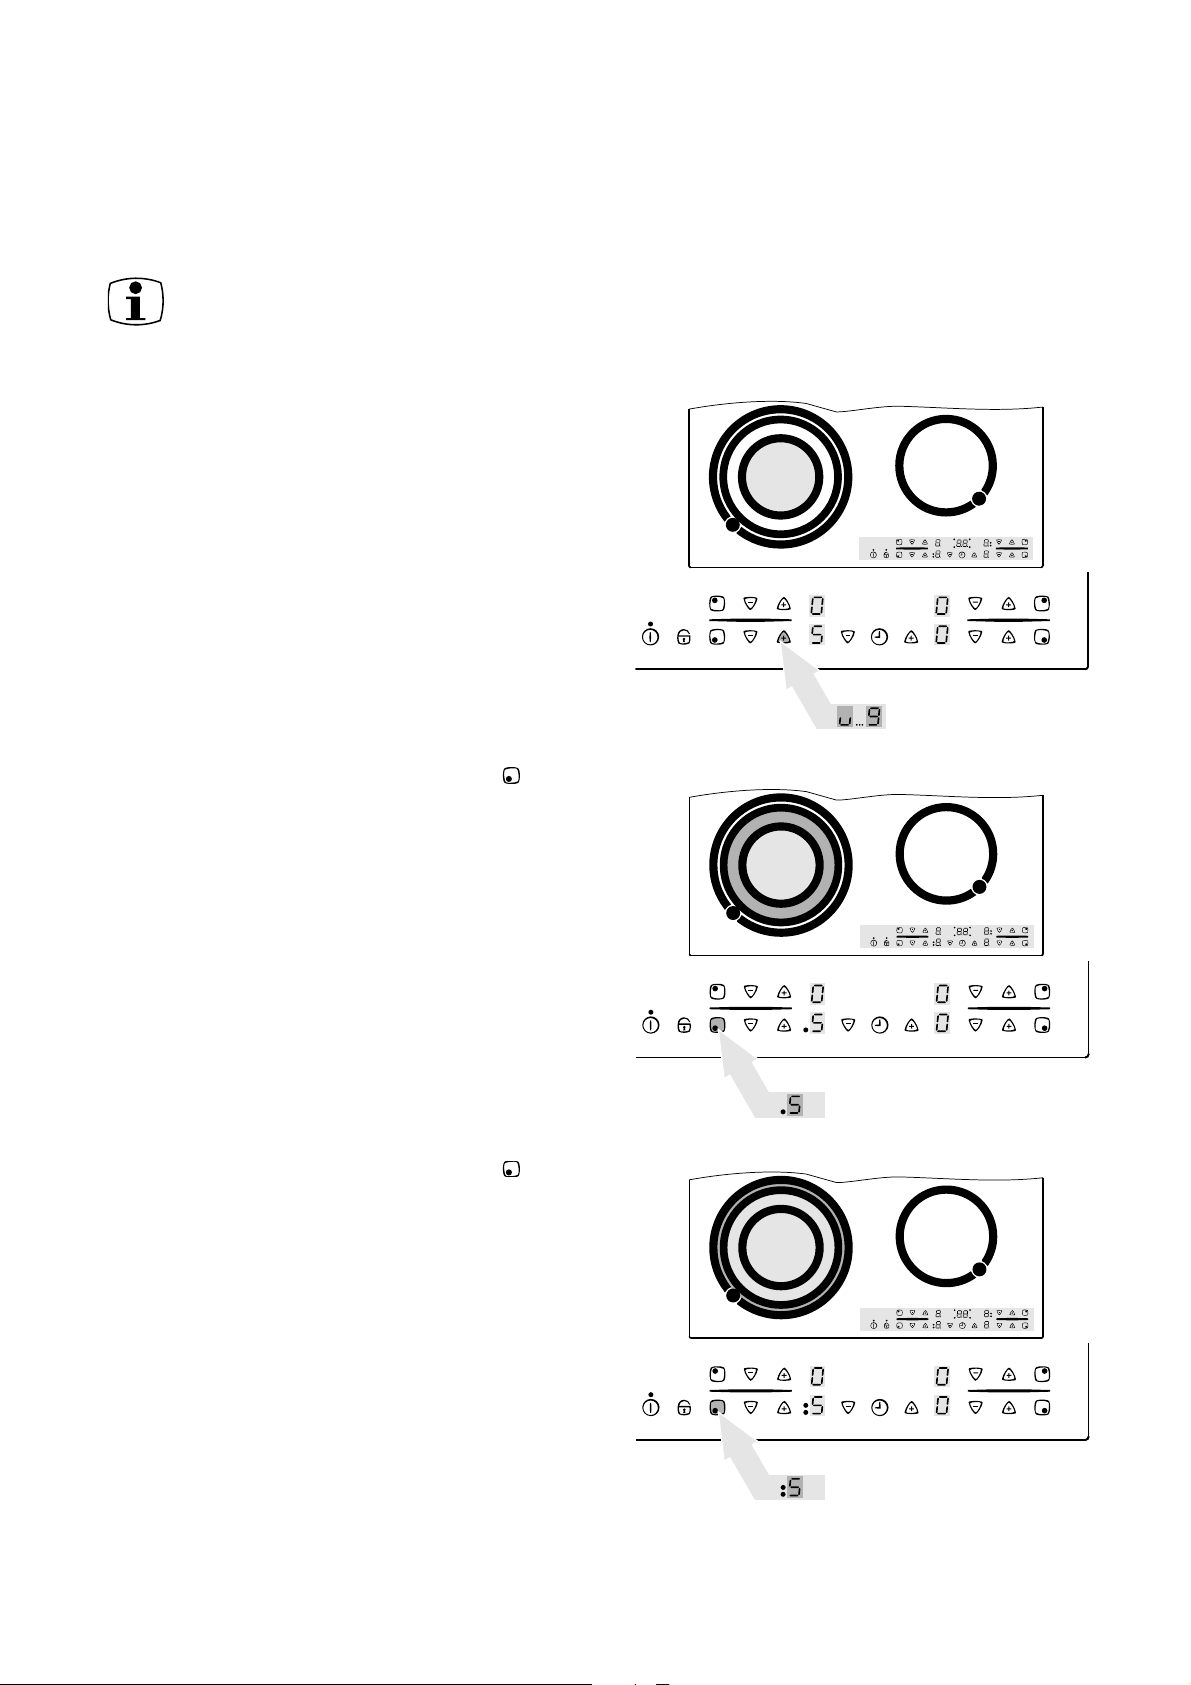
Innstilling av koketrinn
Til innstilling av koketrinnet ( til ) for valgt
kokesone.
Ved sensorfeltet koketrinnsvalg kan koketrinnet
økes.
Ved sensorfeltet koketrinnsvalg kan koketrinnet
senkes.
~ 1 sec.
Innstilling av varmetrinn
Alle 4 kokesoner er utstyrt med en varmesone .
Innstill varmesonen med sensorfeltet
koketrinnsvalg .
10
Page 11
Skru av og på stekesonen
Alt etter gryte- og pannestørrelsen kan man ved
stekesonen skru på det ytre varmefeltet ved hjelp
av sensorfeltet "Stekesone".
Denne kan kun skrus på hvis et
koketrinn er innstilt for den indre
varmesonen.
1. Innstill ønsket koketrinn.
2. Berør sensorfelter ”Stekesone” .
Det ytre varmefeltet skrus på.
Kontrollampen lyser.
3. For å skru av det ytre varmefeltet, berør
sensorfeltet "Stekesone" .
Det ytre varmefeltet skrus av.
Kontrollampen slukkes.
11
Page 12
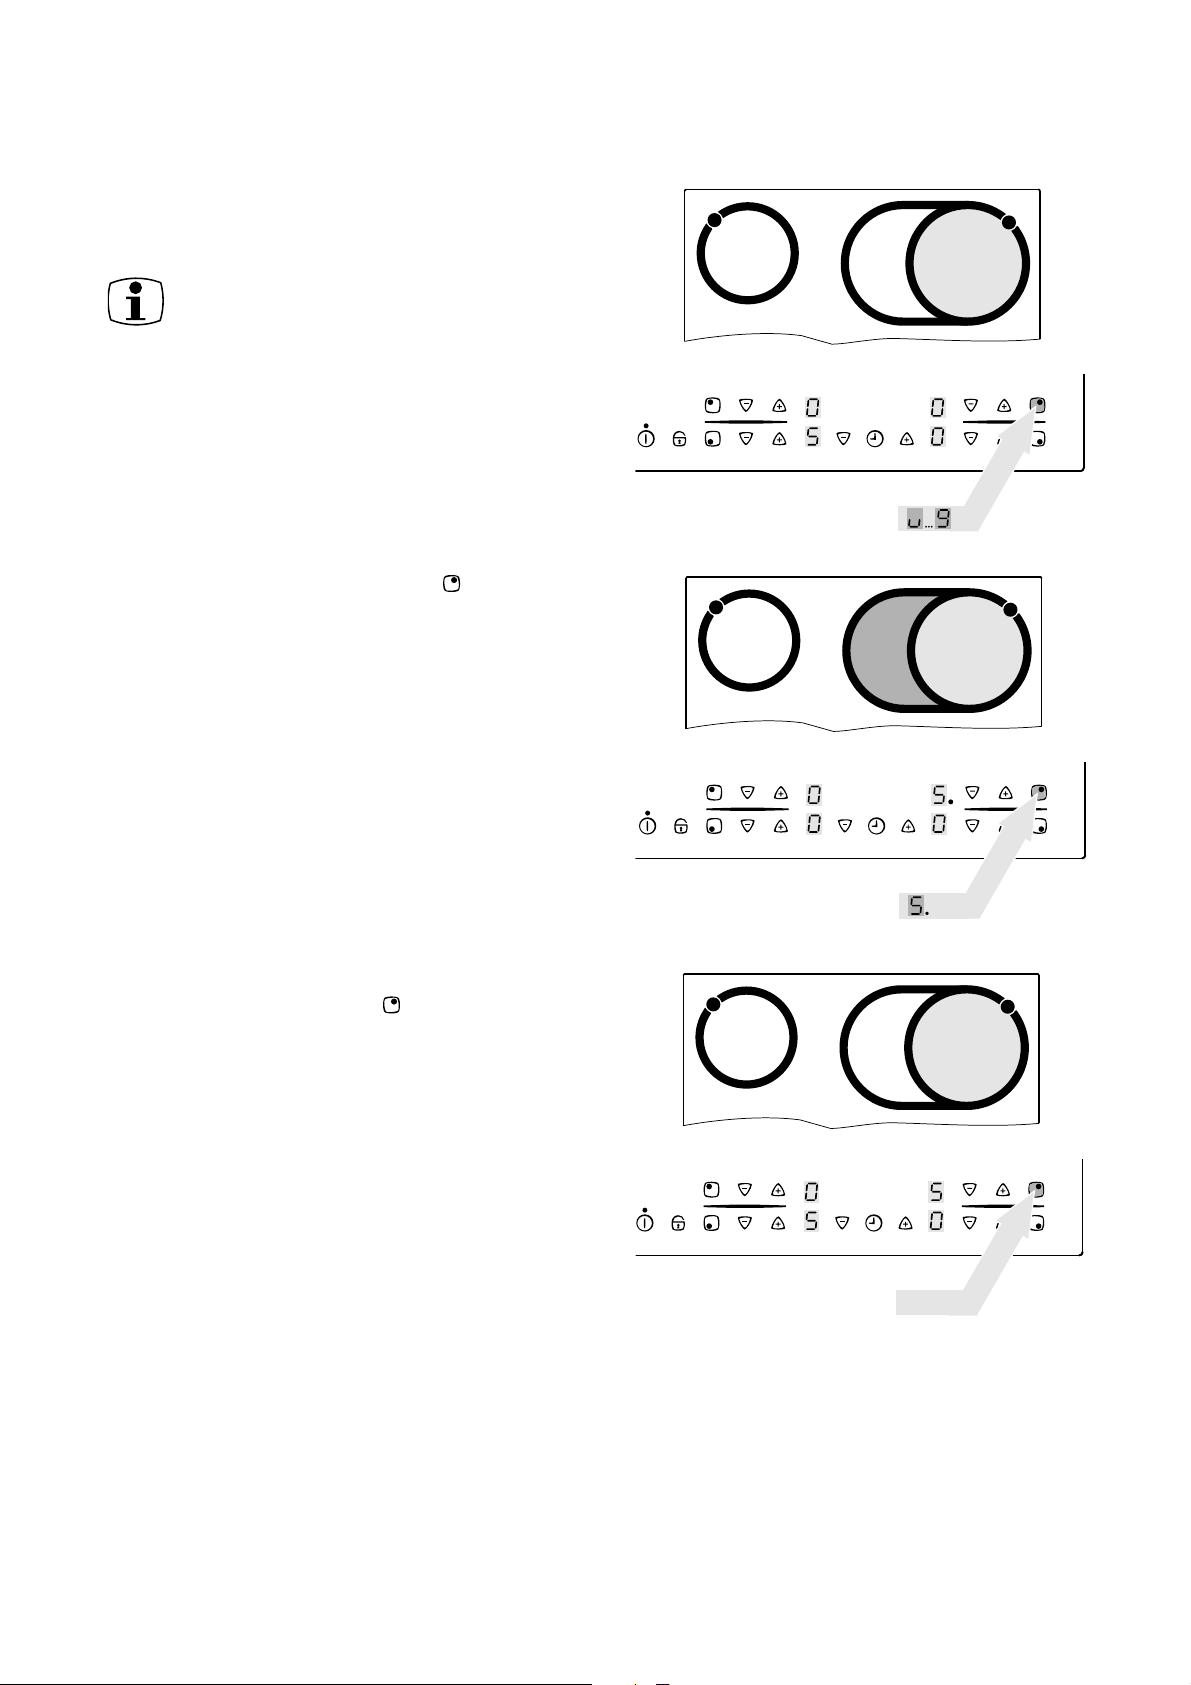
Skru av og på den trippel kokesonen
Alt etter gryte- og pannestørrelsen kan man ved
trippel kokesoner skru på det ytre varmefeltet ved
hjelp av sensorfeltet "Trippel kokesone".
Denne kan kun skrus på hvis et koketrinn
er innstilt for den indre varmesonen.
1. Innstill ønsket koketrinn.
2. Berør sensorfeltet ”Trippel kokesone” .
Det midtre varmefeltet skrus på.
Den nedre kontrollampen lyser.
3. Berør sensorfeltet ”Trippel kokesone” .
Det ytre varmefeltet skrus på.
Den øvre kontrollampen lyser.
12
Page 13

4. For å skru av det ytre varmefeltet, berør
sensorfeltet "Trippel kokesone".
Det ytre hhv. midtre varmefeltet skrus av.
Den tilhørende kontrollampen slukkes.
13
Page 14
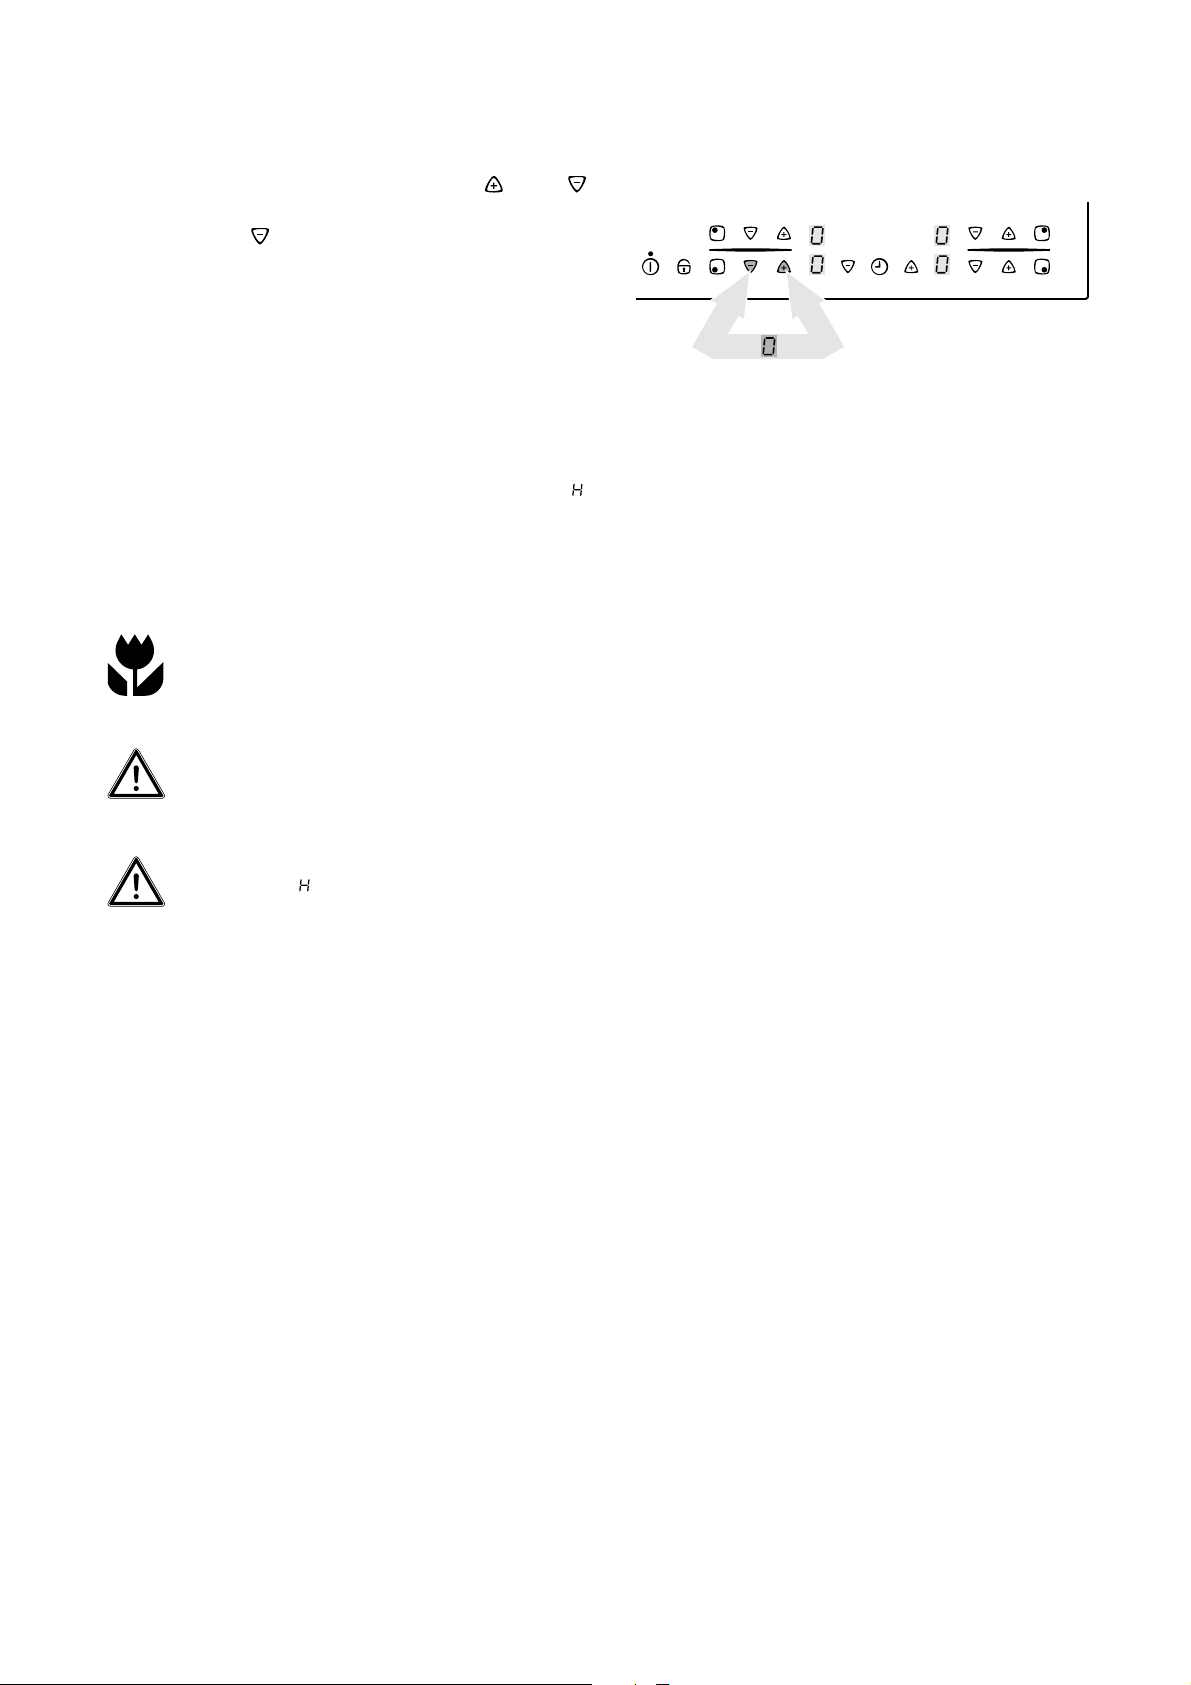
Slå av kokesone
Berør sensorfeltene koketrinnsvalg og
samtidig eller still tilbake til null med sensorfeltet
koketrinnsvalg for å skru av.
Restvarmevarsler
Når man har slått av en enkelt kokesone eller hele
kokefeltet, vises eksisterende restvarme med
("het") på de digitale displayene til de respektive
kokesonene.
Selv etter at man har slått av kokesonen, slukkes
restvarmevarsleren først når kokesonen er avkjølt.
Du kan bruke restvarmen til å smelte
ting eller til å holde mat varm.
OBS ! Det er fare for at man brenner seg
sålenge restvarmevarsleren lyser.
OBS ! Ved strømbrudd slukkes også
symbolet og dermed henvisningen
om eksisterende restvarme. Man kan
imidlertid fortsatt brenne seg. Dette kan
du unngå ved å holde et oppmerksomt
øye med forholdene.
14
Page 15
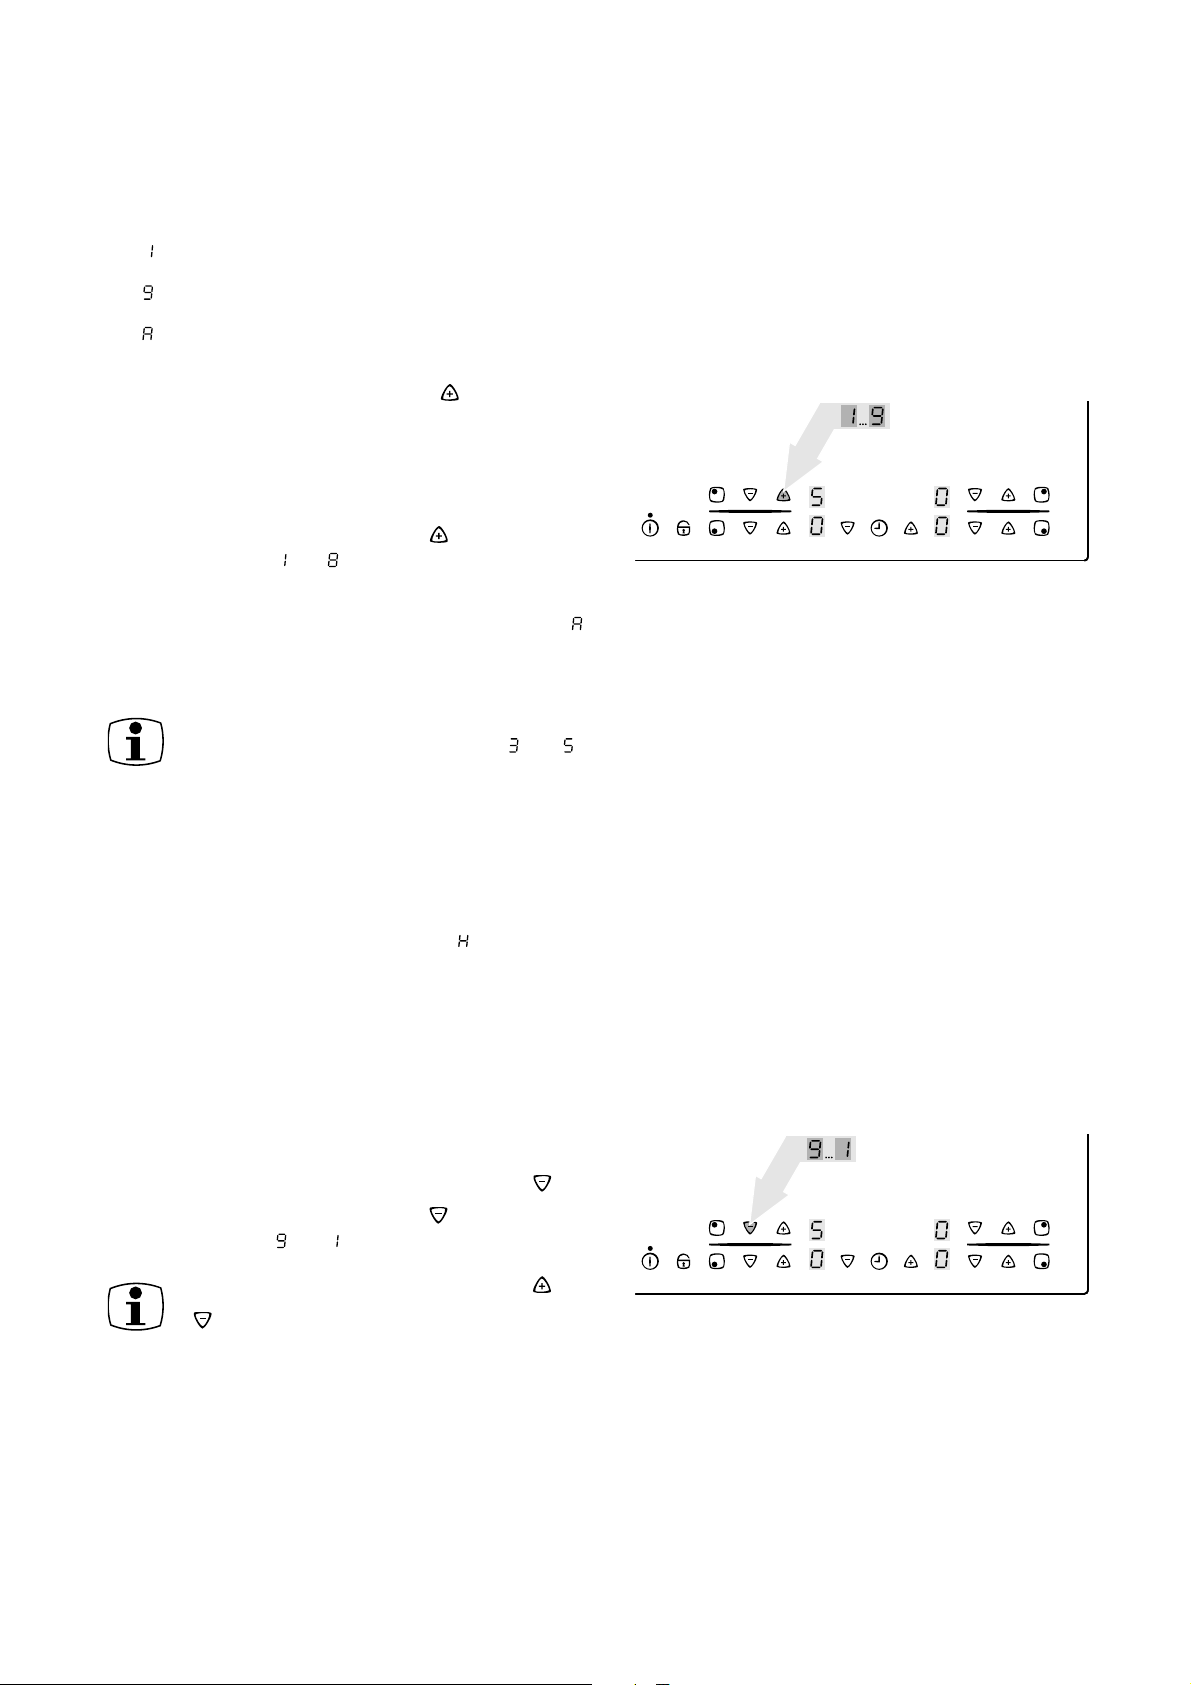
Koking med oppkokingsautomatikk
Alle de fire kokesonene kan reguleres i ni trinn og
de er utstyrt med en oppkokingsautomatikk.
• , laveste koketrinn
• , høyeste koketrinn
• , oppkokingsfunksjon.
Hvis du velger det ønskete koketrinnet med
sensorfeltet koketrinnsvalg , arbeider
kokesonen en bestemt tid på full styrke og skrus så
automatisk til det innstilte koketrinnet.
Lengden på den automatiske oppkokingsperioden
er avhengig av hvilket koketrinnet man har valgt.
Berør sensorfeltet koketrinnsvalg , for å stille inn
ønsket koketrinn til .
Det innstilte koketrinnet vises.
Etter 5 sekunder vises isteden koketrinn
(oppkokingsautomatikk) i displayet. Etter at
oppkokingstiden har gått ut vises koketrinnet igjen.
Hvis du i løpet av oppkokingsfunksjonen
velger et høyere trinn, f.eks fra til ,
blir oppkokingstiden tilpasset.
Velger du et lavere trinn vil
oppkokingstiden avsluttes umiddelbart.
Det er kun mulig å koke med
oppkokingsautomatikk på en kald eller
svakt oppvarmet kokesone. Er
kokesonen allerede varm ( i displayet)
når man skrur på, kan man ikke benytte
oppkokingsautomatikk.
Koking uten oppkokingsautomatikk
Hvis du ønsker å benytte kokesonen uten
oppkokingsautomatikk, velg det ønskete
koketrinnet med sensorfeltet koketrinnsvalg .
Berør sensorfeltet koketrinnsvalg , for å stille inn
ønsket koketrinn til .
Med sensorfeltene koketrinnsvalg og
kan du til enhver tid velge et annet
trinn.
15
Page 16
Barnesikring
Barnesikringen sikrer kokefeltet mot uønsket bruk.
Aktivering av barnesikringen
For å aktivere barnesikringen må apparatet være
slått på og alle kokesonene må være slått av.
1. Berør sensorfeltet "Sperring" i ca. tre
sekunder.
Et bekreftende signal kan høres.
2. Berør et villkårlig sensorfelt koketrinnsvalg .
I displayene kommer til syne, barnesikringen er
aktivert. Apparatet slås av automatisk etter noen
sekunder.
~ 3 sec.
Overvinne barnesikringen
Barnesikringen kan overvinnes for engangs bruk
av apparatet (til neste gang det slås av). Når
apparatet slås på neste gang er barnesikringen
automatisk aktiv igjen.
1. Slå på apparatet.
Er barnesikringen aktivert vises .
2. Berør to villkårlig valgte sensorfelter. Berør
koketrinnsvalg og i ca. 1 sekund.
Et bekreftende signal kan høres. Barnesikringen er
overvunnet inntil apparatet slås av, kokefeltet kan
benyttes normalt.
~ 2 sec.
~ 1 sec.
16
Page 17
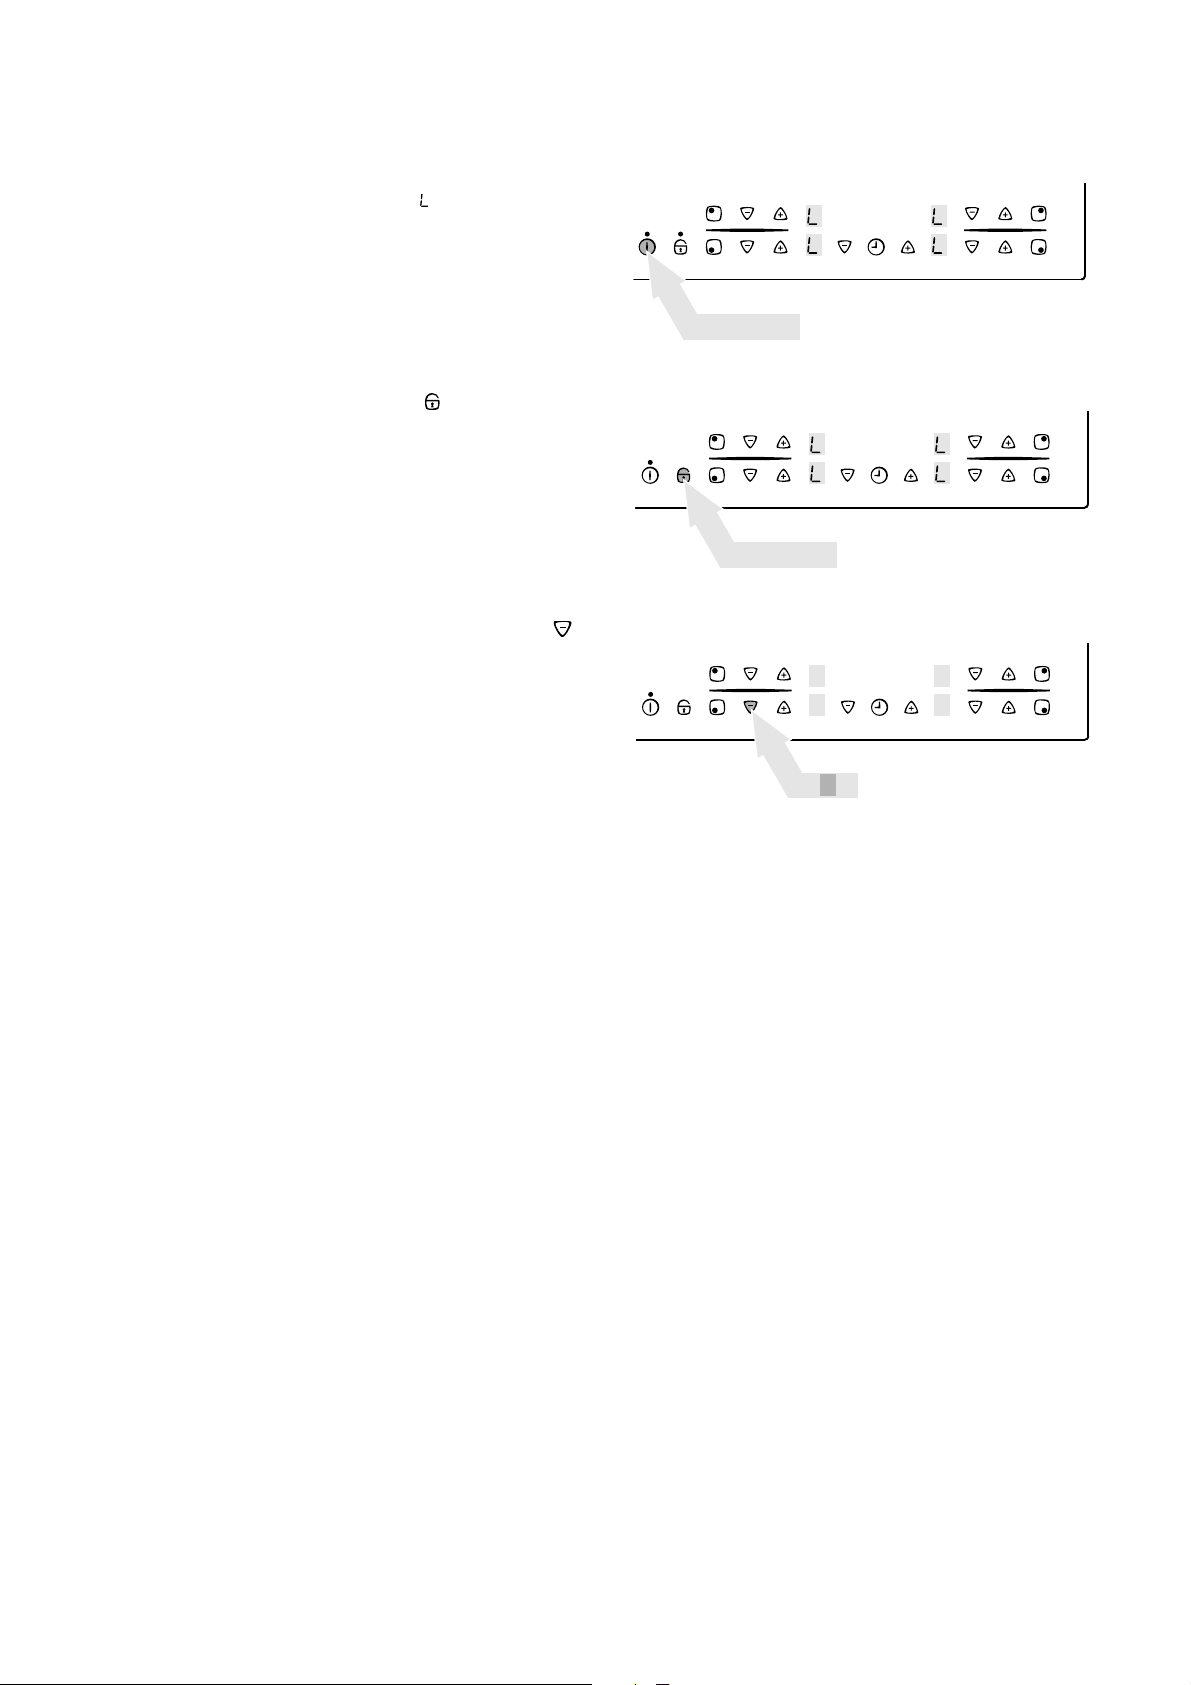
Deaktivering av barnesikringen
1. Slå på apparatet.
Er barnesikringen aktivert vises .
2. Berør sensorfeltet "Sperring" i ca. tre
sekunder.
Et bekreftende signal kan høres.
3. Berør et villkårlig sensorfelt koketrinnsvalg .
Displayene blir mørke, barnesikringen er
deaktivert. Apparatet slås av automatisk etter noen
sekunder.
~ 2 sec.
~ 3 sec.
17
Page 18
Timer
Du kan benytte timeren på to måter:
•som
•som
Benyttelse av deaktiveringsautomatikk
De(n) kokesonen(e) hvor du vil benytte
deaktiveringsatomatikk må være slått på.
1. Velg ut for hvilken kokesone
deaktiveringsautomatikk. Du innstiller en
bestemt periode for en kokesone, etter at
perioden har gått ut slås kokesonen automatisk
av. Denne funksjonen kan benyttes samtidig
for flere kokesoner.
korttidsmåler uten koplefunksjon, etter at
den innstilte perioden har gått ut hører man et
akustisk signal.
Korttidsmåleren kan ikke benyttes når en
kokesone er slått på.
deaktiveringsautomatikken skal innstilles for
ved hjelp av sensorfeltet timer .
Ved at man berører sensorfeltet timer velges
den første kokesonen (i urviserens retning),
kontrollampen som hører til blinker raskt. Her
henviser f. eks. bakre kontrollampe til venstre den
bakre kokesonen til venstre. I timer-displayet vises
.
Ved at man berører sensorfeltet timer en gang
til velges den neste kokesonen.
2. Mens kontrollampen blinker raskt, innstill
ønsket tidsperiode inntil automatisk
deaktivering av denne kokesonen (f. eks. 15
minutter) ved hjelp av sensorfeltene
timerinnstilling eller .
Etter få sekunder slås deaktiveringsautomatikken
på.
Kontrollampen blinker nå langsommere og den
resterende steketiden vises i displayet. Er
deaktiveringsautomatikken stilt inn for flere
kokesoner, så gjelder dette for kokesonen som har
den korteste resterende steketiden.
Kontrollampene til de øvrige kokesonene hvor
deaktiveringsautomatikken er innstilt lyser. For å
vise den resterende steketiden for en av disse
kokesonene, må denne velges ut ved hjelp av
sensorfeltet timer og dens kontrolllampe vil
blinke raskt.
~ 1 sec.
18
Page 19
For å endre den resterende steketien må man
velge den ønskete kokesonen med sensorfeltet
timer . Dens kontrollampe blinker da raskere.
Endringen foregår ved hjelp av sensorfeltene
timerinnstiling eller .
Etter at den innstilte steketiden har gått ut, slås
kokesonen automatisk av og man kan høre et
akustisk signal i ca. to minutter, timerdisplayet
blinker .
3. Berør sensorfeltet timer for å slå av signalet.
For raskere innstilling, berør enten
sensorfeltet timerinnstilling eller
helt til den ønskete verdien er nådd.
Hvis man først berører sensorfeltet
timerinnstilling , begynner
tidsinnstillingen ved 99 minutter, berøres
først sensorfeltet timerinnstilling
begynner tidsinnstillingen ved 1 minutt.
Stansing av deaktiveringsautomatikken før
tiden har gått ut.
~ 1 sec.
Du har to muligheter til å stanse
deaktiveringsautomatikken tidligere:
Slå av kokesonen og timer samtidig
Still den ønskede kokesonen på null ved hjelp av
sensorfeltet koketrinnsvalg .
Kokesone og timer slås av.
Slå av timer - kokesonen forblir aktivert
1. Velg den ønskede kokesonen ved hjelp av
sensorfeltet timer .
Den tilhørende kontrollampen blinker da raskere.
2. Still sensorfeltet timerinnstilling timer på :
Det er kun timeren som slås av, kokesonen forblir
aktivert.
19
Page 20
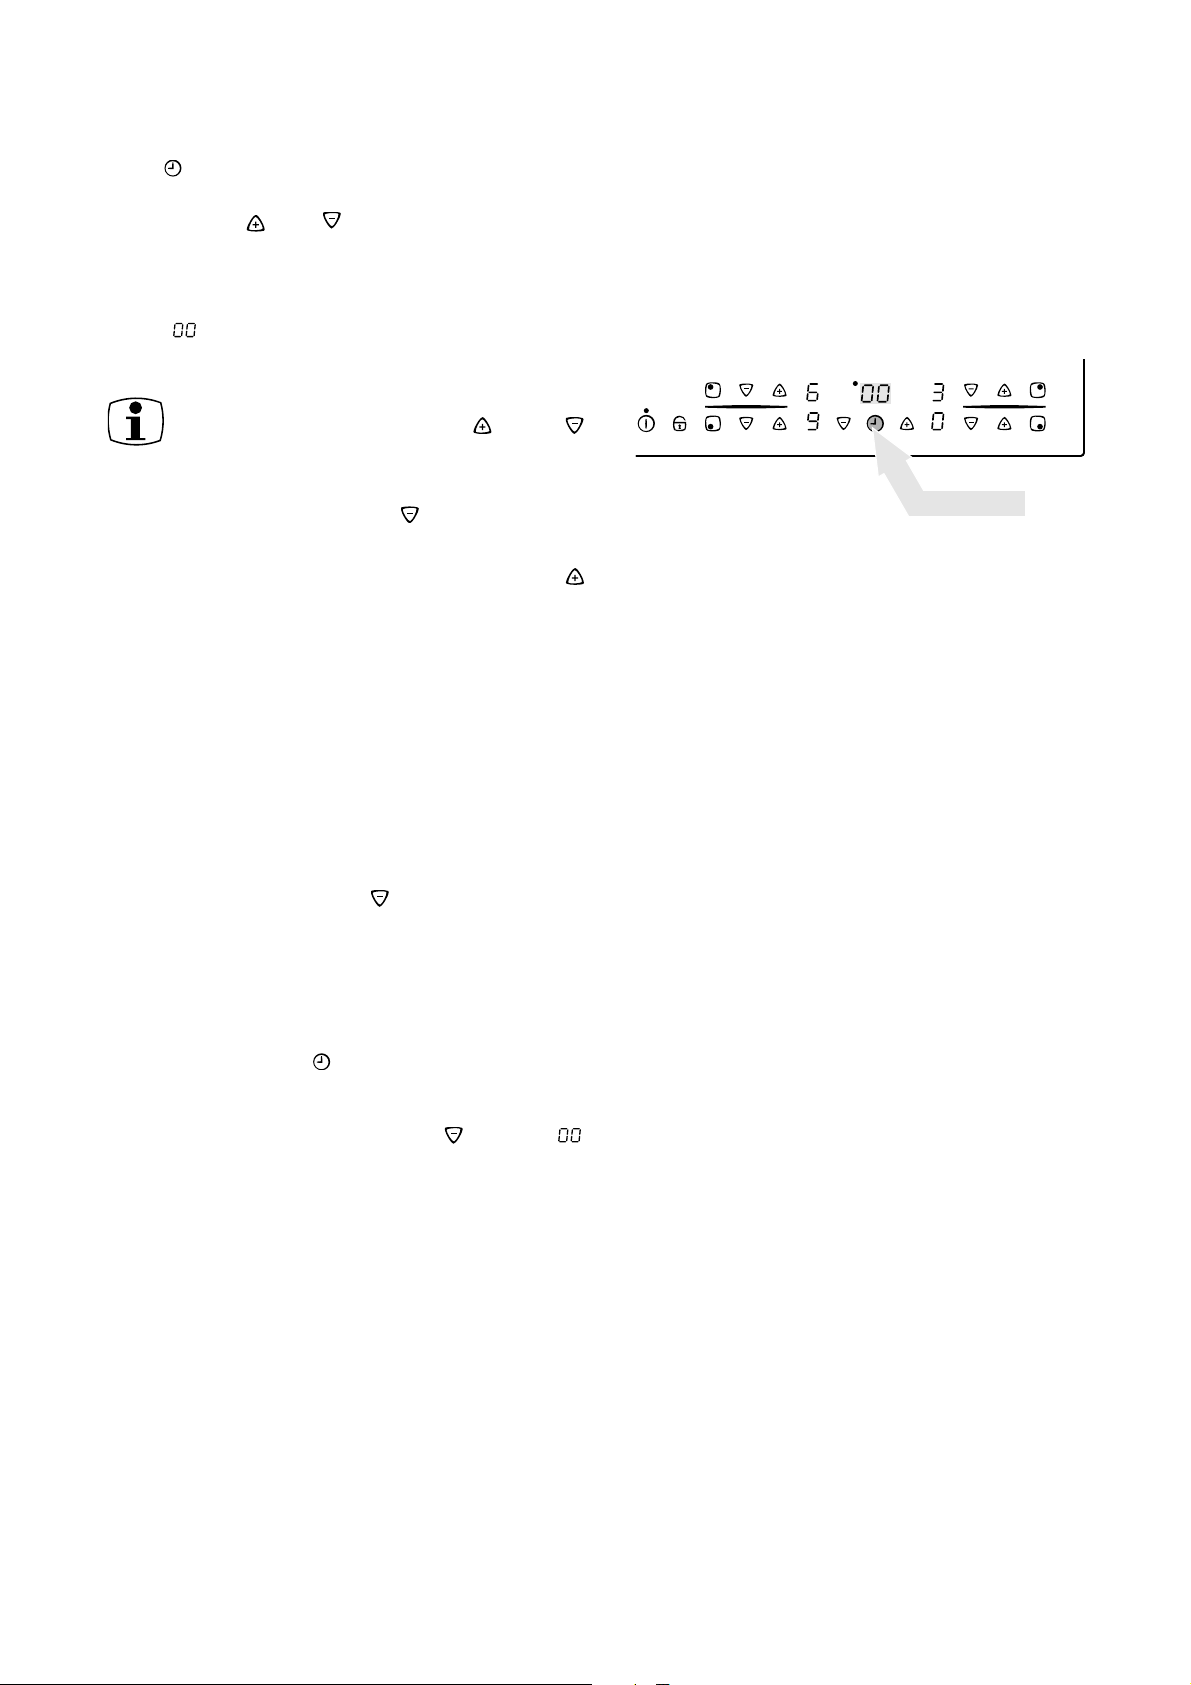
Benyttelse av korttidsmåler
For å aktivere korttidsmåleren må apparatet være
slått på og alle kokesonene må være slått av.
1. Berør sensorfelter timer .
I timer-displayet vises .
2. Still inn den ønskede tidsperioden ved hjelp av
sensorfeltene timerinnstilling eller .
Etter få sekunder er korttidsmåleren aktivert og
den resterende tiden vises.
Berør sensorfeltet timer for å endre den resterende
tiden, innstillingen endres ved hjelp av
sensorfeltene for timerinnstillingen og .
Etter at den innstilte tiden har gått ut, kan man
høre et akustisk signal og timerdisplayet blinker
.
3. Berør sensorfeltet timer for å slå av signalet.
Sperring/frigjøring av kontrollfelt
Til enhver tid i matlagingsprosessen kan
kontrollfeltet sperres (unntatt sensorfeltet "På/Av"),
for å hindre en endring i innstillingene f. eks. når
man vasker over med en klut.
1. Berør sensorfeltet "Sperring" i ca. ett
sekund.
Kontrollampen til sensorfeltet "Sperring" lyser.
2. For å oppheve sperringen, berør sensorfeltet
"Sperring" en gang til i ca. ett sekund.
Kontrollampen til sensorfeltet "Sperring" slukker,
de koketrinnene som var innstilt tidligere vises på
ny.
Når apparatet slås av blir sperringen
automatisk slått av.
~ 1 sec.
~ 1 sec.
20
Page 21
Bruk, tabeller, tips
Kokekar
Jo bedre gryter og kokekar man benytter, jo bedre
blir resultatet av matlagingen.
• Gode kokekar gjenkjenner man på
grytebunnen. Bunnen bør være så tykk og plan
som mulig.
• Når du kjøper nye gryter eller panner, må du
være oppmerksom på bunnens diameter.
Produsenten angir ofte diameteren for øverste
kant på kokekaret.
• Kokekar med bunn av aluminium eller kobber
kan etterlate fargeendringer på
glasskeramikkflaten.
• Bruk ikke gryter av smijern eller med skadet
bunn, som er ru eller har grater. Når slike gryter
forskyves, kan det oppstå varige riper.
• I kald tilstand er grytebunnene vanligvis buet litt
innover (konkave). De må ikke være buet
utover (konvekse).
• Hvis du bruker spesielle kokekar, (f. eks.
dampgryte, simmergryte eller WOK osv.), må
du følge produsentens henvisninger.
Generelle henvisninger
• Bunnen må alltid være ren og tørr.
• For å unngå riper på glasskeramikkokesonen,
bør man løfte gryter og panner når de skal
flyttes istedetfor å skyve dem.
• Riper kan også oppstå på grunn av sandkorn
(f. eks. fra vasking av grønnsaker) som trekkes
med gryten over koketoppen.
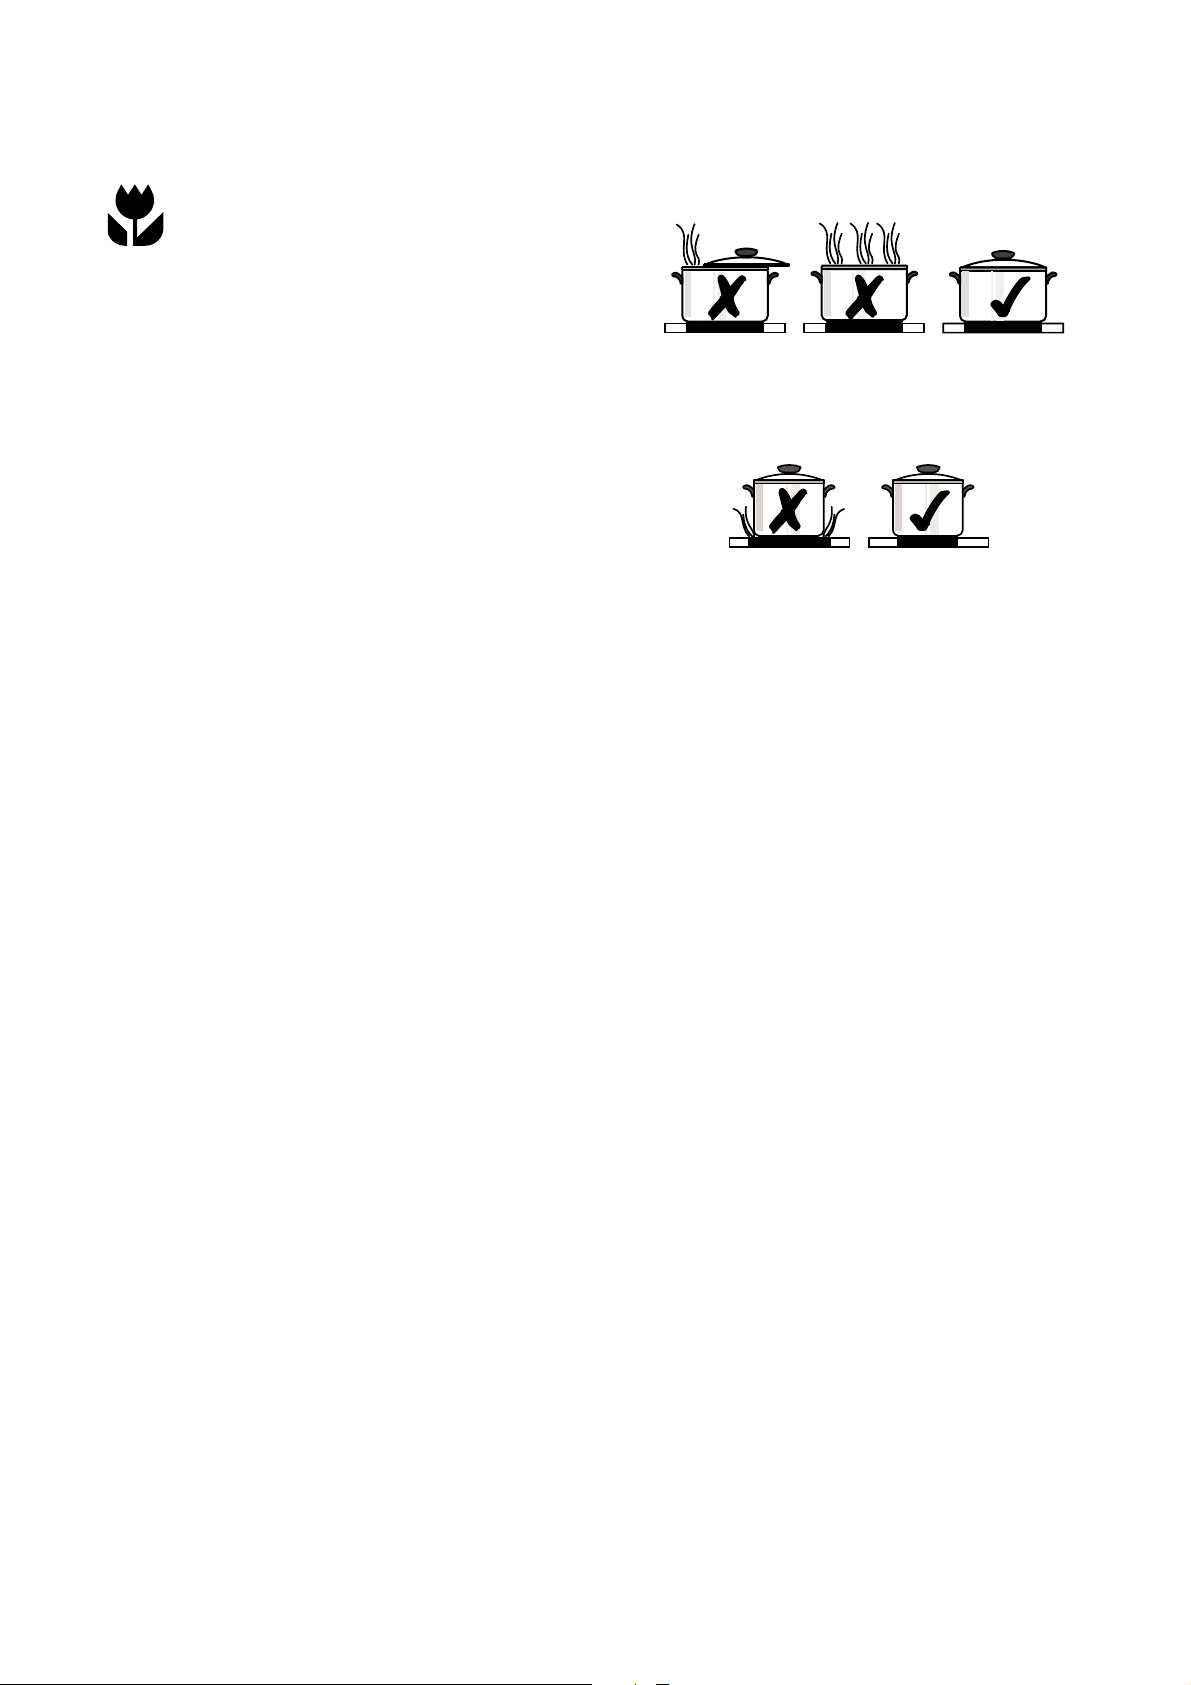
• Bruk høye gryter for retter med mye væske, da
kan de ikke koke over.
21
Page 22
Tips om energisparing
Du kan spare strøm ved å følge
punktene nedenfor:
• Gryter og panner skal prinsipielt settes på
kokesonen før denne slås på.
• Er kokesonen eller bunnen av kokekaret ikke
rengjort, øker strømforbruket.
• Sett alltid lokk på gryter og panner når dette er
mulig.
• Slå kokesonene av før koketiden er over, slik at
du kan utnytte restvarmen, f.eks. til å holde mat
varm eller til å smelte ting.
• Grytebunn og kokesone bør være like store.
• Ved bruk av trykkoker, reduseres koketiden
med opptil 50%.
22
Page 23

Tips for matlaging med og uten
oppkokingsautomatikk
Den automatiske oppkokingsfunksjonen egner
seg for:
• Retter som settes inn kalt, som varmes opp
ved sterk varme og som ikke stadig må passes
på i stekeprosessen.
• Retter som legges i en varm panne.
Den automatiske oppkokingsfunksjonen egner
seg ikke for:
• Gulasj, rullade og liknende gryteretter, som for
å oppnå den riktige brunfargen snus ofte under
steking, helles over og ferdigstekes,
• raspeball, pastaretter med mye væske,
• koking med hurtigkjeler,
• svært store mengder supper/gryteretter med
mer enn 2 liter væske.
Generelle henvisninger:
• Ved matlaging uten oppkokingsautomatikk
anbefaler vi at man for oppkoking/steking stiller
inn på et høyt trinn (med -tasten) og deretter
lar det steke ferdig på det dertil passende
trinnet.
• Følg med på det tidlige kokeforløpet ! Dermed
kan du finne ut hvilket koketrinn som passer
best for "din rett" i de "mengdene du vanligvis
tilbereder den "med dine kokekar". Snart vil du
oppdage fordelene med automatikken og du
oppnår en sikker følelse overfor din nye
koketopp.
23
Page 24

Referanseverdier for koking med kokesonene
Angivelsene i tabellen nedenfor er veiledende
verdier. Hvilken bryterstilling som kreves for den
faktiske matlagingen, avhenger av grytenes
kvalitet og type og av mengde næringsmidler.
Koketrinn Automatik-
kens
oppkoking
1)
stid
[min.]
4,5
3,5
2,0
10,2
6,5
Kokeforløp Eksempler på bruk
Oppkoking
Bruning
Frittering
Oppkoking av store væskemengder,
koking av "Spätzle" (eggnudler),
bruning av kjøtt,
(bruning av gulasj)
Sterk bruning Biff, mørbrad,
potetkaker,
stekte pølser,
pannekaker
Steking Snitsel/koteletter,
lever, fisk,
karbonader, speilegg
Koking
Koking av inntil 1,5 l væske,
poteter, grønnsaker
4,8
Dampkoking
Dunsting
1,7
Svelling
Smelting Smelting av smør,
1,0
0,5
1)
Ved koking uten automatikk kan oppkokingstiden
Varmholding
velges individuelt.
Vi anbefaler at man innstiller koketrinn
" " for oppkoking og bruning og at man
deretter lar mat med lengre koketid koke
ferdig på et passende trinn for videre
koking.
Dampkoking og dunsting av
mindre mengder grønnsaker,
svelling av ris og
melkeretter
oppløsning av gelatin,
smelting av sjokolade
Holde maten varm
24
Page 25

Rengjøring og vedlikehold
Koketopp
OBS ! Det må ikke komme
rengjøringsmidler på varm
glasskeramikktopp ! Alle rengjøringsmidler må fjernes med tilstrekkelig rent
vann etter rengjøring, ettersom de kan
ha en etsende virkning når kokesonene
varmes opp igjen !
Bruk ikke aggressive rengjøringsmidler,
som f.eks. grill- eller stekeovnsspray,
grove skuremidler eller svamper med
skrapende virkning.
Rengjør glasskeramikkkoketoppen etter
hver bruk, mens den er håndvarm eller
kald. På den måten forhindrer du at
smussen brenner seg fast.
Kalk- og vannrender, fettsprut og
fargeforandringer som skinner i metall
fjernes med vanlig rengjøringsmiddel for
glasskeramikk eller spesialstål.
Lett tilsmussing
1. Tørk av glasskeramikktoppen med en fuktig
klut og litt rengjøringsmiddel.
2. Vask deretter med en ren klut og gni flaten tørr.
Det må ikke være noen rester av
rengjøringsmiddel igjen på overflaten.
3. Rengjør hele glasskeramikkflaten grundig en
gang i uken med vanlig rengjøringsmiddel for
glasskeramikk eller spesialstål.
4. Skyll deretter av glasskeramikkflaten med
rikelig mengde rent vann og benytt en ren og
støvfri klut for å tørke flaten helt tørr.
25
Page 26

Tilsmussing som sitter fast
1. Benytt en rengjøringsskraper for å fjerne mat
som har kokt over eller grov smuss som sitter
fast.
2. Sett rengjøringsskraperen skrått ned på
glasskeramikktoppen.
3. Fjern smussen fra glasskeramikktoppen med
en glidende bevegelse.
Man får kjøpt rengjøringsskrape og
rengjøringsmiddel for glasskeramikk hos
en fagforhandler.
Spesiell tilsmussing
1. Fastbrent sukker, smeltet kunststoff,
aluminiumsfolie eller andre materialer som kan
smelte må fjernes umiddelbart, i fortsatt varm
tilstand, med en rengjøringsskraper.
OBS ! Når man arbeider med
rengjøringsskraper på varm kokesone, er
det fare for å brenne seg.
2. Rengjør deretter koketoppen på vanlig måte
når det er blitt kaldt.
Hvis kokesonen med det smeltede
materialet allerede er blitt kald, må
sonen varmes opp igjen før den
rengjøres.
Riper eller mørke flekker i
glasskeramikkflaten, som f. eks. skyldes
grytebunner med skarpe kanter, kan
man ikke fjerne. De har ingen virkning på
kokesonen funksjonsdyktighet.
26
Page 27

Dekorasjonsstriper i metall
OBS ! Unngå å få eddik eller kalløsende
midler på kokefeltets dekorasjonsstriper
av metall, da matte flekker kan oppstå.
Ved rengjøring må man ikke stikke flate
gjenstander som f. eks. kniver under
dekorasjonsstripene, da disse kan løsne.
1. Tørk av dekorasjonsstripene med en fuktig klut
og litt rengjøringsmiddel.
2. Bløt opp tørket tilsmussing med en våt klut.
Tørk det så bort og sørg for at flaten er tørr.
27
Page 28

Hva må gjøres.....
... hvis det ikke er mulig å slå på
kokesonene ?
Hjelp ved feil
Hvis det foreligger et problem, kan det hende at
det bare dreier seg om en liten feil som du kan
utbedre selv ved hjelp av henvisningene
nedenfor. Ikke utfør videre arbeider selv hvis
informasjonen nedenfor ikke hjelper i det
konkrete tilfellet.
Advarsel! Reparasjoner på apparatet
skal kun utføres av fagfolk. Hvis
reparasjoner ikke utføres på riktig måte
kan det oppstå alvorlige farer for
brukeren.
Henvend deg til din fagforhandler eller
til kundeservice hvis det er nødvendig
å utføre en reparasjon.
Hvis det er sprekk i glasset på glasskeramikkoketoppen, vennligst oppgi det
som befinner seg på glassplaten når du
henvender deg til kundeservice.
tresiftete tallet
Hva må gjøres.....
... hvis kokesonen ikke fungerer ?
Kontrollér om
• kontrollfeltet er sperret.
• det har gått mer enn 10 sekunder fra På/Avtasten ble betjent til kokesonen ble slått på
(se kapittelet "Slå på apparatet").
• sensorfeltene er helt eller delvis dekket av
væske eller en våt klut.
... displayet plutselig slukkes, bortsett fra
for indikering av restvarme ?
Kontrollér om
• om du ved en feiltakelse har berørt På/Avtasten.
• sensorfeltene er delvis dekket av en fuktig
klut, væske eller liknende.
• sikringsutkoplingen er utløst.
... hvis ikke for restvarme vises på
displayet etter at kokesonene slås av ?
Kontrollér om
• kokesonen kun var slått på en kort tid og
derfor ikke er blitt varm nok enda.
Hvis kokesonen er varm, må du informere
kundeservice.
Kontrollér om
• sikringen i husets faste installasjon
(sikringsboksen) er intakt. Hvis sikringen går
flere ganger må du tilkalle en elektrisk
installatør.
• apparatet er slått på riktig,
• kontrollampene på kontrollfeltet lyser,
• den respektive kokesonen er slått på,
• kokesonen er innstilt på ønsket koketrinn,
• kokesonens sikkerhetsutkopling er slått på
(se kapittelet "Sikkerhet").
... hvis det ikke er mulig å slå av
kokesonen ?
Kontrollér om
• berøringsbryterne er delvis dekket av væske
eller en våt klut.
• kontrollfeltet er sperret.
... hvis det ikke er mulig å slå på
kokesonen ?
Kontrollér om
• barnesikringen er aktivert.
• kontrollfeltet er sperret.
28
Page 29

... indikeringen lyser ?
Kontrollér om kokesonen er overopphetet.
Displayet lyser ved overoppheting, feil ved
elektronikken eller av sikkerhetsmessige grunner.
... apparatet reagerer ikke på berøring av
et sensorfelt ?
Apparatet reagerer ikke når man berører et
sensorfelt, når du ikke samtidig berører et annet
sensorfelt som ikke var ment å kombinere.
Hvis du tilkaller kundeservice på grunn av feil
betjening, er kundeservice-teknikerens besøk ikke
gratis selv om det skjer i garantiperioden.
29
Page 30

Monteringsanvisning
OBS ! Montering og tilkopling av det nye
apparatet skal kun utføres av autorisert
elektriker.
Følg disse instruksjonene, hvis ikke
taper man garantien hvis det oppstår
skade.
Tekniske data
Apparatets dimensjoner
Bredde foran 626 mm
Bredde bak 590 mm
Dybde 520 mm
Høyde 47 mm
Utskjæringsens dimensjoner
Bredde 560 mm
Dybde 490 mm
Hjørneradius R5
Kokesoner
Position Diameter Effekt
foran til
venstre
bak til
venstre
bak til høyre 170x265 mm 1500/2400 W
foran til
høyre
120/175/210
mm
145 mm 1200 W
145 mm 1200 W
800/1600/
2300 W
Tilkoplingsverdier
Tilkoplingsspenning 230 V
~ 50 Hz
samlet tilkoplingsverdi, maks. 7,1 kW
30
Page 31

Bestemmelser, normer, direktiver
Dette apparatet svarer til følgende normer:
• EN 60335-1 og EN 60335-2-6
om sikkerhet ved elektriske apparater for bruk i
husholdning eller til liknende formål og
• EN 60350 hhv. DIN 44546 / 44547 / 44548
om bruksegenskapene til elektriske komfyrer
og grillapparater for husholdning.
• EN 55014-2 / VDE 0875 del 14-2
• EN 55014 / VDE 0875 del 14 / 1999-10
• EN 61000-3-2 / VDE 0838 del 2
• EN 61000-3-3 / VDE 0838 del 3
om grunnleggende sikkerhetskrav vedrørende
elektromagnetisk kompatibilitet (EMV).
Dette apparatet svarer til følgende EUdirektiver:
• 73/23/EØF av 19.02.1973 (direktiv for
lavspenning)
• 89/336/EØF av 03.05.1989 (direktiv om
elektromagnetisk kompatibilitet inkl.
revisjonsdirektiv 92/31/EØF).
31
Page 32

Sikkerhetsinstrukser for
installatøren
• I den elektriske installasjonen er det lagt opp til
en innretning som gjør det mulig at apparatet
med en kontaktåpningsvidde på min. 3 mm
koples fra nettet med alle polene.
Egnete delingsanordninger er f. eks. LSbrytere, sikringer (skruesikringer må tas ut av
holderen) eller FI-sikkerhetsbrytere.
• Dette apparatet svarer til EN 60 335-2-6 når
det gjelder vern mot brannfare.
• De minstekravene som er satt til de andre
apparatene på kjøkkenet ditt (se deres
tekniske spesifikasjoner) må overholdes.
• Skuffer får ikke monteres under kokefeltet.
• Berøringsvern må være sikret ved
forskriftsmessig montering.
• Stabiliteten til innbygningsskapet må oppfylle
kravene i DIN 68930.
• Som vern mot fuktighet må alle avsagde
snittflater dekkes med egnet
fortetningsmaterial.
• Ved flislagte arbeidsflater må fugene i
kokedelens bærende omeråder fylles helt med
fugematerial.
• Ved natur-, kunststein- eller keramikkplater må
springfjærene klebes inn med egnet syntetisk
harpiks eller tokomponentlim.
• Kleb de fire ensidig, selvklebende
tetningsbåndene på undersiden av
koketoppen, langs den ytre kanten til
glasskeramikkskiven. Ikke strekk. Endene på
tetningsbåndene må overlappe hverandre.
• Ved demontering må skålen trykkes ut
nedenifra.
• Rengjør arbeidsplaten i det utskårede
omerådet.
32
Page 33

Elektrisk tilkopling
Før tilkopling må man kontrollere at apparatets
merkespenning, dvs. den spenningen som er
angitt på typeskiltet, stemmer overens med
eksisterende nettspenning. Typeskiltet befinner
seg på komfyrtoppens nederste kledning.
Varmeelementspenningen er AC 230V~.
Apparatet fungerer også upåklagelig i eldre nett
med AC 220V~.
Nettilkoplingen av komfyrtoppen skal utføres slik at
det finnes en brytermulighet for alle poler med
kontaktåpngsvidde å minst 3mm, f.eks. LSautomat, FI-sikkerhetsbryter eller sikring.
En ledning av type H05VV-F eller av bedre kvalitet
skal brukes som nettkabel.
Tilkoplingen skal utføres i samsvar med skjemaet.
Tilkoplingsbroene skal settes inn i samsvar med
tilkoplingsskjemaet. Vernelederen tilsluttes
klemme . Jordingsledningens leder må være
lenger enn de strømførende lederne.
Kabeltilkoplingene skal utføres
forskriftsmessig og klemskruene trekkes fast
til.
Deretter skal strømledningen sikres med
strekkavlastningsklemmen og dekselet lukkes ved
at det presses fast på (smekker i lås).
Før apparatet slås på første gang, må man fjerne
evnt. beskyttelsesfolier eller klistremerker fra
glasskeramikkflaten eller rammen.
Når man har koplet apparatet til
strømforsyningen, skal alle kokesoner
slås på maks. en liten stund i tur og
orden for å kontrollere at de er klare til
bruk.
33
1
2
3
4
Page 34

Service
I avsnittet "Hjelp ved feil" finner du beskrivelser
av problemer du selv kan løse.
Hvis det oppstår en feil, kikk der først.
Er det en teknisk feil ?
Hvis ja, vennligst kontakt vår kundeservice eller
en av våre service-partnere.
ELECTROLUX HOME PRODUCTS
NORWAY AS
RISL
ØKKVEIEN 2
0508 OSLO
TLF.: 815 30 222
TLF. service: 815 00 560
ærmeste servicerepresentant kan også finnes
N
på www.electrolux.no.
Vi anbefaler at du noterer kjenningstallene her,
slik at de alltid er lette å finne:
Modell: . . . . . . . . . . . . . . . . . . . . . . . . . . . . . . .
Prod. nr.: . . . . . . . . . . . . . . . . . . . . . . . . . . . . .
Ser. nr.: . . . . . . . . . . . . . . . . . . . . . . . . . . . . . . .
Når oppstår det kostnader for deg også i
løpet av garantiperioden ?
• Når du hadde kunnet løse problemet med
hjelp av tabellen (se avsnittet "Hjelp ved feil")
selv,
• når service-teknikeren må komme flere
ganger, fordi ikke alle de nødvendige
informasjonene var gitt videre og at han
derfor må hente f. eks. reservedeler. Disse
ekstra turene kan man unngå ved at du
forbereder telefonsamtalen på den måten
som er beskrevet over.
Forbered samtalen godt. Du gjør det derved
lettere å foreta en diagnose og treffe en
beslutning om hvorvidt det er nødvendig at en
tekniker fra kundeservice kommer forbi.
Hold følgende informasjon klar:
• Hvordan arter feilen seg ?
• Under hvilke omstendigheter opptrer feilen ?
Notér følgende kjenningstall fra typeskiltet på
apparatet ditt :
• Modell-betegnelse,
• Prod-nr. (9 siffer),
• Ser. nr. (8 siffer).
Modell
Typ: 55 HAD 56 AO
Made in Germany
Modell
Typ: 55 HAD 56 AO
Made in Germany
EHS 6691 X
EHS 6691 U
Prod.Nr.
230 V AC 50 Hz
Ser.Nr.: . . . . . . . . . . . .
Prod.Nr.
230 V AC 50 Hz
Ser.Nr.: . . . . . . . . . . . .
949 591 202
7,1 kW
V
E
D
949 591 203
7,1 kW
V
E
D
34
Page 35

Når oppstår det kostnader for deg også i løpet
av garantiperioden ?
• Når du hadde kunnet løse problemet med hjelp
av tabellen (se avsnittet "Hva må gjøres...")
selv,
• når service-teknikeren må komme flere
ganger, fordi ikke alle de nødvendige
informasjonene var gitt videre og at han derfor
må hente f. eks. reservedeler. Disse ekstra
turene kan man unngå ved at du forbereder
telefonsamtalen på den måten som er
beskrevet over.
35
Page 36

Dear customer
Please read these operating instructions carefully.
Pay particular attention to the section „Safety
Information” on the first pages. Please retain these
operating instructions for later reference. Pass
them on to any possible new owners of the
appliance.
The following symbols are used in
the text:
Safety information
Warning! Information which serves your
personal safety.
Important! Information on how to avoid
damaging the appliance.
Information and practical hints
Environmental information
1. These numbers indicate step by step how to
use the appliance as required.
2. ...
3. ...
In the event of any disturbances, these operating
instructions contain information on how to
eliminate the fault yourself; refer to the section
“What to do if…”
Printed on environmentally compatible paper.
Thinking ecologically means acting ecologically…
36
Page 37

Contents
Operating instructions ................................ 38
Safety .......................................................... 38
Electrical safety ............................................ 38
Safety for children ........................................ 38
Safety during use ......................................... 38
Safety when cleaning ................................... 38
How to prevent damage to the appliance .... 39
Disposal ...................................................... 39
Disposing of the packaging material ............ 39
Disposing of old appliances ......................... 39
The key features of your appliance .......... 40
Appliance description ............................... 41
Control panel ............................................... 41
Digital displays ............................................. 42
Safety cut-out of the cooking zones ............. 42
Before using for the first time .................. 43
First cleaning ............................................... 43
Operating the cooking area ...................... 43
Touch Control-Sensor fields ........................ 43
Switching on the appliance .......................... 43
Switching off the appliance .......................... 44
Heat setting ................................................. 44
Setting the keep warm function .................. 44
Switching the casserole cooking zone
on and off ..................................................... 45
Switching the triple ring cooking zone
on and off ..................................................... 46
Switching off the cooking zone .................... 48
Residual heat indicator ................................ 48
Cooking with the
automatic warm-up function ........................ 49
Cooking without the
automatic warm-up function ........................ 50
Child safety feature ...................................... 51
Timer ............................................................ 53
Locking/unlocking the control panel ............. 55
Uses, Tables and Tips ................................ 56
Pots and pans .............................................. 56
Tips on saving energy .................................. 57
Advice on cooking with and
without automatic warm-up .......................... 58
Cleaning and care ...................................... 60
Cooking area ................................................ 60
Metal decor strips ......................................... 62
What to do if … ........................................... 63
Rectifying faults ............................................ 63
What to do if … ............................................. 63
Installation instructions...............................65
Technical data ............................................ 65
Appliance dimensions .................................. 65
Cut-out dimensions ...................................... 65
Cooking zones .............................................. 65
Connection values ........................................ 65
Regulations, standards, directives ........... 66
Safety instructions for the installation
technician .................................................... 67
Electrical connection ................................. 68
Service and Spare Parts ............................ 69
Guarantee Conditions ................................ 70
Standard guarantee conditions .................... 70
Exclusions .................................................... 70
European Guarantee .................................... 70
Installation ....................................................71
37
Page 38

Operating instructions
Safety
The safety aspects of this appliance comply with
the accepted technical standards and the
German Appliance Safety Law. However, as the
manufacturer we also believe it is our
responsibility to familiarise you with the following
safety instructions.
Electrical safety
• Installation and connection of this new
appliance must only be carried out by a
qualified personnel.
• Repairs to the appliance are only to be
carried out by qualified personnel. Repairs
carried out by inexperienced persons may
cause an injury or serious malfunction. If your
appliances needs repairing, please contact
your local Service Force Centre.
Please follow these instructions
carefully, otherwise the guarantee will
not cover any damage that may occur.
• Flush-mounted appliances shall only be
operated following installation in suitable
installation cabinets and workplaces
complying with applicable standards. This
ensures adequate protection against contact
for electrical units as required by the VDE
(Association of German Electrical Engineers)
• If your appliance malfunctions or if fractures,
cracks or splits appear:
- Switch off all cooking zones.
- Disconnect the hob from the electricity
supply.
Safety for children
• When you are cooking or frying, the cooking
zones get hot. Keep small children away from
the appliance at all times. Keep older children
under supervision when they are using the
appliance.
• This appliance incorporates a locking device
which can be switched on so that playing
children cannot inadvertently switch the
appliance on.
Safety during use
• This appliance may only be used for cooking
and frying of foods in the home. It is not
designed for commercial or industrial
purposes.
• Never use the hob to heat the room.
• Be careful when plugging in electrical
appliances into main sockets near the
appliance. Connecting leads must not come
into contact with any hot parts of the
appliance.
• Overheated fats and oils catch fire quickly.
You should supervise cooking when
preparing foods in fat or oil (e.g., chips).
• Switch off the cooking zones after use.
• The sensor technology offers you the
maximum possible safety when using the
appliance. However, it also requires care
when setting the cooking zones, power and
times.
Safety when cleaning
• Switch off the appliance always before
cleaning.
• For reasons of safety, never use a steam jet
or a high pressure cleaner to clean the hob.
38
Page 39

How to prevent damage to the
appliance
• Never use the hob as a work surface or for
storage.
• The frameless edge of the ceramic glass
surface is susceptible to knocks. Be careful
when moving pots and pans around.
• Do not operate the cooking zones with empty
pots or pans, or with no pots and pans on
them. The cooking utensils as well as the hob
surface could suffer damage as a result.
• Ceramic glass is insensitive to temperature
shocks and is very robust, however it is not
unbreakable. Especially sharp and hard
objects that fall on the cooking surface could
damage it.
• Do not use cast iron pots or pans with
damaged bases with rough edges or burrs.
Sliding these across the hob could cause
scratches.
• Do not place any pots or pans on the frame of
the cooking area. Scratches and damage to
the varnished surface could occur.
• Always make sure that no acid-containing
liquids such as vinegar, lemon or limedissolving agents are split on the hob frame
as these can cause dull spots to appear.
• If sugar or a mixture containing sugarfalls
onto the cooking zone and melts, remove
immediately while still hot, using a suitable
kitchen scraper. If left to cool down, it may
damage the surface when removed.
• Keep objects, liable to melt, away from the
ceramic glass surface, for example, synthetic
materials, aluminium foils or cooking wraps. If
any other materials or foodstuffs melt on the
ceramic glass surface, these should be
cleaned away immediately using a suitable
kitchen scraper.
Disposal
Disposing of the packaging
material
All packing materials used can be recycled.
The plastic materials are identified as follows:
• >PE< for polyethylene, e.g. for the outer
wrapping and the bags inside.
• >PS< for foamed polystyrene, e.g., for
cushioning parts, in principle CFC-free.
The materials must be disposed of properly.
Please observe the national and regional
regulations for the disposal of packaging material
and the material designation (material
separation, recycling, waste collection).
Disposing of old appliances
Warning! Before disposing of old
appliances, make them inoperable so
that they are not a danger to others.
Separate the appliance from the
mains supply. Remove the mains
lead.
For ecological reasons, all old appliances must
be disposed of in compliance with applicable
regulations.
• The appliance must not be disposed of with
the normal domestic waste.
• Contact your local council or Environmental
Health Office for information regarding the
safe disposal of the appliance.
39
Page 40

The key features of your appliance
• Ceramic glass cooking surface: The
appliance has a ceramic glass cooking
surface and 4 rapid response cooking zones.
The particularly powerful radiant heater
elements substantially shorten the amount of
time taken for the zones to heat up.
• Sensor fields: Your appliance is operated
using Touch-Control-sensor fields.
• Cleaning: The advantage of the ceramic
glass cooking surface and the sensor fields is
their accessibility for cleaning. It is easy to
clean the flat smooth surface.
• „ON/OFF“ Sensor field: With the „ON/OFF“
sensor field the appliance has a separate
mains switch with which the power supply to
the appliance can be completely switched on
and off with one touch.
• Displays: Digital displays and/or control
lamps inform the user about heat settings,
selected functions as well as any possible
residual heat of the corresponding cooking
zone.
• Safety cut-out: A safety cut-out ensures that
all cooking zones shut off automatically after
a period of time if the settings have not been
changed.
• Timer: With the integrated timer, all zones
can be switched off automatically. When the
end of the cooking time has been reached,
the cooking zone switches off.
• Child safety: With this function the
cooking area can be locked to prevent any
unintentional switching on of the appliance.
• Keep warm stage: is the cooking stage
where foods can be kept warm.
• Residual heat display: will illuminate if
the cooking zone becomes hot enough for
there to be a risk of burning.
• Casserole cooking zone (multi-purpose
cooking zone): The cooking area is
equipped with a casserole cooking zone
(multi-purpose cooking zone). Depending on
the setting, it can be used as a round or oval
cooking zone, e.g., for casseroles or for
keeping dishes and/or food warm.
• Triple ring cooking zone: The cooking area
has a triple ring cooking zone. With this, your
appliance has a cooking zone with variable
size, e.g., for smaller pots. This saves
energy.
40
Page 41

Appliance description
Control panel
41
Page 42

Digital displays
The four display fields allocated to the four cooking
zones show:
• after switching on
• on selection of the keep warm setting
• to , depending on the selected heat
setting
• for cooking automatic
• for residual heat
• when child safety is switched on
• upon malfunction /overheating
Safety cut-out of the cooking zones
If one of the cooking zones is not switched off after
a certain time, or if the heat setting is not changed,
the corresponding cooking zone switches itself off
automatically.
Existing residual heat is indicated with (as „hot“)
in the digital displays of the corresponding cooking
zones.
The cooking zones switch off at:
• heat setting , , after 6 hours
• heat setting , after 5 hours
• heat setting after 4 hours
• heat setting , , , after 1.5 hours
Should one or several cooking zones
switch off before expiration of the times
indicated, refer to the Chapter “What to
do, if…”
Switching off for other causes
Liquid boiling over onto the control panel causes
all cooking zones to switch off immediately.
The same effect occurs if you place a wet cloth
onto the control panel. In both cases, the appliance
must be switched on with the main switch after
the liquid or the wet cloth have been removed.
42
Page 43

Before using for the first time
First cleaning
Wipe the ceramic glass surface with a damp cloth.
Important! Do not use any caustic or
abrasive cleaners!
The surface could get damaged as a
result.
Operating the cooking area
Touch Control-Sensor fields
In order to operate the Touch Control sensor fields
place your finger from above flat onto the required
field until the corresponding display lights up or
extinguishes, and/or the desired function is carried
out.
Switching on the appliance
To switch on the appliance completely, touch the
„ON/OFF“ sensor field .
Touch the „ON/OFF“ sensor field for approx.
2 seconds.
The digital displays show:
After the sensor field „ON/OFF“ has
been activated to switch on the
appliance, one of the cooking zones
must be selected within approx. 10
seconds or a time period must be set
with the timer (egg timer function).
Otherwise the appliance switches off
again for safety reasons.
~ 2 sec.
43
Page 44

Switching off the appliance
To switch off the appliance completely, touch the
„ON/OFF“ sensor field .
Touch the „ON/OFF“ sensor field for approx.
one second.
The digital displays extinguish.
After switching off an individual cooking
zone or the entire hob, the existing
residual heat is displayed with (as
„hot“) in the digital displays of the
corresponding cooking zones.
Heat setting
For setting and adjusting the heat setting ( to )
for the selected cooking zone.
With the heat setting sensor field increase the
setting.
With the heat setting sensor field reduce the
setting.
~ 1 sec.
Setting the keep warm function
All 4 cooking zones are equipped with the keep
warm function .
With the heat setting sensor field select setting
the keep warm function
44
Page 45

Switching the casserole cooking
zone on and off
Depending on the size of the pot or pan, the
“casserole cooking zone“ sensor field can be used
to switch between the two sizes of the casserole
cooking zone.
This can only be activated when a heat
setting has already been made for the
inner heating ring.
1. Set the desired heat setting.
2. Touch the „casserole cooking zone“ sensor
field .
The outer heating ring is activated.
The control lamp illuminates.
3. In order to switch off the outer heating ring,
touch the „casserole cooking zone“ sensor field
.
The outer heating ring is switched off.
The control lamp extinguishes.
45
Page 46

Switching the triple ring cooking
zone on and off
Depending on the size of the pot or pan, the “triple
ring cooking zone” sensor field can be used to
switch between the three sizes of the zone.
This can only be activated when a heat
setting has already been made for the
inner heating ring.
1. Set the desired heat setting.
2. Touch the sensor field „triple ring zone” sensor
field .
The middle heating ring is activated.
The lower control lamp illuminates.
3. Touch the sensor field „triple ring zone” sensor
field .
The outer heating ring is activated.
The upper control lamp illuminates.
46
Page 47

4. In order to switch off the outer heating ring,
touch the „triple ring zone“ sensor field .
The outer and middle heating ring, respectively, is
switched off.
The relevant control lamp extinguishes.
47
Page 48

Switching off the cooking zone
In order to switch off, touch the heat setting
selection sensor fields and simultaneously
or with sensor field set the heat setting back to
zero.
Residual heat indicator
When an individual cooking zone or the entire
cooking area has been switched off, any residual
heat is shown with (as „Hot“) in the digital
displays of the corresponding cooking zones.
Even after the cooking zone has been switched off,
the residual heat indicator only goes out when the
cooking zone has cooled down.
You can use the residual heat for melting
foods or keeping them warm.
Important! As long as the residual heat
indicator is illuminated, there is a risk of
burns.
Important! In the event of a power failure,
the symbol also extinguishes and
there is no longer any indication of
residual heat. However, it is still possible
to burn yourself. You can avoid this by
being particularly careful when near the
hob.
48
Page 49

Cooking with the automatic warm-up
function
All four cooking zones of the hob can be controlled
in nine stages and have an automatic warm-up
function:
• , lowest heat setting
• , highest heat setting
• , warm-up function
When you select the required heat setting with the
heat setting selection sensor field , the cooking
zone will work for a specific time on full power and
will then switch automatically to the heat setting
selected.
The duration of the automatic warm-up function
depends on the heat setting selected.
Touch the sensor field heat setting selection in
order to set the required heat setting to .
The heat setting selected is shown first.
After 5 seconds, the heat setting will be replaced
by (= automatic warm-up function) in the
display. After the end of the warm-up time, the heat
setting will be shown again.
If during the automatic warm-up function
you select a higher setting, e.g., from
to , the warm-up time is adjusted to
match.
If you select a lower setting, the warm-up
time ends immediately.
Cooking with the automatic warm-up
function is only possible with a cold or
moderately warm cooking zone. If a
cooking zone is already hot when
switched on (display ), you cannot
work with the automatic warm-up
function.
49
Page 50

Cooking without the automatic
warm-up function
If you want to use the cooking zone without the
automatic warm-up function, then select the
required heat setting with the heat setting selection
sensor field .
Touch the sensor field heat setting selection in
order to set the required heat setting to .
With the heat setting selection sensor
fields and you can adjust the
setting at all times.
50
Page 51

Child safety feature
With the child safety feature, the hob can be
protected against undesirable use.
Switching on the child safety feature
The appliance must be switched on in order to
switch on the child safety feature. However, no
cooking zone must be switched on.
1. Touch the „locking“ sensor field for approx.
3 seconds.
As acknowledgement, you hear a signal tone.
2. Touch any of the heat setting selection sensor
fields .
In the displays, will appear, the child safety
feature is activated. The appliance switches off
automatically after a few seconds.
~ 3 sec.
Bypassing the child safety feature
The child safety feature can be bypassed for the
one-time use of the appliance (up to the next
switch-off of the appliance). At the next switch-on,
the child safety feature is automatically activated
again.
1. Switch on the appliance.
If the child safety feature is active, then is
indicated.
2. At the same time, touch any of the two heat
setting selection sensor fields and for
approx. 1 second.
As acknowledgement, you hear a signal tone. The
child safety feature is bypassed up to the point
when you switch off the appliance. The cooking
area can be used normally.
~ 2 sec.
~ 1 sec.
51
Page 52

Switching off the child safety feature
1. Switch on the appliance.
If the child safety feature is active, then is
indicated.
2. Touch the „locking“ sensor field for approx.
3 seconds.
As acknowledgement, you hear a signal tone.
3. Touch any of the heat setting selection sensor
fields .
The displays turn dark, the child safety feature is
switched off. The appliance switches off
automatically after a few seconds.
~ 2 sec.
~ 3 sec.
52
Page 53

Timer
You can use the timer in two ways:
•as
Switch-off automatic function. You set a
slow cooking time for a cooking zone, and the
cooking zone switches off automatically when
the time expires. This function can be used for
several cooking zones at the same time.
•as a
Using the automatic switch-off function
The cooking zone(s) for which you want to use the
automatic switch-off function must be switched on.
minute minder that does not control the
hob („egg timer”), you hear an acoustic signal
after the set time expires.
The minute minder cannot be used when
a cooking zone is switched on.
1. With the Timer sensor field select which
heating zone is to be controlled by the
automatic switch-off function is to be set.
By touching once the Timer sensor field the
first active cooking zone is selected clockwise, the
relevant lamp flashes quickly. Here, for example,
the left rear control lamp corresponds to the left
rear cooking zone. In the timer display, there
appears .
By a repeated touching of the Timer sensor field
the next active cooking zone is selected.
2. While the control lamp is flashing quickly, and
using the Timer setting sensor fields or
for this cooking zone, set the required time
period up to the automatic shut-off (e.g., 15
minutes).
After a few seconds, the automatic switch-off
function is activated.
The control lamp now flashes slower and the
remaining slow cooking time is shown in the
display. If the automatic switch-off function is set
for several cooking zones, then this applies for the
cooking zone with the shortest remaining slow
cooking time. The control lamps of the other
cooking zones with set shut-off automatic function
light up. To indicate the remaining slow cooking
time of one of these cooking zones, this must be
selected with the Timer sensor field , the
corresponding control lamp then flashes quickly.
~ 1 sec.
53
Page 54

For adjusting the remaining slow cooking time, the
required cooking zone must be selected with the
Timer sensor field . The relevant control lamp
then flashes quicker. The adjustment is made with
the Timer setting senor fields or .
After expiry of the set slow cooking time, the
cooking zone switches off automatically and for
two minutes you hear an acoustic signal, the Timer
display flashes .
3. Touch the sensor field timer in order to shut off
the signal.
For a faster adjustment, touch one of the
Timer setting sensor fields or for
such time until the required value is
obtained.
If the Timer setting sensor field is
activated first, the time setting begins
with 99 minutes. If the Timer setting
sensor field is activated first, the time
setting begins with 1 minute.
~ 1 sec.
Ending the automatic switch-off function
prematurely
You have two ways for ending the automatic
switch-off function prematurely:
Switching off the cooking zone and timer at the
same time.
With the heat setting selection sensor field , set
the required cooking zone back to zero.
Cooking zone and timer switch off.
Switch off the timer - the cooking zone remains
active
1. With the Timer sensor field select the
required cooking zone.
The corresponding control lamp then flashes
quicker.
2. With the Timer setting sensor field set the
timer to :
Only the timer switches off, while the cooking zone
remains in operation.
54
Page 55

Using the minute minder
To use the minute minder, the appliance must be
switched on but no cooking zone shall be switched
on.
1. Touch the Timer sensor field .
In the timer display, there appears .
2. With the Timer setting sensor fields or
set the required time period.
After a few seconds the minute minder is activated
and the remaining time duration is shown on the
display.
To adjust the remaining time duration, touch the
sensor field timer and with the Timer setting sensor
fields or change the setting.
After expiry of the set time duration, you hear an
acoustic signal and the timer indicator flashes .
3. Touch the Timer sensor field in order to
switch off the signal.
Locking/unlocking the control panel
At any random time during cooking, the control
panel can be locked with the exception of the
sensor field „ON/OFF“ in order to prevent a
changing of the settings caused by, for example,
the wiping with a cloth.
1. Touch the sensor field „locking“ for approx.
1 second.
The control lamp of the sensor field „locking“
lights up.
2. In order to cancel the locking again, touch the
sensor field „locking“ again for approx. 1
second.
The control lamp of the sensor field „locking“
extinguishes, and the previously set heat settings
are displayed again.
When switching off the appliance, the
locking function is automatically
switched off.
~ 1 sec.
55
Page 56

Uses, Tables and Tips
Pots and pans
The better the pot, the better the cooking results.
• You can recognise good pots and pans by their
bases. The base should be as thick and flat as
possible.
• When buying new pots and pans, pay
particular attention to the diameter of the base.
Manufacturers often only state the diameter of
the rim.
• Pots with aluminium or copper bases can
cause metallic discolouring on the ceramic
glass surface which is very difficult or
impossible to remove.
• Do not use cast iron pots or pots with damaged
bases which are rough and or burrs on them.
Scratches can occur if they are slid across the
surface.
• When cold, pot bases are normally bowed
slightly inwards (concave). They should never
be bowed outwards (convex).
• If you use special pots and pans (e.g., a
pressure cooker, simmering pan, wok etc.)
please observe the manufacturer´s
instructions.
General information
• The base should always be clean and dry.
• In order to avoid ugly scratches on the ceramic
glass cooking surface, do not slide pots and
pans around but lift them up instead when
changing positions.
• Scratches can result from grains of sand (e.g.,
after washing out vegetables) which are
dragged with the pot across the cooking
surface.
• Always use large pots for dishes with lots of
liquid so that nothing can boil over.
56
Page 57

Tips on saving energy
You will save valuable energy by
observing the following points:
• Always position pots and pans before you
switch on the cooking zone.
• Dirty cooking zones and pot bases increase the
power consumption.
• Whenever possible, always have the lid firmly
placed on the pots and pans so that they are
completely covered.
• Switch off the cooking zones before the end of
the cooking time to use the residual heat for
keeping foods warm or for melting purposes.
• The base of the pot should have the same size
as the cooking zone.
• Using a pressure cooker shortens the cooking
times by up to 50%.
57
Page 58

Advice on cooking with and without
automatic warm-up
The automatic warm-up function is suitable
for:
• Dishes that start off cold, are heated up at high
power and do not need to be continually
watched when cooking on the lower heat
setting.
• Dishes that are put into a hot frying pan.
The automatic warm-up function is not suitable
for:
• Goulash, beef olives and similar braised dishes
that need continual turning until browned
correctly, have liquid added and are then
braised until cooked,
• Dumplings, pasta dishes with lots of liquid,
• Cooking with pressure cookers,
• Very large quantities of soups/stews with more
than 2 litres of liquid.
General information
• When cooking without the automatic warm-up
function, we recommend the use of a high heat
setting to warm up the food (with the -button)
and then leave the dish to finish cooking at a
suitable lower heat setting.
• Pay special attention to the results of your first
use of the appliance. You can then decide
which heat setting is the best for „your dishes”
in the “quantities you are accustomed to
preparing” with your own „pots and pans”. You
will then quickly appreciate the advantages of
the automatic function and will feel secure and
relaxed with your new appliance.
58
Page 59

Typical heat settings for cooking
The details shown in the following table are
guidelines. The heat setting required for cooking
depends on the quality of the pans and on the type
and quantity of food.
Heat
setting
Warm-up
time of the
automatic
function
1)
[Min.]
4,5
3,5
2,0
10,2
6,5
Slow cooking
procedure
Warming up
Frying
Deep-fat frying
Fast frying Steaks, pieces of loin,
Frying Schnitzel/cutlets,
Boiling
Examples for use
Warming up large amounts of liquid
boiling pasta,
browning of meat,
(browning goulash, pot-roast)
potato fritters,
fried sausages,
pancakes /flat cakes
liver, fish,
rissoles, fried eggs
Boiling up to 1.5 l liquid,
potatoes, vegetables
4,8
Steaming
Sautéing
1,7
Poaching
Melting Melting butter,
1,0
0,5
1)
When cooking without the automatic warmup
Keeping warm
function, the warmup time can be individually
selected.
When heating up or frying, we
recommend using the warm-up setting
„ “ and then continue cooking foods
that require longer cooking times at a
suitable lower heat setting.
Steaming and sautéing of
small quantities of vegetables,
cooking rice and
milk-based dishes
dissolving gelatine,
melting chocolate
Keeping food warm
59
Page 60

Cleaning and care
Cooking area
Important! Cleaning agents must not
come into contact with the hot ceramic
glass surface! All cleaning agents must
be removed with plenty of clean water
after cleaning because they have a
caustic effect when the zones are heated
up again.
Never use any aggressive cleaners such
as grill or oven sprays, coarse scourers
or abrasive pot cleaners.
Clean the ceramic glass surface after
every use when it is hand-warm or in a
cold condition. In this way you avoid
spillage burning solidly to the surface.
Remove scale and water marks, fat
spots and metallic shimmer discolouring
with commercially available ceramic
glass or stainless steel cleaner.
Minor soiling
1. Wipe the ceramic glass surface with a damp
cloth and a little washing up liquid.
2. Then, rub dry with a clean cloth. Remnants of
cleaner must not remain on the surface.
3. Once a week, you must thoroughly clean the
entire ceramic glass cooking surface with a
commercially available ceramic glass or
stainless steel cleaner.
4. Then wipe the ceramic glass surface using
plenty of clean water and rub dry with a clean
fluff-free cloth.
60
Page 61

Stubborn soiling
1. To remove food that has boiled over, or to
remove stubborn spatters, use a ceramic hob
scraper.
2. Place the scraper at an angle to the ceramic
glass surface.
3. Remove the soiling by sliding the blade.
Scrapers and ceramic glass cleaners are
available from Service Force.
Problem soiling
1. Remove burnt-on sugar, melted plastic,
aluminium foil or other meltable materials
immediately while there are in a hot condition,
using a suitable cleaning scraper.
Important! There is a risk of burning
yourself when you use the cleaning
scraper on the hot cooking zone!
2. Then clean the hob normally when it has
cooled down.
If the cooking zone on which something
has melted has already cooled down,
warm it up again before cleaning.
Scratches or dark marks on the ceramic
glass surface, caused for example by a
pot or pan base with sharp edges,
cannot be removed. However, they do
not impair the functioning of the hob.
61
Page 62

Metal decor strips
Important! Do not use any vinegar,
lemon or scale-removing agents on the
metal decor strips of the hob as matt
spots may appear.
During cleaning do not run under the
decor strips with flat objects (e.g. knives)
as the decor strip could become
detached.
1. Wipe metal decor strips with a damp cloth and
a little washing-up liquid.
2. Dampen dried-on soiling with a wet cloth. Then
wipe off and rub dry.
62
Page 63

What to do if …
… the cooking zones cannot be switched
on?
Rectifying faults
It is possible that faults have been caused by a
minor error which you can rectify yourself with
the help of the following instructions. Do not
attempt any further repairs if the following
instructions do not help in each specific case.
Warning! Repairs to the appliance
shall only be carried out by approved
service engineers. Improper repairs
can result in considerable danger for
the user.
Contact your specialist dealer or
Service Force if repairs are required.
If the ceramic glass cooking area has a glass
fracture, please notify to the customer service
the
three-digit number, which is printed on the
glass plate.
Check whether
• the control panel is locked.
• more than 10 seconds have elapsed between
operating the ON/OFF button and switching
of the required cooking zone (refer to the
Chapter “Switching on the appliance”).
• the sensor fields are partially covered with a
damp cloth or with liquid.
… the display suddenly fails except for
for residual heat?
Check whether
• the ON/OFF button has been activated
accidentally.
• the sensor fields are partially covered with a
damp cloth, liquid or similar.
• the safety switch has been activated.
… after switching off the cooking zones,
What to do if …
… the cooking zones do not work?
Check whether
• the mains fuse (fuse box) is intact. If the fuses
trip repeatedly, call an approved electrician.
• the appliance has been switched on properly.
• the control lamps in the control panel light up.
• the corresponding cooking zone is switched
on,
• the cooking zones are set to the required
heat setting,
• the cooking zones have been switched off by
the safety switch (refer to Chapter on
“Safety”)
for residual heat does not appear in
the display?
Check whether
• the cooking zone was only used for a short
period and is therefore not hot enough.
If the cooking zone is hot, please contact the
Service Force.
… a cooking zone cannot be switched
off?
Check whether
• the control panel is covered partially by a
damp cloth or a liquid.
• the control panel is locked.
… a cooking zone cannot be switched
on?
Check whether
• the child safety feature is switched on.
• the control panel is locked.
63
Page 64

… the indication lights up?
Check whether the cooking zone is overheated.
This indicator lights up to show overheating,
electronic faults or for safety reasons.
… the appliance does not react to
activation of a sensor field?
The appliance does not react to activation of a
sensor field if you touch at the same time another
sensor field not designed for a combination.
If you request a service visit to resolve a fault listed
above or because of improper operation, the visit
of the customer service technician is not free of
charge even during the guarantee period.
64
Page 65

Installation
instructions
Important! The new appliance should
only be installed and connected up by
qualified and approved personnel.
Please observe these instructions,
otherwise the guarantee will not cover
any damage that may occur.
Technical data
Appliance dimensions
Width at front 626 mm
Width at rear 590 mm
Depth 520 mm
Height 47 mm
Cut-out dimensions
Width 560 mm
Depth 490 mm
Corner radius R5
Cooking zones
Position Diameter Power
front left 120/175/210
mm
back left 145 mm 1200 W
back right 170x265 mm 1500/2400 W
front right 145 mm 1200 W
800/1600/
2300 W
Connection values
Connection voltage 230 V
~ 50 Hz
Total connected load max. 7.1 kW
65
Page 66

Regulations, standards, directives
This appliance complies with the following
standards
• EN 60335-1 and EN 60335-2-6
relating to the safety of electrical appliances
for household use and similar purposes
• EN 60350 or DIN 44546 / 44547 / 44548
relating to the operating features of electric
cookers, hobs, ovens and grills for household
use.
• EN 55014-2 / VDE 0875 Part 14-2
• EN 55014 / VDE 0875 Part 14 / 1999-10
• EN 61000-3-2 / VDE 0838 Part 2
• EN 61000-3-3 / VDE 0838 Part 3
relating to basic requirements for protection
requirements with reference to electromagnetic compatibility (EMC).
This appliance complies with the
following EU directives
• 73/23/EWG dated 19.02.1973 Low voltage
directive
• 89/336/EWG dated 03.05.1989 (EMC-directive
including Amending Directive 92/31/EWG).
66
Page 67

Safety instructions for the
installation technician
• In the electrical installation a device must be
provided which allows the appliance to be
disconnected from the mains at all poles with a
contact opening width of at least 3 mm.
Suitable isolation devices include protecting
cut-outs, fuses (screw type fuses are to be
removed from the holder), earth leakage trips
and contactors.
• With regard to fire protection this appliance
complies with EN 60 335-2-6. Only this type of
appliance may be installed with a high
cupboard or wall on one side.
• The required minimum distances to other
appliances (refer to their technical
specification) of your kitchen must be
maintained.
• Drawers shall not be fitted underneath the hob.
• The installation must ensure protection against
shock.
• The kitchen unit in which the appliance is fitted
must satisfy the stability requirements of DIN
68930.
• For protection against moisture, all cut
surfaces must be sealed with a suitable sealing
material.
• On tiled work surfaces, the joints in the area
where the hob sits must be completely filled
with grout.
• On natural, artificial stone or ceramic tops, the
snap action springs must be bonded in place
with a suitable artificial resin or two-component
adhesive.
• Attach the four supplied one-sided adhesive
liner tapes to the lower side of the hob along
the outer rim of the glass ceramic pane. Do not
expand. The ends of the liner tapes must
overlap.
• For dismantling, the hob must be pressed out
from below.
• Clean the worktop around the cutout area.
67
Page 68

Electrical connection
Before connecting, check that the nominal voltage
of the appliance, that is the voltage stated on the
rating plate, corresponds to the available supply
voltage. The rating plate is located on the lower
casing of the hob.
The heating element voltage is AC230V~. The
appliance also works perfectly on older networks
with AC220V~ .
The hob is to be connected to the mains using a
device that allows the appliance to be
disconnected from the mains at all poles with a
contact opening width of at least 3 mm, e.g.,
automatic line protecting cut-out, earth leakage
trips or fuse.
A type H05VV-F cable or one with a higher grade
must be used as the mains connecting cable.
The connection must be carried out as shown in
the diagram. The connecting links should be fitted
according to the appropriate connecting diagram.
The earth lead is connected to terminal . The
earth lead must be longer than leads carrying
electric current.
The cable connections must be made in
accordance with the regulations and the
terminal screws tightened securely as
required.
Finally, the connecting cable is to be secured with
the mains cable cleat and the covering closed by
pressing firmly (lock into place).
Before switching on the the first time, any
protective foils or stickers must be removed from
the glass ceramic surface.
After connecting to the mains supply,
check and make sure that all cooking
zones are ready for use by briefly
switching each on in turn at the
maximum setting.
1
2
68
3
4
Page 69

Service and Spare Parts
If you wish to purchase spare parts or require an
engineer, contact your local Electrolux Service
Force Centre by telephoning:
08705 929 929
Your telephone call will be automatically routed to
the Service Force Centre covering your post code
area.
For the address of your local Service Force Centre
and further information about Service Force,
please visit the website at
www.serviceforce.co.uk
When you contact the Service Centre they will
need the following information:
1. Your name & address, including post code.
2. Your telephone number.
3. Clear and concise details of the fault.
4. The model and serial number of the appliance
(found on the rating plate).
5. The purchase date:
Please note that a valid purchase receipt or
guarantee documentation is required for inguarantee service calls.
Customer Care
For general enquiries concerning your Electrolux
appliance or for further information on Electrolux
products please contact our Customer Care
Department by letter or telephone at the address
below or visit our website at
www.electrolux.co.uk.
Customer Care Department
Electrolux
55-77 High Street
Slough
Berkshire, SL1 1DZ
Tel. 08705 950950 (*)
(*) Calls may be recorded for training purposes.
Modell
Typ: 55 HAD 56 AO
Made in Germany
Modell
Typ: 55 HAD 56 AO
Made in Germany
EHS 6691 X
EHS 6691 U
Prod.Nr.
230 V AC 50 Hz
Ser.Nr.: . . . . . . . . . . . .
Prod.Nr.
230 V AC 50 Hz
Ser.Nr.: . . . . . . . . . . . .
949 591 202
7,1 kW
V
E
D
949 591 203
7,1 kW
V
E
D
69
Page 70

Guarantee Conditions
Standard guarantee conditions
We, Electrolux, undertake that if within 12
months of the date of the purchase this
Electrolux appliance or any part thereof is proved
to be defective by reason only of faulty
workmanship or materials, we will, at our option
repair or replace the same FREE OF CHARGE
for labour, materials or carriage on condition that:
• The appliance has been correctly installed
and used only on the electricity supply stated
on the rating plate.
• The appliance has been used for normal
domestic purposes only, and in accordance
with the manufacturer’s instructions.
• The appliance has not been serviced,
maintained, repaired, taken apart or
tampered with by any person not authorised
by us.
• All service work under this guarantee must be
undertaken by a Service Force Centre.
• Any appliance or defective part replaced shall
become the Company’s property.
• This guarantee is in addition to your statutory
and other legal rights.
Home visits are made between 8.30am and
5.30pm Monday to Friday. Visits may be
available outside these hours in which case a
premium will be charged.
European Guarantee
If you should move to another country within
Europe then your guarantee moves with you to
your new home subject to the following
qualifications:
• The guarantee starts from the date you first
purchased your product.
• The guarantee is for the same period and to
the same extent for labour and parts as exists
in the new country of use for this brand or
range of
•products.
• This guarantee relates to you and cannot be
transferred to another user.
• Your new home is within the European
Community (EC) or European Free Trade
Area.
• The product is installed and used in
accordance with our instructions and is only
used domestically, i.e. a normal household.
• The product is installed taking into account
regulations in your new country.
Before you move please contact your nearest
Customer Care centre, listed below, to give them
details of your new home. They will then ensure
that the local Service Organisation is aware of
your move and able to look after you and your
appliances.
Exclusions
This guarantee does not cover:
• Damage or calls resulting from
transportation, improper use or neglect, the
replacement of any light bulbs or removable
parts of glass or plastic.
• Costs incurred for calls to put right an
appliance which is improperly installed or
calls to appliances outside the United
Kingdom.
• Appliances found to be in use within a
commercial environment, plus those which
are subject to rental agreements.
• Products of Electrolux manufacture which are
not marketed by Electrolux.
France Senlis +33 (0) 3 44 62 20 13
Germany Nürnberg +49 (0) 800 234 7378
Italy Pordernone +39 (0) 800 11 7511
Sweden Stockholm +46 (0) 20 78 77 50
UK Slough +44 (0) 1753 219898
70
Page 71

Installation / Montering
> 50 mm
22 mm
22 mm
155 mm
155 mm
155 mm
155 mm
71
Page 72

 Loading...