

AEG EBCSL90SAL, EBCSL9CN, EBCSL90SW-SP, EBCSL9SCN, EBCSL9SAL User Manual
...
Built-in Compact Oven
Hot air, microwave, grill
INSTRUCTIONS FOR USE
EBC SL9(S)
(55 cm)
EBC SL90(S)
(60 cm)
The documentation for the compact oven is 3-part: Instructions for use, baking / roasting chart
and supplementary technical sheet. The safety instructions in the supplementary technical sheet
are an integral part of this documentation.
Do not operate the appliance until you have read all documents and safety instructions.
In order to guarantee that you have taken note of the content of these instructions, we request
that you send the complete warranty card to Customer Service in Mägenwil. Please hand
these instructions to anyone who may use this appliance.
Start-up
Use
AnwendungAnwendung
- Press button with your finger tip –> set within 5 seconds!
Have you already set the time? See page 7
1
Page
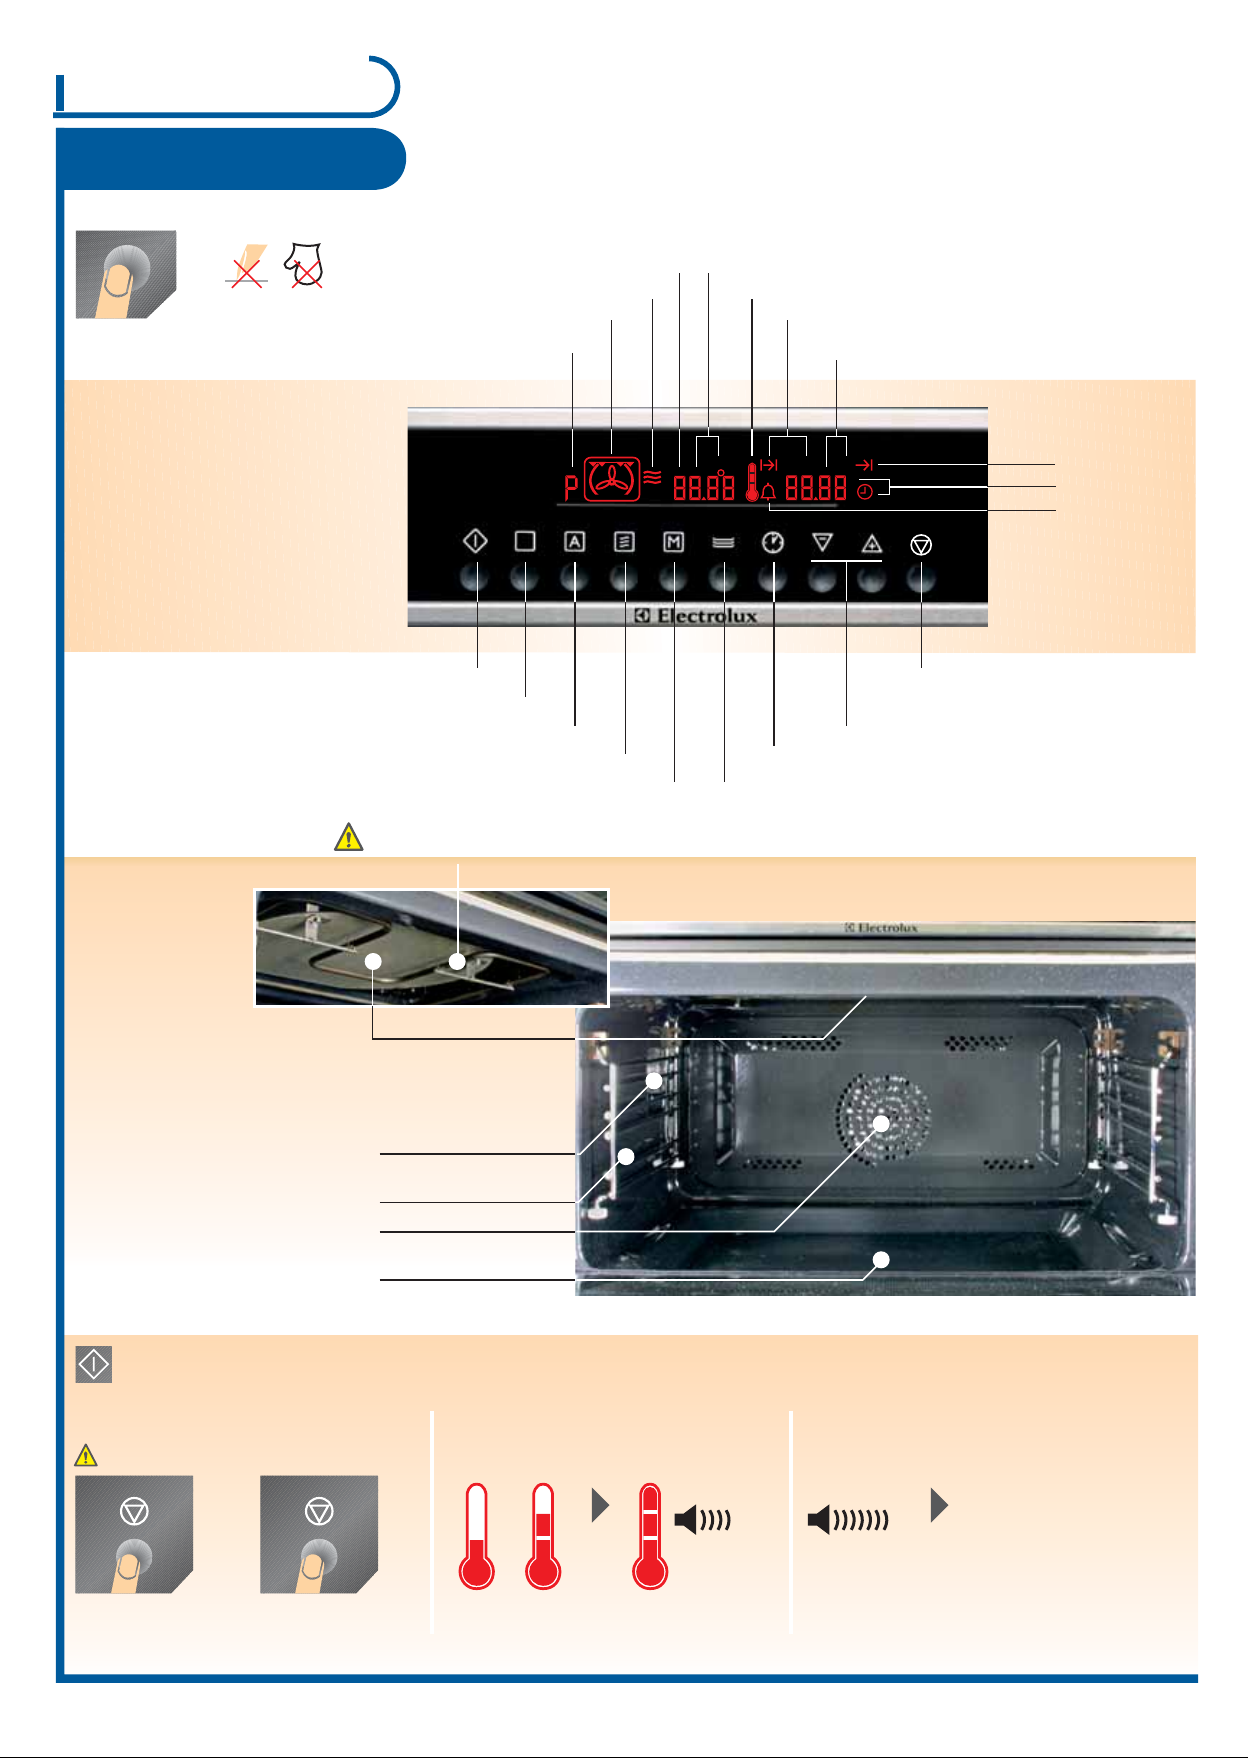
Control panel
Baking area
P =Automatic programme 1-12
Microwave functions
Oven functions
P =Memory function
(d =Demo function)
Start
Oven function
Automatic programme
Microwave functions
Memory function Keeping warm
Do not place aluminium foil / aluminium tray on the oven base!
The bottom glass is a work space for heating food / liquid and imperative for microwave oven operation!
Surface grill
Microwave power
Thermometer symbol
Duration
Watt
min gr
Clock functions
Weight display
End
Time
Short time
Stop/reset
Setting
temperature and time
Microwave generator
Oven light
- is switched on as soon as
a function is started or the
door is open
- goes out after 10 minutes
when the door is open and
appliance is switched off
Griddle guides
(3 slot levels)
Rear panel heating element
Bottom glass
(removable)
General
- If the chosen function is not started within 30 seconds, the appliance switches off.
- If the door opens during operation, the function stops -> close door and press start button within 30 seconds.
During/at the end of the operation
No function when door opened
1x
Interrupting
operation
Continue operation -> Press start button
Switch off
appliance
2 x
Temperature display
Appliance heats up Temperature reached
If time / end is up
(2 min.)
BEEPBEEP
After switching off the appliance the fan runs
until the temperature is less than 80 °C.
Appliance switches
off automatically
Switch off BEEP:
Press any button
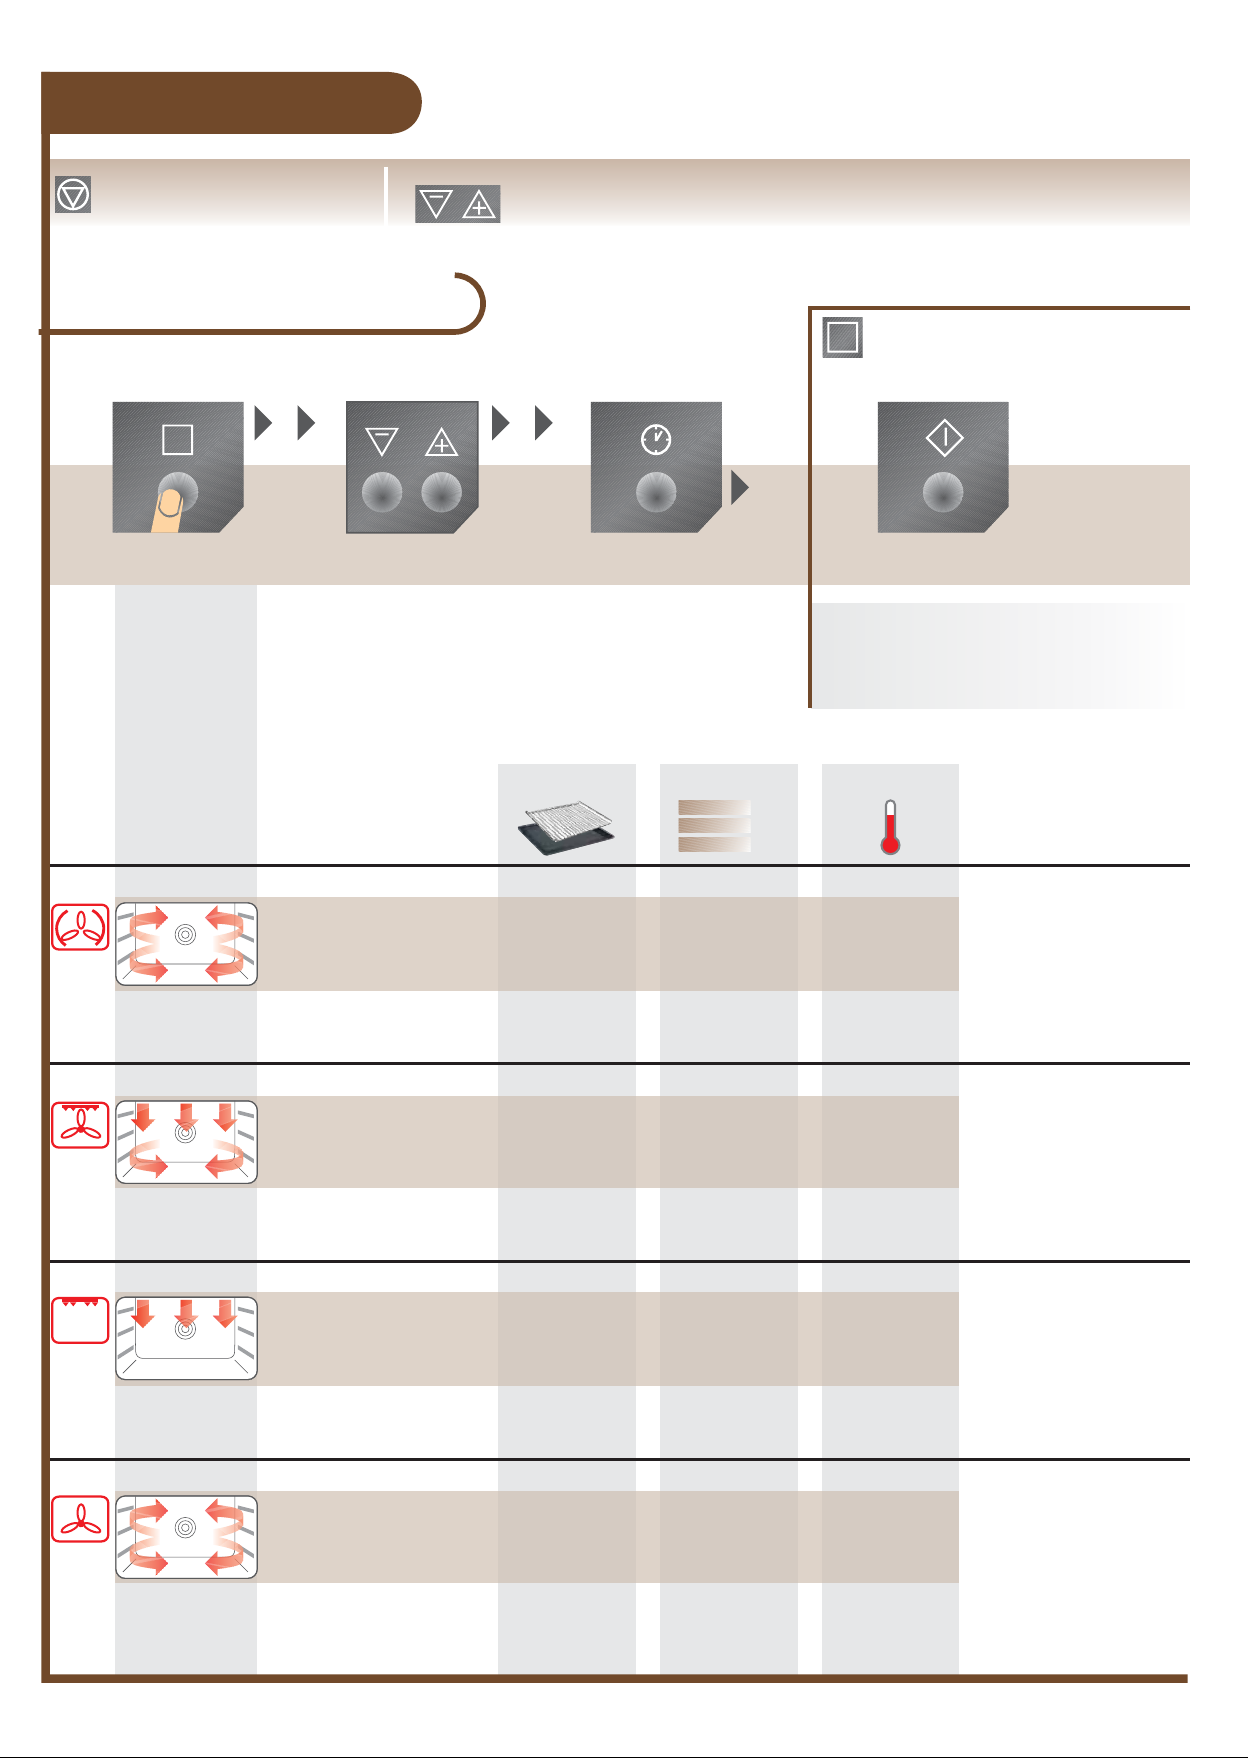
Roasting / Baking
2
Page
Evt. switch off first with
stop button
During operation...
the temperature can be changed
Select oven function
M
1 2
Select
function
Press button repeatedly...
Select poss.
temperature
Select poss.
time / end
(see clock function, p. 5)
Press «M» button for 2 seconds until signal is audible
(for new function button press again for 2 seconds)
Start the memory function:
1. Call up memory storage with «M» button
2. Press start
MEMORY FUNCTION
Possible to store a setting that will be used again
and again.
Start
HOT AIR
for…
- Pastry
(up to 2 levels)
- Select temp. 15° C lower than
indicated on recipes
TURBOGRILL
- High joints
- Rollbraten (sliced roast pork)
- Poultry
- Gratins/casseroles
- etc.
SURFACE GRILL
- For flat grilled food such as steaks,
cutlets, sausages, fish
- Grilled toast
- Melting marzipan/ice cream
- Overcrusting of casseroles
Plates / grid
3
2
1
1 or 2 plates 1 plate: 1 or 2
2 plates: 1 + 3
1 grid + 1 plate
1 grid + 1 plate
Grid: 1 or 2
Plate: 1 level
below
Grid: 2 or 3
Plate: 1 level
below
TemperaturSlot level
Presetting:
170 °C
Setting range:
30-250 °C
Presetting:
180 °C
Setting range:
30-250 °C
Presetting:
250 °C
Setting range:
30-250 °C
(*optional accessories p. 7)
- The joint is cooked once it
no longer holds down
- Leave the roast uncovered
for about 10 minutes before
slicing
-
Distance to heating element
can be
varied up or down
by grid curve
- insert the baking tray below as
a collection pan
BAKING & DEFROSTING
- Baking/drying of herbs,
fruit, vegetables (1 to 2 levels,
change plates from time to time)
- Defrosting
1 or 2 plates Presetting:
1 plate: 2
2 plates: 1 + 2
30 °C
Setting range:
30-100 °C
- Line griddle with
baking paper
- Place dry food in single
layers/close together
- Open oven every now and
then, cool down half-way
- Dry sheets are particularly
suitable
- Check degree of dryness
regularly (moist or crumbly)
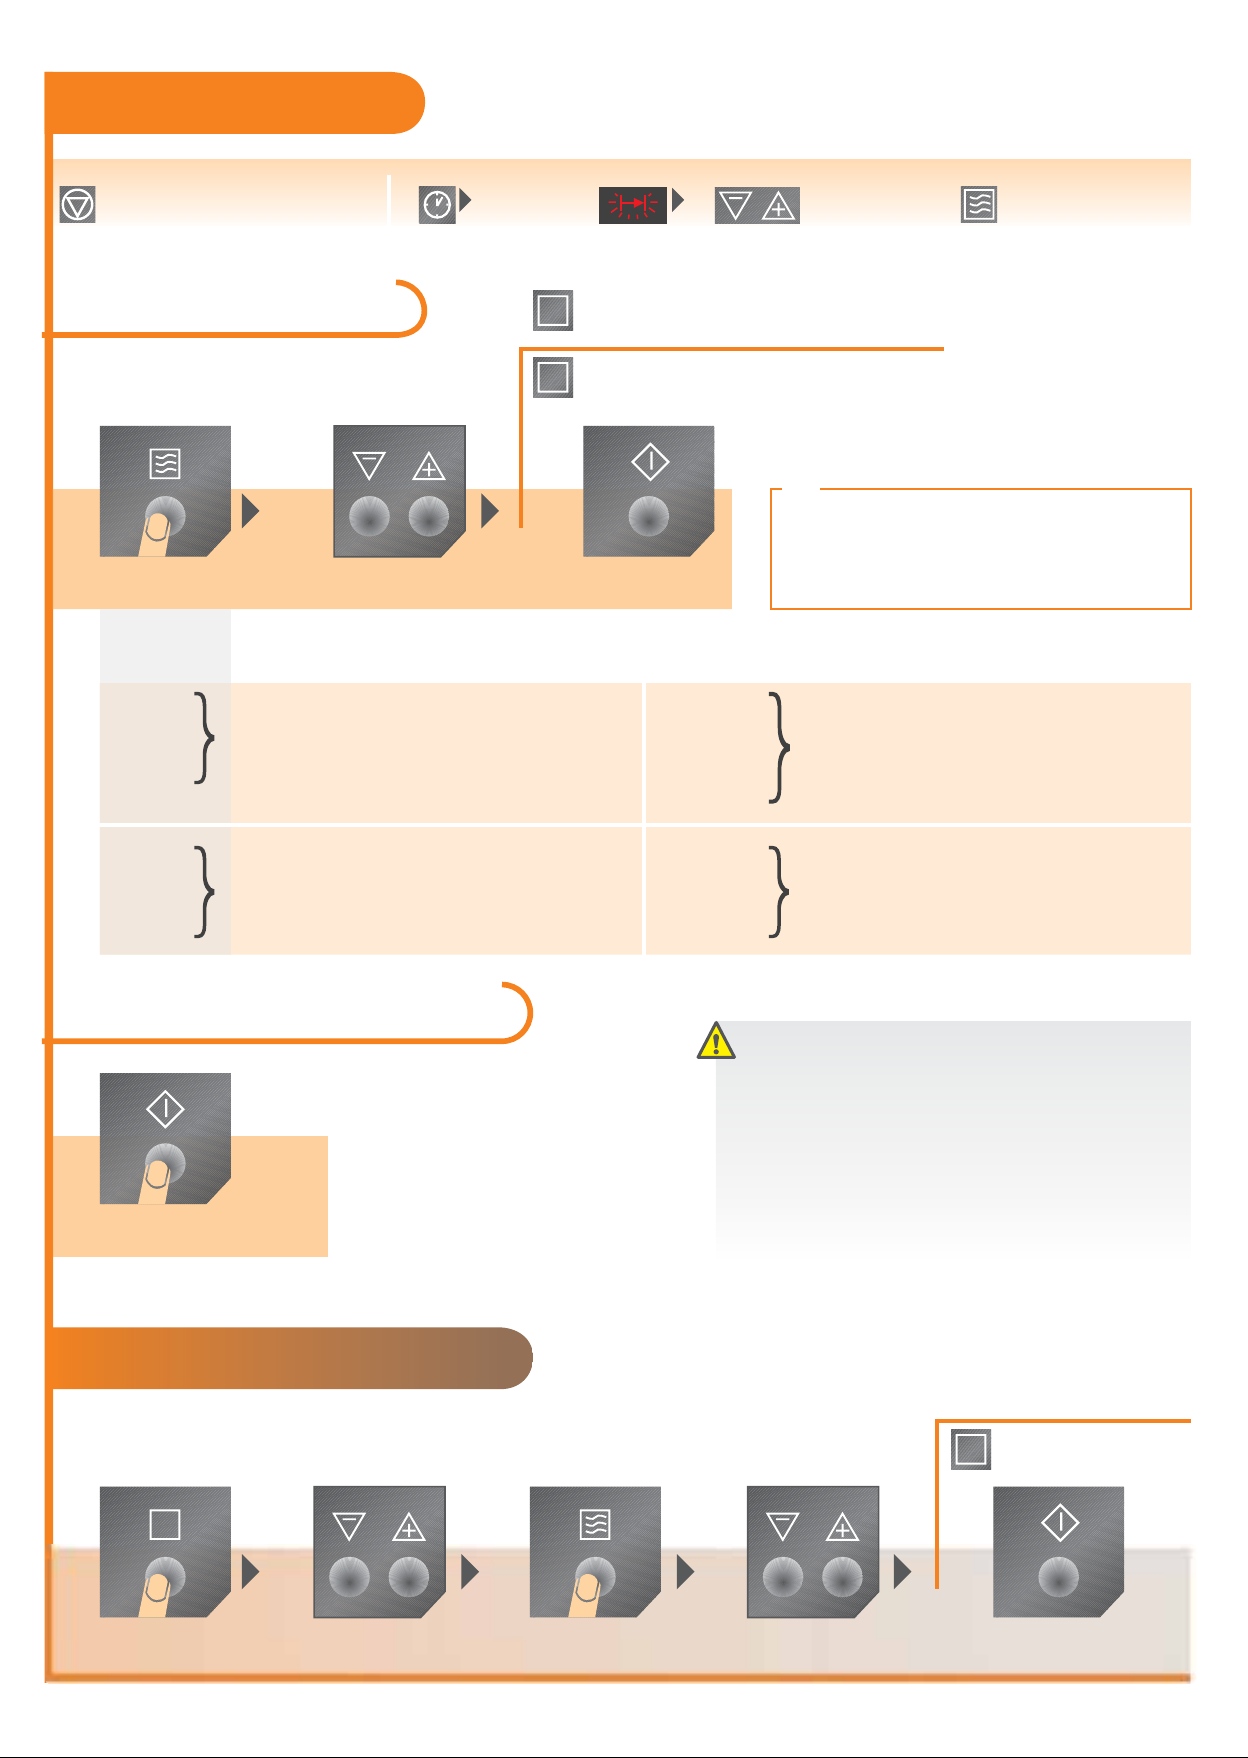
Microwave
Evt. switch off first with
stop button
1 2
Microwave
Recommendation: Place your food on the glass
baking tray on the bottom glass
While time passes by...
PROGRAMMED RECIPES
A
see baking and roasting chart and automatic programme
MEMORY FUNCTION
M
See roasting / baking
3
Page
power can be changed
Change durationPress clock function
132
Select power
output (Watt)
In 100th steps,
Press button repeatedly...
Suitable for…Power
1000 Watt
900 Watt
800 Watt
700 Watt
600 Watt
500 Watt
The power outputs given are standard values
- Heating fluids
- Parboiling at the start of cooking process
- Cooking vegetables
- Cooking of food
- Melting of gelatine or butter
- Defrosting and heating frozen foods
- Heating meals
- Cooking stews
- Cooking scrambled eggs
Microwave Quick Start
1
Set operating
time
Max. 7 min. on maximum
microwave power output
Set cooking time
(Time)
At 700 W to 1000 W, 0 to 7 min. 40 secs
At 100 W to 600 W, 0 to 59 min.
The appliance switches on with maximum
microwave power output.
Do not overcooke food by power and time
that is set too high.
Meals can dry out, burn or inflame in specific
places.
Setting see microwave
Start
TIP
Familiarize yourself with a similar food and
adapt the cooking times according to the following rule:
Double the quantity = almost double the time
Half the quantity = half the time
400 Watt
300 Watt
200 Watt
100 Watt - Defrosting meat, fish, bread
- Only operate microwave with food inside - never empty!
- Only use dishware suitable for microwave p. 4
- Place food on bottom glass or glass baking tray
- Always place coffee spoon or glass stirrer (accessory) in the
- Prick food with «peel» or «shell» ((e.g. potatoes, tomatoes,
- Do not cook eggs in their shells, they can crack.
- Do not use aluminium foil. When using convenience foods
- Cooking meals further
- Cooking delicate meals
- Heating baby food
- Preparing rice
- Heating delicate meals
- Melting cheese
- Defrosting cheese, cream, butter
- Defrosting fruit and cakes (cream cakes)
- Leaving dough
- Heating cold meals and drinks
Notes for microwave
container when heating fluid, in order to avoid boiling retardation
(overcooking or splashing)
sausages) several times using a fork to prevent from bursting
always see that there is a space in the container (sparking)
see «Safety instructions»
The microwave can be switched to the various heating forms of oven functions.
Combinated functions
Food is cooked in the shortest time and browned at the same time,
See baking and roasting charted suitable dishware /material page 4
1 2 354
Select oven
function
Set
temperature
Select MW
power output
cooking time
MEMORY FUNCTION
M
see «baking and roasting»
StartSet

General
Roasting / Baking
Baking dishes
- Place lean meat, venison, meat loaf directly on the
roasting tray
- Light-coloured moulds extend baking/roasting times
- Place baking dishes/dishware on the griddle
- With hot air use baking ceramic/heat-resistant moulds
(roasting tin, Pyrex or stoneware)
(*optional accessories p. 7)
Grill
Grill with curve upwards to prevent
slipping of roast/baking dish
4
Page
Sauces
- Allow the gravy to brown slightly, then pour on
hot water
-
With a roasting time of over 1h: Do not add
gravy ingredients into the roasting tin until
1/2h before the end
Frozen pastry
- Place the griddle lined with baking paper
to avoid distortion of baking sheet
(Temperature differences)
- Use professional tray*
Microwave
- Leave meals to stand for a few minutes after
switching off appliance
- Remove aluminium packaging, metal boxes
before preparation
- Metal objects or aluminium backing foil must be
at least 2 cm from the cooking area walls and door
Convenience foods
- Always observe the manufacturer’s instructions
imprinted on the packaging
(e.g. Pizza)
(*optional accessories p. 7)
Keeping warm
In order to pre-heat dishware or keep meals warm
Grill
- Do not insert very fatty grilled food too close under the heating element
- Close oven door when grilling
- Always supervise grilling
- If several items of food have to be grilled in succession; clean the griddle each time
Cooking
- Covered up as much as possible, only if
it is to form crust, cook meals uncovered
- Chilled or frozen meals need longer cooking
time
- Stir meals containing sauce from time to time
- Cook vegetables with solid texture (e.g. carrots,
peas, cauliflower) with water
- Cut vegetables into big pieces
- Use flat, wide cookware
Defrost
Meat, Poultry, fish:
- Place frozen, unwrapped food on small plate
turned upside down with tin below and turn half
way through the defrosting time
Butter, slice of cake, quark:
- Leave to defrost at room temperature, not
completely in appliance
Fruit, vegetable:
- If it is raw processed, defrost at room temperature,
and not completely in appliance
- If the fruit and vegetables are to be cooked,
directly with higher microwave power, the output
can be changed.
Select keep warm function
(Temperature, approx. 80 °C, is controlled automatically)
- e.g. shift around once (up/down)
Suitable dishware / material
Dishware/Material
Fireproof glass and porcelain, glass baking tray (no metal parts, e.g. Pyrex, Jenaer Glas)
Non fireproof glass and porcelain 1)
Glass and glass ceramics made with fire /rustproof material (e.g. arcoflam)
Ceramics 2), stoneware 2)
Heat-resistant plastic up to 200 °C
Cardboard, paper
Cling film
Roasting film with seal suitable for microwave use 3)
Roasting ovenware made in metal e.g. enamel, cast iron
Baking dishes, varnished in black or silicon-coated 3)
Grill, baking tray
Switch on- arrange dishware evenly
Breakpoint/
switch off
Microwave
Defrost Heat Cooking
Oven
Grill
Crostinoplate (optional accessories p. 7)
Packaged convenience foods 3)
1) without silver, gold, platinum or metal plating / decorations
2) without crystal or metal parts, no glaze containing metal
3) please observe maximum temperatures given by the manufacturer
- When heating food in the microwave, stir/turn continuously, as heat is generated in the food itself and
not all places are heated simultaneously.
- Leave food standing inside or outside the appliance, so that heat is distributed evenly.
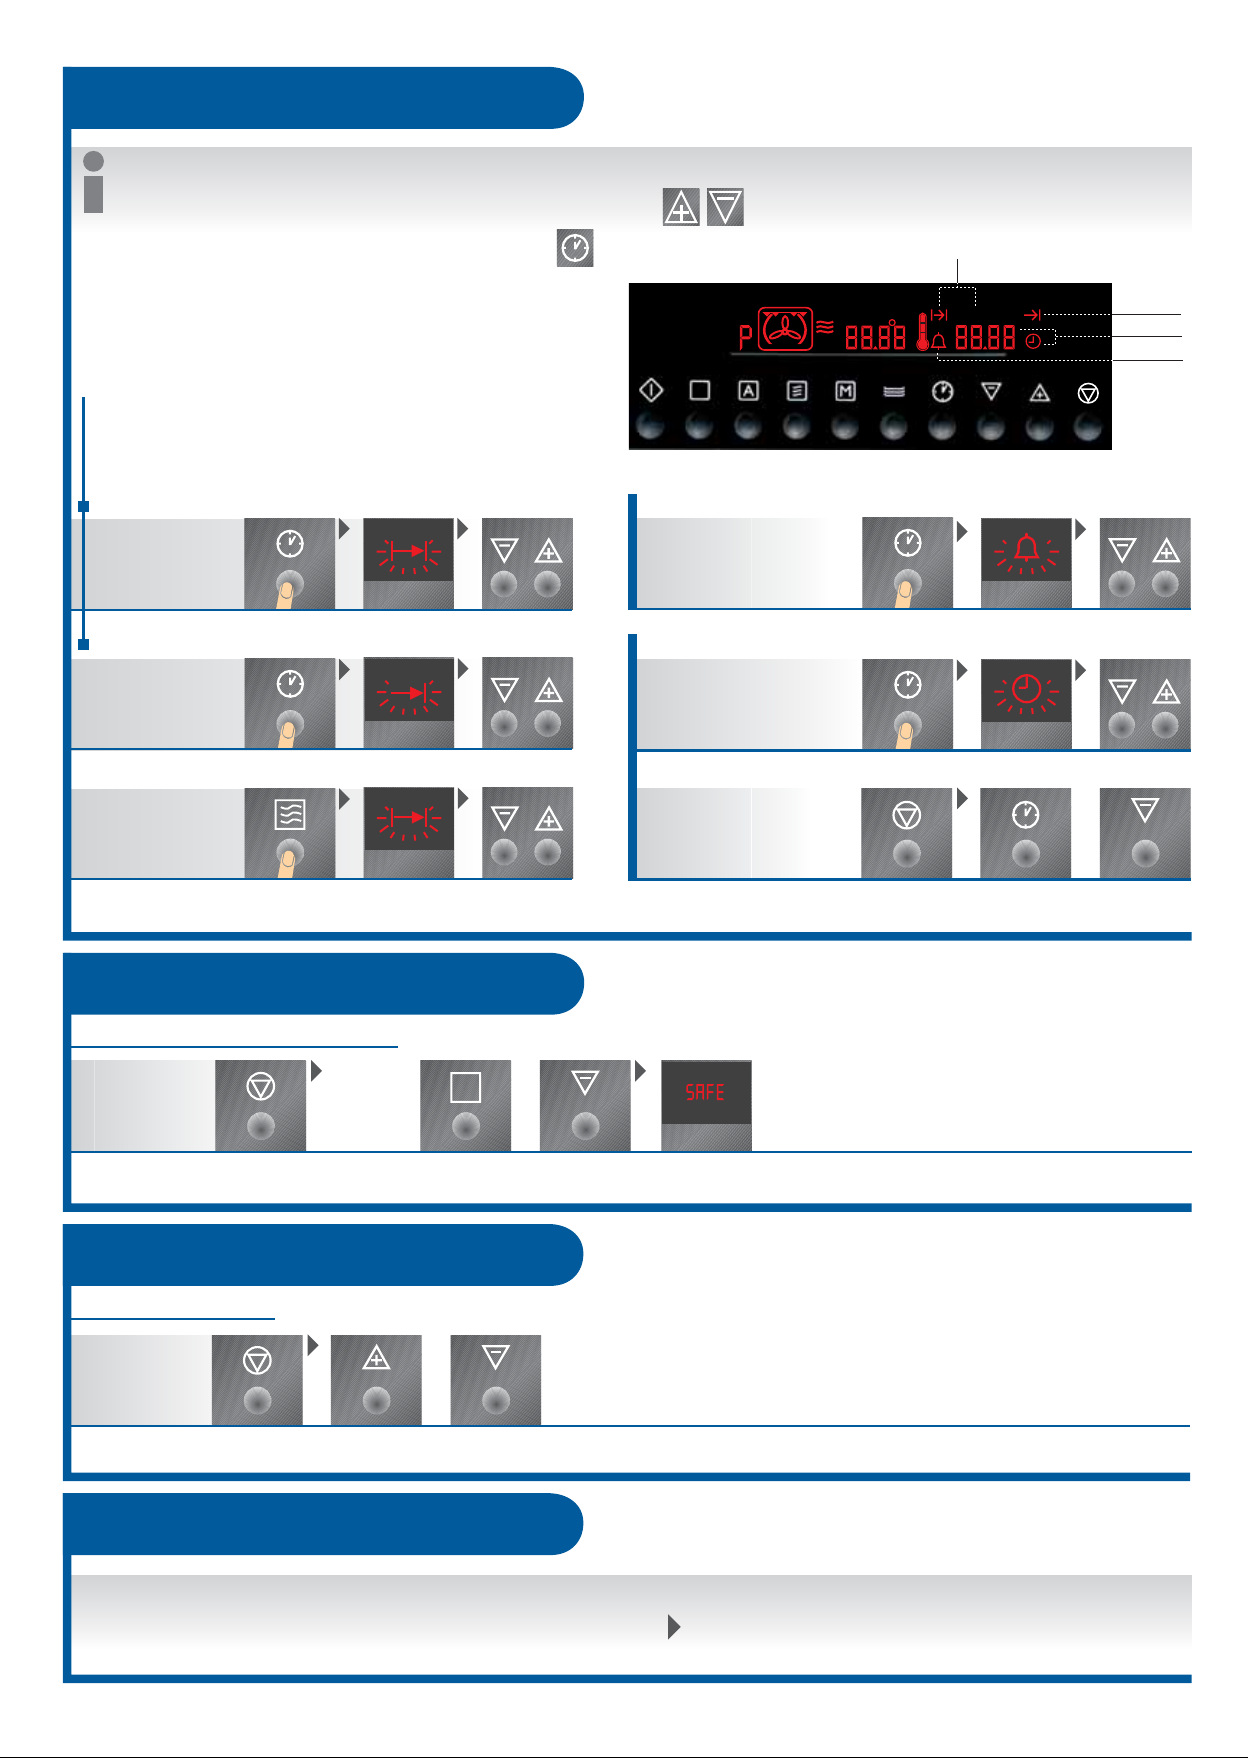
Clock functions
- After setting a time, symbol flashes for 5 sec., afterwards the time, short time or duration is illuminated, and the time starts.
- While the corresponding symbol flashes (5 sec.): Set/change times
5
Page
- By repeated touch the current time can be prompted
DURATION / END can be used simultaneously, if:
- the oven shall be switched on and off automatically at the later time
- a programme is selected.
DURATION
END
When will the meal be ready?
(first select oven function)
Duration MICROWAVE
0 to 23 hrs 59 min.
set duration
set time
set duration
Short time
No impact on
microwave / oven operation
Time
Time can only be faded out, if no other display is active!
Is the time faded out:
- Display is illuminated when
switched on
- Display goes out when switched off
Watt
0 to 99 minutes
change (e.g. Summer-/ Wintertime)
set
fading in/out
Switching off Press off button at the same
Duration
min gr
End
Time
Short time
+
time for about 2 seconds until
display goes out/lights up
Child lock
Button locking mechanism
No function
can be
selected!
Switching off
Buttons-signal
Switching on/off
Switching off
Press simultaneously for about 2
seconds until the signal is audible
Safety cut-off
+
A
Press the off switch at the same
time for about 2 seconds, until
the display goes out/lights up
+
Press the same button again for
about 2 seconds in order to switch on
the signal again!
Child lock on
Press the same button again
for about 2 seconds in order to
switch off child lock!
If the function and temperature is set WITHOUT time
restriction,the oven switches off automatically as follows:
at 30 - 120 °C
at 120 - 200 °C
at 200 - 250 °C
after 12,5 h
after 8,5 h
after 5,5 h
«OFF» appears in the display
Start-up after safety cut-off:
Switch off oven completely, it can
be restarted afterwards.
 Loading...