

Page 1
COMPETENCE B8100-1
The Versatile Built-in Oven
Operating Instructions
Page 2

Dear customer,
Please read these operating instructions carefully.
Pay particular attention to the section “Safety information” on the first
few pages. Please retain these operating instructions for later reference. Pass them on to possible new owners of the appliance.
The following symbols are used in the text:
Safety instructions
1
Warning: Information concerning your personal safety.
Important: Information on how to avoid damaging the appliance.
Information and practical tips
3
Environmental information
2
1. These numbers indicate step by step how to use the appliance.
2. ...
3. ...
In the event of any technical problems please contact your nearest
CUSTOMER SERVICE CENTRE at any time. (Addresses and telephone
numbers may be found in the appendix under "Customer Service
Centres“).
You should also refer to the section "Service"“.
Printed on environmentally friendly paper.
Thinking ecologically means acting ecologically ...
2
Page 3

Contents
Safety . . . . . . . . . . . . . . . . . . . . . . . . . . . . . . . . . . . . . . . . . . . . . . . . . . . . . . . . 5
Disposal . . . . . . . . . . . . . . . . . . . . . . . . . . . . . . . . . . . . . . . . . . . . . . . . . . . . . . 7
Description of the Appliance . . . . . . . . . . . . . . . . . . . . . . . . . . . . . . . . . . . . 8
General Overview . . . . . . . . . . . . . . . . . . . . . . . . . . . . . . . . . . . . . . . . . . . . . . . 8
Control Panel . . . . . . . . . . . . . . . . . . . . . . . . . . . . . . . . . . . . . . . . . . . . . . . . . . 9
Oven Features . . . . . . . . . . . . . . . . . . . . . . . . . . . . . . . . . . . . . . . . . . . . . . . . . . 10
Oven accessories . . . . . . . . . . . . . . . . . . . . . . . . . . . . . . . . . . . . . . . . . . . . . . . 11
Before Using for the First Time . . . . . . . . . . . . . . . . . . . . . . . . . . . . . . . . . 12
Setting the Time . . . . . . . . . . . . . . . . . . . . . . . . . . . . . . . . . . . . . . . . . . . . . . . 12
Initial Cleaning . . . . . . . . . . . . . . . . . . . . . . . . . . . . . . . . . . . . . . . . . . . . . . . . . 13
Using the Oven . . . . . . . . . . . . . . . . . . . . . . . . . . . . . . . . . . . . . . . . . . . . . . . . 14
The Electronic Oven Control . . . . . . . . . . . . . . . . . . . . . . . . . . . . . . . . . . . . . . 14
Oven Functions . . . . . . . . . . . . . . . . . . . . . . . . . . . . . . . . . . . . . . . . . . . . . . . . 15
Inserting the Shelf and Universal Baking Tray . . . . . . . . . . . . . . . . . . . . . . . 19
Inserting/Removing the Fat Filter . . . . . . . . . . . . . . . . . . . . . . . . . . . . . . . . . 20
Additional Functions . . . . . . . . . . . . . . . . . . . . . . . . . . . . . . . . . . . . . . . . . . . . 21
Clock Functions . . . . . . . . . . . . . . . . . . . . . . . . . . . . . . . . . . . . . . . . . . . . . . . . 26
Other Functions . . . . . . . . . . . . . . . . . . . . . . . . . . . . . . . . . . . . . . . . . . . . . . . . 32
Oven Child Safety Feature . . . . . . . . . . . . . . . . . . . . . . . . . . . . . . . . . . . . . 33
Button Locking Feature . . . . . . . . . . . . . . . . . . . . . . . . . . . . . . . . . . . . . . . 34
Oven safety cut-out . . . . . . . . . . . . . . . . . . . . . . . . . . . . . . . . . . . . . . . . . . 35
Uses, Tables and Tips . . . . . . . . . . . . . . . . . . . . . . . . . . . . . . . . . . . . . . . . . . . 36
Baking . . . . . . . . . . . . . . . . . . . . . . . . . . . . . . . . . . . . . . . . . . . . . . . . . . . . . . . . 36
Baking Table . . . . . . . . . . . . . . . . . . . . . . . . . . . . . . . . . . . . . . . . . . . . . . . . 38
Pies and Gratin Table . . . . . . . . . . . . . . . . . . . . . . . . . . . . . . . . . . . . . . . . . 42
Frozen Ready Meals Table . . . . . . . . . . . . . . . . . . . . . . . . . . . . . . . . . . . . . 43
Roasting . . . . . . . . . . . . . . . . . . . . . . . . . . . . . . . . . . . . . . . . . . . . . . . . . . . . . . 44
Roasting Table . . . . . . . . . . . . . . . . . . . . . . . . . . . . . . . . . . . . . . . . . . . . . . 46
Meat Probe Table . . . . . . . . . . . . . . . . . . . . . . . . . . . . . . . . . . . . . . . . . . . . 48
Grilling . . . . . . . . . . . . . . . . . . . . . . . . . . . . . . . . . . . . . . . . . . . . . . . . . . . . . . . 49
Grilling Table . . . . . . . . . . . . . . . . . . . . . . . . . . . . . . . . . . . . . . . . . . . . . . . 49
Bio-Functions . . . . . . . . . . . . . . . . . . . . . . . . . . . . . . . . . . . . . . . . . . . . . . . . . . 50
Low Temperature Roasting Table . . . . . . . . . . . . . . . . . . . . . . . . . . . . . . . 52
Making Yoghurt . . . . . . . . . . . . . . . . . . . . . . . . . . . . . . . . . . . . . . . . . . . . . 53
Proving Dough . . . . . . . . . . . . . . . . . . . . . . . . . . . . . . . . . . . . . . . . . . . . . . 53
Drying . . . . . . . . . . . . . . . . . . . . . . . . . . . . . . . . . . . . . . . . . . . . . . . . . . . . . 54
3
Page 4

Defrosting . . . . . . . . . . . . . . . . . . . . . . . . . . . . . . . . . . . . . . . . . . . . . . . . . . . . . 55
Defrosting Table . . . . . . . . . . . . . . . . . . . . . . . . . . . . . . . . . . . . . . . . . . . . . 55
Preserving . . . . . . . . . . . . . . . . . . . . . . . . . . . . . . . . . . . . . . . . . . . . . . . . . . . . . 56
Cleaning and Care . . . . . . . . . . . . . . . . . . . . . . . . . . . . . . . . . . . . . . . . . . . . . 58
Exterior of the Appliance . . . . . . . . . . . . . . . . . . . . . . . . . . . . . . . . . . . . . . . . 58
Oven Interior . . . . . . . . . . . . . . . . . . . . . . . . . . . . . . . . . . . . . . . . . . . . . . . . . . 58
Accessories . . . . . . . . . . . . . . . . . . . . . . . . . . . . . . . . . . . . . . . . . . . . . . . . . . . . 59
Fat Filter . . . . . . . . . . . . . . . . . . . . . . . . . . . . . . . . . . . . . . . . . . . . . . . . . . . . . . 59
Shelf Support Rails . . . . . . . . . . . . . . . . . . . . . . . . . . . . . . . . . . . . . . . . . . . . . 60
Oven Lighting . . . . . . . . . . . . . . . . . . . . . . . . . . . . . . . . . . . . . . . . . . . . . . . . . 61
Cleaning the Oven Ceiling . . . . . . . . . . . . . . . . . . . . . . . . . . . . . . . . . . . . . . . 62
Oven Door . . . . . . . . . . . . . . . . . . . . . . . . . . . . . . . . . . . . . . . . . . . . . . . . . . . . . 63
Oven Door Glass . . . . . . . . . . . . . . . . . . . . . . . . . . . . . . . . . . . . . . . . . . . . . . . . 64
What to do if ... . . . . . . . . . . . . . . . . . . . . . . . . . . . . . . . . . . . . . . . . . . . . . . . 66
Technical Data . . . . . . . . . . . . . . . . . . . . . . . . . . . . . . . . . . . . . . . . . . . . . . . . 67
Oven Interior Dimensions . . . . . . . . . . . . . . . . . . . . . . . . . . . . . . . . . . . . . . . . 67
Regulations, Standards, Directives . . . . . . . . . . . . . . . . . . . . . . . . . . . . . . . . . 67
Index . . . . . . . . . . . . . . . . . . . . . . . . . . . . . . . . . . . . . . . . . . . . . . . . . . . . . . . . . 70
Service . . . . . . . . . . . . . . . . . . . . . . . . . . . . . . . . . . . . . . . . . . . . . . . . . . . . . . . 71
4
Page 5

1 Safety
Electrical Safety
• The appliance may only be connected by a registered specialist.
• In the event of any faults or damage to the appliance: remove fuses
or switch off.
• It is not permissible to clean the appliance with a steam or high
pressure cleaner for safety reasons!
• Repairs to the appliance may only be carried out by specialists. Re-
pairs carried out by inexperienced persons may cause injury or serious
malfunctioning. If your appliance needs repairing, please contact
your local AEG Service Force Centre or your specialist dealer.
Child Safety
• Never leave children unsupervised when the appliance is in use.
Safety whilst Using
• This appliance is intended to be used for cooking, frying and baking
food in the home.
• Take care when connecting electric appliances to sockets nearby. Do
not allow connecting leads to come into contact with hot rings or to
catch beneath the hot oven door.
• Warning: Risk of burns! The interior of the oven becomes hot dur-
ing use.
• Using ingredients containing alcohol in the oven may create an alcohol-air mixture that is easily ignited. In this case, open the door carefully. Do not have embers, sparks or naked flames in the vicinity when
opening the door.
5
Page 6

To Avoid Damaging Your Appliance
• Do not line your oven with aluminium foil and do not place a baking
tray or dish on the oven floor, otherwise the oven enamel will be
damaged by the resulting build up of heat.
• Juice from fruit that drips from baking trays will leave marks that
cannot be removed. For very moist cakes, use the universal baking
tray.
• Do not put any weight on the oven door when it is open.
• Never pour water directly into the hot oven. The enamel may be dam-
aged.
• Using force, especially on the edges of the front glass panel, may
break the glass.
• Do not store inflammable objects in the oven. They may ignite when
the oven is switched on.
• Do not store moist food in the oven. The enamel may be damaged.
6
Page 7

2 Disposal
Disposing of the packaging material
All materials used can be fully recycled.
Plastics are marked as follows:
• >PE< for polyethylene, as used for the outer wrapping and the bags
inside.
• >PS< for polystyrene foam, e.g., as used for the padding materials.
They are completely free of CFCs.
Disposal of old appliances
Warning: Before disposing of old appliances please make them inoper-
1
able so that they cannot be the source of danger.
To do this, disconnect the appliance from the mains supply and remove the mains lead.
To protect the environment, it is important that worn out appliances
are disposed of in the correct manner.
• The appliance must not be disposed of with household rubbish.
• You can obtain information about collection dates or public refuse
disposal sites from your local refuse department or council.
7
Page 8
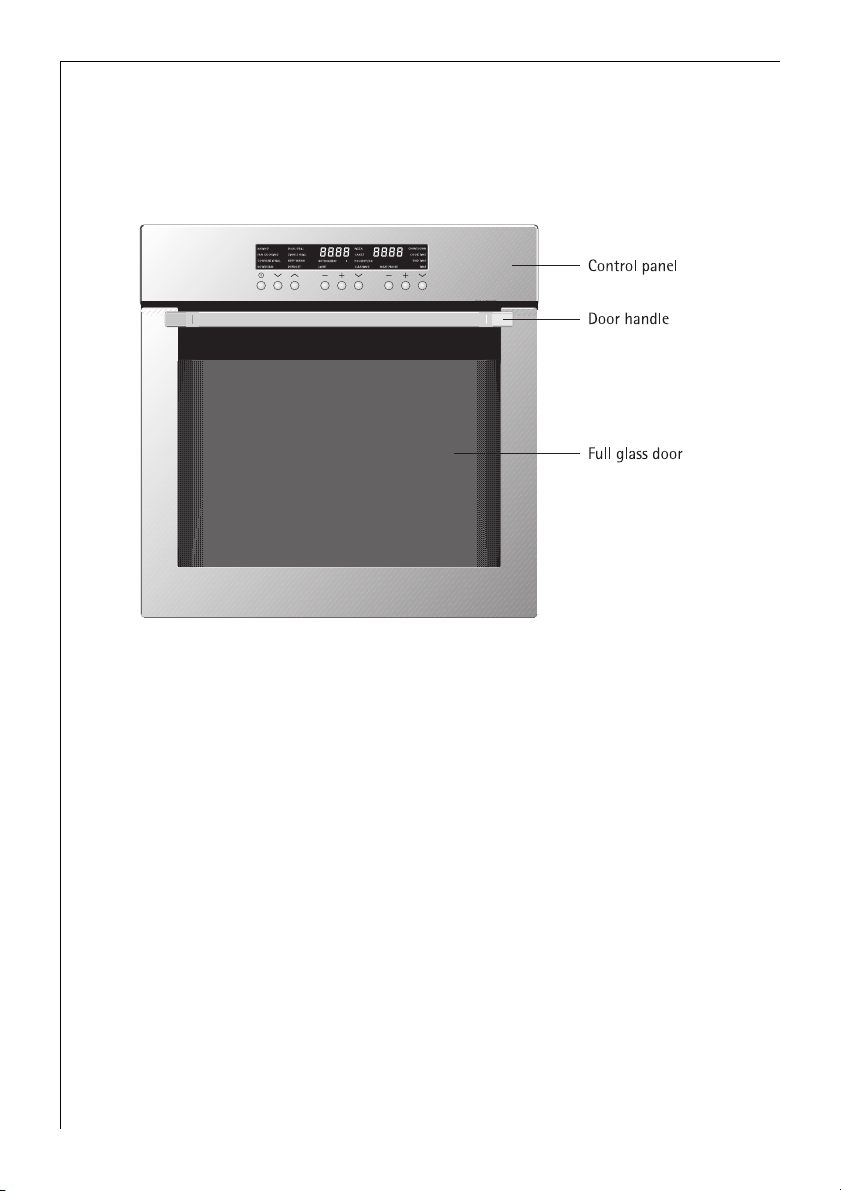
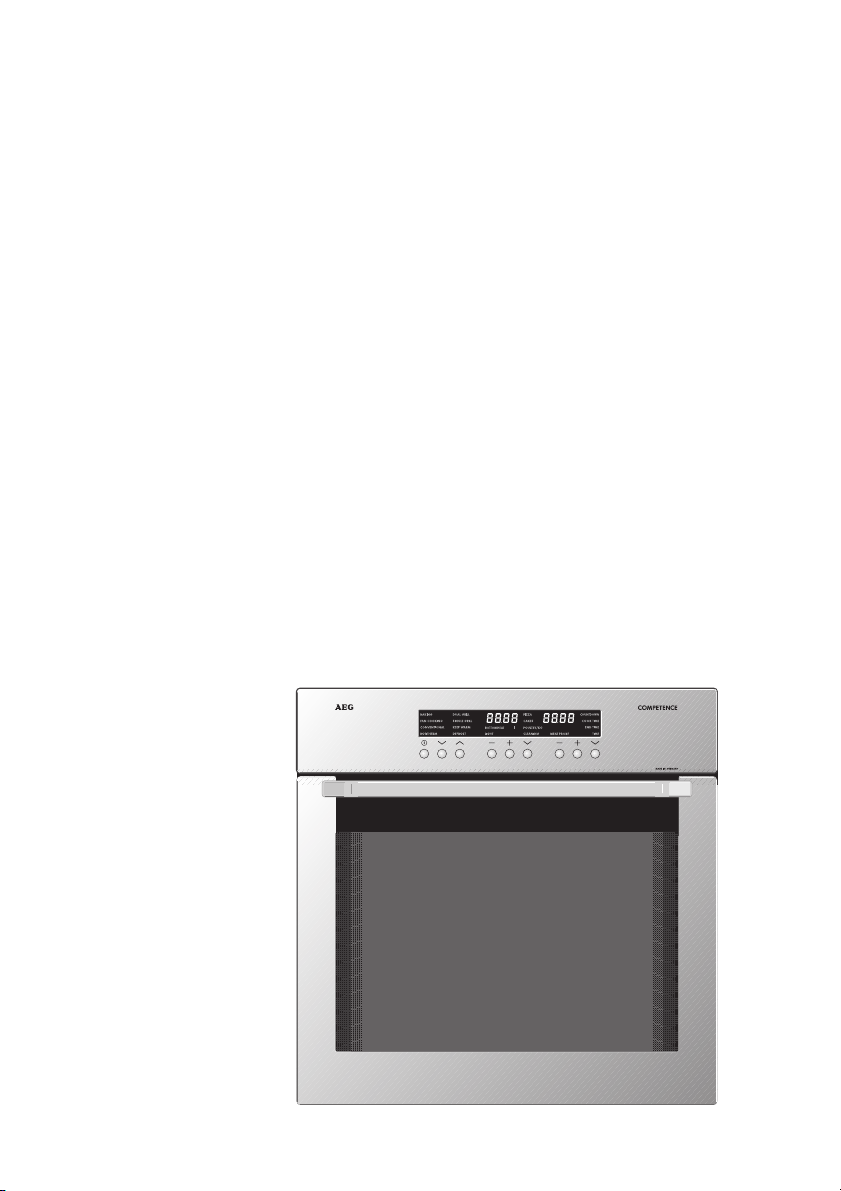
Description of the Appliance
General Overview
8
Page 9
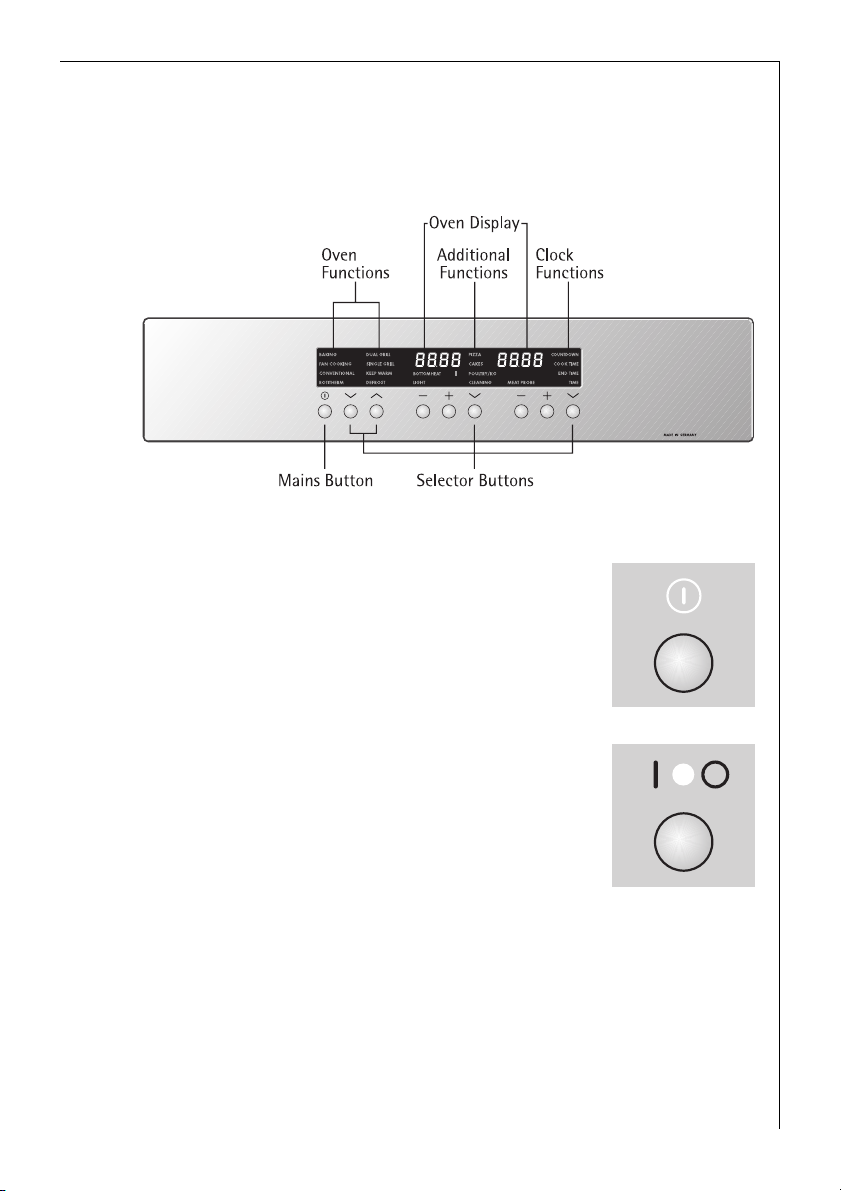
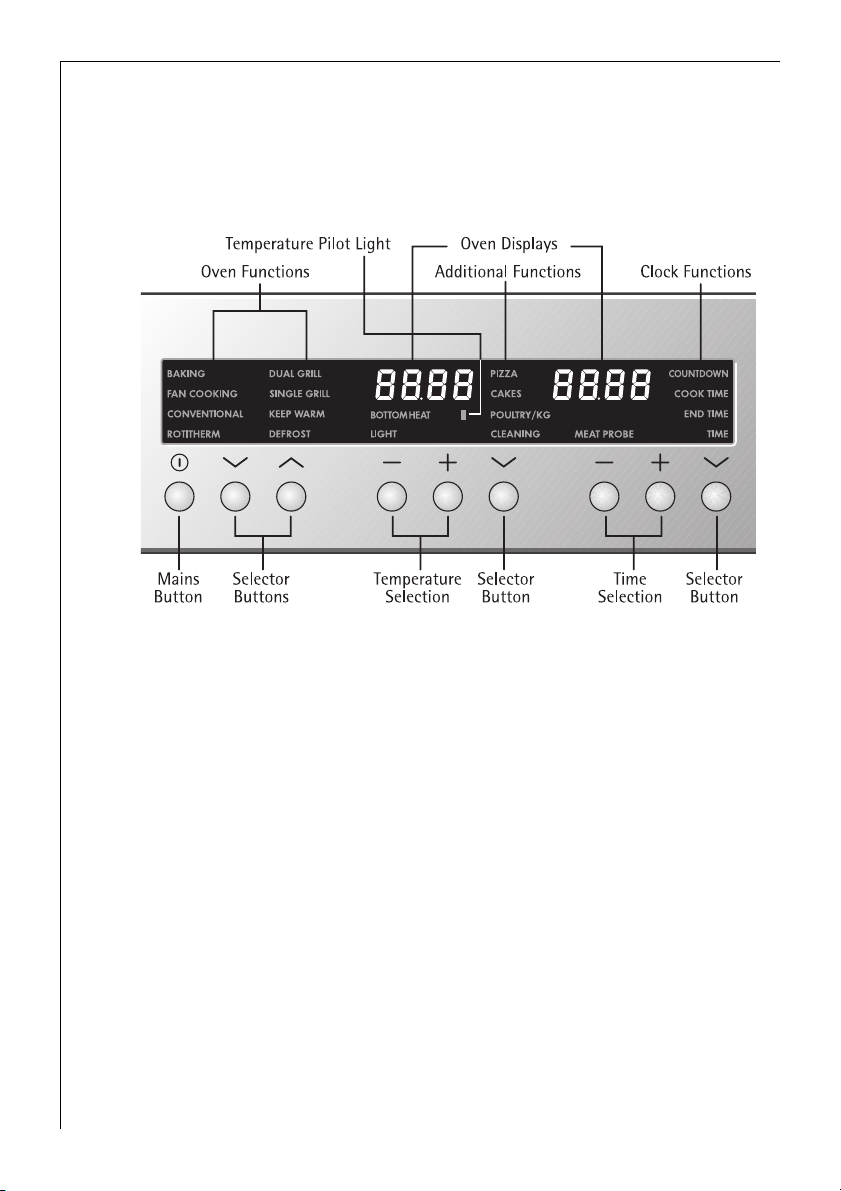
Control Panel
Mains button
For switching the entire appliance on and off.
Mains button on appliances with a metal front
In the following text and in the illustrations the
3
symbol N is always used to indicate the mains button.
9
Page 10

Oven Features
Oven steam vent
Steam from the oven is fed out below the door handle.
Relates only to appliances with a metal front:
Steam from the oven is fed out between the upper door edge and the
control panel.
10
Page 11
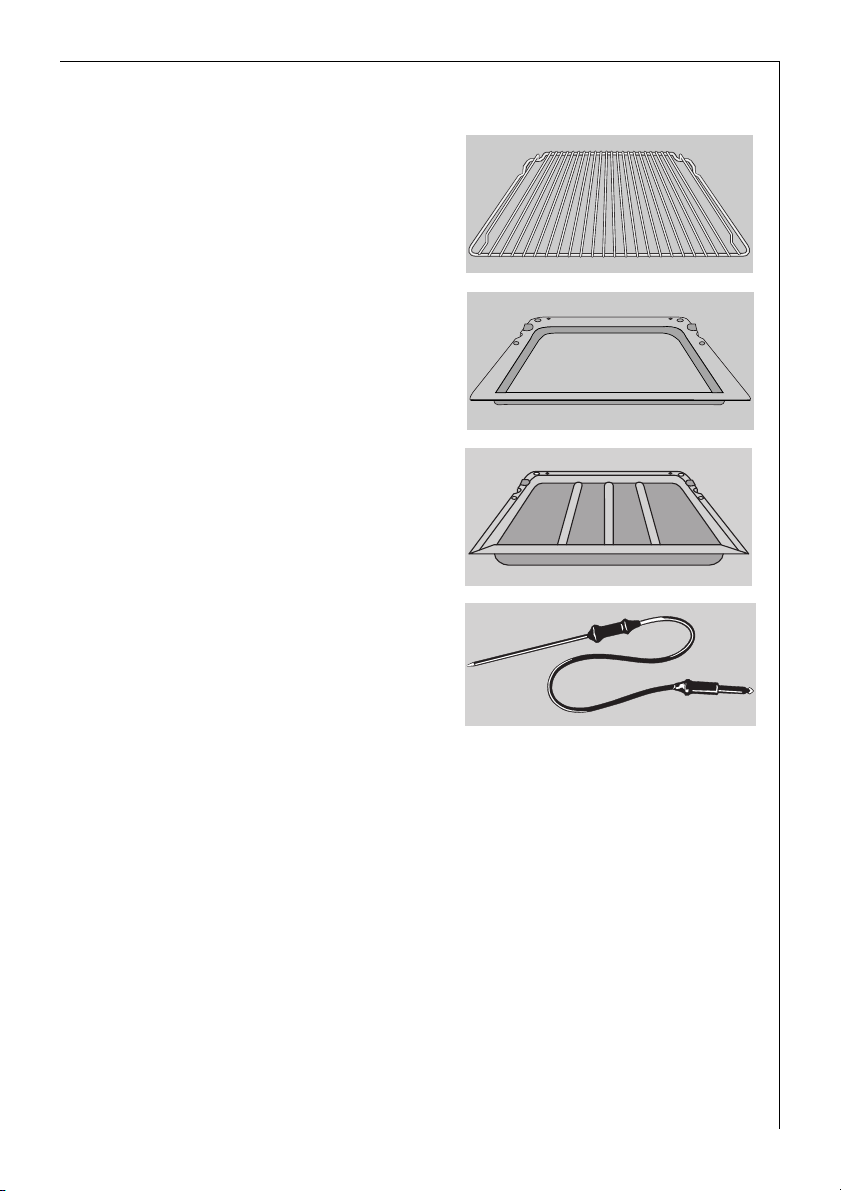
Oven accessories
Combination shelf
For dishes, cake tins, items for
roasting and grilling.
Baking tray
For cakes and biscuits
Fat tray
For roasting or for collecting fat.
Meat probe
For determining exactly how far
joints of meat are cooked.
11
Page 12

Before Using for the First Time
Setting the Time
The oven will only operate when the time has been set.
3
After connection to the mains or
following a power failure “12.00” is
illuminated and “TIME” flashes.
1. Using buttons + or - set the cur-
rent time.
2. Wait for approx. 5 seconds.
The flashing will stop and the set
time is displayed.
The appliance is ready for use.
12
Page 13
Initial Cleaning
Before using the oven for the first time you should clean it thoroughly.
Important: Do not use any caustic, abrasive cleaners! The surface could
1
be damaged.
Tip: Use commercially available cleaners for metal fronts.
3
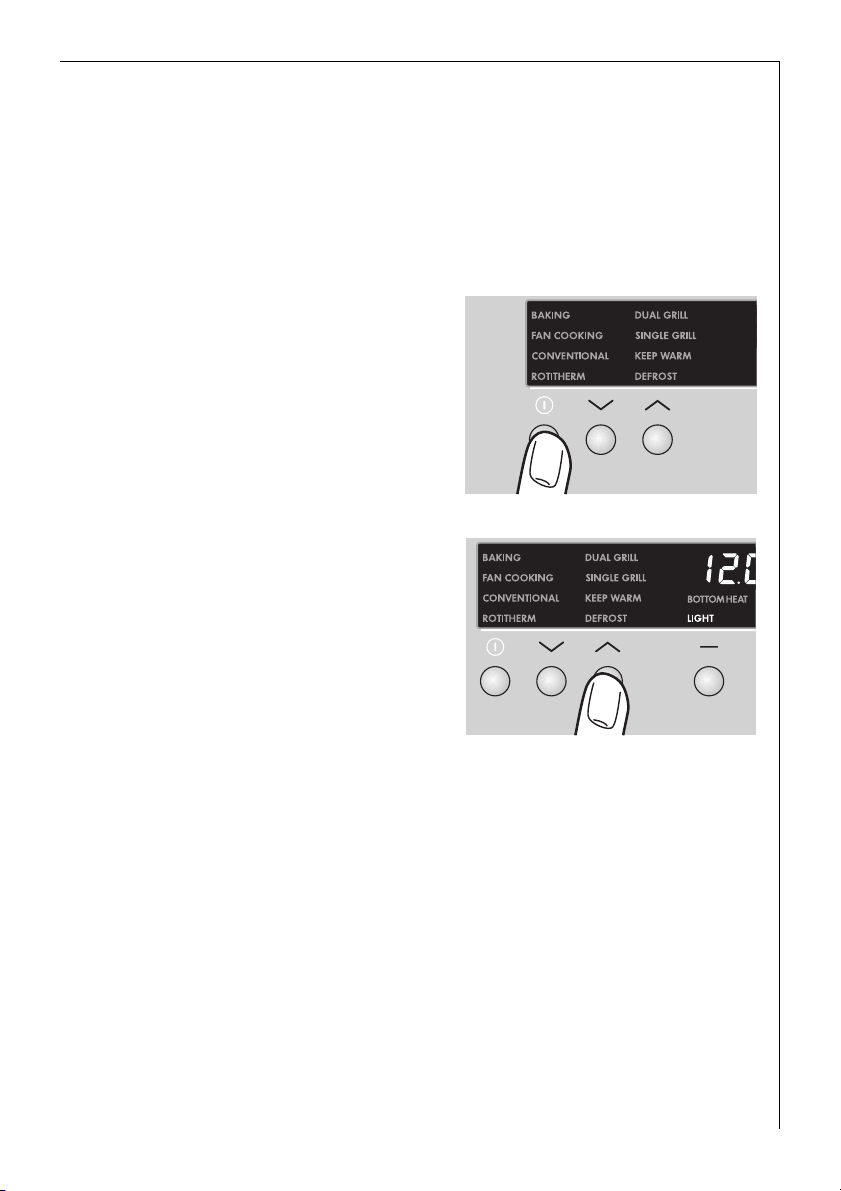
Switch on the appliance using the
mains button.
The symbol above the button will be
illuminated.
3. Press selection button X once for
oven functions.
“LIGHT” is illuminated and the oven
lighting is switched on.
4. Remove all accessories and the shelf support rails and wash them with
warm water and washing up liquid.
5. Then wash out the oven with warm water and washing-up liquid, and
dry.
6. Wipe the front of the appliance with a damp cloth.
7. After cleaning switch off the oven lighting using selection button Y
for oven functions.
13
Page 14
Using the Oven
The Electronic Oven Control
General information
3
• Always switch the appliance on first using the mains button N.
• When the selected function is illuminated the oven starts to heat up
and the set time begins to count down.
• The oven lighting comes on as soon as an oven function is selected.
• Switch the appliance off using the mains button N.
14
Page 15

Oven Functions
The oven has the following functions:
The BAKING, CONVENTIONAL and ROTITHERM functions include an au-
3
tomatic fast warm up. This ensures that the selected temperature is
reached as quickly as possible.
BAKING
Suggested temperature: 150 °C
For baking cakes on one level and for pastries that need more brown-
ing and a crispy base. These include such foods as pizza, quiche lorraine,
and cheese cake.
Set oven temperatures 20-40 °C lower than when using conventional.
Conventional is used and in addition the fan is switched on.
FAN COOKING
Suggested temperature: 150 °C
For baking on up to three levels at the same time.
Set oven temperatures 20-40 °C lower than when using conventional.
The rear wall heating element is used and in addition the fan is
switched on.
CONVENTIONAL
Suggested temperature: 200 °C
For baking and roasting on one level.
The top and bottom heating elements are in use.
ROTITHERM
Suggested temperature: 180 °C
For roasting larger pieces of meat or poultry on one level. This function
is also suited to cooking foods au gratin and browning.
The grill heating element and top heat operate alternately with the fan.
15
Page 16

DUAL GRILL
Suggested temperature: 300 °C
For grilling larger quantities of flat foods such as steaks, escalopes or
fish, or for toasting.
Top heat and the grill heating element are in use.
SINGLE GRILL
Suggested temperature: 300 °C
For grilling flat foods placed on the middle of the shelf such as steaks,
escalopes or fish, or for toasting.
The grill heating element is in use.
KEEPING FOOD WARM
Temperature setting: 80 °C
To keep food warm.
The top and bottom heating elements are in use.
DEFROST
Temperature setting: 30 °C
To begin to thaw and to defrost such items as flan, butter, bread, fruit
or other frozen foods.
For this function the fan operates without heating.
BOTTOM HEAT
Suggested temperature: 150 °C
For crisping and browning cakes with crispy bases.
The bottom heating element is in use.
16
LIGHT
To switch the oven lighting on and off.
The oven lighting is switched on automatically as long as the oven is in
operation.
Page 17

Switching On Oven Functions
1. Switch the appliance on with the
mains button N.
2. Press selection button X or Y un-
til the required function is illuminated.
A suggested temperature will appear in the temperature display.
The temperature pilot light comes
on while the oven is heating up.
Changing the Oven Temperature
Press the + or - button to increase or decrease the temperature.
The temperature may be set at intervals of 5 °C.
Changing the Oven Function
Press the X or Y button repeatedly until the required function is illuminated.
17
Page 18
Switching the Oven Off
To switch the oven off press selection button X or Y repeatedly until none of the oven functions is
illuminated.
Cooling fan
3
The fan comes on automatically when the oven is in use in order to
keep the surfaces of the appliance cool. Once the oven has been
switched off, the fan continues running to cool down the appliance
and then switches itself off automatically.
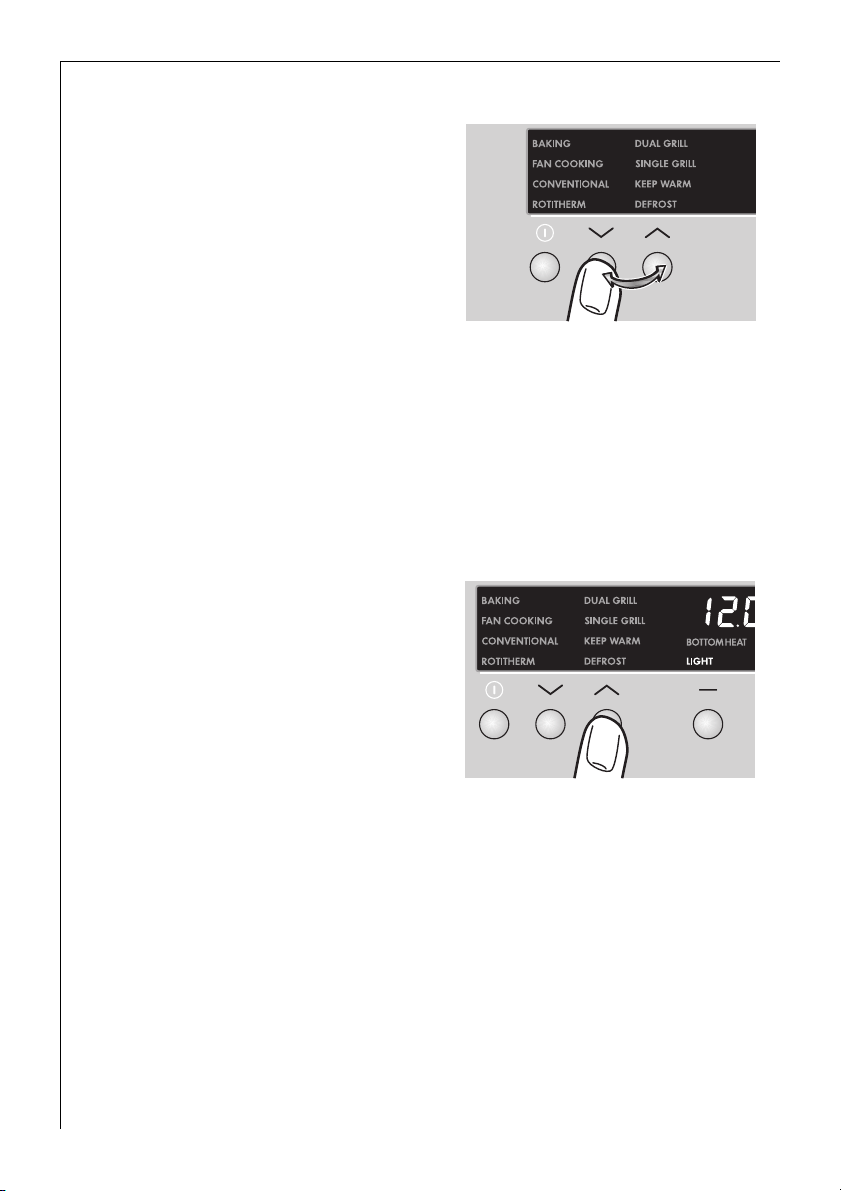
Switching the Oven Lighting On and Off
You can also switch on the oven lighting without an oven function.
1. Switch the appliance on using the
mains button N.
2. Press selection button X once for
oven functions.
“LIGHT” is illuminated and the oven
lighting is switched on.
3. Press selection button Y once for
oven functions.
The oven lighting is switched off.
18
Page 19
Inserting the Shelf and Universal Baking Tray
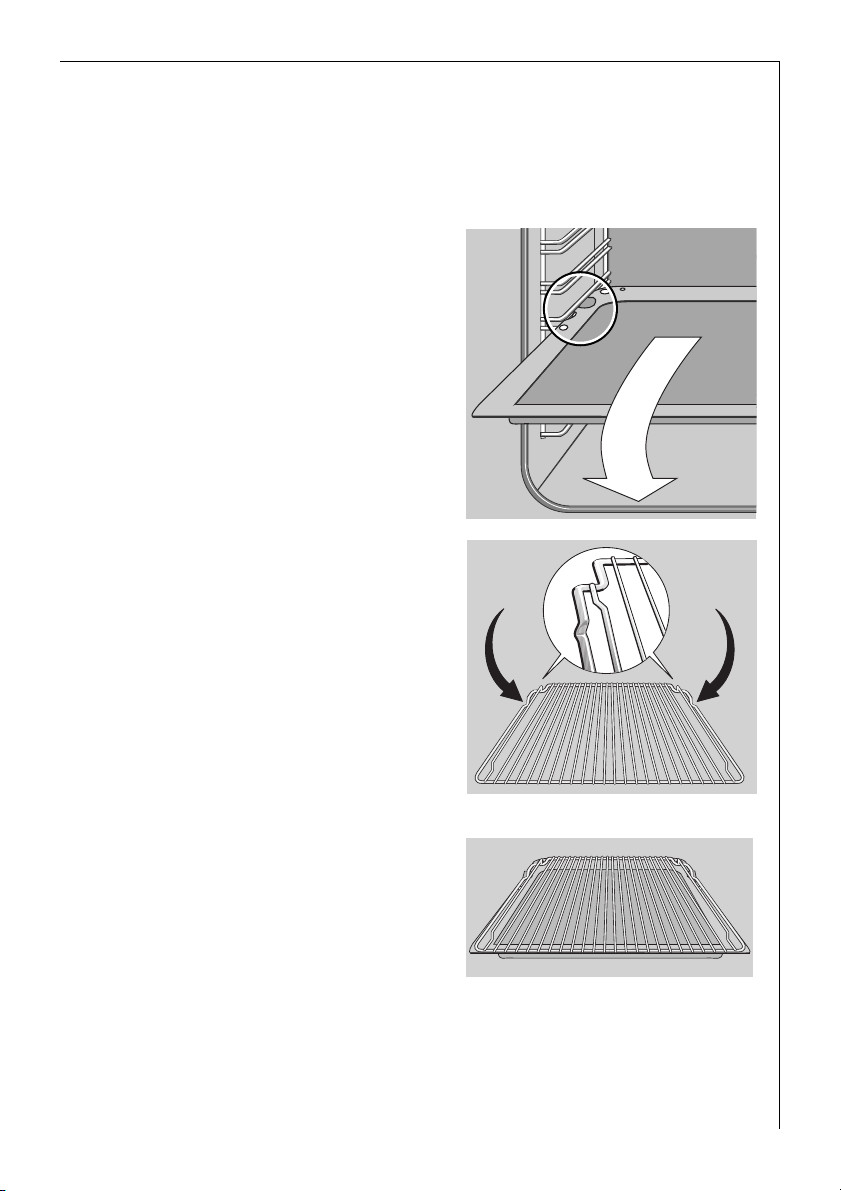
Anti-tip device
3
All slide-in units have a small bulge on the left and right. This bulge is
an anti-tip device and must always point to the rear of the oven.
Tray or universal baking tray:
The anti-tip device must point towards the rear of the oven.
✘
Inserting shelf:
Insert the shelf unit with both guide
rails pointing upwards. The anti-tip
device must point downwards and
be positioned to the rear of the
oven compartment.
Inserting shelf and tray:
When the shelf unit and universal
baking tray are used together, carefully place the shelf anti-tip device
in the bulges on the tray.
19
Page 20

Inserting/Removing the Fat Filter
The fat filter protects the rear wall heating element against splashes of
fat when roasting.
Inserting the fat filter
Holding the fat filter by the tab, insert the two retainers into the
opening on the rear wall of the
oven (fan opening) from the top
downwards.
Removing the fat filter
Take hold of the tab on the fat filter
and remove by pulling upwards.
20
Page 21
Additional Functions
PIZZA
To bake ready meals such as pizza, lasagne, foods au gratin and chips
from the freezer.
There is no need to pre-heat the oven as recommended on the packaging when this special additional function is used.
Refer to the maker's instructions for preparation.
3
Use the oven temperature for hot air.
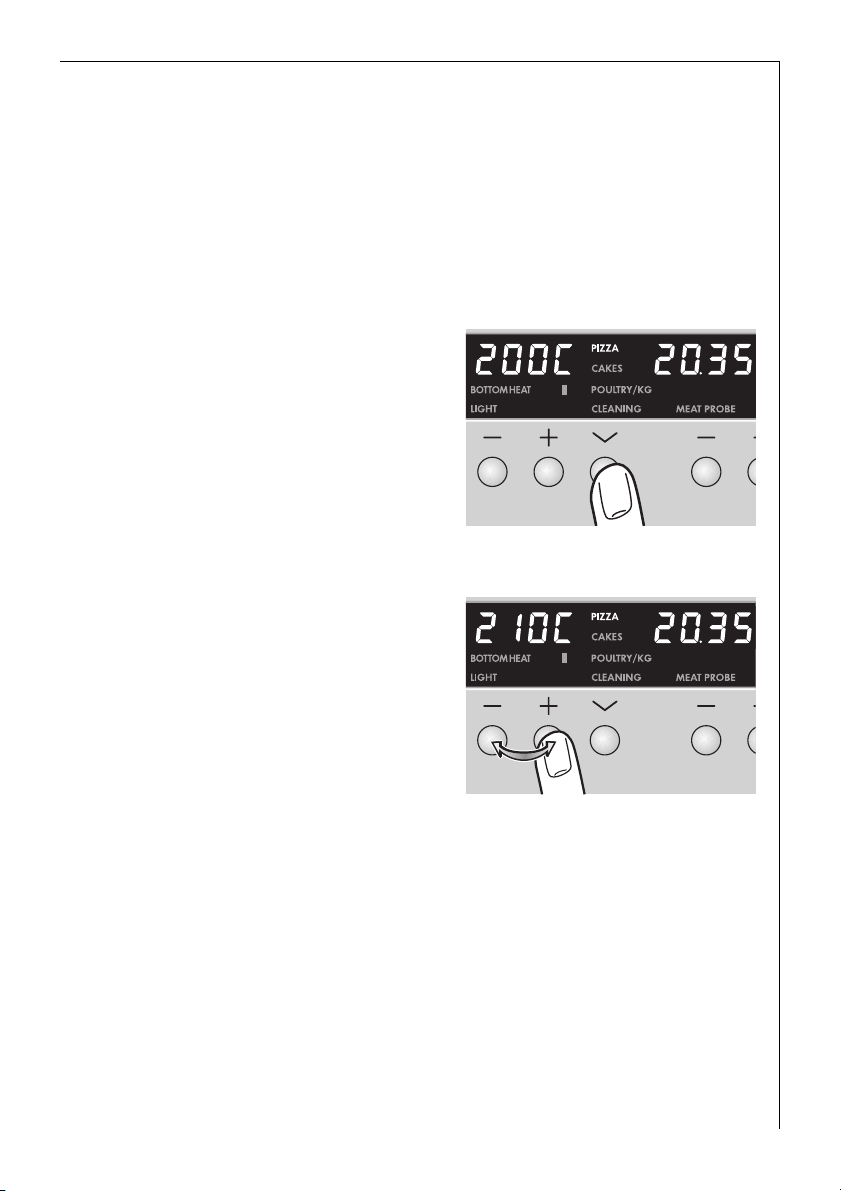
1. Press additional functions selection
button Y repeatedly until the
“PIZZA” function is illuminated.
The suggested temperature of
“200 °C” will appear in the temperature display.
2. By pressing the relevant + or button the suggested temperature
can be increased or decreased in
stages of 10 °C.
Turn chips etc. 2 - 3 times during cooking.
3
21
Page 22
CAKES
For baking prepared cakes and cake mixtures. There is no need to preheat the oven as recommended on the packaging when this special additional function is used.
Refer to the maker's instructions for preparation.
3
Use the oven temperature for hot air.
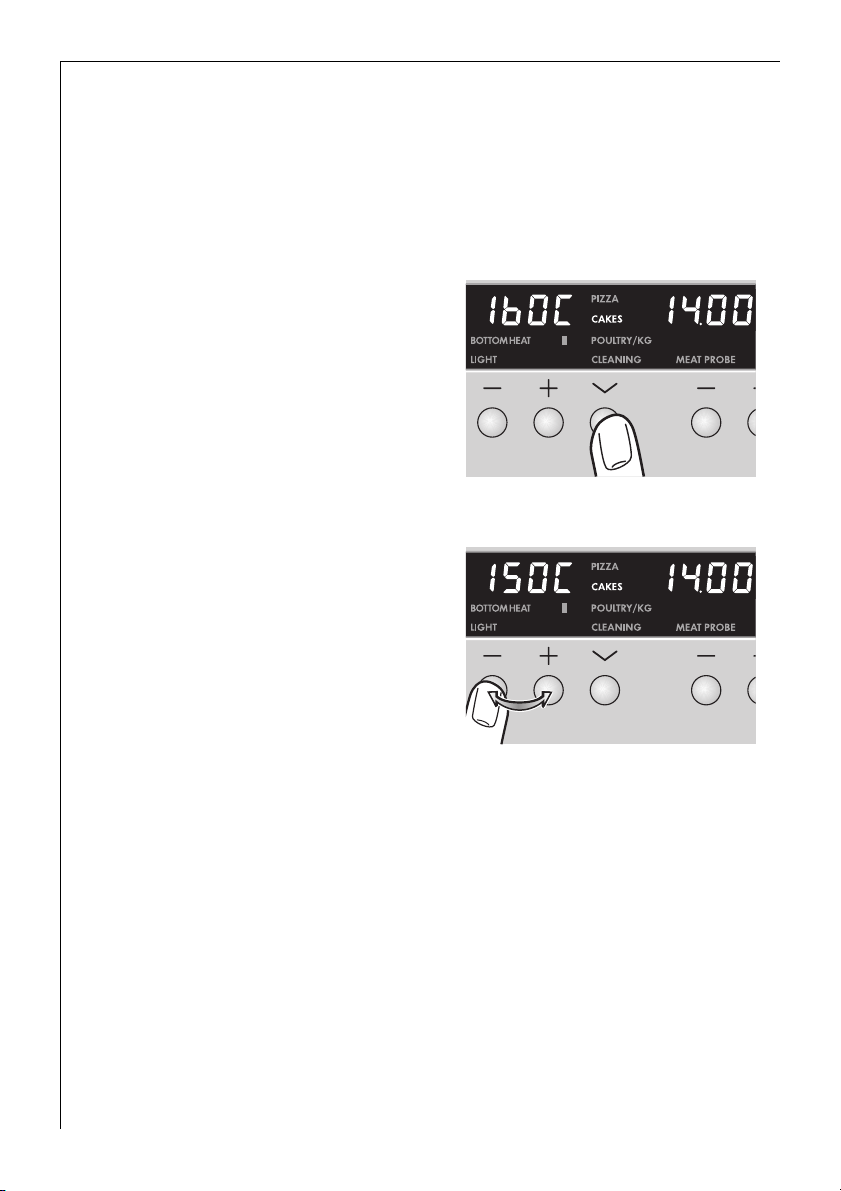
1. Press additional functions selection
button Y repeatedly until the
“CAKES” function is illuminated.
The suggested temperature of
“160 °C” will appear in the temperature display.
2. By pressing the relevant + or button the suggested temperature
can be increased or decreased in
stages of 10 °C.
22
Page 23
POULTRY
To roast whole poultry on an automatic program where all you need to
do is set the weight.
1. Prepare the poultry for roasting then place it breast down in the roasting dish and insert it on the shelf in the first oven position from the
bottom.
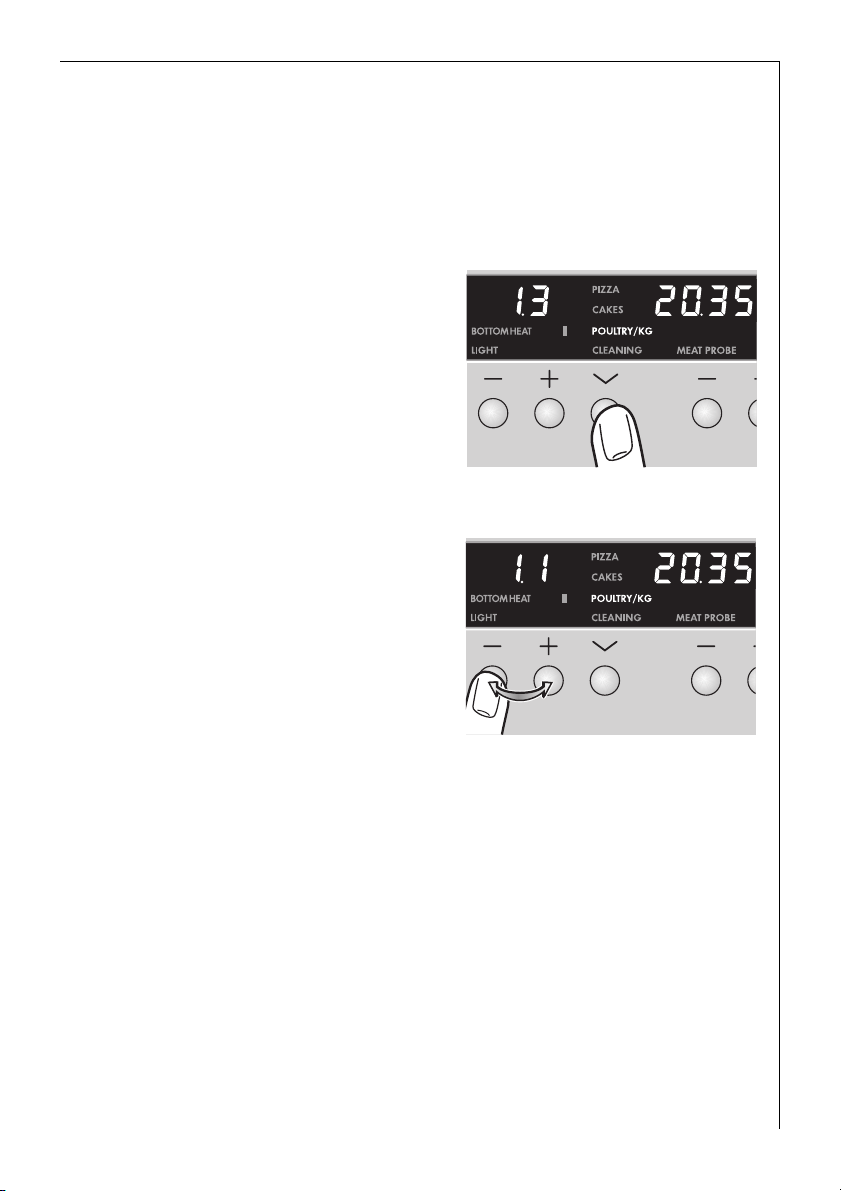
2. Press additional functions selection
button Y repeatedly until “POULTRY” is illuminated.
“1.3” will appear in the temperature
display and the “COOK TIME” clock
function will be illuminated.
3. Press the relevant + or - buttons
within the next minute to change
the weight setting (0.5 - 2.9).
You can check the COOK TIME by
3
pressing clock functions selection
button Y.
4. After approx. 2/3 of the roasting time an acoustic signal will sound to
remind you to turn the poultry.
5. At the end of the cooking time an acoustic signal will sound.
The oven will switch off.
CLEANING
To clean the oven.
With this oven function you can heat the oven to the optimum tem-
perature for oven cleaners that require a warm oven to take effect.
The ring heating elements and fan are in use.
23
Page 24

Meat Probe
To switch the oven off when the precise meat core temperature has
been reached.
Important: Only the meat probe delivered with the oven should be
1
used! If a replacement is required use only an original spare part.
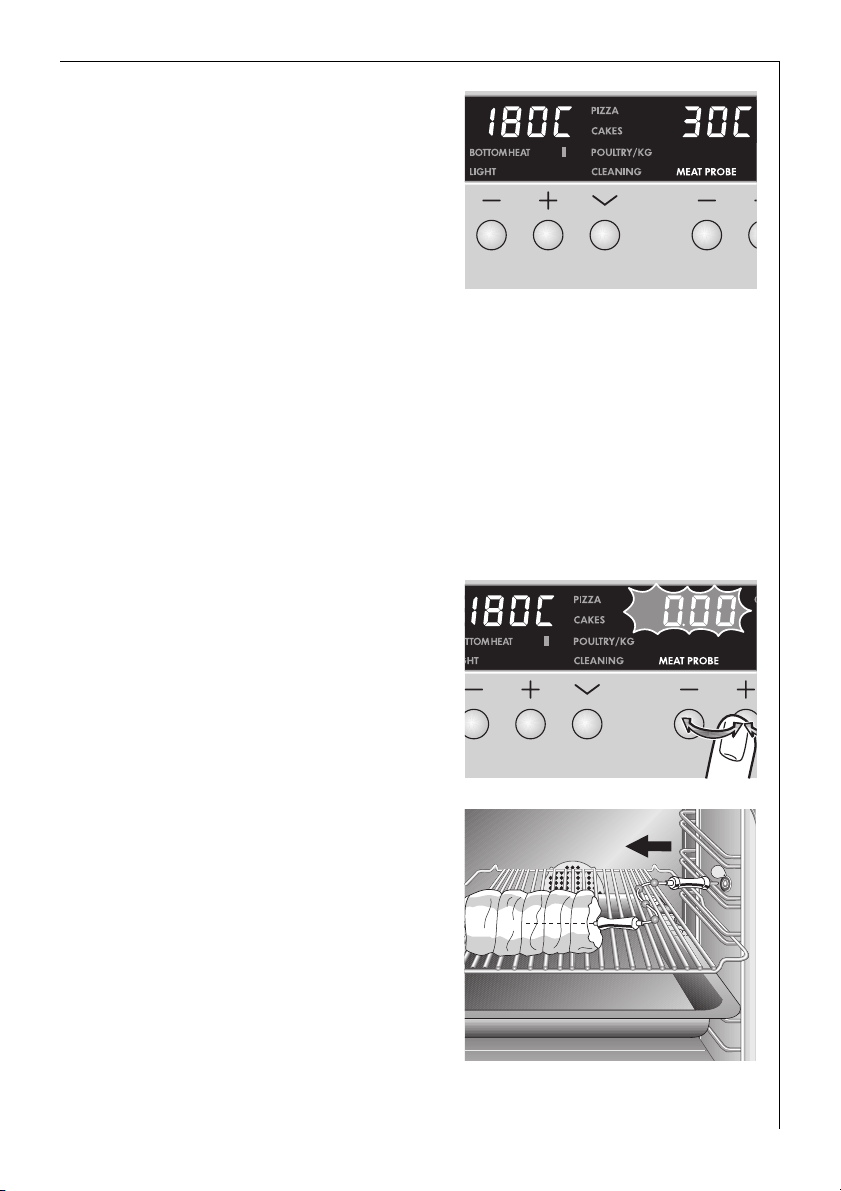
1. Push the tip of the meat probe as
far as possible into the food that is
to be cooked so that the tip is right
in the centre of the food.
2. Push the meat probe plug fully into
the socket on the side wall of the
oven.
“MEAT PROBE” is illuminated.
3. Set the required oven function and
oven temperature.
The suggested temperature for the
selected oven function will appear
in the temperature display on the
left.
In the time display on the right
a suggested temperature of '60 C'
will appear for the meat core tem-
perature.
4. Set the required meat core temper-
ature using time selection
buttons + or -.
24
Page 25
After approx. 5 seconds the current
meat core temperature will be
shown in the time display on the
right.
The meat core temperature is dis-
3
played from 30 °C upwards.
Checking or changing the meat core temperature
3
– The set meat core temperature can be displayed by pressing
buttons + or - once.
– It is possible to change a previously selected temperature by pressing
+ or - several times.
As soon as the measured meat core temperature matches the temperature that has been set an acoustic signal will sound and the oven will
switch off automatically.
5. Press the + or - time selection
button to deactivate the signal.
Warning: The meat probe is hot!
1
There is a risk of burning when the
plug and probe are removed!
6. Pull the meat probe plug out of the
socket and remove the cooked food
from the oven with the meat thermometer still inside it.
7. Switch off the oven.
25
Page 26

Clock Functions
COUNTDOWN
To set a countdown. A signal sounds after the time has elapsed.
This function does not affect the functioning of the oven.
COOK TIME
To set how long the oven is to be in use.
END TIME
To set when the oven is to switch off again.
TIME
To set, change or check the time.
(See also section “Before Using for the First Time”.)
General information
3
• Before setting the time always switch the appliance on using the
mains button N.
• After a clock function has been selected the function will flash for
approx. 5 seconds. During this time the required times can be set or
changed using the + or - time selection buttons.
• After the required time has been set the function will flash again for
approx. 5 seconds. Then the function stays illuminated. The set time
will begin to count down.
• The acoustic signal may be turned off by pressing any clock button.
26
Page 27

COUNTDOWN
1. Press clock function selection but-
ton Y repeatedly until COUNTDOWN is flashing.
2. Using buttons + or - set the re-
quired countdown.
(Max. 2 hours and 30 minutes.)
After approx. 5 seconds the display
will show the remaining time.
COUNTDOWN is illuminated.
When the time has expired COUNTDOWN flashes and an acoustic signal will sound for 2 minutes.
To switch the acoustic signal off:
press any clock functions button.
27
Page 28

COOK TIME
1. Select oven function and temperature.
2. Press clock function selection but-
ton Y repeatedly until COOK TIME
flashes.
3. Using buttons + or - set the re-
quired cooking time.
After approx. 5 seconds the display
will switch to the time. COOK TIME
is illuminated.
28
When the cooking time has expired
COOK TIME will flash, an acoustic
signal will sound for 2 minutes and
the oven will switch off.
To switch the acoustic signal off:
press any clock function button.
Page 29

END TIME
1. Select oven function and temperature.
2. Press clock function selection but-
ton Y repeatedly until END TIME is
flashing.
3. Using the + button set the time at
which you want the oven to switch
off.
After approx. 5 seconds the display
will revert to the time. END TIME is
illuminated.
4. When the time has expired END
TIME will flash, an accoustic signal
will sound for 2 minutes and the
oven will switch off.
To switch the acoustic signal off:
press any clock function button.
29
Page 30
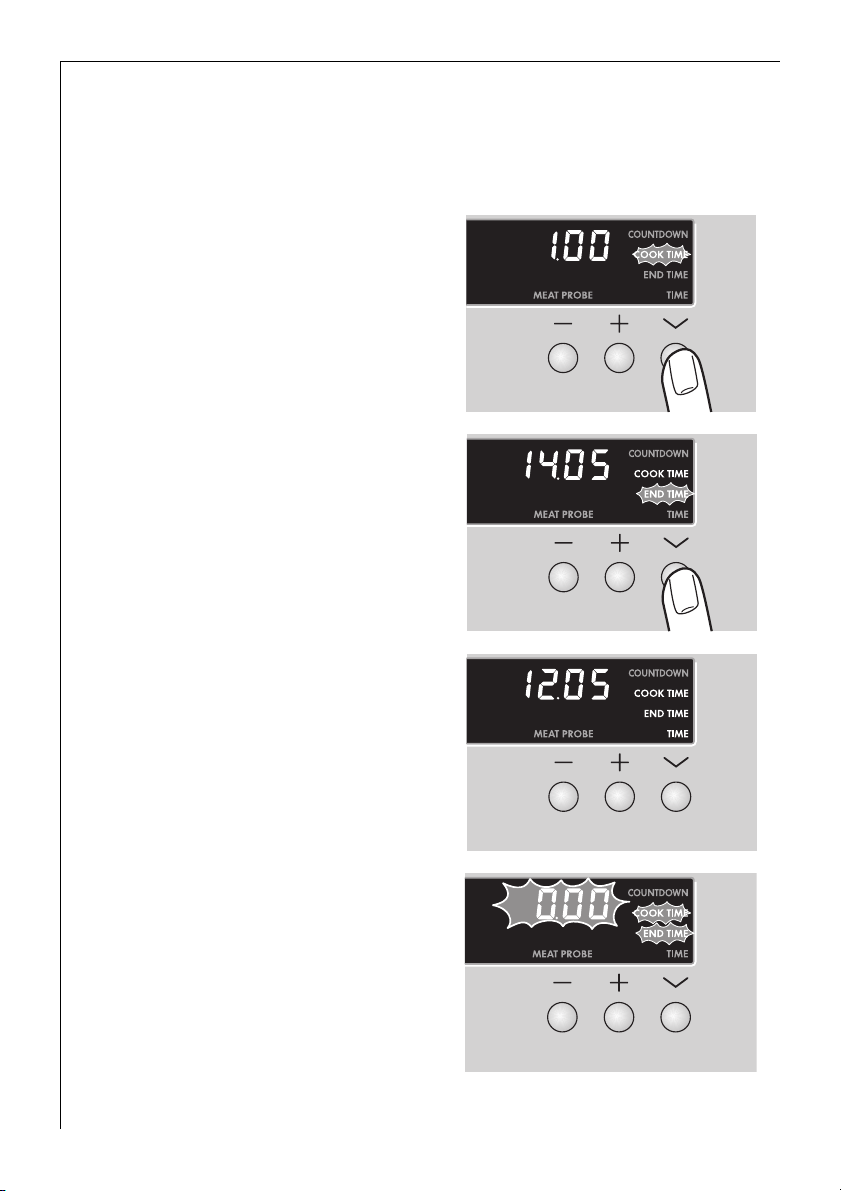
COOK TIME and END TIME Combined
COOK TIME and END TIME can be used together if the oven is to switch
3
on and off automatically at a later time.
1. Select oven function and temperature.
2. Using the COOK TIME function set
the time required for the dish to
cook.
E.g. 1 hour.
3. Using the END TIME function set
the time at which the dish is to be
ready.
E.g., 14:05.
4. COOK TIME and END TIME are illuminated and the time will appear in
the display. In this case 12:05.
The oven will switch on automatically at the calculated time.
E.g., 13:05.
5. After the set period of time has expired an acoustic tone will sound
for 2 minutes and the oven will
switch off.
E.g., 14:05.
COOK TIME and END TIME will flash.
30
Page 31

Changing TIME
1. Press clock function selection
button Y repeatedly until TIME
flashes.
2. Using buttons + or - set the cur-
rent time.
3. After approx. 5 seconds the flashing
will stop and the clock will display
the set time.
The appliance is ready for use again.
The TIME can only be changed if the oven and child safety feature are
3
switched off.
31
Page 32

Other Functions
2 Switching Off the Time Display
By switching off the time display you can save energy.
Switching off the time display
1. If necessary switch off the appliance with the mains button.
2. Press clock functions Y and + simultaneously until the display goes
dark (approx. 5 seconds).
As soon as the appliance is used again the display will automatically
3
switch on.
The next time the appliance is switched off the time display will again
go out.
To display the time constantly again the time display must be switched
on again.
Switching on the time display
1. If necessary switch off the appliance with the mains button.
2. Press clock functions selection buttons Y and + simultaneously until
the display reappears (approx. 5 seconds).
The display can only be switched off if the oven is also switched off.
3
32
Page 33

Oven Child Safety Feature
The oven is equipped with a child safety feature. As soon as the child
safety feature is activated, the oven cannot be used.
There must be no oven function selected if the child safety feature is to
3
be switched on.
Activating the Child Safety Feature
1. If necessary, switch on the appli-
ance using the mains button.
2. Hold down oven function selector buttons X and Y simultaneously until “SAFE” appears in
the oven display.
The child safety feature is now
activated.
Deactivating the Child Safety Feature
Hold down oven function selector buttons X and Y simultaneously
for approx. 2 seconds.
The child safety feature is now deactivated and the oven is again ready
for use.
Switching off the appliance with the mains button does not cancel the
3
child safety feature.
33
Page 34

Button Locking Feature
To prevent a set oven function being adjusted unintentionally.
Activating the button locking feature
1. If necessary, switch on the appli-
ance using the mains button.
2. Select oven function.
3. Hold down oven function selec-
tor buttons X and Y simultaneously for approx. 2 seconds
until “LO” appears in the display.
The button locking feature has
now been activated.
Deactivating the button locking feature
Hold down oven function selector buttons X and Y simultaneously
for approx. 2 seconds.
The button locking feature is automatically deactivated when the appliance is switched off.
34
Page 35

Oven safety cut-out
If not switched off after a certain time, or if the temperature does not
3
change, the oven switches off automatically.
The indication "0.00" flashes, the temperature indicator light flashes,
and a signal sounds.
The oven switches off at temperatures of:
30 - 120° C after 12.5 hours
120 - 200° C after 8.5 hours
200 - 250° C after 5.5 hours
250 - 300° C after 1.5 hours
Switching on again after a safety cut-out
Switch the oven off completely.
You will then be able to switch on again.
35
Page 36
Uses, Tables and Tips
Baking
Use the BAKING, FAN COOKING or CONVENTIONAL oven functions for
baking.
Baking tins
• Cake tins made of dark metal and coated tins are suitable for CONVENTIONAL.
• Baking tins made of light metal are also suitable for BAKING and FAN
COOKING.
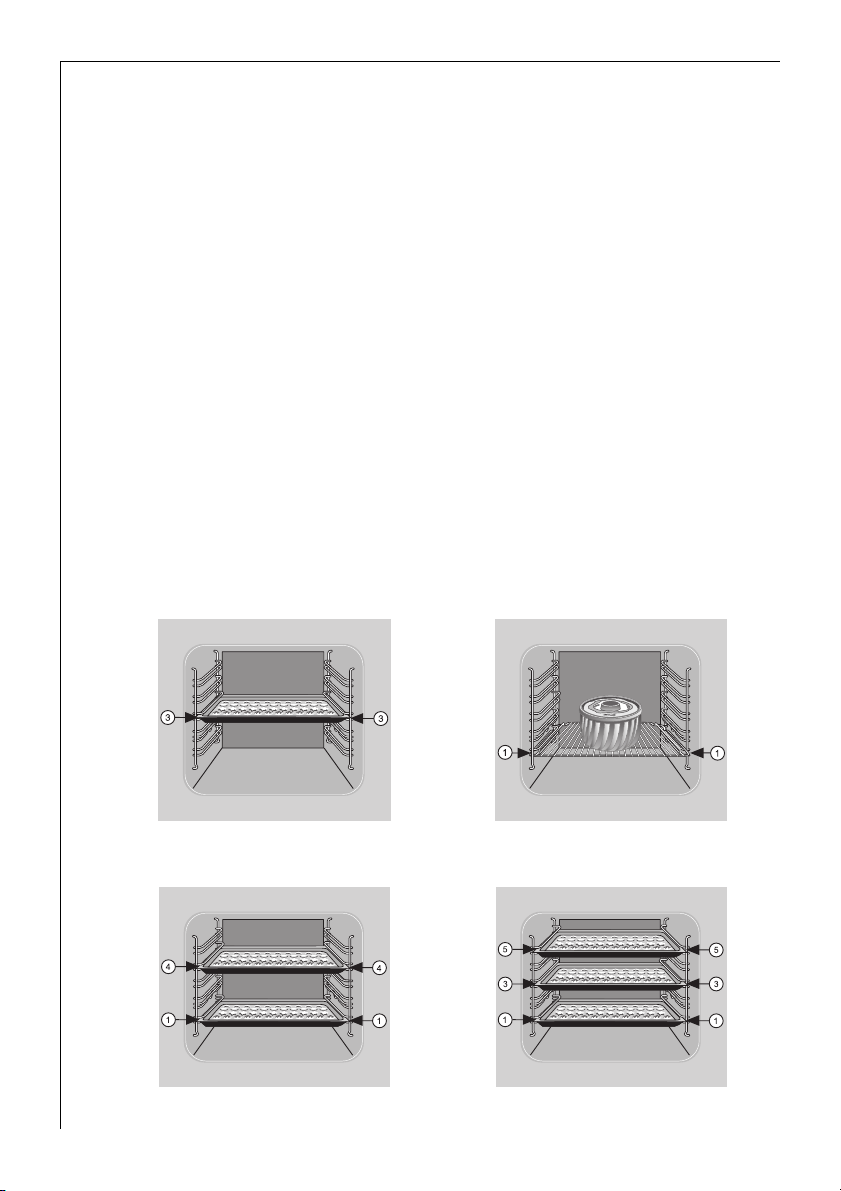
Shelf positions
• Baking with BAKING or CONVENTIONAL is only possible on one shelf
position at a time.
• With FAN COOKING you can bake on up to three baking trays at
once:
36
1 Baking tray
e.g., shelf position 3
2 Baking trays:
Shelf positions 1 and 4
1 Baking tin:
e.g., shelf position 1
3 Baking trays:
Shelf positions 1, 3 and 5
Page 37

General information
3
• Remove the fat filter when baking, as otherwise the baking time is
longer and the surface will brown unevenly.
• Always count the shelf positions from the bottom upwards.
• Insert baking sheets with the bevelled edge to the front!
• Always place cake tins in the middle of the shelf.
• With BAKING or CONVENTIONAL you can also bake with two tins at
the same time by placing them side by side on the shelf. There is no
significant increase in baking time.
Notes on the baking tables
In the tables you will find information on temperatures, cooking times
and shelf positions for a selection of dishes.
• The temperatures and cooking times are for guidance only since these
are dependent on the mixture, quantity and cake tin used.
• When using for the first time, we recommend setting the lower temperature, and only if necessary, e.g. if increased browning is required
or the cooking time is too long, select a higher temperature.
• If you cannot find specific information for one of your own recipes,
use information given in a similar recipe for guidance.
• When cakes are baked on trays or in tins on more than one oven position at once the baking time may be increased by 10-15 minutes.
• Items that might drip (e.g., pizzas, fruit flans) should only be prepared
on one level.
• Variations in the height of the item to be baked can lead to different
degrees of browning at the start of baking. In this case please do not
change the temperature setting. Differences in the degree of
browning will balance out during baking.
For longer cooking times switch off the oven approx. 10 minutes before
2
the end of the cooking time to make use of the residual heat.
Unless otherwise stated, the information in the tables assumes starting
with a cold oven.
37
Page 38

Baking Table
Baking on one shelf position
Type of cake or pastry BAKING CONVENTIONAL Time
Shelf
position
from
bottom
Tempera-
ture
ºC
Shelf po-
sition
from
bottom
Tempera-
ture
ºC
For both
functions
Hrs.: Mins.
Cakes in cake tins
Ring-shaped or
bowl-shaped cakes
Madeira cake/
king cake
1 150-160 1 160-180 0:50-1:10
1 140-160 1 150-170 1:10-1:30
Sponge cake 1 150-160 1 160-180 0:25-0:40
Shortcrust pastry flan
base
3 170-180 2
190-210
1
0:10-0:25
Sponge flan base 3 150-170 2 170-190 0:20-0:25
Covered apple flan 1 150-170 1 170-190 0:50-1:00
Savoury flan
(e.g., quiche lorraine)
1 160-180 1 190-210 0:30-1:10
Cheesecake 1 140-160 1 170-190 1:00-1:30
Cakes and pastries on
baking trays
Plaited roll/ring 3 160-170 3 170-190 0:30-0:40
Fruit loaf 3
Bread (rye bread) initially
.....................................then
Cream puffs/eclairs 3
Swiss roll 3
1
150-170
.180-200
1
140-160
160-170
150-170
3
160-180
1
2
160-180
1
3 190-210 0:15-0:30
1
3
180-200
250
1
1
0:40-1:00
0:30-1:00
1
0:10-0:20
0:20
38
Dry streusel cake 3 150-160 3 160-180 0:20-0:40
Butter cake/sugar cake 3
160-170
1
3
190-210
1
0:15-0:30
Page 39

Type of cake or pastry BAKING CONVENTIONAL Time
Fruit flan (with a yeast
dough/sponge base)
2
Fruit flans on shortcrust
pastry base
1
Shelf
position
from
bottom
Tempera-
ture
Shelf po-
sition
ºC
from
Tempera-
ture
ºC
For both
functions
Hrs.: Mins.
bottom
3 150-170 3 170-190 0:25-0:50
3 160-170 3 170-190 0:40-1:20
Tarts with delicate fillings
(e.g., curd cheese, cream,
- - 3
160-180
1
0:40-1:20
sugar-topped cakes)
2
Pizza (with deep topping)
1 180-200 1
Pizza (thin) 1 200-220 1
Unleavened bread 1 200-220 1
Flat sweet or
savoury pies
1 180-200 1 210-230 0:35-0:50
230-300
270-300
190-210
1
1
1
0:30-1:00
0:10-0:25
0:08-0:15
Biscuits
Shortcrust biscuits 3 150-160 3
170-190
1
0:06-0:20
Small piped biscuits 3 140-150 3 160-180 0:10-0:40
Sponge fingers 3 150-160 3 170-190 0:15-0:20
Meringues 3 80-100 3 100-120 2:00-2:30
Macaroons 3 100-120 3 120-140 0:30-0:60
Small pastries made with
yeast dough
Small pastries made with
puff pastry
Bread rolls 3
3 160-170 3 170-190 0:20-0:40
3
170-180
180-200
1
3
1
3
180-220
190-210
1
1
0:20-0:30
0:20-0:35
1) Pre-heat the oven
2) Use the combination/fat tray or the fat tray!
Information printed in bold type indicates the best oven function in each case.
39
Page 40

Baking on several shelf positions
FAN COOKING
Time
Type of cake or pastry
Shelf position from bottom
2 Levels 3 Levels
Tempera-
ture ºC
Hours:
Mins.
Cakes and pastries on
baking sheets
Cream puffs/eclairs 1/4 -
160-180
1
0:35-0:60
Dry streusel cake 1/4 - 140-160 0:30-0:60
Biscuits
Shortcrust biscuits 1/4 1/3/5 150-160 0:15-0:35
Small piped biscuits 1/4 1/3/5 140-150 0:20-0:60
Sponge fingers 1/4 - 160-170 0:25-0:40
Meringues 1/4 - 80-100 2:10-2:50
Macaroons 1/4 - 100-120 0:40-1:20
Small pastries made with
yeast dough
Small pastries made with
puff pastry
Bread rolls 1/4 -
1/4 - 160-170 0:30-0:60
1/4 -
170-180
180-190
1
1
0:30-0:50
0:30-0:55
40
Page 41

Tips for Baking
Baking result Possible cause Solution
The cake is undercooked at the bottom
The cake collapses
(is sticky, soft in
the middle, damp
patches)
Cake is too dry Cooking temperature too low Set a slightly higher baking
Cake is unevenly
browned
Wrong shelf position
Cooking temperature too high Set to a lower temperature
Cooking time too short Increase cooking time
Too much liquid in mixture Next time use less liquid.
Cooking time too long Reduce cooking time
Cooking temperature too high
and cooking time too short
Mixture is spread unevenly Spread mixture evenly on the
Insert the cake at a lower
shelf position
Cooking times may not be
reduced by using a higher
cooking temperature
Check that you have beaten
the mixture for the correct
length of time, particularly
when using a food-processor.
temperature next time
Set to a lower temperature
and increase cooking time
baking tray
Cooking time too
long
Fat filter is still in position Remove fat filter
Temperature too low Set a slightly higher baking
temperature next time
Fat filter is still in position Removing the fat filter
41
Page 42

Pies and Gratin Table
CONVENTIONAL ROTITHERM Time
Shelf posi-
tion from
bottom
Pasta bake 1 180-200 1 160-170 0:45-1:00
Lasagne 1 180-200 1 160-170 0:25-0:40
Vegetables au
1
gratin
Pizza ba-
1
guettes
Sweet
soufflés
Fish pies 1 180-200 1 160-170 0:30-1:00
Stuffed vegetables
1) Pre-heat the oven.
Information printed in bold type indicates the best oven function for the dish.
1 200-220 1 160-170 0:15-0:30
1 200-220 1 160-170 0:15-0:30
1 180-200 - - 0:40-0:60
1 180-200 1 160-170 0:30-1:00
Tempera-
ture
°C
Shelf posi-
tion from
bottom
Tempera-
ture
°C
Hours:
Mins.
42
Page 43

Frozen Ready Meals Table
Food to be
cooked
Frozen pizza 3 CONVENTIONAL
1
Chips
(300-600 g)
Baguettes 3 CONVENTIONAL
Fruit flan 3 CONVENTIONAL
1) Comment: Turn chips 2-3 times during cooking.
When frozen foods are used the trays inserted may distort during cook-
3
ing. This is because of the large differences in temperature between the
Shelf posi-
tion from
bottom
3 ROTITHERM 200-220 °C 15-25 Mins.
Oven function Temperature Time
in accordance
with the
maker's instruc-
tions
in accordance
with the
maker's instruc-
tions
in accordance
with the
maker's instruc-
tions
frozen item and the oven. Once the trays have cooled the distortion will
disappear again.
in accordance
with the maker's
instructions
in accordance
with the maker's
instructions
in accordance
with the maker's
instructions
43
Page 44

Roasting
Use the ROTITHERM or CONVENTIONAL oven functions for roasting.
Ovenware for roasting
• Any heat-resistant dish is suitable for roasting (refer to the manufacturer's instructions!).
• If the dish has plastic handles, check that they are heat-resistant (refer to manufacturer's instructions!).
• Large roasts can be roasted directly on the universal baking tray or
on the shelf with the universal baking tray underneath (e.g. tur-
key, goose, 3-4 chickens, 3-4 knuckles of veal).
• We recommend that all lean pieces of meat should be roasted in a
casserole dish with a lid (e.g. veal, marinated beef, pot roast, frozen
meat.) In this way the meat will retain its juices.
• In order to obtain a tasty outside crust we recommend roasting
pieces of meat in a casserole dish without a lid (e.g. roast pork, lamb
and mutton, meat loaf, duck, 1-2 knuckles of veal, 1-2 chickens, small
fowl, roast beef, fillets, game).
Tip: The oven will be less dirty if you always use a dish for roasting!
3
Shelf positions
• Please see the following table for the shelf positions to be used.
44
Page 45

Notes on the roasting table
3
Information is given in the table on suitable oven functions, temperature settings, cooking times and shelf positions for various types of
meat. The information is for guidance.
• We recommend roasting meat and fish with a minimum weight of
1kg in the oven.
• Generally the CONVENTIONAL function is particularly suitable for
very lean meat such as fish or game. For all other types of meat (especially poultry) we recommend the ROTITHERM function.
• To stop meat juices or fat burning onto dishes or the oven, we recommend adding a little liquid to the roasting dish.
• Turn the joint as required (after 1/2 - 2/3 of the cooking time).
Tip: Baste large joints and poultry several times during cooking with
3
the meat juices. This will produce better roasting results.
Switch off the oven approx. 10 minutes before the end of the cooking
2
time to make use of the residual heat.
45
Page 46

Roasting Table
Type of meat Quantity CONVENTIONAL ROTITHERM Time
Weight Shelf po-
sition
from bot-
tom
Beef
Pot roast 1-1.5 kg 1 200-250 - - 2:00-2:30
Roast beef or fillet
- rare
- medium rare
- well done
Pork
Shoulder, neck
ham joint
Chop, smoked
loin chop
Meat loaf
per cm of
thickness
per cm of
thickness
per cm of
thickness
1-1.5 kg 1 210-220 1 160-180 1:30-2:00
1-1.5 kg 1 180-190 1 170-180 1:00-1:30
750 g-
1kg
Tempera-
ture
ºC
1
250-270
1
250-270
1
210-250
1 170-180 1 160-170 0:45-1:00
Shelf
position
from
bottom
1
1
1
Tempera-
ture
ºC
1 190-200 0:05-0:06
1 180-190 0:06-0:08
1 170-180 0:08-0:10
Hours:
Mins.
per cm of
thickness
Knuckle of pork
(pre-cooked)
Veal
Roast veal 1kg 1 210-220 1 160-180 1:30-2:00
Knuckle of veal 1.5-2 kg 1 210-225 1 160-180 2:00-2:30
Lamb
Leg of lamb,
roast lamb
Saddle of lamb 1-1.5 kg 1 210-220 1 160-180 1:00-1:30
750 g-
1kg
1-1.5 kg 1 210-220 1 150-170 1:15-2:00
1 210-220 1 150-170 1:30-2:00
46
Page 47

Type of meat Quantity CONVENTIONAL ROTITHERM Time
Weight Shelf po-
sition
from bot-
tom
Game
Saddle of hare,
haunch of hare
Saddle of venison 1.5-2 kg 1 210-220 1 160-180 1:15-1:45
Haunch of venison 1.5-2 kg 1 200-210 1 160-180 1:30-2:15
Poultry
Poultry portions
4-6 pieces
Chicken halves
2-4 pieces
Chicken,
poulard
Duck 1.5-2 kg 1 210-220 1 160-180 1:00-1:30
Goose 3.5-5 kg 1 200-210 1 150-160 2:30-3:00
up to
1kg
per
200-
250 g
per
400-
500 g
1-1.5 kg 1 220-250 1 170-180 0:45-1:15
Tempera-
ture
ºC
3
220-250
3 220-250 3 180-200 0:35-0:50
3 220-250 3 180-200 0:35-0:50
Shelf
position
from
bottom
1
Tempera-
ture
ºC
3 160-170 0:25-0:40
Hours:
Mins.
2.5-
Turkey
Fish (steaming)
Whole fish 1-1.5 kg 2/3 210-220 2/3 160-170 0:45-1:15
1) Pre-heat the oven.
Information printed in bold type indicates the best oven function.
3.5 kg
4-6 kg
1
200-210
180-200
150-160
1
140-150
1:30-2:00
2:30-4:00
47
Page 48

Meat Probe Table
Food to be Cooked Meat Core Temperature
Beef
Pot roast 90 - 95 °C
Rib steak or fillet steak rare
medium
well done
Pork
Shoulder of pork, ham joint, neck 80 - 82 °C
Chop (saddle), smoked pork loin 75 - 80 °C
Meat loaf 75 - 80 °C
Veal
Roast veal 75 - 80 °C
Knuckle of veal 85 - 90 °C
Mutton / lamb
Leg of mutton 80 - 85 °C
Saddle of mutton 80 - 85 °C
Roast lamb, leg of lamb 75 - 80 °C
Game
Saddle of hare 70 - 75 °C
Leg of hare 70 - 75 °C
Whole hare 70 - 75 °C
45 - 50 °C
60 - 65 °C
75 - 80 °C
48
Saddle of venison 70 - 75 °C
Leg of venison 70 - 75 °C
Page 49

Grilling
To grill use the DUAL GRILL or SINGLE GRILL oven function with a temperature setting of 300 °C.
Important: Always grill with the oven door closed.
1
Always pre-heat the empty oven for 5 minutes using the grill func-
3
tions!
Ovenware for grilling
• Use the shelf unit and universal tray together for grilling.
Shelf positions
• For grilling flat foods you should mainly use the 4th shelf position
from the bottom.
Notes on the grilling table
The grilling times are only for guidance and will vary depending on the
type and quality of meat or fish.
• Grilling is particularly suitable for flat pieces of meat and fish.
• Turn the food halfway through the grilling time.
Grilling Table
Food for grilling
Rissoles 4 8-10 mins. 6-8 mins.
Fillet of pork 4 10-12 mins. 6-10 mins.
Grilled sausages 4 8-10 mins. 6-8 mins.
Beef fillet steaks,
veal steaks
Fillet of beef, sirloin
(approx. 1 kg)
1
Toast
Toast with topping 3 6-8 mins. -
1) Do not use the universal baking tray together with the grilling shelf unit.
Shelf position
from bottom
4 6-7 mins. 5-6 mins.
3 10-12 mins. 10-12 mins.
3 2-3 mins. 2-3 mins.
Grilling time
1st side 2nd side
49
Page 50

Bio-Functions
The low temperatures that can be set on this oven enable meat to be
cooked so that it is particularly tender and juicy. Yoghurt can also be
made, dough proven and fruit dried in the oven.
Caution: The suggested temperature must be changed for all bio-
1
functions!
When roasting at low temperatures you will need up to 20 percent less
2
energy than when roasting conventionally.
Low Temperature Roasting
Use the ROTITHERM oven function for low temperature roasting.
Important: Use the fat filter when roasting!
1
Ovenware for roasting
• Any heat-resistant dish is suitable for roasting.
• If the dish has plastic handles, check that they are heat-resistant.
• When roasting at low temperatures, always roast uncovered without
a lid.
Shelf positions
• Use the 1st shelf position from the bottom for low temperature
roasting.
50
General information
Roasting is performed in 2 stages:
• Select a high temperature for browning.
• Then reduce to a lower temperature.
Page 51

Notes on low temperature roasting
The roasting times are only for guidance and are dependent on the type
and quality of the meat or fish.
• The thicker and heavier a piece of meat, the longer the browning
time and subsequent final roasting time.
• It is only necessary to turn whole poultry.
• Only add vegetables after approx. 2/3 of the browning time.
• Once the item has been browned do not open the oven door
again!
(Turn poultry first.) The loss of heat would significantly extend the
roasting time.
1. Prepare meat as usual (wash, dry, season, tie into specific shape if required, etc.).
2. Select the ROTITHERM oven function.
3. Change the suggested temperature to the roasting temperature for
browning according to the table.
4. At the end of the browning time change the setting to the final
roasting temperature.
51
Page 52

Low Temperature Roasting Table
ROTITHERM
1st Stage
Browning
Food to be
roasted
Meat 220
Roast beef 1-1.5 24-45 85 30-60
Beef, veal fillet 1-1.5 20-40 85 20-40
Saddle of veal 1-2 30-50 90 20-60
Game 220
Saddle of venison 1.5-2 25-45 90 20-60
Leg of venison 1.5-2 25-45 120 40-120
Fish 180
Sea trout 0.5-1 15-20 80 10-20
Salmon (middle
piece)
Zander / pike 0.7-1.5 15-35 80 10-20
We recommend low temperature roasting for:
3
WeightkgTempera-
ture
°C
1-2 25-40 80 10-20
tender, lean pieces of meat and fish.
Low temperature roasting is not suitable for:
e.g., pot roast, pork joints.
Time
Mins.
2nd Stage
Final roasting
Tempera-
ture
°C
Time
Mins.
52
Page 53

Making Yoghurt
Use the CONVENTIONAL oven function to prepare yoghurt.
Ovenware for making yoghurt
• Use cups or glasses of approx. 150ml capacity as containers for yo-
ghurt and cover with foil or a lid.
Shelf position
• Place the shelf in the 3rd position from the bottom.
1. Bring the milk to the boil (e.g. 1 litre for 6-8 portions).
2. Leave the milk to cool to 40 °C.
3. Stir a pot of live natural yoghurt culture (approx. 150g) into the milk,
pour into containers and close with a lid.
4. Place the containers on the shelf.
5. Select CONVENTIONAL oven function and change the suggested tem-
perature to 40 °C.
6. Remove the yoghurt after approx. 5-8 hours (as soon as it sets).
Proving Dough
Use the CONVENTIONAL oven function to prove dough.
Ovenware for proving dough
• Place the dough in a bowl that is heat resistant up to 40 °C.
Shelf position
• Insert the shelf in the 2nd shelf position from the bottom.
1. Cover the bowl containing the prepared dough with transparent film
and place on the shelf.
2. Select the CONVENTIONAL oven function and change the suggested
temperature to 40 °C.
3. Leave the dough to rise until it has doubled in size.
53
Page 54

Drying
Use the FAN COOKING oven function for drying.
Ovenware for drying
• Line the shelf or baking tray with parchment or greaseproof paper.
Shelf positions
• You can dry foods on up to 2 positions simultaneously.
• Insert the shelf or baking tray in the 1st and 4th position from the
bottom.
Notes on drying
3
• Spread the prepared foods for drying evenly on the shelf or baking
tray.
• Turn the foods occasionally as they dry.
• Remove the foods when they can still be bent but no more juice is
produced.
FAN COOKING
54
Food
Vegetables
Chilli peppers (slices) 50-75 6 - 8
Vegetables for making soup 50-75 5 - 6
Mushrooms 50-75 5 - 6
Herbs 50-75 6 - 8
Fruit
Plums 50-75 8 - 10
Apricots 50-75 8 - 10
Sliced apple 50-75 6 - 8
Pears 50-75 6 - 9
Temperature
°C
Time
Hrs.
Page 55

Defrosting
To defrost use the oven function DEFROST without setting a temperature.
Dishes for defrosting
• Remove packaging and place the food on a plate on the shelf.
• Do not use a plate or dish to cover as these significantly increase the
defrosting time.
Shelf positions
• Insert the shelf in the 1st position from the bottom to defrost.
Notes on the defrosting table
The table below offers some guidance on defrosting times.
Defrosting Table
Defrost-
Dish
Chicken, 1000 g 100-140 20-30
Meat, 1000 g 100-140 20-30
Meat, 500 g 90-120 20-30
Trout, 150 g 25-35 10-15 Do not cover.
Strawberries,
300 g
Butter, 250 g 30-40 10-15 Do not cover.
Cream, 2 x 200 g 80-100 10-15
Flan, 1400 g 60 60 Do not cover.
ing time
Mins.
30-40 10-20 Do not cover.
Final de-
frosting
time Mins.
Place the chicken on an upside-down
saucer on a large plate. Halfway
through cooking turn or cover with
foil.
Halfway through cooking turn or
cover with foil.
Halfway through cooking turn or
cover with foil.
Do not cover
(Cream may be whipped when some
of it is still slightly frozen)
Note
55
Page 56

Preserving
Use the BOTTOM HEAT oven function for preserving.
Preserving jars
• For preserving use only commercially available preserving jars that
are all the same size.
Screw-top jars, jars with a bayonet fastening and metal containers
3
are unsuitable.
Shelf positions
• Use the 1st shelf position from the bottom for preserving.
Notes on preserving
• Use the baking tray for preserving. There is room for up to 6 preserv-
ing jars each with a capacity of 1 litre on this tray.
• The preserving jars should all be filled to the same level and closed.
• Position the preserving jars on the baking tray so that they do not
come into contact with one another.
• Pour about 1/2 litre of water into the baking tray so that there is
sufficient moisture in the oven.
• As soon as bubbles begin to appear in the liquid in the first jars
(for 1-litre jars this takes about 35-60 minutes), switch off the oven
or reduce the temperature to 100 °C (see table).
56
Page 57

Preserving Table
The stated times and temperatures are for guidance only.
Tempera-
Preserves
Soft fruit
Strawberries, blueberries, raspberries, ripe
gooseberries
Unripe gooseberries 160-170 35-45 10-15 -
Stone fruit
Pears, quinces, plums 160-170 35-45 10-15 -
Vegetables
Carrots 160-170 50-60 5-10 60
Mushrooms 160-170 40-60 10-15 60
Gherkins 160-170 50-60 -
Mixed Pickles 160-1700 50-60 15 -
Kohlrabi, peas, asparagus 160-170 50-60 15-20 -
Beans 160-170 50-60 - -
Plum purée
ture in
°C
160-170 35-45 - -
160-170
50
Preserving
time until
bubbles form
Mins.
45
-
Continued
cooking
at 100°C
Mins.
6-8 hrs.
standing time
-
-
in switched
off oven
57
Page 58

Cleaning and Care
Warning: For safety reasons cleaning the appliance with a steam jet
1
cleaner or high-pressure water cleaner is not permissible!
Exterior of the Appliance
Wipe the front of the appliance with a soft cloth dipped in warm soapy
water.
• Do not use scourers, caustic cleaners or abrasive items.
• Use commercially available cleaners for metal fronts.
Oven Interior
Cleaning after each use
Caution: The oven must be switched off and cold before cleaning.
1
Clean the appliance after each use. This is the easiest way to remove
3
spills and prevents them being burnt on.
1. Switch on the oven lighting for cleaning.
2. Every time you use the oven, wipe it out afterwards with water and
washing-up liquid, then dry. Do not use any abrasive items.
58
Remove stubborn marks with special oven cleaners.
3
Page 59

“CLEANING” oven function
Using the CLEANING oven function you can pre-heat the oven to the
optimum temperature for oven sprays to take effect.
Important: Only use oven sprays that require a heated oven. Refer to
1
the manufacturer's instructions!
1. Press additional functions selection button Y repeatedly until “CLEAN-
ING” is illuminated.
“CL” will appear in the display.
The oven will now heat up to the necessary temperature.
The first acoustic signal will sound after approx. 15 minutes.
After a further 5 minutes a second acoustic signal will sound for
2minutes.
“0.00” will flash in the display.
The acoustic signal can be cancelled by pressing any button. The time
3
will then appear in the display.
The optimum cleaning temperature has now been reached.
2. Spray the oven spray into the interior of the oven and leave to take effect. (See manufacturer's instructions!)
3. Wipe the oven clean.
Accessories
Wash all slide-in units (shelf unit, baking tray, shelf support rails etc.)
after each use and dry well. Soak briefly to make them easier to clean.
Fat Filter
1. Clean the fat filter in hot water and washing up liquid or in the dish-
washer.
2. Badly burned on soiling can be removed by boiling the filter in a little
water to which 2-3 tablespoonsful of dishwasher cleaner has been
added.
59
Page 60

Shelf Support Rails
The shelf support rails on the left and right hand sides of the oven can
be removed for cleaning the side walls.
Removing the shelf support rails
First pull the front of the rail away
from the oven wall (1) and then unhitch at the back (2).
60
Fitting the shelf support rails
Important! The rounded ends of
3
the guide rails must be pointing forwards!
To re-insert, first hook the rail into
place at the back (1) and then insert
the front and press into place (2).
Page 61

Oven Lighting
Warning: There is a danger of electric shock! Prior to changing the
1
oven light bulb:
– Switch off the oven!
– Remove the fuses in the fuse box or switch off the circuit breaker.
Place a cloth on the oven floor to protect the oven light and glass
3
cover.
Changing the rear oven light/Cleaning the glass cover
1. Remove the glass cover by turning
it anti-clockwise and then clean it.
2. If necessary:
replace bulb with a 40 watt,
230 V, 300 °C heat-resistant,
oven light bulb.
3. Refit the glass cover.
Changing side oven light/Cleaning glass cover
1. Remove the left shelf support rail.
2. Remove the glass cover with the aid
of a narrow, blunt implement (e.g.,
teaspoon) and clean it.
3. If necessary:
replace bulb with a 25 watt,
230 V, 300 °C heat-resistant,
oven light bulb.
4. Refit the glass cover.
5. Insert the shelf support rail.
61
Page 62

Cleaning the Oven Ceiling
The upper heating element can be folded down to make it easier to
clean the oven ceiling.
Folding down the heating element
Warning: Only fold down the heat-
1
ing element when the oven is
switched off and there is no risk of
being burnt!
1. Remove the side shelf support rails.
2. Grip the heating element at the
front and pull it forwards and out
over the support lug on the inner
wall of the oven.
3. The heating element will now fold
down.
Caution: Do not use force to press
1
the heating element down! The
heating element might break.
Cleaning the oven ceiling
Repositioning the heating element
1. Move the heating element back up
towards the oven ceiling.
2. Pull the heating element forwards
against the spring pressure and
guide it over the oven support lug.
3. Settle it onto the support.
4. Insert shelf support rail.
Important: The heating element
1
must be positioned correctly and securely on both sides above the support lug on the inner wall of the
oven (2).
62
Page 63

Oven Door
The oven door of your appliance may be removed for cleaning.
Removing the oven door
1. Open the oven door completely.
2. Completely fold back the brasscoloured clamping lever on both
door hinges.
3. Grip the oven door with both hands
on the sides and close it to about
3/4 going past the point of resist-
ance.
4. Pull the door away from the oven
(Caution: heavy!).
5. Place the door, with the outer sur-
face downwards, on a soft, flat surface, for example a blanket, to avoid
scratches.
Hanging the oven door
1. With both hands take hold of the
sides of the door from the side on
which the handle is positioned.
2. Hold the door at an angle of
approx. 60°.
3. Slide the door hinges simultaneously as far as possible into the two
slots on the right and left at the
bottom of the oven.
4. Lift the door up until resistance is
met and then open fully.
5. Lift the brass-coloured clamping levers on both door hinges back to
their original position.
6. Close the oven door.
5
63
Page 64

Oven Door Glass
The oven door is fitted with three glass panels mounted one behind the
other. The inner panels may be removed for cleaning.
Warning: Carry out the following steps only when the oven door is un-
1
hinged! When left on its hinges, the door could rise rapidly due to the
lighter weight when the glass is removed and could cause injury.
Important: Using force, especially on the edges of the front glass
1
panel, may break the glass.
Removing the top door glass
1. Unhinge the oven door and place it
on a soft, flat surface with the handle facing down.
2. Take hold of the upper glass panel
at the lower edge and slide it
against the spring pressure in the
direction of the oven door handle
until it is free at the base.
3. Raise the panel gently at the base
and pull out.
Removing the middle door glass
1. Grip the bottom edge of the middle
glass panel and push it in the direction of the oven door handle until it
is free at the base.
2. Raise the panel gently at the base
and pull out.
Clean the glass door panels
64
Page 65
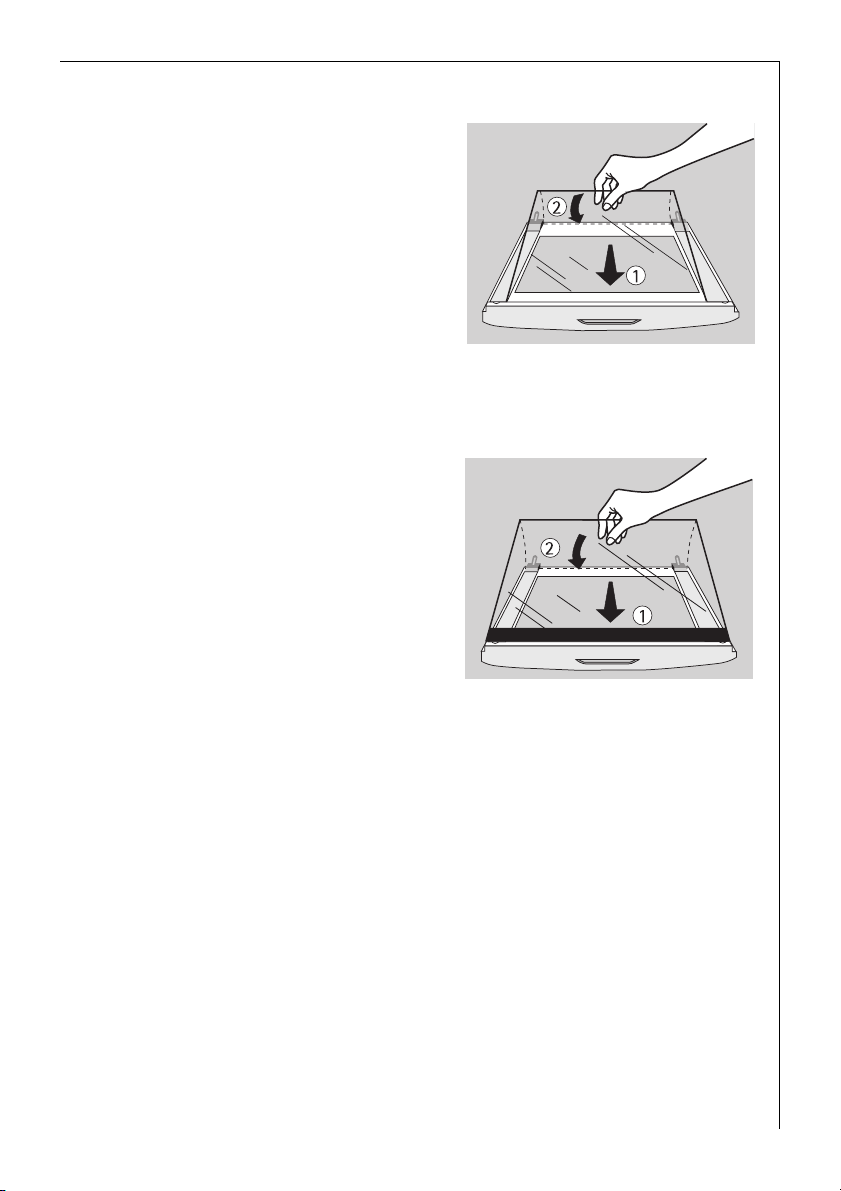
Inserting the middle door glass
1. Insert the middle glass panel at an
angle from above into the section
of the door in which the handle is
located.
2. Lower the middle glass panel and
slide it under the lower bracket towards the lower door edge as far as
it will go.
Inserting the upper door glass
1. Insert the upper glass panel at an
angle from above into the section
of the door in which the handle is
located.
2. Lower the glass panel. Lay the panel
against the spring on the lower
door edge in front of the retaining
section on the handle side, and slide
it under the retaining section.
The glass panel must be firmly in
position!
Re-hang the oven door
65
Page 66

What to do if ...
Symptom Possible cause Solution
The oven does not heat
up.
The oven lighting does
not come on.
The oven has not been
switched on.
The time has not been set. Set the time.
The necessary settings have
not been made.
The circuit breaker (at the
household fuse box) has
tripped or the fuse has
blown.
The oven light bulb has
blown.
Switch on the oven.
Check the settings.
Check the fuse.
If the circuit breaker trips or
the fuse blows several times,
please call an approved electrician.
Replace the light bulb in the
oven (see Cleaning and Care).
If you cannot rectify the fault with the help of the information
given above, please contact your specialist dealer or customer
service.
Warning: Repairs to the appliance may only be carried out by qualified
1
specialists. Improperly effected repairs may result in considerable risk to
the user.
If the appliance has been used improperly, the customer service engineer's visit or that of the specialist dealer will not be free of charge,
even during the warranty period.
66
Information for appliances with a metal front:
Due to the cold front of your appliance the inner door glass may steam
3
over briefly if you open the door during or shortly after baking or
roasting.
Page 67

Technical Data
Oven Interior Dimensions
Height x Width x Depth 31 cm x 41 cm x 41 cm
Capacity (usable capacity) 52 l
Regulations, Standards, Directives
This appliance meets the following standards:
• EN 60 335-1 and EN 60 335-2-6
relating to the safety of electric appliances for household use and
similar purposes and
• EN 60350 and
• DIN 44546 / 44547 / 44548
relating to the operating features of household electric cookers.
• EN 55014-2
• EN 55014
• EN 61000-3-2
• EN 61000-3-3
relating to basic requirements for electromagnetic compatibility protection (EMC).
This appliance complies with the following EC directives:
4
• 73/23/EWG dated 19.02.1973 (Low Voltage Directive)
• 89/336/EWG dated 03.05.1989 (EMC Directive including
Amending Directive 92/31/EWG).
67
Page 68

686970
Page 69

Page 70

Index
A
Accessories . . . . . . . . . . . . . . . . . . . . . . .11, 19
Additional Functions
. . . . . . . . . . . . . . . . . 21
B
Baking . . . . . . . . . . . . . . . . . . . . . . . . . .15, 36
Baking tray
Bottom heat
Button locking feature
. . . . . . . . . . . . . . . . . . . . . . . . . 11
. . . . . . . . . . . . . . . . . . . . . . . . 16
. . . . . . . . . . . . . . . . 34
C
Cakes . . . . . . . . . . . . . . . . . . . . . . . . . . . . . . 22
Child safety feature
Cleaning
Clock
Combination shelf
Control panel
Conventional
Customer service
. . . . . . . . . . . . . . . . . . . . . . . . . . . . 23
accessories
initial cleaning
oven door
shelf support rails
. . . . . . . . . . . . . . . . . . . . . . . . . . . . . . . 14
functions
setting the time
. . . . . . . . . . . . . . . . . . 33
. . . . . . . . . . . . . . . . . . . . . . . . 59
. . . . . . . . . . . . . . . . . . . . 13
. . . . . . . . . . . . . . . . . . . . . . . . . 63
. . . . . . . . . . . . . . . . . . 60
. . . . . . . . . . . . . . . . . . . . . . . . . 26
. . . . . . . . . . . . . . . .12, 26
. . . . . . . . . . . . . . . . . . . . 11
. . . . . . . . . . . . . . . . . . . . . . . . . 9
. . . . . . . . . . . . . . . . . . . . . . . . 15
. . . . . . . . . . . . . . . . . . . . . 71
D
Defrosting . . . . . . . . . . . . . . . . . . . . . . .16, 55
Description of the appliance
Dishes with toppings
Disposal
. . . . . . . . . . . . . . . . . . . . . . . . . . . . . 7
Door
. . . . . . . . . . . . . . . . . . . . . . . . . . . . . . . 63
Dual grill
. . . . . . . . . . . . . . . . . . . . . . . . . . . 16
. . . . . . . . . . . . 8
. . . . . . . . . . . . . . . . . 42
F
Fan cooking . . . . . . . . . . . . . . . . . . . . . . . . . 15
Fat filter
Fat tray
Frying
. . . . . . . . . . . . . . . . . . . . . . . . . . . . 59
. . . . . . . . . . . . . . . . . . . . . . . . . . . . . 11
. . . . . . . . . . . . . . . . . . . . . . . . . . . . . . 44
G
Grilling . . . . . . . . . . . . . . . . . . . . . . . . . . . . . 49
I
Insert anti-tip . . . . . . . . . . . . . . . . . . . . . . . 19
K
Keeping Food Warm . . . . . . . . . . . . . . . . . . 16
L
Light . . . . . . . . . . . . . . . . . . . . . . . . . . . . . . .16
Lighting
. . . . . . . . . . . . . . . . . . . . . . . . . 18, 61
M
Meat probe . . . . . . . . . . . . . . . . . . . . . . . . . .24
O
Oven
accessories
door
functions
light
. . . . . . . . . . . . . . . . . . . . . . . .11
. . . . . . . . . . . . . . . . . . . . . . . . . . . . . .63
. . . . . . . . . . . . . . . . . . . . . . . . . .15
. . . . . . . . . . . . . . . . . . . . . . . . . . . . . .61
P
Pizza . . . . . . . . . . . . . . . . . . . . . . . . . . . . . . .21
Poultry
. . . . . . . . . . . . . . . . . . . . . . . . . . . . . .23
Preserving
. . . . . . . . . . . . . . . . . . . . . . . . . . .56
R
Ready meals . . . . . . . . . . . . . . . . . . . . . . . . .43
Repairs
. . . . . . . . . . . . . . . . . . . . . . . . . . . . . . .5
Rotitherm
. . . . . . . . . . . . . . . . . . . . . . . . . . .15
S
Safety . . . . . . . . . . . . . . . . . . . . . . . . . . . . . . .5
Shelf
. . . . . . . . . . . . . . . . . . . . . . . . . . . . . . .19
Shelf support rails
Single grill
Soufflés
. . . . . . . . . . . . . . . . . . . . . . . . . . . . .42
Steam vent
. . . . . . . . . . . . . . . . . . . .60
. . . . . . . . . . . . . . . . . . . . . . . . . . .16
. . . . . . . . . . . . . . . . . . . . . . . . . .10
T
Tables and tips . . . . . . . . . . . . . . . . . . . . . . .36
Time display
. . . . . . . . . . . . . . . . . . . . . . . . .32
U
Universal baking tray . . . . . . . . . . . . . . . . . .19
Using the oven
. . . . . . . . . . . . . . . . . . . . . . .14
Page 71

Service
The section "What do I do if...“ lists some faults that you can remedy
yourself. Look there first if a fault occurs.
Is it a technical fault?
Then contact your nearest customer service centre. (Addresses and telephone numbers can be found under "Customer Service Centres“.)
Always prepare in advance for the discussion. By doing so you will make
it easier to diagnose the fault and decide whether customer service is
necessary.
Please make a note of the folllowing information as accurately as
possible:
• What form does the fault take?
• Under what circumstances does
the fault occur?
Prior to the telephone call it is imperative that you make a note of
the following appliance code numbers that are given on the rating
plate:
• PNC Code (9 digits),
• S No Code (8 digits).
We recommend that you record the code numbers here so that you always have them to hand:
PNC . . . . . . . . .
S No. . . . . . . . .
When do you incur costs even during the warranty period?
• if you could have remedied the fault using the fault table (see section
"What to do if ...“),
• if the customer service technician has to make several journeys be-
cause he was not provided with all the relevant information before
his visit and therefore, for example, has to fetch spare parts. These
multiple trips can be avoided if you prepare for your phone call as
described above.
71
Page 72

AEG Hausgeräte GmbH
Postfach 1036
D-90327 Nürnberg
http://www.aeg.hausgeraete.de
© Copyright by AEG
822 947 538-A-101201-07
Subject to change without notice
Page 73

documentation manual, user maintenance, brochure, user reference, pdf manual
This file has been downloaded from:
User Manual and User Guide for many equipments like mobile phones, photo cameras, monther board, monitors, software, tv, dvd, and othes..
Manual users, user manuals, user guide manual, owners manual, instruction manual, manual owner, manual owner's, manual guide,
manual operation, operating manual, user's manual, operating instructions, manual operators, manual operator, manual product,
 Loading...