

Page 1

COMPETENCE 7658 B
The multi-function build-in double oven
AEG
Instruction Book
Page 2

Hello
Allow me to introduce myself: I am your new AEG cooking appli
ance. From now on, 1 should like to make cooking and baking
more pleasurable for you. Not simply because of my attractive ap
pearance, but also thanks to “Intrinsic qualities”. I am economical
in terms of energy consumpfion, easy to operate, and simple to
care for. If you carefully read and follow my operating instructions
before first use, you are sure to experience a good deal of joy
when using me to cook, bake, roast, and grill your food.
You must read these instructions prior to using the appli
ance and retain them for future reference.
Printed on recycled paper.
AEG - putting words into action.
D
m
(D
D
O
Page 3

Contents
Safety instructions
For the installer
For the user
Appliance description
Features 5
First use
Operating the controls 6
Push-in oven door handle 7
Switching on the electronic timer 8
Precleaning the oven 8
Operating the electronic timer 9-12
How to use the ovens
General 13
Flow to use the cooking functions for the ovens 14/15
Switching on and off 16
Cookmatic 17
Baking 18/19
Roasting, Rotitherm roasting/grilling and stewing
in the mam oven 20/21
Roasting, Rotitherm roasting/grilling using
the meat thermometer 22-25
Grilling 26
Specialised applications of the hot air oven
- Menu cooking 27
- Defrosting 28
- Bottling 29
Cleaning and care
Oven 30-34
Optional extras 35/36
What to do if... 37
Service 38
D
(3
Page 4

Safety instructions
For the The safety requirements oblige me to give the following instruc-
¡nstaller tions:
When installing cooking appliances into kitchen furniture the en
closed installation instructions must be strictly adhered to.
For the - If my high quality ceramic oven roof breaks or cracks
user appear, do not use my oven at all.
- My oven needs to be switched off and must be isolated
from the electrical supply. Contact AEG Service Depart
ment as soon as possible.
When you use me to prepare your food, my oven doors
and cooking plates become hot. Therefore keep small
children well away from me.
This especially applies when you are grilling or
pyrolytically cleaning my oven (where applicable).
Overheated tat and cooking oil may ignite. Prepare foods re
quiring tat or oil (chips) only under constant supervision.
Do not use me to heat your room.
Take care when using small electrical appliances near the
cooker Connection leads should not come in contact with hot
hobs/cooking zones or get trapped in the hot oven door.
Do not line my oven base with aluminium toil or place any other
cooking utensil on my base, as this will trap heat resulting in
damage to my enamel interior This invalidates my warranty.
The vitreous enamel in your oven is very durable. However vit
reous enamel is adversely affected by fruit acids (rhubarb,
lemon, etc.) and tea which will discolour and dull the enamel.
The performance of the oven is not affected. To prevent spill
age of the above coming in contact with the enamel, place the
cooking container on a baking sheet.
Do not place the grill/meat pan on the cooking plate to
make gravy. The direct heat will weaken the pan base result
ing in warping and twisting of the pan when next used as a
meat or grill pan.
I comply with radio interference suppression specifications EN
55014 (previously EEC Directive 82/499) and as appropriate
with EN 60555 relating to the Retroactive Effect of the Mams
Supply
D
s
o
Page 5
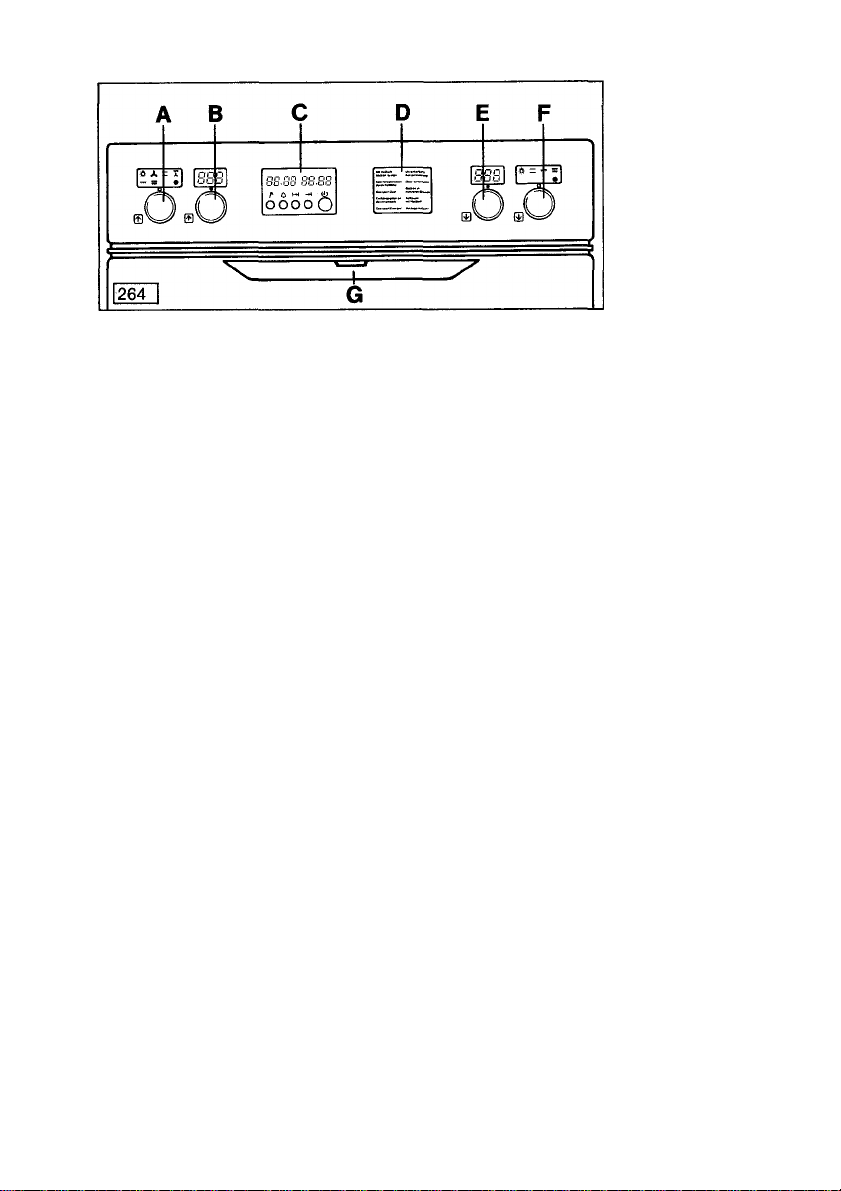
Appliance description
A Push-in cooking method selector, illuminated with
electronic display for mam oven
B Push-in temperature selector,, illuminated with
electronic display for mam oven
C Electronic clock with minute minder, auto-timer and
temperature indicator for meat thermometer
D Cookmatic (electronic cooking guide) for mam oven
E Push-m temperature selector for secondary oven,
illuminated with electronic display for secondary oven
F Push-m coocmg method selector, illuminated with
with electronic display for secondary oven
G Push-m handles to open my oven doors
Features
D
o
Page 6

First use
Operating To operate the illuminated control knob press to release
the control the control.
knobs My control knob (A) can be turned clockwise or anti-clockwise to
any position.
Further information to this can be found in the “Oven” sec
tions.
However, my oven temperature control knobs (B) and (E) must
be turned clockwise to set and anti-clockwise to turn off. The tem
perature control knobs (B) and (E) can be set to maximum
300 °c.
My control knob (F) is turned clockwise to the grill symbol
i^l and anti.clockwise to turn it back.
My control knobs (B) and (E) are illuminated when you
switch on my control knobs (A) and (F).
You can reduce soiling of my control knobs whilst the oven
is in operation by pushing them in (child safety feature).
The controls remain illuminated.
D
o
Page 7
Push-in oven door handle
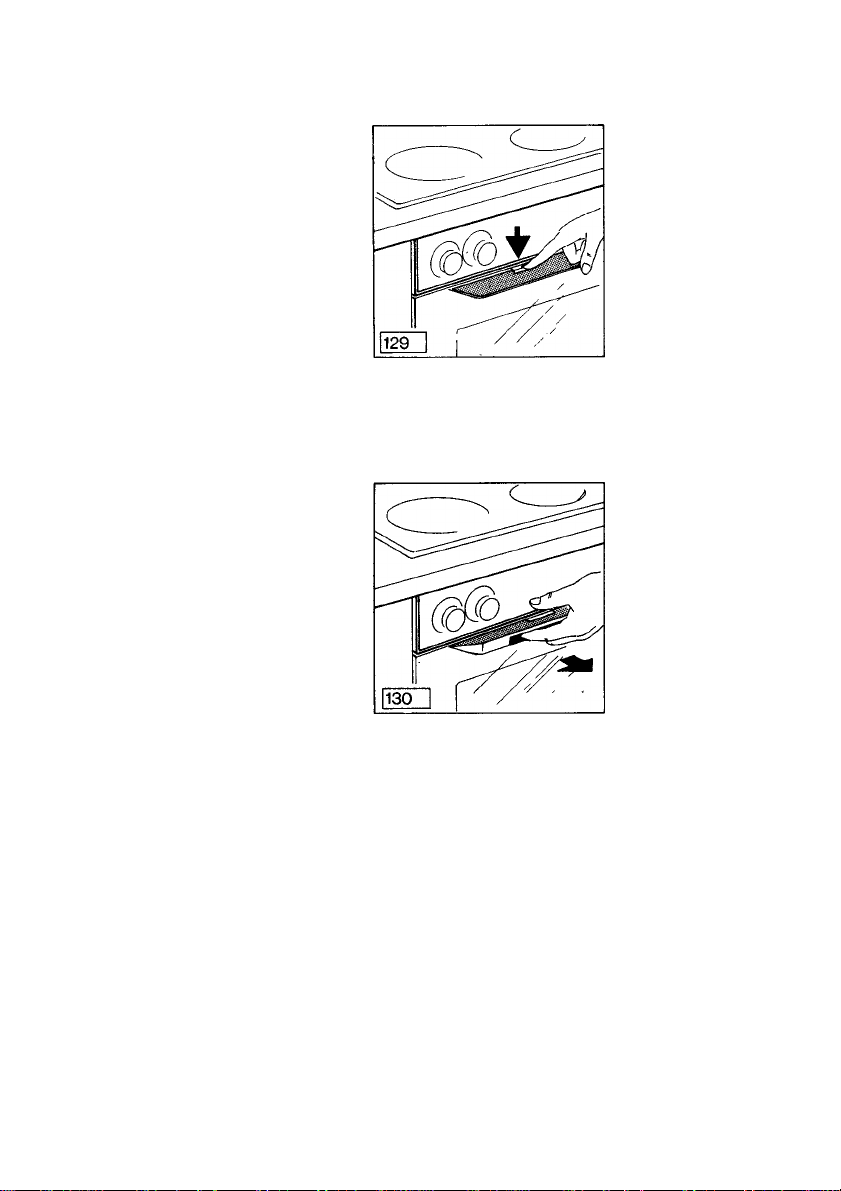
- Press button/arrow in the centre of my oven door handle.
To open oven door, release the handle.
To close my oven door and retract the handle push the handle
and the button/arrow simultaneously.
Releasing
the handle
Page 8
Switching
on the
electronic
timer
As soon as I am connected to the mains supply (and also after a
power cut), the display on the right of my electronic timer flashes
00.00.
Only when you have set me to the correct time of day am 1
ready to operate
Setting the
time of day
You should
also
be aware of the
following:
Pre-cleaning
the oven
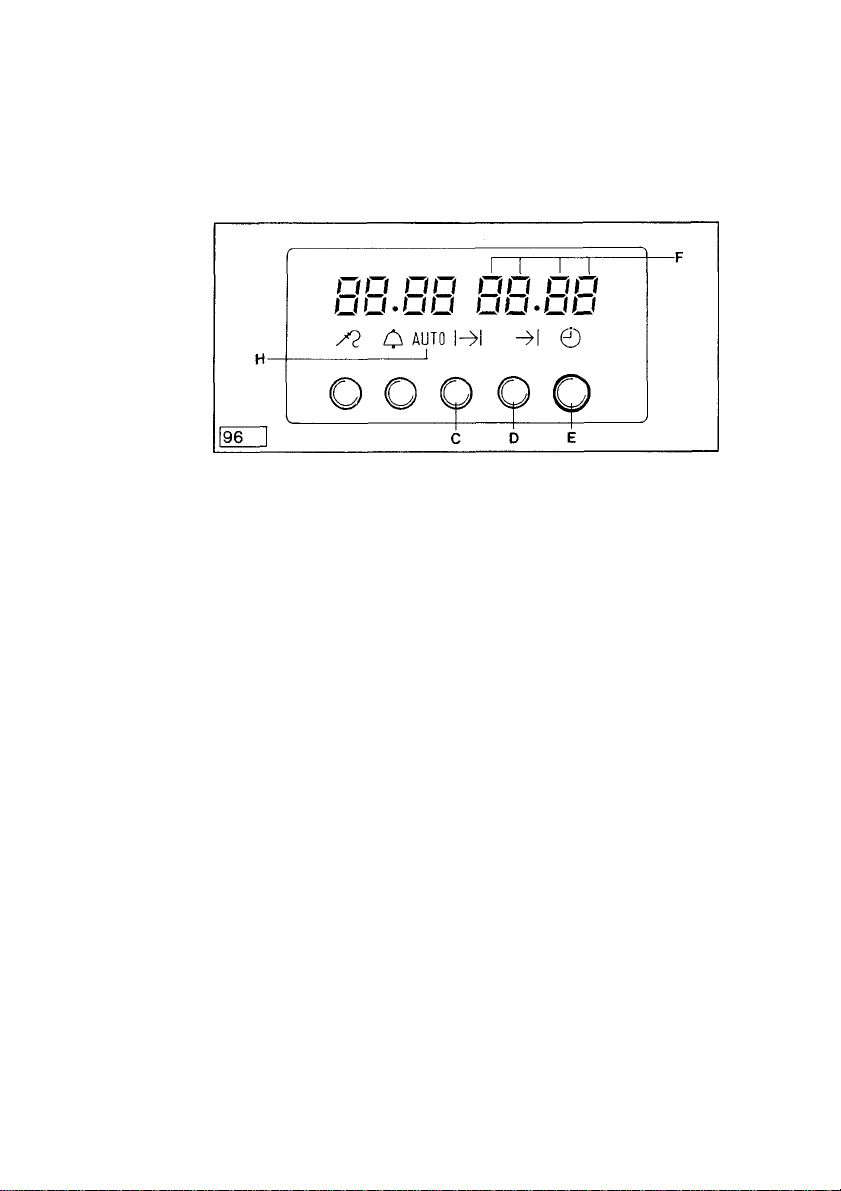
Press knob E to release.
When finished with knob E press to retract.
Press buttons C 0 and D 0 at the same time, hold them in
position, and set the actual time of day by turning my knob E
The time of day appears for you in display F.
Only now is my oven ready to operate.
Before using my ovens for the first time, clean all accessories with
warm water and washing-up liquid. Then switch my oven either to
the conventional or the hot air cooking method and select the
highest temperature and leave the oven on for at least one hour
with the oven door closed.
During this period there is an unavoidable odour which is not
harmful to your health. We recommend that the room is well
ventilated for your convenience.
When my oven has cooled down, clean it with warm water and
washing-up liquid.
D
s
Page 9
Operating the electronic timer
Setting the minute minder
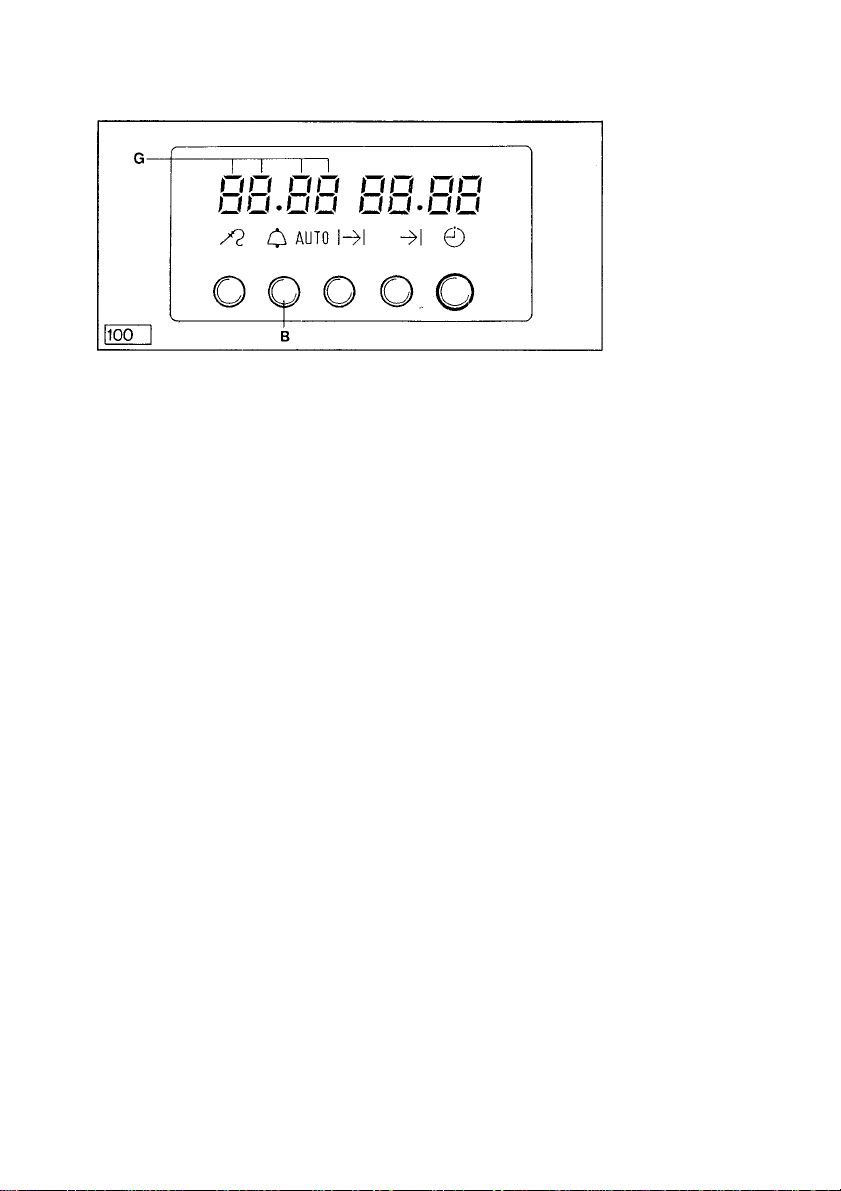
- Press button B [^, hold it in position and set the required time
with my knob E (^. The duration appears in display G.
- The time of day reappears in display F after release of button
B.
- To check the cooking time, press my button B [^. The remain
ing cooking time now appears in display G.
You should also be aware of the following:
When the selected time has elapsed you will hear an aud
ible signal which will switch off automatically after approx
imately 2 minutes. To switch this off manually press button
Biol.
Operating
the electronic
tinier (for both
ovens on
double ovens)
Page 10
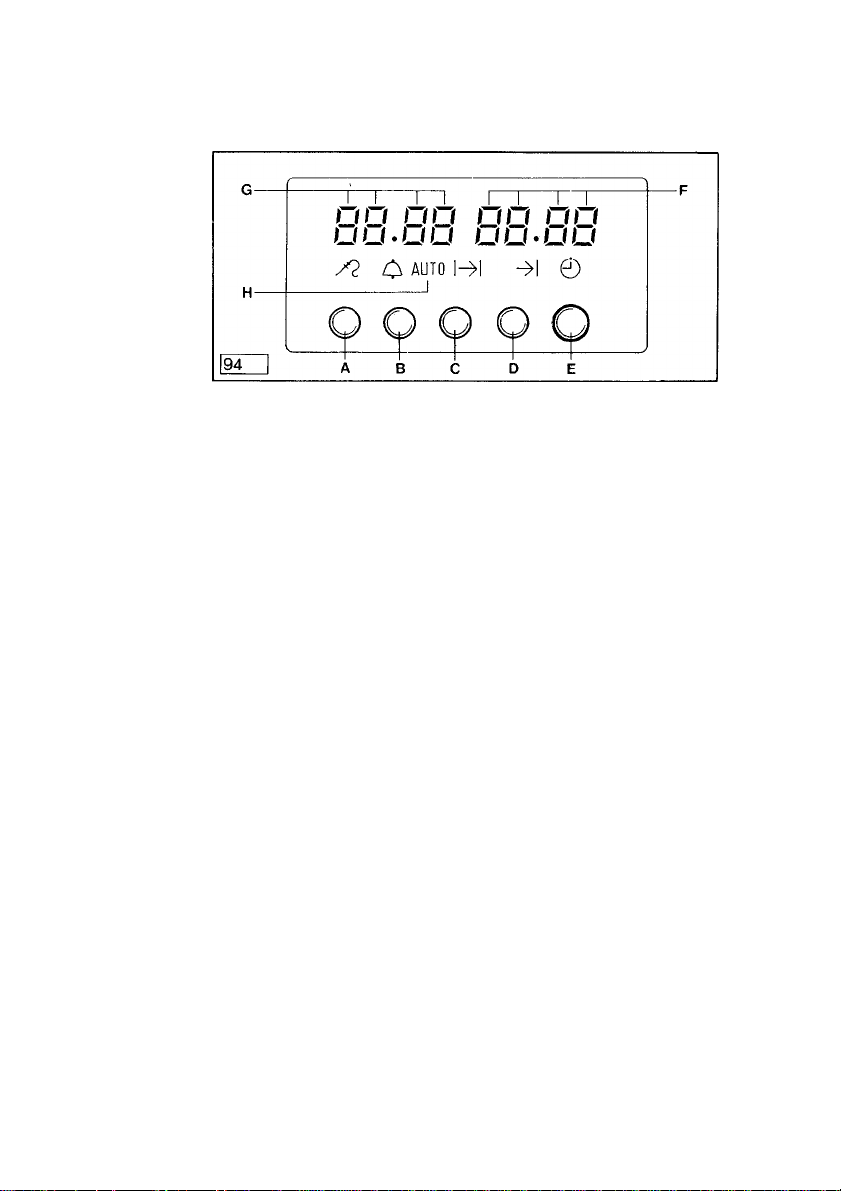
My electronic timer is designed to switch my oven on and off automatically.
My symbols
have
the following
meanings:
13 Setting the internal meat temperature in C ¡0] Setting the minute minder
(up to 99 minutes)
@ Manual or automatic operation of ovens
@ Setting the cooking duration of the oven
(up to 23 hours 59 minutes)
Q Setting the end of the cooking duration
(up to 23 hours 59 minutes in advance)
^ Rotary control for time selections
® Indicator symbol, illuminated during time controlled
cooking
10
D
c2
O
Page 11
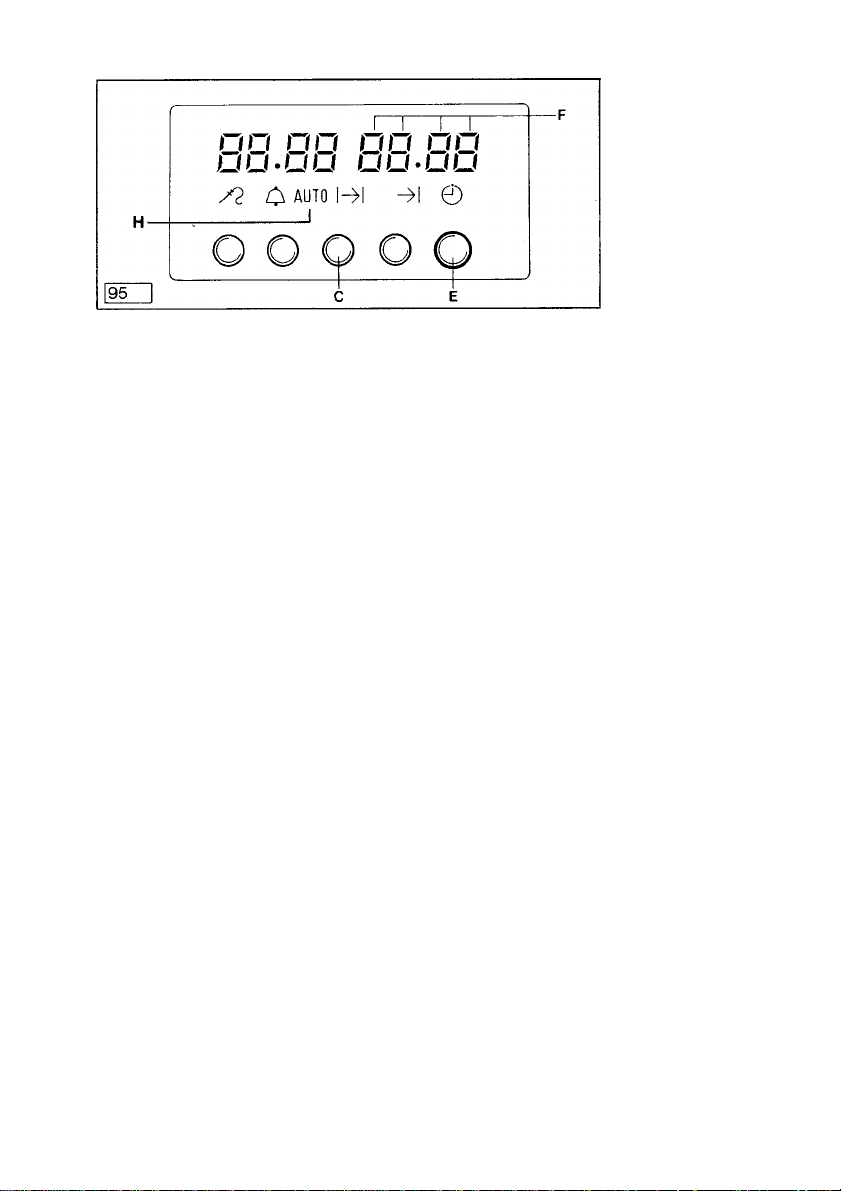
- Select the cooking method and temperature as required
How to programme the main oven to switch off automati
cally
- Press my button C 0, hold it depressed, and enter the re
quired duration with knob E 0. When my button. B is re
leased, the time of day reappears in display F.
- The word “AUTO” is illuminated indicating time con
trolled cooking is in progress.
My oven immediately switches on and automatically off
after the elapsed duration.
At the end, an audible signal sounds for around two min
utes. You can prematurely cancel it by pressing my button
CR.
After time controlled cooking, set the cooking method se
lector and temperature control to the off position.
- My oven is only ready for manual operation after the
“AUTO” has been cancelled.
It is cancelled by pressing my button C and D.
You can check on the remaining cooking duration and the
cooking end at any time during time controlled cooking by
pressing either my button C R or D R.
It you want to cancel automatic operation, press my button C R,
and set my cooking method selector and oven temperature con
trol to the 0 and off position respectively.
3
(3
<
Ш
Э
You should
be aware
of the
following:
11
Page 12
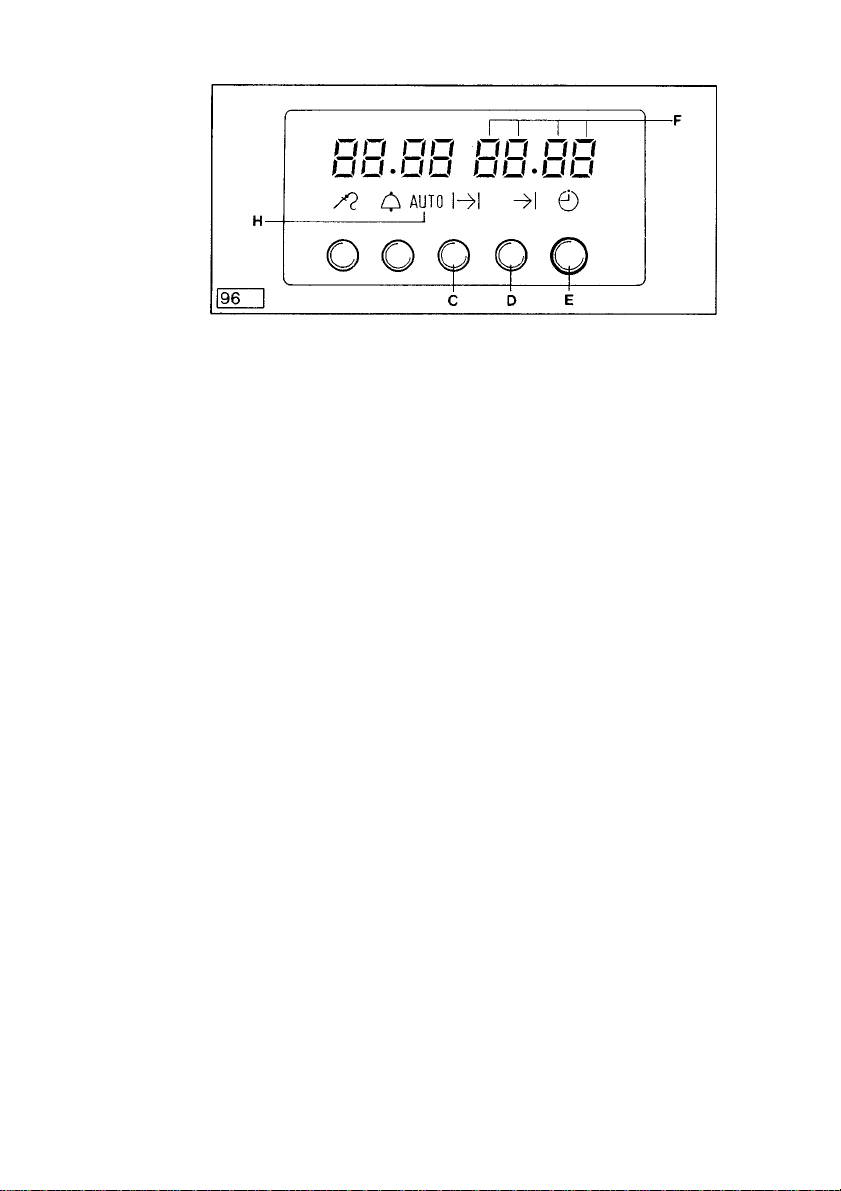
Automatic
switch-on
and -off
of my main
oven
- Set my cooking method selector and temperature control as
required.
- Press my button C 0. hold it depressed and enter the required
duration with knob E 0j, and then, by pressing my button D
0, set the cooking end time.
- When my buttons C 0 or D 0 are released, the time of day
reappears in display F
You should
also be aware
of the
following:
My oven switches on automatically at the correct time,
having deducted the cooking duration from the cooking
end. It then switches off automatically at the cooking
end.
At the end, an audible signal sounds for around two min
utes. You can prematurely cancel it by pressing my button
C0.
My oven is ready to operate manually again when the word
“AUTO” is cancelled in the display. To do this press my
buttons C and D.
You can check the remaining cooking duration and the cook
ing end at any time during time controlled cooking by pressing
either my button C 0 or D 0.
If you want to cancel automatic operation, press my buttons C 0
and D 0 simultaneously, and set my cooking method selector
and oven temperature control to the 0 and off position respective
ly.
12
Page 13

Ovens
Before using for the first time, refer to the section describing pre
cleaning of the ovens.
My secondary oven is a conventional one with top and bottom
heat and grill
My main oven is a multi-function oven which features conven
tional cooking with top and bottom heat, hot air cooking and two
(three) grilling options. For further details consult the relevant sec
tions in this booklet.
General
13
Page 14

Cooking
methods for
secondary
oven
My different cooking options
Conventional electric cooking
This method of cooking uniformly radiates heat from above
and below. You should however make sure that you only cook
on one level to ensure a uniform distribution of heat.
Cooking
methods (for
main oven
in case of
double ovens)
Dual-circuit grill
To grill large quantities of food use my large grill area |^. For
smaller quantities, e. g., 4 slices of toast, use my smaller grill
area R.
My different cooking options
___
Conventional electric cooking
This method of cooking uniformly radiates heat from above
and below. You should however make sure that you only cook
on one level to ensure a uniform distribution ot heat.
Hot air cooking
A fan ensures that hot air is continuously circulated around the
oven allowing you to cook, bake and roast at several levels si
multaneously. This cooking method also uses lower tempera
tures, This system saves you time and is highly energy effi
cient.
Rotitherm roasting/grilling
This cooking method combines the fan with the grill element. It
replaces the rôtisserie in your oven and is an excellent method
of roasting/grilling meat and poultry on one level. It is also per
fect for “au gratin” dishes.
Grilling
The grill element is used to grill foods such as steaks, chops,
sausages, fish, etc.
14
Dual-circuit grill |^| (where featured)
To grill large quantities of food use my large grill area i^. For
smaller quantities e. g., 4 slices of toast, use my smaller grill
area @.
Page 15
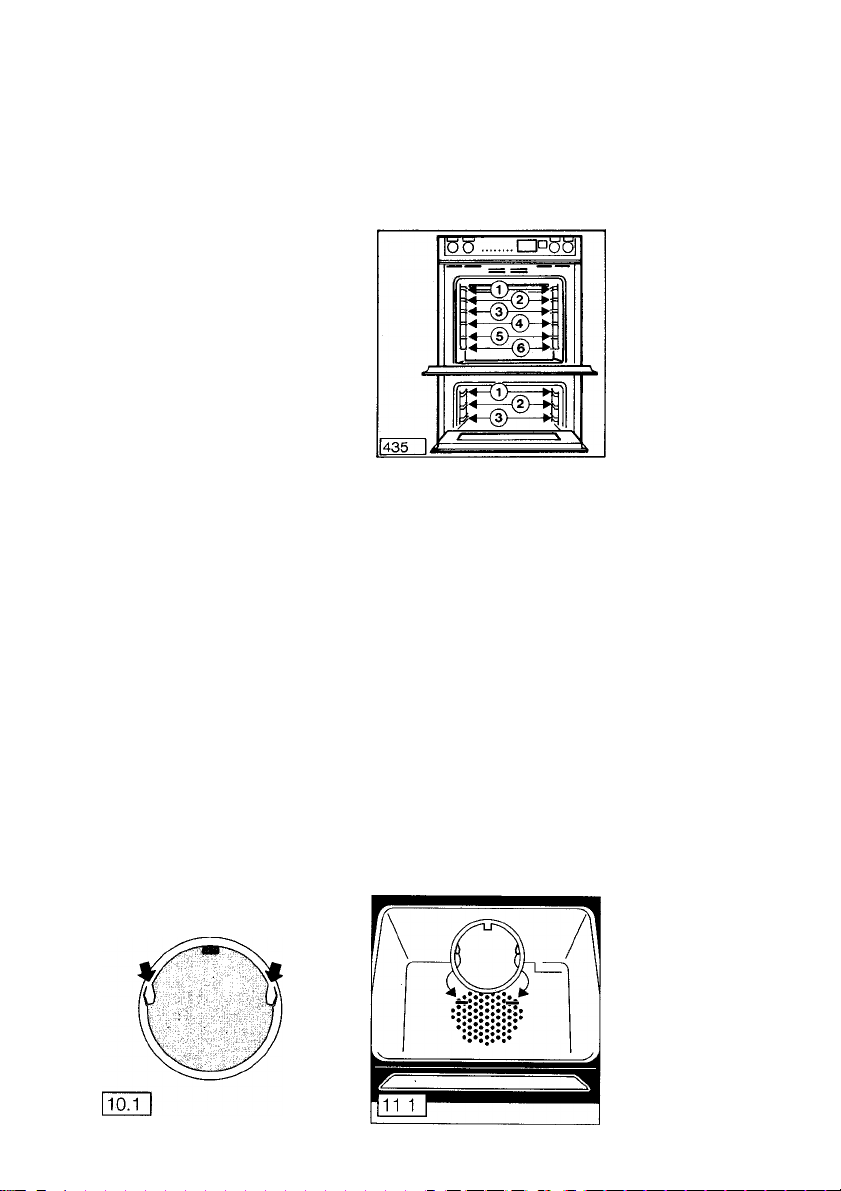
My ovens feature shelf supports to slot in wire shelves or the meat
pan.
The cooking tables supplied recommend the shelf positions on
which my main oven will produce best results.
The roof of my secondary oven is fitted with a catalytic liner
which largely prevents my oven root from becoming soiled.
Shelf levels
and
secondary
ovens
The tat filter supplied protects my tan against soiling. It must al
ways be in place when:
- I am used as a Hot Air oven (X| and meat is cooked in uncov
ered containers (i. e. do not insert when baking!);
- During Rotitherm roasting/grilling (on multi-function ovens
only).
How to insert my fat filter:
Hold the tat filter by the handle and insert the two tabs (see illus
trations) into the slots in the back panel of the oven thereby cover
ing the tan opening. The fat filter must cover the opening com
pletely.
Cleaning the fat filter
The fat filter should be cleaned after every use. How to clean the
filter, see “Cleaning the fat filter” in this booklet.
Fat filter
15
Page 16

Switching Oven Interior Light
on and off The lamp symbol Щ on any control knob indicates that the oven
can be Illuminated.
=.rr„ r.r„-ur.
,-,r, n,-l
OOOO Ò
1265
Secondary oven @
Decide whether you want to use my conventional oven or my grill.
Select the relevant symbol on my cooking method selector and
the temperature required.
Main oven
Decide which cooking method you want to use and select the ap
propriate symbol on the cooking method selector, e, g., @ for
Hot Air Then select the required temperature with the tempera
ture control. The red thermostat light is on tor as long as the oven
IS pre-heating. The thermostat light cycles on and off during oper
ation, indicating heating periods.
When pre-heating my oven (see information in the relevant cook
ing charts) position food in the oven after the red thermostat light
has gone out tor the first time. To utilise the residual heat in the
oven switch the oven oft 5-10 minutes before the end of the
cooking time by returning both the cooking method selector and
the temperature control to the oft positions.
16
Page 17

Cookmatic - Electronic Cooking Guide
The electronic cooking guide recommends the use of tempera
tures for the major food categories and for the different cooking
methods available on the oven.
Cookmatic provides helpful instructions on the appliance which cannot get lost.
After selecting a cooking method, e. g., hot air [X| and atemperature, e. g., 180 °C, the electronic cooking guide gives a visual in
dication as to what can be cooked on this setting. To accommo
date personal preferences it may be necessary to increase or
decrease the recommended temperature.
O OO 0'~i
u uu.uu
l->l ->l 0
OO O
Eiw eiß gebac k
Pas teten
Ternne n
Makronen
Geb äck in Fo rm en
empfín di. Ne mg eb.
Infr ath . Grille n infr ath . Grille n
Fleisch
Geb äck auf
Bac kblechen
Bra ten
Gef lüg el
Übe rback en
Gef lüg el Roa stb eef
17
Page 18

Baking
With conven
tional top/
bottom heat
Bakeware
Cakes are baked either in cake tins or alternatively on baking
sheets, full width baking sheets are available from AEG Spare
Parts as an optional extra.
How bakeware affects browning:
1, Bakeware, which is dark in colour, has a non-stick coating
or IS made from aluminium is the best as heat is absorbed
and then transferred to the cake resulting in shorter cook
ing times, lower energy and better browning.
2. Bakeware which is light in colour or is made of tin reflect
the heat resulting in longer cooking times and poorer
browning. It IS advisable not to use such bakeware when
using conventional top and bottom heat.
Baking on one level
Using the conventional method you can only bake on one
level at any one time. The shallower the cake, the higher you
should place it in my oven.
Baking times and temperatures
In many cases, it is not necessary to preheat me. The recom
mended temperatures and times given in the enclosed chart
are guidelines only To suit personal taste it may be necessary
to make small adjustments.
With
hot air
18
Recommendations
I recommend hot air cooking for all types of baking. However,
you may prefer cooked cheesecakes, all types of sponges,
bread and rich fruit cakes cooked by the conventional meth
od.
When you use my hot air cooking system I can cook on sever
al levels simultaneously This saves time, is convenient and
energy efficient. I can also cook different cakes at the same
time for instance a Victoria Sandwich and a Bakewell Tart or a
Madeira Cake with a Dundee Cake. Simply make sure that the
cooking temperatures are roughly the same and that sufficient
space IS left between the shelves to allow the air to circulate
freely.
If baking cakes with a high moisture content such as several
apple pies, it may be advisable to use only 2 shelves at the
same time to prevent too much steam forming in the
oven.
Page 19
Baking times and temperatures
When baking with hot air it is often unnecessary to pre-heat
my oven. For exceptions see enclosed baking charts.
If you use my oven for batch baking, choose cakes which re
quire similar temperatures. Different cooking times can be
overcome by either placing cakes into the oven later or by re
moving them earlier
The baking chart is provided as a quick reference to keep near
the oven.
When baking on more than one level the time given in the
cooking charts has to be extended by 10-20 minutes.
Baking on one or more levels
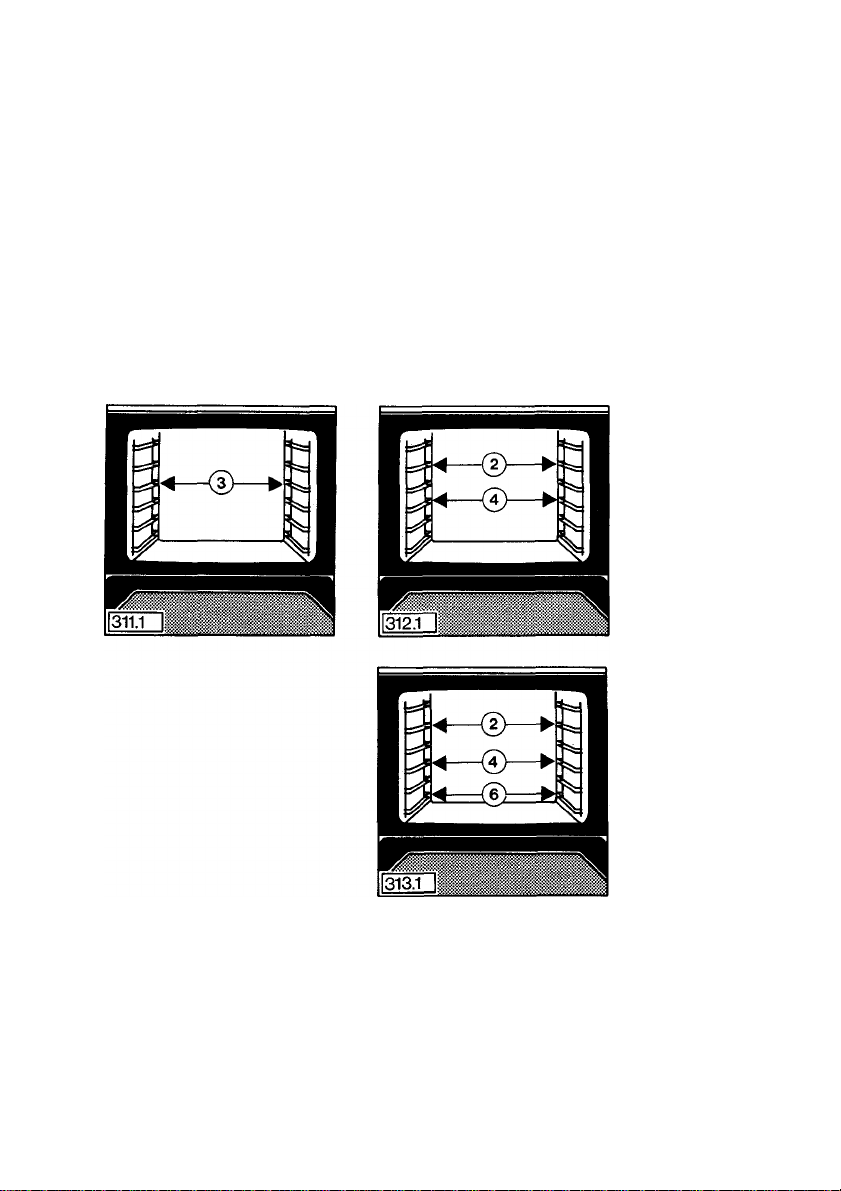
You can bake on several levels simultaneously. Place cake tins
centrally on the wire shelves to ensure even cooking results. Full
width baking sheets and additional wire shelves are available as
optional extras - see section “Optional Extras” in this booklet.
19
Page 20

Roasting,
Rotitherm
roasting/
griiiing
and stewing in
the main oven
Cooking method
■ Choose the most suitable cooking method from my various
options:
Conventional top/botton heat
Hot air
Rotitherm roasting/grilling
Where the attached cooking charts highlight shelf positions
and temperatures in bold my oven may give you the better re
sult when using this cooking method. However you may wish
to experiment and decide for yourself which cooking method
gives the best result.
A note to Rotitherm roasting/grilling as this is a relatively new
method of cooking meat and poultry although spit roasting
which Rotitherm is replacing is not so new. Rotitherm is very
much more convenient to use than a spit and once you have
tried it you will be delighted with the results.
Recommendations
Wipe and weigh the meat. If stuffing is used, weigh the stuffed
joint to calculate the cooking time. Place the joint in a suitable
roasting dish, season with salt and pepper and brush lean
joints with melted fat.
When cooking pies, place dish on a baking sheet to avoid
spillage on to the floor of the oven.
Cooking
temperatures
and times
20
The times and temperatures given in the roasting chart provide a
guide when cooking meat. Some adjustments may be necessary
depending on the type of meat to be cooked. Cooking times
have been given for meat which is at room temperature.
Prime cuts can be cooked at higher temperatures than those
which require a longer cooking time to tenderise the meat. A thick
joint will require longer to cook through than a thinner one.
A boned rolled joint will require a longer cooking time than one
with the bone left in as bone is a conductor of heat.
A small joint will require longer cooking time per 450 g (1 lb) than
a large one. Allow an extra 30 minutes cooking time for joints up
to and including 1.5 kg (3 lb).
If the joint IS cooked in foil the temperature has to be increased by
10 °C. To brown the joint, remove foil for the last 15 minutes or so
of the cooking time.
If cooking from frozen, place joint in a covered container and ex
tend the calculated cooking time by approximately one third. To
brown and crisp meat remove cover for the last 30 minutes of the
cooking period.
Page 21

Never use stainless steel ovenware in my oven, since it reflects
the heat. Meat, poultry, and fish should be cooked in ovenproof
dishes or in my meat pan for large quantities.
Choose a dish which is just a little larger than the joint itself. This
will contain any fat in a smaller area and reduce splashing. If you
wish to roast potatoes in the same dish around the joint rather
than in a separate one you need to make allowances for this
when selecting a suitable dish.
Never place cooking containers on the base of my oven, but on
the wire shelf which you should insert on the 4th or 5th level from
the top depending on the size of the food to be cooked.
When using the Rotitherm roasting/grilling method (where fea
tured) place the joint on the wire shelf 3rd and 4th from the top
(depending on size of roast) and slot the drip-pan into the 5th or
6th from the top to catch the juices. If you want to roast potatoes
in the dripping, allow approximately 1-1'/4 hours cooking time.
Turn the roast over halfway through cooking to ensure an all
round crisp and brown joint.
Ovenware
21
Page 22
Roasting
meat using
the meat
thermometer
The meat thermometer takes the guesswork out of roasting meat
regardless of whether you use the conventional, hot air or
Rotitherm roasting/grilling method.
A thermo couple is located in the tip of the meat thermometer
which “senses” the temperatures. When the meat thermometer is
plugged into the side of the oven, the oven will work automatically
until the temperature inside the meat is the same as the one you
selected on the electronic timer.
WARNING: Only use the meat thermometer supplied with
the oven. If a replacement becomes necessary only use a
meat thermometer ordered from AEG Spare Parts Depart
ment.
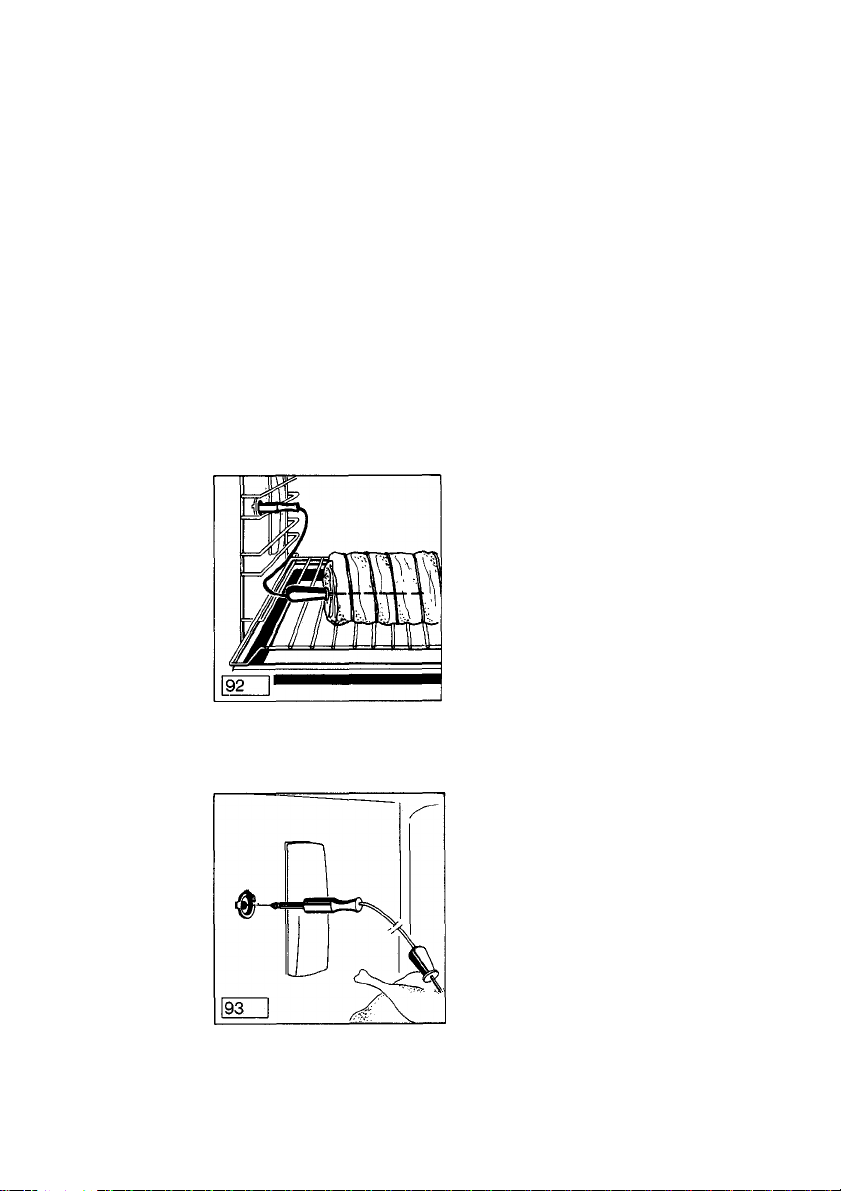
To switch on
1 Insert the meat thermometer horizontally into the thickest part
of the joint and push the probe into the joint until the tip is as
near to the centre of the joint as possible making sure to avoid
bones and fat. Position meat pan in the oven.
2. Insert the meat thermometer plug firmly into the socket on the
inside of the oven.
22
Z>
o
A temperature of 60 C appears in display H of my electronic
clock. This temperature can be increased or descreased as
required.
Page 23
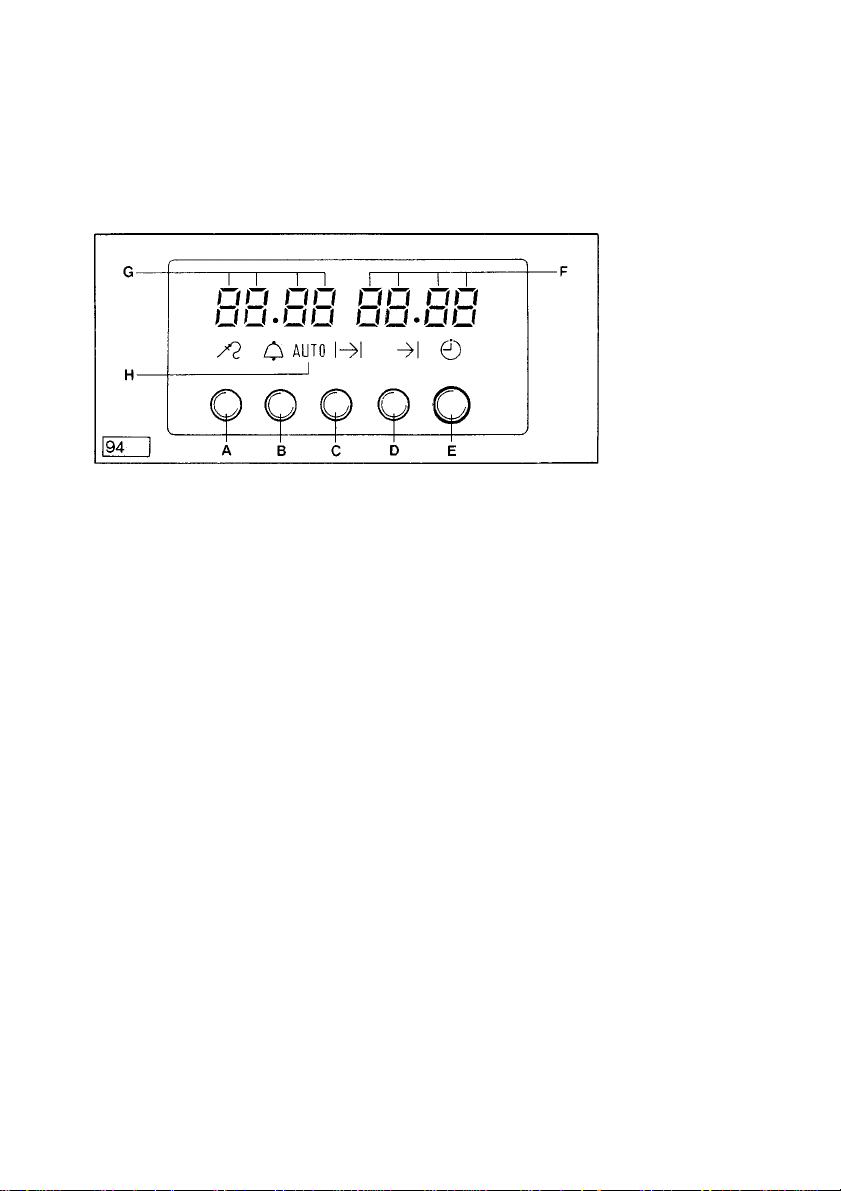
4. Press button A ^ on my electronic clock, hold it depressed
and enter the required internal meat temperature with knob E
¡^, for example 85 C. This temperature appears in the left dis
play H of my electronic clock for as long as you keep button A
3 depressed. When you release button A, 30 °C appears in
display H,
5. Set the cooking method selector and the temperature control
to the settings required using the cooking charts supplied as a
guide (cooking charts for Roasting, Rotitherm roasting/grilling;
cooking times and shelf positions.
The display H on my electronic clock shows the internal
temperature of the meat in C as it continues to cook. To
check what internal meat temperature you have selected
press button A 7() on my electronic clock.
When the internal temperature in the meat has been reached my
oven switches off automatically. When you unplug the meat ther
mometer from the oven, display H stops flashing.
You will also hear an audible signal for around 2 minutes and my
display H flashes. To switch off the signal prematurely, press my
button A E.
Return the cooking method selector and the temperature control
to the off positions.
You should
be aware of
the following:
To switch off
23
Page 24

Roasting with the meat thermometer
guide
temperature
Meat
Internal
temperature selection
Beef
rare
medium
well done
meat loaf
Pork
Veal
45-50 °C
60-65 °C
75-80 °C
75-80 °C
80-85 °C
80-85 °C
Lamb
well cooked
pink
80 °C
70-75 °C
Game 75-80 °C
Poultry
except goose 85-90 °C
80-85 °C
24
Page 25
Secondary Oven
My secondary oven is useful for cooking small quantities of food,
e. g., one small cake or a small roast (max. 2 kg). Do not overload
my secondary oven as too much food may result in excessive
amounts of steam developing.
When using my secondary oven place the cooking container on a
wire shelf having removed all other oven equipment first.
Warning!
The handle must be removed whilst grilling. Failing to do
so will result in overheating of the handle. This may cause
damage leading to breakage of the handle.
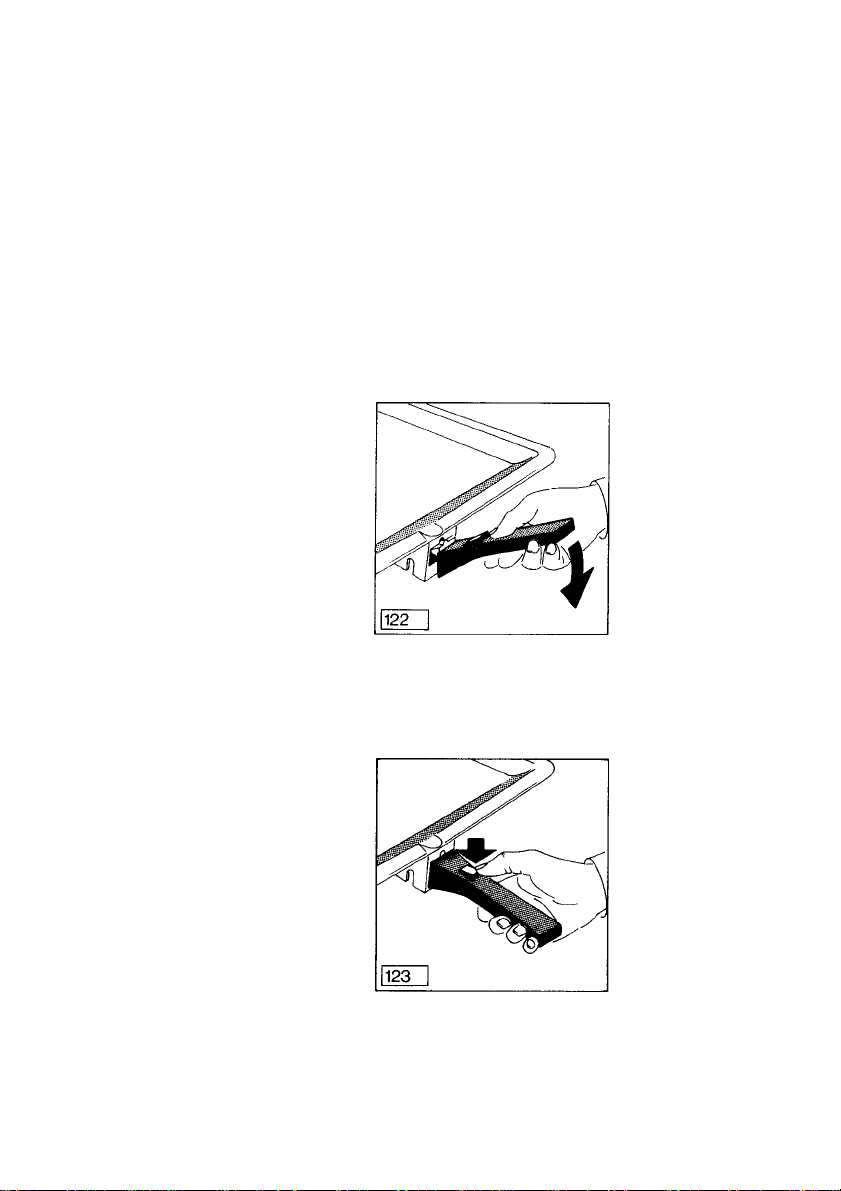
Inserting the handle
Lock it into the grip at the front of the pan. See illustration.
General
Inserting/
removing
grill handle
Make sure that the handle is firmly attached to the pan! Removing the handle
Press the button on the handle. See illustration.
25
Page 26

Traditional
grilling
and
How to use the grill
Prime cuts of meat such as steaks and chops or fish weighing
less than 1 kg can either be fried or grilled. Salt large pieces short
ly before grilling and small ones just after grilling.
Turn meat/fish after half the grilling time so that both sides are uni
formly browned. Turn thin pieces once: thicker pieces need turn
ing more often.
On appliances with a dual circuit grill you should set the grill to
grill symbol 0 for small amounts and to symbol for larger
amounts.
Select the highest setting on the variable temperature selector to
seal the food and then turn down to a lower temperature. Position
the wire shelf with the projection facing upwards .or downwards in
a shelf position of your choice depending on the thickness of the
food you wish to grill.
Place the grill pan on the wire shelf and remove the grill pan han
dle.
Where the appliance features a vapour vent, this must be open
during grilling.
Main oven: the oven door is closed during grilling
(if oven features a grill element)
Secondary oven: the oven door is left OPEN during
grilling.
There IS no need to pre-heat my grill unless you prefer to do
so.
Grill pan and wire shelf can be cleaned more easily if soaked in
the sink with water and washing-up liquid after grilling.
26
o
U.
00
Page 27

My hot air oven is extremely versatile since you can cook a
complete meal in it. You can cook different foods at the same
time, such as fish and cakes, without any transfer of smell or
taste from one to the other.
When menu cooking try to choose foods which require similar
cooking temperatures.
When cooking meat in uncovered containers the fat filter
must be inserted.
When cooking pies or cakes at the same time as a roast you
can choose pies or cakes which normally cook at tempera
tures 20 °C lower than the roast. Temperature differences of
10 °C lower than the roast can be compensated by longer or
shorter oooking times.
Shelf positions are chosen according to the food being
cooked and in connection with the cooking guidelines in the
recipe book supplied.
Menu
cooking
in my
niain oven
Menu suggestion:
Ovenware:
Shelf positions:
Cooking method:
Temperature:
Time:
Vapour vent:
(where featured)
Meat Loaf
Potato Bake
Buttered Carrots
Fruity Rice Pudding
Oblong ovenproof dishes
Meat Loaf & Potato Bake
Side by side 3rd from top
Carrots and Fruity Rice Pudding
Side by side 5th from top
Hot Air
170-180°C
Approx. 60-75 minutes
Open unless you wish
to retain moisture in
the oven to prevent food
from drying out, such as
pheasants, etc.
27
Page 28

Defrosting
by hot air
in the main
oven
Food in flat aluminium containers defrosts especially well
since aluminium is a good heat conductor For freezing and
subsequent defrosting of meat and vegetable dishes, flat alu
minium containers should therefore be used. For defrosting
uncooked frozen meat and fruit, closed ovenproof dishes are
especially well suited.
Position the containers on the wire shelf or in the meat pan 4th
from the top.
Food
Ready-made meals
1-4 portions)
Small cakes without
cream fillings or top
pings (in foil)
Large cakes without
cream fillings or top
pings (in foil)
Unsliced bread in toil
(approx. 450 g/1 lb)
Bread rolls
Fruit, e. g. 300 g
strawberries, raspber
ries (in covered con
tainer)
Ready to cook foods
(pizza, pies)
Uncooked joints
(e. g. 1.5 kg)
Temp.
°C
200
200
200
200
200 0.15 -r 0.30
200 0.15 -f 0.15
Time Flours/minutes
0.40-0.50 thawing and
heating ready to
sei-ve
0.15-0.20 ready to serve
0.30-0.45 ready to serve
0.15 -H 0.30
at room temp.
at room temp.
at room temp.
ready to serve
ready to serve
ready to serve
200 0.45-1.00 ready to serve
180-200 2.00-3.00
depending on
type of meat
thawed and
cooked
Chicken approx. 1 kg
(cover with
greaseproof paper)
28
50 1.00-1 15 thawed, remove
giblets and roast
Page 29

For bottling, use only jars with rubber seals and glass lids.
Never use jars with screw fittings or bayonet catches or metal
tins. And make sure you use fresh foodstuffsl
The oven holds 6 bottling jars of 1-1.5 litres capacity
Place 1 cup of hot water in the drip-pan so that the necessary
humidity IS retained in the oven.
Position the jars in the enamelled pan on the 4th level from the
top. The jars should not touch, must wherever possible be
filled to the same level with the same contents and must be se
curely clamped.
Vapour vent (where featured): closed.
To switch on, turn my cooking method selector to hot air [A|
and the oven temperature control to 160 “C.
Keep an eye on the food being bottled.
As soon as the liquid in the first jars (when bottling fruit or
gherkins) begins to bubble (after around 45 minutes for 1
litre jars) switch off the oven, but allow the jars to stand a fur
ther 30 minutes or so - around 15 minutes for soft fruit, e. g.
strawberries - in the closed oven.
When bottling vegetables or meat, set back my oven tem
perature control to 100 °C as soon as the liquid in the first jars
begins to bubble and allow the contents to cook for a further
60-90 minutes. Then switch off the oven and allow the jars to
stand a further 30 minutes in the closed oven.
Bottling
in the
main oven
29
Page 30

Cleaning and care
Ovens
These instructions refer to a large range of AEG double and single ovens.
All secondary ovens have a catalytic roof panel as standard.
The mam oven has catalytic roof (except Vitratherm ceramic roof
models), sides and back panels, either as standard or they are
available as optional extras form your AEG retailer depending on
the model you selected to buy (except ovens which include mi
crowave). If your mam oven has a pyrolytic self-cleaning system,
then also consult the relevant pages-for cleaning the oven.
Before cleaning my ovens
Allow my ovens to cool down if they have been used before
cleaning. Switch off the ovens before cleaning.
Cleaning
Ovens which are cleaned after every use need very little attention.
If leff and used again fat splashes will bake on and are then diffi
cult to remove.
Clean glass surfaces, trims and controls with a soft cloth and
lukewarm water Polish dry with a soft cloth.
The ceramic glass oven roof (Vitratherm,- where featured) can be
cleaned with an oven spray or with “Ovenpad” or “Kleenoff”.
Vitreous enamel interior surfaces can be cleaned with:
- a damp cloth and mild detergent
- cream cleaners such as “Jif” and a cloth.
- oven cleaners such as “Ovenpad" or “Kleenoff” Do follow the
manufacturer’s instruction on the cleaning materials you use
carefully
Take care that oven cleaners do not come in contact with the fan
or any other part of the oven other than the vitreous enamel.
Do not use scouring pads or abrasive powder which may
scratch the surface of any part of the appliance.
Catalytic
liners
Secondary
oven
30
Do not use any detergpnts, abrasives or oven cleaners on catalytic liners.
It should not normally be necessary to clean the catalytic roof in
water If you feel you would like to do so, take out the roof and
wash in warm, soapy water, followed by rinsing m clear
water.
3
£
O
Page 31
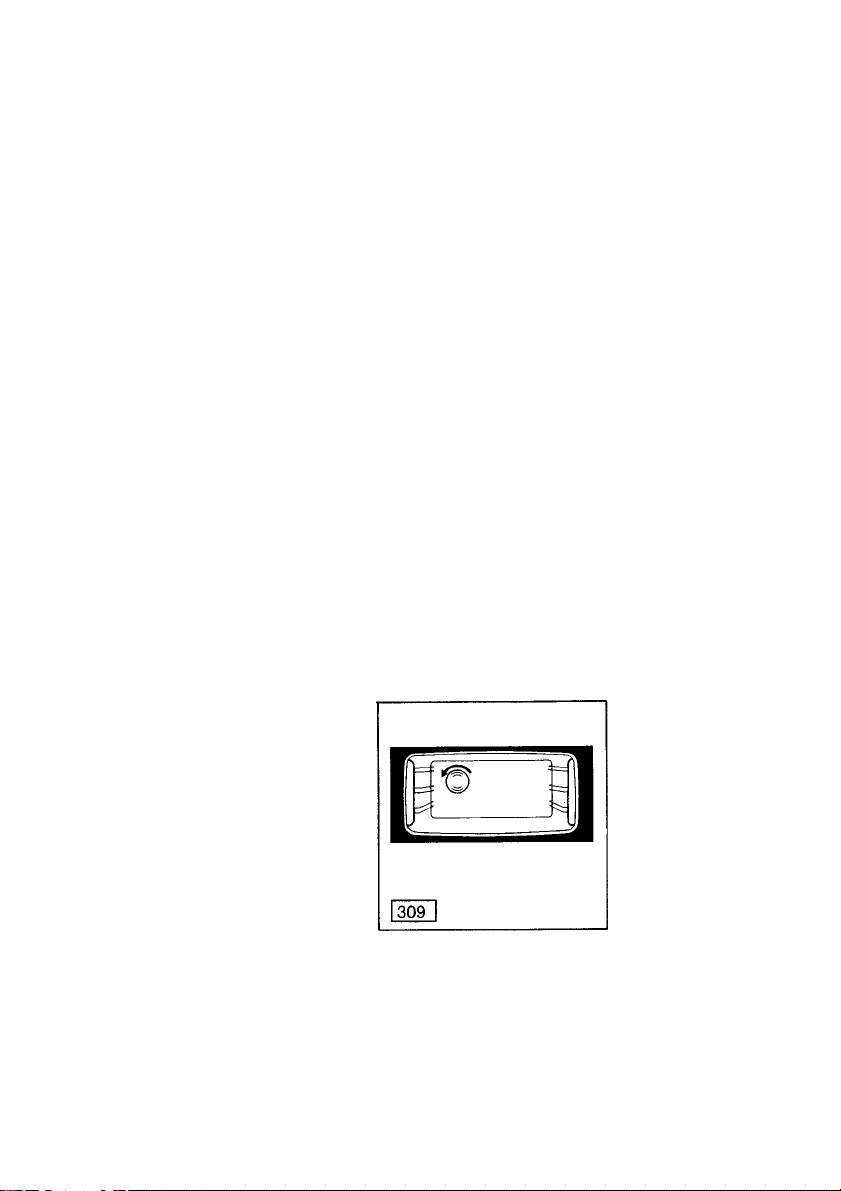
If your oven has a catalytic roof, sides and back panel either as
standard equipment or if you have bought these parts separately
and fitted them, then the following information will be of interest to
you.
The liners help to keep the oven cleaner as they clean themselves
to a great extent during roasting and baking at temperatures
above 200 °C. As cleaning may be improved by exposure to a
higher temperature it may be necessary to run the oven at 250 °C
for 1 or 2 hours per week. Before carrying out such a heat cycle,
remove all oven equipment and make sure that you have cleaned
the unlined surfaces to prevent any soil from baking on. For isolat
ed stubborn stains use a soft bush and very hot soapy water
Never use abrasive cleaners or scouring powders.
Main oven
You can illuminate my oven for cleaning. To do this, turn my
oven control knob or my cooking method selector to the lamp po
sition §].
■ Thorough cleaning
For thorough cleaning, you can remove various parts:
Cleaning the lamp cover or replacing the oven lamp
Warning! Isolate my oven from supply before replacing my
oven lamp.
To clean the glass cover or change my oven lamp the glass cover
can be taken off by turning it anti-clockwise.
Oven
lighting
31
Page 32
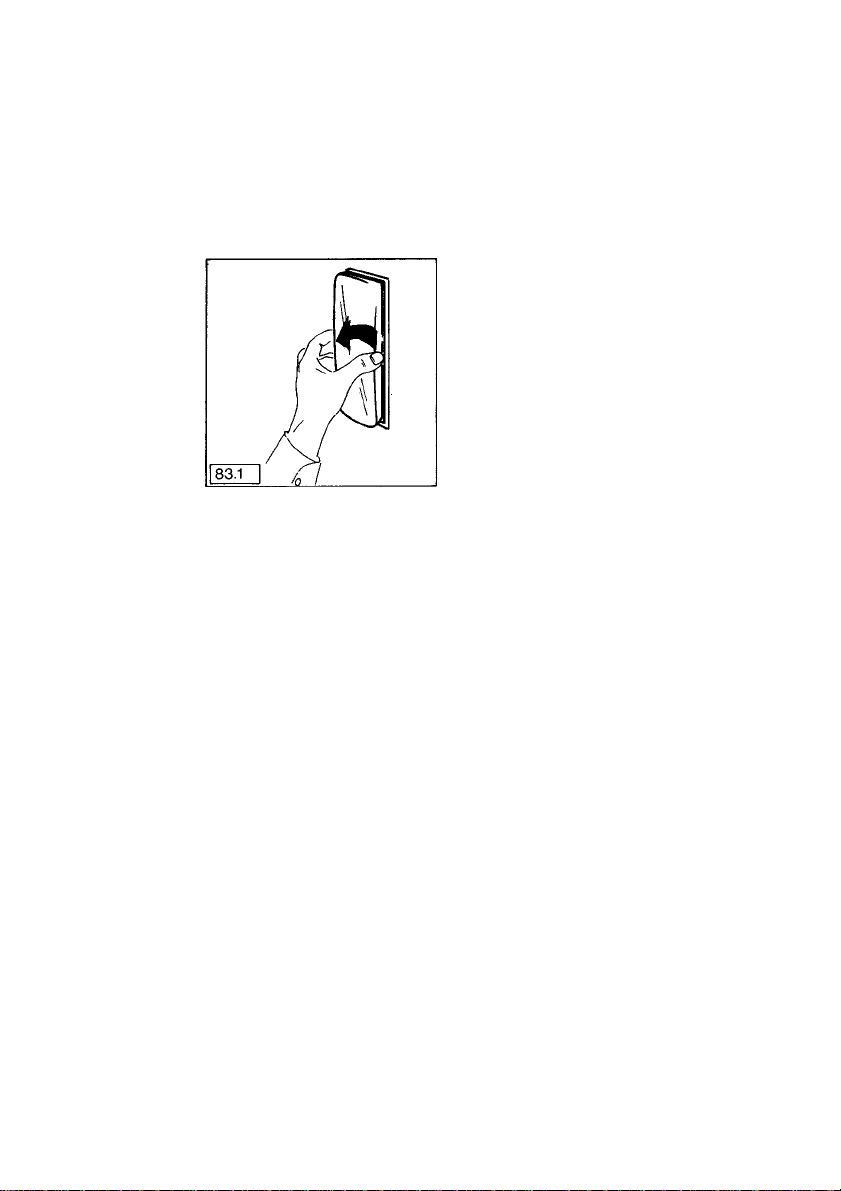
Cleaning the
lamp cover(s)
or replacing
the oven
lamp(s) in the
main oven
Warning! Isolate my oven from supply before replacing my
oven lamp(s).
To clean the glass cover(s) or change my oven lamp(s) the
glass cover(s) should only be undipped by hand. Do not
use tools of any kind.
After cleaning the lamp cover(s) or changing the light bulb(s) refit
the lamp cover(s).
32
Page 33
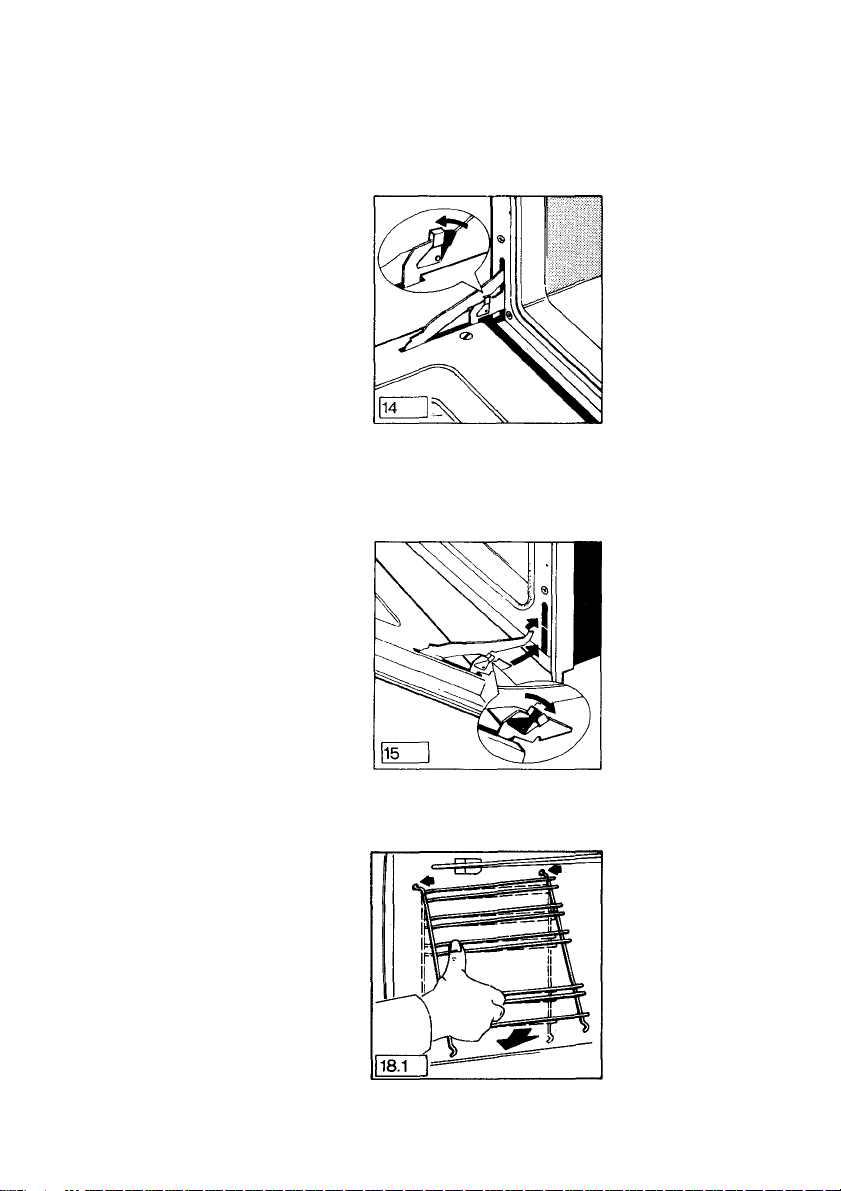
Removing the oven door
1 Lift the door catch on both door hinges (see illustration).
2. Lift the door up and pull forward away from the oven (grip
the sides - do not pull on the door handle!).
Replacing the oven door
1. Insert both brackets into the oven frame.
2. Fully open the door and return door catches to their work
ing positions (see illustration).
Removing
the oven door
(main and/or
secondary
ovens)
Shelf supports
To clean the sides of the oven, the shelf supports (see illustra
tion) can be removed.
Pull the shelf support at the bottom, towards the centre of the
oven and unhook from the top. Replace in reverse order.
Removing
the sheif
supports
33
Page 34
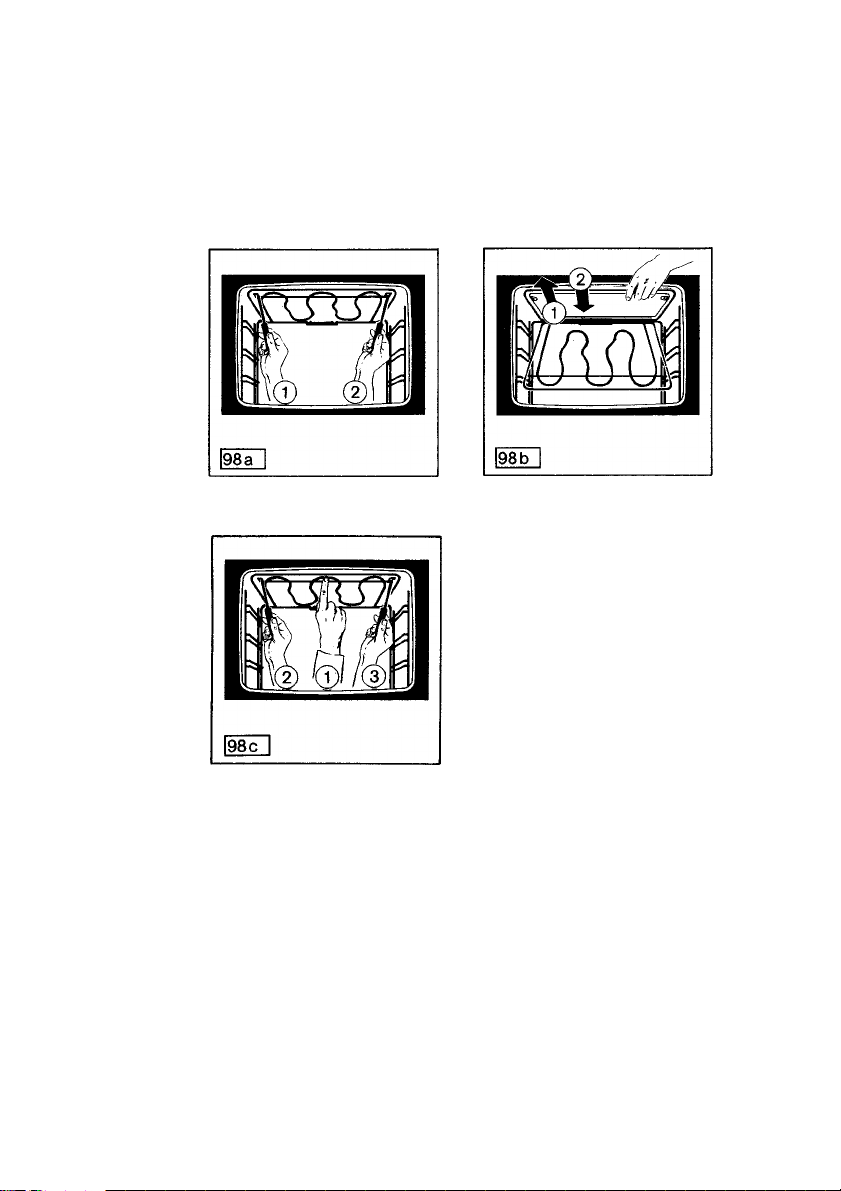
The catalytic roof of your secondary oven may require cleaning
from time to time. To remove the roof panel proceed as fol
lows:
Loosen the two holding screws (98a).
Remove the catalytic roof for cleaning (98b).
After cleaning re-insert roof panel and re-fasten screws (98c).
Cleaning The fat filter should be cleaned after every use. To remove filter,
the fat hold it by the handle and lift upwards. Place the fat filter in a
filter saucepan, add approximately 2 tbsp. of automatic washing pow
der or 1 tbsp. of dishwasher powder and cover filter with water.
Bring to the boil and leave to soak for approx. 30 mins, or longer
depending on the degree of soiling. Make sure the solution does
not boil over as it could mark your hob. Rinse filter in clear water
and dry. For light soilage wash in a 65 °C dishwasher pro
gramme.
34
Page 35
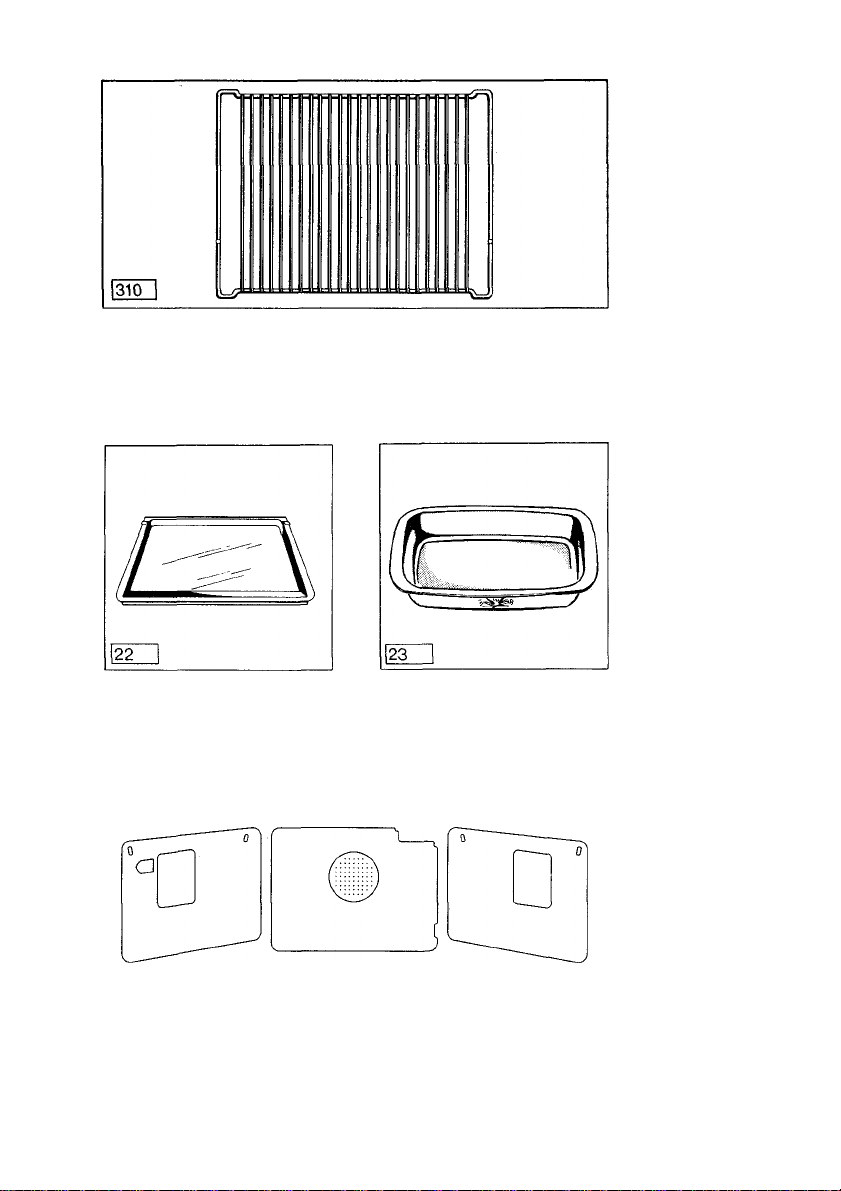
Optional extras
Additional wire shelf
ET No. 661 307 540
Baking sheet
E No. 611 898 620
250
D
m
O
Catalytic set KTG
(3 part set for mam oven)
E No. 611 898 606
Ceramic oven dish
E No. 611 899 660
35
Page 36
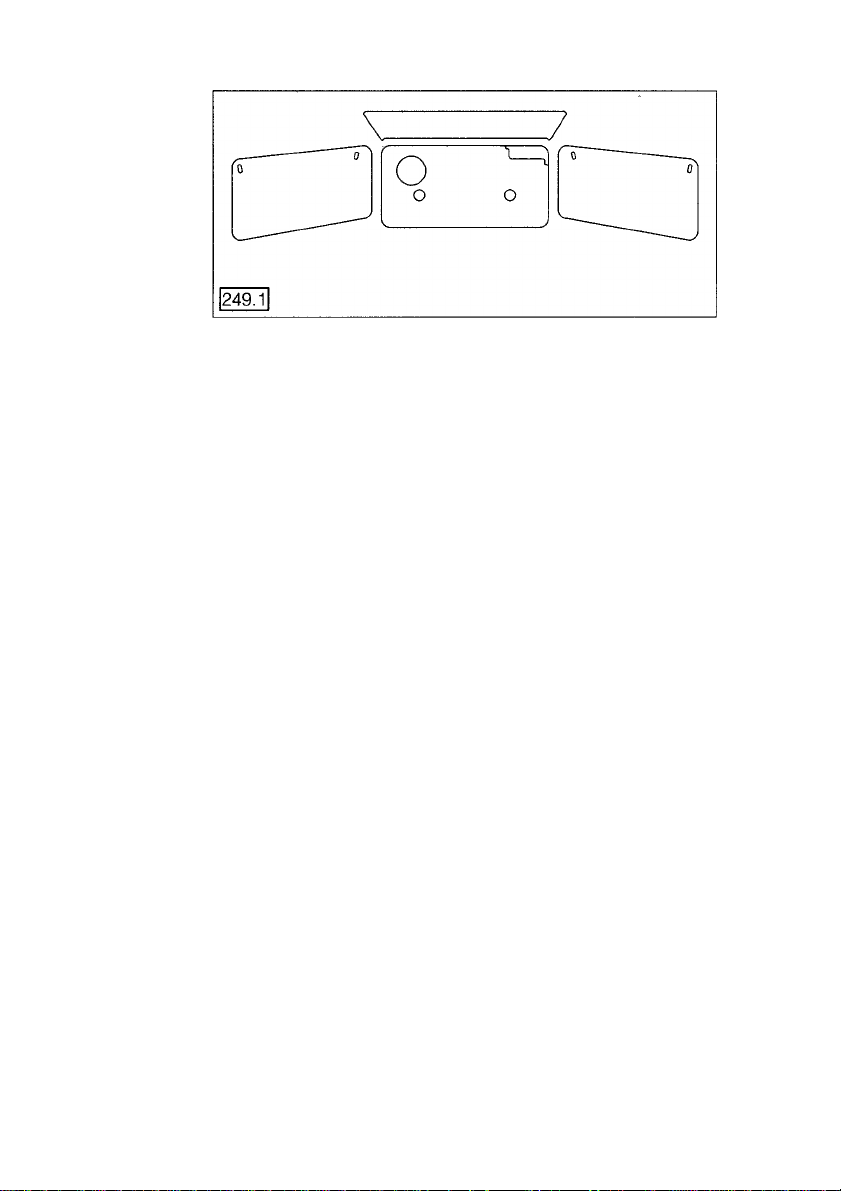
Optional extras
KTKBL.
(4 part catalytic set for secondary
oven with lamp).
E No. 611 898 611
36
Page 37

What to do if... (something goes wrong?)
... the pilot lamps do not show? Faults you
... the oven does not heat? can rectify
1 You may well have not operated all relevant switches or yourself
2. The fuse in the fuse box has blown.
... the fuses keep blowing?
Please call an approved and qualified electrician.
... the oven lamp fails?
See Cleaning and care on page 32.
Replacement lamps are not covered by warranty and are
not free of charge.
... the oven cannot be switched on?
Check whether-
... my time of day is flashing in the display! If yes, reset my time
of day
... the audible tone of my timer is emitting a continuous tone.
Then press the corresponding button to switch it off!
... my timer display does not show, but the pilot lamps of the
appliance still show'?
... incorrect indications appear in my display'?
... duration and end cannot be entered!
My timer has been wrongly operated or there has been a short
power cut. Isolate my oven from the power supply wait 30
seconds and then switch on the power. Reset the time of day
on my electronic timer.
Please make sure that you are not able to rectify the fault
yourself prior to calling a service engineer in connection
with one of the aforementioned problems, as the cost in
volved will have to be passed on even during the warranty
period.
Therefore, follow the instructions in this booklet and any
additional information which may accompany this appli
D
ance carefully.
o
AEG electrical appliances comply with current safety reg
ulations. Repairs to these appliances should only be car
ried out by qualified AEG engineers or AEG appointed
service agents. Repairs carried out by unauthorised per
sonnel could lead to considerable damage and could pose
a considerable safety hazard to the user.
37
Page 38
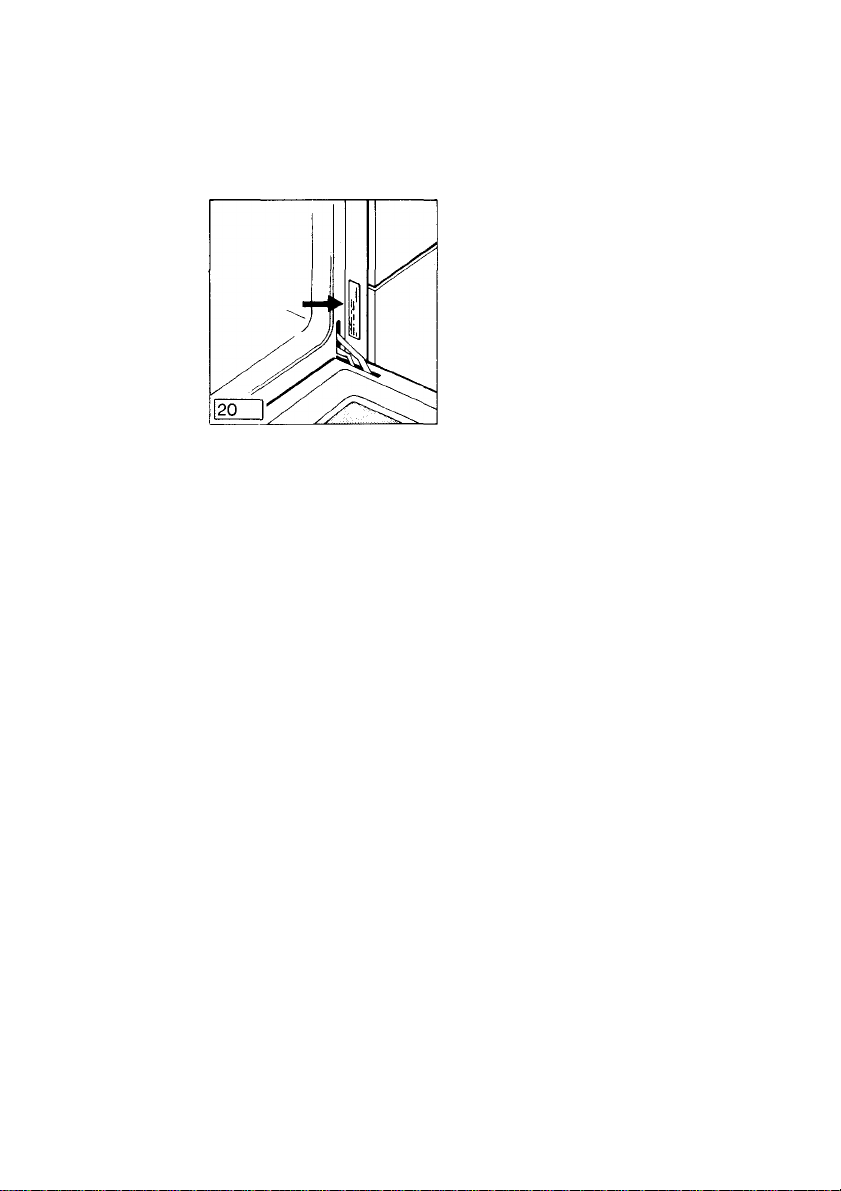
Service
Should you be unable to locate the cause of the problem in spite
of the above check-list please contact your AEG service depart
ment quoting the E and F numbers \which you will find on the rat
ing plate (see illustration/arrow).
Please transfer these numbers to the space provided below for
your convenience.
These numbers enable the service department to prepare as far
as possible any spare parts required to rectify the fault on first
call. This may save you money.
E-No.
38
F-No.
Z)
£
o
Page 39

AEG
AEG Hausgeräte AG
Postfach 1036
D-8500 Nürnberg 1
© Copyright by AEG
H 260 213 740 - 10900.5/03
 Loading...