

Page 1
5
4
3
2
1
DD
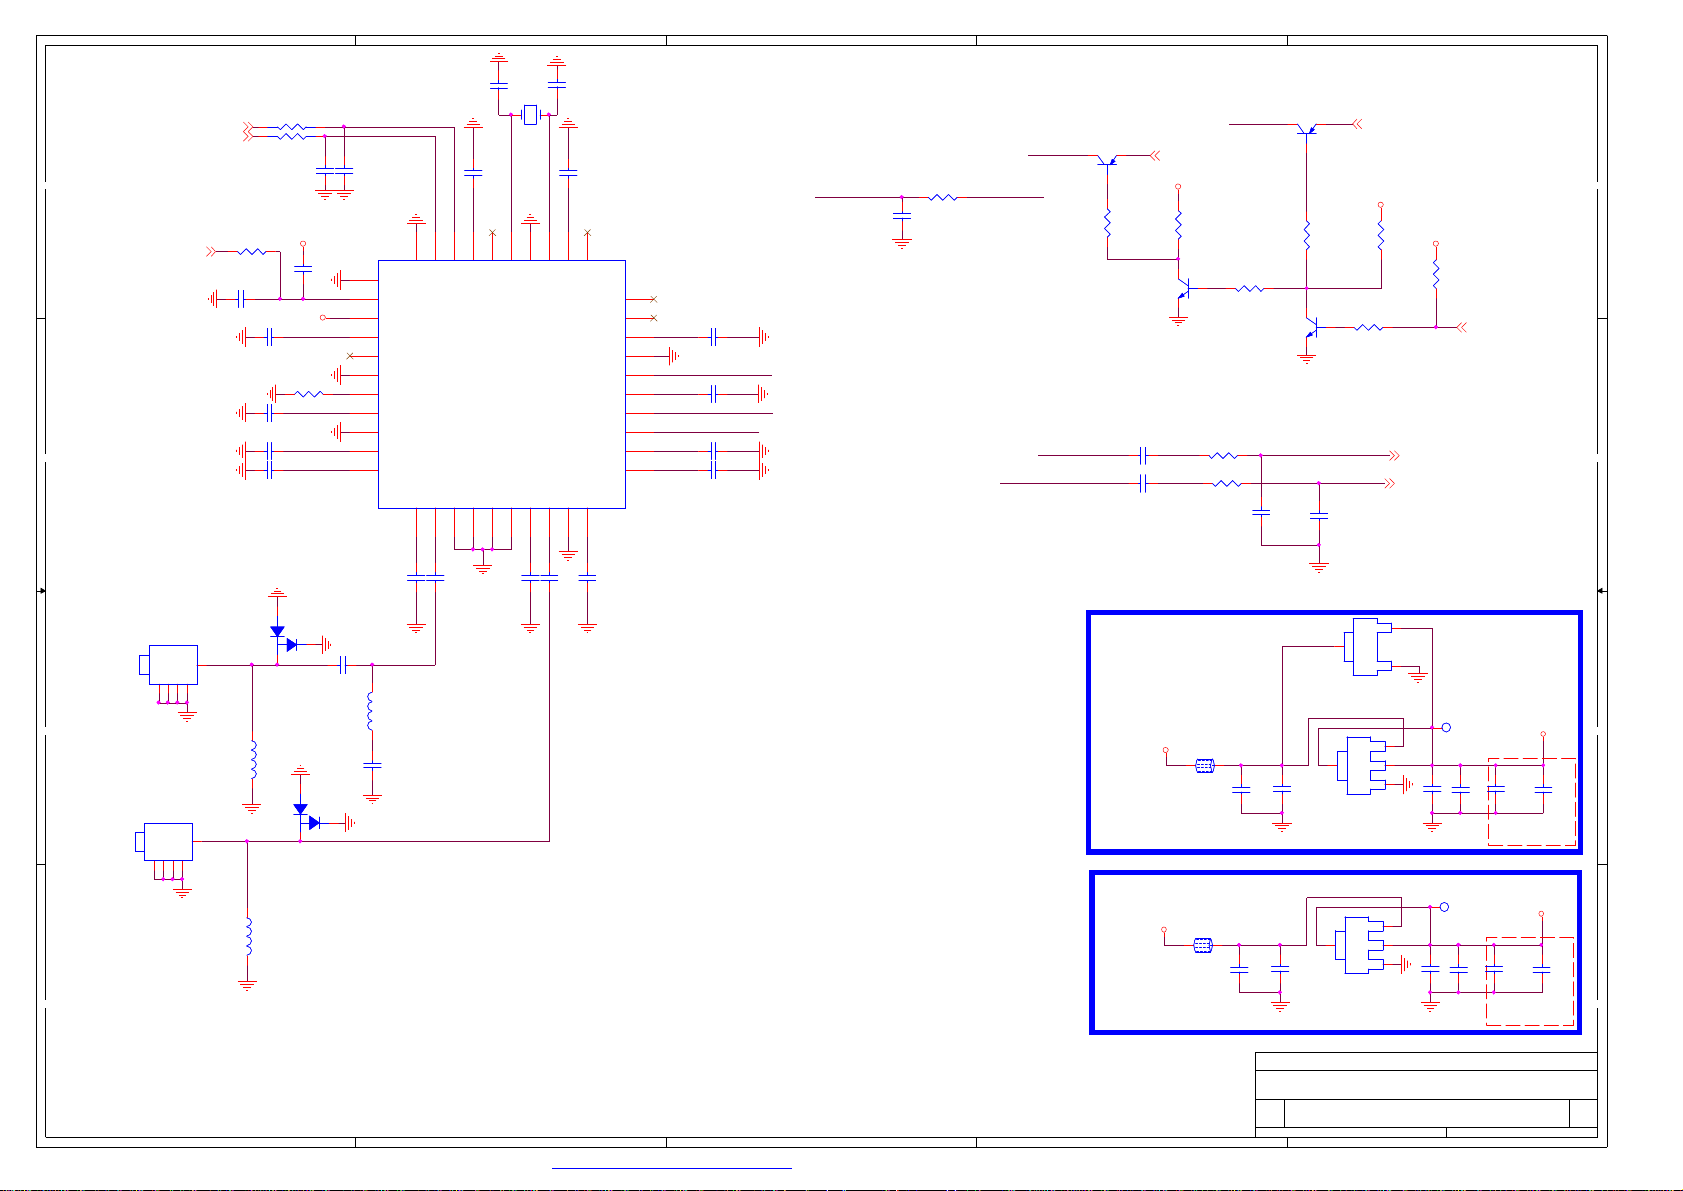
KONKA DTV SCH Design
机型:KDL42XS715UN
原型机:KDL55XS715AN
CC
主芯片:6369
拟制:
标准化:
BB
批准:
AA
5
4
3
2
1
Page 2

XS801
XS801
1
3
5
7
9
10
11
12
13
14
HEADER_7x2
HEADER_7x2
1
2
3
4
5
6
7
8
9
10
11
12
13
14
16
15
18
17
XS811
XS811
C840
C840
10uF/10V
10uF/10V
NC/WL2004_3.3V
NC/WL2004_3.3V
12
C836
C836
C837
C837
12
10uF/16V
10uF/16V
10uF/16V
10uF/16V
L816
L816
FB_1.8A
FB_1.8A
R83510KR83510K
R834NC/10KR834NC/10K
L824
L824
NC/FB_1.8A
NC/FB_1.8A
NC/0.1uF
NC/0.1uF
12VIN
2
2
4
4
6
6
8
8
10
12
POWER-ON
14
2
12VIN
4
12VIN
6
BKLT_EN
8
BKLT_ADJ
10
12
14
POWER-ON
16
18
NC/HEADER_9x2
NC/HEADER_9x2
N804
N804
C83310nFC83310nF
C838
C838
0.1uF
0.1uF
C871
C871
10uF/10V
10uF/10V
C824
C824
NC/10uF/10V
NC/10uF/10V
5
F801
F801
C801
C801
FB_6A
FB_6A
0.1uF
0.1uF
BKLT_EN
BKLT_ADJ
PS_ON/OFFPS_ON/OFF
N802
N802
IN
IN
4
OUT
OUT
ADJ
ADJ
1117-3.3
1117-3.3
OUT
OUT
3
IN
IN
GND
GND
N803FR9886N803FR9886
1
2
3
4
L80910uHL80910uH
C870
C870
C867
C867
0.1uF
0.1uF
0.1uF
0.1uF
C861
C861
5
+12V
+12V+12V
12
BKLT_ENBKLT_EN
BKLT_ADJBKLT_ADJ
PM_PWR_ON
POWER-ON_D PM_PWR_ON
3V3_STB3V3_STB
3
2
1
C841
C841
C842
C842
10uF/10V
10uF/10V
0.1uF
2
0.1uF
1
C832
C832
0.1uF
0.1uF
R82310KR82310K
8
BS
SS
7
IN
EN
R8242.2KR8242.2K
6
COMP
SW
5
GND
FB
GND
9
C844
C844
C843
C843
C845
C845
10uF/10V
10uF/10V
10uF/10V
10uF/10V
10uF/10V
10uF/10V
N808
N808
4
LX3VIN
2
GND
1
5
EN
FB
SY8087
SY8087
0.1W
L823
L823
NC/FB_1.8A
NC/FB_1.8A
1 2
N812
N812
3
IN
IN
2
4
OUT
OUT
1
ADJ
ADJ
NC/1117-3.3
NC/1117-3.3
2
OUT
OUT
3
IN
IN
1
GND
GND
N813
N813
NC/WL2004_3.3V
NC/WL2004_3.3V
5Vstb
R815
R815
4.7K
4.7K
R817
R817
C825
C825
100R
100R
0.1uF
0.1uF
NC/0R
NC/0R
R830
R830
BRI_ADJ
2.5V_Normal
3V3_Normal
1 2
C8340.1uFC8340.1uF
PM_PWR_ON
C8353.3nFC8353.3nF
R82510K/1%R82510K/1%
R827
R827
R826NCR826
27K/1%
27K/1%
NC
400mA
C846
C846
0.1uF
0.1uF
DDR3 1.5V
L818
L818
2.2uH
2.2uH
C858
C858
C872
C872
22uF/6.3V
22uF/6.3V
NC/22uF/6.3V
NC/22uF/6.3V
待机功耗时,给
C863
C863
C862
C862
0.1uF
0.1uF
10uF/10V
10uF/10V
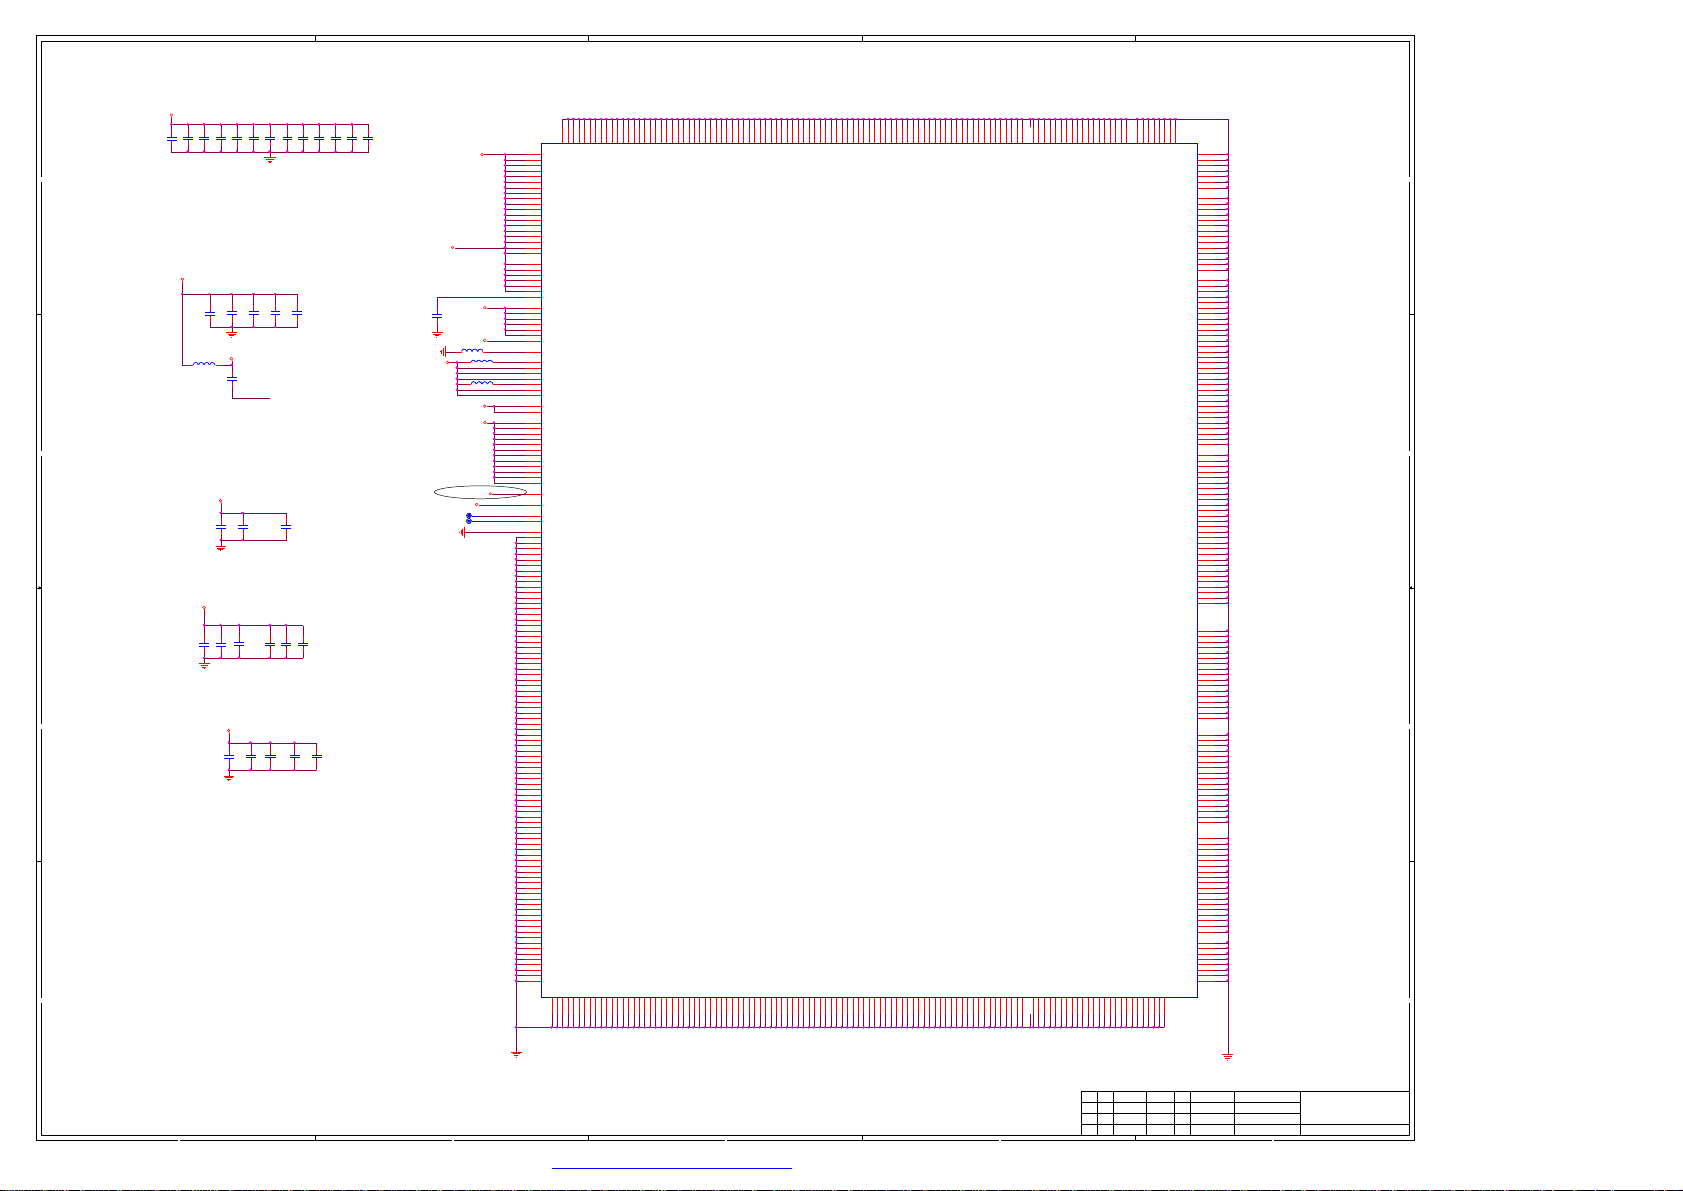
主板电源接口
1
3
5VSTBIN
5
7
C816
C816
9
0.1uF
0.1uF
11
13
DD
12VIN 12VIN
1
12VIN
3
12VIN
5
7
5VSTBIN
9
11
13
15
17
3.3Vstb
5Vstb 3.3Vstb
L808
L808
FB_1.8A
FB_1.8A
1 2
150mA
C839
C839
CC
0.1uF
0.1uF
3V3_Normal
+12V
L806
L806
NC/FB_4A
NC/FB_4A
5Vstb
L807
L807
FB_4A
FB_4A
如果走线不方便,
则仅留5Vstb输入即可
5Vstb
BB
3V3_Normal
VD803
VD803
5.6V
5.6V
1 2
For Dongle
5VSTBIN 3.3Vstb_D
1 2
AA
4
POWER INPUT
100
100
ON_BKLT
H:ON
L:OFF
POWER-ON
3V3_Normal
R8161KR816
1K
PWM_IN
R8181KR8181K
R819
L815
L815
FB_1.8A
FB_1.8A
100mA
3V3_Normal
R819
10K
10K
C866
C866
0.1uF
0.1uF
3V33V3
C868
C868
C873
C873
0.1uF
0.1uF
22pF
22pF
donggle
V809
V809
NC/3904
NC/3904
V805
V805
3904
3904
C865
C865
10uF/10V
10uF/10V
WL2004_2.5V
WL2004_2.5V
R839
R839
16K/1%
16K/1%
10K/1%
10K/1%
R840
R840
NC/47K
NC/47K
3
2
5Vstb
4
NC/10uF/10V
NC/10uF/10V
4
N806
N806
AP2114
AP2114
3
N810
N810
+1.5V_DDR
R845
R845
供电
C879NC/0.1uFC879NC/0.1uF
R841
R841
NC/100K
NC/100K
R842NC/10KR842NC/10K
1
R843NC/10KR843NC/10K
C826
C826
IN
IN
R810
R810
R807
R807
10K
10K
C869
C869
22uF/6.3V
22uF/6.3V
NC/ME2345
NC/ME2345
V808
V808
开关
BKLT_EN
BKLT_ADJ
C827
C827
0.1uF/NC
0.1uF/NC
3
IN
IN
2
OUT
OUT
1
ADJ
ADJ
2
OUT
OUT
1
GND
GND
5Vstb(
1V51V5
L804
L804
NC/FB_4A
NC/FB_4A
12
3
CORE POWER
VCC-12V
C818NCC818
NC
2V52V5
2.5V_Normal
C860
C860
C859
C859
10uF/10V
10uF/10V
0.1uF
0.1uF
预留单
12V电源)
5Vstb5VSTBIN
5V_STB5V_STB
C880
C880
0.1uF
0.1uF
POWER-ON_D
12
L802
L802
FB_4A
FB_4A
C804
C804
10uF/16V
10uF/16V
C805
C805
10uF/16V
10uF/16V
5VA
VCC-12V
C809
C809
10uF/16V
10uF/16V
3
V811
V811
8
D1
7
D1
6
C808
C808
C806
C806
D2
5
10uF/16V
10uF/16V
L805
L805
FB_4A
FB_4A
C890
C890
10uF/16V
10uF/16V
0.1uF
0.1uF
R8442.2RR8442.2R
L821
L821
NC/FB_4A
NC/FB_4A
12
12
C889
C889
0.1uF
0.1uF
D2
ME4920
ME4920
R820
R820
47K
47K
V807
V807
3904
3904
8
7
6
5
R8462.2RR8462.2R
10uF/16V
10uF/16V
+12V
C823
C823
For单12V
L825
L825
+12V
FB_6A
FB_6A
12
L813
L813
NC/FB_4A
NC/FB_4A
12
V812
V812
NC/3904
NC/3904
+12V
L810
L810
NC/FB_4A
NC/FB_4A
12
C851
C851
NC/10uF/16V
NC/10uF/16V
12V to 5vstb
拟 制
拟 制
拟 制
审 核
审 核
审 核
标准化
标准化
标准化
批 准
批 准
批 准
S1
G1
S2
G2
贴
VD804
VD804
3
2
V814
V814
D1
D1
D2
D2
ME4920
ME4920
R851
R851
NC/47K
NC/47K
3
2
C852
C852
NC/10uF/16V
NC/10uF/16V
2
C807
C807
5VA
2.2uF/10V
N801
N801
1
2
3
4
RT8110C
RT8110C
R82210K R82210K
C877
C877
2.2uF/10V
2.2uF/10V
VCC
LG
GND
UG
Phase
BOOT
5V&12V
V8019435AV8019435A
1
S
2
S
3
S
4
G
R836
R836
10K
10K
N811
N811
1
2
3
4
RT8110
RT8110
FB
VIN
VCC
LG
GND
UG
2.2uF/10V
8
7
6
5
PANEL-ON
Phase
BOOT
D
D
D
D
电源供电,且为LG玻璃
8
7
6
5
FB
VIN
C803
C803
2.2uF/10V
2.2uF/10V
1
2
3
4
C8783.3nFC8783.3nF
PANEL POWER
L821
的条件:
C828
C828
0.47uF
0.47uF
R821100K R821100K
NC/1N4148
NC/1N4148
1
1
S1
2
G1
3
S2
4
G2
C8883.3nFC8883.3nF
电源
V802
V802
NC/9435A
NC/9435A
1
8
S
D
2
7
S
L811
L811
NC/10uH
NC/10uH
2
3
4
1
2
3
4
9
R847
R847
NC/10K
NC/10K
N805
N805
NC/FR9886
NC/FR9886
S
G
BS
IN
SW
GND
GND
R828
R828
NC/100K
NC/100K
D
6
D
5
D
PM_PWR_ON
SS
EN
COMP
FB
C854
C854
NC/10uF/10V
NC/10uF/10V
R848
R848
NC/100K
NC/100K
1
NC/0.1uF
NC/0.1uF
C899
C899
NC/0.47uF
NC/0.47uF
R852
R852
NC/10K
NC/10K
C853
C853
C849
C849
NC/10nF
NC/10nF
V803NC/2N7002V803NC/2N7002
FB=0.8V
R808
R808
VID03
NC/10K
NC/10K
VD801
VD801
1N4148
1N4148
C802
C802
47nF
47nF
L8014.7uHL8014.7uH
C810
C810
10uF/10V
10uF/10V
FB=0.8V
VD802
VD802
1N4148
1N4148
8
7
6
5
C891
C891
10nF/50V
10nF/50V
L8034.7uHL8034.7uH
C847
C847
NC/0.1uF
NC/0.1uF
8
7
6
5
R832NCR832
NC
C855
C855
C856
C856
NC/10uF/10V
NC/10uF/10V
NC/10uF/10V
NC/10uF/10V
01.System Power
01.System Power
01.System Power
312
R804
R804
NC/33K/1%
NC/33K/1%
C811
C811
10uF/10V
10uF/10V
C829
C829
10uF/16V
10uF/16V
电压要调整到
R80912K/1%R80912K/1%
R81368K/1%R81368K/1%
VCC-12V
C874
C874
2.2uF/25V
2.2uF/25V
C876
C876
10uF/10V
10uF/10V
R829
R829
NC/2.2K
NC/2.2K
C850
C850
NC/0.1uF
NC/0.1uF
R831NC/10K/1%R831NC/10K/1%
R833
R833
NC/47K/1%
NC/47K/1%
C857
C857
NC/0.1uF
NC/0.1uF
C812
C812
10uF/10V
10uF/10V
R814NCR814
C831
C831
10uF/10V
10uF/10V
V810
V810
312
R805
R805
59K/1%
59K/1%
R8025.6K/1%R8025.6K/1%
R8013K/1%R8013K/1%
R803
R803
NC/1%
NC/1%
C813
C813
0.1uF
0.1uF
VCC-Panel
C830
C830
0.1uF
0.1uF
待定
NC
C875
C875
10uF/10V
10uF/10V
C898
C898
NC/0.1uF
NC/0.1uF
C848
C848
NC/3.3nF
NC/3.3nF
12
L812
L812
NC/FB_4A
NC/FB_4A
2N7002
2N7002
R80610KR80610K
C821
C821
33pF
33pF
C814
C814
220uF
220uF
VCC-12V
C897
C897
NC/10uF/16V
NC/10uF/16V
5Vstb
标记
标记
标记
阶段标记
阶段标记
阶段标记
1
+
+
LVDS_VCCLVDS_VCC
C822
C822
0.1uF
0.1uF
1
5.2v
5VA
更改单号数量
更改单号数量
更改单号数量
VID1
R8120RR8120R
R811
R811
NC/0R
NC/0R
5VA5VA
第
张共
第
张共
第
张共
117
117
117
VCC_VSENSE
VDDC1.15V
CORE_1V2CORE_1V2
签名
签名
签名
日期
日期
日期
张
张
张
Page 3
5
RA106
RA106
3 1
4 2
3 1
R130
R130
100R
100R
C104
C104
0.1uF
0.1uF
C100
C100
C101
C101
C102
C102
C103
C103
4 2
C143
C143
47pF
47pF
3V3_Tun
3V3_Tun
1uF/6V3/0402
1uF/6V3/0402
0.1uF
0.1uF
470pF
470pF
0.1uF
0.1uF
100x2
100x2
R100
R100
4K99/1%
4K99/1%
C105
C105
0.1uF
0.1uF
3V3_TUN
3V3_TUN
3V3_TUN
C142
C142
47pF
47pF
29
30
41
VSS
SDA
GND
31
Reset
32
VDD3
33
V145
34
NC
N110
GNDA
Rext
VDDA
GNDS
VDDS
VDDS
N110
CTC707CCQ
CTC707CCQ
35
36
37
38
39
40
TUNER_SCL
TUNER_SDA
DD
RST_TUN
CC
AC GND1IN12GND3GND4GND5GND6AC GND7IN28GND9VDDV
C106
C106
1nF
1nF
1
BAV99_3
BAV99_3
V108
5
5
L101
L101
NC/330nH
NC/330nH
V108
3
BAV99_3
BAV99_3
V109
V109
2
C148
C148
ESD
56pF
56pF
L112
L112
270nH
270nH
Q>8
C165
C165
120pF
1
120pF
2
3
XS102
XS102
RFIN
2233441
1
RFIN
BB
RFIN
AIR Input
靠左
XS101
XS101
2233441
RFIN
C107
C107
39pF
39pF
4
C109
C109
33pF
33pF
31.875MHZ
31.875MHZ
1 2
C108
C108
0.1uF
0.1uF
1V8_TUN
26
27
28
SCL
VDD
ExtRef
Z110
Z110
C111
C111
33pF
33pF
C113
C113
0.1uF
0.1uF
1V8_TUN
21
22X223
24X125
GND
VDDX
GPIO2
20
TestMode
19
GPIO1
VDDC
GNDC
VIF_N
VDDA_DAC
VIF_P
VDDA
VDDP1
Vagc
1V8_TUN
18
17
16
15
14
13
12
11
3V3_TUN
3V3_TUN
1V8_TUN
C144
C144
C145
C145
C146
C146
C147
C147
0.1uF
0.1uF
0.1uF
0.1uF
0.1uF
0.1uF
0.1uF
0.1uF
VIF_N
VIF_P
IF_AGC
10
1V8_TUN
C112
C112
C141
180pF
180pF
C141
0.1uF
0.1uF
C110
C110
390pF
390pF
3
IF-AGC
R1291KR129
C183
C183
0.1u
0.1u
1K
Close to Tuner
IF-AGCIF_AGC
2
DVB-T AGC
V101
V101
3906
3906
VIF_P
VIF_N
R117
R117
100K
100K
C1270.1uFC1270.1uF
C1280.1uFC1280.1uF
和主芯片的
IF_AGC_A
3V3_Tun
R116
R116
10K
10K
V103
V103
3904
3904
R16451RR16451R
R165
R165
NC/47PF
NC/47PF
IF-AGC
51R
51R
C140
C140
TUNER POWER
5VA
L110
L110
1 2
FB_1.8A
FB_1.8A
ATV AGC
R122
R122
4.7K
4.7K
C182
C182
0.1uF
0.1uF
开关
V102
V102
3906
3906
R118
R118
100K
100K
V104
V104
3904
3904
C136
C136
NC/47PF
NC/47PF
N807
N807
NC/WL2004_1.8V
NC/WL2004_1.8V
4
C184
C184
10uF/10V
10uF/10V
3
IN
IN
N113
N113
1117-3.3
1117-3.3
IF_AGC_DT
3V3_Tun
R123
R123
10K
10K
OUT
OUT
GND
GND
IN
IN
OUT
OUT
ADJ
ADJ
R119
R119
4.7K
4.7K
3
2
1
IFP
IFN
2
1
3V3_Tun
C186
C186
10uF/10V
10uF/10V
1
R120
R120
4.7K
4.7K
IF-AGC-SEL
3V3_TU3V3_TU
C185
C185
0.1uF
0.1uF
250mA
C187
C187
NC/22uF
NC/22uF
3V3_Tun
C188
C188
47nF
47nF
close the IC
1
RFIN
RFIN
CATV Input
靠右
AA
L109
L109
330nH
330nH
TUNER POWER
3V3_Tun
L111
L111
1 2
FB_1.8A
FB_1.8A
C189
C189
0.1uF
0.1uF
C190
C190
10uF/10V
10uF/10V
C192
C192
10uF/10V
10uF/10V
1V8_TU1V8_TU
N114
N114
3
IN
IN
1117-1.8
1117-1.8
OUT
OUT
ADJ
ADJ
2
1
4
1V8_Tun
150mA
C193
C193
C191
C191
NC/22uF
NC/22uF
0.1uF
0.1uF
close the IC
C194
C194
47nF
47nF
5
4
PDF 文件使用 "pdfFactory Pro" 试用版本创建 ÿÿ www.fineprint.com.cn
Title
Title
Title
<Title>
<Title>
<Title>
SizeDocument NumberRev
SizeDocument NumberRev
SizeDocument NumberRev
<Doc><RevCode>
A3
<Doc><RevCode>
A3
<Doc><RevCode>
A3
Date:Sheet of
Date:Sheet of
3
2
Date:Sheet of
11Friday, November 28, 2014
11Friday, November 28, 2014
11Friday, November 28, 2014
1
Page 4

5
HDMI & Audio
N501C
HDMI Interface
DD
CC
HDMI1-RX0N
HDMI1-RX0P
HDMI1-RX1N
HDMI1-RX1P
HDMI1-RX2N
HDMI1-RX2P
HDMI1-CLKN
HDMI1-CLKP
HDMI1-SCL
HDMI1-SDA
HDMI1-HPDIN
HDMI2-RX0N
HDMI2-RX0P
HDMI2-RX1N
HDMI2-RX1P
HDMI2-RX2N
HDMI2-RX2P
HDMI2-CLKN
HDMI2-CLKP
HDMI2-SCL
HDMI2-SDA
HDMI2-HPDIN
HDMI3-RX0N
HDMI3-RX0P
HDMI3-RX1N
HDMI3-RX1P
HDMI3-RX2N
HDMI3-RX2P
HDMI3-CLKN
HDMI3-CLKP
HDMI3-SCL
HDMI3-SDA
HDMI3-HPDIN
HDMI-ARC
HDMI-CEC
HDMI1-RX0N
HDMI1-RX0P
HDMI1-RX1N
HDMI1-RX2N
HDMI1-RX2P
HDMI1-CLKN
HDMI1-CLKP
HDMI1-SCL
HDMI1-SDA
HDMI1-HPDIN
HDMI2-RX0N
HDMI2-RX0P
HDMI2-RX1N
HDMI2-RX1P
HDMI2-RX2N
HDMI2-RX2P
HDMI2-CLKN
HDMI2-CLKP
HDMI2-SCL
HDMI2-SDA
HDMI2-HPDIN
HDMI3-RX0N
HDMI3-RX0P
HDMI3-RX1N
HDMI3-RX1P
HDMI3-RX2N
HDMI3-RX2P
HDMI3-CLKN
HDMI3-CLKP
HDMI3-SCL
HDMI3-SDA
HDMI3-HPDIN
HDMI-ARC
HDMI-CEC
L2
M3
M2
M1
N3
N1
K2
L3
R6
T6
R5
H2
J3
J2
J1
K3
K1
G2
H3
P4
T5
P5
P2
R3
R2
R1
T3
T1
N2
P3
U5
U4
U6
E2
F3
F2
F1
G3
G1
D2
E3
N6
P6
M6
R4
M5
N501C
A_RX0N
A_RX0P
A_RX1N
A_RX1P
A_RX2N
A_RX2P
A_RXCN
A_RXCP
DDCDA_CK
DDCDA_DA
HOTPLUGA
B_RX0N
B_RX0P
B_RX1N
B_RX1P
B_RX2N
B_RX2P
B_RXCN
B_RXCP
DDCDB_CK
DDCDB_DA
HOTPLUGB
C_RX0N
C_RX0P
C_RX1N
C_RX1P
C_RX2N
C_RX2P
C_RXCN
C_RXCP
DDCDC_CK
DDCDC_DA
HOTPLUGC
D_RX0N
D_RX0P
D_RX1N
D_RX1P
D_RX2N
D_RX2P
D_RXCN
D_RXCP
DDCDD_CK
DDCDD_DA
HOTPLUGD
PAD_ARC0
CEC
MSD6369
MSD6369
AD1
LINE_IN_0L
AE3
LINE_IN_0R
LINE_IN_1L
AE1
LINE_IN_1L
LINE_IN_1RHDMI1-RX1P
AE2
LINE_IN_1R
AF3
LINE_IN_2L
AF2
LINE_IN_2R
AF4
LINE_IN_3L
AF5
LINE_IN_3R
AD6
MIC_IN
MICINCM
AC6
MIC_CM
EARPHONE_OUTL
AK4
HP_OUT_1L
HP_OUT_1R
LINE_OUT_0L
LINE_OUT_0R
LINE_OUT_2L
LINE_OUT_2R
Analog
Analog
Audio
Audio
HDMI
HDMI
I2S_OUT_BCK
I2S_OUT_MCK
I2S_OUT_WS
I2S_OUT_SD
I2S_IN_BCK
I2S_IN_WS
I2S_IN_SD
I2S
I2S
XTALOUT
SPDIF_IN
SPDIF_OUT
SPDIF
SPDIF
RESET
XTALIN
TESTPIN
EARPHONE_OUTR
AL4
AV-AUOUTL0
AG4
AV-AUOUTR0
AG5
AH4
AH5
AUVRP
AE5
VRP
AUVAG
AE4
VAG
AUVRM
AE6
VRM
I2S-OUT_BCK
H7
I2S-OUT_MCK
H5
I2S-OUT_WS
H4
L_DIM_DBL
H6
LVDS_SEL
E6
R0061KR0061K
E5
F6
IR_SYNC
M4
IRINT
System-RST
D5
XTALI
AM2
XTALO
AM3
N9
G6
SPDIF_OUT
G5
R098100RR098100R
3D_FLAG
4
C5011uF/6.3VC5011uF/6.3V
C5071uF/6.3VC5071uF/6.3V
C5081uF/6.3VC5081uF/6.3V
C5091uF/6.3VC5091uF/6.3V
C5132.2uF/10VC5132.2uF/10V
C5142.2uF/10VC5142.2uF/10V
HP_MUTE
3D_FLAG
C532
C532
33pF
33pF
Demod_RST
SPDIF_OUT
HD_Lin
HD_Rin
3
2
1
NAND & CI & TS & Front End
N501B
N501B
AJ28
PCM_D0
AH28
PCM_D1
AJ29
PCM_D2
VGA-Lin
VGA-Rin
HD1-Lin
HD1-Rin
MIC_INMICIN
MIC_IN
Audio Line Out
R5010RR501
靠近
L501
L501
10uH
10uH
L503
L503
10uH
10uH
0R
R5050RR505
0R
C527
C527
10uF/6.3V
10uF/6.3V
mstar IC
C506
C506
220pF
220pF
C515
C515
220pF
220pF
R524
R524
200R
200R
C518
C518
10uF/16V
10uF/16V
R530
R530
200R
200R
C525
C525
10uF/16V
10uF/16V
C528
C528
0.1uF
0.1uF
R503
R503
100K
100K
R508
R508
100K
100K
C529
C529
0.1uF
0.1uF
L505
L505
FB_0.3A/0402
FB_0.3A/0402
AV-AUOUTL0
AV-AUOUTR0
EARPHONE_OUTL
EARPHONE_OUTR
AUVRM
AUVRP
AUVAG
Close to MSTAR IC
with width trace
AUOUTL0
AUOUTR0
EARPHONE-OUTL
EARPHONE-OUTR
C530
C530
10uF/6.3V
10uF/6.3V
SD2-CLK
SD2-CMD
11
USB3_EN
SD_CDZ1
NAND_WEZ
EMMC_CMD
EMMC_RSTZ
EMMC_CLK
NAND_ALE
NAND_WPZ
NAND_CEZ
NAND_CE1Z
NAND_CLE
NAND_REZ
NAND_RBZ
PCM_D4
PCM_D4
PCM_D5
PCM_D5
PCM_D6
PCM_D6
PCM_D7
PCM_D7
SD2-CLK SD2-CLK
SD2-CMD SD2-CMD
USB3_EN USB3_EN
NAND_ALEEMMC_D1
NAND_WPZEMMC_D2
NAND_CEZEMMC_D6
NAND_CE1ZEMMC_D7
NAND_CLEEMMC_D5
NAND_REZEMMC_D4
NAND_WEZEMMC_D3
NAND_RBZEMMC_D0
EMMC_CMDNAND_D4
EMMC_RSTZNAND_D6
EMMC_CLKNAND_D5
AH26
PCM_D3
AJ26
PCM_D4
AG27
PCM_D5
AJ27
PCM_D6
AH27
PCM_D7
AJ21
PCM_A0
AG21
PCM_A1
AJ20
PCM_A2
AH19
PCM_A3
AH18
PCM_A4
AJ18
PCM_A5
AL18
PCM_A6
AM18
PCM_A7
AK15
PCM_A8
AL15
PCM_A9
AG17
PCM_A10
AG18
PCM_A11
AK17
PCM_A12
AL16
PCM_A13
AK16
PCM_A14
AG19
PCM_RESET
AM17
PCM_IRQA_N
AM15
PCM_IOWR_N
AH17
PCM_OE_N
AG20
PCM_WAIT_N
AJ17
PCM_IORD_N
AH16
PCM_CD_N
AH20
AL17
AG16
AH29
AE32
AE31
AG28
SD_CDZ1SD_CDZ1
AE30
AG23
AJ23
AG25
AJ24
AH24
AH25
AH23
AG24
AG26
AH22
AH21
AG22
C534
C534
C533
C533
33pF
33pF
33pF
33pF
靠近主IC
TS2_CLK/NAND_D0
PCM_REG_N
TS2_VLD/NAND_D2
PCM_WE_N
TS2_SYNC/NAND_D1
PCM_CE_N
PCM2_CD_N/NAND_D7
PCM2_CE_N/SD_CLK
PCM2_IRQA_N/SD_CMD
PCM2_RESET/SD_CLK1
PCM2_WAIT_N/SD_CMD1
NAND_ALE/EMMC_D1
NAND_WPZ/EMMC_D2
NAND_CEZ/EMMC_D6
NAND_CE1Z/EMMC_D7
NAND_CLE/EMMC_D5
NAND_REZ/EMMC_D4
NAND_WEZ/EMMC_D3
NAND_RBZ/EMMC_D0
NAND_DQS
EMMC_CMD/NAND_D4
EMMC_RSTZ/NAND_D6
EMMC CLK/NAND_D5
MSD6369
MSD6369
TS0_D0
TS0_D1
TS0_D2
TS0_D3
TS0_D4
TS0_D5
TS0_D6
TS0_D7
TS0_CLK
TS0_VLD
TS0_SYNC
TS1_D0
TS1_D1
TS1_D2
TS1_D3
TS1_D4
TS1_D5
TS1_D6
TS1_D7
TS1_CLK
TS1_VLD
TS1_SYNC
TS2_D0/NAND_D3
TS2_D1
TS2_D2
TS2_D3
TS2_D4
TS2_D5
TS2_D6
TS2_D7
SSIF/SIFP
SSIF/SIFM
IFAGC
RF_TAGC
TGPIO0/UPGAIN
TGPIO1
TGPIO2/ I2C_CLK
TGPIO3/ I2C_SDA
AG15
AJ15
AH15
AG11
AH11
AJ11
AG12
AJ12
AG14
AH14
AJ14
AL12
AK12
AL13
AK13
AL14
AH12
AH13
AG13
AK14
AM14
AM12
AK10
AL10
AK9
AL9
AG10
AH10
AH9
AJ9
AK11
AM11
AL11
AJ3
IP
AH2
IM
AJ1
VIFP
AJ2
VIFM
AK2
AK1
AG1
AH3
AG2
AG3
AL1
AL2
RST_TUN
TS1_D[7:0]
TS1_D0
TS1_D1
TS1_D2
TS1_D3
TS1_D4
TS1_D5
TS1_D6
TS1_D7
TS1_CLK
TS1_CLK
TS1_VALID
TS1_VALID
TS1_SYNC
TS1_SYNC
C520NC/0.1uFC520NC/0.1uF
C522NC/0.1uFC522NC/0.1uF
C5230.1uFC5230.1uF
C5240.1uFC5240.1uF
Closed to MST IC
IF-AGC-SEL
R4790RR479
XTALO
0R
R4801MR480
1M
XTALI
NOTE:晶体频偏需要小于30PPM
C1=C2=2*CL-5
IFP
IFN
Closed to MSTIC
R53110KR53110K
R5320RR5320R
C536
C536
C535
C535
33pF
33pF
C560
C560
C1
20pF
20pF
3
Z501
Z501
1 2
24.000MHz
24.000MHz
C561
C561
20pF
20pF
C2
电源纹波在50mV以内
IF_AGC_A
C526
C526
22nF
22nF
3 1
4 2
3 1
4 2
RA5224.7Kx2
RA5224.7Kx2
Closed to MSTIC
33pF
33pF
3V3_TUN
TUNER_SCL
TUNER_SDA
3V3_TUN
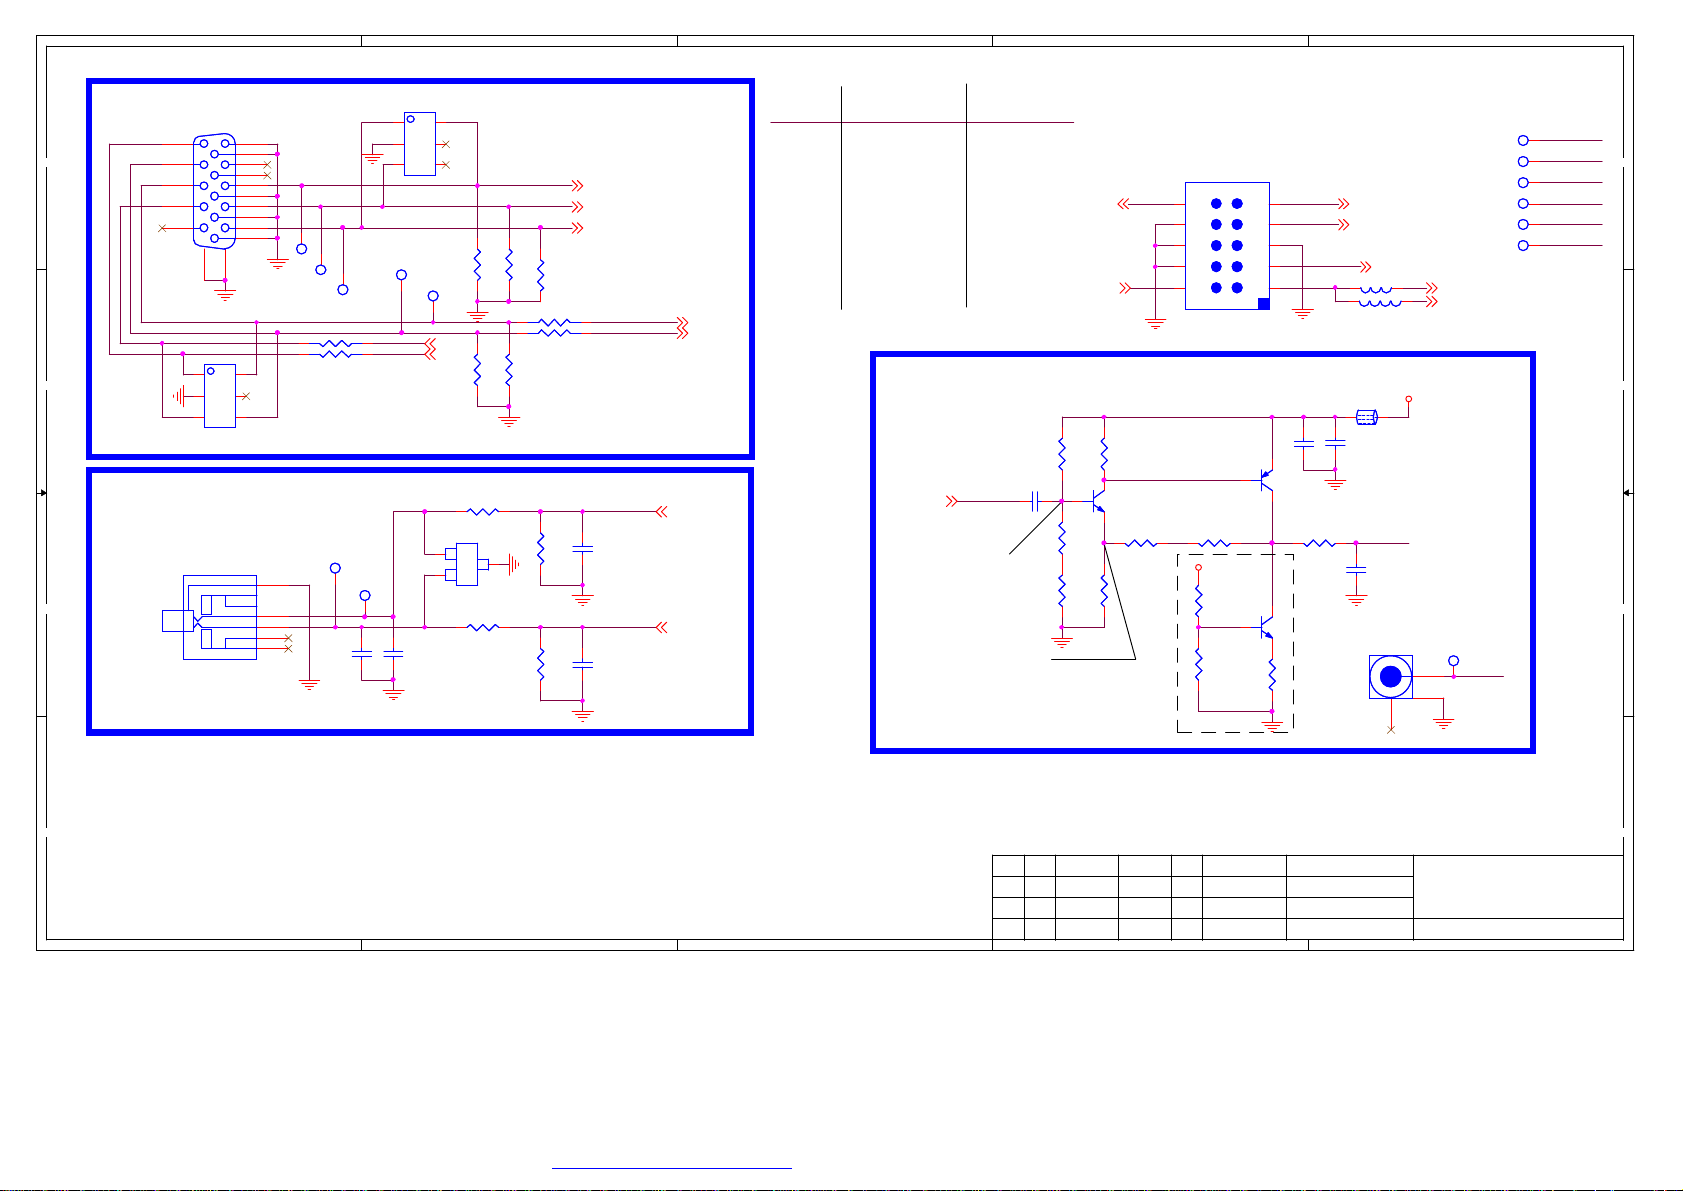
RGB & CVBS & LAN & USB
Close to MST IC
VGA-Rin+
with wide trace
VGA-Gin+
VGA-Bin+
VGA_HSYNC
VGA_VSYNC
YPbPr_PR+
YPbPr_Y+
YPbPr_PB+
BB
Mode Selection
3V3_Normal
AA
12
XS512
XS512
12
10
11
11
//{I2S_OUT_WS,I2S_OUT_BCK, I2S_OUT_MCK, PAD_PWM1, PAD_PWM0}
4'b00000 B51_NO_EJ (External SPI)
4'b00011 CA9_EMMC_NO_EJ
4'b00100 CA9_SPI_NO_EJ (External SPI)
4'b00110 CA9_ROM_NO_EJ
4'b01100 CA9_EMMC_M2_NO_EJ
PWM_PM
R5924.7KR5924.7K
I2S-OUT_WS
R0084.7KR0084.7K
I2S-OUT_BCK
R5944.7KR5944.7K
I2S-OUT_MCK
R5954.7KR5954.7K
CFG-PWM1
R5964.7KR5964.7K
CFG-PWM0
R4744.7KR4744.7K
LOCAL DIMMING
RA528
RA528
22Rx4
22Rx4
CSB
1
2
3
4
5
6
7
8
9
D1251_10
D1251_10
1
SCK
2
MISO
3
MOSI
4
GND
5
VSYNC_LIKE
6
EN
7
FAULT
8
GND
9
10
7 5 3 1
8 6 4 2
7 5 3 1
8 6 4 2
R041
R041
22R
22R
R042
R042
NC/22R
NC/22R
NC/22R
NC/22R
R043
R043
VSYNC_LIKE
R027
R027
22R
22R
ON_BKLTEN
5
R54768R R54768R
R55933R R55933R
R54968R R54968R
R56033R R56033R
R55068R R55068R
R55133R R55133R
R5530R R5530R
R56468R R56468R
R56633R R56633R
R56868R R56868R
R56933R R56933R
R57068R R57068R
R57233R R57233R
R5740R R5740R
PAD_SPI2_DI
PAD_SPI2_CK
PAD_SPI1_DI
PAD_SPI1_CK
PAD_VSYNC_LIKE
SCN_EN_TCON
NC/D2006-2A
NC/D2006-2A
GND
RIN0N
C54147nF C54147nF
RIN0
C54247nF C54247nF
GIN0N
C53747nF C53747nF
GIN0
C53847nF C53847nF
BIN0N
C54347nF C54347nF
BIN0
C53947nF C53947nF
SOGIN0
C5401nF C5401nF
VGA_HSYNC
VGA_VSYNC
RIN1N
C54447nF C54447nF
RIN1
C54547nF C54547nF
GIN1N
C54647nF C54647nF
GIN1
C54747nF C54747nF
BIN1N
C54847nF C54847nF
BIN1
C55147nF C55147nF
SOGIN1
C5521nF C5521nF
XS513
XS513
1
2
RIN0N
RIN0
GIN0N
GIN0
BIN0N
BIN0
SOGIN0
VGA_HSYNC
VGA_VSYNC
RIN1N
RIN1
GIN1N
GIN1
BIN1N
BIN1
SOGIN1
N501E
N501E
W3
RIN0M
V1
RIN0P
V2
GIN0M
V3
GIN0P
U3
BIN0M
T2
BIN0P
U2
SOGIN0
Y4
HSYNC0
Y5
VSYNC0
AA1
AA2
AA3
Y2
W2
W1
Y3
AD2
AD3
AC2
AC3
AB1
AB3
AB2
AA5
Y6
RIN1M
RIN1P
GIN1M
GIN1P
BIN1M
BIN1P
SOGIN1
RIN2M
RIN2P
GIN2M
GIN2P
BIN2M
BIN2P
SOGIN2
HSYNC1
VSYNC1
MSD6369
MSD6369
6A801 NC
RGB
RGB
POWER-ON_D
POWER-ON
CVBS_OUT1
CVBS PHYUSB
CVBS PHYUSB
CVBS_OUT2
PWM_LED
A5
RN
B5
RP
C5
TN
B4
TP
C4
GPIO19
A3
GPIO20
A2
DM_P0
B2
DP_P0
B1
NC/DM_P1
C2
NC/DP_P1
AK5
DM_P2
AM6
DP_P2
AK7
DM
AL8
DP
AK8
NC/SSRXN
AM8
NC/SSRXP
AL7
NC/SSTXN
AK6
NC/SSTXP
AB5
CVBS3P
AC5
CVBS2P
AB6
CVBS1P
AB4
CVBS0P
AA6
VCOM0
AC4
AD5
RESET
N515
N515
3.3Vstb
RESET
3
VCC
GND
C557
C557
APX810
APX810
0.1uF
0.1uF
LED_IR_KEY
XS630
XS630
D2006-6W
D2006-6W
1
2
3
4
5
6
R413NC/10KR413NC/10K
R409NC/10KR409NC/10K
R40810KR40810K
4
MDI_RN
MDI_RP
MDI_TN
MDI_TP
USB0_DUSB0_D+
USB1_DUSB1_D+
USB2_DUSB2_D+
USB3_DUSB3_D+
USB3_SSRXN
USB3_SSRXP
USB3_SSTXN
USB3_SSTXP
CVBS3
VCOM0
CVBS_OUT
XS627
XS627
NC/D1250-06
NC/D1250-06
R007330KR007330K
R585100RR585100R
2
1
78
1
2
3
4
5
6
3.3Vstb
R0211KR021
1K
LAN-LED03
LAN-LED13
USB0_DUSB0_D+
USB1_DUSB1_D+
USB2_DUSB2_D+
USB3_DUSB3_D+
USB3_SSRXN
USB3_SSRXP
USB3_SSTXN
USB3_SSTXP
CVBS_OUT
3.3Vstb
3.3Vstb
KEY0
STB_POWER
LOGO_POWER
5VSTBIN
R500
R500
NC/1K
NC/1K
STB_POWER
V501
V501
3904
3904
System-RST
IR_in
CVBS3
VCOM0
LED_GREEN
3.3Vstb
R401
R401
10K/1%
10K/1%
C563
C563
0.1uF
0.1uF
R555 49.9R/1%R555 49.9R/1%
R554 49.9R/1%R554 49.9R/1%
C549
C549
0.1uF
0.1uF
USB3.0 for 6A806
C55347nFC55347nF
C55547nFC55547nF
XS511
XS511
D2006-4A
D2006-4A
IR_in
R40710KR40710K
R55 6 49 .9R /1%R5 56 4 9.9 R/1 %
C550
C550
0.1uF
0.1uF
R58133RR58133R
R58368RR58368R
RA521
RA521
10Kx2
10Kx2
1
2
3
4
R405100RR405100R
Close to MST IC
R557 49.9R/1%R557 49.9R/1%
5Vstb
MUST pull high to 5VSTB
31
31
Debug port
42
42
3.3Vstb
R4154.7K R4154.7K
IR_SYNC
C564
C564
100pF
100pF
5VA
R0051KR005
1K
LOGO_POWER
V502
V502
3904
3904
AV2_VIN
MDI_RN
MDI_RP
MDI_TN
MDI_TP
UART-RX
UART-TX
R404
R404
NC/1K_1%
NC/1K_1%
C565
C565
NC/10nF
NC/10nF
POWER_KEY
3.3Vstb
GPIO Pull Up/Down
MHL_SENSE
MHL_PW_EN
SD_CDZ2
3D_EN_TCON
3D_LR_in
R400
R400
R403NC/0RR403NC/0R
XS631
XS631
PWM_PM
SCN_EN_TCON
0R/NC
0R/NC
R410
R410
1K_1%
1K_1%
KEY0
C400
C400
10nF
10nF
R0204.7KR0204.7K
R5524.7KR5524.7K
R5624.7KR5624.7K
R5654.7kR5654.7k
R567NC/4.7KR567NC/4.7K
R563
R563
R5714.7KR5714.7K
R0174.7kR0174.7k
R5774.7kR5774.7k
R5784.7kR5784.7k
R5794.7kR5794.7k
R5804.7KR5804.7K
for SG Glasses
56
1
2
3
4
3.3Vstb
R4190RR419
POWER_KEY
3.3V_ADC
C566
C566
NC/10nF
NC/10nF
3.3Vstb_D
R411
R411
NC/10K
NC/10K
3
I/O_R
BRI_ADJ
Demod_RST
LVDS_SEL
L_DIM_DBL
ON_BKLT
PM_PWR_ON
HP_MUTE
VID0
VID1
PANEL-ON
AMP-MUTE
PWM_PM
MHL_SENSE
MHL_PW_EN
SD_CDZ2
3D_EN_TCON
3D_SYNC
SCN_EN_TCON
M_SCL
M_SDA
IR_in
IRIR
KEY0
KEYKEY
POWER_KEY
1
2
3
4
C401
C401
NC/D2006_03W
NC/D2006_03W
NC/10nF
NC/10nF
POWER_KEY1
R040
R024
R024
NC/0R
NC/0R
R040
NC/10K
NC/10K
V503
V503
32
NC/3906
NC/3906
1
R412
R412
NC/0R
NC/0R
PWM3固定做3D输出
1、901做3D flag输出给6M30
2、906做 LR flag输出给3D Active屏
3V3_Normal
NC/4.7k
NC/4.7k
3.3Vstb
XS649
XS649
NC/D2006-5A
NC/D2006-5A
XS629
XS629
NC/D1250-03
NC/D1250-03
0R
1
2
3
4
5
XS628
XS628
1
2
3
D2006_03W
D2006_03W
PWM_LED
SAR
口耐压只能到
R019NC/0R R019NC/0R
R018NC/0R R018NC/0R
R026NC/0R R026NC/0R
CFG-PWM0
CFG-PWM1
BRI_ADJ
PWM_PM
3.3V!!!!!
KEY0
R5861KR5861K
VID0
SCN_EN_TCON
I/O_R
SPI_SCK
SPI_SDI
SPI_SDO
SPI_CSN
VID1
100RX2
100RX2
UART-RX
UART-TX
3 1
3 1
RA523
RA523
M_SCL
M_SDA
3D_EN_TCON
POWER_KEY1
FLASH-WPN
PANEL-ON
PM_PWR_ON
ON_BKLT
AMP-MUTE
MHL_SENSE
SD_CDZ2
PM8保留做3D LR眼镜信号输入
3D_LR_in
LED_GREEN
PAD_SPI1_CK
PAD_SPI1_DI
PAD_SPI2_CK
PAD_SPI2_DI
PAD_VSYNC_LIKE
Dongle BOARD
3D_SYNC
3D_SYNC
I/O_R
I/O_R
POWER-ON_D
POWER-ON_D
XS648
XS648
NC/D1251-02
NC/D1251-02
STB_POWER
2
1
3 4
2
GPIO & LVDS
N501D
N501D
B7
PWM0
C8
PWM1
B8
PWM2
C7
PWM3
N5
PWM_PM
K6
SAR0
L5
SAR1
L6
SAR2
L4
SAR3
C1
PM_SPI_CK
D3
PM_SPI_DI
D1
PM_SPI_DO
D4
PM_SPI_CS1/PM6
E4
PM_SPI_CS2/PM10
J5
DDCA_CK/UART0_RX
4 2
4 2
J6
DDCA_DA/UART0_TX
F5
DDCR_CK
F4
DDCR_DA
A6
GPIO4
B6
GPIO3
C6
GPIO2
B3
GPIO_PM0
K5
GPIO_PM1/PM_UART_TX
C3
GPIO_PM4
J4
GPIO_PM5/PM_UART_RX
D6
GPIO_PM7/PM_SPI_WP2
AK3
GPIO_PM14
AL3
GPIO_PM15
AJ4
GPIO_PM16
G8
GPIO_PM8
G9
PM_SPI_CZ
AD31
PM_SPI1_CK
AD32
PM_SPI1_DI
AC31
PM_SPI2_CK
AC30
PM_SPI2_DI
AD30
PM_VSYNC_LIKE
MSD6369
MSD6369
3.3Vstb
C558
C558
0.1uF
0.1uF
3.3Vstb
标记数量签名更改单号
标记数量签名更改单号
标记数量签名更改单号
VDDVDD
SCKSCK
SDISDI
R4774.7KR4774.7K
R478NC/4.7KR478NC/4.7K
PWM SAR SPI
PWM SAR SPI
SPI_SCK
SPI_SDI
SPI_SDI
日期
日期
日期
AF31
A0P
AF30
A0M
AG31
A1P
AG32
A1M
AG30
A2P
AH32
A2M
AH31
ACKP
AH30
ACKM
AJ31
A3P
AJ30
A3M
AK31
A4P
AK32
A4M
AK30
B0P
AL32
B0M
AL31
B1P
AM31
B1M
AL30
B2P
AM30
B2M
AK29
BCKP
AM29
BCKM
AL29
GPIO
GPIO
B3P
AK28
B3M
AL28
B4P
AK27
B4M
C0P
AL27
C0P
C0M
AM27
C0M
C1P
AK26
LVDS
LVDS
C1P
C1M
AM26
C1M
C2P
AL26
C2P
C2M
AK25
C2M
CCKPMHL_PW_EN
AL25
CCKP
CCKM
AK24
CCKM
C3P
AL24
C3P
C3M
AM24
C3M
C4P
AK23
C4P
C4M
AM23
C4M
D0P
AL23
D0P
D0M
AK22
D0M
D1P
AL22
D1P
D1M
AK21
D1M
D2P
AL21
D2P
D2M
AM21
D2M
DCKP
AK20
DCKP
DCKM
AM20
DCKM
D3P
AL20
D3P
D3M
AK19
D3M
D4P
AL19
D4P
D4M
AK18
D4M
N506
N506
8
VDD
7
HOLD#
6
SCK
5
W25X80A
W25X80A
SPI_CSN
1
CE#
SPI_SDO
2
SO
WPWP
3
WP#
VSS4SI
C559
C559
0.1uF
0.1uF
拟制
拟制
拟制
审核
审核
审核
R6_RXO0+
R7_RXO0R4_RXO1+
R5_RXO1R2_RXO2+
R3_RXO2R0_RXOC+
R1_RXOCG6_RXO3+
G7_RXO3G4_RXO4+
G5_RXO4-
G2_RXE0+
G3_RXE0G0_RXE1+
G1_RXE1B6_RXE2+
B7_RXE2B4_RXEC+
B5_RXECB2_RXE3+
B3_RXE3B0_RXE4+
B1_RXE4-
SPI Flash
CSNCSN
SDOSDO
FLASH-WPN
R4751KR4751K
R476
R476
10K
10K
*100MHz, No any VIA hole!
02.MSD6369(RGB/CI/HDMI)
02.MSD6369(RGB/CI/HDMI)
02.MSD6369(RGB/CI/HDMI)
第
第
第
1
2
2
2
张
张
张
PDF 文件使用 "pdfFactory Pro" 试用版本创建 ÿÿ www.fineprint.com.cn
Page 5
5
4
3
2
1
Power interface
VDDC1.15V
C567
C567
C403
C516
C516
0.1uF
0.1uF
C570
C570
0.1uF
0.1uF
PGA_VCOM
C576
C576
2.2uF/6.3V
2.2uF/6.3V
C581
C581
0.1uF
0.1uF
C586
C586
0.1uF
0.1uF
Close to MSD6369
0.1uF
0.1uF
C582
C582
0.1uF
0.1uF
C589
C589
1uF/6.3V
1uF/6.3V
C573
C573
0.1uF
0.1uF
C402
C402
22uF/6.3V
22uF/6.3V
C578
C578
0.1uF
0.1uF
C583
C583
0.1uF
0.1uF
C403
22uF/6.3V
22uF/6.3V
C571
C571
0.1uF
0.1uF
C584
C584
0.1uF
0.1uF
C587
C587
0.1uF
0.1uF
C592
C592
0.1uF
0.1uF
C588
C588
0.1uF
0.1uF
22uF/6.3V
22uF/6.3V
C404
C404
C577
C577
C405
C405
0.1uF
0.1uF
22uF/6.3V
22uF/6.3V
power for 6A806
VCC_VSENSE
3.3Vstb
VDDC1.15V
C572
C572
1uF/6.3V
1uF/6.3V
AVDD25_PGA
L507
L507
FB_0.3A/0402
FB_0.3A/0402
L508FB_0.3A/0402L508FB_0.3A/0402
L509FB_0.3A/0402L509FB_0.3A/0402
3V3_Normal
+1.5V_DDR
AVDD5V_MHL
3V3_Normal
TP2TP2
TP3TP3
2.5V_Normal
1
1
PGA_VCOM
VSENSE_VSS
VSENSE_VDD
AC25
AC26
AC27
AC28
AC29
AD27
AD28
AD29
AA24
AB24
AB25
AB26
AB18
AB19
AB20
W24
U24
V23
V24
W22
Y21
AA22
Y22
AA23
AB23
U8
AF8
AG9
AH8
AG8
AF9
AF10
AJ7
AH7
V8
V7
V5
V6
W5
W6
V4
W4
W7
L19
L20
L21
L22
K18
L18
M22
N22
N23
P23
L23
M23
AL5
AM5
AA25
AA26
M9
A15
A17
A24
A26
A31
B9
B14
B16
B18
B23
B25
B27
B32
C11
C12
C13
C20
C21
C22
C29
D25
D26
D27
D28
D29
D30
E25
E28
E29
F9
F10
F11
F12
F13
F14
F15
F16
F17
F18
F19
F20
F21
F22
F23
F24
F28
F29
F31
G27
G32
H27
H31
J27
J32
K27
K31
L27
L30
M27
M30
N27
N30
P27
R27
R31
T27
T32
U27
U31
V27
V32
W27
W31
Y27
Y30
AA27
AA30
AB27
AB28
AB29
AB30
D7
MSD6369
MSD6369
N501F
N501F
R11
R12
R13
A8
VDDC
GND
GND
GND
GND
VDDC
VDDC
VDDC
VDDC
VDDC
VDDC
VDDC
VDDC
VDDC
VDDC
VDDC
VDDC
VDDC
VDDC
VDDC_CPU
VDDC_CPU
VDDC_CPU
VDDC_CPU
VDDC_DDR
AVDDL_HDMITX
AVDDL_MOD
AVDD11_ETH
AVDD1P1_ADC
AVDDLV_USB
DVDD_NODIE
AVDD25_DADC
AVDD25_DADC
AVDD25_ADC
AVDD25_ADC
AVDD25_ETH
AVDD_MOD
AVDD25_PGA
PGA_VCOM
AVDD_DMPLL
AVDD_NODIE
AVDD_DVI
AVDD_DVI
AVDD_AU33
AVDD_EAR33
AVDD3P3_ADC_MPLL
VDDP
AVDD_LPLL
AVDD_DDR0_D
AVDD_DDR0_D
AVDD_DDR0_D
AVDD_DDR0_D
AVDD_DDR0_C
AVDD_DDR0_C
AVDD_DDR1_D
AVDD_DDR1_D
AVDD_DDR1_D
AVDD_DDR1_D
AVDD_DDR1_C
AVDD_DDR1_C
AVDD5V_MHL
VDD_3318
VSENCE_VSS
VSENCE_VDD
GEN_EFUSE
GND
GND
GND
GND
GND
GND
GND
GND
GND
GND
GND
GND
GND
GND
GND
GND
GND
GND
GND
GND
GND
GND
GND
GND
GND
GND
GND
GND
GND
GND
GND
GND
GND
GND
GND
GND
GND
GND
GND
GND
GND
GND
GND
GND
GND
GND
GND
GND
GND
GND
GND
GND
GND
GND
GND
GND
GND
GND
GND
GND
GND
GND
GND
GND
GND
GND
GND
GND
GND
GND
GND
GND
GND
GND
GND
GND
GND
GND
GND
GND
GND
GND
GND
GND
GND
GND
GND
GND
AA11
AA12
AA13
AA14
AA15
AA16
R14
R15
R16
R17
R18
R19
R20
R21
R22
R23
R24
R26
T10
T11
T12
T13
T14
T15
T16
T17
T18
T19
T20
T21
T22
T23
T24
T25
T26
U10
U11
U12
U13
U14
U15
U16
U17
U18
U19
U20
U21
U22
U23
U25
U26
V10
V11
V12
V13
V14
V15
V16
V17
V18
V19
V20
V21
V22
V25
V26
W10
W11
W12
W13
GND
GND
GND
GND
GND
GND
GND
GND
GND
GND
GND
GND
GNDT7GNDT8GNDT9GND
GND
GND
GND
GND
GND
GND
GND
GND
GND
GND
GND
GND
GND
GND
GND
GND
GNDU7GNDU9GND
GND
GND
GND
GND
GND
GND
GND
GND
GND
GND
GND
GND
GND
GND
GND
GNDV9GND
GND
GND
GND
GND
GND
GND
GND
GND
GND
GND
GND
GND
GND
GND
GND
GND
GND
GND
GND
GND
GND
GND
GND
GND
GND
GND
GND
GND
GND
GND
GND
GND
GND
GND
GND
GND
GND
GND
GND
GND
GND
GND
GND
GND
GND
GND
GND
GND
GND
GND
GND
GND
GND
AB7
AB8
AB9
AC7
AC8
AA17
AA18
AA19
AA20
AA21
AB10
AC9
AB11
AB12
AB13
AB14
AB15
AB16
AB17
AB21
AB22
AC10
AC11
AC12
AC13
AD7
AD8
AC14
AC15
AC16
AD9
AC17
AC18
AC19
AC20
AC21
AC22
AC23
AC24
AD10
AD11
AD12
GND
AD13
AD14
AD15
AD16
AD17
AD18
AD19
AD20
AD21
AD22
AD23
P9
GND
GND
GND
GND
GND
GND
GND
GND
GND
GND
GND
GND
GND
GNDW8GNDW9GND
GND
GND
GND
GND
GND
GND
GND
GND
GND
GND
GND
GND
GND
GND
GND
GND
GND
GND
GND
GND
GND
AE7
AE8
AE9
AD24
AD25
AD26
AE10
AE11
GND
AE12
AE13
AE14
AE15
AE16
AE17
AE18
AE19
AE20
AE21
AE22
AE23
D8
W14
W15
W16
W17
W18
W19
W20
W21
W23
W25
W26
Y10
Y11
Y12
Y13
Y14
Y15
Y16
Y17
Y18
Y19
Y20
Y23
Y24
Y25
Y26
AA7
AA8
AA9
AA10
E7
GND
GND
GND
GND
GND
GND
GND
GND
GND
GND
GND
GND
GND
GNDY7GNDY8GNDY9GND
GND
GND
GND
GND
GND
GND
GND
GND
GND
GND
GND
GND
GND
GND
GND
GND
GND
GND
GND
GND
GND
GND
GND
GND
GND
GND
GND
GND
GND
GND
GND
GND
AF6
AF7
AF11
AF12
AF13
AF14
AE24
AE25
AE26
AF15
AE27
AE28
AE29
GND
AF16
AF17
AF18
AF19
AF20
AF21
AF22
AF23
AF24
AF25
AF26
AF27
GND
GND
GND
GND
GND
GND
GND
GND
GND
GND
GND
E8
GND
AL6
GND
AM9
GND
F7
GND
F8
GND
G7
GND
G10
GND
G11
GND
G12
GND
G13
GND
G14
GND
G15
GND
G16
GND
G17
GND
G18
GND
G19
GND
G20
GND
G21
GND
G22
GND
G23
GND
H8
GND
H9
GND
H10
GND
H11
GND
H12
GND
H13
GND
H14
GND
H15
GND
H16
GND
H17
GND
H18
GND
H19
GND
H20
GND
H21
GND
H22
GND
H26
GND
J7
GND
J8
GND
J9
GND
J10
GND
J11
GND
J12
GND
J13
GND
J14
GND
J15
GND
J16
GND
J17
GND
J18
GND
J19
GND
J20
GND
J21
GND
J26
GND
K7
GND
K8
GND
K9
GND
K10
GND
K11
GND
K12
GND
K13
GND
K14
GND
K15
GND
K16
GND
K17
GND
K19
GND
K20
GND
K21
GND
K25
GND
K26
GND
L7
GND
L8
GND
L9
GND
L10
GND
L11
GND
L12
GND
L13
GND
L14
GND
L15
GND
L16
GND
L17
GND
L24
GND
L25
GND
L26
GND
M7
GND
M8
GND
M10
GND
M11
GND
M12
GND
M13
GND
M14
GND
M15
GND
M16
GND
M17
GND
M18
GND
M19
GND
M20
GND
M21
GND
M24
GND
M25
GND
M26
GND
N7
GND
N8
GND
N10
GND
N11
GND
N12
GND
N13
GND
N14
GND
N15
GND
N16
GND
N17
GND
N18
GND
N19
GND
N20
GND
N21
GND
N24
GND
N25
GND
N26
GND
P7
GND
P8
GND
P10
GND
P11
GND
P12
GND
P13
GND
P14
GND
P15
GND
P16
GND
P17
GND
P18
GND
P19
GND
P20
GND
P21
GND
P22
GND
P24
GND
P25
GND
P26
GND
R7
GND
R8
GND
R9
GND
R10
GND
R25
GND
GND
GND
GND
GND
GND
GND
GND
GND
GND
AJ5
AJ6
AH6
AG6
AG7
AF28
AF29
AG29
C505
C505
C502
C502
2.2uF/6.3V
2.2uF/6.3V
DD
CC
2.5V
2.5V_Normal
C503
C503
0.1uF
0.1uF
0.1uF
0.1uF
Close to MSD6369
C568
C568
2.2uF/6.3V
2.2uF/6.3V
L506
L506
FB_0.3A/0402
FB_0.3A/0402
Close to MSD6369
C511
C511
0.1uF
0.1uF
C569
C569
0.1uF
0.1uF
AVDD25_PGA
0.1uF
0.1uF
C512
C512
0.1uF
0.1uF
Close to MSD6369
C574
C574
Standby Power 3.3V
3.3Vstb
C575
C575
0.1uF
0.1uF
Close to MSD6369
DDR3 POWER
+1.5V_DDR
C579
C579
C580
C580
2.2uF/6.3V
2.2uF/6.3V
2.2uF/6.3V
2.2uF/6.3V
Close to MSD6369
Normal Power 3.3V
BB
AA
3V3_Normal
C585
C585
2.2uF/6.3V
2.2uF/6.3V
5
4
3
PDF 文件使用 "pdfFactory Pro" 试用版本创建 ÿÿ www.fineprint.com.cn
拟制
拟制
拟制
审核
审核
审核
标记
数量签名更改单号
标记
数量签名更改单号
标记
2
数量签名更改单号
日期
日期
日期
03.MSD6369(POWER/GND)
03.MSD6369(POWER/GND)
03.MSD6369(POWER/GND)
第 张
第 张
第 张
1
3
3
3
Page 6
5
4
3
2
1
AV
N602
42
42
PC_RPC_R
C604
C604
10nF
10nF
1
2
3
VGA_VSVGA_VS
VGA_HS
VGA_VS
UART-TX
UART-RX
C605
C605
10nF
10nF
N602
IP4223CZ6
IP4223CZ6
VGA_HSVGA_HS
UART-TX
UART-RX
1
2
PESD5VOS2BT
PESD5VOS2BT
4
5
6
R604
R604
75R
75R
R608
R608
10K
10K
R61210KR61210K
V608
V608
C
C
3
D
D
ESD
ESD
C
C
R61410KR61410K
R605
R605
75R
75R
R607
R607
10K
10K
R606
R606
75R
75R
RA618
RA618
3 1
3 1
100Rx2
100Rx2
R613
R613
12K
12K
R615
R615
12K
12K
VGA-Bin+
VGA-Gin+
VGA-Rin+
VGA_HSYNC
4 2
4 2
VGA_VSYNC
C603
C603
560pF
560pF
C606
C606
560pF
560pF
VGA-Rin
VGA-Lin
VGA_HSYNC
VGA_VSYNC
SPDIF
Y
Pb
Pr
R
L
XS605
VGA
DD
CC
15
14
13
12
11
XS605
VGA
VGA
16
N601
N601
1
2
3
IP4223CZ6
IP4223CZ6
5
10
4
9
RGB1-VGA_B
3
8
RGB1_VGA-G
2
7
RGB1-VGA_R
1
6
VGA_BVGA_B
17
4
5
6
VGA-GVGA-G
RA619
RA619
0Rx2
0Rx2
31
31
VGA_RVGA_R
VGA_AUDIO_IN
XS615
XS615
BB
EAR
EAR
1
3
2
4
5
PC_LPC_L
PC_R
PC_L
板主板
Pin10
Pin9
Pin7
Pin3
Pin1
Pin2
Pin2
Pin1
Pin3
Pin7
Pin9
Pin10
VIDEO OUT
CVBS_OUT
偏压调整,
使
V602-E=1.2VDC
C60210uFC60210uF
HD1-Lin
SPDIF_OUT
R636
R636
22K
22K
1
R627
R627
6.8K
6.8K
R632
R632
6.8K
6.8K
1.2VDC
AV/YPbPr&SPDIF
XS624
XS624
1
9
9
7
7
5
5
3
3
1
1
C616
C616
0.1uF
0.1uF
V602
V602
3906
3906
R62675RR62675R
V605
V605
3904
3904
2 3
R644
R644
33R
33R
HD1_Y
5V_AMP
C643
C643
10uF
10uF
10
R628
R628
5.1K
5.1K
V603
V603
3904
3904
2 3
R624499R/1%R624499R/1%
R641
R641
499R 1%
499R 1%
10
8
8
6
6
4
4
2
2
HEADER_5x2
HEADER_5x2
R64949.9R/1%R64949.9R/1%
5V_AMP
R657
R657
3.9K
3.9K
R656
R656
1.2K
1.2K
恒流源
HD1-Rin
YPBPR_Pr+
YPBPR_Pb+
L6030RL603
L6010RL6010R
L605
L605
1 2
FB_1.8A
FB_1.8A
AVOUT
C644
C644
47pF/NC
47pF/NC
HD1-LinHD1-Lin
SPDIF_OUTSPDIF_OUT
YPBPR_Pr+YPBPR_Pr+
YPBPR_Pb+YPBPR_Pb+
HD1-RinHD1-Rin
HD1_YHD1_Y
0R
YPbPr_Y+
AV2_VIN
5VA
XS613
XS613
AVOUTAVOUT
AVOUT
2
AVOUT
AVOUT
1
3
HD1-Lin
SPDIF_OUT
YPBPR_Pr+
YPBPR_Pb+
HD1-Rin
HD1_Y
AA
拟制
拟制
拟制
审核
审核
审核
标记
数量签名更改单号
标记
数量签名更改单号
标记
5
4
3
数量签名更改单号
日期
日期
日期
2
04.YPbPr&AV
04.YPbPr&AV
04.YPbPr&AV
第
张4
第
张4
第
张4
1
PDF 文件使用 "pdfFactory Pro" 试用版本创建 ÿÿ www.fineprint.com.cn
Page 7

5
AMP
12VIN
L201FB_4AL201FB_4A
12
DD
N204
N204
5Vstb
AMP-MUTE
CC
PH_Drive
BB
EARPHONE-L
EARPHONE-R
RESET#
3
VCC
GND
APX809-4.4
APX809-4.4
EARPHONE-OUTL
EARPHONE-OUTR
2
1
MUTE_EN
C231
C231
22uF/6.3V
22uF/6.3V
C232
C232
22uF/6.3V
22uF/6.3V
R219
R219
47K
47K
R22310KR22310K
R23010KR23010K
C278
C278
1uF/6.3V
1uF/6.3V
C276
C276
1uF/6.3V
1uF/6.3V
EARPHONE-OUTL
EARPHONE-OUTR
L209
L209
FB_33000440
FB_33000440
12
12
L211
L211
FB_33000440
FB_33000440
C233
C233
470pF
470pF
GAIN0GAIN1GAIN (dB)
0
C204
C204
1uF/25V
1uF/25V
H:OFF
L:ON
10uF/10V
10uF/10V
R269
R269
10K
10K
R258
R258
10K
10K
1
1
R22510K/NCR22510K/NC
R2291KR2291K
32
V215
V215
1
3904
3904
2V5Buf
C258
C258
R274
R274
33K
33K
C277
C277
100pF
100pF
C230
C230
100pF
100pF
R260
R260
NC/0R
NC/0R
R261
R261
NC/0R
NC/0R
R226
R226
R227
R227
10K
10K
10K
10K
12V_AMP
C201
C201
1nF
1nF
HP_MUTE
R259
R259
33K
33K
EARPHONE-L
EARPHONE-R
C234
C234
470pF
470pF
0
1
0
1
HP_MUTEHP_MUTE
12V_AMP
R224
R224
20K/NC
20K/NC
R231
R231
12K/NC
12K/NC
OP_VCC1
84
3
+
+
2
-
-
R28133KR28133K
C242100pFC242100pF
84
5
+
+
6
-
-
R29033KR29033K
C243100pFC243100pF
HP_MUTE
C259
C259
0.1uF
0.1uF
N201A
N201A
TDA1308
TDA1308
1
OP_VCC1
N201B
N201B
TDA1308
TDA1308
7
PH_L
PH_R
200
26
32
36
AMP_EN
AUOUTL0
12V_AMP
AUOUTR0
C283
C283
10uF/10V
10uF/10V
EARPHONE-L
EARPHONE-R
4
AUOUTL0
R203100KR203100K
R205NCR205NC
R2060R2060
R204NCR204NC
R21010R/1206/(1/4W)R21010R/1206/(1/4W)
R21110KR21110K
R21510KR21510K
AUOUTR0
5VA
10R
10R
R213
R213
1T3
1T3
2
2
4
L
3
R
5
5
1
1
XS606
XS606
AMP_EN
C2090.47uFC2090.47uF
C2050.47uFC2050.47uF
C217
C217
1uF/25V
1uF/25V
C218
C218
1uF/25V
1uF/25V
C219
C219
1uF/6.3V
1uF/6.3V
C2350.47uFC2350.47uF
C2380.47uFC2380.47uF
R201NC/100KR201NC/100K
1
SD
2
FAULT
3
LINP
4
LINN
N202
GAIN0
GAIN1
AVCC
AGND
GVDD
PLIMIT
RINN
RINP
REG/DRC
Mute
N202
RT9108
RT9108
注意焊盘
5
6
7
8
9
10
11
12
13
14
Mic_Drive
XS623
XS623
1T3
1T3
标记
数量签名更改单号
标记
数量签名更改单号
标记
数量签名更改单号
2
3
4
1
5
AL_MIC
AR_MIC
Thermal
PVCCL
PVCCL
BSPL
OUTPL
PGND
OUTNL
BSNL
BSNR
OUTNR
PGND
OUTPR
BSPR
PVCCR
PVCCR
2
1
29
28
27
C206
C206
26
0.47uF/25V
0.47uF/25V
25
24
23
0.47uF/25V
0.47uF/25V
C224
C224
22
C228
C228
21
0.47uF/25V
0.47uF/25V
20
19
18
0.47uF/25V
0.47uF/25V
C236
C236
17
16
15
C279
C279
0.1uF
0.1uF
R267
R267
10K
10K
VD206
VD206
PESD5VOS2BT
PESD5VOS2BT
C
C
ESD
ESD
C
C
日期
日期
日期
3
12V_AMP
+
C208
+
C208
C203
C203
C202
C202
220uF
220uF
0.1uF
0.1uF
1nF
1nF
L212
L212
NC/15uH
NC/15uH
C2111nF/25VC2111nF/25V
12
AMP_Lout+
L205FB_3AL205FB_3A
AMP_Lout-
12
L206FB_3AL206FB_3A
L214NC/15uHL214NC/15uH
L20415uHL20415uH
L208
L208
NC/FB_3A
NC/FB_3A
L210
L210
NC/FB_3A
NC/FB_3A
L20215uHL20215uH
C240
C240
+
C241
+
C241
C239
C239
0.1uF
0.1uF
220uF
220uF
1nF
1nF
R2480RR248
0R
R246
R246
10K
10K
C256
C256
1nF
1nF
5VA
D
D
3
拟制
拟制
拟制
审核
审核
审核
R251
R251
10K
10K
R262
R262
C253
C253
10K
10K
1nF
1nF
C2231nF/25VC2231nF/25V
C2290.47uF/25VC2290.47uF/25V
12
AMP_Rout-
AMP_Rout+
12
C2370.47uF/25VC2370.47uF/25V
12V_AMP
5VA
R253
R253
2.2K
2.2K
C255
C255
3.3nF
3.3nF
R272
R272
2.2K
2.2K
C271
C271
3.3nF
3.3nF
R254
R254
2.2K
2.2K
C254
C254
3.3nF
3.3nF
R273
R273
2.2K
2.2K
第
第
第
8
欧姆喇叭
AMP_Rout+
AMP_RoutAMP_Lout+
AMP_Lout-
R2520RR252
0R
R2710RR271
0R
C272
C272
3.3nF
3.3nF
05.Amp
05.Amp
05.Amp
5
5
5
XS201
XS201
1
2
3
4
D2006-4W
D2006-4W
R2640RR264
0R
张
张
张
MIC_IN
2
1
AA
5
4
3
2
1
PDF 文件使用 "pdfFactory Pro" 试用版本创建 ÿÿ www.fineprint.com.cn
Page 8
5
4
3
2
1
2st HDMI &
XS601
XS601
HDMI
HDMI
ARC
21
DATA2+
21
DATA2 SHIELD
DATA2-
DATA1+
DD
CC
DATA1 SHIELD
DAT1A-
DATA0+
DATA0 SHIELD
DATA0-
CLK SHIELD
22
22
23
23
24
24
DDC/CEC GND
+5V POWER
20
HOT PLUG
20
180-Degree Connector
3nd HDMI
XS602
XS602
HDMI
HDMI
21
DATA2+
21
DATA2 SHIELD
DATA2-
DATA1+
DATA1 SHIELD
DAT1A-
DATA0+
DATA0 SHIELD
DATA0-
CLK SHIELD
22
22
23
23
24
24
DDC/CEC GND
+5V POWER
20
HOT PLUG
20
180-Degree Connector
1th HDMI & MHL
XS603
XS603
HDMI
HDMI
21
DATA2+
21
DATA2 SHIELD
DATA2-
DATA1+
DATA1 SHIELD
DAT1A-
DATA0+
22
23
24
20
DATA0 SHIELD
DATA0-
CLK SHIELD
22
23
24
DDC/CEC GND
+5V POWER
HOT PLUG
20
BB
CLK+
CLK-
CEC
SDA
CLK+
CLK-
CEC
SDA
CLK+
CLK-
CEC
SCL
SDA
SCL
SCL
HDMI1_RX2P
1
2
HDMI1_RX2N
3
HDMI1_RX1P
4
5
HDMI1_RX1N
6
HDMI1_RX0P
7
8
HDMI1_RX0N
9
HDMI1_CLKP
10
11
HDMI1_CLKN
12
HDMI1_CEC
13
HDMI_ARC
14
NC
DDC1BSCL
15
DDC1BSDA
16
17
HDMI1-5V
18
HDMI1_HPDIN
19
HDMI2_RX2P
1
2
HDMI2_RX2N
3
HDMI2_RX1P
4
5
HDMI2_RX1N
6
HDMI2_RX0P
7
8
HDMI2_RX0N
9
HDMI2_CLKP
10
11
HDMI2_CLKN
12
HDMI2_CEC
13
14
NC
DDC2BSCL
15
DDC2BSDA
16
17
HDMI2-5V
18
HDMI2_HPDIN
19
HDMI3_RX2P
1
2
HDMI3_RX2N
3
HDMI3_RX1P
4
5
HDMI3_RX1N
6
HDMI3_RX0P
7
8
HDMI3_RX0N
9
HDMI3_CLKP
10
11
HDMI3_CLKN
12
HDMI3_CEC
13
14
NC
DDC3BSCL
15
DDC3BSDA
16
17
HDMI3-5V
18
HDMI3_HPDIN
19
7531
7531
5R1x4
5R1x4
RA601
RA601
7531
7531
5R1x4
5R1x4
RA602
RA602
7531
7531
5R1x4
5R1x4
RA604
RA604
7531
7531
5R1x4
5R1x4
RA603
RA603
7531
7531
5R1x4
5R1x4
RA606
RA606
7531
7531
5R1x4
5R1x4
RA605
RA605
HDMI1-RX2P
HDMI1-RX2N
8642
8642
HDMI1-RX1P
HDMI1-RX1N
HDMI1-RX0P
HDMI1-RX0N
8642
8642
HDMI1-CLKP
HDMI1-CLKN
HDMI1-5V
8642
8642
8642
8642
HDMI2-5V
MHL_CD_SENSE
8642
8642
8642
8642
HDMI3-5V
HDMI2-RX2P
HDMI2-RX2N
HDMI2-RX1P
HDMI2-RX1N
HDMI2-RX0P
HDMI2-RX0N
HDMI2-CLKP
HDMI2-CLKN
HDMI3-RX2P
HDMI3-RX2N
HDMI3-RX1P
HDMI3-RX1N
HDMI3-RX0P
HDMI3-RX0N
HDMI3-CLKP
HDMI3-CLKN
HDMI1-RX2P
HDMI1-RX2N
HDMI1-RX1P
HDMI1-RX1N
HDMI1-RX0P
HDMI1-RX0N
HDMI1-CLKP
HDMI1-CLKN
HDMI3-RX2P
HDMI3-RX2N
HDMI3-RX1P
HDMI3-RX1N
HDMI3-RX0P
HDMI3-RX0N
HDMI3-CLKP
HDMI3-CLKN
HDMI2-RX2P
HDMI2-RX2N
HDMI2-RX1P
HDMI2-RX1N
HDMI2-RX0P
HDMI2-RX0N
HDMI2-CLKP
HDMI2-CLKN
HDMI1-5V
31
31
RA611
RA611
10Kx2
10Kx2
42
42
5Vstb
R616
R616
R617
R617
10K
10K
4.7K
4.7K
HDMI3_HPDIN HDMI3-HPDIN
HDMI2-5V
31
31
42
42
100x2
100x2
RA614
RA614
RA610
RA610
10Kx2
10Kx2
3 1
3 1
100x2
100x2
RA612
RA612
RA613
RA613
100x2
100x2
3 1
4 2
3 1
4 2
31
42
31
42
4 2
4 2
R62922R R62922R
HDMI1-SCL
HDMI1-SDA
HDMI2-SCL
HDMI2-SDA
HDMI3-SCL
HDMI3-SDA
Hot-Plug Control
HDMI1-5V
R6011KR601
1K
HDMI1_HPDIN
V601
V601
1
3904
3904
2 3
HDMI1-SCL
HDMI1-SDA
HDMI2-5V
R6601KR660
1K
HDMI2_HPDIN
V607
V607
1
3904
3904
2 3
HDMI2-SCL
HDMI2-SDA
HDMI3-5V
R618
R618
NC/1K
NC/1K
HDMI3_HPDIN
V609
V609
NC/3904
NC/3904
2 3
HDMI3-SCL
HDMI3-SDA
HDMI3-HPDIN
MHL for MSD6369
R602
R602
10K
10K
HDMI1-HPDIN
R6034.7K R6034.7K
R610
R610
10K
10K
HDMI2-HPDIN
R6114.7K R6114.7K
R619NC/4.7K R619NC/4.7K
HDMI3-HPDIN
1
R620
R620
NC/10K
NC/10K
HDMI1-HPDIN
HDMI2-HPDIN
HDMI3-HPDIN
5VA
R6250RR625
0R
MHL_PW_EN3
C607
C607
10uF/10V
10uF/10V
C608
C608
0.1uF
0.1uF
R684
R684
10K
10K
N600
N600
G5250M2
G5250M2
MHL_CD_SENSE
HDMI3-5V
R630NC/10KR630NC/10K
5
VIN
EN4GND2VOUT
C609
C609
47nF
47nF
L60710RL60710R
3
/OC
1
C610
C610
10uF/10V
10uF/10V
R622100RR622100R
R661
R661
300K
300K
HDMI3-5V
C611
C611
0.1uF
0.1uF
AVDD5V_MHL
MHL_SENSE
ARC
R6230RR6230R
C601
C601
HDMI_ARC HDMI-ARC
1uF/6.3V
1uF/6.3V
HDMI-ARC
For CEC
HDMI2_CEC
HDMI1_CEC
HDMI3_CEC
AA
拟制
拟制
拟制
审核
审核
审核
标记
数量签名更改单号
标记
数量签名更改单号
标记
数量签名更改单号
5
4
3
日期
日期
日期
2
To MST IC
R621220R R621220R
HDMI-CEC
HDMI-CEC
06.HDMI
06.HDMI
06.HDMI
第
第
第
1
6
6
6
张
张
张
PDF 文件使用 "pdfFactory Pro" 试用版本创建 ÿÿ www.fineprint.com.cn
Page 9
5
Close to Demod.
IFP
IFP
DD
CC
IFN
IF_AGC_DT
IFN
R1090RR1090R
R1100RR1100R
Close to Demod.
22nF
22nF
C168
C168
R1140RR114
0R
IP
3.3V_Dm
Demod_RST
R115
R115
10K
10K
D_IF_AGC
IM
DEMOD 3.3V POWER
3V3_Tun
L108
L108
1 2
FB_1.8A
FB_1.8A
C156
C156
10uF/10V
10uF/10V
3.3V_Dm
1.2V_Dm
C117
C117
0.1uF
0.1uF
C118
C118
0.1uF
0.1uF
C119
C119
0.1uF
0.1uF
C114
C114
0.1uF
0.1uF
C115
C115
0.1uF
0.1uF
C116
C116
0.1uF
0.1uF
C167
C167
0.1uF
0.1uF
3.3V_Dm
R111
R111
10K
10K
C130
C130
2.2uF/6.3V
2.2uF/6.3V
4
RESETn
RESETn
C125
C125
0.1uF
0.1uF
3.3V_Dm
QP
QM
MSPI_WP
XTAL_OUT
XTAL_IN
D_IF_AGC
QP
QM
IP
IM
N102
N102
1
2
3
4
5
6
7
8
9
10
11
12
I2CS_SCL
GND
XTAL_OUT
XTAL_IN
AVDD33
RFAGC/GPIO
IF_AGC
QP
QM
GND
IP
IM
3
3.3V_Dm
1.2V_Dm
TS_SYNC
I2CS_SDA
46
44
45
47
48
VDD
GND
VDD33
I2CS_SDA
MSB101S
MSB101S
AVDD3316NC15GND
AVDD33
14
17
13
3.3V_Dm
3.3V_Dm
TS_D1
TS_D0
TS_VLD
42
43
TS_VLD
TS_SYNC
VSS
VDD
Configure/GPIO0
18
19
Configure
1.2V_Dm
TS_D5
TS_D4
TS_D3
TS_D2
TS_D[5]37TS_D[4]38TS_D[3]39TS_D[2]40TS_D[1]41TS_D[0]
MSPI_CSZ/SSPI_CLK
MSPI_DO/SSPI_DI
MSPI_DI/SSPI_DO
MSPI_CLK/SSPI_CSZ
I2CM_SCL20I2CM_SDA
VDD3323TS_ERR
GND
21
24
22
TS_ERR
3.3V_Dm
TS_D[6]
TS_D[7]
TS_CLK
GND
RESETZ
VDD33
GND
VDD
2
C131
C131
27pF
XTAL_IN
R1611MR161
1M
RA10233RX4
RA10233RX4
RA10333RX4
RA10333RX4
RA104
RA104
22Rx2
22Rx2
33RX4
33RX4
8 6 4 2
8 6 4 2
8 6 4 2
8 6 4 2
8 6 4 2
8 6 4 2
R1130RR113
0R
31
31
RA101
RA101
XTAL_OUT
TS_D6I2CS_SCL
36
TS_D7
35
TS_CLK
34
MSPI_CSZ
33
MSPI_DO
32
MSPI_DI
31
30
RESETn
29
MSPI_CLK
28
27
26
25
3.3V_Dm
1.2V_Dm
N103
1. 当N102为MSB101S、MSB101T时N103、R153、C133、R150要 NC。
2. 当N102为MSB101A时N103、R153、C133、R150
I2CS_SDA
I2CS_SCL
TS_SYNC
上件说明:
TS_VLD
TS_D0
TS_D1
TS_D3
TS_D4
TS_D5
TS_D6
TS_D7
TS_CLK
Z102
Z102
XTAL-24MHz
XTAL-24MHz
42
42
7 5 3 1
7 5 3 1
7 5 3 1
7 5 3 1
7 5 3 1
7 5 3 1
27pF
C132
C132
27pF
27pF
TUNER_SDA
TUNER_SCL
TS1_SYNC
TS1_VALID
3
TS1_D0
TS1_D1
TS1_D2TS_D2
TS1_D3
TS1_D4
TS1_D5
TS1_D6
TS1_D7
TS1_CLK
TUNER_SDA
TUNER_SCL
TS1_SYNC
TS1_CLK
1
TS1_VALID
TS1_D[7:0]
要上件。
BB
DEMOD 1.2V POWER
3V3_Normal
L106
L106
1 2
C151
C151
FB_1.8A
FB_1.8A
AA
0.1uF
0.1uF
C152
C152
2.2uF/10V
2.2uF/10V
5
C121
C121
C122
OUT
OUT
ADJ
ADJ
IN
IN
0.1uF
0.1uF
C122
0.1uF
0.1uF
1V21V2
C154
C154
10uF/10V
10uF/10V
1.2V_Dm
C153
C153
0.1uF
0.1uF
3
2
1
H/W Strap
I2C slave address:
TS_ERR=0, I2C slave address=0xD2
TS_ERR=1, I2C slave address=0xF2
如果TS_ERR(PIN24)悬空,默认为上拉
则address=0xF2。
4
TS_ERR
R147
R147
10K
10K
Configure
R148
R148
10K
10K
R149
R149
NC/10K
NC/10K
MSPI_WP
R160
R160
NC/10K
NC/10K
3.3V_Dm
N112
MSPI_CSZ
MSPI_DO
3
标记
标记
标记
C133
C133
0.1uF
0.1uF
R13633R R13633R
数量签名更改单号
数量签名更改单号
数量签名更改单号
N112
1
2
3
2
CE#
SO
HOLD#
WP#
VSS4SI
NC/W25X10CL
NC/W25X10CL
日期
日期
日期
VDD
SCK
3.3V_Dm
8
7
6
5
C134
C134
0.1uF
0.1uF
拟制
拟制
拟制
审核
审核
审核
MSPI_CLKMSPI_WP
MSPI_DI
07.ISDB Demod
07.ISDB Demod
07.ISDB Demod
第
张
第
张
第
张
7
7
7
1
C120
C120
0.1uF
0.1uF
N101
N101
4
1117-1.2
1117-1.2
PDF 文件使用 "pdfFactory Pro" 试用版本创建 ÿÿ www.fineprint.com.cn
Page 10
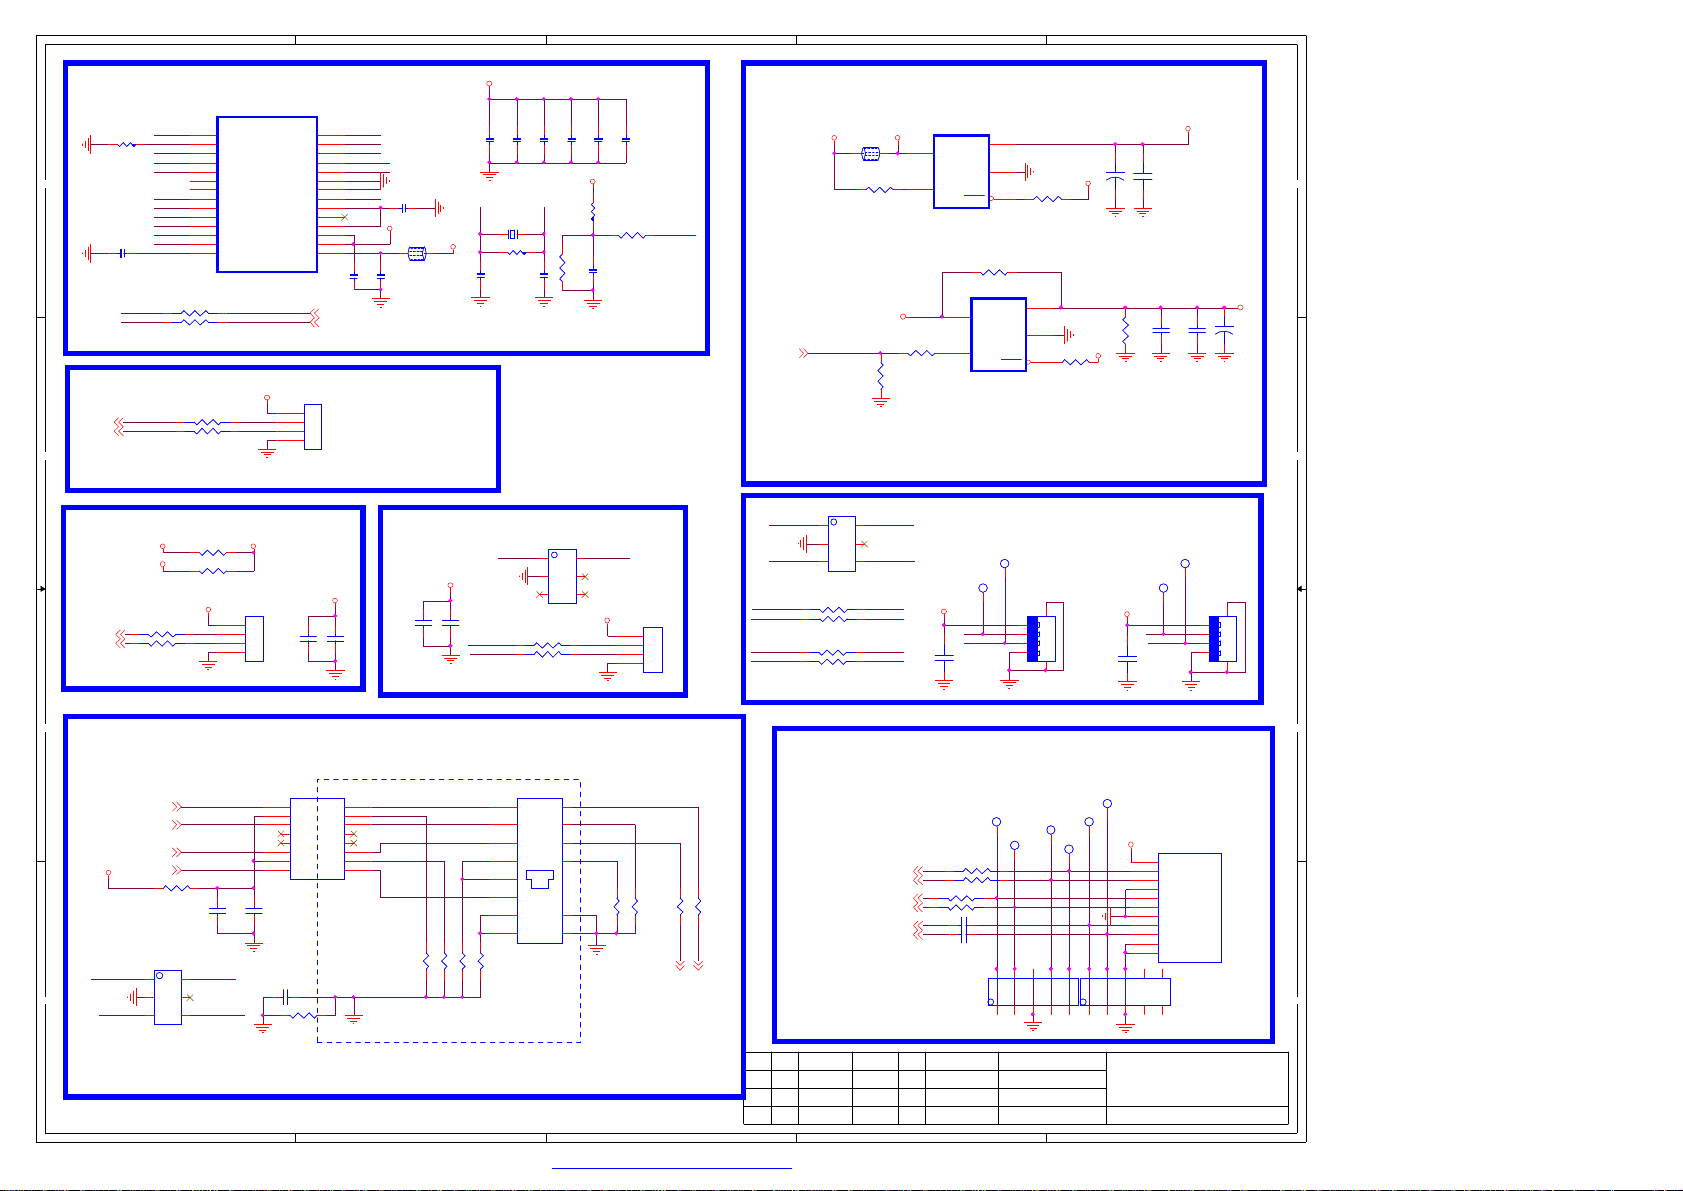
5
4
3
2
1
5VA
C633
C633
10nF
10nF
VUSB
VCC3.3
AVDD0
AVDD1
C641
C641
C617
C617
0.1uF
0.1uF
0.1uF
0.1uF
XSCO
1 2
Z60112MHzZ60112MHz
R6311MR6311M
C623
C623
C624
C624
18P
18P
18P
18P
USB-DM1 USB-DP1
1
235
5R1x2
5R1x2
USB_DM1
USB_DP1
RA624
RA624
3 1
3 1
AVDD2
C618
C618
0.1uF
0.1uF
XSCI
N610
N610
IP4223CZ6
IP4223CZ6
AVDD3
C619
C619
0.1uF
0.1uF
R638
R638
470k
470k
4 2
4 2
PVDD
C612
C612
0.1uF
0.1uF
VUSB
6
4
5VA
USB-DM1
USB-DP1
R662
R662
47K
47K
C627
C627
1uF/6.3V
1uF/6.3V
VDDH
C621
C621
0.1uF
0.1uF
R635
R635
10K
10K
XS612
XS612
4
3
2
1
D2006-4W
D2006-4W
Reset_N
USB POWER
5VA
L604
L604
FB_4A
FB_4A
R63310KR63310K
5V_USB
3
USB_DM4
USB_DP4
USB_DM3
USB_DP3
USB3_EN
USB3_EN
H :Power ON
L :Power OFF
N606
1
235
IP4223CZ6
IP4223CZ6
RA625
RA625
31
31
5R1x2
5R1x2
RA626
RA626
31
31
5R1x2
5R1x2
N606
6
4
42
42
DM1
42
42
USB_DP3 USB_DM3
USB_DM4 USB_DP4
DM2
DP1
DP2
5V_USB
12
R651
R651
10K
10K
5
4
R6521KR6521K
1.5A Switch
N605
N605
MC2110
MC2110
1
OUT
IN
2
GND
EN
3
FLAG
R653NCR653NC
N604
N604
MC2110
MC2110
OUT
5
IN
GND
4
EN
FLAG
DP2DP2
DM2DM2
USB V Connector
USB V Connector
VUSB
XS607
XS607
PWR4
DM2 DM1
DP2 DP1
C629
C629
0.1uF
0.1uF
5V_USB
R63410KR63410K
1
2
5V_USB
R663
R663
3
10K
10K
Note:电容靠近USB(XSU04)端子,提供usb读写稳定性
56
4 3 2 1
4 3 2 1
4
3
2
1
C613
C613
220uF
220uF
+
+
VUSB
R650
R650
9.1K
9.1K
C626
C626
0.1uF
0.1uF
C614
C614
0.1uF
0.1uF
C634
C634
0.1uF
0.1uF
DP1DP1
DM1DM1
USB V Connector
USB V Connector
XS626
XS626
PWR1
VUSB
10uF/10V
10uF/10V
C637
C637
4
3
2
1
5V_USB3
+
+
C628
C628
100uF
100uF
56
4 3 2 1
4 3 2 1
USB HUB
N603
5R1x2
5R1x2
3 1
3 1
RA620
RA620
RA621
RA621
31
31
NC/5R1x2
NC/5R1x2
R654NCR654NC
R6550RR6550R
VCC_WIFI
42
42
10
11
12
13
14
1
2
3
4
5
6
7
8
9
N603
AVDD
UP_RREF
PVDD
XSCO
XSCI
DP2_DM
DP2_DP
AVDD
DP3_DM
DP3_DP
DP4_DM
DP4_DP
AVDD
V18
AU6258
AU6258
4 2
4 2
42
42
VCC_WIFI
BUS_PWREDN
USBUP_DP_H
USBUP_DM_H
DM5
DP5
XSU10
XSU10
4
3
2
1
D2006-4W
D2006-4W
DP1_DP
DP1_DM
UP_DM
ChipResetN
SUSPEND
AVDD5V
3.3Vstb_D
10uF/10V
10uF/10V
AVDD
UP_DP
VSSH
VDDH
VDD
VDD
V33
XS610
XS610
4
3
2
1
NC/D2006-4W
NC/D2006-4W
VCC_WIFI
C630
C630
28
27
26
25
24
23
22
21
20
19
18
17
16
15
USB2_D+
USB2_D-
C631
C631
10nF
10nF
USB_DP1
USB_DM1
AVDD0
USBUP_DP
VDDH
Reset_N
VDD
VDD
C642
C642
10uF/10V
10uF/10V
C6220.1uFC6220.1uF
VCC3.3
L602
L602
FB_1.8A
FB_1.8A
1 2
C625
C625
2.2uF/10V
2.2uF/10V
摄像头
C632
C632
10uF/10V
10uF/10V
AVDD1
R637
R637
PVDD
680R
680R
XSCO
DD
XSCI USBUP_DM
AVDD2
USB_DM3
USB_DP3
USB_DM4
USB_DP4
AVDD3
VDD
C620
C620
1uF/6.3V
1uF/6.3V
USBUP_DP
USBUP_DM
Dongle
USB1_D-
USB1_D-
USB1_D+
USB1_D+
CC
Wifi
USB0_DUSB0_D+
3V3_Normal
5VA
RA623
RA623
31
31
5R1x2
5R1x2
BB
Ethernet
TU01PD1602TU01PD1602
REGOUT
C636
C636
10nF
10nF
1
2
3
4
6
7
8
14009964
C6381000pF/2KVC6381000pF/2KV
R6640R/NCR6640R/NC
MDI_TP
MDI_TN
MDI_RP
2.5V_Normal
MDI_RN
R6390RR6390R
MDI_TP MDI_TN
AA
MDI_RN
N609
N609
1
235
IP4223CZ6
IP4223CZ6
5
6
4
MDI_TN
MDI_RP
MDI_RN
C635
C635
10nF
10nF
MDI_RP
TD+
CT
TDnc
nc5nc
RD+
CT
RD-
TX+
CT
TX-
RX+
TC
RX-
nc
ETH_GND
16
15
14
13
12
11
10
9
4
R64075R R64075R
LAN_TX+MDI_TP
LAN_TXLAN_RX+
LAN_RX-
R64375R R64375R
R66575R R66575R
R64275R R64275R
XS609
XS609
ETHERNET_JACK
ETHERNET_JACK
+
+
1
ACTIVITY
-
-
2
+
+
3
LINKON
-
-
4
5
6
RJ-45
RJ-45
7
8
9
10
11
12
R6450R R6450R
R647470R R647470R
14
13
R648470R R648470R
R6460R R6460R
LAN-LED13
LAN-LED03
标记数量签名更改单号
标记数量签名更改单号
标记数量签名更改单号
3
USB3_D-
USB3_D+
USB3_SSRXN
USB3_SSRXP
USB3_SSTXN
USB3_SSTXP
日期
日期
日期
2
42
42
RA628
RA628
5R1x2
5R1x2
5R1x2
5R1x2
4 2
4 2
C6390.1uF C6390.1uF
C6400.1uF C6400.1uF
N607
N607
IP4284CZ10
IP4284CZ10
拟制
拟制
拟制
审核
审核
审核
3 1
3 1
RA627
RA627
SSRXNSSRXN
SSRXPSSRXP
31
31
12354
DM3
8910
DP3DP3
7
DM3DM3
DP3
6
SSTXPSSTXP
SSTXNSSTXN
5V_USB3
8
9
10
12354
09.USB & Ethernet
09.USB & Ethernet
09.USB & Ethernet
1
2
3
4
5
6
7
8
9
10
11
7
XS608
XS608
USB3-A/90D
USB3-A/90D
VBUS
DD+
GND
STDA_SSRXSTDA_SSRX+
GND_DRAIN
STDA_SSTXSTDA_SSTX+
SHELL
SHELL
6
N608
N608
IP4284CZ10
IP4284CZ10
第
第
第
9
9
9
1
USB 3.0
张
张
张
PDF 文件使用 "pdfFactory Pro" 试用版本创建 ÿÿ www.fineprint.com.cn
Page 11
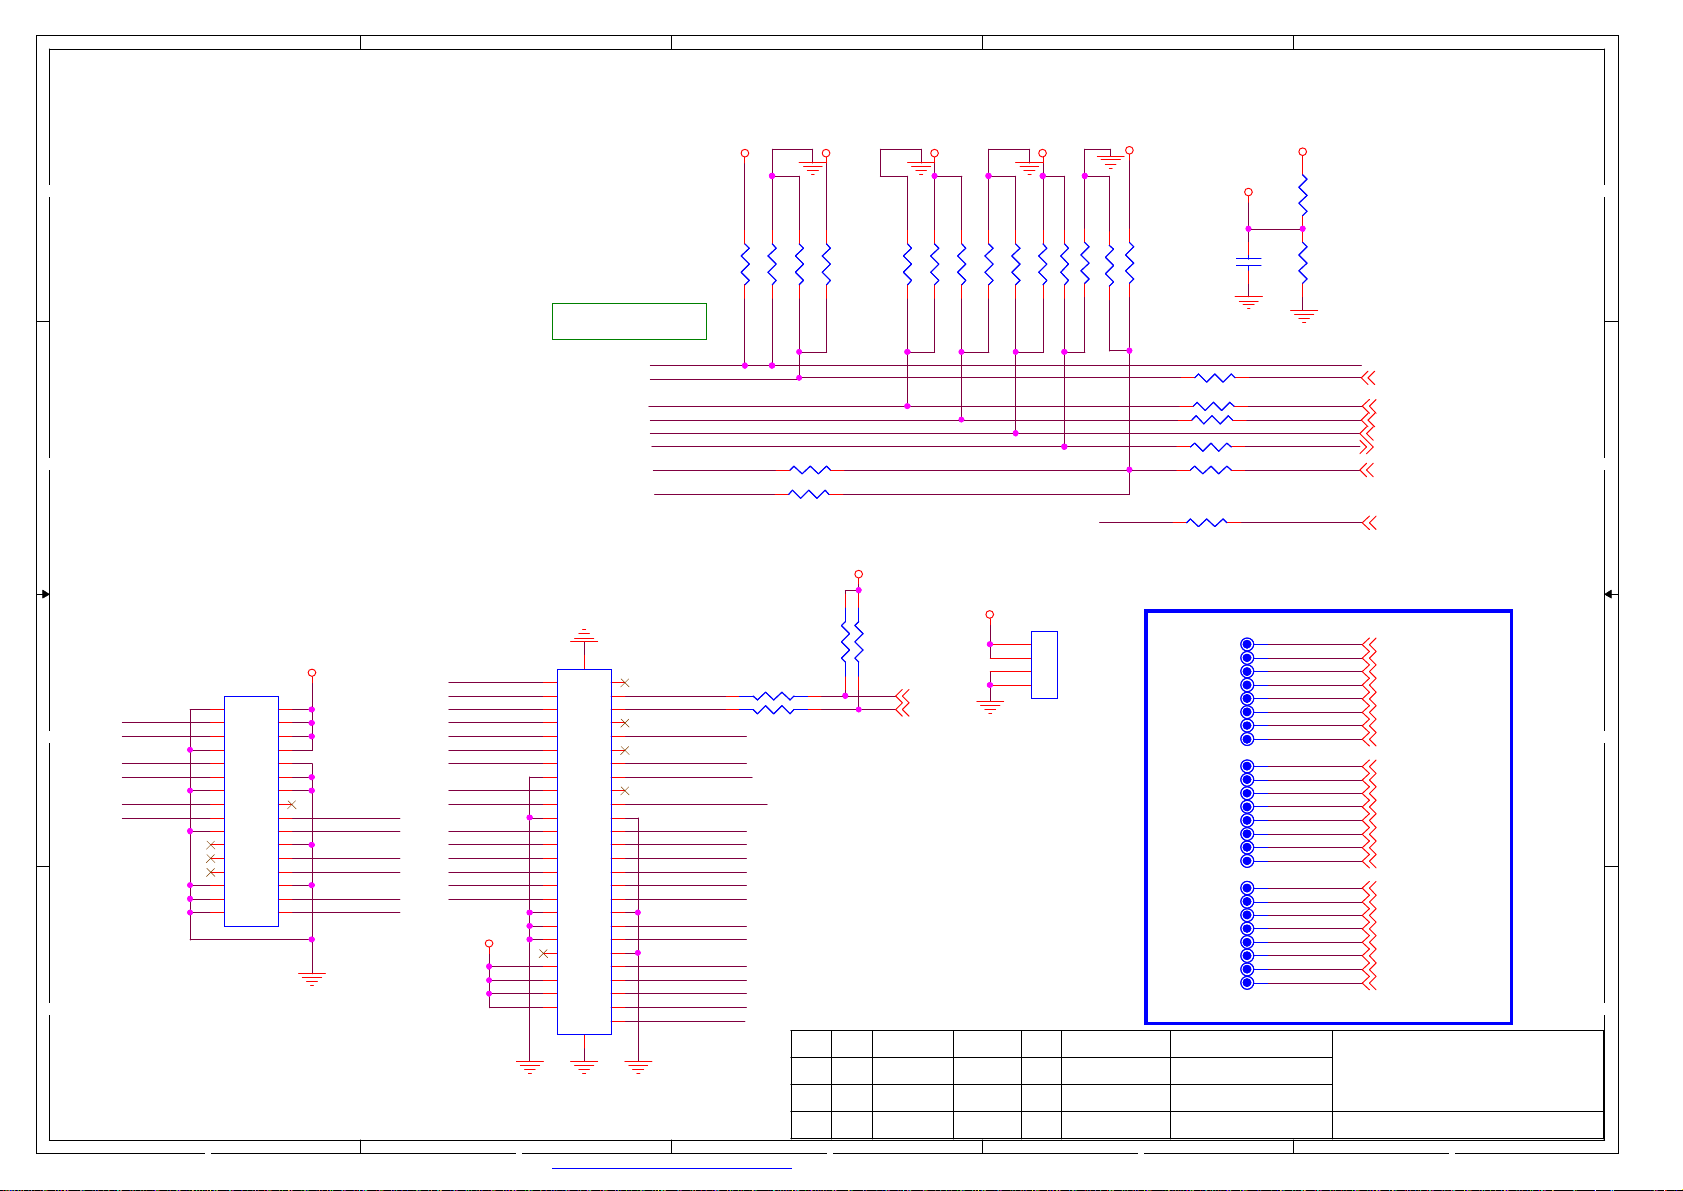
5
4
3
2
1
R422 NC/100RR422 NC/100R
R423 NC/0RR423 NC/0R
R424 NC/0RR424 NC/0R
3D_SYNC_I
拟制
拟制
拟制
审核
审核
审核
3V3_P
R425 NC/4.7kR425 NC/4.7k
R432
R432
NC/0R
NC/0R
R428100R R428100R
R427100R R427100R
R022NC/100R R022NC/100R
3V3_P
R429NC/0R R429NC/0R
R0090R R0090R
VCC-Panel
C431
C431
0.1uF
0.1uF
3D_SYNC
R4171KR417
1K
R426
R426
390R
390R
Net to other page
R7_RXO0-
RXO0-RXO0RXO0+RXO0+
RXO1-RXO1RXO1+RXO1+
RXO2-RXO2RXO2+RXO2+
RXOC-RXOCRXOC+RXOC+
RXO3-RXO3RXO3+RXO3+
RXO4-RXO4RXO4+RXO4+
RXE0-RXE0RXE0+RXE0+
RXE1-RXE1RXE1+RXE1+
RXE2-RXE2RXE2+RXE2+
RXEC-RXECRXEC+RXEC+
RXE3-RXE3RXE3+RXE3+
RXE4-RXE4RXE4+RXE4+
1
R6_RXO0+
1
R5_RXO1-
1
R4_RXO1+
1
R3_RXO2-
1
R2_RXO2+
1
R1_RXOC-
1
R0_RXOC+
1
G7_RXO3-
1
G6_RXO3+
1
G5_RXO4-
1
G4_RXO4+
1
G3_RXE0-
1
G2_RXE0+
1
G1_RXE1-
1
G0_RXE1+
1
B7_RXE2-
1
B6_RXE2+
1
B5_RXEC-
1
B4_RXEC+
1
B3_RXE3-
1
B2_RXE3+
1
B1_RXE4-
1
B0_RXE4+
1
3D_EN_TCON
SCN_EN_TCON
PWM_IN
LVDS_SEL
3D_SYNC
L_DIM_DBL
3D_FLAG
R7_RXO0R6_RXO0+
R5_RXO1R4_RXO1+
R3_RXO2R2_RXO2+
R1_RXOCR0_RXOC+
G7_RXO3G6_RXO3+
G5_RXO4G4_RXO4+
G3_RXE0G2_RXE0+
G1_RXE1G0_RXE1+
B7_RXE2B6_RXE2+
B5_RXECB4_RXEC+
B3_RXE3B2_RXE3+
B1_RXE4B0_RXE4+
10.LVDS
10.LVDS
10.LVDS
3V3_P 3V3_P 3V3_P 3V3_P
DD
R481 NC/0RR481 NC/0R
R482 NC/0RR482 NC/0R
NC/100RX2
NC/100RX2
3D_SYNC_O
3D_EN
R418 4.7KR418 4.7K
NC/100R
NC/100R
RA526
RA526
31
31
CMO屏3D_SYNC_I
LG屏BIT_SEL
Bit_SEL 3D_SYNC_I 3D_SYNC_I
3D_EN
SCN_EN_CMI OD_SEL
VBR/RPF
LVDS_SEL
3D_SYNC_O
CC
标清
R2_RXO2+
BB
AA
R3_RXO2R0_RXOC+
R1_RXOCG6_RXO3+
G7_RXO3-
XS502
XS502
NC/30Pin
NC/30Pin
17
18
19
20
21
22
23
24
25
26
27
28
29
30
31
32
FFC
VCC-Panel
1
2
3
4
5
6
7
8
9
10
11
12
13
14
15
16
LVDS_SEL
OD_SEL
R6_RXO0+
R7_RXO0-
R4_RXO1+
R5_RXO1-
XS501
XS501
51Pin_FPC
51Pin_FPC
Bit_SEL
G2_RXE0+
G3_RXE0G0_RXE1+
G1_RXE1B6_RXE2+
B7_RXE2-
B4_RXEC+
B5_RXEC-
B2_RXE3+
B3_RXE3B0_RXE4+
B1_RXE4L_DIM_CMI
SCN_EN_CMI
VCC-Panel
高清
FFC
52
27
28
29
30
31
32
33
34
35
36
37
38
39
40
41
42
43
44
45
46
47
48
49
50
51
1
27
52
2
28
3
29
4
30
5
31
6
32
7
33
8
34
9
35
10
36
11
37
12
38
13
39
14
40
15
41
16
42
17
43
18
44
19
45
20
46
21
47
22
48
23
49
24
50
25
51
26
53
53
1
2
3
4
5
6
7
8
9
10
11
12
13
14
15
16
17
18
19
20
21
22
23
24
25
26
L_DIM_LG
L_DIM_CMI
LVDS_SEL
VBR/RPF
L_DIM_LG
R6_RXO0+
R7_RXO0R4_RXO1+
R5_RXO1-
R2_RXO2+
R3_RXO2-
R0_RXOC+
R1_RXOC-
G6_RXO3+
G7_RXO3-
G4_RXO4+
G5_RXO4-
42
42
R483 NC/4.7KR483 NC/4.7K
R430100R R430100R
R431
R431
3V3_Normal
31
31
42
42
RA525
RA525
NC/4.7KX2
NC/4.7KX2
R484 NC/0RR484 NC/0R
M_SCL
M_SDA
R485 NC/4.7KR485 NC/4.7K
R486 NC/4.7KR486 NC/4.7K
R487 NC/0RR487 NC/0R
VCC-Panel
R420 0RR420 0R
XS651
XS651
4
3
2
1
D2006-4W
D2006-4W
R421 NC/4.7KR421 NC/4.7K
PDF 文件使用 "pdfFactory Pro" 试用版本创建 ÿÿ www.fineprint.com.cn
5
4
标记
数量签名更改单号
标记
数量签名更改单号
标记
数量签名更改单号
3
日期
日期
日期
第
10
10
10
1
张
张
张
第
第
2
Page 12

5
4
3
2
1
DD
3.3Vstb
蓝牙发射接口
45
1
D1250-03
3D_SYNC
3D_SYNC3D_SYNC
D1250-03
2
3
XS647
XS647
5VA
CC
L502
L502
NC/FB_1.8A
NC/FB_1.8A
1 2
C409
C408
C408
0.1uF
0.1uF
C412
C412
10uF/10V
10uF/10V
C409
10uF/10V
10uF/10V
R028
R028
4.7R/1206
4.7R/1206
R029
R029
4.7R/1206
4.7R/1206
红外发射接口
拟制
拟制
拟制
审核
审核
审核
3D_IROUT
1
2
XS646
XS646
D1251-02
D1251-02
3
4
12.3D Emitting
12.3D Emitting
12.3D Emitting
第
第
第
12
12
12
张
张
张
R030
R030
47K
47K
BB
R0311KR031
PWM_PM
PWM_PM
R0320RR032
0R
1K
C410
C410
0.22uF
0.22uF
3
V504
V504
1
3904
3904
2
V505
V505
WNM2306
WNM2306
1
C411
C411
100pF
100pF
3
2
AA
标记数量签名更改单号
标记数量签名更改单号
标记数量签名更改单号
日期
日期
日期
PDF 文件使用 "pdfFactory Pro" 试用版本创建 ÿÿ www.fineprint.com.cn
Page 13
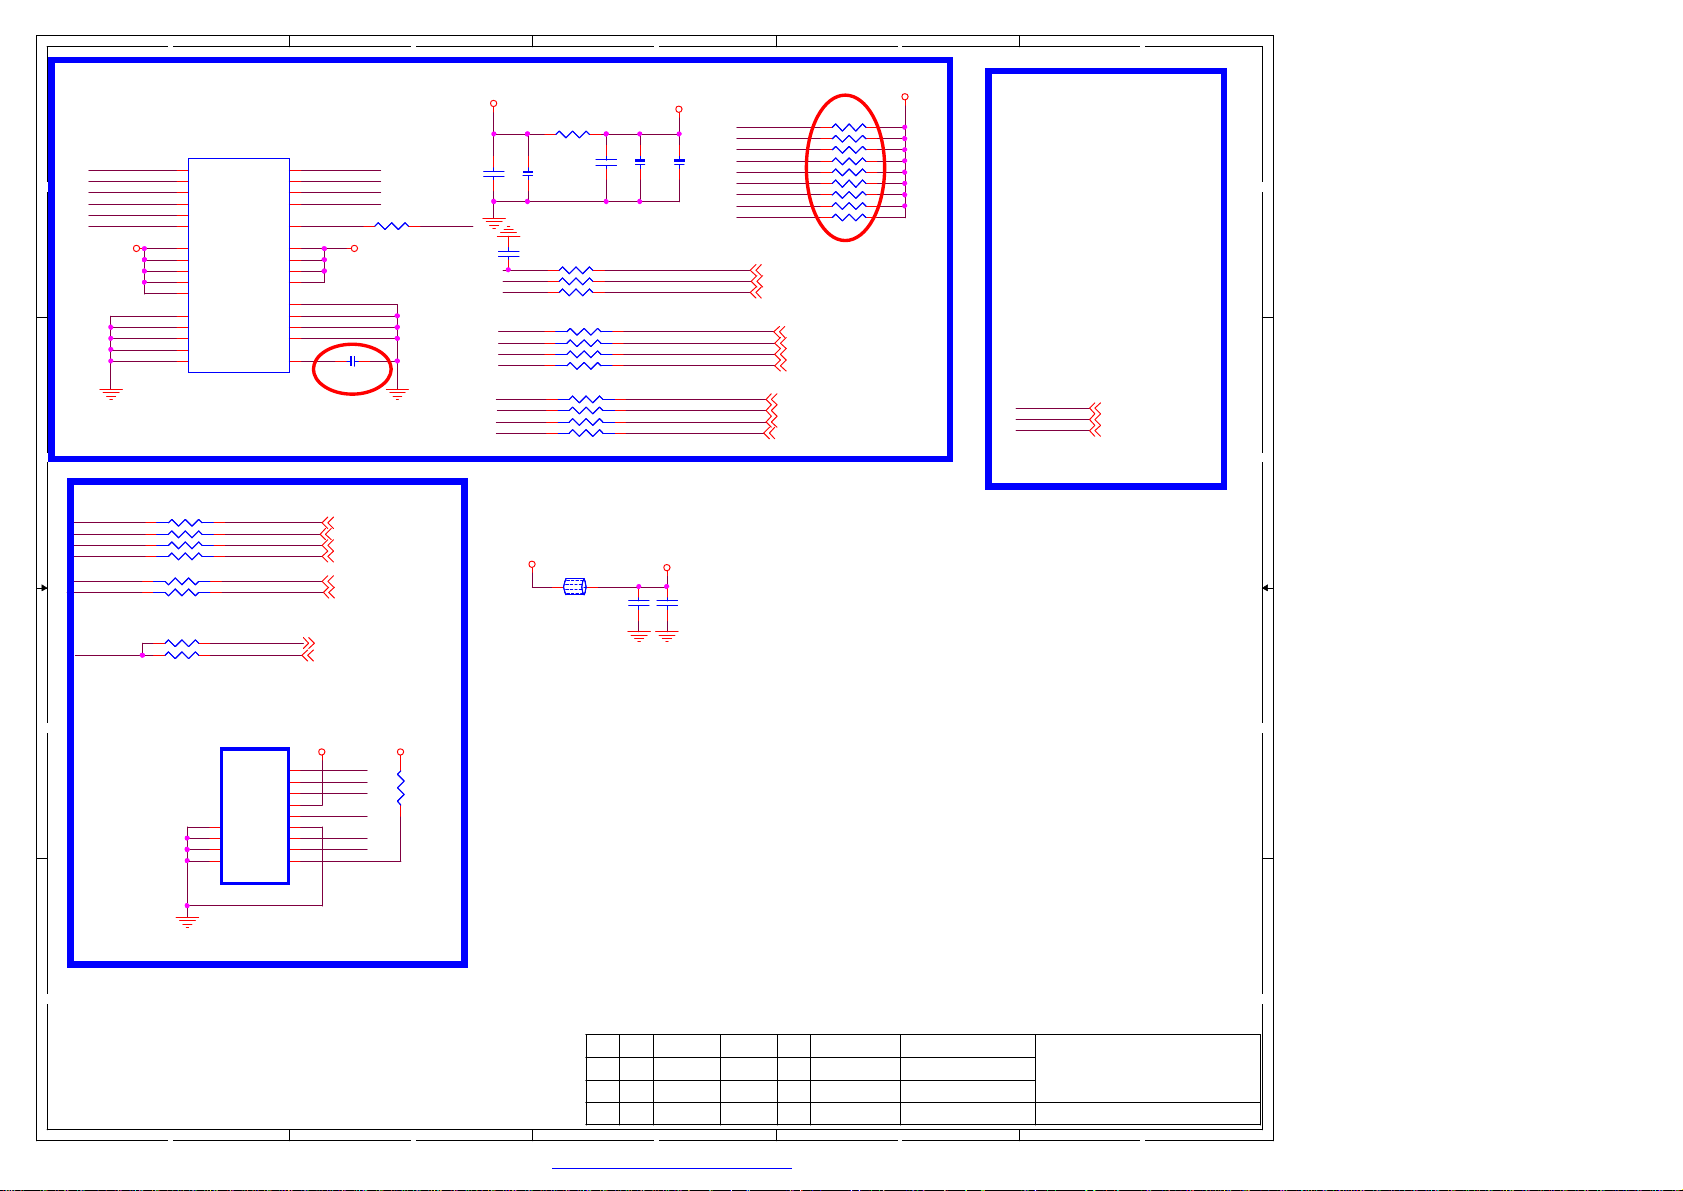
5
4
3
2
1
R51110KR51110K
R51310KR51310K
R51510KR51510K
R51710KR51710K
R51910KR51910K
R52110KR52110K
R52310KR52310K
R52610KR52610K
R52710KR52710K
NF_POWER
Net
NAND_D4
NAND_D5
NAND_D6
EMMC_CMD4
EMMC_CLK4
EMMC_RSTZ4
SD_CDZ2
3V3_Normal
R5020RR5020R
C597
C597
C596
C596
0.1uF
0.1uF
2.2uF/10V
2.2uF/10V
C590NCC590
NC
R5060RR5060R
NF_CLK
R5070RR5070R
NF_RSTZ EMMC_RSTZEMMC_RSTZ
R5090RR5090R
RA531
RA531
0Rx4
NF_D6 EMMC_D6EMMC_D6
NF_D5
NF_D4
NF_D3
NF_D0 EMMC_D0EMMC_D0
3V3_Normal SD_VCC
0Rx4
7 5 3 1
7 5 3 1
RA529
RA529
0Rx4
0Rx4
7 5 3 1
7 5 3 1
L504
L504
1 2
FB_1.8A
FB_1.8A
iNAND FLASH
N510
NF_CLK
DD
CC
NF_CMD
NF_D0
NF_D1
NF_D2
SD-D2
SD-D3
SD-D0 PCM_D4
SD-CMD SD2-CMD
SD-CDZ
N510
M6
CLK
M5
CMD
A3
D0
A4
D1
A5
D2
B2
D3
C6
VDD
M4
VDD
N4
VDD
P3
VDD
P5
VDD
C4
VSS
N2
VSS
N5
VSS
P4
VSS
P6
VSS
iNAND
iNAND
RA532
RA532
0Rx4
0Rx4
8642
8642
31
31
RA533
RA533
0Rx2
0Rx2
R576NC/0RR576NC/0R
R5430RR5430R
NF_D4
B3
D4
NF_D5
B4
D5
NF_D6
B5
D6
NF_D7
B6
D7
NF_RSTZNF_D3
K5
RESETn
E6
VDDF
F5
VDDF
J10
VDDF
K9
VDDF
E7
VSS
G5
VSS
iNAND
iNAND
H10
VSS
K8
VSS
C2
VDDi
7531
7531
SD2-CLKSD-CLK
42
42
SD_CDZ1
SD_CDZ2
PCM_D5SD-D1
PCM_D6
PCM_D7
C5992.2uF/10VC5992.2uF/10V
SD_CDZ1
SD_CDZ2
PCM_D5
PCM_D6
PCM_D7
PCM_D4
SD2-CLK
SD2-CMD
R504
R504
NC/0R
NC/0R
NF_POWERNF_POWER
NF_POWER
C598
C598
C594
C594
2.2uF/10V
2.2uF/10V
EMMC_CLKEMMC_CLK
EMMC_CMDEMMC_CMDNF_CMD
8 6 4 2
8 6 4 2
8 6 4 2
8 6 4 2
C406
C406
10uF/10V
10uF/10V
C595
C595
0.1uF
0.1uF
0.1uF
0.1uF
EMMC_D5EMMC_D5
EMMC_D4EMMC_D4
EMMC_D3EMMC_D3
EMMC_D1EMMC_D1NF_D1
EMMC_D2EMMC_D2NF_D2
EMMC_D7EMMC_D7NF_D7
C407
C407
0.1uF
0.1uF
NF_D0
NF_D1
NF_D2
NF_D3
NF_D4
NF_D5
NF_D6
NF_D7
NF_CMD
EMMC_CLK
EMMC_CMD
EMMC_RSTZ
NAND_CEZ
NAND_CLE
NAND_REZ
NAND_WEZ
NAND_RBZ
NAND_ALE
NAND_WPZ
NAND_CE1Z
BB
AA
TF Socket
5
10
11
12
13
XS650
XS650
GND
GND
GND
GND
TF Card
TF Card
DAT2
DAT3
CMD
VDD
CLK
VSS
DAT0
DAT1
SD_VCCSD_VCC
SD-D2
1
SD-D3
2
SD-CMD
3
4
SD-CLK
5
6
SD-D0
7
SD-D1
8
SD-CDZ
9
CD
R537
R537
4.7K
4.7K
拟制
拟制
拟制
审核
审核
审核
标记
数量签名更改单号
标记
数量签名更改单号
标记
数量签名更改单号
4
3
日期
日期
日期
2
13.NAND FLASH/SD
13.NAND FLASH/SD
13.NAND FLASH/SD
第
13
13
13
1
张
张
张
第
第
PDF 文件使用 "pdfFactory Pro" 试用版本创建 ÿÿ www.fineprint.com.cn
Page 14
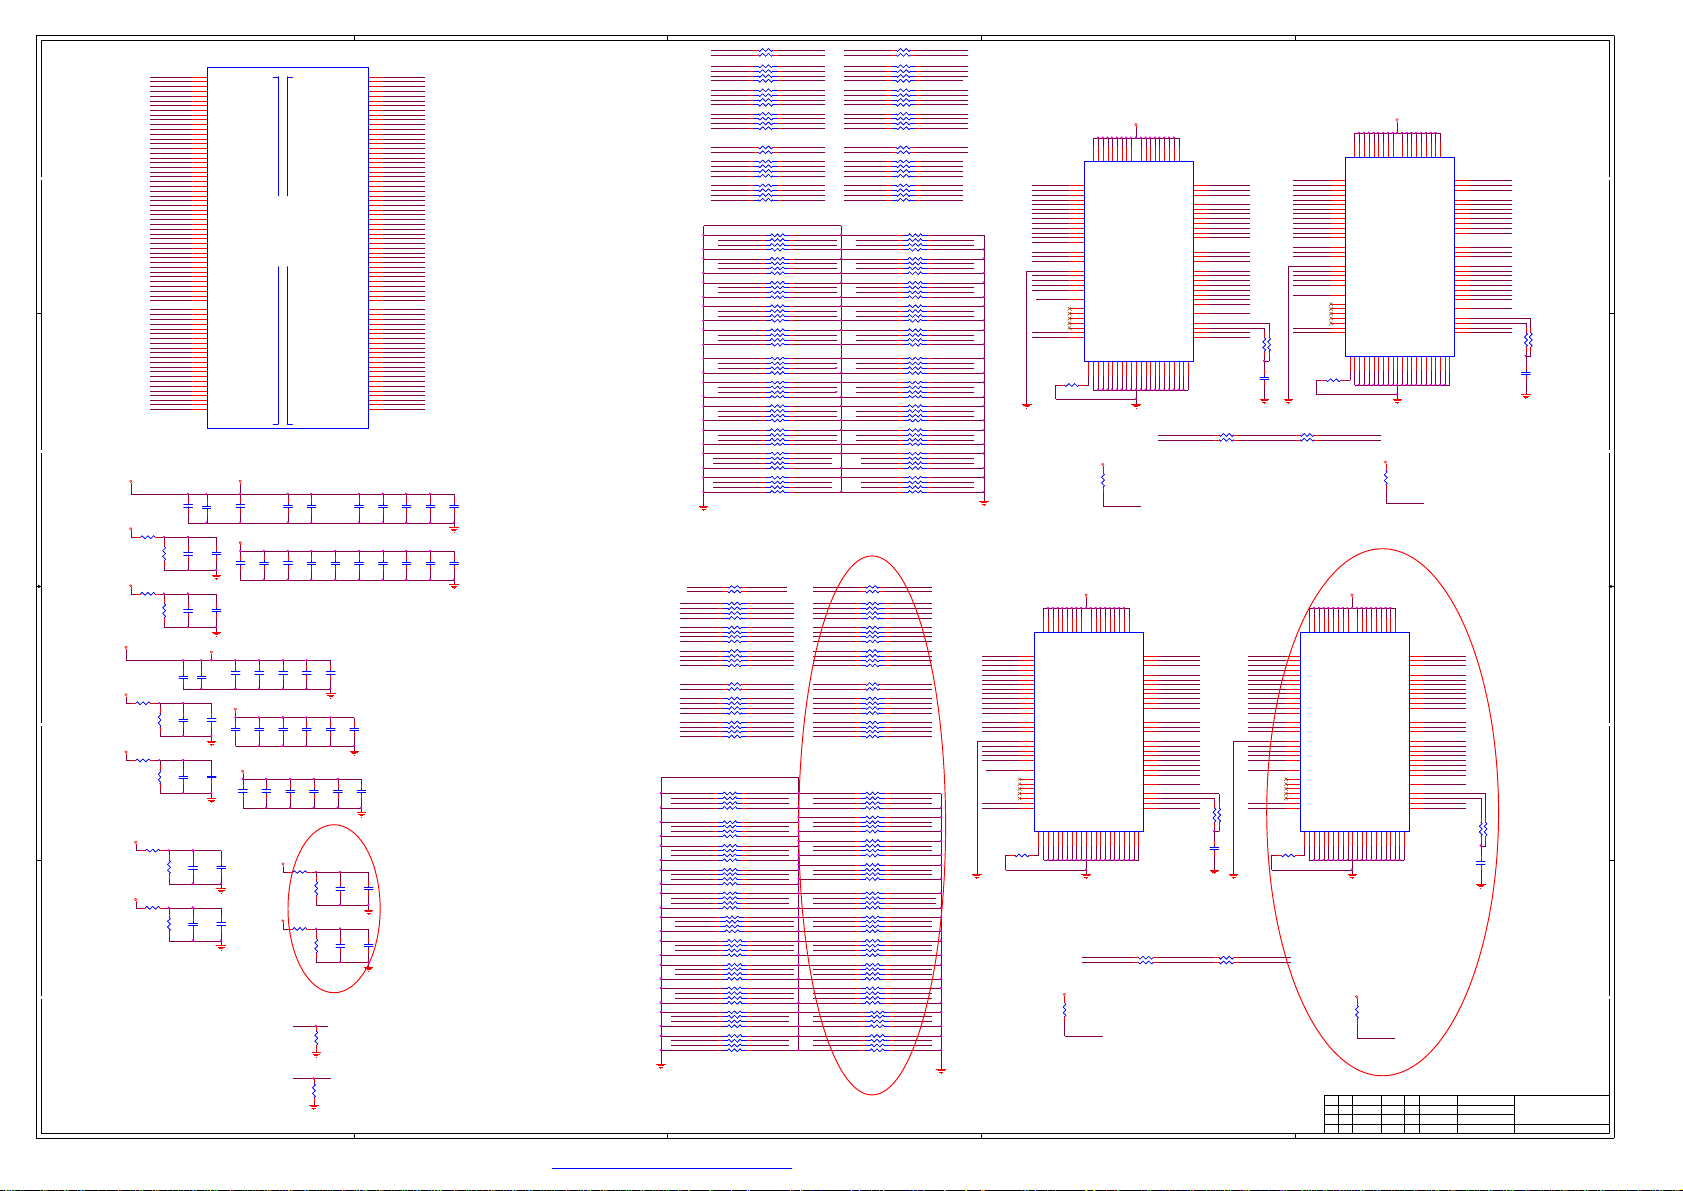
5
N501A
N501A
A_DDR3_A0
C10
A_DDR3_A0/DDR2_A5
A_DDR3_A1
B11
A_DDR3_A1/DDR2_A13
A_DDR3_A2
E12
A_DDR3_A2/DDR2_A9
A_DDR3_A3
E10
A_DDR3_A3/DDR2_A10
A_DDR3_A4
B12
A_DDR3_A4/DDR2_A2
A_DDR3_A5
D11
A_DDR3_A5/DDR2_A3
A_DDR3_A6
E14
A_DDR3_A6/DDR2_A4
A_DDR3_A7
D12
A_DDR3_A7/DDR2_A7
A_DDR3_A8
A12
A_DDR3_A8/DDR2_A8
A_DDR3_A9
A9
A_DDR3_A9/DDR2_A14
A_DDR3_A10
B13
A_DDR3_A10/DDR2_CASZ
A_DDR3_A11
A11
A_DDR3_A11/DDR2_A6
A_DDR3_A12
D15
A_DDR3_A12/DDR2_A0
A_DDR3_A13
E11
A_DDR3_A13/DDR2_A12
A_DDR3_A14
E13
A_DDR3_A14/DDR2_A11
A_DDR3_CASZ
D13
A_DDR3_CASZ/DDR2_BA0
A_DDR3_RASZ
D14
A_DDR3_RASZ/DDR2_BA1
A_DDR3_WEZ
B10
A_DDR3_WEZ/DDR2_A1
A_DDR3_ODT
D9
A_DDR3_ODT/DDR2_WEZ
A_DDR3_BA0
D10
A_DDR3_BA0/DDR2_CKE
A_DDR3_BA1
D16
A_DDR3_BA1/DDR2_RASZ
A_DDR3_BA2
E9
DD
CC
+1.5V_DDR
AVDD_DDR0
R416
R416
1K/1%
1K/1%
AVDD_DDR0
R448
R448
1K/1%
1K/1%
+1.5V_DDR
AVDD_DDR0
R450
R450
1K/1%
AVDD_DDR0
AVDD_DDR1
AVDD_DDR1
1K/1%
R452
R452
1K/1%
1K/1%
R460
R460
1K/1%
1K/1%
R465
R465
1K/1%
1K/1%
BB
AA
A_DDR3_RESET
A_DDR3_CKE
A_DDR3_DQ0
A_DDR3_DQ1
A_DDR3_DQ2
A_DDR3_DQ3
A_DDR3_DQ4
A_DDR3_DQ5
A_DDR3_DQ6
A_DDR3_DQ7
A_DDR3_DQ8
A_DDR3_DQ9
A_DDR3_DQ10
A_DDR3_DQ11
A_DDR3_DQ12
A_DDR3_DQ13
A_DDR3_DQ14
A_DDR3_DQ15
A_DDR3_DM0
A_DDR3_DM1
A_DDR3_MCLK
A_DDR3_MCLKZ
A_DDR3_DQS0
A_DDR3_DQS0B
A_DDR3_DQS1
A_DDR3_DQS1B
A_DDR3_DQ16
A_DDR3_DQ17
A_DDR3_DQ18
A_DDR3_DQ19
A_DDR3_DQ20
A_DDR3_DQ21
A_DDR3_DQ22
A_DDR3_DQ23
A_DDR3_DQ24
A_DDR3_DQ25
A_DDR3_DQ26
A_DDR3_DQ27
A_DDR3_DQ28
A_DDR3_DQ29
A_DDR3_DQ30
A_DDR3_DQ31
A_DDR3_DM2
A_DDR3_DM3
A_DDR3_DQS2
A_DDR3_DQS2B
A_DDR3_DQS3
A_DDR3_DQS3B
R445
R445
1K/1%
1K/1%
R449
R449
1K/1%
1K/1%
R451
R451
1K/1%
1K/1%
R457
R457
1K/1%
1K/1%
R462
R462
1K/1%
1K/1%
R468
R468
1K/1%
1K/1%
A_DDR3_BA2/DDR2_BA2
C9
A_DDR3_RESETB
C14
A_DDR3_CKE/DDR2_ODT
E19
A_DDR3_DQ0/DDR2_DQ6
E15
A_DDR3_DQ1/DDR2_DQ0
E20
A_DDR3_DQ2/DDR2_DQ1
E16
A_DDR3_DQ3/DDR2_DQ7
B21
A_DDR3_DQ4/DDR2_DQ4
B15
A_DDR3_DQ5/DDR2_DQ5
A21
A_DDR3_DQ6/DDR2_DQ3
C16
A_DDR3_DQ7/DDR2_DQ2
B17
A_DDR3_DQ8/DDR2_DQ15
E18
A_DDR3_DQ9/DDR2_DMU
D17
A_DDR3_DQ10/DDR2_DQ10
B20
A_DDR3_DQ11/DDR2_DQ9
E17
A_DDR3_DQ12/DDR2_DML
D20
A_DDR3_DQ13/DDR2_DQ12
D18
A_DDR3_DQ14/DDR2_DQ8
D19
A_DDR3_DQ15/DDR2_DQ14
C17
A_DDR3_DM0//DDR2_DQ13
A20
A_DDR3_DM1/DDR2_DQ11
C15
A_DDR3_MCLK/DDR2_MCLK
A14
A_DDR3_MCLKZ/DDR2_MCLKZ
B19
A_DDR3_DQS0/DDR2_DQS0
C19
A_DDR3_DQS0B/DDR2_DQSB0
A18
A_DDR3_DQS1/DDR2_DQS1
C18
A_DDR3_DQS1B/DDR2_DQSB1
C28
A_DDR3_DQ16/DDR2_DQ6
D21
A_DDR3_DQ17/DDR2_DQ0
B28
A_DDR3_DQ18/DDR2_DQ1
D22
A_DDR3_DQ19/DDR2_DQ7
A29
A_DDR3_DQ20/DDR2_DQ4
B22
A_DDR3_DQ21/DDR2_DQ5
B29
A_DDR3_DQ22/DDR2_DQ3
C23
A_DDR3_DQ23/DDR2_DQ2
E22
A_DDR3_DQ24/DDR2_DQ15
E24
A_DDR3_DQ25/DDR2_DMU
E23
A_DDR3_DQ26/DDR2_DQ10
C27
A_DDR3_DQ27/DDR2_DQ9
D24
A_DDR3_DQ28/DDR2_DML
B26
A_DDR3_DQ29/DDR2_DQ12
D23
A_DDR3_DQ30/DDR2_DQ8
C26
A_DDR3_DQ31/DDR2_DQ14
E21
A_DDR3_DM2//DDR2_DQ13
A27
A_DDR3_DM3/DDR2_DQ11
C25
A_DDR3_DQS2/DDR2_DQS0
B24
A_DDR3_DQS2B/DDR2_DQSB0
C24
A_DDR3_DQS3/DDR2_DQS1
A23
A_DDR3_DQS3B/DDR2_DQSB1
C430
C430
C488
C488
22uF/6.3V
22uF/6.3V
22uF/6.3V
22uF/6.3V
A-MVREFDQ-T1
C447
C447
0.1uF
0.1uF
A-MVREFCA-T1
C454
C454
0.1uF
0.1uF
AVDD_DDR1
C489
C489
C456
C456
22uF/6.3V
22uF/6.3V
22uF/6.3V
22uF/6.3V
A-MVREFDQ-T2
C462
C462
0.1uF
0.1uF
A-MVREFCA-T2
C470
C470
0.1uF
0.1uF
B-MVREFDQ-T1
C480
C480
0.1uF
0.1uF
B-MVREFCA-T1
C484
C484
0.1uF
0.1uF
5
MSD6369
MSD6369
C463
C463
1nF
1nF
C471
C471
1nF
1nF
AVDD_DDR0
AVDD_DDR0
C448
C448
1nF
1nF
C455
C455
1nF
1nF
AVDD_DDR1
C481
C481
1nF
1nF
C485
C485
1nF
1nF
AVDD_DDR1
C434
C434
0.1uF
0.1uF
C449
C449
0.1uF
0.1uF
C457
C457
0.1uF
0.1uF
C464
C464
0.1uF
0.1uF
C472
C472
0.1uF
0.1uF
C458
C458
0.1uF
0.1uF
C465
C465
0.1uF
0.1uF
MIU0
MIU0
C442
C442
0.1uF
0.1uF
C473
C473
0.1uF
0.1uF
AVDD_DDR1
AVDD_DDR1
B_DDR3_A0/DDR2_A5
B_DDR3_A1/DDR2_A13
B_DDR3_A2/DDR2_A9
B_DDR3_A3/DDR2_A10
B_DDR3_A4/DDR2_A2
B_DDR3_A5/DDR2_A3
B_DDR3_A6/DDR2_A4
B_DDR3_A7/DDR2_A7
B_DDR3_A8/DDR2_A8
B_DDR3_A9/DDR2_A14
B_DDR3_A10/DDR2_CASZ
B_DDR3_A11/DDR2_A6
B_DDR3_A12/DDR2_A0
B_DDR3_A13/DDR2_A12
B_DDR3_A14/DDR2_A11
B_DDR3_CASZ/DDR2_BA0
B_DDR3_RASZ/DDR2_BA1
B_DDR3_WEZ/DDR2_A1
B_DDR3_ODT/DDR2_WEZ
B_DDR3_BA0/DDR2_CKE
B_DDR3_BA1/DDR2_RASZ
B_DDR3_BA2/DDR2_BA2
B_DDR3_CKE/DDR2_ODT
B_DDR3_DQ0/DDR2_DQ6
B_DDR3_DQ1/DDR2_DQ0
B_DDR3_DQ2/DDR2_DQ1
B_DDR3_DQ3/DDR2_DQ7
B_DDR3_DQ4/DDR2_DQ4
B_DDR3_DQ5/DDR2_DQ5
B_DDR3_DQ6/DDR2_DQ3
B_DDR3_DQ7/DDR2_DQ2
B_DDR3_DQ8/DDR2_DQ15
B_DDR3_DQ9/DDR2_DMU
B_DDR3_DQ10/DDR2_DQ10
B_DDR3_DQ11/DDR2_DQ9
B_DDR3_DQ12/DDR2_DML
MIU1
MIU1
B_DDR3_DQ13/DDR2_DQ12
B_DDR3_DQ14/DDR2_DQ8
B_DDR3_DQ15/DDR2_DQ14
B_DDR3_DM0//DDR2_DQ13
B_DDR3_DM1/DDR2_DQ11
B_DDR3_MCLK/DDR2_MCLK
B_DDR3_MCLKZ/DDR2_MCLKZ
B_DDR3_DQS0/DDR2_DQS0
B_DDR3_DQS0B/DDR2_DQSB0
B_DDR3_DQS1/DDR2_DQS1
B_DDR3_DQS1B/DDR2_DQSB1
B_DDR3_DQ16/DDR2_DQ6
B_DDR3_DQ17/DDR2_DQ0
B_DDR3_DQ18/DDR2_DQ1
B_DDR3_DQ19/DDR2_DQ7
B_DDR3_DQ20/DDR2_DQ4
B_DDR3_DQ21/DDR2_DQ5
B_DDR3_DQ22/DDR2_DQ3
B_DDR3_DQ23/DDR2_DQ2
B_DDR3_DQ24/DDR2_DQ15
B_DDR3_DQ25/DDR2_DMU
B_DDR3_DQ26/DDR2_DQ10
B_DDR3_DQ27/DDR2_DQ9
B_DDR3_DQ28/DDR2_DML
B_DDR3_DQ29/DDR2_DQ12
B_DDR3_DQ30/DDR2_DQ8
B_DDR3_DQ31/DDR2_DQ14
B_DDR3_DM2//DDR2_DQ13
B_DDR3_DM3/DDR2_DQ11
B_DDR3_DQS2/DDR2_DQS0
B_DDR3_DQS2B/DDR2_DQSB0
B_DDR3_DQS3/DDR2_DQS1
B_DDR3_DQS3B/DDR2_DQSB1
Close to DDR POWER PIN
C435
C435
C436
C436
0.1uF
0.1uF
0.1uF
0.1uF
C444
C444
C443
C443
0.1uF
0.1uF
0.1uF
0.1uF
C460
C460
C459
C459
0.1uF
0.1uF
0.1uF
0.1uF
C466
C466
C467
C467
0.1uF
0.1uF
0.1uF
0.1uF
C475
C475
C474
C474
0.1uF
0.1uF
0.1uF
0.1uF
R461
R461
1K/1%
1K/1%
R463
R463
1K/1%
1K/1%
R466
R466
1K/1%
1K/1%
R469
R469
1K/1%
1K/1%
A_DDR3_CKE
1K
R4911KR491
B_DDR3_CKE
1K
R4881KR488
B_DDR3_RESETB
C461
C461
0.1uF
0.1uF
C468
C468
0.1uF
0.1uF
C450
C450
0.1uF
0.1uF
C476
C476
0.1uF
0.1uF
B-MVREFDQ-T2
C482
C482
0.1uF
0.1uF
B-MVREFCA-T2
C486
C486
0.1uF
0.1uF
C31
D32
J29
B30
E30
H28
L29
J28
E31
B31
F32
D31
M28
H29
K29
K28
L28
C32
G29
G28
N28
A30
C30
F30
T29
M29
U29
N29
P30
H30
P31
J31
K32
R29
P28
N32
P29
U28
R28
T28
J30
N31
G30
G31
M32
M31
L31
K30
AA31
V28
AA32
W28
AB31
R32
AB32
R30
W29
AA29
Y28
W30
Y29
W32
AA28
V30
V29
Y31
V31
U30
T30
T31
C437
C437
0.1uF
0.1uF
C451
C451
0.1uF
0.1uF
C469
C469
0.1uF
0.1uF
C477
C477
0.1uF
0.1uF
MIU For 6A806
C483
C483
1nF
1nF
C487
C487
1nF
1nF
B_DDR3_A0
B_DDR3_A1
B_DDR3_A2
B_DDR3_A3
B_DDR3_A4
B_DDR3_A5
B_DDR3_A6
B_DDR3_A7
B_DDR3_A8
B_DDR3_A9
B_DDR3_A10
B_DDR3_A11
B_DDR3_A12
B_DDR3_A13
B_DDR3_A14
B_DDR3_CASZ
B_DDR3_RASZ
B_DDR3_WEZ
B_DDR3_ODT
B_DDR3_BA0
B_DDR3_BA1
B_DDR3_BA2
B_DDR3_RESET
B_DDR3_CKE
B_DDR3_DQ0
B_DDR3_DQ1
B_DDR3_DQ2
B_DDR3_DQ3
B_DDR3_DQ4
B_DDR3_DQ5
B_DDR3_DQ6
B_DDR3_DQ7
B_DDR3_DQ8
B_DDR3_DQ9
B_DDR3_DQ10
B_DDR3_DQ11
B_DDR3_DQ12
B_DDR3_DQ13
B_DDR3_DQ14
B_DDR3_DQ15
B_DDR3_DM0
B_DDR3_DM1
B_DDR3_MCLK
B_DDR3_MCLKZ
B_DDR3_DQS0
B_DDR3_DQS0B
B_DDR3_DQS1
B_DDR3_DQS1B
B_DDR3_DQ16
B_DDR3_DQ17
B_DDR3_DQ18
B_DDR3_DQ19
B_DDR3_DQ20
B_DDR3_DQ21
B_DDR3_DQ22
B_DDR3_DQ23
B_DDR3_DQ24
B_DDR3_DQ25
B_DDR3_DQ26
B_DDR3_DQ27
B_DDR3_DQ28
B_DDR3_DQ29
B_DDR3_DQ30
B_DDR3_DQ31
B_DDR3_DM2
B_DDR3_DM3
B_DDR3_DQS2
B_DDR3_DQS2B
B_DDR3_DQS3
B_DDR3_DQS3B
C438
C438
0.1uF
0.1uF
C445
C445
0.1uF
0.1uF
C439
C439
C440
C440
0.1uF
0.1uF
0.1uF
0.1uF
C452
C452
C446
C446
0.1uF
0.1uF
0.1uF
0.1uF
4
C441
C441
0.1uF
0.1uF
A-DDR3-ODT-T1
A-DDR3-BA2-T1
A-DDR3-A3-T1
A-DDR3-A5-T1
A-DDR3-A7-T1
A-DDR3-RESET-T1
A-DDR3-A9-T1
A-DDR3-A13-T1
A-DDR3-A2-T1
A-DDR3-A0-T1
A-DDR3-WEZ-T1
A-DDR3-CASZ-T1
A-DDR3-RASZ-T1
A-DDR3-A1-T1
A-DDR3-A11-T1
A-DDR3-A14-T1
A-DDR3-A6-T1
A-DDR3-A8-T1
A-DDR3-A4-T1
A-DDR3-A12-T1
A-DDR3-BA1-T1
A-DDR3-A10-T1
A-DDR3-CKE-T1
A_DDR3_DQS1
A_DDR3_DQS1B
A_DDR3_DQS0
A_DDR3_DQS0B
A_DDR3_DQ20
A_DDR3_DQ22
A_DDR3_DQ18
A_DDR3_DQ16
A_DDR3_DM3
A_DDR3_DQ27
A_DDR3_DQ29
A_DDR3_DQ31
A_DDR3_DQ7
A_DDR3_DQ5
A_DDR3_DQ23
A_DDR3_DQ21
A_DDR3_DQ4
A_DDR3_DQ6
A_DDR3_DM1
A_DDR3_DQ11
A_DDR3_DQ8
A_DDR3_DM0
R439 22RR439 22R
R440 22RR440 22R
7531
7531
7531
7531
7531
7531
R492 22RR492 22R
R493 22RR493 22R
7531
7531
7531
7531
A_DDR3_ODT
A_DDR3_BA0A-DDR3-BA0-T1
RA4010RX4
RA4010RX4
A_DDR3_BA2
A_DDR3_A3
8642
8642
A_DDR3_A5
A_DDR3_A7
RA40222RX4
RA40222RX4
A_DDR3_RESET
A_DDR3_A9
8642
8642
A_DDR3_A13
A_DDR3_A2
RA40322RX4
RA40322RX4
A_DDR3_A0
A_DDR3_WEZ
8642
8642
A_DDR3_CASZ
A_DDR3_RASZ
A_DDR3_A1
A_DDR3_A11
RA40722RX4
RA40722RX4
A_DDR3_A14
A_DDR3_A6
8642
8642
A_DDR3_A8
A_DDR3_A4
RA40822RX4
RA40822RX4
A_DDR3_A12
A_DDR3_BA1
8642
8642
A_DDR3_A10
A_DDR3_CKE
RA41122RX4
RA41122RX4
A-DDR3-DQ20
A-DDR3-DQ22
7531
8642
7531
8642
RA41222RX4
RA41222RX4
A-DDR3-DQ18
A-DDR3-DQ16
7531
8642
7531
8642
RA41322RX4
RA41322RX4
A-DDR3-DM3
A-DDR3-DQ27
7531
8642
7531
8642
RA41422RX4
RA41422RX4
A-DDR3-DQ29
A-DDR3-DQ31
7531
8642
7531
8642
RA41522RX4
RA41522RX4
A-DDR3-DQ7
A-DDR3-DQ5
7531
8642
7531
8642
RA41622RX4
RA41622RX4
A-DDR3-DQ23
A-DDR3-DQ21
7531
8642
7531
8642
RA41722RX4
RA41722RX4
A-DDR3-DQ4
A-DDR3-DQ6
7531
8642
7531
8642
RA41822RX4
RA41822RX4
A-DDR3-DM1
A-DDR3-DQ11
7531
8642
7531
8642
RA41922RX4
RA41922RX4
A-DDR3-DQ8
A-DDR3-DM0
7531
8642
7531
8642
RA42022RX4
RA42022RX4
A-DDR3-DQS1
A-DDR3-DQS1B
7531
8642
7531
8642
RA42122RX4
RA42122RX4
A-DDR3-DQS0
A-DDR3-DQS0B A_DDR3_DQS3
7531
8642
7531
8642
3
A_DDR3_ODT
R470 22RR470 22R
A_DDR3_BA0
R473 22RR473 22R
RA4040RX4
RA4040RX4
A_DDR3_BA2
A_DDR3_A3
7531
7531
A_DDR3_A5
A_DDR3_A7
RA40522RX4
RA40522RX4
A_DDR3_RESET
A_DDR3_A9
7531
7531
A_DDR3_A13
A_DDR3_A2
RA40622RX4
RA40622RX4
A_DDR3_A0
A_DDR3_WEZ
7531
7531
A_DDR3_CASZ
A_DDR3_RASZ
A_DDR3_A1 A-DDR3-A1-T2
R494 22RR494 22R
A_DDR3_A11
R495 22RR495 22R
RA40922RX4
RA40922RX4
A_DDR3_A14
A_DDR3_A6
7531
7531
A_DDR3_A8
A_DDR3_A4
RA41022RX4
RA41022RX4
A_DDR3_A12 A-DDR3-A12-T2
A_DDR3_BA1
7531
7531
A_DDR3_A10
A_DDR3_CKE
RA42222RX4
RA42222RX4
A_DDR3_DQ3
A_DDR3_DQ1
RA42322RX4
RA42322RX4
A_DDR3_DQ25
A_DDR3_DQ28
RA42422RX4
RA42422RX4
A_DDR3_DQ30
A_DDR3_DQ26
RA42522RX4
RA42522RX4
A_DDR3_DQ24
A_DDR3_DM2
RA42622RX4
RA42622RX4
A_DDR3_DQ19
A_DDR3_DQ17
RA42722RX4
RA42722RX4
A_DDR3_DQ2
A_DDR3_DQ0
RA42822RX4
RA42822RX4
A_DDR3_DQ13
A_DDR3_DQ15
RA42922RX4
RA42922RX4
A_DDR3_DQ9
A_DDR3_DQ12
RA43022RX4
RA43022RX4
A_DDR3_DQ14
A_DDR3_DQ10
RA43122RX4
RA43122RX4
A_DDR3_DQS2B
A_DDR3_DQS2
RA43222RX4
RA43222RX4
A_DDR3_DQS3B
A0
A1
A2
A3
A4
A5
A6
A7
A8
A9
A10
A11
A12
BA0
BA1
BA2
/CS
/RAS
/CAS
/WE
ODT
VREFCA
NC1
NC2
NC3
NC4
NC5
A13
NC7
ZQ
L8
AVDD_DDR0
R9
T9
R441 2KR441 2K
A-DDR3-RESET-T1
2
AVDD_DDR0
H9
VDDB2VDDD9VDDG7VDDK2VDDK8VDDN1VDDN9VDDR1VDD
VDDQA1VDDQA8VDDQC1VDDQC9VDDQD2VDDQE9VDDQF1VDDQH2VDDQ
A-DDR3-DM1
D3
DMU
A-DDR3-DQS1
C7
DQSU
A-DDR3-DQS1B
B7
/DQSU
A-DDR3-DQ8
D7
DQU0
A-DDR3-DQ9
C3
DQU1
A-DDR3-DQ10
C8
DQU2
A-DDR3-DQ11
C2
DQU3
A-DDR3-DQ12
A7
DQU4
A-DDR3-DQ13
A2
DQU5
A-DDR3-DQ14
B8
DQU6
A-DDR3-DQ15
A3
DQU7
A-DDR3-DM0
E7
DML
A-DDR3-DQS0
F3
DQSL
A-DDR3-DQS0B
G3
/DQSL
A-DDR3-DQ0
E3
DQL0
A-DDR3-DQ1
F7
DQL1
A-DDR3-DQ2
F2
DQL2
A-DDR3-DQ3
F8
DQL3
A-DDR3-DQ4
H3
DQL4
A-DDR3-DQ5
H8
DQL5
A-DDR3-DQ6
G2
DQL6
A-DDR3-DQ7
H7
DQL7
A-MVREFDQ-T1
H1
VREFDQ
A_DDR3-MCLK
J7
CK
A_DDR3-MCLKZ
K7
/CK
A-DDR3-CKE-T1
K9
CKE
A-DDR3-RESET-T1
T2
/RESET
VSSQB9VSSQB1VSSQD1VSSQD8VSSQE2VSSQE8VSSQF9VSSQG1VSSQ
VSSA9VSSE1VSSG8VSSJ2VSSJ8VSSM1VSSM9VSSP1VSSP9VSST1VSS
VSS
B3
G9
R015 22RR015 22R
R016 22RR016 22R
A_DDR3-MCLK
A_DDR3-MCLKZA_DDR3_MCLKZ
A_DDR3_MCLK A-DDR3_MCLK
DDR3 2G bit 1600MHz
AVDD_DDR0
N503
N503
H5TQ2G63BFR-PBC
H5TQ2G63BFR-PBC
R9
A-DDR3-A0-T2
N3
A0
A-DDR3-A1-T2
P7
A1
A-DDR3-A2-T2
P3
A2
A-DDR3-A3-T2
N2
A3
A-DDR3-A4-T2
P8
A4
A-DDR3-A5-T2
P2
A5
A-DDR3-A6-T2
R8
A6
A-DDR3-A7-T2
R2
A7
A-DDR3-A8-T2
T8
A8
A-DDR3-A9-T2
R3
A9
A-DDR3-A10-T2
L7
A10
A-DDR3-A11-T2
R7
A11
A-DDR3-A12-T2
N7
A12
A-DDR3-BA0-T2
M2
BA0
A-DDR3-BA1-T2
N8
BA1
A-DDR3-BA2-T2
M3
BA2
L2
/CS
A-DDR3-RASZ-T2
J3
/RAS
A-DDR3-CASZ-T2
K3
/CAS
A-DDR3-WEZ-T2
L3
/WE
A-DDR3-ODT-T2
K1
ODT
A-MVREFCA-T2
M8
VREFCA
J1
NC1
J9
NC2
L1
NC3
L9
NC4
M7
NC5
A-DDR3-A13-T2
T3
A13
A-DDR3-A14-T2
T7
NC7
R433 56RR433 56R
R434 56RR434 56R
C432 10nFC432 10nF
R011 0RR011 0R
R013 0RR013 0R
R438
R438
240R/1%
240R/1%
A-DDR3_MCLKZ
ZQ
L8
T9
AVDD_DDR0
R442 2KR442 2K
A-DDR3-RESET-T2
A-DDR3-ODT-T2
A-DDR3-BA0-T2
A-DDR3-BA2-T2
A-DDR3-A3-T2
8642
8642
A-DDR3-A5-T2
A-DDR3-A7-T2
A-DDR3-RESET-T2
A-DDR3-A9-T2
8642
8642
A-DDR3-A13-T2
A-DDR3-A2-T2
A-DDR3-A0-T2
A-DDR3-WEZ-T2
8642
8642
A-DDR3-CASZ-T2
A-DDR3-RASZ-T2
A-DDR3-A11-T2
A-DDR3-A14-T2
A-DDR3-A6-T2
8642
8642
A-DDR3-A8-T2
A-DDR3-A4-T2
A-DDR3-BA1-T2
8642
8642
A-DDR3-A10-T2
A-DDR3-CKE-T2
A-DDR3-DQ3
A-DDR3-DQ1
7 5 3 1
8 6 4 2
7 5 3 1
8 6 4 2
A-DDR3-DQ25
A-DDR3-DQ28
7 5 3 1
8 6 4 2
7 5 3 1
8 6 4 2
A-DDR3-DQ30
A-DDR3-DQ26
7 5 3 1
8 6 4 2
7 5 3 1
8 6 4 2
A-DDR3-DQ24
A-DDR3-DM2
7 5 3 1
8 6 4 2
7 5 3 1
8 6 4 2
A-DDR3-DQ19
A-DDR3-DQ17
7 5 3 1
8 6 4 2
7 5 3 1
8 6 4 2
A-DDR3-DQ2
A-DDR3-DQ0
7 5 3 1
8 6 4 2
7 5 3 1
8 6 4 2
A-DDR3-DQ13
A-DDR3-DQ15
7 5 3 1
8 6 4 2
7 5 3 1
8 6 4 2
A-DDR3-DQ9
A-DDR3-DQ12
7 5 3 1
8 6 4 2
7 5 3 1
8 6 4 2
A-DDR3-DQ14
A-DDR3-DQ10
7 5 3 1
8 6 4 2
7 5 3 1
8 6 4 2
A-DDR3-DQS2B
A-DDR3-DQS2
7 5 3 1
8 6 4 2
7 5 3 1
8 6 4 2
A-DDR3-DQS3B
A-DDR3-DQS3
7 5 3 1
8 6 4 2
7 5 3 1
8 6 4 2
A-DDR3-A0-T1
A-DDR3-A1-T1
A-DDR3-A2-T1
A-DDR3-A3-T1
A-DDR3-A4-T1
A-DDR3-A5-T1
A-DDR3-A6-T1
A-DDR3-A7-T1
A-DDR3-A8-T1
A-DDR3-A9-T1
A-DDR3-A10-T1
A-DDR3-A11-T1
A-DDR3-A12-T1
A-DDR3-BA0-T1
A-DDR3-BA1-T1
A-DDR3-BA2-T1
A-DDR3-RASZ-T1
A-DDR3-CASZ-T1
A-DDR3-WEZ-T1
A-DDR3-ODT-T1
A-MVREFCA-T1
A-DDR3-A13-T1
A-DDR3-A14-T1
N502
N502
H5TQ2G63BFR-PBC
H5TQ2G63BFR-PBC
R437
R437
240R/1%
240R/1%
DDR3 2G bit 1600MHz
N3
P7
P3
N2
P8
P2
R8
R2
T8
R3
L7
R7
N7
M2
N8
M3
L2
J3
K3
L3
K1
M8
J1
J9
L1
L9
M7
T3
T7
1
H9
VDDB2VDDD9VDDG7VDDK2VDDK8VDDN1VDDN9VDDR1VDD
VDDQA1VDDQA8VDDQC1VDDQC9VDDQD2VDDQE9VDDQF1VDDQH2VDDQ
A-DDR3-DM3
D3
DMU
A-DDR3-DQS3
C7
DQSU
A-DDR3-DQS3B
B7
/DQSU
A-DDR3-DQ24
D7
DQU0
A-DDR3-DQ25
C3
DQU1
A-DDR3-DQ26
C8
DQU2
A-DDR3-DQ27
C2
DQU3
A-DDR3-DQ28
A7
DQU4
A-DDR3-DQ29
A2
DQU5
A-DDR3-DQ30
B8
DQU6
A-DDR3-DQ31
A3
DQU7
A-DDR3-DM2
E7
DML
A-DDR3-DQS2
F3
DQSL
A-DDR3-DQS2B
G3
/DQSL
A-DDR3-DQ16
E3
DQL0
A-DDR3-DQ17
F7
DQL1
A-DDR3-DQ18
F2
DQL2
A-DDR3-DQ19
F8
DQL3
A-DDR3-DQ20
H3
DQL4
A-DDR3-DQ21
H8
DQL5
A-DDR3-DQ22
G2
DQL6
A-DDR3-DQ23
H7
DQL7
A-MVREFDQ-T2
H1
VREFDQ
A-DDR3_MCLK
J7
CK
A-DDR3_MCLKZ
K7
/CK
A-DDR3-CKE-T2
K9
CKE
A-DDR3-RESET-T2
T2
/RESET
VSSQB9VSSQB1VSSQD1VSSQD8VSSQE2VSSQE8VSSQF9VSSQG1VSSQ
VSSA9VSSE1VSSG8VSSJ2VSSJ8VSSM1VSSM9VSSP1VSSP9VSST1VSS
VSS
B3
G9
R435 56RR435 56R
R436 56RR436 56R
C433 10nFC433 10nF
DDR3 2G bit 1600MHz
B-DDR3-A0-T1
B-DDR3-A1-T1
B-DDR3-A2-T1
B-DDR3-A3-T1
B-DDR3-A4-T1
B-DDR3-A5-T1
B-DDR3-A6-T1
B-DDR3-A7-T1
B-DDR3-A8-T1
B-DDR3-A9-T1
B-DDR3-A10-T1
B-DDR3-A11-T1
B-DDR3-A12-T1
B-DDR3-BA0-T1
B-DDR3-BA1-T1
B-DDR3-BA2-T1
B-DDR3-RASZ-T1
B-DDR3-CASZ-T1
B-DDR3-WEZ-T1
B-DDR3-ODT-T1
B-MVREFCA-T1
B-DDR3-A13-T1
B-DDR3-A14-T1
N504
N504
H5TQ2G63BFR-PBC
H5TQ2G63BFR-PBC
R458
R458
240R/1%
240R/1%
N3
P7
P3
N2
P8
P2
R8
R2
T8
R3
L7
R7
N7
M2
N8
M3
L2
J3
K3
L3
K1
M8
J1
J9
L1
L9
M7
T3
T7
DDR3 2G bit 1600MHz
AVDD_DDR1
H9
R9
VDDB2VDDD9VDDG7VDDK2VDDK8VDDN1VDDN9VDDR1VDD
A0
A1
A2
A3
A4
A5
A6
A7
A8
A9
A10
A11
A12
BA0
BA1
BA2
/CS
/RAS
/CAS
/WE
ODT
VREFCA
NC1
NC2
NC3
NC4
NC5
A13
NC7
ZQ
L8
T9
B_DDR3_MCLK
B_DDR3_MCLKZ
AVDD_DDR1
R471 1K/2KR471 1K/2K
B-DDR3-RESET-T1
AVDD_DDR1
N505
N505
NC/H5TQ2G63BFR-PBC
NC/H5TQ2G63BFR-PBC
VDDQA1VDDQA8VDDQC1VDDQC9VDDQD2VDDQE9VDDQF1VDDQH2VDDQ
B-DDR3-DM1
D3
DMU
B-DDR3-DQS1
C7
DQSU
B-DDR3-DQS1B
B7
/DQSU
B-DDR3-DQ8
D7
DQU0
B-DDR3-DQ9
C3
DQU1
B-DDR3-DQ10
C8
DQU2
B-DDR3-DQ11
C2
DQU3
B-DDR3-DQ12
A7
DQU4
B-DDR3-DQ13
A2
DQU5
B-DDR3-DQ14
B8
DQU6
B-DDR3-DQ15
A3
DQU7
B-DDR3-DM0
E7
DML
B-DDR3-DQS0
F3
DQSL
B-DDR3-DQS0B
G3
/DQSL
B-DDR3-DQ0
E3
DQL0
B-DDR3-DQ1
F7
DQL1
B-DDR3-DQ2
F2
DQL2
B-DDR3-DQ3
F8
DQL3
B-DDR3-DQ4
H3
DQL4
B-DDR3-DQ5
H8
DQL5
B-DDR3-DQ6
G2
DQL6
B-DDR3-DQ7
H7
DQL7
B-MVREFDQ-T1
H1
VREFDQ
B_DDR3-MCLK
J7
CK
B_DDR3-MCLKZ
K7
/CK
B-DDR3-CKE-T1
K9
CKE
B-DDR3-RESET-T1
T2
/RESET
VSSQB9VSSQB1VSSQD1VSSQD8VSSQE2VSSQE8VSSQF9VSSQG1VSSQ
VSSA9VSSE1VSSG8VSSJ2VSSJ8VSSM1VSSM9VSSP1VSSP9VSST1VSS
VSS
B3
G9
B_DDR3-MCLK
R489 22RR489 22R
B_DDR3-MCLKZ
R490 22RR490 22R
2
R453 56RR453 56R
R454 56RR454 56R
C478 10nFC478 10nF
R464 0RR464 0R
R467 0RR467 0R
B-DDR3-A0-T2
B-DDR3-A1-T2
B-DDR3-A2-T2
B-DDR3-A3-T2
B-DDR3-A4-T2
B-DDR3-A5-T2
B-DDR3-A6-T2
B-DDR3-A7-T2
B-DDR3-A8-T2
B-DDR3-A9-T2
B-DDR3-A10-T2
B-DDR3-A11-T2
B-DDR3-A12-T2
B-DDR3-BA0-T2
B-DDR3-BA1-T2
B-DDR3-BA2-T2
B-DDR3-RASZ-T2
B-DDR3-CASZ-T2
B-DDR3-WEZ-T2
B-DDR3-ODT-T2
B-MVREFCA-T2
B-DDR3-A13-T2
B-DDR3-A14-T2
B-DDR3-MCLK
B-DDR3-MCLKZ
N3
P7
P3
N2
P8
P2
R8
R2
T8
R3
L7
R7
N7
M2
N8
M3
L2
J3
K3
L3
K1
M8
J1
J9
L1
L9
M7
T3
T7
R459
R459
240R/1%
240R/1%
A0
A1
A2
A3
A4
A5
A6
A7
A8
A9
A10
A11
A12
BA0
BA1
BA2
/CS
/RAS
/CAS
/WE
ODT
VREFCA
NC1
NC2
NC3
NC4
NC5
A13
NC7
L8
H9
R9
VDDB2VDDD9VDDG7VDDK2VDDK8VDDN1VDDN9VDDR1VDD
ZQ
VSSA9VSSE1VSSG8VSSJ2VSSJ8VSSM1VSSM9VSSP1VSSP9VSST1VSS
VSS
T9
B3
G9
AVDD_DDR1
R472 2KR472 2K
B-DDR3-RESET-T2
标记
数量签名更改单号
标记
数量签名更改单号
标记
数量签名更改单号
VREFDQ
/DQSU
/RESET
MIU For 6A806
VDDQA1VDDQA8VDDQC1VDDQC9VDDQD2VDDQE9VDDQF1VDDQH2VDDQ
B-DDR3-DM3
D3
DMU
B-DDR3-DQS3
C7
DQSU
B-DDR3-DQS3B
B7
B-DDR3-DQ24
D7
DQU0
B-DDR3-DQ25
C3
DQU1
B-DDR3-DQ26
C8
DQU2
B-DDR3-DQ27
C2
DQU3
B-DDR3-DQ28
A7
DQU4
B-DDR3-DQ29
A2
DQU5
B-DDR3-DQ30
B8
DQU6
B-DDR3-DQ31
A3
DQU7
B-DDR3-DM2
E7
DML
B-DDR3-DQS2
F3
DQSL
B-DDR3-DQS2B
G3
/DQSL
B-DDR3-DQ16
E3
DQL0
B-DDR3-DQ17
F7
DQL1
B-DDR3-DQ18
F2
DQL2
B-DDR3-DQ19
F8
DQL3
B-DDR3-DQ20
H3
DQL4
B-DDR3-DQ21
H8
DQL5
B-DDR3-DQ22
G2
DQL6
B-DDR3-DQ23
H7
DQL7
B-MVREFDQ-T2
H1
B-DDR3-MCLK
J7
CK
B-DDR3-MCLKZ
K7
/CK
B-DDR3-CKE-T2
K9
CKE
B-DDR3-RESET-T2
T2
VSSQB9VSSQB1VSSQD1VSSQD8VSSQE2VSSQE8VSSQF9VSSQG1VSSQ
日期
日期
日期
R456 56RR456 56R
R455 56RR455 56R
C479 10nFC479 10nF
拟制
拟制
拟制
审核
审核
审核
1
14.Dram
14.Dram
14.Dram
第
第
第
14
14
14
张
张
张
C453
C453
0.1uF
0.1uF
4
B-DDR3-ODT-T1
B-DDR3-BA0-T1
B-DDR3-BA2-T1
B-DDR3-A3-T1
B-DDR3-A5-T1
B-DDR3-A7-T1
B-DDR3-RESET-T1
B-DDR3-A9-T1
B-DDR3-A13-T1
B-DDR3-A2-T1
B-DDR3-A0-T1
B-DDR3-WEZ-T1
B-DDR3-CASZ-T1
B-DDR3-RASZ-T1
B-DDR3-A1-T1
B-DDR3-A11-T1
B-DDR3-A14-T1
B-DDR3-A6-T1
B-DDR3-A8-T1
B-DDR3-A4-T1
B-DDR3-A12-T1
B-DDR3-BA1-T1
B-DDR3-A10-T1
B_DDR3_DQ2
B_DDR3_DQ0
B_DDR3_DQ13
B_DDR3_DQ15
B_DDR3_DQ9
B_DDR3_DQ12
B_DDR3_DQ14
B_DDR3_DQ10
B_DDR3_DQ3
B_DDR3_DQ1
B_DDR3_DQ4
B_DDR3_DQ6
B_DDR3_DM1
B_DDR3_DQ11
B_DDR3_DQ8
B_DDR3_DM0
B_DDR3_DQ7
B_DDR3_DQ5
B_DDR3_DQS1
B_DDR3_DQS1B
B_DDR3_DQS0
B_DDR3_DQS0B
R496 22RR496 22R
R497 22RR497 22R
7531
7531
7531
7531
7531
7531
R001 22RR001 22R
R002 22RR002 22R
7531
7531
7531
7531
RA44722RX4
RA44722RX4
7 5 3 1
7 5 3 1
RA44922RX4
RA44922RX4
7 5 3 1
7 5 3 1
RA45122RX4
RA45122RX4
7 5 3 1
7 5 3 1
RA45322RX4
RA45322RX4
7 5 3 1
7 5 3 1
RA45522RX4
RA45522RX4
7 5 3 1
7 5 3 1
8642
8642
8642
8642
8642
8642
8642
8642
8642
8642
8642
8642
B_DDR3_ODT
B_DDR3_BA0
RA43722RX4
RA43722RX4
B_DDR3_BA2
B_DDR3_A3
8642
8642
B_DDR3_A5
B_DDR3_A7
RA43822RX4
RA43822RX4
B_DDR3_RESET
B_DDR3_A9
8642
8642
B_DDR3_A13
B_DDR3_A2
RA43922RX4
RA43922RX4
B_DDR3_A0
B_DDR3_WEZ
8642
8642
B_DDR3_CASZ
B_DDR3_RASZ
B_DDR3_A1
B_DDR3_A11
RA44122RX4
RA44122RX4
B_DDR3_A14
B_DDR3_A6
8642
8642
B_DDR3_A8
B_DDR3_A4
RA44322RX4
RA44322RX4
B_DDR3_A12
B_DDR3_BA1
8642
8642
B_DDR3_A10
B_DDR3_CKE
B-DDR3-DQ2
B-DDR3-DQ0
8 6 4 2
8 6 4 2
B-DDR3-DQ13
B-DDR3-DQ15
8 6 4 2
8 6 4 2
B-DDR3-DQ9
B-DDR3-DQ12
8 6 4 2
8 6 4 2
B-DDR3-DQ14
B-DDR3-DQ10
8 6 4 2
8 6 4 2
B-DDR3-DQ3
B-DDR3-DQ1
8 6 4 2
8 6 4 2
RA45722RX4
RA45722RX4
B-DDR3-DQ4
B-DDR3-DQ6
7531
7531
RA45922RX4
RA45922RX4
B-DDR3-DM1
B-DDR3-DQ11
7531
7531
RA46122RX4
RA46122RX4
B-DDR3-DQ8
B-DDR3-DM0
7531
7531
RA46322RX4
RA46322RX4
B-DDR3-DQ7
B-DDR3-DQ5
7531
7531
RA46522RX4
RA46522RX4
B-DDR3-DQS1
B-DDR3-DQS1B
7531
7531
RA46722RX4
RA46722RX4
B-DDR3-DQS0
B-DDR3-DQS0B
7531
7531
B_DDR3_ODT
B_DDR3_BA0
B_DDR3_BA2
B_DDR3_A3
B_DDR3_A5
B_DDR3_A7
B_DDR3_RESET
B_DDR3_A9
B_DDR3_A13
B_DDR3_A2
B_DDR3_A0
B_DDR3_WEZ
B_DDR3_CASZ
B_DDR3_RASZ
B_DDR3_A1
B_DDR3_A11
B_DDR3_A14
B_DDR3_A6
B_DDR3_A8
B_DDR3_A4
B_DDR3_A12
B_DDR3_BA1
B_DDR3_A10
B_DDR3_CKE
B_DDR3_DQ25
B_DDR3_DQ28
B_DDR3_DQ30
B_DDR3_DQ26
B_DDR3_DQ24
B_DDR3_DM2
B_DDR3_DQ17
B_DDR3_DQ19
B_DDR3_DQ20
B_DDR3_DQ22
B_DDR3_DQ18
B_DDR3_DQ16
B_DDR3_DM3
B_DDR3_DQ27
B_DDR3_DQ29
B_DDR3_DQ31
B_DDR3_DQ23
B_DDR3_DQ21
B_DDR3_DQS3B
B_DDR3_DQS3
B_DDR3_DQS2B
3
R498 22RR498 22R
R499 22RR499 22R
7531
7531
7531
7531
7531
7531
R003 22RR003 22R
R004 22RR004 22R
7531
7531
7531
7531
RA44822RX4
RA44822RX4
7 5 3 1
7 5 3 1
RA45022RX4
RA45022RX4
7 5 3 1
7 53 1
RA45222RX4
RA45222RX4
7 5 3 1
7 5 3 1
RA45422RX4
RA45422RX4
7 5 3 1
7 53 1
8642
8642
8642
8642
8642
8642
8642
8642
8642
8642
RA46622RX4
RA46622RX4
7 5 3 1
7 5 3 1
RA46822RX4
RA46822RX4
7 5 3 1
7 5 3 1
RA43522RX4
RA43522RX4
RA43622RX4
RA43622RX4
RA44022RX4
RA44022RX4
RA44422RX4
RA44422RX4
RA44622RX4
RA44622RX4
RA45622RX4
RA45622RX4
7531
7531
RA45822RX4
RA45822RX4
7531
7531
RA46022RX4
RA46022RX4
7531
7531
RA46222RX4
RA46222RX4
7531
7531
RA46422RX4
RA46422RX4
7531
7531
8642
8642
B-DDR3-RESET-T2
8642
8642
8642
8642
8642
8642
8642
8642
8 6 4 2
8 6 4 2
8 6 4 2
8 64 2
8 6 4 2
8 6 4 2
8 6 4 2
8 64 2
8 6 4 2
8 6 4 2
8 6 4 2
8 6 4 2
B-DDR3-ODT-T2
B-DDR3-BA0-T2
B-DDR3-BA2-T2
B-DDR3-A3-T2
B-DDR3-A5-T2
B-DDR3-A7-T2
B-DDR3-A9-T2
B-DDR3-A13-T2
B-DDR3-A2-T2
B-DDR3-A0-T2
B-DDR3-WEZ-T2
B-DDR3-CASZ-T2
B-DDR3-RASZ-T2
B-DDR3-A1-T2
B-DDR3-A11-T2
B-DDR3-A14-T2
B-DDR3-A6-T2
B-DDR3-A8-T2
B-DDR3-A4-T2
B-DDR3-A12-T2
B-DDR3-BA1-T2
B-DDR3-A10-T2
B-DDR3-CKE-T2B-DDR3-CKE-T1
B-DDR3-DQ25
B-DDR3-DQ28
B-DDR3-DQ30
B-DDR3-DQ26
B-DDR3-DQ24
B-DDR3-DM2
B-DDR3-DQ17
B-DDR3-DQ19
B-DDR3-DQ20
B-DDR3-DQ22
B-DDR3-DQ18
B-DDR3-DQ16
B-DDR3-DM3
B-DDR3-DQ27
B-DDR3-DQ29
B-DDR3-DQ31
B-DDR3-DQ23
B-DDR3-DQ21
B-DDR3-DQS3B
B-DDR3-DQS3
B-DDR3-DQS2B
B-DDR3-DQS2B_DDR3_DQS2
MIU For 6369
PDF 文件使用 "pdfFactory Pro" 试用版本创建 ÿÿ www.fineprint.com.cn
Page 15

LED TV
KDL42XS718UN
KDL49XS718UN
KDL55XS718UN
OWNER'S MANUAL
Please read this manual carefully b ef or e TV o pe ra ti on .
Retain it for future reference.
Page 16

Page 17
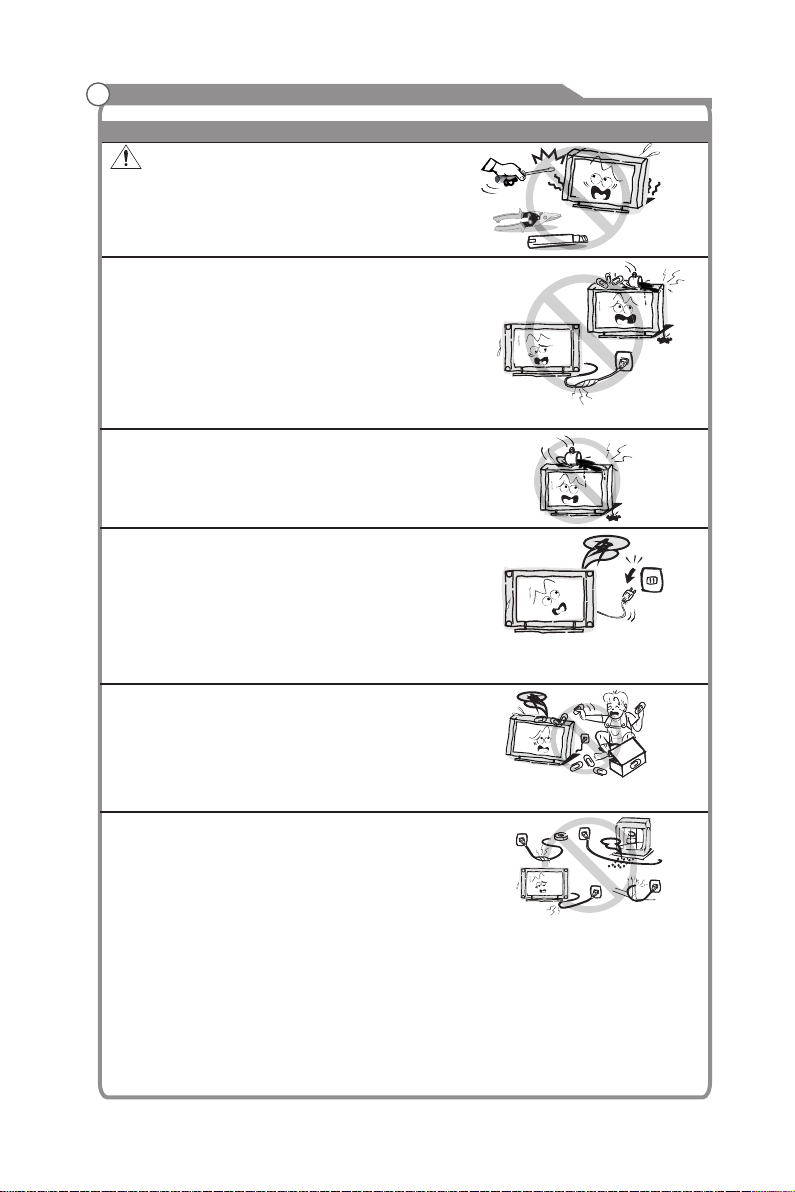
Important Safety Instructions and Maintenance
Important Safety Instructions
CAUTION
Risk of electronic shock, do not open.
Do not attempt to service this product yourself
as opening or removing covers may expose
you to dangerous voltage or other hazards.
Refer all servicing to qualified service personnel.
If the following problems occur:
Turn off the TV set and unplug the AC power cord
immediately if any of the following problems occur.
Ask your dealer or service centre to have it checked
by qualified service personnel
When:
- AC power cord is damaged.
- Poor fitting of AC power outlet.
- TV set is damaged by being dropped, hit or having something thrown at it.
- Any liquid or solid object falls through openings in the cabinet.
To reduce the risk of fire or electric shock, do not
expose this product to rain or moisture.
The apparatus shall not be exposed to dripping
or splashing and no objects filled with liquids,
such as vases, shall be placed on the apparatus.
The screen and cabinet get warm when the TV
is in use. This is not a malfunction.In case of
smoke, strange noise or strange smell from the
unit:
· Turn off the power switch immediately;
· Disconnect the power plug from the power
outlet;
· Contact your dealer or service centre. Never attempt to make repairs
yourself because this could be dangerous.
Never push objects of any kind into the set
through the cabinet slots as they may touch
dangerous voltage points or short-circuit parts that
could result in a fire or electric shock. Never spill
liquid of any kind on the set. Use special caution
in households where children are present. The apparatus is not suitable for children
under 3-year to operate.
Do not overload wall outlets, extension cords or
adaptors beyond their capacity, this can result in
fire or electrical shock.
Power-supply cords should be routed so that they
are not likely to be walked on or pinched by items
placed upon or against them, paying particular attention to cords at plug end, adaptors
and the point where they exit from the appliance. The mains plug is used as the
disconnect device. It shall remain readily accessible and should not be obstructed
during intended use. Make sure to plug the power cord in until it is firmly inserted.
When removing the power cord, make sure to hold the power plug when pulling the
plug from the outlet, do not pull the plug out by the wire. NEVER touch the plug or
power cord with wet hands. To disconnect the apparatus from the mains power, the
plug must be pulled out from the mains socket, therefore make sure the mains plug
is always easily accessible.
High Voltage
Do not open
1
Page 18
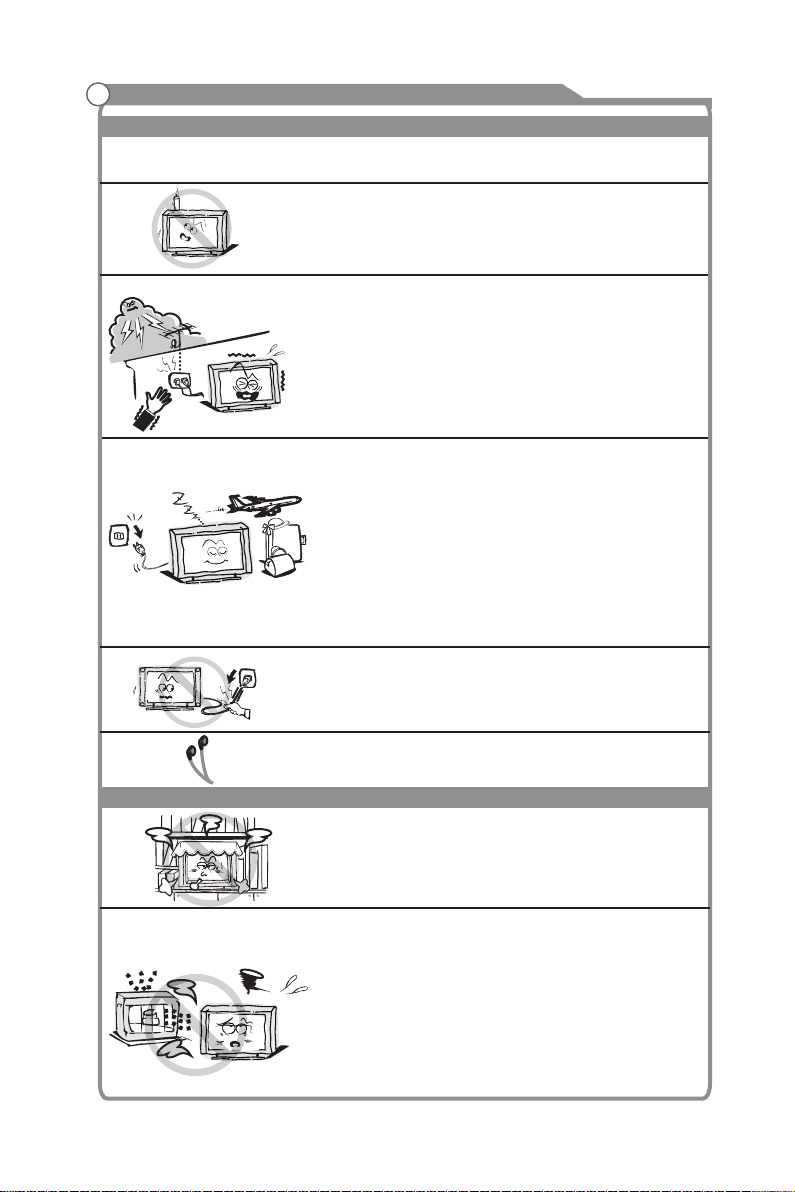
Important Safety Instructions and Maintenance
Important Safety Instructions
Do not push or scratch the front filter, or place any objects on top of the TV set. The
image may be uneven or the screen may be damaged.
To avoid the fire, no naked flame source,
such as lighted candles, should be placed on the
apparatus.
An outside antenna system should not be located in
the vicinity of overhead power lines or other electric
light or power circuits, or where it can fall into such
power lines or circuits. When installing an outside
antenna system, extreme care should be taken to keep
from touching such power lines or circuits as contact
with them might be fatal.Ensuring the television is not
overhanging the edge of the supporting furniture.
When not in use
If you will not be using the TV set for several days, the
TV set should be disconnected from the AC mains for
environmental and safety reasons. As the TV set is not
disconnected from the AC power when the TV is turned
off at the standby switch, pull the plug from the AC power
outlet to disconnect the TV completely. However, some
TV sets may have features that require the TV set to be
left in standby to function correctly. In the case of lightning,
unplug the TV set from the outlet immediately. Never
touch the antenna wire during lightning.
Installation
Do not pull the plug out by the wire;
Never touch the plug with wet hands.
Excessive from earphones and headphones volume
can cause hearing loss.
The ventilation should not be impeded by covering the
ventilation opening with items, such as newspapers,
tablecloths, curtains, etc.
At least 10 cm space should be left around the
apparatus for sufficient ventilation.
The product should be situated away from heat
sources such as radiators, heat registers, stoves, or
other products (including amplifiers) that produce heat.
Place the apparatus in such a position that the screen
is not exposed to direct sunlight. It is best to have soft
indirect lighting while watching and avoid completely
dark environments and reflection from the screen as
these may cause eye fatigue.
Keep the TV set away from any equipment emitting
electromagnetic radiation.
2
Page 19
Important Safety Instructions and Maintenance
Installation
Do not place the set on an unstable cart, stand, table
or shelf. The set may fall, causing serious personal
injury as well as damage to the product. Use only with
the cart, stand, tripod, bracket, or table specified by
the manufacturer, or sold with the apparatus. An
appliance and cart combination should be moved with
care. Quick stops, excessive force, and uneven
surfaces may cause the appliance and cart
combination to overturn.
Do not place this apparatus near water, for example,
near a bath tub, wash bowl, kitchen sink, or laundry
tub; in a wet basement; or a swimming pool; and
the like;
When the TV being moved in from cold place, it needs
Move
LED Screen
Although the LED screen is made with high precision technology and 99.99% or
more of the pixels are effective, black dots may appear or bright points of light (red,
blue or green) may appear constantly on the LED screen. This is a structural property
of the LED screen and is not a malfunction.
If the surface of the LED panel cracks, do not touch it until you have unplugged the
AC power cord. Otherwise electric shock may result.
Do not throw anything at the TV set. The LED panel may break from the impact and
cause serious injury.
Precautions When Displaying a Still Image
A still image may cause permanent damage to the TV screen.
Do not display still images and partially still images on the LED panel for more
than 2 hours as it can cause screen image retention. This image retention is
also known as "screen burn". To avoid such image retention, reduce the
degree of brightness and contrast of the screen when displaying a still image.
Watching the LED TV in 4:3 format for a long period of time may leave traces
of borders displayed on the left, right and centre of the screen caused by the
difference of light emission on the screen. Playing a DVD or a game console
may cause a similar effect to the screen. Damages caused by the above effect
are not covered by the Warranty.
Displaying still images from Video games and PC for longer than a certain
period of time may produce partial after-images. To prevent this effect, reduce
the 'brightness' and 'contrast' when displaying still images.
Cleaning
Cleaning and handling the screen
surface and cabinet. Disconnect
the unit from the AC outlet before
cleaning. To remove dust, wipe
gently with a soft, lint free cloth. If
required use a slightly damp cloth.
thinner
thinner
solvent
solvent
some right time for dew inside unit evaporating fully
before turn on the unit;
To prevent injury, this apparatus must be securely
attached to the floor/wall in accordance with the
installation instructions.
MAINS PLUG
Wipe the mains plug with
a dry cloth at regular
intervals. Moisture and
dust may lead to fire or
electrical shock.
Use care not to subject the TV's surfaces to detergent.
(A liquid inside the TV could lead to product failure, fire or
electrical shock.)
Use care not to subject surfaces to bug repellent, solvent,
thinner, or other volatile substances as this may deteriorate the
surface and finish of the cabinet.
3
Page 20

Important Information
Keep small accessories out of reach of child ren so th ey are no t mistakenly swallowed.
Table of Contents
Option
5
6
6
7
8
12
12
13
14
17
17
17
18
19
20
21
22
23
23
24
24
25
26
27
27
27
29
30
32
32
35
36
37
39
43
45
4
Page 21

Accessories
Please make sure the following items are included with your LED TV. If any items are
missing, contact your dealer.
INPUT
1
3
2
4
5
6
7
8
9
CH RTN
0
LIST
2D/3D
MENU
INFO
HOME
ENTER
EXIT
BACK
EPG
VOL CH
MTS/AUD
CC/SUBT
ZOOM
PgUp
PgDn
Remote Control
Owner’s
Instructions
Note: Detail operation please refer to HELP menu on the TV.
5
Page 22

Introduction
Features
TV adopts 42”/49”/55” TFT display screenLED
Zero X radiation complies to green environment protection requirement
Connect to computer directly to realize TV/monitor combo.
MHL2.0
Android4.2
USB3.0
16:9 wide screen
Auto tuning and fine tuning
HDMI input
Component Compatible (480i; 480P; 720P; 1080i; 1080P)
PC VGA
Programmable sleep timer
Wide range voltage input
No-signal automatic power off
Input terminals used for external equipment connection
2 antenna cable inputs 3 x HDMI inputs
1 x computer PC-RGB input 3 x USB inputs
1 x COMPONENT input 1 x VIDEO output
1 x AV input 1 x SPDIF output
1 x Headphone output 1 x TF card slot
6
Page 23

Introduction
Specifications
Model
Display size
LCD panel resolution
Speaker output power
Power supply
TV receive system
Frequency range
Video in
Power consumption
Standby consumption
Antenna Input
Controller power
Work Temperature
KDL42XS718UN
42” Diagonal (max.)
1920X1080
≥5 X2W
~110-240V, 50/60Hz
PAL-M/N, NTSC
Digital: DTV 7-69
AIR 2-69 Cable 1-125
PAL / NTSC
90W
≤0.5W
75 ohms, unbalanced
DC 3V
(Two AAA size batteries)
963x240x610mm
963x71x570mm
10.7Kg
8.4Kg
o o
0 C-40 C
KDL49XS718UN KDL55XS718UN
49” Diagonal (max.)
120W
1106x275x699mm
1106x71.5x650mm
15Kg
11.8Kg
55” Diagonal (max.)
120W
1248x275x784mm
1248x72x734mm
18.7Kg
15.5Kg
Note:
- Design and specifications are subject to change without notice.
- Weight and Dimension shown are approximate.
7
Page 24

Introduction
Stand and wall-mounted
How to assemble the stand
If you need to remove or assemble the stand please read the following instructions.
- Before attaching/detaching the stand, make sure to turn off the TV.
- Before performing work, spread cushioning over the base area to lay the LED TV on.
This will prevent it from being damaged.
Assembling instruction:
1) Fix the bracket and the stand with four screws .(figure 1)
2)Remove the backcover screws and keep the screws.(figure 2)
3) Put the telvevision on the table, fix the stand and the unit with four screws given in the
carton.(figure 3)
Figure 1
Bracket
Stand
Screw
B-ST4*20x4
Figure 2
Screws
(2 x M4*6)
Only for 42” model
Screws
(5 x M4*6)
Only for 49”/55” model
8
Page 25

Stand and wall-mounting instructions (optional)
Figure 3
Screws
(4 x M4*10)
Only for 42” model
Screws
(5 x M4*10)
Only for 49” model
B- ST4 *2 0
Only for 55” model
B-M4*10
99
Screws
(5 x M4*12)
B-M4*12
Page 26

Stand and wall-mounting instructions (optional)
Mounting instruction:(Only for 42” model)
1. Fix t he b ackco ve r with two sc re ws.
2.
3.
4.
5.
6.
7.
8.
T-M4 x6
Screws
(2 x M4*6)
10
Page 27

External Connection
Stand and wall-mounted
Mounting instruction:(Only for 49”/55” model)
1. Fix the backcover with five screws.
2. After detaching the stand, fasten 4 mounting screws into the 4 screw holes on the rear cover, see the
figure below.
3. Fasten wall mounting bracket with screws on the wall.
4. Carefully check for the strength before releasing the LED TV.
T-M4 x6
Screws
(5 x M4*6)
467 mm
200 mm
278 mm
200 mm
200 mm
Note:
1. Please mount your TV on the strength of the wall for withstanding the TV’s weight.
2. Be careful not to scratch panel and TV cabinet when your fasten the screws on the TV.
11
Page 28

General Description
Overview of back panel
You can connect the TV with video devices such as DVD/VCD player, VCR and video camera
to enjoy the high quality picture.
Y/V
L
R
AV IN
COMPONENT IN
ANT
VGA
HDMI2HDMI3
HDMI1(MHL)
AUDIO
CABLE
Video output
Microphone
Camcorder
DVD player
Headphone
PC
TF card
Blu-ray disc player
PC (HDMI-output)
USB
DVD player
12
Page 29

General DescriptionGeneral Description
Overview of front panel
The buttons on the lower-left panel control your TV’s basic features, including the on-screen
menu. To use the more advanced features, you must use the remote control.
INPUT
6
Standby button
Press button to toggle between
normal and standby mode.
PROG
Press to change programs.
In the on-screen menu, use the
PROG buttons as up/down
arrow buttons.
13
INPU T
POWER INDICATOR
Red:In standby mode.
Green: In power on mode.
7
POWER SWITCH
7
Page 30

General Description
Overview of remote control
INPUT
LIST
HOME
BACK
ZOOM
1
4
7
2
5
8
0
MENU
ENTER
VOL CH
MTS/AUD
3
6
9
CH RTN
2D/3D
INFO
EXIT
EPG
CC/SUBT
PgUp
PgDn
Loading batteries:
1) Remove the lid of the battery compartment.
2) Insert 2 size AAA batteries with polarities as indicated inside the compartment.
3) Replace the lid.
Note:
1) A loading of batteries should be last one year under normal use.
2) If you don't intend to use the remote control for a long period of time, remove batteries
to avoid damage due to leakage.
3) Do not mix old and new batteries or different types.
4) Do not throw batteries into fire or water.
5) The batteries (battery pack or batteries installed) should not be exposed to excessive
heat such as sunshine, fire or the like.
14
Page 31

General Description
Overview of remote control
1. INPUT: This button is used to switch among
different sources, select a source and press
ENTER button to confirm.
2. POWER: Turn the TV on and off.
3. Digital Buttons(0-9,-): Directly select channel
with digital buttons.
4. CH RTN: Switch to the previous program.
5. LIST: Press it to show channel list on screen.
6. MENU: Display the main menu or exit the
current menu.
7. BACK: Return to previous page.
8. Arrow button : Use to select on-screen s
menu items and change menu values.
Use to fast backword/forword when PVR or
USB files is playing
9. ENTER: Validation key.
10. EXIT: Exit the menu.
11. HOME: Press this button to enter the main
interface directly.
12. INFO: This button is used to start the "Current
Service Banner" application that provides
information about the current service.
13. ZOOM: Press this button to switch the screen
mode.
LIST
HOME
BACK
ZOOM
1
4
7
2
5
8
0
MENU
ENTER
VOL CH
MTS/AUD
INPUT
3
6
9
CH RTN
2D/3D
INFO
EXIT
EPG
CC/SUBT
PgUp
PgDn
14. VOL : Press these buttons to adjust the /
volume.
15. CH : / Press these buttons to change
channel upward or downward.
16. MUTE: Press this button to cut off the sound of
the TV set temporarily, press again to resume.
15
Page 32

General Description
Overview of remote control
17. EPG: Open electronic program guide in DTV, to
see program informations.
18. COLOR BUTTONS: Used in different menus
for different function. follow the hints in menus.
19. 2D/3D: Press this button to display the
“PIP setting”.
Note: 3D function is no available for this model.
20. MTS/AUD:
In ATV/CATV : Switch MTS mode.
In DTV : Select audio language.
21. CC/SUBT
In TV/AV: Switch closed caption mode.
22. MEDIA PLAY CONTROL BUTTON
At the bottom of the remote control, including
“PLAY/PAUSE”, “STOP”, “PREVIOUS”, “NEXT”,
“PAGE UP”, “PAGE DOWN”.
Those buttons are used in Media player and PVR
to control media playing.
LIST
HOME
BACK
ZOOM
1
4
7
2
5
8
0
MENU
ENTER
VOL CH
MTS/AUD
INPUT
3
6
9
CH RTN
2D/3D
INFO
EXIT
EPG
CC/SUBT
PgUp
PgDn
16
Page 33

General Description
INPUT
3
2
1
Installing Batteries in the Remote Control
Installing Batteries
Open th e ba tt ery com pa rt ment
1
cover o n th e ba ck side .
Inser t tw o 1. 5V AAA size b at te ries
in corr ec t po larit y. Do n´t m ix o ld o r
2
used ba tt er ies wit h ne w on es.
3
The ba tt eries ( ba ttery pac k or b atter ie s install ed) shall n ot b e exposed t o
exce ss ive hea t su ch as sunsh in e, fire o r th e like.
External Connection
Antenna connection
Antenna input impedance of this unit is 75ohm. VHF/UHF 75ohm coaxial cable can be
connected to the antenna jack directly, if the antenna cable is 300ohm parallel flat feeder
cable, you need to use the 300ohm/75ohm converter to connect the antenna cable to the
antenna jack. For details Please refer to the following drawing.
Antennas with 300 flat twins Leads
Use a 75ohm - 300ohm converter
300ohm coaxial cable
Antenna feeder
Antennas with 75 Round Leads
75ohm coa xi al c ab le
Antenna c ab le
17
Page 34

External Connection
Connecting VCR
These instructions assume that you have already connected your TV to an antenna or a
cable TV system. Skip step 1 if you have not yet connected to an antenna or a cable
system.
VCR Rear Panel
AUDIO OUT
White
3
Red
TV Rear Panel
White
Red
Yellow
Red
Blue
AV IN
HDMI1(MHL)
VIDEO OUT
VGA
Green
AUDIO
Blue
ANT
Red
CABLE
ANT
ANT OUT S-VIDEO
1 2
RF Cable (Not supplied)
1
YPbPr cable( supplied) Not
2
Audio Cable (Not supplied)
3
HDMI2HDMI3
Follow the instructions in Viewing a VCR or Camcorder
Tape to view your VCR tape.
Each VCR has a different back panel configuration.
When connecting a VCR, match the color of the connection
terminal to the cable.
1. Unplug the cable or antenna from the back of the TV.
2. Connect the cable or antenna to the ANT IN terminal on
the back of the VCR.
3. Connect an RF Cable between the ANT OUT terminal
on the VCR and the ANT IN terminal on the TV.
4. Connect a Component Cable between the COMPONENT
[Y, Pb, Pr] jacks on the DVD player and YPbPr jack
on the TV.
5. Connect Audio Cables between the AUDIO OUT jacks
on the VCR and the AUDIO L and AUDIO R jacks on
the TV.
Y/V
L
R
COMPONENT IN
Note: 1. Whenever you connect an external device to your TV,
make sure that power on the unit is turned off.
2. When connecting an external device, match the color
of the connection terminal to the cable.
18
Page 35

External Connection
Connecting a Camcorder
The rear panel jacks on your TV make it easy to connect a camcorder to your TV. They
allow you to view the camcorder tapes without using a VCR.
Each Camcorder has a different back panel configuration.
When connecting a Camcorder or DVD, match the color of the connection terminal to
the cable.
1. Connect a Video Cable between the AV VIDEO jacks on the TV
and the VIDEO OUT jack on the camcorder.
2. Connect Audio Cables between the AUDIO L and AUDIO R jacks on
the TV and the AUDIO OUT jacks on the camcorder.
3. Connect a Video Cable between the component IN Y on the TV
and the VIDEO OUT jack on the camcorder.
4. Connect Audio Cables between the component IN AUDIO L and
R jacks on the TV and the AUDIO OUT jack on the camcorder.
Camcorder
2
Audio Cable (Not supplied)
White
Red
Yellow
1
Video Cable (Not supplied)
White
Red
Yellow
AV IN
Y/V
L
R
COMPONENT IN
Note:
1. Whenever you connect an external device to your TV, make sure that
power on the unit is turned off.
2. When connecting an external device, match the color of the connection
terminal to the cable.
19
Page 36

External Connection
Connecting a DVD Player/Set-Top Box via DVI
This connection can only be made if there is a DVI Output connector on the external device.
DVD Player/
Set-Top Box
1
DVI to HDMI Cable (Not supplied)
White
Red
HDMI2HDMI3
HDMI1(MHL)
Audio Cable (Not supplied)
2
VGA
AUDIO
TV Rear Panel
ANT
CABLE
Each DVD player/STB has a different back panel configuration.
When connecting a DVD player/STB, match the color of the connection terminal to the
cable.
1. Connect a DVI to HDMI Cable or DVI-HDMI Adapter between the HDMI 1, HDMI 2, HDMI 3
connector on the TV and the DVI connector on the DVD player/Set-Top Box.
2. Connect Audio Cables between the PC AUDIO IN jack on the TV and the AUDIO OUT
jacks on the DVD player/Set-Top Box.
Note:
1.Whenever you connect an external device to your TV, make sure that power on the unit is
turned off.
2.When connecting an external device, match the color of the connection terminal to the
cable.
20
Page 37

External Connection
Connecting DVD Player/Set-Top Box via HDMI
This connection can only be made if there is a HDMI Output connector on the external
device.
DVD Player/
Set-Top Box
HDMI Cable (Not supplied)
HDMI2HDMI3
HDMI1(MHL)
What is HDMI?
HDMI, or high-definition multimedia interface, is a next-generation interface that enables
the transmission of digital audio and video signals using a single cable without
compression.
Multimedia interface is a more accurate name for it especially because it allows multiple
channels of digital audio (5.1 channels).
The difference between HDMI and DVI is that the HDMI device is smaller in size, has the
HDCP(High Bandwidth Digital Copy Protection) coding feature installed, and supports
multi-channel digital audio.
Each DVD player/STB has a different back panel configuration.
1. Connect an HDMI Cable between the HDMI1, HDMI2, HDMI3 connector on the TV and
the HDMI connector on the DVD player/Set-Top Box.
VGA
AUDIO
TV Rear Panel
ANT
CABLE
Note:
1.Whenever you connect an external device to your TV, make sure that power on the unit is
turned off.
2.When connecting an external device, match the color of the connection terminal to the
cable.
21
Page 38

External Connection
Connecting Digital Audio System
The rear panel jacks on your TV make it easy to connect a Digital Audio System to your TV.
TV Rear Panel
Y/V
L
R
AV IN
COMPONENT IN
Coaxial Cable (Not supplied)
Digital Audio System
5.1 CH audio is possible when the TV is connected to an external device supporting 5.1 CH.
1. Connect an Coaxial Cable between the SPDIF jacks on the TV and the Digital Audio Input
jacks on the Digital Audio System. When a Digital Audio System is connected to the
SPDIF terminal: Decrease the gain (volume) of the TV, and adjust the volume level with
the volume control.Digital Audio System's
22
Page 39

External Connection
Connecting PC
ANT
VGA
HDMI2HDMI3
HDMI1(MHL)
AUDIO
PC
2
PC Audio Cable (Not supplied)
1
D-Sub Cable (Not supplied)
Each PC has a different back panel configuration.
1. Connect a D-Sub Cable between VGA/PC IN connector on the TV and the PC output
connector on your computer.
2. Connect a PC Audio Cable between PC AUDIO IN jack on the TV and the Audio Out jack
of the soundcard on your computer.
You should set PC software before you connect a PC to your TV (please refer to "PC
Display'' settings)
Note:
1. Whenever you connect an external device to your TV, make sure that power on the unit is
turned off.
2. When connecting an external device, match the color of the connection terminal to the
cable.
CABLE
Supporting signals
Input
PC/VGA
Input
Digital
Analog
CVBS
Resolution
VGA
SVGA
XGA
SXGA
Mode
ISDB-T
PAL-M/PAL-N/NTSC-M
PAL/NTSC
640x480
800X600
1024X768
1280X1024
1360X768
Vertical
Frequency
60/75Hz
60/75Hz
60/75Hz
60Hz
60Hz
23
Input
Component
HDMI
Resolution
480i
480p
720p
1080i
1080p
480p
576p
720p
1080i
1080p
Vertical
Frequency
60Hz
60Hz
60Hz
60Hz
60Hz
60Hz
60Hz
60Hz
60Hz
60Hz
Page 40

Basic Operation
Turning the TV On and Off
How to turn the TV on or off
1
1. Insert the power cord plug into a polarized AC outlet.
2. If TV is in standby mode, press POWER button on
the remote control or button on the bottom panel
of LED TV.
3. Normal picture will be displayed on the screen after 15 seconds. If no signal input,
"No Signal" will be displayed on the screen.
4. If temporary POWER off is required, press POWER button on the remote control or
button on the bottom panel.
5. If you want to completely switch off the power for this unit, unplug the power cord plug
for this unit.
6. After switching off the unit, you should wait at least 5 seconds before switching on again.
Auto power-off
1. If there is no signal, the TV will 10 minutes.automatically enter standby mode after
2. In VGA mode, if no any operation 2 minutes later, TV will enter standby mode.
Memory before turning TV off
The picture and sound settings and preset channels will be memorised at the point when
the TV is turned off. When the TV is started up again it will work accordingly with these
settings.
24
Page 41

Basic Operation
Menu operation
Arrow Buttons: Move the cursor, the pointed item is highlighted.
ENTER: Confirm an Action, or enter an application.
INPUT: Goto TV, in full screen.
The icons at the top of the screen from left to right function as :
1.Add to home screen
2.Applications List
3.Change wallpaper
4.Search
5.System Setting
6.Storage Device
7.Network connection
Note:
1. The preview area display the TV input images.
2. The widget area has desktop widgets for quick access application’s feature.
3. The shortcuts area displays shortcuts of some common functions.
Use ENTER to select a function.
25
Page 42

Basic Operation
Menu operation
Applications of the TV
Application menu shows applications built-in TV and those you downloaded.
Menu : Open or close the app's menu
Exit : Return to the main menu
Arrow Buttons : Move the cursor.
ENTER: Enter the application you've selected.
Note:
When the applications are more than one page, use LEFT/RIGHT to switch pages.
26
Page 43

Menu system instruction
TV Menu
Sound Image Program Function
Press MENU to show main menu.
Exit : Close the TV menu.
LEFT/RIGHT: Move cursor.
ENTER : Enter focused setting menu.
Note: Some menus need password when system lock is turned on.
Sound
Sound Mode Standard
Sound Mode Standard
Equalizer
Equalizer
Balance
Balance
Auto Volume
Auto Volume
Surround
Surround
SPDIF Mode
SPDIF Mode
HDMI Sound
HDMI Sound
Audio Lang Setting
Option
Sound Mode
Different sound to be used when watching a given broadcast. There are five settings
sound modes (“Standard”,“Music”, “Movie”,“Sports”,“User”) .
Use / key to select one sound mode.
Standard: The normal sound mode.
Music: Sound mode for music.
Movie: Provides live and full sound for movies.
Sports: Emphasizes bass over other sounds.
User: Your customized sound settings (See "Equalizer”).
27
Page 44

Menu system instruction
Sound
Equalizer
Press ENTER on equalizer item to enter the
Equalizer . submenu
you can adjust sound settings according to your
user preferences.
1. Use ▲/▼ key to select an item.
2. Use / key to decrease or increase the
value of a particular item.
Balance
This option allows you to adjust the volumes of left/right speakers separately
Use / key to decrease or increase the value of the item.
Auto Volume
Broadcasting stations have different signal conditions, and it is inconvenient to adjust the
volume every time the channel changed. Auto Volume automatically adjusts the volume of
the TV by lowering the sound output when the modulation signalis high or by raising the
sound output when the modulation signal is low.
Use / key to set “On” or “Off”.
Surround Sound
This is used to turn on surround sound to gain better sound effect.
Use / key to set “On” or “Off”.
Equalizer
120Hz
500Hz
1.5KHz
5KHz
10KHz
30
57
57
50
50
SPDIF Mode
This is used to select "SPDIF Mode". This option is only used in HDMI/DTV mode.
Use / key to select "RAW" or "PCM" mode.
HDMI Sound
This option is only used in HDMI mode.
Use / key to select HDMI Sound mode: HDMI or VGA.
Audio Lang Setting
This option is only used in DTV mode.
Press ENTER key to enter the . Then choose the audio language you prefer.submenu
28
Page 45

Menu system instruction
Image
Picture Mode Dynamic
Advanced Setting
Aspect Ratio
Color Temp
Backlight
Noise Reduction
RGB Range
Window Adjust
Picture Mode
There are five picture modes (Standard, Soft, Vivid, User, Dynamic).
Under User mode you can adjust advanced picture settings such as contrast, brightness, etc.
Aspect Ratio
Select the picture size which best corresponds to your viewing requirement.
Use / to select a scale mode.
Use Zoom key on remote control to fast switch scale mode.
Note : different source have different modes (16:9, 4:3, Panorama, Movie, Subtitie ).
16:9
Auto
100
Default
16-235
...
Color Temp
Change the color of the entire screen according
to your favorite.
Use/ to select a color mode.
Backlight
Change the brightness of the screen.
Use / key to decrease or increase the value .
29
Standard: Keeps whites white.
Warm: Makes whites reddish.
Cool: Makes whites bluish.
Default
Page 46

Menu system instruction
ENTER
Program
Auto Search ...
...
...
...
...
...
Window Adjust
...
50
50
0
0
Auto Search
Press ENTER on Auto Search, a dialog will show, you can set “Tune Type” option.
The number of searched channels will be shown on
the screen. If you set “Tune Type” to “AIR+CABLE”,
when the searching of DTV channels is over , TV will
start to search CABLE channels. When the whole
searching is finished, all the channels will be saved.
Note: If you want to stop searching, you can
press EXIT button.
EPG(Used only in DTV)
Press ENTER on EPG item to enter EPG function.
Note: Please refer to page 37 for function details.
30
Auto Search
Air ATV:
Air DTV:
CH 7 AIR DTV
11%
EXIT
Exit
0 Programmes
0 Programmes
MENU
Skip
Page 47

Menu system instruction
Program
ATV Manual Search
In the ATV/DTV source, choose “ATV Manual ” to enter “ATV Manual Search
” menu.Search
DTV Manual Search
In the ATV/DTV source, you can choose “DTV Manual
Search” to enter “DTV Manual Search” menu.
You can use /button to choose the channel and
press button to search, and then the TV will storeENTER
the DTV channel if there is a DTV signal present.
Program Edit
You can use / button to choose “Program Edit” and
enter the menu, use color buttons to edit program.
Delete:
1. Select the program to be deleted.
2. Press RED button.
Note: Deleted program only appears after auto searching.
Lock:
1. Select the program to be locked
2. Press GREEN button.
Note: Press GREEN on a blocked program to unlock.
Only work when Lock System in Option menu is turned on.
Favorite:
1. Select the program you want.
2. Press YELLOW button.
Note: Press YELLOW again to cancel Favorite.
DTV Manual Search
Signal Strength
Signal Quality
OK
9
Nine Digital HD
90
99
1
2
3
4
5
6
7
Delete
CH37
AIR DTV: 0
MENU
Program Edit
Nine Digital
Nine Guide
C-01
C-04
S-43
S-45
S-02
S-04
S-05
Lock
FAV
84%
Return
DTV
DTV
DTV
ATV
ATV
ATV
ATV
ATV
ATV
ATV
Skip
Skip:
1. Select the program to be skipped.
2. Press BLUE button.
Note: Press BLUE on a skipped program to cancel skip.
31
Page 48

Menu system instruction
Signal Information(Used only in DTV)
1. Press / key to select “Signal Information" option.
2. Press “ENTER”or key ,you can see the information
of the DTV channel.
Signal Information
NOTE: Signal Quality/Signal Strength (DTV Only):
Unlike analogue channels, which can vary in reception
quality, digital channels must have perfect reception
quality or you will not receive them at all. So, unlike
analogue channels, you are not able to fine tune a digital
channel. If the signal strength indicates that the signal
Channel
NetWork
Modulation
Signal Strength
Signal Quality
Nine Melbourne
64 QAM
is weak, a possible solution is to adjust your antenna
to increase the signal strength. Continue to adjust the
antenna until you find the best position with the
strongest signal.
Input Source
Input Setup
Press INPUT key on the remote control to enter "INPUT SOURCE" menu. Use / key to
move the cursor to the input you desired and press ENTER key to confirm.
AIR CABLE
AV
COMPONENT
VGA
HDMI1 HDMI2
HDMI3
Function
Ginga
Ginga Application
PVR File System
Link Setup
Link Controls
MHL Auto Switch
Football Mode
Off
...
...
...
...
Off
Off
37
84%
100%
Ginga
This function can be only used in DTV mode.
1. Press / key to select "On" or "Off ".
2. S " "elect Ginga Application to view Ginga Applications.
32
Page 49

Menu system instruction
Function
PVR File System
Press ENTER on PVR file system item to enter
“PVR File System" submenu.
Link Setup
This function configures the detailed behaviour how to
command and control CEC-enabled (Consumer
Electronic Control) devices,that are connect through
HDMI, by using only the remote control of TV.
Note:CEC Function will be disabled in PIP Mode.
1.When "Enable Link" is toggled to ON, that gives the
user permission to command and control CEC-enabled
devices by usingremote control of TV.
2.The "Auto Standby" will let the CEC-enabled devices
transfer to standby state when your TV get in standby
state.
3.If the "Auto Power On" is on, your CEC-enabled
devices will wake up when your TV power on.
4.The "ARC Setting" function can toggle ARC(Audio
Return Channel) feature which enable audio from
TV is sent back down to the HDMI cable to something
like soundbar, home theater in box.
5."Device List" will show all CEC-enabled devices
currently connecting to TV by HDMI cable.
Link Controls
This function allow the user to command and control
CEC-enabled (Consumer Electronic Control) devices,
that are connected through HDMI, by using only the
remote control of TV. This feature will be disable if there
is no real CEC-enabled devices connecting with TV or
the "Enable Link" submenu in “Link Setup" is off.
1.The function "Power" will power off or power on your
CEC-enabled devices.
2.The "Root Menu" will open the top menu of your
CEC-enabled devices.
3.The "Setup Menu" will open the setup menu of your
CEC-enabled devices.
4.The function "Menu" will open the menu of the
resource currently being processed by CEC-enabled
devices.
PVR File System
Sekect Disk
Format Start
Speed Check
Enable link
Auto Standby
Auto Power On
ARC Setting
Device List
...
...
...
Link Setup
On
Off
Off
On
...
Link Controls
Power
Root Menu
Setup Menu
Menu
33
Page 50

Menu system instruction
Function
MHL Auto Switch
MHL is Mobile High-Definition Link, it utilizes established connectors and features a single
cable with a 5-pin interface, supports 1080p HD video and digital audio and simultaneously
provides power to the mobile device. It also enables the TV remote to control the mobile
phone and access its contents.
Note: MHL cable, portable devices are required for this function, and it is only
available for HDMI1 mode.
Ensure your mobile phone supports MHL.
Step 1: Connect mobile phones and portable
devices to TV(only for HDMI1 interface)
with the MHL cable.
Step 2: Use button to go back to home page.
Step 3: Press INPUT button twice to enter input
source menu.
Step 4: Use Navigation buttons to select “HDMI1",
TV will access mobile phone contents, and
contents on your portable devices can be
shared on TV.
Football Mode
This function is used to watch the DTV video that even play back three minutes.
This function can be only used in DTV mode.
1. Press / key select "Football Mode" option.
2. Press / key to select "On" or "Off".
MHL cable
34
Page 51

Menu system instruction
Option
Closed Caption
Lock
Language
OSD Time
Screen Saver
Store Show
Reset
Off
...
English
5 Seconds
Off
Off
...
Lock
The lock feature requires a Password if system lock is
turned on.
Press ENTER key to enter " " submenu, when password Lock
dialog shows, enter your 4-digit password to enter " " Lock
submenu (the default and universal password is 0000,
the almighty password is 1980).
Lock System
2. Press / key to select "On" or "Off".
Set Password
Choose 4-digits for your new password, re-enter the
new password to confirm.
Parental Guidance
This option only used in DTV mode.
1. Press / key to select “ ” option. Parental Guidance
2. Press key to select the lock level of the Parental /
Guidance.
Lock System1. Press / key to select " " option.
. Enter your 4-digits old password
password
Cancel
Lock
Lock System
Set Password
Parental Guidance
Set Password
old password
Language
Set system language.
OSD Time
new password
Confirm password
Set the preferred amount of time for the OSD to be
displayed on the screen.
Screen Saver
This option can be only used in ATV/CATV mode.
Use key to set screen saver “On” or “Off”./
Store Show
The Store Show is a program which displays a virtual pop-up sticker on the TV screen.
1. Press / key to select "Store Show" option.
35
Page 52

Menu system instruction
Option
2. Press / key to select "On" or "Off".
Reset
Reset all settings and delete all channels.
A reset confirm dialog will show and select “reset”, if you want to reset.
Time
2013/01/18 13:00
On Time
Off Time
Sleep Timer
Time Zone
Clock Setting
Enter the Clock Setting menu to set the Date and Time.
In the "Auto Mode" item, you can get the time from DTV
or Net.
Off
Off
Off
---
Auto Mode Off
Date
Time
Clock Setting
2013-04-18
09:16
On Time
Enter On Time submenu.
Set the time to turn on the TV set when it is in the standby
mode.
Off Time
On Time
Switch On
Time
Source
12:00
AIR
set the time to turn off the TV set.
Sleep Timer
Use / key to select “Sleep Timer” (Off, 10min, 20min,
30min, 60min, 90min, 120min, 180min, 240min).
Notes:
Switch On
00:00
1. The sleep timer you have set will be cancelled when
the TV turns off or if a power failure occurs.
2. When the time is less than 60 seconds, remind information will be displayed on the screen.
Press any key to cancel standby.
Time Zone
You can choose it to modify your time zone in the TV set.
1. Press / key to select "Time Zone" option.
2. Press / key to select time zone.
Note: only available in Brazil.
36
Page 53

Menu system instruction
PVR
PVR File System
WARNING:
1. Before connecting your USB device to the TV, please back up your files to prevent them
from damage or loss of data.
2. A USB disk must be formatted when first used for PVR. Any existing data on the disk will
be lost during the formatting process. Please back up your disk. You are recommended
to use a dedicated disk for PVR only. Do not disconnect disk or power during formatting.
3. Do not modify PVR files on a PC.
Note: Make sure your USB device is compatible with the TV and able to support
PVR recording.
Select Disk
C: FAT
Cancel
Select Disk: Choose the disk for PVR.
Format: The disk must be first before using PVR. formatted Do not remove disk or
turn power off during formatting.
Note: The larger your device the longer it will take to format. It may take minutes
to perform format, this is not a malfunction, please wait for the formatting to finish.
Speed Check: Test your disk speed.
PVR Guide
If the disk for PVR is ready, the programs can be
recorded in DTV mode.
Press the button again to play the program from the
point where it was paused.
Note: Time Shift will stop if you change channels,
change inputs or go into standby mode while in Time
Shift mode.
CH9 Nine Digital
Play
MALCOLM IN THE MIDDLE
00:00:00
Stop
Pause Rev
FF
00:00:00
SlowMotion
Instant recording
1. In DTV channel, press the button on the remote
control to start recording the current broadcast.
2. press the EXIT to stop recording the recorded file is
saved in the external USB device automatically.
NOTE: When a recording is in progress, you can’t change
channel, or the recording will stop.
C:FAT
512M
1G
2G
4G
HOME
BACK
ZOOM
4
LIST
1
7
2
5
8
0
MENU
ENTER
VOL CH
MTS/AUD
INPUT
3
6
9
CH RTN
2D/3D
INFO
EXIT
EPG
CC/SUBT
PgUp
PgDn
37
Page 54

Menu system instruction
EPG
DTV EPG (Electronic Program Guide)
In DTV mode, press “EPG” button to enter the Electronic Program .Guide
At Guide menu, press "RED” button to setup a record.
OK
OK
16
18
30
16
18
Once
EXIT
EXIT
0
1
1
Back
Reminder
0
16
1
18
Once
Reminder
Back
2007-01-18 16:01
Monday Tuesday
INFO
V1.0.12 Build 7587
INFO
2007-01-18 15:53
Monday Tuesday
INFO
V1.0.12 Build 7587
INFO
EPG
DTV
9 Nine Digital
90 Nine Digital HD
99 Nine Guide
Schedule
Record
Thursday Friday
Saturday Sunday
16:00 THE SHAK
Record Setting
Channel CH 90 Nine Digital HD
Minute
Hour
Month
Date
Minute
Hour
Month
Date
Mode
OK
Ok
Switch Day
Press "ENTER" button to setup a reminder.
Note: Use / ENTER button to adjust the scheduled time, press
button to save the setting.
EPG
DTV
9 Nine Digiral
90 Nine Digiral HD
99 Nine Guide
Schedule
Record
Thursday Friday
Saturday Sunday
16:00 THE SHAK
Reminder Settings
Channel 90 Nine Digital HD
Minute
Hour
Month
Date
Mode
OK
Ok
Switch Day
4
LIST
HOME
BACK
1
7
2
5
8
0
MENU
ENTER
VOL CH
INPUT
3
6
9
CH RTN
2D/3D
INFO
EXIT
EPG
Press YELLOW button to enter Schedule interface.
Schedule
Channel ID Channel Name Event Name
90 CH90 Nine Digital HD Once 2007-01-18 16:30 NATIONAL NINE AFTERNOON...
99 Ch99 Nine Guide Once 2007-01-18 17:00 THE SHAK
2007-01-18 16:01
OK
Delete
Return
38
ZOOM
MTS/AUD
CC/SUBT
PgUp
PgDn
Page 55

Digital Media Player
Introduction
This TV has a digital media player. It can find devices that compatible with
USB1.1/2.0/3.0, including flash disk, USB hard disk and digital camera. You can
play pictures, music and videos.
Note:Please do not remove the device during the data transfer. It may cause problems for
the system.
Surpportted file formats are listed below.
Data
Picture
Music
Video
MGP,MPEG,MP4,MOV,MKV
Format
JPG,JPEG,PNG,BMP
MP3,AAC,WMA,WAV
Device and File Management
On the main interface(page.24), click the “File Manage” icon to enter the USB
chanel. If no disk was founded, a dialog will show just like that in Figure 1.
Disk Choice
Storage DeviceRemove
At present there is no storage equipment can be used, will soon
quit this module.
When disk inserted, something like in Figure 2 is shown.
Current Version: 1.2.00 Bulid:16114
Quit
Figure 1
Disk Choice
C:
Current Version: 1.2.00 Bulid:16114
Figure 2
39
Page 56

Digital Media Player
USB support character
Press MENU button to show/hide the play controls menu.
Functions are indicated below.
002.jpg
Wallpaper
List
Prev
Play/Pause
Next
Stop
Functions are indicated below.
Lyric
Prev
Pause/Play
Play
DragMode
Zoom out
Zoom in
Rotate right
90 degree
Rotate left
90 degree
Shuffle Mode
Play Mode
Next
40
Page 57

Digital Media Player
USB support character
3. Movie
Press menu button to play/exit the "movie menu".
Those menu items from left to right function as the following in turn:
a.Prev b.Play/Pause c.Next d.Stop e.Advanced setting
Note: It is only for 4K1K video, not for 4k2k video.
Prev
Play/Pause
Next
Advanced setting
Stop
4. PIP
Press 3D/2D button to open the PIP menu.
PIP
Select the PIP item and press OK to enter the PIP mode.
PIP
If you enter the PIP mode, the PIP window will show on the top right of the screen.
Sub Channel Enter Sub Back Main
Sub Channel Enter Sub Back Main
41
Page 58

Digital Media Player
USB support character
Select the Sub Channel item and press OK to open the Sub Channel selection menu.
Press / key and press OK to select a channel.“ ”
AIR
CABLE
AV
COMPONENT
VGA
HDMI1
HDMI2
HDMI3
PIP
Sub Channel
Enter Sub Back Main
Select the “Enter Sub” item and press OK to enter the sub channel you want.
PIP
Sub Channel Enter Sub
Back Main
Select the “Back Main” item and press OK to exit PIP.
PIP
Sub Channel Enter Sub Back Main
42
Page 59

Troubleshooting
If you have any problem, check the couter measures for each symptom listed below.
The following symptoms may have . adjustment rather been caused by inappropriate
than actual malfunction of the unit. If the trouble persists, contact the Customer Care
Centre, see back page for contact details.
Symp to ms
No pow er
No pic tu re
Good p ic ture bu t no
soun d
Good sound but abnormal
color or no picture
No res po nse to re mo te
cont ro l
Full s cr een fli ck ering
unde r VG A
Please check the power cord plugged in and that the power
outlet works.
Unplug the power cord and plug it in after 60 seconds and
restart the TV.
Please check antenna connection.
Station may problems, please tune to be experiencing
another station.
Please adjust the settings of contrast and brightness.
Please increase the volume.
Please check TV is under mute mode, press MUTE button
on the remote control.
Please check sound settings
If external devices are being used, check their volumes are
not set too low or turned off.
If using AVI or Component inputs, please make sure cables
are connected properly and not loose.
If using DVI to HDMI cable, a separate audio cable is required.
Make sure a headphone jack is not connected..
Please check antenna connection and antenna condition.
If using Component input, please check Component
connections, incorrect or loose connections may cause
colour problems or cause the screen to be blank.
Batteries of remote control may have exhausted, if
necessary, please change the batteries.
Clean the remote control lens. The distance between
LED TV and remote control should be within 8m, within
recommended operating angle and path is free of obstructions.
V-HEIGHT value may be set too big, restart computer and
enter safe mode, then set monitor parameters to correct
value according to adjustment description.
Poss ib le solu ti ons
Hori zo ntal st ri pes
unde r VG A
Colo re d dots ma y be
pres en t on the sc re en
Pic ture is brea king up
Sample phase may be deflected, adjust phase according to
picture position.
Although the LED screen is made with high-precision
technology and 99.99% or more of the the pixels are
effective, black dots may appear or bright points of light
(red, blue, or green) may appear constantly on the LED
screen. This is a structural property of the LED screen
and not a malfunction.
Keep the TV away from noisy electrical sources such as cars,
hair dryers, welders, and all optional equipment.
Electrical atmospheric interference such as local or distant
lightning storms may cause picture to break up.
When installing optional equipment, leave some space
between the optional equipment and the TV.
Check the antenna and connection.
Keep the antenna away from any power or input/output cables.
43
Page 60

Troubleshooting
After Auto Tuning only
some channels are
available
Channel cannot be
selected
USB not playing
Picture is distorted,
macroblock, small block,
dots, pixelization, etc
Nois e fr om spea ke r
TV turns off automatically
TV tur ns o n
auto ma tical ly
Pict ur e is not sh ow n in
full s cr een
Che ck your area is covered by Digita l Video Broadcast s.
Try re-tuni ng or manually tuning miss ing cha nnels.
Che ck that you ar e using the correct antenna type - please
see pg.16 'Antenna connection '.
Check if the channel has bee n bl oc ke d in t he m ai n me nu
settings.
Please check connecting USB cable and power supply is
connected.Hard drive has not been formatted. Please make
sure USB disk is compatible and the multimedia data formats
are supported.
Compressio n of vid eo c on te nt s ma y ca use distortion
especially on fast mov in g pi ct ur es such as sports and
action movies.
Chec k ca ble con ne ctions, m ak e sure a vi de o cable is no t
conn ec ted to an a ud io input.
Low si gn al leve l ma y cause sou nd distor ti on.
Chec k if t he Off Timer is se t to O n in the Se tu p menu.
Slee p Tim er may ha ve b een enabl ed.
If the re i s no sign al f or about 10 m in utes fr om a n input,
the TV wil l tu rn off , see Auto S le ep pg. 33.
If con ne cted to y ou r PC, check y ou r PC powe r se ttings.
Make s ur e the AC pow er c ord is plug ged in secu re ly to
the wa ll o utlet a nd t he TV.
Chec k if t he On Time r is s et to On in the S et up menu .
Blac k ba rs on eac h si de will be sh ow n on HD cha nn els
when d is playi ng S D (4:3) con te nts.
Blac k ba rs on Top & Bottom wi ll b e shown o n mo vies that
have a sp ect rat io s diff erent f ro m your TV.
Adju st p ictur e si ze option o n yo ur exte rn al device o r TV t o
full s cr een.
44
Page 61

Troubleshooting
Picture defects and the reason
Ghostin g may a lso occur wh en still pictur es are
display ed co ntinuous ly. It may d isappear a fte r a
few momen ts.
45
Page 62

 Loading...