

Page 1

IMX-9000
Rugged Handheld Device
User’s Manual
Manual Revision: 0.10
Revision Date: February 18, 2013
Part No.:
Page 2

IMX-9000 User's Manual
Revision History
Version Date Description
0.10 2013/02/18 Preliminary release
Copyright 2013 ADLINK Technology, Inc.
All Rights Reserved
The information in this document is subject to change without prior notice in order to
improve reliability, design, and function and does not represent a commitment on the part
of the manufacturer.
In no event will the manufacturer be liable for direct, indirect, special, incidental, or
consequential damages arising out of the use or inability to use the product or
documentation, even if advised of the possibility of such damages.
This document contains proprietary information protected by copyright. All rights are
reserved. No part of this manual may be reproduced by any mechanical, electronic, or
other means in any form without prior written permission of the manufacturer.
Trademarks
Product names mentioned herein are used for identification purposes only and may be
trademarks and/or registered trademarks of their respective companies.
2
Page 3
IMX-9000 User's Manual
Safety Precautions
For user safety, please read and follow all instructions, WARNINGS, CAUTIONS, and
NOTES marked in this manual and on the associated equipment before handling/operating
the equipment. To avoid damaging the product due to improper operation, please read the
manual thoroughly before use.
IMX-9000 working temperature.
Operating temperature range is -10°C to 50°C .
Storage temperature range is -20°C to 60°C.
Discharge temperature range is 0°C to 40°C.
The use of any batteries or accessories not originally sold or
manufactured by ADLINK may cause damage to the product.
The charging cradle only supports charging of two batteries
simultaneously. Attempting to charge three or more batteries at the same
time may damage the cradle or result in other safety risks.
Do not connect any USB devices when charging the batteries as this may
damage the cradle or result in other safety risks.
Do not power on the IMX-9000 if it is forbidden to use wireless equipment
or if using such equipment will cause noise, interference or other dangers.
Wireless devices may suffer decreased performance due to
electromagnetic interference.
Power off the IMX-9000 when refueling. Do not use the IMX-9000 in gas
stations or when near flammables.
Power off the IMX-9000 in or nearby areas where blasting occurs and
abide by related safety rules. Do not use the IMX-9000 in places with
blasting operation.
Only authorized maintenance staff can repair the IMX-9000.
Before trying to connect the IMX-9000 to other devices, read the user
manual for proper instructions. Do not connect the IMX-9000 to any
incompatible products.
3
Page 4

IMX-9000 User's Manual
Important Safety Instructions
Read and follow all instructions marked on the product and in the documentation before
you operate your system. Retain all safety and operating instructions for future use.
Please read these safety instructions carefully.
Please keep this User‘s Manual for later reference.
The equipment can be operated at an ambient temperature of 50ºC for discharge;
40ºC for charge.
The equipment should be operated only from the type of power source indicated on
the rating label. Make sure the voltage of the power source when connect the
equipment to the power outlet.
If the equipment is not use for long time, disconnect the equipment from mains to
avoid being damaged by transient overvoltage.
All cautions and warnings on the equipment should be noted.
Please keep this equipment from humidity.
Do not use this equipment near water or a heat source.
Never pour any liquid into opening; this could cause fire or electrical shock.
Openings in the case are provided for ventilation. Do not block or cover these
openings. Make sure you provide adequate space around the system for ventilation
when you set up your work area. Never insert objects of any kind into the ventilation
openings.
To avoid electrical shock, always unplug all power cables and modem cables from the
wall outlets before removing covers.
If one of the following situations arises, get the equipment checked by a service
personnel:
A. Liquid has penetrated into the equipment.
B. The equipment has been exposed to moisture.
C. The equipment has not work well or you can not get it work according to user‘s
manual.
D. The equipment has dropped and damaged.
E. If the equipment has obvious sign of breakage.
4
Page 5

IMX-9000 User's Manual
Never open the equipment. For safety reason, the equipment should only be opened
by qualified service personnel.
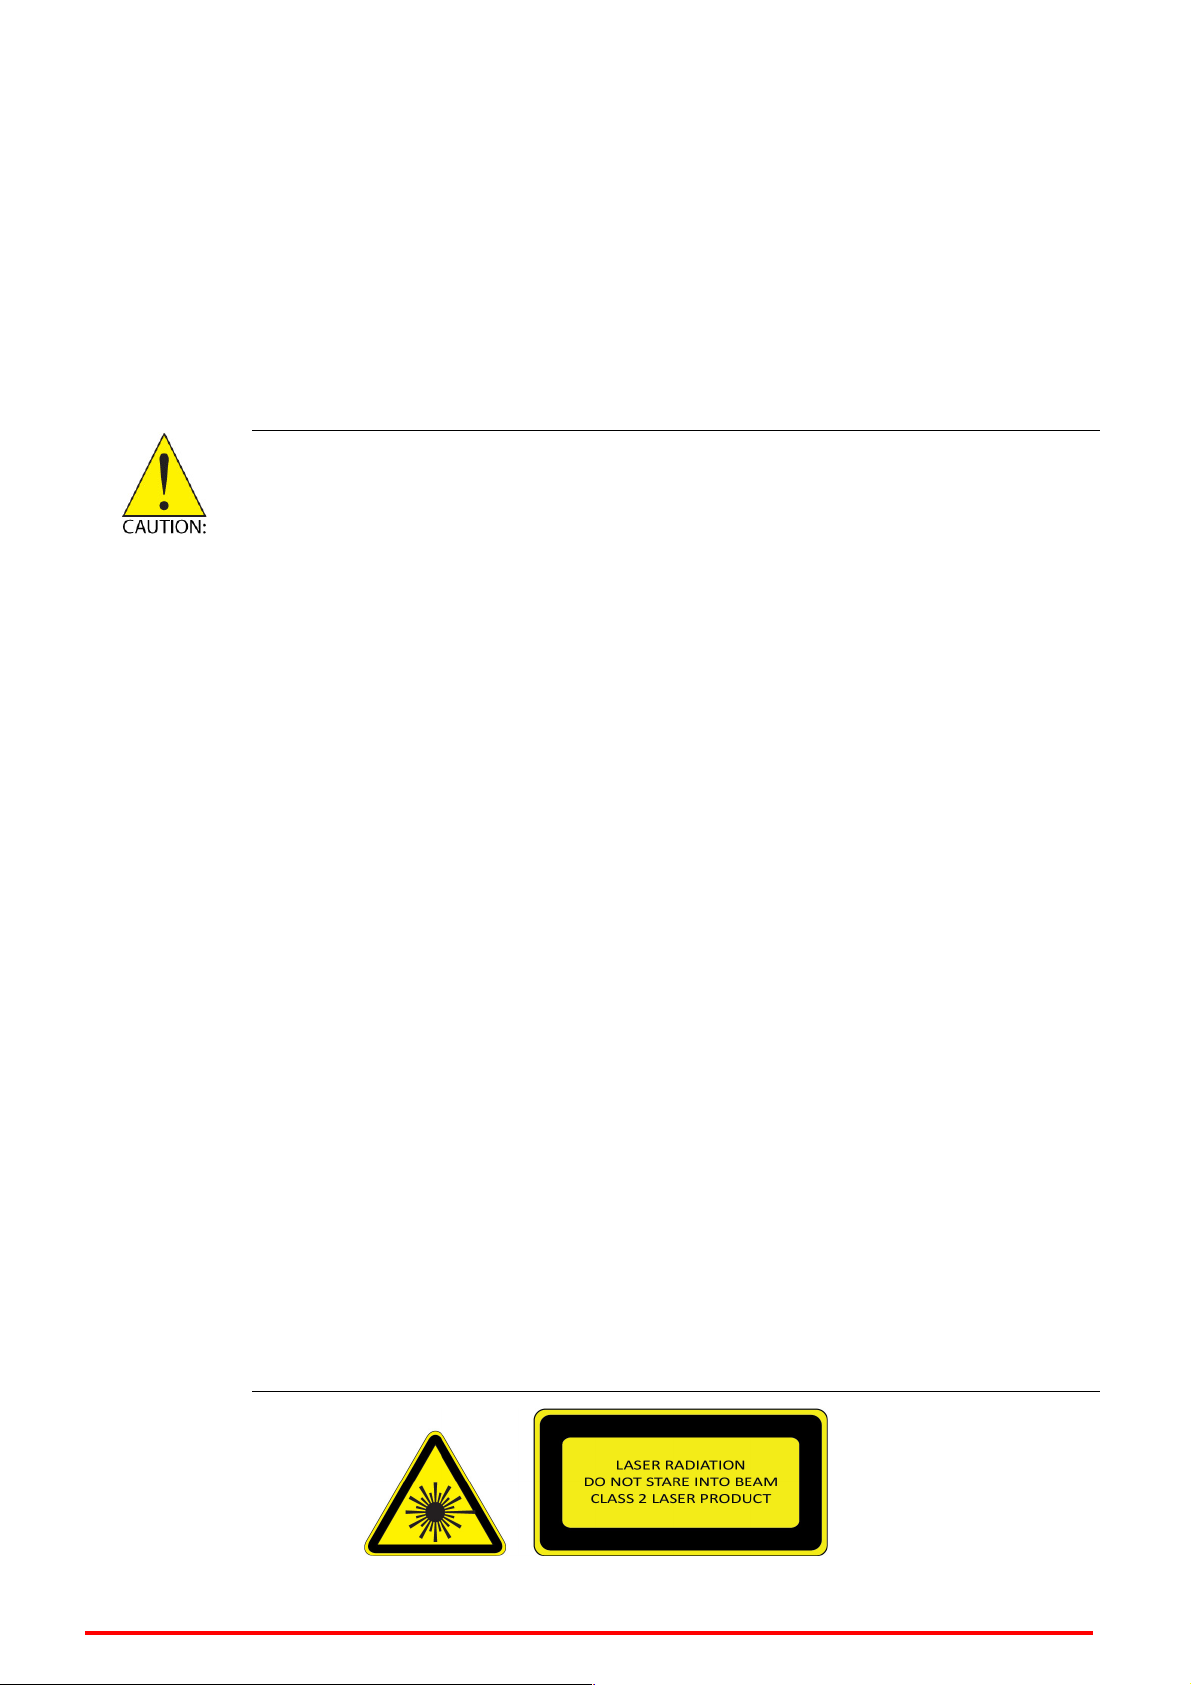
“CAUTION – Risk of explosion if battery is replaced by an incorrect type.
Dispose of used batteries according to the instructions”
5
Page 6

IMX-9000 User's Manual
Table of Contents
REVISION HISTORY..............................................................................................................................................................2
SAFETY PRECAUTIONS ....................................................................................................................................................... 3
IMPORTANT SAFETY INSTRUCTIONS.............................................................................................................................4
TABLE OF CONTENTS ..........................................................................................................................................................6
1 OVERVIEW.....................................................................................................................................................................7
1.1
IMX-9000 L
1.2
P
ACKAGE CONTENTS
2 QUICK START ................................................................................................................................................................ 9
2.1
I
NSTALLING A
2.2
I
NSTALLING A MICRO SD CARD
2.3
I
NSTALLING A BATTERY
2.4
C
HARGING THE BATTERY
2.5
I
NDICATOR
2.6
P
OWER ON/OFF
AYOUT
...................................................................................................................................................7
.................................................................................................................................................8
SIM C
ARD
.......................................................................................................................................... 9
................................................................................................................................ 9
........................................................................................................................................... 10
........................................................................................................................................ 11
LEDS.................................................................................................................................................... 13
....................................................................................................................................................... 14
2.7
K
EYPAD
.................................................................................................................................................................. 15
3 TURN THE IMX-9000 ON FOR THE FIRST TIME ................................................................................................ 17
3.1
R
ECALIBRATE THE
3.2
S
ETTING THE TIME AND DATE
3.3
S
OUND SETTING
3.4
D
ISPLAY SETTING
3.5
ADLINK P
3.6
R
EADER UTILITY
3.7
RFID R
4 GETTING CONNECTED ............................................................................................................................................ 26
4.1
I
4.2
C
TECHNICAL SUPPORT ....................................................................................................................................................... 28
EADER UTILITY
NSTALLING MICROSOFT ACTIVESYNC
ONNECTING TO YOUR COMPUTER
IMX-9000
...................................................................................................................................................... 20
.................................................................................................................................................... 22
OWER UTILITY
.................................................................................................................................................... 23
SCREEN
................................................................................................................................. 18
...................................................................................................................................... 22
........................................................................................................................................... 25
.................................................................................................................... 17
................................................................................................................... 26
......................................................................................................................... 26
6
Page 7

IMX-9000 User's Manual
1 Overview
1.1 IMX-9000 Layout
No. Description No. Description
1 LCD 12 Function key 2
2 Front camera 13 Back camera
3 Communication LED 14 Camera flash light
4 Power LED 15 Back clip
5 Scan window 16 Stylus
6 Software reset 17 Hand strap pad
7 Headset jack 18 Battery cover
8 Volume up 19 Battery cover lock
9 Volume down 20 Charging pad
10 USB port
11 Function key 1
7
Page 8

IMX-9000 User's Manual
1.2 Package Contents
The IMX-9000 is packaged with the components listed below. If any of the items in the
contents list are missing or damaged, retain the shipping carton and packing material
and contact the dealer for inspection. Please obtain authorization before returning any
product to ADLINK.
IMX-9000 Handheld Computer
Battery (3900 mAh)
AC Adapter and plug
Hand strap
USB cable
Quick guide
8
Page 9
IMX-9000 User's Manual
2 Quick Start
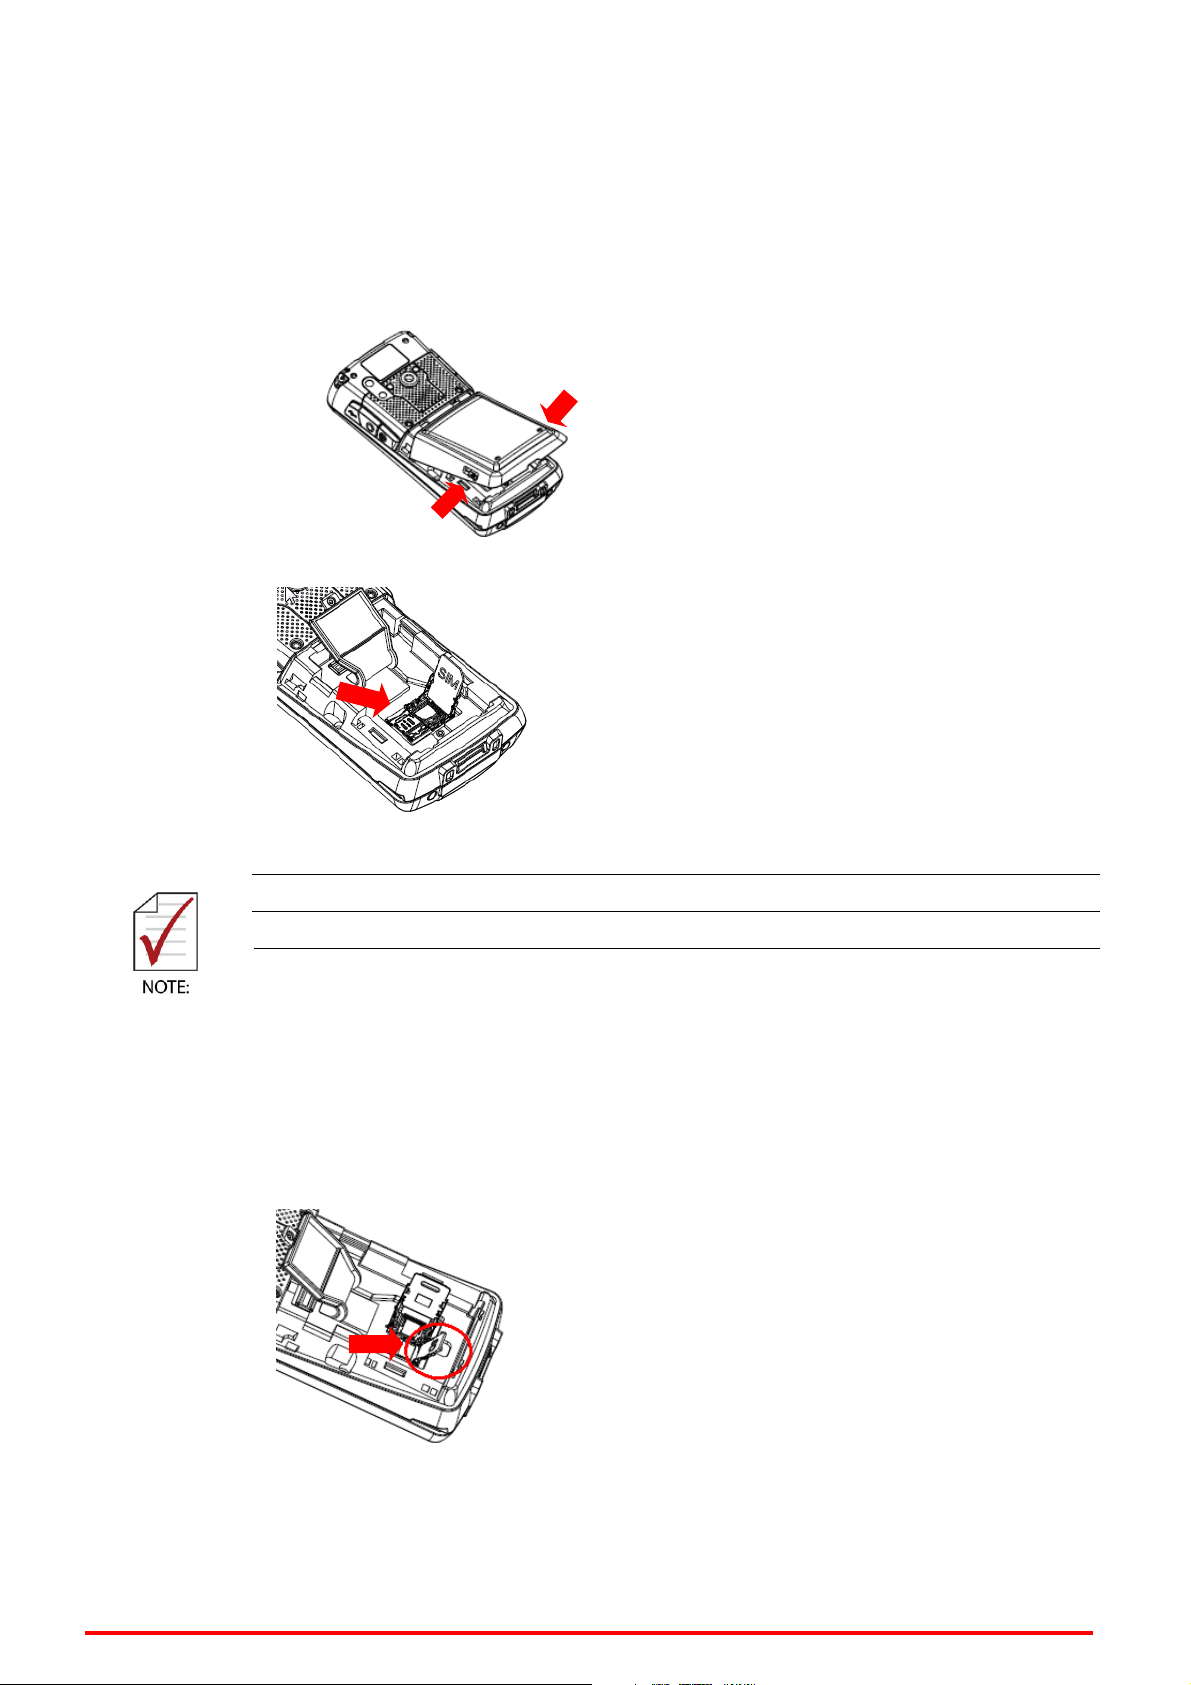
2.1 Installing a SIM Card
1. Open the battery cover by releasing the two locks and lifting the cover
2. Open the waterproof cover to expose the SIM card slots.
Insert the SIM card in the correct direction.
Lock the SIM card cover after inserting the SIM card.
2.2 Installing a Micro SD Card
1. The Micro SD card slot is under the SIM card slot.
2. Lift the SIM slot to expose the Micro SD card slot.
3. After inserting the Micro SD card, lock the SIM card slot in place.
9
Page 10

IMX-9000 User's Manual
1
2
2.3 Installing a Battery
1. Insert the bottom of the battery into the IMX-9000.
2. Press the battery down to lock it in place.
10
Page 11

IMX-9000 User's Manual
2.4 Charging the Battery
There are three methods to charge the battery.
1. USB Charge: Connect the USB connector from the DC adapter to the
2. Charging Cradle: Connect the DC adapter to the charging cradle to
USB socket of the IMX-9000 as shown. Insert the correct plug for your
region into the DC adapter and plug it into the wall socket to begin
charging.
charge the IMX-9000 and secondary battery simultaneously.
3. Secondary Battery Charging: The LED on the charging cradle will
change from red to green when charging is complete.
11
Page 12

IMX-9000 User's Manual
The IMX-9000 cannot be charged while using the PC USB connection.
12
Page 13

IMX-9000 User's Manual
1 2
2.5 Indicator LEDs
The Power LED and Communication LED are located at the top of the
IMX-9000.
No. Name Description
1 Power LED
Red: Charging
Green: Charging completed
2 Communication LED Blue: Bluetooth enabled
13
Page 14

IMX-9000 User's Manual
2.6 Power On/Off
Powering On
1. Install and charge a battery.
2. Press and hold the Power button for around 2 seconds until the
Powering Off
1. Press and hold the Power button for around 2 seconds.
2. The IMX-9000 is powered off when the screen turns off.
IMX-9000 is powered on.
14
Page 15
IMX-9000 User's Manual
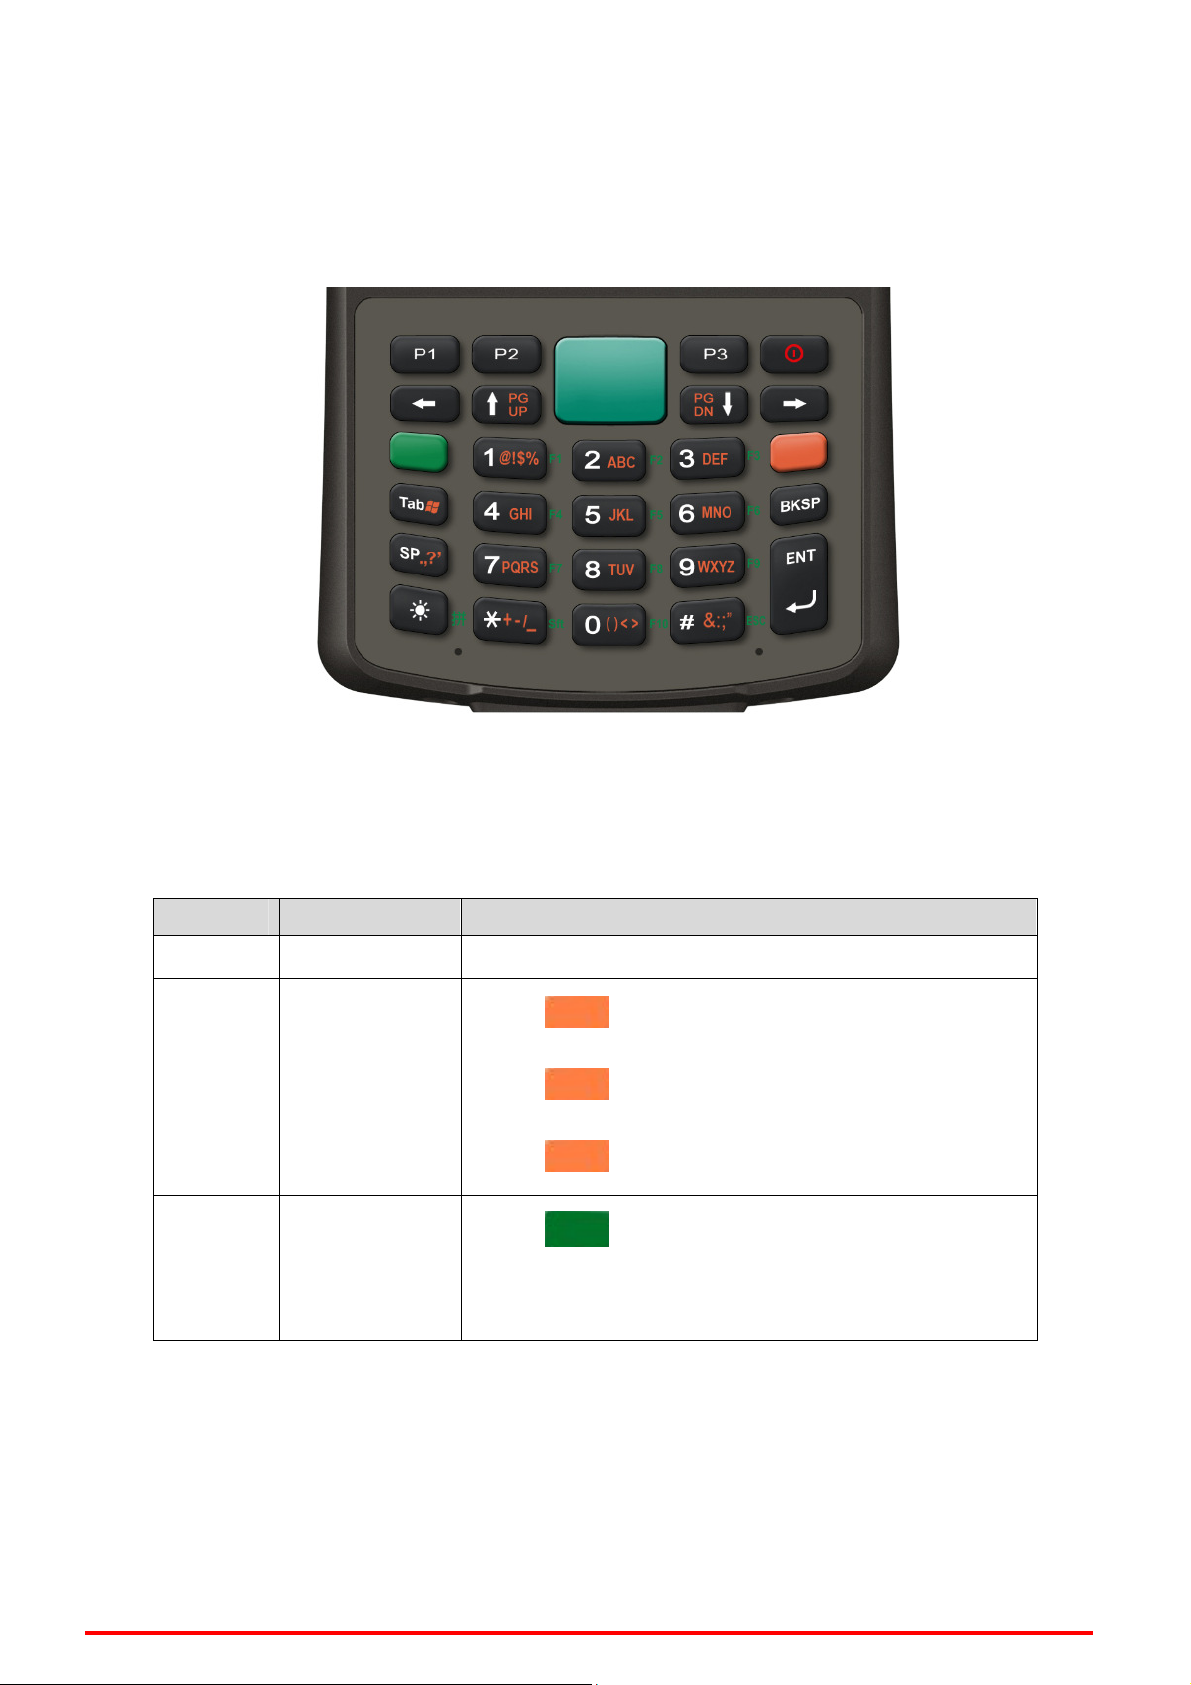
2.7 Keypad
Keypad Definitions
Color Codes:
There are three key colors on the keypad that are active depending on
the color keys pressed.
Color Mode Description
White 1st layer The Numeric keys and other white keys are active
Press once: Upper-case alphabetic
English/
Orange
Sign Input
Press twice: Lower-case alphabetic
Press three times: numeric function
Press to switch to Function keys
Green Function key
The Numeric keys now act as Function keys. For
example, press 1 to use F1
15
Page 16

IMX-9000 User's Manual
Special Keys:
Key Name Description
Direction key Direction key - Left
Page Up &
Direction key
Page Down &
Direction key
Direction key Direction key - Right
White: Direction key - Up
Orange: Page up
White: Direction key – Down
Orange: Page down
Programmable key P1 for shortcut key 1, programmable key.
Programmable key P2 for shortcut key 2, programmable key
Programmable key P3 for shortcut key 3, programmable key
Keypad backlight Turn on/off keypad backlight
Back Space White: Back Space key.
1. When the barcode reader is enabled, press
Scan or Confirm
to start barcode scanning.
2. In an application interface, press to confirm
the option.
16
Page 17

IMX-9000 User's Manual
3 Turn the IMX-9000 on for the first time
After you have initially charged your device for about 4 hours, the device is ready to be used.
You can now start up your device where you will calibrate the display, learn some basic stylus
usage and setup the system time and date.
Power Key
3.1 Recalibrate the IMX-9000 screen
The calibrate screen can be activated by tap .Start Settings Control Panel. Then
double-tap Stylus. Tap the Calibration tab and tap Recalibrate.
1. Tap the Center cross with the stylus.
2. The cross moves to the next location.
Continue tapping the cross until the screen
has been calibrated.
3. After calibration is finished, press the
Enter key the save the setting.
17
Page 18

IMX-9000 User's Manual
3.2 Setting the Time and Date
1. Tap Start - Setting Control Panel
2. Double-tap Date/Time.
3. Tap the arrows next to the month to select the correct month.
4. Select a field in the time box and tap the arrows next to the time to change
the value of the field.
5. Tap the drop-down arrow next to Time Zone to select the correct time zone
for your area.
18
Page 19

IMX-9000 User's Manual
6. Check the box next to Automatically adjust clock for daylight saving to
have the OS automatically adjust for daylight saving time.
7. Click Apply to save the settings.
19
Page 20

IMX-9000 User's Manual
3.3 Sound Setting
1. Tap Start - Setting Control Panel
2. Open Volume & Sounds icon and select the Volume tab.
3. Press the left / right arrow icon or move the slide bar to adjust a volume.
4. Click all items to activate the sound such as Events (warning, system
events), Applications, Notifications (alarms, reminders) , Key clicks and
Screen taps.
20
Page 21

IMX-9000 User's Manual
3.4 Display Setting
The calibrate screen can be activated by This screen lets you set the wallpaper image of the
IMX-9000, or change the color of the background screen. Call up the right button menu from
desktop and select Properties and you can check the Display Properties window.
1. Select the Background tab.
2. Click Browse to select an image file.
3. Press OK to apply the setting.
21
Page 22
IMX-9000 User's Manual
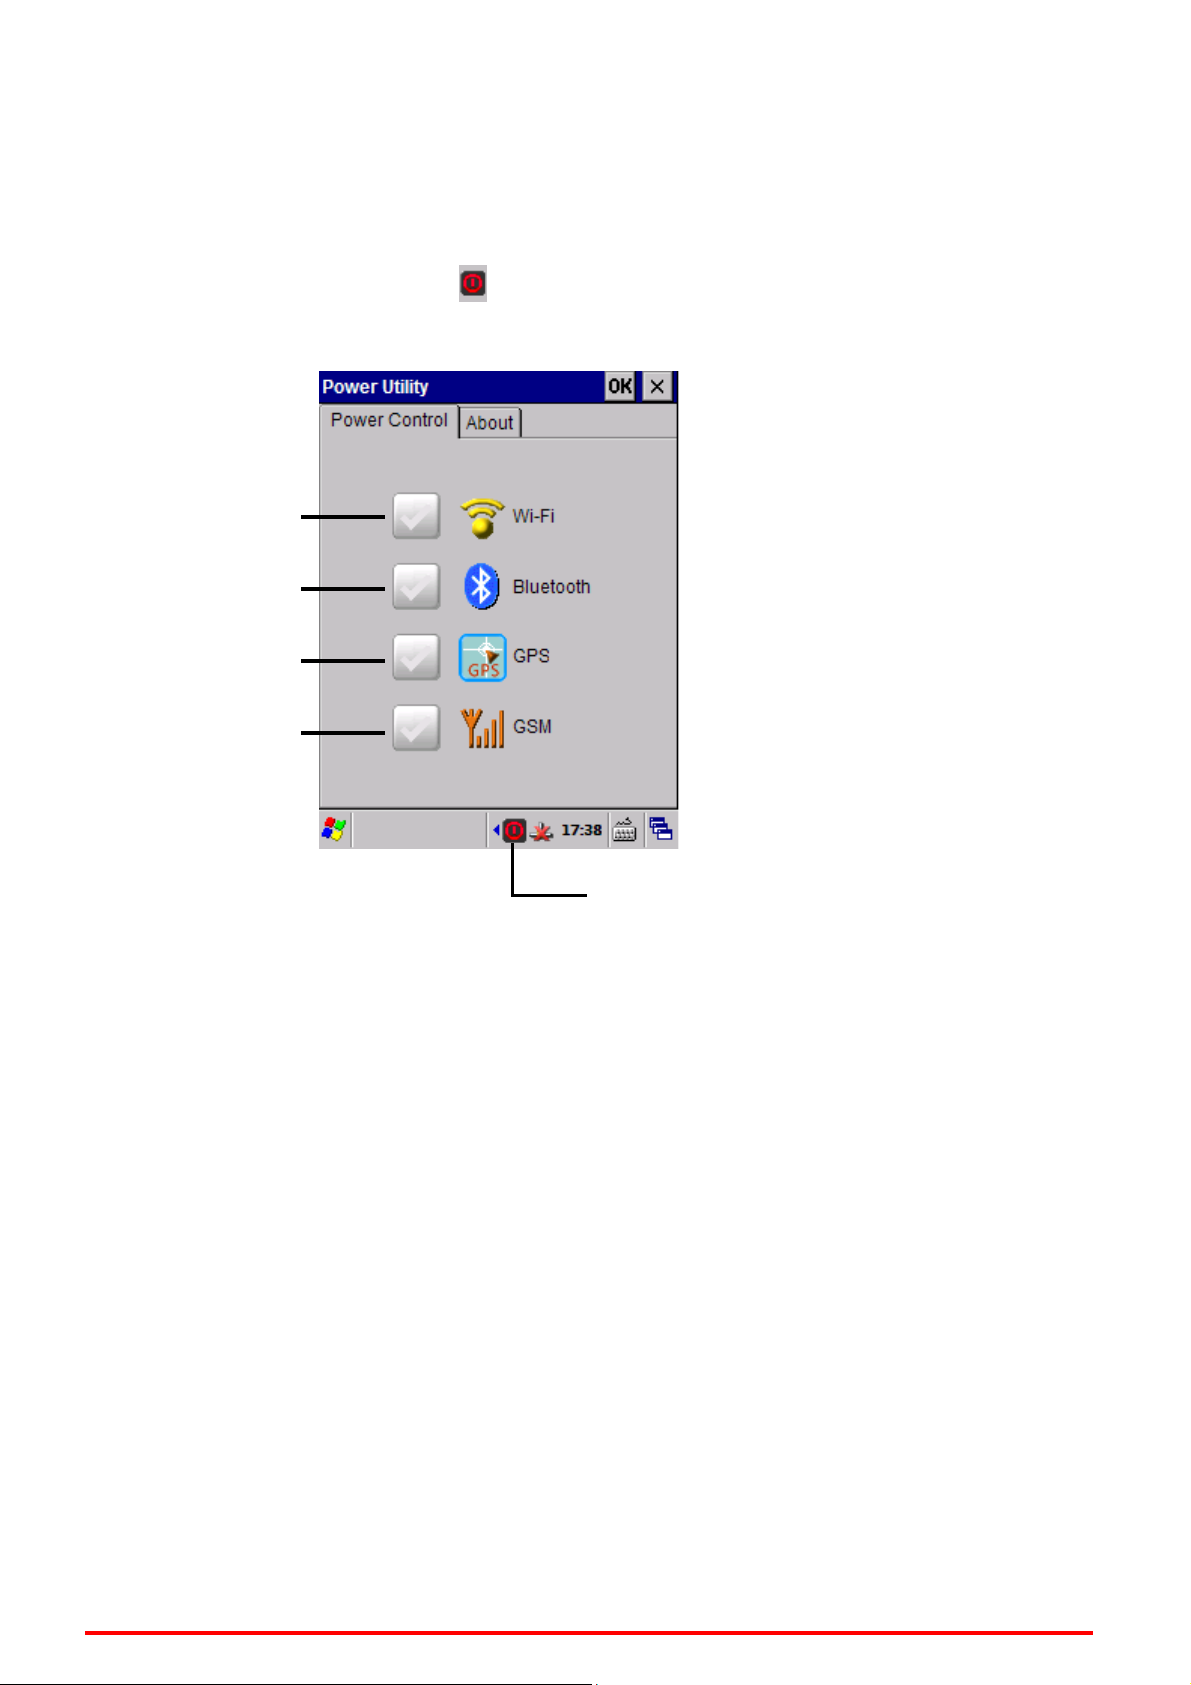
3.5 ADLINK Power Utility
Manage power control to WiFi, Bluetooth, GPS and GSM.
1. Double–tap Power Utility icon on taskbar.
2. Click to check the box to power on WiFi, Bluetooth, GPS and GSM.
Power on WiFi
Power on Bluetooth
Power on GPS
Power on GSM
Power Utility icon
22
Page 23

IMX-9000 User's Manual
3.6 Reader Utility
Manage 1D/2D barcode reader
1. Double-tap the Reader Utility on the desktop.
2. Tap Scan to perform barcode scanning test.
23
Page 24

IMX-9000 User's Manual
3. Tap Setting to enter barcode setting.
4. Adjust the barcode parameter.
24
Page 25

IMX-9000 User's Manual
3.7 RFID Reader Utility
RFID reader demo program
1. Double-tap RFID Reader on the desktop.
2. Tap Scan to perform RFID scanning test.
.
25
Page 26

IMX-9000 User's Manual
4 Getting Connected
4.1 Installing Microsoft ActiveSync
In order to exchange data between your computer and the IMX-9000 and install
extra applications or utilities to the IMT-902T, Microsoft ActiveSync must be installed
on your computer. Connect the IMT-902T to a PC using a USB type B cable.
Download the latest version of Microsoft ActiveSync from the Microsoft website.
4.2 Connecting to Your Computer
1. After ActiveSync has been installed, connect the USB B cable to the USB port on
your IMX-9000.
2. Plug the other end of the USB cable into a USB port on your computer.
3. Turn the device on.
4. ActiveSync starts automatically and configure the USB port to work with the
IMX-9000. The New Partnership setup wizard will automatically start.
If ActiveSync doesn’t start automatically, click Start Programs
Microsoft ActiveSync.
If a message appears indicating that it is unable to detect a connection, click the
Cancel button and manually configure the communication settings.
5. Follow the onscreen instructions.
6. When the configuration process is complete, the ActiveSync window appears.
26
Page 27

IMX-9000 User's Manual
7. Synchronization will be initialized and will take place if you’ve chosen to
synchronize periodically or upon connection.
8. ActiveSync detects the IMX-9000 and establishes a connection.
9. Click No, and then click Next.
27
Page 28

IMX-9000 User's Manual
Technical Support
Contact us should you require any service or assistance.
ADLINK Technology, Inc.
Address: 9F, No.166 Jian Yi Road, Zhonghe District
New Taipei City 235, Taiwan
新北市中和區建一路 166 號 9 樓
Tel: +886-2-8226-5877
Fax: +886-2-8226-5717
Email: service@adlinktech.com
Ampro ADLINK Technology, Inc.
Address: 5215 Hellyer Avenue, #110, San Jose, CA 95138, USA
Tel: +1-408-360-0200
Toll Free: +1-800-966-5200 (USA only)
Fax: +1-408-360-0222
Email: info@adlinktech.com
ADLINK Technology (China) Co., Ltd.
Address: 上海市浦东新区张江高科技园区芳春路 300 号 (201203)
300 Fang Chun Rd., Zhangjiang Hi-Tech Park,
Pudong New Area, Shanghai, 201203 China
Tel: +86-21-5132-8988
Fax: +86-21-5132-3588
Email: market@adlinktech.com
ADLINK Technology Beijing
Address: 北京市海淀区上地东路 1 号盈创动力大厦 E 座 801 室(100085)
Rm. 801, Power Creative E, No. 1, B/D
Shang Di East Rd., Beijing, 100085 China
Tel: +86-10-5885-8666
Fax: +86-10-5885-8625
Email: market@adlinktech.com
ADLINK Technology Shenzhen
Address: 深圳市南山区科技园南区高新南七道 数字技术园
A1 栋 2 楼 C 区 (518057)
2F, C Block, Bldg. A1, Cyber-Tech Zone, Gao Xin Ave. Sec. 7,
High-Tech Industrial Park S., Shenzhen, 518054 China
Tel: +86-755-2643-4858
Fax: +86-755-2664-6353
Email: market@adlinktech.com
LiPPERT ADLINK Technology GmbH
Address: Hans-Thoma-Strasse 11, D-68163, Mannheim, Germany
Tel: +49-621-43214-0
Fax: +49-621 43214-30
Email: emea@adlinktech.com
28
Page 29

IMX-9000 User's Manual
ADLINK Technology, Inc. (French Liaison Office)
Address: 15 rue Emile Baudot, 91300 Massy CEDEX, France
Tel: +33 (0) 1 60 12 35 66
Fax: +33 (0) 1 60 12 35 66
Email: france@adlinktech.com
ADLINK Technology Japan Corporation
Address: 〒101-0045 東京都千代田区神田鍛冶町 3-7-4
神田 374 ビル 4F
KANDA374 Bldg. 4F, 3-7-4 Kanda Kajicho,
Chiyoda-ku, Tokyo 101-0045, Japan
Tel: +81-3-4455-3722
Fax: +81-3-5209-6013
Email: japan@adlinktech.com
ADLINK Technology, Inc. (Korean Liaison Office)
Address: 서울시 서초구 서초동 1675-12 모인터빌딩 8 층
8F Mointer B/D,1675-12, Seocho-Dong, Seocho-Gu,
Seoul 137-070, Korea
Tel: +82-2-2057-0565
Fax: +82-2-2057-0563
Email: korea@adlinktech.com
ADLINK Technology Singapore Pte. Ltd.
Address: 84 Genting Lane #07-02A, Cityneon Design Centre,
Singapore 349584
Tel: +65-6844-2261
Fax: +65-6844-2263
Email: singapore@adlinktech.com
ADLINK Technology Singapore Pte. Ltd. (Indian Liaison Office)
Address: 1st Floor, #50-56 (Between 16th/17th Cross) Margosa Plaza,
Margosa Main Road, Malleswaram, Bangalore-560055, India
Tel: +91-80-65605817, +91-80-42246107
Fax: +91-80- 23464606
Email: india@adlinktech.com
ADLINK Technology, Inc. (Israeli Liaison Office)
Address: 6 Hasadna St., Kfar Saba 44424, Israel
Tel: +972-9-7446541
Fax: +972-9-7446542
Email: israel@adlinktech.com
29
 Loading...