

Page 1

Manual, complete
745 - 34 Speedpocket
Sewing unit for runstitching
of rectangular piped pockets
Operating Instructions
Installation Instructions
Service Instructions
Instructions for programming DAC
1
2
3
4
Postfach 17 03 51, D-33703 Bielefeld • Potsdamer Straße 190, D-33719 Bielefeld
Telefon + 49 (0) 5 21 / 9 25-00 • Telefax + 49 (0) 5 21 / 9 25 24 35 • www.duerkopp-adler.com
Ausgabe / Edition: 08/2005 Printed in Federal Republic of Germany Teile-Nr./Part.-No.: 0791 745171
Page 2

745 - 34 Speedpocket
Manual, complete
Summary
Operating Instructions
Installation Instructions
Service Instructions
Instructions for programming DAC
Interconnection diagram
9870 745131 B
9890 745001 B
Pneumatic circuit plan
9770 745002
Page 3

Index Page:
Part 4: Programming Instructions DAC Cl. 745-34 Speedpocket
Program version A 01.0
1. Structure of menu ............................................ 3
2. Operation
2.1 Editingthepocketprogram ....................................... 5
2.2 Editing the sequence ........................................... 6
3. Setting programs of the machine
3.1 Indicating / Deleting the counter for the bobbin thread quantity .................. 7
3.2 Setting the counter for the bobbin thread quantity .......................... 7
3.3 Testing the feeding process ....................................... 7
3.4 Step-by-stepmode ............................................ 8
3.5 Dongle menu ................................................ 9
4. Multitest
4.1 Testingtheoutputelements....................................... 12
4.2 Testing the input elements manually .................................. 12
4.3 Testing the input elements automatically ............................... 12
4.4 TestingtheROM ............................................. 13
4.5 TestingtheRAM.............................................. 13
4.6 Testingthesewingmotor......................................... 13
4.7 Testingthecornerknives......................................... 14
4.8 Testingthecenterknifeactivation ................................... 14
4.9 Settingthelight-barrierfortheflap................................... 14
5. Table Seam Parameters ......................................... 16
6. Machine parameters ........................................... 18
7. Error messages/ Functional indications .............................. 19
8. Input elements .............................................. 24
9. Output elements ............................................. 24
Page 4

Page 5

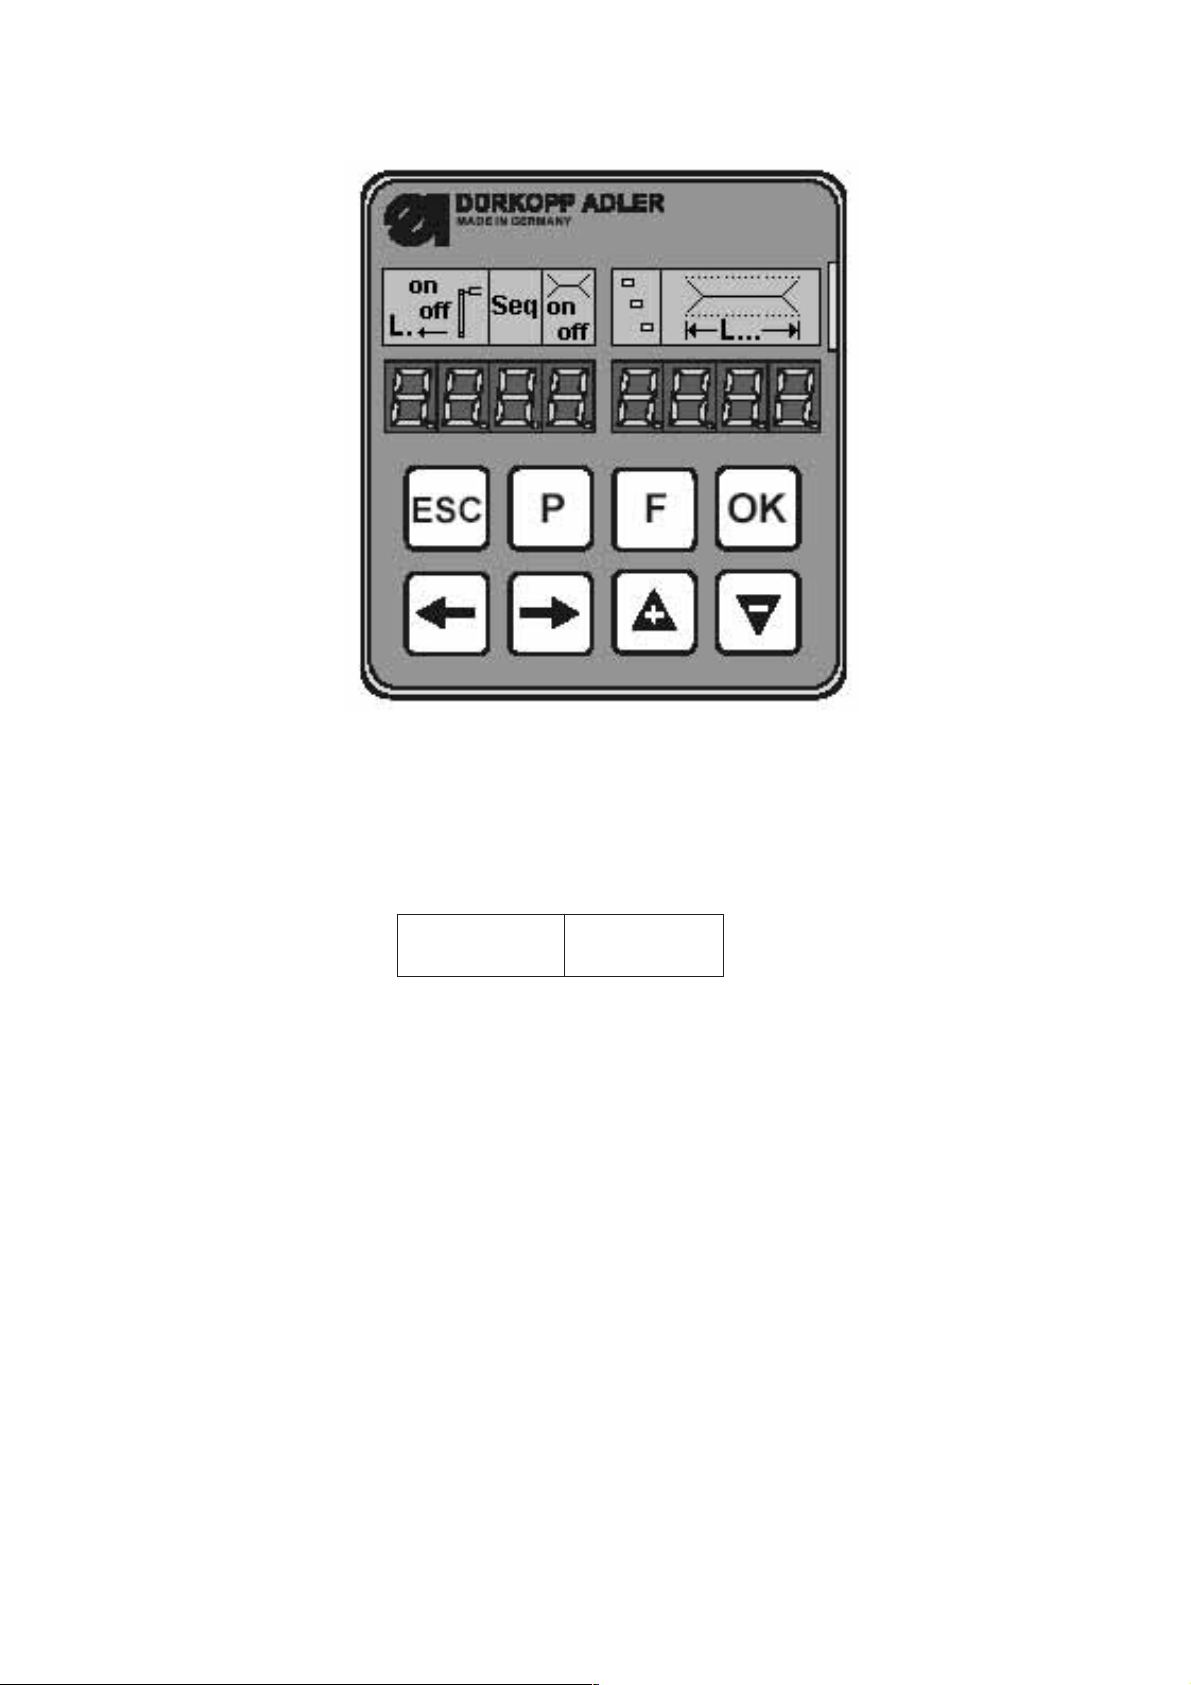
1. Structure of menu
Switch-on
“P” and “ç” 902 Input elements, manual
“P” and “è” Initializing the parameters Code : 2548
Multitest 901 Output elements
903 Input elements, automatic
904 Testing the ROM
905 Testing the RAM
906 Testing the sewing motor
950 Testing the corner knives
951 Testing the center knife
952 Setting the light-barrier for the flap
400 Machine parameters
Initializing the parameters
500 501 Machine parameters
502 Pockets
503 Sequence
504 All parameters
Produced
Sewing mode
“P” and “F” Setting programs
600 Displaying the counter of pieces
301 Indicating / Deleting
the counter for the bobbin thread quantity
302 Setting the bobbin thread counter
303 Testing the feeding process
304 Step-by-step mode
305 Dongle
“P” Editing the current seam parameters,
100 -136
“F” short/long Sequence, short = on/off,
long = editing
“ESC” and “ç” Indicating / Deleting the piece counter
“ESC” and “ê” Center knife on/ off
“ESC” and “é” Corner knife on/ off
“ESC” and “è” Stacker on/ off
“é”or“ê” Changing the current seam length
“ç”or“è” Changing over to the next seam
program
3
Page 6
2. Operation
If neither the key ( “P” and “è” ) nor the key ( “P” and “ç” )
is pressed within 2 seconds after switching on, the program
starts the sewing mode.
First the machine has to carry out the reference run initiated
by the pedal.
Until then the display will flash.
rEF
4
Page 7
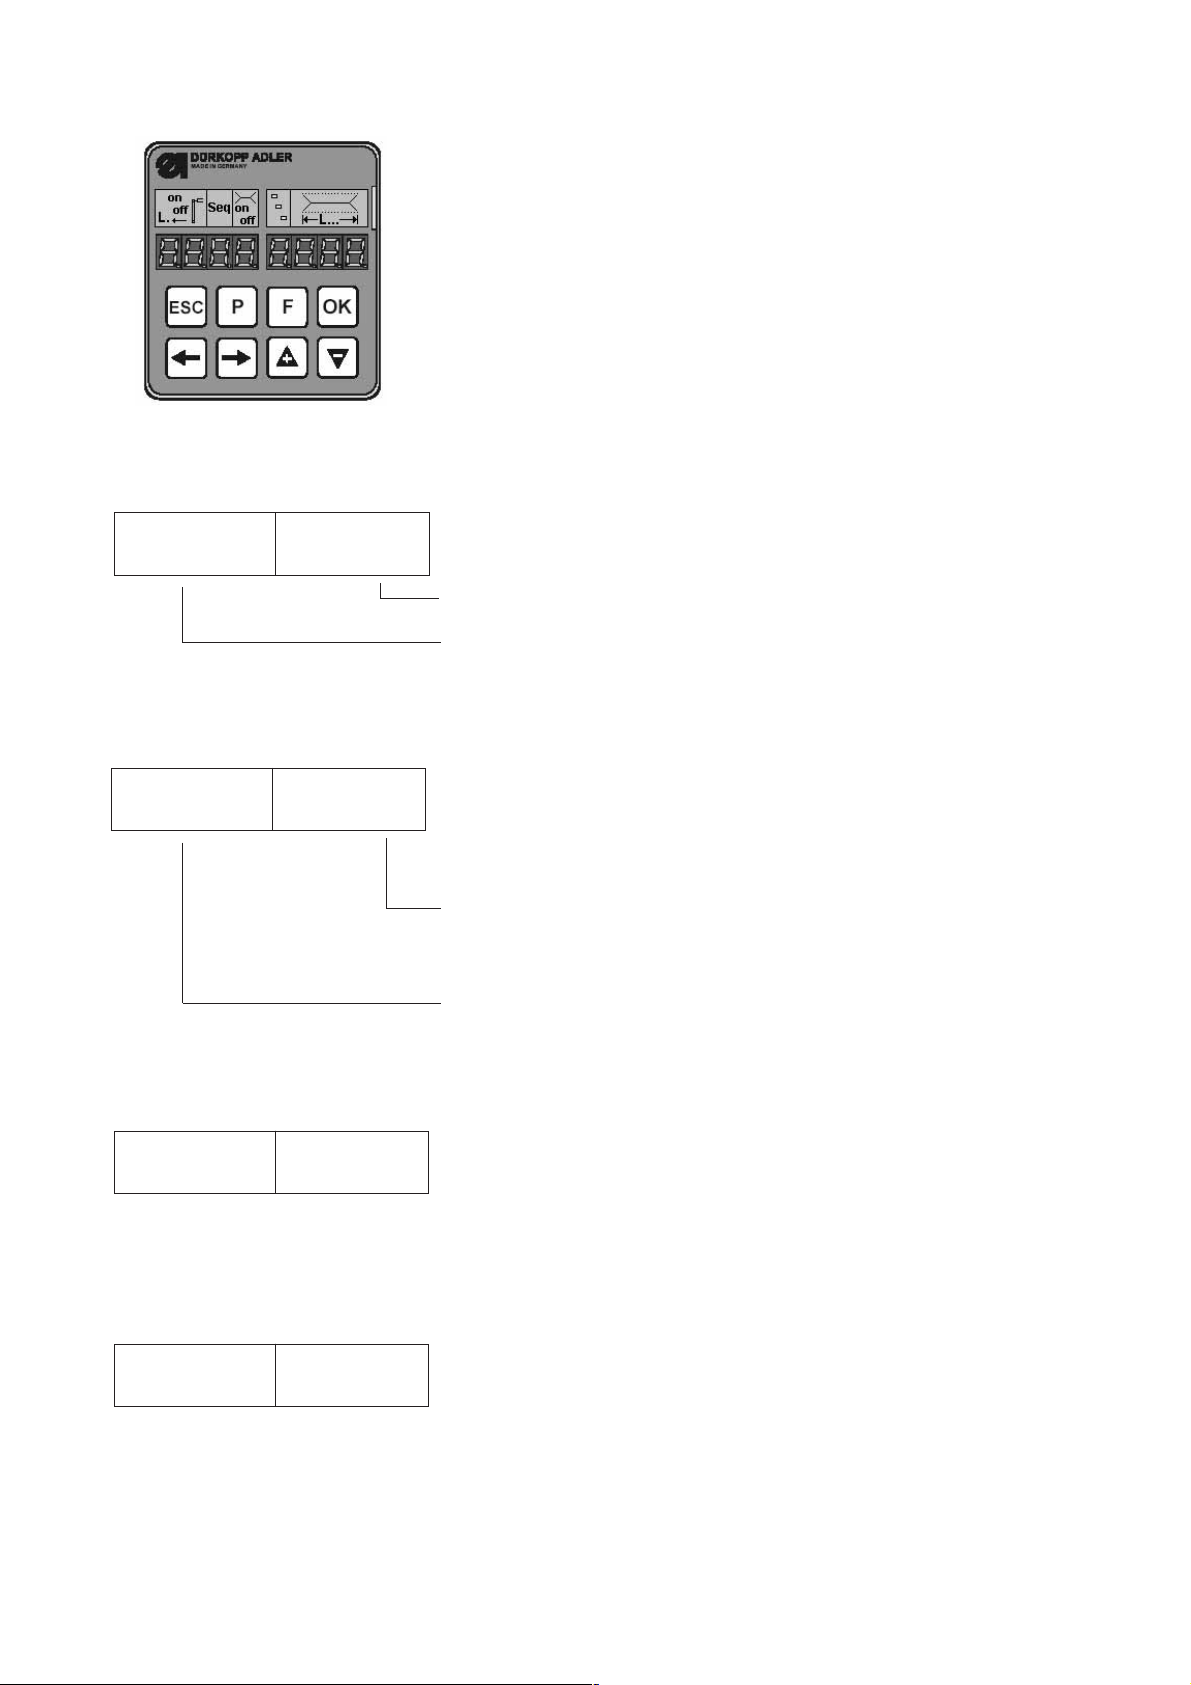
2.1 Editing the pocket program
When the machine is in basic position and in the sewing mode and the
key “P” is actuated, you get into the level for editing the current pocket
program.
In case the feeding process has started already, this is not possible.
For this purpose the feeding operation w ould have to be cancelled so
that the machine is in its basic position again.
Selecting the seam parameter
100 23
current parameter value
The parameter number flashes, select with the keys”é“ and ”ê“.
After “OK” the display changes, e.g. ->
Editing the seam parameter
108 054
Initializing the pocket program
1P P I n I
One digit of the value 054 flashes and can be changed with the keys
”é“ and ”ê“andsavedwith“OK”.
“ESC” -> no alteration and back.
With the keys “¬ “or“®” you can change to the next editable digit.
Parameter No. 108
After a short actuation of “F” the display changes to this submenu.
The initialization is carried out with “OK” and aborted with “ESC”. With
the initialization a pocket program with standard values is loaded.
9P P I n I
With a long actuation of “F” all 9 seam pograms are initialized.
Afterwards the display changes to the mode for selecting a seam
parameter in the current seam program again.
5
Page 8

2.2 Editing the sequence
1
When in the sewing mode key “ F ” is pressed longer than 2 seconds,
you get into the level for editing the sequence.
With a short actuation of “F” the sequence is switched on or off.
At the beginning of editing the sequence the current sequence is
cancelled and the first digit after the “S” flashes.
123 4 5 67
2.3 Piece counter
S 1054
With the keys ““and”¯“ the program number can be altered. With the
keys”¬“or“®” you change to the next position.
After actuating the key ”¬” the position right of the flashing digit is
cancelled. Thus, the number of seam programs per sequence is
determined. Max. 7 seam programs can be entered per sequence.
With “OK” the editing of the sequence is finished and the display goes
back to the sewing mode with sequence.
When actuating “ESC” and “¬” in the sewing mode, the daily piece
counter is displayed.
With a short touch of key “ESC” you change to the sewing mode again.
With a long actuation of “OK” the counter is set to “0” and the display
“0” appears until the “ESC”-key is actuated.
6
Page 9

3. Setting programs of the machine
The setting programs can be reached from the sewing mode by
actuating “P” and “F” simultaneously
List of setting programs:
301 Indicating the counter for the bobbin thread quantity / Deleting
302 Setting the counter for the bobbin thread quantity
303 Testing the feeding process
304 Step-by-step mode
The various setting programs can be selected with the keys ““ and
” ¯“, activated with “OK” and quitted with “ESC”.
30x ____
After actuating “ OK” the selected program is activated.
3.1 Indicating the counter for the bobbin thread quantity / Deleting
301 12 34
The current value can be reset to the programmed maximum value by
a long actuation of “ OK”.
The indicated value has to be multiplied by 10.
3.2
Setting the counter for the bobbin thread quantity
302 1 2 34
The value flashes and can be altered with the keys ““ and ” ¯“. When
actuating “OK” the value is saved and a setting program can be
selected again.
The indicated value has to be multiplied by 10.
At the value 0 the bobbin thread counter is switched off.
3.3 Testing the feeding process
303 on
After a long actuation of “OK” the program changes to the sewing
process.
After the reference run the feeding process is carried out as in the
sewing program. When actuating the pedal in inching operation the
transport carriage runs in its rear position. The feeding clamps are
lifted and the flap clamps open. The process can be started anew or
quittedwith“ESC”.
Switch the machine off in order to quit the program.
7
Page 10

3.4 Step-by-step mode
304 StEP
SP PEd
Withalongactuation of “OK” the program changes to the sewing
process.
At the stops at the seam beginning and seam end the following display
appears:
After stepping on the pedal the sewing process continues up to the
next stop.
While the sewing program is running, the display changes to the
normal sewing process again.
Switch the machine off in order to quit the program.
8
Page 11

3.5 Dongle Menu
305
do dir
Data dongle, e.g. for Cl. 745-34S
d745 -34S
Important:
To save the parameters you will need an empty dongle. It can be
bought at the sales point of Dürkopp Adler AG under the following part
number 9835 901005.
After actuating the “OK” k ey, the display display changes to a lower
level. Using the key “¬” will bring it back, one level higher. For other
choices within the menu use the ““ and ”¯“keys.
At the same time, the right half of the display flashes.
If no dongle is connected at the plug connection “X110“, the message
“Info 4301“ will be displayed. The left and right half of each menu item
will flash during the data transmission.
Menu item display dongle content
The following displays may appear after actuating the “OK”key
(to save the parameters)
Boot dongle, e.g. for C l. 745-34S
b745 -34S
Empty Dongle (not formatted)
Info 4302
do L PPP
InFo 4323
(The dongle has to be formatted first, check menu item format dongle).
Exit and go back to the Menu item display dongle content by
actuating the “OK“key.
Menu item load the machine parameter
Confirmation
After actuating the “OK” k ey, the machine parameter will be loaded
from the dongle to the control.
Exit and go back to the Menu item load the machine parameter by
actuating the “ESC“key.
If the dongle contains no machine parameter, the message “Info 4325“
displays, it has to be confirmed by actuating the “OK“key.
9
Page 12

do L 9PS
InFo 4324
do S PPP
InFo 4321
Menu item load pocket program and sequence
Confirmation
After actuating the “OK” k ey, the pocket parameter and the sequence
will be loaded from the dongle to the control.
Exit and go back to the Menu item load pocket program and
sequence by actuating the “ESC “key.
If the dongle contains no pocket program, the message “Info 4326“
displays, it has to be confirmed by actuating the “OK“key.
Menu item save machine parameter
Confirmation
do S 9PS
InFo 4322
do For
After actuating the “OK” k ey, the machine parameter of the sewing unit
will be saved onto the dongle.
Exit and go back to the Menu item save machine parameter by
actuating the “ESC“key.
Menu item save pocket program and sequence
Confirmation
After actuating the “OK” k ey, the pocket parameters and the sequence
will be saved onto the dongle.
Exit and go back to the Menu item save pocket program and
sequence by actuating the “ESC “key.
Menu item format dongle
InFo 4320
10
Confirmation
After actuating the “OK” k ey, the dongle will be formatted.
Format cancel and go back to the Menu item format dongle by
actuating the “ESC“key.
Page 13

d745 For
d745 -34S
Boot-Dongle, e.g. for cl. 745-34S
b745 -34S
Empty Dongle
During the format process the display flashes
When the format process ends, the Menu item format dongle is
displayed again.
I
mportant:
The data on the dongle will be erased through the formatting.
A formatting of the dongle is necessary, if in the Menu item display
dongle content does not display
but for example
, the following.
Info 4302
11
Page 14

4. Multitest
4.1 Testing the output elements
901 ____
The Multitest programs can be reached by switching on and actuating
“P”and “ç” simultaneously.
List of programs:
901 Testing the output elements
902 Testing the input elements manually
903 Testing the input elements automatically
904 Testing the ROM
905 Testing the RAM
906 Testing the sewing motor
950 Testing the corner knives
951 Testing the center knife
952 Setting the light-barrier for the flap
After “OK” the display changes to
Y01 0
In the left half of the display the number of the output element flashes,
the right half shows its state:
0=off,
1 = on.
With the keys “é” and “ê” the number of the output element can be
selected.
With “OK” this output element is switched on or off.
When changing over to the next output element the state of the
preceding one remains unchanged.
4.2 Testing the input elements manually
902 ____
After “OK” the display changes to
S01 0
12
In the left half of the display the number of the input element flashes.
In the right half the state is indicated;
0 or 1 respectively.
With the keys “é” and “ê” the number of the input element can be
selected.
Page 15

4.3 Testing the input elements automatically
903 ____
After “OK” the display changes to
E01 0
In the right half the state of the input element is indicated which
changed last.
4.4 Testing the ROM
904 ____
buSY
1C3F H 1
4.5 Testing the RAM
905 ____
buSY
R1.1r2.1
Display during the test
Display after the test
check sum, e.g.
1=OK
0 = Error
Display during the test
Display after the test
1=OK 1=OK
0 = Error 0 = Error
4.6 Testing the sewing motor
906 ____
After “OK” the display changes to
n0
With the keys “+” and “-” the speed can be changed in steps of 100
r/min.
13
Page 16

4.7 Testing the corner knives
950 123
In the right LED field the c urrent seam length of L1 flashes.
With key “P” the corner knives are moved up and down.
4.8 Checking the center knife activation
951 on
The center knife is switched on and off with key “F”.
4.9 Setting the light-barrier for the flap
–
Swing out the folding station.
–
Place the fabric under the feeding clamp.
952 ____
952 LS 1
After actuating the “OK“ k ey, the switching status of the light-barrier to
the flap-scanning will be shown in the right half of the display flashing.
Reflecting ® LS 1
No reflection ® LS 0
Activate the following output elements:
Lower the feeding clamps left and right
Close the folding sheets
Close the flap clamps
–
Pull the feeding clamp to the feeding area.
–
Align the light-barrier with the center of the reflecting foil.
Please check the area from the seam beginning to the seam end
on the clamp.
–
Determine the distance between the switch actuation point of the
light-barrier to the needle. For this purpose lay a pattern made of
paper having the same size as the flap under the flap clamps.
Then push the feeding clamps from the feeding area to the
machine head until the light-barrier has no longer reflexion. Then
measure the distance between the front edge of the pattern to the
needle.
–
Enter the distance between the switch actuation point of the
light-barrier and the needle in the machine parameters. Switch the
machine off, when swithching it on strike the “P“ and “ ® “keys
simultaneously in order to switch over to the programming level
(400) for machine parameters (Code 2548). In the menu item 406
enter the distance in 1/10 mm.
14
Page 17

Orange LED on = reflection available
Orange LED off = no reflection
Green LED on = stable switching signal
If the green LED does not shine, the light-barrier should be cleaned,
readjusted, replaced or a new reflecting foil should be fitted.
15
Page 18

5. Table Seam Parameters
Press key “P” in the main level.
In the programming level initialize key “F” -> current program and
“F-Long” all seam programs.
Number Description Minimum Maximum Standard
Menu item value value value
100 Seam length mm 20 180 180
101 Stacker on / off on
102 Center knife on / off on
103 Center knife correction seam beginning 1/10 mm -9,9 9,9 0
104 Center knife correction seam end 1/10 mm -9,9 9,9 0
105 Corner knife on / off on
106 Corner knife correction seam beginning 1/10 mm -20 20 0
107 Corner knife correction seam end 1/10 mm -20 20 0
108 Stitch length 1/10 mm 2,0 3,0 2,5
109 Sewing motor speed 2000 3000 2750
110 Sewing motor soft start on / off on
111 Sewing motor number of soft start stitches 1 20 2
112 Sewing motor soft start speed 500 900 900
113 Clamping mode 0
0 = Lower left and right feeding clamp
simultaneously
1 = Lower left feeding clamp first
2 = Lower right feeding clamp first
114 Positioning point 0
0 = front
1 = center
2 = rear
115 Positioning point offset mm 1 170 90
116 Type s eam tightening seam beginning 1
0=Bartack
1 = Condensed stitches
117 Number of condensed stitches seam beginning 1 10 4
118 Stitch length condensed stitches / Bartack
Seam beginning 1/10 mm 0,5 3,0 1,0
119 Number of bartacks seam beginning 1 5 3
120 Type seam tightening seam end 1
0=Bartack
1 = Condensed stitches
121 Number of condensed stitches seam end 1 10 4
122 Stitch length condensed stitches / Bartack
Seam end 1/10 mm 0,5 3,0 1,0
123 Number of bartacks seam end 1 5 3
124 Material feed type 2
0 = Material runs to the loading position
1 = Material runs to the stacking position
2 = no run, in stacking position
16
Page 19

Number Description Minimum Maximum Standard
Menu item value value value
125 Type of waiting position 1
0 = Feeding clamp runs to the waiting position
1 = Feeding clamp remains in stacking position
126 Material feed to the stacking position 1 100 40
127 Loading speed % 10 100 80
128 Return speed % 10 100 80
129 Downholder on / off on
130 Sewing mode 0
0 = Constant sewing length
1 = Light-barrier for flap scanning
131 Light-barrier correction seam beginning 1/10 mm -20 20 0
132 Light-barrier correction seam end 1/10 mm -20 20 0
133 Material feed to the waiting position 1 515 100
134 Max. flap length 30 180 180
135 Flap clamp on / off on
136 Pedal mode 0
0 = normal
1 = Pedal has to be in basic position before the
next step
2 = Pedal actuation for moving in sewing position
(flap clamp)
17
Page 20

6. Machine parameters
When starting the machine hold the keys “P” and “è” pressed.
Enter code : 2548
Number Description Minimum Maximum Standard
Menu item value value value
400 Submenu machine configuration
401 Stacker available
402 Downholder available 1=available
403 Thread monitor on / off 1=on
404 Needle distance (10, 12) 10
405 Max. sewing length 180 / 200 180 200 180
406 Dist. light-barrier - needles 1/10 mm 1 375 60
407 Dist. between corner knife seam end and needles 1 375 13 0
500 Initialize parameter
501 Machine parameter
502 Pocket parameter
503 Sequence
504 All parameters
600 Indicate counter of pieces produced
1=available
501 InI
502 InI
503 InI
504 InI
When selecting an initializing program (501 to 504) “InI” flashes in the
right half of the display.
For initializing in the programs 501 to 504 hold the key “OK” pressed.
After initializing the machine parameters to the defautl values (factory
setting), the parameters 401-407 must be adapted to the machine
equipment.
After initialization of the pocket parameters, the default values will be
loaded.
After initialization the sequence will be loaded with the default value.
Initialize all parameters i.e. load the standard values for the machine,
pocket parameters and sequence.
18
Page 21

7. Error messages / Functional indications
Error/ Info Meaning Remedy
Control
1051
1052
1053
1055
1056
1058
1062
Sewing motor Timeout
· Faulty cable to the sewing motor
reference switch
· Faulty reference switch
Sewing motor excess current
· Faulty sewing motor cable
· Faulty sewing motor
· Faulty control
Too high mains voltage
Sewing motor overcharge
· Sewing motor blocked/ moves too
heavy
· Faulty sewing motor
· Faulty control
Sewing motor excess temperature
· Sewing motor moves too heavy
· Faulty sewing motor
· Faulty control
Sewing motor speed
Faulty sewing motor
Sewing motor defect of IDMA
Autoincrement
· Exchange the cable
· Exchange the reference switch
· Exchange the sewing motor cable
· Exchange the sewing motor
· Exchange the control
Check the mains voltage
· Eliminate the blocking/ rough running
· Exchange the sewing motor
· Exchange the control
· Eliminate the rough running
· Exchange the sewing motor
· Exchange the control
· Exchange the sewing motor
Switch machine off and on again
1302
1342
1344
2101
2103
2152
2153
2156
2162
Sewing motor error
Control receives no impulse from
the impulse transmitter in the motor
Sewing motor failure
Internal fault
Step motor X-axis Timeout
Reference
· Cable to the reference switch
defective
· Defective reference switch
Step motor feed clamp (X-axis)
has step loss
Step motor X-axis excess current
Step motor X-axis excess voltage
Too high mains voltage
Step motor X-axis
excess temperature
· Step motor X-axis moves too
heavy
· Step motor X-axis defective
· Faulty control
Step motor X-axis
Defect of IDMA Autoincrement
Check the cable from the impulse
transmitter in the motor to the control
· Switch machine off and on again
· Software update
· Information to the DA-Service
· Exchange the cable
· Exchange the reference switch
Check that the feed clamp moves freely
· Exchange the step motor X-axis
· Exchange the control
Check the mains voltage
· Eliminate the rough running
· Exchange the step motor X-axis
· Exchange the control
Switch machine off and on again
19
Page 22

Error/ Info Meaning Remedy
3100
3101
3102
3103
3107
3210
3215
3220
3500
3507
3520
3530
3540
3545
3721
3722
Machine Control voltage
Temporary mains voltage dip
Machine Power voltage
Temporary mains voltage dip
Machine Voltage Sewing motor
Temporary mains voltage dip
Machine Voltage Step motors
Temporary mains voltage dip
Machine Temperature
· Vent holes closed
· Ventilation grid soiled
Thread breakage
Bobbin thread counter is zero
Empty bobbin
Error Control command interpreter /
Motor synchronization
Internal fault
Check the mains voltage
Check the mains voltage
Check the mains voltage
Check the mains voltage
· Check the vent holes
· Clean the ventilation grid
Thread in the thread again
Insert a full bobbin
Insert a full bobbin
· Switch machine off and on again
· Software update
· Information to the DA-Service
Dongle
4301 No dongle plugged in
4304 Wrong dongle type, to be able to
save, a data dongle must to
available
4320 Confirmation before formatting the
dongle
4321 Confirmation before saving the
machine parameter onto the dongle
4322 Confirmation before saving the
pocket parameter onto the dongle
Confirmation before loading the
machine parameter from the dongle
to the control.
4324 Confirmation before loading the
pocket parameters from the dongle
to the control.
4325 The loading of the machine
parameter f rom the donlge to the
control is not possible because
there is no machine parameter
stored.
The dongle must be formatted
“OK” key ® format
“ESC” key ® cancel
“OK”key ® save
“ESC” key ® cancel
“OK” key ® speichern
“ESC” key ® cancel
Info 4323
“OK” key ® save
“ESC” key ® cancel
“OK” key ® save
“ESC” key ® cancel
20
Page 23

Error/ Info Meaning Remedy
Dongle
4326 The loading of the pocket parameter
6551
6554
6651
-6653
6751
6761
6952
7451
7453
7454
7452
7455
from the donlge to the control is not
possible because there is no pocket
parameter stored.
Error Machine head position/ AD
Converter/
Processor error
Internal fault
Error Step motor driver
Internal fault
Communication Test interface
Internal fault
Communication Test interface
· Line fault
· Cable Test interface defective
· Internal fault
· Switch machine off and on again
· Software update
· Information to the DA-Service
· Switch machine off and on again
· Software update
· Information to the DA-Service
· Switch the machine off and on again
· Eliminate the malfunction
· Exchange the cable
· Switch the machine off and on again
7551
7555
7558
7559
7556
7557
8151
8156
8159
8152
8154
8251
8255
8252
8257
8258
/
8253
8256
8254
Communication Control panel
interface
Internal fault
Communication Control panel
interface
· Line fault
· Cable Control panel interface
defective
IDMA error
· Malfunction
· Faulty control
IDMA error
Internal fault
Error ADSP Booting/ Booting
Internal fault
ADSP Booting/ XILINX Booting/
Booting
Malfunction
· Switch the machine off and on again
· Software update
· Information to the DA-Service
· Eliminate the malfunction
· Exchange the cable
· Switch the machine off and on again
· Exchange the control
· Switch the machine off and on again
· Software update
· Information to the DA-Service
· Switch the machine off and on again
· Software update
· Information to the DA-Service
Switch the machine off and on again
21
Page 24

Error/ Info Meaning Remedy
8351
8801
8805
8806
8890
8891
System
Info 9001
Err 9001
Info 9002
Err 9002
Error Testpins/ Signals / Event
processing/ Memory Wrapper/ List
of functions
Internal fault
Corner knife station is swung out
Corner knife station is swung out
during the sewing process.
Step back on the pedal; afterwards
the transport carriage runs to the
back; start the process.
Folding station is swung out
Folding station is swung out during
the sewing process.
Step back on the pedal; afterwards
the transport carriage runs to the
back; start the process.
· Switch the machine off and on again
· Software update
· Information to the DA-Service
Swing corner knife station in
Check/ adjust fastening of the corner knife
station
Swing folding station in
Check/ adjust fastening of the folding
station
9003
9601
9604
9700
9701
9710
9720
9721
9722
Wrong needle position before
sewing start
Pedal has been stepped back
during the sewing process
Light-barrier (s4) for fabric removal
inactive
Folder not in top position
Folder not in low position
Limit switch feeding clamp active
Error when scanning the flap by
light-barrier
Flap has been positioned in front of
the front positioning point
Flap protrudes from the maximum
sewing area (behind the rear
positioning point)
Turn manually the hand wheel in lever
up position
For cancelling the pedal has to be
actuated once again.
Afterwards the feeding clamp runs in its
rear position
Adjust light-barrier (s4) for fabric removal
Correct folder adjustment (mechanical
collision; check switch S8)
Correct folder adjustment (mechanical
collision; check switch S8)
Check material feed and limit switch
Check the reflecting foil; check alignment
of the light-barriers
Position the flap correctly
Check the flap size; Position the flap
correctly
9723
9726
22
Fluff at the flap beginning
Flap too large or reflecting foil
soiled or defective
Feed flaps with smooth edges; Check the
reflecting foil
Check flap size and reflecting foil
Page 25

Error/ Info Meaning Remedy
9730
9800
9900
9901
9902
reF
Current seam length flashes
Corner knife at the seam beginning
cannot be driven to
Hardware error DC motor control
Defective machine parameters
(check sum error)
Defective pocket sequences (check
sum error)
Defective pocket programs (check
sum error)
Request to carry out the reference
run after switching the machine on
Corner knife for seam beginning
cannot be reached
Alter L1 (adjust corner knife distance) or
change positioning point of the current
seam
Check DC motor, DC controller and cable;
check voltage supply
Initialize machine parameters anew (test
program); Set machine parameters
Initialize pocket sequences anew (test
program);
Set pocket sequences
Initialize defective pocket programs (test
program);
Set pocket programs
Step back on t he pedal
Change the present seam length, or
change the loading position, or change L1
(adjust distance counter knife).
23
Page 26

8. Input elements
9. Output elements
S1 Folding device swung in
S2 Folder in low position
S3 Knife support swung in
S4 Light-barrier workpiece removed / Hood monitoring
S5 Pedal forward
S6 Pedal back
S9 Needle thread monitor right needle
S10 Needle thread monitor left needle
S17 Light-barrier for flap scanning
S100 Reference switch sewing motor
S101 Reference switch feeding clamp
Y1 Close folding sheets
Y2 Open flap clamp
Y3 Lower left feeding clamp
Y4 Lower right feeding clamp
Y5 Lower folder
Y6 Folder lifting off
Y7 Downholder on
Y8 Reserve
Y9 Knife support seam beginning
Y10 Knife support seam end
Y11 Stacking tongs forward
Y12 Swing stacking bow out
Y13 Reserve
Y14 Reserve
Y15 Reserve
Y16 Reserve
24
Y17 Open needle thread scissors
Y18 Lower center knife
Y19 Blow fluff out
Y20 Open bobbin thread clamp
Y21 Close bobbin thread scissors
Y22 Close thread tension
 Loading...