

Page 1

Additel/Land DataLogging Management Software
Copyright© 2012 Additel Corporation. All rights reserved.
Page 2

Chapter Title Page
Chapter 1 Introduction ................................................................................................................................................................................................................................ 4
Chapter 2 Installation ................................................................................................................................................................................................................................... 4
2.1 System Requirements .................................................................................................................................................................................................................... 4
2.2 Procedures ..................................................................................................................................................................................................................................... 4
Chapter 3 Starting the Program ................................................................................................................................................................................................................... 5
3.1 Licensing ......................................................................................................................................................................................................................................... 5
Chapter 4 Home Screen ............................................................................................................................................................................................................................... 6
4.1 Using the Home Screen .................................................................................................................................................................................................................. 6
4.2 File Menu ....................................................................................................................................................................................................................................... 7
4.3 Setting Menu .................................................................................................................................................................................................................................. 7
4.4. Help Menu .................................................................................................................................................................................................................................... 8
4.5 Calibrators List ................................................................................................................................................................................................................................ 8
Chapter 5 ADT672 Calibrator ....................................................................................................................................................................................................................... 9
5.1 Logging Files List .......................................................................................................................................................................................................................... 10
5.2 Delete ........................................................................................................................................................................................................................................... 11
5.3 Delete All ...................................................................................................................................................................................................................................... 11
5.4 Export Wizard .............................................................................................................................................................................................................................. 11
Chapter 6 ADT22X series Calibrator ........................................................................................................................................................................................................... 12
6.1 Snapshot list ................................................................................................................................................................................................................................. 13
6.2 Delete ........................................................................................................................................................................................................................................... 14
6.3 Delete All ...................................................................................................................................................................................................................................... 14
6.4 Export Wizard .............................................................................................................................................................................................................................. 14
Chapter 7 AD761 calibrator ....................................................................................................................................................................................................................... 15
7.1 Snapshot list ................................................................................................................................................................................................................................. 16
7.2 Delete ........................................................................................................................................................................................................................................... 17
2
Page 3

7.3 Delete All ...................................................................................................................................................................................................................................... 17
7.4 Export Wizard .............................................................................................................................................................................................................................. 17
Chapter 8 Ports Configuration ................................................................................................................................................................................................................... 18
8.1 Possible communication problems .............................................................................................................................................................................................. 18
8.2 Procedures ................................................................................................................................................................................................................................... 18
3
Page 4

Chapter 1 Introduction
This manual will introduce you to how to install, and use the Additel/Land. All screens have a uniform look with similar speed buttons and menus,
making it easy for you to adapt to t he syst e m quickly. Each subsequent chapter individual ly address es on e of the progr am ’ s scre en s or m ajor functions.
In each of these chapters you will find a full description and explanation of the screens fe at ur es, as well as detailed, hands-on operating instruct ions.
Chapter 2 Installation
2.1 System Requirements
To use the Addit el/Land recommended that you have the following hardware and software:
A Pentium class 667 MHz or higher computer with a minimum of 256 MB of RAM (512 MB or more rec ommended)
Graphics monitor and card: (VGA color or better recomm ended)
Windows XP or later operating system versions
A hard disk with at least 500 MB of fre e space
Microsoft Of fi ce 2003 or later versions
For calibrator communic ation:
RS232 serial asynchrono us communication port
ADT672, ADT761 , ADT223A Series Calibrat or s ( t he version of calibrators is DP C2.10 or higher )
Suitable commun ications cable (supplied)
2.2 Procedures
Insert the Additel/Land CD into your computer’s CD-ROM drive. If the program does not aut ost ar t, Run “ setup.exe”. Follow the prompt s on y our scre e n
to complete installati on.
4
Page 5

Chapter 3 Starting the Program
To star t Additel/Land, double-click on the Additel Land icon located in the Additel Land Group. (Multiple instances of Additel/Land may not be run
concurrently on the same ma chine.)
3.1 Licensing
This software is free of payment. Users can be free to copy, exchange and use.
5
Page 6
Chapter 4 Home Scr een
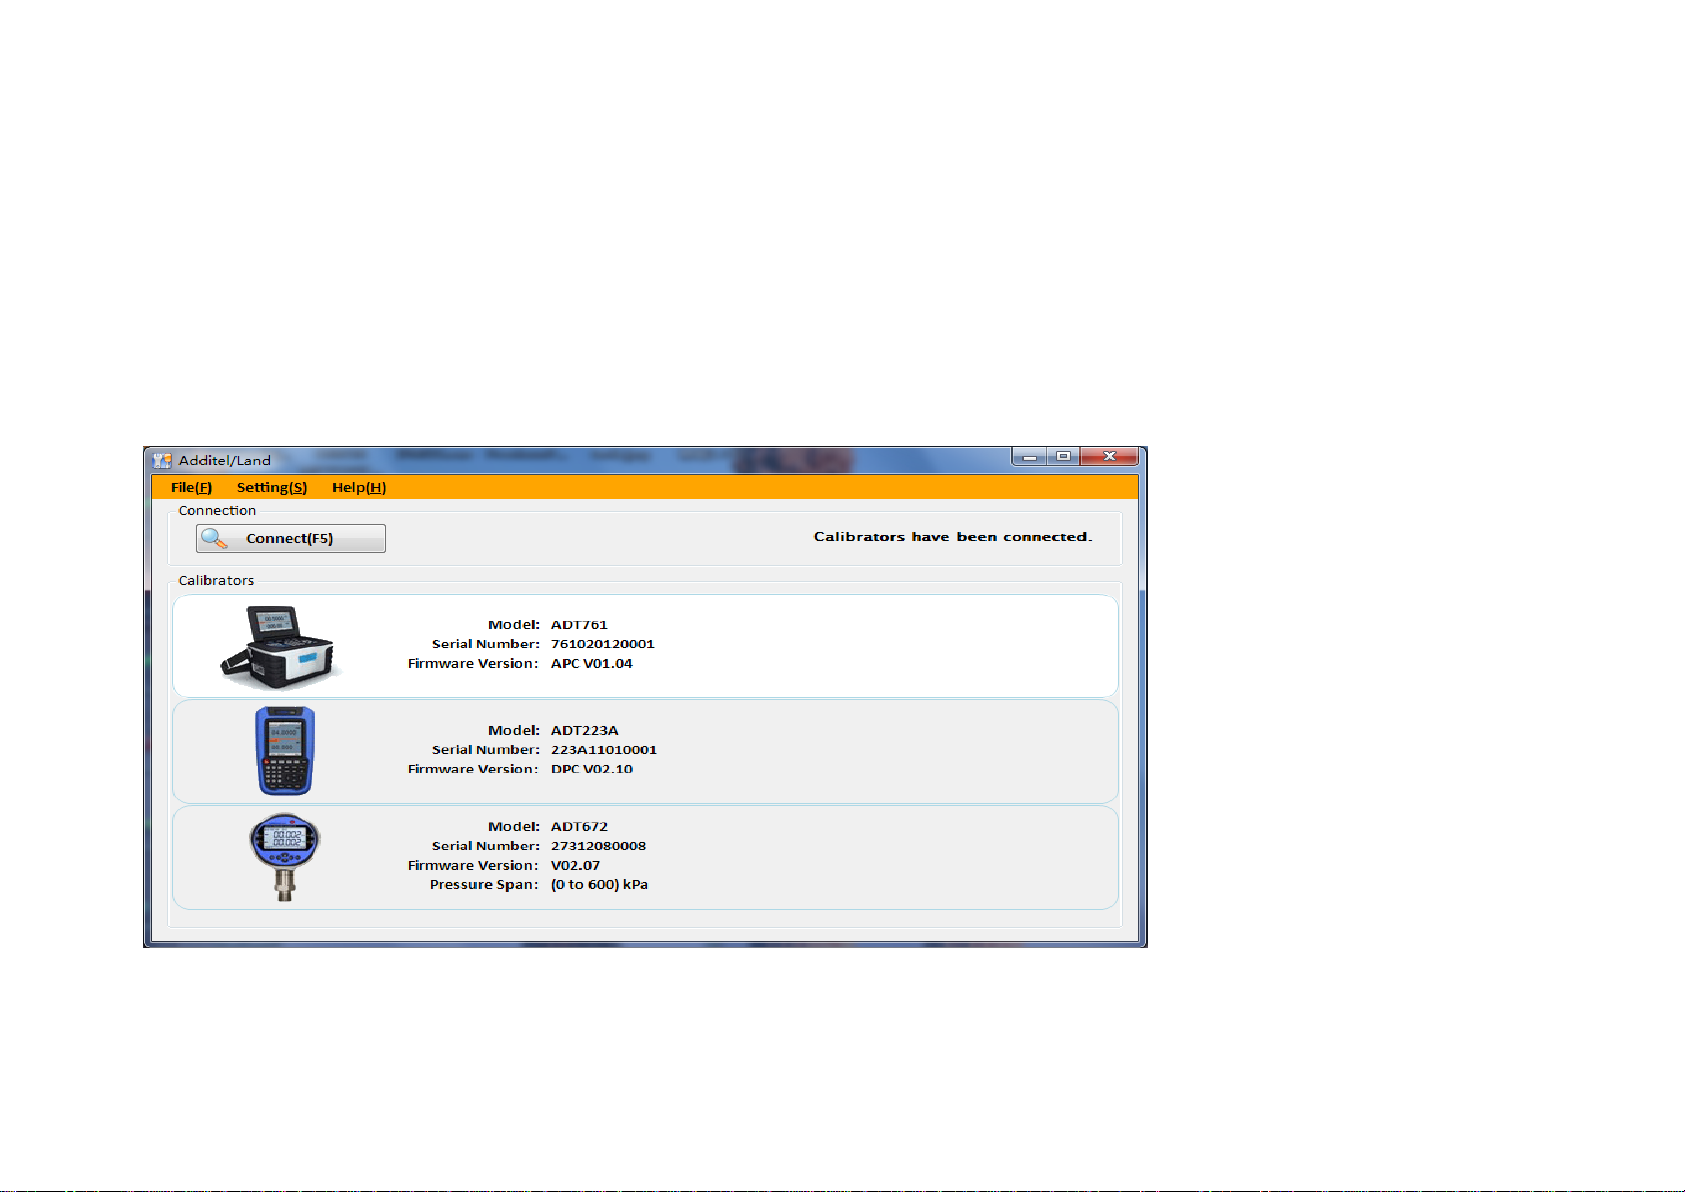
4.1 Using the Home Screen
Figure 4.1 below, is the system’s HOME SCREEN. This is the main screen you work from when you are using Additel/Land. It has the buttons and
menu items used to activate every other branch and/or function of the system. An overview of this screen’s sections is provided below. However, for
more detailed information on any of the items mentioned, please refer to the pages dedicat ed t o t hose topics in the other sections of this manual.
Figure 4.1
6
Page 7

4.2 File Menu
4.2.1 Connect(F5)
To scan the calibrators connected w ith the PC by clicking t he Connect(F5) box (or press the F5 on the keyboard),you will see calibrators in the list
on the bottom of the HOME SCREEN, and the message of “Calibrators have been connect ed!” on the right top of the HOME SCREEN. See
figure 4.1 below.
If there are no calibrators, y ou will se e the message of “Cali brators not foun d”.See figure 4.2.1 below.
Figure 4.2.1
4.2.2 Exit
This will close the Additel/ Land.
4.3 Setting Menu
4.3.1 SerialPort
This will open the SerialPort screen.
Note : for a more detailded explanation,see chapter 8 bellow.
7
Page 8

4.4. Help Menu
This will open the About Additel/Land screen.
The Help menu displays the "About" box, which will giv e you specific details regarding the Additel/Land system you are working with. See figure 4.4
below.
Figure 4.4
4.5 Calibrators List
This is the large section of the HOME SCREEN with the calibrators su ppor ted by Additel/Land.See figur e 4. 1 above.
Here you will see the calibr at or s connected by Additel/Land, after clicking the “Connect” button on the left t op of the HOME SCREEN.
8
Page 9

Chapter 5 ADT672 Calibrator
By clicking the ADT672 calibrator displayed in the list on the bottom of HOME SCREEN, you will see the ADT672 Logging Manager Screen.
See figure 5 below.
Figure 5
9
Page 10

5.1 Logging Files List
By clicking the tool strip button labeled “Refresh” on the toolbar of ADT672 Logging Manager Screen, you will see the data on the Logging
Files Area. Here you will see 30 files displayed on the left, and each file contains a maximum of 40 records displayed on the right. See figure
5.1 below
Figure 5.1
10
Page 11

5.2 Delete
To delete records saved in a file, you must select the file on the left by clicking the tool strip button labeled “Delete” on the toolbar of ADT672 Logging
Manager Screen.
5.3 Delete All
To delete all records saved in files by clicking the tool str ip b ut ton labeled “Delete All” on the toolbar of ADT672 Logging Manager Scre en .
5.4 Export Wizard
To export records saved in a file, by clicki ng the tool strip button labe led “ Export to Excel” on the toolbar of ADT672 Logging Manager Screen.
11
Page 12

Chapter 6 ADT22X series Calibrator
By clicking the ADT22X series calibrator displayed in the list on the bottom of HOME SCREEN, you will see the ADT22X series Snapsh ot Manager
Screen. See figure 6 belo w .
Figure 6
12
Page 13

6.1 Snapshot list
By clicking the tool strip button labeled “Refresh” on t he toolbar of ADT22X series Snapshot Manager Screen, all the snapshot data will be
reloaded and displayed. E ach dat a in this list represents a sna pshot. See figure 6.1 below.
Figure 6.1
13
Page 14

6.2 Delete
To delete a snapshot, you must select a snapshot in the list by clicking the tool str ip butt on labeled “Delete” on the toolbar.
6.3 Delete All
To delete al l records saved in files by clicking the tool strip button label ed “Delete All” on the tool bar.
6.4 Export Wizard
To export all the snapshot displayed in the snapshot list, by clicking the tool strip button la beled “Export to Excel” on the toolbar.
Figure 6.4
14
Page 15

Chapter 7 AD761 calibrator
By clicking the AD761 calibrator displ ayed in t he l ist on the b ott om of HOME SCREEN, you will see the AD761 Snapshot Manager Screen. See figure
7 below.
Figure 7
15
Page 16

7.1 Snapshot list
By clicking the tool strip button labeled “Refresh” on t he toolbar of AD761 Snapshot Manager Screen, all the snapshot data will be reloaded and
displayed. Each data in this list r epr esents a snapshot. See figure 7.1 below.
Figure 7.1
16
Page 17

7.2 Delete
To delete a snapshot, you must select a snapshot in t he list by clicking the tool strip button l abeled “Delete” on the toolbar.
7.3 Delete All
To delete al l records saved in files by clicking the tool strip button label ed “Delete All” on the tool bar.
7.4 Export Wizard
To export all the snapshot display ed in the snapshot list, by clic king the tool strip button labeled “ E xp ort to Excel” on the toolbar.See figure 7.4 below
Figure 7.4
17
Page 18

Chapter 8 Ports Configuration
8.1 Possible communication problems
? Be sure the cable is connected t o t he calibrator properly, and t o your PC's serial port as well. Consult your calibrator 's documentation for the
correct method of connect ion.
? Programs that use a serial port to connect to other exter nal devices, such as Palm Pilots, should be shut down when usin g this program with that
same serial port. The comput er needs to recognize that the COM por t is free, and can be used for communication with the cali brator device.
8.2 Procedures
To communicate with the calibrator, you need to configure the port settings by clicking the “SerialPort” box of the Setting Menu on the of the HOME
SCREEN.The SerialPort Screen will be shown(see fi gure 8.2 below ). After completing that, you could manually build the connection by clicking the
“Connect” button on the left top of the HOME SCREEN.
Figure 8.2
18
 Loading...