

Page 1

Additel/PCal
User Manual
Additel Corporation
www.additel.com
Page 2

Contents
Introduction ................................................................................................................................. - 2 -
Overview .............................................................................................................................. - 2 -
About this Manual ................................................................................................................ - 2 -
Installation.................................................................................................................................... - 3 -
System Requirements ........................................................................................................... - 3 -
Installation of PCal ............................................................................................................... - 3 -
Starting PCal ................................................................................................................................. - 5 -
License Key ........................................................................................................................... - 5 -
Login ..................................................................................................................................... - 5 -
General Presentation of PCal ............................................................................................... - 6 -
Basic Settings................................................................................................................................ - 7 -
System .................................................................................................................................. - 7 -
UUT ...................................................................................................................................... - 9 -
References .......................................................................................................................... - 12 -
Maintenance ...................................................................................................................... - 14 -
Windows ............................................................................................................................ - 18 -
Toolbar ............................................................................................................................... - 18 -
Calibration .................................................................................................................................. - 19 -
Calibration Wizard ............................................................................................................. - 19 -
Certificates ................................................................................................................................. - 26 -
Build Certificate .................................................................................................................. - 26 -
Certificate Management .................................................................................................... - 28 -
Certificate Template ........................................................................................................... - 30 -
Appendix .................................................................................................................................... - 32 -
PCal Pressure Units ............................................................................................................. - 32 -
Excel Template Tags ............................................................................................................ - 32 -
Frequently Asked Questions ............................................................................................... - 34 -
- 1 -
Page 3

Introduction
Overview
Thank you for purchasing Additel/PCal from Additel Corporation which is one of
the leading providers of process calibration instruments throughout the world.
Additel/PCal is a specially designed pressure calibration system for calibrating
gauges and transmitters. It’s a combination of our excellent know-how of
experienced professionals and valuable suggestions from worldwide customers that
can help users to highly increase calibration efficiency.
Additel/PCal is called PCal for short in the following document.
About this Manual
The user of this document should be familiar with Windows environment and
such terms as Clicking, Selecting, Double-clicking, Marking, using the secondary
button of the mouse, Drag and drop, Resizing a window, etc.
This document will indicate how to use PCal software. Following is a brief
introduction of all the sections in this document.
Introduction
Basic information about PCal.
Installation
Initial setup of PCal, system requirements and hardware setup.
Starting PCal
Providing the “License Key” and explaining how to use it, how to start PCal and
the general look and feel of PCal.
Basic Settings
Information that should be used to get started
Calibration
Explanation of how to calibrate gauges and provide as found and as left
calibration results. This section also includes an introduction on how to view the
calibration result from the certificate template in PCal.
Certificates
Detail description of the calibration certificate. Useful information about how to
manage and rework the certificate template.
Appendix
This section includes common standard units, a list of certificate template tags
used by PCal to store all useful information and some frequently asked questions.
- 2 -
Page 4

Installation
System Requirements
Hardware Requirements
Computer: CPU-Intel Pentium II (or better)
Memory: 1GB (minimum)
Hard Disk free space: 60GB (minimum)
Hardware must have serial port
A Pressure Comparator: Additel pressure pump series are recommended
Reference: A Digital Pressure Gauge (ADT681), or A Digital Pressure Calibrator
(ADT672) are recommended
Software Requirements
Operating System:
Windows XP/Windows 2003/Windows Vista/Windows7/Windows8
Installation of PCal
Make sure you have an installation CD, if not, please contact Additel.
First, Insert the CD into the drive on your computer and the setup will run
automatically. If the setup fails to start, please run the Setup.exe from the CD.
Second, Installation will detect whether the following items have been installed
in system or not. If not, they will be installed automatically, if so, this step will be
skipped.
Windows Installer 3.1
Windows Imaging Component
Microsoft .NET Framework 4
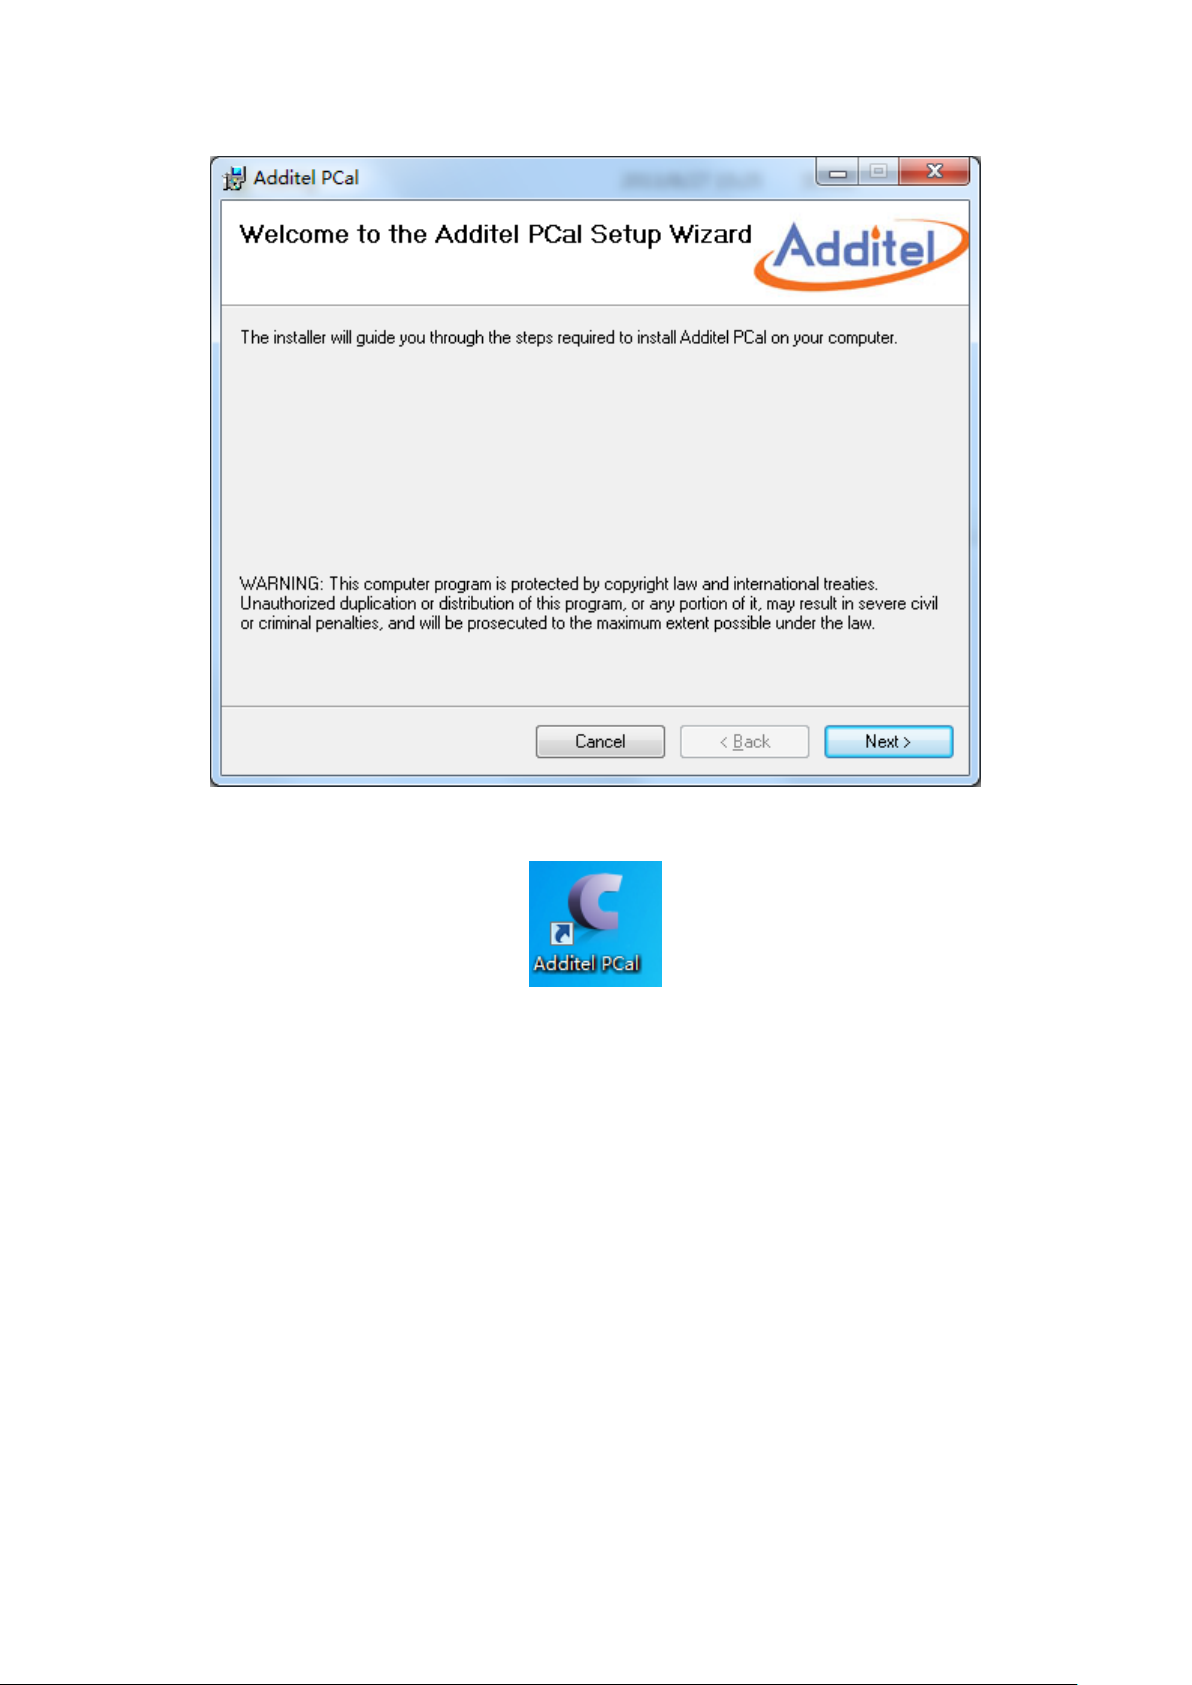
Third, the setup Wizard will be displayed as shown in below picture. Follow the
instructions in the setup to complete the installation.
- 3 -
Page 5
When the installation is completed, the following icon will be appeared on the
desktop.
- 4 -
Page 6
Starting PCal
License Key
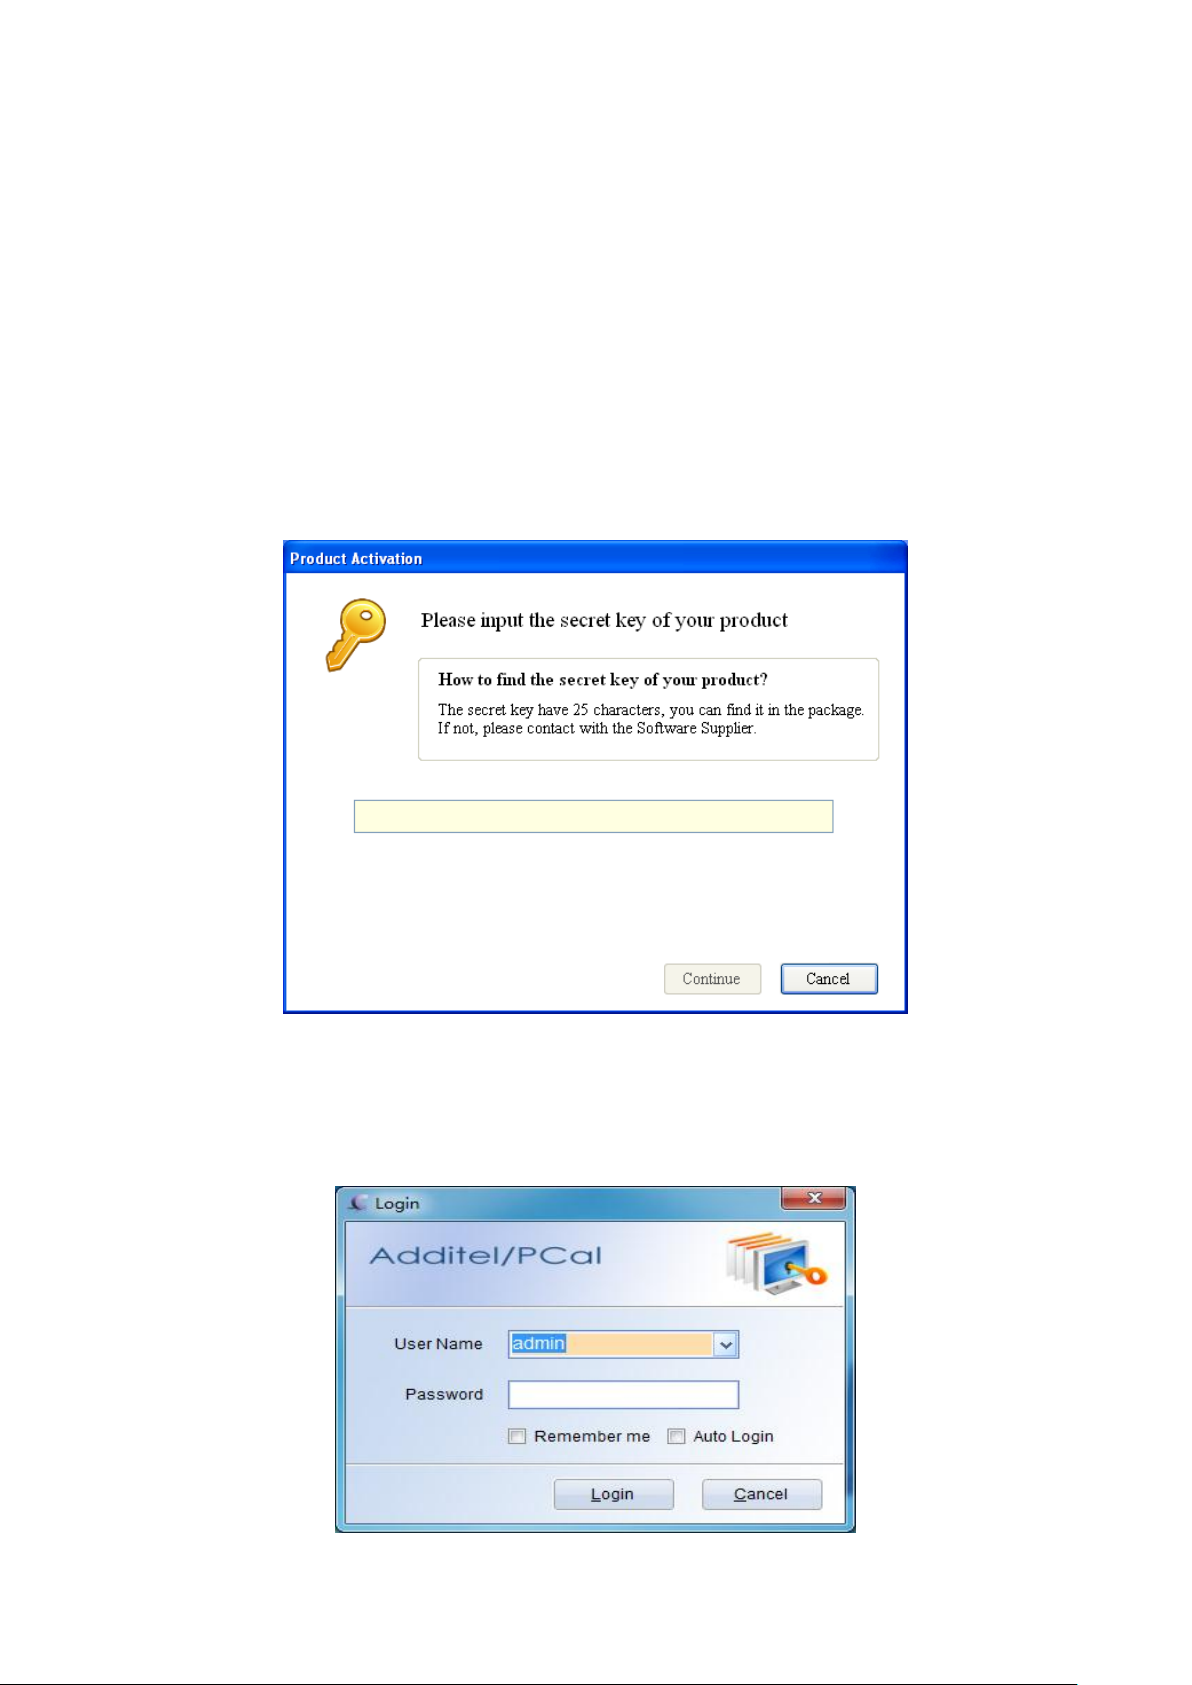
The first time you run PCal after installation, a Product Activation interface will
be shown as below. The license key is marked on the CD box. Please entering the key
into the textbox, and click “Continue,” then PCal will be activated and this dialog will
not appeared again. If you unable to find the key or the key isn't effective, please
contact us.
Login
- 5 -
Page 7
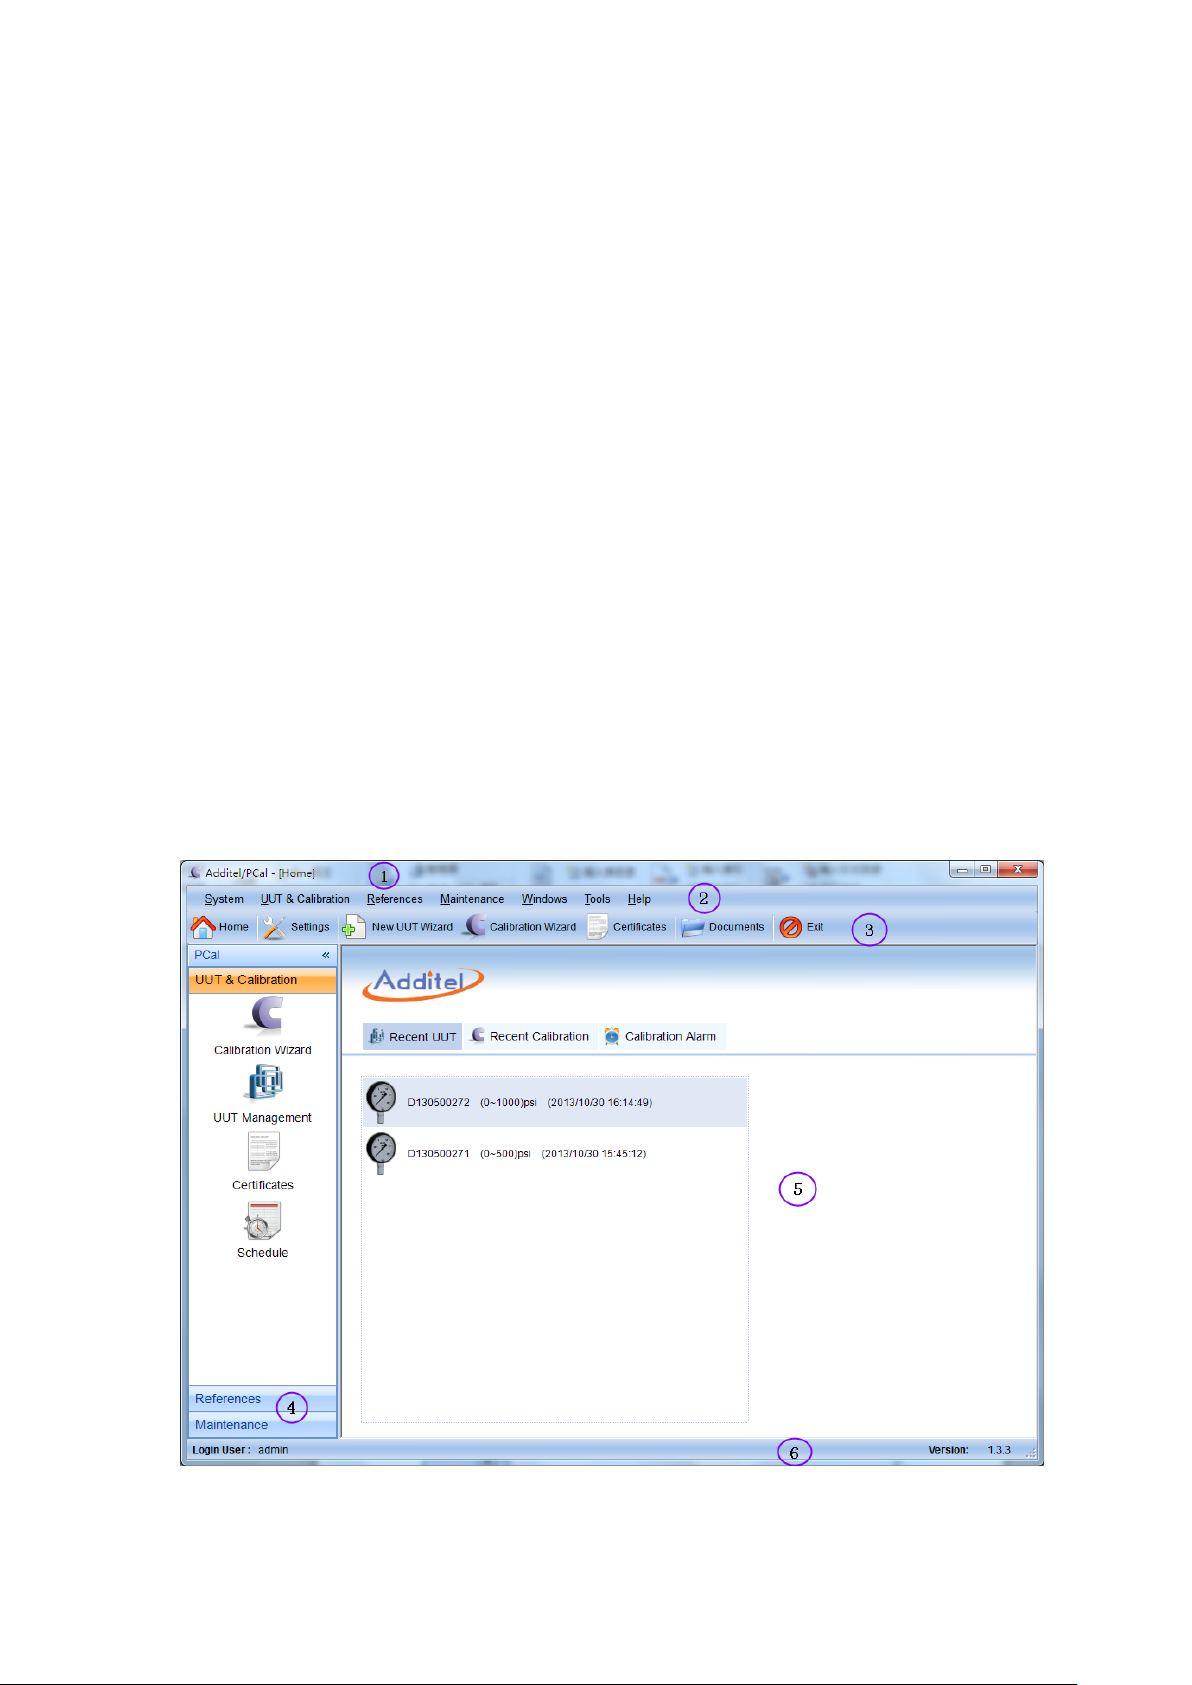
After the initial installation, PCal will prompt you for your username and
password. Initially, you can enter Administrator’s username and password. The
Administrator’s username is “admin”, and the password is empty, it cannot be
deleted. After login, you can create your own username and password in the User
Management section or continue to use the administrator's password.
General Presentation of PCal
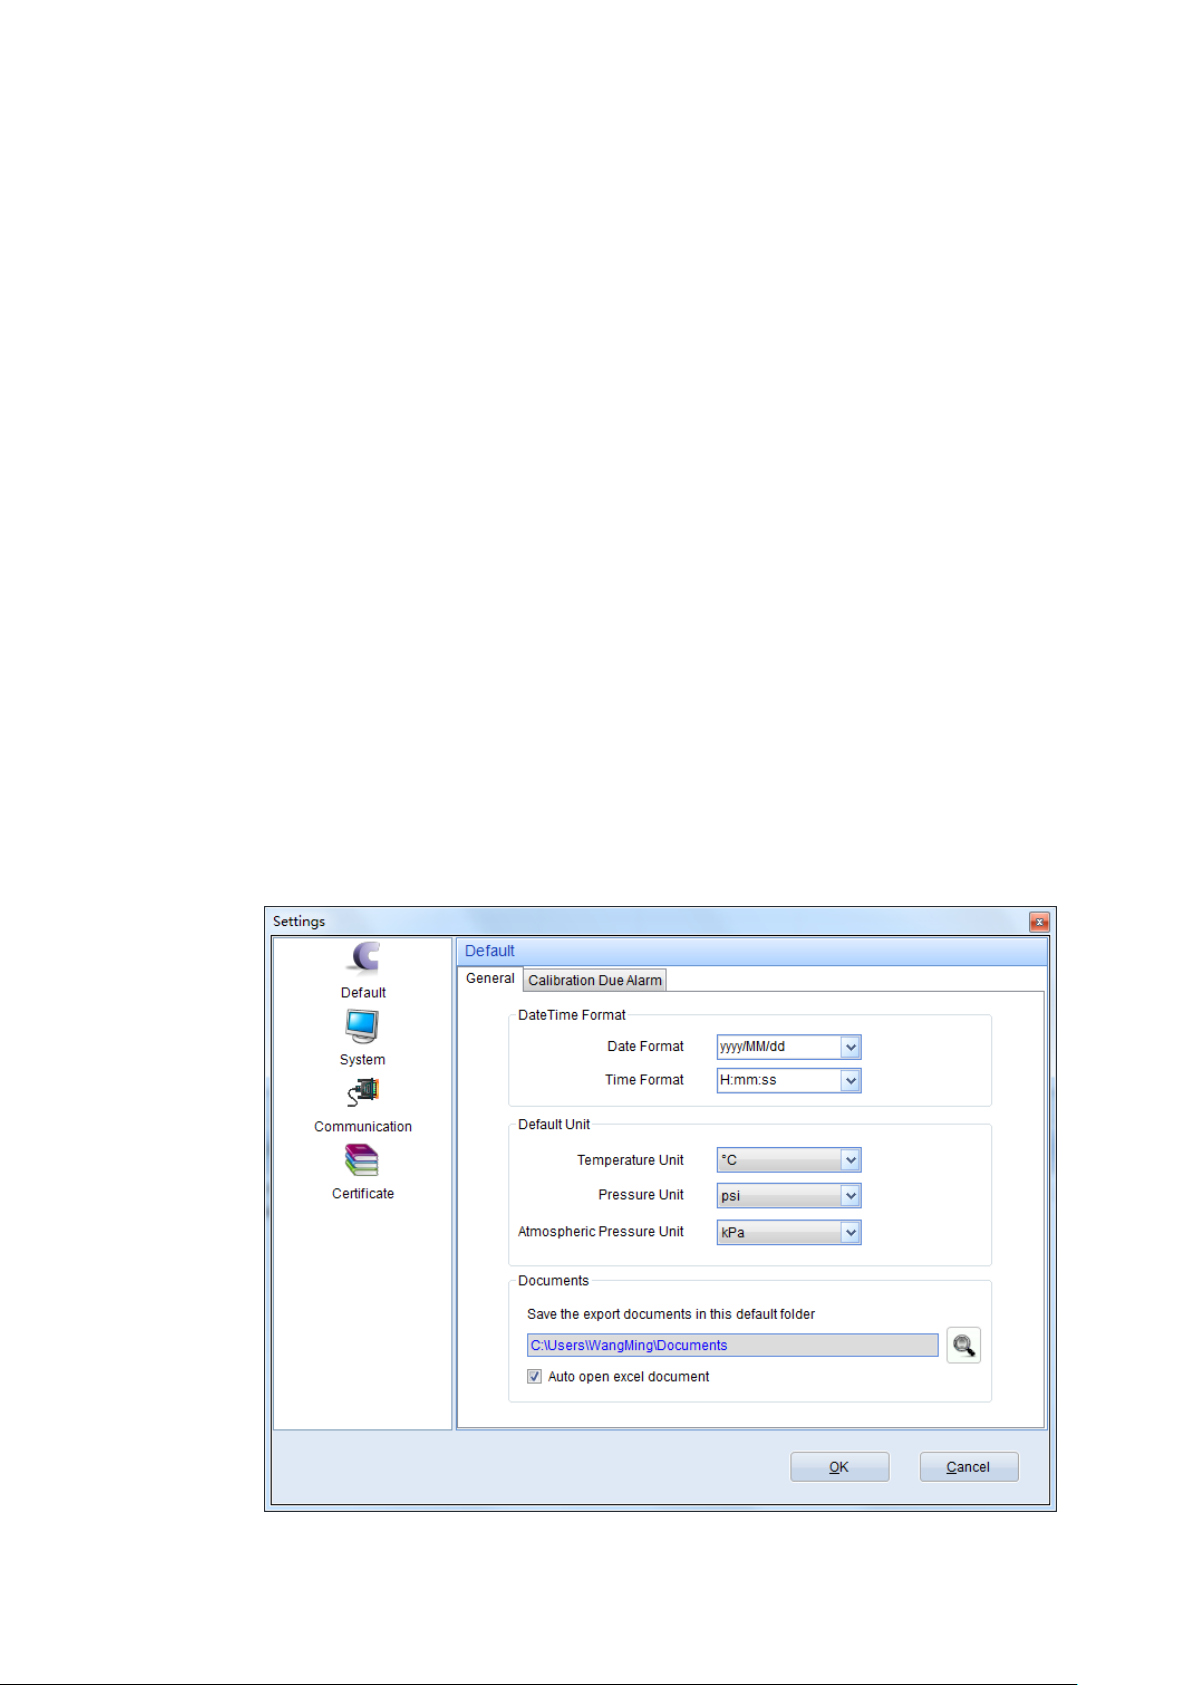
When you start PCal, the Main screen will be shown as below. The Main Window
includes following selections.
1. Title Bar. It contains the name of the software and occasionally additional
information will be displayed.
2. Menu Bar. The Menu structure is presented in a subsequent chapter.
3. Tool Bar. The Toolbar structure is presented in a subsequent chapter.
4. Navigation Bar. To switch among the different program functions (UUT &
Calibration, Reference, and Maintenance).
5. Start Page. Contains information of Recent UUT, Recent Calibration and
Calibration Alarm. The Calibration Alarm shows upcoming calibrations for
UUTs.
6. Status Bar. Shows the name of the currently logged user and the current
software version.
- 6 -
Page 8
Basic Settings
Basic settings can be edited anytime. For a better experience we recommend
you modify after your initial setup as it may help in making your daily use of PCAL
more efficient.
System
The System section allows you to define the following options:
User Management
In this section you can manage username and password, such as creating,
editing and deleting the user. When a user is logged in, the name of the user is
displayed in the Status Bar at the bottom of the PCal main window.
New: creates a new user.
Edit: edits existing username, full name and password.
Delete: deletes existing user’s information (“Admin” account can't be
deleted).
Change User
Clicking this menu button, you can change the current user.
Settings
By clicking the Settings button, a new dialog interface will be displayed as
pictured below; there are four editable items listed in left section.
- 7 -
Page 9
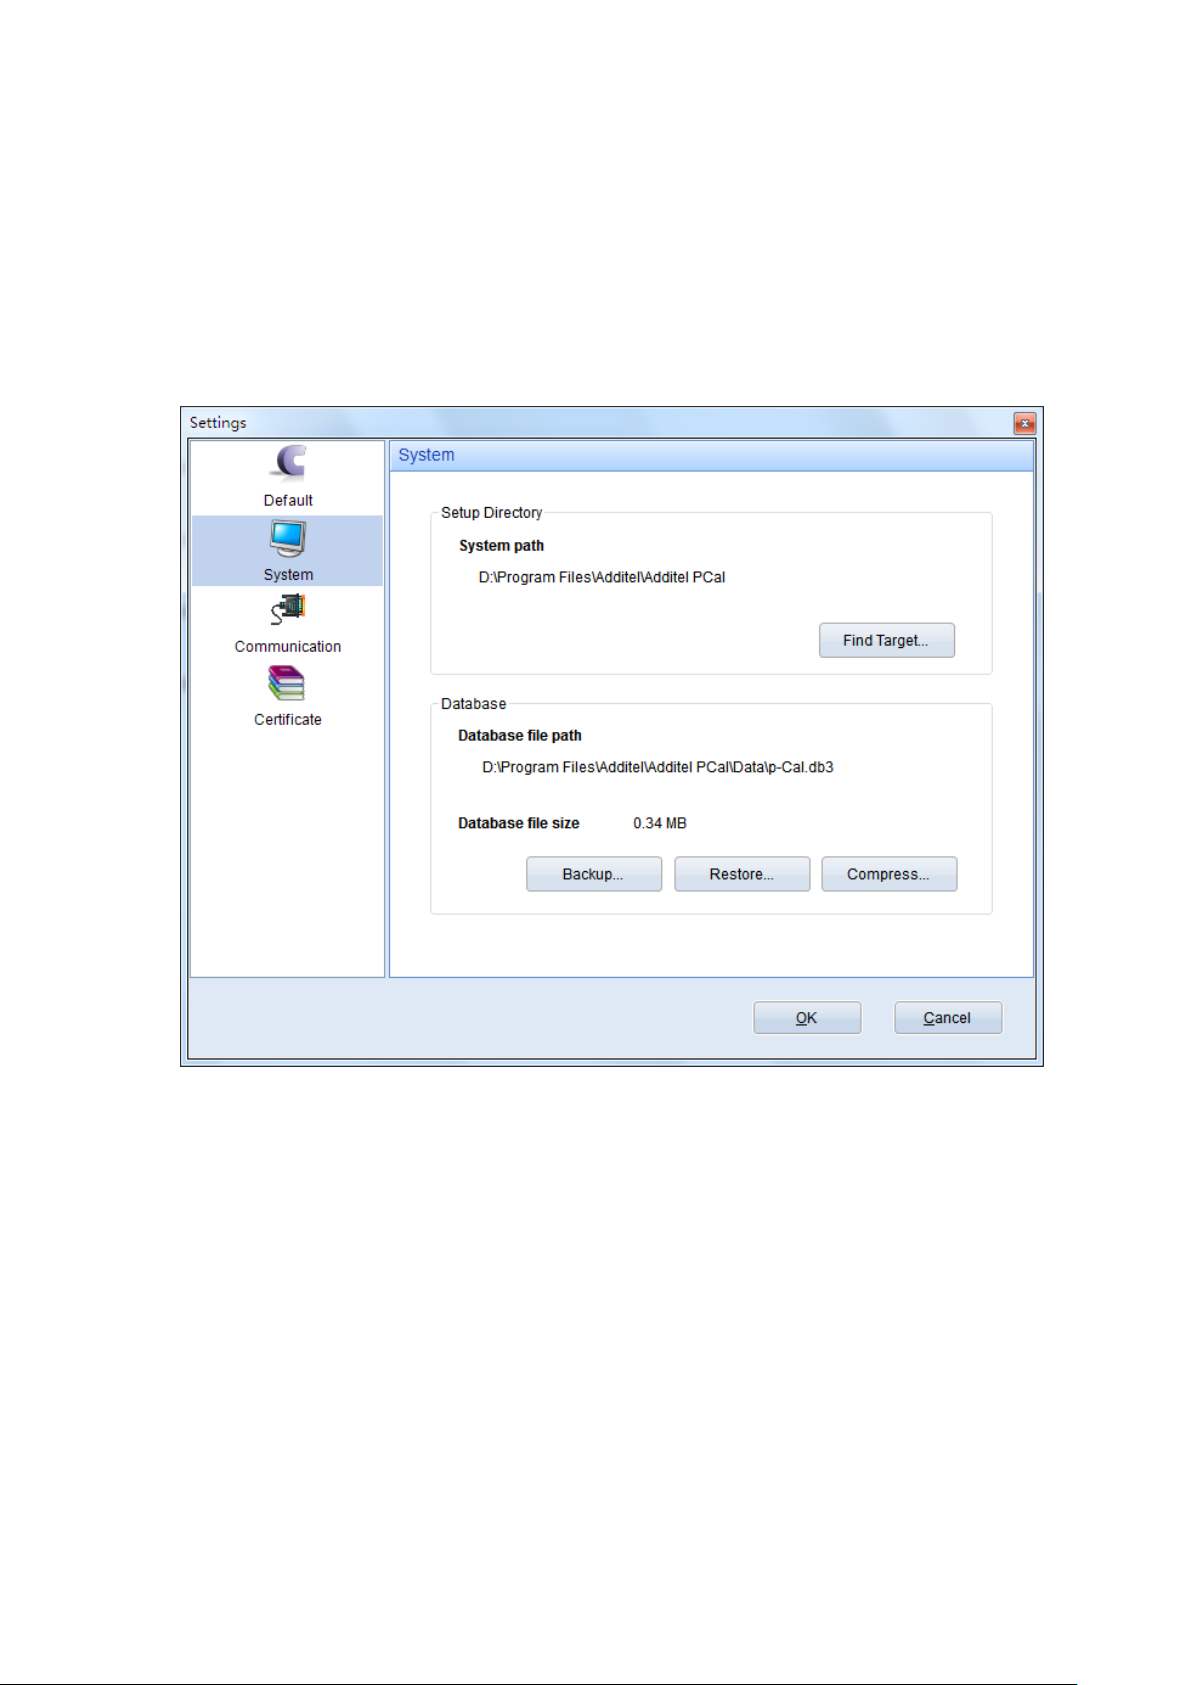
Default: choose Date and Time Format, restore defaults, and change the location
of exported documents. The “Auto open excel document” checkbox enable the
excel-certificate to be opened automatically. The Calibration Due Alarm tab allows
setting the UUT Due Alarm and Reference Due Alarm.
System: This Setup Directory is created after the PCal installation, you can find
this directory by clicking the Find Target button. In this section the database file path
and database file size are displayed. You can operate the database by clicking these
three buttons (Backup, Restore and Compress) as below.
Communication: The Communication function specifies the DataBits, StopBits,
Parity and Baudrate which PCal will look at to find the reference. Changing the
Baudrate if your configuration requires it.
Certificate: Please consult the function of Certificates for Certificate Template.
- 8 -
Page 10
UUT
1
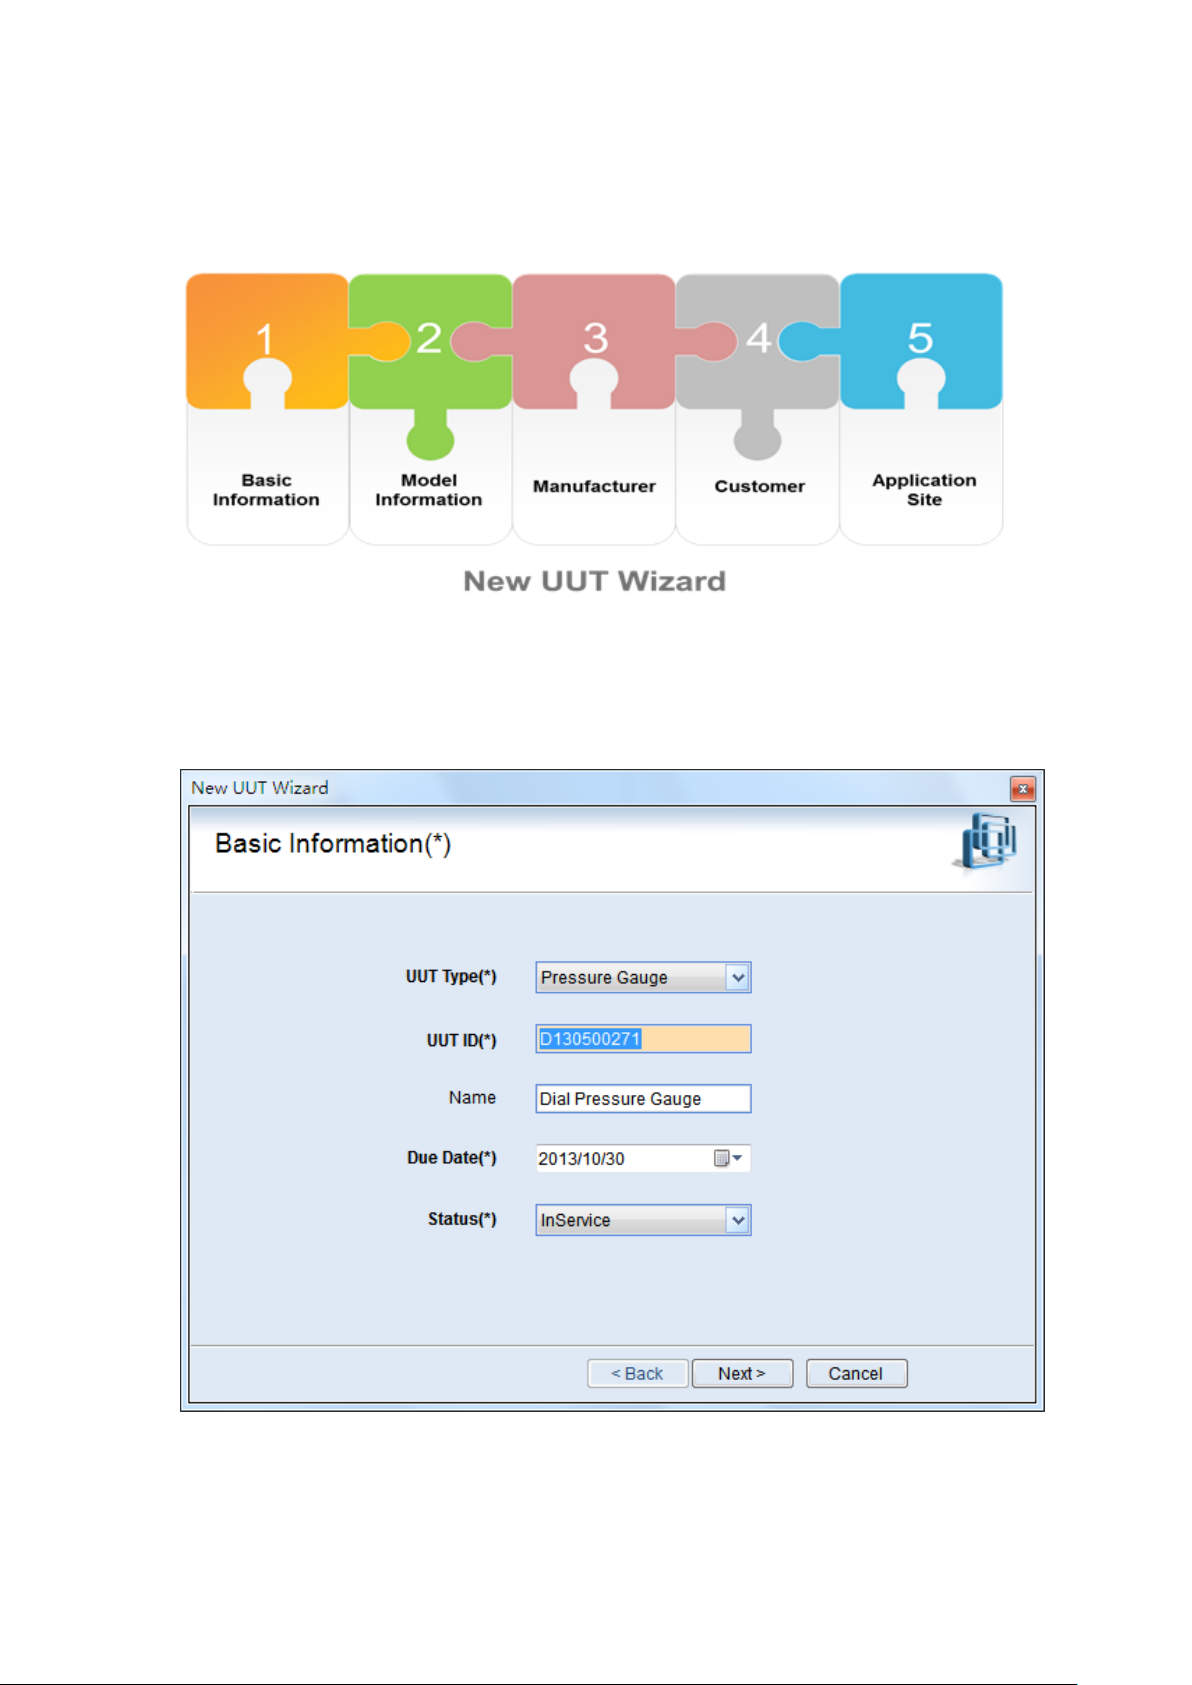
Flow chart: Below shows a flow chart of the UUT setup wizard.
New UUT: In UUT Management menu, users can create a new UUT. The below
steps guide you through the setup process.
First: Accurately fill in the basic information for the UUT. (The symbol * indicates
a required field)
Second: Choose the model. (If you want to create a new model this can be done
by selecting Maintenance under the UUT Management section)
- 9 -
Page 11
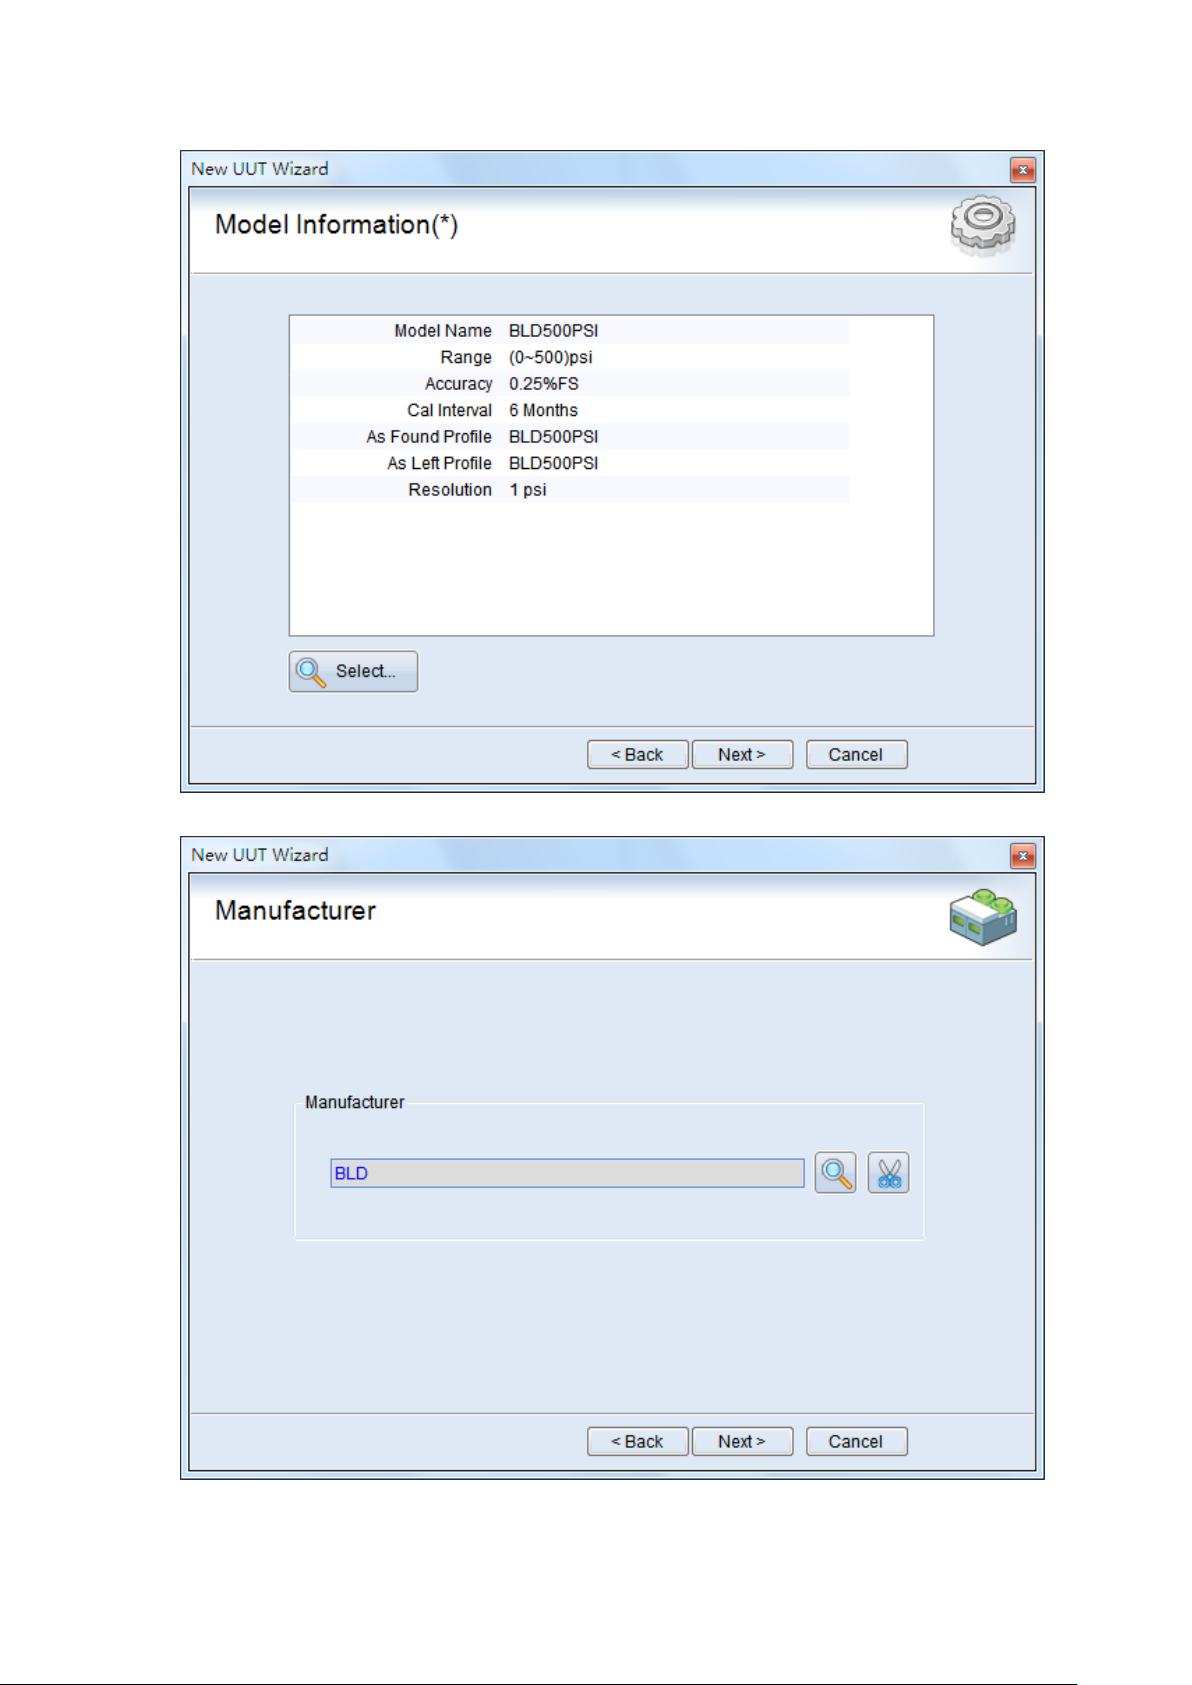
Third: Choose the Manufacturer
Fourth: Choose the Customer
- 10 -
Page 12
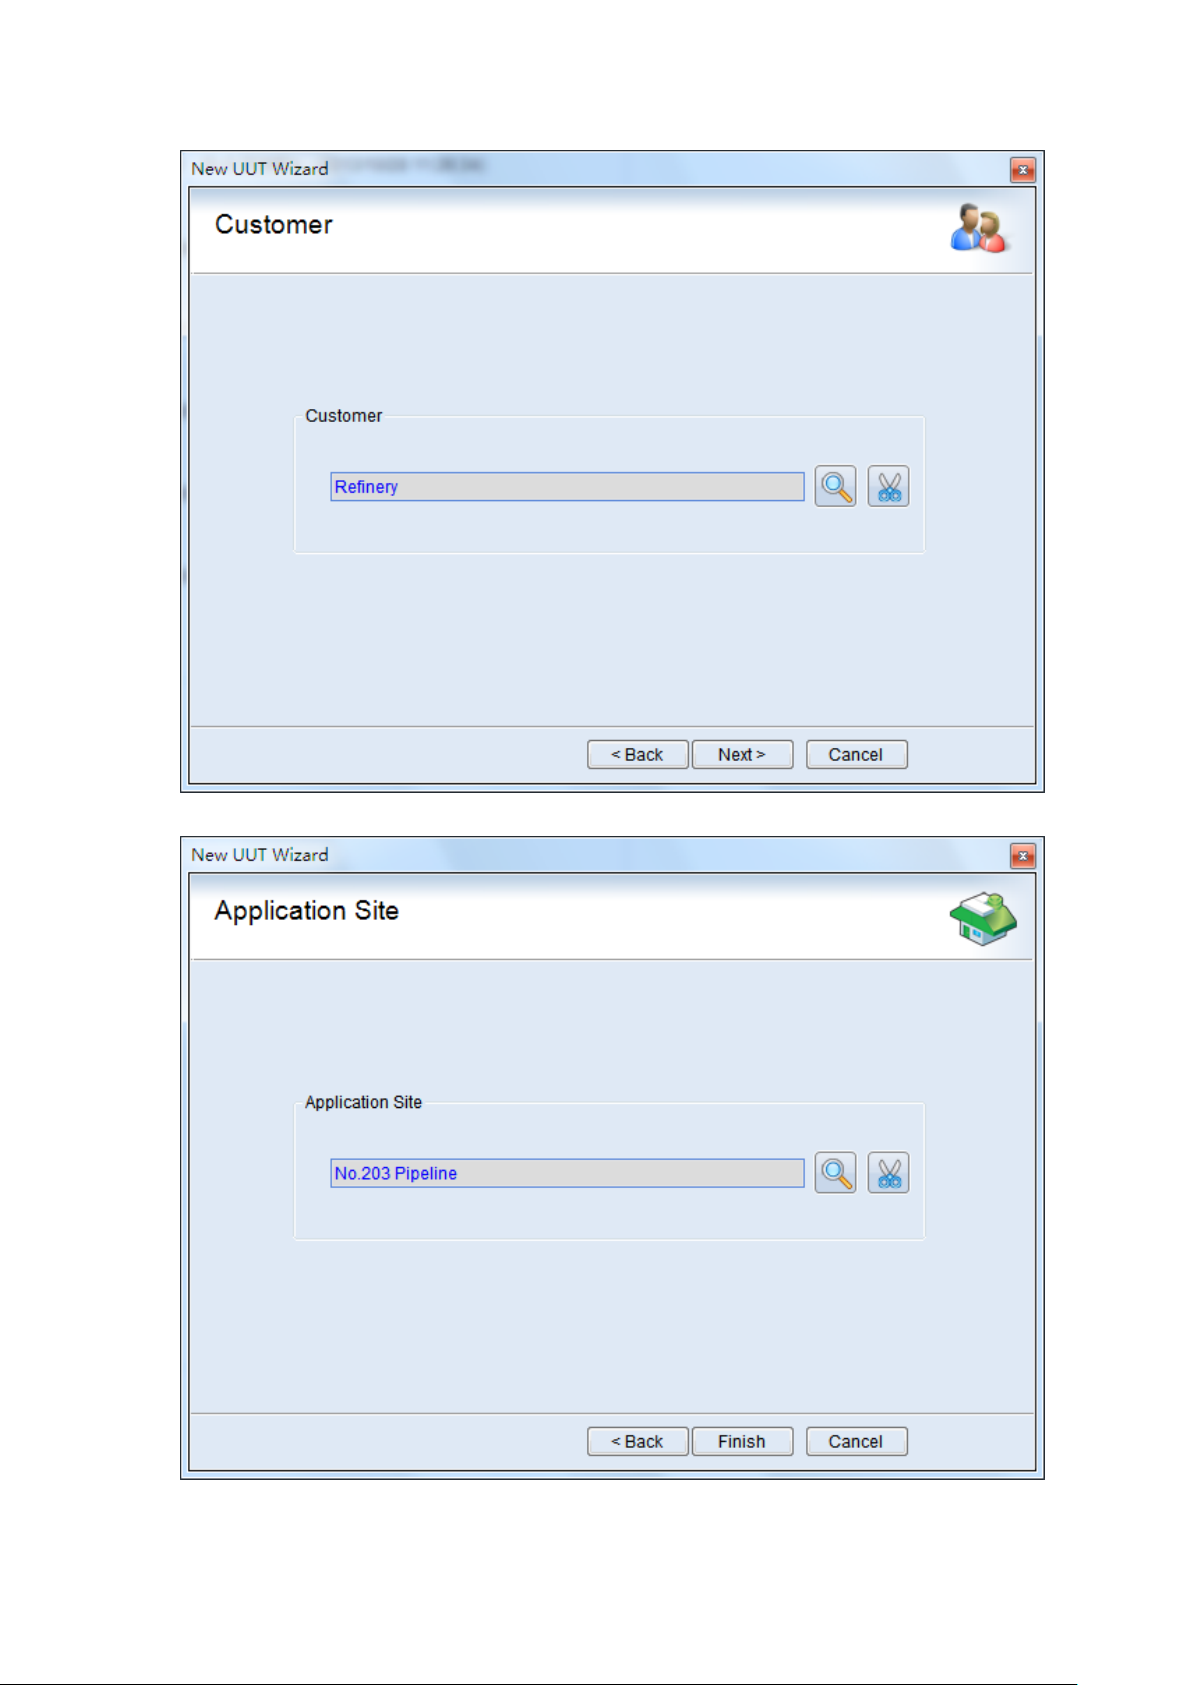
Fifth: Choose the Application Site
- 11 -
Page 13
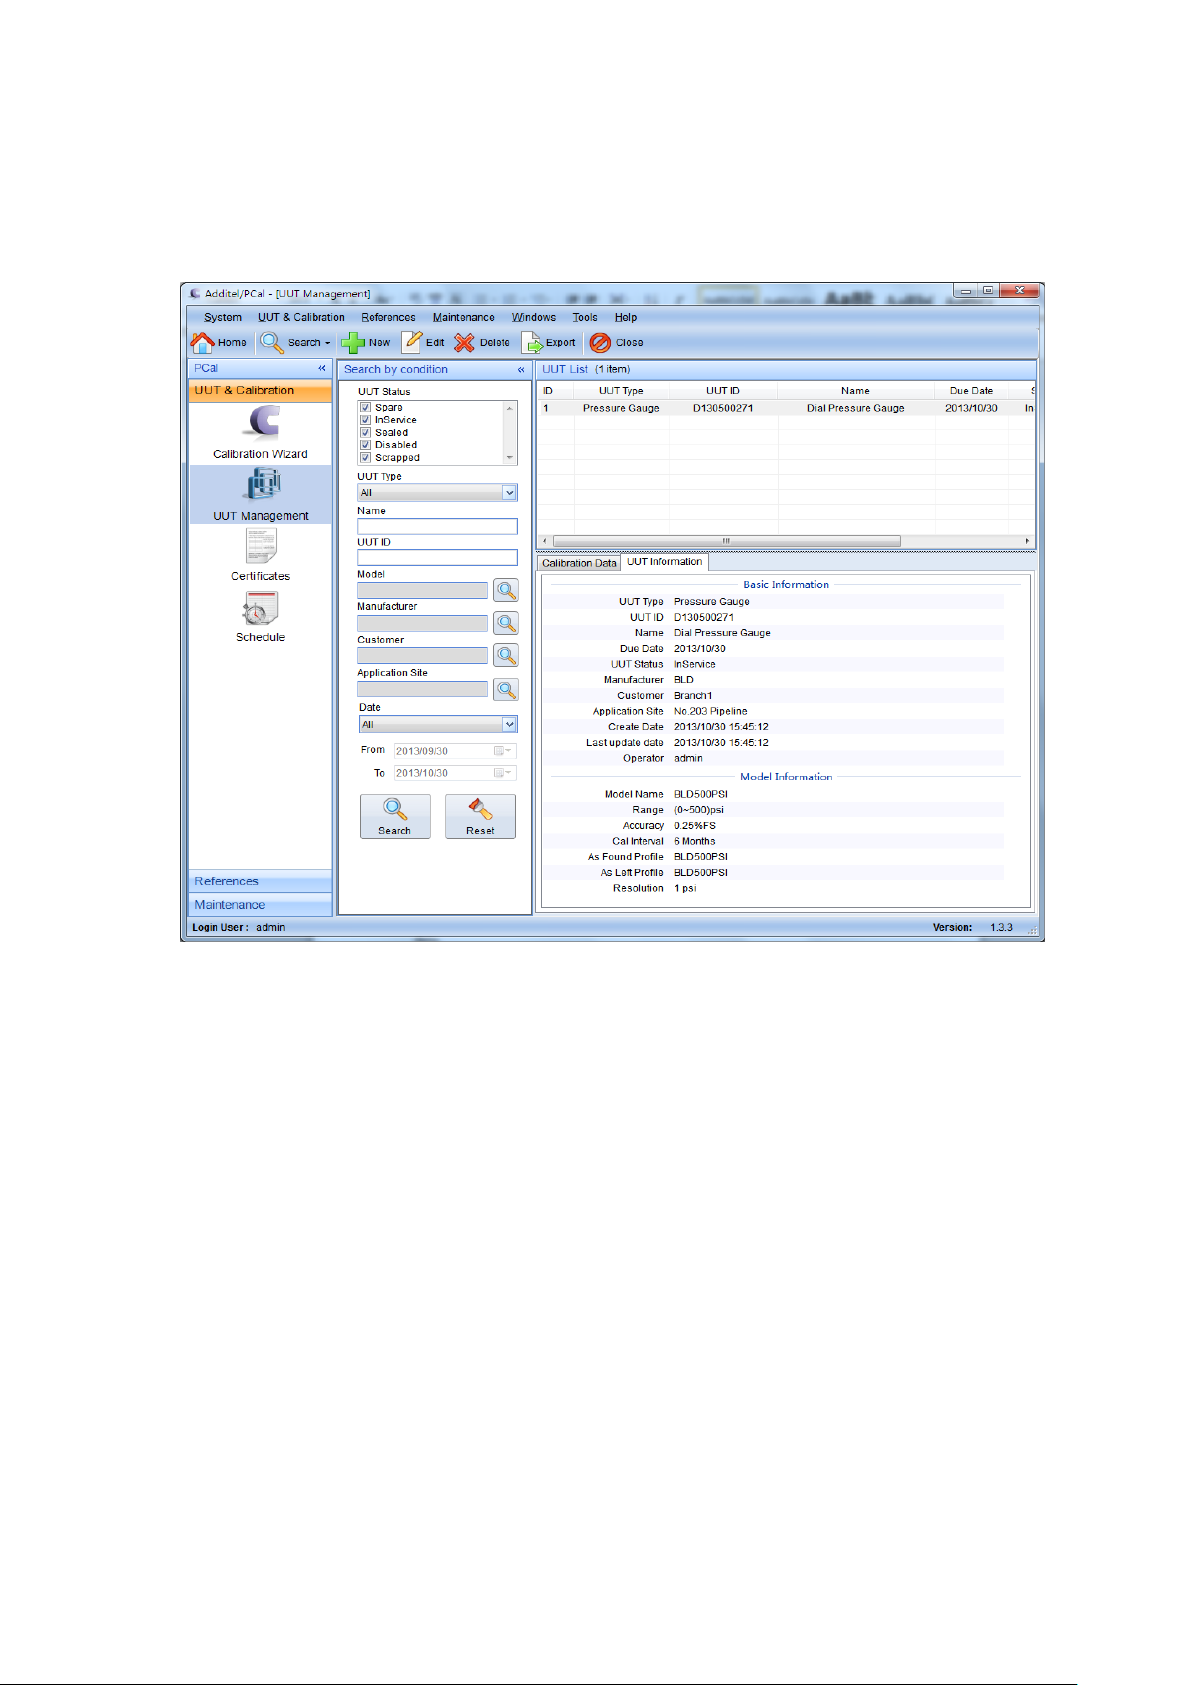
UUT Management: The UUT Management allows user creating, editing,
exporting and deleting the data associated with all gauges in the UUT Management
List. You can search the Gauges by the gauge’s properties from the search button.
The UUT information and History Calibration Data are displayed under the UUT List.
The UUT Management also allows user to create new calibration procedures,
start calibrations, building certificates, show calibration data and delete calibration
data.
New Calibration: Please consult this function in Calibration Wizard section
As Left Calibration: You can execute a new As Left Calibration or load the As
Found Calibration data. Refer to the As Found Calibration for the detailed
information.
Build Certificate: Please see the function of Certificates for Build Certificate.
Calibration Data: Shows the Calibration Data selected.
Delete Calibration Data: You can delete the calibration data which you choose.
References
A reference is the digital pressure gauge to which the gauge under test is
compared during a calibration.
Management: The reference management allows user creating, editing,
exporting and deleting the data associated with all references in the reference List.
- 12 -
Page 14
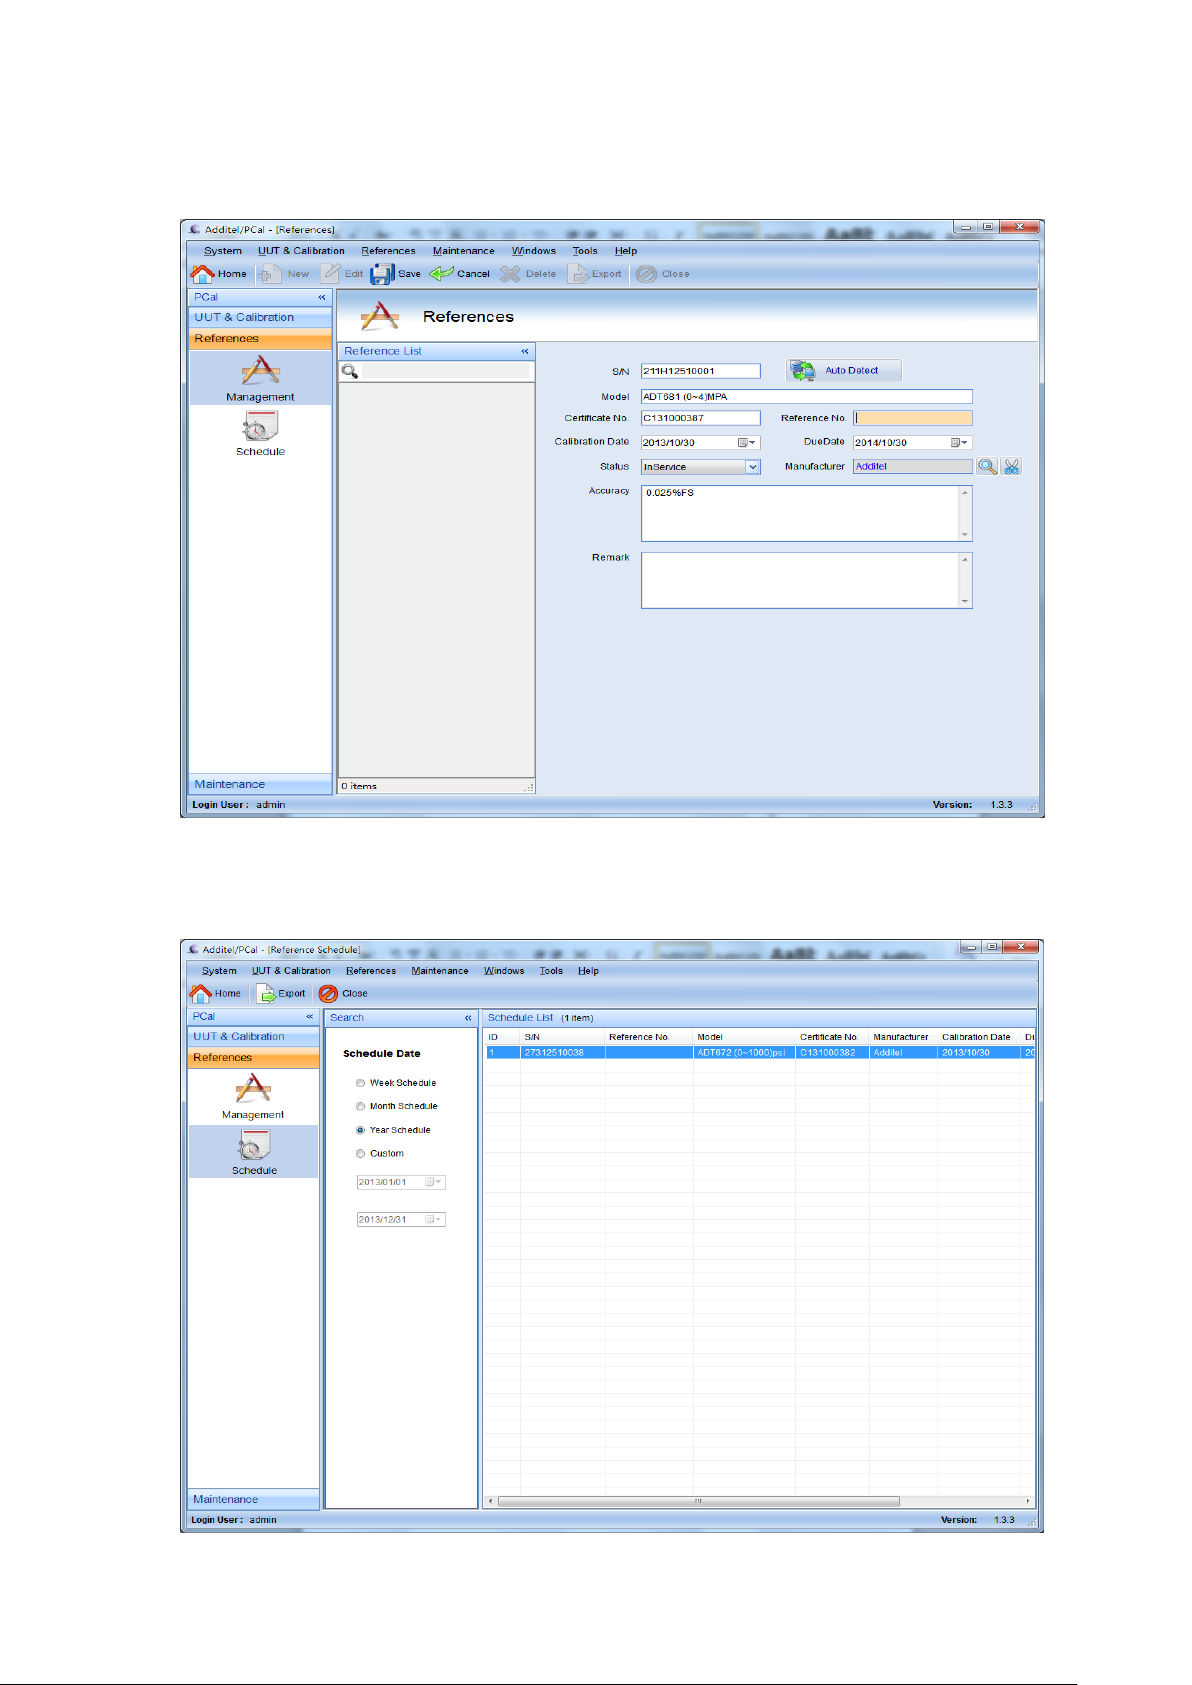
When creating a new reference, the Model, Certificate No., Reference No. and
Accuracy are required.
Schedule: In this section, you can manage the references by schedule date. Due
Date means the date the reference needs to be re-calibrated. The calibration interval
indicates the frequency of calibration for the reference gauge.
- 13 -
Page 15
Maintenance
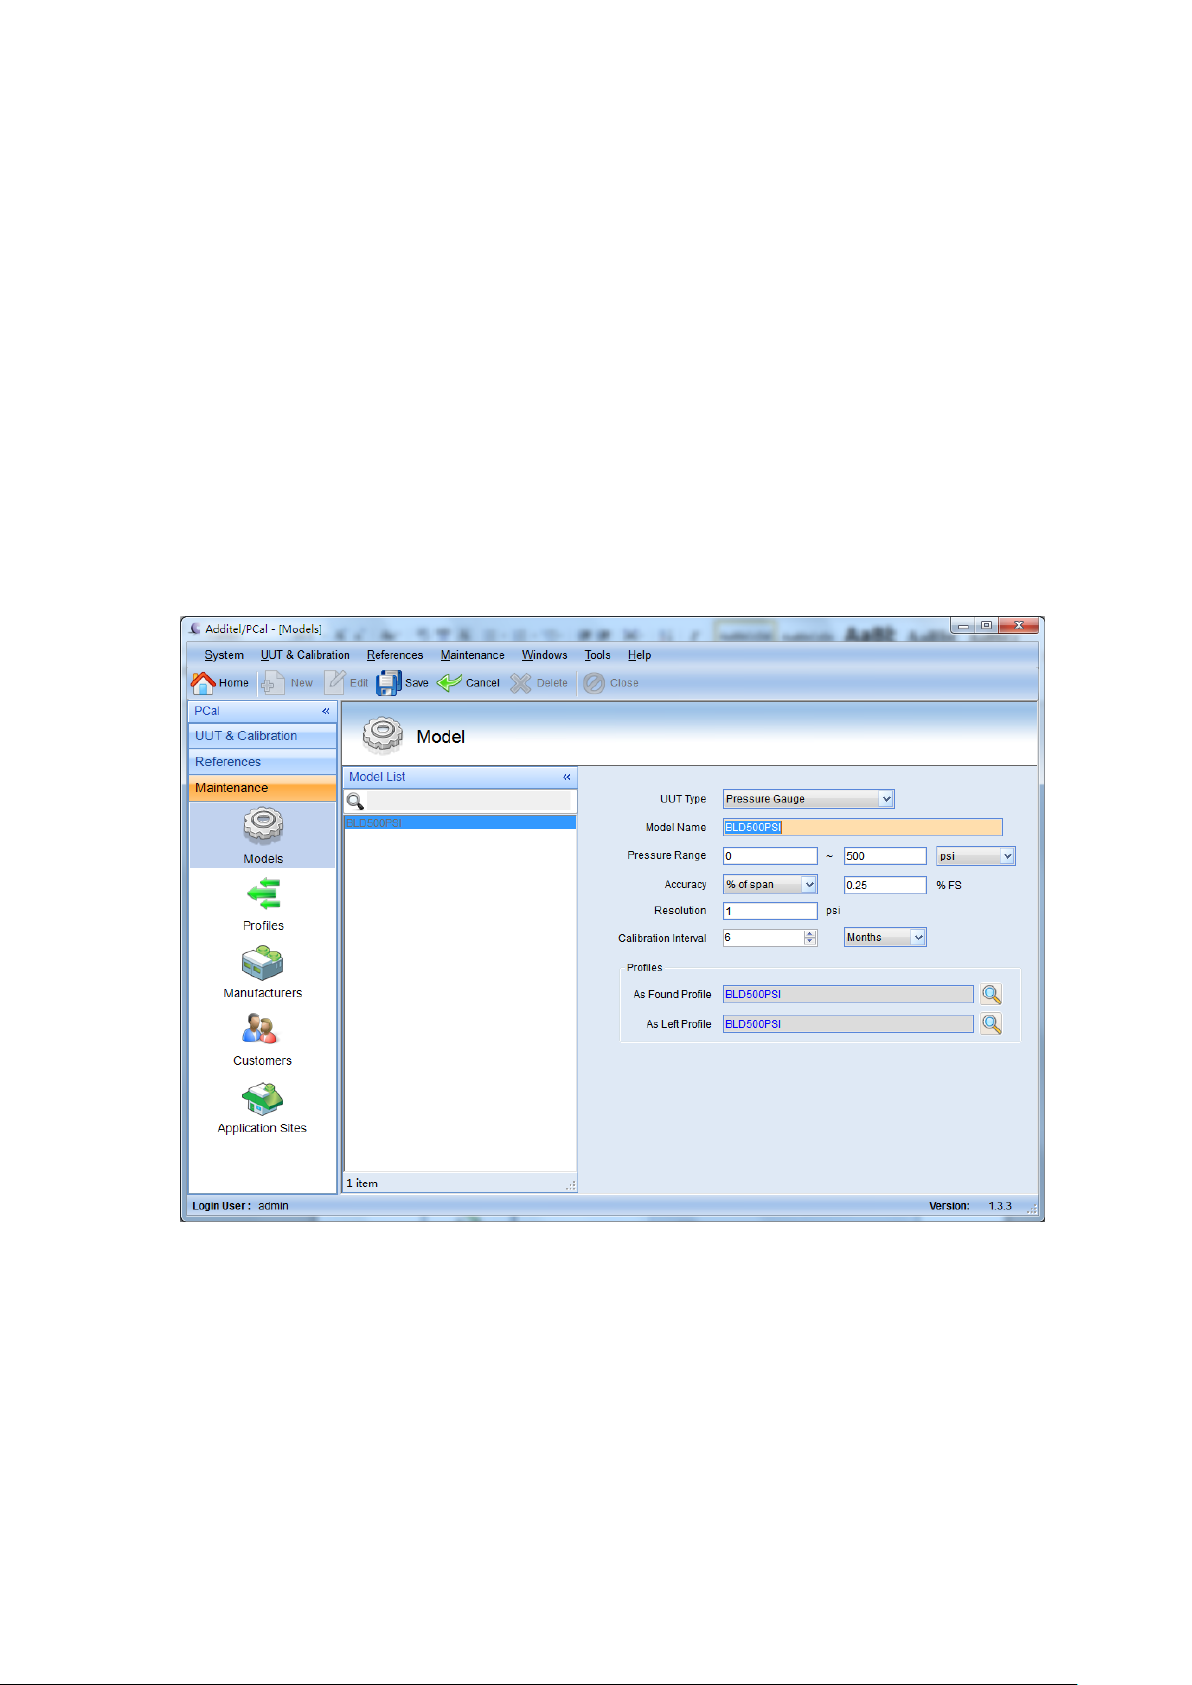
The Maintenance menu allows user to manage all the entered or acquired
information stored in database. For management purposes, the Maintenance menu
consists of five tables.
Models: The Models editor allows access to the data associated with all models
stored in the database.
Enter the Model Name, Pressure Range, Accuracy and Resolution of the gauge.
Select the Units of Pressure for this model from the pull-down lists.
Enter the Calibration Interval, in days (weeks or years), which will be used for
calibration scheduling.
From the pull-down lists, select Profiles for As Found and As Left calibrations.
Specify the number of runs through each profile, if the desired profile is not listed,
click the “New” button to open a Profile editor.
If the UUT Type is a transmitter, there is an additional section that contains the
information about Output Signal and Transfer Function.
- 14 -
Page 16
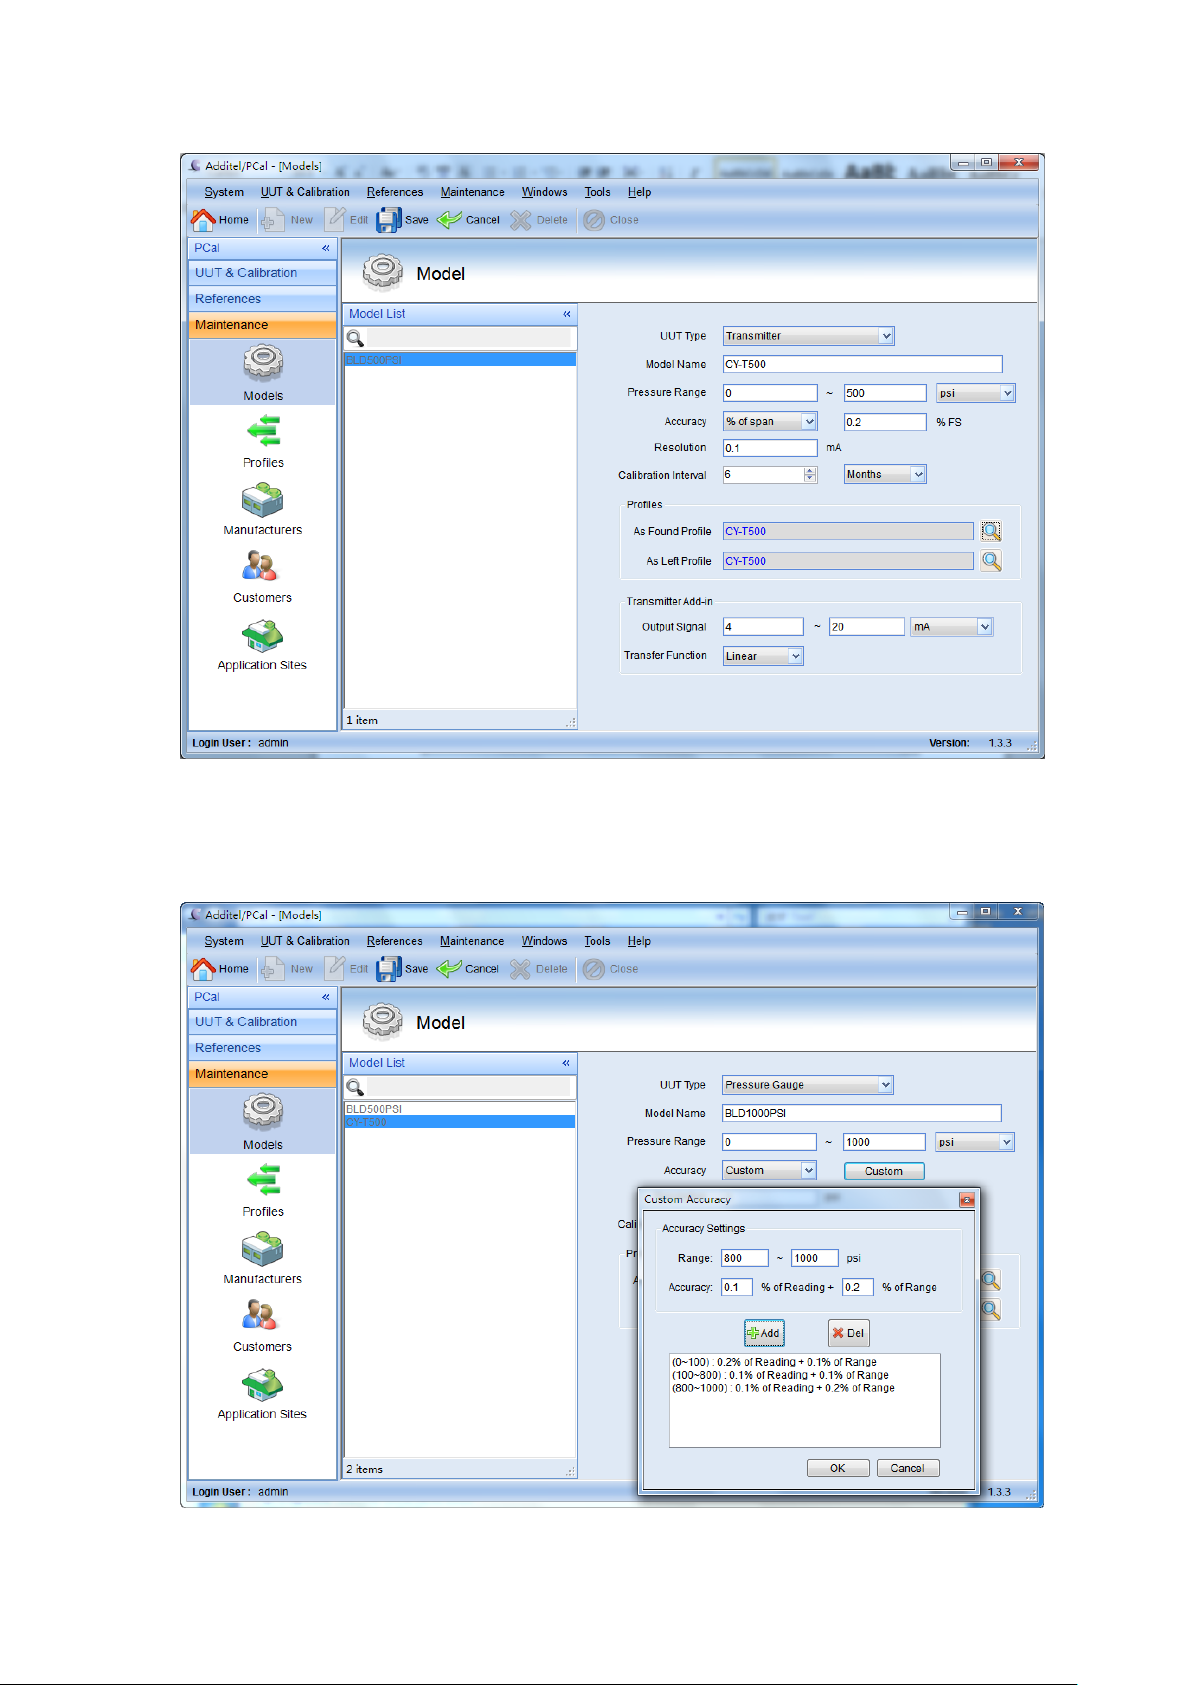
When selecting the accuracy, you can select a custom accuracy which the steps
are outlined below. If the pressure range is (0 to 1000) psi, the accuracy window
maybe has some subsections. For example: you can fill the range (0 to 200) psi, (200
to 800) psi and (800 to 1000) psi.
- 15 -
Page 17
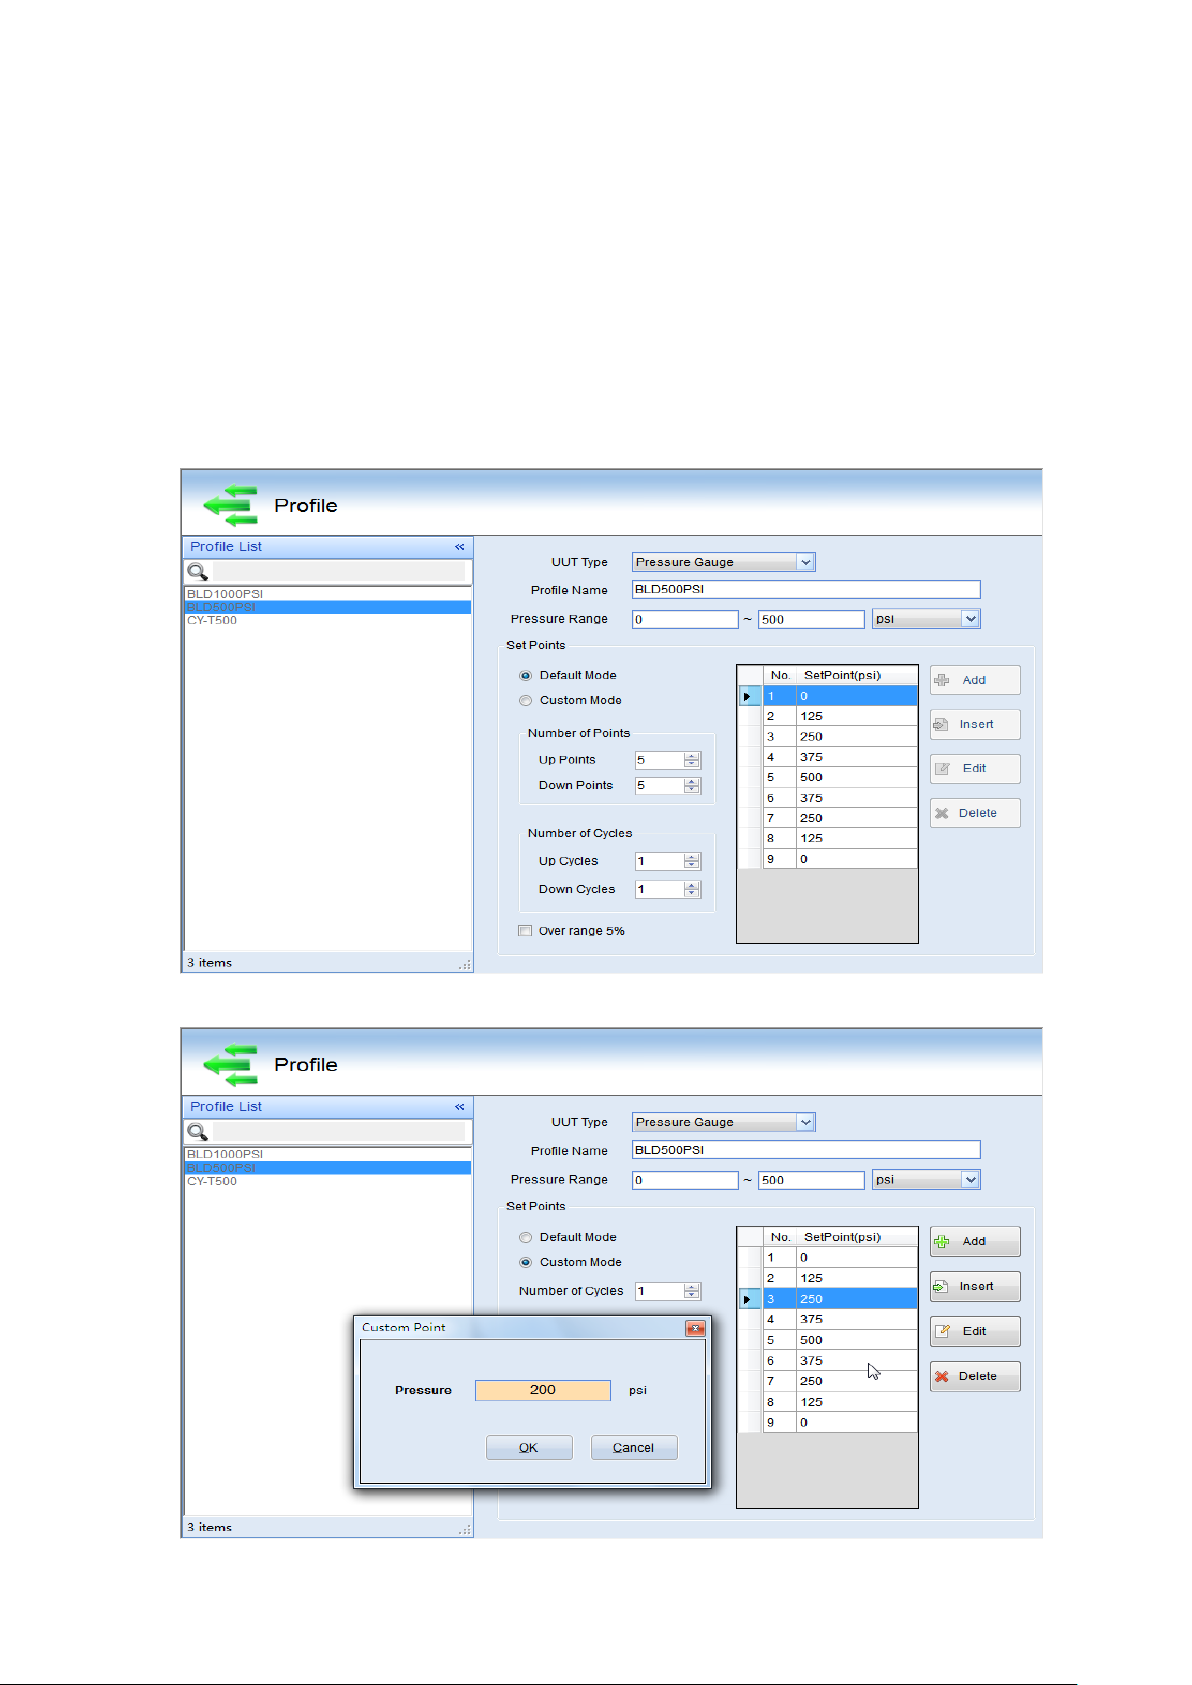
Profiles: The profile editor provides access to all test profiles stored in the
database. The profile detail box is used to create a new profile when a new model is
created using the new gauge wizard.
Specify the Pressure Range of the test profile. To create a uniform series of
pressure points, click on Default Mode. Specify the number of Up/Down points and
the Up/Down Cycles. The test points will be filled in automatically. To create a
non-uniform series, click on Customer Mode. Any points that are already listed will
remain. Selecting a point to delete or clicking the button to add (insert, edit) a point.
In this section, you can choose default mode or custom mode. In the default
mode you can only change the number of points and number of cycles.
You can define the set points by your demand.
- 16 -
Page 18
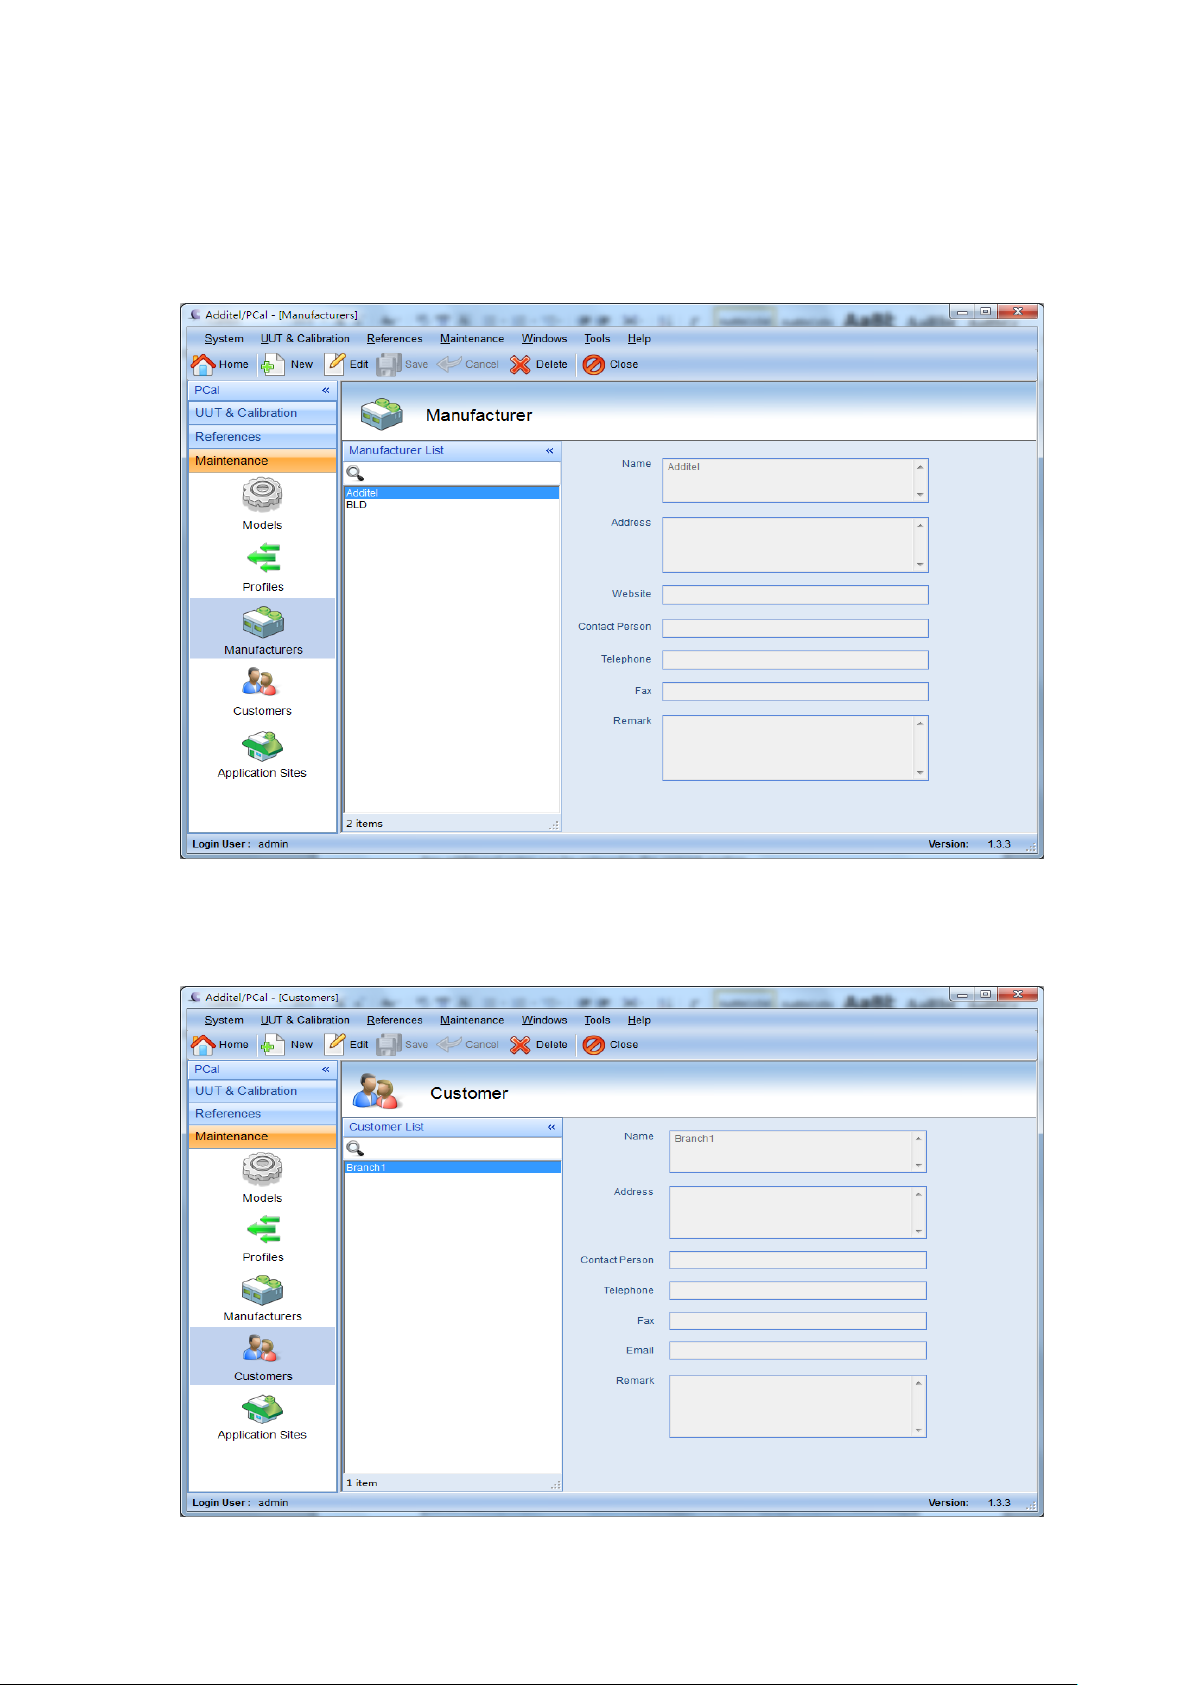
Manufacturers: The manufacturers editor allows access to the information
about each manufacturer stored in the database. Only the manufacturer's name is
required. The Address, Website, Telephone, Fax and Contact are optional fields that
can be entered. Any additional comments or notes can be entered in the Remarks
section.
Customers: The customers editor allows access to the information about each
customer stored in the database. Only the name of customer is required. The Address,
Email, Telephone, Fax and contact will help with contacting the customer if necessary.
Any additional notes can be entered in the remark section.
- 17 -
Page 19
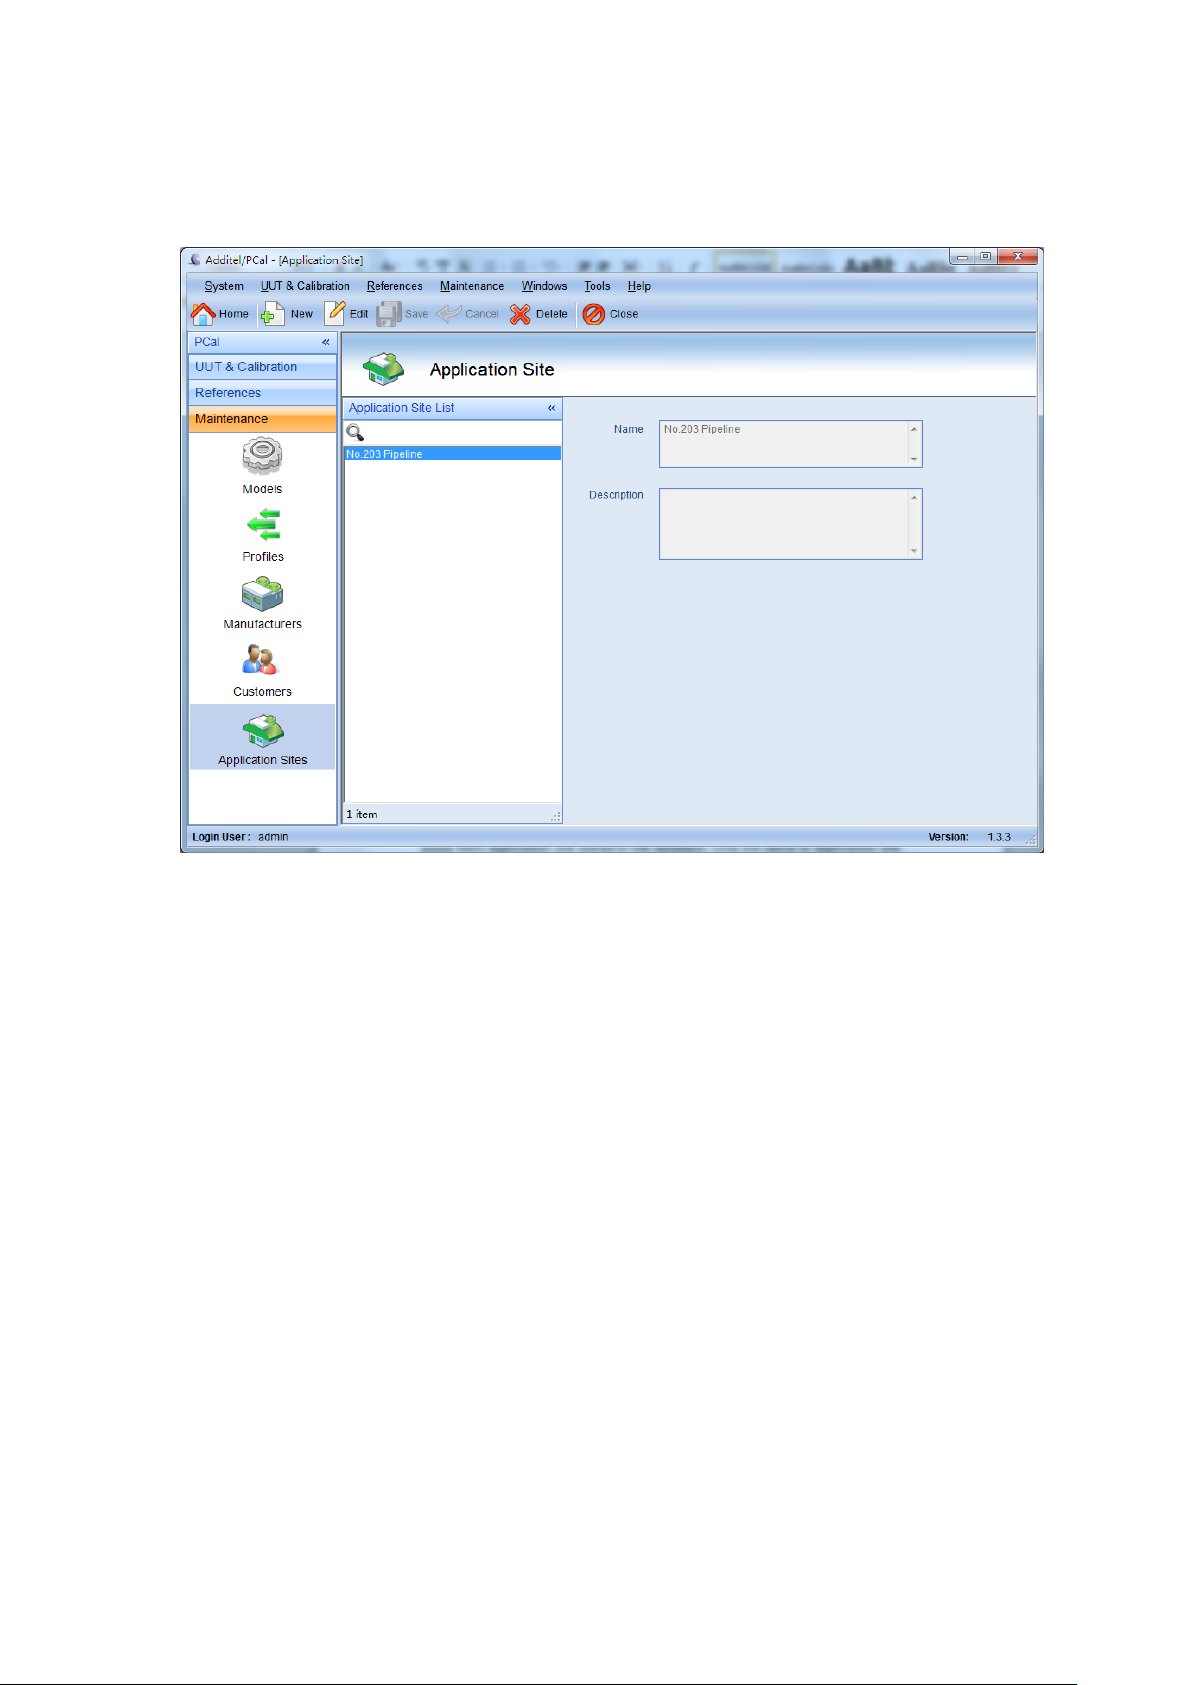
Application Site: The application sites editor allows access to the information
about each application site stored in the database. Only the name of application site
is required.
Windows
The windows menu allow for switching between open windows or closing all
windows. All windows can also be closed by selecting F4. The Start Page provides a
representation of the program and the current status of the program.
Tools: In this section, you have access to a calculator and pressure unit convertor.
Help: This menu provides system information about PCal and access to the user
manual.
Toolbar
Home: Displays the main page and current status of any running program.
Settings: Refer to the System-Settings section.
- 18 -
Page 20
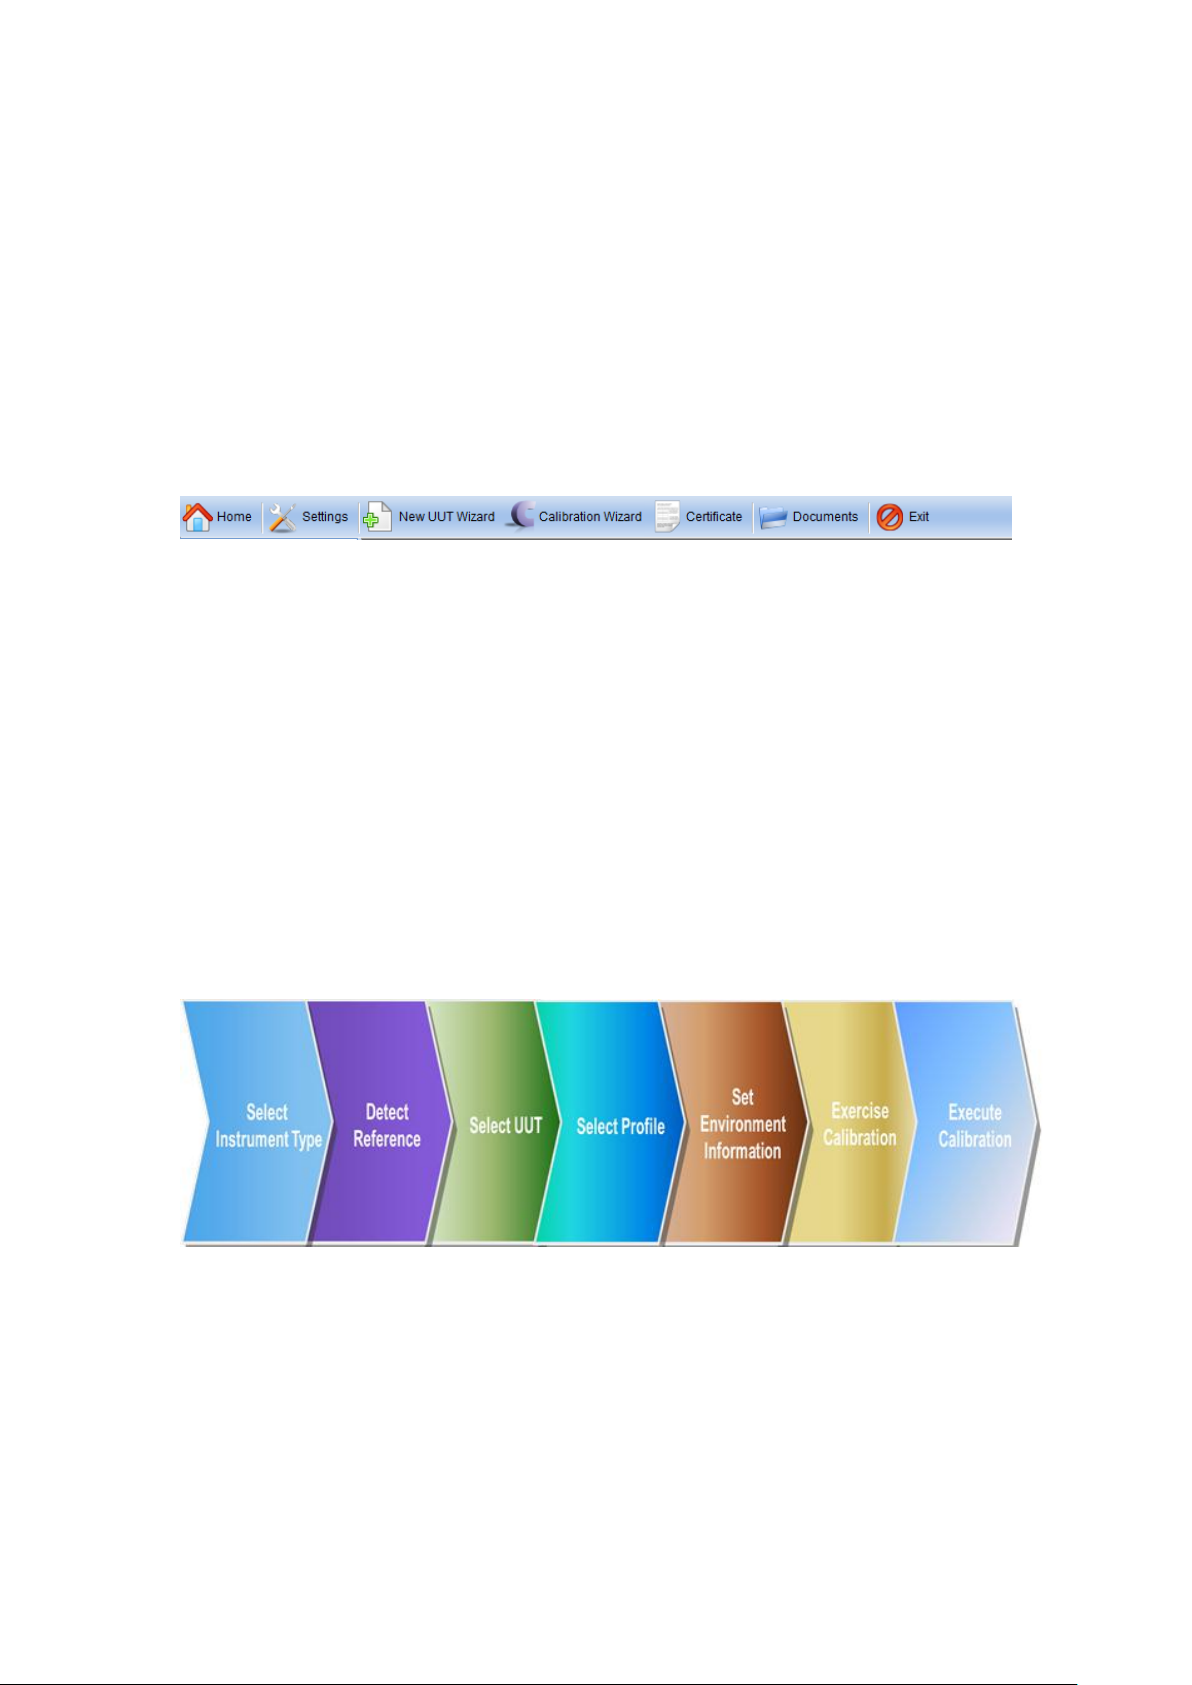
New UUT Wizard: Create a new UUT.
Calibration Wizard: Create a new calibration.
Certificate: Refer to the Certificates section.
Documents: Opens the default folder for exported documents.
Exit: Exit the program and close the software.
Calibration
Calibration Wizard
Calibration Wizard: The Calibration Wizard provides a step-by-step guide to set
up and complete a calibration.
Flow chart: The flow chart below describes the calibration wizard process.
Calibration Wizard
First: Choose the instrument type
- 19 -
Page 21
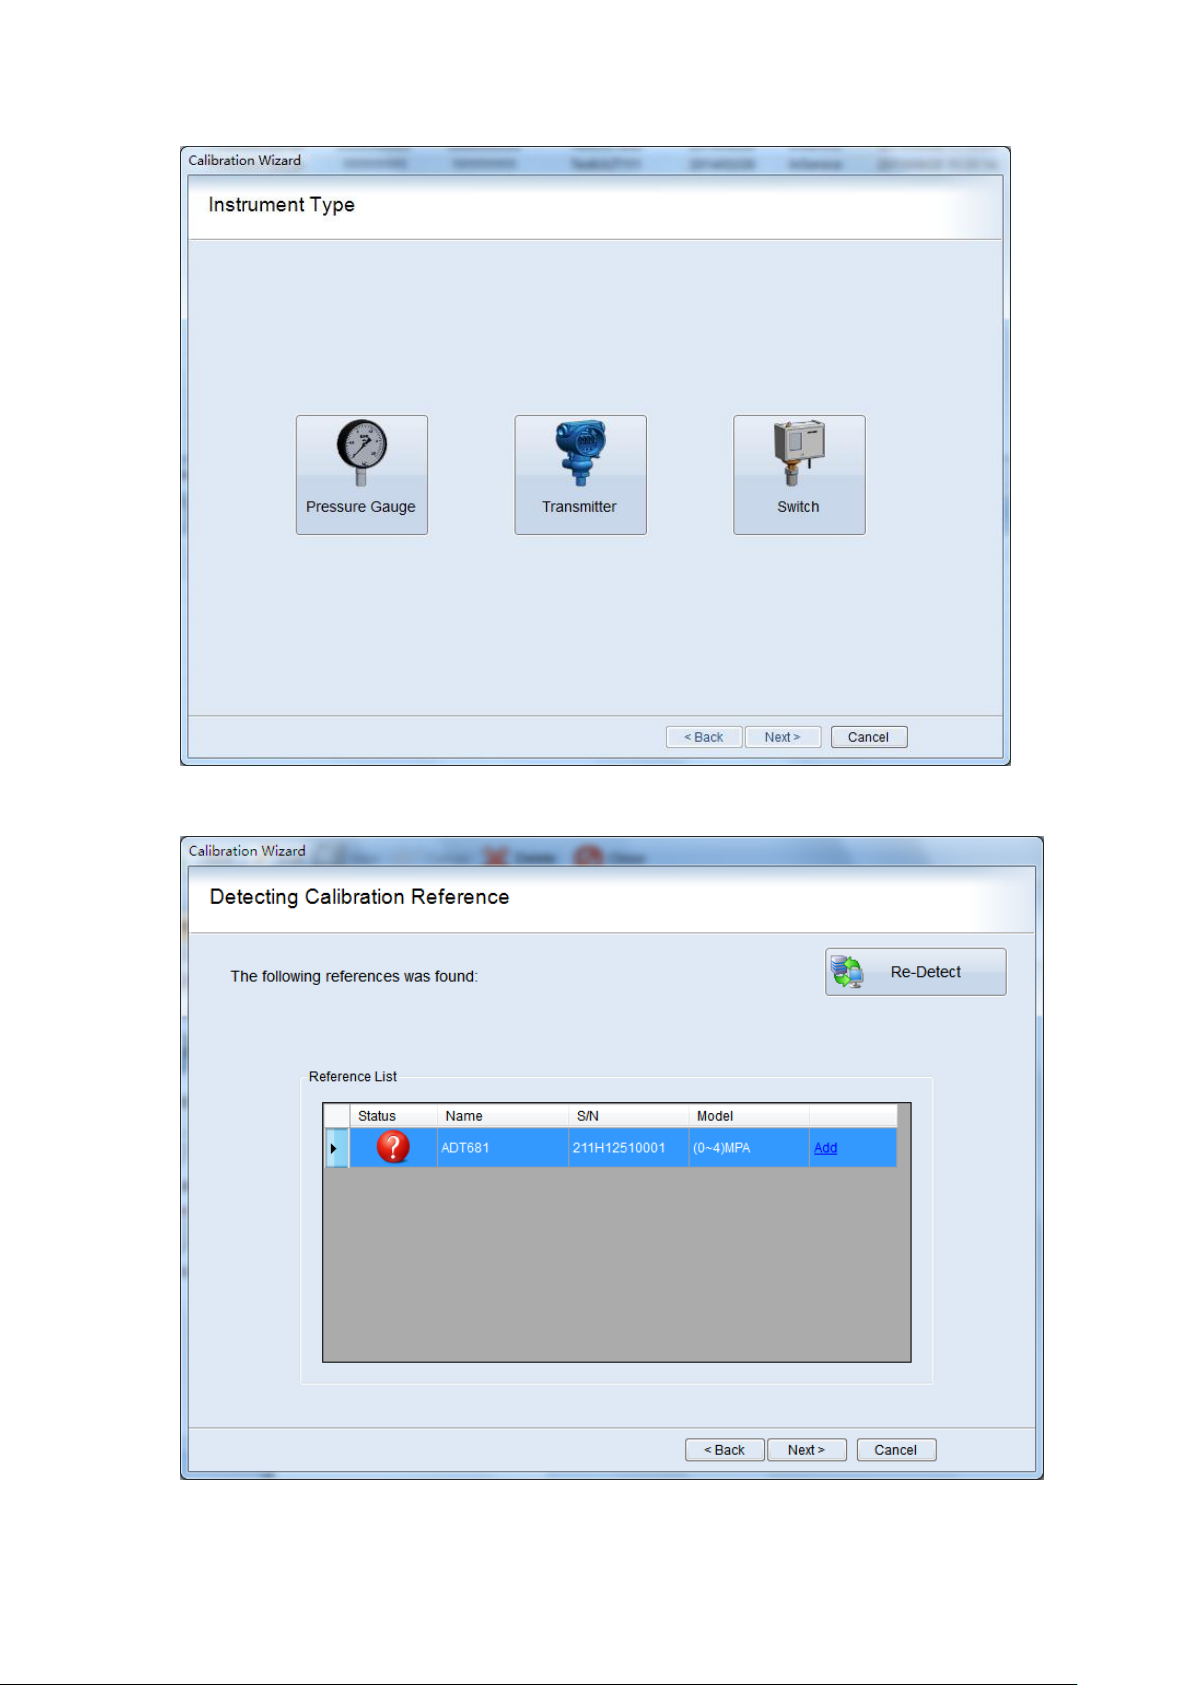
Second: The software will attempt to auto detect the calibration reference. If the
reference is a non-supported gauge then the information can manually be entered.
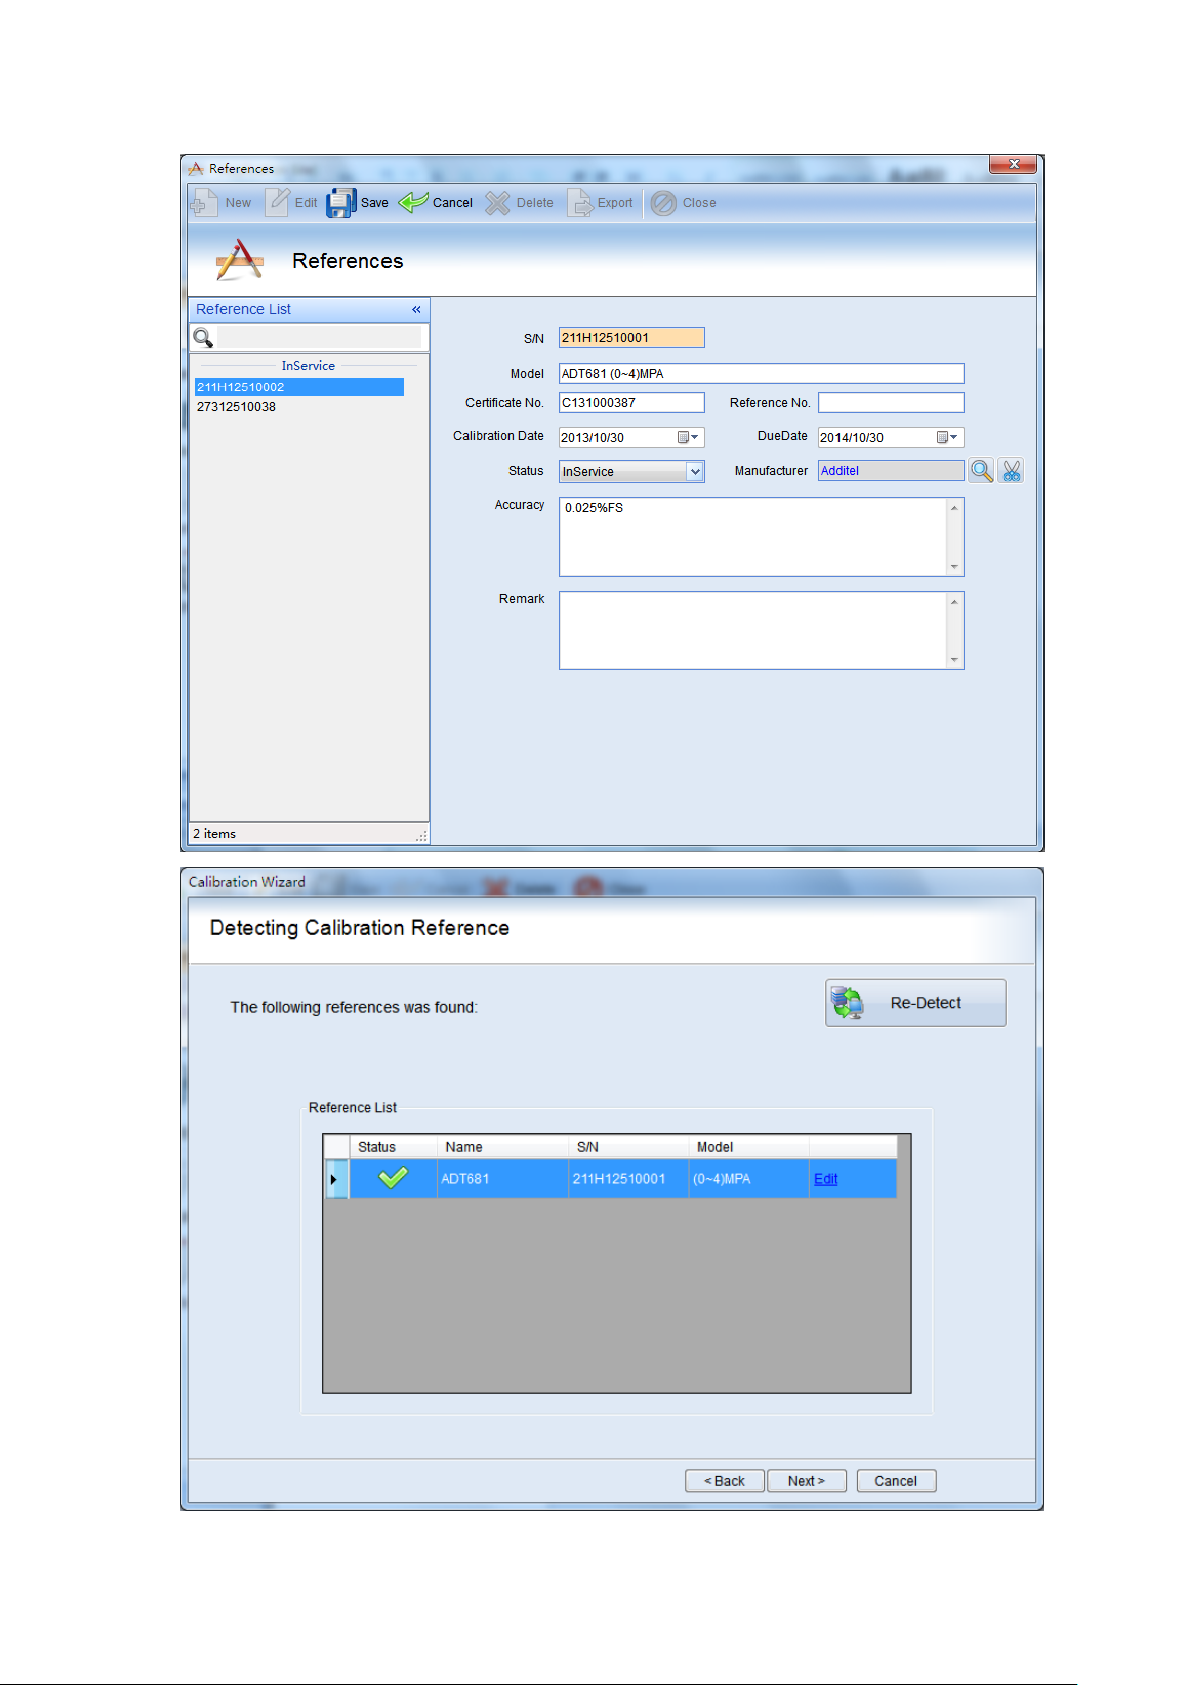
Reference gauge information is entered and then saved.
- 20 -
Page 22
- 21 -
Page 23
Account: If the reference is a supported item it may also be edited.
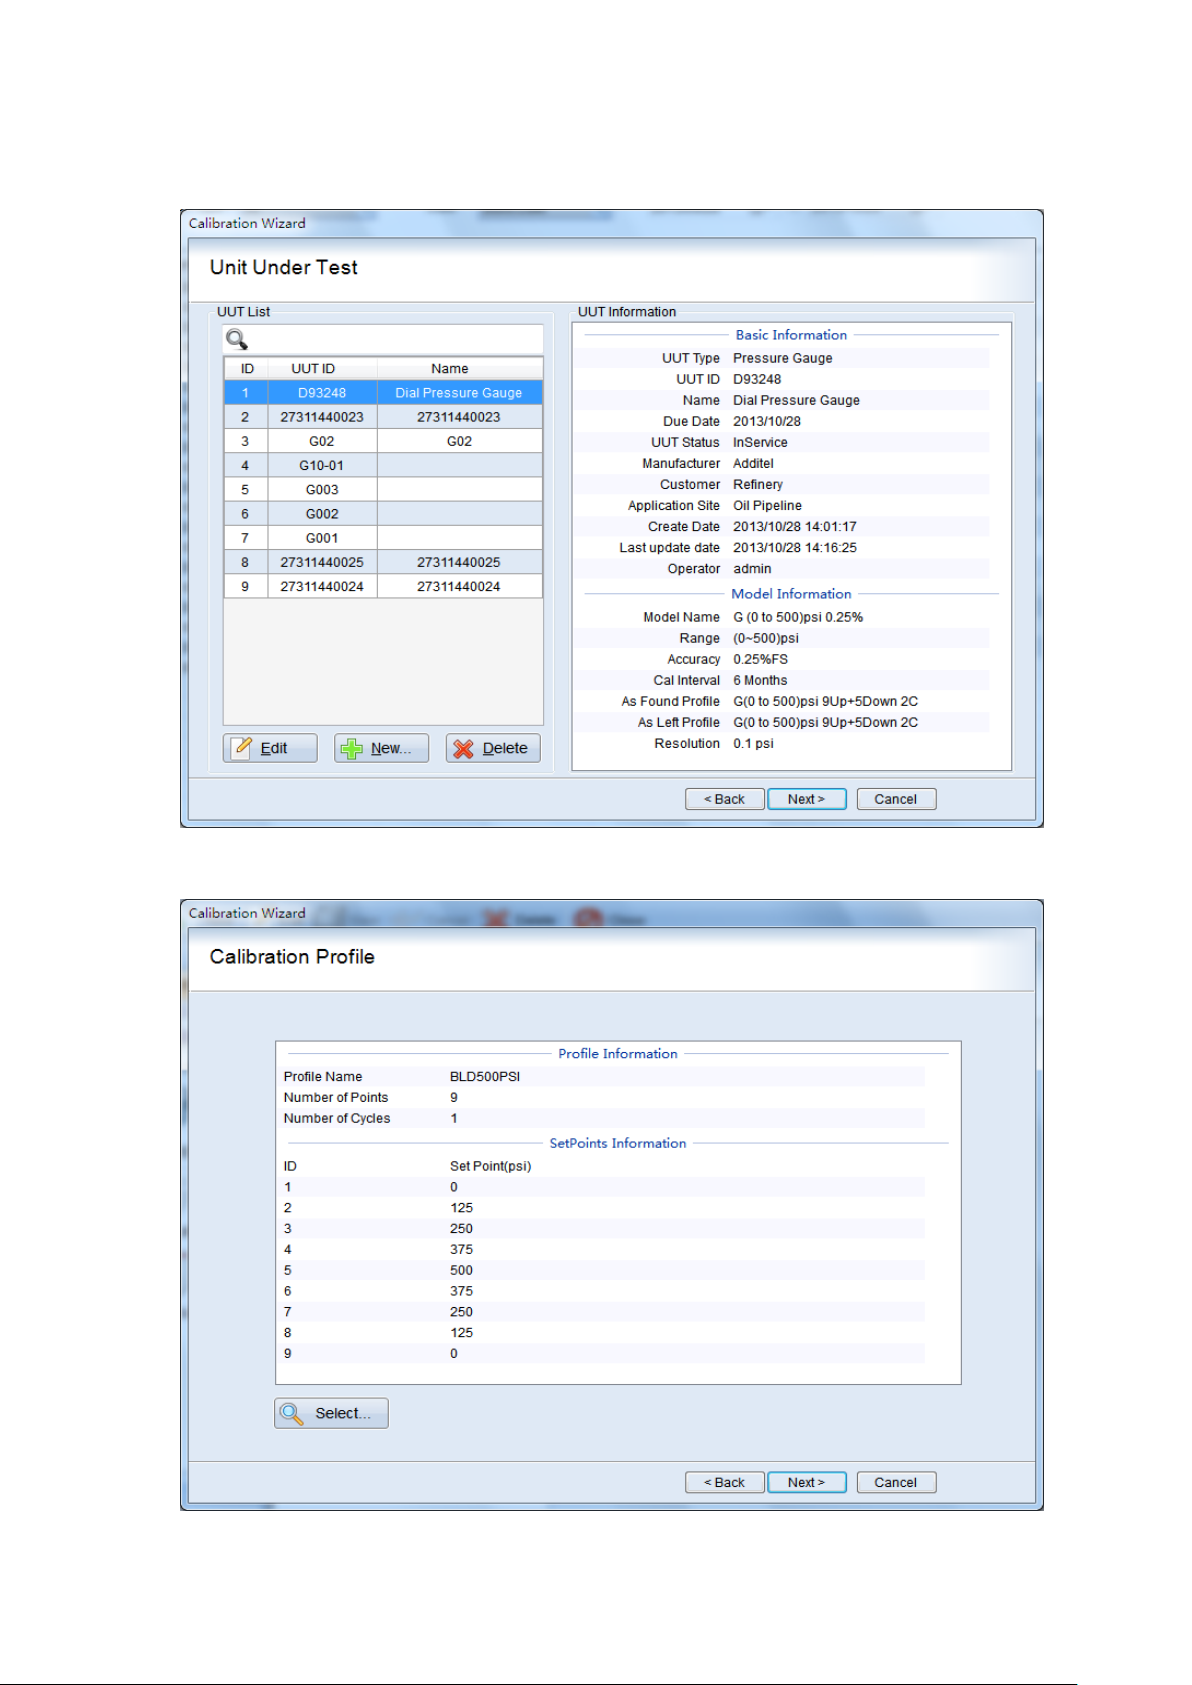
Third: Choosing the UUT.
Fourth: Calibration Profile
Account: You can choose the existing profile or create a new profile by yourself.
- 22 -
Page 24
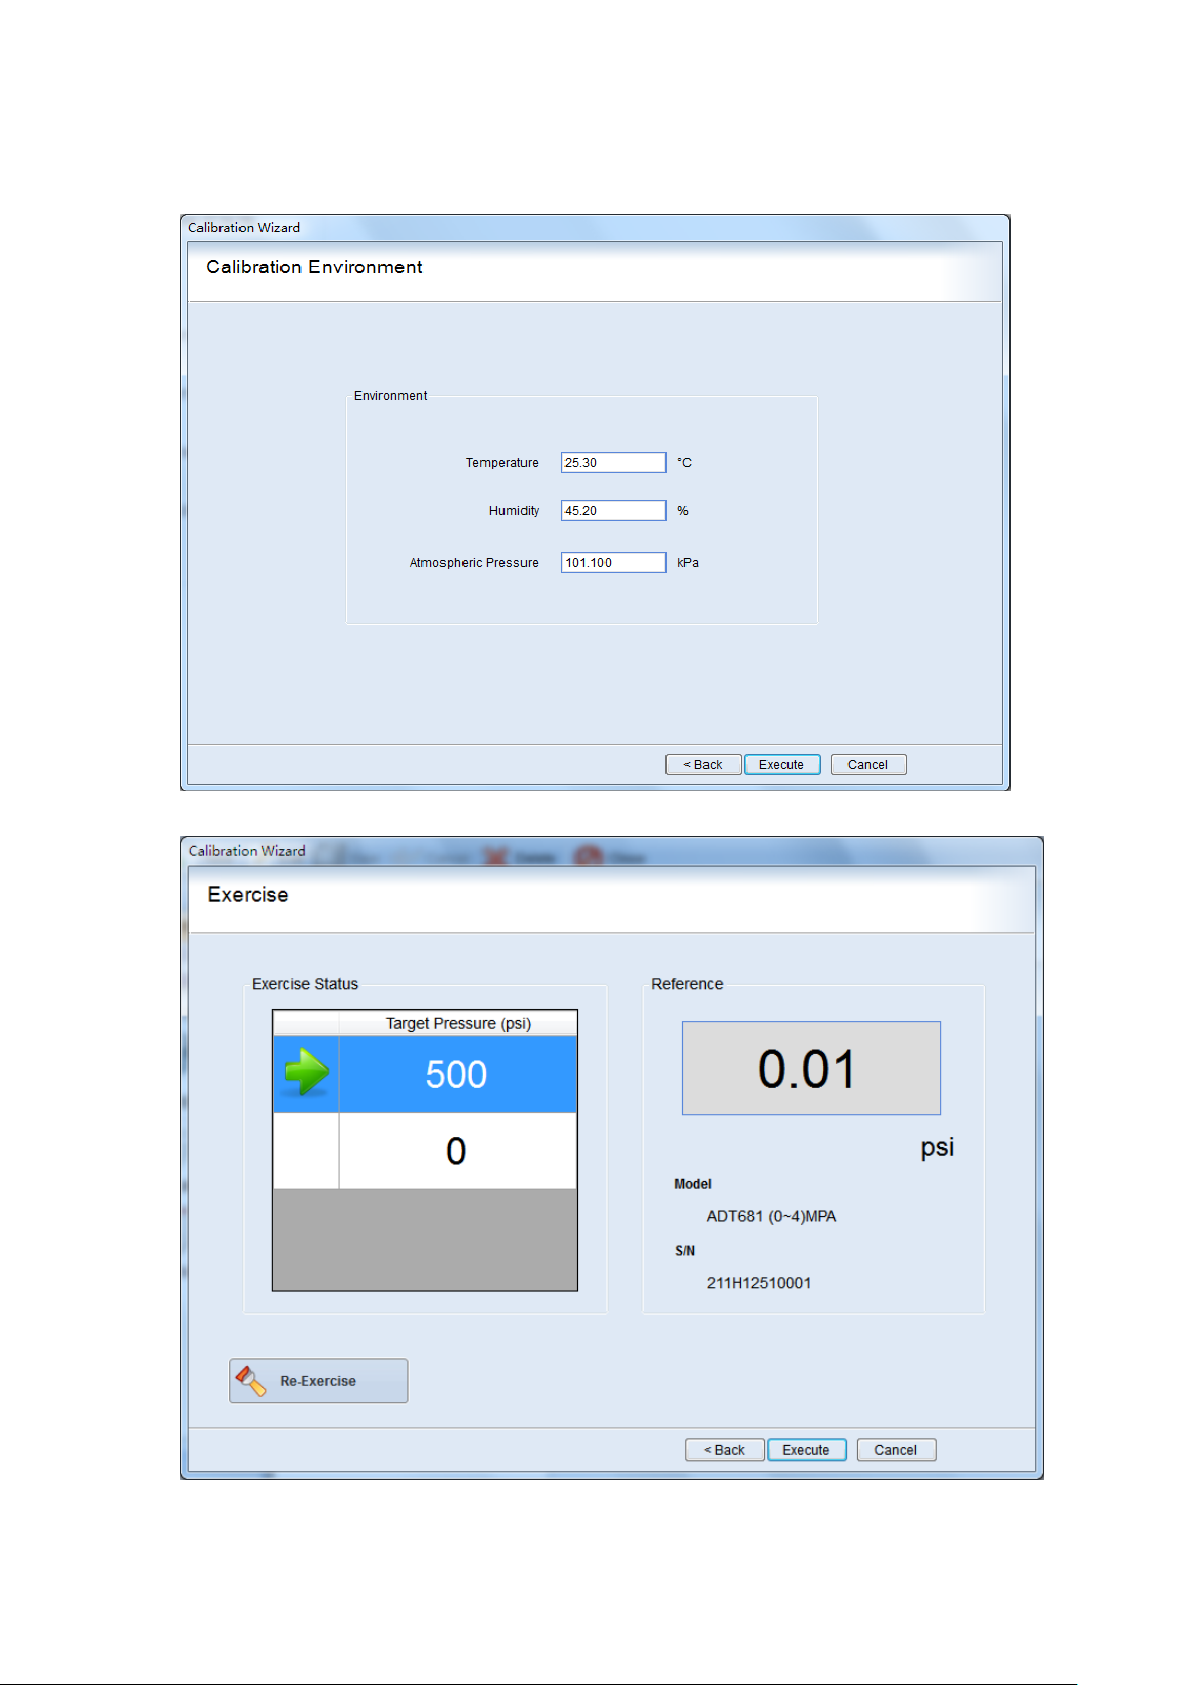
If you want to create a new profile, please see Maintenance section.
Fifth: Enter the environmental conditions
Sixth: Exercise Calibration
Seventh: Execute Calibration
- 23 -
Page 25
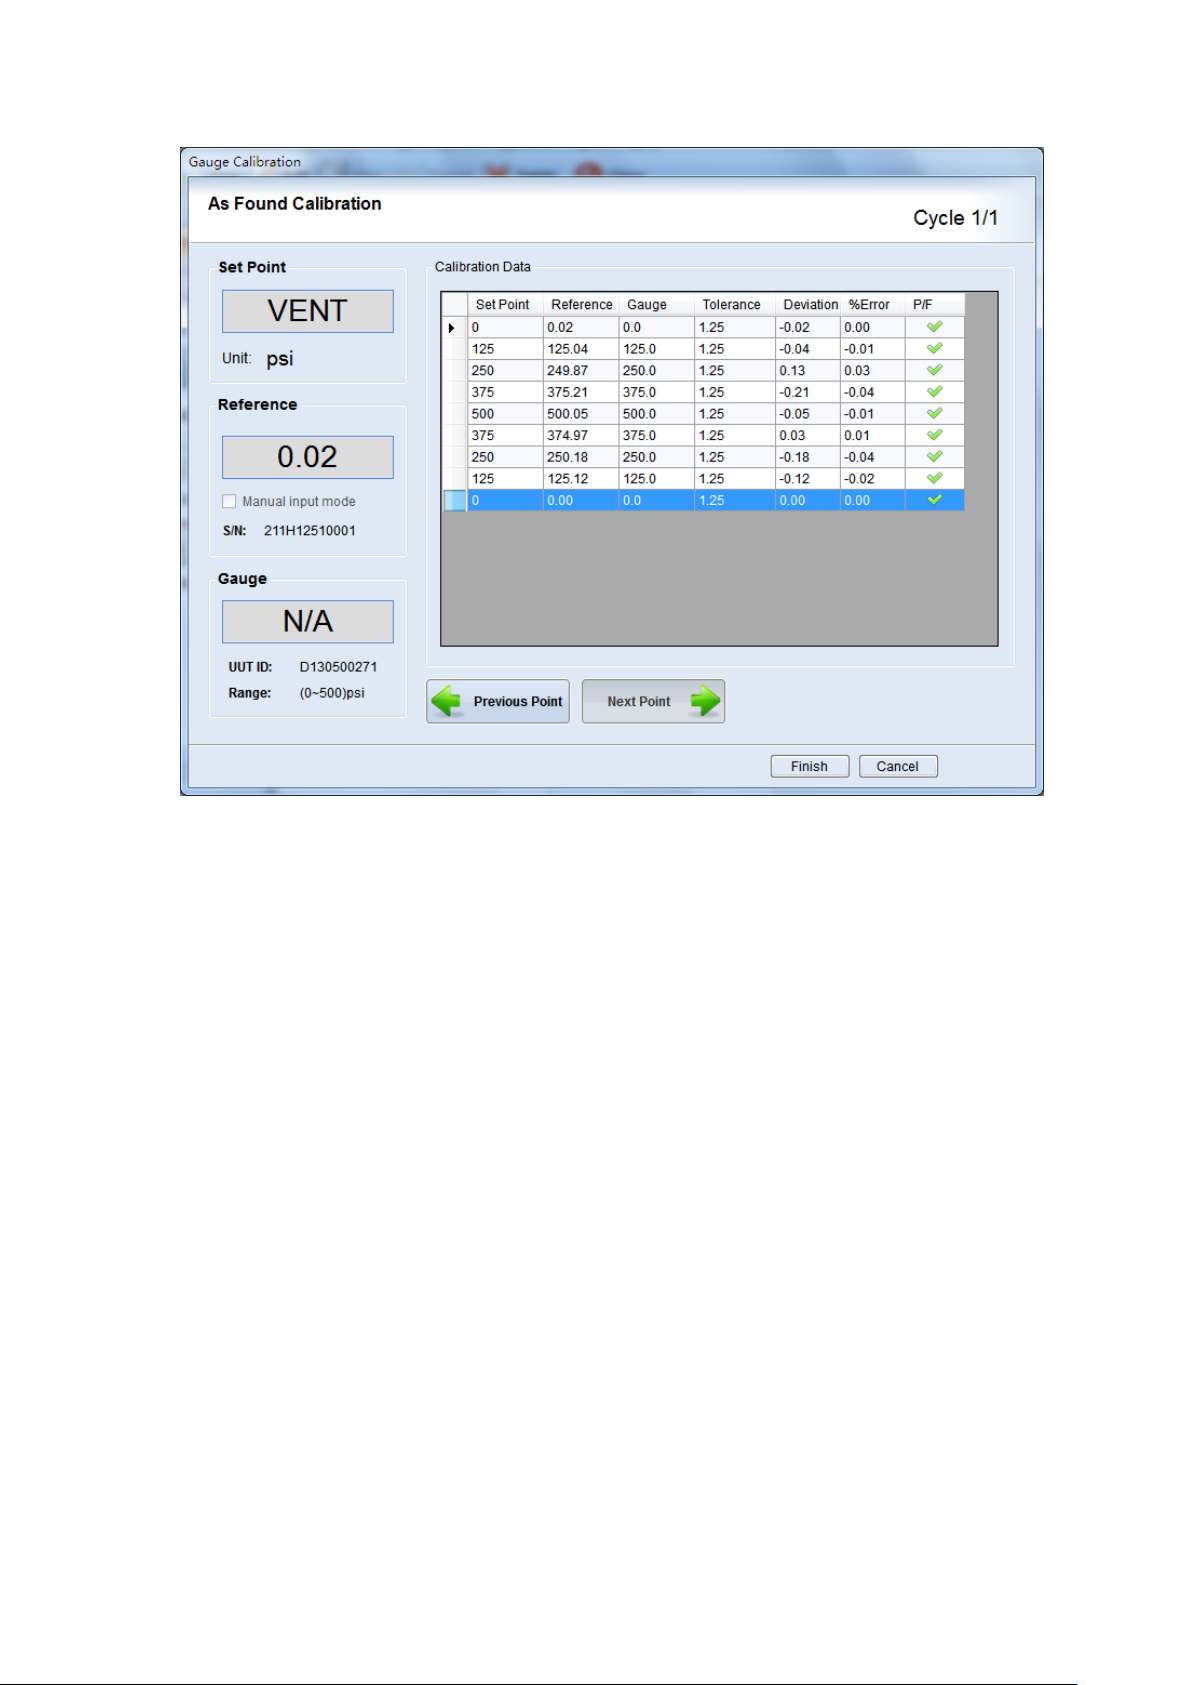
There are two methods that can be selected while calibrating a gauge.
Reverse Calibration means to match the UUT reading to the target Pressure.
Applying a pressure to hit a nominal reading on the pressure gauge, and then record
the reading from the reference. Matching the gauge allows for much faster
calibration since the Gauge value and the Reference value does not have to be
entered.
Observe Calibration means to match the reference to the Target Pressure.
Handle the pressure pump until the Reference reaches the Target Pressure, and then
enter the reading value of the pressure gauge in the text box.
The first method is easier than the other one and PCal uses this method by
default.
When performing transmitter calibration, a transmitter is required. PCal uses
the mA or V range value from the model information to compute the pressure from
the measured signals.
- 24 -
Page 26
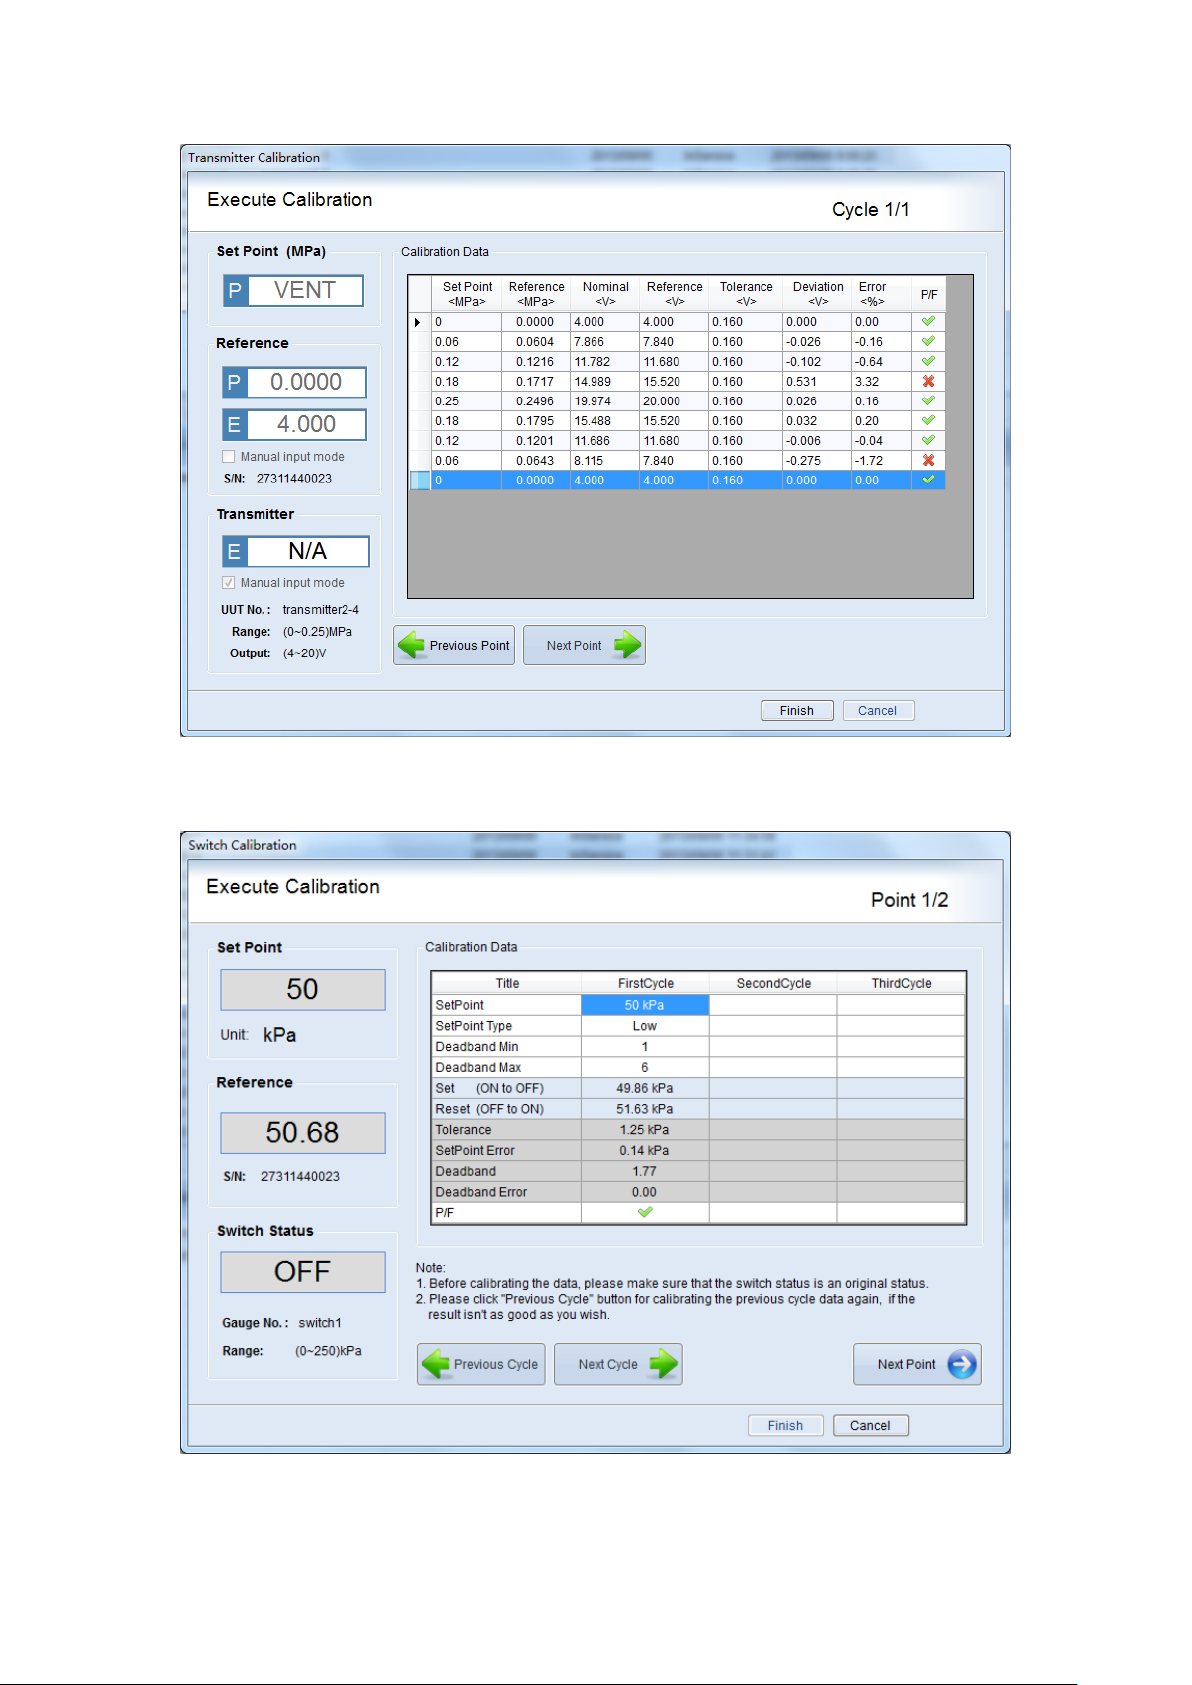
When performing pressure switch calibrations, a pressure switch is required. You
can validate the accuracy of pressure switch by the P/F from the window.
- 25 -
Page 27
Certificates
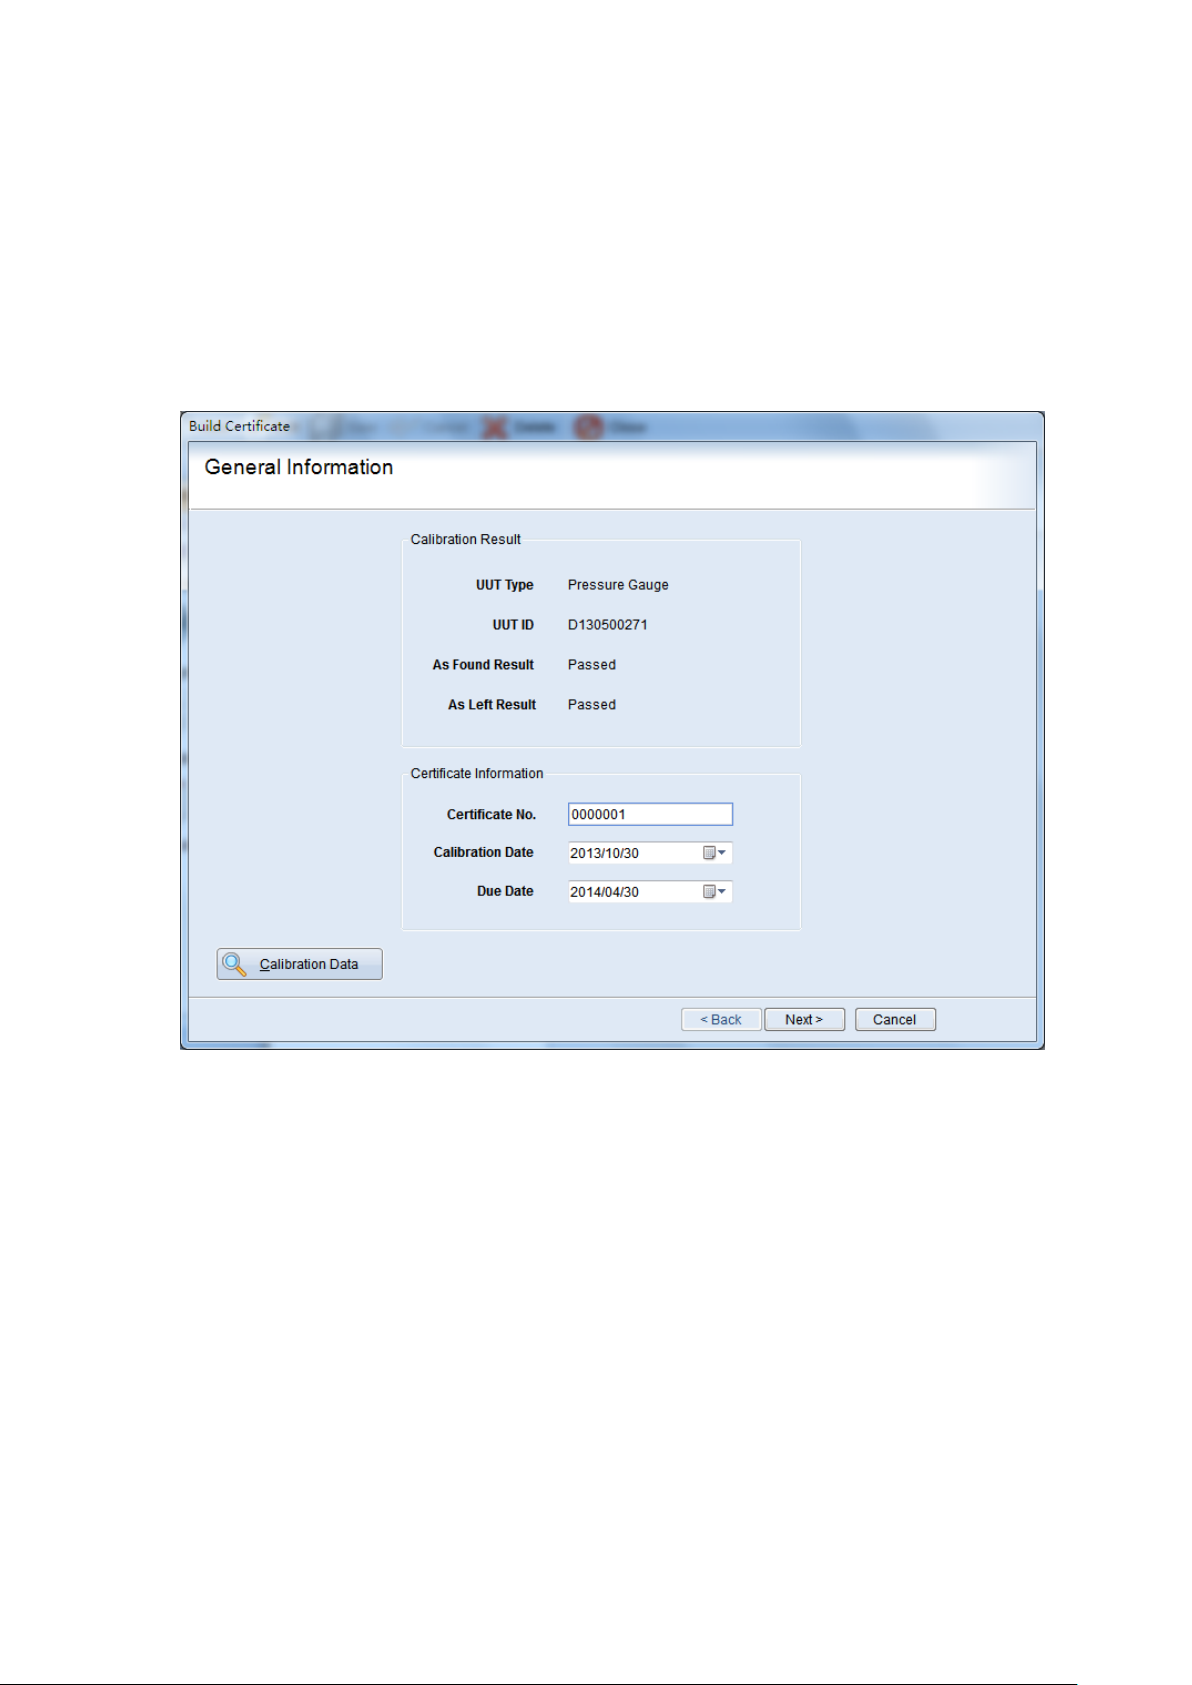
Build Certificate
In this section, you can build certificate.
First: General Information
Second: Choose the reference.
- 26 -
Page 28
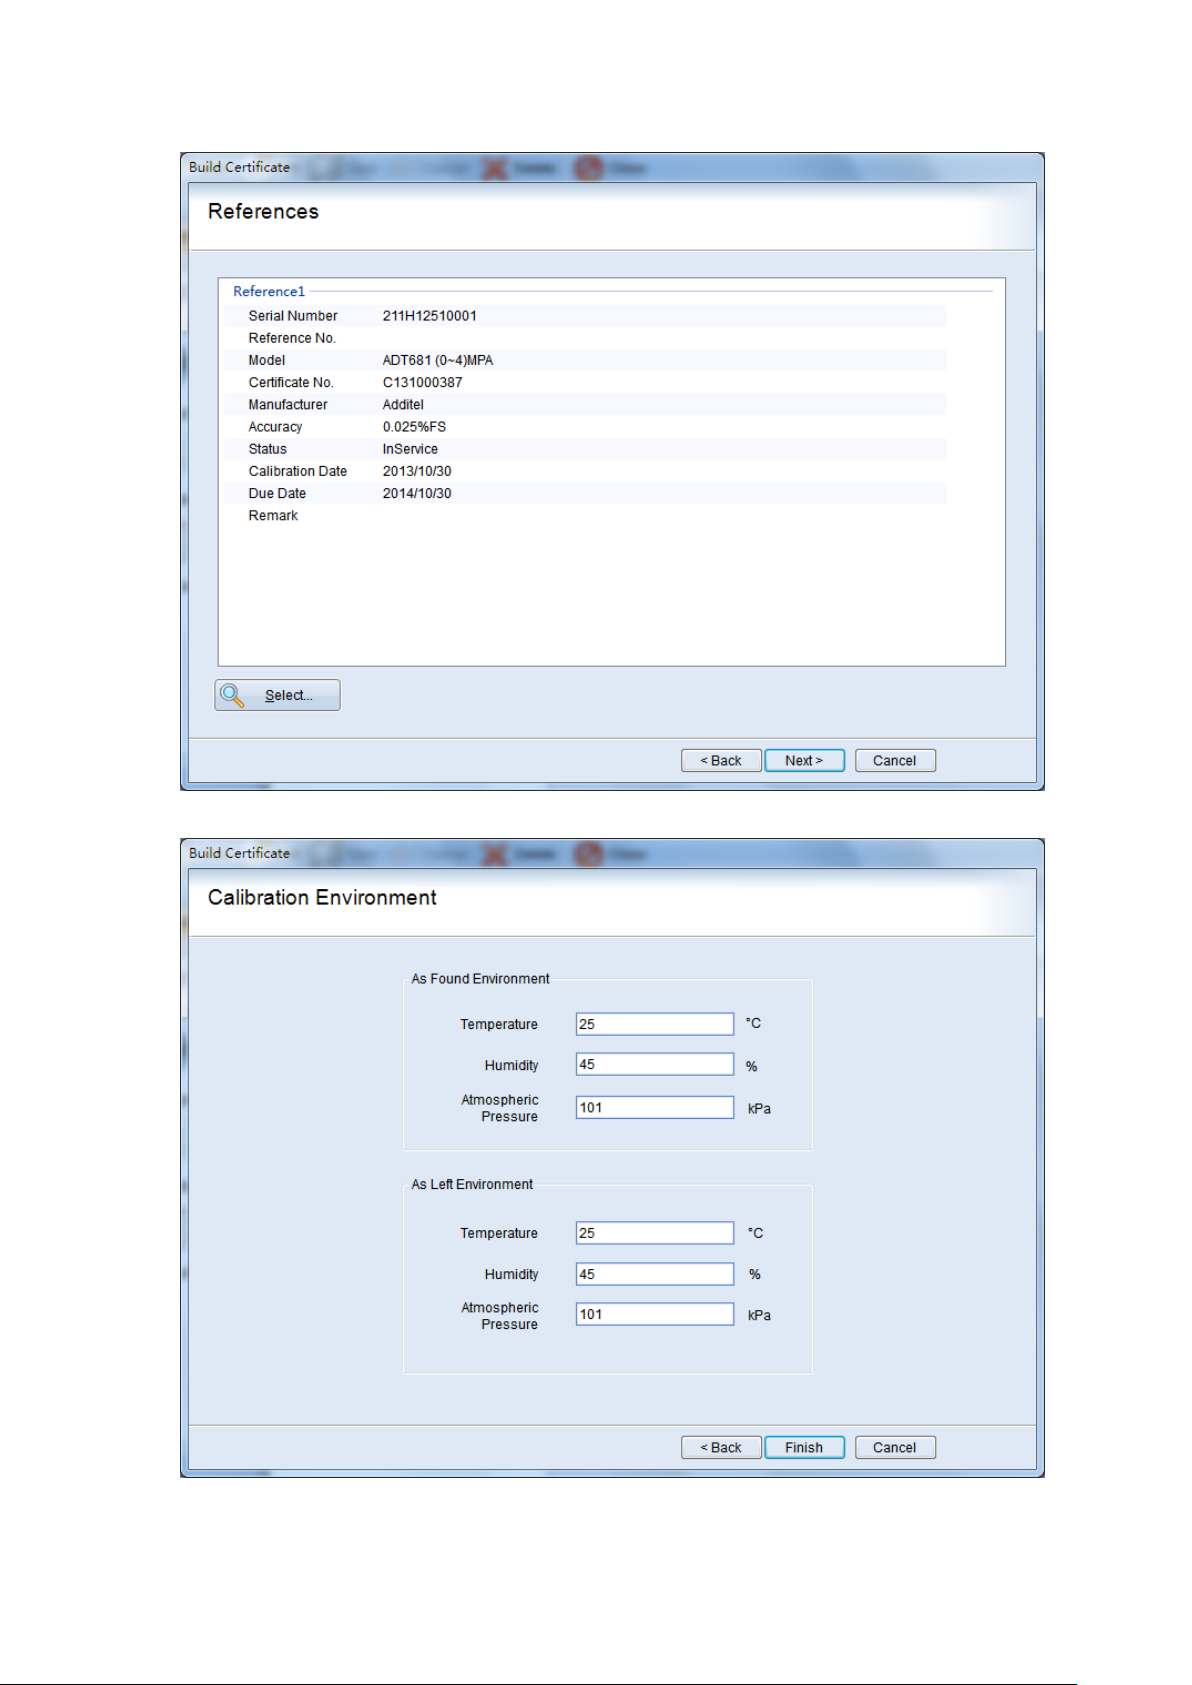
Third: enter the environmental conditions.
- 27 -
Page 29
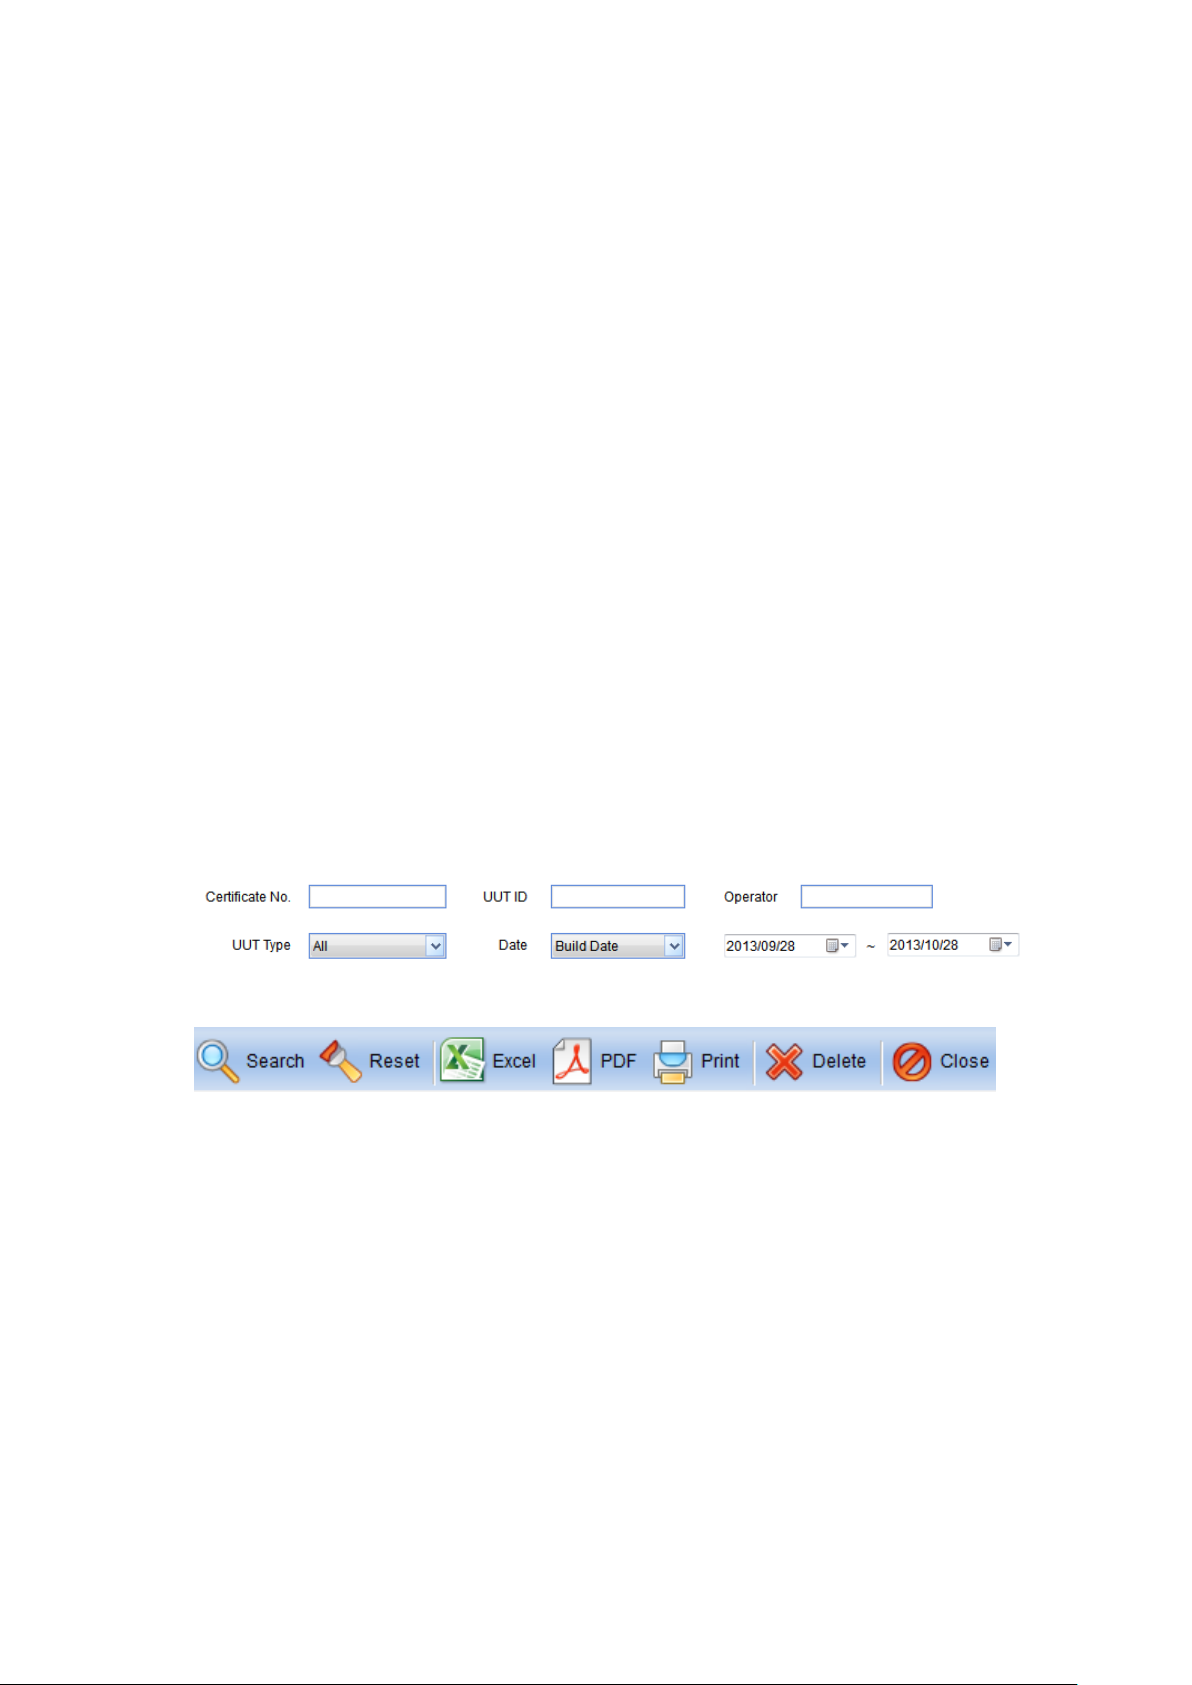
Certificate Management
Certificates are the documents that record the calibration of gauges. The
certificate templates of PCal are excel .xls or .xlsx format documents. When as found
and as left calibrations have been completed, the certificate can be created, viewed
and printed. Since all of the data for the certificate is retained in the database, the
certificate can be recreated at any time.
Search: First select the UUT types (gauge or transmitter). Then enter into the
Certificate No., UUT Type or UUT No. The date search information will need to be set
before searching for the certificate.
Reset: Select to reset the search condition.
Export Certificate: If you want to generate a certificate and view the detailed
information of the certificate, please click the Export Certificate button. It will create
the certificate and open it in Excel or PDF. The Microsoft Office (2007 or later) and
the Save as PDF or XPS subassembly are both required prior to exporting the
certificate. You can install the Save as PDF or XPS subassembly which is provided in
the “Toolkit” folder of the CD.
Print Certificate: Print certificate by clicking the Print Certificate button. The
Microsoft Office (2003 or later) is required.
Delete Certificate: If you do not want the certificate, you can delete the
certificate by clicking the Delete button.
Close: Close the window by clicking the close button.
Certificates: In the Section, you can generate, view and print certificates, Refer
to the discussion of Certificate Management in Certificates for detailed information
about managing certificates.
- 28 -
Page 30
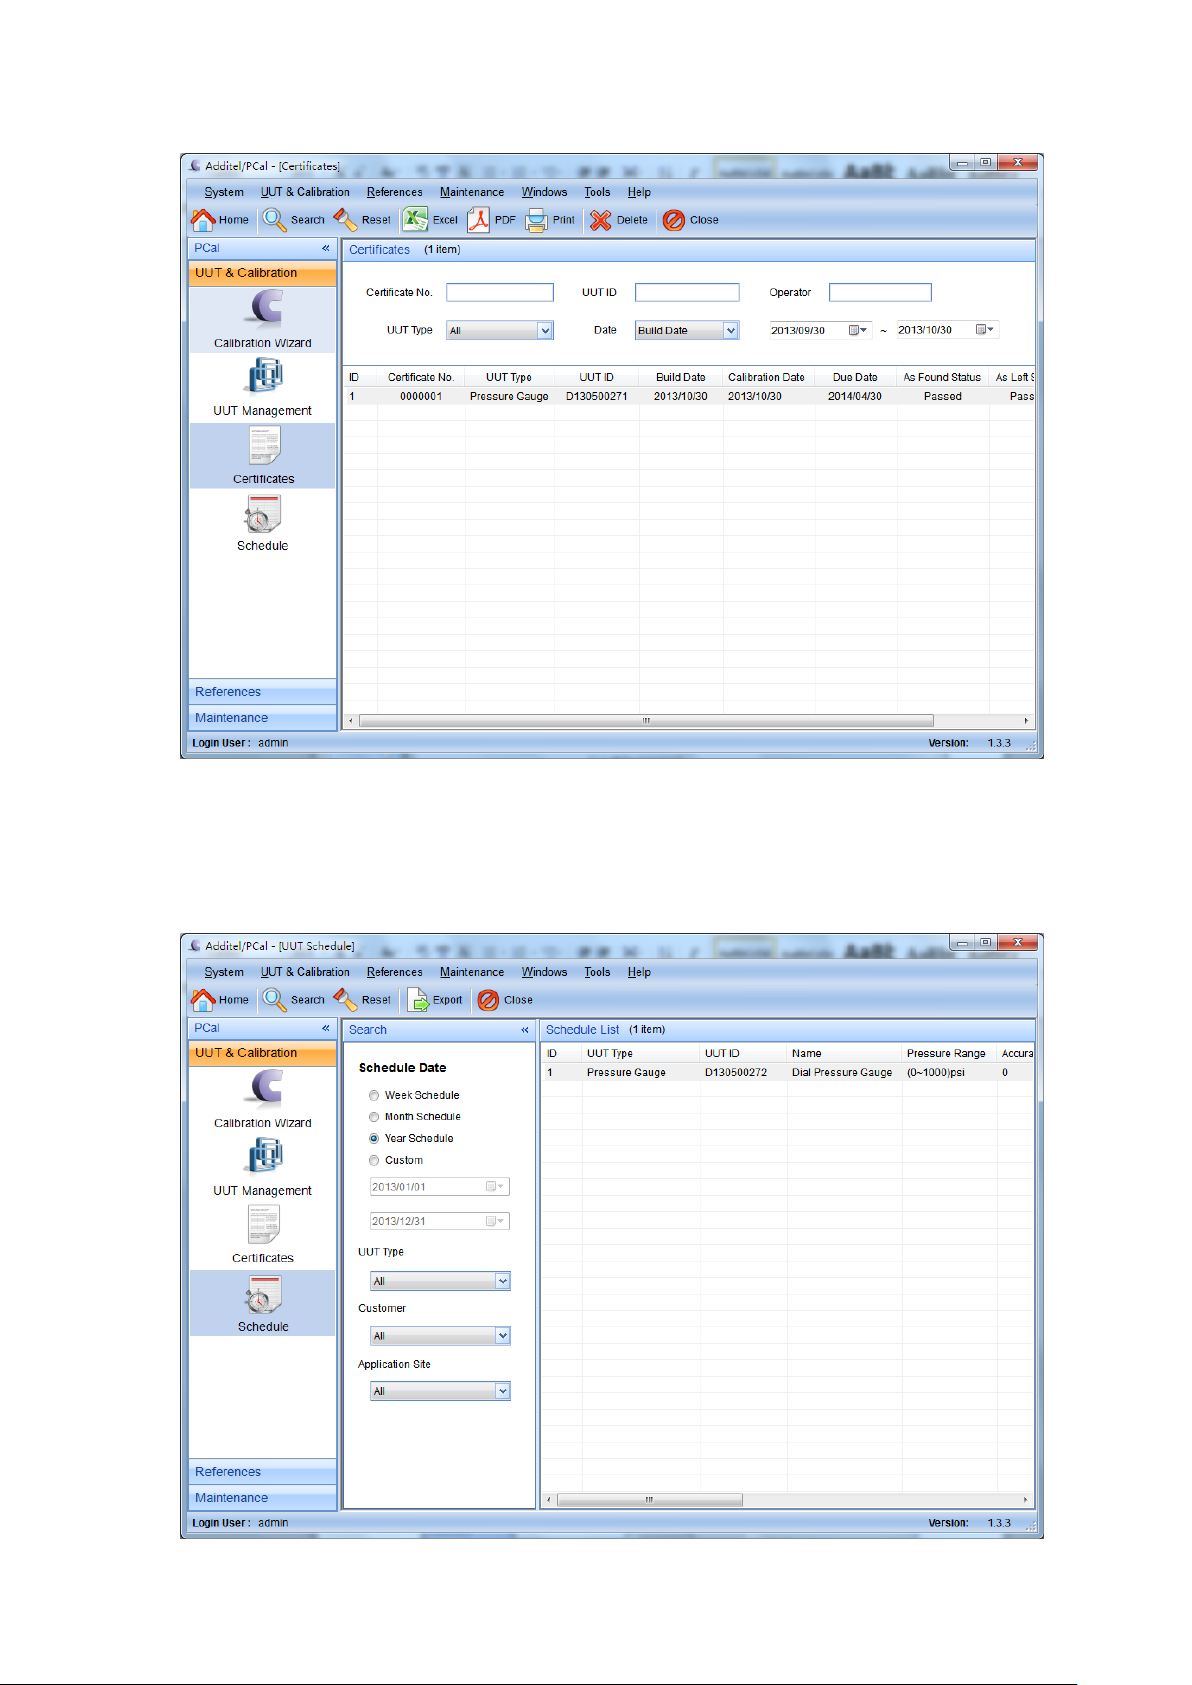
Schedule: In this section, you can manage the gauges by schedule date. Use the
search button to view a list of Gauges. “Due Date” means the date the gauge needs
to be re-calibrated. When a calibration has been completed and a certificate created,
this date is updated automatically using the calibration interval specified for the
model.
- 29 -
Page 31
Certificate Template
PCAL allows for the ability to create customer certificates using excel. These certificates
can be fully customized, including the form of the certificate and languages. PCal
creates certificates by replacing tags in the excel template. PCal does a
search-and-replace operation in each worksheet by filling with the calibration data.
Refer to Excel Template Tags for a list of tags that can be included in the certificate
templates.
Some standard templates are provided with the PCal software. These templates
can be copied and edited to create any number of different templates.
Excel-Template Instruction
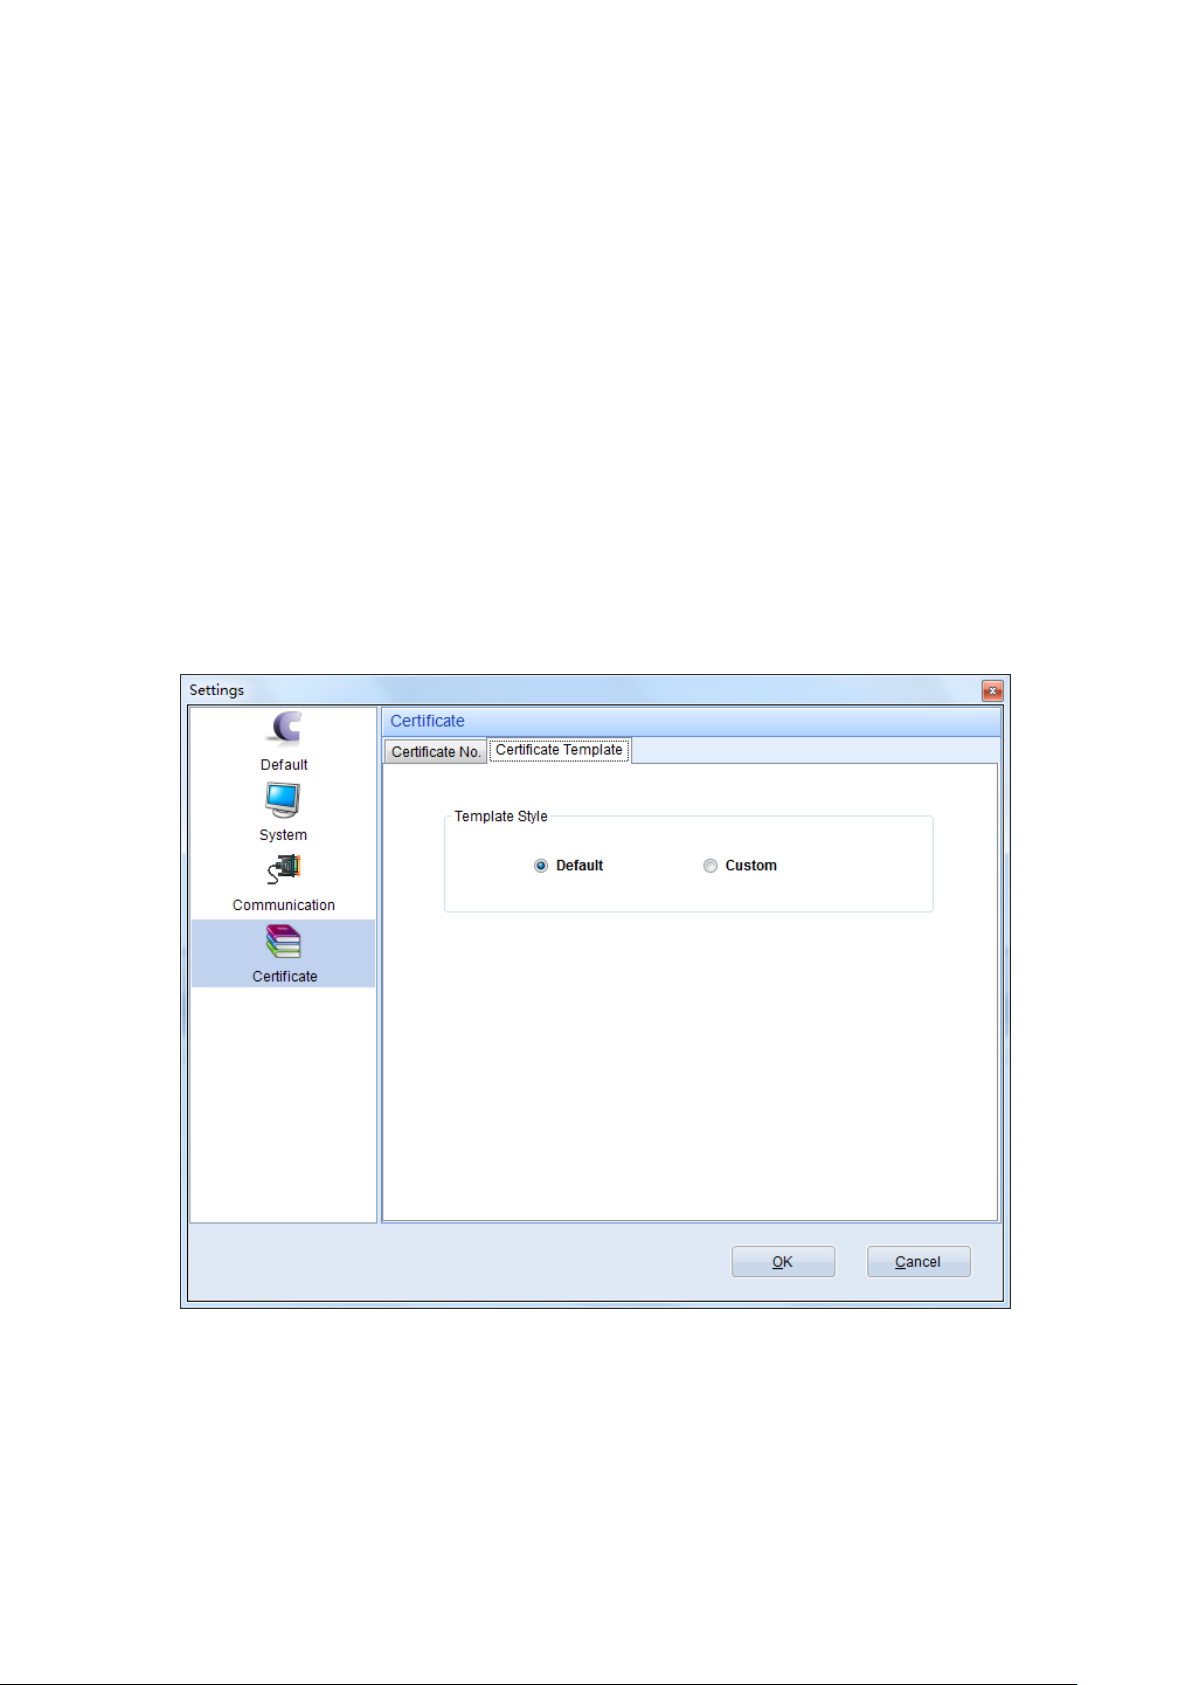
The Certificate Template Style has two modes.
Default: PCal has provided the default template. These include Gauge Certificate,
Transmitter Certificate and switch Certificate.
Custom: Customize your own certificate by selecting the Custom radio button.
- 30 -
Page 32
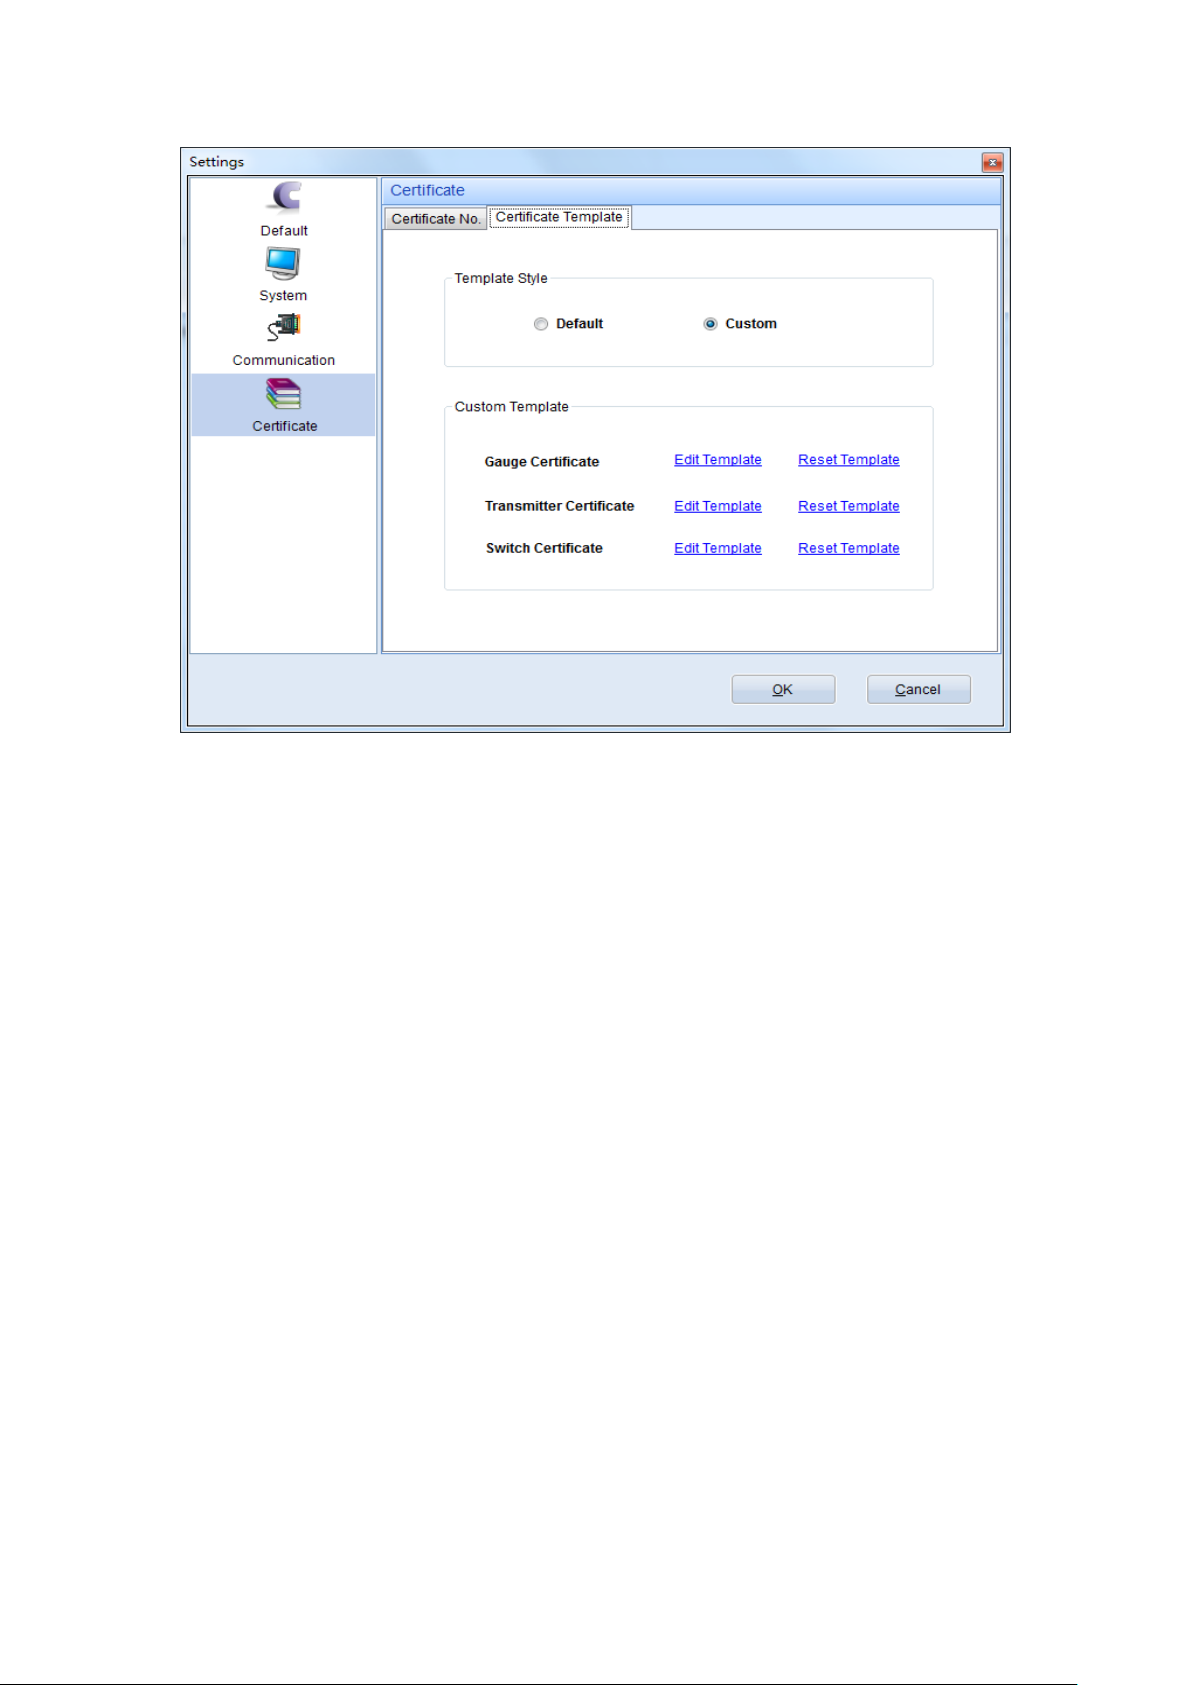
Now you can edit or reset the template by selecting the appropriate links Please
refer to the following steps:
1. Clicking the Edit Template. Then PCal will open the template for you .This
workbook has three worksheets. The names of these worksheets are “Cert”, “As
Found” and “As Left”. These worksheets can’t be renamed.
2. The “Cert” worksheet is the first page of the certificate. The summary
information will be displayed in this worksheet. The “As Found” worksheet and “As
Left” worksheet have detailed information about As Found Calibration and As Left
Calibration. Each Calibration data contains three “Cycle” maximum and the number
of the “Point” data belongs to “Cycle” maximum.
A list of excel template tags used by PCal to create certificates using
search-and-replace operations is shown in the Appendix. You can display further
information about the calibration by screening the tags. Tags are included within
“#tag#” and they can occur anywhere within a template worksheet. Whatever you
want to change in the Excel Template is allowed except recomposing the cells which
have relations with “#tag#”. You can change the logo, the title and the position of the
tags, etc.
Some of the tags have a number sign as part of the tag. This is to support
multiple references or data points which are included in the certificate. In the As
Found worksheet or the As Left worksheet, PCal will empty all unused fields. For
example, if the template contains 10 data points, but the profile only contains 5 data
points, only the first 5 data points will be placed in the certificate. 3. When you finish
the new template, save it. Then PCal will create certificates by using this new
template.
Now you can rework the certificate template to meet your actual demand.
- 31 -
Page 33

1000
……………………….
Pa 1
……………………….
kPa
0.001
……………………….
MPa
0.1450377
……………………….
PSI
0.01
……………………….
Bar
10 ……………………….
Mbar
0.2952998
……………………….
inHg 0℃
7.500615758
……………………….
mmHg 0℃
4.01463
……………………….
in 4℃
101.9716213
……………………….
mm 4℃
0.010197
……………………….
kgf/cm²
Tag Name
Description
Certificate
#Cert_No#
Certificate Number
#Cert_BuildDate#
Certificate Build Date
#Cert_ExpireDate#
Certificate Expire Date
#Cert_Status#
Certificate Status
#Cert_CreateUser#
Certificate Create User
#PrintDate#
Certificate Print Date
#CalibrationDate#
Calibration Date
UUT
#UUT_No#
UUT ID
# UUT_Type#
UUT Type
# UUT_Name#
UUT Name
Appendix
PCal Pressure Units
PCal uses the following standard units and associated conversion factors from
kPa. All conversion factors use a gravity constant of 9.80665 m/sec²
Excel Template Tags
- 32 -
Page 34

# UUT_DueDate#
UUT Due Date
# UUT_Status#
UUT Status
# UUT_CreateDate#
UUT Created Date
# UUT_UpdateDate#
UUT Updated Date
Model
#Model#
Model Name
#Model_PressureMin#
Model Min Pressure
#Model_PressureMax#
Model Max Pressure
#PressureUnit#
Model Pressure Unit
#Model_Accuracy#
Model Accuracy
#Model_CalibrationInterval#
Model Calibration Interval
#Model_CalibrationIntervalType#
Model Calibration Interval Type
#Model_Range#
Model Range
#Model_Resolution#
Model Resolution
#Model_XmitOutputLow#
Model Transmitter Low Output
#Model_XmitOutputHigh#
Model Transmitter High Output
#XmitUnit#
Model Transmitter Unit
#Model_TransferFunction#
Model Transmitter Transfer Function
AsFound Calibration
#AsFound_Result#
AsFound Result
#AFMaxError#
AsFound Max Error
#AsFound_ExecuteDate#
AsFound Execute Date
#AsFound_LastUpdateUser#
AsFound Last Update User
#AFTemperature#
AsFound Temperature
#AFHumidity#
AsFound Humidity
#AFAtmospheric#
AsFound Atmospheric Pressure
AsLeft Calibration
#AsLeft_Result#
AsLeft Result
#ALMaxError#
AsLeft Max Error
#AsLeft_ExecuteDate#
AsLeft Execute Date
#AsLeft_LastUpdateUser#
AsLeft Last Update User
#ALTemperature#
AsLeft Temperature
#ALHumidity#
AsLeft Humidity
#ALAtmospheric#
AsLeft Atmospheric Pressure
Reference {0}=1,2,3
{0} =1,2,3
#Reference{0}SN#
Reference{0} Serial Number
#Reference{0}No#
Reference{0} Number
#Reference{0}Model#
Reference{0} Model
#Reference{0}Cert#
Reference{0} Certificate
#Reference{0}Accuracy#
Reference{0} Accuracy
#Reference{0}Resolution#
Reference{0} Resolution
- 33 -
Page 35

#Reference{0}CalibrationDate#
Reference{0} Calibration Date
#Reference{0}Due#
Reference{0} Due Date
#Reference{0}Status#
Reference{0} Status
#Reference{0}Mfr#
Reference{0} Manufacturer
UUT Manufacturer
# UUT_Manufacturer#
UUT Manufacturer Name
# UUT_Manufacturer_Address#
UUT Manufacturer Address
# UUT_Manufacturer_Website#
UUT Manufacturer Website
# UUT_Manufacturer_Telephone#
UUT Manufacturer Telephone
# UUT_Manufacturer_Fax#
UUT Manufacturer Fax
# UUT_Manufacturer_ContactPerson#
UUT Manufacturer Linkman
# UUT_Manufacturer_Remark#
UUT Manufacturer Remark
UUT Customer
#UUT_Customer#
UUT Customer Name
# UUT_Customer_Address#
UUT Customer Address
# UUT_Customer_Email#
UUT Customer Email
# UUT_Customer_Teplephone#
UUT Customer Telephone
# UUT_Customer_Fax#
UUT Customer Fax
# UUT_Customer_ContactPerson#
UUT Customer Linkman
# UUT_Customer_Remark#
UUT Customer Remark
UUT Application Site
# UUT_Location#
UUT Application Site Name
# UUT_Location_Address#
UUT Application Site Address
# UUT_Location_Email#
UUT Application Site Email
# UUT_Location_Telephone#
UUT Application Site Telephone
# UUT_Location_Fax#
UUT Application Site Fax
# UUT_Location_ContactPerson#
UUT Application Site Contact Person
# UUT_Location_Remark#
UUT Application Site Remark
Frequently Asked Questions
Be sure that the serial cable connectors are properly seated and that the
reference has been turned on. If the software still does not detect the reference,
check the number of the serial port on the computer. And please make sure that the
Baud Rate in the System Settings is consistent with the reference.
- 34 -
 Loading...