

Page 1
USER AND MAINTENANCE MANUAL
MANUAL DE USO Y MANTENIMIENTO
ESWH-25 MP / ESWH-30 MP / ESWH-40 MP / ESWH-60 MP
ESWM-25 MP / ESWM-30 MP / ESWM-40 MP / ESWM-60 MP
1
Page 2

GR A B
MD ESWH-25 ESWH-30 ESWH-40 ESWH-60 ESWM-25 ESWM-30 ESWM-40 ESWM- 60
DC litres 100 130 180 250 100 130 180 250
CM Lb 25 30 40 60 25 30 40 60
SP1 r.p.m. 50 50 47 45 50 50 47 45
SP2 rpm 500 500 475 450 500 500 475 450
SP3 r.p.m. 1000 1000 950 900 820 760 760 714
SP4 rpm 800 800 750 700 820 760 760 714
LV1 mm 70 75 85 95 70 75 85 95
LV2 mm 90 105 115 125 90 105 115 125
LV3 mm 110 135 145 155 110 135 145 155
LV4 mm 130 165 175 185 130 165 175 185
LV5 mm 180 225 240 260 180 225 240 260
1
Page 3
Page 4

P1
PH 1 2 3 4 5 6 7
BL 1 2 3 3 4 5 6
PP
SP 1 1 1 1 2 1 3
RT
EAC
EAF
EAD
LV 1 1 3 3 --- 3 ---
ML
ºC
ºF
PT
TM(min) 6 12 3 3 2 3 6
FR
DO
ND
MD
D1
D2
D3
D4
D5
D6
D7
P3
PH
BL
PP 0 0 0 0 0 0 0
SP
RT 12/3 12/3 12/3 12/3 --- 12/3 ---
EAC 0 2 0 0 --- 0 ---
EAF 1 1 1 1 --- 1 ---
EAD 0 0 0 0 --- 0 ---
LV
ML 1 1 1 1 --- 1 ---
ºC
ºF
PT 0 1 --- --- --- --- ---
TM(min)
FR 0 0 --- --- --- --- ---
DO --- --- --- --- 1 --- 1
ND 0 0 0 0 --- 0 ---
MD 1 1 1 1 --- 1 ---
D1 T30/R0 0 0 0 --- 0 ---
D2 0 T30/R0 0 0 --- 0 ---
D3 0 T30/R0 0 0 --- 0 ---
D4 0 0 0 0 --- T30/R0 ---
D5 0 0 0 0 --- T30/R0 ---
D6 0 0 0 0 --- 0 ---
D7 0 0 0 0 --- 0 ---
0 0 0 0 0 0 0
12/3 12/3 12/3 12/3 --- 12/3 ---
2 2 0 0 --- 0 ---
1 1 1 1 --- 1 ---
0 0 0 0 --- 0 ---
1 1 1 1 --- 1 ---
40
104
0 1 --- --- --- --- ---
0 0 --- --- --- --- ---
--- --- --- --- 1 --- 1
0 0 0 0 --- 0 ---
1 1 1 1 --- 1 ---
T30/R0 0 0 0 --- 0 ---
0 T30/R0 0 0 --- 0 ---
0 T30/R0 0 0 --- 0 ---
0 0 0 0 --- T30/R0 ---
0 0 0 0 --- T30/R0 ---
0 0 0 0 --- 0 ---
0 0 0 0 --- 0 ---
1 2 3 4 5 6 7
8 10 3 3 4 5 6
1 1 1 1 2 1 3
1 1 3 3 --- 3 ---
---
6 12 3 3 2 3 6
90
194 --- --- --- --- ---
40
104 --- --- --- --- ---
P2
PH 1 2 3 4 5 6 7
BL 7 9 3 3 4 5 6
PP
SP 1 1 1 1 2 1 3
RT
EAC
EAF
EAD
LV 1 1 3 3 --- 3 ---
ML
ºC
ºF
PT
TM(min) 6 15 3 3 2 3 6
FR
DO
ND
MD
D1
D2
D3
D4
D5
D6
D7
P4
PH
BL
PP 0 0 0 0 0 0 0
SP
RT 12/3 12/3 12/3 12/3 --- 12/3 ---
EAC 0 2 0 0 --- 0 ---
EAF 1 1 1 1 --- 1 ---
EAD 0 0 0 0 --- 0 ---
LV
ML 1 1 1 1 --- 1 ---
ºC
ºF
PT 0 1 --- --- --- --- ---
TM(min)
FR 0 0 --- --- --- --- ---
DO --- --- --- --- 1 --- 1
ND 0 0 0 0 --- 0 ---
MD 1 1 1 1 --- 1 ---
D1 T30/R0 0 0 0 --- 0 ---
D2 0 T30/R0 0 0 --- 0 ---
D3 0 T30/R0 0 0 --- 0 ---
D4 0 0 0 0 --- T30/R0 ---
D5 0 0 0 0 --- T30/R0 ---
D6 0 0 0 0 --- 0 ---
D7 0 0 0 0 --- 0 ---
0 0 0 0 0 0 0
12/3 12/3 12/3 12/3 --- 12/3 ---
2 2 0 0 --- 0 ---
1 1 1 1 --- 1 ---
0 0 0 0 --- 0 ---
1 1 1 1 --- 1 ---
30
86
0 1 --- --- --- --- ---
0 0 --- --- --- --- ---
--- --- --- --- 1 --- 1
0 0 0 0 --- 0 ---
1 1 1 1 --- 1 ---
T30/R0 0 0 0 --- 0 ---
0 T30/R0 0 0 --- 0 ---
0 T30/R0 0 0 --- 0 ---
0 0 0 0 --- T30/R0 ---
0 0 0 0 --- T30/R0 ---
0 0 0 0 --- 0 ---
0 0 0 0 --- 0 ---
1 2 3 4 5 6 7
8 11 3 3 4 5 6
1 1 1 1 2 1 3
1 1 3 3 --- 3 ---
---
6 12 3 3 2 3 6
60
140 --- --- --- --- ---
30
86 --- --- --- --- ---
Page 5

P5
PH 1 2 3 4 5 6 7
BL 8 12 3 3 4 5 6
PP
SP 1 1 1 1 2 1 3
RT
EAC
EAF
EAD
LV 1 1 3 3 --- 3 ---
ML
ºC
ºF
PT
TM(min) 6 12 3 3 2 3 6
FR
DO
ND
MD
D1
D2
D3
D4
D5
D6
D7
P7
PH
BL
PP 0 0 0 0 0 0 0
SP
RT 12/3 12/3 12/3 12/3 --- 12/3 ---
EAC 0 2 0 0 --- 0 ---
EAF 1 1 1 1 --- 1 ---
EAD 0 0 0 0 --- 0 ---
LV
ML 1 1 1 1 --- 1 ---
ºC
ºF
PT 0 1 --- --- --- --- ---
TM(min)
FR 0 0 --- --- --- --- ---
DO --- --- --- --- 1 --- 1
ND 0 0 0 0 --- 0 ---
MD 0 0 0 0 --- 0 ---
D1 T30/R0 0 0 0 --- 0 ---
D2 0 T30/R0 0 0 --- 0 ---
D3 0 T30/R0 0 0 --- 0 ---
D4 0 0 0 0 --- T30/R0 ---
D5 0 0 0 0 --- T30/R0 ---
D6 0 0 0 0 --- 0 ---
D7 0 0 0 0 --- 0 ---
0 0 0 0 0 0 0
12/3 12/3 12/3 12/3 --- 12/3 ---
0 0 0 0 --- 0 ---
1 1 1 1 --- 1 ---
0 0 0 0 --- 0 ---
1 1 1 1 --- 1 ---
---
0 0 --- --- --- --- ---
0 0 --- --- --- --- ---
--- --- --- --- 1 --- 1
0 0 0 0 --- 0 ---
1 1 1 1 --- 1 ---
T30/R0 0 0 0 --- 0 ---
0 T30/R0 0 0 --- 0 ---
0 T30/R0 0 0 --- 0 ---
0 0 0 0 ---
0 0 0 0 --- T30/R0 ---
0 0 0 0 --- 0 ---
0 0 0 0 --- 0 ---
1 2 3 4 5 6 7
14 17 19 19 4 20 21
1 1 1 1 2 1 4
2 2 3 3 --- 3 ---
---
6 12 3 3 2 3 4
--- --- --- --- --- ---
T30/R0
30
86 --- --- --- --- ---
---
P6
PH 1 2 3 4 5 6 7
BL 13 15 19 19 4 20 21
PP
SP 1 1 1 1 2 1 4
RT
EAC
EAF
EAD
LV 2 2 3 3 --- 3 ---
ML
ºC
ºF
PT
TM(min) 6 15 3 3 2 3 4
FR
DO
ND
MD
D1
D2
D3
D4
D5
D6
D7
P8
PH
BL
PP 0 0 0 0 0 0 0
SP
RT 12/3 12/3 12/3 12/3 --- 12/3 ---
EAC 0 0 0 0 --- 0 ---
EAF 1 1 1 1 --- 1 ---
EAD 0 0 0 0 --- 0 ---
LV
ML 1 1 1 1 --- 1 ---
ºC
ºF
PT 0 1 --- --- --- --- ---
TM(min)
FR 0 0 --- --- --- --- ---
DO --- --- --- --- 1 --- 1
ND 0 0 0 0 --- 0 ---
MD 0 0 0 0 --- 0 ---
D1 T30/R0 0 0 0 --- 0 ---
D2 0 T30/R0 0 0 --- 0 ---
D3 0 T30/R0 0 0 --- 0 ---
D4 0 0 0 0 --- T30/R0 ---
D5 0 0 0 0 --- T30/R0 ---
D6 0 0 0 0 --- 0 ---
D7 0 0 0 0 --- 0 ---
0 0 0 0 0 0 0
12/3 12/3 12/3 12/3 --- 12/3 ---
2 2 0 0 --- 0 ---
1 1 1 1 --- 1 ---
0 0 0 0 --- 0 ---
1 1 1 1 --- 1 ---
30
86
0 1 --- --- --- --- ---
0 0 --- --- --- --- ---
--- --- --- --- 1 --- 1
0 0 0 0 --- 0 ---
0 0 0 0 --- 0 ---
T30/R0 0 0 0 --- 0 ---
0 T30/R0 0 0 --- 0 ---
0 T30/R0 0 0 --- 0 ---
0 0 0 0 ---
0 0 0 0 --- T30/R0 ---
0 0 0 0 --- 0 ---
0 0 0 0 --- 0 ---
1 2 3 4 5 6 7
14 18 19 19 4 20 21
1 1 1 1 2 1 4
2 2 3 3 --- 3 ---
---
6 12 3 3 2 3 4
60
140 --- --- --- --- ---
T30/R0
--- --- --- --- --- ---
---
Page 6
P9
PH 1 2 3 4 6 7
BL 22 23 26 26 27 34
PP
SP 1 1 1 1 1 4
RT
EAC
EAF
EAD
LV 3 3 4 4 4 ---
ML
ºC
ºF
PT
TM(min) 6 12 3 3 3 4
FR
DO
ND
MD
D1
D2
D3
D4
D5
D6
D7
P11
PH 1 2 3 4 6 7
BL 22 25 26 26 27 34
PP
SP 1 1 1 1 1 4
RT
EAC
EAF
EAD
LV 3 3 4 4 4 ---
ML
ºC
ºF
PT
TM(min) 6 12 3 3 3 4
FR
DO
ND
MD
D1
D2
D3
D4
D5
D6
D7
0 0 0 0 0 0
8/6 8/6 8/6 8/6 8/6 ---
0 2 0 0 0 ---
1 1 1 1 1 ---
0 0 0 0 0 ---
0 1 1 1 1 ---
---
0 1 --- --- --- ---
0 0 --- --- --- ---
--- --- --- --- --- 1
0 0 0 0 0 ---
0 0 0 0 0 ---
T30/R0 0 0 0 0 ---
0 T30/R0 0 0 0 ---
0 T30/R0 0 0 0 ---
0 0 0 0 T30/R0 ---
0 0 0 0 T30/R0 ---
0 0 0 0 0 ---
0 0 0 0 0 ---
0 0 0 0 0 0
8/6 8/6 8/6 8/6 8/6 ---
0 0 0 0 0 ---
1 1 1 1 1 ---
0 0 0 0 0 ---
0 0 0 0 0 ---
---
0 0 --- --- --- ---
0 0 --- --- --- ---
--- --- --- --- --- 1
0 0 0 0 0 ---
0 0 0 0 0 ---
T30/R0 0 0 0 0 ---
0 T30/R0 0 0 0 ---
0 T30/R0 0 0 0 ---
0 0 0 0 T30/R0 ---
0 0 0 0 T30/R0 ---
0 0 0 0 0 ---
0 0 0 0 0 ---
40
104 --- --- --- ---
--- --- --- --- ---
P10
PH 1 2 3 4 6 7
BL 22 24 26 26 27 34
PP
SP 1 1 1 1 1 4
RT
EAC
EAF
EAD
LV 3 3 4 4 4 ---
ML
ºC
ºF
PT
TM(min) 6 12 3 3 3 4
FR
DO
ND
MD
D1
D2
D3
D4
D5
D6
D7
P12
PH 2 3 4 6 7
BL 28 30 30 31 32
PP
SP 1 1 1 1 2
RT
EAC
EAF
EAD
LV 3 4 4 4 ---
ML
ºC
ºF
PT
TM(min) 12 3 3 3 3
FR
DO
ND
MD
D1
D2
D3
D4
D5
D6
D7
0 0 0 0 0 0
8/6 8/6 8/6 8/6 8/6 ---
0 2 0 0 0 ---
1 1 1 1 1 ---
0 0 0 0 0 ---
0 0 0 0 0 ---
---
0 0 --- --- --- ---
0 0 --- --- --- ---
--- --- --- --- --- 1
0 0 0 0 0 ---
0 0 0 0 0 ---
T30/R0 0 0 0 0 ---
0 T30/R0 0 0 0 ---
0 T30/R0 0 0 0 ---
0 0 0 0 T30/R0 ---
0 0 0 0 T30/R0 ---
0 0 0 0 0 ---
0 0 0 0 0 ---
0 0 0 0 0
4/12 4/12 4/12 4/12 ---
0 0 0 0 ---
1 1 1 1 ---
0 0 0 0 ---
0 0 0 0 ---
30
86 --- --- --- ---
1 --- --- --- ---
0 --- --- --- ---
--- --- --- --- 1
0 0 0 0 ---
0 0 0 0 ---
0 0 0 0 ---
T30/R0 0 0 0 ---
0 0 0 0 ---
0 0 0 T30/R0 ---
0 0 0 T30/R0 ---
0 0 0 0 ---
0 0 0 0 ---
3
86 --- --- --- ---
Page 7
P13
PH 2 3 4 6 7
BL 29 30 30 31 32
PP
SP 1 1 1 1 2
RT
EAC
EAF
EAD
LV 3 4 4 4 ---
ML
ºC
ºF
PT
TM(min) 12 3 3 3 3
FR
DO
ND
MD
D1
D2
D3
D4
D5
D6
D7
P15
PH
BL
PP 0
SP
RT ---
EAC ---
EAF ---
EAD ---
LV
ML ---
ºC
ºF
PT ---
TM(min)
FR ---
DO 1
ND ---
MD ---
D1 ---
D2 ---
D3 ---
D4 ---
D5 ---
D6 ---
D7 ---
0 0 0 0 0
4/12 4/12 4/12 4/12 ---
0 0 0 0 ---
1 1 1 1 ---
0 0 0 0 ---
0 0 0 0 ---
--- --- --- --- ---
0 --- --- --- ---
0 --- --- --- ---
--- --- --- --- 1
0 0 0 0 ---
0 0 0 0 ---
0 0 0 0 ---
T30/R0 0 0 0 ---
0 0 0 0 ---
0 0 0 T30/R0 ---
0 0 0 T30/R0 ---
0 0 0 0 ---
0 0 0 0 ---
7
6
3
---
---
6
P14
PH 0 1 2 3 5 4 5 6 7
BL 3 35 36 3 4 3 4 5 6
PP
SP 1 1 1 1 2 1 2 1 3
RT
EAC
EAF
EAD
LV 3 1 1 3 --- 3 --- 3 ---
ML
ºC
ºF ---
PT
TM(min) 3 5 5 3 2 3 2 3 6
FR
DO
ND
MD
D1
D2
D3
D4
D5
D6
D7
P16
PH
BL
PP 0
SP
RT ---
EAC ---
EAF ---
EAD ---
LV
ML ---
ºC
ºF
PT ---
TM(min)
FR ---
DO 1
ND ---
MD ---
D1 ---
D2 ---
D3 ---
D4 ---
D5 ---
D6 ---
D7 ---
0 0 0 0 0 0 0 0 0
12/3 12/3 12/3 12/3 --- 12/3 --- 12/3 ---
0 2 2 0 --- 0 --- 0 ---
1 1 1 1 --- 1 --- 1 ---
0 0 0 0 --- 0 --- 0 ---
1 1 1 1 --- 1 --- 1 ---
65
149
--- 1 1 --- --- --- --- --- ---
--- 0 0 --- --- --- --- --- ---
--- --- --- --- 1 --- 1 --- 1
0 0 0 0 --- 0 --- 0 ---
1 1 1 1 --- 1 --- 1 ---
0 T30/R0 0 0 --- 0 --- 0 ---
0 0 T30/R0 0 --- 0 --- 0 ---
0 0 T30/R0 0 --- 0 --- 0 ---
0 0 0 0 --- 0 --- 0 ---
0 0 0 0 --- 0 --- T30/R0 ---
0 0 0 0 --- 0 --- T30/R0 ---
0 0 0 0 --- 0 --- 0 ---
71
160 --- --- --- --- --- ---
5
33
2
---
---
2
Page 8

ENGLISH
ºC
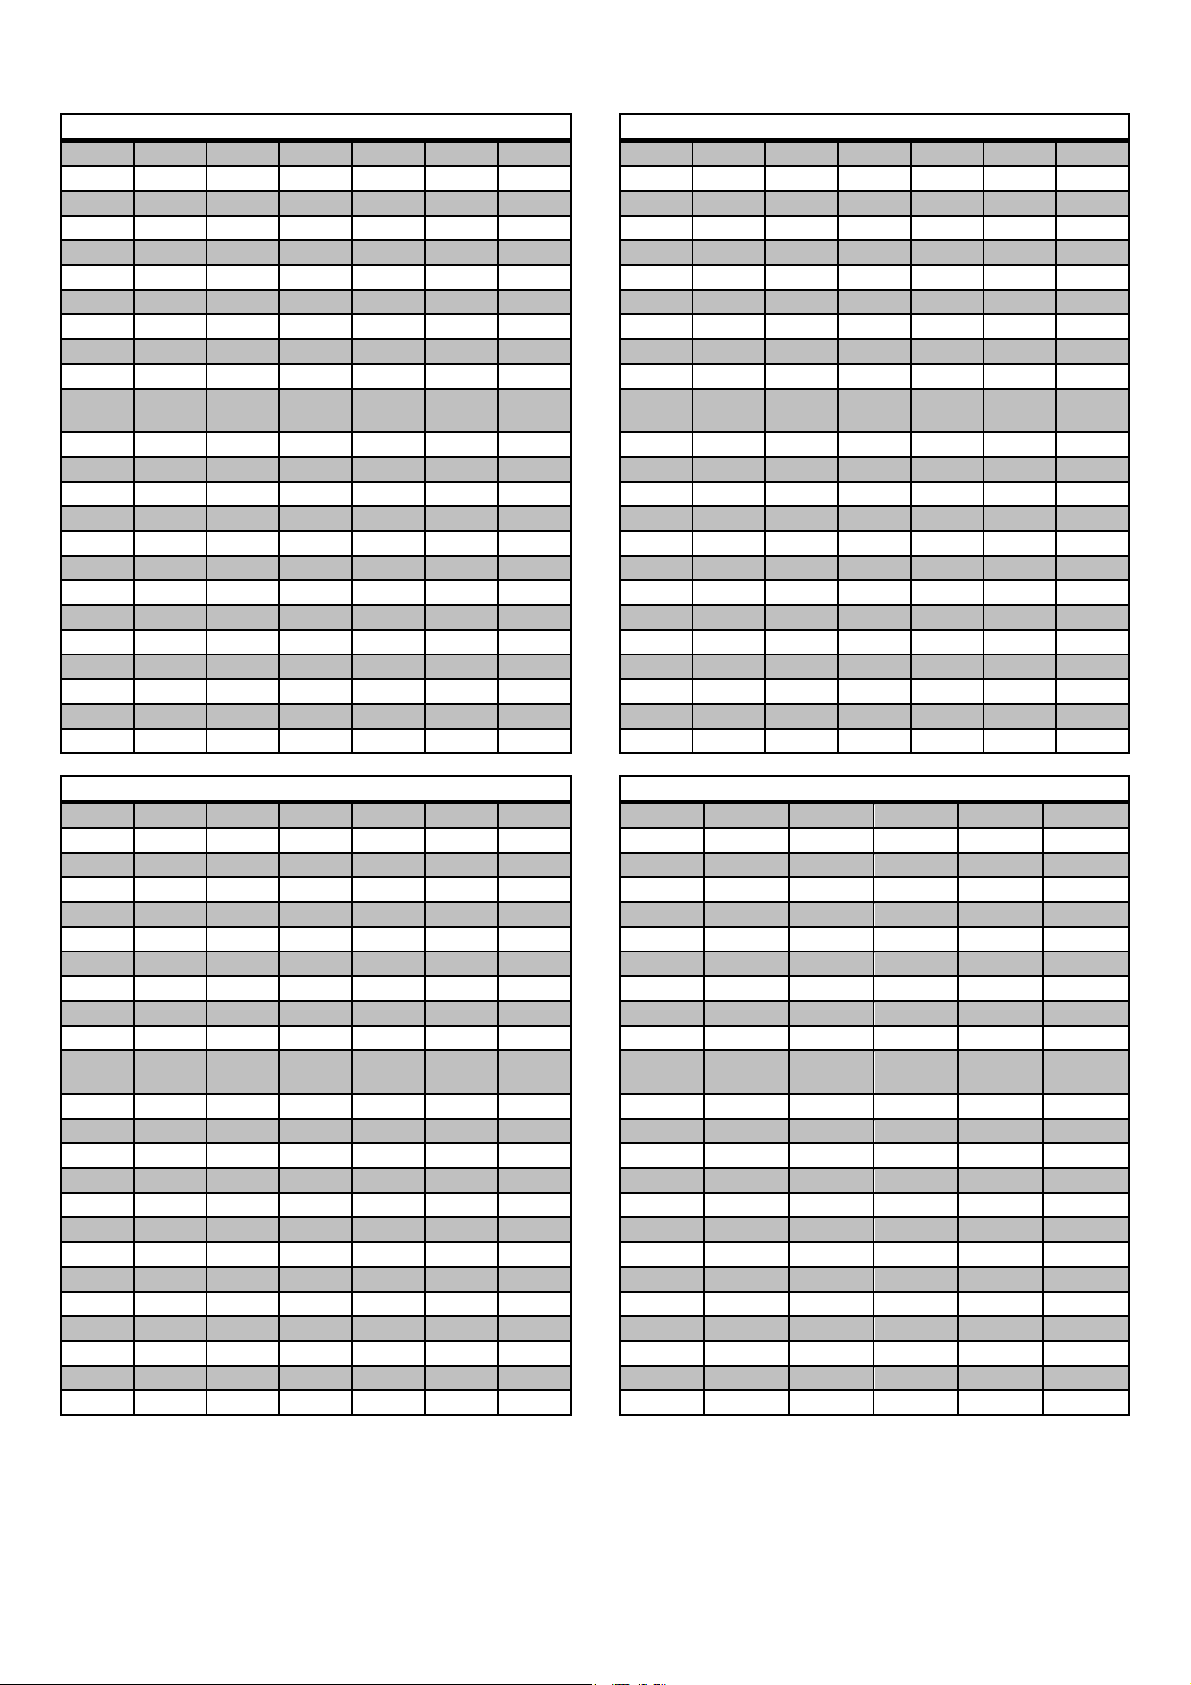
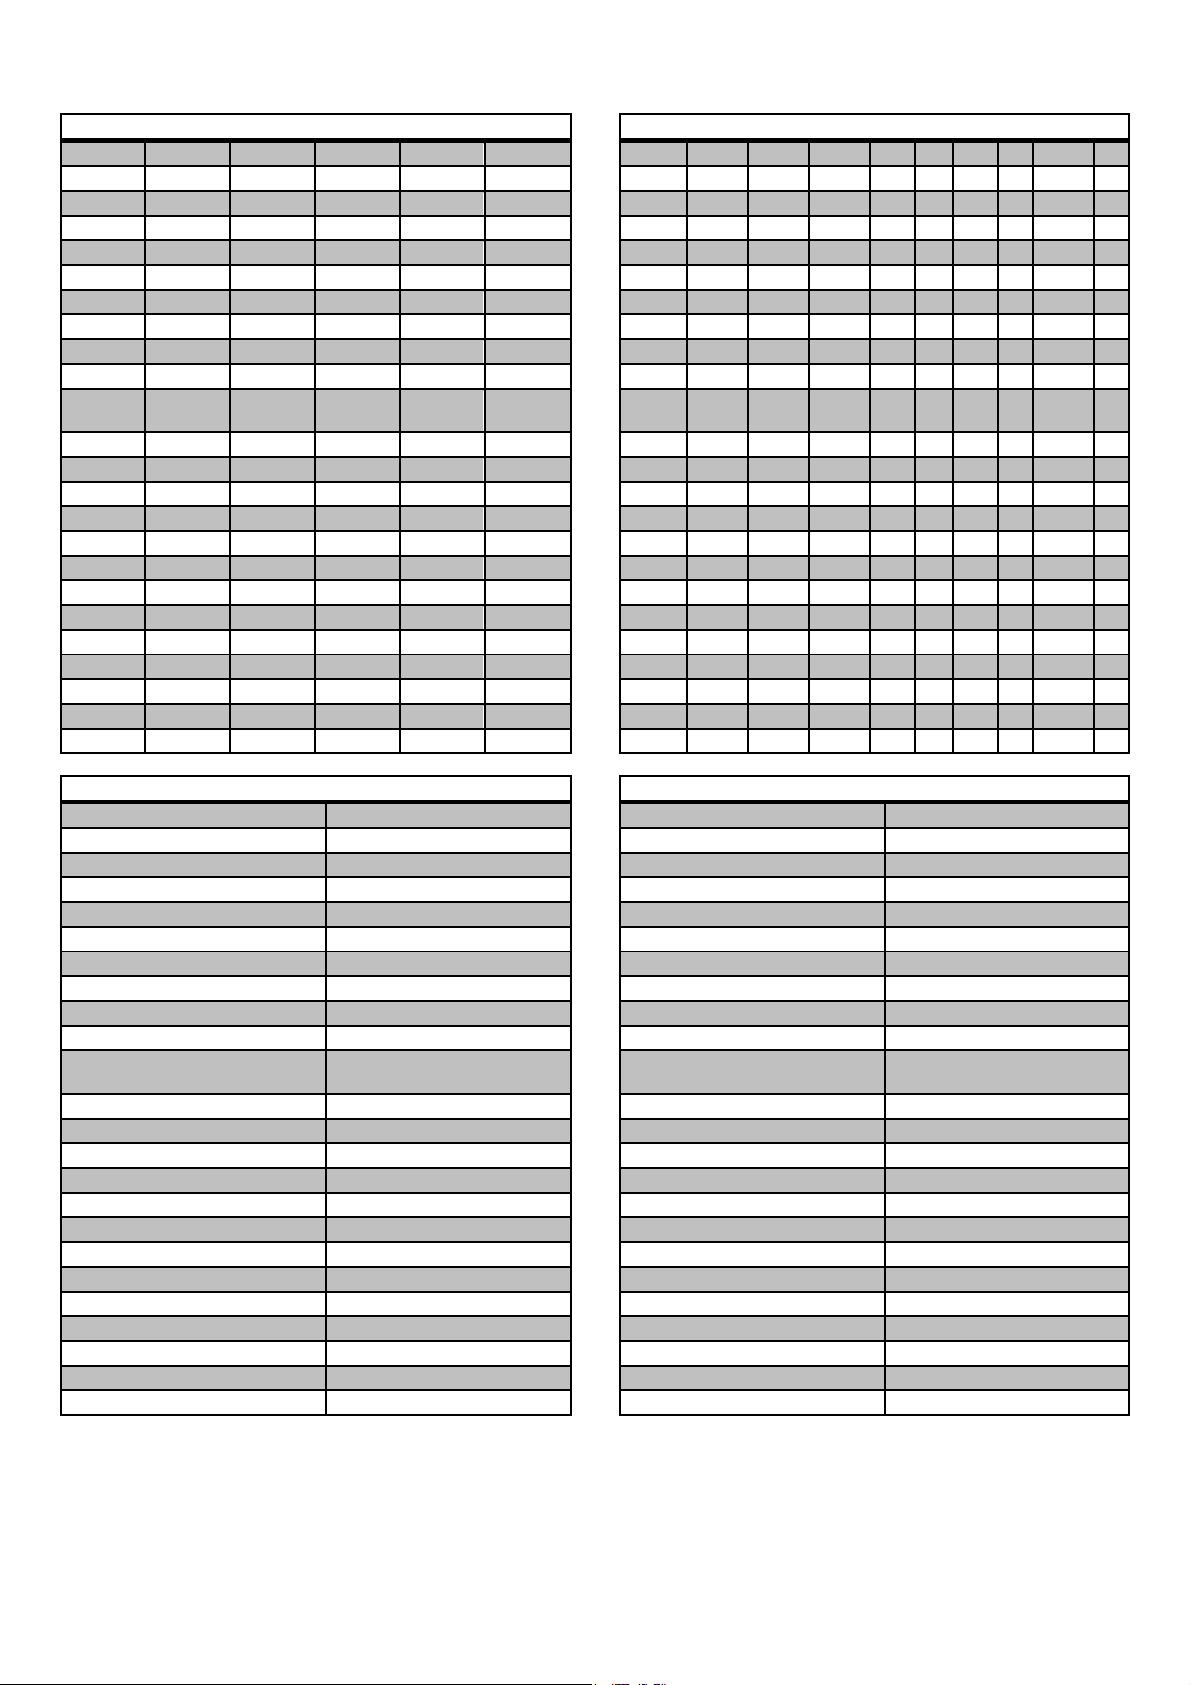
INTERPRETATION OF TABLES: SYMBOLS AND VALUES
SYMBOL
A
B
C
F
G
H
I
PH
BL
PP
SP
RT
EAC
EAF
EAD
LV
ML
ºF
PT
TM:
FR
DO
D*
P*
MEANING
CONTROLS
DETERGENT TRAY
POWER SWITCH
PREWASH
SYSTEMS
SOFTENER
BLEACH
PHASE
BLOCK NO.
STOP PROGRAMME
SPEED
RHYTHM
HOT WATER INPUT
COLD WATER INPUT
AUX/DECALCIFIED WATER INPUT
WATER LEVEL
MOVEMENT DURING FILLING
TEMPERATURE IN DEGREES CENTIGRADE
TEMPERATURE IN DEGREES FAHRENHEIT
THERMAL STOP
TIME
COOLING
OPTIMUM DISTRIBUTION
DISPENSER INPUT NUMBER
PROGRAMMES
VALUES
0: Soak
1: Pre-wash
2: wash
3: Rinse 1
4: Rinse 2
5: Short spin
6: Final rinse (softener)
7: Long spin
0: NO
1: YES
SP1: SYSTEMS
SP2: SHORT SPIN
SP3: LONG SPIN (MAX)
SP4: DELICATES SPIN
SECONDS MOVING/ SECONDS STOPPED
0: NO
1: YES
2: CONTROL
0: NO
1: YES
0: NO
1: YES
LV1: MINIMUM
LV2: LOW
LV3: MEDIUM
LV4: HIGH
LV5: MAXIMUM
0: NO
1: YES
0: NO
1: YES
MINUTES
0: NO
TEMPERATURE/TIME
0: NO
1: YES
0: NO
TIME/DELAY (SECONDS)
P1 Whites 90ºC
P2 Whites/coloureds 60 ºC
P3 Whites/coloureds 40 ºC
P4 Whites/coloureds 30 ºC
P5 Whites/coloureds cold wash
P6 Synthetics 60ºC
P7 Synthetics 30ºC
P8 Synthetics cold wash
P9 Delicates 40ºC
P10 Delicates 30ºC
P11 Delicates cold wash
P12 Woollens 30 ºC
P13 Cold woollens
P14 Sanitary
P15 Long spin
P16 Short spin
3
Page 9

ENGLISH
CONTENTS
INTERPRETATION OF TABLES: SYMBOLS AND VALUES ....................................................................................... 3
IMPORTANT INSTRUCTIONS REGARDING SAFETY AND USE .............................................................................. 6
1INTRODUCTION ....................................................................................................................................................... 2
2USE ............................................................................................................................................................................ 3
2.1
Controls ............................................................................................................................................................. 3
2.2
Operation ........................................................................................................................................................... 4
2.3
Selecting a programme ..................................................................................................................................... 4
2.4
Programme execution ....................................................................................................................................... 4
2.5
Programme end................................................................................................................................................. 5
3MAIN MENU .............................................................................................................................................................. 7
3.1
Delayed programming ....................................................................................................................................... 7
3.2
Configuration ..................................................................................................................................................... 7
3.3
Options .............................................................................................................................................................. 7
3.3.1Contrast: ...................................................................................................................................................... 7
3.3.2Double drain: ............................................................................................................................................... 8
3.3.3Eliminate advance ....................................................................................................................................... 8
3.3.4Restricted access: ....................................................................................................................................... 8
3.3.5Change levels: ............................................................................................................................................. 8
3.3.6Laundrette message: ................................................................................................................................... 8
3.3.7Thermal stop: ............................................................................................................................................... 9
3.3.8Language ..................................................................................................................................................... 9
3.3.9WET CLEANING ......................................................................................................................................... 9
3.3.10Degrees ºC/ºF .............................................................................................................................................. 9
3.4
STATISTICS .................................................................................................................................................... 10
4PROGRAMMING ..................................................................................................................................................... 11
4.1
CREATION OF A WASH PROGRAM ............................................................................................................. 11
4.2
MAIN PROGRAMMING MENU ....................................................................................................................... 12
4.3
PROGRAMME NAME ..................................................................................................................................... 12
4.3.1Create name .............................................................................................................................................. 12
4.3.2Copy name ................................................................................................................................................ 12
4.3.3Change name ............................................................................................................................................ 12
4.4
CYCLE NAME ................................................................................................................................................. 12
4.4.1Create cycle name..................................................................................................................................... 12
4.4.2Copy cycle name ....................................................................................................................................... 13
4.4.3Change cycle name ................................................................................................................................... 13
4.5
BLOCK ............................................................................................................................................................ 13
4.5.1Stop programme ........................................................................................................................................ 13
4.5.2Speed ........................................................................................................................................................ 13
4.5.3Rate On ..................................................................................................................................................... 13
4.5.4Rate Off ..................................................................................................................................................... 13
4.5.5Hot water inlet ............................................................................................................................................ 13
4.5.6Cold water inlet .......................................................................................................................................... 14
4.5.7Decalcified water inlet ............................................................................................................................... 14
4.5.8Level 1 ....................................................................................................................................................... 14
4.5.9Filling with movement ................................................................................................................................ 14
4.5.10Temperature .............................................................................................................................................. 14
4.5.11Thermal stop .............................................................................................................................................. 14
4.5.12Time ........................................................................................................................................................... 14
4.5.13Cooling ...................................................................................................................................................... 14
4.5.14Drainage level ............................................................................................................................................ 14
4.5.15Drain no 1/Drain no 2 ................................................................................................................................ 14
4.5.16Unwinding/Movement in drainage ............................................................................................................. 14
4.5.17Dosing time ................................................................................................................................................ 15
4.5.18Start dosing ............................................................................................................................................... 15
4.5.19Delay ......................................................................................................................................................... 15
4.5.20Create block .............................................................................................................................................. 15
4.5.21Copy block ................................................................................................................................................. 15
4.5.22Change block ............................................................................................................................................. 15
4.6
PROGRAMME ................................................................................................................................................ 16
4.6.1Create program ......................................................................................................................................... 16
4
Page 10

ENGLISH
4.6.2
Copy program ............................................................................................................................................ 16
4.6.3Change program ........................................................................................................................................ 17
4.6.4Insert .......................................................................................................................................................... 17
4.6.5Modify ........................................................................................................................................................ 17
4.6.6Erase ......................................................................................................................................................... 17
4.6.7Erase program ........................................................................................................................................... 18
5MAINTENANCE ....................................................................................................................................................... 19
5.1
Electrical and mechanical irregularities ........................................................................................................... 19
5.2
Error messages ............................................................................................................................................... 19
5
Page 11

ENGLISH
IMPORTANT INSTRUCTIONS REGARDING SAFETY AND USE
WARNING: To reduce the risk of electrical shocks
or injury when using the appliance, the basic
precautions should be observed, including the
following:
1- READ all the instructions prior to using the
appliance and KEEP THEM in an easily
accessible place for reference in the event of
doubt.
2- Do NOT wash clothes which have been
previously treated, washed, soaked or stained
with petrol, dry cleaning solvents, or other
inflammable or explosive substances, as these
give off vapours which may catch fire or
explode.
3- Do NOT add petrol, dry cleaning solvents or
other inflammable substances to the washing
water. These substances give off vapours
which could catch fire or explode.
4- In some conditions, hydrogen gas may be
produced in a hot water system which has not
been used for more than two weeks. Hydrogen
gas is explosive. If the hot water system has
not been used for a while, before using the
washing machine turn on all the hot water taps
and let the water run for a few minutes. This
will release any accumulated hydrogen gas.
As the gas is inflammable, do not smoke or
use naked flames during this operation.
5- Do NOT allow children to play in or on the
appliance. Children should be strictly
supervised when in the vicinity of a machine
which is operating.
6- Remove the door from the appliance before
disposal or before leaving it out of service.
7- DO NOT TRY TO OPEN THE DOOR if the
drum is moving.
8- Do NOT install or store the appliance in the
open.
9- Do NOT try to force the controls.
10- Do not repair or replace parts of the
appliance or carry out any servicing unless
recommended to do so in the User Instruction
Manual. Make sure that you fully understand
the instructions and have the necessary skills
to carry out the operations described.
11- Do NOT remove any safety device or modify
any components in the washing machine. DO
NOT INSTALL components not belonging to
the machine in the appliance.
12- Failure to comply with any of the instructions
given in the Instruction Manual may result in
personal injury to the user. It is no possible to
provide for all possible situations and
contingencies with warnings about risk and
hazards. Therefore, any person involved in the
transportation, installation, use or maintenance
of the machine should always employ
common sense, caution and care.
13- Do NOT use the machine unless all the covers
and guards are correctly fitted and secured.
14- The distributor (vendor) MUST correctly
instruct the user during commissioning.
15- Pour the correct doses of detergent, fabric
softener and lay into the dispenser drawer, as
indicated by the manufacturer. Heed tips
concerning the treatment of different materials
given by the manufacturers.
16- Daily remove any traces of detergent or liquids
from the dispenser drawer. Never use
powdered or abrasive detergents for cleaning;
use only water and soap.
17- Clean the water inlet filters and the external
dispenser conducts once a month.
18- Never clean the exterior by water injection;
functional parts of the machine could damage.
19- If the washing machine is to be idle for long
periods, apply a coat of Vaseline oil to all its
stainless steel surfaces.
20- An annual general revision is recommended.
6
Page 12

ENGLISH
1 INTRODUCTION
Dear customer,
Thank you for the confidence you have placed in our product. We hope it meets your needs.
The guarantee does not cover damage to glass components, or consumables (seals, bulbs, etc.) nor damage to
insulation material or damage due to the incorrect installation of the appliance, or to inappropriate use, inadequate
maintenance or poor repair processes.
This appliance is subject to changes and modifications for its technical progress.
2
Page 13

ENGLISH
2 USE
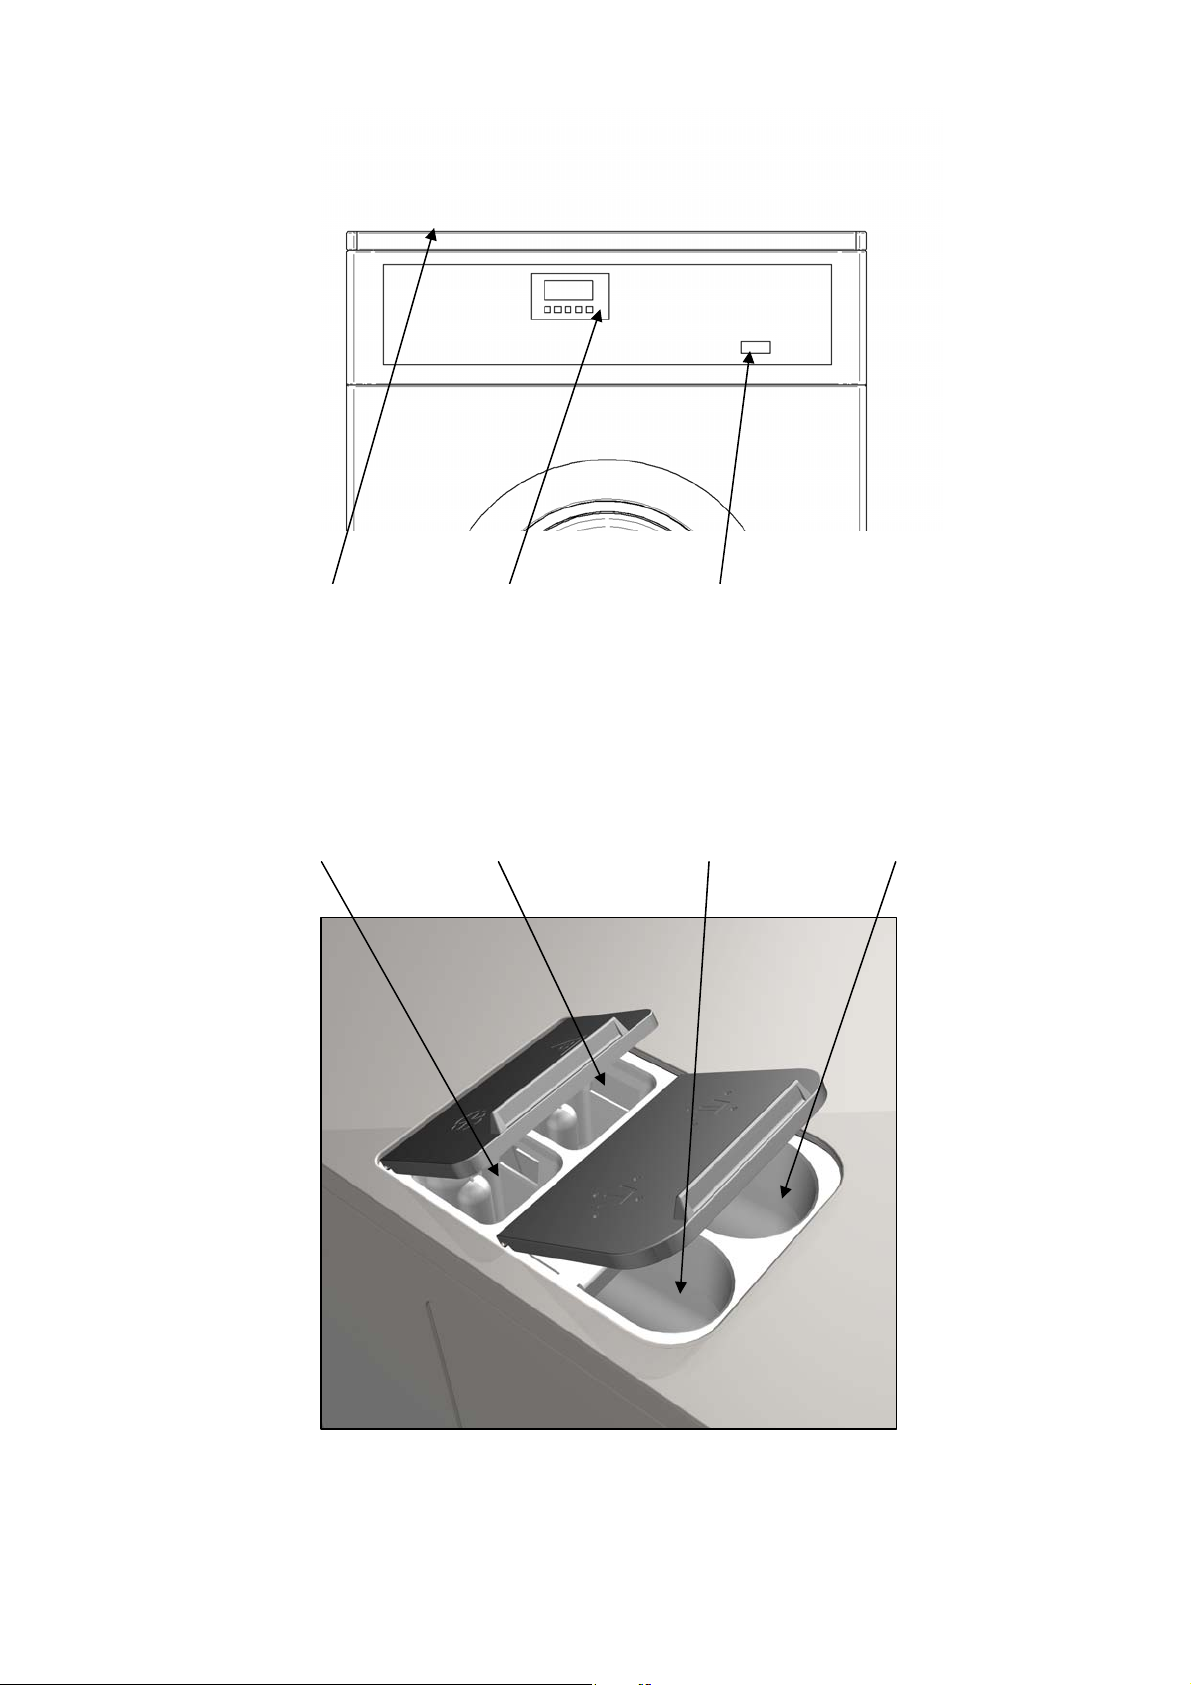
2.1 Controls
Screen (2)
Mains switch (4) On/Off
START key
STOP key
INFO key
ADVANCE (>>) key
INC (∧ ) and DEC (∨ ) keys
ESC key
ENTER key
This displays information concerning the current operation.
The switch has two positions. Press “I” to switch on the washing machine and “O” to
switch it off.
Press Start to start a programme, pause or continue the programme after the
pause.
This key is used to end a programme.
This key gives access to several menus such as programming, maintenance,
configuration or statistics. It also gives access to detailed displays of the phases.
Press advance to accelerate a programme. Each time this key is pressed, the
programmer moves directly to the next programme cycle; and if it is in the last cycle,
the programme is terminated. Please note that if this key is pressed during a spin
cycle, the machine will not move to the next cycle until the braking safety time has
elapsed.
The INC (∧) and DEC (∨) keys have different functions depending on the screen
and the programmer operating mode. Use these keys to select a wash programme
or to scroll through different menus.
This key is used to eliminate the error messages from the screen and consider the
programme ended. It is also used to go up a submenu when the programming,
maintenance, configuration and statistics menus are accessed.
This key is used to eliminate the error messages from the screen and continue with
the execution of the programme. It is also used to enter the programming,
maintenance, configuration and statistics submenus and to validate the
modifications made to them.
3
Page 14

ENGLISH
2.2 Operation
This machine has been designed to wash or treat most
materials. Its use for other purposes than those given
is considered as undue and dangerous.
The machine should be loaded with the nominal load,
smaller or bigger loads should be avoided.
Clothes should not be washed in sacks or cloth bags.
If this is absolutely necessary, make sure the machine
is loaded to the nominal load to avoid possible
unbalanced loads.
Canvas, waterproof items, mops, carpets or rugs
should not be spun.
The machine is controlled using a programmable
microprocessor able to adapt to the needs of each
user.
There are 16 programmes which can NOT be
modified, you may create up to 99 programmes to
meet your needs. For further details, please see the
sections Programming (page 68) and Standardised
Programmes (page 68).
The machine has an intelligent control to control the
water temperature; if hot water is available, it should
be connected. The machine adjusts the different water
inputs to maintain the programmed temperature.
It has intelligent control for spin cycle management.
The washing machine controls any unbalanced loads
and manages the spin to ensure a good spin, reducing
noise and extending the useful life of wearable
components, thus significantly reducing fatigue in the
mechanical components.
Press the START key.
Once the programme has started, information
relating to the ongoing programme's status and
function is shown on the screen. For example,
Programme: 2
WHITES/COLOUREDS 60ºC
Prewash 30ºC
Filling…
The third line indicates the ongoing phase, in
this case a pre-wash. The fourth line shows the
operation in process at that instant, in the example,
water intake.
When the water intake has finished and the
heating starts, this is indicated on the screen, as can
be observed in the following Figure:
After finishing heating the water, the washing
time starts, and the time remaining to complete the
prewash cycle is displayed on the screen, as can be
observed in the following figure:
Programme: 2
WHITES/COLOUREDS 60ºC
Prewash 30ºC
Heating…
2.3 Selecting a programme
When the washing turns on, the last programme
carried out appears on the screen, indicating its
number and name, as well as its main characteristics.
For example, if programme number one is selected:
Programme: 2
WHITES/COLOUREDS 60ºC
Prewash 30ºC
Time remaining 4 min
Programme: 1
WHITES 90ºC
The first line on the screen indicates the
programme number (1) and its name (WHITES 90 ºC)
is on the second line. The functions of each key are
given in the last lines.
2.4 Programme execution
In order to carry out a wash programme, the
following steps should be followed:
Put dirty clothes in washing machine drum
Close washing machine door.
Add detergent
Select desired programme.
When the phase finishes, the drainage is
performed, indicated on the screen, as can be
observed in the following Figure:
Programme: 2
WHITES/COLOUREDS 60ºC
Prewash 30ºC
Draining...
Then the following phase begins, in this case
the wash phase, as can be observed in the following
Figure:
4
Page 15

ENGLISH
Programme: 2
WHITES/COLOUREDS 60ºC
Wash 60ºC
Filling...
While the programme is running the next keys on the
control panel may be pressed, activating different
functions in each case:
PAUSE key: the programme stops, it is paused. The
screen displays the message:
To end the programme, press ENTER; to continue
the programme press ESC.
INFO key (advanced) While the machine is
running, use the INFO key to enter the parameters
in use at that moment; the different options are
displayed on the following figure:
SEE INPUTS
SEE OUTPUTS
SETTINGS
TRUE VALUES
Programme: 2
WHITES/COLOUREDS 60ºC
Wash 60ºC
Pause on...
For the programme to continue, press the START key.
For safety reasons, the programme can not be paused
while in the spin cycle, and therefore the PAUSE key
does not exist.
ADVANCE (>>) key: Use the ADVANCE key to go
directly to the next phase.
After a few seconds, the programme continues,
starting the next phase, unless the phase being carried
out when ADVANCE was pushed was the last one, in
which case the programme will end.
If the ADVANCE key is pressed while the machine is
spinning, as the drum is braking the following message
is displayed (the braking time is approximately 1.5
minutes depending on the model of washing machine,
please wait and do not try to open the door):
Programme: 2
WHITES/COLOUREDS 60ºC
Spin 500rpm
Braking...
STOP key: when this key is pressed, the following
message is displayed:
P2:WHITES/COLOUREDS 60ºC
Spin 900rpm
End programme?
The active inputs and outputs are displayed in real
time, together with the true values and the
programme settings.
2.5 Programme end
The programme can finish in several ways:
Normal end: the programme finishes when all its
phases have been carried out.
Pressing the STOP key: from any point in the
programme, pressing the STOP key and then the
ENTER key.
Pressing the ADVANCE key: at any point of the
programme, pressing the ADVANCE key repeatedly or
holding it continuously the end can be reached. As in
the previous case, if a spinning process was being
carried out, first the braking of the drum will be allowed
during a few seconds before replaying the ADVANCE
key again.
When a programme finishes, before the door can be
opened the unwinding of the clothes is carried out
during 30 seconds, and the screen displays the
following message:
Programme: 2
WHITES/COLOUREDS 60ºC
Spin 500rpm:
Unwinding...
After 30 seconds, a message appears on the screen
accompanied by an acoustic signal, indicating that the
programme has ended and that the door can be
opened:
5
Page 16

ENGLISH
Programme: 2
WHITES/COLOUREDS 60ºC
End of programme
Open door…
Now, the acoustic signal can be stopped by pressing
PAUSE or by opening the door.
6
Page 17

ENGLISH
3 MAIN MENU
With the washing machine on but not running, press
the info. key.
→ DELAYED PROG.
PROGRAMMING
CONFIGURATION
MAINTENANCE
Use the DEC (∨∨∨∨ ) key to access the different options:
PROGRAMMING
CONFIGURATION
MAINTENANCE
→ STATISTICS
3.1 Delayed programming
Before starting up the programme, the initial time of a
programme can be selected. Select the required
programme and press INFO:
→DELAYED PROG.
PROGRAMMING
CONFIGURATION
MAINTENANCE
Programme: 2
WHITES/COLOUREDS 60ºC
Time remaining 2h30 min
3.2 Configuration
With the washing machine on, press the INFO key:
DELAYED PROG.
PROGRAMMING
CONFIGURATION
MAINTENANCE
Use the INC (∧∧∧∧) and DEC (∨∨∨∨) buttons to access
CONFIGURATION and press ENTER to select the
desired option.
→ OPTIONS
LANGUAGE
WET CLEANING
ºC/F
MODEL
Press Enter to access the DELAYED
PROGRAMMING option.
Delayed programm ing
→ 0h
0m
The delay can be selected with the INC (∧∧∧∧ ) or DEC (∨∨∨∨)
keys and the cursor moves to the next character with
the ADVANCE key (>>).
Press ENTER after introducing the desired value. The
time remaining to run the programme is automatically
displayed and after the delay, the selected programme
starts.
3.3 Options
Once OPTIONS has been selected, press ENTER.
→ CONTRAST
DOUBLE DRAINAGE
ELIMINATE ADVANCE
RESTRICTED ACCESS
CHANGE LEVELS
LAUNDRETTE MESSAGE
THERMAL STOP
3.3.1 Contrast:
To change the display contrast, press ENTER:
Adjust contrast…
7
Page 18

ENGLISH
With the INC (∧∧∧∧) and DEC (∨∨∨∨) keys the display contrast
can be changed. Press the ESC key to return to the
OPTIONS screen. Press ENTER to select the desired
contrast.
If the machine is equipped with this option*, the
double drain should be activated. Fixed programmes
do not vary (drain no 1) but a new option appears in
programming (drain no 1/drain no 2) to programme**
different drains and reuse the clean water in the rinse
cycles. This option is only activated if the second drain
is fitted.
* To obtain a double drain, please consult your usual
dealer.
** Please see the programming manual.
Double drain?
→ NO
YES
3.3.2 Double drain:
3.3.3 Eliminate advance
Eliminate advanc e?
→ NO
YES
Use the INC (∧∧∧∧) and DEC (∨∨∨∨) keys to change the digit
selected and ADVANCE to change to the next digit.
After entering any digit, press RETURN to correct.
After entering all the digits, press ENTER and repeat
password as requested:
ENTER CODE
0000
Keep password in a safe place for use in subsequent
configurations,
IF THE CODE IS LOST IT WILL NOT BE POSSIBLE
TO RETURN TO THE CONFIGURATION MENU
3.3.5 Change levels:
The pre-established water levels for the washing
machine can be modified within certain limits. The
levels depend upon the model of washing machine; a
safety model is established for all models of 60mm.
→ Minimum: 110mm
Low: 130mm
Medium: 150mm
High: 170mm
Maximum: 180 mm
Reset levels
If the advance is eliminated, it will not be possible to
advance any programme while running, and
programmes may only be started from the first cycle.
3.3.4 Restricted access:
This option serves to prevent unwanted handling of the
machine.
Access restricted
→ NO
YES
If YES is selected, enter the required code:
ENTER CODE
0000
Use the INC (∧∧∧∧) and DEC (∨∨∨∨) keys to select the level
you wish to modify and use the ENTER key to enter
the level. The following screen is displayed:
CHANGE LEVELS
Low: 130mm
Now the pre-established level “Low” (130 mm) can be
modified within the values “Minimum”(110 mm) and
“Medium”(170 mm) using the INC (∧∧∧∧) and DEC (∨∨∨∨)
keys. For a greater margin of movement, the adjacent
levels should also be modified.
If we select the option, Reset Levels, the water levels
will automatically return to the manufacturer’s preestablished levels.
3.3.6 Laundrette message:
The welcome message can be configured. This
message appears after the model and software
version when the machine is switched on. If this option
is selected:
8
Page 19

ENGLISH
LAUNDRETTE MESSAGE
message
->MANUAL DOSING
SEE INPUTS
SEE OUTPUTS
SETTINGS
TRUE VALUES
The INC (∧∧∧∧) and DEC (∨∨∨∨) keys change the character
selected and the ADVANCE key selects the character
to be modified. ENTER to save.
3.3.7 Thermal stop:
When the thermal stop switch is activated, the cycle
time does not start until the programmed temperature
has been reached in order to guarantee the wash
cycle is correctly completed; this switch can be
deactivated so that the time is counted from the
moment the programmed level is reached. ON
activated, OFF deactivated (activated by defect) If this
is deactivated, nothing will be run, even if the thermal
stop switch is programmed in new blocks.
3.3.8 Language
8 languages are available:
→ SPANISH
FRENCH
ENGLISH
GERMAN
ITALIAN
PORTUGUES
TURKISH
POLISH
RUSSIAN
Press START to activate or deactivate the selected
output.
->dosing 1 Yes
dosing 2 No
dosing 3 No
dosing 4 No
dosing 5 No
dosing 5 No
dosing 5 No
Cold water No
Hot water No
Decalcified water No
rpm. For speeds of under 30 rpm we recommend
blocks are programmed with a stop time which is
greater than the run time. For example 20 sec. Run 30
sec. Stop.
second to obtain a “rocking” effect.
Once the ºC/ºF DEGREES option has been selected,
press ENTER:
2-Possibility of programming speeds up to 15
3-Possibility to programme rhythms of up to 1
3.3.10 Degrees ºC/ºF
Select degrees
→ ºC
ºF
A personalised language can be loaded using a
“MEMORY KIT” or PC by selecting the option,
USER/IMPORT. Please see the “Wash control” (PC
communication) manual for further information.
Press ENTER to validate the selection. To exit without
validating, press ESC.
3.3.9 WET CLEANING
Do NOT activate this option unless you are sure of
how it works.
When the WET CLEANING option is activated, the
following options are available:
1-Possibility to dispense detergent while
machine is running. If INFO is pressed while the
machine is running, a new menu, MANUAL DOSING,
is displayed which permits manual dosing of any input
dose or any water input. It is not permitted to add
anything during the spin cycle.
With the INC (∧∧∧∧) and DEC (∨∨∨∨) keys any of the 2
options can be selected: Centigrade ºC or Fahrenheit
ºF. Press ENTER to validate the selection. To exit
without validating, press ESC.
9
Page 20

ENGLISH
3.4 STATISTICS
This option is used to view the number of times that each programme has been run. With the washing machine on,
press the INFO key, STATISTICS:
P1: 12
P2: 14
P3: 17
P4: 0
Use the INC (∧∧∧∧) and DEC (∨∨∨∨) keys to view the remaining programmes. Press ESC to exit.
10
Page 21

ENGLISH
Cycle Name
1
Cycle Name
2
Cycle Name
3
4 PROGRAMMING
4.1 CREATION OF A WASH PROGRAMME
A wash programme consists of a programme name and a set of cycles with a minimum of one and a maximum of 15.
Each cycle has a name and a block, which is a structure of 30 parameters that the user can programme and modify as
required.
Example:
Up to 99 different programmes can be programmed. Nevertheless, it should be taken into account that programmes 1
to 16 are fixed, that is to say, they can not be modified nor erased. Therefore, the new programmes to be created
must be recorded between 17 and 99. Similarly, it is possible to programme up to 120 blocks, but there are 34 fixed
blocks which can not be modified or erased.
The programme name (name) as well as the name of the cycle consists of a maximum of 15 characters. The following
characters can be used:
Example: Prewash
Block number
PROGRAMME NAME
Example.: Delicates 40ºC
Example: Wash
Block number
Example: Spin
Block number
A to Z , a to z , 0 to 9 , blank space , $, %, /, (, ), =, ?, +, -, _ , >, <
11
Page 22

ENGLISH
4.2 MAIN PROGRAMMING MENU
After turning the machine on, press the INFO key:
→DELAYED. PROGRAMMING
PROGRAMMING
CONFIGURATION
MAINTENANCE
Press DEC (∨∨∨∨ ) twice followed by ENTER to access
the main programming menu:
→PROGRAMME NAME
CYCLE NAME
BLOCK
PROGRAMME
4.3 PROGRAMME NAME
After pressing the ENTER key we have three options:
→CREATE NAME
COPY NAME
CHANGE NAME
4.3.1 Create name
This command allows us to create the programme
name. The steps to follow are the following:
ENTER key:
the character indicated by the cursor; and the
ADVANCE (>>) key to move the cursor to the next
character; use the INFO key to change from upper to
lower case and to special characters. Once the name
has been written, press ENTER.
ENTER: Accept / ESC: Cancel / <<: Previous menu
This command allows for copying the name of a
programme from another existing one. The steps to
follow are the following:
ENTER key and the first name saved in the memory
will be displayed.
After selecting CREATE NAME, press the
CREATE NAME
Programme name
A
Use the INC (∧∧∧∧) and DEC (∨∨∨∨) keys to modify
Save name?
4.3.2 Copy name
After selecting COPY NAME, press the
names saved in the memory. Once the name has been
selected, press ENTER. It is now possible to change
the name; after changing press ENTER.
ENTER: Accept / ESC: Cancel / <<: Previous menu
This command allows for modifying the name of a
programme amongst those created by the user. The
steps to follow are the following:
ENTER key and the first available name will be
displayed. For example:
to be modified is selected. Press ENTER to validate
the selection.
the character indicated by the cursor; use the
ADVANCE (>>) key to move the cursor to the next
character. Once the name has been modified, press
ENTER.
ENTER: Accept / ESC: Cancel / <<: Previous menu
4.4 CYCLE NAME
After pressing the ENTER key we have three options:
This command allows for the creation of a cycle name.
The steps to follow are the following:
the ENTER key:
12
COPY NAME
Programme name
WHITES 90 ºC
The INC (∧∧∧∧ ) and DEC (∨∨∨∨) keys display all the
Save name?
4.3.3 Change name
After selecting CHANGE NAME, press the
CHANGE NAME
Programme name
BLANKETS
With the INC (∧∧∧∧) and DEC (∨∨∨∨) keys, the name
Use the INC (∧∧∧∧) and DEC (∨∨∨∨) keys to modify
Save name?
CREATE CYCLE NAME
COPY CYCLE NAME
CHANGE CYCLE NAME
4.4.1 Create cycle name
After selecting CREATE CYCLE NAME, press
Page 23

ENGLISH
CREATE CYCLE NAME
Cycle:
Wash 75º
the character indicated by the cursor; use the
ADVANCE (>>) key to move the cursor to the next
character. Once the name has been written, press
ENTER.
ENTER: Accept / ESC: Cancel / <<: Previous menu
This command allows for copying the name of cycle
from an existing one. The steps to follow are the
following:
the ENTER key and the first cycle name saved in the
memory will be displayed.
cycles saved in the memory. Once the cycle has been
selected, press ENTER. It is now possible to change
the cycle; after changing press ENTER.
ENTER: Accept / ESC: Cancel / <<: Previous menu
This command allows the cycle name to be modified
from amongst the names created by the user. The
steps to follow are the following:
the ENTER key and the first available cycle is
displayed:
to be modified is selected. Press ENTER to validate
the selection.
Use the INC (∧∧∧∧) and DEC (∨∨∨∨) keys to modify
Save cycle name?
4.4.2 Copy cycle name
After selecting COPY CYCLE NAME, press
COPY CYCLE NAME
Cycle:
Pre-wash
The INC (∧∧∧∧ ) and DEC (∨∨∨∨) keys display all the
Save cycle name?
4.4.3 Change cycle name
After selecting CHANGE CYCLE NAME, press
CHANGE CYCLE NAME
Cycle:
Soaking
With the INC (∧∧∧∧) and DEC (∨∨∨∨) keys, the name
the character indicated by the cursor; use the
ADVANCE (>>) key to move the cursor to the next
character. Once the name has been modified, press
ENTER.
ENTER: Accept / ESC: Cancel / <<: Previous menu
Use the INC (∧∧∧∧) and DEC (∨∨∨∨) keys to modify
Save cycle name?
4.5 BLOCK
All the parameters of a block are described below and
the values that each one allows:
4.5.1 Stop programme
With this parameter a programme stop can be carried
out before the start of a cycle, that is to say, before the
tub begins to fill up with water or the drum starts to
move. This stop will be indicated by means of a
message on the screen and an acoustic signal. The
options are:
YES : the stop will be carried out.
This defines the drum's turning speed. The different
options that can be programmed are the following (in
revolutions per minute or rpm.):
From 30 to 70 in steps of 5: this is the washing speed.
From 300 to 1000 in steps of 50 : this is the spinning
speed.
If a speed equal or higher than 300 rpm is
programmed, it will be understood to be a spin, and so
only two more parameters can be programmed: “Time”
and “Unwinding”.
With this parameter, the running time of the drum than
be set. The drum will spin in one direction during the
running time and will stop in the stop time ("Rhythm
Off" parameter), and will then turn in the opposite
direction. The different options are:
From 3 to 99 seconds in steps of 1 running movement
of the drum.
With this parameter, the running time of the drum than
be set. The drum will spin in one direction during the
running time and will stop in the stop time ("Rhythm
On" parameter), and will then turn in the opposite
direction. The different options are:
From 3 to 99 seconds in steps of 1 running movement
of the drum.
This serves to indicate if the hot water inlet is going to
be used to fill the tub. The options are:
YES : the hot water inlet will be used.
NO : the hot water inlet will not be used.
NO : the stop will not be carried out.
4.5.2 Speed
4.5.3 Rate On
4.5.4 Rate Off
4.5.5 Hot water inlet
13
Page 24

ENGLISH
Reg. :the hot water inlet will be used together with
the cold water inlet to adjust the temperature of the
two.
4.5.6 Cold water inlet
This serves to indicate if the cold water inlet is going to
be used to fill the tub. The options are:
This is the time that passes from the moment the water
reaches the water level (without thermal stop), the
programmed temperature (with thermal stop) or the
spin time. The possible values are:
1 to 99 sec. in steps of 1 wash or spin time.
4.5.12 Time
YES : the cold water inlet will be used.
NO : the cold water inlet will not be used.
4.5.7 Decalcified water inlet
This serves to indicate if the decalcified water inlet is
going to be used to fill the tub. The options are:
YES : the decalcified water inlet will be used.
NO : the decalcified water inlet will not be used.
4.5.8 Level 1
It determines the tub water level in the initial filling up.
The possible values are:
0 : filling the tub up with water is not
possible.
Minimum : the water level is the lowest possible.
Low : indicates a water level above the minimum
level.
Intermediate : indicates an average water level,
above the lower level.
Height : indicates a water level above the average
level.
Maximum : the water level is higher than the
previous level and the highest possible.
These values may be modified in the section:
CONFIGURATION/OPTIONS/CHANGE LEVELS.
(Page 19).
This serves to indicate if the drum should move while
filling up with water, or if on the contrary, it should only
start to move when the water has reached a
programmed level. The options are:
YES : the drum will move whilst filling up with water.
NO : the drum will move when the programmed
water level is reached.
This determines the temperature of the water. The
possible values are:
Cold : the water will not heat up.
30 ºC to 90 ºC in steps of 5 ºC : the water will heat up
to the specified temperature.
This indicates if the wash time starts from reaching the
programmed temperature or not. The possible values
are:
YES : the wash time starts on reaching the
programmed temperature.
NO : the wash time starts on reaching the water
level.
4.5.9 Filling with movement
4.5.10 Temperature
4.5.11 Thermal stop
4.5.13 Cooling
This serves to specify the gradual cooling temperature
of the water after ending the wash with hot water and
before emptying the tub. The cooling of the water is
achieved by introducing cold water until the water
temperature lowers to the programmed temperature or
the programmed time is reached. The drum will
continue to spin at the programmed speed and rhythm.
The possible options for this parameter are:
Yes : Two new parameters are displayed,
temperature (from 30ºC to 70ºC) and time (0 to
99 min).
No. : Cooling is not carried out.
It serves to specify the water level in the drainage. The
possible options are:
0 : the tub will be completely emptied.
Minimum : the water level is the lowest possible.
Low : indicates a water level above the
minimum level.
Intermediate : indicates an average water
level, above the lower level.
Height : indicates a water level above the
average level.
Maximum : indicates that this cycle will not be
drained.
These values may be modified in the section:
CONFIGURATION/OPTIONS/CHANGE LEVELS.
(Page 19).
If the machine is fitted with the DOUBLE DRAIN
function*, this should be activated in
CONFIGURATION/OPTIONS**. Fixed programmes do
not vary (drain no 1) but a new option appears in
programming (drain no 1/drain no 2) to programme
different drains and reuse the clean water in the rinse
cycles.
usual dealer.
** Please see Page 18.
If this option is not activated, the parameter can not be
configured.
If this is a spin, it indicates if unwinding will be carried
out afterwards. If this is not a spin, it indicates if the
drum should turn whilst the drainage is being carried
out. The possible options are:
* To obtain a double drain, please consult your
4.5.16 Unwinding/Movement in drainage
4.5.14 Drainage level
4.5.15 Drain no 1/Drain no 2
YES : unwinding/movement in drainage is carried
out.
14
Page 25

ENGLISH
NO : unwinding/movement in drainage is not
carried out.
Indicate the additive n dosing time (up to 7 additives)
during the filling of the tub. The possible options are:
0 : the dosing is not carried
out.
1 to 99 sec. in steps of 1: dosing time in seconds.
This determines when to start the dose time of additive
n, possible options include:
Dose level: Dosing starts on reaches a minimum
safety level (60 mm).
Fill level: Dosing starts on reaching the level
programmed for this block.
Temp programmed: Dosing starts on reaching the
temperature programmed for this block.
This is the time taken between the detection of water
in the tub and the start of dosage of additive n.
Possible values include:
0 to 99 sec. in steps of 1 sec : delay time in seconds.
Once all the parameters to be introduced are known,
we return to the main programming menu.
After pressing the ENTER key we have three options:
This command allows for a new block to be created.
The steps to follow are the following:
After selecting CREATE BLOCK, press the ENTER
key:
Press ENTER
4.5.17 Dosing time
4.5.18 Start dosing
4.5.19 Delay
PROGRAMME NAME
CYCLE NAME
→BLOCK
PROGRAMME
CREATE BLOCK
COPY BLOCK
CHANGE BLOCK
4.5.20 Create block
CREATE BLOCK
Block: 35
Use the INC (∧∧∧∧) and DEC (∨∨∨∨) keys to modify the
character indicated by the cursor; use the ADVANCE
(>>) key to move the cursor to the next character.
Press ENTER to validate the selection.
Use the INC (∧∧∧∧) and DEC (∨∨∨∨) keys to modify the
corresponding parameter value; use the ADVANCE
(>>) key to move to the next parameter. Once all the
parameters have been created, press ENTER.
ENTER: Accept / ESC: Cancel / <<: Previous menu
This command allows for a block to be copied from an
existing one. The steps to follow are the following:
After selecting COPY BLOCK, press the ENTER key
and the number of the first block saved in the memory
will be displayed with its corresponding text as well as
the number of the destination block:
Press ENTER
With the INC (∧∧∧∧) and DEC (∨∨∨∨) keys, the number of the
source block is selected. Press ENTER
ENTER: Accept / ESC: Cancel / <<: Previous menu
This command allows for all the parameters of a block
to be modified amongst those created by the user. The
steps to follow are the following:
CREATE BLOCK
Text block:
Save block?
4.5.21 Copy block
COPY BLOCK
Dest. block: 35
COPY BLOCK
Block 1
Pre-wash 40 ºC
Save block?
4.5.22 Change block
15
Page 26

ENGLISH
After selecting CHANGE BLOCK, press the ENTER
key and the number of the first available block will be
displayed with its corresponding text:
CHANGE BLOCK
Block: 35
Washing
With the INC (∧∧∧∧) and DEC (∨∨∨∨) keys, the number of the
source block is selected. Press ENTER. and the block
text is modified:
Use the INC (∧∧∧∧) and DEC (∨∨∨∨) keys to modify the
character indicated by the cursor; use the ADVANCE
(>>) key to move the cursor to the next character.
Press ENTER to validate the selection.
Use the INC (∧∧∧∧) and DEC (∨∨∨∨) keys to modify the
parameter values; use the ADVANCE (>>) key to
move the cursor to the next parameter. Once all the
parameters have been modified, press ENTER.
ENTER: Accept / ESC: Cancel / <<: Previous menu
CHANGE BLOCK
Text block:
Washing
CHANGE BLOCK
Block: 39
Washing
Stop programme
No.
Save block?
4.6 PROGRAMME
After pressing the ENTER key we have four options:
CREATE PROGRAMME
COPY PROGRAMME
CHANGE PROGRAMME
ERASE PROGRAMME
4.6.1 Create programme
This command allows for a new programme to be
created. The steps to follow are the following:
After selecting CREATE PROGRAMME, press the
ENTER key and the lowest programme number to be
created will be displayed: With the INC (∧∧∧∧) and DEC
(∨∨∨∨) keys, the programme number is selected.
CREATE PROGRAMME
Programme:
17
Once the programme number has been selected,
press ENTER and the first available name will be
displayed:
Use the INC (∧∧∧∧) and DEC (∨∨∨∨) keys to change between
names. Once the name has been selected, press
ENTER and the first available cycle and name will be
displayed:
With the INC (∧∧∧∧) and DEC (∨∨∨∨) keys the cycle name is
varied. Once this name has been selected, press
ENTER and the first available block will be displayed:
With the INC (∧∧∧∧) and DEC (∨∨∨∨) keys, the number of the
block is selected. Press the INFO key to view the
parameters of this block. Once this number has been
selected, press ENTER and the number of the
following cycle will be displayed with the first available
name. Proceed, as many times as necessary, as
above to name the cycles and select the block
numbers. To end, press ESC
ENTER: Accept / ESC: Cancel / <<: Previous menu
This command allows a programme to be copied from
an existing one. The steps to follow are the following:
After selecting COPY PROGRAMME, press the
ENTER key and the lowest destination programme
number will be determined:
16
4.6.2 Copy programme
COPY PROGRAMME
Dest. programme (17)
CREATE PROGRAMME
Program: 21
Programme name
WHITES 90 ºC
WHITES 90 ºC
Cycle:
1
Pre-wash
Block:
BLANKETS
SPIN
Block: 1
Pre-wash 40 ºC
Save programme?
BLANKETS
Page 27

ENGLISH
Next, select the source programme. With the INC (∧∧∧∧)
and DEC (∨∨∨∨) keys, the source programme number is
selected and the corresponding name displayed. Once
the programme number has been selected, press
ENTER
ENTER: Accept / ESC: Cancel / <<: Previous menu
This command allows for inserting, modifying or
erasing a block in a program, The steps to follow are
the following:
Copy programme?
4.6.3 Change programme
With the INC (∧∧∧∧) and DEC (∨∨∨∨) keys, the cycle name
can be chosen amongst those saved in the memory.
Once this name has been selected, press ENTER and
the first available block will be displayed:
Cycle: 1
Washing
Block: 7
Prewash 90ºC
Use the INC (∧∧∧∧) and DEC (∨∨∨∨) keys to select the block
and then press ENTER.
After selecting CHANGE PROGRAMME, press the
ENTER key and the number of the first available
programme will be displayed with its name:
CHANGE PROGRAMME
Program: 21
BLANKETS
With the INC (∧∧∧∧) and DEC (∨∨∨∨) keys, the programme
number is selected. Press ENTER
CHANGE PROGRAMME
Program: 21
Programme name
BLANKETS
Use the INC (∧∧∧∧) and DEC (∨∨∨∨) keys to select the name.
Next if we press ENTER, the new name is selected.
Programme 18
BLANKETS
Cycle: 1
Pre-wash
number is selected. Press ENTER
This command allows for a cycle to be inserted in a
program. The steps to follow are the following:
After selecting INSERT, press ENTER and the first
cycle will be displayed with its name.
With the INC (∧∧∧∧) and DEC (∨∨∨∨) keys, the cycle
MODIFY
INSERT
ELIMINATE
4.6.4 Insert
Insert cycle?
ENTER: Accept / ESC: Cancel / <<: Previous menu
4.6.5 Modify
This command allows for a programme cycle to be
modified. The steps to follow are the following:
After selecting MODIFY, press ENTER and the first
cycle will be displayed with its name.
Cycle: 1
Washing
Block: 7
Prewash 90ºC
With the INC (∧∧∧∧) and DEC (∨∨∨∨) keys, the cycle name
can be chosen amongst those saved in the memory.
Once this name has been selected, press ENTER and
the first available block will be displayed:
Cycle: 1
Washing
Block: 7
Prewash 90ºC
Use the INC (∧∧∧∧) and DEC (∨∨∨∨) keys to select the block
and then press ENTER. Press the INFO key to view
the parameters of this block.
Change cycle?
ENTER: Accept / ESC: Cancel / <<: Previous menu
4.6.6 Erase
This command allows a programme cycle to be
erased. The steps to follow are the following:
BLANKETS
Cycle: 1
Pre-wash
Block:
After selecting the cycle to be eliminated press ENTER
and select ERASE.
Remove cycle?
17
Page 28

ENGLISH
Pre-wash
ENTER: Accept / ESC: Cancel / <<: Previous menu
After selecting ERASE PROGRAMME, press the
ENTER key and the name of the first erasable
programme saved in the memory will be displayed.
When all changes have been completed press ESC.
Save programme?
BLANKETS
If you wish to return to the previous menu you should
press the << key.
4.6.7 Erase programme
This command allows for erasing any programme
created by the user. The steps to follow are the
following:
ERASE PROGRAMME
Programme: 17
BLANKETS
Use the INC (∧∧∧∧) and DEC (∨∨∨∨) keys to view all erasable
programmes. Once the programme has been selected,
press ENTER.
ENTER: Accept / ESC: Cancel / <<: Previous menu
Erase programme
18
Page 29

ENGLISH
5 MAINTENANCE
5.1 Electrical and mechanical
irregularities
Before calling the Technical Service Centre, check the
following:
That power is supplied to the machine.
The condition of the fuses.
That the voltage is correct for the machine.
If the washing machine fails to get the required
level of water, check:
The water mains tap is open.
The water inlet filter is not blocked.
That the water pressure is between 2 and 4 kg/cm2 (28
and 56 psi).
Message Possible causes Action
This message appears on recovering the power after having been
POWER
CUT
DETECTED
E2
E3
E4
E5
E6
E7
E9
E10
E11
E12
cut-off.
If the power cut occurs during the spin cycle, the message "WAIT" is
displayed. For safety reasons, wait approximately 1.5 minutes
without pressing anything until "PWR FAULT" is displayed.
FAULT LOCK
This message appears when it is detected that the door can not be
unlocked at the end of the programme or that it has unlocked during
the programme
FAULT DRAIN PIPE
This message is displayed when, in spite of deactivating the
emptying valve output, the water level inside the drum has not
decreased for a pre-established period of time.
FAULT WATER INLET
This message appears when, in spite of activating the
corresponding solenoid valves' outputs, the water level inside the
tub has not increased during a certain pre-established period of
time.
HEATING FAULT
This message is shown when, in spite of activating the heating
output, the water temperature has not increased for a certain pre-
established period of time.
MAX. TEMP
This message is displayed when the water temperature has
exceeded 95 ºC.
THERMOSTAT OPEN
This message appears when the water exceeds 95 ºC
MOTOR HEATING
This message appears when the thermal protection of the washing
machine's motor is detected to have not been activated.
UNBALANCE
This message appears when the final spin activates the unbalance
micro three times.
CLOTHES HOT
This message is displayed when a programme execution finishes
but the water temperature inside the tub exceeds 50 ºC.
WATER IN TUB
This message is displayed when a programme execution is finished
but there is still water inside the tub. The door can not be opened
until the water is drained from the tub.
If the washing machine vibrates excessively,
check:
None of the panel screws is loose.
If a power cut occurs, check:
The tub is drained and the door is blocked. If you want
to take the clothes out of the washing machine, unlock
the door by pulling down the belt located behind the
front panel.
5.2 Error messages
On the washing machine screen, warning or fault
messages may be displayed during or after the
execution of a wash programme. Except in the event
of a power cut, the washing machine will be paused
(drain pipe valve off, motor off, etc.), awaiting user
action.
Press START: the programme continues
to operate in the same phase as before
the power cut.
Press EXPRESS: the programme ends.
Press ESC: the programme ends.
Press START: the programme continues.
Press EXPRESS: the programme ends.
Press START: the programme continues.
Press EXPRESS: the programme ends.
Press START: the programme continues.
Press EXPRESS: the programme ends.
Press START: the programme continues.
Press EXPRESS: the programme ends.
Press START: the programme continues.
Press EXPRESS: the programme ends.
Press START: the programme continues.
Press EXPRESS: the programme ends.
Press EXPRESS: the programme ends.
Press EXPRESS: the programme ends.
Press EXPRESS: the programme ends.
19
Page 30

ENGLISH
2
Page 31

WASHING MACHINE INSTALLATION AND MAINTENANCE
WASHING MACHINE INSTALLATION
Check belt tension
Remove the transport anchors
It is advisable that the floor is not slippery
Drain water circuits prior to making the connections
Check that the specification plates correspond with the order
Fixing all low revolution washing machines to the floor is compulsory
Fixing all high revolution washing machines to the floor is recommended
Ensure that the floor withstands the weight and maximum force transmitted by the machine
Ensure that the dynamic pressure from the mains to the machine inlet is from 2 to 4 bars
Installing a 300 mA differential switch between the wiring and the mains is recommended
It is advisable for the voltage between neutral and earth be equal to zero
Connect drainage pipe. Important: ensure the correct inclination for full water disposal
Before turning the line breaker on measure voltage between phases and phase-neutral
Leaving the door open when the washing machine is not running is recommended
Clean the water inlet filters
Clean the outside of the machine with a damp cloth
Clean converter ventilation filter and motor fan grille
Put in the correct load (complete) and select the appropriate programme
Clean the detergent tray compartments so that there are no blockages
At the end of the shift, clean the door seal with a damp cloth and turn the machine off
Connect the mains supply. Compare mains voltage and machine voltage (observe specification plate)
Fit out the machine location so that it is levelled and the necessary distances are observed for maintenance
Unpack removing the bag and corner pieces Unpack: follow indications stuck on the package
MODEL 10,13,18,25 40,60,120
POSITIONING
Install water hoses (a filter is required in the cold water inlet) Install hoses (filter necessary in each inlet)
- always open the steam cock gradually and not suddenly
- installing a filter in the steam electrovalve inlet is compulsory
STEAM machines: - installing Teflon joints on both ends of the hose is compulsory
- retighten the steam hose nuts
INSTALLATION
WASHING MACHINE PREVENTIVE MAINTENANCE
DAILY
GENERAL
WEEKLY
THREE-MONTHLY
Page 32

ESPAÑOL
ºC
INTERPRETACION DE TABLAS: SIMBOLOS Y VALORES
SIMBOLO SIGNIFICADO VALORES
A
B
C
F
G
H
I
PH
BL
PP
SP
RT
EAC
EAF
EAD
LV
ML
ºF
PT
TM
FR
DO
D*
P*
CONTROLES
CUBETERA DETERGENTES
INTERRUPTOR GENERAL
PRELAVADO
LAVADO
SUAVIZANTE
LEJIA
0: Remojo
1: Prelavado
2: lavado
FASE
Nº DE BLOQUE
PARADA PROGRAMA
VELOCIDAD
RITMO SEGUNDOS EN MOVIMIENTO/ SEGUNDOS DE PARADA
ENTRADA AGUA CALIENTE
ENTRADA AGUA FRIA
ENTRADA AGUA AUX/DESCALCIFICADA
NIVEL DE AGUA
MOVIMIENTO EN LLENADO
TEMPERATURA GRADOS CENTIGRADOS
TEMPERATURA GRADOS FAHRENHEIT
PARADA TERMICA
TIEMPO MINUTOS
ENFRIAMIENTO
DISTRIBUCION OPTIMA
Nº DE ENTRDA DOSIFICACION
PROGRAMAS
3: aclarado 1
4: aclarado 2
5: centrifugado corto
6: Aclarado final (suavizante)
7: centrifugado largo
0: NO
1: SI
SP1: LAVADO
SP2: CENTRIFUGADO CORTO
SP3: CENTRIFUGADO LARGO (MAX)
SP4: CENTRIFUGADO DELICADO
0: NO
1: SI
2: REGULACION
0: NO
1: SI
0: NO
1: SI
LV1: MINIMO
LV2: BAJO
LV3: MEDIO
LV4: ALTO
LV5: MAXIMO
0: NO
1: SI
0: NO
1: SI
0: NO
TEMPERATURA/TIEMPO
0: NO
1: SI
0: NO
TIEMPO/RETARDO (SEGUNDOS)
P1 Blanca 90ºC
P2 Blanca/color 60ºC
P3 Blanca/color 40ºC
P4 Blanca/color 30ºC
P5 Blanca/color fría
P6 Sintética 60ºC
P7 Sintética 30ºC
P8 Sintética fría
P9 Delicada 40ºC
P10 Delicada 30ºC
P11 Delicada fría
P12 Lana 30ºC
P13 Lana fría
P14 Sanitario
P15 Centrifugado largo
P16 Centrifugado Corto
3
Page 33

ESPAÑOL
INDICE
INTERPRETACION DE TABLAS: SIMBOLOS Y VALORES ....................................................................................... 3
INSTRUCCIONES IMPORTANTES DE SEGURIDAD Y USO ..................................................................................... 6
1INTRODUCCIÓN ....................................................................................................................................................... 2
2USO ........................................................................................................................................................................... 3
2.1
Elementos de mando ........................................................................................................................................ 3
2.2
Funcionamiento ................................................................................................................................................. 4
2.3
Selección de un programa ................................................................................................................................ 4
2.4
Ejecución de un programa ................................................................................................................................ 4
2.5
Finalización de un programa ............................................................................................................................. 5
3MENU PRINCIPAL .................................................................................................................................................... 7
3.1
Programación retardada .................................................................................................................................. 7
3.2
Configuración .................................................................................................................................................... 7
3.3
Opciones ........................................................................................................................................................... 7
3.3.1Contraste: ...................................................................................................................................................... 7
3.3.2Doble desagüe: ............................................................................................................................................. 8
3.3.3Eliminar avance: ............................................................................................................................................ 8
3.3.4Acceso restringido: ........................................................................................................................................ 8
3.3.5Cambiar niveles: ............................................................................................................................................ 8
3.3.6Mensaje lavandería: ...................................................................................................................................... 8
3.3.7Parada térmica: ............................................................................................................................................. 9
3.3.8Idioma ............................................................................................................................................................ 9
3.3.9WET CLEANING ........................................................................................................................................... 9
3.3.10Grados ºC/ºF ............................................................................................................................................. 9
3.4
ESTADISTICAS .............................................................................................................................................. 10
4PROGRAMACION ................................................................................................................................................... 11
4.1
CONSTITUCIÓN DE UN PROGRAMA DE LAVADO ..................................................................................... 11
4.2
MENÚ PRINCIPAL DE PROGRAMACIÓN .................................................................................................... 12
4.3
TITULO PROGRAMA ..................................................................................................................................... 12
4.3.1Crear Título ................................................................................................................................................. 12
4.3.2Copiar título ................................................................................................................................................. 12
4.3.3Modificar título ............................................................................................................................................. 12
4.4
NOMBRE FASE .............................................................................................................................................. 12
4.4.1Crear nombre fase ...................................................................................................................................... 12
4.4.2Copiar nombre fase ..................................................................................................................................... 13
4.4.3Modificar nombre fase ................................................................................................................................. 13
4.5
BLOQUE ......................................................................................................................................................... 13
4.5.1Parada de programa ................................................................................................................................... 13
4.5.2Velocidad ..................................................................................................................................................... 13
4.5.3Ritmo On ..................................................................................................................................................... 13
4.5.4Ritmo Off ..................................................................................................................................................... 13
4.5.5Entrada agua caliente ................................................................................................................................. 13
4.5.6Entrada agua fría ......................................................................................................................................... 14
4.5.7Entrada agua descalcificada ....................................................................................................................... 14
4.5.8Nivel 1 ......................................................................................................................................................... 14
4.5.9Llenado con movimiento ............................................................................................................................. 14
4.5.10Temperatura ............................................................................................................................................ 14
4.5.11Parada Térmica ....................................................................................................................................... 14
4.5.12Tiempo .................................................................................................................................................... 14
4.5.13Enfriamiento ............................................................................................................................................ 14
4.5.14Nivel de Desagüe .................................................................................................................................... 14
4.5.15Desagüe nº1/Desagüe nº2 ...................................................................................................................... 14
4.5.16Desapelmazado/Movimiento en desagüe ............................................................................................... 14
4.5.17Tiempo dosificación................................................................................................................................. 15
4.5.18Comienzo dosificacion ............................................................................................................................ 15
4.5.19Retardo .................................................................................................................................................... 15
4.5.20Crear bloque ............................................................................................................................................ 15
4.5.21Copiar bloque .......................................................................................................................................... 15
4.5.22Modificar bloque ...................................................................................................................................... 16
4.6
PROGRAMA ................................................................................................................................................... 16
4.6.1Crear programa ........................................................................................................................................... 16
4
Page 34

ESPAÑOL
4.6.2
Copiar programa ......................................................................................................................................... 17
4.6.3Modificar programa ..................................................................................................................................... 17
4.6.4Insertar ........................................................................................................................................................ 17
4.6.5Modificar ...................................................................................................................................................... 17
4.6.6Eliminar ....................................................................................................................................................... 18
4.6.7Borrar programa .......................................................................................................................................... 18
5MANTENIMIENTO ................................................................................................................................................... 19
5.1
IIrregularidades eléctricas y mecánicas .......................................................................................................... 19
5.2
Mensajes de error ........................................................................................................................................... 19
5
Page 35

ESPAÑOL
INSTRUCCIONES IMPORTANTES DE SEGURIDAD Y USO
ADVERTENCIA: Para reducir el riesgo de
descargas eléctricas o lesiones personales al
usar su aparato, siga las precauciones
básicas, incluyendo las siguientes:
1- LEA todas las instrucciones antes de usar el
aparato y GUARDELAS en lugar fácilmente
accesible para solventar cualquier duda.
2- NO lave prendas que hayan sido previamente
tratatadas, lavadas, remojadas o manchadas
con gasolina, disolventes de limpieza en seco,
u otras sustancias inflamables o explosivas,
ya que despiden vapores que pueden
incendiarse o explotar.
3- NO agregue gasolina, disolventes de limpieza
en seco, o otras sustancias inflamables al
agua de lavado. Estas substancias emiten
vapores que pueden incendiarse o explotar.
4- En determinadas condiciones, el gas de
hidrógeno puede ser producido en un sistema
de agua caliente que no se ha utilizado
durante dos semanas o más. Gas hidrógeno
es explosivo. Si el sistema de agua caliente no
ha sido usado por un período, antes de usar la
lavadora, abra todos los grifos de agua
caliente y deje que el agua de cada uno corra
durante varios minutos. Esto liberará el gas
hidrógeno acumulado. Como el gas es
inflamable, no fume ni use una llama durante
este tiempo.
5- NO permita que los niños jueguen en o sobre
el aparato. Mantenga a los niños bajo estricta
vigilancia cuando se encuentren en las
proximidades de una maquina en
funcionamiento.
6- Quite la puerta antes de desechar el aparato o
dejarlo fuera de servicio.
7- NO INTENTE ABRIR LA PUERTA si el
tambor está en movimiento.
8- NO instale ni almacene el aparato a la
intemperie.
9- NO trate de forzar los controles.
10- No repare o reemplace ninguna pieza del
aparato ni intente ningúna operación de
servicio a menos que se recomiende en el
manual de instrucciones de usuario. Aún así
asegurese siempre de entender
perfectamente las instrucciones y tenga las
habilidades necesarias para llevar a cabo la
operación.
11- NO eliminar nigún dispositivo de seguridad ni
modificar ningún elemento de la lavadora. NO
INSTALAR en el interior de la maquina
elementos ajenos a ella.
12- Cualquier omisión de las indicaciones
descritas en los manuales de instrucciones,
pueden ocasionar daños personales al
usuario. No es posible cubrir todas las
condiciones y situaciones posibles con los
avisos de peligro y advertencias. Por lo tanto,
el sentido común, precaución y el cuidado
son factores que deben ser aportados por
la(s) persona(s) que transporte, instale, utilice
o mantenga la maquina.
13- NO utilizar la maquina sin estar todas las
tapas y protecciones correctamente colocadas
y fijadas.
14- ES OBLIGATORIO la instrucción correcta del
usuario por parte del distribuidor (vendedor)
durante la puesta en marcha.
15- Aporte a las cubetas correspondientes las
dosis de detergente, suavizante y lejía
indicadas por el fabricante. Observar los
consejos de tratamiento de cada tejido
indicados por el fabricante del mismo.
16- Limpie diariamente las cubetas de detergente
y líquidos. Para la limpieza use agua y jabón,
nunca detergentes abrasivos.
17- Limpie mensualmente los filtros de las
entradas de agua y los conductos de
dosificación exteriores.
18- No lave nunca el exterior utilizando chorro de
agua; pueden estropearse las partes
funcionales de la máquina.
19- Si la lavadora no va a utilizarse en un período
de tiempo largo, pase una mano de aceite de
vaselina sobre todas las superficies de acero
inoxidable.
20- Se recomienda una revisión general anual.
6
Page 36

ESPAÑOL
1 INTRODUCCIÓN
Estimado cliente:
Gracias por haber depositado su confianza en nuestro producto. Deseamos que responda a sus necesidades.
Las condiciones de garantía no cubren daños de componentes de cristal, ni repuestos consumibles (juntas,
bombillas, etc.) como tampoco el deterioro del material aislante o daños imputables a una instalación incorrecta del
aparato, a su utilización en una aplicación indebida, a un mantenimiento inadecuado o a procesos de reparación
deficientes.
Este aparato está sujeto a cambios y modificaciones que apoyen su progreso técnico.
2
Page 37

ESPAÑOL
2 USO
2.1 Elementos de mando
Pantalla (2)
Interruptor general (4) On/Off
Tecla START
Tecla STOP
Tecla INFO
Tecla AVANCE (>>)
Teclas INC (∧) y DEC (∨)
Tecla ESC
Tecla ENTER
Se muestra información referente a la operación que se este realizando.
Este interruptor tiene dos posiciones. Pulse “I” para encender la lavadora y “O” para
apagarla.
Pulse Start para iniciar un programa, hacer una pausa o continuar con el programa
tras una pausa.
Esta tecla sirve para finalizar un programa.
Esta tecla permite acceder a diversos menús tales como programación,
mantenimiento, configuración o estadísticas. También permite el acceso a
visualización detallada de las fases.
Pulse avance para acelerar la ejecución de un programa. Cada vez que se pulsa
dicha tecla el programador pasa directamente a ejecutar la siguiente fase del
programa; y si la fase que se está ejecutando es la última, se termina el
programa.Tenga en cuenta que si pulsa esta tecla en un centrifugado no pasará de
fase durante un tiempo de seguridad necesario para el completo frenado del
tambor.
Las teclas INC (∧) y DEC (∨) tienen diversas funciones dependiendo de la pantalla
y el modo de funcionamiento del programador. Permiten la selección de un
programa de lavado y la navegación en los diferentes menús.
Esta tecla se utiliza para eliminar de pantalla los mensajes de error y dar por
concluido el programa. También se utiliza para subir de submenú cuando se
accede a los menús de programación, mantenimiento, configuración y estadísticas.
Esta tecla se utiliza para eliminar de pantalla los mensajes de error y seguir con la
ejecución del programa. También se utiliza para entrar en los submenús de
programación, mantenimiento, configuración y estadísticas y validar las
modificaciones en los mismos.
3
Page 38

ESPAÑOL
2.2 Funcionamiento
Esta maquina esta diseñada y concebida para el
lavado o tratado de textiles en general. Su empleo en
propósitos ajenos a lo indicado será considerado
como indebido y peligroso.
Es aconsejable cargar la maquina con su carga
nominal, evite meter cargas muy inferiores o
superiores.
No es aconsejable lavar ropa introducida en sacos, en
tal caso, llene la lavadora hasta su carga nominal para
evitar posibles desequilibrios de carga.
No es aconsejable centrifugar lonas o prendas
impermeables, mopas, moquetas o alfombras.
El control de la maquina se realiza mediante un
microprocesador programable capaz de adaptarse a
las necesidades de cada usuario.
Dispone de 16 programas NO modificables, puede
crear hasta 99 programas para cubrir sus
necesidades. Para más información consulte el
apartado programación (pag.68) y programas
normalizados (pag.68).
Dispone de control inteligente para la regulación de
temperatura, si dispone de agua caliente, conéctela.
La lavadora gestionará las diferentes entradas de
agua para mantener la temperatura programada.
Dispone de control inteligente para la gestión del
centrifugado. La lavadora controla el desequilibrio
generado por la carga y gestiona el giro para
garantizar un buen centrifugado, sin ruidos y
alargando la vida útil de los elementos de desgaste y
así como una significativa reducción de fatiga en los
componentes mecánicos.
2.3 Selección de un programa
Cuando se enciende la lavadora, en la pantalla
aparece el último programa ejecutado, indicando su
número y título, así como sus características
principales. Por ejemplo, si se selecciona el programa
número uno:
Programa: 1
BLANCA 90ºC
Cerrar la puerta de la lavadora.
Añadir detergentes
Seleccionar el programa que se desea.
Pulsar la tecla START.
Después de iniciar un programa, en la pantalla
se indica el estado del mismo y su evolución. Por
ejemplo,
Programa: 2
BLANCA/COLOR 60ºC
Prelavado 30ºC
Llenando…
En la tercera línea se indica la fase que se está
ejecutando, en este caso un prelavado. En la cuarta
línea se muestra la operación que se está
desarrollando en ese instante; en el ejemplo, la toma
de agua.
Cuando termina de realizarse la toma de agua y
se inicia el calentamiento, este se indica en la pantalla,
tal como se muestra en la figura siguiente:
Programa: 2
BLANCA/COLOR 60ºC
Prelavado 30ºC
Calentando…
Después de terminar de calentar el agua, se
inicia el tiempo de lavado, indicando en la pantalla el
tiempo restante para finalizar la fase de prelavado, tal
como se muestra en la figura siguiente:
Programa: 2
BLANCA/COLOR 60ºC
Prelavado 30ºC
Ti restante 4 min
Al llegar al término de la fase, se realiza el
correspondiente desagüe, indicando en la pantalla, tal
como se muestra en la figura siguiente:
En la primera fila de la pantalla se puede ver el
número del programa (1) y su nombre (BLANCA 90ºC)
en la segunda. En las ultimas filas aparecen las
funciones de cada tecla.
2.4 Ejecución de un programa
Para realizar un programa de lavado se deben
seguir los pasos que se indican a continuación:
Introducir la ropa sucia en el tambor de la
lavadora
caso un lavado, tal como se muestra en la figura
siguiente:
Programa: 2
BLANCA/COLOR 60ºC
Prelavado 30ºC
Vaciando...
Y después comienza la siguiente fase, en este
4
Page 39

ESPAÑOL
Programa: 2
BLANCA/COLOR 60ºC
Lavado 60ºC
Llenando...
P2:BLANCA/COLOR 60ºC
Centrifugado 900rpm
Finalizar programa?
Con el programa en marcha se pueden pulsar las
siguientes teclas del panel de mandos, activando en
cada caso distintas funciones:
Tecla PAUSE: el programa se detiene, hace una
pausa. En la pantalla aparece un mensaje:
Programa: 2
BLANCA/COLOR 60ºC
Lavado 60ºC
Pausa activada...
Para que el programa continúe se debe pulsar la tecla
SART.
Si el programa está realizando un centrifugado no es
posible hacer una pausa por motivos de seguridad,
por lo que la tecla PAUSE no existirá.
Tecla AVANCE (>>): al pulsar la tecla AVANCE el
programa pasa directamente a la siguiente fase.
Al cabo de unos segundos el programa continúa,
iniciando la fase siguiente, a menos que la fase que
estaba realizándose cuando se pulsó AVANCE fuera
la última, en cuyo caso el programa finalizará.
Si se pulsa la tecla AVANCE cuando se está
centrifugando, mientras se frena el tambor, en la
pantalla se indicará el siguiente mensaje (el tiempo de
frenado es aproximadamente 1,5 minutos
dependiendo del modelo de lavadora, espere y no
intente abrir la puerta):
Programa: 2
BLANCA/COLOR 60ºC
Centrifugado 500rpm
Frenando...
Tecla STOP: al pulsar esta tecla en la pantalla
aparecerá el siguiente mensaje:
Para finalizar el programa pulsar la tecla ENTER;
para que el programa continúe pulsar la tecla
ESC.
Tecla INFO: (avanzado) Estando la maquina en
marcha, con la tecla INFO accedemos a los
parámetros que se están ejecutando en ese
momento, en la siguiente figura se muestran las
diferentes opciones
VER ENTRADAS
VER SALIDAS
CONSIGNAS
VALORES REALES
Se muestran a tiempo real tanto las entradas y
salidas activas, como los valores reales y las
consignas programadas.
2.5 Finalización de un programa
El programa puede finalizar de varias formas:
Finalización normal: el programa termina cuando
ha realizado todos las fases que lo componen.
Pulsando la tecla STOP: desde cualquier punto
del programa, pulsando la tecla STOP y, a
continuación, la tecla ENTER.
Pulsando la tecla AVANCE: desde cualquier punto
del programa, pulsando repetidamente o manteniendo
pulsada la tecla de AVANCE se puede llegar hasta el
final. Tal como en el caso anterior, si estaba
realizándose un centrifugado, primero se permitirá el
frenado del tambor durante unos segundos antes de
que se responda de nuevo a la tecla AVANCE.
Cuando finaliza un programa, antes de permitir la
apertura de la puerta se realiza el desapelmazado de
la ropa durante 30 segundos, y en la pantalla aparece
el siguiente mensaje:
Programa: 2
BLANCA/COLOR 60ºC
Centrifugado 500rpm
Desapelmazado...
5
Page 40

ESPAÑOL
Después de los 30 segundos, en la pantalla aparece
un mensaje acompañado de una señal acústica,
indicando el fin del programa y la posibilidad de abrir
la puerta:
Programa: 2
BLANCA/COLOR 60ºC
Fin del programa
Abrir la puerta…
En este momento se puede silenciar la señal acústica
pulsando PAUSE o abriendo la puerta.
6
Page 41

ESPAÑOL
3 MENU PRINCIPAL
Estando la lavadora encendida pero no en marcha,
pulsamos la tecla info.
→ PROG. RETARDADA
PROGRAMACION
CONFIGURACION
MANTENIMIENTO
Con la tecla DEC (∨∨∨∨) se accede a las diferentes
opciones:
PROGRAMACION
CONFIGURACION
MANTENIMIENTO
→ ESTADISTICAS
3.1 Programación retardada
Antes de poner el programa en marcha se puede
seleccionar el tiempo de inicio de un programa.
Seleccionamos el programa deseado y pulsamos la
tecla INFO:
→ PROG. RETARDADA
PROGRAMACION
CONFIGURACION
MANTENIMIENTO
Programa: 2
BLANCA/COLOR 60ºC
Tiempo restante 2h30min
3.2 Configuración
Estando la lavadora encendida, pulsar la tecla INFO:
PROG. RETARDADA
PROGRAMACION
→ CONFIGURACION
MANTENIMIENTO
Con las teclas INC (∧∧∧∧) y DEC (∨∨∨∨) accedemos a
CONFIGURACION y pulsando la tecla ENTER se
selecciona la opción deseada.
→ OPCIONES
IDIOMA
WET CLEANING
ºC/F
MODELO
Pulsamos enter para acceder a la opción
PROGRAMACION RETARDADA
Prog. retardada
→ 0h
0m
Con las teclas INC (∧∧∧∧) ó DEC (∨∨∨∨) podemos seleccionar
el retardo y con la tecla AVANCE (>>) el cursor pasa
al siguiente carácter.
Una vez introducido el valor deseado pulsar ENTER.
Automáticamente en pantalla aparecerá el tiempo
restante para ejecutarse dicho programa y una vez
pasado dicho retardo, comenzará el programa
seleccionado.
3.3 Opciones
Una vez seleccionado OPCIONES, pulsar ENTER:
→ CONTRASTE
DOBLE DESAGUE
ELIMINAR AVANCE
ACCESO RESTRINGIDO
CAMBIAR NIVELES
MENSAJE LAVANDERIA
PARADA TERMICA
3.3.1 Contraste:
Para modificar el contraste del display, pulsar ENTER:
Ajuste contraste…
7
Page 42

ESPAÑOL
Con las teclas INC (∧∧∧∧) y DEC (∨∨∨∨), se puede modificar
el contraste del display. Pulsando la tecla ESC se
vuelve al menú de OPCIONES. Pulsando ENTER se
selecciona el contraste deseado.
Con las teclas INC (∧∧∧∧) y DEC (∨∨∨∨) se puede cambiar el
digito seleccionado y con AVANCE cambiar al
siguiente digito. Después de introducir cualquier dígito
se podrá pulsar ATRAS para corregir. Una vez
introducidos todos los dígitos, pulsamos ENTER y nos
Doble desagüe?
pedirá que repitamos la contraseña:
→ NO
SI
INTRODUZCA CLAVE
0000
3.3.2 Doble desagüe:
Si su aparato esta equipado con esta opción*, es
necesario activar el doble desagüe. Los programas
fijos no variarán (desagüe nº1) pero en programación
Guarde dicha clave en un lugar seguro para
posteriores configuraciones,
aparecerá una nueva opción (desagüe nº1/desagüe
nº2) para poder programar** distintos desagües y
reutilizar el agua limpia de los aclarados. Solo activar
SI PIERDE LA CLAVE NO PODRA VOLVER AL
MENU DE CONFIGURACION
esta opción si se tiene el segundo desagüe instalado.
* Para adquirir el doble desagüe consulte a su
distribuidor habitual.
** Consulte el manual de programación.
3.3.3 Eliminar avance:
Eliminar avance?
Los niveles de agua preestablecidos para la lavadora,
se pueden modificar dentro de unos limites. Los
niveles dependen del modelo de lavadora, esta
establecido un mínimo de seguridad para todos los
modelos, 60mm.
3.3.5 Cambiar niveles:
→ NO
SI
→ Minimo: 110mm
Bajo: 130mm
Medio: 150mm
Alto: 170mm
Maximo: 180 mm
Resetear niveles
Si se elimina el avance, no estará permitido avanzar
ningún programa en marcha y solo se podrá comenzar
los programas desde la primera fase.
3.3.4 Acceso restringido:
Esta opción sirve para evitar manipulaciones no
deseadas en la maquina.
Con las teclas INC (∧∧∧∧) y DEC (∨∨∨∨) se selecciona el nivel
que se quiere modificar y se accede con ENTER.
Entonces aparecerá la siguiente pantalla:
Acceso restringido
→ NO
SI
En caso de seleccionar SI, introduciremos la clave
deseada:
INTRODUZCA CLAVE
0000
CAMBIAR NIVELES
Bajo: 130mm
Ahora se puede modificar el nivel preestablecido
“Bajo”(130mm) entre los valores “Mínimo”(110mm) y
“Medio”(170mm) mediante las teclas INC (∧∧∧∧) y DEC
(∨∨∨∨). Si se quiere tener mas margen de movimiento, es
necesario modificar los niveles adyacentes.
Si seleccionamos la opción Resetear Niveles los
niveles de agua volverán a los niveles preestablecidos
de fabrica automáticamente.
3.3.6 Mensaje lavandería:
Se puede configurar el mensaje de bienvenida. Este
mensaje aparecerá cuando encendamos la maquina
8
Page 43

ESPAÑOL
tras modelo y versión de software. Si seleccionamos
esta opción:
MENSAJE LAVANDERIA
mensaje
manualmente. En centrifugados no estará permitido
dosificar nada.
->DOSIFICACION MANUAL
VER ENTRADAS
VER SALIDAS
CONSIGNAS
VALORES REALES
Las teclas INC (∧∧∧∧) y DEC (∨∨∨∨) modifican el carácter
seleccionado y AVANCE selecciona el carácter a
modificar. ENTER para guardar.
3.3.7 Parada térmica:
Con parada térmica activada el tiempo de fase no
empezará a descontarse hasta no haber logrado la
temperatura programada para asegurar un correcto
lavado, es posible desactivarla y empezar a descontar
el tiempo en el momento que alcanza el nivel
programado. ON activado, OFF desactivado (por
defecto activado). Si se desactiva no se ejecutara
nunca, aun programando la parada térmica en bloques
nuevos.
Dispone de 8 idiomas:
→ ESPAÑOL
FRANCES
INGLES
ALEMAN
ITALIANO
PORTUGUES
TURCO
POLACO
RUSO
3.3.8 Idioma
Pulse START para activar o desactivar la salida
seleccionada.
->dosificación 1 Si
dosificación 2 No
dosificación 3 No
dosificación 4 No
dosificación 5 No
dosificación 5 No
dosificación 5 No
Agua fria No
Agua caliente No
Agua descalcificada No
2-Posibilidad de programar velocidades de
hasta 15r.p.m. Para velocidades menores de 30r.p.m.
se recomienda programar bloques con un tiempo de
paro mayor que el de marcha. Por ejemplo 20 seg.
Marcha 30 seg. Paro.
3-Posibilidad de programar ritmos de hasta 1
segundo para conseguir un efecto de “acunamiento”.
3.3.10 Grados ºC/ºF
Una vez seleccionada la opción GRADOS ºC/ºF,
pulsar ENTER:
Seleccione grados
→ ºC
ºF
Es posible cargar un idioma personalizado a través de
un “MEMORY KIT” o PC eligiendo la opción
USUARIO/IMPORTAR. Consulte manual “Wash
control”(comunicación PC) para mas información.
Pulsar ENTER para validar la selección. Para salir sin
validar, pulsar ESC.
3.3.9 WET CLEANING
NO active esta opción si no está seguro de su
funcionamiento.
Con la opción WET CLEANING activada se ofrecen
mas opciones:
1-Posibilidad de dosificar en marcha.
Pulsando INFO cuando la maquina está en marcha
aparecerá un nuevo menú, DOSIFICACION MANUAL,
que nos permitirá dosificar cualquier entrada de
dosificación o cualquier entrada de agua
Con las teclas INC (∧∧∧∧) y DEC (∨∨∨∨) se puede seleccionar
cualquiera de las 2 opciones: centígrados ºC o
Fahrenheit ºF. Pulsar ENTER para validar la
selección. Para salir sin validar, pulsar ESC.
9
Page 44

ESPAÑOL
3.4 ESTADISTICAS
Con esta opción se puede ver la cantidad de veces que se ha ejecutado cada programa. Estando la lavadora
encendida, pulsar la tecla INFO, ESTADISTICAS:
P1: 12
P2: 14
P3: 17
P4: 0
Con las teclas INC (∧∧∧∧) y DEC (∨∨∨∨) se pueden ver el resto de programas. Pulsar ESC para salir.
10
Page 45

ESPAÑOL
Nombre Fase 1
Nombre Fase 2
Nombre Fase 3
4 PROGRAMACION
4.1 CONSTITUCIÓN DE UN PROGRAMA DE LAVADO
Un programa de lavado está formado por un nombre de programa (título) más un conjunto de fases en un número
mínimo de uno y un máximo de 15. Cada fase consta de un nombre más un bloque, que es una estructura de 30
parámetros que el usuario puede programar y modificar a su gusto, en función de sus necesidades particulares.
Ejemplo:
Se pueden programar hasta 99 programas diferentes. No obstante, se debe tener presente que los programas 1 a 16
son fijos, es decir, que no se pueden modificar ni borrar. Por tanto, los nuevos programas que se vayan a crear deben
grabarse entre el 17 y el 99. De la misma forma, cabe la posibilidad de programar hasta 120 bloques, existiendo 34
bloques fijos que no se pueden modificar ni borrar.
El nombre del programa (título) así como el nombre de fase constan de un máximo de 15 caracteres. Los caracteres
que se pueden utilizar son los siguientes:
Ejemplo.:Prelavado
Número Bloque
TITULO PROGRAMA
Ejemplo.: Ropa delicada 40ºC
Ejemplo.:Lavado
Número Bloque Número Bloque
Ejemplo.:Centrifugado
A a Z, a a z, 0 a 9, espacio en blanco, $, %, /, (, ), =, ?, +, -, _ , >, <
11
Page 46

ESPAÑOL
4.2 MENÚ PRINCIPAL DE PROGRAMACIÓN
Tras encender la máquina, pulsar la tecla INFO:
Titulo de programa
BLANCA 90ºC
→PROG. RETARDADA
PROGRAMACION
CONFIGURACION
MANTENIMIENTO
Con las teclas INC (∧∧∧∧) y DEC (∨∨∨∨) se visualizan
todos los títulos guardados en memoria. Una vez
seleccionado el título a copiar, pulsar ENTER. En este
momento se le da la opción de modificar el título, una
Pulsar dos veces DEC (∨∨∨∨) y después ENTER para
acceder al menú principal de programación:
vez modificado pulsar ENTER.
Guardar título?
→TITULO PROGRAMA
NOMBRE FASE
BLOQUE
PROGRAMA
ENTER: Aceptar / ESC:
Cancelar / <<: Menú anterior
4.3 TITULO PROGRAMA
Después de pulsar la tecla ENTER tenemos tres
opciones:
→CREAR TITULO
COPIAR TITULO
MODIFICAR TITULO
4.3.1 Crear Título
Este comando permite crear el título de un programa.
Los pasos a seguir son los siguientes:
Después de seleccionar CREAR TITULO,
pulsar la tecla ENTER:
CREAR TITULO
Titulo de programa
A
Con las teclas INC (∧∧∧∧) y DEC (∨∨∨∨) se modifica
el carácter donde se sitúa el cursor; con la tecla
AVANCE (>>) el cursor pasa al siguiente carácter; con
la tecla INFO se cambia de mayúsculas a minúsculas
y a caracteres especiales. Una vez escrito el título,
pulsar ENTER.
Guardar título?
ENTER: Aceptar / ESC: Cancelar / <<: Menú anterior
4.3.2 Copiar título
Este comando permite copiar el título de un programa
a partir de otro existente. Los pasos a seguir son los
siguientes:
Después de seleccionar COPIAR TITULO,
pulsar la tecla ENTER y se visualiza el primer título
guardado en memoria.
COPIAR TITULO
4.3.3 Modificar título
Este comando permite modificar el título de un
programa entre los creados por el usuario. Los pasos
a seguir son los siguientes:
Después de seleccionar MODIFICAR TITULO,
pulsar la tecla ENTER y se visualiza el primer título
disponible. Por ejemplo:
MODIFICAR TITULO
Titulo de programa
MANTAS
Con las teclas INC (∧∧∧∧) y DEC (∨∨∨∨) se
selecciona el título a modificar. Pulsar ENTER para
validar la selección.
Con las teclas INC (∧∧∧∧) y DEC (∨∨∨∨) se modifica
el carácter donde se sitúa el cursor; con la tecla
AVANCE (>>) el cursor pasa al siguiente carácter.
Una vez modificado el título, pulsar ENTER.
Guardar título?
ENTER: Aceptar / ESC: Cancelar / <<: Menú anterior
4.4 NOMBRE FASE
Después de pulsar la tecla ENTER tenemos tres
opciones:
CREAR NOMBRE FASE
COPIAR NOMBRE FASE
MODIF. NOMBRE FASE
4.4.1 Crear nombre fase
Este comando permite crear el nombre de una fase.
Los pasos a seguir son los siguientes:
Después de seleccionar CREAR NOMBRE
FASE, pulsar la tecla ENTER:
12
Page 47

ESPAÑOL
CREAR NOMBRE FASE
Fase:
Lavado 75º
Con las teclas INC (∧∧∧∧) y DEC (∨∨∨∨) se modifica
el carácter donde se sitúa el cursor; con la tecla
AVANCE (>>) el cursor pasa al siguiente carácter.
Una vez escrito el nombre, pulsar ENTER.
Guardar nombre fase?
ENTER: Aceptar / ESC: Cancelar / <<: Menú anterior
4.4.2 Copiar nombre fase
Este comando permite copiar el nombre de una fase a
partir de otro existente. Los pasos a seguir son los
siguientes:
Después de seleccionar COPIAR NOMBRE
FASE, pulsar la tecla ENTER y se visualiza el primer
nombre de fase guardado en memoria.
COPIAR NOMBRE
FASE
Fase:
Prelavado
Con las teclas INC (∧∧∧∧) y DEC (∨∨∨∨) se visualizan
todas las fases guardadas en memoria. Una vez
seleccionada la fase a copiar, pulsar ENTER. En este
momento se le da la opción de modificar el nombre de
fase, una vez modificado pulsar ENTER.
Guardar nombre fase?
ENTER: Aceptar / ESC: Cancelar / <<: Menú anterior
4.4.3 Modificar nombre fase
Este comando permite modificar el nombre de una
fase entre los creados por el usuario. Los pasos a
seguir son los siguientes:
Después de seleccionar MODIFICNOMBRE
FASE, pulsar la tecla ENTER y se visualiza la primera
fase disponible:
Con las teclas INC (∧∧∧∧) y DEC (∨∨∨∨) se modifica
el carácter donde se sitúa el cursor; con la tecla
AVANCE (>>) el cursor pasa al siguiente carácter.
Una vez modificado el título, pulsar ENTER.
Guardar nombre fase?
ENTER: Aceptar / ESC: Cancelar / <<: Menú anterior
4.5 BLOQUE
A continuación se describen todos los parámetros de
un bloque y los valores que admite cada uno de ellos:
4.5.1 Parada de programa
Mediante esté parámetro se puede realizar una
parada en el programa antes de que empiece la
ejecución de la fase, es decir, antes de que empiece a
llenarse de agua la cuba o moverse el tambor. Dicha
parada se indicará mediante un mensaje en la pantalla
y una señal acústica. Las opciones son:
SI : se realizará la parada.
NO : no se realizará la parada.
4.5.2 Velocidad
Define la velocidad de giro del tambor. Las distintas
opciones que se pueden programar son las siguientes
(en revoluciones por minuto o r.p.m.):
De 30 a 70 en pasos de 5: se trata de velocidad de
lavado.
De 300 a 1000 en pasos de 50 : se trata de velocidad
de centrifugado.
Si se programa una velocidad igual o superior a 300
r.p.m. se entiende que es un centrifugado, por lo que
sólo se podrán programar otros dos parámetros:
“Tiempo” y “Desapelmazado”.
4.5.3 Ritmo On
Mediante este parámetro se puede fijar el tiempo de
marcha del movimiento del tambor. El tambor girará
en un sentido durante el tiempo de marcha y se
detendrá durante el tiempo de parada (parámetro
“Ritmo Off”), para luego volver a girar en sentido
contrario. Las distintas opciones son:
De 3 a 99seg. en pasos de 1: movimiento de marcha
del tambor.
4.5.4 Ritmo Off
Mediante este parámetro se puede fijar el tiempo de
parada del movimiento del tambor. El tambor girará en
un sentido durante el tiempo de marcha (parámetro
“Ritmo On”) y se detendrá durante el tiempo de
parada, para luego volver a girar en sentido contrario.
MODIFI. NOMBRE FASE
Las distintas opciones son:
Fase:
Humectación
Con las teclas INC (∧∧∧∧) y DEC (∨∨∨∨) se
selecciona el nombre a modificar. Pulsar ENTER para
validar la selección.
De 3 a 99seg. en pasos de 1: movimiento de parada
del tambor.
4.5.5 Entrada agua caliente
Sirve para indicar si se va a utilizar la toma de agua
caliente para llenar la cuba. Las opciones son:
SI : se utilizará la toma de agua caliente.
13
Page 48

ESPAÑOL
NO : no se utilizará la toma de agua caliente.
REG. :se utilizará la toma de agua caliente junto con
la fría para regular la temperatura de la mezcla.
4.5.6 Entrada agua fría
Sirve para indicar si se va a utilizar la toma de agua
fría para llenar la cuba. Las opciones son:
SI : se utilizará la toma de agua fría.
NO : no se utilizará la toma de agua fría.
Es el tiempo que transcurre a partir del momento en
que el agua alcanza el nivel de agua (sin parada
térmica), la temperatura programada (con parada
térmica) o el tiempo de centrifugado. Los valores
posibles son:
1 a 99 min. en pasos de 1: tiempo de lavado o
centrifugado.
4.5.12 Tiempo
4.5.7 Entrada agua descalcificada
Sirve para indicar si se va a utilizar la toma de agua
descalcificada para llenar la cuba. Las opciones son:
SI : se utilizará la toma de agua descalcificada.
NO : no se utilizará la toma de agua
descalcificada.
4.5.8 Nivel 1
Determina el nivel de agua en la cuba en el llenado
inicial. Los valores posibles son:
0 : no se permite llenar de agua la cuba.
Mínimo : el nivel de agua es el menor de los posibles.
Bajo : indica un nivel de agua superior al nivel
mínimo.
Medio : indica un nivel de agua medio, superior al
nivel bajo.
Alto : indica un nivel de agua superior al nivel
medio.
Máximo : el nivel de agua es superior al nivel anterior y
el mayor de los posibles.
Estos valores pueden ser modificados en el apartado
CONFIGURACION/OPCIONES/CAMBIAR NIVELES.
(Pág.19).
4.5.9 Llenado con movimiento
Determina si el tambor debe moverse mientras se
realiza el llenado de agua, o si por el contrario sólo
debe empezar a moverse cuando el agua haya
alcanzado el nivel programado. Las opciones son:
SI : el tambor se moverá mientras se llena de
agua.
NO : el tambor se moverá cuando se alcance el
nivel de agua programado.
4.5.10 Temperatura
Determina la temperatura del agua. Los valores
posibles son:
Fría : el agua no se calienta.
30ºC a 90ºC en pasos de 5ºC : el agua se calentará
a la temperatura especificada.
4.5.11 Parada Térmica
Indica si el tiempo de lavado empieza a contar a partir
de que se alcance la temperatura programada o no.
Los valores posibles son:
SI : el tiempo de lavado comienza a contar al
alcanzar la temperatura programada.
NO : el tiempo de lavado comienza a contar al
alcanzar el nivel de agua.
4.5.13 Enfriamiento
Sirve para especificar la temperatura de enfriamiento
gradual del agua después de haber realizado el lavado
con agua caliente y antes de vaciar la cuba. El
enfriamiento del agua se consigue introduciendo agua
fría hasta que la temperatura del agua se reduzca a la
programada o se alcance el tiempo programado. El
tambor seguirá girando a la velocidad y ritmo
programados. Las opciones posibles para este
parámetro son:
Si : Aparecerán dos nuevos parámetros,
temperatura (de 30ºC a 70ºC) y tiempo( de 0 a
99min).
No : No se realizará el enfriamiento.
4.5.14 Nivel de Desagüe
Sirve para especificar el nivel de agua en el desagüe.
Las opciones posibles son:
0 : la cuba se vaciará completamente.
Mínimo : el nivel de agua es el menor de los posibles.
Bajo : indica un nivel de agua superior al
nivel mínimo.
Medio : indica un nivel de agua medio,
superior al nivel bajo.
Alto : indica un nivel de agua superior al
nivel medio.
Máximo : indica que no se desaguará en esta fase.
Estos valores pueden ser modificados en el apartado
CONFIGURACION/OPCIONES/CAMBIAR NIVELES.
(Pág.19).
4.5.15 Desagüe nº1/Desagüe nº2
Si su aparato esta equipado con el accesorio DOBLE
DESAGÜE*, es necesario activar en
CONFIGURACION/OPCIONES la opción doble
desagüe**. Los programas fijos no variarán (desagüe
nº1) pero en programación aparecerá una nueva
opción (desagüe nº1/desagüe nº2) para poder
programar distintos desagües y reutilizar el agua
limpia de los aclarados.
* Para adquirir el doble desagüe consulte a su
distribuidor habitual.
** Consulte la Pag.18.
Si no tiene esta opción activada dicho parámetro no
podrá ser configurable.
4.5.16 Desapelmazado/Movimiento en desagüe
Si se trata de un centrifugado, indica si se realiza un
desapelmazado posterior. Si no se trata de un
14
Page 49

ESPAÑOL
centrifugado, indica si el tambor debe girar mientras se
realiza el desagüe. Las opciones posibles son:
Después de seleccionar CREAR BLOQUE , pulsar la
tecla ENTER:
SI : se realiza el desapelmazado/movimiento en
desagüe.
NO : no se realiza el desapelmazado/movimiento
en desagüe.
4.5.17 Tiempo dosificación
Indican el tiempo de dosificación del aditivo n (hasta 7
aditivos) durante el llenado de la cuba. Las opciones
posibles son:
0 : no se realiza la
dosificación.
1 a 99 seg. en pasos de 1: tiempo de dosificación en
segundos.
4.5.18 Comienzo dosificacion
Determina en que momento comienza el tiempo de
dosificación del aditivo n, las opciones posibles son:
Nivel dosificación: La dosificación comenzará cuando
se haya alcanzado el nivel minimo de seguridad
(60mm).
Nivel de llenado: La dosificación comenzará cuando
se haya alcanzado el nivel programado para ese
bloque.
Tº programada: La dosificación comenzará cuando se
haya alcanzado la temperatura programada para ese
bloque.
4.5.19 Retardo
Es el tiempo que transcurre entre la detección de agua
en la cuba y el comienzo de la dosificación del aditivo
n. Los valores posibles son:
0 a 99 seg. en pasos de 1 seg.: tiempo de retardo en
segundos.
Una vez conocidos los parámetros que hay que
introducir volvemos al menú principal de
programación.
CREAR BLOQUE
Bloque: 35
Pulsar ENTER
CREAR BLOQUE
Texto bloque:
Con las teclas INC (∧∧∧∧) y DEC (∨∨∨∨) se modifica el
carácter donde se sitúa el cursor; con la tecla
AVANCE (>>) el cursor pasa al siguiente carácter.
Pulsar ENTER para validar la selección.
Con las teclas INC (∧∧∧∧) y DEC (∨∨∨∨) se modifica el valor
del parámetro correspondiente; con la tecla AVANCE
(>>) se pasa al siguiente parámetro. Una vez creado
todos los parámetros, pulsar ENTER.
Guardar bloque?
ENTER: Aceptar / ESC: Cancelar / <<: Menú anterior
TITULO PROGRAMA
NOMBRE FASE
→BLOQUE
PROGRAMA
Después de pulsar la tecla ENTER tenemos tres
opciones:
CREAR BLOQUE
COPIAR BLOQUE
MODIFICAR BLOQUE
4.5.20 Crear bloque
Este comando permite crear un nuevo bloque. Los
pasos a seguir son los siguientes:
4.5.21 Copiar bloque
Este comando permite copiar un bloque a partir de
otro existente. Los pasos a seguir son los siguientes:
Después de seleccionar COPIAR BLOQUE, pulsar la
tecla ENTER y se visualiza el número del primer
bloque guardado en memoria con su correspondiente
texto, así como el número del bloque destino:
COPIAR BLOQUE
Bloque destino: 35
Pulsar ENTER
COPIAR BLOQUE
Bloque 1
Prelavado 40ºC
Con las teclas INC (∧∧∧∧) y DEC (∨∨∨∨) se selecciona el
número del bloque origen. Pulsar ENTER.
15
Page 50

ESPAÑOL
MANTAS
Guardar bloque?
4.6.1 Crear programa
Este comando permite crear un nuevo programa. Los
pasos a seguir son los siguientes:
ENTER: Aceptar / ESC: Cancelar / <<: Menú anterior
4.5.22 Modificar bloque
Este comando permite modificar todos los parámetros
de un bloque entre los creados por el usuario. Los
pasos a seguir son los siguientes:
Después de seleccionar MODIFICAR BLOQUE, pulsar
la tecla ENTER y se visualiza el número del primer
bloque disponible con su correspondiente texto:
MODIFICAR BLOQUE
Bloque: 35
Lavado
Con las teclas INC (∧∧∧∧) y DEC (∨∨∨∨) se selecciona el
número del bloque origen. Pulsar ENTER. y se
modifica el texto del bloque:
MODIFICAR BLOQUE
Texto bloque:
Lavado
Con las teclas INC (∧∧∧∧) y DEC (∨∨∨∨) se modifica el
carácter donde se sitúa el cursor; con la tecla
AVANCE (>>) el cursor pasa al siguiente carácter.
Pulsar ENTER para validar la selección.
MODIFICAR BLOQUE
Bloque: 39
Lavado
Parada programa
No
Con las teclas INC (∧∧∧∧) y DEC (∨∨∨∨) se varían los valores
de los parámetros; con la tecla AVANCE (>>) el cursor
pasa al siguiente parámetro. Una vez modificados los
parámetros, pulsar ENTER.
Guardar bloque?
ENTER: Aceptar / ESC: Cancelar / <<: Menú anterior
4.6 PROGRAMA
Después de pulsar la tecla ENTER tenemos cuatro
opciones:
CREAR PROGRAMA
COPIAR PROGRAMA
MODIFICAR PROGRAMA
BORRAR PROGRAMA
Después de seleccionar CREAR PROGRAMA, pulsar
la tecla ENTER y se visualiza el menor número del
programa a crear: Con las teclas INC (∧∧∧∧) y DEC (∨∨∨∨) se
selecciona el número de programa.
CREAR PROGRAMA
Programa:
17
Una vez seleccionado el número de programa, pulsar
ENTER y se visualiza el primer título disponible:
CREAR PROGRAMA
Programa:
21
Titulo de programa
BLANCA 90ºC
Con las teclas INC (∧∧∧∧) y DEC (∨∨∨∨) se varía el título. Una
vez seleccionado dicho título, pulsar ENTER y se
visualizan la primera fase y el primer nombre
disponible:
BLANCA 90ºC
Fase:
1
Prelavado
Bloque:
Con las teclas INC (∧∧∧∧) y DEC (∨∨∨∨) se varía el nombre
de la fase. Una vez seleccionado dicho nombre, pulsar
ENTER y se visualiza el primer número de bloque
disponible:
CENTRIFUGADO
Bloque:
1
Prelavado 40ºC
Con las teclas INC (∧∧∧∧) y DEC (∨∨∨∨) se selecciona el
número del bloque. Pulsando la tecla INFO se pueden
ver los parámetros de dicho bloque. Una vez
seleccionado dicho número, pulsar ENTER y se
visualiza el número de la siguiente fase con el primer
nombre disponible. Proceder, tantas veces como sea
necesario, como en el caso anterior para nombrar la
fases y seleccionar los números de bloque. Para
finalizar, pulsar ESC
Guardar programa?
MANTAS
16
Page 51

ESPAÑOL
ENTER: Aceptar / ESC: Cancelar / <<: Menú anterior
4.6.2 Copiar programa
Este comando permite copiar un programa a partir de
otro existente. Los pasos a seguir son los siguientes:
MODIFICAR
INSERTAR
ELIMINAR
4.6.4 Insertar
Este comando permite insertar una fase en un
Después de seleccionar COPIAR PROGRAMA, pulsar
programa. Los pasos a seguir son los siguientes:
la tecla ENTER y se determina el numero del
programa de destino:
Después de seleccionar INSERTAR, pulsar ENTER y
se visualiza la primera fase con su nombre.
COPIAR PROGRAMA
Programa destino 17
A continuación se debe seleccionar el programa de
origen. Con las teclas INC (∧∧∧∧) y DEC (∨∨∨∨) se selecciona
MANTAS
Fase: 1
Prelavado
Bloque:
el número del programa origen y al mismo tiempo se
visualiza el título correspondiente. Una vez
seleccionado el número de programa pulsar ENTER.
Con las teclas INC (∧∧∧∧) y DEC (∨∨∨∨) se elige el nombre
de fase entre los guardados en memoria. Una vez
seleccionado dicho nombre, pulsar ENTER y se
Copiar programa?
visualiza el primer número de bloque disponible:
ENTER: Aceptar / ESC: Cancelar / <<: Menú anterior
Fase: 1
Lavado
Bloque: 7
4.6.3 Modificar programa
Este comando permite insertar, modificar o eliminar un
Prelavado 90ºC
bloque en un programa. Los pasos a seguir son los
siguientes:
Con las teclas INC (∧∧∧∧) y DEC (∨∨∨∨) se elige el bloque y
una vez seleccionado dicho bloque, pulsar ENTER.
Después de seleccionar MODIFICAR PROGRAMA,
pulsar la tecla ENTER y se visualiza el número del
primer programa disponible con su título:
Insertar fase?
MODIFICAR PROGRAMA
ENTER: Aceptar / ESC: Cancelar / <<: Menú anterior
Programa: 21
MANTAS
Con las teclas INC (∧∧∧∧) y DEC (∨∨∨∨) se selecciona el
número de programa. Pulsar ENTER.
MODIFICAR PROGRAMA
Programa: 21
Titulo programa
MANTAS
Con las teclas INC (∧∧∧∧) y DEC (∨∨∨∨) seleccionamos el
Este comando permite modificar una fase de un
programa. Los pasos a seguir son los siguientes:
Después de seleccionar MODIFICAR, pulsar ENTER y
se visualiza la primera fase con su nombre.
4.6.5 Modificar
Fase: 1
Lavado
Bloque: 7
Prelavado 90ºC
título. A continuación si pulsamos ENTER el nuevo
título queda seleccionado.
Con las teclas INC (∧∧∧∧) y DEC (∨∨∨∨) se elige el nombre
de fase entre los guardados en memoria. Una vez
Programa 18
MANTAS
seleccionado dicho nombre, pulsar ENTER y se
visualiza el primer número de bloque disponible:
Fase: 1
Prelavado
Con las teclas INC (∧∧∧∧) y DEC (∨∨∨∨) se
selecciona el número de la fase. Pulsar ENTER.
Con las teclas INC (∧∧∧∧) y DEC (∨∨∨∨) se elige el bloque y
Fase: 1
Lavado
Bloque: 7
Prelavado 90ºC
una vez seleccionado dicho bloque, pulsar ENTER.
17
Page 52

ESPAÑOL
Con la tecla INFO se visualizan los parámetros de
dicho bloque.
Si se desea volver al menú anterior se debe pulsar la
tecla <<.
Modificar fase?
ENTER: Aceptar / ESC: Cancelar / <<: Menú anterior
Este comando permite borrar cualquier programa
creado por el usuario. Los pasos a seguir son los
siguientes:
4.6.7 Borrar programa
4.6.6 Eliminar
Este comando permite eliminar una fase de un
programa. Los pasos a seguir son los siguientes:
Después de seleccionar la fase a eliminar pulsar
ENTER y seleccionar ELIMINAR.
Eliminar fase?
Prelavado
ENTER: Aceptar / ESC: Cancelar / <<: Menú anterior
Una vez realizados todos los cambios pulsar ESC.
Guardar programa?
MANTAS
Después de seleccionar BORRAR PROGRAMA,
pulsar la tecla ENTER y se visualiza el primer
programa borrable guardado en memoria.
BORRAR PROGRAMA
Programa: 17
MANTAS
Con las teclas INC (∧∧∧∧) y DEC (∨∨∨∨) se visualizan todos
los programas borrables. Una vez seleccionado el
programa, pulsar ENTER.
Borrar programa?
ENTER: Aceptar / ESC: Cancelar / <<: Menú anterior
18
Page 53

ESPAÑOL
5 MANTENIMIENTO
5.1 IIrregularidades eléctricas y
mecánicas
Antes de llamar al Servicio de Asistencia Técnica,
compruebe,
Que llega corriente a la máquina.
El estado de los fusibles.
Que la tensión coincide con la de la máquina.
Si la lavadora no coge el nivel de agua,
compruebe,
Que la llave de paso del agua está abierta.
Que el filtro de entrada de agua no está obstruido.
Que la presión del agua de red está entre 2 ÷ 4
Kg/cm2 (28 ÷ 56 psi).
Si la lavadora vibra excesivamente, compruebe,
Mensaje Causas posibles Acciones
Este mensaje aparece al recuperar la tensión después de
CORTE
SUMISNISTRO
ELECTRICO
DETECTADO
E 2
E 3
E 4
E 5
E 6
E 7
E 9
E 10
E 11
E 12
registrase un corte del mismo.
Si el corte de tensión se produce en la fase de centrifugado
aparecerá en pantalla el mensaje "UAIT" (wait). Espere un tiempo
de seguridad sin pulsar nada hasta que aparezca el citado "PWR
FAULT" (1,5 min. aprox.).
FALLO EN BLOQUEO
Este mensaje aparece cuando se detecta que no se consigue
desbloquear la puerta al finalizar un programa o se desbloquea
durante el mismo
FALLO EN DESAGÜE
Este mensaje aparece cuando se detecta que, a pesar de
desactivar la salida de la válvula de vaciado, el nivel de agua
dentro del tambor de la lavadora no ha disminuido durante cierto
tiempo preestablecido.
FALLO ENTRADA AGUA
Este mensaje aparece cuando se detecta que, a pesar de activar
la(s) salidas de la(s) electroválvula(s) correspondiente(s), el nivel
de agua dentro de la cuba de la lavadora no ha aumentado durante
cierto tiempo preestablecido.
FALLO CALENTAMIENTO
Este mensaje aparece cuando se detecta que, a pesar de activar la
salida de calentamiento, la temperatura del agua no ha aumentado
durante cierto tiempo preestablecido.
TEMPERATURA MÁXIMA
Este mensaje aparece cuando se detecta que la temperatura del
agua ha superado los 95ºC.
TERMOSTATO ABIERTO
Este mensaje aparece cuando el agua supera los 95ºC
CALENTAMIENTO MOTOR
Este mensaje aparece cuando se detecta que se ha activado la
protección térmica del motor de la lavadora.
DESEQUILIBRIO
Este mensaje aparece cuando en el centrifugado final se activa
tres veces el micro de desequilibrio.
ROPA CALIENTE
Este mensaje aparece cuando se termina de ejecutar un programa
pero la temperatura dentro de la cuba supera los 50ºC.
AGUA EN LA CUBA
Este mensaje aparece cuando se termina de ejecutar un programa
pero todavía hay agua en la cuba. No se permitirá abrir la puerta
hasta que se haya evacuado el agua de la cuba.
Que ninguno de los tornillos de los paneles está
suelto.
Si hay un corte de tensión,
Se desagua la cuba y la puerta queda bloqueada. Si
quiere sacar la ropa de la lavadora puede desbloquear
la puerta tirando hacia abajo de la cinta situada detrás
del panel frontal.
5.2 Mensajes de error
En la pantalla de la lavadora pueden aparecer
mensajes de advertencia o avería acompañados de
una señal acústica durante y después de la ejecución
de un programa de lavado. Salvo en el caso de corte
de tensión, la lavadora quedará en situación de pausa
(válvula desagüe cerrada, motor parado, etc.)
esperando la acción del usuario.
Pulsar START: continúa la ejecución del
programa en la misma fase en que se
produjo el corte de tensión.
Pulsar EXPRESS: finaliza el programa
Pulsar ESC: finaliza el programa
Pulsar START: continúa con la ejecución
del programa.
Pulsar EXPRESS: finaliza el programa.
Pulsar START: continúa con la ejecución
del programa.
Pulsar EXPRESS: finaliza el programa.
Pulsar START: continúa con la ejecución
del programa.
Pulsar EXPRESS: finaliza el programa.
Pulsar START: continúa con la ejecución
del programa.
Pulsar EXPRESS: finaliza el programa.
Pulsar START: continúa con la ejecución
del programa.
Pulsar EXPRESS: finaliza el programa.
Pulsar START: continúa con la ejecución
del programa.
Pulsar EXPRESS: finaliza el programa.
Pulsar EXPRESS: finaliza el programa.
Pulsar EXPRESS: finaliza el programa.
Pulsar EXPRESS: finaliza el programa.
19
Page 54

ESPAÑOL
2
Page 55

INSTALACION Y MANTENIMIENTO EN LAS LAVADORAS
EMPLAZAMIENTO
INSTALACIÓN LAVADORAS
Retirar los anclajes de transporte
Contrastar matrículas con pedido cliente
Se recomienda que el pavimento no sea deslizante
Purgar circuitos de agua antes de realizar las conexiones
Es obligatorio fijar al suelo todas las lavadoras de bajas revoluciones
Se recomienda fijar al suelo todas las lavadoras de altas revoluciones
Se recomineda que la tensión entre neutro y tierra sea igual a cero
Antes de accionar el seccionador medir tensión entre fases y fase-neutro
Limpiar los filtros de las entradas de agua
Poner la carga correcta (completa) y seleccionar el programa adecuado
Revisar la tensión de la correa
Limpiar filtro ventilación variador y rejilla ventilador motor
Limpiar la parte exterior de la máquina con un trapo húmedo
Asegurar que el piso soporta el peso y la fuerza máxima transmitida de la máquina
Asegurarse de que la presión dinámica de la red a la entrada de la maquina sea de 2 a 4 bares
Adecuar la ubicación de forma que la máquina quede nivelada y se respeten las distancias necesarias para mantenimiento
- obligatorio istalar filtro a la entrada de la electrovalvula de vapor
Desembalar quitando bolsa y cantoneras Desembalar: seguir indicaciones adheridas en el embalaje
MODELO 10,13,18,25 40,60,120
Máquinas VAPOR: - obligatorio instalar las juntas de teflón en ambos extremos de la manguera de alimentación
Instalar mangueras de agua (necesario filtro en entrada de agua fría) Instalar mangueras (necesario filtro en cada entrada)
INSTALACIÓN
Es recomendable intercalar un interruptor diferencial de 300mA entre el conexionado y la red
Conectar la alimentación eléctrica. Comparar tensión de red y tensión de máquina (observar matrícula)
Conectar conducto de desagüe. Importante: asegurarse de la correcta inclinación para completa evacuación del agua
- La apertura de la llave de vapor siempre se hará progresivamente y no de una forma repentina
- Volver a apretar las tuercas de las mangueras de vapor
MANTENIMIENTO PREVENTIVO LAVADORAS
Se recomienda dejar la puerta abierta cuando la lavadora no se encuentre en marcha
DIARIO
GENERALES
Limpiar los compartimentos de la cubetera de jabón con el fin de no crear obsturcciones
Al término del turno limpiar con un trapo húmedo la junta de la puerta y apagar la máquina
SEMANAL
SEMESTRAL
 Loading...