

ADC ESWH-60 M, ESWH-30 M, ESWH-40 M, ESWH-60 MC, ESWH-30 MC USER AND MAINTENANCE MANUAL
...Page 1
USER AND MAINTENANCE MANUAL
MANUAL DE USO Y MANTENIMIENTO
ESWH-60 M / ESWH-30 M / ESWH-40 M / ESWH-60 M
ESWH-60 MC / ESWH-30 MC / ESWH-40 MC / ESWH-60 MC
ESWM-60 M / ESWM-30 M / ESWM-40 M / ESWM-60 M
ESWM-60 MC / ESWM-30 MC / ESWM-40 MC / ESWM-60 MC
P628211000-00
Page 2

GR A B
MD
ESWH
-25
ESWH
-30 ESWH
-40
ESWH
-60
ESWM
-25
ESWM
-30
ESWM
-40
ESWM
- 60
DC
CM
SP1
SP2
SP3
SP4
LV1
LV2
LV3
LV4
LV5
litres 100 130 180 250 100 130 180 250
Lb 25 30 40 60 25 30 40 60
r.p.m. 50 50 47 45 50 50 47 45
rpm 500 500 475 450 500 500 475 450
r.p.m. 1000 1000 950 900 820 760 760 714
rpm 800 800 750 700 820 760 760 714
mm 70 75 85 95 70 75 85 95
mm 90 105 115 125 90 105 115 125
mm 110 135 145 155 110 135 145 155
mm 130 165 175 185 130 165 175 185
mm 180 225 240 260 180 225 240 260
Page 3
Page 4

P1
PH 1 2 3 4 5 6 7
BL 1 2 3 3 4 5 6
SP 1 1 1 1 2 1 3
LV 1 1 3 3 --- 3 ---
ºC
ºF
TM(min) 6 12 3 3 2 3 6
MT 1 1 1 1 --- 1 ---
40
104
90
194 --- --- --- --- ---
P2
PH 1 2 3 4 5 6 7
BL 7 9 3 3 4 5 6
SP 1 1 1 1 2 1 3
LV 1 1 3 3 --- 3 ---
ºC
ºF
30
86
60
140 --- --- --- --- ---
P5
PH 1 2 3 4 5 6 7
BL 13 15 19 19 4 20 21
SP 1 1 1 1 2 1 3
LV 2 2 3 3 --- 3 ---
ºC
ºF
TIME(min) 6 15 3 3 2 3 4
MOTION 1 1 1 1 --- 1 ---
30
60
86
140 --- --- --- --- ---
P6
PH 1 2 3 4 5 6 7
BL 14 18 19 19 4 20 21
SP 1 1 1 1 2 1 3
LV 2 2 3 3 --- 3 ---
ºC
ºF --- --- --- --- --- --- --TIME(min) 6 15 3 3 2 3 6
MOTION 1 1 1 1 --- 1 ---
P3
PH 1 2 3 4 5 6 7
BL 8 11 3 3 4 5 6
SP 1 1 1 1 2 1 3
LV 1 1 3 3 --- 3 ---
ºC
ºF ---
TIME(min) 6 12 3 3 2 3 6
MOTION 1 1 1 1 --- 1 ---
30
86 --- --- --- --- ---
P4
PH 1 2 3 4 5 6 7
BL 8 12 3 3 4 5 6
TIME(min) 6 12 3 3 2 3 4
MOTION 1 1 1 1 --- 1 ---
P7
PH 1 2 3 4 6 7
BL 22 23 26 26 27 34
SP 1 1 1 1 1 4
LV 3 3 4 4 4 ---
ºC
ºF ---
TIME(min) 6 12 3 3 3 4
MOTION 2 2 2 2 2 ---
40
104 --- --- --- ---
P8
PH 1 2 3 4 6 7
BL 22 25 26 26 27 34
SP 1 1 1 1 2 1 3
LV 1 1 3 3 --- 3 ---
ºC
ºF --- --- --- --- --- --- ---
TIME(min) 6 12 3 3 2 3 6
MOTION 1 1 1 1 --- 1 ---
SP 1 1 1 1 1 4
LV 3 3 4 4 4 ---
ºC
ºF --- --- --- --- --- ---
TIME(min) 6 12 3 3 3 4
MOTION 2 2 2 2 2 ---
Page 5

P9
PH 2 3 4 6 7
BL 29 30 30 31 32
SP 1 1 1 1 2
LV 3 4 4 4 ---
ºC
ºF --- --- --- --- ---
TIME(min) 12 3 3 3 3
MOTION 3 3 3 3 ---
P10
PH 0 1 2 3 5 4 5 6 7
BL 3 35 36 3 4 3 4 5 6
SP 1 1 1 1 2 1 2 1 3
LV 3 1 3 3 --- 3 --- 3 ---
ºC
ºF ---
65
71
149
160 --- --- --- --- --- ---
P13
PH 2 3 4 6 7
BL 17 24 24 5 6
SP 1 1 1 1 3
LV 1 3 3 --- 3 ---
ºC
ºF
TIME(min) 10 2 2 3 6
MOTION 1 1 1 1 ---
60
140 --- --- --- ---
P14
PH 2 3 4 6 7
BL 28 26 26 27 32
SP 1 1 1 1 2
LV 3 4 4 --- 4 ---
ºC
ºF --- --- --- --- --TIME(min) 3 5 5 3 2 3 2 3 6
MOTION 1 1 1 1 --- 1 --- 1 ---
P11
PH 2 3 4 6 7
BL 10 24 24 5 6
SP 1 1 1 1 3
LV 1 3 3 --- 3 ---
ºC
ºF --- --- --- --- ---
TIME(min) 8 2 2 3 6
MOTION 1 1 1 1 ---
P12
PH 2 3 4 6 7
BL 16 24 24 5 6
TIME(min) 8 3 3 3 6
MOTION 2 2 2 2 ---
P15
PH 6
BL 6
SP 3
LV ---
ºC
ºF
TIME(min) 6
MOTION ---
---
---
P16
PH 4
BL 33
SP 1 1 1 1 3
LV 1 3 3 --- 3 ---
ºC
ºF
TIME(min) 10 2 2 3 6
MOTION 1 1 1 1 ---
40
104 --- --- --- ---
SP 2
LV ---
ºC
ºF
TIME(min) 2
MOTION ---
---
---
Page 6

ENGLISH
INTERPRETATION OF TABLES: SYMBOLS AND VALUES
SYMBOL MEANING VALUES
A
B
C
F
G
H
I
PH
BL
SP*
LV*
T
TM:
MT
P*
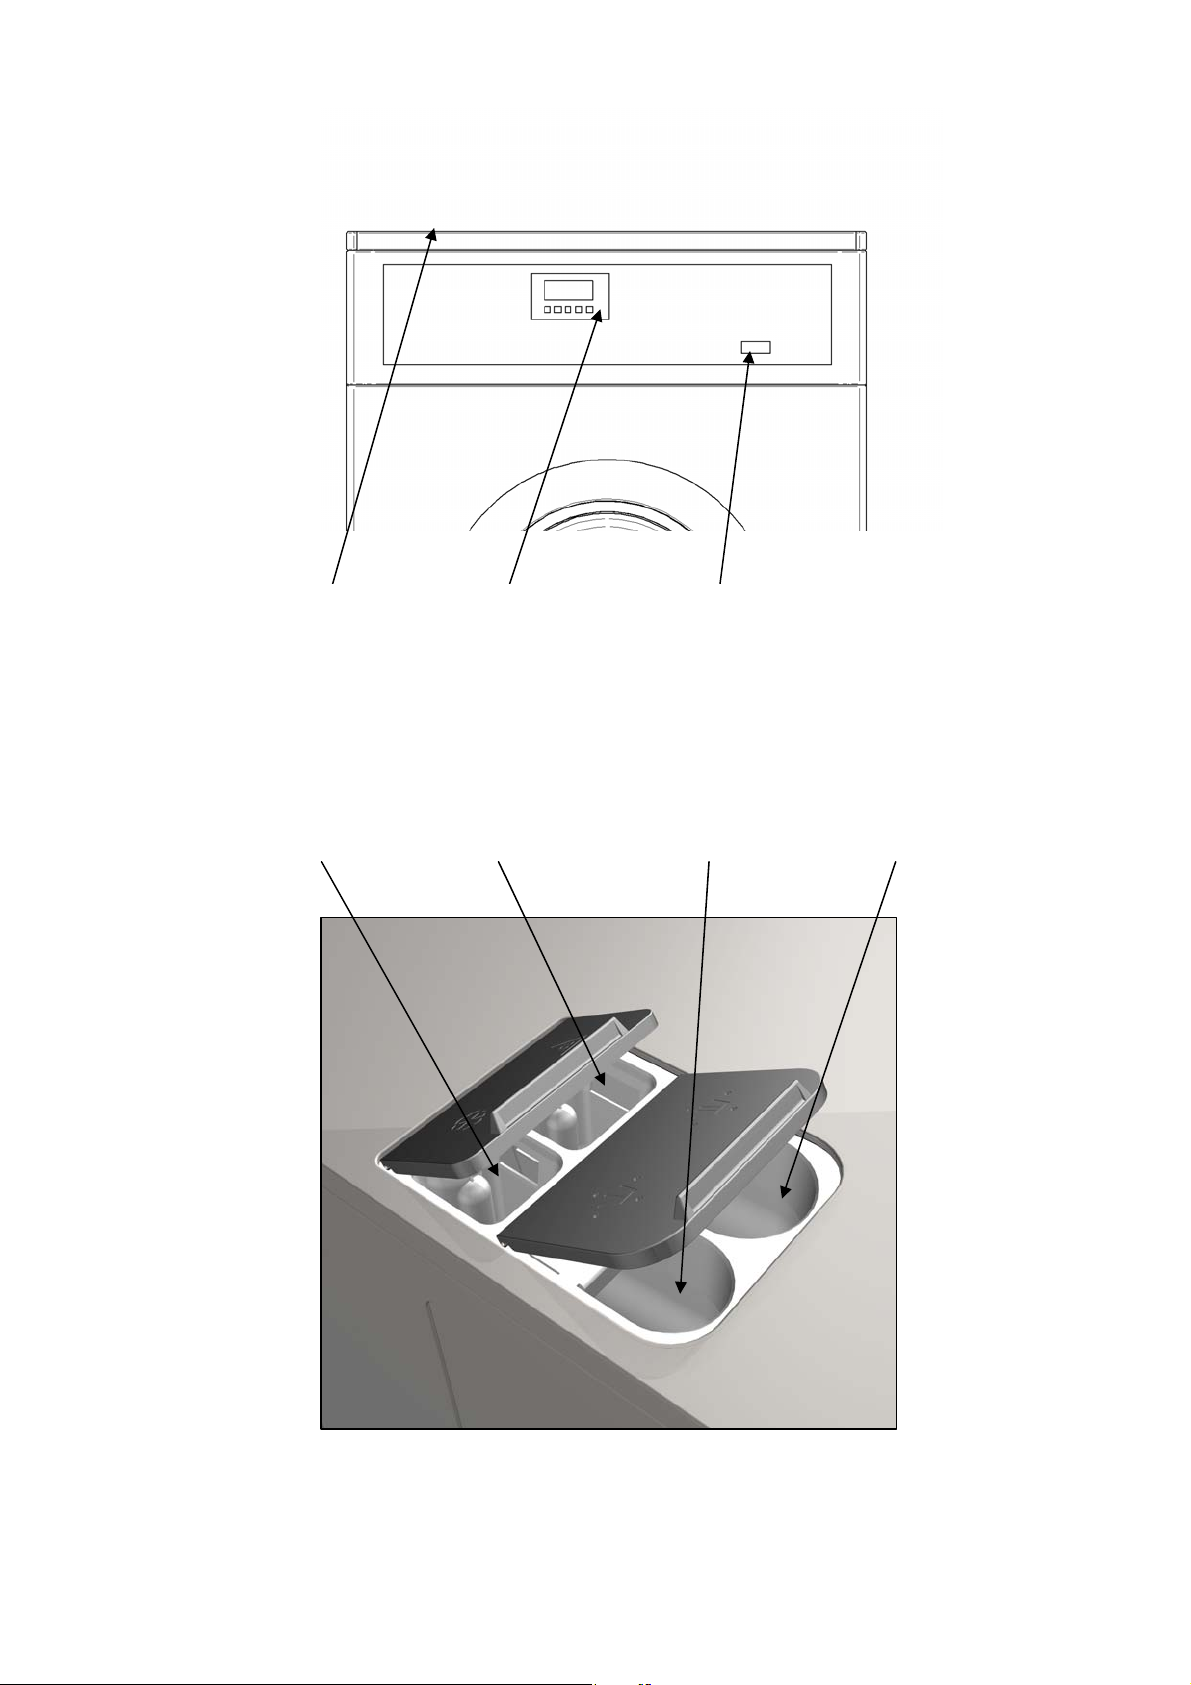
CONTROLS
TRAY
POWER SWITCH
PREWASH
SYSTEMS
SOFTENER
BLEACH
PHASE
BLOCK NO.
SPEED
WATER LEVEL
TEMPERATURE
TIME
DRUM MOVEMENT
PROGRAMMES
0: Soak
1: Pre-wash
2: wash
3: Rinse 1
4: Rinse 2
5: Short spin
6: Final rinse (softener)
7: Long spin
SP1: SYSTEMS
SP2: SHORT SPIN
SP3: LONG SPIN (MAX)
SP4: DELICATES SPIN
LV1: MINIMUM
LV2: LOW
LV3: MEDIUM
LV4: HIGH
LV5: MAXIMUM
1: ENERGETIC
2: NORMAL
3: DELICATES
P1: WHITES 90C/194F
P2: WHITES/COLOUREDS 60 ºC/140F
P3: WHITES/COLOUREDS 30ºC/86F
P4: WHITES/COLOUREDS COLD WASH
P5: SYNTHETICS 60º/140
P6: SYNTHETICS COLD WASH
P7: DELICATES 40ºC/104F
P8: DELICATES COLD WASH
P9: WOOL COLD WASH
P10: SANITARY WASH
P11: FAST COLD WASH
P12: FAST WASH 40ºC/104
P13: FAST WASH 60º/140F
P14: FAST DELICATES
P15: LONG SPIN
P16: SHORT SPIN
3
Page 7

ENGLISH
IMPORTANT INSTRUCTIONS REGARDING SAFETY AND USE
WARNING: To reduce the risk of electrical shocks
or injury when using the appliance, the basic
precautions should be observed, including the
following:
1- READ all the instructions prior to using the
appliance and KEEP THEM in an easily
accessible place for reference in the event of
doubt.
2- Do NOT wash clothes which have been
previously treated, washed, soaked or stained
with petrol, dry cleaning solvents, or other
inflammable or explosive substances, as these
give off vapours which may catch fire or
explode.
3- Do NOT add petrol, dry cleaning solvents or
other inflammable substances to the washing
water. These substances give off vapours
which could catch fire or explode.
4- In some conditions, hydrogen gas may be
produced in a hot water system which has not
been used for more than two weeks. Hydrogen
gas is explosive. If the hot water system has
not been used for a while, before using the
washing machine turn on all the hot water taps
and let the water run for a few minutes. This
will release any accumulated hydrogen gas.
As the gas is inflammable, do not smoke or
use naked flames during this operation.
5- Do NOT allow children to play in or on the
appliance. Children should be strictly
supervised when in the vicinity of a machine
which is operating.
6- Remove the door from the appliance before
disposal or before leaving it out of service.
7- DO NOT TRY TO OPEN THE DOOR if the
drum is moving.
8- Do NOT install or store the appliance in the
open.
9- Do NOT try to force the controls.
10- Do not repair or replace parts of the
appliance or carry out any servicing unless
recommended to do so in the User Instruction
Manual. Make sure that you fully understand
the instructions and have the necessary skills
to carry out the operations described.
11- Do NOT remove any safety device or modify
any components in the washing machine. DO
NOT INSTALL components not belonging to
the machine in the appliance.
12- Failure to comply with any of the instructions
given in the Instruction Manual may result in
personal injury to the user. It is no possible to
provide for all possible situations and
contingencies with warnings about risk and
hazards. Therefore, any person involved in the
transportation, installation, use or maintenance
of the machine should always employ
common sense, caution and care.
13- Do NOT use the machine unless all the covers
and guards are correctly fitted and secured.
14- The distributor (vendor) MUST correctly
instruct the user during commissioning.
15- Pour the correct doses of detergent, fabric
softener and lay into the dispenser drawer, as
indicated by the manufacturer. Heed tips
concerning the treatment of different materials
given by the manufacturers.
16- Daily remove any traces of detergent or liquids
from the dispenser drawer. Never use
powdered or abrasive detergents for cleaning;
use only water and soap.
17- Clean the water inlet filters and the external
dispenser conducts once a month.
18- Never clean the exterior by water injection;
functional parts of the machine could damage.
19- If the washing machine is to be idle for long
periods, apply a coat of Vaseline oil to all its
stainless steel surfaces.
20- An annual general revision is recommended.
4
Page 8

ENGLISH
CONTENTS
INTERPRETATION OF TABLES: SYMBOLS AND VALUES ....................................................................................... 3
IMPORTANT INSTRUCTIONS REGARDING SAFETY AND USE .............................................................................. 4
1 INTRODUCTION ....................................................................................................................................................... 6
2 USE ............................................................................................................................................................................ 7
2.1 Controls ............................................................................................................................................................. 7
2.2 Programmes ...................................................................................................................................................... 7
2.3 Operation ........................................................................................................................................................... 9
2.3.1 Programme execution ................................................................................................................................. 9
2.3.2 Programme end ........................................................................................................................................... 9
3 CONFIGURATION (advanced) ................................................................................................................................ 10
3.1 Prg (programme selection) .............................................................................................................................. 10
3.2 AVAN(advance) ............................................................................................................................................... 10
3.3 SPRES (Express) ............................................................................................................................................ 10
3.4 ACLA (Extra rinse) .......................................................................................................................................... 10
3.5 Stop (Thermal stop switch) ............................................................................................................................. 10
3.6 LEuL (Configuration of levels) ......................................................................................................................... 10
3.7 bLOC (Modify/delete blocks) ........................................................................................................................... 11
3.8 Timr (Remaining time) ..................................................................................................................................... 11
3.9 Parameters (In run mode) ............................................................................................................................... 11
4 SELF-SERVICE ....................................................................................................................................................... 12
4.1 Operation ......................................................................................................................................................... 12
4.2 Pay centre/card ............................................................................................................................................... 12
4.3 COIN ............................................................................................................................................................... 12
5 MAINTENANCE ....................................................................................................................................................... 14
5.1 Electrical and mechanical irregularities ........................................................................................................... 14
5.2 Error messages ............................................................................................................................................... 14
5
Page 9

ENGLISH
1 INTRODUCTION
Dear customer,
Thank you for the confidence you have placed in our product. We hope it meets your needs.
We offer a guarantee of 12 months from the date shown on the invoice for the purchase of spare parts and of 1 month
for labour and displacement.
The guarantee does not cover damage to glass components, or consumables (seals, bulbs, etc.) nor damage to
insulation material or damage due to the incorrect installation of the appliance, or to inappropriate use, inadequate
maintenance or poor repair processes.
This appliance is subject to changes and modifications for its technical progress.
6
Page 10

ENGLISH
2 USE
2.1 Controls
Screen (2)
Mains switch (4) On/Off
START key
ADVANCE (>>) key
INC (∧ ) and DEC (∨ ) keys The INC (∧) and DEC (∨) keys have different functions depending on the screen
EXPRESS Key
Extra Rinse Key Press this key to add an additional rinse to the current washing programme. When it
Phase indicators (LEDS) The programmer has 7 amber LEDs that indicate the status of the washing machine
2.2 Programmes
(S) Express mode on
P1 (S)
P2 (S)
P3 (S)
P4 (S)
P5 (S)
P6 (S)
P7 (S)
P8 (S)
P9 (S)
P10 (S)
P11 (S)
P12 (S)
P13 (S)
P14 (S)
P15 (S)
P16 (S)
Programme
Whites 90ºC The complete prewash cycle is cancelled and the wash cycle lasts 8
Whites/coloureds 60 ºC The complete prewash cycle is cancelled and the wash cycle lasts 10
Whites/coloureds 30 ºC The complete prewash cycle is cancelled and the thermal stop is
Whites/coloureds cold wash The complete prewash cycle is cancelled.
Synthetics 60ºC The complete prewash cycle is cancelled and the wash cycle lasts 10
Synthetics cold wash The complete prewash cycle is cancelled.
Delicates 40ºC The complete prewash cycle is cancelled and the thermal stop is
Delicates cold wash The complete prewash cycle is cancelled.
Cold woollens The complete prewash cycle is cancelled and the wash cycle lasts 8
Sanitary There is no change.
Fast cold wash There is no change.
Fast wash 40ºC There is no change.
Fast wash 60ºC There is no change.
Fast delicates There is no change.
Long spin There is no change.
Short spin There is no change.
“Express” Effect
The screen has 4 displays with 7 segments each and gives information regarding
the current operation.
The switch has two positions. Press “I” to switch on the washing machine and “O” to
switch it off.
Press Start to start a programme, pause or continue the programme after the
pause. In the menu navigation use the ENTER function to enter or go the next level
in a menu.
Press advance to accelerate a programme. When this key is pressed the
programmer goes directly to run the next phase of the programme; where the phase
currently running is the last, the programme ends. Please note that if you press this
key during a spin cycle, the machine will not move to the next phase until
completion of the required safety time to permit the drum to come to a complete
standstill.
and the programmer operating mode. Use these keys to select a wash programme
or to scroll through different menus.
Press Express to reduce the time each programme runs. The following table shows
the effect of the “express” key on the different programmes.
When the Express key is pressed, the letter S appears next to the programme,
indicating that the express mode is on.
When scrolling through the menus, use the Return function to exit or go to the
higher level.
is pressed, the additional Extra Rinse LED lights up.
and the washing programme progress in its different phases. The eighth LED is
green and shows the door status.
minutes instead of 12.
minutes instead of 15.
deactivated in the wash cycle
minutes instead of 15.
deactivated in the wash cycle
minutes instead of 12.
7
Page 11

ENGLISH
NOTE:
temperature to be reached
When the thermal stop is deactivated, the programmed wash time starts to run immediately without waiting for the programmed water
8
Page 12

ENGLISH
2.3 Operation
This machine has been designed to wash or treat most
materials. Its use for other purposes than those given
is considered as undue and dangerous.
The machine should be loaded with the nominal load,
smaller or bigger loads should be avoided.
Clothes should not be washed in sacks or cloth bags.
If this is absolutely necessary, make sure the machine
is loaded to the nominal load to avoid possible
unbalanced loads.
Canvas, waterproof items, mops, carpets or rugs
should not be spun.
The machine is controlled using a microprocessor able
to adapt to the needs of each user.
There are 16 programmes for which the times and
temperatures can be changed. They are divided into
four sections with different spin settings and
treatments: Normal, Delicates, synthetics and fast. For
further details, please see the sections Configuration
(page 68) and Standardised Programmes (page 68).
The machine has an intelligent control to control the
water temperature; if hot water is available, it should
be connected. The machine adjusts the different water
inputs to maintain the programmed temperature.
It has intelligent control for spin cycle management.
The washing machine controls any unbalanced loads
and manages the spin to ensure a good spin, reducing
noise and extending the useful life of wearable
components, thus significantly reducing fatigue in the
mechanical components.
The machine offers the “Express” system. By pressing
one key you automatically reduce the programme time,
thus adapting to user requirements without needing to
change the machine configuration.
Extra rinse option. Press one key to add another rinse
to the programme, thus adapting to user requirements
without needing to change the machine configuration.
it is not possible to pause the machine, and therefore
pressing the START key will have no effect.
2.3.2 Programme end
The programme can finish in several ways:
Normal end: the programme finishes when all cycles
have been carried out.
Pressing the EXPRESS key when the washing
machine is in PAUSE mode.
By pressing the ADVANCE key from any point in
the programme, repeatedly, the end of the programme
can be reached. If a spin is being carried out, the
ADVANCE key will not respond until the braking safety
time has finished (approx 1 min.).
When a programme ends, before allowing the door to
be opened, the clothes are untangled during 30
seconds. An acoustic signal when the door can be
opened after this process.
2.3.1 Programme execution
In order to carry out a wash programme, the following
steps should be followed:
1- Put dirty clothes in washing machine drum
2- Close washing machine door.
3- Add detergent
4- Select desired programme.
5- Press START key.
After starting a programme, the LEDs indicate its
condition and evolution.
With the START key the programme stops, and
pauses. If you want the programme to continue, press
the Start key again. If the programme is in spin mode,
9
Page 13

ENGLISH
3 CONFIGURATION (advanced)
To go to the menu, while the machine is on and
stopped, press the INC and DEC (∧,∨) keys together
for 2 seconds. The two main menus of the machine
are shown below.
CONF Æ Configuration
MANT Æ Maintenance
The maintenance menu is exclusively for use
by the technical service, user options are included in
the configuration menu. To go to configuration, press
START and enter the code, 3489. The different options
are displayed below:
MOD. Æ Model (technical service)
Grd Æ Temperature unit (Cº or Fahrenheit)
Pay Æ Self-service (Off/Coin/CP) Only for
Prg Æ Programme selection
AVAN Æ Advance (On/Off)
SPRES Æ Express (On/Off)
ACLA Æ Extra rinse (On/Off)
Stop Æ Thermal stop switch (On/Off)
LEuL Æ Configuration of water level
bLOC Æ bLOC (Modify/delete blocks)
TimR Æ Remaining time
Div Æ Currency (only self-service/coin
Pric Æ Price (only self-service/coin slot)
self-service models (see point 2.9)
slot) (see point 2.9)
(see point 2.9)
3.1 Prg (programme selection)
Press start to access the programme selection; the
programmes are displayed followed by ‘y’ or ‘n’
(yes/no) indicating which programmes are activated.
Use the INC (∧) and DEC (∨) keys to change the
yes/no, press >> (advance) to change the programme
and Start to end. If no programme is selected, the
defect programme, P1 is active. If, for example,
programmes P1, P4, P5, P8 and P14 are selected,
correlative numbers are displayed on the operation
screen: P1, P2, P3, P4, P5.
3.2 AVAN(advance)
The key >> can be deactivated, to prevent the
advance of a cycle thus ensuring the wash programme
is completed correctly. ON activated, OFF deactivated
(activated by defect)
3.3 SPRES (Express)
The Express function may be switched off. This
function slightly alters the wash cycles and times to
give shorter cycles. ON activated, OFF deactivated
(activated by defect)
3.4 ACLA (Extra rinse)
The extra rinse key can be switched off, eliminating the
option to add an extra rinse. ON activated, OFF
deactivated (activated by defect)
3.5 Stop (Thermal stop switch)
When the thermal stop switch is activated, the cycle
time does not start until the programmed temperature
has been reached in order to guarantee the wash
cycle is correctly completed; this switch can be
deactivated so that the time is counted from the
moment the programmed level is reached. ON
activated, OFF deactivated (activated by defect)
3.6 LEuL (Configuration of levels)
The water levels can be varied; there are three
different settings:
1- Low (factory setting)
2- Intermediate
3- Height
If the configuration is modified, this will affect all the
levels of water used. Press start and the current level
is displayed (Leu1), use the INC and DEC (∧,∨) keys
to change the level to suit your needs. Press Start
again to confirm the level selected.
10
Page 14

ENGLISH
3.7 bLOC (Modify/delete blocks)
It is possible to modify the time and temperature of
each phase and even delete phases.
First, refer to the table of Standardised Programmes
to confirm which blocks are in the programme you wish
to modify.
Next, enter this block and modify the parameters as
follows:
1- When bLOC is displayed on the screen,
press Start.
2- B 1 is displayed, press the INC and DEC
(∧,∨) keys to go to the block you wish to
modify. Press Start.
3- “tIME” is displayed on the screen, press
the INC or DEC (∧,∨) keys to go to “tEMP”
(temperature). To modify the time, press
Start when “tIME” is displayed and the
default time setting will be shown. Use the
INC and DEC (∧,∨) keys to modify this
value and press Start to confirm. Press
Express to exit.
4- To modify the temperature, go to “tEmP”,
press Start and the default temperature
setting is displayed, modify the value using
the INC and DEC (∧,∨) keys and press
Start to exit.
3.8 Timr (Remaining time)
The timer can be activated to display the time
remaining for each programme, provided that the
thermal stop, Express and extra rinse functions are
switched off. ON activated, OFF deactivated
(deactivated by defect)
3.9 Parameters (In run mode)
To go to the menu and view the real data while the
machine is running, press INC and DEC (∧,∨) together
for 2 seconds.
PARA Æ Parameters: Temperature, level of
water and remaining time.
IN Æ Inputs (technical service)
OUT Æ Outputs (technical service)
5- If the time is set to 0 seconds, the block is
cancelled and will not run, i.e. the next
phase will be run. It is not possible to
cancel the last spin of each programme
and therefore this is limited to a time of
one minute.
6- Warning! Please note that some blocks
are used in more than one programme at a
time and, if these block are changed, all
the programmes in which they are used
will be changed.
11
Page 15

ENGLISH
4 SELF-SERVICE
4.1 Operation
The configuration of the machine is different for selfservice models.
There is no mains switch on the control panel. To
switch the machine on and off, use the switch (circuit
breaker) at the rear of the machine.
Only those keys required to run a programme are
displayed; the “Express”, “extra rinse” and advance
keys are switched off although they can be
“>>”
activated in the configuration menu (page 9).
Warning!
For safety reasons, access to configuration is not
the same as in non-self-service machines. Please
ask your distributor (vendor) for details on the
corresponding method.
Remember that these
keys are used in the
configuration menus,
therefore you should
know exactly which
function each key
corresponds to.
The “Timr” (time
remaining) option is activated by default, it can be
switched off in the configuration menu (see section
3.8).
By defect, only 4 programmes are activated:
Self-service programmes
P1
P2
P3
P4
P5
P6
P7
P8
P9
P10
P11
P12
P13
P14
P15
P16
The programme selection can be configured (See
section 3.1)
Remember that the customer is only shown the active
programmes, and these are always shown in
correlative order beginning with P1.
Whites 90ºC
Whites/coloureds 60 ºC
Whites/coloureds 30 ºC
Whites/coloureds cold wash
Synthetics 60ºC
Synthetics cold wash
Delicates 40ºC
Delicates cold wash
Cold woollens
Sanitary
Fast cold wash (P1)
Fast wash 40ºC(P2)
Fast wash 60ºC(P3)
Fast delicates (P4)
Long spin
Short spin
Self-service machines can be operated using different
devices:
1- Pay centre (standard configuration)
2- Coin slot.
3- Card
The self-service washing machine is delivered with
Pay Centre configuration (CP). For the coin and card
operated options, it is necessary to install the
corresponding “kits” sold separately. Please ask your
distributor for further information.
To change the washing machine configuration, go to
CONF/PAY (see section 3) and select the required
option. There are two operating modes:
The different functions in each case are shown below:
4.2 Pay centre/card
Use this option if the washing machine is a pay centre
model or the card kit has been installed.
Programme execution
In order to carry out a wash programme, the following
steps should be followed:
1- Place dirty washing in the machine.
2- Close the door
3- Add detergent
4- Insert card or coins in the pay centre
5- Select programme
6- Press Start
The price rate is the same for all the programmes. To
change the price, please see the pay centre manual or
the card reader if using card payments.
4.3 COIN
Use this option if the machine has been installed with
the coin kit.
In order to carry out a wash programme, the following
steps should be followed:
1- Place dirty washing in the machine.
2- Close the door
3- Add detergent
4- Select programme
5- Confirm price
6- Insert the coins
7- Press Start
The programme number and price are shown on the
screen intermittently; use the INC and DEC (∧,∨) keys
to change the programme and the price will be
12
Page 16

ENGLISH
updated. If there is no activity to the keys or in the coin
slot after 30 seconds, the word “FREE” is displayed on
the screen, indicating that the machine is available.
Press any button to view the programmes.
With this type of coin-operated machine, a different
price can be allocated to each programme. Two new
submenus, DIV and Pric, are displayed in the
configuration menu and can be used to allocate the
corresponding currency and price.
Div: The coin slot has a different setting for each
currency. Please refer to the coin kit manual and
confirm that the installed coin kit accepts your
currency. Allocate the currency to the washing
machine programmer. The table below shows the
available currencies:
CODE COUNTRY MINIMUN PRICE
0 Ficha/Token 1
1 Kuwait
Oman
2 Azerbaijan
Bulgaria
Bahrain
China
Fiji
Malaysia
Panama
Singapore
3 Argentina
Bermuda
Brazil
Canada
Ecuador
Egypt
Ethiopia
Guatemala
Cayman Islands
Saudi Arabia
El Salvador
Turkey
United States
4 United Arab Emirates
Bolivia
Estonia
Euro-Countrys
United Kingdom
Georgia
Ghana
Croatia
Latvia
New Zealand
Qatar
Ukraine
0.05
0.1
0.25
0.5
5 Bosnia and Herzegovina
Bangladesh
Switzerland
Dominican Republic
Hong Kong
Israel
India
Sri Lanka
Lithuania
Morocco
Macedonia
Peru
Philipines
Poland
Russian Federation
Sweden
Slovakia
Thailand
Tunisia
Uruguay
Yugoslavia
South Africa
Australia
6 Czech Republic
Denmark
Kenya
Mexico
Norway
Romania
7 Algeria
Guyana
Hungary
Iceland
Kazakhtan
Slovenia
Taiwan
8 Chile
Costa Rica
Iran, Islamic Republic of
Paraguay
French Polynesia
9 Colombia
Indonesia
Japan
South Korea
Uganda
Venezuela
NOTE: This list is continuously updated, if you cannot find your country in the
list, please ask your distributor for the latest available update.
PRIC: Allocate the price to each programme. Press
Start to go to the programmes, in this menu only the
active programmes are displayed ( but with their
original numbering) (please see the table on page 11).
1
5
10
50
100
Press Start to access the price. The price is
conditioned by the currency selected; if the currency is
changed, the prices will be reset, therefore it is
IMPORTANT to select the currency first. If a
programme is added to the list (section 3.1) the default
price for this currency will be allocated to the
programme, the price should be allocated after it has
been activated.
13
Page 17

ENGLISH
5 MAINTENANCE
5.1 Electrical and mechanical irregularities
Before calling the Technical Service Centre, check the
following:
That power is supplied to the machine.
The condition of the fuses.
That the voltage is correct for the machine.
If the washing machine fails to get the required
level of water, check:
The water mains tap is open.
The water inlet filter is not blocked.
That the water pressure is between 2 and 4 kg/cm 28
(28 and 56 psi).
If the washing machine vibrates excessively,
check:
None of the panel screws is loose.
Message Possible causes Action
PWR FAUL
UAIT
E2
E3
E4
E5
E6
E7
E9
E10
E11
E12
This message appears on recovering the power after having been cut-off.
If the power cut occurs during the spin cycle, the message "WAIT" is
displayed. For safety reasons, wait approximately 1.5 minutes without
pressing anything until "PWR FAULT" is displayed.
FAULT LOCK
This message appears when it is detected that the door can not be unlocked
at the end of the programme or that it has unlocked during the programme
FAULT DRAIN PIPE
This message is displayed when, in spite of deactivating the emptying valve
output, the water level inside the drum has not decreased for a preestablished period of time.
FAULT WATER INLET
This message appears when, in spite of activating the corresponding
solenoid valves' outputs, the water level inside the tub has not increased
during a certain pre-established period of time.
HEATING FAULT
This message is shown when, in spite of activating the heating output, the
water temperature has not increased for a certain pre-established period of
time.
MAX. TEMP
This message is displayed when the water temperature has exceeded 95 ºC.
THERMOSTAT OPEN
This message appears when the water exceeds 95 ºC
MOTOR HEATING
This message appears when the thermal protection of the washing
machine's motor is detected to have not been activated.
UNBALANCE
This message appears when the final spin activates the unbalance micro
three times.
CLOTHES HOT
This message is displayed when a programme execution finishes but the
water temperature inside the tub exceeds 50 ºC.
WATER IN TUB
This message is displayed when a programme execution is finished but there
is still water inside the tub. The door can not be opened until the water is
drained from the tub.
If a power cut occurs, check:
The tub is drained and the door is blocked. If you want
to take the clothes out of the washing machine, unlock
the door by pulling down the belt located behind the
front panel.
5.2 Error messages
On the washing machine screen, warning or fault
messages may be displayed during or after the
execution of a wash programme. Except in the event
of a power cut, the washing machine will be paused
(drain pipe valve off, motor off, etc.), awaiting user
action.
Press START: the programme continues to
operate in the same phase as before the
power cut.
Press EXPRESS: the programme ends.
Press ESC: the programme ends.
Press START: the programme continues.
Press EXPRESS: the programme ends.
Press START: the programme continues.
Press EXPRESS: the programme ends.
Press START: the programme continues.
Press EXPRESS: the programme ends.
Press START: the programme continues.
Press EXPRESS: the programme ends.
Press START: the programme continues.
Press EXPRESS: the programme ends.
Press START: the programme continues.
Press EXPRESS: the programme ends.
Press EXPRESS: the programme ends.
Press EXPRESS: the programme ends.
Press EXPRESS: the programme ends.
14
Page 18

ESPAÑOL
INTERPRETACION DE TABLAS: SIMBOLOS Y VALORES
SIMBOLO SIGNIFICADO VALORES
A
B
C
F
G
H
I
PH
BL
SP*
LV*
T
TM
MT
P*
CONTROLES
CUBETERA
INTERRUPTOR GENERAL
PRELAVADO
LAVADO
SUAVIZANTE
LEJIA
0: Remojo
1: Prelavado
2: lavado
FASE
Nº DE BLOQUE
VELOCIDAD
NIVEL DE AGUA
TEMPERATURA
TIEMPO
MOVIMIENTO TAMBOR
PROGRAMAS
3: aclarado 1
4: aclarado 2
5: centrifugado corto
6: Aclarado final (suavizante)
7: centrifugado largo
SP1: LAVADO
SP2: CENTRIFUGADO CORTO
SP3: CENTRIFUGADO LARGO (MAX)
SP4: CENTRIFUGADO DELICADO
LV1: MINIMO
LV2: BAJO
LV3: MEDIO
LV4: ALTO
LV5: MAXIMO
1: ENERGICO
2: NORMAL
3: DELICADO
P1: BLANCA 90C/194F
P2: BLANCA/COLOR 60ºC/140F
P3: BLANCA/COLOR 30ºC/86F
P4: BLANCA/COLOR FRIA
P5: SINTETICA 60º/140
P6: SINTETICA FRIA
P7: DELICADA 40ºC/104F
P8: DELICADA FRIA
P9: LANA FRIA
P10: SANITARIO
P11: RAPIDO FRIO
P12: RAPIDO 40ºC/104
P13: RAPIDO 60º/140F
P14: RAPIDO DELICADA
P15: CENTRIFUGADO LARGO
P16: CENTRIFUGADO CORTO
3
Page 19

ESPAÑOL
INSTRUCCIONES IMPORTANTES DE SEGURIDAD Y USO
ADVERTENCIA: Para reducir el riesgo de
descargas eléctricas o lesiones personales al
usar su aparato, siga las precauciones
básicas, incluyendo las siguientes:
1- LEA todas las instrucciones antes de usar el
aparato y GUARDELAS en lugar fácilmente
accesible para solventar cualquier duda.
2- NO lave prendas que hayan sido previamente
tratadas, lavadas, remojadas o manchadas
con gasolina, disolventes de limpieza en seco,
u otras sustancias inflamables o explosivas,
ya que despiden vapores que pueden
incendiarse o explotar.
3- NO agregue gasolina, disolventes de limpieza
en seco, u otras sustancias inflamables al
agua de lavado. Estas substancias emiten
vapores que pueden incendiarse o explotar.
4- En determinadas condiciones, el gas de
hidrógeno puede ser producido en un sistema
de agua caliente que no se ha utilizado
durante dos semanas o más. Gas hidrógeno
es explosivo. Si el sistema de agua caliente no
ha sido usado por un período, antes de usar la
lavadora, abra todos los grifos de agua
caliente y deje que el agua de cada uno corra
durante varios minutos. Esto liberará el gas
hidrógeno acumulado. Como el gas es
inflamable, no fume ni use una llama durante
este tiempo.
5- NO permita que los niños jueguen en o sobre
el aparato. Mantenga a los niños bajo estricta
vigilancia cuando se encuentren en las
proximidades de una maquina en
funcionamiento.
6- Quite la puerta antes de desechar el aparato o
dejarlo fuera de servicio.
7- NO INTENTE ABRIR LA PUERTA si el
tambor está en movimiento.
8- NO instale ni almacene el aparato a la
intemperie.
9- NO trate de forzar los controles.
10- No repare o reemplace ninguna pieza del
aparato ni intente ninguna operación de
servicio a menos que se recomiende en el
manual de instrucciones de usuario. Aún así
asegúrese siempre de entender
perfectamente las instrucciones y tenga las
habilidades necesarias para llevar a cabo la
operación.
11- NO eliminar nigún dispositivo de seguridad ni
modificar ningún elemento de la lavadora. NO
INSTALAR en el interior de la maquina
elementos ajenos a ella.
12- Cualquier omisión de las indicaciones
descritas en los manuales de instrucciones,
pueden ocasionar daños personales al
usuario. No es posible cubrir todas las
condiciones y situaciones posibles con los
avisos de peligro y advertencias. Por lo tanto,
el sentido común, precaución y el cuidado
son factores que deben ser aportados por
la(s) persona(s) que transporte, instale, utilice
o mantenga la maquina.
13- NO utilizar la maquina sin estar todas las
tapas y protecciones correctamente colocadas
y fijadas.
14- ES OBLIGATORIO la instrucción correcta del
usuario por parte del distribuidor (vendedor)
durante la puesta en marcha.
15- Aporte a las cubetas correspondientes las
dosis de detergente, suavizante y lejía
indicadas por el fabricante. Observar los
consejos de tratamiento de cada tejido
indicados por el fabricante del mismo.
16- Limpie diariamente las cubetas de detergente
y líquidos. Para la limpieza use agua y jabón,
nunca detergentes abrasivos.
17- Limpie mensualmente los filtros de las
entradas de agua y los conductos de
dosificación exteriores.
18- No lave nunca el exterior utilizando chorro de
agua; pueden estropearse las partes
funcionales de la máquina.
19- Si la lavadora no va a utilizarse en un período
de tiempo largo, pase una mano de aceite de
vaselina sobre todas las superficies de acero
inoxidable.
20- Se recomienda una revisión general anual.
4
Page 20

ESPAÑOL
INDICE
INTERPRETACION DE TABLAS: SIMBOLOS Y VALORES ....................................................................................... 3
INSTRUCCIONES IMPORTANTES DE SEGURIDAD Y USO ..................................................................................... 4
1 INTRODUCCIÓN ....................................................................................................................................................... 6
2 USO ........................................................................................................................................................................... 7
2.1 Elementos de mando ........................................................................................................................................ 7
2.2 Programas ......................................................................................................................................................... 7
2.3 Funcionamiento ................................................................................................................................................. 8
2.3.1 Ejecución de un programa ............................................................................................................................ 8
2.3.2 Finalización de un programa ......................................................................................................................... 8
3 CONFIGURACION (avanzado) ................................................................................................................................. 9
3.1 Prg (selección de programas) ........................................................................................................................... 9
3.2 AVAN(avance) ................................................................................................................................................... 9
3.3 SPRES (Express) .............................................................................................................................................. 9
3.4 ACLA (Aclarado extra) ...................................................................................................................................... 9
3.5 Stop (Parada térmica) ....................................................................................................................................... 9
3.6 LEuL (Configuración niveles) ........................................................................................................................... 9
3.7 bLOC (Modificar/eliminar bloques) .................................................................................................................. 10
3.8 Timr(Tiempo restante) ..................................................................................................................................... 10
3.9 Parámetros (En estado de marcha) ................................................................................................................ 10
4 AUTOSERVICIO ...................................................................................................................................................... 11
4.1 Funcionamiento ............................................................................................................................................... 11
4.2 Central de pago/tarjeta .................................................................................................................................... 11
4.3 COIN (monedero) ............................................................................................................................................ 11
5 MANTENIMIENTO ................................................................................................................................................... 13
5.1 IIrregularidades eléctricas y mecánicas .......................................................................................................... 13
5.2 Mensajes de error ........................................................................................................................................... 13
5
Page 21

ESPAÑOL
1 INTRODUCCIÓN
Estimado cliente:
Gracias por haber depositado su confianza en nuestro producto. Deseamos que responda a sus necesidades.
Concedemos un plazo de garantía de 12 meses a partir de la fecha indicada en su factura de compra en repuestos y
de 1 mes en la mano de obra y desplazamientos.
Las condiciones de garantía no cubren daños de componentes de cristal, ni repuestos consumibles (juntas,
bombillas, etc.) como tampoco el deterioro del material aislante o daños imputables a una instalación incorrecta del
aparato, a su utilización en una aplicación indebida, a un mantenimiento inadecuado o a procesos de reparación
deficientes.
Este aparato está sujeto a cambios y modificaciones que apoyen su progreso técnico.
6
Page 22

ESPAÑOL
2 USO
2.1 Elementos de mando
Pantalla (2)
Interruptor general (4) On/Off Este interruptor tiene dos posiciones. Pulse “I” para encender la lavadora y “O” para
Tecla START
Tecla AVANCE (>>)
Teclas INC (∧) y DEC (∨) Las teclas INC (∧) y DEC (∨) tienen diversas funciones dependiendo de la pantalla
Tecla EXPRESS
Tecla Aclarado Extra Pulse esta tecla para añadir un aclarado adicional al programa de lavado actual.
Indicadores de fase (leds) El programador dispone de 7 leds ámbar que indican el estado de la lavadora y el
2.2 Programas
(S) Express activado
Programa Efecto “Express”
P1 (S)
P2 (S)
P3 (S)
P4 (S)
P5 (S)
P6 (S)
P7 (S)
P8 (S)
P9 (S)
P10 (S)
P11 (S)
P12 (S)
P13 (S)
P14 (S)
P15 (S)
P16 (S)
Blanca 90ºC Se anula el prelavado completo y el lavado será de 8 minutos en vez de 12.
Blanca/color 60ºC Se anula el prelavado completo y el lavado será de 10 minutos en vez de 15.
Blanca/color 30ºC Se anula el prelavado completo y en el lavado se desactiva la parada térmica
Blanca/color fría Se anula el prelavado completo.
Sintética 60ºC Se anula el prelavado completo y el lavado será de 10 minutos en vez de 15.
Sintética fría Se anula el prelavado completo.
Delicada 40ºC Se anula el prelavado completo y en el lavado se desactiva la parada térmica
Delicada fría Se anula el prelavado completo.
Lana fría Se anula el prelavado completo y el lavado será de 8 minutos en vez de 12.
Sanitario No hay efecto.
Rápido frío No hay efecto.
Rápido 40ºC No hay efecto.
Rápido 60ºC No hay efecto.
Rápido delicada No hay efecto.
Centrifugado largo No hay efecto.
Centrifugado Corto No hay efecto.
NOTA:
temperatura de lavado programada
Cuando la parada térmica esta desactivada, comenzará a contar el tiempo programado de lavado, sin esperar a que se alcance la
Se trata de una pantalla de 4 displays de 7 segmentos y se muestra información
referente a la operación que se esté realizando.
apagarla.
Pulse Start para iniciar un programa, hacer una pausa o continuar con el programa
tras una pausa. En la navegación por los menús toma la función de "ENTER", para
entrar o pasar al nivel siguiente en un menú.
Pulse avance para acelerar la ejecución de un programa. Cada vez que se pulsa
dicha tecla el programador pasa directamente a ejecutar la siguiente fase del
programa; y si la fase que se está ejecutando es la última, se termina el programa.
Tenga en cuenta que si pulsa esta tecla en un centrifugado no pasará de fase
durante un tiempo de seguridad necesario para el completo frenado del tambor.
y el modo de funcionamiento del programador. Permiten la selección de un
programa de lavado y la navegación en los diferentes menús.
Pulse Express para reducir el tiempo de cada programa. En la siguiente tabla se
muestra el efecto que tiene el “express” en los diferentes programas.
Cuando se pulsa la tecla Express aparecerá junto al programa la S indicando su
activación.
En la navegación por los menús toma la función de "atrás", para salir o pasar al
nivel superior.
Cuando lo pulse, se iluminará el led adicional de aclarado extra.
avance en el programa de lavado en sus diferentes fases. El octavo LED es verde y
muestra el estado de la puerta.
7
Page 23

ESPAÑOL
2.3 Funcionamiento
Esta máquina está diseñada y concebida para el
lavado o tratado de textiles en general. Su empleo en
propósitos ajenos a lo indicado será considerado
como indebido y peligroso.
Es aconsejable cargar la maquina con su carga
nominal, evite meter cargas muy inferiores o
superiores.
No es aconsejable lavar ropa introducida en sacos, en
tal caso, llene la lavadora hasta su carga nominal para
evitar posibles desequilibrios de carga.
No es aconsejable centrifugar lonas o prendas
impermeables, mopas, moquetas o alfombras.
El control de la maquina se realiza mediante un
microprocesador capaz de adaptarse a las
necesidades de cada usuario.
Dispone de 16 programas modificables en tiempos y
temperaturas. Se dividen en cuatro sectores que
llevan diferentes configuraciones de giro y tratamiento
de la ropa: Normales, Delicados, sintéticos y rápidos.
Para más información consulte el apartado
Configuración (pag.68) y programas normalizados
(pag.68).
Dispone de control inteligente para la regulación de
temperatura, si dispone de agua caliente, conéctela.
La lavadora gestionará las diferentes entradas de
agua para mantener la temperatura programada.
Dispone de control inteligente para la gestión del
centrifugado. La lavadora controla el desequilibrio
generado por la carga y gestiona el giro para
garantizar un buen centrifugado, sin ruidos y
alargando la vida útil de los elementos de desgaste y
así como una significativa reducción de fatiga en los
componentes mecánicos.
Dispone del sistema “Express”, pulsando una tecla
automáticamente reducirá el tiempo de programa
adaptándose a sus necesidades, sin tener que hacer
cambios en configuración.
Opción aclarado extra, pulsando una tecla,
automáticamente se la añadirá un aclarado más a los
programados adaptándose a sus necesidades, sin
tener que hacer cambios en configuración.
Con la tecla Start el programa se detiene, hace una
pausa. Para que el programa continúe se debe pulsar
de nuevo la tecla Start. Si el programa está realizando
un centrifugado no es posible hacer una pausa, por lo
que la tecla Start no tendrá ningún efecto.
2.3.2 Finalización de un programa
El programa se puede terminar de varias formas:
Finalización normal: el programa termina cuando ha
realizado todas las fases que lo componen.
Pulsando la tecla EXPRESS cuando la lavadora
esté en estado de PAUSA.
Pulsando la tecla AVANCE desde cualquier punto
del programa, repetidamente, se puede llegar hasta el
final del programa. Si está realizándose un
centrifugado, la tecla AVANCE no responderá hasta
haber pasado el tiempo de seguridad de frenado (1min
aprox.).
Cuando finaliza un programa, antes de permitir la
apertura de la puerta se realiza el desapelmazado de
la ropa durante 30 segundos. Una señal acústica nos
indicará la posibilidad de abrir la puerta tras este
proceso.
2.3.1 Ejecución de un programa
Para realizar un programa de lavado se deben seguir
los pasos que se indican a continuación:
1- Introducir la ropa sucia en el tambor de la
lavadora.
2- Cerrar la puerta de la lavadora.
3- Añadir detergentes
4- Seleccionar el programa que se desea.
5- Pulsar la tecla START.
Después de iniciar un programa, los LEDS indican el
estado del mismo y su evolución.
8
Page 24

ESPAÑOL
3 CONFIGURACION (avanzado)
Para acceder al menú, estando la lavadora
encendida y parada, pulsamos al mismo instante
durante 2 segundos las teclas INC y DEC (∧,∨).A
continuación se representan los dos menús principales
de los que dispone la maquina.
CONF Æ Configuración
MANT Æ Mantenimiento
Mantenimiento es exclusivamente para el
servicio técnico, las opciones de usuario se
encuentran en configuración. Para acceder a
configuración pulsar Start e introducir la clave 3489. A
continuación se muestran las diferentes opciones:
MOD Æ Modelo (servicio técnico)
Grd Æ Unidad de temperatura (Cº ó
Fahrenheit)
Pay Æ Autoservicio (Off/Coin/CP) solo
para modelos autoservicio (ver punto
2.9)
Prg Æ Selección de programas
AVAN Æ Avance (On/Off)
SPRES Æ Express (On/Off)
ACLA Æ Aclarado extra (On/Off)
Stop Æ Parada térmica (On/Off)
LEuL Æ Configuración de nivel del agua
bLOC Æ bLOC (Modificar/eliminar bloques)
TimR Æ Tiempo restante
Div Æ Divisa (solo autoservicio/monedero)
(ver punto 2.9)
Pric Æ Precio (solo autoservicio/monedero)
(ver punto 2.9)
3.1 Prg (selección de programas)
Pulsar Start para acceder a la selección de los
programas, a continuación se muestran los programas
seguidos de una y o una n (yes/no) indicando que
programas están activados. Con las teclas INC (∧) y
DEC (∨) cambiar el yes/no, pulsar >> (avance) para
cambiar de programa y Start para finalizar. Si no se
selecciona ningún programa se dejará por defecto el
P1 activo. Si se selecciona por ejemplo el P1, P4, P5,
P8 y P14, en funcionamiento se mostrarán números
correlativos: P1, P2, P3, P4, P5.
3.2 AVAN (avance)
Es posible desactivar la tecla >> imposibilitando el
avance de fase para asegurar un correcto lavado. ON
activado, OFF desactivado (por defecto activado).
3.3 SPRES (Express)
Es posible desactivar la función Express. Esta función
varía ligeramente fases y tiempos en los lavados para
realizar ciclos más cortos. ON activado, OFF
desactivado (por defecto activado).
3.4 ACLA (Aclarado extra)
Es posible desactivar la tecla de aclarado extra,
eliminando la opción de añadir un aclarado más. ON
activado, OFF desactivado (por defecto activado).
3.5 Stop (Parada térmica)
Con parada térmica activada el tiempo de fase no
empezará a descontarse hasta no haber logrado la
temperatura programada para asegurar un correcto
lavado, es posible desactivarla y empezar a descontar
el tiempo en el momento que alcanza el nivel
programado. ON activado, OFF desactivado (por
defecto activado).
3.6 LEuL (Configuración niveles)
Es posible variar los niveles de agua, existen tres
configuraciones diferentes:
1- Bajo (configuración de fabrica)
2- Medio
3- Alto
Si se modifica la configuración afectará a todos los
niveles de agua utilizados. Pulse Start y aparecerá el
nivel configurado (Leu1), con las INC y DEC (∧,∨)
podrá variar el nivel que más se adecue a sus
9
Page 25

ESPAÑOL
necesidades. Pulse Start nuevamente para confirmar
el cambio.
3.7 bLOC (Modificar/eliminar bloques)
Es posible modificar el tiempo y temperatura de cada
fase e incluso eliminar fases.
Primero, consulte en la tabla de Programas
Normalizados de que bloques consta el programa que
quiere modificar.
A continuación puede acceder a dicho bloque y
modificar los parámetros de la siguiente manera:
1- Cuando se muestra bLOC en pantalla,
pulse Start.
2- Aparecerá B 1, pulsando las teclas INC y
DEC (∧,∨) accederá al bloque que desea
modificar. Pulse start.
3- En pantalla se muestra “tIME” (tiempo),
pulsando las teclas INC o DEC (∧,∨)
accederá a “tEMP” (temperatura). Si
quiere modificar el tiempo, pulse Start
cuando se muestra “tIME” y aparecerá el
tiempo definido por defecto. Con las teclas
INC y DEC (∧,∨) modifique ese valor y
pulse Start para validar. Pulse Express
para salir.
4- Si lo que quiere modificar es la
temperatura, acceda a “tEmP”, pulse Start
y aparecerá la temperatura definida por
defecto, modifique el valor con las teclas
INC y DEC (∧,∨) y pulse Start para salir.
5- Si se programa el tiempo a 0 segundos el
bloque queda anulado y no se ejecutará,
es decir, se ejecutará la siguiente fase. No
es posible anular el último centrifugado de
cada programa por lo que están limitados
a tiempo de 1 minuto.
6- ¡Atención! Tenga en cuenta que hay
bloques utilizados en varios programas a
la vez y si los modifica, cambiará todos los
programas en los que se utiliza dicho
bloque.
3.8 Timr (Tiempo restante)
Es posible activar el temporizador que indica el tiempo
restante para cada programa, solo si la parada
térmica, el Express y el aclarado extra estén
desactivados. ON activado, OFF desactivado (por
defecto desactivado).
3.9 Parámetros (En estado de marcha)
Para poder acceder al menú y poder visualizar los
datos reales durante el funcionamiento de la lavadora,
pulsamos simultáneamente durante 2 segundos las
teclas INC y DEC (∧,∨).
PARA Æ Parámetros: Temperatura, nivel de
agua y tiempo restante.
IN Æ Entradas (servicio técnico)
OUT Æ Salidas (servicio técnico)
10
Page 26

ESPAÑOL
4 AUTOSERVICIO
4.1 Funcionamiento
En caso de disponer de un modelo de lavadora para
autoservicio, la configuración de máquina es diferente.
No existe el interruptor general en el panel de mandos,
para encender o apagar la lavadora deberá accionar el
interruptor (seccionador) situado en la parte posterior.
Solo se muestran los pulsadores que se deben utilizar
para ejecutar un programa, las teclas “Express”,
“aclarado extra” y “avance >>” están desactivados
aunque es posible activarlos en configuración (pág. 9).
Atención!
Por su seguridad, el acceso a configuración es
diferente de las maquinas no autoservicio,
consulte a su distribuidor (vendedor) para saber
cuál es el método correspondiente.
Recuerde que en los
menús de
configuración se
utilizan estas teclas,
por lo que deberá
saber exactamente
cuál es cada una de
ellas.
La opción “Timr” (tiempo restante) está activa por
defecto, puede desactivarla en el menú de
configuración (ver apartado 3.8).
Por defecto dispone solamente de 4 programas
activados:
Programas autoservicio
P1
P2
P3
P4
P5
P6
P7
P8
P9
P10
P11
P12
P13
P14
P15
P16
La selección de programas es totalmente configurable
(Ver apartado 3.1)
Recuerde que al cliente solo se le muestran los
programas activos y se muestran de manera
correlativa empezando siempre por P1.
Blanca 90ºC
Blanca/color 60ºC
Blanca/color 30ºC
Blanca/color fría
Sintética 60ºC
Sintética fría
Delicada 40ºC
Delicada fría
Lana fría
Sanitario
Rápido frío (P1)
Rápido 40ºC(P2)
Rápido 60ºC(P3)
Rápido delicada(P4)
Centrifugado largo
Centrifugado Corto
Las maquinas de autoservicio pueden ser operadas
con diferentes dispositivos:
1- Central de pago (configuración estándar)
2- Monedero
3- Tarjeta
La lavadora de autoservicio se entrega con la
configuración de Central de pago (CP), para las
opciones de monedero y tarjeta deben ser instalados
los “kits correspondientes que se venden por
separado, consulte a su distribuidor para obtener más
información.
Para cambiar la configuración de la lavadora debe
acceder a CONF/PAY (ver apartado 3) y seleccionar la
opción deseada. Existen dos modos de
funcionamiento:
A continuación se muestran las diferentes funciones
en cada caso:
4.2 Central de pago/tarjeta
Utilice esta opción si su lavadora es modelo de central
de pago o tiene el kit tarjeta instalado.
Ejecución de un programa
Para realizar un programa de lavado se deben seguir
los pasos que se indican a continuación:
1- Introducir la ropa sucia en la lavadora.
2- Cerrar la puerta
3- Añadir detergentes
4- Introducir tarjeta o monedas en la central de pago
5- Seleccionar programa
6- Pulsar start
La tarifa es única para todos los programas, si quiere
cambiar el precio consulte el manual de su central de
pago o del lector de tarjetas en el caso de que esté
utilizando el pago con tarjeta.
4.3 COIN (monedero)
Utilice esta opción si su lavadora tiene el kit monedero
instalado.
Para realizar un programa de lavado se deben seguir
los pasos que se indican a continuación:
1- Introducir la ropa sucia en la lavadora.
2- Cerrar la puerta
3- Añadir detergentes
4- Seleccionar programa
5- Comprobar precio
6- Introducir monedas
7- Pulsar start
11
Page 27

ESPAÑOL
5 Bosnia and Herzegovina
En pantalla se mostrará el número de programa y su
precio de manera intermitente, con las teclas INC y
DEC (∧,∨) puede cambiar el programa y el precio se
actualizará. Si en 30 segundos no hay actividad en las
teclas o en el monedero, en pantalla se mostrará
“FREE” indicando que la maquina está disponible,
pulse cualquier tecla para que se muestren los
programas.
Con este tipo de monedero puede asignar un precio a
cada programa, en el menú configuración aparecerán
dos nuevos submenús DIV y Pric para asignar la
divisa y precio correspondiente.
Div: El monedero tiene la configuración diferente para
cada divisa, consulte el manual del kit monedero y
compruebe que su monedero instalado acepta las
monedas de su país. Asigne esa divisa al
programador de la lavadora, en la tabla se muestran
las divisas disponibles:
CODE PRECIO MÍNIMO
0 Ficha/Token 1
1 Kuwait
Oman
2 Azerbaijan
Bulgaria
Bahrain
China
Fiji
Malaysia
Panama
Singapore
3 Argentina
Bermuda
Brazil
Canada
Ecuador
Egypt
Ethiopia
Guatemala
Cayman Islands
Saudi Arabia
El Salvador
Turkey
United States
4 United Arab Emirates
Bolivia
Estonia
Euro-Countrys
United Kingdom
Georgia
Ghana
Croatia
Latvia
New Zealand
Qatar
Ukraine
0.05
0.1
0.25
0.5
6 Czech Republic
7 Algeria
8 Chile
9 Colombia
NOTA: Esta lista se actualiza continuamente, si su país no se encuentra en la
lista, consulte a su distribuidor la disponibilidad actualizada.
PRIC: Asigne el precio a cada programa, Pulse start
para acceder a los programas, en este menú solo
aparecerán los programas activos pero con su
numeración original (consulte tabla de la pagina 11).
Pulse Start para acceder al precio. El precio irá
condicionado a la divisa seleccionada, si cambia de
divisa los precios se resetearan por lo que es
Bangladesh
Switzerland
Dominican Republic
Hong Kong
Israel
India
Sri Lanka
Lithuania
Morocco
Macedonia
Peru
Philipines
Poland
Russian Federation
Sweden
Slovakia
Thailand
Tunisia
Uruguay
Yugoslavia
South Africa
Australia
Denmark
Kenya
Mexico
Norway
Romania
Guyana
Hungary
Iceland
Kazakhtan
Slovenia
Taiwan
Costa Rica
Iran, Islamic Republic of
Paraguay
French Polynesia
Indonesia
Japan
South Korea
Uganda
Venezuela
1
5
10
50
100
IMPORTANTE seleccionar la divisa primero. Si añade
un programa a la lista (apartado 3.1) se le asignará el
precio por defecto de cada divisa, deberá asignarle el
precio después de haberlo activado.
12
Page 28

ESPAÑOL
5 MANTENIMIENTO
5.1 Irregularidades eléctricas y mecánicas
Antes de llamar al Servicio de Asistencia Técnica,
compruebe,
Que llega corriente a la máquina.
El estado de los fusibles.
Que la tensión coincide con la de la máquina.
Si la lavadora no coge el nivel de agua,
compruebe,
Que la llave de paso del agua está abierta.
Que el filtro de entrada de agua no está obstruido.
Que la presión del agua de red está entre 2 ÷ 4
2
Kg/cm
(28 ÷ 56 psi).
Si la lavadora vibra excesivamente, compruebe,
Que ninguno de los tornillos de los paneles está
suelto.
Si hay un corte de tensión,
Se desagua la cuba y la puerta queda bloqueada. Si
quiere sacar la ropa de la lavadora puede desbloquear
la puerta tirando hacia abajo de la cinta situada detrás
del panel frontal.
5.2 Mensajes de error
En la pantalla de la lavadora pueden aparecer
mensajes de advertencia o avería acompañados de
una señal acústica durante y después de la ejecución
de un programa de lavado. Salvo en el caso de corte
de tensión, la lavadora quedará en situación de pausa
(válvula desagüe cerrada, motor parado, etc.)
esperando la acción del usuario.
Mensaje Causas posibles Acciones
PWR FAUL
UAIT
E 2
E 3
E 4
E 5
E 6
E 7
E 9
E 10
E 11
E 12
Este mensaje aparece al recuperar la tensión después de registrase un corte
del mismo.
Si el corte de tensión se produce en la fase de centrifugado aparecerá en
pantalla el mensaje "UAIT" (wait). Espere un tiempo de seguridad sin pulsar
nada hasta que aparezca el citado "PWR FAULT" (1,5 min. aprox.).
FALLO EN BLOQUEO
Este mensaje aparece cuando se detecta que no se consigue desbloquear la
puerta al finalizar un programa o se desbloquea durante el mismo
FALLO EN DESAGÜE
Este mensaje aparece cuando se detecta que, a pesar de desactivar la
salida de la válvula de vaciado, el nivel de agua dentro del tambor de la
lavadora no ha disminuido durante cierto tiempo preestablecido.
FALLO ENTRADA AGUA
Este mensaje aparece cuando se detecta que, a pesar de activar la (s)
salida de la (s) electroválvula (s) correspondiente (s), el nivel de agua dentro
de la cuba de la lavadora no ha aumentado durante cierto tiempo
preestablecido.
FALLO CALENTAMIENTO
Este mensaje aparece cuando se detecta que, a pesar de activar la salida de
calentamiento, la temperatura del agua no ha aumentado durante cierto
tiempo preestablecido.
TEMPERATURA MÁXIMA
Este mensaje aparece cuando se detecta que la temperatura del agua ha
superado los 95ºC.
TERMOSTATO ABIERTO
Este mensaje aparece cuando el agua supera los 95ºC
CALENTAMIENTO MOTOR
Este mensaje aparece cuando se detecta que se ha activado la protección
térmica del motor de la lavadora.
DESEQUILIBRIO
Este mensaje aparece cuando en el centrifugado final se activa tres veces el
micro de desequilibrio.
ROPA CALIENTE
Este mensaje aparece cuando se termina de ejecutar un programa pero la
temperatura dentro de la cuba supera los 50ºC.
AGUA EN LA CUBA
Este mensaje aparece cuando se termina de ejecutar un programa pero
todavía hay agua en la cuba. No se permitirá abrir la puerta hasta que se
haya evacuado el agua de la cuba.
Pulsar START: continúa la ejecución del
programa en la misma fase en que se produjo
el corte de tensión.
Pulsar EXPRESS: finaliza el programa
Pulsar ESC: finaliza el programa
Pulsar START: continúa con la ejecución del
programa.
Pulsar EXPRESS: finaliza el programa.
Pulsar START: continúa con la ejecución del
programa.
Pulsar EXPRESS: finaliza el programa.
Pulsar START: continúa con la ejecución del
programa.
Pulsar EXPRESS: finaliza el programa.
Pulsar START: continúa con la ejecución del
programa.
Pulsar EXPRESS: finaliza el programa.
Pulsar START: continúa con la ejecución del
programa.
Pulsar EXPRESS: finaliza el programa.
Pulsar START: continúa con la ejecución del
programa.
Pulsar EXPRESS: finaliza el programa.
Pulsar EXPRESS: finaliza el programa.
Pulsar EXPRESS: finaliza el programa.
Pulsar EXPRESS: finaliza el programa.
13
Page 29

 Loading...