

Page 1
Fingerprint Software User Manual
Fingerprint Disk
User Manual
- 1 -
Page 2

Fingerprint Software User Manual
-Index-
General Description .............................................................................................................3
Features .................................................................................................................................3
System Requirements ............................................................................................................3
How to start using your Fingerprint and open Fingerprint Application Software ................4
How to Open the Menu for Fingerprint Software ...............................................................12
IE AutoLogin .......................................................................................................................12
How to "Save ID and Password"................................................................................13
ID/Password AutoLogin auto-filling .........................................................................16
AutoLogin Database Manager ...................................................................................18
Access To Favorites..............................................................................................................19
Flash Mail .............................................................................................................................21
E-mail Account Setup ..................................................................................................22
Flash Mail Function Settings........................................................................................25
Read Mail .....................................................................................................................26
Sending E-Mail.............................................................................................................29
Address Book Summary...............................................................................................30
Change Contacts Information.......................................................................................31
How to add new contacts.......................................................................................31
How to remove contacts .......................................................................................35
User Settings ........................................................................................................................36
Fingerprint registration.................................................................................................36
Fingerprint Software Password Setting........................................................................38
Fingerprint Live Time Setting......................................................................................39
Folder Security......................................................................................................................40
Folder Encryption: .......................................................................................................40
Folder Decryption: .......................................................................................................41
File Security .........................................................................................................................43
File Encryption ............................................................................................................43
File Decryption ............................................................................................................44
- 2 -
Page 3

Fingerprint Software User Manual
General Description
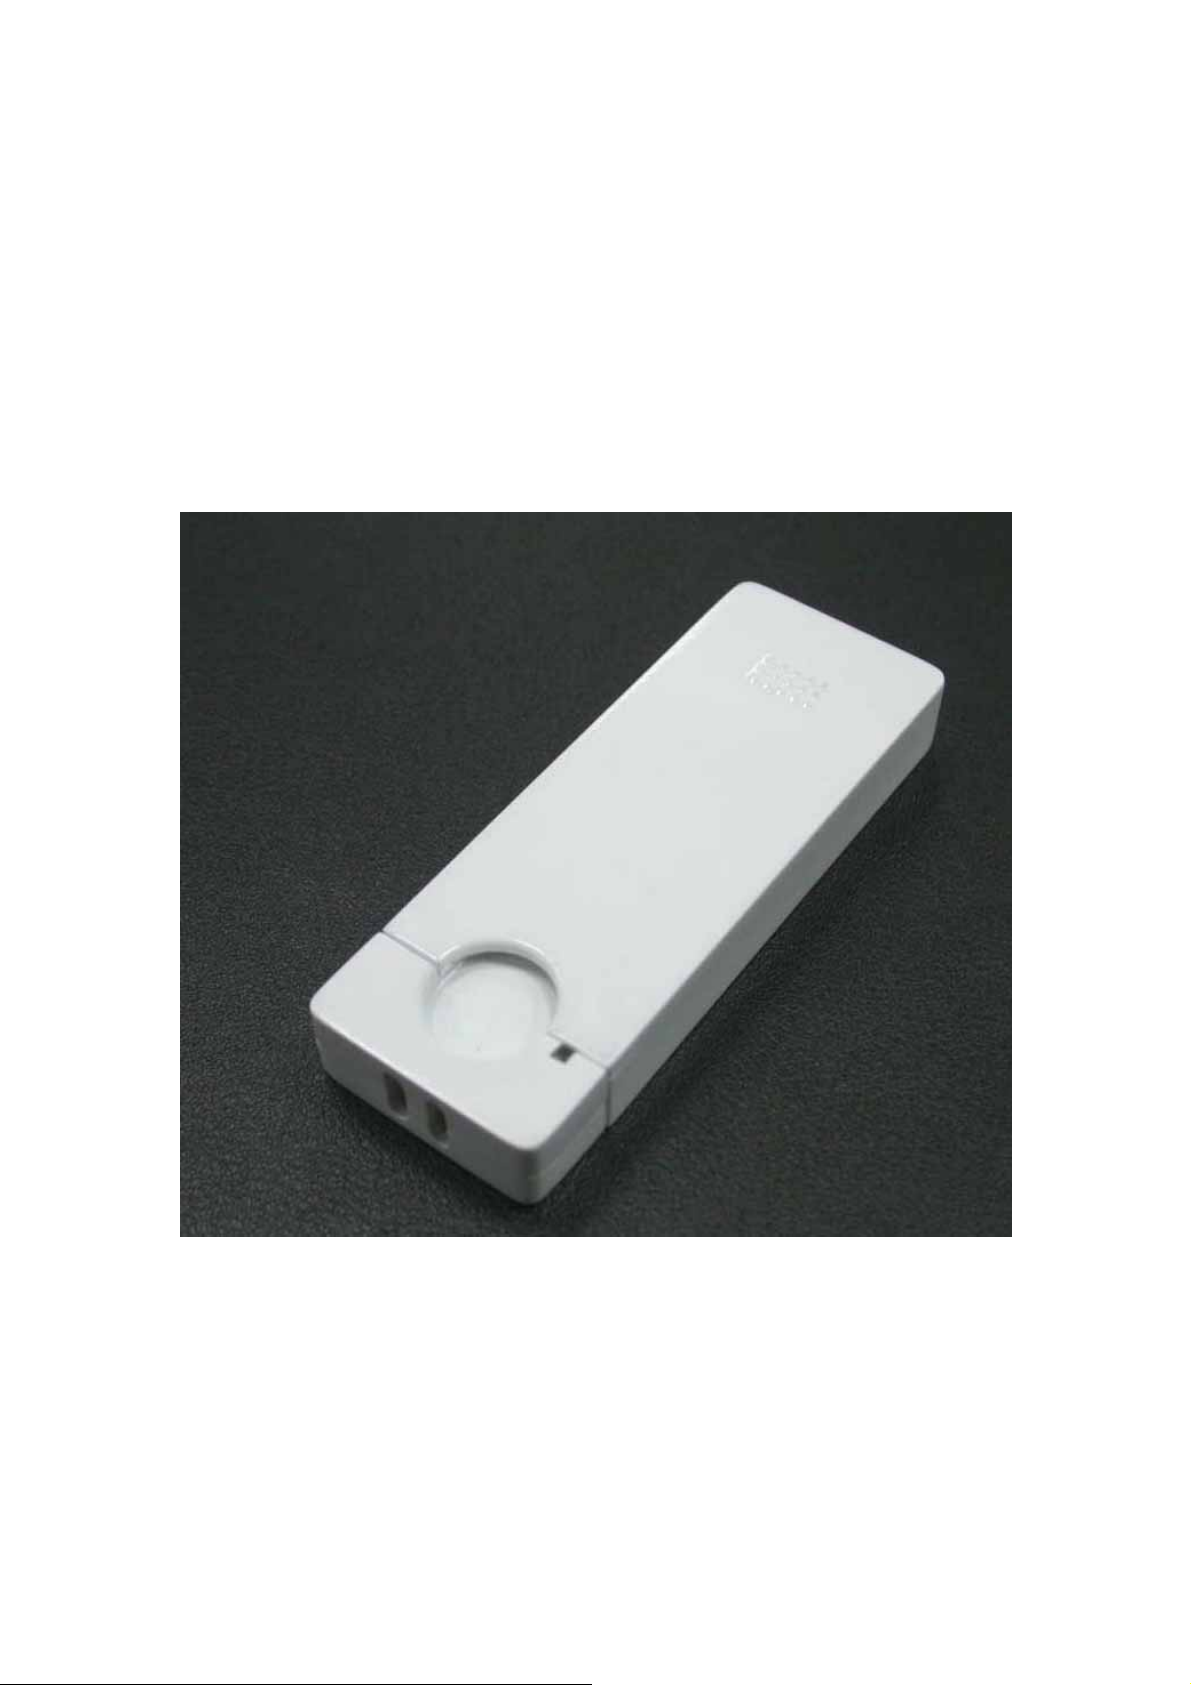
ADATA FP Disk USB 2.0 is a new biometric technology USB flash drive; it
provides data security with fingerprint scanning identification. To protect your
personal data from others in a very easy way, just plug in the pen drive, and
sweep your finger. Then no one can access your disk but you .It also provides
another password access, in case user’s finger is injured.
Features
No driver for Fingerprint sensor for most Windows OS.
․
Disk Memory Capacity: 1GB,2GB,4GB and 8GB.
․
Speed is more than 11 MB/s in read and 10MB/s in write
․
Embedded Software for favorite website, web login management,
․
personal flash mail, file management and fingerprint tools
․
Finger authentication process<3 sec
․
Sweep-type capacitive fingerprint sensor
․
Durable solid-state storage
․
․
Compatible with Windows ME,2000,XP and Vista.
System Requirements
Recommended Pentium III or higher or other compatible machines.
Recommended RAM of at least 128 MB or higher.
One of following operating system:
Windows: ME / 2000 / XP / Vista
- 3 -
Page 4
Fingerprint Software User Manual
How to start using your Fingerprint and open
Fingerprint Application Software
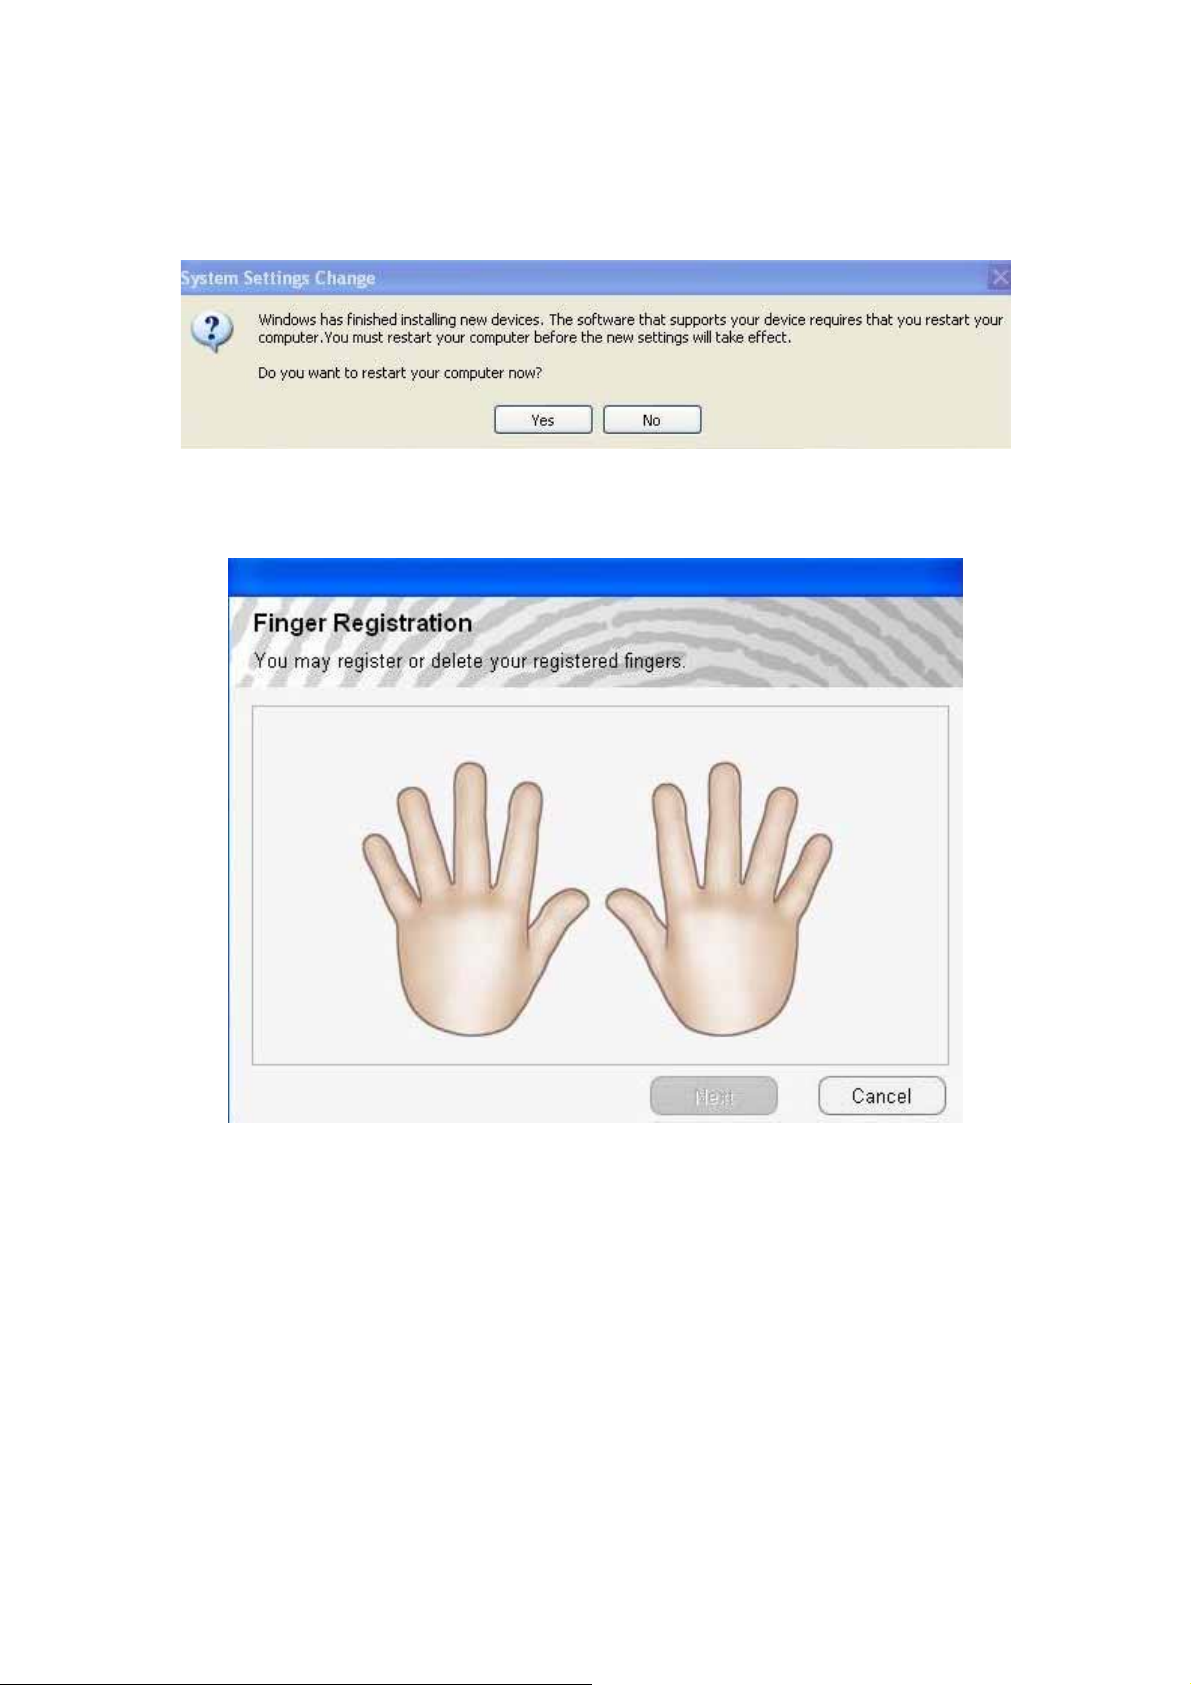
1.Please plug-in your Fingerprint device into your PC or laptop USB port. The
system will pop-up a message. Please click “NO” icon and continue next step.
2.At the same time,the system will pop-up Finger Registertion requirement
message
- 4 -
Page 5
Fingerprint Software User Manual
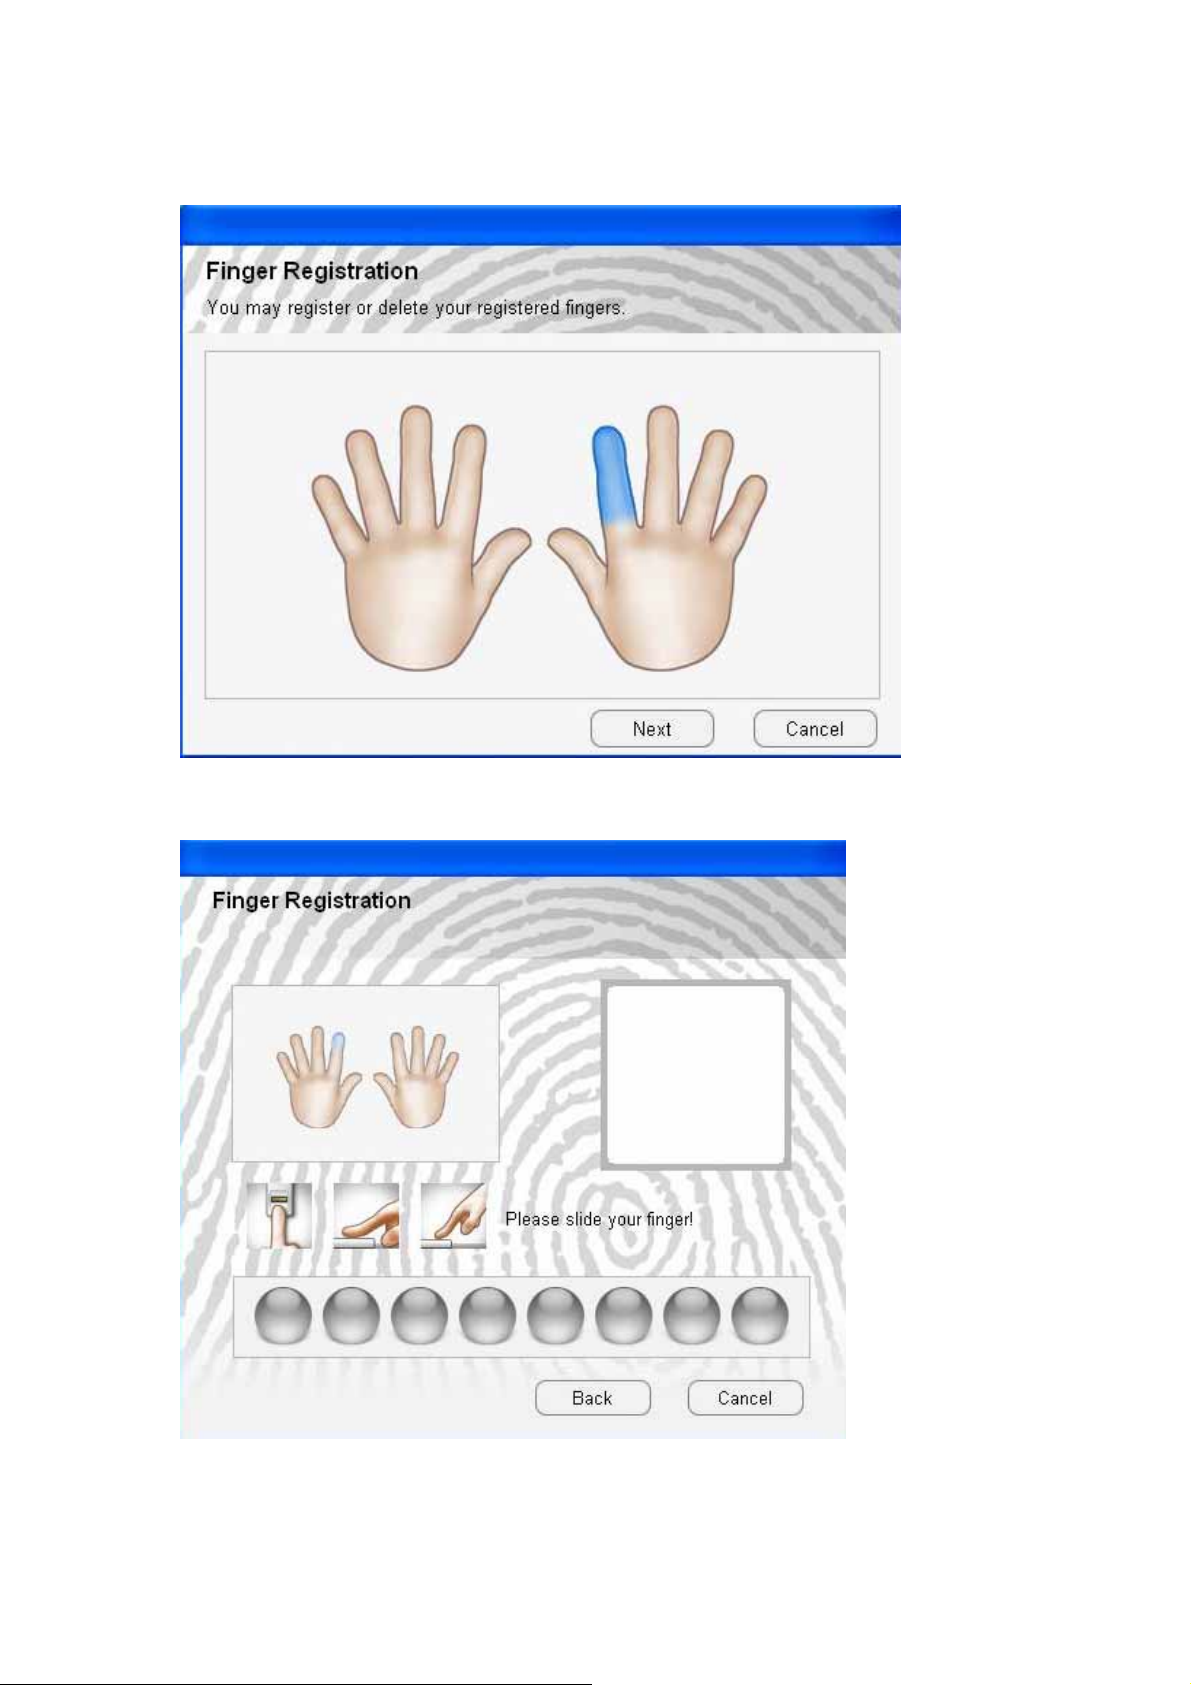
3.Please move your mouse pointer on one finger and click it.Then click “next”
to continue next step.(the finger on the screen does not need to match withthe
real scanned finger)
4.click ”Next”, pop-up below message
- 5 -
Page 6
Fingerprint Software User Manual
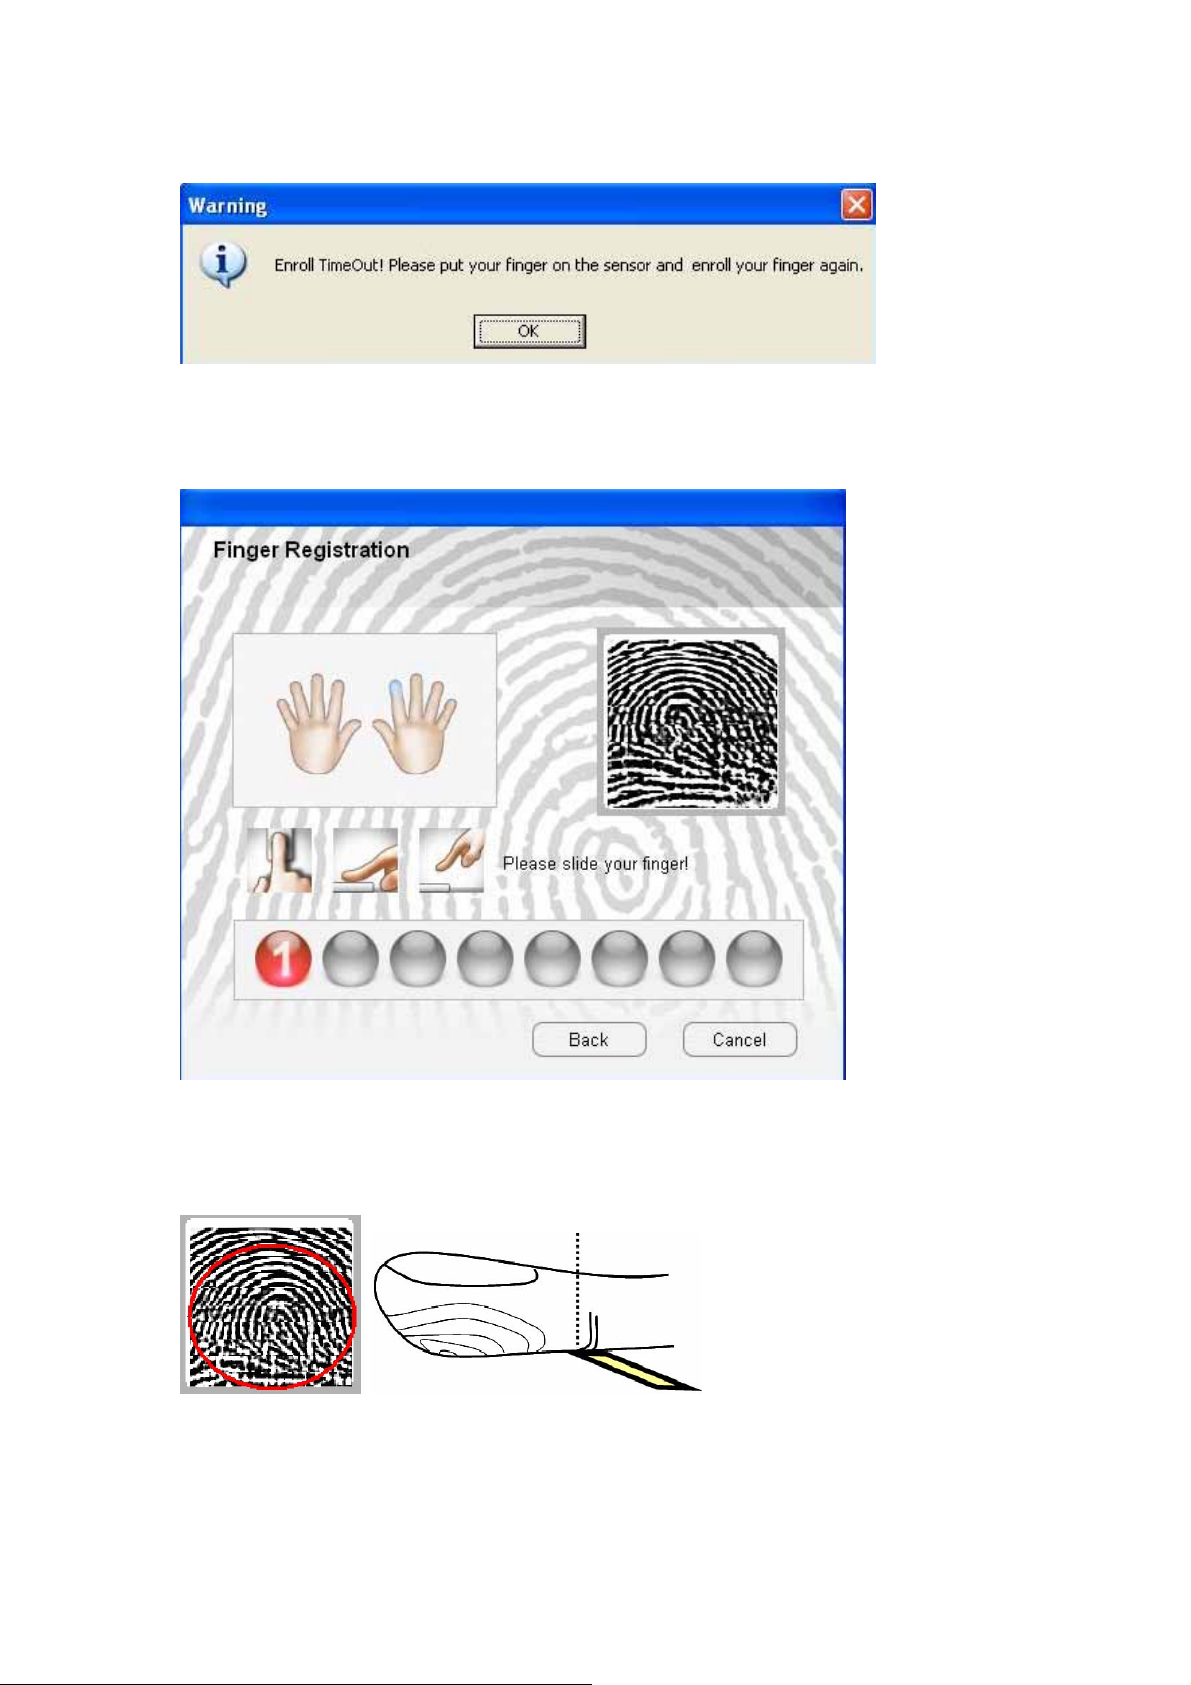
If you are still not scan your finger over 10 minutes,it will open a waring
Message
5.Slide your finger on device sensor.The sensor will scan your fingerprint and
compare it more than 3 times.(Note.1)
Note.1: Scan all of the finger’s volute fingerprint on the sensor (see
below drawing)
- 6 -
Page 7
Fingerprint Software User Manual
6.The fingerprint register into the devicde when your fingerprint is scanned
successfully.
7.Please fill the “Hint” 、”New Password” and “Confirm New Password” then
click “OK”.(Note2.), to enter the backup password.
- 7 -
Page 8

Fingerprint Software User Manual
Note.2:This function offers another way to login this device, especially
when something is wrong with your finger!
8.You can see below windows when you register your fingerprint and
password success into the device. Slide your finger on the device sensoir.
9.The fingerprint indenfies successfully
- 8 -
Page 9
Fingerprint Software User Manual
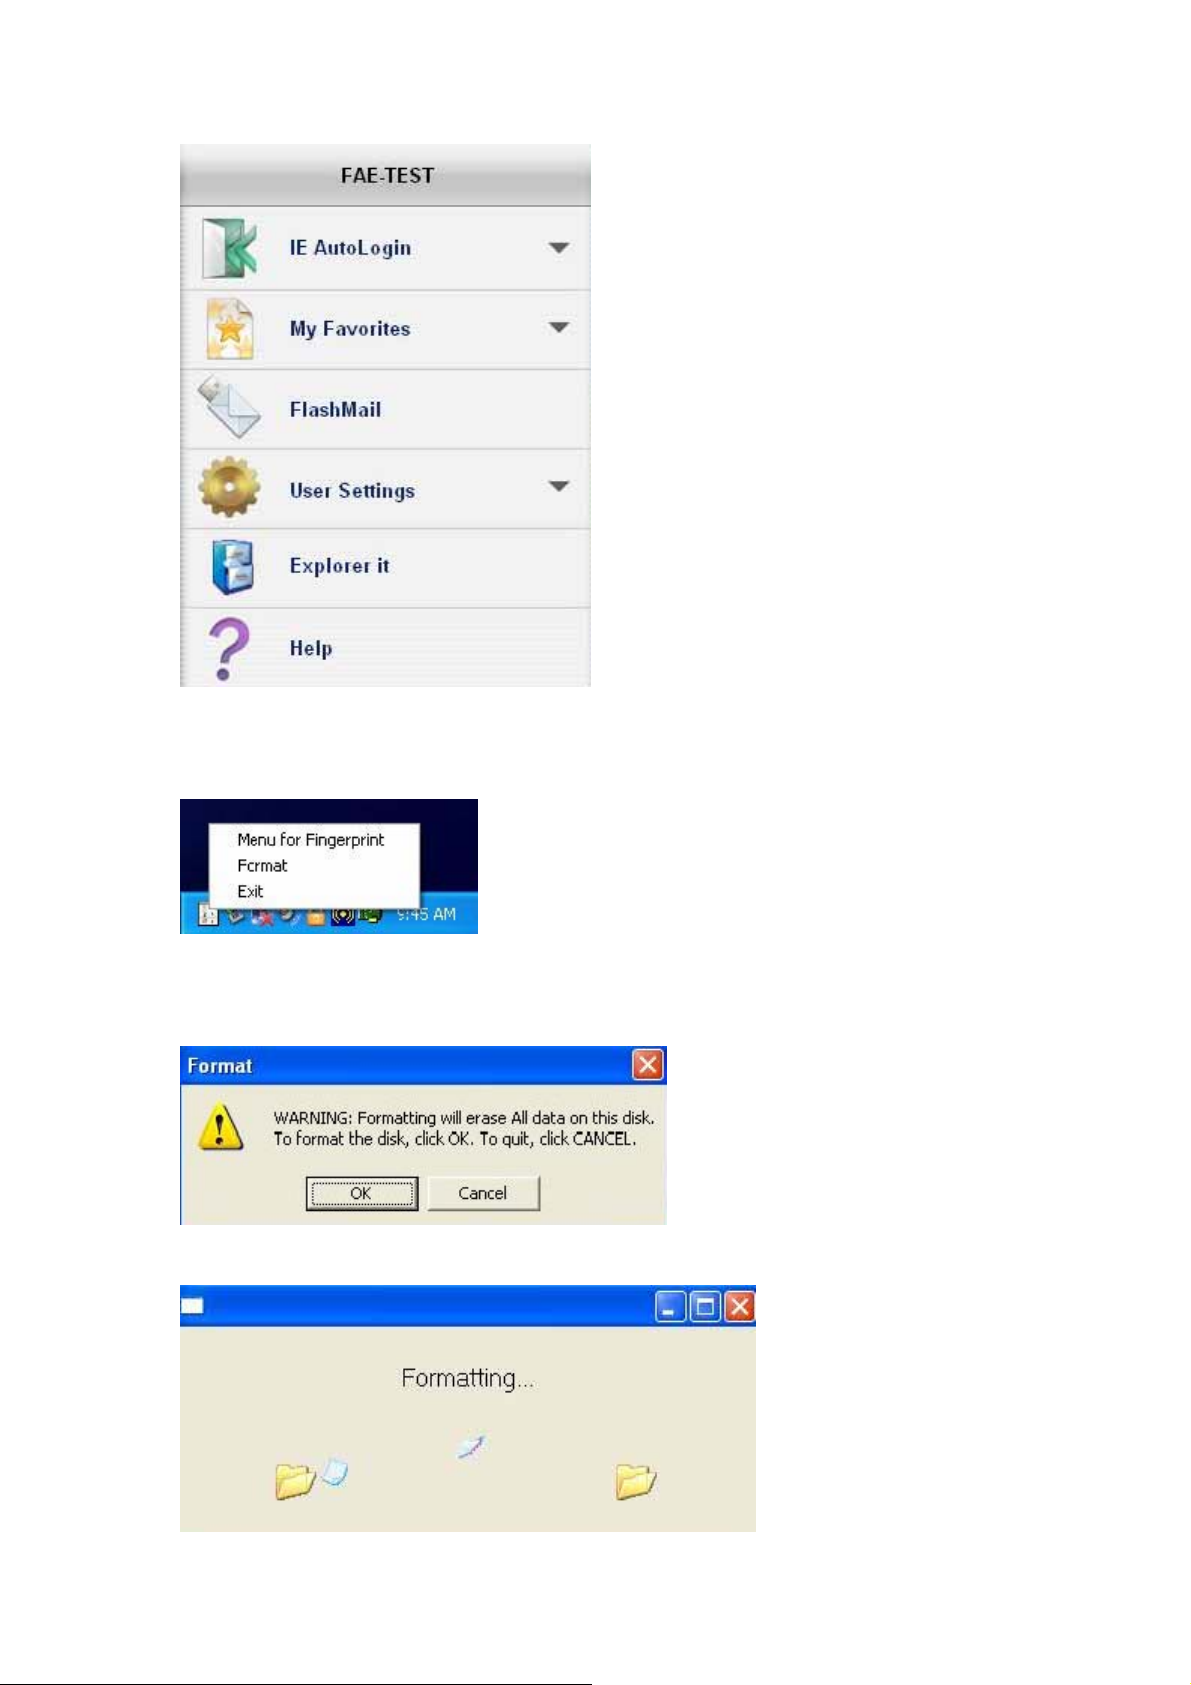
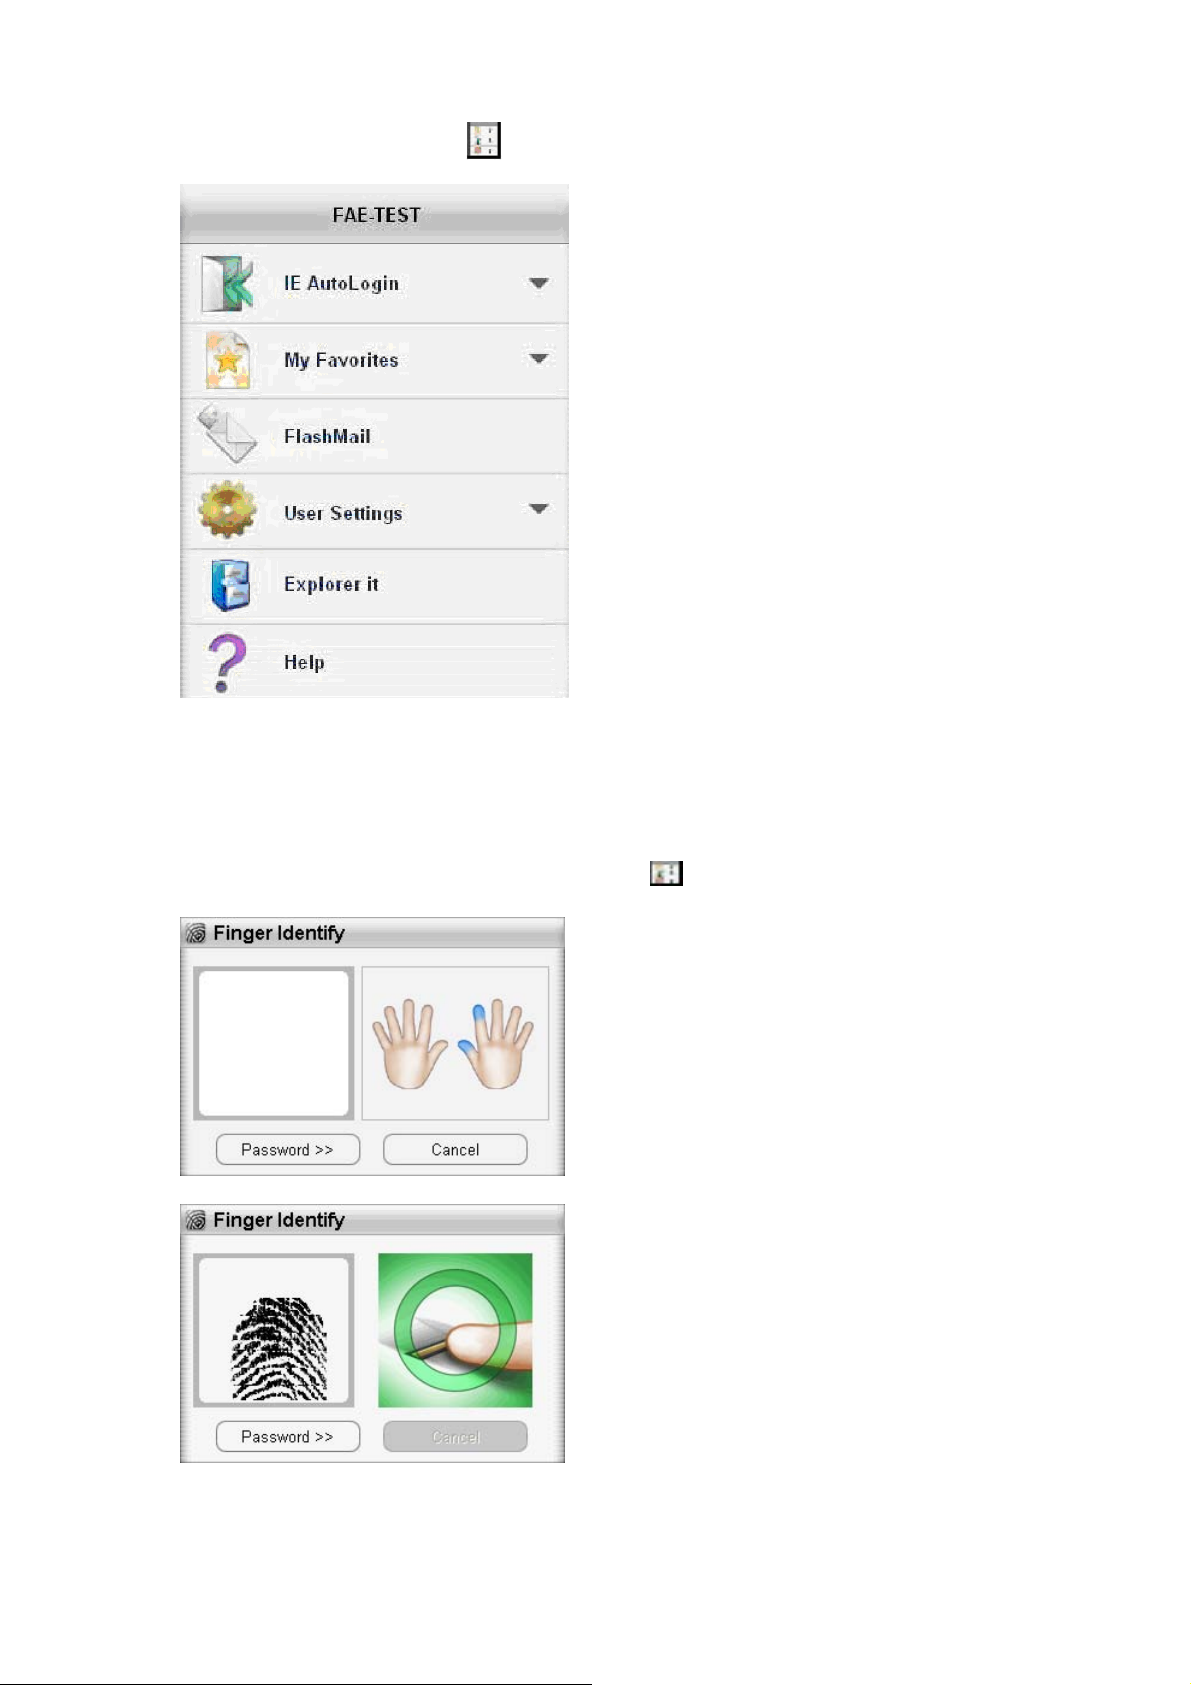
10.Fingerprint AP SW will pop-up on your system
And there is a tray icon showing at left corner on the screen.It has three
functions for user’s choose.
If user chooses the “Format” function,the system will pop-up a warning
message
If you press “OK”,all of the data will be fomat.(except for application software)
- 9 -
Page 10
Fingerprint Software User Manual
If the "Fingerprint Life time setting" is set "Never use Fingerprint enroll", every
time you click on tray icon will open the "Menu for Fingerprint".
If user can not finish the enrollment in ten minutes, you must re-verify the
fingerprint again. "Fingerprint Authentication" dialog will ask you for your
fingerprint verification.
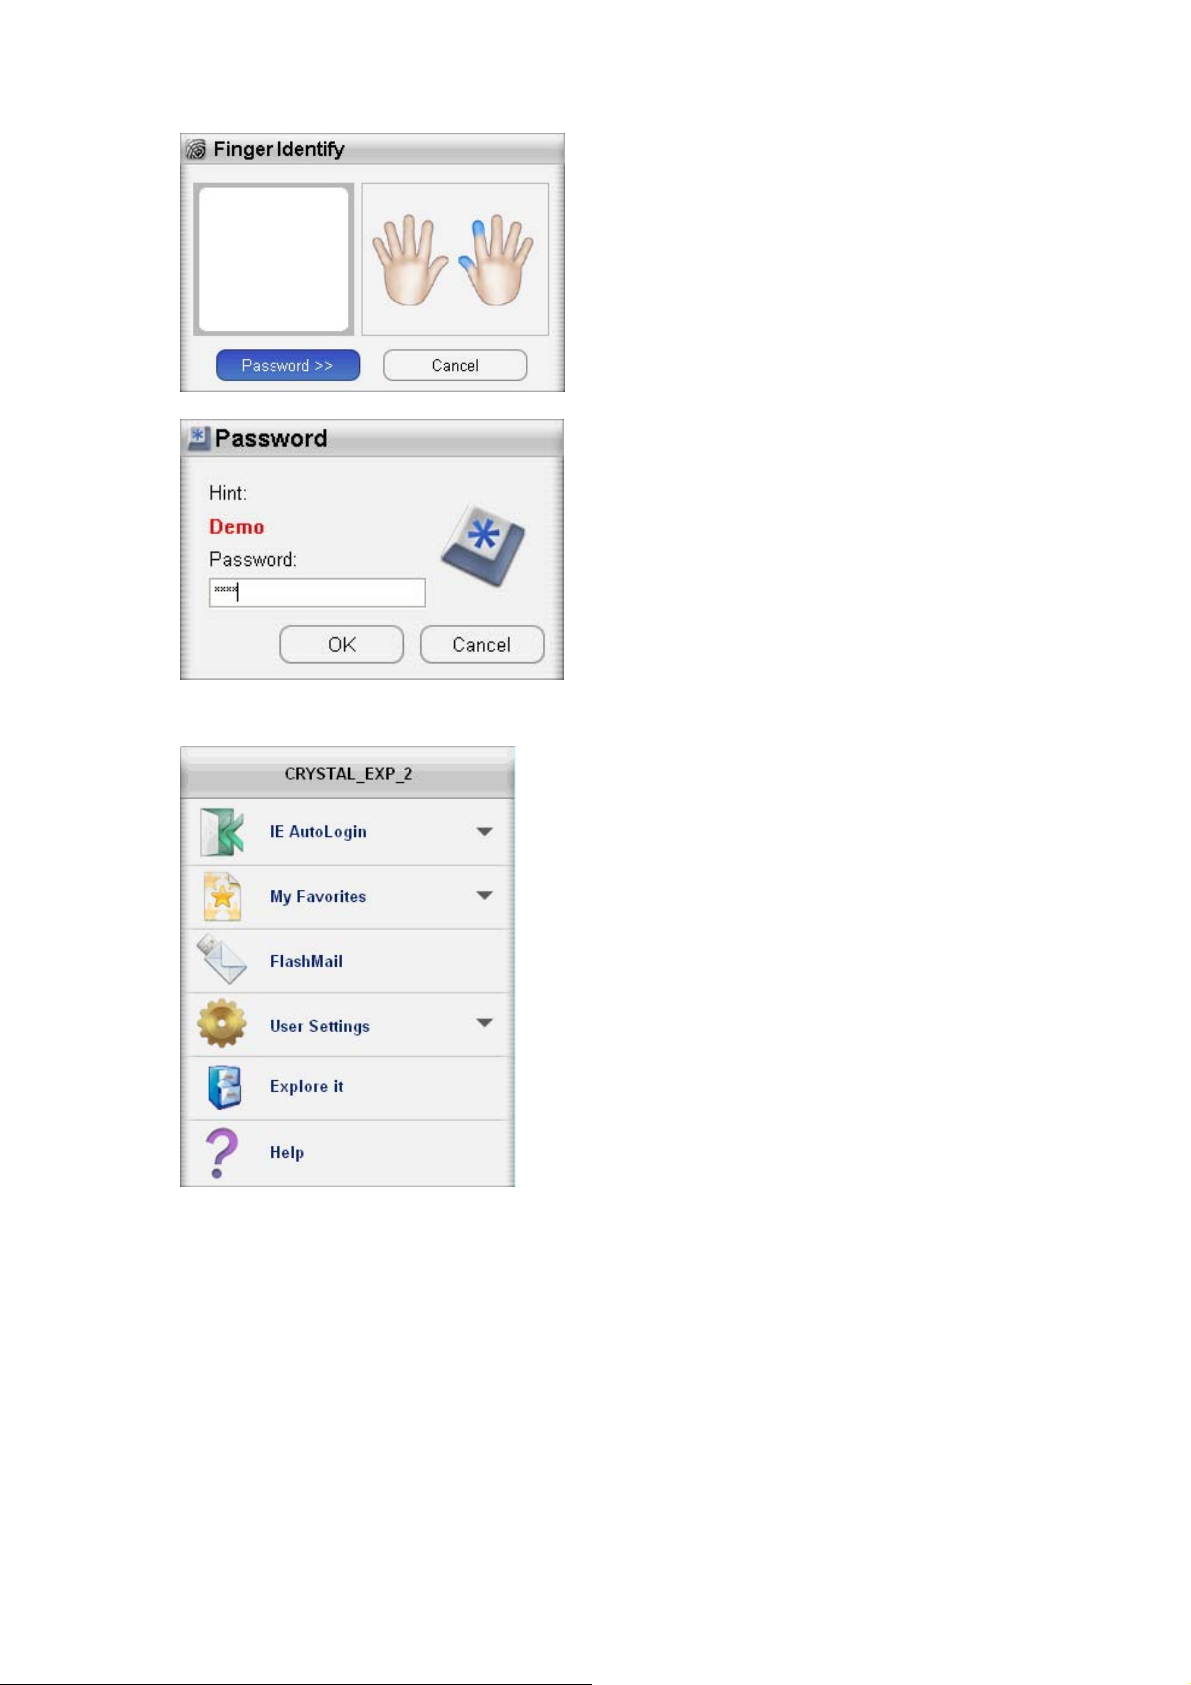
Verify your fingerprint
Click on the Fingerprint Software tray icon and slide your finger to verify
your fingerprint.
- 10 -
Page 11
Fingerprint Software User Manual
Or press "Password >>" button and enter your password.
If the fingerprint verification succeeds, the Menu for Fingerprint Access
will appear.
Remark: When your PC or laptop get into sleeping-mode or
suspend-mode, please replug-in your Fingerprint device agin.
- 11 -
Page 12
Fingerprint Software User Manual
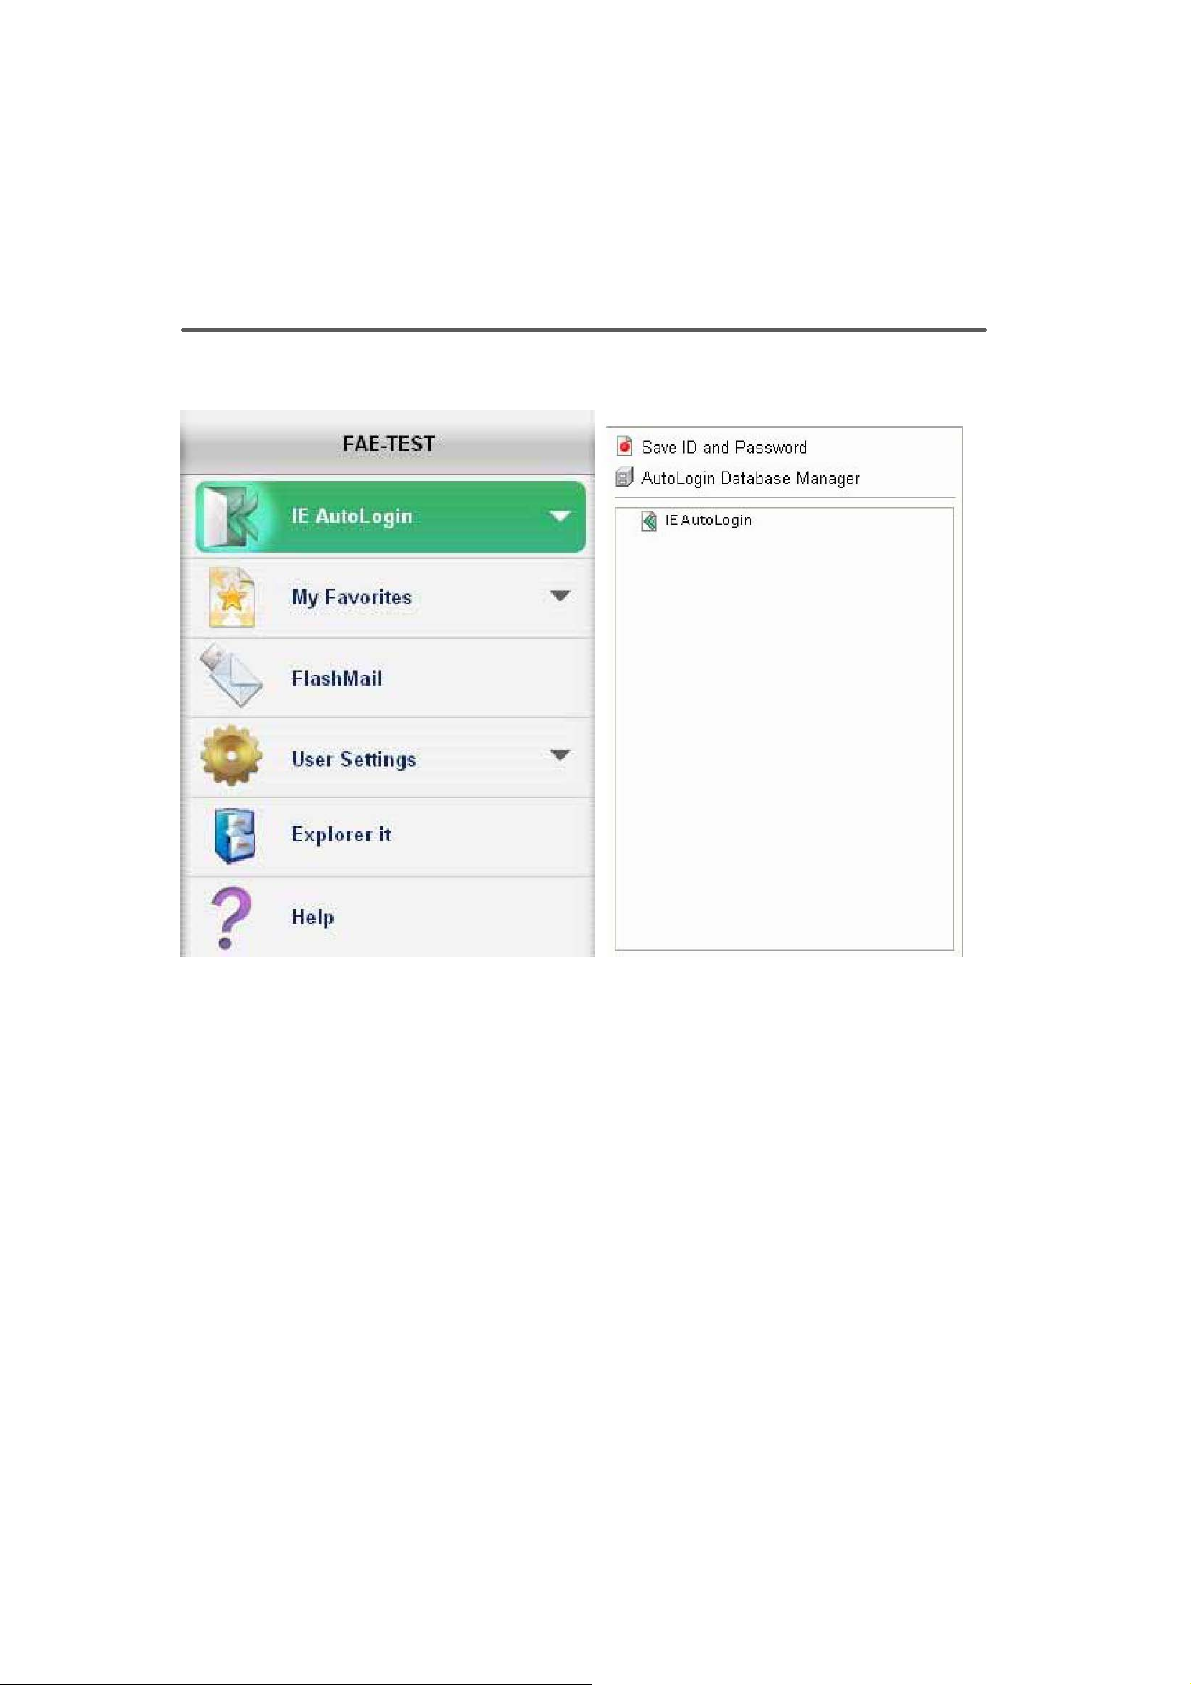
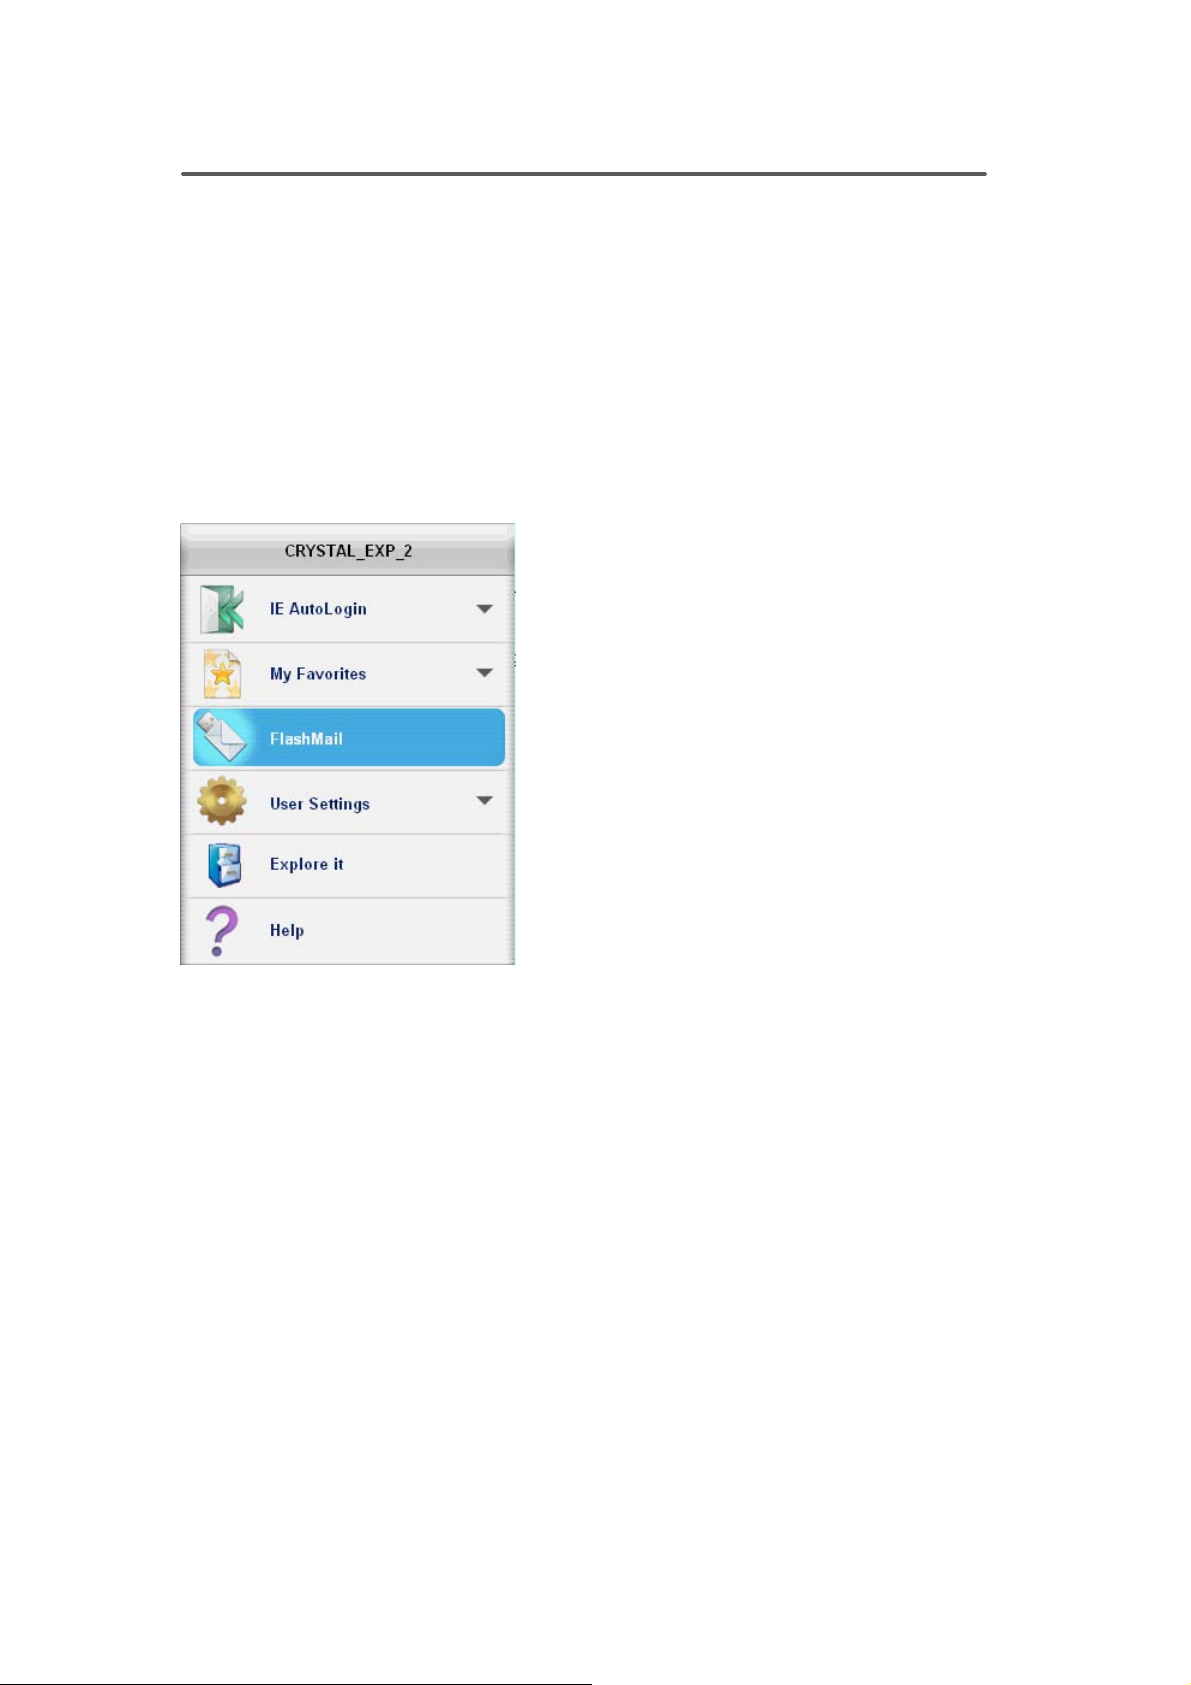
How to Open the Menu for Fingerprint Software
IE AutoLogin
IE AutoLogin allows you to automate the entry of ID and/or password on a
web site. At first, you save your ID and/or password for a web site. When you
go to the web site, IE AutoLogin fills in the dialog boxes automatically after a
successful fingerprint or password verification.
Note : This application is for Internet Explorer only.
- 12 -
Page 13
Fingerprint Software User Manual
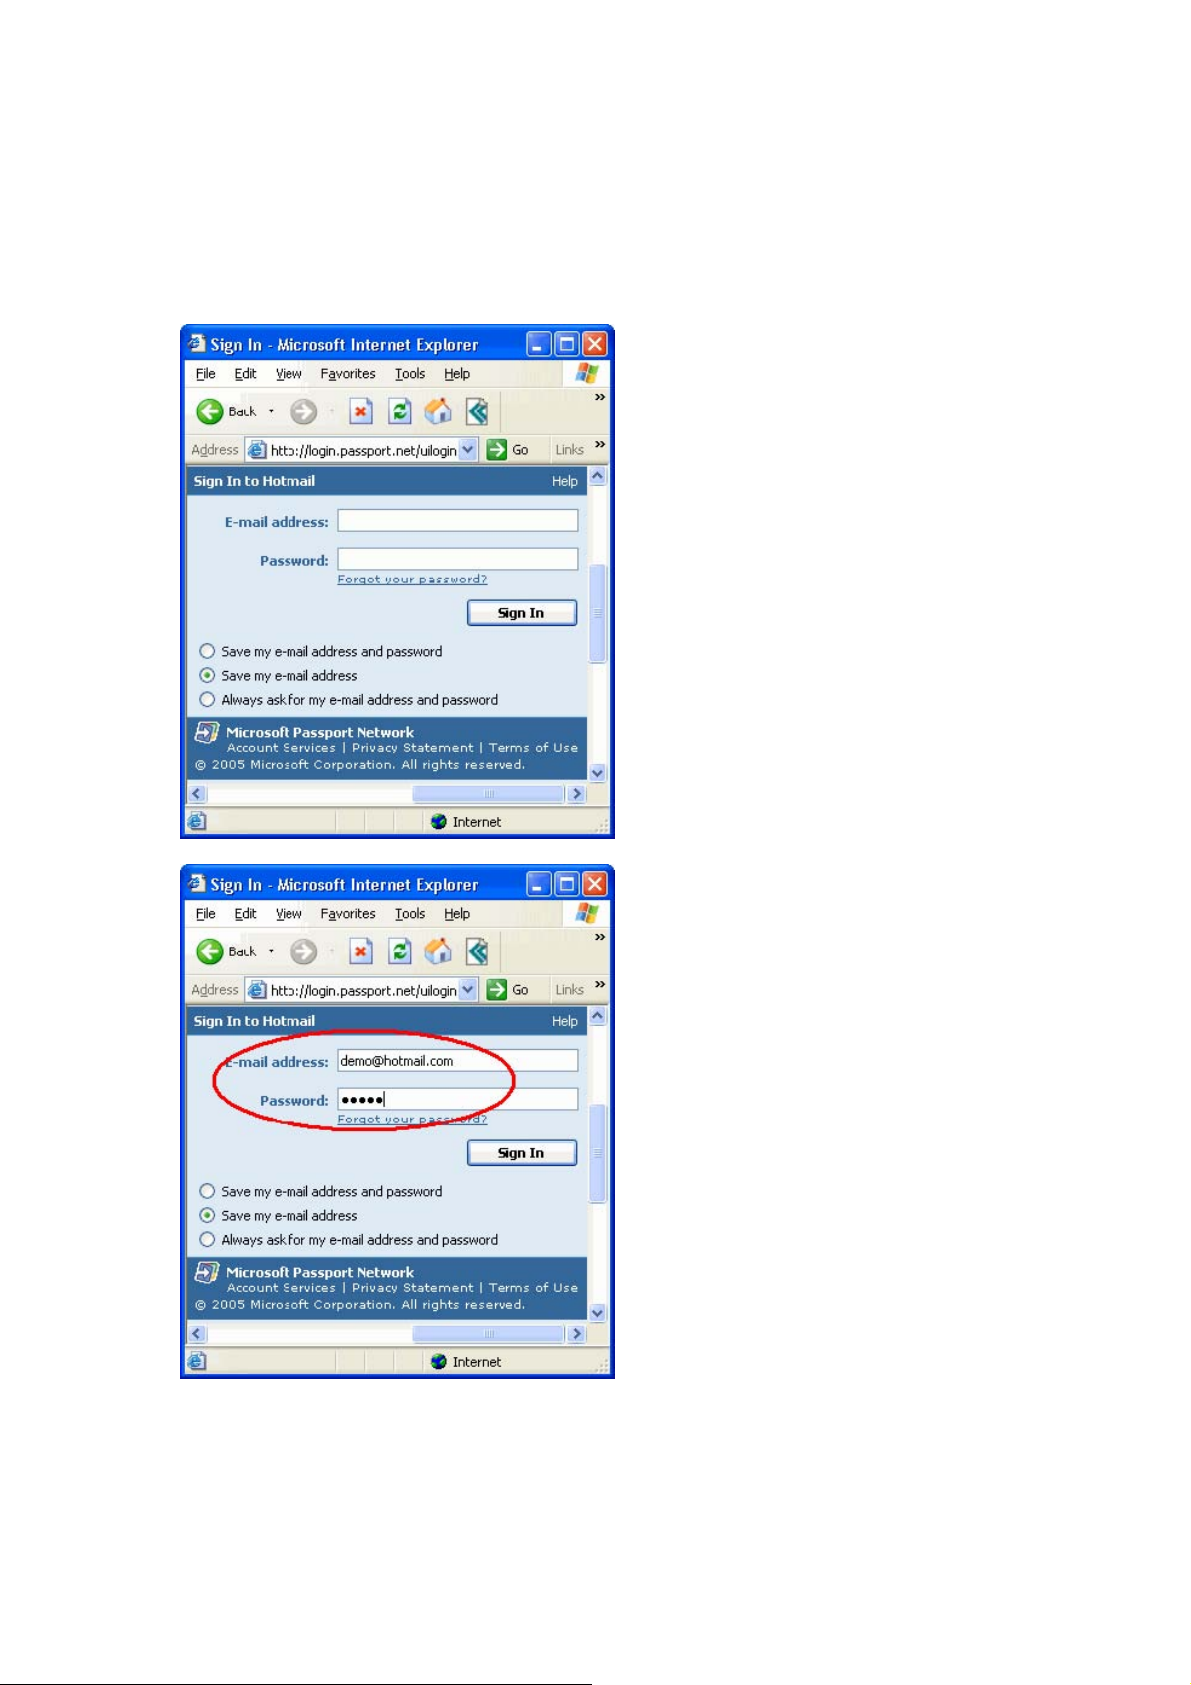
How to "Save ID and Password"
1 Start Internet Explorer and go to the web site for which you want to
store your ID and/or Password.
2 Type your Username and Password.
- 13 -
Page 14
Fingerprint Software User Manual
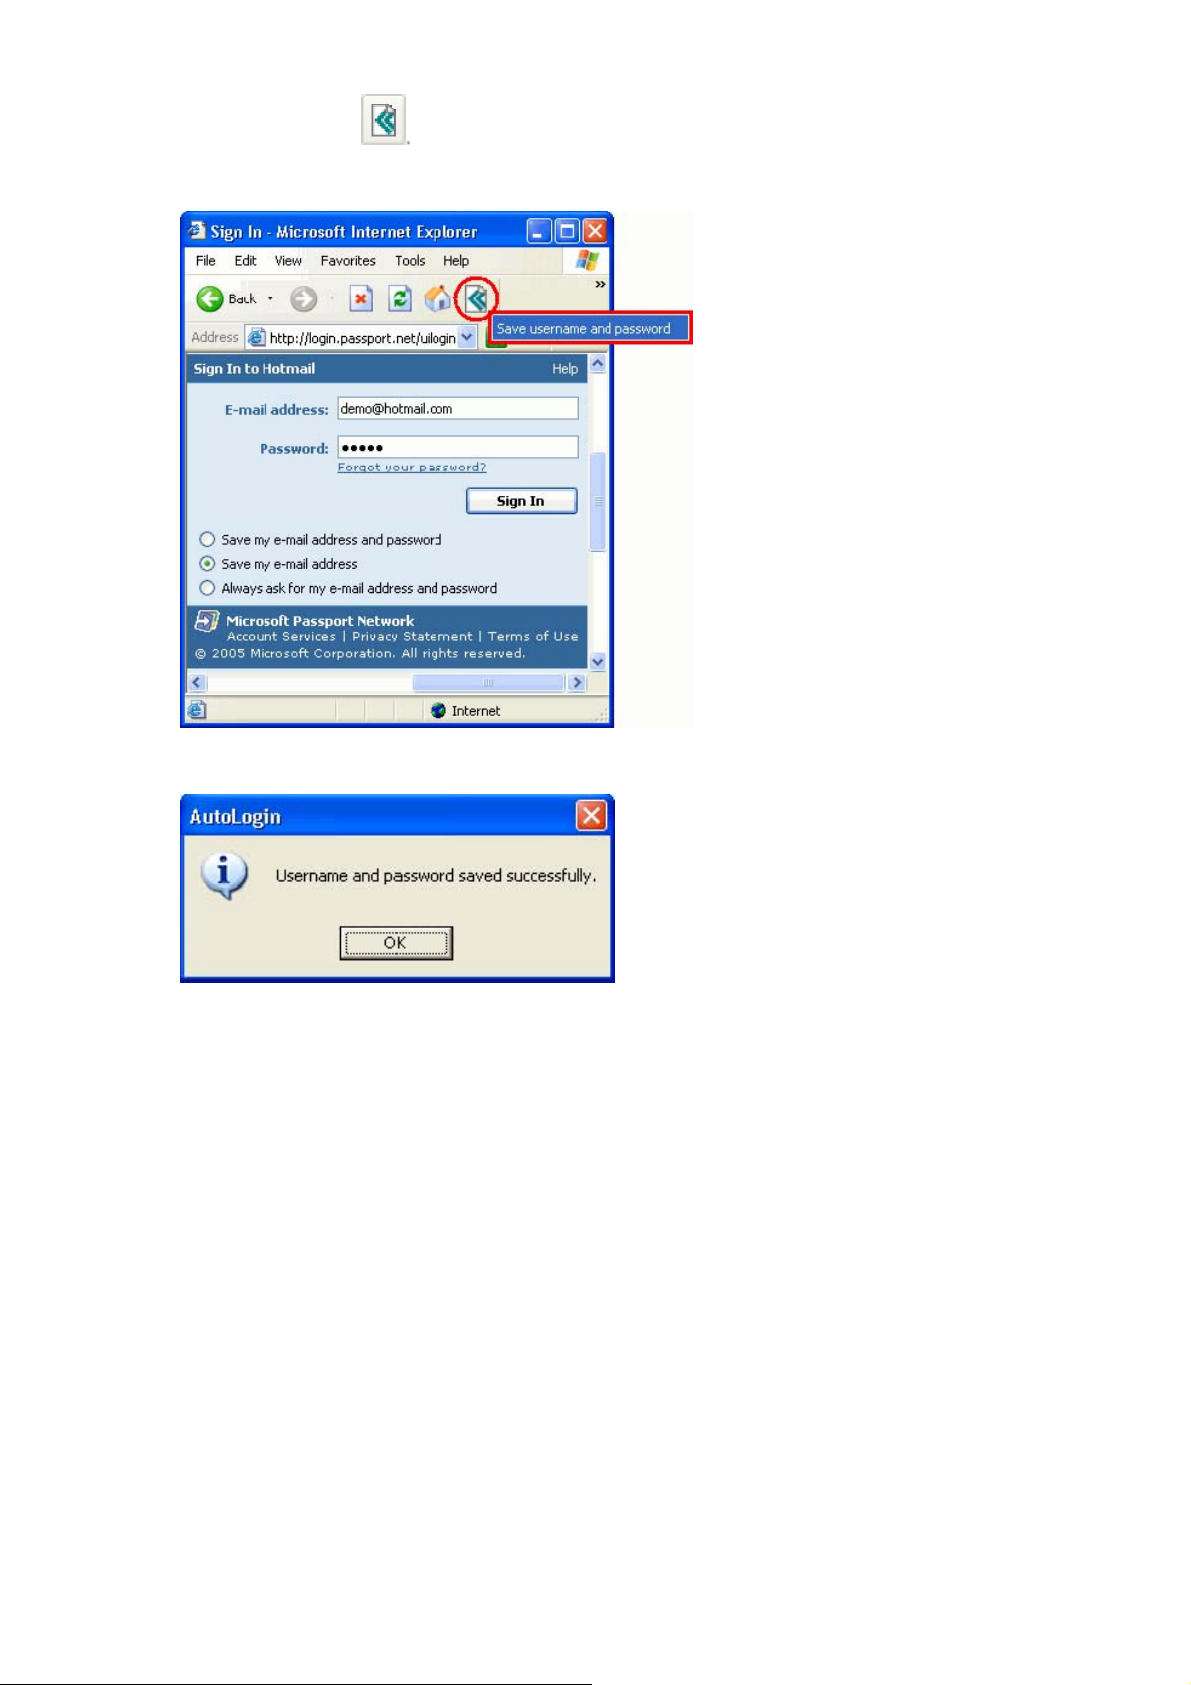
3. Click the icon on the taskbar of Internet Explorer and choose “Save
ID and Password”
4. If the "Fingerprint Life time setting" is set "Never use Fingerprint enroll",
the Username and/or Password is saved.
- 14 -
Page 15
Fingerprint Software User Manual
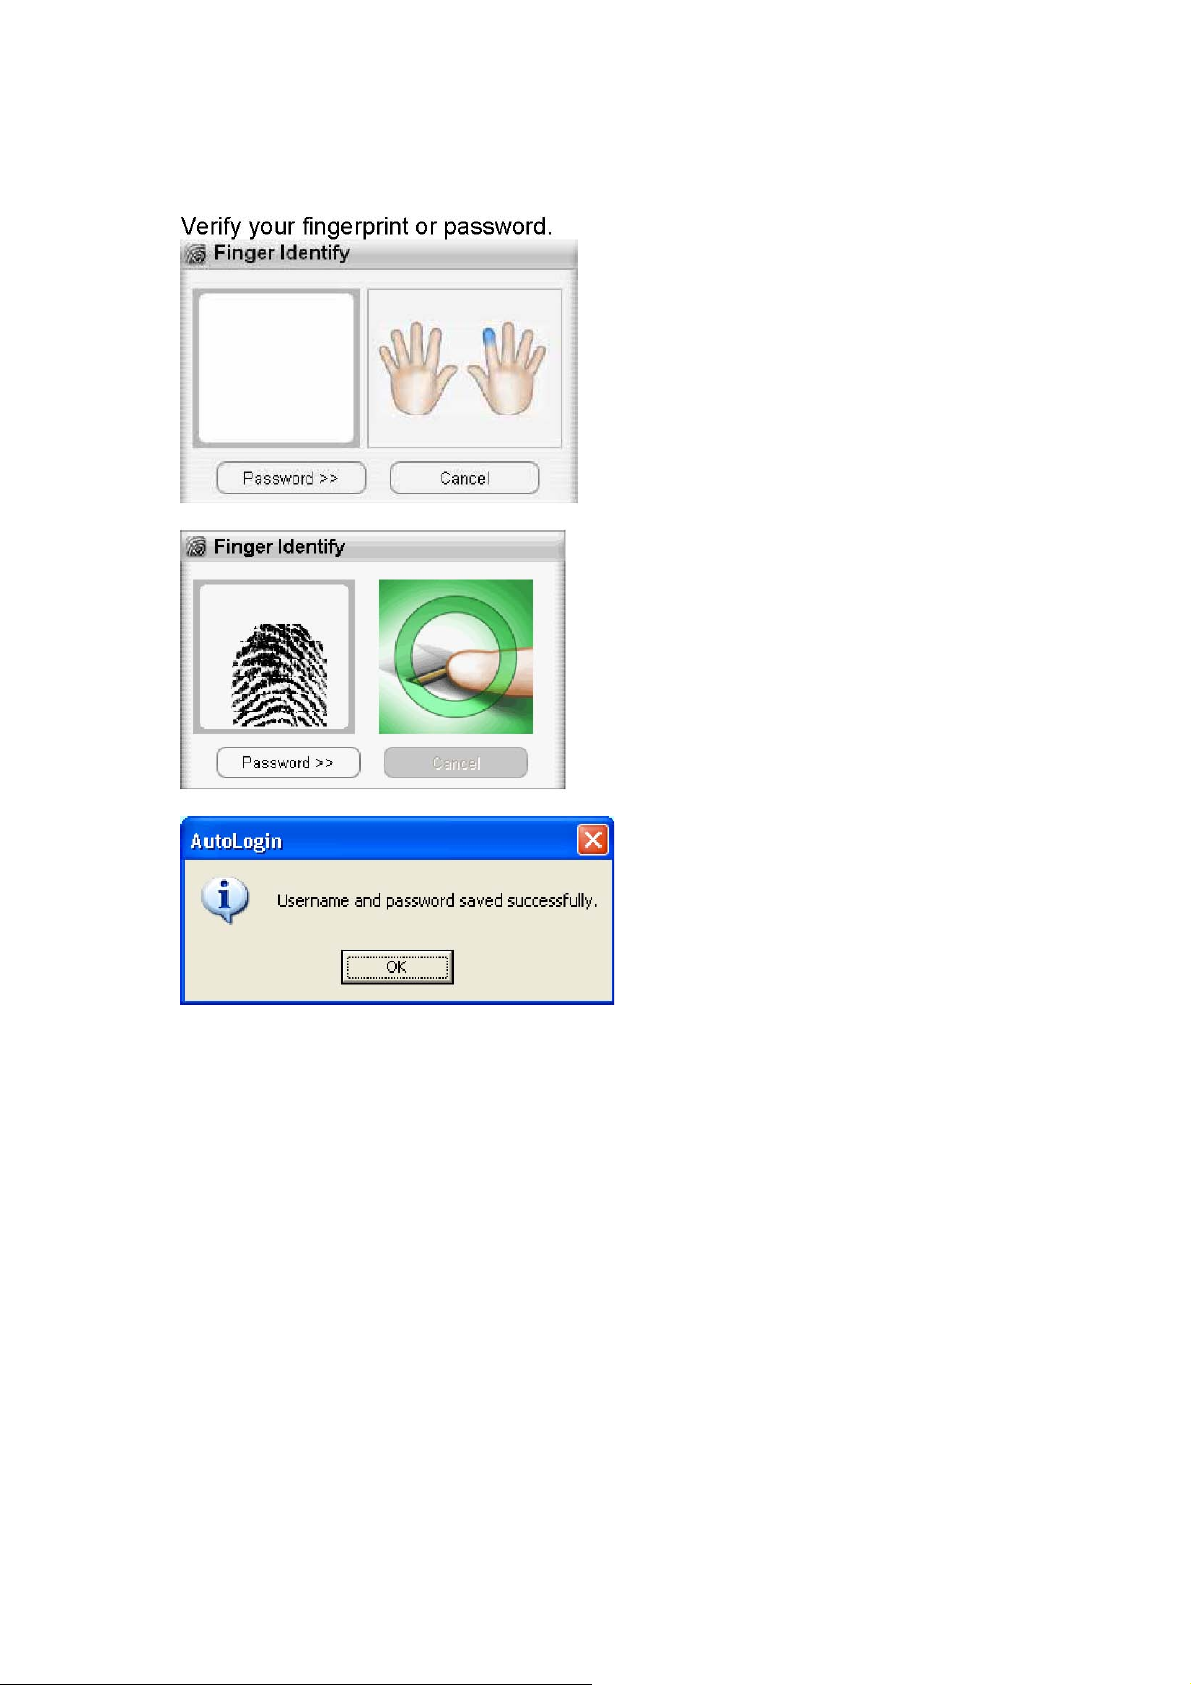
If the current fingerprint expires, you must re-verify the fingerprint in order to
save the Username and/or Password. "Fingerprint Authentication" dialog will
ask you for your fingerprint verification. (This process can also be executed by
typing in your password.)
- 15 -
Page 16
Fingerprint Software User Manual
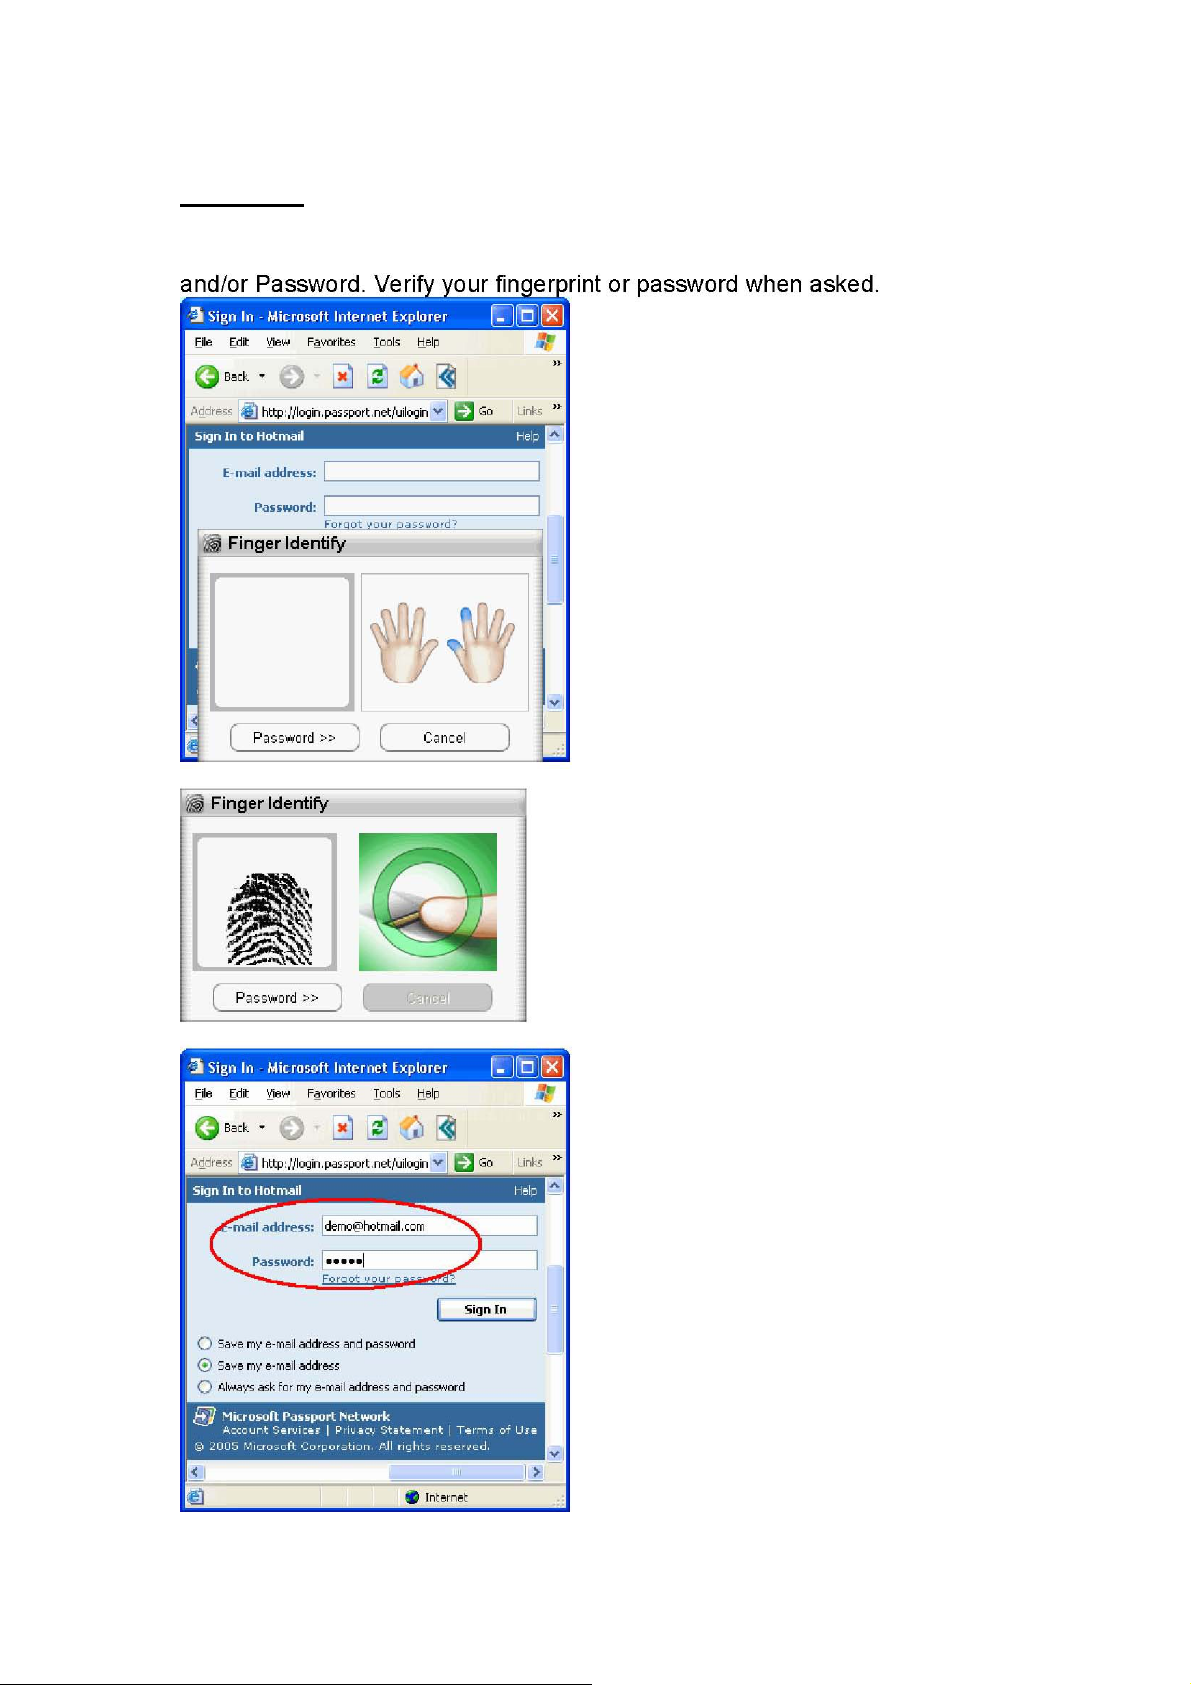
ID/Password AutoLogin auto-filling
Method 1.
Start Internet Explorer and go to the web site where you have saved your ID
- 16 -
Page 17
Fingerprint Software User Manual
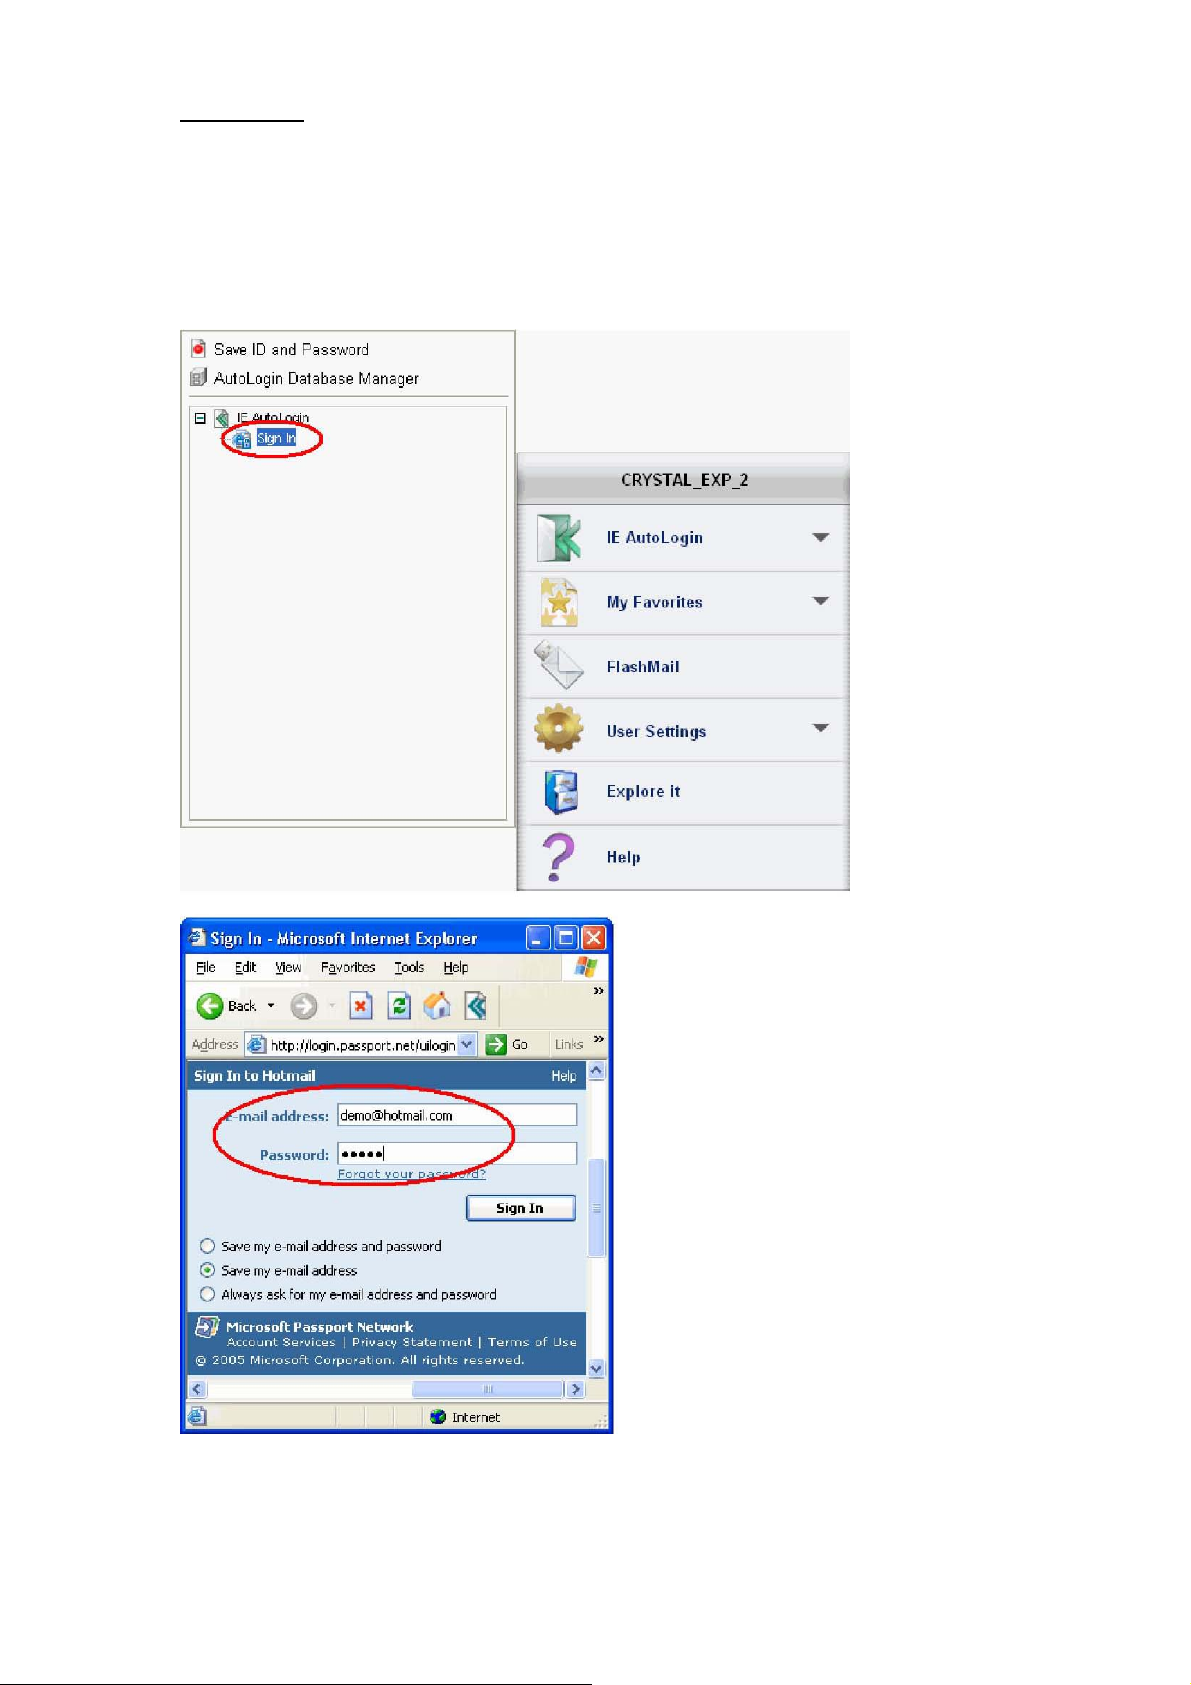
Method 2.
You can also go to the web site directly without starting Internet Explorer via
the Menu for Fingerprint Access. Click IE AutoLogin and choose the web site
you want to go to. Internet Explorer will automatically start and show the web
site that you have chosen. And your ID and/or Password will automatically be
filled in.
- 17 -
Page 18
Fingerprint Software User Manual
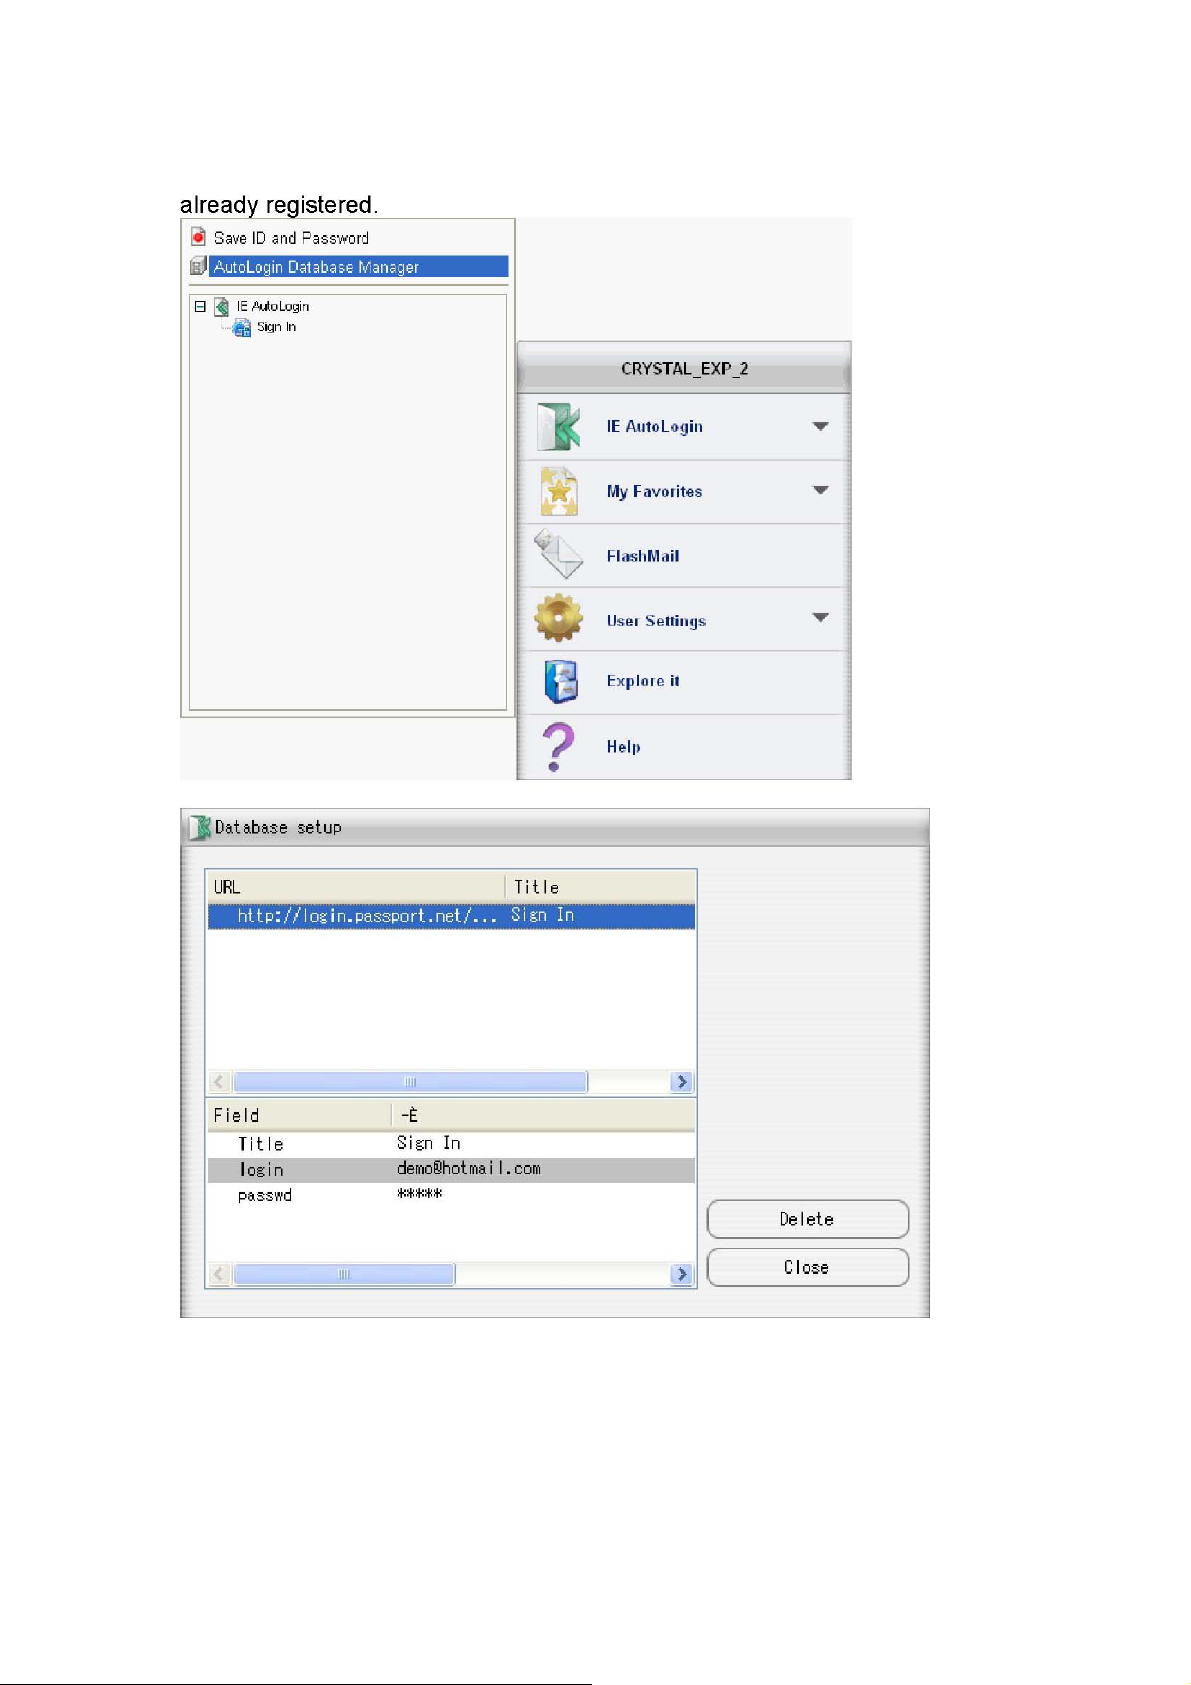
AutoLogin Database Manager
You can delete ID and Password, and manage all the URLs that you've
- 18 -
Page 19

Fingerprint Software User Manual
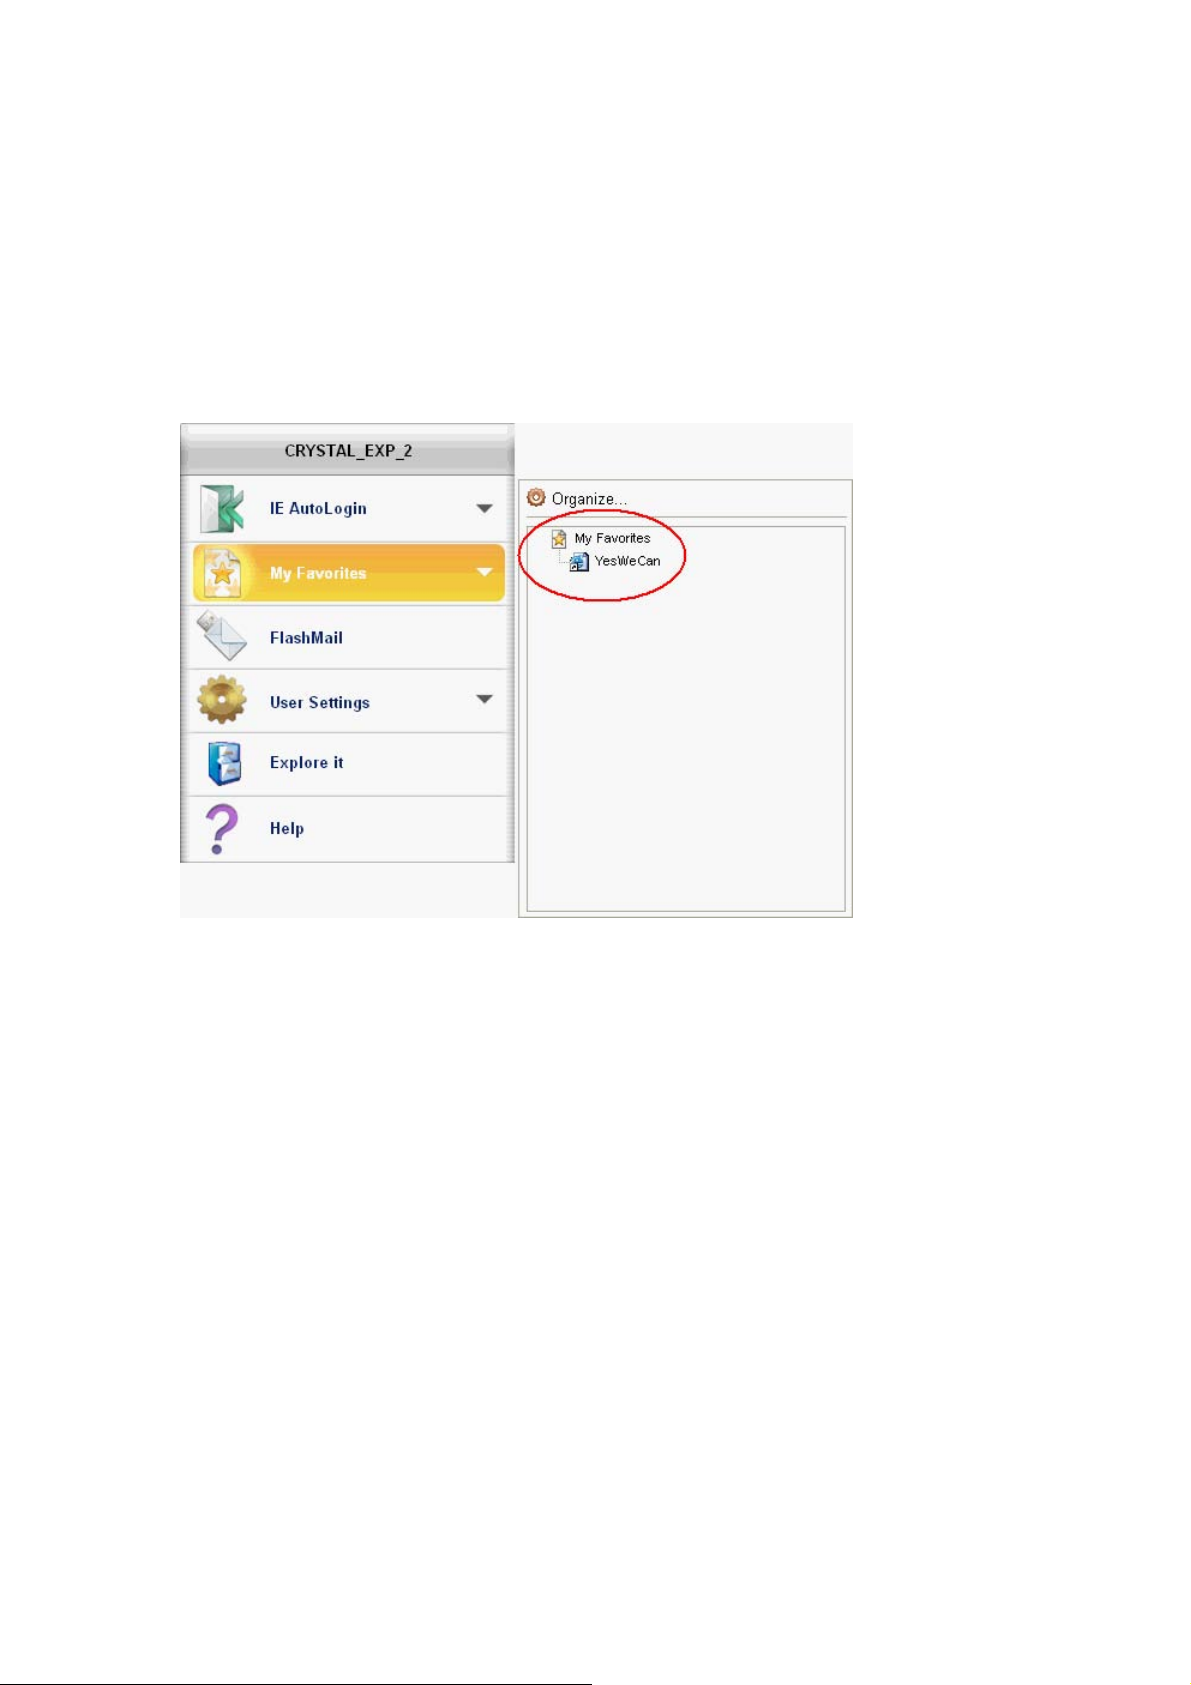
Access To Favorites
You can get access to your "Favorites" included in Internet Explorer.
Carry-On My Favorites
1. Open "Menu for Fingerprint Access".
2. Click "Access To Favorites" and then select "Organize..."
3. My Favorites in Internet Explorer will appear on the left side.
4. You can select a favorite web site you want to add and copy them into
"Fingerprint". Also, you can delete a web site listed in the right pane.
- 19 -
Page 20
Fingerprint Software User Manual
․Computer Side: The favorites already registered into Internet
Explorer are listed.
․Fingerprint Disk side: The favorites already stored in your FP1 are
listed.
․Select All: Select all URL in the frame.
․Delete: Delete the URL that you selected.
5. You can directly open "Access to Favorites" through "Menu for
Fingerprint Access".
- 20 -
Page 21
Fingerprint Software User Manual
FlashMail
Managing multiple e-mail accounts
If you have multiple e-mail accounts, you can manage these accounts in the
same browser window simultaneously. You are also able to set each account
to only receiving certain mails (spam blocking).
Conveniently send and receive mails
FlashMail is an application that runs on Flash Disk. You can easily access
your e-mail accounts when the Flash Disk is inserted into the computer,
wherever you go.
Open "Menu for Fingerprint Software / FlashMail".
- 21 -
Page 22

Fingerprint Software User Manual
E-mail Account Setup
If you would like to set up an account, please click on <Setup (S)> in the tool
bar and select <Account Setup (A)>. Now you will enter <Account
Manager>, as shown below:
When you see the message above, click <Add New> to go to the next
window;
If you would like to add a new account, go to [Accounts in Outlook Express of
this PC:] select the existing Outlook Express e-mail account(s), and click to
add the new account(s). Or you can just click <Add New> to setup the
account you need. An account setup window will pop up when you click on the
<Add New> or selections. There are three settings: <General>,
<Retrieve> and <Send>. Below is an example of how the form is filled, for
your guidance:
- 22 -
Page 23

Fingerprint Software User Manual
- 23 -
Page 24

Fingerprint Software User Manual
If you use button to import your e-mail account in Outlook Express,
please enter the password for that account manually. Also, please make sure
that the information in <Mail server> is correct. (If you have anti-virus
programs, e.g. Norton Anti-Virus, the software may include your e-mail server
into its virus scanning paths.)
If you do not check <Check this account when checking mailbox> option in
<Retrieve>, then this account will not be checked for new mails when you
click on <Check> on the main screen.
If your mail service provider checks your account name and password
whenever a mail is sent, please select the <SMTP server need
authenticating> option (usually not required), and please enter your
account name and password.
When you have finished the above settings and clicked <OK>, then setup is
completed. Now you will find your account name inside <Accounts Manager /
Current accounts>.
If you would like to set up other accounts, simply repeat the above steps.
- 24 -
Page 25

Fingerprint Software User Manual
FlashMail Function Settings
When you execute FlashMail, a FlashMail main window will appear.
File (F): The main choices are <Outbox (O)> and <Exit (X)>.
• If you would like to send an e-mail, you may directly choose <Outbox
(O)> or click on the icon on your tool bar. This will then take you to
the outbox window and you may compose e-mails.
ٛ
• If you would like to exit out of FlashMail, choose <Exit (X)> in the <File
ٛ
(F)> options menu, or click on the close button at the upper right hand
ٛ
corner.
Edit (E): The main choices are <Select All (A)>, <Select Inverse (I)>, and
<Delete (D) >.
•When you have selected the items that you would like to remove,
you may then click on <Delete> option in the <Edit (E)> menu.
ٛ
•Select Inverse (I): For example, if you selected items 1 and 3 then
ٛ
clicked on the <Select Inverse (I)> option, items 1 and 3 will now be
ٛ
unselected while the rest are selected.
Setup (S
Book (D
): The main options are <Account Setup (A)> and <Address
)>
ٛ
•Click on <Account Setup (A)> to manage and set your mailbox.
ٛ
•Click on <Address Book (D)> to manage and set up your address
ٛ
book.
- 25 -
Page 26
Fingerprint Software User Manual
Help (H): The main options are <Contents (H)> and <About FlashMail
(A)>
ٛ
•If you are unsure of how to use FlashMail, refer to the <Contents (H)>
ٛ
under the <Help (H)> menu.
ٛ
•If you would like to learn more about our company and version, you
can click on <About FlashMail (A)> in the <Help (H)> menu.
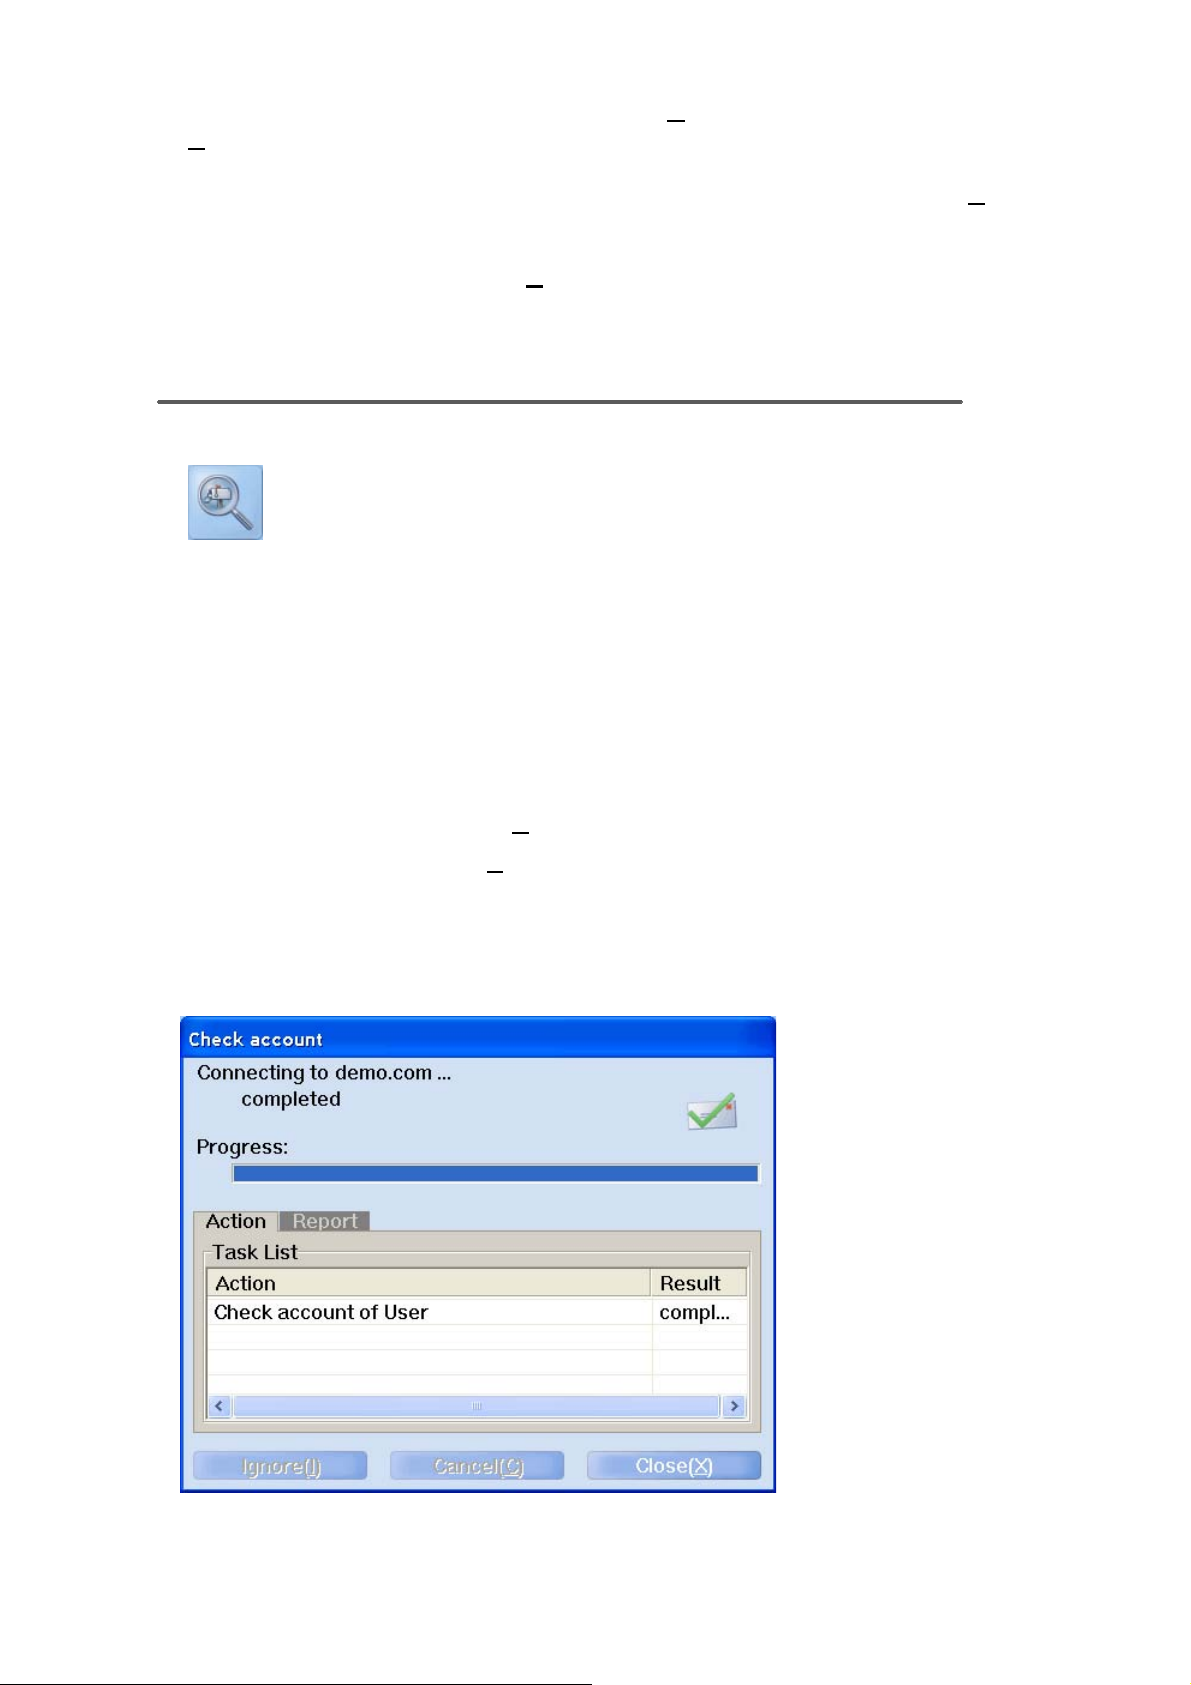
Read Mail
• --Check Mail
Before you download any e-mail, you can click on the <Check Mail>
button on the tool bar to check whether you have any new mail.
If you feel that it takes too long to check mail, you can click on the
<Ignore (I)> button. Then it will skip the mailbox currently being checked.
Or you can click <Cancel(C)> to terminate any mail checking functions.
Simply click on <Close(X)> to exit this window.
When you are done checking mail, you will see a list of mails in the
mailbox in the inbox window. (The e-mails now are not downloaded onto
the Flash Disk yet, they are still located on the server). Now you can,
according to your needs, choose to download or delete mails.
- 26 -
Page 27
Fingerprint Software User Manual
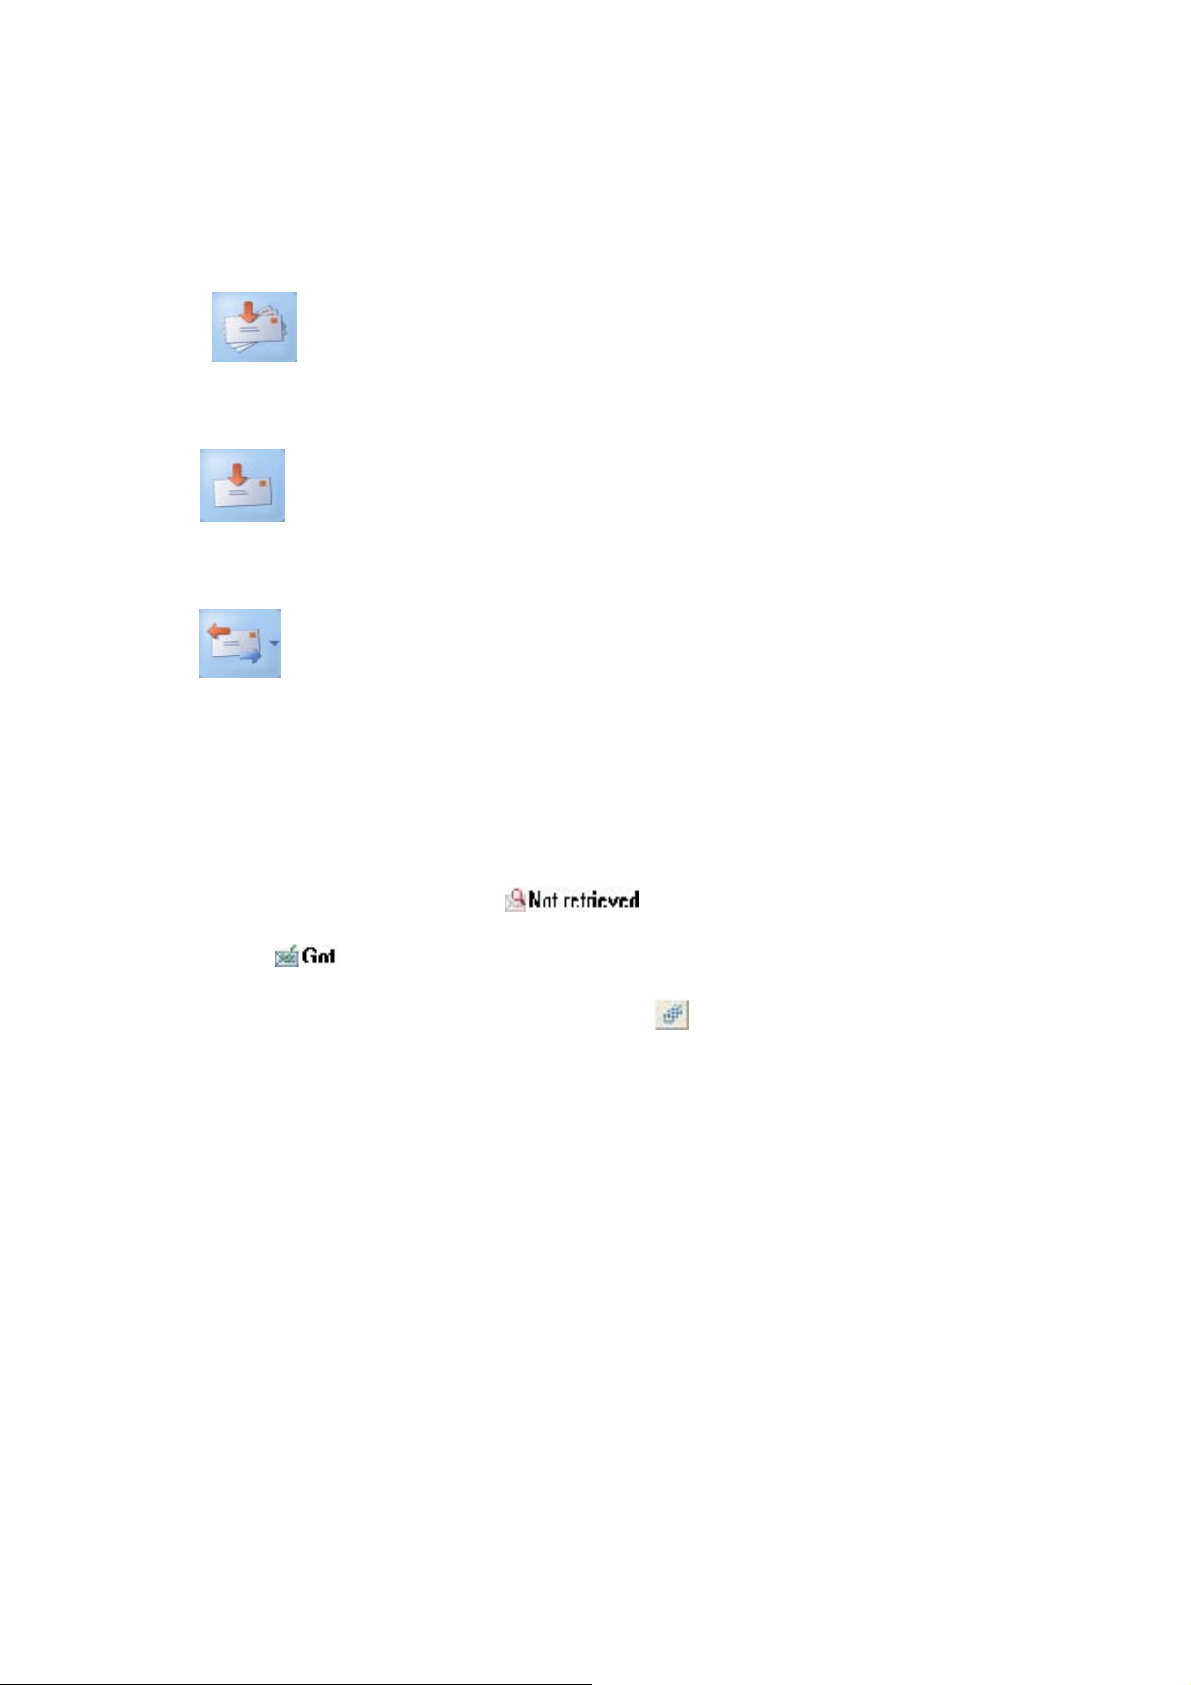
• Download Mail
All the ones selected will immediately be downloaded onto Flash Disk,
and on the file list you can see that the names have been changed to
"Got" instead of "Not yet".
1. --Retrieve All All the mails will immediately be downloaded onto
Flash Disk, and on the file list you can see that the names have been changed
to "Got" instead of "Not yet".
2. -- Retrieve All the ones selected will immediately be downloaded
onto Flash Disk, and on the file list you can see that the names have been
changed to "Got" instead of "Not yet".
ٛ
3.
3. --Transfer You can transfer mails (receive and send) on a specific
mail account. Click the right side drop-down menu and select account name.
4. Or, you can double-click the left mouse button and the mail will download
and open itself.
Note:
ٛ
O After you have checked the mail, a "Not retrieved" status icon will
ٛ
be shown.(see right)
ٛ
O If the e-mail is already downloaded, then a mail icon will appear.
ٛ
(see right)
ٛ
O To distinguish the difference, mails with attachments will have a
ٛ
paperclip icon next to it. (see right)
- 27 -
Page 28

Fingerprint Software User Manual
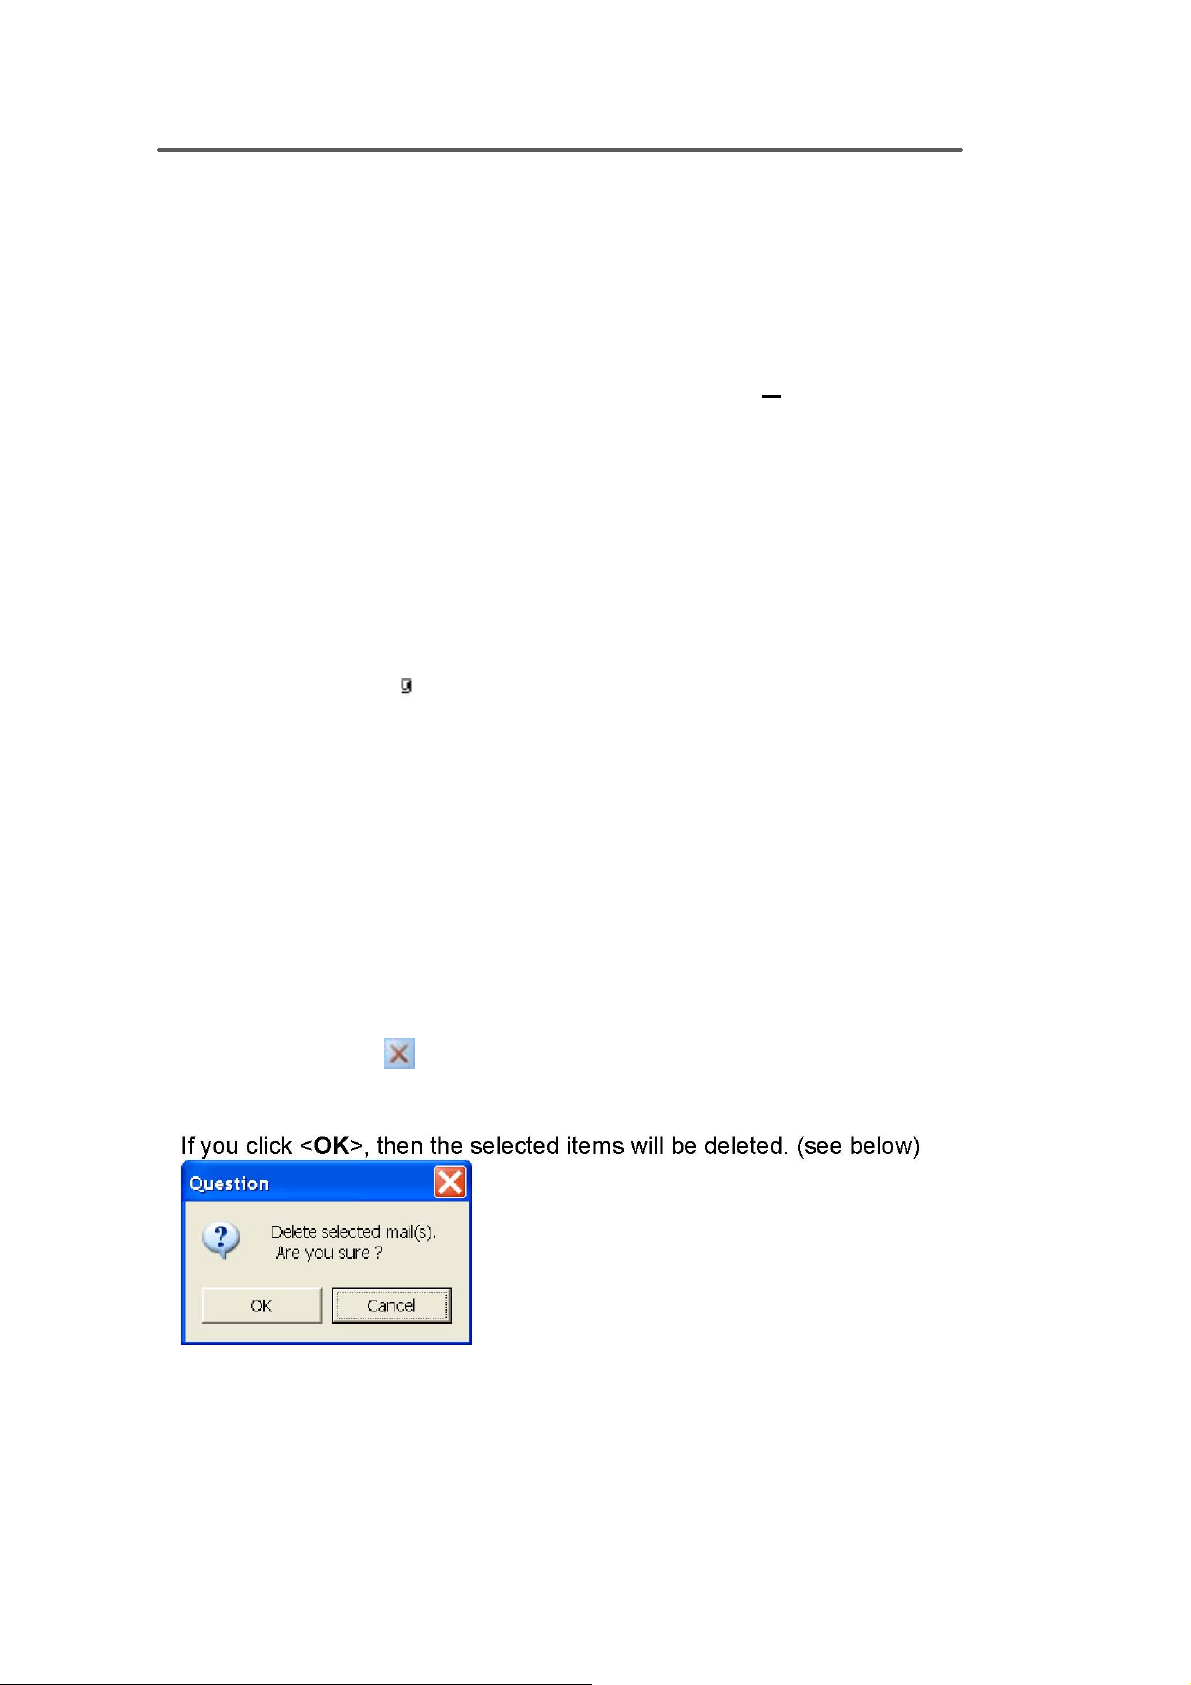
• --Delete Mail
When you wish to delete any mail, first select the ones you would like to
delete and click on <Delete> on the toolbar. A window will then appear
asking whether to <Delete local mail files only> or <Delete with he
mails in mail server>. Please choose one of the options and proceed by
clicking <OK> and the mail will be deleted. (Shown below)
If you choose to <Delete with the mails in mail server>. Then the mail will
be permanently deleted.
- 28 -
Page 29
Fingerprint Software User Manual
Sending E-Mail
1 If you click on the <New Mail> on the Outbox window, a Mail Editor
window will appear.
2 In the <To> line, you can enter the recipient's e-mail address. If there
are multiple recipients, separate the addresses with semi-colons (;). Or
you can click on the <To> button and find the people from your address
book.
3 In the <Subject> line, enter the subject of this e-mail.
4 Write the e-mail, and then click the <Send Out (O)> button on the
toolbar.
5 If you only wish to save this e-mail, simply click on <Save> button on
the toolbar.
Note:
• You can select the mails that you would like to edit from the outbox
window. Double-click left mouse button to open or send this e-mail.
For you to distinguish the difference, mails containing attachments will
have a paperclip by the file name.
•
For you to distinguish the difference, mails containing attachments will
have a paperclip by the file name.
•
If you have multiple mail accounts, you can choose from the "from" line
to select the account.
It does not matter whether the mail was sent or not, all mail saved on the
disk will remain in the outbox window.
•
Next time when you feel like sending another e-mail, simply follow the
above steps to do so.
•If you want to delete mail, choose the ones that you want to delete and
click on <Delete> from the tool bar. Now, a confirmation dialogue box
will appear.
- 29 -
Page 30

Fingerprint Software User Manual
Address Book Summary
FlashMail offers a simple way to store your address book.
Importing address book from other mail software
You can export CSV format address books from other e-mail software(s)
into FlashMail's address book. A good example is to use the "Export
Address Book" function in Microsoft Outlook. First, convert the file into
CSV format and then import it into FlashMail.
You may also use Microsoft Exchange or any other programs that
support imports/exports of CSV files to use your address book file.
Open Address Book
If you want to access your address book through FlashMail, click on the
<Setup(S)> function and choose <Address Book (D)>.
Or, you can open the <Outbox (O)> from the mailbox window, and click
on the <To: > button from the <New Mail> window.
- 30 -
Page 31
Fingerprint Software User Manual
Change Contacts Information
Find the name you want from the <Address Book> list and double click on it.
Or select the name(s) and click on <Contents> to change the information.
Note:
If you want to delete a contact, please select the name of the contact and click
on the <Delete> button. If this contact is part of a group, then it will be
successfully removed from the entire group.
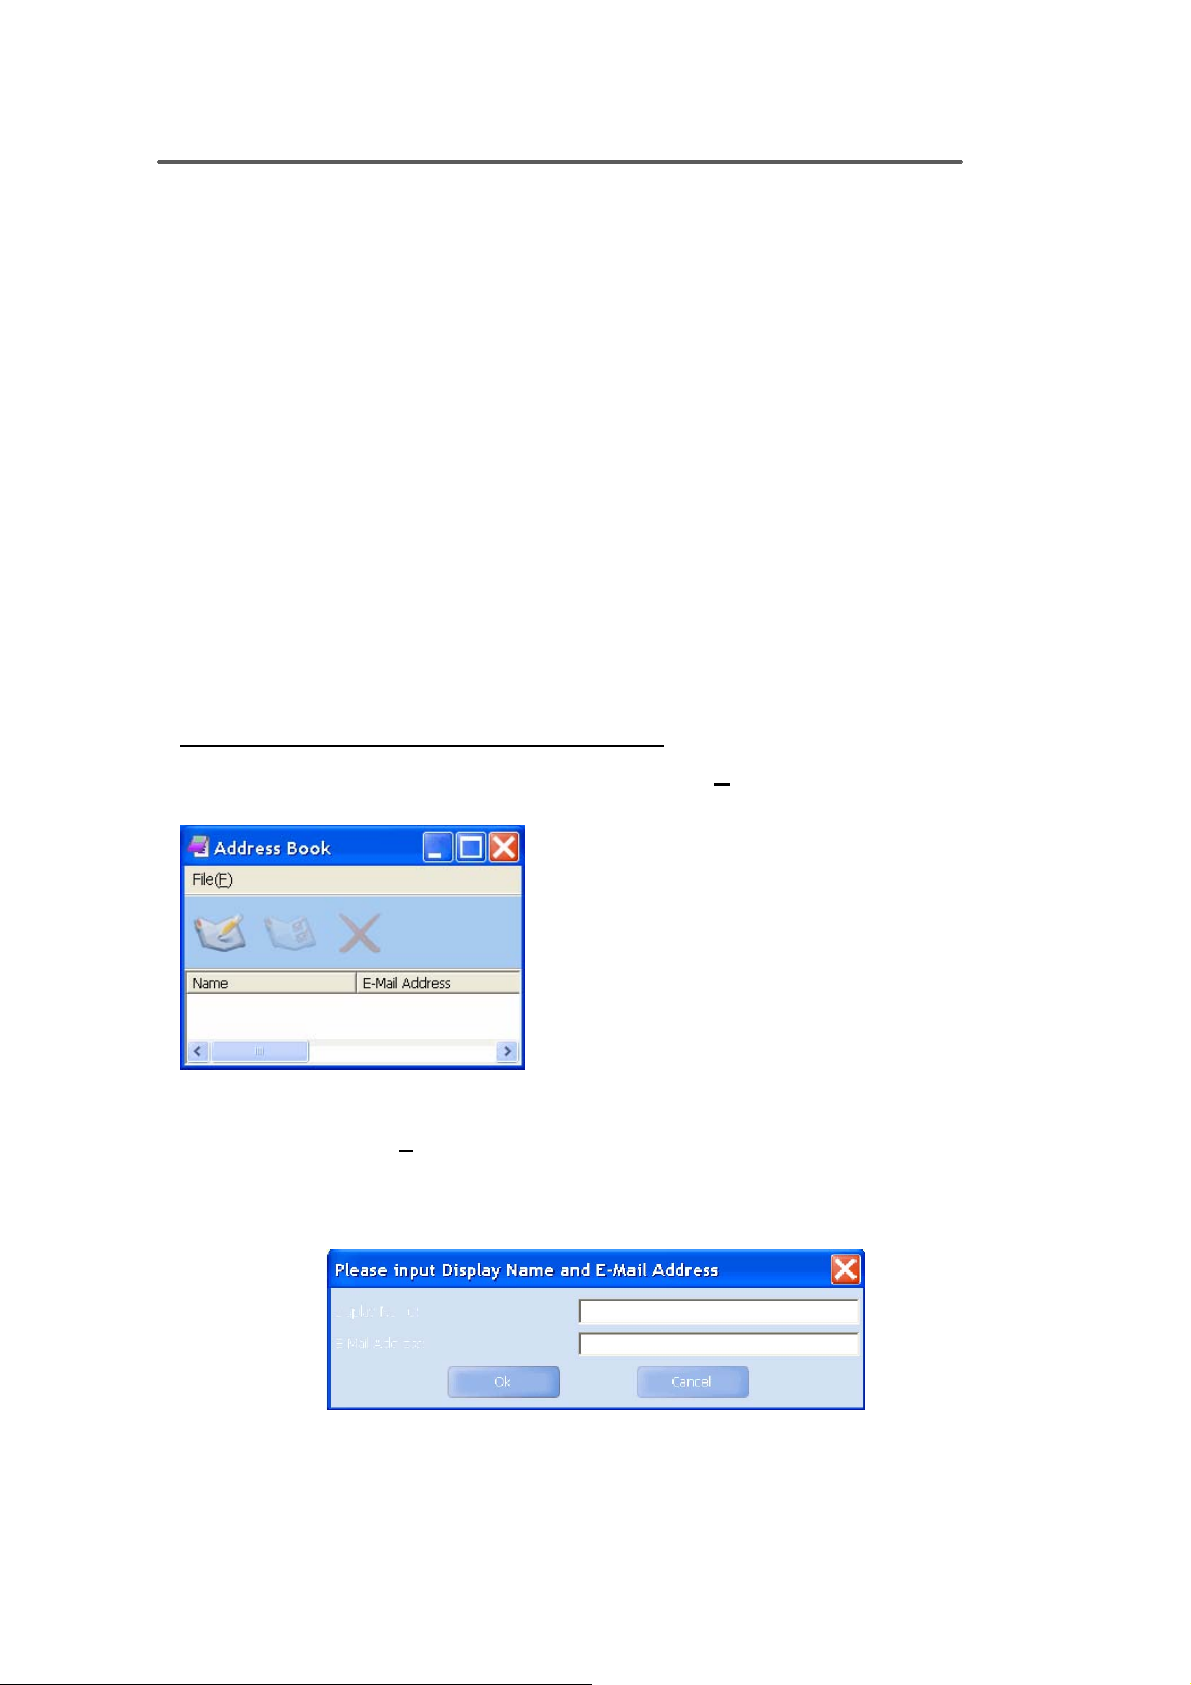
How to add new contacts
To add new contacts to FlashMail
FlashMail provides two ways to add e-mail addresses and other related
information of your contacts:
• Directly add new contacts from FlashMail.
• Use CSV files generated by other programs and import the address book
to FlashMail.
Directly add new contacts from FlashMail
First, move your mouse cursor to the <Setup(S)> menu on the toolbar,
and choose<Address Book (D)>, then the following window will appear:
When you see the above window, click on the <New> button, or choose <New
(N)> from the <File (F
Fill in the name of your contact and e-mail address. For example:
)> menu to add new contacts.
Click <OK> and a detailed form about your new contact will appear, you can
click <Ok> after filling out the information and the process is complete.
- 32 -
- 31 -
Page 32
Fingerprint Software User Manual
You will find the name of the new contact in your address book, shown
below:
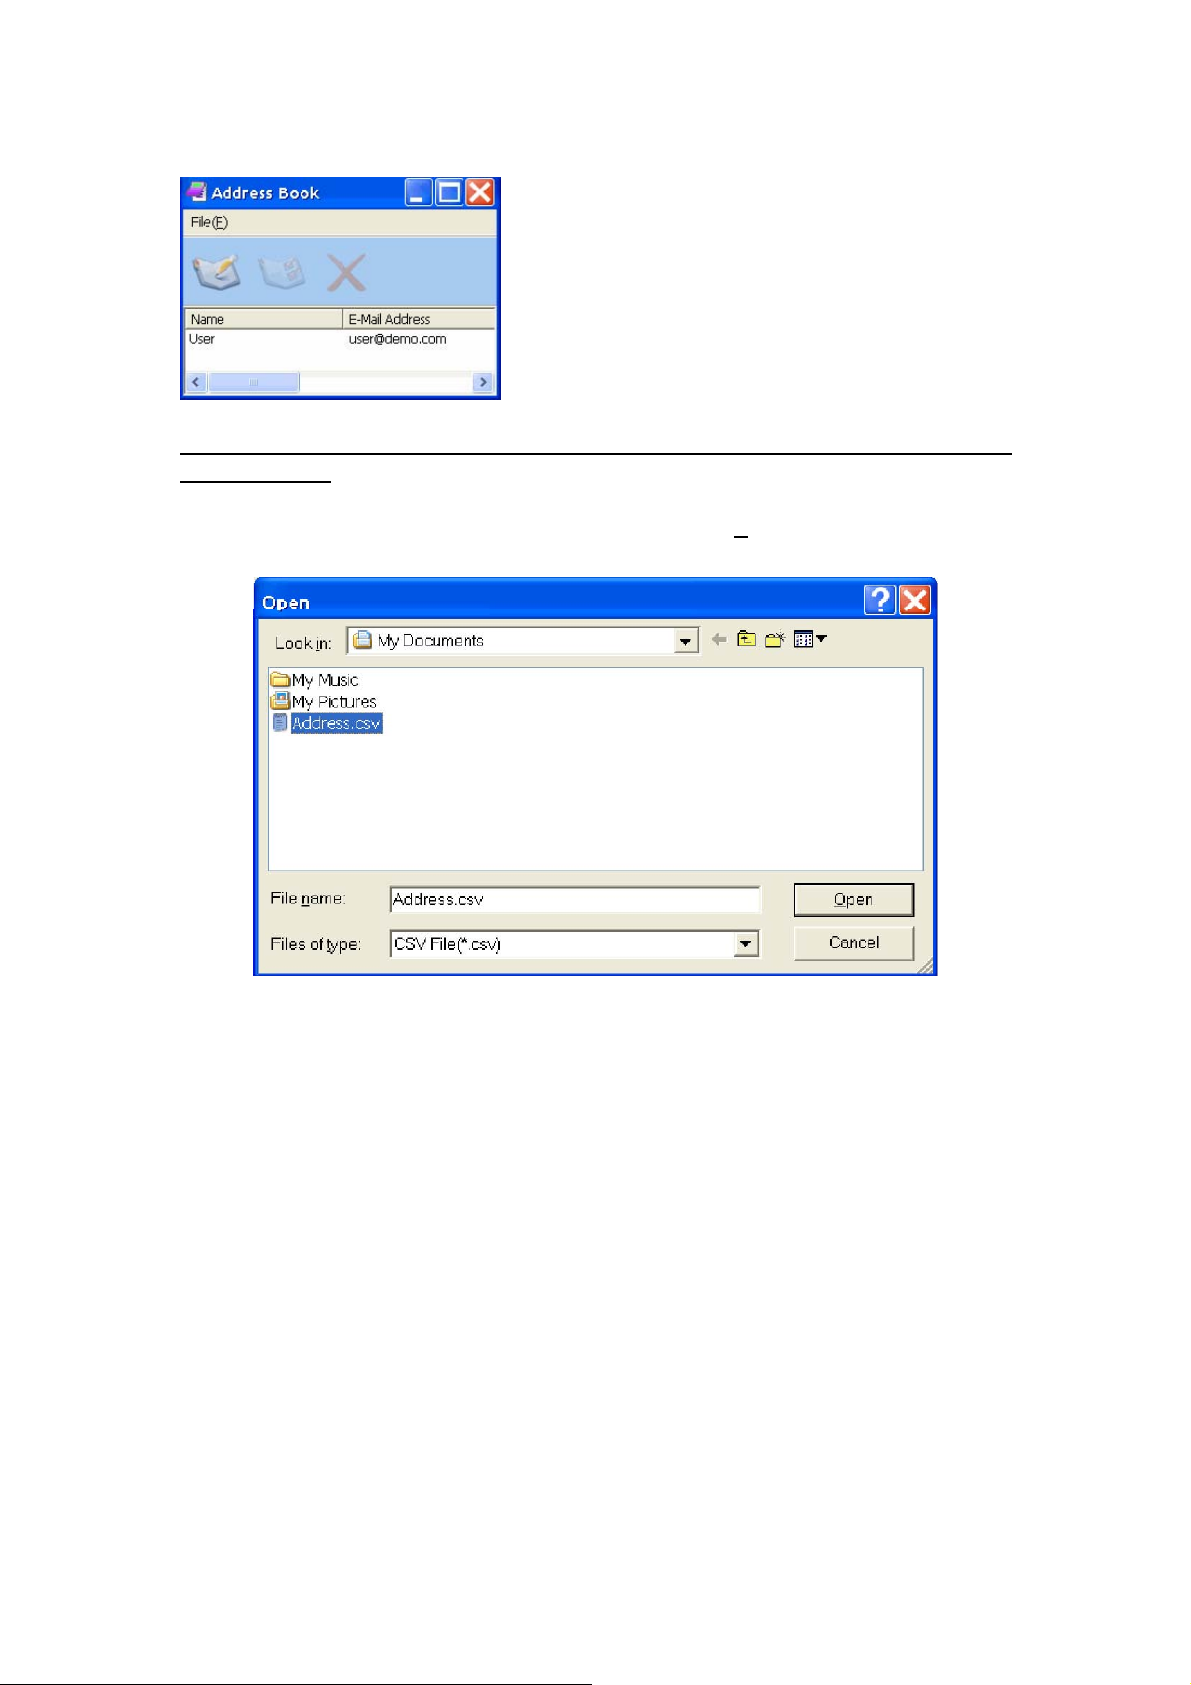
Use CSV files generated by other programs and import the address book
to FlashMail
Choose the <Import (I)> option from the <File (F)> menu, and then the
dialogue below will appear:
Select the CSV file that you would like to import and then the following window
will appear after you click on <Open>:
- 32 -
Page 33

Fingerprint Software User Manual
Now, please choose the contacts you would like to import, and click on
the <Import> button. The contacts you selected will be transferred onto
Flash Disk address book (see Fig. 1), click <Ok> and it will successfully
import the contacts into the address book (see Fig. 2).
Fig. 1
- 33 -
Page 34
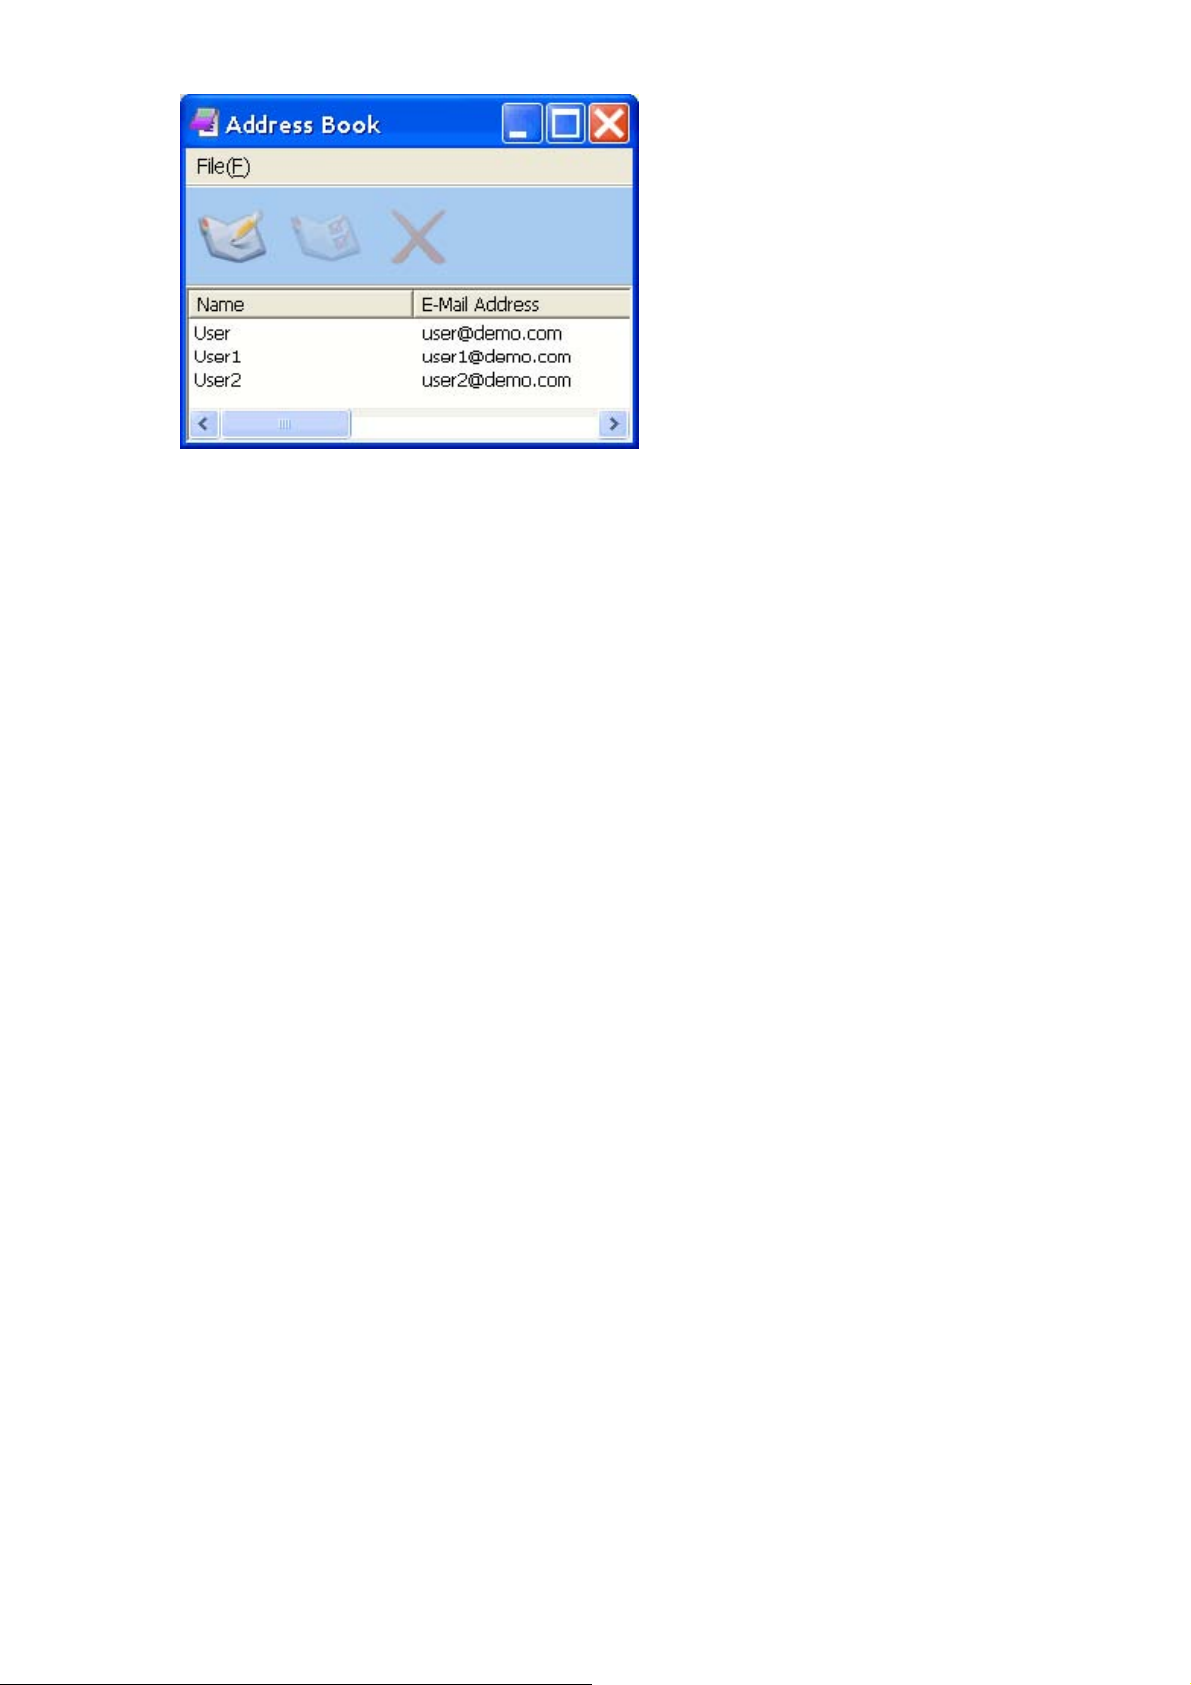
Fingerprint Software User Manual
Fig. 2
- 34 -
Page 35

Fingerprint Software User Manual
How to remove contacts
Remove contacts from address book
Select the contacts that you would like to remove from the address book, and
then click <Delete>. This contact will also be removed from its current group.
Follow the steps below:
1.First, select the contacts, and click <Delete>. Or use the <Delete> option
from the <File(F)> menu, shown below:
2.After you click <Delete>, the message will pop-up to confirm (shown below).
If you choose <Yes>, then this contact will be removed.
- 35 -
Page 36

Fingerprint Software User Manual
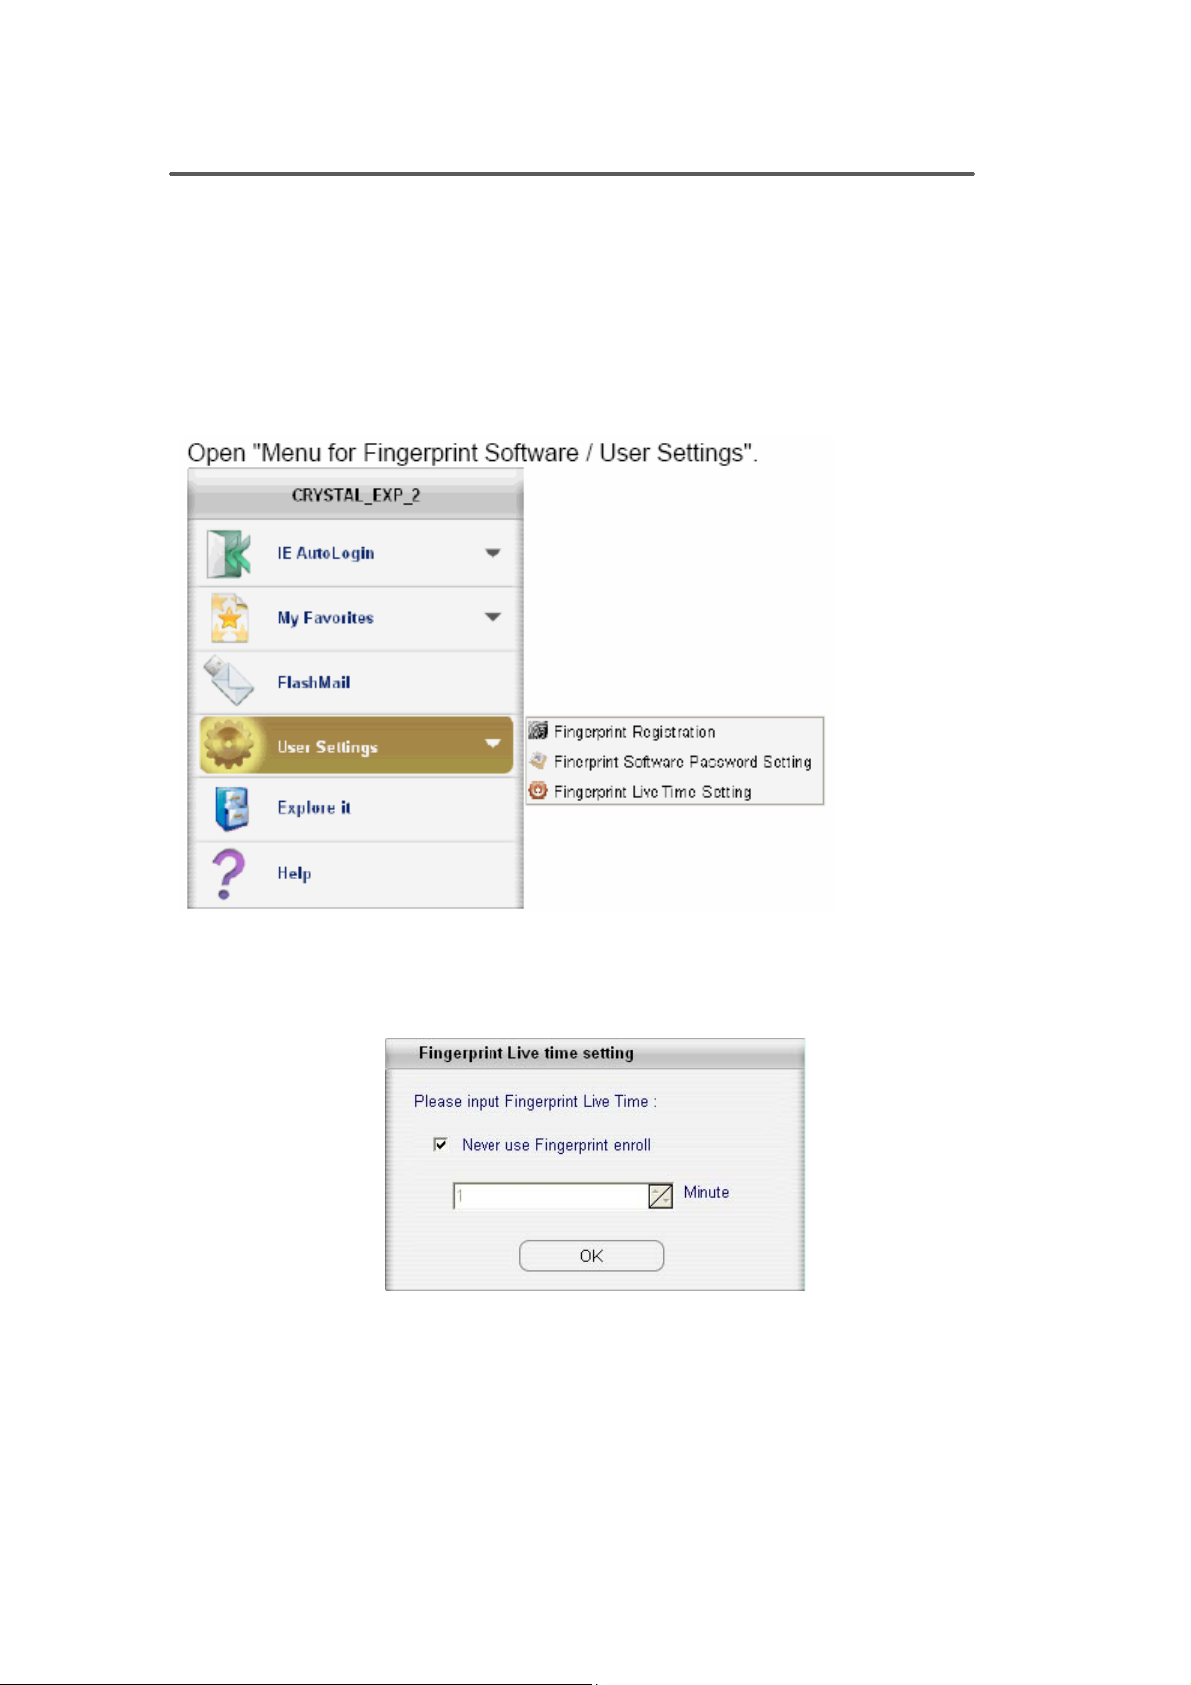
User Settings
In "User Settings" dialog, you can set:
•Fingerprint Registration
•Fingerprint Software Password Setting
•Fingerprint Live Time Setting
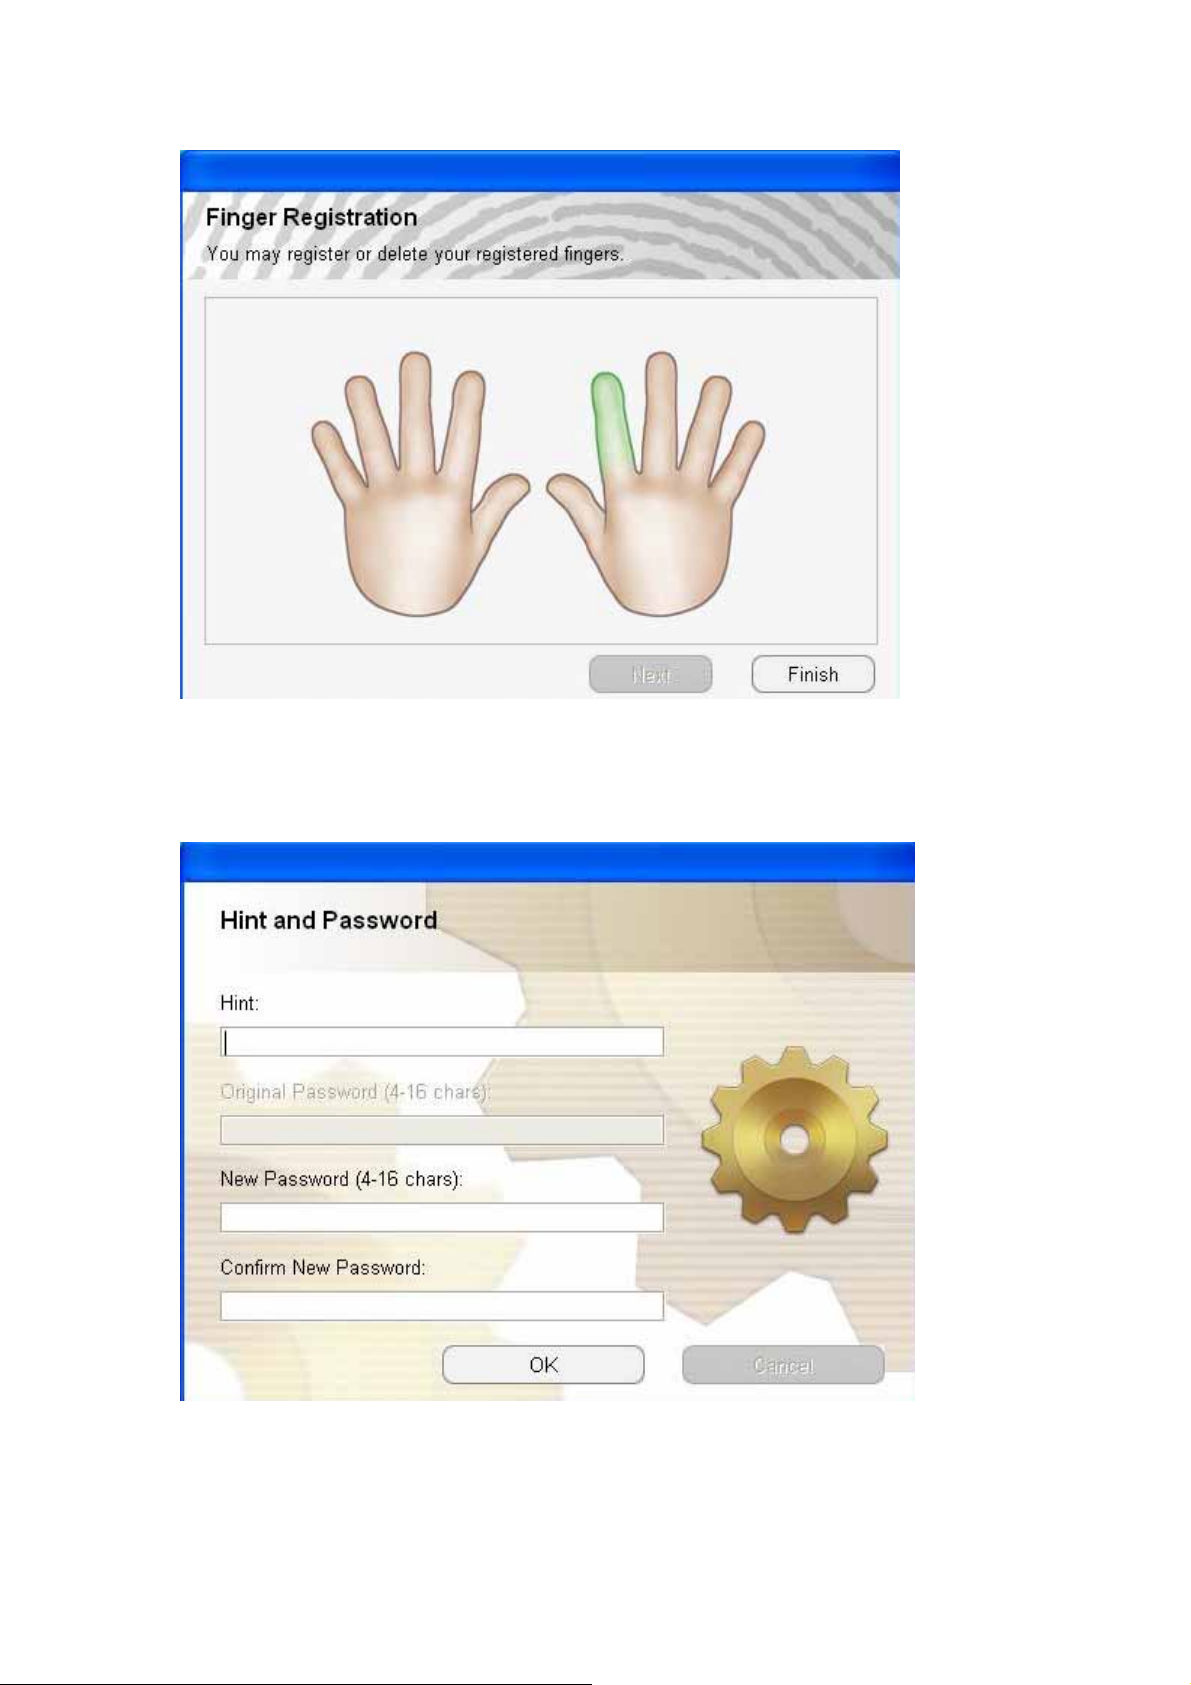
Fingerprint registration
- 36 -
Page 37

Fingerprint Software User Manual
2. In the "Finger Identify" windows, there are two ways to verify your
fingerprint.
Method 1.
* Finger Identify: Verify your previously registered fingerprint. The blue
fingers show which fingers have been registered.
Method 2.
* Password: Click the "Password >>" button and enter your password if you
want to use it instead of your fingerprint.
3. Finger Registration Wizard will start. And you may register or delete your
registered fingers.
Green: Already registered finger(s). Blue: Selected finger. PS: This product
may authenticate the fingerprint, which is other than what is registered due to
the similarity in shape of the fingerprint between them.
- 37 -
Page 38

Fingerprint Software User Manual
Fingerprint Software Password Setting
In the "Hint and Password" dialog, you can set your rescue hint and
password.
- 38 -
Page 39
Fingerprint Software User Manual
Fingerprint Live Time Setting
Life of Current Fingerprint
If you are working in an environment which requires full confidentiality, you
may set the "Fingerprint Life" to a short period of time (e.g. two minutes).
When you leave computer, current fingerprint soon expires. After current
fingerprint expires, you must re-verify the "Fingerprint Life". This feature offers
you full confidentiality.
Select "Fingerprint Live Time Setting"
• Never use Fingerprint enroll
Plug in Fingerprint Software will verify your fingerprint.
• Input Fingerprint Live Time
Every time you re-verify your fingerprint, the life of Current Fingerprint is
renewed.
- 39 -
Page 40

Fingerprint Software User Manual
Folder Security
Folder Encryption:
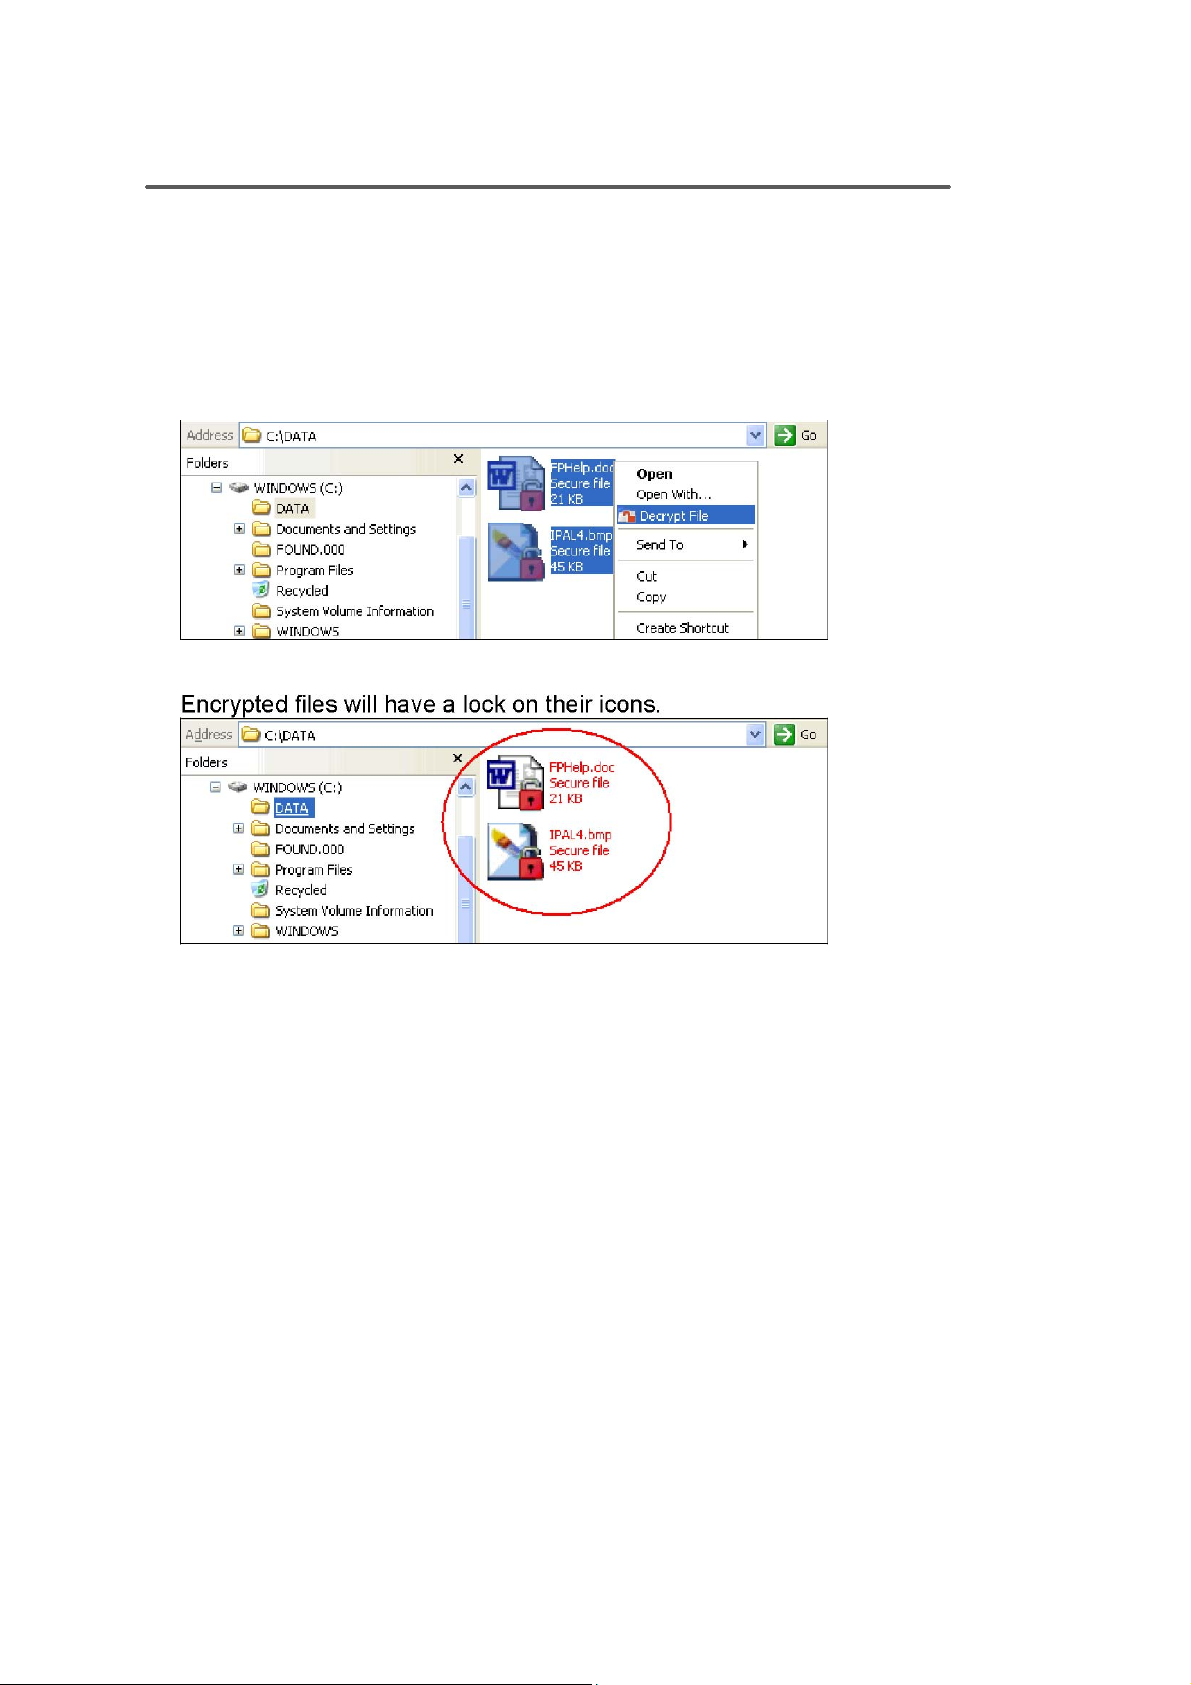
Encrypted folders enable fingerprint security to all files within a folder.
1. Point cursor to the folder you wish to encrypt and right-click. Choose
2. When authentication is successful, the folder (and files inside) will be
encrypted. Files inside this folder will also have a lock on their icons.
PS: The folder icon for the Encrypted Folder is as same as one for normal
folder with Windows 98/98SE. However, the feature of the Encrypted
Folder is effective.
3. Moving files into an encrypted folder will cause those files to be
automatically encrypted. When removing files from an encrypted folder to
a non-encrypted area, "Fingerprint Authentication" dialog will ask you for
your fingerprint, and the file will be decrypted.
- 40 -
Page 41
Fingerprint Software User Manual
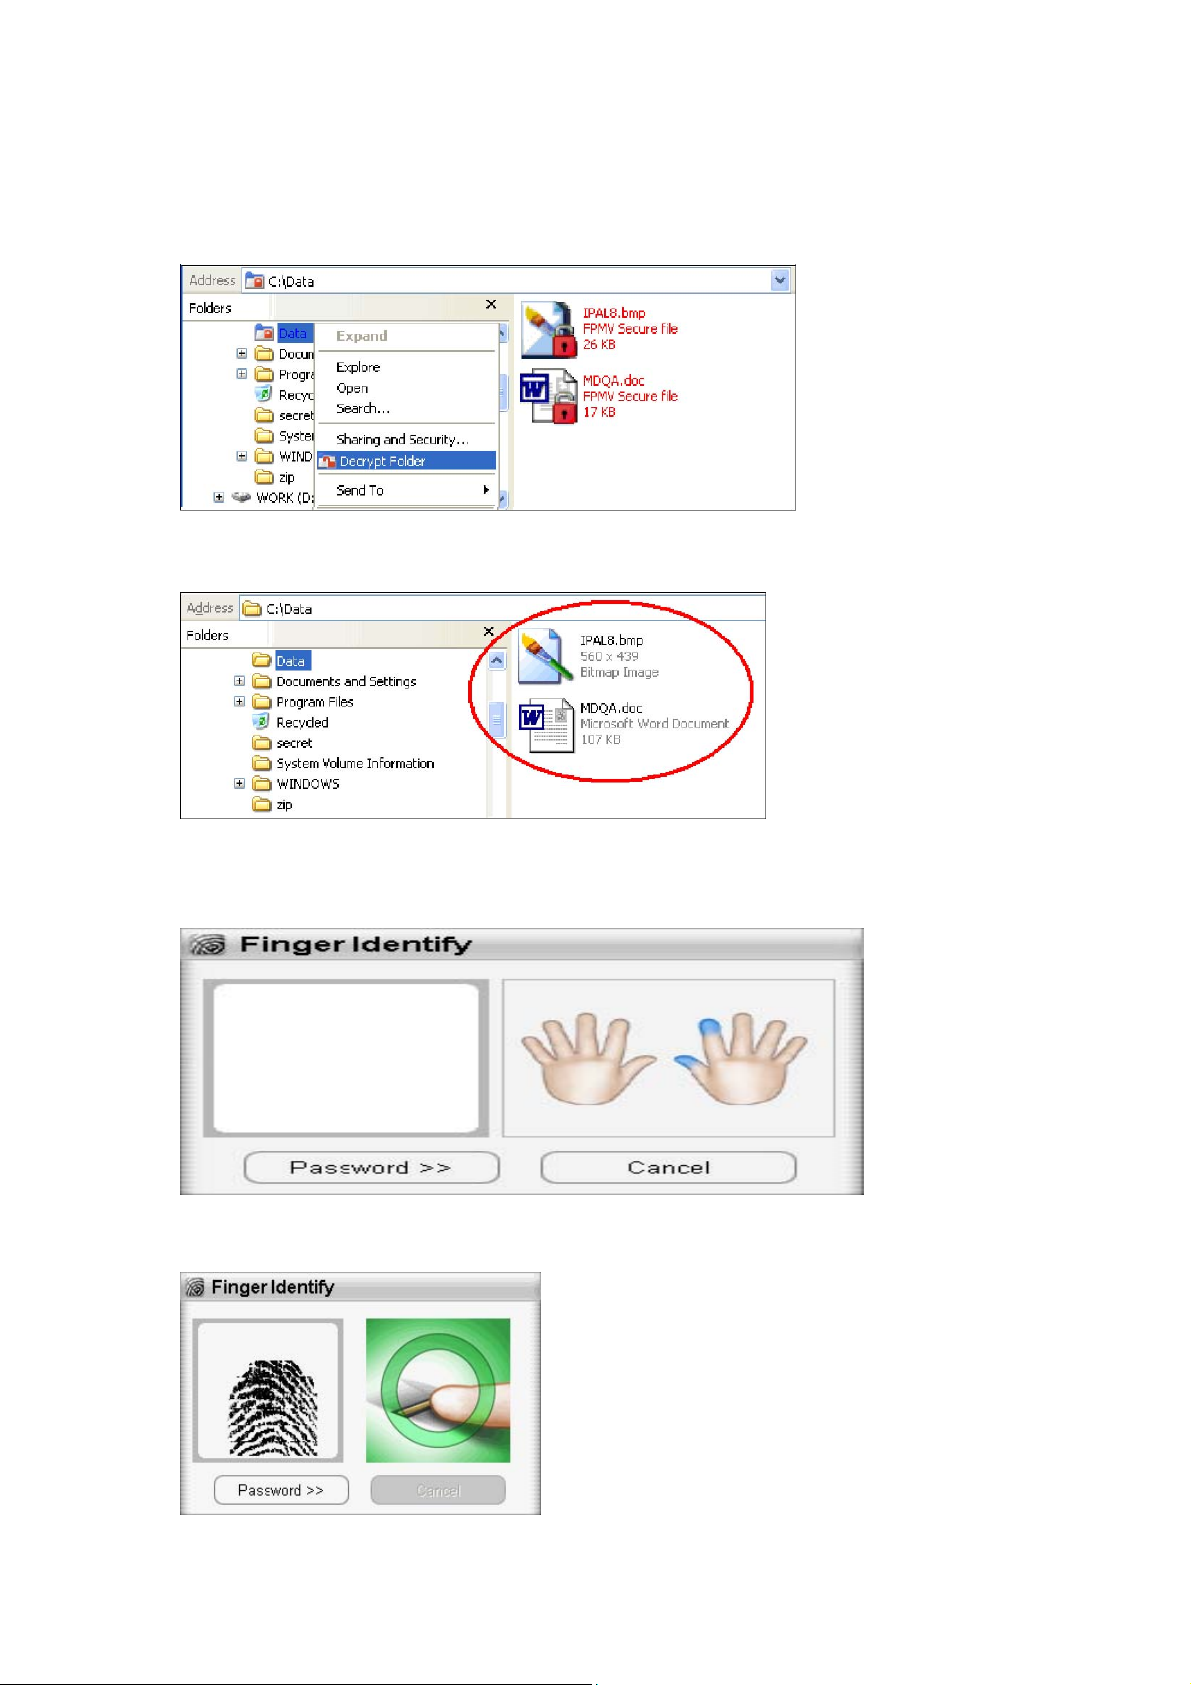
Folder Decryption:
To decrypt encrypted files.
1.Right-click on the encrypted folder, and choose "Decrypt Folder" from the
menu.
2.If the "Fingerprint Life time setting" is set "Never use Fingerprint enroll",
the folder will be decrypted.
3.If the current fingerprint expires, you must re-verify the fingerprint in order to
decrypt the files. "Fingerprint Authentication" dialog will ask you for your
fingerprint verification.
When authentication is successful, the folder will be decrypted.
- 41 -
Page 42

Fingerprint Software User Manual
4. The icon of the decrypted folder will return to its normal appearance. Files
inside this folder will also be decrypted and the icons will have no locks.
- 42 -
Page 43
Fingerprint Software User Manual
File Security
File Encryption
Your encrypted files can only be accessed by fingerprint (or password).
1.Point cursor to the file you want to encrypt and right-click. Choose Encrypt
File from the menu.
2.When authentication is successful, the file will be encrypted.
- 43 -
Page 44

Fingerprint Software User Manual
File Decryption
To decrypt encrypted files.
1.Point cursor to the file you want to decrypt and right-click. Choose Decrypt
File from the menu.
2.If the "Fingerprint Life time setting" is set "Never use Fingerprint enroll",
the file will be decrypted.
3.If the current fingerprint expires, you must re-verify the fingerprint in order to
decrypt the files. "Fingerprint Authentication" dialog will ask you for your
fingerprint verification.
When authentication is successful, the file will be decrypted.
- 44 -
Page 45

Fingerprint Software User Manual
4. The icon of the decrypted file will have no lock and will go back to its
normal appearance.
- 45 -
 Loading...