

Adam Equipment HCB602, HCB123, HCB602H, HCB1002, HCB1502 User Manual
...
© Adam Equipment Company 2011
Adam Equipment
HIGHLAND SERIES
(P.N. 9520, Revision E, October 2011)

© Adam Equipment Company 2011
Easy Reference:
Model name of the scale:
Serial number of the unit:
Software revision number
(Displayed when power is first turned on):
Date of Purchase:
Name of the supplier and place:

1 | P a g e © Adam Equipment Company 2011
1.0 CONTENTS
1.0 CONTENTS...........................................................................................1
2.0 INTRODUCTION...................................................................................3
3.0 SET UP .................................................................................................3
3.1 UNPACKING AND SETTING UP YOUR BALANCE...........................3
3.2 DISPLAY / KEYBOARD FUNCTION..................................................4
3.3 INTERNAL RECHARGEABLE BATTERY..........................................5
3.4 LOCATING AND PROTECTING YOUR BALANCE............................6
3.5 STORING WHEN NOT IN USE..........................................................7
4.0 BASIC OPERATION..............................................................................8
4.1 TURNING ON THE BALANCE...........................................................8
4.2 ZEROING / TARE...............................................................................8
4.4 WEIGHING.........................................................................................9
4.5 WEIGHING UNITS.............................................................................9
5.0 FUNCTIONS .......................................................................................10
5.1 PERCENTAGE WEIGHING .............................................................10
5.2 PARTS COUNTING .........................................................................10
5.3 ACCUMULATION.............................................................................11
6.0 PARAMETERS....................................................................................13
6.1 ENABLING WEIGHING UNITS........................................................13
6.2 SETTING THE BACKLIGHT.............................................................14
6.3 SETTING THE PRINTING PARAMETERS / ACCUMULATION.......15
6.4 AUTO POWER OFF.........................................................................17
6.5 SELECTING THE INTERNAL OR EXTERNAL CALIBRATION........17
6.6 ADJUST THE VALUE OF THE INTERNAL MASS...........................18
6.7 SETTING USER PARAMETERS......................................................19
7.0 CALIBRATION.....................................................................................20
8.0 TROUBLE SHOOTING........................................................................22
8.1 ERROR MESSAGES .......................................................................22
8.2 REPLACEMENT PARTS AND ACCESSORIES...............................23
9.0 SPECIFICATIONS...............................................................................24
9.1 TECHNICAL SPECIFICATIONS.......................................................24
9.2 COMMON SPECIFICATIONS..........................................................24
9.3 RS-232 / USB SPECIFICATIONS ....................................................24
10.0 CALIBRATION CERTIFICATE ............................................................28
11.0 WARRANTY STATEMENT..................................................................28

2 | P a g e © Adam Equipment Company 2011

3 | P a g e © Adam Equipment Company 2011
2.0 INTRODUCTION
Thank you for purchasing your new HighlandTM portable balance, Every HighlandTM
balance has all the features you really need: AC adapter and internal rechargeable
battery, HandiCalTM calibration, backlit display, and ShockProtectTM with overload
indicator. With RS-232 and USB interface for communication with printers and
computers, splash-proof keypad, and sturdy plastic construction, the HighlandTM
series will be a balance you can rely upon. We hope that you enjoy using your new
balance.
3.0 SET UP
3.1 UNPACKING AND SETTING UP YOUR BALANCE
1) Remove the balance, draft shield, top pan, AC adapter and pan support from
the packaging
2) Remove the shipping protection screw and transit disc from the top of the
balance and place the plastic top pan support on the balance. Do not use
excessive force when removing and installing the screw.
3) Gently place the plastic pan support into the receptacle and secure with the
supplied screw. To not over-tighten the screw. It should be finger tight only.
Put the Stainless steel pan on top of the pan support
4) Place the draft shield on top of the balance, the location notches in the breeze
shield should align with the cut outs on the balance. For optimum
performance the balance should be used with the draft shield (if provided).

4 | P a g e © Adam Equipment Company 2011
3.2 DISPLAY / KEYBOARD FUNCTION
The display and keypad have a number of features the key information is shown
below:
KEYS PRIMARY FUNCTION SECONDARY FUNCTION
[On/Off] To turn the balance On or Off. ----
[Tare] Tares the balance and shows the net
weight value. Pressing the [Tare] again
will reset another tare value
A secondary function of "Enter" key is
for setting parameters or other
functions.
[%] Enters the percentage weighing
function.
When in percentage mode, press [%]
key to return to normal weighing
mode. When setting some parameters
this key will move the flashing digit to
the right.
[Smpl] Use this key to enter parts counting
mode from the normal weighing
mode.
When in parts counting pressing the
[Smpl] will return to weighing mode.
Clears the accumulated value from the
memory when pressed during the total.
When setting some parameters this key
will move the flashing digit to the left.
[Mode] Pressing this key will cycle through the
weighing units which are enabled.
Displays the unit weight, total weight
and the count when in the parts
counting mode.
Setting parameters it will show the
next option or increase the value of a
flashing digit.
[Print] To print the results to a PC or printer
using RS-232 or USB interface. It also
adds the value to the accumulated
memory if the accumulation function
is not automatic.
Secondary function is to return to
normal operation when the balance is
in a parameter setting mode.
Setting parameters it will show the
previous option or decrease the value
of a flashing digit.
5 | P a g e © Adam Equipment Company 2011
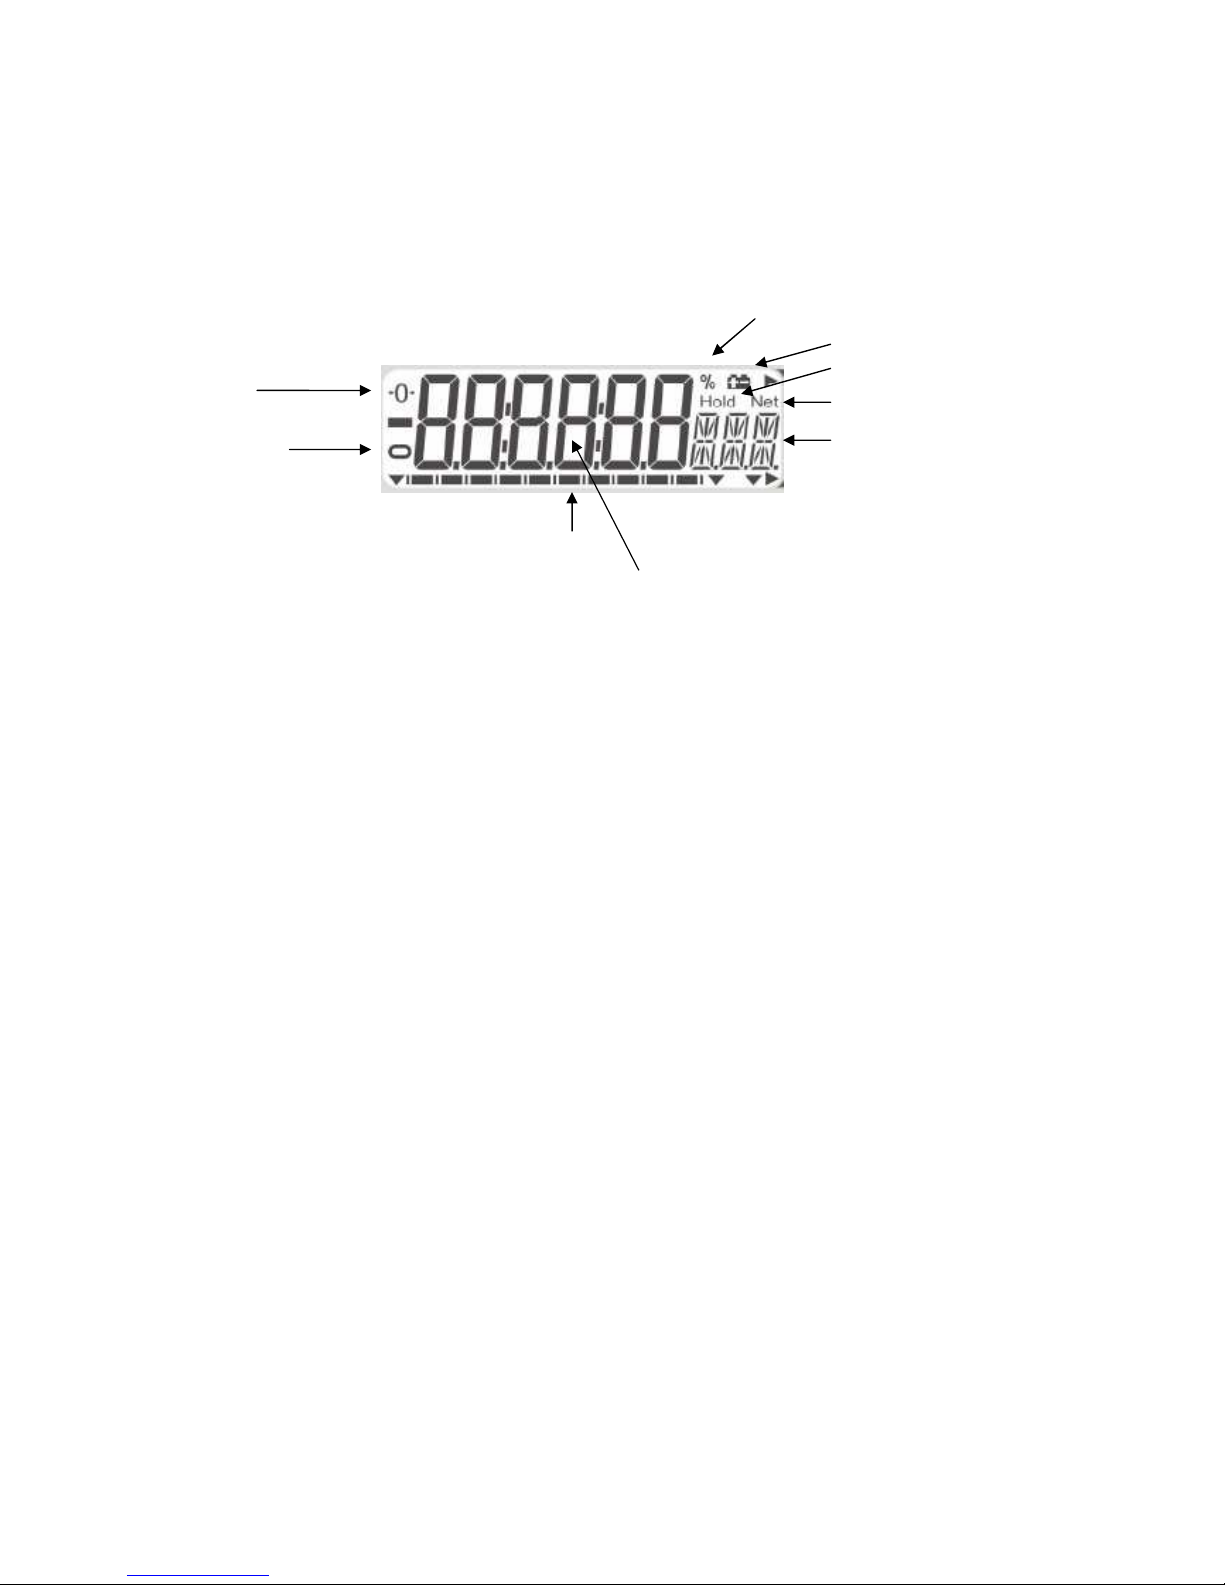
3.3 INTERNAL RECHARGEABLE BATTERY
The balance can be operated from the internal rechargeable battery or using an AC
adapter. The battery discharge time, is approximately 24 hours depending on the
usage of the backlight.
The display will show an indication when the battery needs to be charged. To charge
the battery, plug in the AC adapter at the back of the balance and attach it to the
main power supply. The charging indicator at the left top corner of the LCD will be
on.
Zero
Stable
Capacity tracker
Weighing digits
Percentage symbol
Low battery indicator
Hold symbol
Net symbol
Alpha numeric display

6 | P a g e © Adam Equipment Company 2011
3.4 LOCATING AND PROTECTING YOUR BALANCE
In order to keep your balance functioning at its best we suggest that you do the
following:
Avoid extremes of temperature. Do not place in
direct sunlight or near air conditioning vents.
Make sure the balance is located on a strong table
and free from vibration.
Avoid unstable power sources. Do not use near large
users of electricity such as welding equipment or
large motors. Do not let the balance battery go flat –
if you are not using it for a long time you should
charge the battery up periodically to make sure the
battery does not lose its charge.
Keep free from vibration. Do not place near heavy or
vibrating machinery.
Avoid high humidity that might cause condensation.
Keep away from direct contact with water. Do not
spray or immerse the balance in water.
Do not place near open windows, air-conditioning
vents or fans that may cause a draft and unstable
readings.
Keep the balance clean. Do not stack material on the
balance / balance pan when it is not in use. The
Highland has a stacking feature for stacking more
than one unit on top of each other which does not
apply weight to the pan. For more details on this see
the section on storing.

7 | P a g e © Adam Equipment Company 2011
3.5 STORING WHEN NOT IN USE
If you have any of the HighlandTM series or Core BalanceTM lines you can store them
easily on top of each other. To save space and protect them from damage.
Without Shield With Shield
Note: Only models equipped with a ø 4.7” / 120mm pan, can be stacked for storage.
Core models with the larger ø 5.7” / 145mm may be stacked at the top of the pile
but other balances should NOT be stacked on top of them due to the larger pan size.

8 | P a g e © Adam Equipment Company 2011
4.0 BASIC OPERATION
4.1 TURNING ON THE BALANCE
Plug in the unit using the AC adapter or use the internal rechargeable battery. It is
recommended that you charge the battery for at least 8 hours before first use.
1) To turn on press the [on/off] key once and release. The balance will show the
software revision and the capacity then self-test before showing zero on the
display and the stable sign.
2) The balance is ready to be used.
3) To turn the balance off after use press the [on/off] key again. There is an auto
power-off function that will automatically turn the unit off if not used for a
period of time, this can be set in the parameters section.
If an error is shown while turning on the balance check the internal calibration
weight has not been left in the calibrate position. Move the lever all the way to the
left. Turn off the balance and turn it back on again.
4.2 ZEROING / TARE
You can press the [Tare] key to set a new zero point and show the zero reading if
the weight reading is less than 4% of the total of the maximum capacity of the
balance. This may be necessary if the weight reading is not reading zero with
nothing on the pan. The zero indicator will show up in the upper left corner of the
LCD.
If you are using a container to weigh then you can place this on the platform and
press the [Tare] key. Providing the container weight is more than 4% of the
maximum capacity of the balance, the digits will show zero and NET will light up on
the display. You can then weigh your sample in the container. Taring weight
subtracts from the total balance capacity.
Note: When the container is removed a negative value will be shown
equivalent to the total value of the amount tared. The balance will
not tare a value for a container unless the stability light indicates that
the weight is stable thus ensuring a correct taring function.
 Loading...