

Page 1

.
Adam Equipment
AZplus SERIES
Service Manual
Software rev.: 1.71 & above
© Adam Equipment Company 2007
ADAM EQUIPMENT CO. LTD.
P.N. 4314, Rev. D2, October 2007
Page 2

CONTENTS
1.0 INTRODUCTION.......................................................................................................3
1.1 FEATURES: ..........................................................................................................3
1.2 SPECIFICATIONS.................................................................................................3
2.0 TROUBLESHOOTING..............................................................................................4
3.0 INSTALLATION.........................................................................................................5
3.1 GENERAL INSTALLATION...................................................................................5
3.2 PREPARATION FOR USE ....................................................................................5
3.3 DISPLAY WINDOWS ............................................................................................6
3.4 BATTERY CHARGING..........................................................................................7
3.5 KEY DESCRIPTIONS............................................................................................8
4.0 OPERATION.............................................................................................................9
4.1 ZEROING THE DISPLAY ......................................................................................9
4.2 TARING.................................................................................................................9
4.3 DETERMINING VALUE OF PRODUCT BY WEIGHT..........................................10
4.4 USING A STORED PLU VALUE FOR UNIT PRICE.............................................11
4.5 ENTERING VALUES FOR THE PLU S ................................................................12
4.6 AUTO CLEAR KEY..............................................................................................12
4.7 KG/100G KEY, PRICE PER KILOGRAM, PRICE PER 100G ................................13
4.8 AUTO SLEEP FUNCTION...................................................................................13
4.9 BACKLIGHT OPERATION ..................................................................................14
5.0 CALIBRATION........................................................................................................15
5.1 CALIBRATION PROCEDURE.............................................................................15
5.2 SECURITY SEALS..............................................................................................15
5.3 CALIBRATION PROCEDURE.............................................................................16
6.0 SERVICE PARAMETERS.......................................................................................16
6.1 USING “0000” TO ENTER THE CALIBRATION PARAMETER............................ 16
6.2 USING “2003” TO ENTER THE SERVICE PARAMETERS..................................17
6.2.1 F1 -CALIBRATION............................................................................................18
6.2.2 F2 -RESOLUTION ............................................................................................18
6.2.3 F3 -CAPACITY..................................................................................................18
6.2.4 F4 WEIGHT DECIMAL POINT POSITION........................................................19
6.2.5 F5 -UNIT PRICE/TOTAL PRICE DECIMAL POINT LOCATION........................19
© Adam Equipment Company 2007
Page 3

6.2.6 F6 -INITIAL ZERO RANGE...............................................................................20
6.2.7 F7 -RE-ZERO RANGE ......................................................................................20
6.2.8 F8 -SUCCESSIVE TARE..................................................................................20
6.2.9 F9 -A/D COUNT................................................................................................ 21
6.2.10 F10 –ROUNDING OFF THE TOTAL PRICE......................................................21
7.0 WIRING DIAGRAM.................................................................................................22
8.0 MECHANICAL ASSEMBLY ....................................................................................23
10.0 FRONT DISPLAY SCHEMATIC..............................................................................25
12.0 MAIN SCHEMATIC LAYOUT ..................................................................................27
13.0 PILLAR DISPLAY SCHEMATIC ................................................................................28
14.0 REAR DISPLAY SCHEMATIC................................................................................29
*****
© Adam Equipment Company 2007
2
Page 4
1.0 INTRODUCTION
The AZplus series of digital price-computing scales provide an accurate, fast and
versatile method of computing price by weight.
These series of scales are EC approved for the use in UK and Europe.
For all revisions from 1.27 and above, the Price per kilogram and per 100 gram [Kg
100g] key can be disabled at the factory for the scales to be used in South Africa
and Far East. This is done by linking the jumper at K5 position on the PCB.
1.1 FEATURES:
Stainless steel weighing platform
Level indicator with adjustable levelling feet
Colour coded, sealed, keypad
Large liquid crystal displays (LCD)
Three Displays for Weight, Unit Price and Total Price
Computes Price per 100g and per kilogram (Not applicable for
AZplus for South Africa and Far East)
Displays on both front and back panels (Optional user display on pillar)
Battery operated for portability
70+ hours battery life when fully charged
43 Prices (PLU) stored for easy access
1.2 SPECIFICATIONS
Capacity, Max= 6 kg 15 kg 30 kg
Resolution
d=e=
Tare, T= -6kg -15kg -30kg
Working
Temperature
Platform
AZplus 6 AZplus 15 AZplus 30
2 g 5 g 10 g
-10ºC to 40ºC
225 x 275mm / 8.9” x 10.8”
Overall
315 x 355 x 110mm / 12.4” x 14” x 4.3”
Battery Life 70+ hours typical*
Power
Net Weight
M power supply to an internal transformer
4.3 kg / 9.5 lb
*Battery Life is less when the backlight is used.
© Adam Equipment Company 2007
3
Page 5

2.0 TROUBLESHOOTING
1. Unit does not
turn on
2. The scale
weighs but is
unstable
3. Scale shows
Check whether the scale is plugged into the power supply properly.
Check the operation of the charging circuit.
Check whether the battery is charged- LED should turn to green from red.
Check the adapter output.
.
Air drafts or vibration or unstable table.
Pan rubbing against case or not installed correctly.
Scale not installed properly.
Improper connections on ADC circuit.
Scale not installed correctly.
wrong weight
4. An error “E4”
displays on
the screen
Check the Calibration.
To check whether a part of product weighed is trapped between the pan
and the scale.
Incorrect adjustment of the mechanical stops.
Load cell damage.
Scale not installed properly.
Incorrect adjustment of the mechanical stops.
Factory calibration has been tampered with- check the ADC counts and
re-calibrate.
5. An error “E9”
The scale is not stable to set the initial zero.
displays on
the screen
© Adam Equipment Company 2007
4
Page 6

3.0 INSTALLATION
3.1 GENERAL INSTALLATION
The scales should not be placed in a location that will reduce the accuracy.
Avoid extremes of temperature. Do not place in direct sunlight or near air conditioning
vents.
Avoid unsuitable tables. The table or floor must be rigid and not vibrate.
Avoid unstable power sources. Do not use near large users of electricity such as welding
equipment or large motors.
Do not place near vibrating machinery.
Avoid high humidity that might cause condensation. Avoid direct contact with water. Do not
spray or immerse the scales in water.
Avoid air movement such as from fans or opening doors. Do not place near open windows
or air-conditioning vents.
Keep the scales clean. Do not stack material on the scales when they are not in use.
3.2 PREPARATION FOR USE
The scales come with a stainless steel platform, packed separately.
Place the platform in the receptacles on the top cover.
Do not press with excessive force as that could damage the load cell inside.
If an optional scoop has been supplied, place it on top of the platform.
If an optional display on Pillar is supplied, install the pillar in the upright position into the
socket at the rear of the scale by carefully pushing the cable inside the pillar rod. Secure
the pillar rod to the socket by using two M4 screws. A black plastic cap is provided to seal
© Adam Equipment Company 2007
5
Page 7
the socket from the bottom to avoid damaging of the cable.
Level the scale by adjusting the four feet. The scale should be adjusted such that the
bubble in the spirit level is in the centre of the level and the scale is supported by all four
feet.
Turn the power ON using the switch located on the right side of the base.
The unit will display the software revision number in the Weight window and count down
to zero while performing a self-test.
When ready all three displays will show zero.
Level the scale by adjusting the four feet. The scale should be adjusted such that the
bubble in the spirit level is in the centre of the level and the scale is supported by all four
feet.
Turn the power ON using the switch located on the right side of the base.
The unit will count down while performing a self-test.
When ready the displays will show zero.
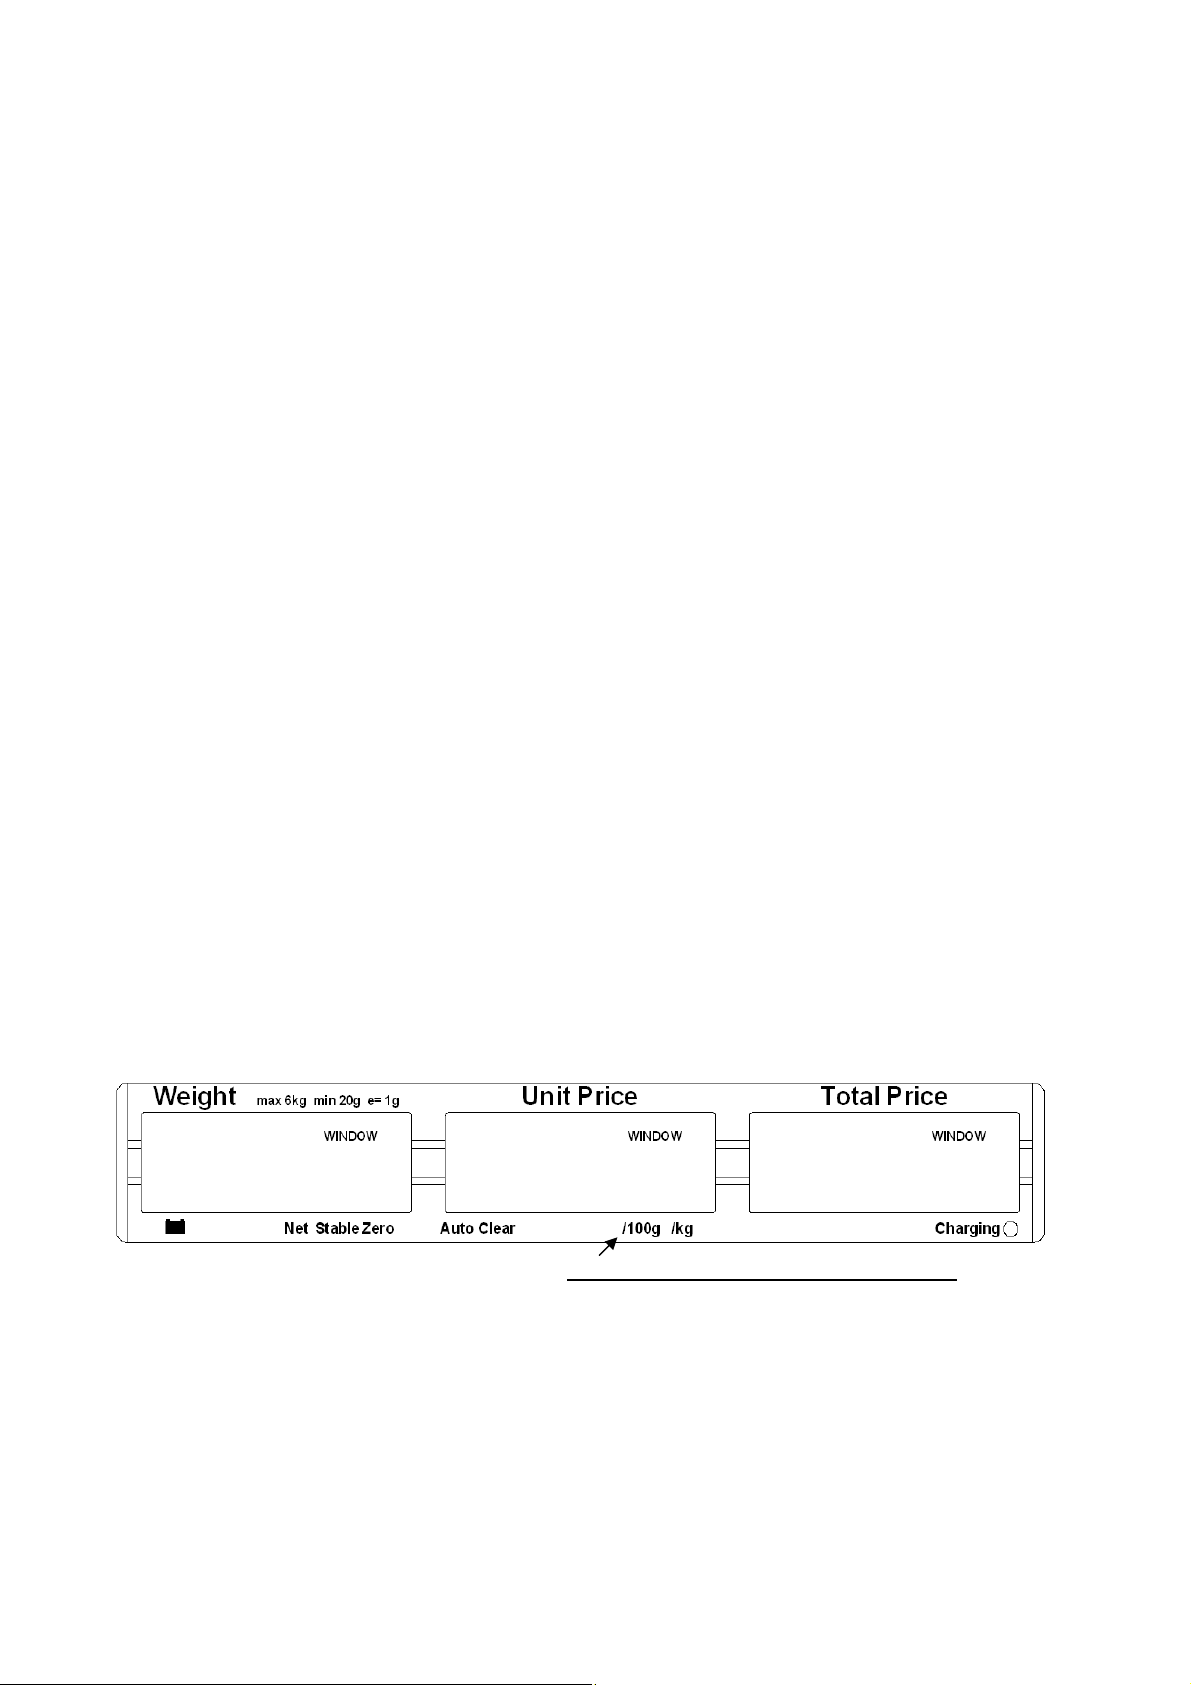
3.3 DISPLAY WINDOWS
Not applicable for South Africa and Far East
The window for the Weight has arrows to indicate when the scale is at zero or if the scale
is displaying a net weight (if a tare value has been entered). It also indicates when the
scale is stable.
© Adam Equipment Company 2007
6
Page 8

The window for the Unit Price has arrows to show when the Auto Clear function is active
and whether it displays the price per 100g or per kilogram.
NOTE: For AZplus for South Africa and Far East, unit weight per 100g or per kg is not
available.
The window for the Total Price displays the price of the items on the scale. Below this
window is a LED to show the state of the battery charger.
The above display panel is also available with French, German, Spanish, Dutch
and Italian text or with symbols for Weight, Unit Price and Total Price.
3.4 BATTERY CHARGING
The scale has an internal rechargeable lead acid battery. This battery will make the scale
operate for more than 70 hours when fully charged or less if the backlight is on.
When the battery needs charging the arrow above the low battery symbol under the
Weight display will be on. The battery should be charged immediately. The scale will still
operate for about 10 hours after which it will automatically switch off to protect the battery
from getting damaged.
To charge the battery, simply switch the main power ON. The scale does not need to be
turned on.
The battery should be charged for 12 hours for full capacity.
Just under the Total Price display is an LED to indicate the status of battery charging.
When the scale is plugged into the main power, the internal battery will be charged. If the
LED is green the battery is fully charged. If it is red the battery is nearly discharged and
yellow indicates the battery should be charged longer, preferably overnight.
© Adam Equipment Company 2007
7
Page 9

3.5 KEY DESCRIPTIONS
Not applicable for South Africa and Far East
Note: The AZplus scales sold in Europe have a slightly different keypad. For Tare
and Zero, the text keys are replaced by the symbol keys.
[., 0-9] keys
Numeric entry keys to set the unit price. Pressing [.] will display the price with “00” added
after the digit.
[CE] key
Used to clear an erroneous entry or return to normal operation.
[PLU1] to [PLU4]
Used to store or recall one of the PLU values. [PLU1] to [PLU3] are immediately used,
[PLU4] will also select one of the 39 additional values.
[Tare] key
It tares the scale to display zero weight when an empty container is placed on the platform
or removed again.
[Zero] key
It sets the zero of the scale when the platform is empty and no tare value is entered.
[Auto Clear]
It enables the user to automatically reset the unit price to zero, when the weight is
removed.
[Kg 100g]
It selects the unit price per 100g or per kilogram.
NOTE: For AZplus for South Africa and Far East, this selection of unit price per 100g
or per kilogram is not applicable.
© Adam Equipment Company 2007
8
Page 10

4.0 OPERATION
4.1 ZEROING THE DISPLAY
You can press the [Zero] key when no tare is entered to set the zero point from which all
other weighing is measured. This will usually be necessary when the platform is empty.
When the zero point is obtained the Weight display will show an arrow next to the Zero
legend marked under the Weight display.
The scale has an automatic re-zeroing function to account for minor drifting or
accumulation of material on the platform. However you may need to press the [Zero] key
to re-zero the scale if small amounts of weight are shown when the platform is empty.
4.2 TARING
Taring is used to eliminate the weight of a container so that only the net weight is
displayed.
Zero the scale by pressing [Zero] if necessary. The zero indicator will be on.
Place an empty container on the platform. It’s weight will be displayed.
Press [Tare] to zero the scale. The weight that was displayed is stored as the tare value
and that value is subtracted from the display, leaving zero on the display. The Net
indicator will be on. As product is added only the weight of the product will be shown.
When the product and container are removed the weight display will show a negative
value. If a different container is to be used, remove this negative tare value by pressing the
[Tare] once more.
© Adam Equipment Company 2007
9
Page 11

4.3 DETERMINING VALUE OF PRODUCT BY WEIGHT
To determine the value of a product sold by weight it is necessary to enter the cost per
kilogram using the numeric keys or one of the preset PLU values.
The Weight display will show the net weight, the Unit Price display will show the price per
kilogram or per 100g as selected by the [kg 100g] key. The Total Price display will show
the computed value for the total price.
Example:
Place a container on the
scale and Press [Tare]
Place the items on the
platform
Key in the unit price
Weight in kg. Unit Price Total Price
0.000 0.00 0.00
1.300
1.300
Display will show
0.00 0.00
5.00 6.50
Press the [kg 100g] key to change the calculation to a price based on the cost per 100g or
the cost per kilogram.
If a different unit price is required either press [CE] to reset the unit price to 0.00 or simply
enter a new unit price.
(Note: Not applicable for AZplus for South Africa and far East).
Note: For all revisions from 1.27 and above, the Price per kilogram and per 100
gram [Kg 100g] key can be disabled at the factory for the scales to be used in
South Africa and Far East. This is done by linking the jumper at K5 position on
the PCB.
© Adam Equipment Company 2007
10
Page 12

4.4 USING A STORED PLU VALUE FOR UNIT PRICE
The user can store and recall up to 43 PLU values (Product Look Up).
The values stored are used to calculate the price for goods.
The value is stored as either cost per kilogram or cost per 100g.
The keys labelled [PLU1] to [PLU3] are used to immediately recall the most used PLU
values and the [PLU4] key is used to access up to 40 other values. To recall one of these
values the following procedure applies.
1. To recall PLU number 1, simply press [PLU1].
2. The same applies to PLU number 2 and 3.
3. To recall one of the other PLU values press [PLU4]. The display will
show “LOAd” “POS 00” ” ”. If a number (01 to 39) is entered
immediately, then the value saved against that PLU number will be
recalled. If nothing is entered after a few seconds, the value saved for
PLU 4 will be recalled.
For example:
Press [PLU4].
Press [1] and then [4] immediately.
Display will show “LOAd” “POS 14” ” ” and the Unit Weight value for
PLU 14 will be displayed.
OR
Press [PLU4].
Wait for few seconds.
Display will show “LOAd” “POS 00” ” ” and the Unit Weight value for
PLU 4 will be displayed.
© Adam Equipment Company 2007
11
Page 13

4.5 ENTERING VALUES FOR THE PLU s
To store values into the memory for the PLU s follow the procedure.
Entering values for PLU1 to PLU3 keys
Enter the unit price value using the keypad, selecting either price/kg or price/100g if
needed.
Press and hold down the key [PLU1], [PLU2] or [PLU3] for more than 3 seconds. The
scale displays “PLU” “ 1” ”SAVEd”
Entering values for the [PLU4] key
Enter the unit price value using the keypad, selecting either price/kg or price/100g if
needed.
Press and hold down the key [PLU4] for more than 3 seconds.
The scale will show “SAVE” “POS 00” ” ”
If no number is entered for 00 within a few seconds, the unit price entered will be saved for
position 4 which can be recalled in future by using the [PLU4] key. The display will show
“PLU” “ 4” ”SAVEd” and the scale will return to weighing.
OR
Enter any number (up to 39) for saving the unit price in the desired position. For example,
press [1] and [4] for the position 14. It will show “SAVE” “POS 14” ” ” and then “PLU”
“SAVEd” ” ” before returning to weighing.
To change the earlier saved value against a particular PLU, simply repeat the process.
4.6 AUTO CLEAR KEY
The [Auto Clear] key will enable the Auto Clear function.
When this function is active the scale will automatically clear (set to zero) the unit price
when the last item to be weighed has been removed from the scale.
When the Auto Clear is active the Auto Clear indicator (arrow) on the LCD will be ON.
Pressing the [Auto Clear] key will turn off the function and the indicator will disappear.
Pressing it will turn the function on again.
© Adam Equipment Company 2007
12
Page 14

4.7 Kg/100g KEY, PRICE PER KILOGRAM, PRICE PER 100g
j
The [kg 100g] key will change the scale from using a price per kilogram to price per 100g.
It will also change the arrows under the Unit Price display to show the selection.
This information is also saved for the PLU values that are stored in the memory.
NOTE:
This is not applicable for AZplus for South Africa and Far East.
The current software revision number is 1.61. For all revisions from 1.27 and
above, the Price per kilogram and per 100 gram key can be disabled at the factory
for the scales to be used in South Africa and Far East. This is done by linking the
umper at K5 position on the PCB.
4.8 AUTO SLEEP FUNCTION
This function may be enabled or disabled by the user. If enabled, when the scale is not
used for some time (as pre-set by the user under this function) it automatically switches
off. To set this parameter,
• During self-checking, press [kg 100g] and release at once. The display
shows “SLEEP nodE”.
• Press [PLU4] key to scroll through the auto sleep values.
“0” Auto sleep mode disabled
“1” Auto sleep after 1 minute
“5” Auto sleep after 5 minutes
“30” Auto sleep after 30 minutes
• Press [Tare] to set the value. The scale returns to zero.
NOTE: For AZplus for South Africa and Far East, press the [Zero] key to enter Auto Sleep
function.
© Adam Equipment Company 2007
13
Page 15

4.9 BACKLIGHT OPERATION
The backlight may be enabled or disabled by the user. If the backlight is disabled battery
life will be maximised.
With the backlight in operation the battery life will be less, depending upon the extent at
which the scale has been used.
To enable the backlight
Press and hold the [Auto Clear] key for 4 seconds.
Press the [PLU4] key to change the operation:
“
EL” “ AU” Automatic control of the backlight
“EL” “ on” Backlight on full time
“EL” “ oFF” Backlight turned off.
Press [Tare] to store the setting.
To disable the backlight
Press the [Zero] key.
Then quickly press [5] while the weight display shows dashes.
Backlight operation
When the backlight is set to automatic control, it will only turn on when the scale is
being used.
It will be on when a weight is on the platform or when a key is pressed.
It will turn off automatically after a few seconds when the weight is zero or after a
while the last key was pressed.
© Adam Equipment Company 2007
14
Page 16

5.0 CALIBRATION
5.1 CALIBRATION PROCEDURE
The scales are sealed to prevent unauthorised calibration.
Contact Adam Equipment or your supplier for more details.
The calibration of the AZplus scale is
accomplished by removing the label at
the base of the scale which covers a hole
through which the PCB can be accessed.
If your scale is not provided with this
hole, you need to break the security
seals and remove the top cover to gain
access to the circuit boards inside. See
the figure on the security seal below.
WARNING: CALIBRATION OF THE SCALES MAY MAKE IT ILLEGAL TO
USE THE SCALES FOR SALES OF GOODS. CONTACT YOUR TRADING
STANDARDS OFFICE FOR FURTHER ASSISTANCE.
5.2 SECURITY SEALS
To seal the scale a lead-wire seal can be
used as shown below. The base has a
metal pin that protrudes through the
cover. The security seal may be threaded
through this metal pin, making it
impossible to remove the cover without
damaging either the security seal or the
enclosure.
Metrology labels and additional security
© Adam Equipment Company 2007
measures may be added to the scale as
required by the national legislation.
15
Page 17

5.3 CALIBRATION PROCEDURE
The scales are sealed to prevent unauthorised calibration.
To calibrate the scales, access to the PCB inside is needed to place a jumper in K6
position. This is done by removing the tamper-proof label placed on a hole at the bottom of
the scale. Through the hole, pick up the jumper (the jumper will be there placed on one of
the pins on the PCB) and place it in the desired K6 position. If the hole is not provided in
your scale, the security seal has to be broken to remove the top cover and gain access to
the main PCB. Replace the cover and install the screws before starting the calibration.
6.0 SERVICE PARAMETERS
6.1 USING “0000” TO ENTER THE CALIBRATION PARAMETER
After the jumper has been placed in position K6, apply power to the scale.
During the self-test press the [Tare] key.
The display will ask for a code number, “
To carry out the Calibration, enter the number “0000” then press [Tare]. The display will
show “F1” will be enabled.
The display will show “UnloAd” asking you to remove any weight from the scale,
The display will tell you to add weight to the scale by showing “
Add the weight shown, wait for stability then press the [Tare] key.
Pn - - - -“ on the Weight Display.
LoAd” “ 15” “kilo”
The display will show “SPAn” “PASS” if the calibration is OK. Or it will show “SPAN” “FAIL” if
calibration could not be completed correctly.
The scale will return to the parameter menu.
© Adam Equipment Company 2007
16
Page 18

6.2 USING “2003” TO ENTER THE SERVICE PARAMETERS
After the jumper has been placed in position K6, apply power to the scale.
During the self-test press the [Tare] key.
The display will ask for a code number, “
Enter the number 2003 when “
The displays will show the first parameters, called “F1”. To select another parameter press
the [PLU4] key to advance through the parameters.
Press the [Tare] key to enter a parameter.
To exit a parameter press the [Zero] key.
The Weight Display window will show the word “
the parameter number.
When a parameter is entered by pressing the [Tare] key, the displays will guide you
through the parameter selected and the options available.
Pn - - - -“ is displayed and then press [Tare].
Pn - - - -“ on the Weight Display.
CAL” and the Unit Price window will show
The parameters available are:
F1 CAL To enter the Calibration
F2 RES Resolution selection
F3 CAPA Select capacity
F4 0.00 Point Weight decimal point location
F5 Point 0.00 0.00 Unit Price/Price decimal point
F6 Init ZEro Initial Zero Range
F7 rE ZEro Re-Zero range
F8 SCSivE tArE Successive Tare Enable
F9 A/D counts Display the A/D counts
F10 roUnd Rounding off the Total Price
© Adam Equipment Company 2007
17
Page 19

6.2.1 F1 -CALIBRATION
To enter the calibration parameter, press the [Tare] key when “F1” is displayed.
The display will instruct you to remove any weight from the scale, “UnloAd”
The display will tell you to add weight to the scale: “LoAd” “ 15” “kilo”
Add the weight shown, wait for stability then press the [Tare] key.
The display will show “
SPAn” “PASS” if the calibration is OK. Or it will show “SPAn” “FAIL” if
calibration could not be completed correctly.
The scale will return to the parameter menu.
6.2.2 F2 -RESOLUTION
To enter this parameter, press the [Tare] key when “F2” is shown.
The display will show the current resolution, either 3000 or 6000 or Dual Range.
Press the [PLU4] key to change the value.
Press [Tare] to accept the displayed value.
NOTE: Only 3000 is allowed for the AZplus scales.
6.2.3 F3 -CAPACITY
To enter this parameter, press the [Tare] key when “F3” is shown.
The display will show the current capacity in 6, 15 or 30 kilograms.
Press the [PLU4] key to change the value.
Press [Tare] to accept the displayed value.
© Adam Equipment Company 2007
18
Page 20

NOTE: The scale must be originally built for the capacity selected. The 6 kg unit uses
10kg load cells, the 15 kilogram unit uses 20 kilogram load cells and the 30 kilogram unit
uses 35 kilogram load cells.
6.2.4 F4 WEIGHT DECIMAL POINT POSITION
To enter this parameter, press the [Tare] key when “F4” is shown.
The display will show the current decimal point location in the Weight window.
Press the [PLU4] key to change the value and press [Tare] to accept the value.
NOTE: Only certain positions are allowed for the AZplus scales.
6.2.5 F5 -UNIT PRICE/TOTAL PRICE DECIMAL POINT LOCATION
To enter this parameter, press the [Tare] key when “F5” is shown.
The display will show the current decimal point location in the Unit Price and the Total
Price windows.
Press the [PLU4] key to change the value.
Press [Tare] to accept the displayed value.
NOTE: The units must match the currency used in the country. Normally 0.00 is
shown.
© Adam Equipment Company 2007
19
Page 21

6.2.6 F6 -INITIAL ZERO RANGE
To enter this parameter, press the [Tare] key when “F6” is shown.
The display will show the current initial zero range.
Press the [PLU4] key to change the value and press [Tare] to accept the value.
NOTE: Only 10% is allowed for the AZplus scales.
6.2.7 F7 -RE-ZERO RANGE
To enter this parameter, press the [Tare] key when “F7” is shown.
The display will show the current re-zero range.
Press the [PLU4] key to change the value and press [Tare] to accept the value.
NOTE: Only 2% is allowed for the AZplus scales.
6.2.8 F8 -SUCCESSIVE TARE
To enter this parameter, press the [Tare] key when “F8” is shown.
The display will show if the successive tare is on or off.
Press the [PLU4] key to change the value.
Press [Tare] to accept the displayed value.
NOTE: Either option is allowed for the AZplus scales.
© Adam Equipment Company 2007
20
Page 22

6.2.9 F9 -A/D COUNT
To enter this parameter, press the [Tare] key when “F9” is shown.
This parameter allows you to view the A/D counts from the internal A/D converter. This can
be an aid to service.
Press the [Tare] key to return to the PARAMETER menu.
Press the [Zero] key to return to weighing.
Ranges allotted at zero is 30,000-90,000 (approx.)
Ranges allotted at full capacity is 400,000 (approx.)
NOTE: To secure the scale after calibration, it is necessary to remove the jumper
placed at position K6 and re-seal the scale.
6.2.10 F10 –ROUNDING OFF THE TOTAL PRICE
This parameter allows you to set the value to 1 or 5 for rounding off the least significant
digit of the Total Price. For example, if the value is set to 1, the Total Price will remain as
12.47 for the original value of 12.47 and if it is set to 5, the Total Price will be rounded off
to 12.45 instead of 12.47.
To enter this parameter, press the [Tare] key when “
The display will show the current settings.
Press the [PLU4] key to change the value and press [Tare] to accept the value.
Press [Tare] to return to the PARAMETER menu.
F10” is shown.
Press [Zero] to return to weighing.
© Adam Equipment Company 2007
21
Page 23

7.0 WIRING DIAGRAM
© Adam Equipment Company 2007
22
Page 24

8.0 MECHANICAL ASSEMBLY
© Adam Equipment Company 2007
23
Page 25

9.0 LIST OF MECHANICAL ASSEMBLY
26 front display overlay 1
25 front keyboard 1
24 screw 1
23 washer 4
22 tapping screw 4
21 washer 4
20 main PCBA 1
19 screw 5
18 screw 1
17 washer 4
16 battery cover 1
15 power switch 1
14 support feet 4
13 bottom cover 1
12 rechargeable battery 1
11 rear display PCBA 1
10 the load cell lower supporter 1
9 the load cell 1
8 the load cell upper supporter 1
7 washer 2
6 screw 2
5 front display PCBA 1
4 upper cover 1
3 rear display overlay 1
2 ABS pan 1
1 SST pan 1
© Adam Equipment Company 2007
24
Page 26

10.0 FRONT DISPLAY SCHEMATIC
© Adam Equipment Company 2007
25
Page 27

11.0 MAIN PCB ASSEMBLY
© Adam Equipment Company 2007
26
Page 28

12.0 MAIN SCHEMATIC LAYOUT
© Adam Equipment Company 2007
27
Page 29

13.0 PILLAR DISPLAY SCHEMATIC
© Adam Equipment Company 2007
28
Page 30

14.0 REAR DISPLAY SCHEMATIC
© Adam Equipment Company 2007
29
Page 31

Adam Equipment
ADAM EQUIPMENT, BOND AVENUE, DENBIGH EAST INDUSTRIAL ESTATE,
Intl Tel: -44 1908 -274545 Intl Fax: -44 1908 641339
The non-automatic weighing instrument Het niet –automatische weegwerktuig
Die nicht- automatischen Wägeapparate Strumento per pesatura non automatico
L’instrument de pesage à fonctionnement non automatique Imstrumento para pesaje non automatico
Manufacturer :
Type: AZplus Typ: AZplus Type: AZplus
No of the EC
type-approval
certificate:
Corresponds to the production model
described in the EC type-approval certificate
and to the requirements of the Council
Directive 90/384/EEC as amended and to
the requirements of the following EC
Directives:
73/23/EEC Electrical equipment
89/336/EEC Electromagnetic
Test Certicifate Test certificaat
Prüfzertifikat Certificato di prova
Certificat de test Certificado de prueba
Adam Equipment Co.
Ltd.
T6320
for use within certain
voltage limits (Low
Voltage Directive)
compatibility
Fabrikant :
Type: AZplus Modello: AZplus Tipo: AZplus
Nummer van de
Verklarling van
EGtypegoedkeuring
Conform met het model beschreven in de
verklaring van EG-typegoedkeuring en met
de voorschriften van EG richtlijn
90/384/EEC zoals gewijzigd en met de
volgende EG richtlijnen:
73/23/EEC Laagspanning richtlijn 73/23/EWG Strumenti elettrici per uso
89/336/EEC EMC richtlijn
Adam Equipment Co.
Ltd.
T6320
Signature Date
Unterschrift Datum
Signature Date 1 October 2007
Handtekening Datum
Firma Date
Firma Fache
J.S. Cumbach
MILTON KEYNES, MK1 1SW, U.K.
Tel: (01908) 274545 Fax: (01908) 641339
E-Mail Address:
info@Adamequipment.co.uk
Hersteller :
Nr. der EGBauartzulassung:
Entspricht dem in der Bescheinigung über die
Bauartzulassung beschriebenen Baumuster, sowie
den Anforderungen der EG-Richtlinie 90/384/EWG
in der jeweils geltenden Fassung und den
Anforderungen folgender EG-Richtlinien:
73/23/EWG Elektrische Betriebsmittel
89/336/EWG Elektromagnetische
Produttore
N. di certificato di
approvazione di tipo
CE
Conforme al modello di produzione descritto nel
certificato di approvazione de tipo CE e secondo le
richieste CE direttivo 90/384/CEE come modificato
e secondo le rechieste della seguente directive CE
89/336/EWG Compatibilita
Adam Equipment Co.
Ltd.
T6320
zur Verwendung innerhalb
bestimmter
Spannungsgrenzen
(Niederspannungsrichtlinie)
Verträglichkeit
Adam Equipment Co.
Ltd.
T6320
entro certi limiti di
voltaggio ( Directivo di
voltaggio basso)
electromagnetico
Fabricant : Adam Equipment Co. Ltd.
N˚ du certificate
d’approbation
CE de type:
Correspond au modèle décrit dans le certificat
d’approbation CE de type, aux exigences de la
directive 90/384/CEE modifiée et aux
exigences des directives CE suivantes:
73/23/CEE Matériel électrique pour
89/336/CEE Compatibilité
Fabricante Adam Equipment Co. Ltd.
Numaro del
certificado de
aprobacion de
tipo CE:
Conforme al modello di producion descrito nel
certificado di aprobacion del tipo CE e segun
los requisitos del CE diretiva 90/384/CEE
como modificato e segun los requisitos della
siguiente diretive CE
73/23/CEE Instrumentos electricos
89/336/CEE Compatibilidad
utilisation dans des limites
de tension définies
(Directive Basse Tension)
électromagnétique
para uso dentro cierti
limites del voltaje
(Diretivo di voltaje bajo)
electromagnetico
T6320
T6320
© Adam Equipment Company 2007
Page 32

ADAM EQUIPMENT is an ISO 9001:2000 certified global company with more than 35
years experience in the production and sale of electronic weighing equipment.
Adam products are predominantly designed for the Laboratory, Educational, Medical,
retail and Industrial Segments. The product range can be described as follows:
-Analytical and Precision Balances
-Compact and Portable Balances
-High Capacity Balances
-Moisture analysers / balances
-Mechanical Scales
-Counting Scales
-Digital Weighing/Check-weighing Scales
-High performance Platform Scales
-Crane scales
-Medical Scales
-Retail Scales for Price computing
For a complete listing of all Adam products visit our website at
www.adamequipment.com
© Copyright by Adam Equipment Co. Ltd. All rights reserved. No part of this
publication may be reprinted or translated in any form or by any means without
the prior permission of Adam Equipment.
Adam Equipment reserves the right to make changes to the technology,
features, specifications and design of the equipment without notice.
All information contained within this publication is to the best of our knowledge
timely, complete and accurate when issued. However, we are not responsible
for misinterpretations which may result from the reading of this material.
The latest version of this publication can be found on our Website.
www.adamequipment.com
© Adam Equipment Company 2007
 Loading...