

Page 1
MEASUREMENT FOUNDATION
Operating manual
Laser level
Model: ULTRALiner 360 2V/3V/4V
Manufacturer
Address: WWW. ADAINSTRUMENTS.COM
Page 2
Table of contents
1. Kit . . . . . . . . . . . . . . . . . . . . . . . . . . . . . . . . . . . . . . . . . . . . . . . . . . . . . . . . . . . . .3
2. Applications . . . . . . . . . . . . . . . . . . . . . . . . . . . . . . . . . . . . . . . . . . . . . . . . . . . . . . . .3
3. Specications . . . . . . . . . . . . . . . . . . . . . . . . . . . . . . . . . . . . . . . . . . . . . . . . . . . . . . 3
4. Functional description . . . . . . . . . . . . . . . . . . . . . . . . . . . . . . . . . . . . . . . . . . . . . . . . . . .4
5. Laser lines. . . . . . . . . . . . . . . . . . . . . . . . . . . . . . . . . . . . . . . . . . . . . . . . . . . . . . . . 5
6. Features . . . . . . . . . . . . . . . . . . . . . . . . . . . . . . . . . . . . . . . . . . . . . . . . . . . . . . . . 6
7. Keypad . . . . . . . . . . . . . . . . . . . . . . . . . . . . . . . . . . . . . . . . . . . . . . . . . . . . . . . . . . 7
8. Operation . . . . . . . . . . . . . . . . . . . . . . . . . . . . . . . . . . . . . . . . . . . . . . . . . . . . . . . . .8
9. Detector . . . . . . . . . . . . . . . . . . . . . . . . . . . . . . . . . . . . . . . . . . . . . . . . . . . . . . 9
10. Application of the detector . . . . . . . . . . . . . . . . . . . . . . . . . . . . . . . . . . . . . . . . . . . . . . . . . . . . . . 9
11. To check the accuracy of line laser level. . . . . . . . . . . . . . . . . . . . . . . . . . . . . . . . . . . . . . . . . 10
12. To check the accuracy of line laser level (slope of plane) . . . . . . . . . . . . . . . . . . . . . . . . . . . . . . . . . . . . . . . . . . 10
13.To check plumb . . . . . . . . . . . . . . . . . . . . . . . . . . . . . . . . . . . . . . . . . . . . . . . . . . . . . .11
14. Care and cleaning . . . . . . . . . . . . . . . . . . . . . . . . . . . . . . . . . . . . . . . . . . . . . . . . . . . 12
15. Specic reasons for erroneous measuring results . . . . . . . . . . . . . . . . . . . . . . . . . . . . . . . . . . . .12
16. Electromagnetic acceptability . . . . . . . . . . . . . . . . . . . . . . . . . . . . . . . . . . . . . . . . . . . . . . 13
17. Laser classication . . . . . . . . . . . . . . . . . . . . . . . . . . . . . . . . . . . . . . . . . . . . . . . . . . . 14
18. Safety instructions . . . . . . . . . . . . . . . . . . . . . . . . . . . . . . . . . . . . . . . . . . . . . . . . . . . 14
19. Warranty . . . . . . . . . . . . . . . . . . . . . . . . . . . . . . . . . . . . . . . . . . . . . . . . . . . . . . . . 14
20. Exceptions from responsibility . . . . . . . . . . . . . . . . . . . . . . . . . . . . . . . . . . . . . . . . . . . . . . 15
Appendix 1. Certicate of acceptance and sale
Appendix 2. Warranty card
Page 3

Kit
Laser level ADA ULTRALiner 360 2V/3V/4V, screw extender 5/8, target plate, laser glasses, batteries holder, 4xAA batteries, case, operating manual. Optional: Li-battery, charger, detector LR-60 with clamp. Manufacturer reserves the right
to change the complete set without any notication.
Applications
Laser cross level is a type of laser levels. With the help of ADA ULTRALiner 360 2V/3V/4V you can take horizontal and
vertical marking. You can use the instrument inside and outside.
Specications
Laser beam 2V/3V/4V1H1D (depends on the model)
Light sources 635nm/oor point 650nm
Laser safety class 2
Accuracy ±0.2mm/1m (V)
±0.3mm/1m (H)
Self-leveling range ±3°
Working range (with detector)* 20m (70m)*
Rotation/Fine adjustment 360°
Power supply 4 X AA batteries (lithium accumulator, charger)
Service time approx 8h with all lines ON
Mounting thread 5/8"
Operating temperature -10°C ~ +40°C
Weight 0.9kg
*working range depends on illumination: working range decreases in bright conditions and increases in poor lighting.
3
Page 4

Functional description
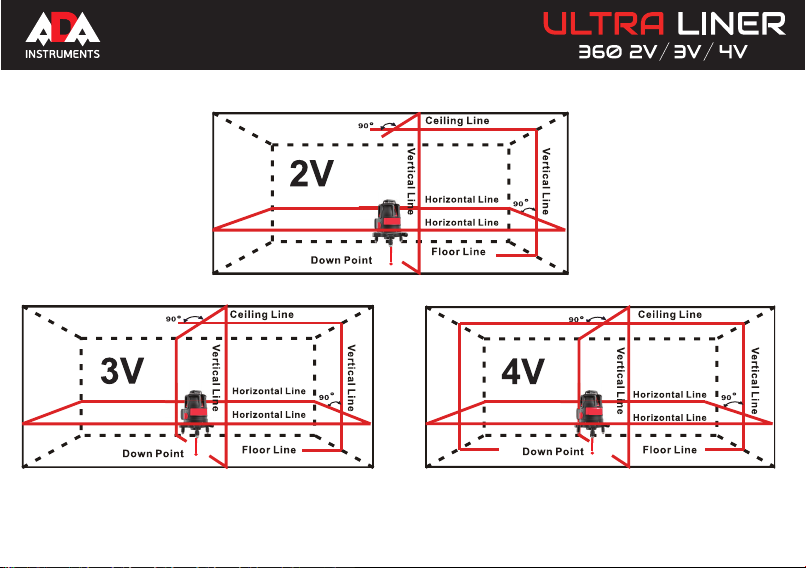
1. The instrument projects 2, 3 or 4 vertical lines (V, depends on the model), 1 horizontal line (H), plumb point.
2. The instrument is used for indoor and outdoor applications. The detector is used in the range up to 70 m. For outdoor
application.
3. Compensator for fast leveling is used in the range up to ±3°.
4. Warning sound is prodced when the instrument inclines from horizontal plane more than ±3°.
5. Rotating ne adjustment mechanism makes it easy to nd objects.
6. Built-in locking system automatically locks the compensator when the power is OFF. It protects the compensator from
vibrations during transportation.
7. Intermediate position of the switch handle activates slope mode.
4
Page 5
Laser lines
5
Page 6

Features
1. Battery compartment
(rechargeable battery compartment)
2. Switch On handle (compensator lock)
3. Vertical laser window
4. Horizontal laser window
5. Fine adjustment screw
6. Adjusting legs
7. Bubble level
4
3
2
1
7
5
6
6
Page 7
Keypad
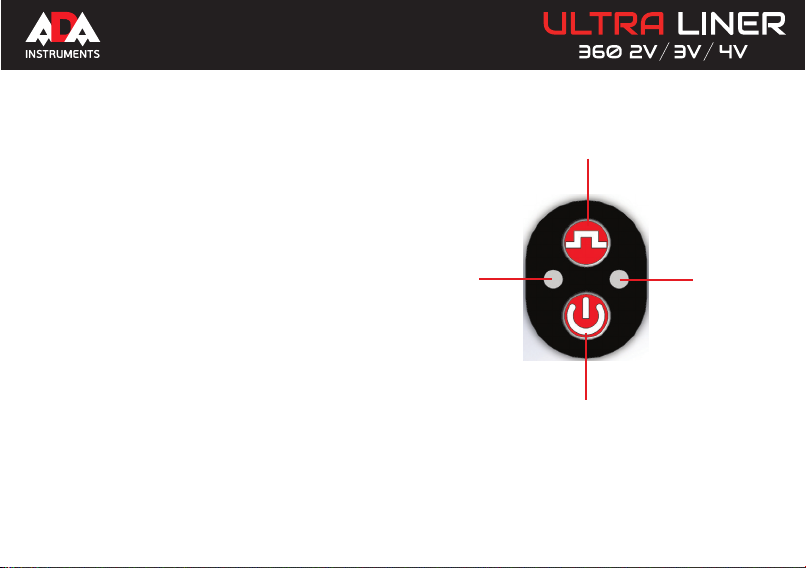
1. On/shift/Off button for V emitters
2. ON/OFF indicator
3. Detector button (D)
4. Detector mode indicator
3
2 4
1
7
Page 8

Operation
1. Open battery compartment cover. Insert 4 batteries with proper polarity into the holder. Contacts of the holder (batteries)
or Li-batteries must coincide with contacts of the battery compartment. Close the battery cover.
2. Place the instrument on the tripod or oor. When using tripod, place the instrument on the tripod and screw the centering
screw into the center hole.
3. Switch On the instrument by rotating the switch 2 counterclockwise until its clicking position. Green LED will ash. If the
battery power is low, green color of the indicator will be changed into red.
4. The instrument works in slope mode in the rst position of the switch (X). It is possible to project laser lines at any angle.
In the position ON the pendulum will be unlocked and laser lines will be automatically self-leveled.
5. If there is a sound signal and laser lines begin to blink while switching on the instrument, that means that the instrument is
out of range more than ±3°. Adjust the position of the instrument by means of the bubble level with the help of legs or tripod.
6. Aim the down point on the required point on the oor. Rotate the upper part of the instrument to adjust vertical lines.
Then adjust the position of the instrument with the help of ne adjustment screw.
7. Laser level has several operating modes. Press button 1 to select laser lines. Variants of projections:
- horizontal beam and down point;
- horizontal beam and vertical beam, down point;
- horizontal beam and 3 vertical beams, down point.
- orizontal beam and 4 vertical beams, down point.
8
Page 9
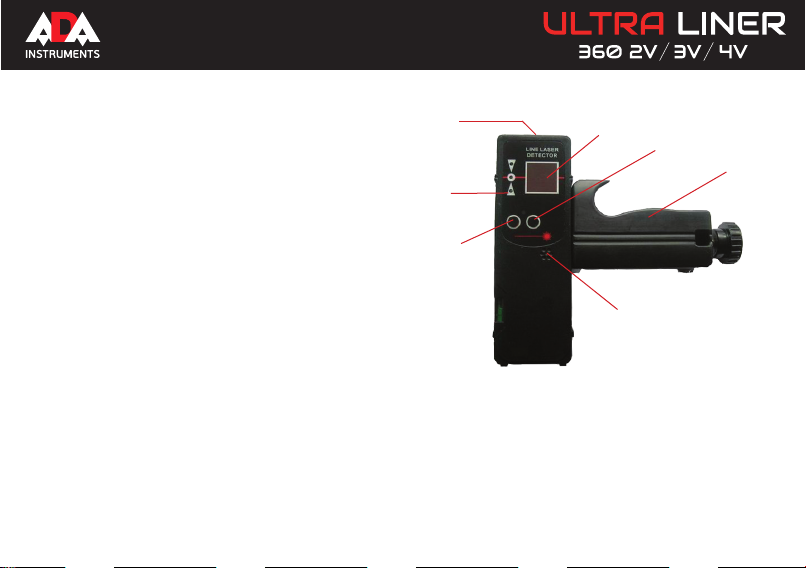
Detector
1. On/Off button
2. Signal LEDs
3. Bubble level
4. Sensitive element
5. Sound Off button
6. Clamp on the staff
7. Dynamic loudspeaker
Application of the detector
Application of the detector is a decisive advantage when
working outside in sunny weather. Press button (3) to
switch on the detector mode. Open the battery cover and
insert the battery into the detector. Press On/Off button to
switch on the detector.
Bring the receiver to the place of beam location. When
laser beam will be on the sensitive element, there will be
sound alarm and one of the LEDs will ash. LED will show
the direction for the receiver for beam detection. Move the
receiver until you will hear continious sound alarm and
middle signal LED will ash. With the help of bubble level
check the leveling of the receiver housing. Mark the surface. Place the detector on the staff with the help of clamp.
3
4
5
6
2
1
7
Page 10
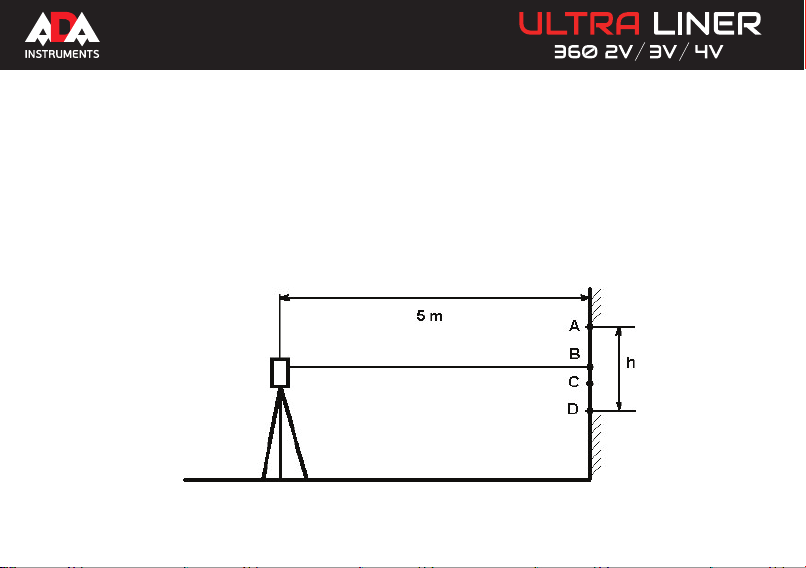
To check the accuracy of line laser level
To check the accuracy of line laser level (slope of plane)
Place laser level on the tripod 5m away from the wall so the horizontal laser line will be directed to the wall.
Switch on the power. The instrument starts to self-level. Mark point A on the wall to show the contact of laser beam
with the wall. Turn the instrument by 90° and mark points В, С, D on the wall. Measure distance “h” between the
highest and lowest points (these are A and D points in the picture).
If “h”is ≤ 6 mm, the measurement accuracy is good. If “h” exceeds 6 mm, apply service center.
10
Page 11

To check plumb
Choose a wall and set laser 5 m away from the wall. Hang a plumb with the length 2.5 m on the
wall. Turn on the laser and make the vertical laser line meet the point of the plumb. The accuracy of
the line is in the range if the vertical line doesn’t exceed (up or down) the accuracy that is shown in
the specifications (±2 mm/10 m). If the accuracy isn’t corresponding with claimed accuracy, contact
the authorized service center.
Note: Because of construction of laser emitter laser beam may be unhomogeneous and has different intensity of brightness along the perimeter in different light conditions. Unhomogeneous of laser
beam: laser patch of light but the center of laser beam is identified. Different laser beam brightness:
difference of intensity is up to 50%.
11
Page 12
CARE AND CLEANING
Please handle measuring instrument with care. Clean with soft cloth only after any use. If necessary damp cloth with
some water. If instrument is wet clean and dry it carefully. Pack it up only if it is perfectly dry. Transport in original
container/case only.
Note: During transport On/Off compensator lock (2) must be set to position “OFF”. Disregard may lead to damage of
compensator.
SPECIFIC REASONS FOR ERRONEOUS MEASURING RESULTS
• Measurements through glass or plastic windows;
• Dirty laser emitting window;
• After instrument has been dropped or hit. Please check the accuracy.
• Large uctuation of temperature: if instrument will be used in cold areas after it has been stored in warm areas
(or the other way round) please wait some minutes before carrying out measurements.
12
Page 13

ELECTROMAGNETIC ACCEPTABILITY (EMC)
• It cannot be completely excluded that this instrument will disturb other instruments (e.g. navigation systems);
• will be disturbed by other instruments (e.g. intensive electromagnetic radiation nearby industrial facilities or radio
transmitters).
Laser class 2 warning labels on the laser instrument.
13
Page 14

LASER CLASSIFICATION
The instrument is a laser class 2 laser product accortding to DIN IEC 60825-1:2007. It is allowed to use unit without
further safety precautions.
SAFETY INSTRUCTIONS
Please follow up instructions given in operators’ manual.
Do not stare into beam. Laser beam can lead to eye injury (even from greater distances).
Do not aim laser beam at persons or animals.
The laser plane should be set up above eye level of persons.
Use the instrument for measuring jobs only.
Do not open instrument housing. Repairs should be carried out by authorized workshops only. Please contact your
local dealer.
Do not remove warning labels or safety instructions.
Keep instrument away from children.
Do not use instrument in explosive environment.
WARRANTY
This product is warranted by the manufacturer to the original purchaser to be free from defects in material and workmanship under normal use for a period of two (2) years from the date of purchase.
During the warranty period, and upon proof of purchase, the product will be repaired or replaced (with the same or
similar model at manufactures option), without charge for either parts of labour.
In case of a defect please contact the dealer where you originally purchased this product. The warranty will not apply
14
Page 15

to this product if it has been misused, abused or altered. Withiut limiting the foregoing, leakage of the battery, bending or
dropping the unit are presumed to be defects resulting from misuse or abuse.
EXCEPTIONS FROM RESPONSIBILITY
The user of this product is expected to follow the instructions given in operators’ manual.
Although all instruments left our warehouse in perfect condition and adjustment the user is expected to carry out periodic
checks of the product’s accuracy and general performance.
The manufacturer, or its representatives, assumes no responsibility of results of a faulty or intentional usage or misuse
including any direct, indirect, consequential damage, and loss of prots.
The manufacturer, or its representatives, assumes no responsibility for consequential damage, and loss of prots by any
disaster (earthquake, storm, ood ...), re, accident, or an act of a third party and/or a usage in other than usual condi-
tions.
The manufacturer, or its representatives, assumes no responsibility for any damage, and loss of prots due to a change
of data, loss of data and interruption of business etc., caused by using the product or an unusable product.
The manufacturer, or its representatives, assumes no responsibility for any damage, and loss of prots caused by usage
other thsn explained in the users’ manual.
The manufacturer, or its representatives, assumes no responsibility for damage caused by wrong movement or action
due to connecting with other products.
15
Page 16

WARRANTY DOESN’T EXTEND TO FOLLOWING CASES:
1. If the standard or serial product number will be changed, erased, removed or wil be unreadable.
2. Periodic maintenance, repair or changing parts as a result of their normal runout.
3. All adaptations and modications with the purpose of improvement and expansion of normal sphere of product application, mentioned in the service instruction, without tentative written agreement of the expert provider.
4. Service by anyone other than an authorized service center.
5. Damage to products or parts caused by misuse, including, without limitation, misapplication or nrgligence of the terms
of service instruction.
6. Power supply units, chargers, accessories, wearing parts.
7. Products, damaged from mishandling, faulty adjustment, maintenance with low-quality and non-standard materials,
presence of any liquids and foreign objects inside the product.
8. Acts of God and/or actions of third persons.
9. In case of unwarranted repair till the end of warranty period because of damages during the operation of the product,
it’s transportation and storing, warranty doesn’t resume.
For more information you can visit our website WWW.ADAINSTRUMENTS.COM
or write the letter with your questions on info@adainstruments.com
Page 17

WARRANTY CARD
Name and model of the product ________________________________________________
Serial number ________________date of sale_______________________
Name of commercial organization _____________________stamp of commercial organization
Warranty period for the instrument explotation is 24 months.
During this warranty period the owner of the product has the right for free repair of his instrument in case of manufacturing defects.
Warranty is valid only with original warranty card, fully and clear lled (stamp or mark of thr seller is obligatory).
Technical examination of instruments for fault identication which is under the warranty, is made only in the authorized service center.
In no event shall manufacturer be liable before the client for direct or consewuential damages, loss of prot or any other damage which
occur in the result of the instrument outage.
The product is received in the state of operability, without any visible damages, in full completeness. It is tested in my presence. I have no
complaints to the product quality. I am familiar and agree with the conditions of warranty service.
purchaser signature _______________________________
If you have any questions about the warranty service and technical support contact seller of this product
Before operating you should read service instruction!
Page 18

Certicate of acceptance and sale
__________________________________________________________________________
__________________________________________________________________________
___________________________________________________________№_____________
name and model of the instrument
Corresponds to ______________________________________________________________
designation of standard and technical requirements
Data of issue _______________________________________________________________
Stamp of quality control department
Price
Sold ___________________________________ Date of sale ______________________
name of commercial establishment
Page 19

MEASUREMENT FOUNDATION
Руководство по эксплуатации
Лазерный нивелир
Модель: ULTRALiner 360 2V/3V/4V
Производитель: ADA INSTRUMENTS Адрес: WWW.ADAINSTRUMENTS.COM
Page 20

Оглавление
1. Комплект поставки . . . . . . . . . . . . . . . . . . . . . . . . . . . . . . . . . . . . . . . . . . . . . . . . . . 21
2. Применение лазерного нивелира . . . . . . . . . . . . . . . . . . . . . . . . . . . . . . . . . . 21
3. Технические данные . . . . . . . . . . . . . . . . . . . . . . . . . . . . . . . . . . . . . . . . . . . . . . . . . 21
4. Функциональные характеристики прибора . . . . . . . . . . . . . . . . . . . . . . . . . . . . . . . . . . . . . 22
5. Лазерные плоскости . . . . . . . . . . . . . . . . . . . . . . . . . . . . . . . . . . . . . . . . . . . . . . . . . 23
6. Устройст во прибора . . . . . . . . . . . . . . . . . . . . . . . . . . . . . . . . . . . . . . . . . . . . . . . . . . . . . . . 24
7. Клавишная панель . . . . . . . . . . . . . . . . . . . . . . . . . . . . . . . . . . . . . . . . . . . . . . . . . . 25
8. Использование лазерного нивелира . . . . . . . . . . . . . . . . . . . . . . . . . . . . . . . . 26
9. Приемник лазерного луча . . . . . . . . . . . . . . . . . . . . . . . . . . . . . . . . . . . . . . . . . . . . . . . . . . 27
10 . Ис по л ь зо в а ни е пр и е мн и ка ла зе р н ог о лу ча . . . . . . . . . . . . . . . . . . . . . . . . . . . . . . . . . . . . . . . . . . . . . . . . . . 27
11 . П ро в ер ка т оч но ст и л а зе рн о го н и ве ли ра . . . . . . . . . . . . . . . . . . . . . . . . . . . . . . . . . . . . . . . . . . . . . . . . . . . . . . . . . . 2 8
12. Проверка точности лазерного нивелира (наклон плоскости) . . . . . . . . . . . . . . . . . . 28
13. Проверка точности горизонтального луча. . . . . . . . . . . . . . . . . . . . . . . . . . . . . . . . . . . . 28
14. Проверка точности вертикального луча . . . . . . . . . . . . . . . . . . . . . . . . . . . . . . . . . . . . . 29
15. Уход за лазерн ым нивелиром . . . . . . . . . . . . . . . . . . . . . . . . . . . . . . . . . . . . . . . . . . . . . . . . 30
16. Возможные причины ошибочных результатов измерений . . . . . . . . . . . . . . . . . . . . . . . . . . . . 30
17. Электромагнитная совместимость . . . . . . . . . . . . . . . . . . . . . . . . . . . . . . . . . . . . . . . . . 31
18. Класссификация лазера . . . . . . . . . . . . . . . . . . . . . . . . . . . . . . . . . . . . . . . . . . . . . . 31
19. Инструкция по безопасности . . . . . . . . . . . . . . . . . . . . . . . . . . . . . . . . . . . . . . . . . . . .32
20. Гарантия . . . . . . . . . . . . . . . . . . . . . . . . . . . . . . . . . . . . . . . . . . . . . . . . . . . . . . .32
21. Освобождение от ответственности . . . . . . . . . . . . . . . . . . . . . . . . . . . . . . . . . . . . . . . . .33
Приложение 1. Гарантийный талон
Приложение 2. Свидетельство о приемке и продаже
Page 21

Комплект поставки
Лазерный нивелир ADA ULTRALiner 360 2V/3V/4V, винт удлинитель 5/8, мишень, лазерные очки, держатель батареек,
батарейки 4хАА, инструкция, кейс. Опция: литиевый аккумулятор, зарядное устройство, детектор лазерного луча с
креплением LR-60. Производитель оставляет за собой право изменять комплектацию без уведомления.
Применение лазерного нивелира
Лазерный построитель плоскостей- это тип лазерных нивелиров. С помощью ADA ULTRALiner 360 2V/3V/4V Вы можете
быстро провести вертикальную и горизонтальную разметку для проведения работ внутри помещения и на улице.
Технические данные
Лазерный луч 2V/3V/4V1H1D (в зависимости от модели)
Лазерные излучатели 635нм/точка отвеса 650нм
Класс лазера 2
Точность ±0.2мм/1м (V)
±0.3мм/1м (H)
Диапазон самовыравнивания ±3°
Рабочий диапазон (с приемником)* 20 м (70 м)*
Миханизм точной регулировки поворота 360°
Источник питания 4 x AA батарейки (литиевый аккумулятор, ЗУ)
Время работы приблизительно 8 часов, если работают все лазерные излучатели
Резьба под штатив 5/8"
Рабочий диапазон температур -10°С ~ +40°С
Вес 0,9 кг
* рабочий диапазон зависит от условий освещенности: при ярком освещении диапазон уменьшается, при слабом освещении диапазон
увеличивается
21
Page 22

Функциональные характеристики прибора
1. Прибор проецирует 2, 3 или 4 вертикальные линии (V, в зависимости от модели построителя), 1 горизонтальная
(Н), точка отвеса.
2. Прибор предназначен для работ внутри помещений и на улице. Приемник может применяться в радиусе до
70м- для применения на улице.
3. Компенсатор для быстрого самовыравнивания работает в диапазоне до ±3°.
4. При отклонении прибора от горизонтальной плоскости более, чем на ±3° включается сигнализация (звуковой
сигнал).
5. Механизм точной регулировки поворота облегчает точное нахождение объектов.
6. Компенсатор блокируется автоматически при выключении питания. Это защищает его от воздействия
вибрациии во время транспортировки.
7. При промежуточном положении ручки включения включается режим работы под наклоном.
22
Page 23

Лазерные плоскости
23
Page 24

Устройство прибора
1. Батарейный (аккумуляторный) отсек
2. Ручка включения (блокировка компенсатора)
3. Окно вертикального излучателя
4. Окно горизонтального излучателя
5. Поворотный винт
6. Регулируемые ножки
7. Пузырьковый уровень
4
3
2
1
7
5
6
24
Page 25

Клавишная панель
1. Кнопка включения/переключения/выключения V излучателей
2. Индикатор ВКЛ/ВЫКЛ
3. Кнопка включения режима работы с приемником (D)
4.Индикатор режима работы с приемником
25
3
2 4
1
Page 26

Использование лазерного нивелира
1. Откройте крышку батарейного отсека. Вставьте 4 батарейки соблюдая полярность в держатель, Вставьте
держатель с батарейками или литиевую батарейку в отсек так, что бы контакты держателя (батарейки) совпали с
контактами батарейного отсека. Закройте крышку батарейного отсека.
2. Установите прибор на пол или на штатив. Если вы используете штатив, установите основание прибора на
штатив и вкрутите винт штатива в центровочное отверстие.
3. Включите прибор повернув включатель 2 против часовой стрелки до щелчка. Загорится зеленый индикатор
включения. Если батарея разряжена индикатор горит красным светом.
4. В первом положении выключателя (Х) прибор работает в режиме под наклоном. В этом режиме можно
проецировать лазерные лучи под любым углом. В следующем положении (ON) разблокируются маятник и лучи
автоматически выравниваются.
5. Если при включении прибора звучит сигнал и мигают лазерные линии - это значит, что отклонение прибора
от горизонтальной плоскости более ±3°. С помощью ножек или штатива отрегулируйте положение прибора по
пузырьковому уровню.
6. Направьте точку отвеса на нужную точку на полу. Поворачивайте верхнюю часть прибора, чтобы настроить
вертикальные лучи. Затем отрегулируйте точно положение прибора с помощью ручки регулировки поворота.
7. Лазерный нивелир имеет несколько режимов работы. Для выбора лазерных лучей нажимайте каждый раз
кнопку 1. Варианты проекций:
- горизонтальный луч и точка отвеса;
- горизонтальный и вертикальный луч, точка отвеса;
- горизонтальный и три вертикальных луча, точка отвеса;
- горизонтальный и 4 вертикальных луча, точка отвеса.
26
Page 27

Приемник лазерного луча
1. Кнопка вкл/выкл
2. Сигнальные светодиоды
3. Пузырьковый уровень
4. Чувствительный элемент
5. Кнопка выключения звука
6. Крепление на рейку
7. Динамик
Использование приемника лазерного луча
При ярком освещении, когда лазерный луч
визуально не видно, используйте режим работы с
приемником. Для включения этого режима нажмите
кнопку (3) на клавишной панели. Вставьте батарейку
в приемник открыв крышку батарейного отсека.
Соблюдайте полярность. Включите приемник нажав
клавишу включения.
Поднесите приемник лазерного луча к примерному месту нахождения луча. При попадании лазерного луча на
чувствительный элемент приемника будет раздаваться звуковой сигнал и загорится один из крайних светодиодов,
указывающих направление перемещения приемника для улавливания луча. Передвигайте приемник до тех пор
пока не услышите продолжительный звуковой сигнал и не загорится средний сигнальный светодиод. Проверьте
выравнивание корпуса приемника по пузырьковому уровню и сделайте отметку на поверхности. С помощью
крепления приемник можно установить на геодезическую рейку (линейку).
3
4
5
6
2
1
7
Page 28

Проверка точности лазерного построителя плоскости
Проверка точности лазерного построителя плоскости (наклон плоскости)
Установите лазерный нивелир на штатив в 5 м от стены так, чтобы горизонтальный лазерный луч был
направлен к стене. Включите питание и дождитесь завершения процесса самовыравнивания.
Пометьте на стене буквой А точку соприкосновения лазерного луча со стеной. Поворачивая прибор на
90° соответствующим образом, пометьте на стене точки В, С, D. Измерьте расстояние “h” между высшей и
низшей точками (для примера на рисунке это точки А и D).
Если “h” ≤ 6 мм, то точность измерений хорошая. Если “h” превышает 6 мм, обратитесь в сервисный центр.
заявленную в технических характеристиках, точность Вашего лазерного построителя в допустимых
пределах.
28
Page 29

Проверка точности вертикального луча
Установить лазерный инструмент на расстоянии приблизительно 5м от стены. Укрепить на стене отвес со
шнуром длиной около 2,5м. Включите лазерный построитель плоскостей и направьте вертикальную линию
на отвес со шнуром. Точность линии находится в допустимых пределах, если отклонение вертикальной
линии (сверху или снизу) не превышает половину значения характеристики „точность” (+/-2мм на 10м).
Если точность лазерного построителя не соответствует заявленной, необходимо обратиться в авторизованный
сервисный центр.
Примечание: Из-за особенности конструкции лазерного излучателя допускается неоднородность и различная
интенсивность яркости горизонтального лазерного луча по периметру в различных условиях освещенности.
Неоднородность лазерного луча: лазерные блики, но середина луча определяется. Различная яркость лазерного
луча: отличие интенсивности до 50%.
29
Page 30

Уход за устройством
• Пожалуйста, бережно обращайтесь с прибором
• П о с л е и с п о л ь з о в а н и я п р о т и р а й т е п р и б о р м я г к о й т р я п к о й . П р и н е о б х о д и м о с т и с м о ч и т е
тряпку водой.
• Если прибор влажный, осторожно вытрите его на сухо. Прибор можно убирать в кейс
только сухим!
• При транспортировке убирайте прибор в кейс.
Примечание: Во время транспортировки переключатель вкл./выкл./замок компенсатора (2) должен быть
установлен в положение «OFF»- иначе при транспортировке настройки прибора могут быть «сбиты». Относитесь
внимательно к аккуратной транспортировке прибора — это позволит выполнять качествено поставленные задачи
в будущем и пользоваться построителем плоскостей долго и успешно.
Возможные причины ошибочных результатов измерений
• измерения проводятся через стеклянное или пластиковое окно;
• загрязнен лазерный излучатель;
• если прибор уронили или ударили. В этом случае проверьте точность. При
необходимости обратитесь в авторизованный сервисный центр.
• с и л ь н ы е к о л е б а н и я т е м п е р а т у р ы : е с л и п о с л е х р а н е н и я в т е п л е п р и б о р и с п о л ь з у е т с я
при низкой температуре. В этом случае подождите несколько минут, перед тем как
начать работать.
30
Page 31

Электромагнитная совместимость (EMC)
• н е и с к л ю ч е н о , ч т о р а б о т а л а з е р н о г о н и в е л и р а м о ж е т п о в л и я т ь н а р а б о т у д р у г и х
устройств (например, системы навигации);
• н а р а б о т у л а з е р н о г о н и в е л и р а м о ж е т п о в л и я т ь р а б о т а д р у г и х п р и б о р о в ( н а п р и м е р ,
интенсивное электромагнитное излучение от промышленного оборудования или радиоприборов).
Предупредительные наклейки лазера класса 2
ВНИМАНИЕ
лазерное излучение
не смотрите на лазерный луч
макс. мощность излучения <1mw@ 635nm
КЛАСС ЛАЗЕРА 2М
Классификация лазера
Данный прибор является лазером класса 2 в соответствии с DIN IEC 60825-1:2007, что позволяет использовать
устройство выполняя меры предосторожности (см. ниже).
31
Page 32

Инструкция по безопасности
Пожалуйста, следуйте инструкциям, которые даны в руководстве пользователей.
Не смотрите на лазерный луч. Лазерный луч может повредить глаза, даже если вы смотрите на него с большого
расстояния.
Не направляйте лазерный луч на людей или животных.
Лазер должен быть установлен выше уровня глаз.
Используйте прибор только для замеров.
Не вскрывайте прибор. Ремонт должен производиться только авторизованной мастерской. Пожалуйста,
свяжитесь с вашим местным дилером. Не выкидывайте предупредительные этикетки или инструкции по
безопасности.
Держите прибор в недоступном для детей месте.
Не используйте прибор вблизи взрывоопасных веществами.
Гарантия
Производитель предоставляет гарантию на продукцию покупателю в случае дефектов материала или качества
его изготовления во время использования оборудования с соблюдением инструкции пользователя на срок до 2
лет со дня покупки.
32
Page 33

Во время гарантийного срока, при предъявлении доказательства покупки, прибор будет починен или заменен
на такую же или аналогичную модель бесплатно. Гарантийные обязательства также распространяются и на
запасные части.
В случае дефекта, пожалуйста, свяжитесь с дилером, у которого вы приобрели прибор. Гарантия не
распространяется на продукт, если повреждения возникли в результате деформации, неправильного
использования или ненадлежащего обращения.
Все вышеизложенные безо всяких ограничений причины, а также утечка батареи, деформация прибора являются
дефектами, которые возникли в результате неправильного использования или плохого обращения.
Освобождение от ответственности
Пользователю данного продукта необходимо следовать инструкциям, которые приведены в руководстве по
эксплуатации. Даже, несмотря на то, что все прборы проверены производителем, пользователь должен проверять
точность прибора и его работу.
Производитель или его представители не несут ответственности за прямые или косвенные убытки, упущенную
выгоду или иной ущерб, возникший в результате неправильного обращения с прибором.
Производитель или его представители не несут ответственности за косвенные убытки, упущенную выгоду,
возникшие в результате катастроф (землетрясение, шторм, наводнение и т.д.), пожара, несчастных случаев,
действия третьих лиц и/или использование прибора в необычных условиях.
Производитель или его представители не несут ответственности за косвенные убытки, упущенную выгоду,
возникшие в результате изменения данных, потери данных и временной приостановки бизнеса и т.д., вызванных
применением прибора.
Производитель или его представители не несут ответственности за косвенные убытки, упущенную выгоду,
возникшие в результате использования прибора не по инструкции.
33
Page 34

ГАРАНТИЙНЫЕ ОБЯЗАТЕЛЬСТВА НЕ РАСПРОСТРАНЯЮТСЯ НА СЛЕДУЮЩИЕ СЛУЧАИ:
1.Если будет изменен, стерт, удален или будет неразборчив типовой или серийный номер на изделии;
2.Периодическое обслуживание и ремонт или замену запчастей в связи с их нормальным износом;
3.Любые адаптации и изменения с целью усовершенствования и расширения обычной сферы применения
изделия, указанной в инструкции по эксплуатации, без предварительного письменного соглашения специалиста
поставщика;
4.Ремонт, произведенный не уполномоченным на то сервисным центром;
5.Ущерб в результате неправильной эксплуатации, включая, но не ограничиваясь этим, следующее:
использовнаие изделия не по назначению или не в соответствии с инструкцией по эксплуатации на прибор;
6.На элементы питания, зарядные устройства, комплектующие, быстроизнашивающиеся и запасные части;
7. Изделия, поврежденные в результате небрежного отношения, неправильной регулировки, ненадлежащего
технического обслуживания с применением некачественных и нестандартных расходных материалов, попадания
жидкостей и посторонних предметов внутрь.
8.Воздействие факторов непреодолимой силы и/или действие третьих лиц;
9.В случае негарантийного ремонта прибора до окончания гарантийного срока, произошедшего по причине
полученных повреждений в ходе эксплуатации, транспортировки или хранения, и не возобновляется.
Для получения дополнительной информации Вы можете посетить наш Интернет сайт WWW.ADAINSTRUMENTS.COM
или написать письмо с интерисующими Вас вопросами на электронный адрес info@adainstruments.com
Page 35

ГАРАНТИЙНЫЙ ТАЛОН
Наименование изделия и модель _______________________________________________
Серийный номер ___________________Дата продажи_________________
Наименование торговой организации ___________________Штамп торговой организации мп.
Гарантийный срок эксплуатации приборов составляет 24 месяца со дня продажи.
В течении гарантийного срока владелец имеет право на бесплатный ремонт изделия по неисправностям,
являющимся следствием производственных дефектов.
Гарантийные обязательства действительны только по предъявлении оригинального талона, заполненного
полностью и четко (наличие печати и штампа с наименованием и формой собственности продавца
обязательно).
Техническое освидетельствование приборов (дефектация) на предмет установления гарантийного случая
производится только в авторизованной мастерской.
Производитель не несет ответственности перед клиентом за прямые или косвенные убытки, упущенную выгоду
или иной ущерб, возникшие в результате выхода из строя приобретенного оборудования.
Правовой основой настоящих гарантийных обязательств является действующее законодательство, в частности,
Федеральный закон РФ “О защите прав потребителя” и Гражданский кодекс РФ ч.II ст. 454-491.
Товар получен в исправном состоянии, без видимых повреждений, в полной комплектности, проверен в моем
присутствии, претензий по качеству товара не имею. С условиями гарантийного обслуживания ознакомлен и
согласен.
Подпись получателя_________________________________
Перед началом эксплуатации внимательно ознакомьтесь с инструкцией по эксплуатации!
По вопросам гарантийного обслуживания и технической поддержки обращаться к продавцу данного товара
Page 36

СВИДЕТЕЛЬСТВО О ПРИЕМКЕ И ПРОДАЖЕ
______________________________________________________________________________________________
______________________________________________________________________________________________
_____________________________________________________________________________№_______________
НАИМЕНОВАНИЕ И ТИП ПРИБОРА
Соответствует __________________________________________________________________________________
обозначение стандарта и технических условий
Дата выпуска ___________________________________________________________________________________
Штамп ОТК (клеймо приемщика)
Цена
Продан(а) ___________________________________________________Дата продажи ______________________
Page 37

MEASUREMENT FOUNDATION
WWW.ADAINSTRUMENTS.COM
ADA
 Loading...