

Page 1

Operating manual
Laser distance meter
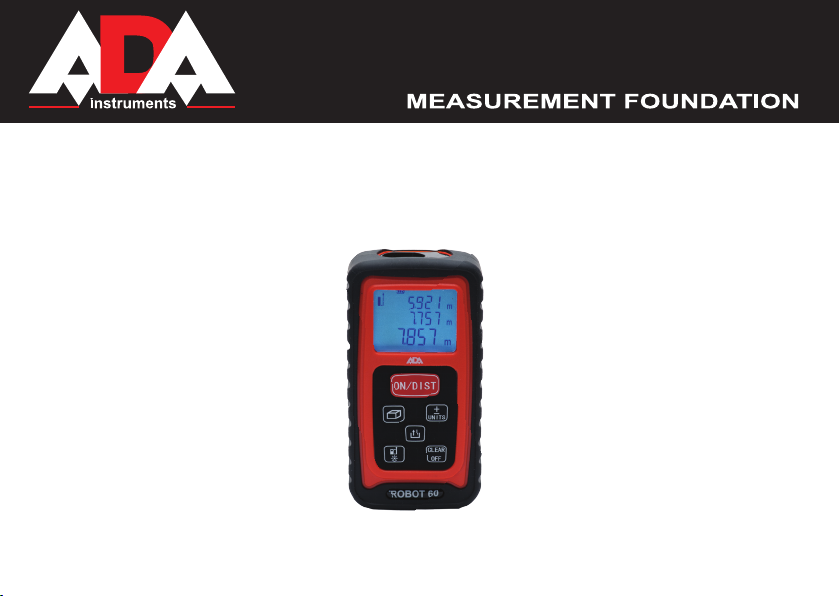
Model: ROBOT 60
Manufacturer: ADAINSTRUMENTS Address: WWW.ADAINSTRUMENTS.COM
Page 2

ROBOT 60
Table of contents
1. Safety Instructions . . . . . . . . . . . . . . . . . . . . . . . . . . . . . . . . . . . . . . . . . . . . . . . . . . . .3
2. Prohibited use . . . . . . . . . . . . . . . . . . . . . . . . . . . . . . . . . . . . . . . . . . . . . . . . . . . . . 4
3. Start up . . . . . . . . . . . . . . . . . . . . . . . . . . . . . . . . . . . . . . . . . . . . . . . . . . . . . . . 4
4. Menu functions . . . . . . . . . . . . . . . . . . . . . . . . . . . . . . . . . . . . . . . . . . . . . . . . . . . . . . . . . 5
5. Measurements . . . . . . . . . . . . . . . . . . . . . . . . . . . . . . . . . . . . . . . . . . . . 6
6. Functions . . . . . . . . . . . . . . . . . . . . . . . . . . . . . . . . . . . . . . . . . . . . . 7
7. Message codes . . . . . . . . . . . . . . . . . . . . . . . . . . . . . . . . . . . . . . . . . . . . . . . . . 9
8. Techical data . . . . . . . . . . . . . . . . . . . . . . . . . . . . . . . . . . . . . . . . . . . . . . . 10
9. Precautions . . . . . . . . . . . . . . . . . . . . . . . . . . . . . . . . . . . . . . . . . . . . . . . . . . 11
10. Care and cleaning. . . . . . . . . . . . . . . . . . . . . . . . . . . . . . . . . . . . . . . . . 11
11. Specic reasons for erroneous measuring results . . . . . . . . . . . . . . . . . . . . . . . . . . . . . . . . . . . . . . . . 11
13. Laser classication . . . . . . . . . . . . . . . . . . . . . . . . . . . . . . . . . . . . . . . . . . . . . . 12
14. Warranty. . . . . . . . . . . . . . . . . . . . . . . . . . . . . . . . . . . . . . . . . . . . . . 12
15. Exceptions from responsibility . . . . . . . . . . . . . . . . . . . . . . . . . . . . . . . . . . . . . . . . . . . . . . . . . . . . . . . 12
Appendix 1 - “Certicate of acceptance and sale”
Appendix 2 - “Warranty card”
2
MEASUREMENT FOUNDATION
Page 3

ROBOT 60
Congratulations on the purchase of laser distance meter ADA ROBOT 60!
Permitted use
· Measuring distances
· Computing functions, e.g. areas, volumes, subtractions, Pythagorean calculation
· Storing measurements
The safety regulations and instructions along with the operating manual should be read carefully before initial operation.The
person responsible for the instrument must ensure that equipment is used in accordance with the instructions. This person is also
accountable for the deployment of personnel and for their training and for the safety of the equipment when in use.
Safety instruction
Please follow up instructions given in operators’ manual.
Do not stare into beam. Laser beam can lead to eye injury (even from greater distances).
Do not aim laser beam at persons or animals.
The laser plane should be set up above eye level of persons.
Use the instrument for measuring jobs only.
Do not open instrument housing. Repairs should be carried out by authorized workshops only. Please contact your local dealer.
Do not remove warning labels or safety instructions.
Keep instrument away from children.
Do not use instrument in explosive environment.
3
MEASUREMENT FOUNDATION
Page 4

ROBOT 60
Prohibited use
- Using the instrument without instruction
- Using outside the stated limits
- Using the instrument in explosive environment (gas station, gas equipment, chemical industry and so on)
- Deactivation of safety systems and removal of explanatory and hazard labels
- Opening of the equipment by using tools (screwdrivers, etc.), as far as not specically permitted for certain cases
- Carrying out modication or conversion of the product
- Don’t shoot at others with the laser intentionally
- Don’t stare at the laser directly.
- Aiming directly into the sun
- Inadequate safeguards at the surveying site (e.g. when measuring on roads, construction sites, etc.)
- Using the instrument on the plane, near manufacturers, technological objects
Laser classication
The instrument is a laser class 2 laser product with power < 1 mW and wavelength 635 nm.
START UP
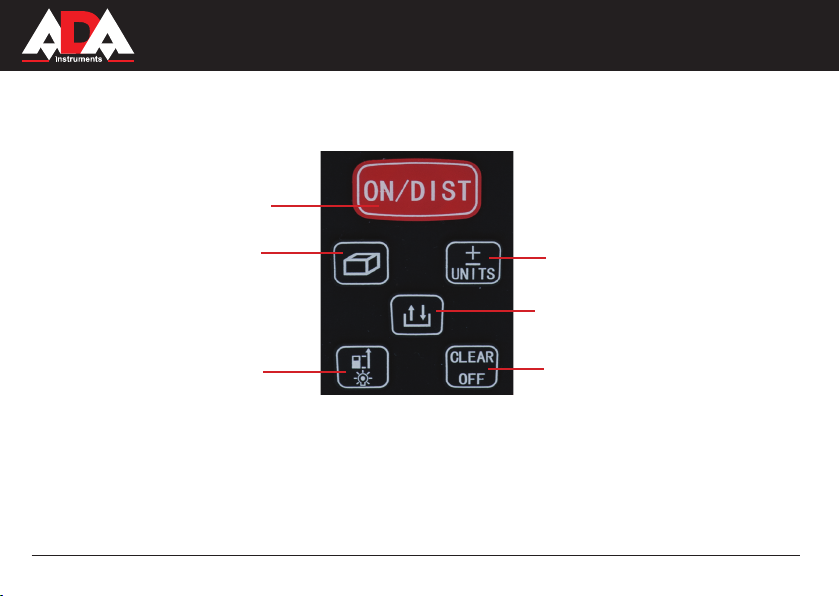
Keypad
1 ON / Single measure / Continuous measure
2 Area / Volume / Pythagorean measure
3 Plus / Minus / Units
4 Reference / Illumination
5 Clear / OFF
6 Data storage key
1
2
3
6
4
4
MEASUREMENT FOUNDATION
5
Page 5

4
5 6 7 8 9
1
2
3
Display
1 Laser ON
2 Reference (front/rear)
3 Area / volume/ Pythagorean
4 Hardware error
5 Battery display
6 Data storage
7 Data storage quanity
8 Fixed timing measure
9 Wall space measure
10 Units with exponents ( 2/3 )
11 Auxiliary Display 1
12 Auxiliary Display 2
13 Main display
10
11
12
13
ROBOT 60
Inserting / Replacing Batteries
Remove the battery cover, insert the battery correctly. Pay attention to correct polarity.
Close the battery compartment.
Replace the battery when symbol constantly blinks in the display.
Batteries should be removed in case of danger of corrosion, if the device
will not be used for a long time.
MENU FUNCTIONS
Swtich on and off
Press the button (1) to switch on the instrument and laser.
Press and hold key for about 2 seconds to start continuous measuring.
The device also switches off automatically after 3 minutes of inactivity i.e.
no key is pressed within that interval.
To switch off the instrument press and hold button (5) 2 sec.
Reference Setting
Default reference setting is from the rear of the device.
Press the button (4) to set the reference the front or the rear.
When the end-piece is folded out fully, the reference rear is set.
You will see the reference symbol on the display.
5
MEASUREMENT FOUNDATION
Page 6

ROBOT 60
Selecting Units
Press and hold the button (3) for 2 sec. until the desired unit is displayed.
Illumination
Press and hold the button (4) for 2 seconds to switch the illumination on or off.
Clear-Key
Cancel the last action. Press button (5).
MEASUREMENTS
Single distance measurement
Press button (1) to activate the laser. When in continuous laser mode, press this button to trigger the distance measurement directly.
Press again to trigger the distance measurement. The result is displayed immediately.
Continuous Measurement
Press and hold the button (1) for about 2 seconds to start continuous measuring.
Minimum/ Maximum measurement
This function allows the user to measure the minimum or maximum distance from a xed measuring point. It is commonly used to measure room
diagonals (maximum values) or horizontal distances (minimum values).
Press and hold down the button (1). Then slowly sweep the laser back and forth and up and down over the desired target point-(e.g. into the corner of
a room).
Press to stop continuous measurement. The values for maximum and minimum distances are shown on the display as well as the last measured value
in the summary line.
6
MEASUREMENT FOUNDATION
Page 7

ROBOT 60
FUNCTIONS
Addition / Subtraction
Distance measuring.
Press button (3): next measurement is added to the previous one. Press button (3): next measurement is substracted from the previous one.
The result is displayed in the second line. Previous value is displayed in the previous line.
Area
Press the button (2) once.The symbol is displayed.
Press button to take the rst measurement (for example, length). Measured value is displayed in the second line.
Press button to take the second measurement (for example, width). Measured value is displayed in the second line. First measurement is displayed in
the rst line. The result of measured area is displayed in the main display area.
Addition / Subtraction of areas
Area measuring – see Area.
Press button (3) to enter into the Addition / Subtraction mode. Area value is displayed in the second line.
Press button (1) to take the rst measurement (for example, length).Press button (1) to take the second measurement (for example, width).
After the completion of area, press button (1), the result of substraction of areas is displayed in the main display area.
If the measurements are not nished, press button (3) to continue calculations.
Volume
For volume measurements, press button (2) twice until the indicator for volume measurement appears on the display.
Press button (1) to take the rst measurement (for example, length). Measured value is displayed in the second line.
Press button (1) to take the second measurement (for example, width). Measured value is displayed in the second line. First measurement is displayed
in the rst line.
Press button (1) to take the third measurement (for example, height). Measured value is displayed in the intermediate rst line.
The volume value will be displayed in the main display area and the previous area value is displayed in the rst line.
7
MEASUREMENT FOUNDATION
Page 8

ROBOT 60
Indirect measurement
Pythagorean measurement is used in the condition that the objective needing to be measured is covered or has no effective reecting
surface and can’t be measured directly.
Make sure you adhere to the prescribed sequence of measurement:
All target points must be in a horizontal or vertical plane.
The best results are achieved when the instrument is rotated about a xed point (e.g. with the positioning bracket fully folded out and the
instrument placed on a wall) or the instrument is mounted on a tripod.
The minimum / maximum function can be used. The minimum value must be used for measurements at right angles to the target; the
maximum distance for all other measurements.
Indirect measurement – determing a distance using 2 auxilary measurements.
E.g. When height and distance can’t be measured directly.
Press button (2) 3 times. The symbol is displayed. The distance to be measured is blinking in the symbol triangle.
Press button (2) to take distance measuring . The result is displayed in the rst line.
Press button (2) to take distance measuring.
After pressing button (2) the result is displayed in the rst line. The result of the function is displayed in the second line.
Indirect measurement – determing a distance using 3 measurements.
Press button (2) 4 times. The symbol is displayed. The distance to be measured is blinking in the symbol triangle.
Press button (1) to take distance measuring (side of the triangle) . The result of the function is displayed in the second line.
Press button (1) to take distance measuring (height of the triangle) . The result of the measurement is displayed in the rst line.
Press button (1) to take distance measuring (side of the triangle) . The result of the function is displayed in the second line.
The result of the measurement is displayed in the second line.
8
MEASUREMENT FOUNDATION
Page 9

ROBOT 60
Storage of constant / historical storage
Storage of constant
You can store and recall a frequently used value (e.g. height of a room). Measure the desired
distance, press and hold the button (6) until
the device beeps to conrm storage.
Recalling the constant
Press the button (6) once to recall the constant
and then press the button (1) to enter it into
your calculation.
History storage
Press the button (6) twice and the previous 20
results (measurements or calculated results)
are shown in reverse order. Use button (3) to
navigate through the records. Press the button
(1) to use the result from the summary line for
further calculations.
MESSAGE CODES
All message codes are displayed with either “Info” or symbol telephone receiver (Error).
Following mistakes can be corrected.
INFO CAUSE REMEDY
204 Calculation overow Repeat procedure
252 Temperature too high Cool down instrument
253 Temperature too low Warm up instrument
255 Receiver signal too weak Use target plate
256 Received signal too
257 Wrong measurement Use target plate (brown
258 Wrong initialization Switch on – off the
ERROR CAUSE REMEDY
Error Hardware error Switch on/off the device
9
strong
MEASUREMENT FOUNDATION
Use target plate (grey
side)
side)
instrument
several times and check if
the symbol still appears. If
so please call your dealer
for assistance.
Page 10

ROBOT 60
TECHNICAL DATA
Range, without target, m 0.05 to 60
Accuracy, mm ±1.5*
Smallest unit displayed 1 mm
Laser class 2
Laser type 635 nm, <1 mW
IP rating IP 54
Automatic switch off 3 minutes of inactivity
Display illumination yes
Battery life, 2 x AAA > 5000 measurements
Dimensions, mm 116×54×35
Weight 155g
Temperature range:
Storage
Operating
* In favourable conditions (good target surface properties, room temperature).
Maximum deviation occurs under unfavorable conditions such as bright sunlight or when measuring to poorly reecting or very rough
surfaces.
-25º to +70º
0º to +40º
10
MEASUREMENT FOUNDATION
Page 11

ROBOT 60
Measuring conditions
Measuring range: the range is limited to 60 m. At night, at dusk and when the target is shadowed the measuring range without target plate is increased.
Use a target plate to increase the measurement range during daylight or if the target has a bad reection.
Measuring Surfaces
Measuring errors can occur when measuring toward colorless liquids (e.g. water) or dust free glass, styrofoam or similar semi-permeable surfaces.
Aiming at high gloss surfaces deects the laser beam and measurement errors can occur. Against non-reective and dark surfaces the measuring time
can be increased.
Precautions
Please, handle the instrument with care.
Avoid viabrations and hits.
During transportation put the instrument into the soft bag.
Note: the instrument should be dry!
Care and cleaning
Do not immerse the instrument in water. Wipe off dirt with a damp, soft cloth. Do not use aggressive cleaning agents or solutions.
Specic reasons for erroneous measuring results
- Measurements through glass or plastic windows;
- Dirty laser emitting window;
- After instrument has been dropped or hit. Please check the accuracy.
- Large uctuation of temperature: if instrument will be used in cold areas after it has been stored in warm areas (or the other way round) please wait some
minutes before carrying out measurements.
Electromagnetic acceptability (EMC)
It cannot be completely excluded that this instrument will disturb other instruments (e.g. navigation systems);
will be disturbed by other instruments (e.g. intensive electromagnetic radiation nearby industrial facilities or radio transmitters).
11
MEASUREMENT FOUNDATION
Page 12

ROBOT 60
Laser classication
The instrument is a laser class 2 laser product accortding to DIN IEC 6082 5-1:2007. It is allowed to use unit without further safety
precautions.
Warranty
This product is warranted by the manufacturer to the original purchaser to be free from defects in material and workmanship under normal
use for a period of two (2) years from the date of purchase.
During the warranty period, and upon proof of purchase, the product will be repaired or replaced (with the same or similar model at
manufactures option), without charge for either parts of labour.
In case of a defect please contact the dealer where you originally purchased this product. The warranty will not apply to this product if it
has been misused, abused or altered. Withiut limiting the foregoing, leakage of the battery, bending or dropping the unit are presumed to
be defects resulting from misuse or abuse.
Exceptions from responsibility
The user of this product is expected to follow the instructions given in operators’ manual.
Although all instruments left our warehouse in perfect condition and adjustment the user is expected to carry out periodic checks of the
product’s accuracy and general performance.
The manufacturer, or its representatives, assumes no responsibility of results of a faulty or intentional usage or misuse including any
direct, indirect, consequential damage, and loss of prots.
The manufacturer, or its representatives, assumes no responsibility for consequential damage, and loss of prots by any disaster (earthquake, storm, ood ...), re, accident, or an act of a third party and/or a usage in other than usual conditions.
The manufacturer, or its representatives, assumes no responsibility for any damage, and loss of prots due to a change of data, loss of data
and interruption of business etc., caused by using the product or an unusable product.
The manufacturer, or its representatives, assumes no responsibility for any damage, and loss of prots caused by usage other thsn explained in the users’ manual.
The manufacturer, or its representatives, assumes no responsibility for damage caused by wrong movement or action due to connecting
with other products.
12
MEASUREMENT FOUNDATION
Page 13

Certicate of acceptance and sale
____________________________________________________________________________
____________________________________________________________________________
___________________________________________________________№_______________
name and model of the instrument
Corresponds to ________________________________________________________________
designation of standard and technical requirements
Data of issue __________________________________________________________________
Stamp of quality control department
Price
Sold ___________________________________ Date of sale ________________________
name of commercial establishment
Page 14

WARRANTY CARD
Name and model of the product ________________________________________________
Serial number ________________date of sale_______________________
Name of commercial organization _____________________stamp of commercial organization
Warranty period for the instrument explotation is 24 months after the date of original retail purchase. It extends to the equipment, imported on the RF
territory by ofcial importer.
During this warranty period the owner of the product has the right for free repair of his instrument in case of manufacturing defects.
Warranty is valid only with original warranty card, fully and clear lled (stamp or mark of thr seller is obligatory).
Technical examination of instruments for fault identication which is under the warranty, is made only in the authorized service center.
In no event shall manufacturer be liable before the client for direct or consewuential damages, loss of prot or any other damage which occur in the result
of the instrument outage.
The product is received in the state of operability, without any visible damages, in full completeness. It is tested in my presence. I have no complaints to
the product quality. I am familiar with the conditions of qarranty service and i agree.
purchaser signature _______________________________
Before operating you should read service instruction!
If you have any questions about the warranty service and technical support contact seller of this product
Page 15

WARRANTY DOESN’T EXTEND TO FOLLOWING CASES:
1. If the standard or serial product number will be changed, erased, removed or wil be unreadable.
2. Periodic maintenance, repair or changing parts as a result of their normal runout.
3. All adaptations and modications with the purpose of improvement and expansion of normal sphere of product application, mentioned in the service instruction, without tentative written agreement of the expert provider.
4. Service by anyone other than an authorized service center.
5. Damage to products or parts caused by misuse, including, without limitation, misapplication or nrgligence of the terms of service
instruction.
6. Power supply units, chargers, accessories, wearing parts.
7. Products, damaged from mishandling, faulty adjustment, maintenance with low-quality and non-standard materials, presence of any
liquids and foreign objects inside the product.
8. Acts of God and/or actions of third persons.
9. In case of unwarranted repair till the end of warranty period because of damages during the operation of the product, it’s transportation and storing, warranty doesn’t resume.
Page 16

Page 17
Руководство по эксплуатации
Лазерный дальномер
Модель: ROBOT 60
Производитель: ADAINSTRUMENTS Адрес: WWW.ADAINSTRUMENTS.COM
Page 18

ROBOT 60
Оглавление
1. Начало работы . . . . . . . . . . . . . . . . . . . . . . . . . . . . . . . . . . . . . . . . . . . . . . . . . . . . 19
2. Функции меню . . . . . . . . . . . . . . . . . . . . . . . . . . . . . . . . . . . . . . . . . . . . . . . . . . . . . 22
3. Измерения . . . . . . . . . . . . . . . . . . . . . . . . . . . . . . . . . . . . . . . . . . . . . . . . . . . . . . . 23
4. Функции . . . . . . . . . . . . . . . . . . . . . . . . . . . . . . . . . . . . . . . . . . . . . . . . . . . . . . . . . 24
5. Предупреждения на дисплее . . . . . . . . . . . . . . . . . . . . . . . . . . . . . . . . . . . . . . . . . . . . 28
6. Технические характеристики . . . . . . . . . . . . . . . . . . . . . . . . . . . . . . . . . . . . . . . . . . . . . 29
7. Условия измерений . . . . . . . . . . . . . . . . . . . . . . . . . . . . . . . . . . . . . . . . . . . . . . . . . .30
8. Меры предосторожности . . . . . . . . . . . . . . . . . . . . . . . . . . . . . . . . . . . . . . . . . . . . . . . 30
9. Уход за прибором . . . . . . . . . . . . . . . . . . . . . . . . . . . . . . . . . . . . . . . . . . . . . . . . . . 30
10. Возможные причины ошибочных результатов измерений . . . . . . . . . . . . . . . . . . . . . . . . . . . . 30
11. Электромагнитная совместимость . . . . . . . . . . . . . . . . . . . . . . . . . . . . . . . . . . . . . . . . . . 31
13. Класссификация лазера . . . . . . . . . . . . . . . . . . . . . . . . . . . . . . . . . . . . . . . . . . . . . . 31
14. Инструкция по безопасности . . . . . . . . . . . . . . . . . . . . . . . . . . . . . . . . . . . . . . . . . . . . . 31
15. Гарантия . . . . . . . . . . . . . . . . . . . . . . . . . . . . . . . . . . . . . . . . . . . . . . . . . . . . . . . 32
16. Освобождение от ответственности . . . . . . . . . . . . . . . . . . . . . . . . . . . . . . . . . . . . . . . . . 32
17. Приложение 1 - “Свидетельство о приемке и продаже”
18. Приложение 2 - “Гарантийный талон”
18
MEASUREMENT FOUNDATION
Page 19

ROBOT 60
Поздравляем Вас с приобретением лазерного дальномера ADA ROBOT 60!
Назначение инструмента
Лазерный дальномер ADA ROBOT 60 позволит Вам:
- измерять расстояния дистационно,
- вычислять функции: сложение, вычитание, площади, объема, расстояния по теореме Пифагора,
- сохранять измеренные значения в память.
Руководство пользователя должно быть тщательно изучено перед тем, как Вы начнете измерения. Лицо, ответственное
за прибор, должно удостовериться, что все пользователи лазерного дальномера следуют данному Руководству.
Инструкция по безопасной эксплуатации прибора
ЗАПРЕЩАЕТСЯ:
Использование прибора не по инструкции и использование, выходящее за пределы разрешенных операций
Использование прибора во взрывоопасной среде (АЗС, газовое оборудование, химическое производство и т.д.)
Вывод прибора из строя и удаление с прибора предупредительных и указательных надписей
Вскрытие прибора с помощью инструментов (отверток и т.д.), изменение конструкции прибора или его модификация
Намеренное ослепление лазером третьих лиц, прямое наведение прибора на солнце
Смотреть на лазерный луч
Ненадлежащие меры безопасности на участке проведения геодезиической съемки (например, при проведении измерений на дорогах, строительных площадках и т.д.)
Использование прибора в местах, где это может быть потенциально опасно: на воздушном транспорте, вблизи производств и
технологических объектов, в местах, где работа дальномер
Классификация лазерного прибора
Класс лазера 2. Мощность излучения менее 1 mW. Длинна волны лазера 635 нм.
Лазер является безопасным в нормальных условиях эксплуатации и в поддающихся прогнозированию ситуациях.
а может привести к вредному воздействию на людей или животных
19
MEASUREMENT FOUNDATION
Page 20
НАЧАЛО РАБОТЫ
НАЧАЛО РАБОТЫ
Клавишная панель
ROBOT 60
1
2
4
1. Кнопка включения/измерения
2. Площадь/объем/косвенные измерения (по теореме Пифагора)
3. Сложение, вычитание, изменение единиц измерения
4. Выбор точки отсчета, подсветка
5. Стереть, выкл
6. Память
20
3
6
5
MEASUREMENT FOUNDATION
Page 21
ROBOT 60
Дисплей
4
5 6 7 8 9
1
2
10
11
3
12
13
1 Лазер “ВКЛ”
2 Точка отсчета (верхний край/ нижний край)
3 Вычисление площадь/объем/косвенные измерения (по теореме Пифагора)
4 Ошибка
5 Статус батареи
6 Сохранение измерений
7 Количество сохраненных значений
8 Установленное время измерений
9. Измерение поверхности стены
10. Единица измерения
11. Строка 1
12. Строка 2
13. Основная строка
21
MEASUREMENT FOUNDATION
Page 22

ROBOT 60
Установка/замена элементов питания
1. Снимите крышку отсека для батарей.
2. Поместите в него новые элементы питания. Соблюдайте полярность.
3. Закройте отсек для батареи.
4.Замените элементы питания, когда на дисплее символ батареи будет обозначать полную разрядку.
Если прибор не будет использоваться долгое время, извлеките батареи.
ФУНКЦИИ МЕНЮ
Включение / выключение прибора
Нажмите один раз кнопку (1) : прибор и лазер включены.
При более длительном нажатии на эту клавишу происходит включение режима трекинг.
Прибор отключается автоматически через три минуты после последнего выполненного действия если не были
нажаты никакие клавиши.
Для выключения дальномера нажмите на кнопку (5) в течении 2 секунд.
Выбор точки отсчета
По умолчанию прибор производит измерения от его нижней поверхности. На клавишной панели нажимая кнопку (4) выберите точку отсчета: верхняя чаять дальномера, нижняя часть дальномера. Если позиционная скоба
развернута, прибор распознает ее положение и проводит измерение от нижней части скобы. На экране прибора
отображается выбранная точка отсчета измерений.
Выбор единиц измерения
На клавишной панели нажав кнопку (3) в течении 2 секунд, выберите единицу измерения.
22
MEASUREMENT FOUNDATION
Page 23

ROBOT 60
Включение / выключение подсветки
На клавишной панели нажав кнопку (4) в течении 2 секунд, включите/выключите подсветку экрана.
Отмена последнего действия
На клавишной панели нажмите клавишу (5).
ИЗМЕРЕНИЯ
Однократное измерение расстояния
Нажмите однократно на кнопку (1) для включения прибора, активации лазерного указателя.
Нажмите еще раз для проведения измерения. Прозвучит звуковой сигнал. Результат измерения отобразится на дисплее.
Непрерывное измерение расстояния
При длительном нажатии кнопки (1) включается функция — режим трекинг (непрерывного измерения расстояния с
интервалом 1 сек.).
Измерения минимальных/максимальных расстояний
Эта функция позволяет пользователю измерять минимальные или максимальные расстояния от зафиксированной
точки. Чаще всего эта функция используется для измерения диагоналей (максимальное значение) или горизонтальных
расстояний до вертикальной поверхности (минимальное значение). Нажимайте и удерживайте клавишу (1), пока вы не
услышите звуквой сигнал, сигнализирующий, что прибор находится в режиме непрерывного измерения. Затем медленно
перемещайте лазерный луч соответственно влево - вправо, например, вверх и вниз в районе цели.
Нажмите клавишу (1) еще раз, и режим непрерывного измерения будет отключен. Значения максимального и минимального
расстояния будут отображены на дисплее. Результат последнего измерения будет также отображен в главной строке
дисплея.
23
MEASUREMENT FOUNDATION
Page 24

ROBOT 60
ФУНКЦИИ
Сложение / Вычитание
Измерение расстояния.
Нажмите кнопку (3) : следующее измерение суммируется к предыдущему.
Нажмите кнопку (3) : следующее измерение вычитается из предыдущего.
Повторяйте эту функции столько раз, сколько это Вам необходимо для измерения необходимых расстояний.
Результат отображается в строке 2 , предыдущее измеренное значение отображается в строке 1.
Функция вычисления площади
Нажмите один раз кнопку (2): Отображается значок площадь .
Нажмите: производится измерение первого значения расстояния (например, длины). Измеренное значение отображается в строке 2.
Нажмите: производится измерение второго значения расстояния (например, ширины). Измеренное значение
отображается в строке 2. Первое измеренное значение (например, длина) отображается в строке 1.
Результат измерения площади отображается в основной строке.
Сложение и вычитание площадей
Измерение по площади. (см. Функция вычисления площади)
Нажмите кнопку (3) для вызова функции Сложение / Вычитание. Значение вычесленной площади отображается в
строке 2.
Нажмите кнопку (1) : производится измерение первого значения расстояния (например, длины)
Нажмите кнопку (1) : производится измерение второго значения расстояния (например, ширины)
Если измерения закончены — нажмите кнопку (1) и результат сложения площадей отобразиться в основной
24
MEASUREMENT FOUNDATION
Page 25

ROBOT 60
строке. Если измерения не закончены и нужно сложить или вычесть из полученного результата следующее значение площади Нажмите кнопку (3) и продолжите вычисления.
Функция вычисления объема
Нажмите два раза кнопку (2) : Отображается значок .
Нажмите (1) : производится измерение первого значения расстояния (например, длины). Значение отобразится
в строке 2.
Нажмите (1) : производится измерение второго значения расстояния (например, ширины). Значение отобразится в строке 2, а первое значение отобразится в строке 1.
Нажмите (1): производится измерение третьего значения расстояния (например, высоты). Значение отображается в промежуточной строке 1.
Результат измерения объема отображается в итоговой строке. Ранее вычесленное значение площади отобража-
ется в строке 1.
Косвенное измерение
Прибор может производить измерение расстояний по теореме Пифагора. Эта процедура помогает измерять расстояния в труднодоступных местах.
Придерживайтесь ранее предписанной последовательности измерений:
• Все точки измерения должны быть расположены по вертикали или горизонтали на поверхности стены.
• Лучшие результаты достигаются, когда прибор поворачивается вокруг неподвижной точки (например, нижняя
часть прибора прижата к неподвижной поверхности, например к стене).
• Для произведения измерения может быть вызвана функция трекинг (Непрерывное измерение расстояния). Эта
функции может быть использована для оценки и измерения минимального/максимального значения. Минимальное значение используется для произведения измерений, которые должны находиться под прямым углом к точке
измерения; максимальное расстояние используется для всех других измерений.
25
MEASUREMENT FOUNDATION
Page 26

ROBOT 60
Удостоверьтесь, что первое измерение и измеряемое расстояние измеряются под прямыми углами. Используйте
функцию трекинга (непрерывное измерение расстояния).
Косвенное измерение - определение расстояния с помощью двух дополнительных измерений (по Теореме
“Пифагора”)
Косвенные измерения — измерение катета по гипотенузе и катету
Функция полезна при измерении недоступных высот, расстояний.
Нажмите кнопку (2) три раза . Отображается значок треугольник
Расстояние, которое предстоит измерить, мигает в значке треугольник.
Нажмите (2): производится измерение расстояния (гипотенуза треугольника) . Результат функции отображается в
строке1. Второе расстояние, которое предстоит измерить, вспыхивает в значке треугольник.
Нажмите (2) : производится измерение расстояния (любой из двух катетов треугольника).
Очень важно произвести второе измерение, строго выдерживая прямой угол между лучом лазера и отрезком, длину,
которого Вы хотите косвенно измерить. Поэтому измерение производится в режиме трекинг. После нажатия кнопки (2)
фиксируется минимальное расстояние. Результат измерения отображается в строке1.
Результат функции отображается в строке 2.
Косвенные измерения — измерение гипотенузы по двум катетам и высоте
Функция полезна при измерении диагоналей прямоугольных помещения, участков; а также для вычисления длины стропила, наклонных расстояний и т.п.
Нажмите кнопку (2) четыре раза. Отображается значок треугольник
Расстояние, которое предстоит измерить, мигает в значке треугольник.
26
MEASUREMENT FOUNDATION
Page 27

ROBOT 60
Нажмите (1): производится измерение расстояния (сторона треугольника). Результат функции отображается в
строке 2.
Второе расстояние, которое предстоит измерить, вспыхивает в значке треугольник.
Нажмите (1): производится измерение расстояния (высота треугольника) . Результат измерения отображается в строке 1.
Нажмите (1): производится измерение расстояния (сторона треугольника). Результат функции отображается в строке 2.
Результат измерения отображается в строке 2.
Сохранение констант / использование памяти
Сохранение констант
Часто бывает необходимо сохранять и использовать часто употребляемые значения величин, например, высоту
помещения. Измерьте расстояние, значение которого хотите сохранить, затем нажмите и удерживайте кнопку (6),
пока прибор звуковым сигналом не подтвердит ее сохранение в памяти.
Вызов константы из памяти
Нажмите кнопку (6) для вызова константы из памяти. Ее значение можно использовать для дальнейших
вычислений, нажав кнопку (1).
Память
Нажмите кнопку (6) дважды кратковременно и Вы сможете просмотреть 20 значений (измерений или результатов
вычислений) в обратном порядке. Используя клавишу (3) вы можете просмотреть содержимое памяти. нажатием
клавишы (1) вы можете использовать выбранный результат для дальнейших вычислений.
27
MEASUREMENT FOUNDATION
Page 28

ROBOT 60
ПРЕДУПРЕЖДЕНИЯ НА ДИСПЛЕЕ
Все предупреждения на дисплее отображаются с значком InFo и кодом ошибки или значок телефонная трубка (Ошибка).
Следующие ошибки могут быть исправлены.
Info Причина Метод исправления ошибки
204
Ошибка вычисления Повторите процедуру
252
Перегрев прибора Дайте устройству охладиться
253
Слишком низкая температура Согрейте прибор
255
Принятый сигнал слишком слабый,
время измерения слишком длительное
256
Полученный сигнал слишком сильный Используйте визирную пластину (серая сторона)
257
Ошибочное измерение, слишком много
фонового света
258
Ошибка инициализации Выключите-включите прибор
Ошибка Причина Метод исправления ошибки
Error
Ошибка прибора Если это сообщение остается активным после несколь-
Используйте визирную пластину
Используйте визирную пластину (коричневая сторона)
ких отключений и включений инструмента, пожалуйста,
обратитесь к авторизованному дилеру.
28
MEASUREMENT FOUNDATION
Page 29

ROBOT 60
ТЕХНИЧЕСКИЕ ХАРАКТЕРИСТИКИ
Дальность без отражателя, м 0,05-60
Точность, мм ±1,5мм*
Наименьшая используемая единица измерения, мм 1 мм
Класс лазер 2
Тип лазера 635 нм, <1 мВт
Защита от брызг и пыли IP 54, пыле- и влагозащищенный
Автоматическое отключение, сек. через 180 с
Подсветка дисплея да
Срок службы батареи, 2 х ААА более 5 000 измерений
Размер, мм 116 х 54 х 35
Вес 155 г
Температурный диапазон: хранение
Работа с прибором
*при благоприятных условиях работы (хорошие отражательные свойства поверхности, комнатная температура). При
неблагоприятных условиях, таких как интенсивный солнечный свет, плохие отражательные свойства визирной пластины или высокотемпературные колебания, точность может ухудшиться.
-25ºС - +70ºС
0ºС - +40ºС
29
MEASUREMENT FOUNDATION
Page 30

ROBOT 60
Условия измерений
Дальность измерений
Гарантированный диапазон измерений — до 60 м.
В ночное время, в сумерках, либо если объект, до которого производится измерения затенен, дальность измерений может быть
больше заявленной призводителем. Используйте визирную пластину для того, чтобы увеличить дальность измерений при ярком
освещении, или если объект до которого проводится измерение, имеет плохую отражающую поверхность.
Поверхности, до которых производятся измерения
Возможны ошибки, если измерение производится до прозрачных поверхностей (вода, стекло, полупрозрачные пластики). Также
возможны ошибки при измерении до глянцевых и зеркальных поверхностей.
Меры предосторожности
Пожалуйста, бережно обращайтесь с прибором. Не подвергайте прибор прямому воздействию тепла, воды, ударам и вибрации.
При транспортировке убирайте прибор в чехол. Прибор можно убирать в чехол только сухим!
Уход за прибором
При загрязнении прибора протирайте его мягкой, влажной салфеткой. Не применяйте растворители и реактивы. Протирайте
оптику прибора мягкой, сухой салфеткой.
Возможные причины ошибочных результатов измерений
Загрязнено окно оптической части прибора,
Прибор уронили или ударили. В этом случае проверьте прибор в авторизованном сервисном центре.
Сильные колебания температуры: если после хранения в тепле прибор используется при низкой температуре. В этом случае
подождите несколько минут, перед тем как начать работать с прибором. Измерение до зеркальных, сильно рассеивающих, поверхностей с неоднородной структурой, полупрозрачных поверхностей и т.п.
30
MEASUREMENT FOUNDATION
Page 31

ROBOT 60
Электромагнитная совместимость (EMC)
не исключено, что работа прибора может повлиять на работу других
•
на работу лазерного построителя плоскостей может повлиять работа других приборов (например, интенсивное
•
электромагнитное излучение от промышленного оборудования или радиоприборов).
Классификация лазера
ADA ROBOT 60 излучает видимый лазерный луч из передней части. Данный прибор является лазером класса 2 в
соответствии с DIN IEC 60825-1:2007 “безопасность лазерный изделий”, что позволяет использовать устройство
выполняя меры предосторожности (см. инструкцию).
Инструкция по безопасности
- Пожалуйста, следуйте инструкциям, которые даны в руководстве пользователей.
- Не смотрите на лазерный луч. Лазерный луч может повредить глаза, даже если вы смотрите на него с большого
расстояния.
- Не направляйте лазерный луч на людей или животных.
- Используйте прибор выше/ниже уровня глаз.
- Используйте прибор только для измерений.
- Не вскрывайте прибор. Ремонт должен производиться только авторизованной мастерской. Пожалуйста, свяжитесь
с вашим местным дилером. Не выкидывайте и не удаляйте предупредительные этикетки или инструкции по
безопасности.
- Держите прибор в недоступном для детей месте.
- Не используйте прибор вблизи взрывоопасных веществ.
устройств (например, системы навигации);
31
MEASUREMENT FOUNDATION
Page 32

ROBOT 60
Гарантия
Производитель предоставляет гарантию на продукцию покупателю в случае дефектов материала или качества его изготовления
во время использования оборудования с соблюдением инструкции пользователя на срок до 1 года со дня покупки.
Во время гарантийного срока, при предъявлении доказательства покупки, прибор будет починен или заменен на такую же или
аналогичную модель бесплатно. Гарантийные обязательства также распространяются и на запасные части.
В случае дефекта, пожалуйста, свяжитесь с дилером, у которого вы приобрели прибор. Гарантия не распространяется на
продукт, если повреждения возникли в результате деформации, неправильного использования или ненадлежащего обращения.
Все вышеизложенные безо всяких ограничений причины, а также утечка батареи, деформация прибора являются дефектами,
которые возникли в результате неправильного использования или плохого обращения.
Освобождение от ответственности
Пользователю данного продукта необходимо следовать инструкциям, которые приведены в руководстве по эксплуатации. Даже,
несмотря на то, что все приборы проверены производителем, пользователь должен проверять точность прибора и его работу.
Производитель или его представители не несут ответственности за прямые или косвенные убытки, упущенную выгоду или
иной ущерб, возникший в результате неправильного обращения с прибором.
Производитель или его представители не несут ответственности за косвенные убытки, упущенную выгоду, возникшие в
результате катастроф (землетрясение, шторм, наводнение и т.д.), пожара, несчастных случаев, действия третьих лиц и/или
использование прибора в необычных условиях.
Производитель или его представители не несут ответственности за косвенные убытки, упущенную выгоду, возникшие в
результате изменения данных, потери данных и временной приостановки бизнеса и т.д., вызванных применением прибора.
Производитель или его представители не несут ответственности за косвенные убытки, упущенную выгоду, возникшие в
результате использования прибора не по инструкции.
32
MEASUREMENT FOUNDATION
Page 33

ГАРАНТИЙНЫЕ ОБЯЗАТЕЛЬСТВА НЕ РАСПРОСТРАНЯЮТСЯ НА СЛЕДУЮЩИЕ СЛУЧАИ:
1.Если будет изменен, стерт, удален или будет неразборчив типовой или серийный номер на изделии;
2.Периодическое обслуживание и ремонт или замену запчастей в связи с их нормальным износом;
3.Любые адаптации и изменения с целью усовершенствования и расширения обычной сферы применения
изделия, указанной в инструкции по эксплуатации, без предварительного письменного соглашения специалиста поставщика;
4.Ремонт, произведенный не уполномоченным на то сервисным центром;
5.Ущерб в результате неправильной эксплуатации, включая, но не ограничиваясь этим, следующее: использовнаие изделия не по назначению или не в соответствии с инструкцией по эксплуатации на прибор;
6.На элементы питания, зарядные устройства, комплектующие, быстроизнашивающиеся и запасные части;
7. Изделия, поврежденные в результате небрежного отношения, неправильной регулировки, ненадлежащего
технического обслуживания с применением некачественных и нестандартных расходных материалов, попадания жидкостей и посторонних предметов внутрь.
8.Воздействие факторов непреодолимой силы и/или действие третьих лиц;
9.В случае негарантийного ремонта прибора до окончания гарантийного срока, произошедшего по причине
полученных повреждений в ходе эксплуатации, транспортировки или хранения, и не возобновляется.
Page 34

ГАРАНТИЙНЫЙ ТАЛОН
Наименование изделия и модель ________________________________________________
Серийный номер ______________________Дата продажи_______________
Наименование торговой организации ___________________Штамп торговой организации мп.
Гарантийный срок эксплуатации приборов составляет 24 месяца со дня продажи и распространяется на оборудование, ввезенное на территорию РФ официальным импортером.
В течении гарантийного срока владелец имеет право на бесплатный ремонт изделия по неисправностям, являющимся следствием производственных дефектов.
Гарантийные обязательства действительны только по предъявлении оригинального талона, заполненного полностью и четко (наличие печати и штампа с наименованием и формой собственности продавца обязательно).
Техническое освидетельствование приборов (дефектация) на предмет установления гарантийного случая производится только в авторизованной мастерской.
Производитель не несет ответственности перед клиентом за прямые или косвенные убытки, упущенную выгоду или
иной ущерб, возникшие в результате выхода из строя приобретенного оборудования.
Правовой основой настоящих гарантийных обязательств является действующее законодательство, в частности, Федеральный закон РФ “О защите прав потребителя” и Гражданский кодекс РФ ч.II ст. 454-491.
Товар получен в исправном состоянии, без видимых повреждений, в полной комплектности, проверен в моем присутствии, претензий по качеству товара не имею. С условиями гарантийного обслуживания ознакомлен и согласен.
Подпись получателя_________________________________
По вопросам гарантийного обслуживания и технической поддержки обращаться к продавцу данного товара
Перед началом эксплуатации внимательно ознакомьтесь с инструкцией по эксплуатации!
Page 35

СВИДЕТЕЛЬСТВО О ПРИЕМКЕ И ПРОДАЖЕ
______________________________________________________________________________________________
______________________________________________________________________________________________
_____________________________________________________________________________№_______________
НАИМЕНОВАНИЕ И ТИП ПРИБОРА
Соответствует __________________________________________________________________________________
обозначение стандарта и технических условий
Дата выпуска ___________________________________________________________________________________
Штамп ОТК (клеймо приемщика)
Цена
Продан(а) ___________________________________________________Дата продажи ________________________
Page 36

 Loading...