

Page 1
WARNING:THIS PRODUCT CONTAINS A BUTTON-CELL BATTERY. IF SWALLOWED, IT
N
LIMITED ONE YEAR WARRANTY
Chaney Instrument Company warrants that all products it manufactures to be of good material and workmanship and to be free of
defects if properly installed and operated for a period of one year from date of purchase. REMEDY FOR BREACH OF THIS
WARRANTY IS EXPRESSLY LIMITED TO REPAIR OR REPLACEMENT OF DEFECTIVE ITEMS. Any product which, under normal use
and service, is proven to breach the warranty contained herein within ONE YEAR from date of sale will, upon examination by
Chaney, and at its sole option, be repaired or replaced by Chaney. In all cases, transportation costs and charges for returned
goods shall be paid for by the purchaser. Chaney hereby disclaims all responsibility for such transportation costs and charges.
This warranty will not be breached, and Chaney will give no credit for products it manufactures which shall have received normal
wear and tear, been damaged, tampered, abused, improperly installed, damaged in shipping, or repaired or altered by others than
authorized representatives of Chaney.
THE ABOVE-DESCRIBED WARRANTY IS EXPRESSLY IN LIEU OF ALL OTHER WARRANTIES, EXPRESS OR IMPLIED, AND ALL
OTHER WARRANTIES ARE HEREBY EXPRESSLY DISCLAIMED, INCLUDING WITHOUT LIMITATION THE IMPLIED WARRANTY OF
MERCHANTABILITYAND THE IMPLIED WARRANTY OF FITNESS FOR A PARTICULAR PURPOSE. CHANEY EXPRESSLY DISCLAIMS
ALL LIABILITY FOR SPECIAL, CONSEQUENTIAL OR INCIDENTAL DAMAGES, WHETHER ARISING IN TORT OR BY CONTRACT FROM
ANY BREACH OF THIS WARRANTY. SOME STATES DO NOT ALLOW THE EXCLUSION OR LIMITATION OF INCIDENTAL OR
CONSEQUENTIALDAMAGES, SO THE ABOVE LIMITATION OR EXCLUSION MAY NOT APPLY TO YOU. CHANEY FURTHER DISCLAIMS
ALL LIABILITY FROM PERSONAL INJURY RELATING TO ITS PRODUCTS TO THE EXTENT PERMITTED BY LAW. BY ACCEPTANCE
OF ANY OF CHANEY'S EQUIPMENT OR PRODUCTS, THE PURCHASER ASSUMES ALL LIABILITY FOR THE CONSEQUENCES
ARISING FROM THEIR USE OR MISUSE. NO PERSON, FIRM OR CORPORATION IS AUTHORIZED TO ASSUME FOR CHANEY ANY
OTHER LIABILITY IN CONNECTION WITH THE SALE OF ITS PRODUCTS. FURTHERMORE, NO PERSON, FIRM OR CORPORATION IS
AUTHORIZEDTO MODIFY OR WAIVE THE TERMS OF THIS PARAGRAPH, AND THE PRECEDING PARAGRAPH, UNLESS DONE IN
WRITING AND SIGNED BY A DULY AUTHORIZED AGENT OF CHANEY. THIS WARRANTY GIVES YOU SPECIFIC LEGAL RIGHTS, AND
MAYALSO HAVE OTHER RIGHTS WHICH VARY FROM STATE TO STATE.
YOU
COULD CAUSE SEVERE INJURY OR DEATH IN JUST 2 HOURS.
SEEK MEDICAL ATTENTION IMMIDIATELY IF INGESTED.
~~~-
TUE
Forecast Outdoor w
Ne~
~
I 1:32 ••
6/ 1B
YB~
For in-warranty repair, please contact:
Customer Care Department
Chaney Instrument Company
965 Wells Street
Lake Geneva, WI 53147
This device complies with part 15 of the FCC rules. Operation is subject to the
following two conditions:
1- This device may NOT cause harmful interference, and
2- This device must accept any interference received, including interference that
may cause undesired operation.
NOTE: This equipment has been tested and found to comply with the limits for a Class B digital device,
pursuant to Part 15 of the FCC rules. These limits are designed to provide reasonable protection
against harmful interference in a residential installation. This equipment generates, uses and can
radiate radio frequency energy and, if not installed and used in accordance with the instructions, may
cause harmful interference to radio communications. However, There is no guarantee that interference
will not occur in a particular installation. If this equipment does cause harmful interference to radio or
television reception, which can be determined by turning the equipment off and on, the user is
encouraged to try to correct the interference by one or more of the following measures:
• Reorient or relocate the receiving antenna.
• Increase the separation between the equipment and the receiver.
• Connect the equipment into an outlet on a circuit different from that to which the
receiver is connected.
• Consult the dealer or an experienced radio/TV technician for help.
NOTE: The manufacturer is not responsible for any radio or TV interference caused by unauthorized
modifications to this equipment. Such modifications could void the user authority to operate the
equipment.
Patent numbers: 5,978,738; 6,076,044; 6,597,990; US 7,637,141 B2
"'-Y3
~
learning mode
WED THU
~
,,,,,,,,,
.!c 50 SBT .!c60 61T
LO HI LO HI LO HI LO HI
5~T
LO HI
'""'29.98-.
~
'-16!
lQOFindoor 3 3~
FRI◊
16T
.!c 10
.!cl,? BOT
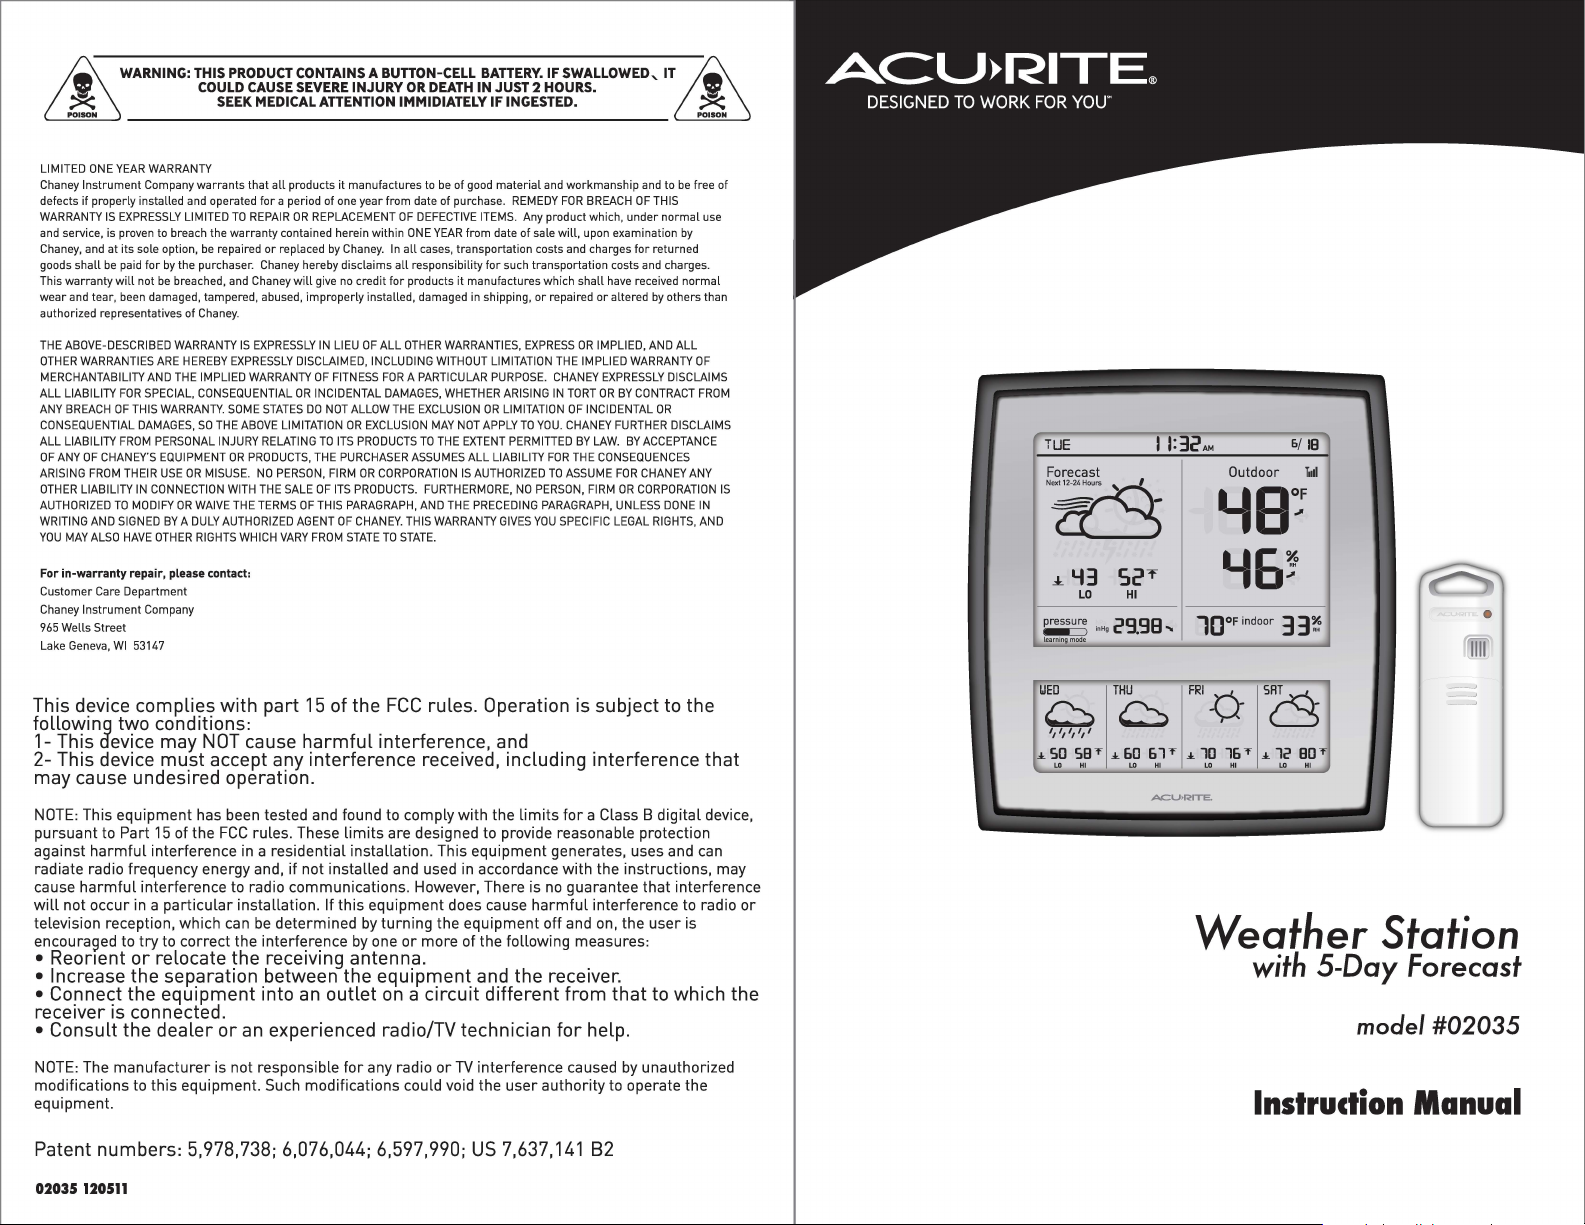
Weather Station
with 5-Day Forecast
Instruction Manual
s~
mode/#02035
02035 120511
Page 2
Overview
Introduction
The AcuRite® Weather Station with wireless outdoor sensor
collects outside weather data and sends it wirelessly to the Display
Console via radio frequency. This weather forecaster has been
designed to be easy to install and use.
This weather station features a NEW Precision 5-Day Weather
Forecasting technology, which allows you to select one of seven
geographic regions to give you a detailed, accurate forecast-from
your own backyard! The easy to read forecast display predicts
your cloud cover, high and low temperatures, and chance of
precipitation over the next
patterns and changes in great detail.
The sleek display console houses a liquid crystal display (LCD)
which will calculate and display all the weather data received from
the wireless sensor outside. The display console features a pressure
sensor for measuring barometric pressure, a temperature sensor
for measuring indoor temperature and a humidity sensor for
measuring indoor humidity. The Display Console is powered with
three "AA" alkaline batteries (not included).
The outdoor sensor is completely wireless and contains a
temperature sensor for measuring indoor temperature and a
humidity sensor for measuring relative humidity. The wireless
outdoor sensor is powered with two "AA" alkaline or lithium
batteries (not included).
5 days by analyzing your weather
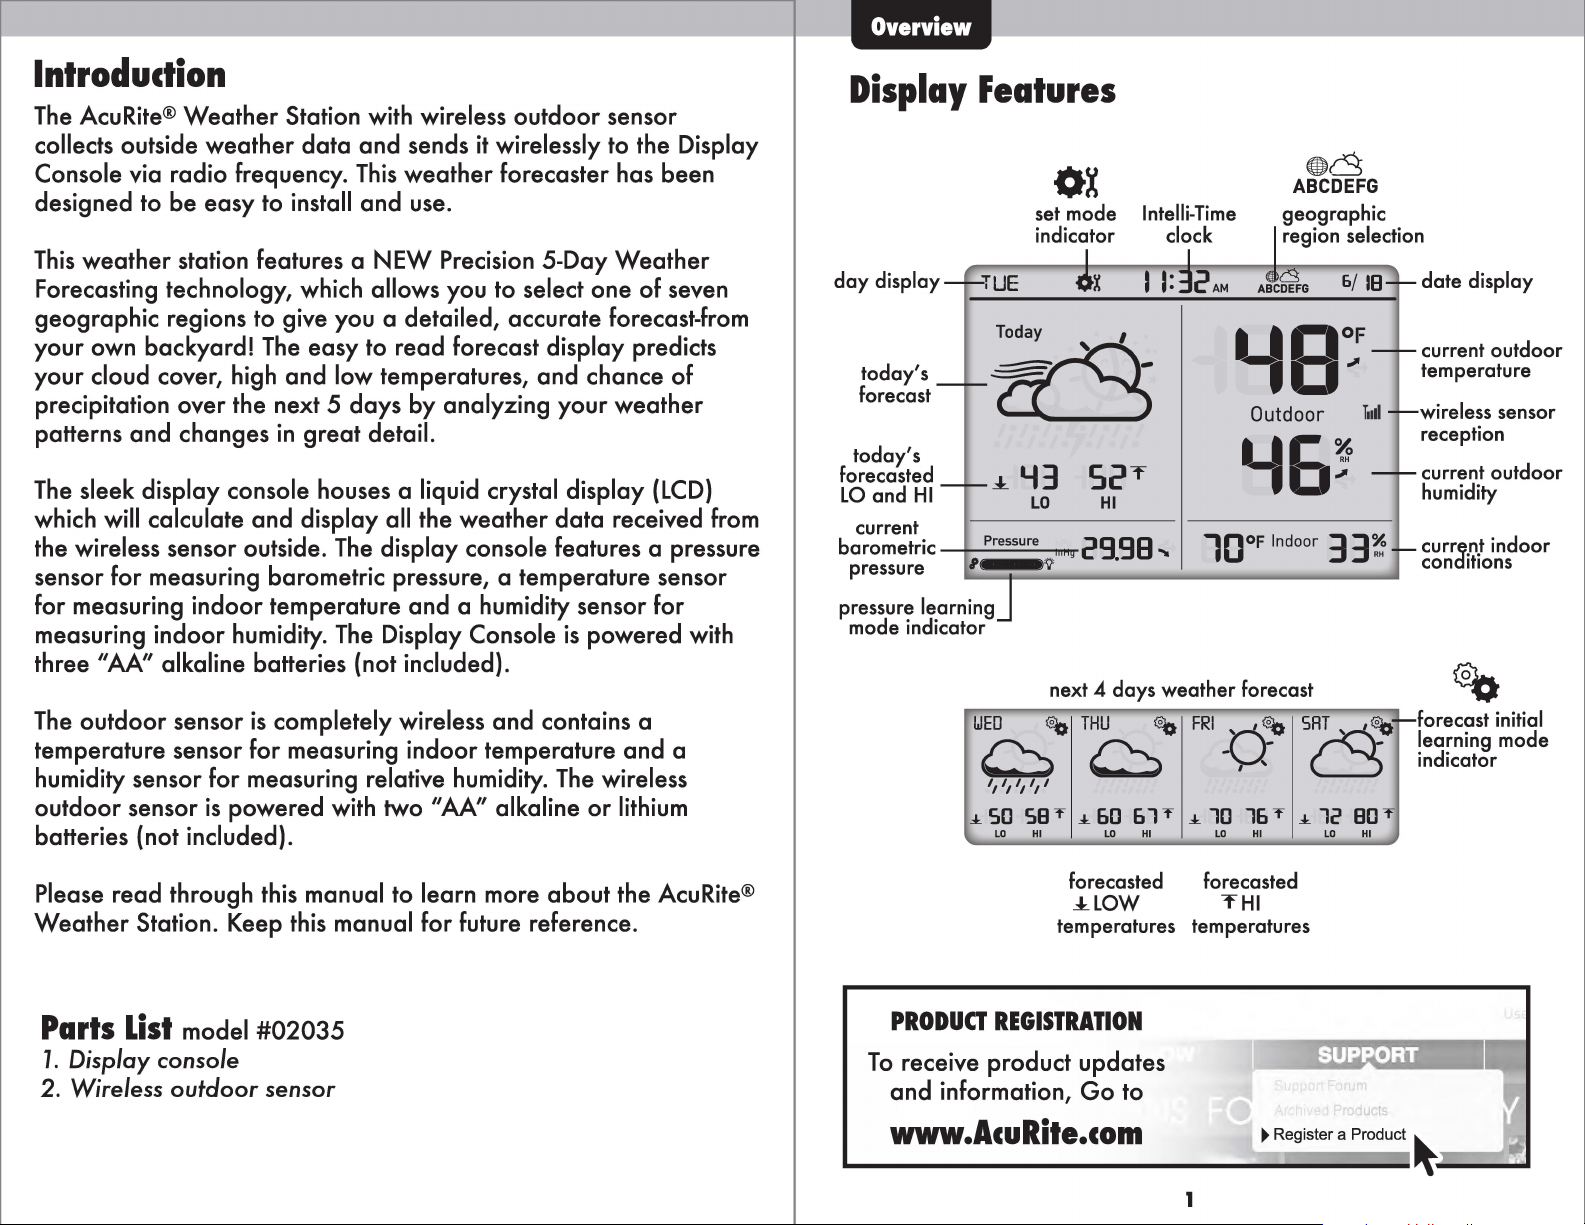
Display Features
ox
day display
today's
forecast
today's
forecasted
LO and HI
current
barometric
pressure
pressure learning
mode indicator
,
WED
cl. 50 SBT
_:l_ '-13
Pressure
D
1, II II II I
LO HI
S2T
LO HI
29.98--
,;.>
next
THU @o
@o
D
cl. 60
ABCDEFG
Outdoor T.111
l□ OF
4 days weather forecast
FRl◊@o
61T
LO
cl. 10
HI
Indoor 3 3~ curr~.n.t indoor
16T
LO
HI
.~
forecast initial
-
scJ
cl. le' BOT
LO HI
learning mode
indicator
date display
current outdoor
temperature
wireless sensor
reception
current outdoor
humidity
cond1t1ons
Please read through this manual to learn more about the AcuRite®
Weather Station. Keep this manual for future reference.
Parts List model #02035
1. Display console
2. Wireless outdoor sensor
forecasted forecasted
_:i_LOW THI
temperatures temperatures
PRODUCTREGISTRATION
To receive product updates
and information, Go to
www.AcuRite.com
1
$UPPORT
►
Register a Product ~--
Page 3
SETUP SETUP
Battery Choice & Temperature Range
Extended periods of cold temperatures ( below -4°F / -20°C ) can cause
alkaline batteries to function improperly. This will cause the outdoor
wireless sensor to stop transmitting readings. Use lithium batteries in
these low temperature conditions to ensure continued operation for
wireless sensors placed outdoors.
LITHIUM ttt,p
BATTERIES ._.,_ .. _ ..__ ,Iii.Iii.
ALKALINE
BATTERIES
=Li•W4
■
(70°C)158°F I
etwiiH®(7QOC)1ssoF1
A/B/C Wireless Selection
To allow for more than one weather station and wireless sensor
network to be used in close rroximity, the display unit and the
wireless sensor have a smal switch fabeled "A B C" within the
battery compartments. This switch selects one of 3 wireless modes
to use, and both switches MUST be set in matching positions (either
A, B, or C) fore wireless communication to take place successfully.
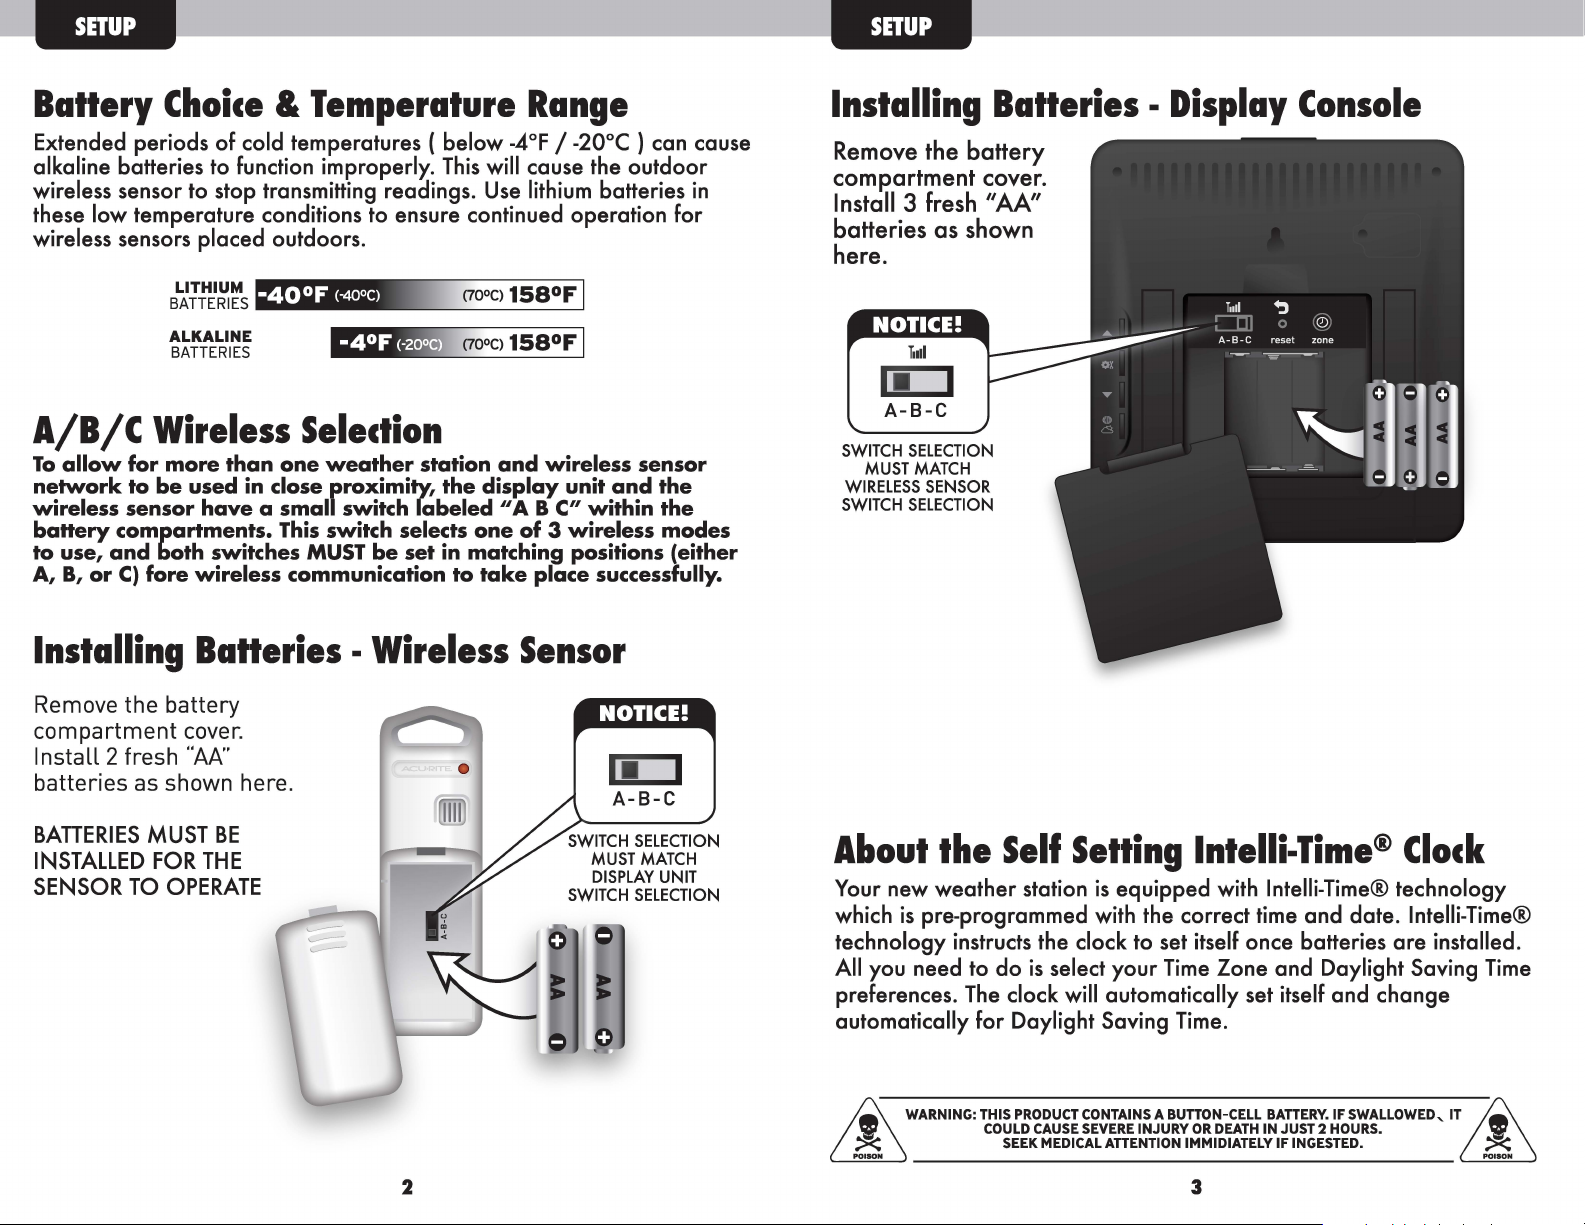
Installing Batteries -Wireless Sensor
Installing Batteries - Display Console
Remove the battery
compartment cover.
Install 3 fresh "AA"
batteries as shown
here.
NOTICE!
Tull
i
■
i
A-8-C
SWITCH SELECTION
MUST MATCH
WIRELESSSENSOR
SWITCH SELECTION
Remove the battery
compartment cover.
Install 2 fresh "AA"
batteries as shown here.
BATTERIES MUST BE
INSTALLED FOR THE
SENSOR TO OPERATE
2
NOTICE!
i
■
i
A-8-C
SWITCH SELECTION
MUST MATCH
DISPLAY UNIT
SWITCH SELECTION
About the Self Setting lntelli-Time® Clock
Your new weather station is equipped with lntelli-Time® technology
which is pre-programmed with the correct time and date. lntelli-Time®
technology instructs the clock to set itself once batteries are installed.
All you need to do is select your Time Zone and Daylight Saving Time
preferences. The clock will automatically set itself and change
automatically for Daylight Saving Time.
WARNING:THISPRODUCT CONTAINS A BUTTON-CELL BATTERY. IF SWALLOWED, IT&
COULD CAUSE SEVERE INJURY OR DEATH IN JUST 2 HOURS.
SEEK MEDICAL ATTENTION IMMIDIATELY IF INGESTED.
3
~
POISON
Page 4

SETUP
SETUP
About the 5-Day Weather Forecast
This weather station includes AcuRite's NEW precision 5-day
forecasting technology.
By determining your geographic climate region and observing sets of
weather related variables, like changes in temperature, humidity, and
barometric pressure, this AcuRite Weather Station can accurately
forecast the weather for your exact location. Preprogrammed regional
weather patterns combined with data collected by the wireless outdoor
temperature and humidity sensor allow for forecasts that include
probability of precipitation, amount of cloud cover, and high/low
temperatures for up to
5 days.
5-Day Forecast Region Selection
For the 5-day forecast to function properly, you will need to select your
general geographic region. The 5-Day Forecast feature analyzes
outdoor temperature, outdoor humidity, pressure changes and
geographic region information to give you the most accurate forecast
breakdown a single station forecaster can provide.
Quick Setup - Display Console
After installing batteries, the lntelli-Time® clock and calendar will
automatically set to the correct time, all you need to do is select your
time zone.
PRESS THE
Q)
zone
......J
r
(SEE DISPLAY CONSOLE: MANUAL SETUP TO CHANGE REFERENCE LANGUAGE),
THE TIME ZONE SELECTION ON THE DISPLAY WILL BE G.M.T.
COMPARTMENT TO SELECT YOUR TIME ZONE
NOTE: IF FRENCH OR SPANISH LANGUAGE ARE SELECTED
11
Es T IIM<ZONE ox
zone
11
BUTION LOCATED IN THE BATIERY
-/+HOURS
OX Manual Setup - Display Console
Press the SET (OX)button to enter into manual set mode. The time
zone will begin blinking. To adjust the currently selected (flashing)
preference item, press and release the " ... " or "..,." buttons.
11
To save your adjustments, press and release the
move on to adjusting the next preference. The preference set order is
as follows:
11
0X button again to
11
PRESS THE
ON THE BACK OF THE DISPLAY
TO SELECT YOUR GEOGRAPHIC
GE0
REGION
11
BUTION LOCATED
4
TIME ZONE (PST MST CST EST AST HAST AKST)
AUTO DST (Automatically adjust time-/+ on DST dates)
CLOCK HOUR
CLOCK MINUTE
CALENDAR MONTH
CALENDAR DATE
CALENDAR YEAR
0
UNITS: TEMPERATURE (°For
C)
UNITS: PRESSURE (inHg or hPa)
REFERENCE LANGUAGE (English, Spanish or French)
You will automatically exit SET MODE if no entries are made for 30
seconds. You may enter basic setup mode again at any time by
pressing and releasing the "SET" button.
5
Page 5

Placement
Now that setup is complete, you must choose a location to place the
wireless sensor and the display console. The wireless sensor MUST be
placed less than 330 feet ( 100 meters) away from the display console.
This wireless forecaster uses radio frequency for communication, which
is susceptible to interference from other electronic devices and large
metallic items or thick walls. Always place both units at least 3 feet (.91
m) away from appliances ( TV, microwave, radios, etc. ) or objects that
may interfere with the wireless communication ( large metal surfaces,
thick stone walls, etc. ).
\ I /
... ...
AT
ILEASTI
3 feet
1.91ml
APART
(330feet maximum]
[ 100 meters]
Placement of Display Console
----• Place the display console in a dry area free of dirt and dust.
To help ensure an accurate indoor temperature measurement,
be sure to place the display console out of direct sunlight, and
away from any heat sources or vents in your home. You may
P.lace the main unit on a table top or otlier flat surface using
the integrated table top display stand.
Placement of Sensor
The wireless sensor MUST BE PLACED OUTDOORS to observe
outdoor temperatures. The wireless sensor must be placed less
than 330 feet ( 100 meters) from the disP.lay console. The
wireless sensor is water resistant and is aesigned for general
outdoor use. However, to extend the life of fhe product, P.lace
the wireless sensor in an area protected from direct weather
elements. To ensure an accurate outdoor temJ?erature
measurement, be sure the wireless sensor is placed out of
direct sunlight and away from any heat sources.
There are 2 placement options for the wireless sensor. You may
hang it using one of the two integrated hang holes, or use
string (not included) to hang it from a suital:ile location like a
well covered tree branch.
5-Day Forecast
Initial learning mode
The Precision 5-Day Forecast feature will be "learning and anylizing"
for the first five days after powering on or resetting. During this initial
5-Day learning mode the forecast will be less accurate. The weather
forecast will observe changes to learn your weather patterns and
increase the accuracy of the forecast.
Forecast Display
The Forecast display area gives you the predicted weather forecast
for the next
predicted High and Low temperatures.
The forecast is always analyzing the available data, and consistently
updates the forecast icons and highs/lows/precipitation chance as
time goes on. This will help you to generally plan ahead for the next
5 days.
The weather forecast icon will display the predicted weather
conditions. Below is an example of some of the forecast icons.
5 days. Each daily forecast will also display the
~~
,, ,, ,, ,, I !l!l!l!l!
Stormy/Windy
0
I '
Sunny
Forecast Calibration
If you feel that the forecast could be "dialed in" to be more accurateyou may want to try calibrating the forecast. See the "Calibration"
section in the back of this manual for more information.
R · L°k I Rain/Snow
1
8
am
Y Mix Likely
6~
Mostly
Cloudy
Partly
Cloudy
6
7
Page 6

Minimum& Maximum Records
Atmospheric Pressure
The display unit features Minimum & Maximum records display
mode. The minimum and maximum values for indoor and outdoor
temperature and humidity are recorded and kept until midnight every
day, when the records are reset for the next day.
Minimum Records
To view the minimum records, press the "adjust down" button ( T)
located on the back of the display unit. The minimum recorded
values will display for about 8 seconds (note the
minimum records being displayed). To manually reset the records
being displayed, press and hold the "adjust down" (
while viewing the records.
"±'' icon indicating
T ) button
Maximum Records
To view the maximum records, press the "adjust up" button ( ..._)
located on the back of the display unit. The maximum recorded
values will display for about 8 seconds (note the
maximum records being displayed). To manually reset the records
being displayed, press and hold the "adjust up" ( ..._ ) button while
viewing the records.
'r.p' icon indicating
Atmospheric Pressure is defined as the pressure at any location on
the Earth, caused by the weight of the column of air above it. At sea
level, atmospheric pressure has an average value of one atmosphere
and gradually decreases as altitude increases. Also called
barometric pressure.
The weight of the air mass, or atmosphere, that envelopes Earth
exerts pressure on all points of the planet's surface. Meteorologists
use barometers to measure this atmospheric pressure (also called
barometric pressure). At sea level the atmospheric pressure is
approximately 1 kilogram per square centimeter ( 14.7 pounds per
square inch), which will cause a column of mercury in a mercury
barometer to rise 760 millimeters (30.4 inches). Subtle variations in
atmospheric pressure greatly affect the weather. Low pressure
generally brings rain. In areas of low air pressure, the air is less
dense and relatively warm, which causes it to rise. The expanding
and rising air naturally cools, and the water vapor in the air
condenses, forming clouds and the drops that fall as rain. In high
pressure areas, conversely, the air is dense and relatively cool, which
causes it to sink. The water vapor in the sinking air does not
condense, leaving the skies sunny and clear.
Momentary Backlight
The display unit features a momentary blue backlight for easy
night-time viewing. The button to activate the backlight is located on
the very top edge of the display unit housing. Pressing the button will
give you about 10 seconds of illumination. Note that excessive use of
the backlight will reduce the battery life.
Momentary Backlight Button
I
n
8
This weather forecaster features a current barometric pressure
display, as well as a trend arrow icon (rising, falling or steady).
These two features can assist you in forecasting changes in the
weather.
inHg
29.
□ S
9
Page 7

TROUBLESHOOTING
REFERENCE
Problem Possible Solution(s)
Bad
Wireless Sensor
Reception
TiIll no bars
Display Console
Screen Not Working
5-Day Forecast
displaying
@o
Relocate the main unit and/or the wireless sensor.
Both units must be within 330 feet (100 meters)
from each other. Make sure both units are placed
at least 3 feet (.91 m) from other electronic
appliances and devices that may interfere with the
wireless communication (such as TV's, microwaves,
computers etc). NOTE: It may take up to 20 minutes
for the main unit to re-synchronize with the sensor
when batteries are replaced. Use lithium batteries
in sensor when temperature is below -4°F (-20°C}.
Make sure the A-B-C switch selection in the battery
compartments of the display unit and sensor match.
Batteries may need replacing.
Check that batteries are correctly installed.
Reset the display unit and wireless sensor.
The 5-Day Forecast will be "learning and
anylizing" for the first five days after powering on
or resetting. During this initial learning mode the
forecast will be less accurate. The weather
forecaster will always observe changes to learn
your weather patterns and increase the accuracy
of the forecast.
Forecast Geographic Region Selections
PRESSTHE "GEO"
BUTTON LOCATED
ON THE BACK OF
THE DISPLAY TO
SELECTYOUR
GEOGRAPHIC
REGION
5-Day Forecast
Inaccuracies
NOTICE: The display may fail to start properly due to static
~
reset
discharge. Press the reset button located on the back of the display
unit to reset the entire unit.
For technical assistance and product return information, please call
Customer Care:
As with anfu weather forecast 100% accuracy is
not possib e. However, if the forecast seems wildly
inaccurate, make certain that your geographic
reton is selected pro~erly. Tlie geographic region
se ection can drastica ly affect tlie accuracy of the
forecast.
Refer to "CALIBRATION" section of this manual for
more options
Please DO NOT return product to the retail store.
877-221-1252 Mon. - Fri. 7:00 A.M. to 7:00 P.M. [CST)
www.acurite.com
10
Have questions about product setup or operation? We're here to help!
www.a_c_u_r_ite_._co_m24/7 Support: (__ __ ___ )
►
Product Setup & Demo Videos ► Register your Product
►
Product Manuals
►
Frequently Asked Questions
EMAIL:
info@chaney-inst.com
1-Year Warranty
►
Don't forget! Register your
product at: www.acurite.com
►
Support Forum
►
Submit Feedback & Ideas
TOLL FREE:
(877) 221-1252
7:00 a.m. -7:00 p.m.CST
11
Page 8

SPECIFICATIONS
CALIBRATION
ProductFacts
Batteries: 5 x "AN' (not included)
(21Lithium Batteries Recommendedin
OutdoorSensorif temperatures are
below-4°F
Measurement Ranges
Outdoor Temperature: -40°F to 158°F
-40°Cto 70°C
Outdoor Humidity: 1%to 99%
Indoor Temperature: 32°F to 122°F
0°Cto 50°C
Indoor Humidity: 1% to 99%
Wireless Range: 330 ft / 1oom MAX
Dependingon home construction materials
MADE IN CHINA
HECHOENCHINA
LimitedOne
YearWarranty
Instructions&
WarrantyEnclosed
Customer Care:
877-221-1252
www.Acurite.com
Patentnumbers:5,978,738;6J076,044;6,59~990;US7,637,141B2
ACURITE®isa registeredtraoemarkofthe l,haneyInstrumentCo.
LakeGeneva,WI
53147
If you find that the temperature and/or humidity is slightly off, this
weather device allows for calibration. The forecast may be
calibrated as well. To calibrate the weather station, you must enter
into the calibration mode.
CalibrationMode
To access the calibration mode, press AND HOLD the "A" and "T"
buttons together for at least 5 seconds. After 20 seconds of inactivity,
the display will save your adjustments and automatically exit
calibration mode and return to normal operation.
Calibrate the outdoor temperature by pressing the
buttons. Note the arrow icons indicate if you are calibrating the value
above or below the uncalibrated raw temperature coming in from the
sensor.
calibration +
~
►
~
Outdoor .~
no calibration
(actual sensor reading)
calibration -
Press the " OX" button to confirm your calibration changes and move
on to calibrating the outdoor humidity, the indoor temperature, and
indoor humidity in the same manner.
After calibrating all of the temperature and humidity values, the
forecast is the final item to be calibrated. If you feel that the forecast
could be "dialed in" to be more accurate- you may calibrate the
forecast to be less or more "wet." Essentially, calibrating the forecast
will either reduce or increase how much moisture is present within the
forecast software algorithm.
"A" or "...,."
WARNING:THIS PRODUCTCONTAINSA BUTTON-CELLBATTERY.IF SWALLOWED, IT~
PLEASEDISPOSEOFOLDORDEFECTIVEBATTERIESIN AN ENVIRONMENTALLYSAFE
WAYANDIN ACCORDANCEWITHYOURLOCALLAWSAND REGULATIONS.
BATTERYSAFETY:Cleanthebatterycontactsandalsothoseofthedevicepriortobatteryinstallation.Removebatteriesfromequipmentwhichisnot
tobeusedforanextendedperiodoflime.Followthepolarity(+/·)diagraminthebatterycompartment.Promptlyremovedeadbatteriesfromthe
device.Disposeofusedbatteriesproperly.Onlybatteriesofthesameorequivalenttypeasrecommendedaretobeused.DONOTincinerateused
batteries.DONOTdisposeofbatteriesinfire,asbatteriesmayexplodeorleak.DONOTmixoldandnewbatteriesortypesofbatteries
(alkaline/standard).00NOTuserechargeablebatteries.00NOTrechargenon-rechargeablebatteries.00NOTshort-circuitthesupplyterminals.
COULDCAUSESEVEREINJURY ORDEATHIN JUST2 HOURS.
SEEKMEDICALATTENTIONIMMIDIATELYIF INGESTED.
12
~
POISON
For example, if you feel the forecast is showing rain too often, you
may want to remove 10% of the moisture from the forecast equation
to start with. Press the
"A" or "T" buttons to remove or add
moisture to the forecast. Note that the forecast graphics will change
accordingly. Calibrating the forecast may take some trial and error.
Note that just like any weather forecast - the forecast can never be
100% accurate.
Note that all calibration changes will be lost if you reset the display
unit or remove the batteries.
13
 Loading...