

Page 1
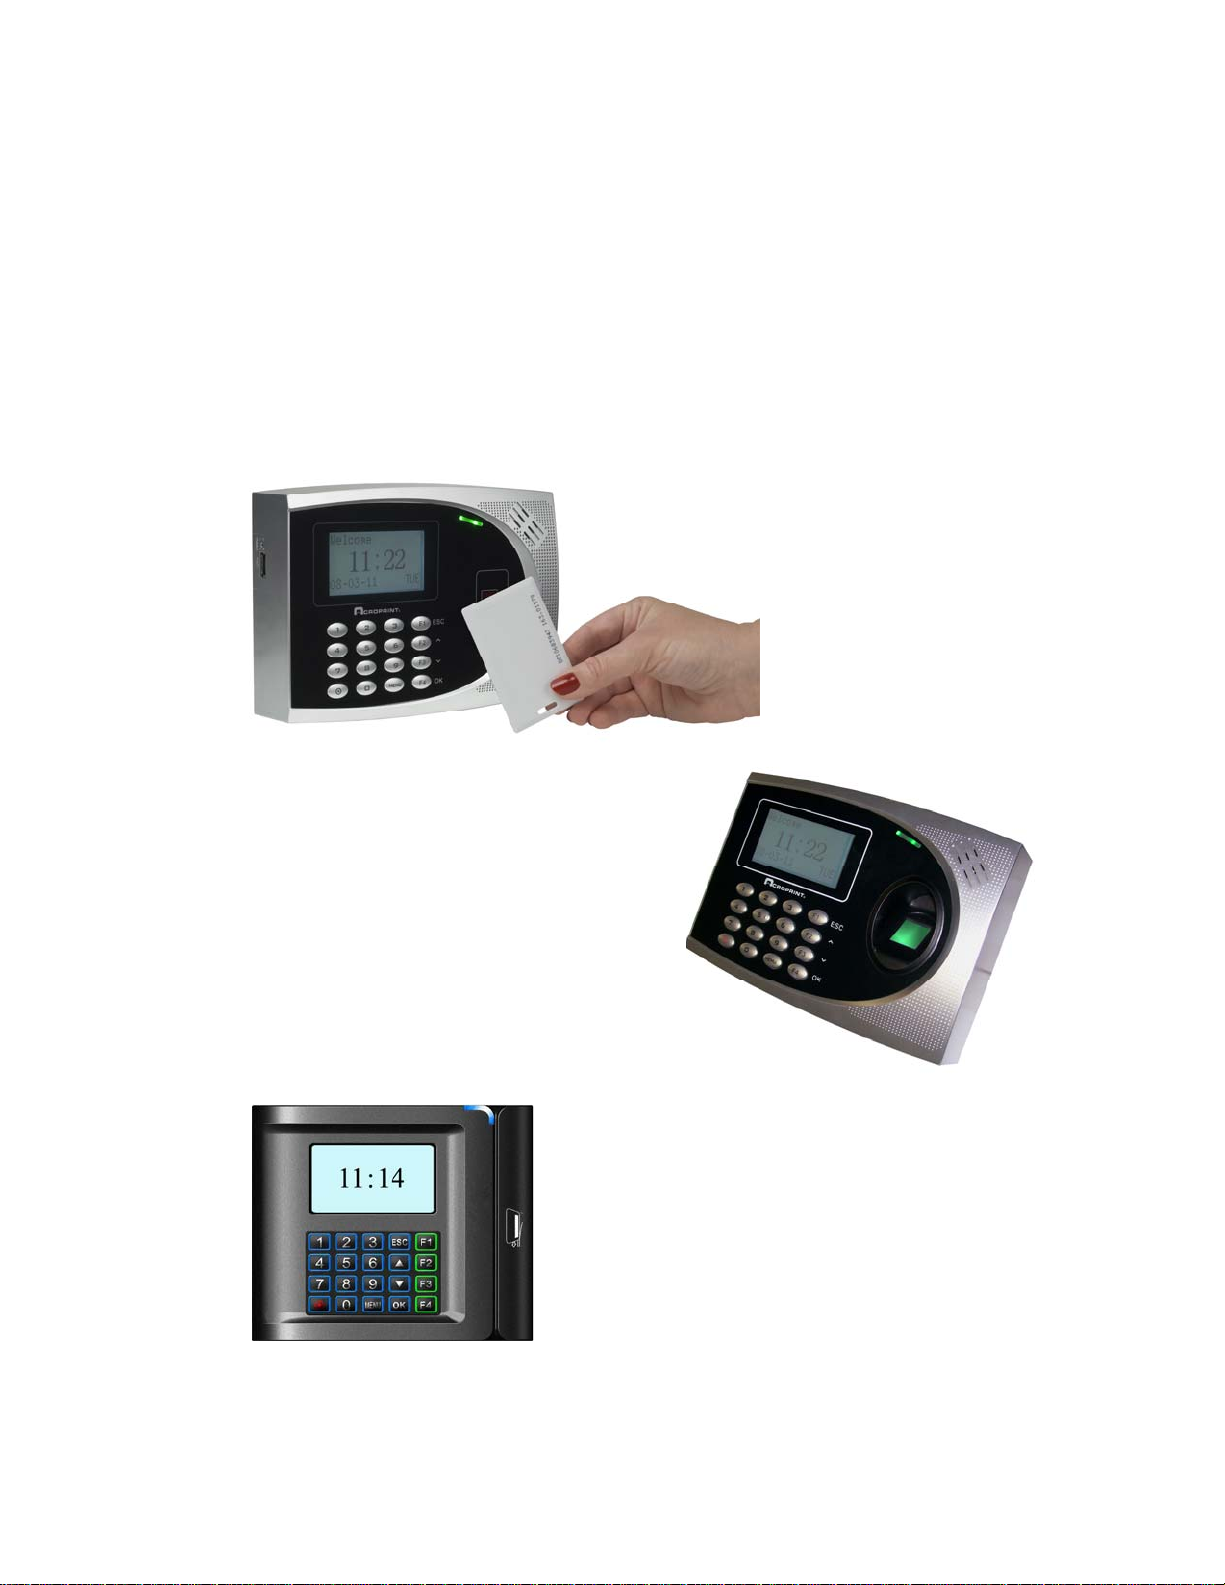
TQ600
User Manual
Proximity
Terminal
Fingerprint
Terminal
Magnetic Stripe/
BarcodeTerminal
Page 2

Page 3

FCC Warning:
Note: This equipment has been tested and found to comply with the limits for
a Class A digital device, pursuant to Part 15 of the FCC rules. These limits are
designed to provide reasonab le protection against harmful interfere nce when
the equipment is operated in a commercial environment. This equipment
generates, uses, and can radiate radio frequency energy and, if not installed
and used in accordance with the instruction manual, may cause harmful
interference to radio communications. Operation of this equipment in a
residential area is likely to cause harmful interfer ence in whi ch case the us er
will be required to correct the interference at his or her own expense.
Caution: Changes or modifications not expressly appr oved by the party
responsible for compliance could void the user’s authority to operate the
equipment.
Canada
This Class A digital apparatus complies with Canadian ICES-003. Cet appareil
numerique de la classe A est conforme a la norme NMB-003 Du Canada.
Lithium Battery Caution:
The circuit board on this terminal is populated with a lithium battery to
protect data or programs stored in the Random Access Memory (RAM). Do
not, under any circumstances, attempt to replace the lithium battery in the
terminal. Failure to comply may invalidate your warranty. Battery
replacement should be done by qualified personnel wearing the proper eye
protection.
CAUTION: Danger of explosion if the battery is incorrectly replaced. Replace
only with the same or equivalent type recommended by the manufacturer.
Discard used batteries according to the manufacturer’s instruction.
This product utilizes a battery that contains Perchlorate Material.
Perchlorate Material – special handling may apply,
See www.dtsc.ca.gov/hazardouswaste/perchlorate
- 1 -
Page 4

Declaration of Conformity According To EMC Directive 89/336/EEC
We declare under our sole responsibili ty that the U600 Finger Print reader
and/or U600P Proximity reader and/or data recording equipment to which
this declaration relates are in conformity with the following standards:
EN61000-6-1, EN55022-2006, EN55024-1998+A1:2001+A2:2003. I, the
undersigned, hereby declare that the equipment specified above conforms to
the above directive and standards.
Raleigh, North Carolina USA
February 15, 2012 W. Glenn Robbins
All Rights Reserved. © COPYRIGHT 2008
Acroprint Time Recorder Company
- 2 -
Page 5

Contents
Getting Started......................................................1
Terminal Configurations ..........................................................1
Operator Panel LEDs...............................................................2
Menu Tree..............................................................3
Basic Concepts.......................................................7
User Enrollment: Fingerprints ................................................7
User Identification / Verification ..............................................7
Threshold...............................................................................8
User ID (PIN number)............................................................. 9
Privilege Levels.......................................................................9
Start-up ............................................................................... 10
Enrolling – Fingerprint Terminals........................11
Fingerprint Enrollment Tips ................................................... 11
Enrolling Users – Fingerprint Terminals................................... 13
Fingerprint Enrollment .........................................................13
Testing a Fingerprint Enrollment..........................................15
Enrolling Auxiliary Fingerprints.............................................15
Password Enrollment............................................................16
Fingerprint & Password........................................................17
Change Password.................................................................19
User V erification Types.......................................................... 20
Fingerprint Verification.........................................................20
Password Verification...........................................................22
Enrolling – Badge Terminals .............................24
Badge/Card Enrollment..............................................................24
Password Enrollment .................................................................25
Proximity Badge & Pas sword Enrollment ...................................26
Change Password......................................................................27
Privilege Levels....................................................28
Enroll w/ Privilege Level........................................................28
Delete User Data..................................................30
- 3 -
Page 6

Options.................................................................31
System Options.....................................................................31
Set Date & Time........................................................................32
Changing the Time Format........................................................32
Changing the Language.............................................................32
Changing the Date Format.........................................................33
Daylight Savings Time (DST).....................................................34
Advanced Options......................................................................35
Power Management...............................................................37
Communication Options.........................................................38
Log Options ..........................................................................39
Auto Test..............................................................................40
System Information.............................................41
View Time and Attendance Records....................43
Review All Attendance Records...............................................43
Review Individual Attendance Records....................................44
Browsing Attendance Records ................................................44
Cleaning the TQ600 .............................................46
Troubleshooting...................................................47
Appendix..............................................................49
USB Flash Drive Management.................................................49
Bell Schedule ........................................................................49
Reserve Battery (Mini-UPS)....................................................49
UPS Operational State:..........................................................49
- 4 -
Page 7

1
Getting Started
Important!
Do not attempt to service the TQ600 yourself. Opening the
terminal will void the warranty. Always follow the
instructions in the user guide.
• Do not place the terminal in direct sunlight. Bright light may
significantly affect fingerprint reads or cause fingerprint verification
to fail. The terminal is designed for indoor use in a temperature
range of 32-104º F (0-40º C). Keep the terminal away from heat
sources such as radiators.
• The terminal warranty does not cover defects or damages arising
from improper installation, improper storage, abuse, ordinary wear
or unauthorized service.
Terminal Configurations
The TQ600 is available in four reader op tions: fingerprint, proximity badge,
magnetic stripe badge and barcode card reader. The fingerprint reader
provides the most secure user verification as it uniquely identifies each user .
The badge is a faster method of verifying a user s ince you only need place
your proximity badge near/in front of the reader or slide your
barcode/magnetic stripe badges through the reader.
This manual provides information for all TQ600 terminal configurations.
Sections specifically about fingerprint verification or proximity/magnetic
stripe/barcode badge verification will pertain only to the corresponding
terminal.
Note: There are Menu variations between models since features
and options are different between models.
1
Page 8

Operator Panel LEDs
1) Normal Operation.
Green light blinks each second.
2) Error Condition (Fingerprint or Badge not Enrolled)
Red light shines for 2 seconds
3) Transaction (Fingerprint or Badge Read) successful
Green light shines for 2 seconds
Note: Contact Acroprint support if you receive any LED
sequence other than those listed above.
2
Page 9

Menu Tree
User Manage
Options
Menu
2
PenDrive Mng
Sys Info
3
Page 10

Menu Level 1 Menu Level 2 Menu Level 3
User Manage
Enroll User
Enroll Admin
Delete User
Reg Badge
Enroll FP
Enroll Pwd
Reg Badge&Pwd
FP & Pwd
Reg Badge
Enroll FP
Enroll Pwd
Reg Badge&Pwd
FP & Pwd
(FIU)
(FIU)
(FIU)
(FIU)
Browse ATTLogs
4
Page 11

g
A
A
g
V
Menu Level 1 Menu Level 2 Menu Level 3 Menu Level 4
System Opt
Power Mn
Date Time
12H or 24H
Language
Fmt
DST
Adv Option
Shutdown
PowerOn
Sleep
Idle
Idle Min
Bell Delay
Scheduled Bell
Lock Power
Reset Opts
Del AttLogs
Clear All Data
Clr Admin Pri
Voice On?
Upd Firmware
Work Code
Button Beep
Adj VOL (%)
Print Mode
Show Score
Match Thr
Mst Input ID
1:1 Thr
Display Info
(Not Supported)
(FIU)
(FIU)
(FIU)
(FIU)
Options
Comm Opt
BaudRate
Dev Num
IP Addr
Net Speed
NetMask
Gateway
Ethernet
RS232
RS485
USB
COMM Key
(Not Supported)
Log Opt
lm SuperLo
Alm AttLog
ReCheck Min
ERType
RF
PW&RF
PW/RF
PIN
PW
uto Test
Run All Test
FLASH Test
LCD Test
Voice Test
FP Reader (FIU)
Key Test
RTC Test
5
Page 12

g
(
)
(
ge
)
Menu Level 1 Menu Level 2 Menu Level 3
PenDrive Mng
DwnLoad AttLo
DwnLoad User
UpLoad User
Sys Info
User Cnt
FP Cnt (FIU)
Att Log
Admin Cnt
Pwd Usr (FIU)
S Logs
Free Space Info
Dev Info
User Cnt
FP Cnt
Att Log
S Logs
Users (100)
FPCnt (100) (FIU)
AttLog (10k)
S Logs
Mfg Date
Serial Num
Vendor
Device Name
Alg Version (FIU)
Firmware Ver
View MAC
MCU Version
Prox
(FIU)
Bad
6
Page 13

Basic Concepts
Fingerprint identification concepts:
z User Enrollment: Fingerprints
z User Identification/Verification
z Threshold
z User ID (PIN Number)
z Privilege Levels
z Start-up
User Enrollment: Fingerprints
3
Enrollment is the process of capturing a user’s fingerprint and storing it
as a “template” in the TQ600 along with a unique five (5) digit user ID.
The user’s fingerprint template is created by taking three sample
fingerprints on the TQ600.
Each user should enroll at least two different fingers so that if an
enrolled f inger is injured an alternate f inger can be used. The TQ600
allows each user to enroll 1-10 fingerprints.
User Identificati on / Verification
User identification is the process of comparing a user’s fingerprint
against a fingerprint template stored in the terminal. When a user’s
fingerprint matches a fingerprint template stored in the TQ600 the
terminal will show a successful match, th us v erif ying the user’s identity.
7
Page 14

Threshold
Threshold means a value tha t is set to ensure the minimum accuracy
required to confirm a match with a finger template stored in a biometric
system.
The threshold setting establishes a balance between False Acceptance
Rate (FAR) and False Rejection Rate (FRR). FAR means the probability
that a biometric system will incorrectly identify a user or will fail to r eject
an impostor. FRR means the probability that a biometric system will f ail
to identify an enrolled user.
The threshold value is a global setting applied for all users. The default
threshold is set at 35. Raising the threshold value increases security but
increases the probability of a false rejection. Lowering the threshold
reduces security by increasing the possibility of a false acceptance. The
correct balance is vital for maximum security as well as usability. It is
possible that adjustments to the threshold value will be needed as you
begin using the biometric system.
If some users have persistent problems being accepted by a biometric
terminal, sometimes acceptance rates can be increased by first inputting
a User ID, then reading the finger. This is called a (1:1) “one to one”
verification. Greater success rates can be achieved because the system
now knows which specific finger template to compare.
Alternatively, the terminal can be set to the “one to one” verif ication
mode which then will require all users to input a User ID, followed by a
finger reading. The default threshold v alue for the “one to one” setting
is 15, but it too can be adjusted as necessary.
Table 1-1 shows some suggested threshold values to try but the others
can be set to achieve desired user acceptance rates.
8
Page 15

Table 1—1 Suggested Threshold Settings
One-to-Many
One-to-One
FRR FAR
(1:N)
High
Middle
(Default)
Low
User ID (PIN number)
Before beginning fingerprint enrollment, a user is assigned a User ID
number (sometimes referred to as a PIN number). This User ID number
is used to recall fingerprint templates or passwords each time
verification is requested.
Privilege Levels
Privilege levels are the levels at which users are authorized to access
terminal functions. These levels define the authority of a user to access
specified administrative functions including the abilit y to view, edit, add,
or renew specified information categories.
Low 45 25
Middle
35 15
(Default)
Low 25 10
(1:1)
Privilege levels are built-in terminal functions that can be set as required.
The TQ600 has four user privilege levels: User, Enroller,
Admin (administrator) and Supervisor.
z Users are people whose identity must be verified t o re co rd t ime
such as punching in/out or the time spent working on a job or working
in specific departments.
z Enrollers can enroll supervisors, administrators, enrollers and
users. Enrollers can delete users. Enrollers can access “User
Manage” and “System Information” menus.
z Administrators (Admin) can enroll supervisors, administrators,
enroller and users. Administrators can delete enrollers and users.
Administrators can acc ess all oper atio ns, excep t “Advanced Options”.
9
Page 16

z Supervisor is the highest authorization level. Supervisors can
enroll supervisors, administrators, enrollers and users. Supervisors
can delete administrators, enrollers and users. Supervisors can
access all functions and change all setups.
Note: If no user has administrative privileges (enroller,
administrator or supervisor) in the terminal, ALL users will be enrolled
with “Supervisor” privileges.
To change a user t hat is currently enrolled as an administr ator or enroller, delete
the user and then re-enroll the user with the new privilege level.
Start-up
Press the power button () to turn the TQ600 on. The Start-up”
window will appear. Press and hold the power button () for 2 seconds
to turn off the TQ600.
Welcom e
10:12
06-18-08 WED
THU
10
Page 17
Enrolling – Fingerprint Terminals
This chapter describes how to enroll and verify users on the TQ600.
The following topics are included:
z Fingerprint Enrollment Tips
z Enrolling User
z Testing an Enrollment
z Enrolling an Auxiliary Fingerprint of User
z Verifying Your Identity
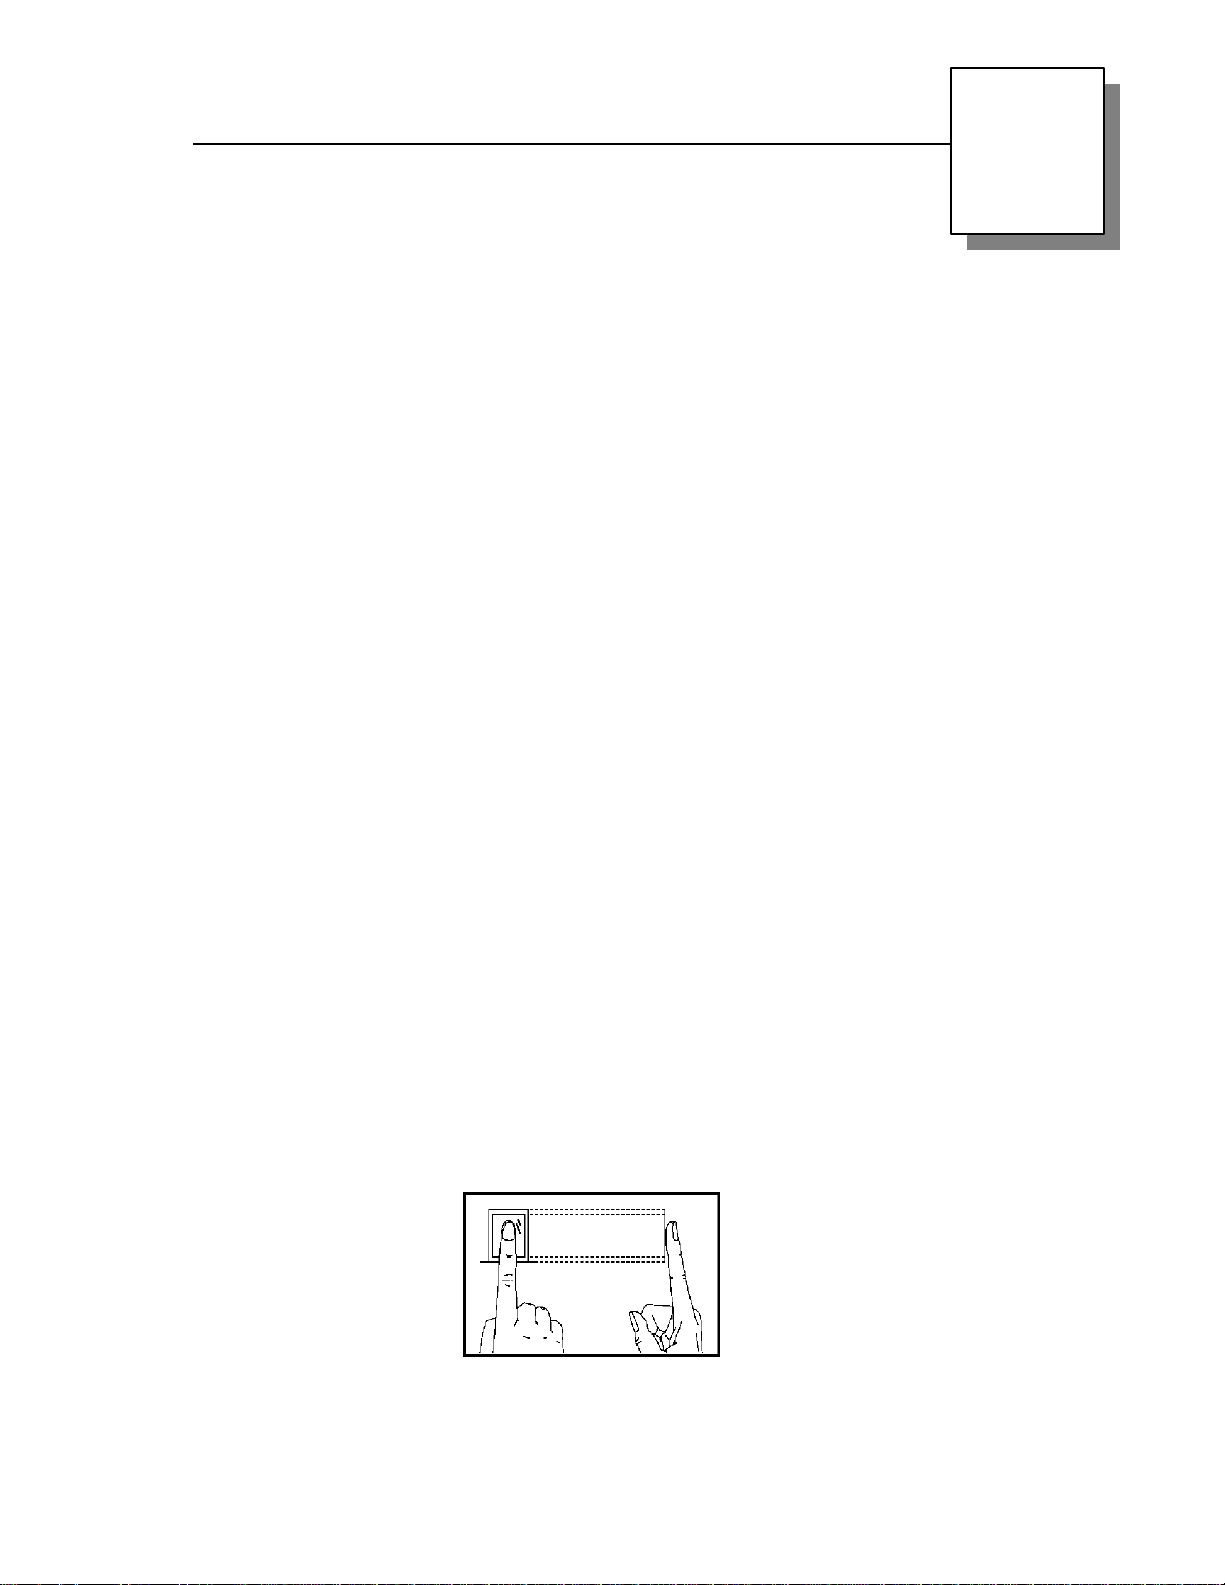
Fingerprint Enrollment Tips
4
It is recommended that you use your index or middle finger for
enrollment. If the fingerprints on your preferred hand are worn or
damaged try using your other hand.
The TQ600 will require three (3) sample fingerprints to enroll a user.
Place your finger in the middle of the sensor. To ensure better
fingerprint reads take each fingerprint sample with slightly different
positioning; one centered, one rolled slightly to the left and the last
rolled slightly to the right. The different angles will help account for
different finger positioning during actual use.
CORRECT finger positioning:
Place finger flat on the sensor surface
Place finger in the center of the sensor surface
11
Page 18
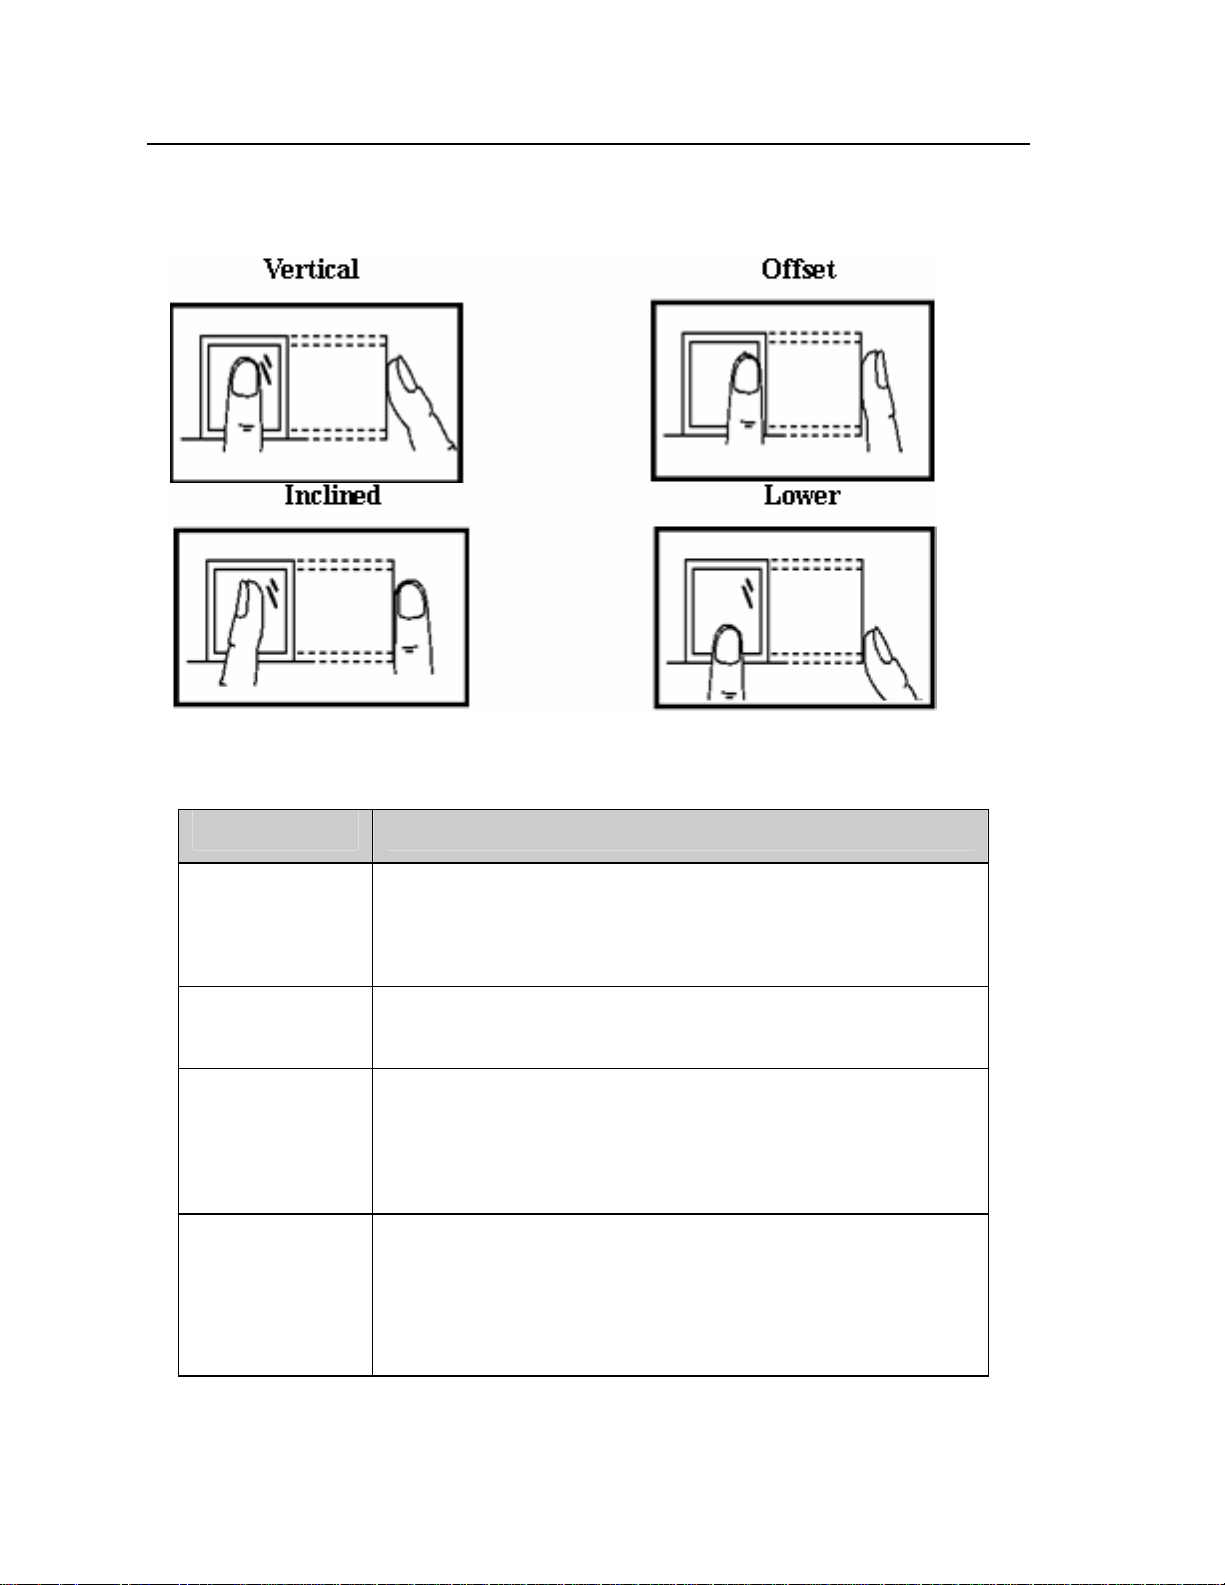
INCORRECT finger positioning:
Tips for improving the quality of finger print reads:
Issue Correction
Dirty or Dry
Finger
Clean finger with moisturizing soap or wipe with a
pre-moisturized tissue (alcohol-free wipes
preferably, enriched to hydrate the skin)
Not enough
pressure
How to select
finger?
The user should place finger firmly and flat on the
sensor surface.
Use the index or middle finger to enroll; try the left
hand fingers if the right hand fingerprints are
worn, damaged or missing.
If the user’s fingers are small, select the thumb.
Place finger in the middle of the sensor; keep
How to
position the
finger?
finger flat on the sensor and apply pressure while
covering as much of the sensor window as
possible; DO NOT touch the sensor in an angled
or tilted position, DO NOT slide finger.
12
Page 19

Fingerprint
pattern
change
Poor
Fingerprint
Def inition
For a user with a worn or injured finger, the
identification can be affected. Use an alternate
finger or select password verification.
A few people’s fingerprint quality is too poor to
verify. Use the User ID & Fingerprint verification,
and lower the 1:1 Threshold. Otherwise use
Password verification.
Enrolling Users – Fingerprint Terminals
After configuring the TQ600 you are ready to enroll users. If there are
no users on the system all users will have a privilege level of supervisor,
if an administrator (Admin) i s enrolled on the system they will be the only
one allowed to enroll a new user.
The TQ600 provides three ways to enroll, Fingerprint Enrollment,
Password Enrollment, or Fingerprint with Password Enrollment.
Fingerprint Enrollment is preferable for personnel with good fingerprint
definition; Fingerprint with Password is preferable for users that have
difficulty verifying their finger print. Password Enrollment is necessary
for users whose fingerprints are too worn or damaged for the termi nal to
read their fingerprint.
T o start the enrollment process , identify yourself . Press [MENU], enter
your ID number or fingerprint, and verify your identity.
Note: If this is the first enrollment in a new or empty system,
you will not be prompted for verification.
Fingerprint Enrollment
Notes on Buttons:
F1 = ESC, use to back up in the menu or quit
F2 = ▲, use to scroll up in the menu
F3 = ▼, use to scroll down in the menu
F4= OK, use to select a menu item
13
Page 20

1) Press [MENU], select “User Manage”, press [OK], select “Enroll
User”, press [OK]. Three enrollment methods are displayed, select
“Enroll FP”, press [OK]. The following screen is displayed:
Enroll FP
New Enroll?
ESC OK
2) Press [OK]. The following screen is displayed:
New Enroll
UserID 00001
ESC OK
Note: The User ID (PIN number) is a 5 digit number. If you
input less than 5 digits the terminal p ads the User ID with 0’s
in front of the User ID, i.e., if you enter 11 the User ID 00011 is
displayed on the terminal.
3) Input the User ID (range is 1 to 65534), press [OK].The following
appears:
New Enroll
00011-0
Place Finger…
ESC/Exit
Note: 00011-0
The dash number (-0)
indicates the first
fingerprint.
4) You will be prompted to take (3) samples of your fingerprint. If
the test is successful three times in a row, the following appears:
New Enroll
00011-0
ESC OK (Save)
14
Page 21

5) Press [OK], the previous message continues to be displayed while
the template is created. If your identity cannot be verified, you are
prompted to try again and you must restart the verification procedure
(Refer to Step 2).
Testing a Fingerprint Enrollment
Ask the user to place their finger on the f ingerprint sensor. If the test
was successful the enrollment is complete. If the terminal cannot read
the fingerprint or if several attempts are required for the terminal to
verify the fingerprint, the user should try 1:1 verification (refer to page
25).
Enrolling Auxiliary Fingerprints
It is a good practice to enroll at least two fingers for each user.
Press [MENU], select “User Manage”, press [OK], select “Enroll User”,
press [OK], select “Enroll FP”, press [OK], the following appears:
Enroll FP
New Enroll?
ESC OK
Press [ESC] to cancel the new enrollment, enter the User ID (PIN
number) of the user you wish to enroll an additional fingerprint for:
Backup Enroll
User ID 00001
ESC OK
15
Page 22

Password Enrollment
1) Press [MENU], select “User Manage”, press [OK], select “Enroll
User”, press [OK]. Three enrollment methods are displayed, select
“Enroll Pwd”, press [OK]. The following screen is displayed:
Enroll Pwd
New Enroll?
ESC OK
2) Press [OK] to enroll new user, the following screen is displayed:
New Enroll
User ID 00006
ESC OK
3) Note: The next available User ID is displayed. Press [OK] to
choose this ID or enter a User ID (range is 1 to 65534) & press [OK].
The following screen is displayed:
New Enroll
Input Pwd_
ESC OK
4) Input the password and affirm:
New Enroll
Input Pwd *****
Pwd Affirm *****
16
Page 23

5) Press [OK], the following screen is displayed:
New Enroll
00006-P
ESC OK (Save)
Note: 00006-P
“-P” means password
enrollment
6) Press [OK]. Press [ESC] to exit user enrollment or press [OK] to
continue Password enrollment.
Fingerprint & Password
1) Press [MENU], select “User Manage”, press [OK], select “Enroll
User” , press [OK]. Three enrollment methods will be displayed, select
“FP & Pwd”, press [OK]. The following screen is displayed:
FP & Pwd
New Enroll?
ESC OK
2) Press [OK], the following appears:
ESC OK
New Enroll
User ID 00008
3) Press [OK], the following appears:
New Enroll
00008-0
Place Finger…
ESC/Exit
17
Page 24

4) If the test is successful three times in
a row, the following appears:
Input Pwd *****
New Enroll
00008-0
ESC OK
5) Input your password, the following appears:
New Enroll
00008-0
Input Pwd *****
Pwd Affirm *****
6) Input the password again, press [OK], the following appears:
New Enroll
00008-0P
ESC OK (Save)
Note: 0000-0P; “-0P” indicates first fingerprint and password.
7) Press [OK], the previous message continues to be displayed while
the template is created.
18
Page 25

Change Password
1) Press [MENU], select “User Manage”, press [OK], select “Enroll
User”, press [OK]. Three enrollment methods are displayed, select
“Enroll Pwd”, press [OK]. The following screen is displayed:
Enroll Pwd
New Enroll?
ESC OK
2) Press [ESC], the following screen is displayed:
Chg Password
User ID 00001
ESC OK
3) Enter the User ID and press [OK]. The following screen is
displayed:
Chg Password
Input Pwd_
ESC OK
4) Input the password and affirm:
Chg Password
Input Pwd *****
Pwd Affirm *****
19
Page 26

5) Press [OK], the following screen is displayed:
Chg Password
00001-P
ESC OK (Save)
Note: 00006-P
“-P” means password
enrollment
6) Press [OK]. Press [ESC] to exit user enrollment or press [OK] to
continue changing passwords.
User Verification Types
Fingerprint Verification
There are (3) fingerprint verification (“authentication”) types:
1:1 Verification (“One to One” Verification)
In this mode, a user enters their 5-digit User ID and takes a fingerprint
reading. The TQ600 compares their fingerprint to the fingerprint
template of the User ID that was entered, thus a 1:1 comparison. The
1:1 verif ication method is the fastest verif ication method since it only
has to compare the user’s fingerprint to one template stored in the
terminal.
1) In the initial interface, enter your ID number and the following
appears:
1:1 FP Match
User ID 00011
ESC OK
Note: The User ID is 5 digits. If you enter a number with less
than 5 digits the TQ600 adds 0’s in order to create a 5 digit
User ID, i.e., if you enter “11” the TQ600 will Enroll “00011”.
20
Page 27

2) Press [OK] and the following appears:
FP Verify
User ID 00011
Place Finger…
3) It continues for about 0.5 seconds. If the test is successful, the
following appears:
Ve r i fy
User ID 00011
Ve r i fi e d .
4) If your i dentity ca nnot be verified, you are prompted to try again,
the following appears:
1:1 FP Match
Please Try Agn.
It continues for about 0.5 seconds then returns to the start-up window.
1:N Verification (“One to Many” Verification)
In this mode, a user simply takes a fingerprint reading. The TQ600
compares their fingerprint to all of the f ingerprint templates stored in
the terminal. 1:N verification takes more time than 1:1 verif ication.
The verification time is dependent on the number of fingerprint
templates stored in the terminal.
21
Page 28

1) Place finger on the sensor surface, the following appears:
FP Verify
Remove Finger
2) It continues for about 0.5 seconds. If the test is successful, the
following appears:
Ve r i fy
User ID 00001
Ve r i fi e d .
3) If your identity cannot be verified, you are prompted to try again,
the following appears:
FP Verify
Please Try Agn.
It continues for about 0.5 seconds, return to the start-up window.
Password Verification
A password 1 to 5 digits long is used to validate authentication.
Password verif ication can be used in special cases, i.e., when all of a
user’s fingerprints are damaged. This method of verification does not
provide the security of biometric identification and should only be used
when absolutely necessary. Note: when a user with an enrolled
password attempts (1:1) verification the TQ600 will ask for the User’s
password and the user will not have the option of taking a f ingerprint
reading.
22
Page 29

1) To verify a password, enter your ID number, the following appears:
PWD Affirm
User ID 00008
ESC OK
2) Press [OK], the following appears:
Pwd Affirm
User ID 00008
Input Pwd *****
3) Input correct password, press [OK], the following appears:
Verify
User ID 00008
Verified.
4) If the password cannot be verified, the following appears:
Pwd Affirm
Error Pwd.
23
Page 30

5
Enrolling – Badge Terminals
This chapter describes how to enroll users on the TQ600 Proximity, TQ600
Barcode and/or TQ600 Magnetic Stripe terminals.
Badge/Card Enrollment
1) Press [MENU], select “User Manage”, press [OK], select “Enroll
User”, press [OK]. The following screen is displayed:
2) Select “Reg Badge”, press [OK]. The following screen is
displayed:
3) Enter a User ID (PIN number) and scan a badge that is not
currently assigned to any other user. The following screen is
displayed:
Enroll User
►Reg Badge
Enroll Pwd
Reg Badge&Pwd
New Enroll
User ID 00001
ESC OK
New Enroll
CARD: 0001234567
User ID 00010
ESC OK
24
Page 31

4) Press [OK] to complete the enrollment. The following screen
appears:
New Enroll
00010-C
ESC OK (Save)
5) Press [OK] to save enrollment. Press [ESC] to cancel the new
enrollment.
Password Enrollment
1) Press [MENU], select “User Manage”, press [OK], select “Enroll
User”, press [OK]. Three enrollment methods are displayed, choose
“Enroll Pwd”, press [OK]. The following screen is displayed:
New Enroll
User ID 00006
ESC OK
2) The next available User ID is displayed. Press [OK] to choose this
ID or enter a User ID (range is 1 to 65534) & press [OK]. The
following screen is displayed:
Input Pwd_
New Enroll
ESC OK
25
Page 32

3) Input the password and affirm:
New Enroll
Input Pwd *****
Pwd Affirm *****
4) Press [OK], the following screen is displayed:
New Enroll
00006-P
ESC OK (Save)
Note: 00006-P
“-P” means password
enrollment.
5) Press [OK]. Press [ESC] to exit user enrollment or press [OK] to
continue Password enrollment.
Proximity Badge & Password Enrollment
1) Press [MENU], select “User Manage”, press [OK], select “Enroll
User”, press [OK]. Three enrollment methods are displayed, select
“Reg Badge&Pwd”, press [OK]. The following screen is displayed:
New Enroll
User ID 00008
ESC OK
2) Enter a User ID (PIN number) and scan a badge that is not
currently assigned to any other user. The following screen is
displayed:
New Enroll
CARD: 0015416415
User ID 00008
ESC OK
26
Page 33

3) Press [OK], the following appears:
Input Pwd _
New Enroll
CARD: 0015416415
ESC OK
4) Input your password, press [OK], the following appears:
Input Pwd *****
Pwd Affirm _
New Enroll
CARD: 0015416415
5) Affirm your password, press [OK], the following appears:
New Enroll
00008-P
ESC OK (Save)
Note: 00006-P
“-P” means password
enrollment.
6) Press [OK] to save. Press [ESC] to cancel the enrollment.
Change Password
To change the password in the Proximity terminal, the password, Proximity
Badge (if used) and user must be deleted and reenrolled. See Chapter 7 for
details on deleting users.
27
Page 34

Privilege Levels
The TQ600 has four user privilege levels: User, Enroller, Admin
(administrator) and Supervisor.
z Users are people whose identity must be verified to re co rd t ime
such as punching in/out or the time spent working on a job or working
in specific departments.
z Enrollers can enroll supervisors, administrators, enrollers and
users. Enrollers can delete users. Enrollers can access “User
Manage” and “System Information” menus.
z Administrators (Admin) can enroll supervisors, administrators,
enroller and users. Administrators can delete enrollers and users.
Administrators can acc ess all oper atio ns, except “Advanced Options”.
6
z Supervisor is the highest authorization level. Supervisors can
enroll supervisors, admi nistrators, enrollers and users. Supe rvisors
can delete administrators, enrollers and users. Supervisors can
access all functions and change all setups.
Note: If no user has administrative privileges (enroller,
administrator or supervisor) in the terminal, ALL users will be enrolled
with “Supervisor” privileges.
To change a user that is currently enrolled as an administrator or enroller,
delete the user and then re-enroll the user with the new privilege level.
Enroll w/ Privilege Level
Important! Until you enroll a user with at least Administrator
privileges, all users will automatically be entered with Supervisor
privileges even if they were entered as users. In order to prevent
unauthorized personnel from makin g changes to the TQ 600 you sh ould
enroll a user with Administrator password security.
28
Page 35

1) Press [MENU]. Select “User Manage”, press [OK].
Menu ▼
►User Manage
Options
PenDrive Mng
2) The User Manage screen appears:
User Manage ▼
User Enroll
►Enroll Admin
Delete
3) Select “Enroll Admin”, press [OK], the following appears:
Enroll Admin
►Enroll FP
Enroll Pwd
FP & Pwd
Y ou can enroll an employee with (3) possible levels of terminal privileges: (1)
“Supervisor”, (2) “Admin” or (3) “Enroller”.
29
Page 36

Delete User Data
1) Pre ss [MENU], the following appears:
2) Select “User Manage”, press [OK], the following appears:
3) Select “Delete”, press [OK], input the User ID, press [OK] to confirm,
follow the prompts to delete user.
Note: You cannot delete a user with multiple enrolled
fingerprints without deleting each fingerprint first. If the
user has a password you will also need to delete it before you
can remove the user from the terminal.
Menu ▼
►User Manage
Options
PenDrive Mng
User Manage ▼
Enroll User
Enroll Admin
►Delete
Delete
User ID 00008
ESC OK
7
30
Page 37

Options
Press [MENU] and verify your identity. The following appears:
Select “Options”, press [OK], the following appears:
Menu
User Manage
►Options
PenDrive Mng
Options
►System Opt
Power Mng
Comm Opt
--------------------------- Log Opt
Auto Test
8
The following topics are reviewed in this section: S ystem Options, Power
Management, Communication Options, Log Options and Auto Test.
System Options
Select “System Opt”, press [OK], the following appears:
The System Options are: Date & Time, 12H or 24H time format,
Language, Date Format, Daylight Savings Time and Advanced Options.
System Opt ▼
►Date Time
12H or 24H
Language ENG
---------------------------Fmt MM/DD/YY
DST
Adv Option
31
Page 38

Set Date & Time
Select “Date Time”, press [OK] the following appears:
YYYY-MM-DD 24H
2008-01-02
08:24:35
ESC OK
To change the date & time, input the correct date, press [▲/▼], enter
the time and press [OK].
Note: The time and date will update automatically when the
terminal is connected to the network.
Changing the Time Format
Select “12H or 24H”, press [OK], press [▲/▼] to change between 12
Hour and 24 Hour Format.
Changing the Language
Select “Language” , press [OK], press [▲/▼] to select the language (the
default language is English), press [OK].
System Opt ▼
Date Time
Time Fmt 12H
►Language ENG
Press [ESC] to exit system options. The system will prompt you to save
the setup, press [OK]. Restart the terminal for the language change to
take effect.
32
Page 39

English Spanish
Changing the Date Format
System Opt ▼
Date Time
Time Fmt 12H
►Language ENG
Select “Fmt YY-MM-DD”, press [OK], press [▲/▼] to select the date and
time format, press [OK].
There are ten formats: YY-MM-DD, YY/MM/DD, YY.MM.DD,
MM-DD-YY, MM/DD/YY, MM.DD.YY, DD-MM-YY, DD/MM/YY,
DD.MM.YY, YYYYMMDD.
System Opt ▼
Time Fmt 12H
Language ENG
►Fmt YY-MM-DD
Opc. Sistema ▼
Fecha y Hora
Time Fmt 12H
►Idioma ESP
E.g.: YY/MM/DD format (left) change to YY-MM-D D format (right)
Wel com e
17:37
08/06/18 WED
33
Wel co me
17:37
08-06-18 WED
Page 40

Daylight Savings Time (DST)
DST, also called Daylight Saving Time, is the practice of temporarily
advancing clocks during the summertime so that evenings hav e more
daylight and mornings have less. It has been introduced as a method of
saving energy. T ypically clocks are adju sted forwar d one hour near the start
of spring and are adjusted backwar d in autumn. DST is currently observed in
many countries, details vary by location.
1) Press OK to enter the DST setting
interface. Press Y to enable DST, and then
press OK to save. Selecting N disables DST.
2) Set the date mode for DST, there are two option s, Mode1 and Mode 2
Mode 1: The default setting of the device. Its time format is shown as
“Month-day hour: minute”.
Mode 2: Its time format is shown as "Month-Weeks-week hour: minute".
After setting, press ESC button, the device will prompt you to save, press
OK to save and quit.
3) After you select the time format, you need to set the start and end time
of DST. The allowed range is 1-16 for the number of weeks (WS), 1 means
the first week, 2 means the second week, etc. The allowed range is 0-06 for
each day of the week (WK), if you input 0, it represents the Sunda y, 1
represents Monday, etc.
If we take 4:00 am on September 1, 2008 (Saturday, the first week in
September 2008) as an example, the two display Modes need to be
configured as follows:
34
Page 41

Mode 1 Mode 2
Note:
1. Let’s take the following example: DST starts on 2007-9-1 4:00 and ends
on 2008-4-1 4:00.
2. If Mode2 is selected, as of 2007, DST is set up as follows: September
Sunday, the sixth week of the month. However the next year, 2008,
September only has five weeks rather than six. In this case the system will
automatically adjust and apply DST on the last Sunday of September.
3. If we enter DST as September, 1st week, Monday, 2008 and then upon
2009, the first day is Tuesday, instead of Monday, the system will
automatically adjust and apply DST to the first Monday on the month.
Advanced Options
Select “Adv Option”, press [OK], the following appears:
Adv Option ▼
►Reset Opts.
Del AttLogs
Clear All Data
---------------------------Clr Admin Pri
Show Score N
Match Thr 35
Mst Input ID N
1:1 Thr 15
Voice Y
Upd Firmware
Work Code NO
Adj VOL(%) 67
35
Page 42

Press [▲/▼] to scroll up or down to select the option.
Reset Opts.: Restore all setup values to factory defaults.
Delete AttLogs: Delete all transaction logs.
Clear All Data: Delete all users and logs. (Note: You will
lose all information stored on the terminal.)
Clr Admin Pri: Change all privilege levels to User.
Voice On? Turn voice prompts on or off.
Show Score: Show the degree to which a fingerprint reading
matches the stored template. 0 is the lowest scor e (no match) and
50 is the highest score (perfect match).
Match Thr: Set the fingerprint match threshold level. The
threshold value can be set 0 – 75 (default is 35). See Table 1-1.
Mst Input ID: Turns 1:1 (one to one) fingerprint verification on
or off.
1:1 Thr: The minimum fingerprint read correlation needed to
achieve a positive match for 1:1 verification.
Voice: Set the voice prompts on or off.
Upd Firmware: The user cannot update the firmware
unless this feature has been enabled by the manufacturer
or an authorized dealer.
Work Code: Enables/disables the work code feature on the clock.
If enabled, 4 Modes are available. Mode 1 and Mode 2 are not
supported. Use M o de 3 if yo u have ti meQpl us so f twa re a nd wan t
to use global list of work codes per company . Mode 4 allows to use
individually assigned work codes for employees (see timeQplus
Software).
Button Beep: Turn audible feedback on/off when pressing
buttons on the keypad.
Adj VOL(%): Adjust the volume level (0-99); “0” turns off the
speaker.
36
Page 43

Print Mode: not supported.
Display Info: Turn display of employee hours worked on or off
when punching.
Power Management
Select “Power Mng”, press [OK], the following appears:
Power Mng ▼
►Shutdown N
PowerOn N
Sleep N
----------------------------
Idle SLP
Idle Min 0
Bell Delay 10
Scheduled Bell
Lock Power N
Shutdown: Set a time the terminal will automatically turn off.
The terminal can be turned on again with the power button.
Select Shutdown, press [OK], the following appears:
Shutdown
Set Sch. Fun?
ESC OK
Press [OK] and enter the time the unit will shut off.
After setting the shutdown time, press [ESC] and then [OK] to
save the settings.
PowerOn: Set a time the terminal will automatically turn on.
37
Page 44

Sleep: Set a time the terminal will go into sleep mode. Pressing
any button will awaken the terminal.
Idle: Select “SLP” or “OFF” for the Idle mode. “SLP” – Sleep
mode allows the terminal to be awakened by pressing any key.
“OFF” - T urns the unit off and the power button must be pressed to
turn the unit on.
Idle Min: Set how many minutes of no use before the terminal
goes into the selected “Idle” mode. Setting “Idle Min” to “0” turns
off this feature.
Bell Delay: Set the length of time the bell sounds. A setting of 5
sets the bell to ring for 10 seconds . A setting of 10 sets the bell to
ring for 20 seconds.
Scheduled Bell: There are 20 bell schedules. Enter the times
you would like the bell to sound. The bell will sound at the
scheduled times for the duration set in the “Bell Delay”.
Lock Power: If set to “Y” the terminal cannot be turned off using
the power button. To turn the unit off with the power button
locked, enter the “Power Mng” menu and scroll down to “Power
Off”.
Communication Options
Select “Comm Opt”, press [OK], the following appears:
Comm. Opt ▼
►Baud Rate 115200
Dev Num 1
IP Addr
--------------------------- Net Speed AUTO
NetMask
Gateway
Ethernet Y
RS232 N
RS485 N
USB Y
COMM Key 0
38
Page 45

The TQ600 Biometric and TQ600 Proximity fully support Ethernet,
RS232 & USB communications. TQ600 Barcode and TQ600 Magnetic
Stripe support Ethernet and direct connection to PC (cable not included).
Baud Rate: The baud rate may be set to 9600, 19200 38400,
57600 & 115200.
Dev Num: The terminal’s unique Device Number, the range is 1 to
255.
IP Addr: Defaults to IP address 192.168.1.201
Net Speed: The default Net Speed is “AUTO”, the other options
are 10M-F, 10M-H, 100M-F and 100M-H.
NetMask: The default Net Mask is 255.255.255.0
Gateway: The default gateway is 0.0.0.0
Ethernet: Turn Ethernet connectivity on or off.
RS232: Turn RS232 connectivity on or off.
RS485: Not Supported
USB: Turn USB connectivity on or off. Note: This is a serial
connection established via USB cable.
COMM Key: Not utilized
Note: After setting, restart the terminal for the new
configurations to take effect.
Log Options
Select “Log Opt”, press [OK], the following message appears:
Log Opt
►Alm SuperLog 99
Alm AttLog 99
ReCheck Min 0
39
Page 46

Alm SuperLog: An alarm will sound to alert the supervisor that
the logs are full. The set number is the remaining log capacity
before the logs are full, set from 0-99.
Alm AttLog: An alarm will sound when the logs are full. The set
number is the remaining log capacity before the logs are full, set
from 0-99.
ReCheck Min: Set the number of minutes before another punch
is accepted by the terminal. If a punch occurs within the ReCheck
Minutes, the punch will not be logged. This reduces duplicate
(accidental) punches.
Auto Test
Select “Auto Test”, press [OK], the following appears:
Auto Test ▼
►Run All Test
FLASH Test
LCD Test
--------------------------- Vo i c e Te s t
FP Test
Key Test
RTC Test
These options allow the testing of each portion of the terminal in order to
pinpoint failures.
WARNING: Do not disconnect or interrupt power while
performing any of the tests (loss of power during testing may
damage the hardware.
40
Page 47

9
System Information
System Information allows review of the terminal information. Press
[Menu], select “Sys Info”, press [OK], the following appears:
Sys Info ▼
►User Cnt 206
FP Cnt 173
Att Log 8046
----------------------------
Admin Cnt 2
Pwd User 30
S Logs 263
Free Space Info
Dev Info
User Cnt: The number of enrolled users.
FP Cnt: The number of enrolled fingerprints.
Att log: The number of punches stored in the system.
Admin Cnt: The number of users enrolled with Supervisor, Admin
and Enroller privledges.
Pwd User: The number of users using a password for
authentication.
S Logs: The number of supervisor logs.
Free Space Info: The remaining log capacity before reaching the
set alarm point.
41
Page 48

Dev Info: Terminal information (see below)
Users (100): 100: Proximity T erminal: Maximum number of
users (100 X 100 = 10,000).
FPCnt (100): 15: Biometric Terminal: Maximum number of
fingerprints (15 X 100 = 1,500).
AttLog (10k): 5: Maximum number of transaction (5 X
10,000 = 50,000).
S Logs: 4096: Maximum number of supervisor logs (tracks
menu access).
Mfg Date: Terminal’s date/time of manufacture.
Serial Num: Terminal serial number.
Vendor: Acroprint
Device Name:TQ600B (Biometric), TQ600P (Proximity),
TQ600BC-M (Barcode or Magnetic Stripe).
Firmware Ver: The version of the terminal firmware.
MAC Address: The MAC address of the terminal.
Alg Version: The version of the fingerprint identification
algorithm.
MCU Version: The firmware version of the microcontroller.
42
Page 49

10
View Time and Attendance Records
Time & attendance records stored inside the terminal can be reviewed.
Review All Attendance Records
1) Press [MENU], select “User Manage”, press [OK], select
“Browse AttLogs”, press [OK] and the following appears:
2) Press [OK] with User ID as “00000” and all terminal attendance
records will be displayed. Scroll through the records using [▲▼].
3) Press [ESC] to return to normal operation
Browse AttLogs
User ID 00000
ESC OK
1/380
00001 05-27 18:46:21I
00012 05-27 18:32:09I
00217 05-27 18:30:52I
00031 05-27 18:29:01I
00016 05-27 18:27:55I
00029 05-27 18:22:08I
43
Page 50

Review Individual Attendance Records
1) Press [MENU], select “User Manage”, press [OK], select
“Browse AttLogs”, press [OK] and the following appears:
Browse AttLogs
User ID 00000
ESC OK
2) Enter User ID (“00014 for example), press [OK] and the
individual attendance recor ds will be displayed. Scroll through
the records using [▲▼].
00014 2006-5 1/23
27 08:30 12:10 13:20
18:08
26 08:46 12:15 13:25
18:23 18:55 22:20
25 08:53 12:07 13:19
18:23
3) Press [ESC] to return to normal operation
Browsing Attendance Records
The table below details additional commands for browsing attendance
records:
Key Description
▲
▼
Scrolls display content up
Scrolls display content down
1 Scrolls display content left
3 Scrolls display content right
OK Restores right and left scrolling to initial position
2 Move up a line
5 Move down a line down
44
Page 51

4
6
Toggles between compact
display and complete
display.
Toggle between Small and
Large fonts.
1/380
00001 05-27 18:46:21I
00012 05-27 18:32:09I
00217 05-27 18:30:52I
00031 05-27 18:29:01I
00016 05-27 18:27:55I
00029 05-27 18:22:08I
Compact
1/380
00001 27 18:46IF
00012 27 18:32IF
00217 27 18:30IF
00031 27 18:29IF
00016 27 18:27IF
00029 27 18:22IF
Complete
00014 2006-5 1/23
27 08:30 12:10 13:20
18:08
26 08:46 12:15 13:25
18:23 18:55 22:20
25 08:53 12:07 13:19
18:23
Small Font
27 08:30 12:10
13:20 18:08
26 08:46 12:15
13:25 18:23
18:55 22:20
Large Font
9 Scrolls to the newest record
0 Scrolls to the oldest record
45
Page 52

Cleaning the TQ600
1. Cleaning the Keypad and Display
Use a soft damp cloth to remove dirt. Wipe dry.
2. Cleaning the Optical Sensor
Clean the optical sensor as follows:
(1) Use a can of compressed air to blow off any loose dust or
dirt particles on the sensor.
(2) Lightly press a small strip of adhesive tape to the sensor
surface and slowly peel if off to remove dust & dirt particles.
(3) Use a soft, non-abrasive dry cloth to wipe the sensor
surface. Be careful not to scratch the surface of the sensor.
If there are lint particles on the sensor surface, use clear
adhesive tape to remove particles.
11
Caution:
Do not use any cleaners on the sensor or it could be damaged.
Cleaning products that contain alcohol or other strong chemicals
may discolor or crack the terminal housing.
46
Page 53

Troubleshooting
1.
Q: Fingerprint cannot be verified.
A: Possible Causes: The following conditions could result in a
failed read.
1) Fingerprint is damaged or smooth
2) Finger is dry
Correction: Use 1:1 matching (see page 21). Moisturize
finger. Enroll a different fingerprint.
2. Q: Terminal fails to communicate.
A: Possible Causes:
1) The communication port configuration is not correct;
insure proper ports are connected.
2) Baud rate of the computer port and the terminal port
are different.
3) The terminal has failed to connect with the power source
or the computer;
4) The terminal is connected but failed to start.
5) The serial number of the linked terminal is not correct.
6) Data line or converter fails to communicate.
7) Failed com puter COM port.
12
3. Q: The display does not work or parts of it do not work.
A: Possible Causes:
1) Motherboard is defective
2) The LCD display is defective.
Correction: Contact your dealer or Acroprint for repair.
4. Q: How do I remove a Supervisor?
A: Call Acroprint Technical Support.
47
Page 54

5. Q: The terminal beeps when the communication connection is
made.
A: When using the RS-232 connection insure that the baud rate of
the PC and terminal are matched.
6. Q: Fingerprints have a high rejection rate.
A: Possible Causes:
1) Dirty sensor
2) Damaged sensor prism
3) Loose fingerprint reader connection
4) Damaged chip on PCB
Correction:
1) Clean sensor (see Cleaning instructions, Chapter 10)
2) Contact dealer or Acroprint for replacement of the prism.
3) Contact dealer or Acroprint.
4) Contact dealer or Acroprint.
7. Q: The terminal is communicating, but the attendance
records are not correct in the system.
A: Lower the baud to 19200 or 9600 and confirm if the records
are correct.
48
Page 55

Appendix
USB Flash Drive Management
See “Remote Terminal Functionality” in the Documents folder of the
timeQplus CD.
Bell Schedule
The TQ600 has a bell signal that can be programmed for dif ferent times
during the day. The bell schedule and bell duration can be set based on
user requirements. A total of 20 bell schedules can be set.
The TQ600 has an internal electronic bell, see Chapter 5, “Power
Manage”.
TQ600 Magnetic Stripe/TQ600 Barcode terminals have relay contacts for
access control/external bell function. It requires purchasing and
connecting a relay box and external bell. For more information see
“TQ600BC-M External Bell Connection.pdf” in the timeQplus
Documentation folder.
Reserve Battery (Mini-UPS)
In order for the TQ600 to function during power interruptions an
optional 12V Mini-UPS (p/n 74-0169-000) is available. Contact your
dealer or Acroprint to purchase.
UPS Operational State:
The UPS remains idle as long as AC Power is available but will
automatically supply power to the TQ600 the instant AC Power is
interrupted. When AC Power is restored the UPS will automatically
charge until fully charged.
49
Page 56

Connection
Note: Connect the Mini-UPS to the TQ600 first, then plug the UPS
in and turn the power on.
Battery Storage:
Store batteries in a cool/dry place 50-86º F (10-30 º C). DO NOT store
batteries for over 3 months and do not store them in direct sunlight, high
temperature or high humidity. Charge the batteries at least once
every three months in order to maintain 50% of the rated capacity of
the battery. Keep the batteries away fr om chemicals and heat s ources.
Warning:
Batteries may leak, overheat, catch fire or explode if you don’t follow
proper safety & handling:
z DO NOT get batteries wet
z DO NOT place batteries near heat sources
z DO NOT use any charger other than the original charg er
z DO NOT inver se polarity connection
z NEVER throw batteries into fire. Properly dispose of
batteries according to local rules and regulations.
z DO NOT allow any t hing to short circuit the batteries (connect
the positive and negative terminals of the battery)
z Dropping a battery may damage the battery. Replace
the battery if you suspect that it is damaged.
50
Page 57

Fingerprint Privacy:
1. The TQ600 merely captures points of the fingerprint but not the
actual fingerprint image.
2. The fingerprint points cannot be used to re-create a fingerprint image.
3. Acroprint will not be liable for any direct or the indirect damages
resulting from the use or inability to use our equipment.
4. If you have a question about privacy concerning the use of
our equipment you should have your employer contact Acroprint.
51
Page 58

06-0386-000 Rev. C
 Loading...