

Page 1

Acronis Storage 2.4
User’s Guide
January 15, 2019
Page 2

Copyright Statement
Acronis International GmbH, 2002-2016. All rights reserved.
”Acronis” and ”Acronis Secure Zone” are registered trademarks of Acronis International GmbH.
”Acronis Compute with Confidence”, ”Acronis Startup Recovery Manager”, ”Acronis Active Restore”,
”Acronis Instant Restore” and the Acronis logo are trademarks of Acronis International GmbH.
Linux is a registered trademark of Linus Torvalds.
VMware and VMware Ready are trademarks and/or registered trademarks of VMware, Inc. in the United States and/or other jurisdictions.
Windows and MS-DOS are registered trademarks of Microsoft Corporation.
All other trademarks and copyrights referred to are the property of their respective owners.
Distribution of substantively modified versions of this document is prohibited without the explicit permission of the copyright holder.
Distribution of this work or derivative work in any standard (paper) book form for commercial purposes is prohibited unless prior permission is
obtained from the copyright holder.
DOCUMENTATION IS PROVIDED ”AS IS” AND ALL EXPRESS OR IMPLIED CONDITIONS, REPRESENTATIONS AND WARRANTIES, INCLUDING ANY IMPLIED
WARRANTY OF MERCHANTABILITY, FITNESS FOR A PARTICULAR PURPOSE OR NON-INFRINGEMENT, ARE DISCLAIMED, EXCEPT TO THE EXTENT THAT
SUCH DISCLAIMERS ARE HELD TO BE LEGALLY INVALID.
Third party code may be provided with the Software and/or Service. The license terms for such third parties are detailed in the license.txt file located in
the root installation directory. You can always find the latest up-to-date list of the third party code and the associated license terms used with the
Software and/or Service at http://kb.acronis.com/content/7696
Acronis patented technologies
Technologies, used in this product, are covered and protected by one or more U.S. Patent Numbers: 7,047,380; 7,275,139; 7,281,104; 7,318,135;
7,353,355; 7,366,859; 7,475,282; 7,603,533; 7,636,824; 7,650,473; 7,721,138; 7,779,221; 7,831,789; 7,886,120; 7,895,403; 7,934,064; 7,937,612; 7,949,635;
7,953,948; 7,979,690; 8,005,797; 8,051,044; 8,069,320; 8,073,815; 8,074,035; 8,145,607; 8,180,984; 8,225,133; 8,261,035; 8,296,264; 8,312,259; 8,347,137;
8,484,427; 8,645,748; 8,732,121 and patent pending applications.
Page 3

Contents
1. About Acronis Storage . . . . . . . . . . . . . . . . . . . . . . . . . . . . . . . . . . . . . . . . . . . . . . . 1
1.1 Supported Storage Types . . . . . . . . . . . . . . . . . . . . . . . . . . . . . . . . . . . . . . . . . . 1
2. Accessing S3 Buckets . . . . . . . . . . . . . . . . . . . . . . . . . . . . . . . . . . . . . . . . . . . . . . . . 2
2.1 Managing Buckets via the Acronis Storage User Panel . . . . . . . . . . . . . . . . . . . . . . . . . 2
2.1.1 Logging in to the Acronis Storage User Panel . . . . . . . . . . . . . . . . . . . . . . . . . . 2
2.1.2 Adding, Deleting, and Listing S3 Buckets . . . . . . . . . . . . . . . . . . . . . . . . . . . . 4
2.1.2.1 Listing S3 Bucket Contents in a Browser . . . . . . . . . . . . . . . . . . . . . . 4
2.1.3 Creating, Deleting, and Listing Folders . . . . . . . . . . . . . . . . . . . . . . . . . . . . . 4
2.1.4 Uploading and Downloading Files . . . . . . . . . . . . . . . . . . . . . . . . . . . . . . . . 5
2.1.5 Obtaining and Validating File Certificates . . . . . . . . . . . . . . . . . . . . . . . . . . . . 6
2.2 Accessing S3 Storage with CyberDuck . . . . . . . . . . . . . . . . . . . . . . . . . . . . . . . . . . . 6
2.2.1 Managing S3 Bucket Versions . . . . . . . . . . . . . . . . . . . . . . . . . . . . . . . . . . . 8
2.3 Mounting S3 Storage with Mountain Duck . . . . . . . . . . . . . . . . . . . . . . . . . . . . . . . . 9
2.3.1 Creating S3 Buckets on Mounted S3 Storage . . . . . . . . . . . . . . . . . . . . . . . . . . 11
2.4 Configuring Backup Exec to Keep Backups in S3 Storage . . . . . . . . . . . . . . . . . . . . . . . . 11
2.5 S3 Bucket and Key Naming Policies . . . . . . . . . . . . . . . . . . . . . . . . . . . . . . . . . . . . 18
3. Accessing iSCSI Targets . . . . . . . . . . . . . . . . . . . . . . . . . . . . . . . . . . . . . . . . . . . . . . 20
3.1 Accessing iSCSI Targets from CentOS 6 . . . . . . . . . . . . . . . . . . . . . . . . . . . . . . . . . . 20
3.2 Accessing iSCSI Targets from Microsoft Windows Server 2012 R2 . . . . . . . . . . . . . . . . . . . 20
3.3 Accessing iSCSI Targets from VMware ESXi . . . . . . . . . . . . . . . . . . . . . . . . . . . . . . . . 27
3.4 Accessing iSCSI Targets from Citrix XenServer 6.2 . . . . . . . . . . . . . . . . . . . . . . . . . . . . 27
3.5 Accessing iSCSI Targets from Microsoft Hyper-V . . . . . . . . . . . . . . . . . . . . . . . . . . . . . 28
4. Accessing NFS Shares . . . . . . . . . . . . . . . . . . . . . . . . . . . . . . . . . . . . . . . . . . . . . . . 30
4.1 Mounting NFS Exports on Linux . . . . . . . . . . . . . . . . . . . . . . . . . . . . . . . . . . . . . . 30
i
Page 4

4.2 Mounting NFS Exports on MacOS . . . . . . . . . . . . . . . . . . . . . . . . . . . . . . . . . . . . . 31
ii
Page 5

CHAPTER 1
About Acronis Storage
Acronis Storage is a software-defined storage solution that allows you to quickly and easily transform
low-cost commodity storage hardware and network equipment into protected enterprise-grade storage like
SAN or NAS.
Acronis Storage is optimized for storing large amounts of data and provides data redundancy (replication
and erasure coding), high availability, self-healing, and storage sharing.
Acronis Storage offers integration with the Acronis Notary service to leverage blockchain notarization and
ensure the immutability of data saved in object storage clusters. The notary service timestamps the data and
stores data fingerprints in a public blockchain ledger, not owned by Acronis, ensuring data immutability. As a
result, blockchain notarization is well suited for and commonly used to maintain authenticity of such data as
property and medical records, chain-of-evidence for court documents, police video or security camera
footage, intellectual property bound documents, long-term archiving that could be subject to IT audits, and
‘consortium’ data storage, where multiple entities or individuals need to securely store and exchange
massive amounts of data and information.
1.1 Supported Storage Types
Your service provider can configure Acronis Storage to keep your data in three storage types:
• S3 object storage for storing an unlimited number of objects (files).
• iSCSI block storage for virtualization, databases, and other needs.
• NFS shares for storing an unlimited number of files via a distributed filesystem.
The following sections describe the ways to access data in Acronis Storage in detail.
1
Page 6

CHAPTER 2
Accessing S3 Buckets
To access Acronis Storage S3 buckets, get the following information (credentials) from your system
administrator:
• user panel IP address,
• DNS name of the S3 endpoint,
• access key ID,
• secret access key.
Acronis Storage allows you to access your S3 data in several ways:
• via Acronis Storage user panel;
• via a third-party S3 application like Cyberduck, Mountain Duck,Backup Exec, etc.
2.1 Managing Buckets via the Acronis Storage User Panel
This section describes how to manage buckets and their contents using Acronis Storage user panel.
2.1.1 Logging in to the Acronis Storage User Panel
To log in to the Acronis Storage user panel, do the following:
1. On any computer with access to the web interface, in a web browser visit
2
Page 7

2.1. Managing Buckets via the Acronis Storage User Panel
http://<user_panel_IP_address>:8888/s3/.
2. On the Acronis Storage login screen, enter your credentials in the corresponding fields and click
Once you log in to the web interface, you will see the Buckets screen with the list of your buckets. From
here, you can manage buckets as well as folders and files stored inside the buckets.
To log out, click the user icon in the upper right corner of any screen and click Log out.
LOG IN
.
3
Page 8

2.1.2 Adding, Deleting, and Listing S3 Buckets
On the Buckets screen:
• To add a new bucket, click Add bucket, specify a name, and click Add.
Chapter 2. Accessing S3 Buckets
Use bucket names that comply with DNS naming conventions. For more information on bucket naming,
see S3 Bucket and Key Naming Policies on page 18.
• To delete a bucket, select it and click Delete.
• To list bucket contents, click a bucket name in the list.
2.1.2.1 Listing S3 Bucket Contents in a Browser
You can list bucket contents with a web browser. To do this, visit the URL that consists of the external DNS
name for the S3 endpoint that you specified when creating the S3 cluster and the bucket name. For example,
mys3storage.example.com/mybucket.
Note: You can also copy the link to bucket contents by right-clicking it in CyberDuck, and then
selecting Copy URL.
2.1.3 Creating, Deleting, and Listing Folders
On the bucket contents screen:
• To create a folder, click New folder, specify folder name in the New folder window, and click Add.
4
Page 9

2.1. Managing Buckets via the Acronis Storage User Panel
• To delete a folder, select it and click Delete.
• To list folder contents, click a folder name.
2.1.4 Uploading and Downloading Files
On the bucket or folder contents screen:
• To upload files to S3, click Upload and choose files to upload.
• To download files, select them and click Download.
5
Page 10

Chapter 2. Accessing S3 Buckets
2.1.5 Obtaining and Validating File Certificates
Acronis Storage offers integration with the Acronis Notary service to leverage blockchain notarization and
ensure the immutability of data saved in S3 buckets.
To certify files stored in your buckets, ask your system administrator to enable the Acronis Notary service for
the buckets.
On the bucket’s or folder’s contents screen:
• To get a notarization certificate for a file, select it and click Get Certificate.
• To check the validity of a file’s certificate, click Validate.
2.2 Accessing S3 Storage with CyberDuck
To access Acronis Storage with CyberDuck, do the following:
6
Page 11

2.2. Accessing S3 Storage with CyberDuck
1. In CyberDuck, click Open Connection.
2. Specify your credentials:
• The DNS name of the S3 endpoint.
• The Access Key ID and, the Password field, the secret access key of an object storage user.
By default, the connection is established over HTTPS. To use CyberDuck over HTTP, you must install a
special S3 profile.
3. Once the connection is established, click File > New Folder to create a bucket.
4. Specify a name for the new bucket, and then click Create. Use bucket names that comply with DNS
naming conventions. For more information on bucket naming, see S3 Bucket and Key Naming Policies on
page 18.
7
Page 12
Chapter 2. Accessing S3 Buckets
The new bucket will appear in CyberDuck. You can manage it and its contents.
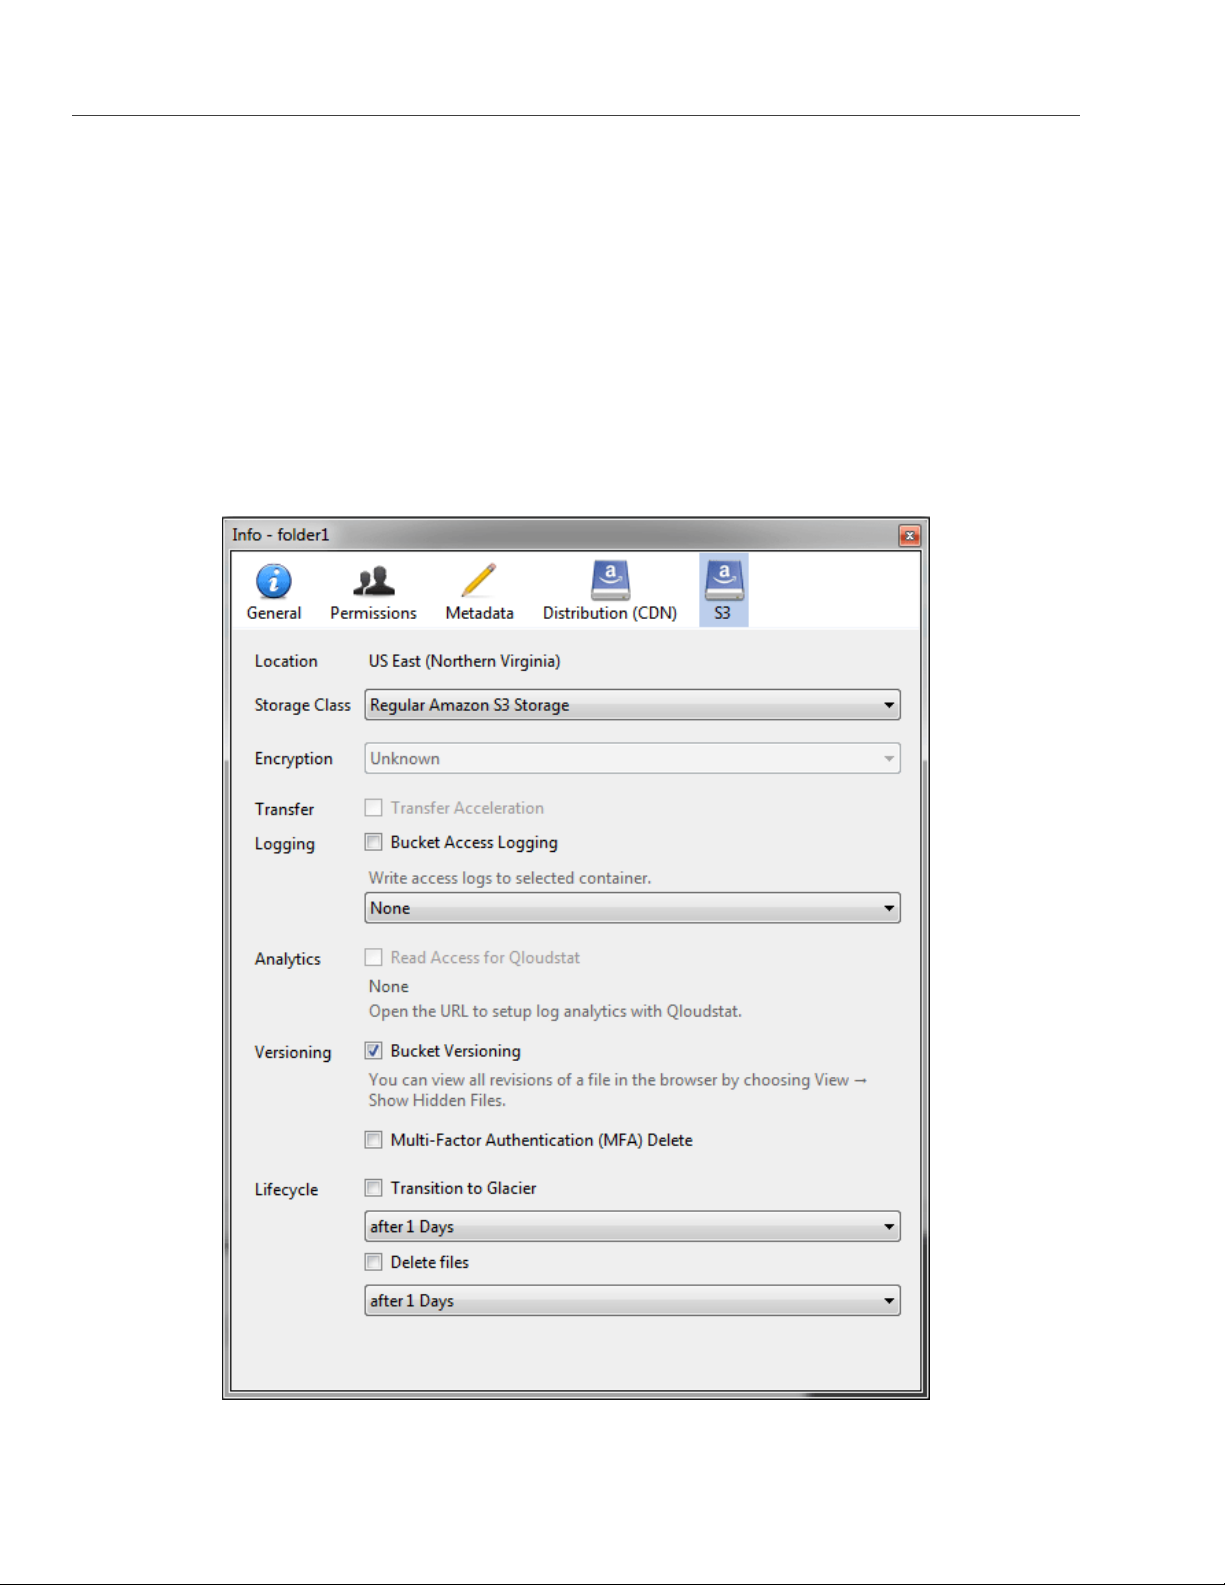
2.2.1 Managing S3 Bucket Versions
Versioning is a way of keeping multiple variants of an object in the same bucket. You can use versioning to
preserve, retrieve, and restore every version of every object stored in your S3 bucket. With versioning, you
can easily recover from both unintended user actions and application failures. For more information about
bucket versioning, refer to the Amazon documentation.
Bucket versioning is turned off by default. In CyberDuck, you can enable it in bucket properties. For example:
8
Page 13
2.3. Mounting S3 Storage with Mountain Duck
2.3 Mounting S3 Storage with Mountain Duck
Mountain Duck enables you to mount and access Acronis Storage S3 storage as a regular disk drive. Do the
following:
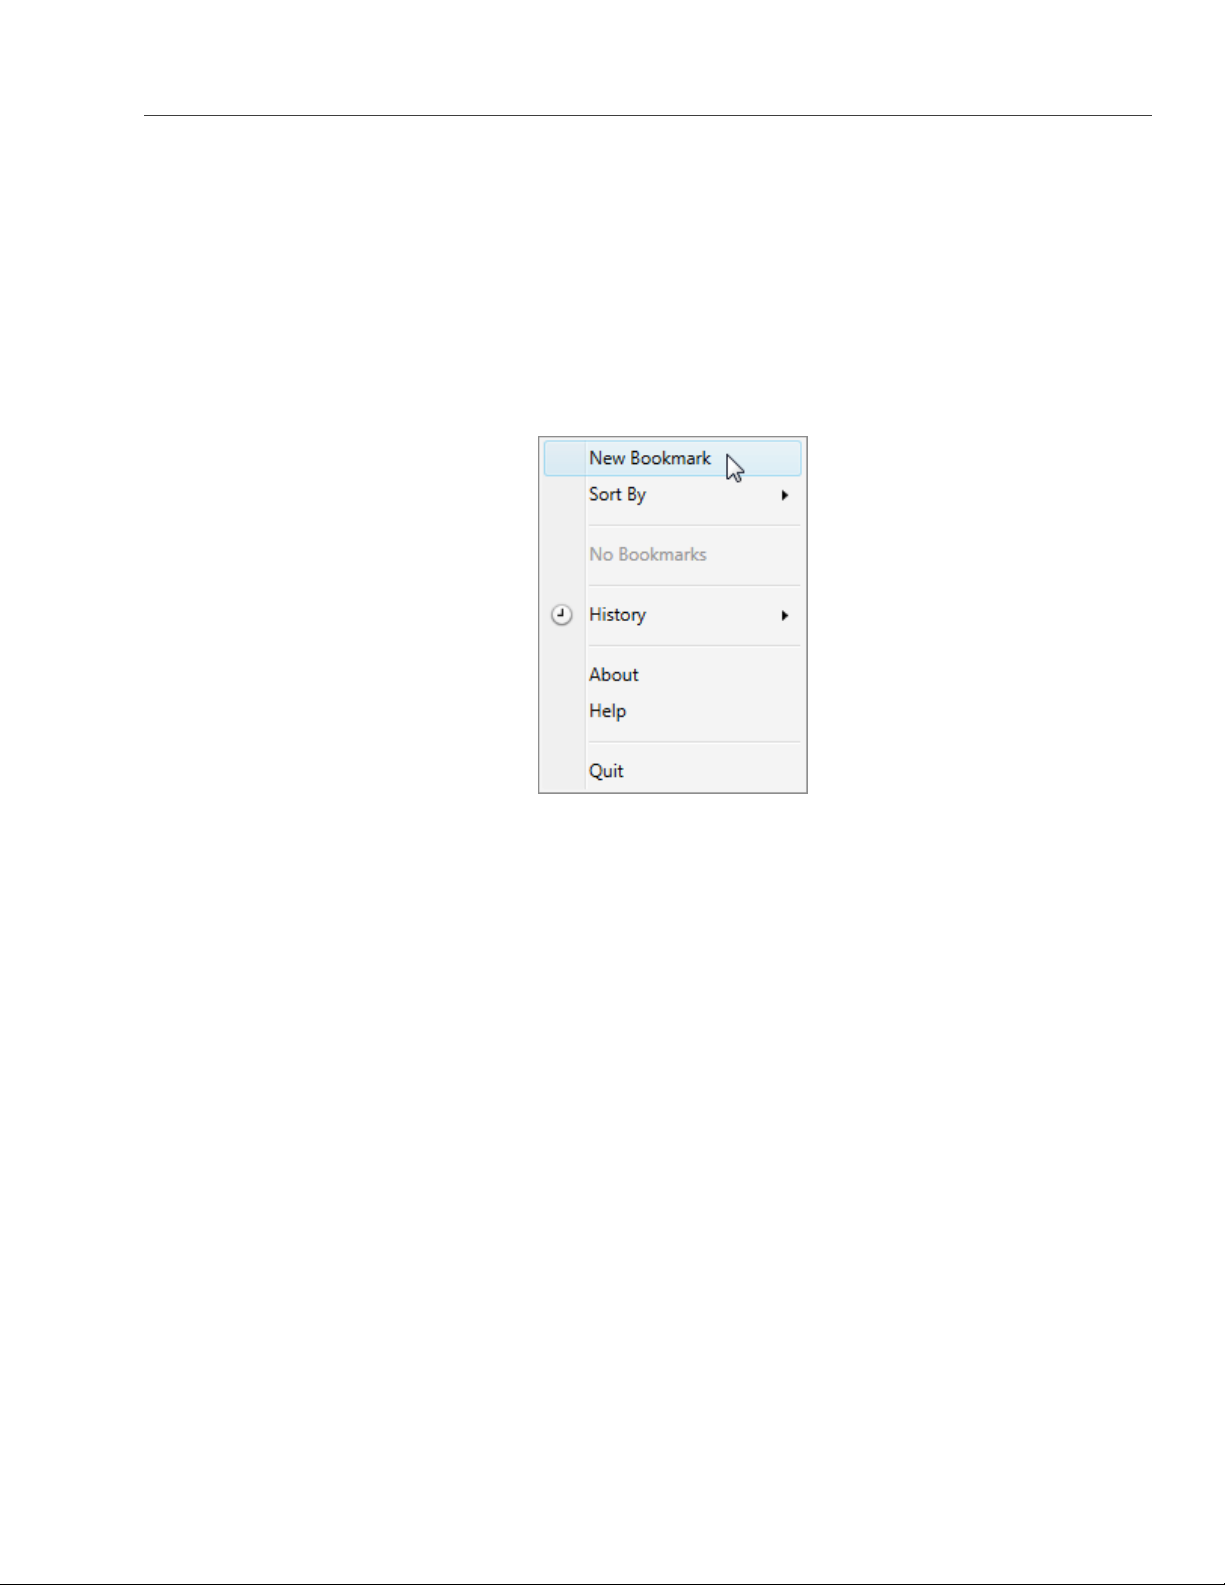
1. If your service provider has provided you with an SSL certificate, install it.
2. In Mountain Duck, click New Bookmark.
3. In the properties window, select Amazon S3 profile from the first drop-down list and specify the
following parameters:
• Nickname of the disk drive,
• endpoint DNS name in the Server field,
• access key ID in the Username field;
and click Connect.
9
Page 14

Chapter 2. Accessing S3 Buckets
4. In the login window, specify Secret Access Key and click Login.
10
Page 15

2.4. Configuring Backup Exec to Keep Backups in S3 Storage
Mountain Duck will mount the S3 storage as a disk drive. On the disk, you can manage buckets and store files
in them.
2.3.1 Creating S3 Buckets on Mounted S3 Storage
Windows and Mac OS X, operating systems supported by MountainDuck, treat buckets as folders in case the
S3 storage is mounted as a disk drive. In both operating systems, the default folder name contains spaces.
This violates bucket naming conventions (see S3 Bucket and Key Naming Policies on page 18), therefore you
cannot create a new bucket directly on the mounted S3 storage. To create a bucket on a mounted S3 storage,
create a folder with a name complying with DNS naming conventions elsewhere and copy it to the root of the
mounted S3 storage.
2.4 Configuring Backup Exec to Keep Backups
in S3 Storage
To store Backup Exec backups in S3 storage, do the following:
1. Create a bucket to store backups either using the Acronis Storage user panel or another application.
2. Install Backup Exec. During installation, make sure so select all the components of Backup Exec and
11
Page 16

Chapter 2. Accessing S3 Buckets
check all the updates.
3. Run CLILauncher located in C:\Program Files\Veritas\Backup Exec.
4. In the Backup Exec command-line prompt, run the following command:
# New-BECloudInstance -Name "cloudinstance" -Provider "cloudian" \
-ServiceHost "<S3_DNS_name>" -SslMode "Disabled" -UrlStyle "Path"
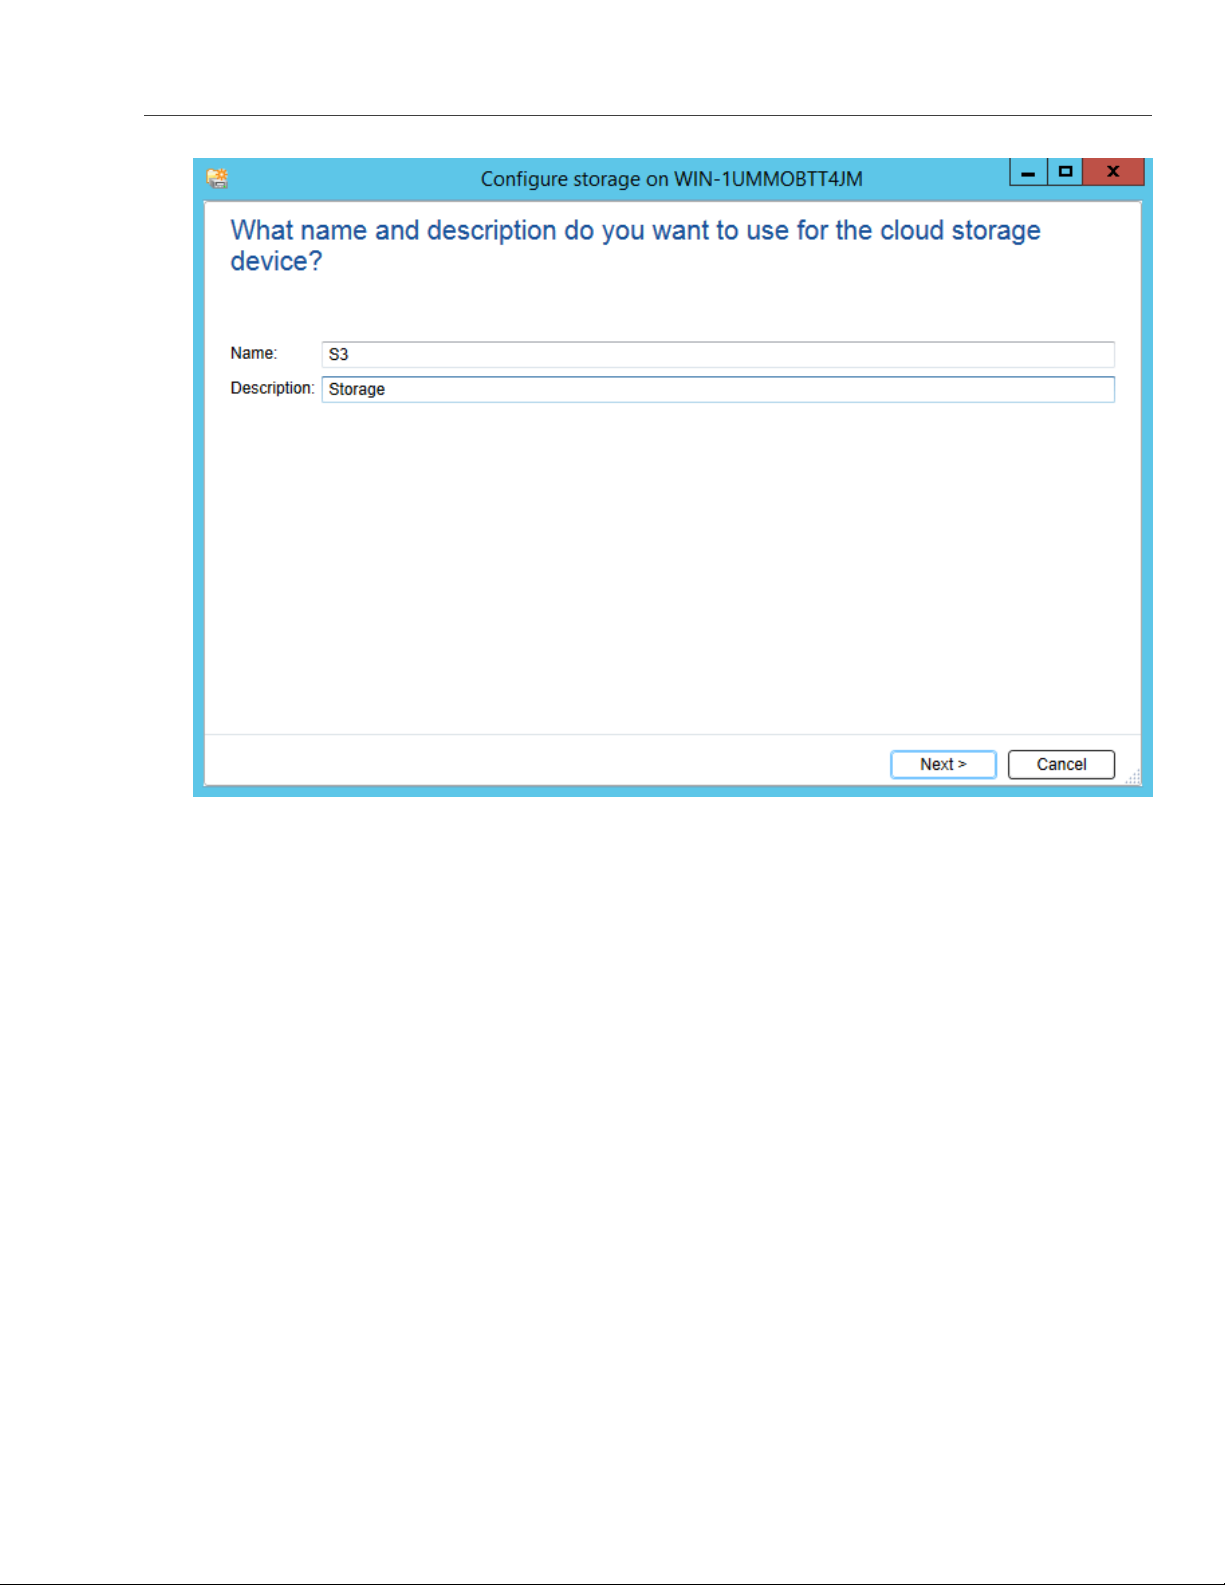
5. In Backup Exec, click Configure Cloud Storage on the Storage tab.
6. In the
Configure storage...
window, specify a name for Acronis Storage S3 and click
12
NEXT
.
Page 17
2.4. Configuring Backup Exec to Keep Backups in S3 Storage
7. Select the S3 device and click NEXT.
13
Page 18

Chapter 2. Accessing S3 Buckets
8. Select cloudinstance [cloudian] from the Cloud storage drop-down list.
14
Page 19

2.4. Configuring Backup Exec to Keep Backups in S3 Storage
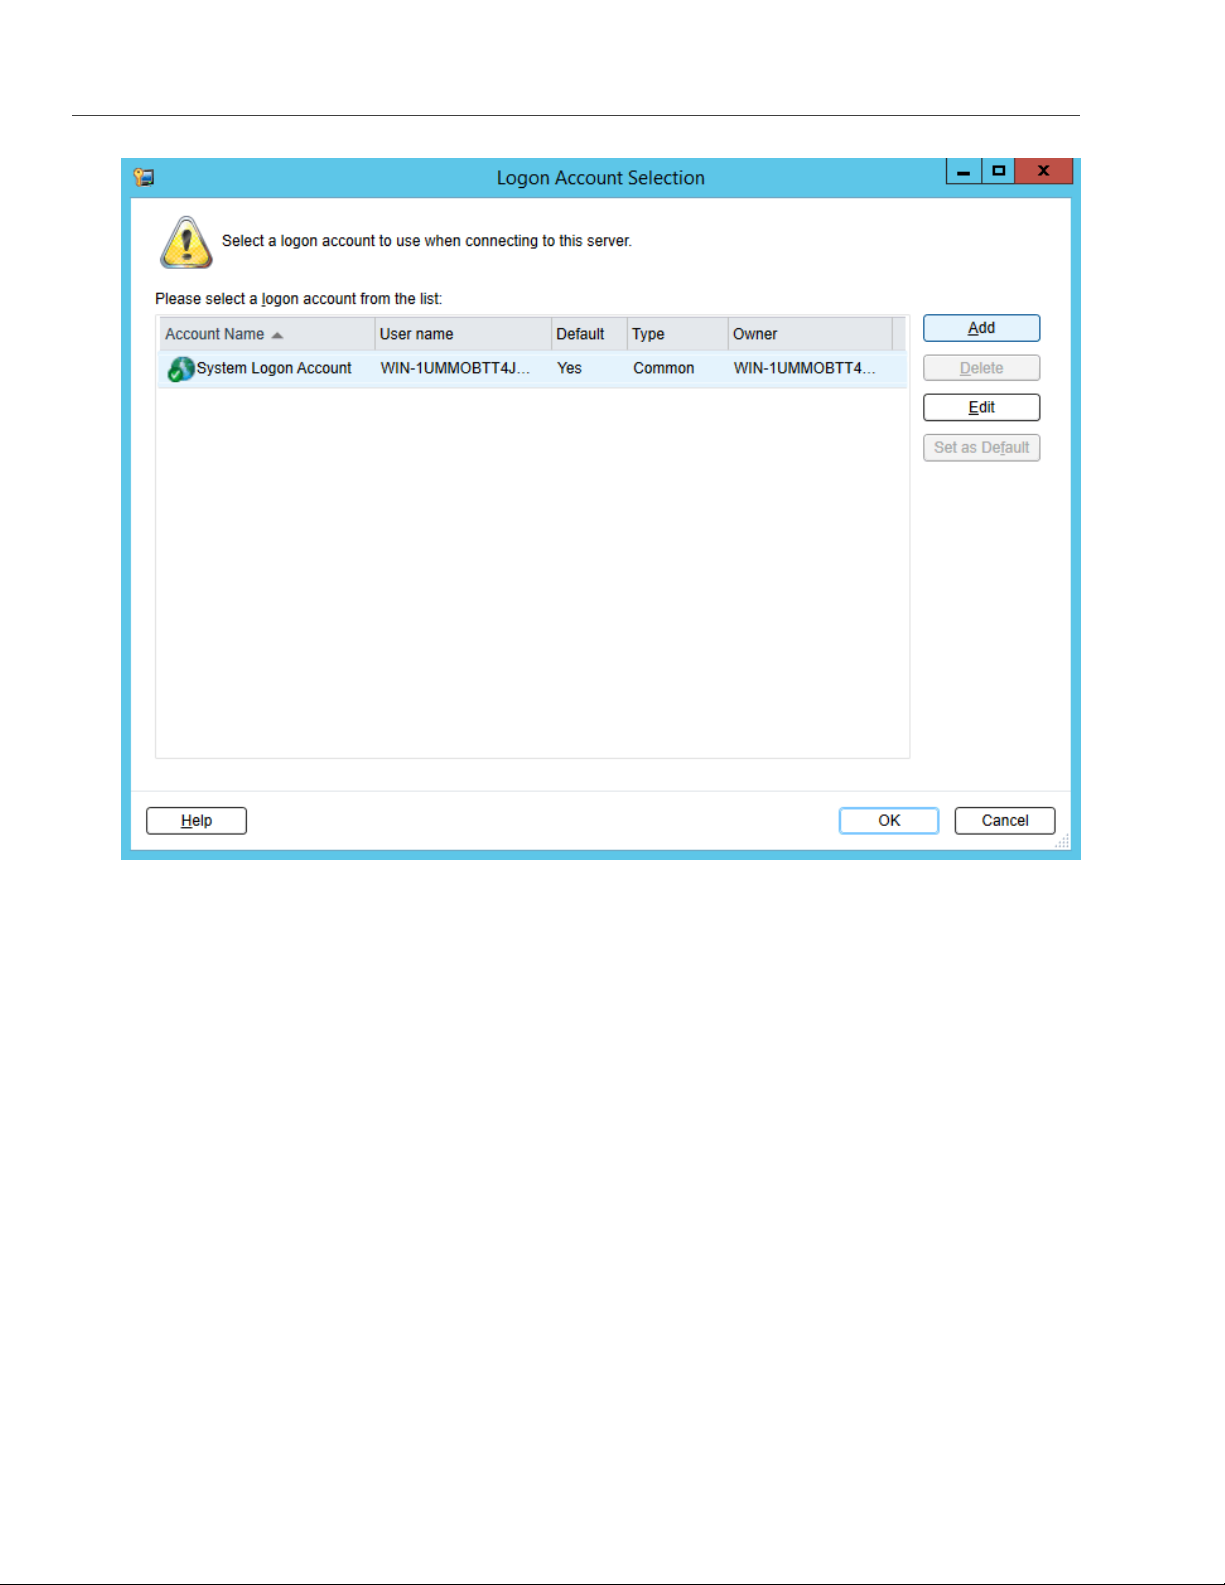
9. Click Add/Edit next to the Logon account drop-down list.
10. In the Logon Account Selection window, click Add.
15
Page 20
Chapter 2. Accessing S3 Buckets
11. In the Account credentials section, specify your credentials:
11.1. S3 access key ID in the User name field.
11.2. S3 secure access key in the Password field and confirm it.
11.3. The username of your account in the Account name field.
16
Page 21

2.4. Configuring Backup Exec to Keep Backups in S3 Storage
12. Clear all the checkboxes and click OK.
13. Back in the Logon Account Selection window, make sure the newly added user account is selected and
click OK.
17
Page 22

Chapter 2. Accessing S3 Buckets
14. Back in the Configure storage... window, click NEXT.
15. Select a bucket and click NEXT twice.
16. On the summary screen, click Finish, OK, and Yes.
Once the Backup Exec services are restarted, the S3 storage will appear in the list on the Storage tab. Now
you can create backup jobs and specify the S3 storage as destination.
2.5 S3 Bucket and Key Naming Policies
It is recommended to use bucket names that comply with DNS naming conventions:
• can be from 3 to 63 characters long,
• must start and end with a lowercase letter or number,
18
Page 23

2.5. S3 Bucket and Key Naming Policies
• can contain lowercase letters, numbers, periods (.), hyphens (-), and underscores (_),
• can be a series of valid name parts (described previously) separated by periods.
An object key can be a string of any UTF-8 encoded characters up to 1024 bytes long.
19
Page 24

CHAPTER 3
Accessing iSCSI Targets
This section describes ways to attach Acronis Storage iSCSI targets to a number of operating systems and
third-party virtualization solutions.
3.1 Accessing iSCSI Targets from CentOS 6
1. Make sure that the iscsi-initiator-utils package is installed.
2. Discover the required target by its IP address. For example:
# iscsiadm --mode discovery --type sendtargets --portal 192.168.10.100
3. Restart the iscsid service to rescan for newly added drives:
# service iscsi restart
To check that the new drive has appeared in the system, use fdisk, parted or similar tools.
For more information, see the Red Hat Enterprise Linux Storage Administration Guide.
3.2 Accessing iSCSI Targets from Microsoft Windows Server 2012 R2
1. In the Server Manager Dashboard, click the Tools menu in the toolbar and select iSCSI Initiator.
20
Page 25

3.2. Accessing iSCSI Targets from Microsoft Windows Server 2012 R2
2. In the iSCSI Initiator Properties, switch to the Discovery tab and click Discover Portal....
3. In the
Discover Target Portal
window, enter the portal IP address and clickOK.
21
Page 26

Chapter 3. Accessing iSCSI Targets
The newly added portal will appear in the Target portals section.
4. On the iSCSI Initiator Properties > Targets tab, select the new target in the Discovered targets
section and click Connect.
5. In the Connect to Target window, click OK.
22
Page 27

3.2. Accessing iSCSI Targets from Microsoft Windows Server 2012 R2
6. Target’s Inactive status will change to Connected.
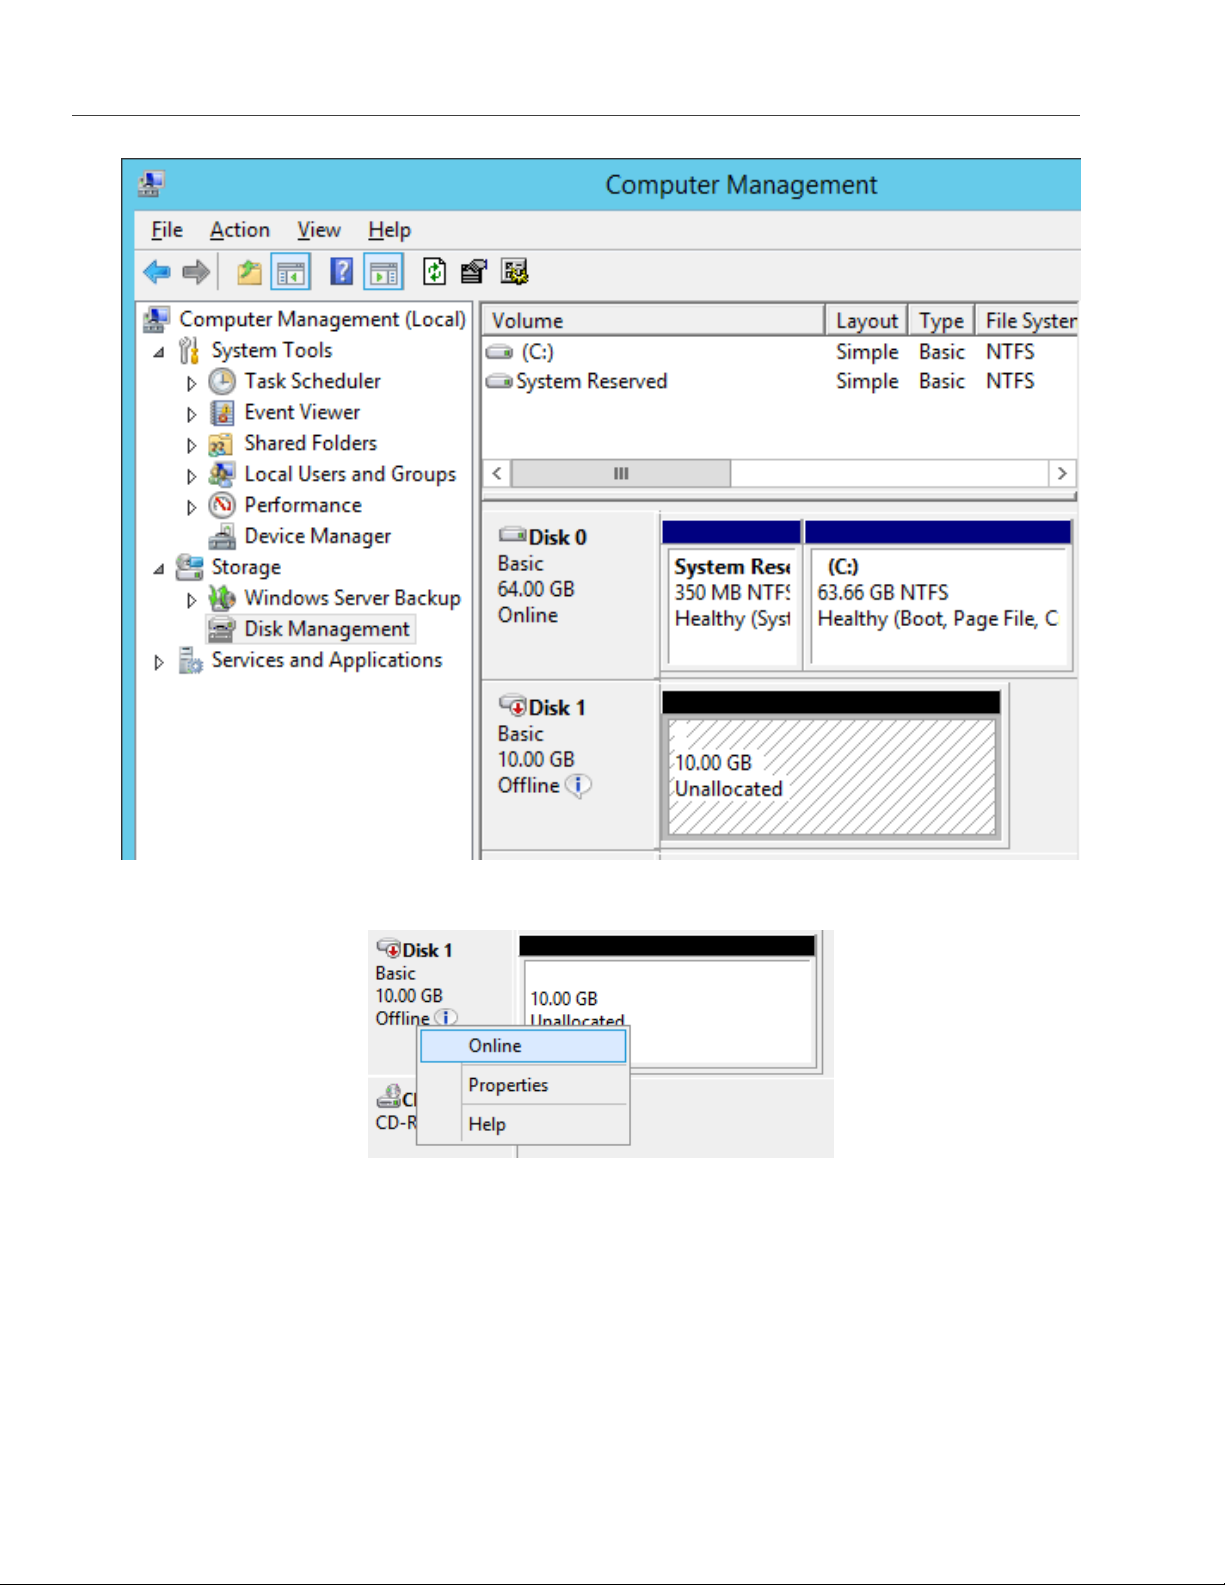
7. The newly attached disk will appear in Server Manager Dashboard > Computer Management >
Storage > Disk Management.
23
Page 28
Chapter 3. Accessing iSCSI Targets
8. Right-click the disk information section and select Online.
The disk status will change to Online.
9. Right-click the disk information section and select Initialize Disk.
24
Page 29

3.2. Accessing iSCSI Targets from Microsoft Windows Server 2012 R2
10. In the Initialize Disk window, click OK.
11. Right-click the disk space section, select New Simple Volume..., and follow the wizard’s instruction to
format the new disk to NTFS.
25
Page 30
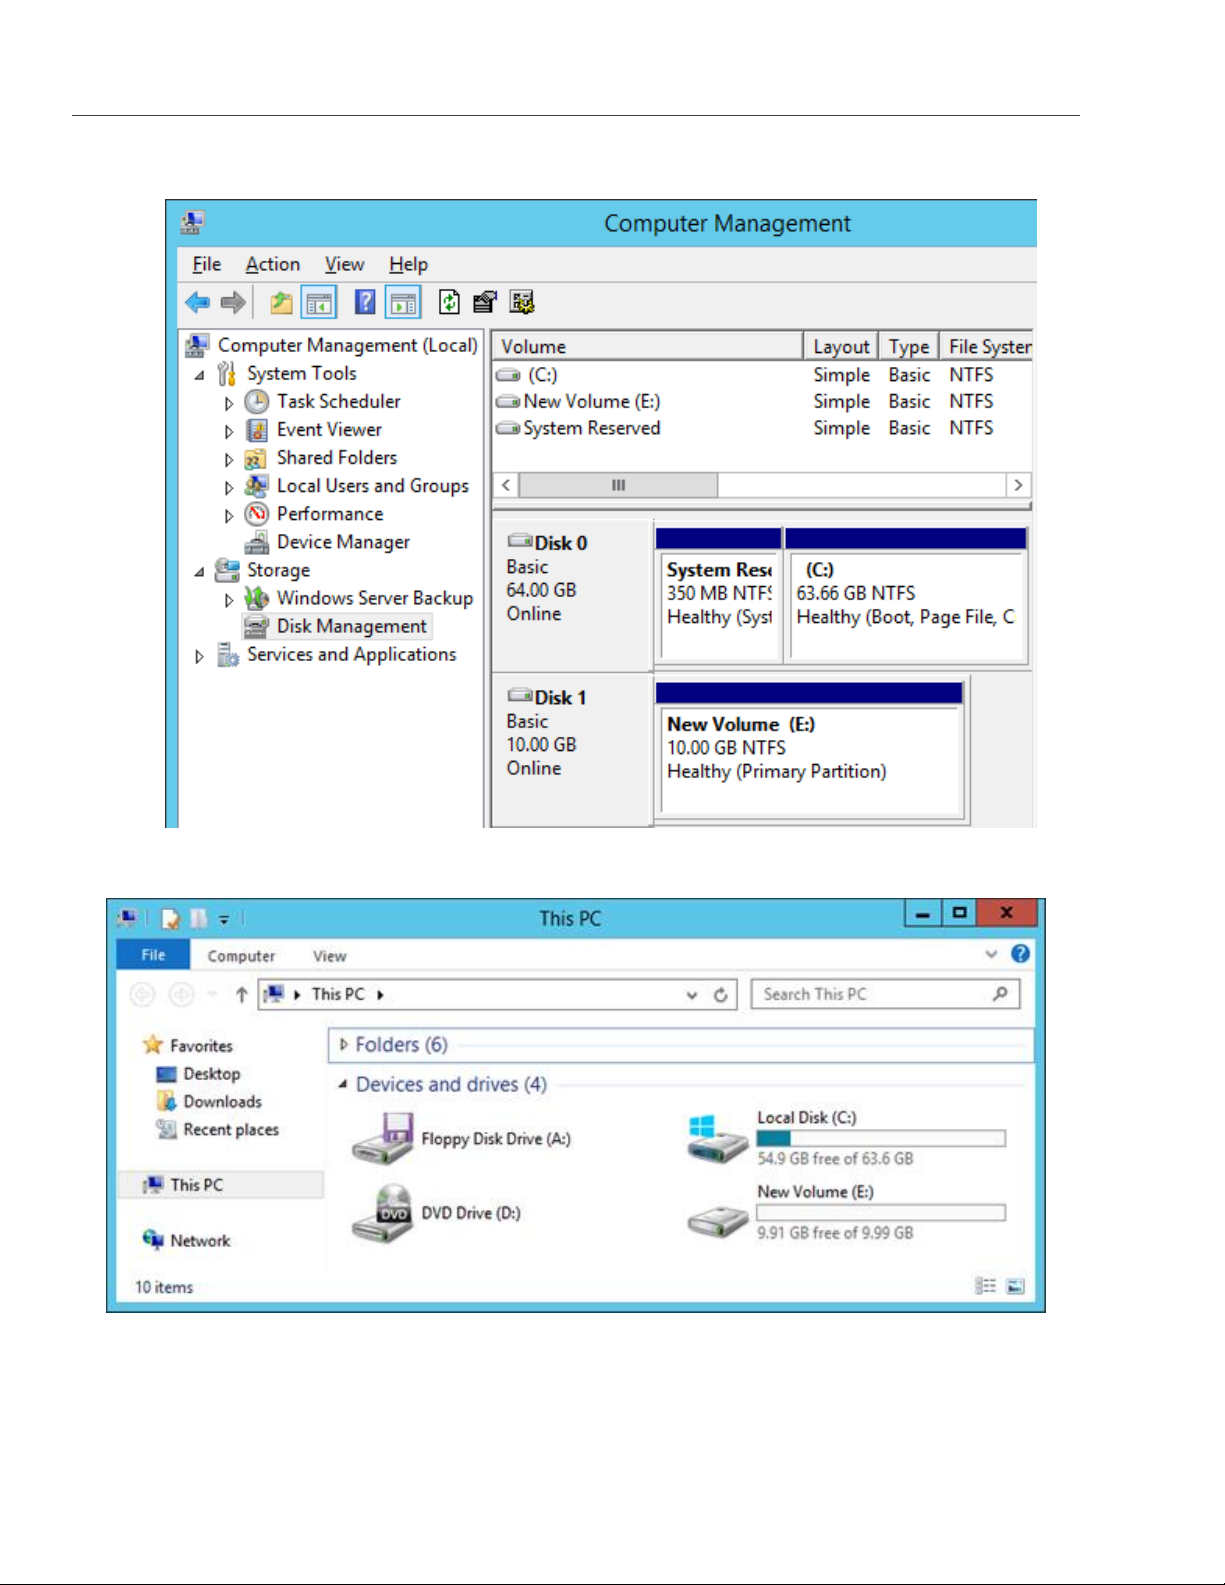
12. The disk state will change to Healthy.
Chapter 3. Accessing iSCSI Targets
The new disk will appear in Windows Explorer.
26
Page 31

3.3. Accessing iSCSI Targets from VMware ESXi
3.3 Accessing iSCSI Targets from VMware ESXi
1. In the vSphere Client, switch to the Configuration tab, and click Storage Adapters in the Hardware
section.
2. If no software iSCSI adapters have been added, do so by right-clicking in the Storage Adapters section
and selecting Add Software iSCSI Adapter....
3. Open the software iSCSI adapter’s properties, switch to the Static Discovery tab and click Add....
4. In the Add Static Target Server window, enter the target’s IP address and name.
5. Close the software iSCSI adapter’s properties window and rescan the adapter as prompted.
6. The newly added iSCSI target will appear in the Details section of the software iSCSI adapter you have
configured.
For more information, see the VMware vSphere Storage Guide.
3.4 Accessing iSCSI Targets from Citrix XenServer 6.2
1. In XenCenter, switch to the Storage tab and click New SR....
2. In the New Storage Repository window:
2.1. In the Type section, select the Software iSCSI option,
2.2. In the Name section, provide a name or leave the default,
2.3. In the Location section, enter target’s IP address in the Target Host field, click Discover IQNs and
select the desired target, then click Discover LUNs and select the desired LUN.
3. Click Finish to format the disk.
The new storage repository will appear in XenCenter.
For more information, see XenCenter documentation.
27
Page 32

Chapter 3. Accessing iSCSI Targets
3.5 Accessing iSCSI Targets from Microsoft Hyper-V
Note: Names of the targets to be mounted must not contain underscore characters.
1. Make sure that Microsoft iSCSI Initiator Service, MSiSCSI, is running.
2. Discover a new target portal. For example, for the portal 192.168.10.100, run:
PS C:\Users\Administrator>new-iscsitargetportal \
-targetportaladdress 192.168.10.100
Initiator Instance Name :
Initiator Portal Address :
IsDataDigest : False
IsHeaderDigest : False
TargetPortalAddress : 192.168.10.100
TargetPortalPortNumber : 3260
.. _PSComputerName ::
PSComputerName :
3. Connect to the desired target. For example, for the target iqn.2014-03.com.vstorage:test1, run:
PS C:\Users\Administrator> connect-iscsitarget
cmdlet Connect-IscsiTarget at command pipeline position 1
Supply values for the following parameters:
NodeAddress: iqn.2014-04.com.vstorage:test1
AuthenticationType : NONE
InitiatorInstanceName : ROOT\ISCSIPRT\0000_0
InitiatorNodeAddress : iqn.1991-05.com.microsoft:win-l2dj7g36n7e...
InitiatorPortalAddress : 0.0.0.0
InitiatorSideIdentifier : 400001370000
IsConnected : True
IsDataDigest : False
IsDiscovered : True
IsHeaderDigest : False
IsPersistent : False
NumberOfConnections : 1
SessionIdentifier : ffffe00000b5e020-4000013700000005
TargetNodeAddress : iqn.2014-04.com.vstorage:test1
TargetSideIdentifier : 0001
.. _PSComputerName ::
28
PSComputerName :
Page 33

3.5. Accessing iSCSI Targets from Microsoft Hyper-V
4. To check that the disk has been connected, run
PS C:\Users\Administrator> get-disk
Number Friendly Name OperationalStatus Total Size
------ ------------- ----------------- ---------1 IET VIRTUAL-DISK SCSI Disk Device Offline 100 GB RAW
...
You can now initialise the newly mounted disk for use in Microsoft Hyper-V.
For more information, see the Microsoft documentation.
29
Page 34
CHAPTER 4
Accessing NFS Shares
This section describes ways to mount Acronis Storage NFS shares on Linux and MacOS.
Note: Acronis Storage currently does not support the Windows built-in NFS client.
4.1 Mounting NFS Exports on Linux
You can mount an NFS export created in Acronis Storage like any other directory exported via NFS. You will
need the share IP address (or hostname) and the volume identifier. For example:
# mount -t nfs -o vers=4.0 192.168.0.51:/0200000000000002/ /mnt/nfs
where:
• -o vers=4.0 is the NFS version to use. To use pNFS, change -o vers=4.0 to -o vers=4.1. In all other
cases, make sure to always specify NFS version 4.0 or newer.
• 192.168.0.51 is the share IP address. You can also use the share hostname.
• /0200000000000002/ is the root export path. For user exports, specify their full path, for example:
/0200000000000002/export1.
• /mnt/nfs is an existing local directory to mount the export to.
30
Page 35

4.2. Mounting NFS Exports on MacOS
4.2 Mounting NFS Exports on MacOS
You can mount an NFS export created in Acronis Storage like any other directory exported via NFS. You will
need the share IP address (or hostname) and the volume identifier. Use either the command-line prompt or
Finder:
• In the command-line prompt, run the following command:
# mount -t nfs -o vers=4.0 192.168.0.51:/0200000000000002/ /mnt/nfs
where:
•
-o vers=4.0 is the NFS version to use.
•
192.168.0.51 is the share IP address. You can also use the share hostname.
•
/0200000000000002/ is the root export path. For user exports, specify their full path, for example:
/0200000000000002/export1.
•
/mnt/nfs is an existing local directory to mount the export to.
• In Finder, do the following:
1. Set the NFS version to 4.0. To do this, add the nfs.client.mount.options = vers=4.0 line to the
/etc/nfs.conf file.
2. In the Finder > Go > Connect to server window, specify nfs://192.168.0.51:/0200000000000002/
where:
•
192.168.0.51 is the share IP address. You can also use the share hostname.
•
/0200000000000002/ is the root export path. For user exports, specify their full path, for
example: /0200000000000002/export1.
3. Click Connect.
The Finder will mount the export to /Volumes/0200000000000002/.
31
 Loading...